PlayStation 4, PlayStation 5
Immortals Fenyx Rising Trophy Guide


General Info
FAQ
How long does it take to beat Immortals Fenyx Rising and unlock all trophies?
Around 40 Hours.
How difficult is it to beat Immortals Fenyx Rising and unlock all trophies?
Easy (3/10).
Does Immortals Fenyx Rising have online trophies?
No.
Does Immortals Fenyx Rising have difficulty-specific trophies?
No.
Does Immortals Fenyx Rising have missable trophies?
No.
Does Immortals Fenyx Rising have glitched trophies?
No.
What is the minimum number of playthroughs required to unlock all trophies in Immortals Fenyx Rising?
One.
Does Immortals Fenyx Rising have a Platinum Trophy?
Yes.
Trophy Guide
Immortals Fenyx Rising PS4 and PS5 Trophy Guide and Road Map
Looking to earn the Platinum trophy in Immortals? Well, you’re in the right place! This Immortals Fenyx Rising Trophy Guide is carefully crafted to be an accurate and comprehensive helping hand on your route to the Platinum!
Immortals Fenyx Rising Trophy Guide – Before You Begin
Below are some tips which should help you avoid getting stuck:
- You may play the game on any difficulty. Lower difficulties will give you more help in finding secrets as well as solving them, with some puzzles simply telling you exactly how to solve them. You can customise the amount of help you get in the “Heers” section of the “Gameplay” settings tab.
- Stop frequently whenever you have a good view over the island from a high point. Hold
 to activate farsight mode and take the time to reveal as many locations as possible. The more icons you can reveal on the map and your compass, the better.
 - Once you have it, the
 +
+ ability can be used on top of the double-jump to triple-jump and add a massive amount of height to your jump at great cost to your stamina. With enough stamina, you can even quadruple-jump, skipping past myriad puzzles on your adventure.
 - Once you have it, the +
 ability can be used while in the air to cover great distances.
 - Once you have completed Phosphor’s first quest, you’ll get the
 +
+ ability to make a clone of yourself. Using this stone clone, you can activate light pressure pads, which will help you to skip puzzles quite frequently.
 - Very Important: Unless you already have pretty much every trophy except story-related ones, you will want to make a manual save when the game warns you about a point of no return. That way, you can safely finish the game and all story trophies, before loading your manual save and collecting the rest of the trophies at your leisure.
- When reaching the end of a Vault, always check behind the end point as there’s often additional puzzles and rewards back there.
- To avoid a painful endgame grind for Golden Amber, open every standard chest that you can as you journey across the islands.
Phase One: Complete the Story
Note: As a reminder, make a manual save at the game’s point of no return. If you complete the game without having a save to come back to, you won’t be able to free-roam and mop up any remaining trophies.
The game will warn you when you’ve reached the Point of No Return so you will know when to do this. It will even offer to make a new save for you, but I would recommend saving your own manual save as my game crashed a few times during the final part of the game and I wouldn’t want to risk trusting the game!
As with most open-world games like this one, you’re free to break away from the story at any point to go off and do side-content and unlock other trophies at your leisure, but the most straight-forward thing to do at this stage is simply play through the story. I’ll leave it up to you how much side-content you wish to complete along the way.
One good reason for getting the main content out of the way is that a lot of the vaults, powerful enemies, and gear, are found as part of the story, so it’s good to know you’ve done all that before you start trying to farm the rest of the things you need. Additionally, some areas like War’s Den and King’s Peak have sections which are locked off and inaccessible until you make progress.
Unmissable Story-Related Trophies
The following trophies in this Immortals Fenyx Rising Trophy Guide will all be unlocked through normal story progress and there’s no need to worry about them.

Among the Stars
Solve a Constellation Myth Challenge.

The Giving Tree
Meet Aphrodite.
Big Chicken
Meet Ares.
The Iron Giant
Meet Hephaistos.
Sassy, Lost Child
Meet Athena.
Don’t Shoot the Messenger
Meet Hermes.
God of War
Complete Ares’s Questline.
Goddess of Wisdom
Complete Athena’s Questline.
Messenger of the Gods
Complete Hermes’s Questline.
Goddess of Love
Complete Aphrodite’s Questline.
God of the Forge
Complete Hephaistos’s Questline.
From the Ashes
Find Phosphor.
Brother Battle
Defeat Ligyron.

Mission Complete
Defeat Typhon.
Phase Two – Map Completion
During this phase of the Immortals Fenyx Rising Trophy Guide you’ll be doing almost everything that there is left to do in the game. Immortals Fenyx Rising has a lot of side-content to enjoy, giving you plenty of incentive to explore and uncover the world around you. For the platinum, you won’t be needing to complete every single objective at every icon on the map, but you will need to do a lot of it.
Here’s a summary of what will be required, mostly for the More than Twelve Labours trophy:
- You will only need to complete 25 Vaults of Tartaros. Try to complete every objective in these vaults though (i.e. loot chests), as Hermes will ask you to 100% complete 22 of them. You can see your completion by whether a Vault rift seals up or not. If it seals up, you’ve done everything. You can hover your cursor over an incomplete vault to see what you forgot to do while you were in there.
- You will have to complete 8 specific “Arena” Vaults of Tartaros for Hermes’ Heroic Task list. See our Molten Fragment Guide for location info.
- All Fresco Myth Challenges.
- All Constellation Myth Challenges.
- All Navigation and Odysseus Myth Challenges.
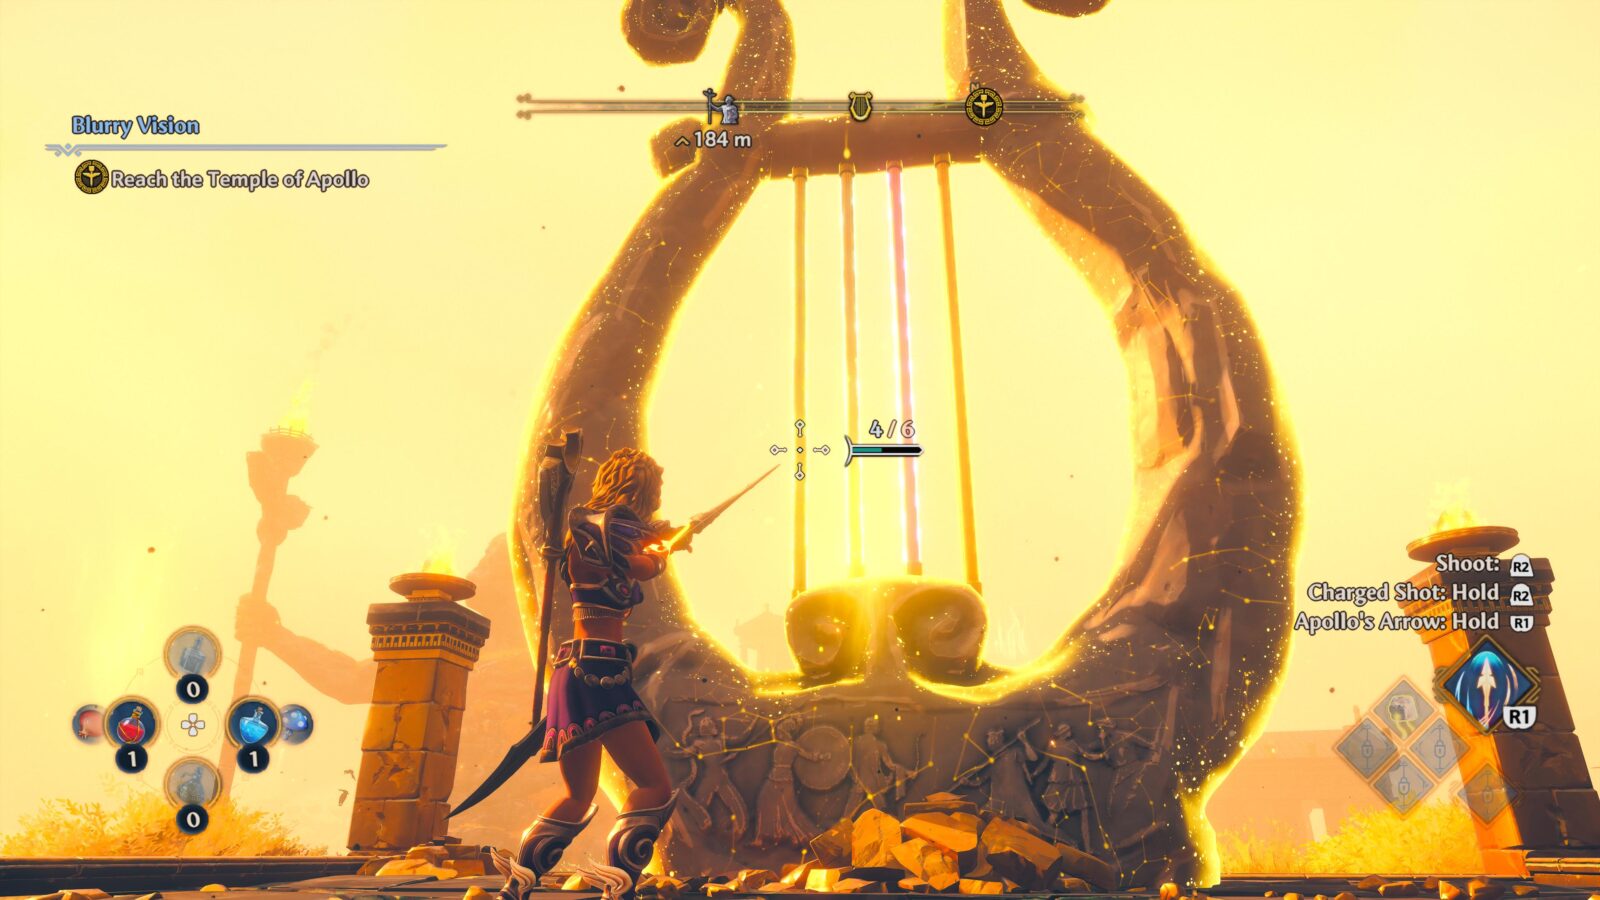
- All Lyre Challenges. These are some of the worst to complete as they require finding multiple well-hidden locations, but luckily the solutions never change! Use this Lyre Challenge Guide to make things much easier.
- All 4 Wraiths + Wraith sidequest.
- All Side-Quests given by the Gods or Phosphor. Not Hidden Side-Quests with “?” icons.
- All Mythical Bosses. See our Mythical Bosses Guide.
- All Legendary Enemies for Phosphor Skins. See our Legendary Enemies Guide under the Ornithology trophy.
- All Lieutenants for Wings. See our Lieutenants Guide under the Wing Nut trophy.
- All 10 Night Chests for Midnight Fragments. See our Night Chest Guide under the Midnight Treasure trophy.
- All 25 Mounts. See our Mounts Guide.
- You do not need all Chests, but the resources are very useful, so get as many as you can.
- You do not need all Ambrosia, you may stop collecting it once your health is at max. There’s more than enough Ambrosia in the game to reach maximum HP.
Exploration and Collectable Trophies
The following trophies in this Immortals Fenyx Rising Trophy Guide are tied to general exploration and collection within the world of Immortals.

Bird’s-Eye View
Unfog the whole map.
The map can be unfogged by using the “Scout” feature when stood in specific locations.
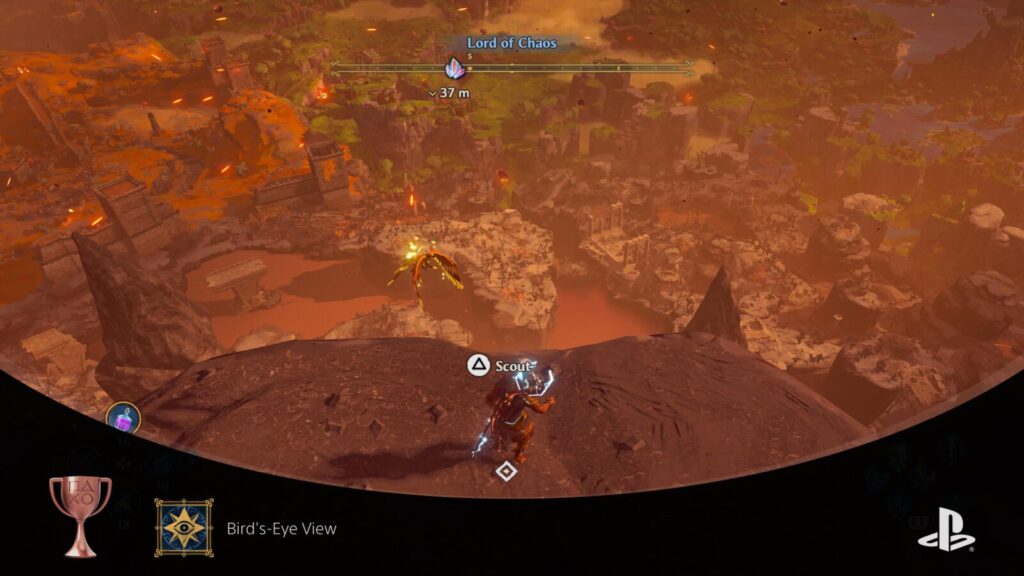
Every region except the centre-most region – “The Gates of Tartaros” – and the King’s Peak will be unfogged as part of the story.
The Scout Point in the King’s Peak is on the head of a huge Eagle Statue on the southern side of the mountain.
The Scout Point in The Gates of Tartaros is found at the top of the volcano, on the southern side – above the face.
Specifically it can be found on a rock which is darker than the rest of the volcano, and is at the base of one of the rock spikes jutting out from the top of the volcano.


Tame an Epic mount.
You can tame a Mount by approaching it slowly and quietly while crouched ![]() . Once you’re close enough without startling the beast, you can press
. Once you’re close enough without startling the beast, you can press ![]() to tame it and add it to your Mounts collection in your Inventory.
to tame it and add it to your Mounts collection in your Inventory.
Typically, tameable Mounts are found in groups but occasionally you will find one on its own, with special features such as wings.
These are “Epic” Mounts, which are very flighty making them hard to approach, and will have 3 bars of stamina as opposed to the one or two bars you see on a standard Mount.
See our Immortals Fenyx Rising Mounts Guide for all Mount locations.
Tame just one Epic Mount and this trophy will unlock.
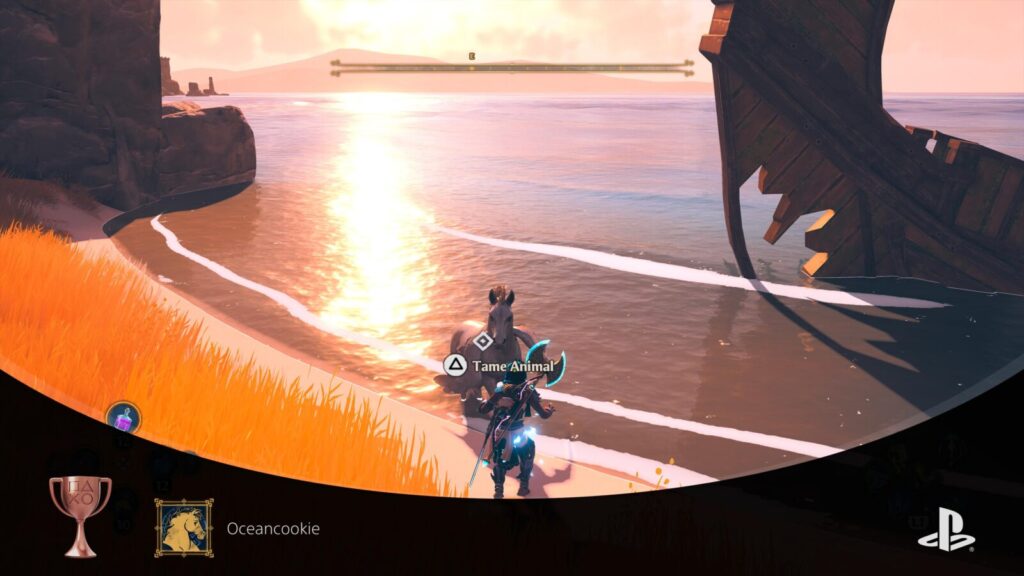
Fenyx the Horseman
Tame all mounts.
You can tame a Mount by approaching it slowly and quietly in crouched mode ![]() . Once you’re close enough without startling the beast, you can press
. Once you’re close enough without startling the beast, you can press ![]() to tame it and add it to your Mounts collection in your Inventory.
to tame it and add it to your Mounts collection in your Inventory.
There are 25 different mounts to find and tame – 9 of which are “Epic”. Once you have found them all, this trophy will unlock.
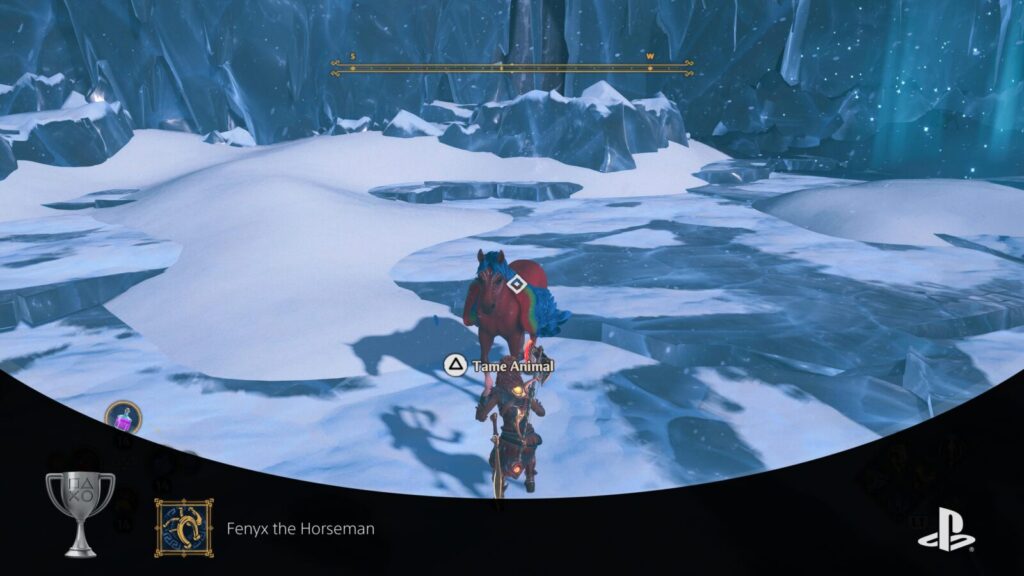
See our Immortals Fenyx Rising Mounts Guide for all Mount locations.
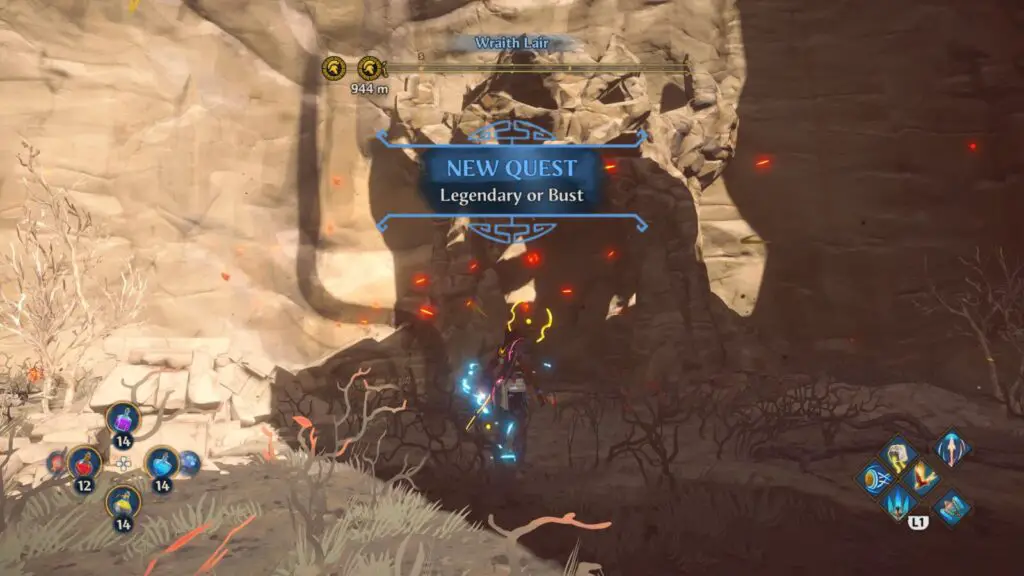
Wraithless in Battle
Defeat a Wraith.
There are several Wraiths in the game, but your first encounter will come after bringing Seafoam to Athena. A Wraith will spawn behind you but cannot be defeated. Once you survive the fight, the Wraith will retreat to a nearby lair which will then be marked on the map.
Head to this Wraith lair and defeat the Wraith to unlock this trophy.

There is a Wraith in all four main regions and they will begin hunting you eventually. Once you defeat them, their lair will be revealed, but you can also actually find the Wraith Lair normally.

Last Hero Standing
Defeat all Wraiths in their lairs.
To unlock this trophy, find the Wraith in each location and defeat them to reveal their Lair, or simply find their Lair via farsight.
Enter each lair and defeat each Wraith in battle. Once all four Wraiths have been defeated, this trophy will unlock.


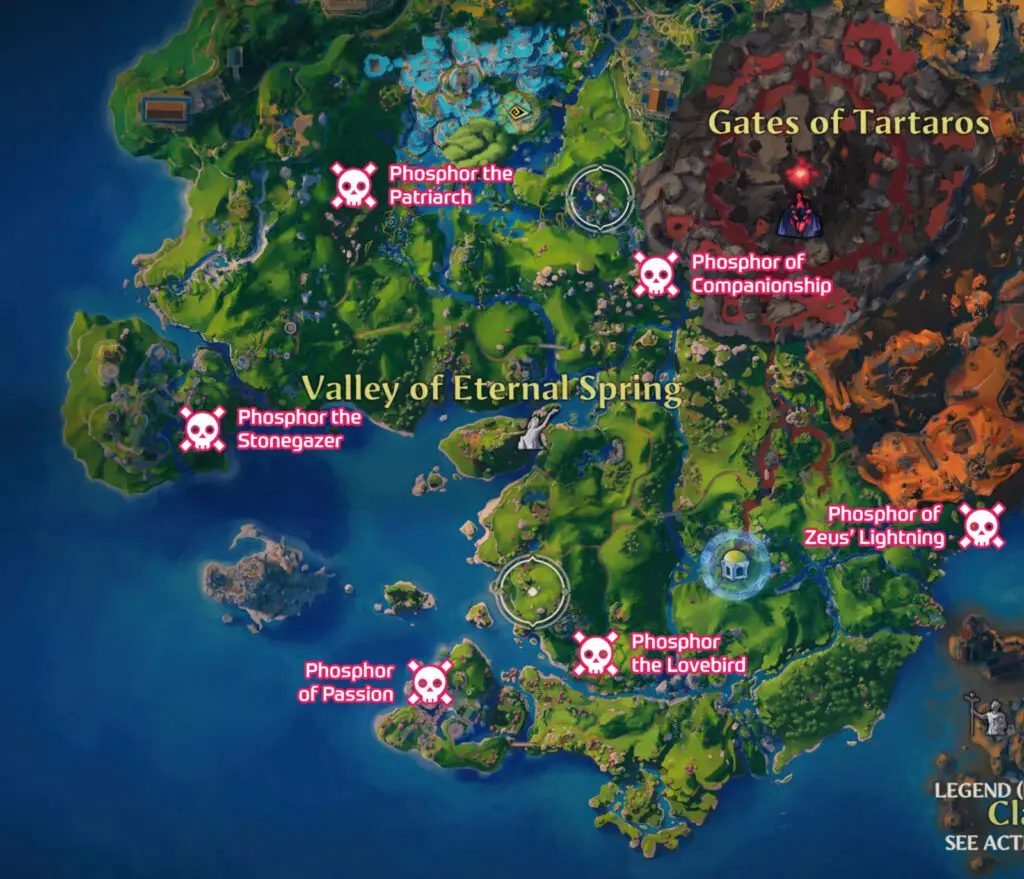
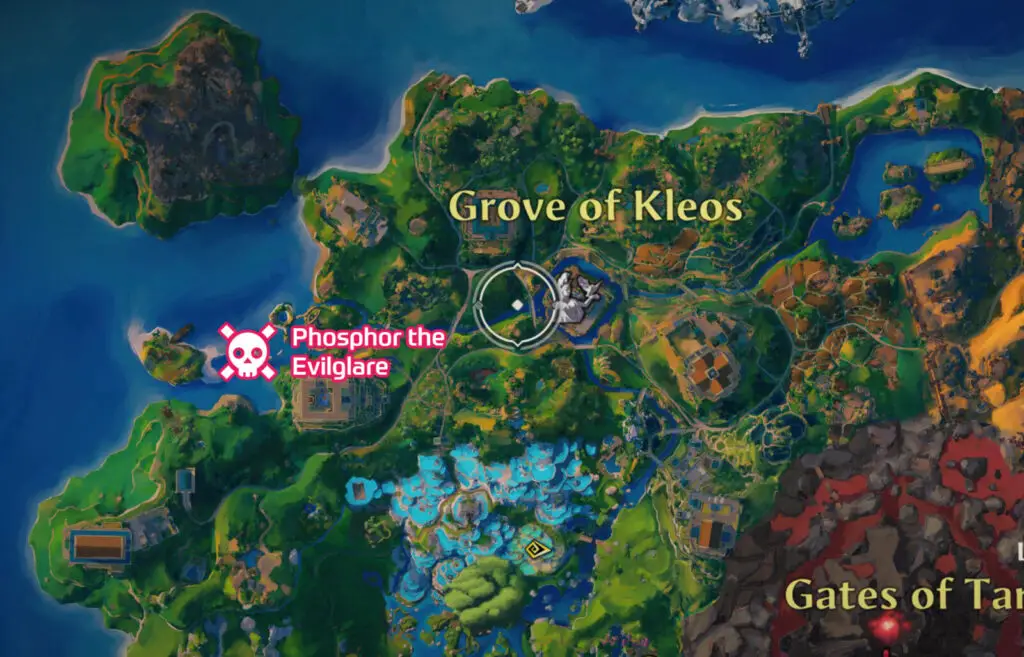
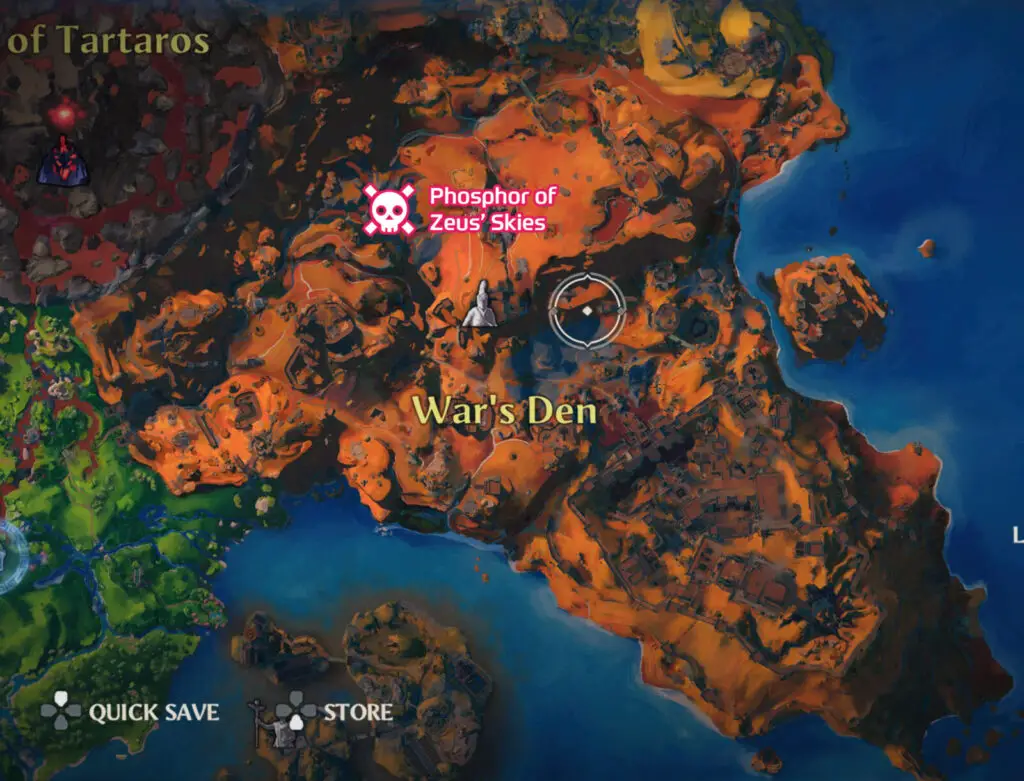
Ornithology
Acquire all Phoenix skins.
For this trophy you will need to unlock all skins for your bird companion; Phosphor. You will earn a large number of these from the main story as quest rewards, but there are 12 which can only be acquired by defeating powerful “Legendary” creatures hidden throughout the world.
Acquiring the complete collection of Phosphor skills will unlock the trophy immediately.
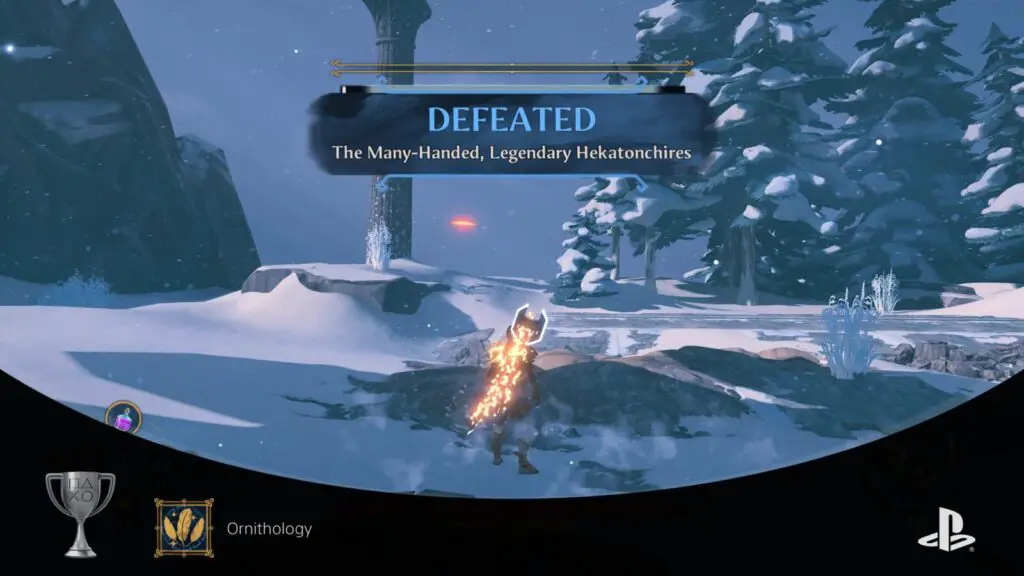
Use the short guide below to find the locations of all 12 Legendary creatures:


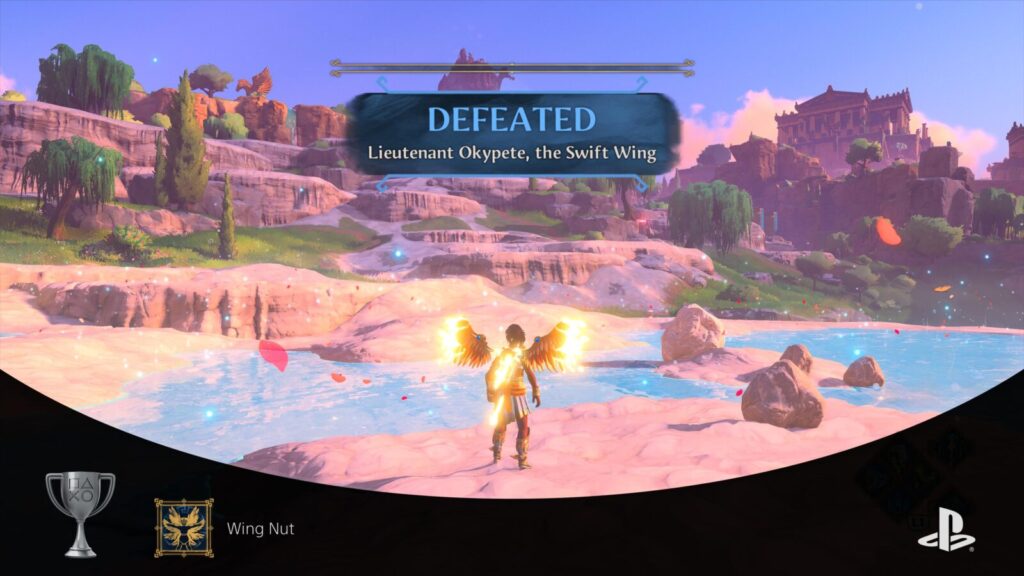
Wing Nut
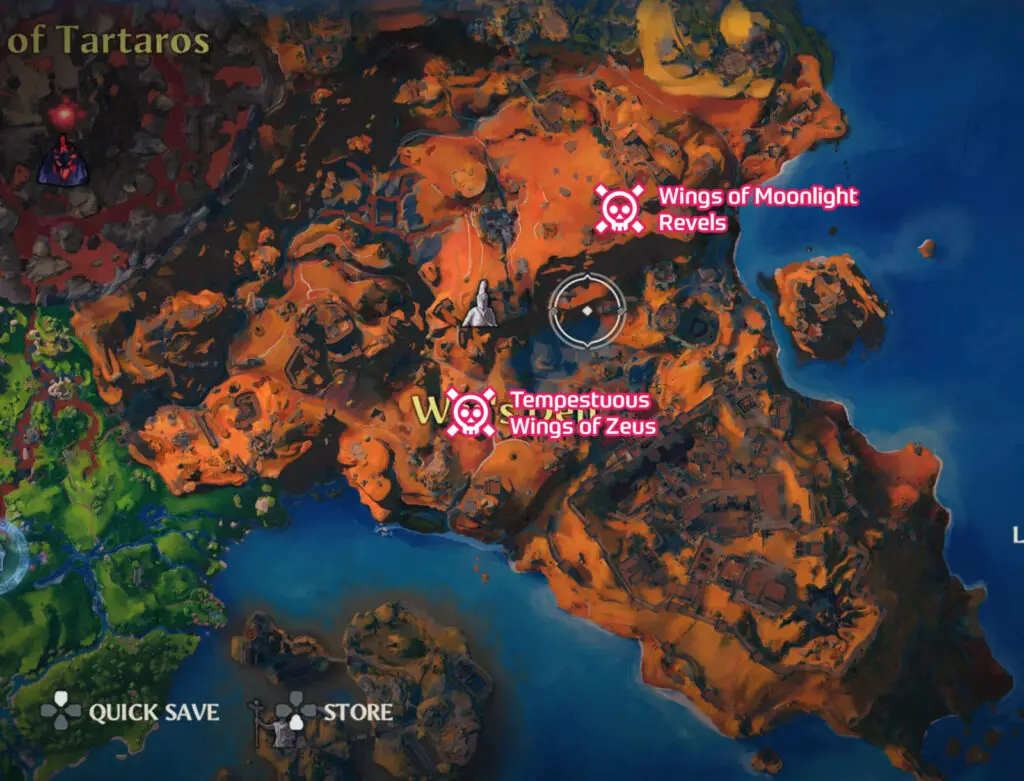
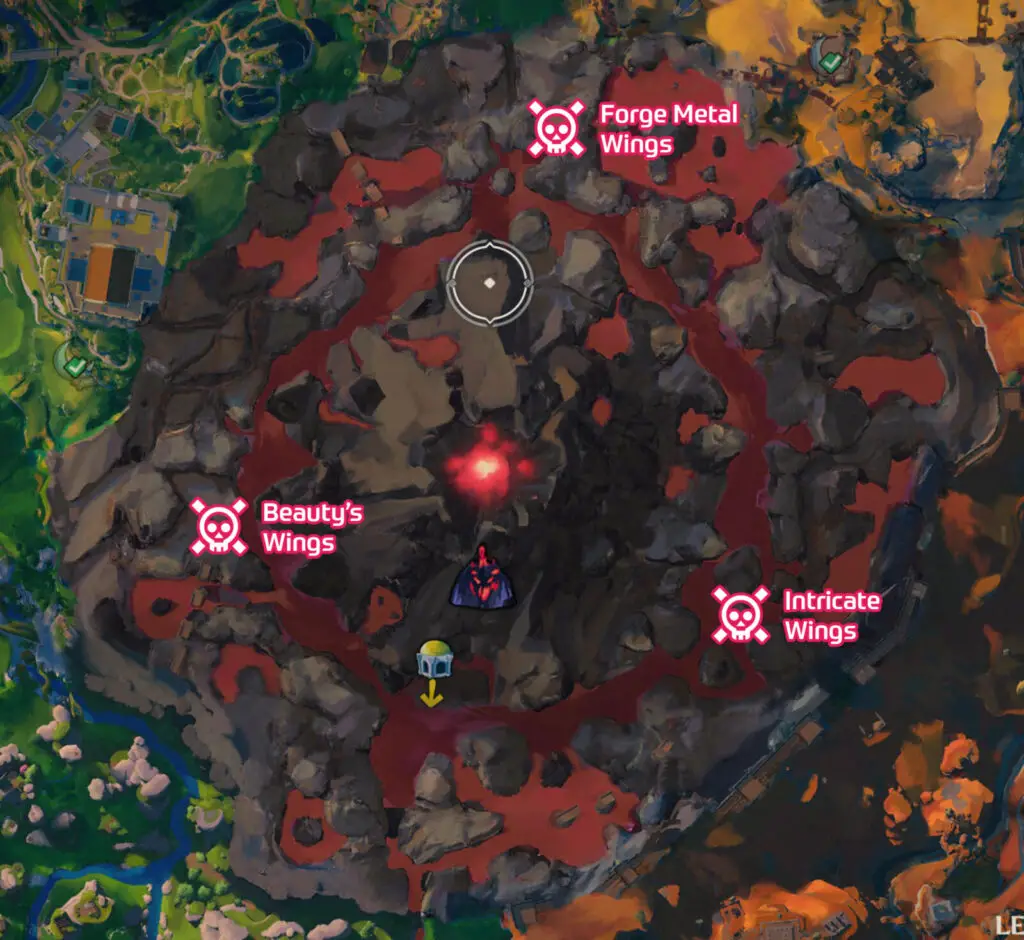
Acquire all Wings.
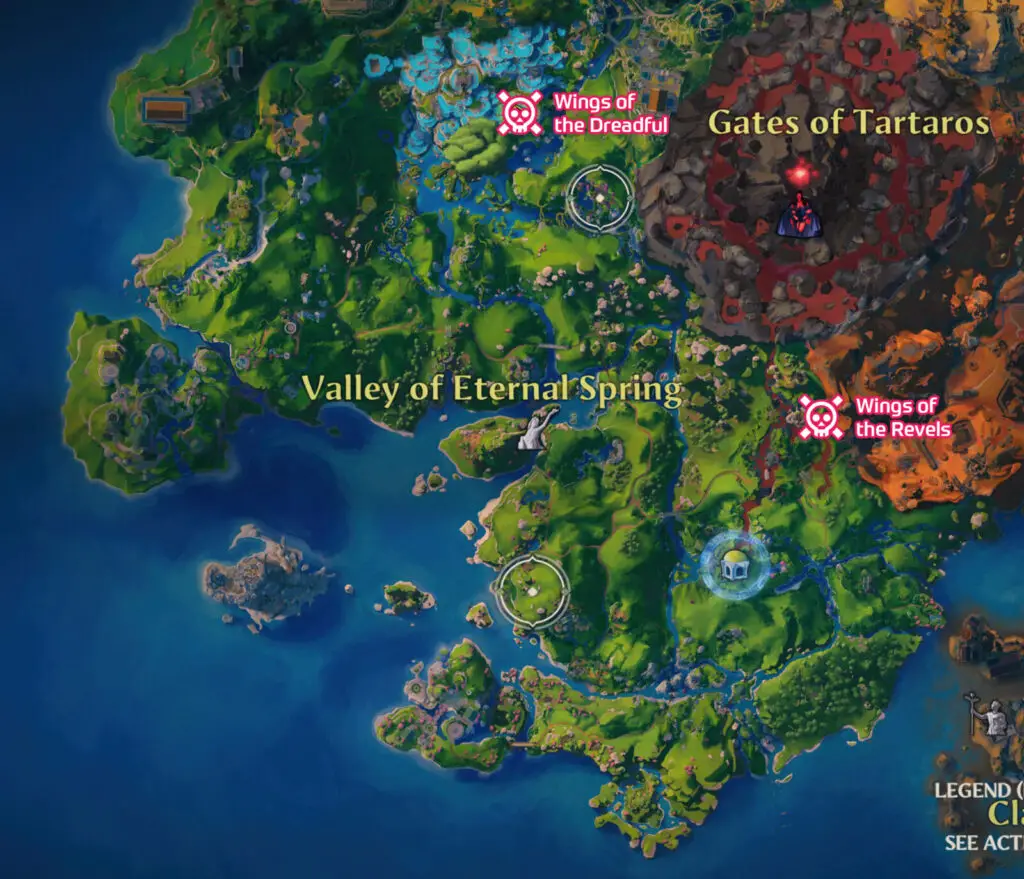
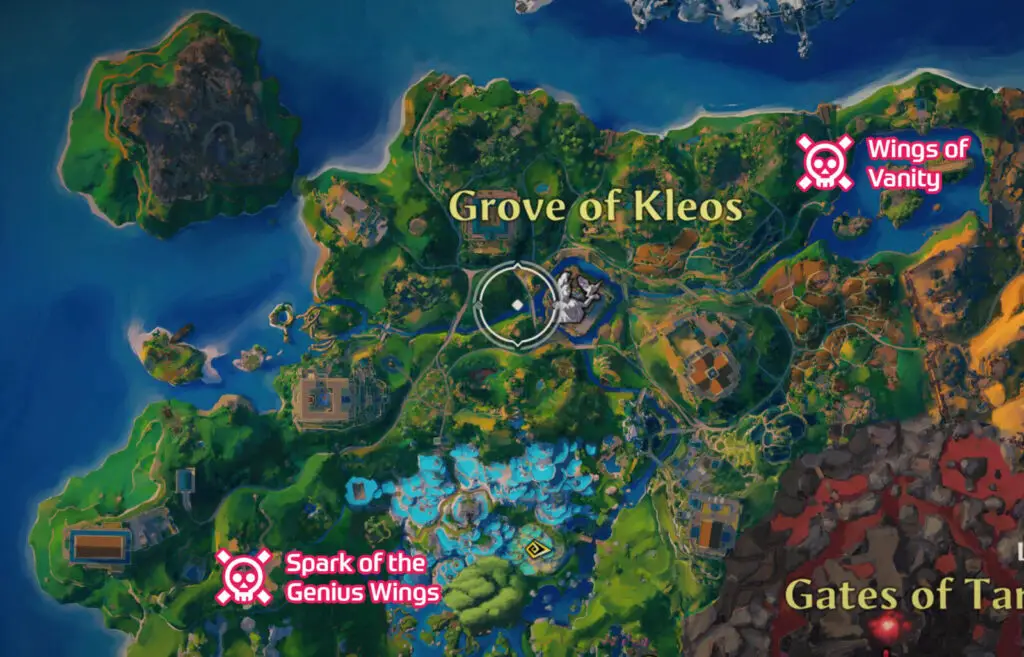
For this trophy, you need to unlock all Wings. The vast majority of the Wing sets are unlocked by defeating “Lieutenant” monsters throughout the world and within main story quests.
When you approach a Lieutenant, the music will change and their name (“Lieutenant of…”) and health bar will appear on-screen.
You will also unlock wings for defeating one of the Mythical Bosses as per the trophy Who’s the Boss?
Note that the set of wings you get from the pre-order bonus quest are not required for this trophy.
One wing set, named “Wings of Dawnlight Revels”, is acquired from Daidalos’ Workshop. Unlocking Daidalos’ Workshop is a little complicated.
Some Challenges, such as Fresco Puzzles, Constellation Puzzles, Navigation Challenges, and Odysseus Challenges will have a stone map with small blue lights on it nearby. This indicates that the challenge where you found the map is one of the blue lights on there.

So, you need to look at all the un-lit pins on the stone map and find each of the Challenges that they correspond to. Completing all of the related challenges will unlock a Hidden Quest which leads you to Daidalos’ Workshop.
As you will have to do all Mythic Challenges for Hermes anyway, this should happen naturally without you trying to read the map.
To aid with finding all the Lieutenants you need for the other wings, check the short Lieutenant Locations guide below:

Who’s the Boss?
Defeat the Mythical Monster bosses.
In order to unlock this trophy you will need to bring down all of the Mythical bosses hidden in the world. These are not simple Lieutenants or Legendary creatures, they’re particularly large and difficult boss fights found in specific locations of the map.
Use our Immortals Mythical Bosses Guide to find them all.
Once you’ve beaten all of them, the trophy will unlock.

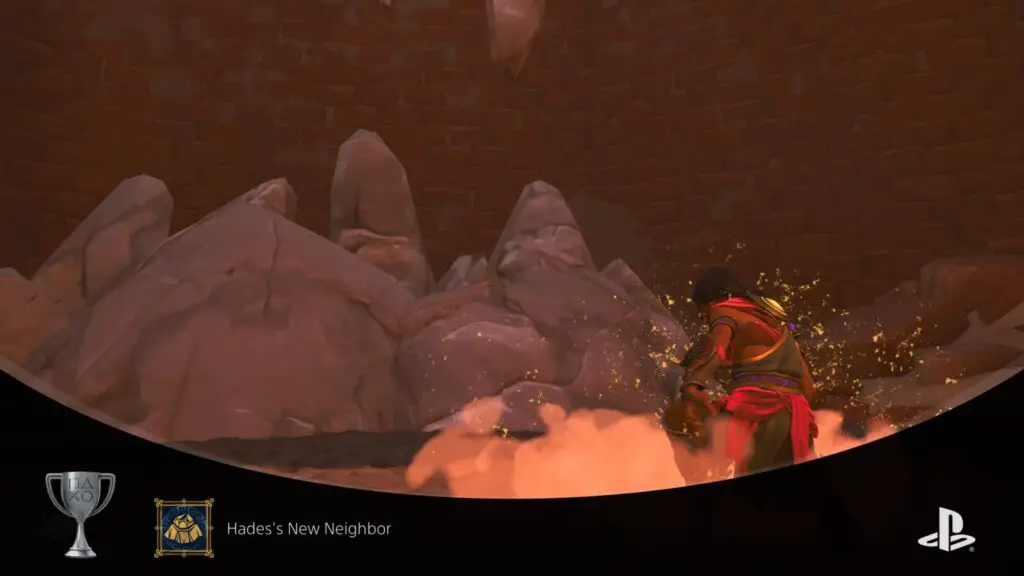
Hades’s New Neighbor
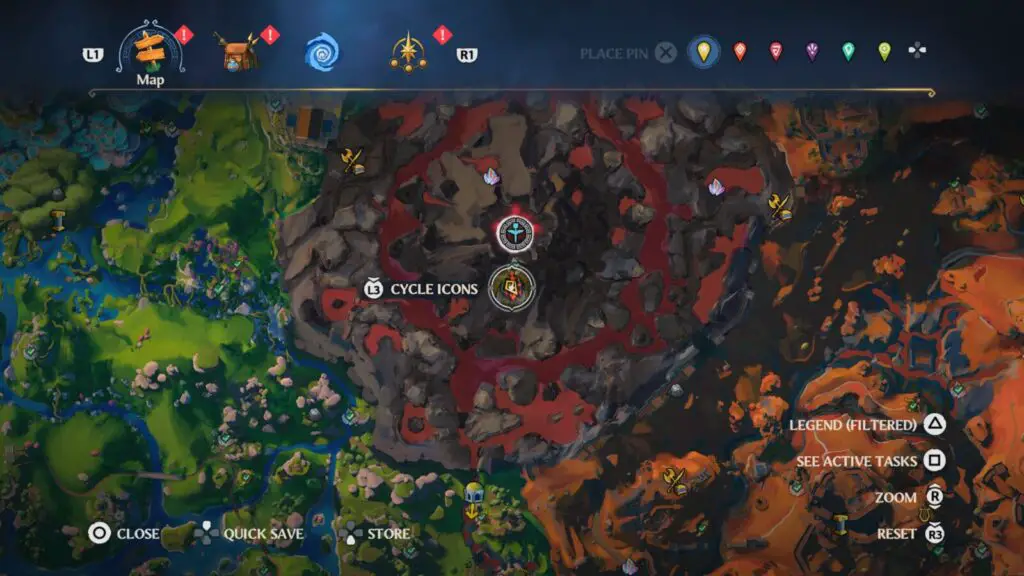
Complete 25 Vaults of Tartaros.
Vaults of Tartaros are small dungeons found all over the map which will contain bolts of Zeus’ Lightning and equipment chests. Once revealed, these are found at red geyser icons on the map which change to simple grey rocks when a Vault has been 100% completed (main objective & all extra rewards).
You can reveal Vault locations by entering farsight mode by holding ![]() and then scouting them out by pressing
and then scouting them out by pressing ![]() whenever you’re looking towards one.
whenever you’re looking towards one.
There are plenty of these in the game and you’ll end up completing many of them for the main story anyway. Once you’ve completed a total of 25, this trophy will unlock.
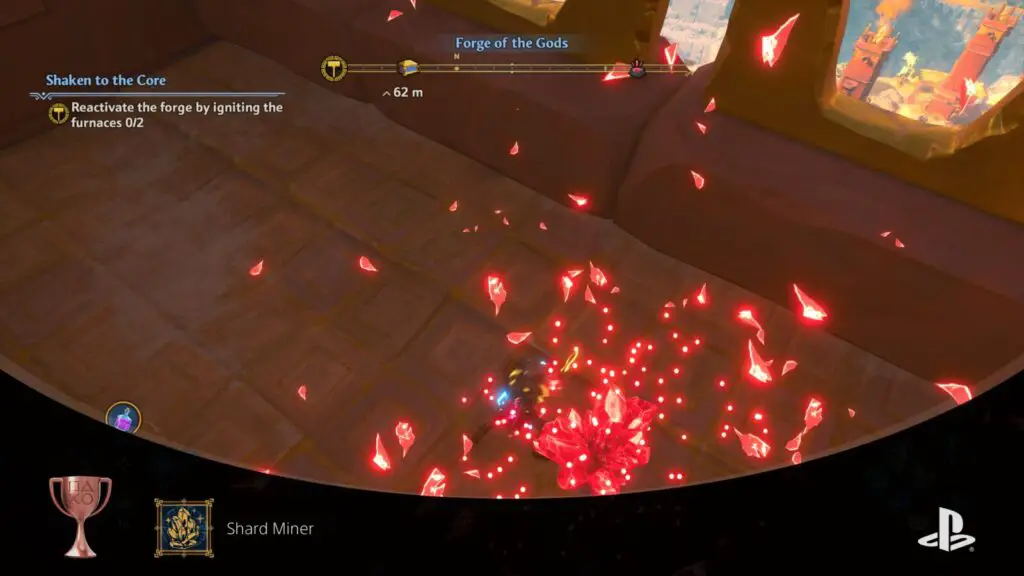
Shard Miner
Destroy 10 Shards Clusters.
During your travels, you’ll see many large glowing crystals of varying colour. These crystals are Adamantine, and breaking them apart with a melee attack will allow you to collect a large sum of Adamantine in the same colour.
Breaking 10 of these crystals is all you need to do to unlock this trophy.

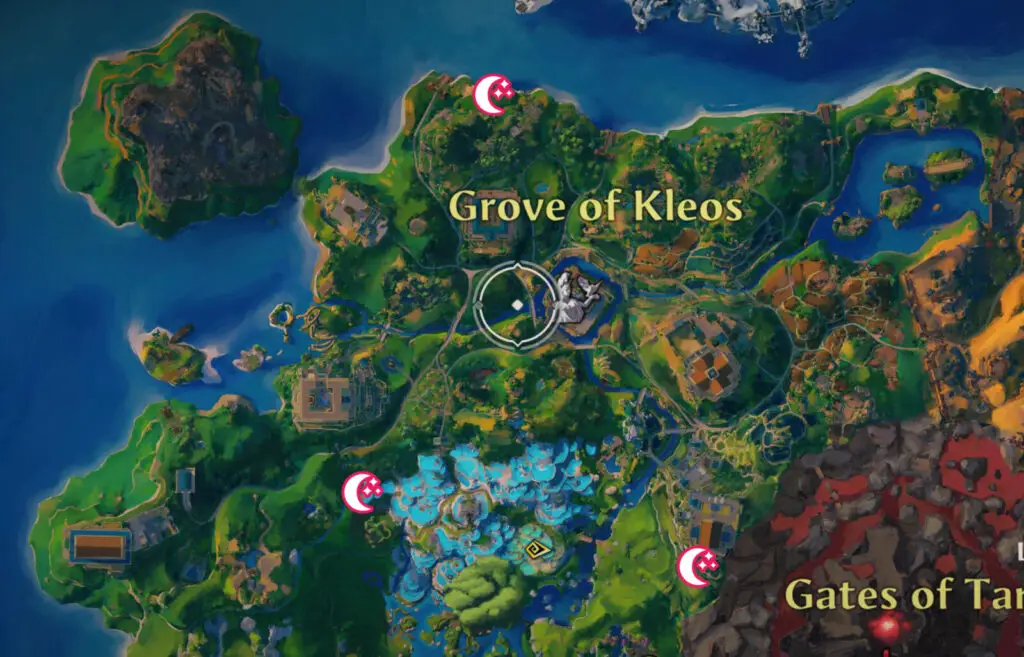
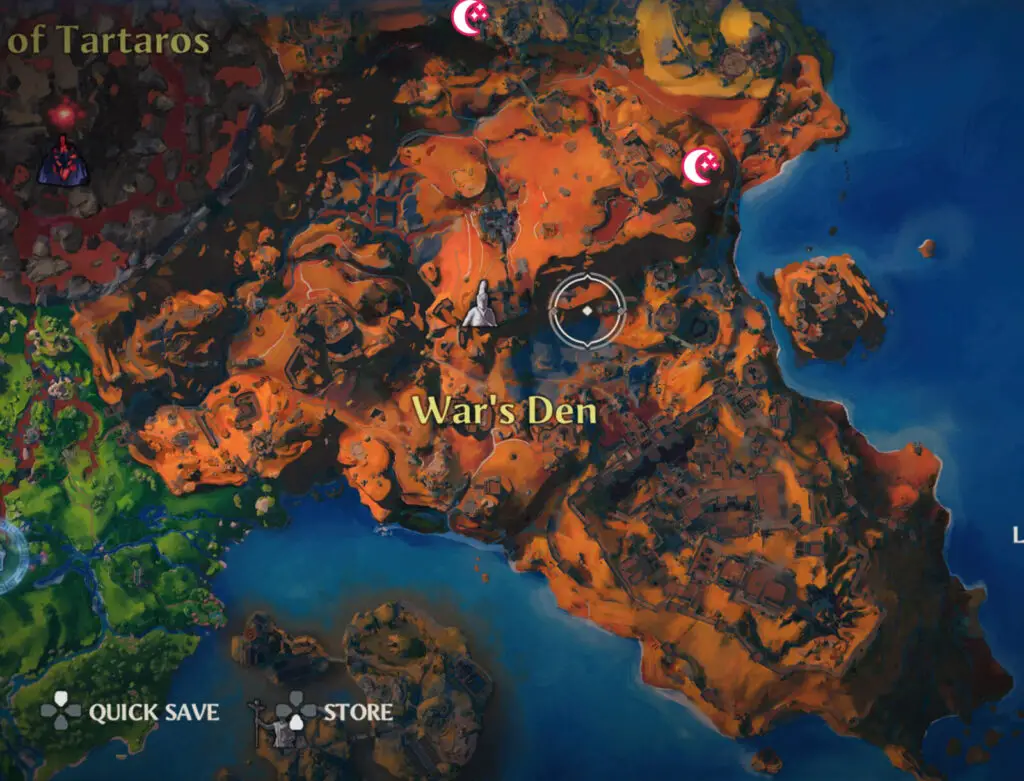
Moonlight Treasure
Open a Night Chest.
Night Chests are chests which only appear – you guessed it – at night. They can still be seen, revealed, and approached during the day, but you will need to approach them at night to open them.
You can rest by holding ![]() which will fast-forward time, but be aware that these chests are heavily guarded, so resting right in front of the chest will drop you right into battle.
which will fast-forward time, but be aware that these chests are heavily guarded, so resting right in front of the chest will drop you right into battle.
When you open a night chest for the very first time, this trophy will unlock!
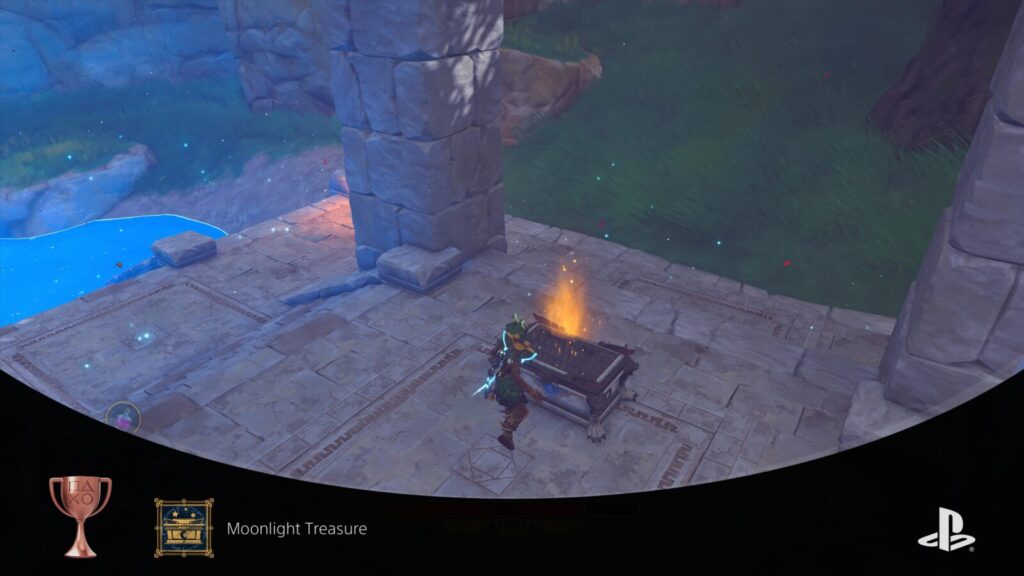
See the small guide below for the locations of every Night Chest:


Sidequest Trophies
Servant to the Gods
Complete the gods’ side questlines.
Each time you complete a God’s main quest line and bring them back to the Hall of Gods, they will offer you some additional quests which will be marked on the map for you to track at your leisure.
Completing all of these side-quests for all of the Gods will unlock this trophy.
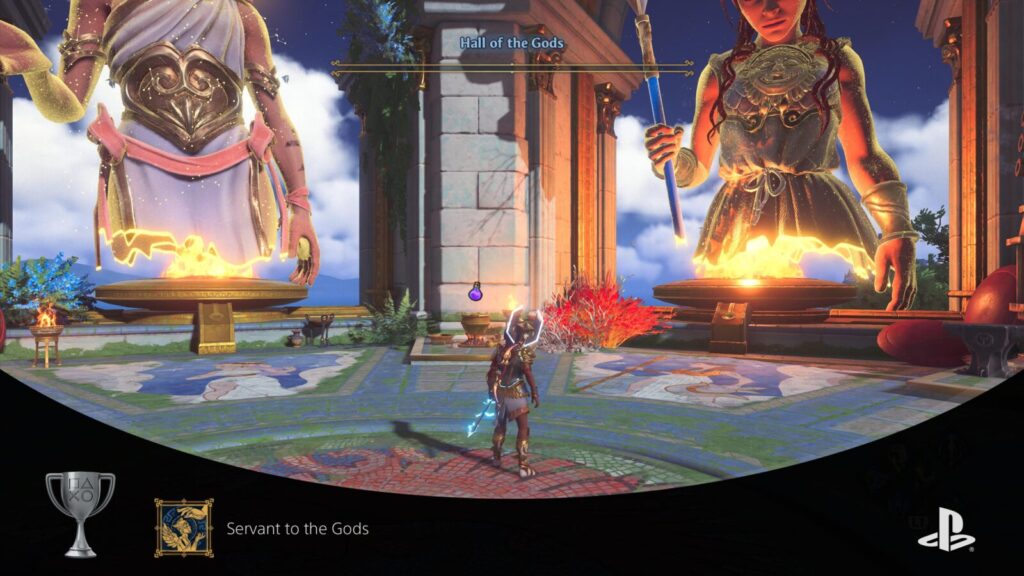
Simply ensuring you complete any quest (you can ignore “?” quests) which appears on your map is a good way to ensure you unlock this trophy, but you can find the specific questlines listed below:
- Aphrodite – “Saving our Hides”.
- Athena – “Ozo-Meanie”.
- Ares – “Hot Pot” > “Pot Ajar” > “Pay-Bagock”.
- Hephaistos – “Dark Arts” > “Forged Friendship” > “Spring Hope Eternal”.
Note that you also need to complete the quest “Legendary or Bust” which is given to you after defeating all four Wraiths in their lairs.
Glitch Warning: Many people have reported that this trophy is glitched. And I myself experienced a glitch too. After I saved Athena and added her to the Hall of the Gods, I couldnt’ speak to her. Here’s how I resolved it:
First, I killed Ozomene, which she would have asked me to do if I could speak with her. Ozomene is found on the stone island with a hurricane at the top of it, over on the west side of the Valley of Eternal Spring. See our Mythical Bosses Guide.
With Ozomene dead, I just needed to get her to talk to me so that the quest would be handed in automatically. It turns out that if you get inside the fire she is floating above, you can actually speak to her, you just can’t talk to her from in front of it like you can the other gods.
Once you get her to speak to you, she should thank you for taking care of Ozomene and if this was the last quest you had remaining, the trophy will pop.

One Chore Down
Complete a task from Hermes’s Heroic Tasks Board at the Hall of the Gods.
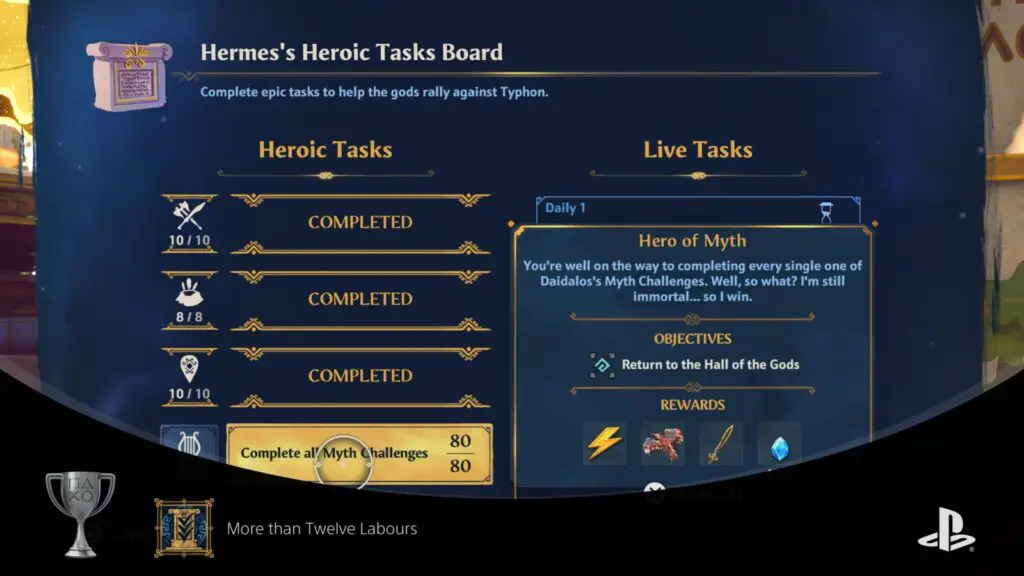
More than Twelve Labours
Complete 36 tasks from Hermes’s Heroic Tasks Board.
After you’ve first arrived at the Hall of Gods, you’ll be able to explore the area and each of the stations there. One of these stations is “Hermes’ Heroic Tasks Board”, at a blue tablet icon, found with Hermes stood next to it.
When you consult the Heroic Tasks Board, you’ll find there are 4 tasks on the left, and four on the right. The “Live Tasks” on the right have nothing to do with this trophy, but feel free to complete some as you like.
Hold ![]() over a “Heroic” task on the left to reveal it. You’ll then need to accomplish the feats listed and return to the board for your reward.
over a “Heroic” task on the left to reveal it. You’ll then need to accomplish the feats listed and return to the board for your reward.
You can also access your active tasks by pressing ![]() on the map tab of the
on the map tab of the ![]() menu, from where you can choose to track any particular task you’d like to focus on.
menu, from where you can choose to track any particular task you’d like to focus on.
You will eventually complete most of the activities in the game for this list of Heroic Tasks, including every Mythical Challenge and as few as 22 Vaults of Tartaros. There are 8 specific Vaults you will need to complete, however. “Arena” Vaults, the locations of which you can find in this Immortals Fenyx Rising Arena Vault Guide.
You’ll also need to find all 10 Night Chests at one point, see the trophy “Midnight Treasure” for all Night Chest locations.
For these two trophies you will need to first complete a single task for “One Chore Down” and then complete a further 35 for a total of 36, thus unlocking “More than Twelve Labours”.

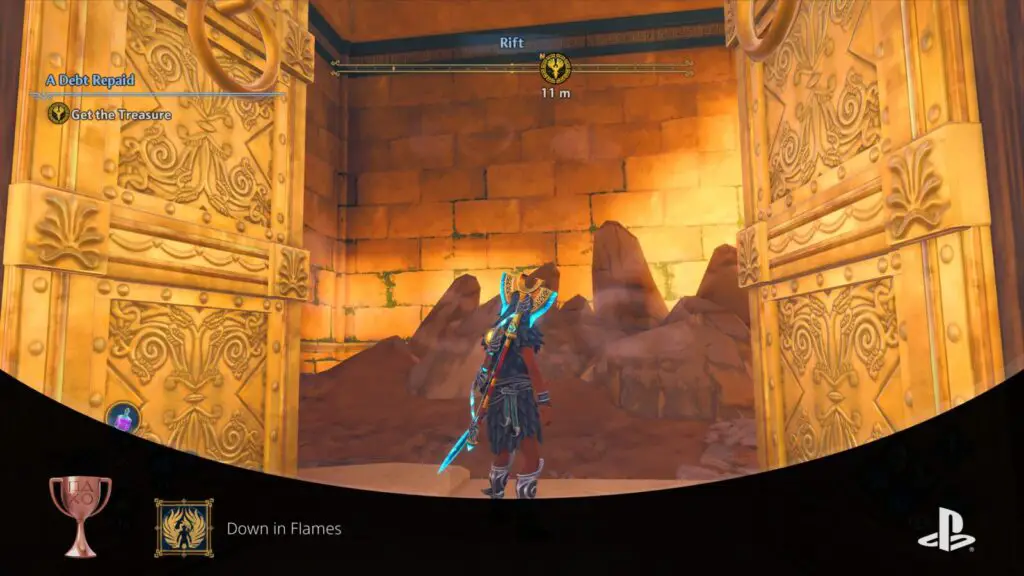
Down in Flames
Complete Phosphor’s questline.
Phosphor is a phoenix-like bird who you can unlock as a companion, using his abilities with ![]() +
+![]() . To unlock him, you need to first find him by following a quest which will be given to you early in the game, and then complete a quest for him.
. To unlock him, you need to first find him by following a quest which will be given to you early in the game, and then complete a quest for him.
After that, Phosphor will offer you quests leading to a Treasure. Completing all of his quests (those with a phoenix icon on them) will unlock this trophy.
Phase Three – Clean Up
The majority of trophies within this phase of the Immortals Fenyx Rising Trophy Guide will have already unlocked naturally, but some will require a bit of an end-game grind to unlock.
Compare the trophies below to your trophy list to see which ones are remaining and then work to unlock the last few.
Misc Combat Trophies
The following trophies in this Immortals Fenyx Rising Trophy Guide are all unlocked by achieving particular feats in combat.

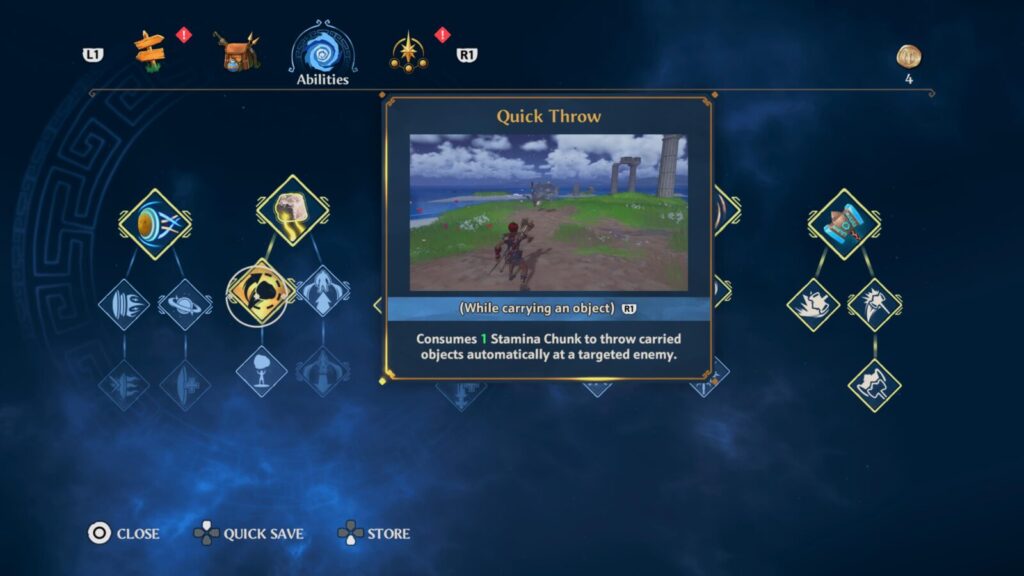
Projectile Pro
Defeat a flying enemy with any thrown object.
For this trophy you will need to use your ![]() +
+![]() ability to lift an object above your head. Whilst you have hold of an object, throw it at a flying enemy with
ability to lift an object above your head. Whilst you have hold of an object, throw it at a flying enemy with ![]() .
.
It isn’t enough to simply hit an enemy with this object, it must defeat the enemy so it will help to weaken them first.
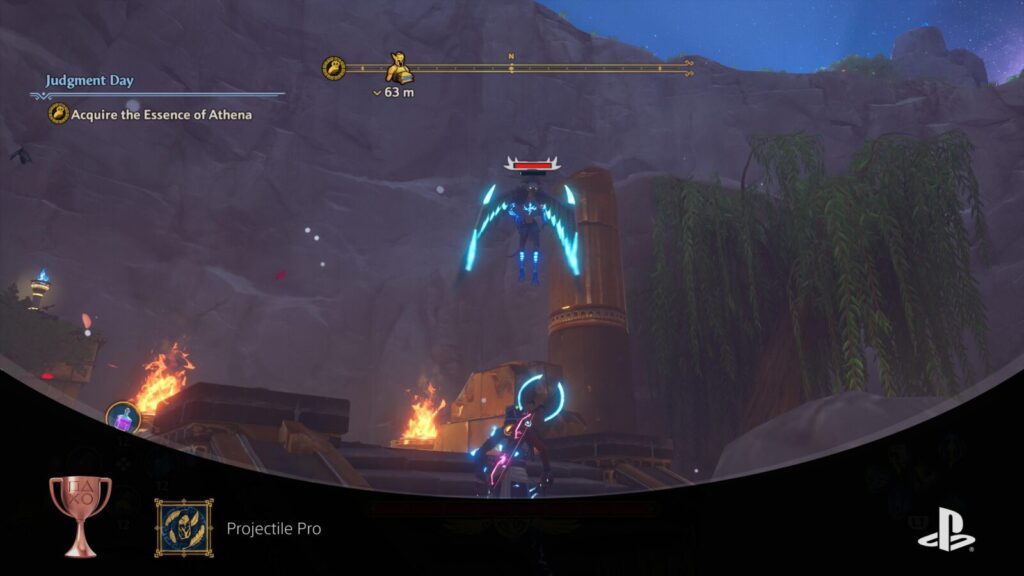
A useful skill which will help with this is the “Quick Throw” Godly Powers upgrade which will allow you to launch a held object at an enemy quickly and without needing to aim.

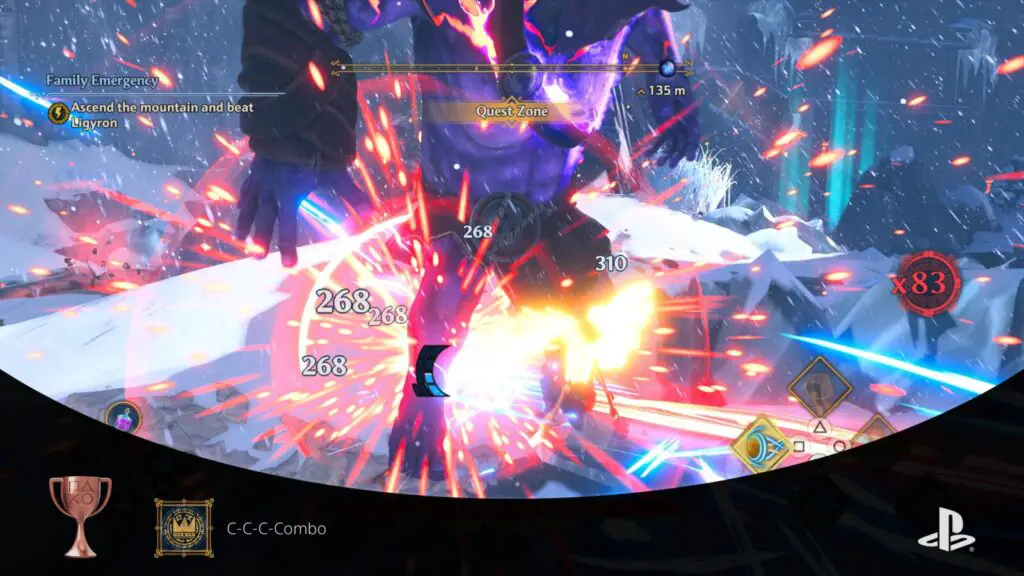
C-C-C-Combo
Reach the final Combo stage.
As your combo meter increases, it will change colour from white to orange, to red, to blue. Each colour indicates a new combo tier. To unlock this trophy you will need to get your combo meter to change colour the full three times, becoming blue and entering the final combo tier. This will happen at 84 hits, but only if you have Ares’ third and final Blessing, which you will get for completing his main questline.
The key to achieving this trophy is earning the “Armor of Bright Divinity” by completing the “Legendary or Bust” sidequest you get for defeating all 4 Wraiths. With that equipped, using Godly Powers to deal damage will increase your combo meter by 5 per hit.
With ![]() +
+![]() , Phosphor will attack your enemies from a distance.
, Phosphor will attack your enemies from a distance.
With ![]() +
+![]() you will use Athena’s dash, adding multiple hits to the combo meter depending on how long you hit an enemy and how many you hit.
you will use Athena’s dash, adding multiple hits to the combo meter depending on how long you hit an enemy and how many you hit.
Those two abilities will build the combo meter at great speed with the right armour equipped, so all you need to do is ensure you have enough enemies to hit and they stay alive long enough. You might need to up the difficulty if you find yourself killing enemies too easily to earn this trophy.
Bosses are good for this trophy as they have a lot of health, provided you can avoid getting hit too much. There’s also a group of enemies who spawn at the entrance to Ares’ Fortress who are perfect for charging through with Athena’s Dash for a quick 100+ combo.
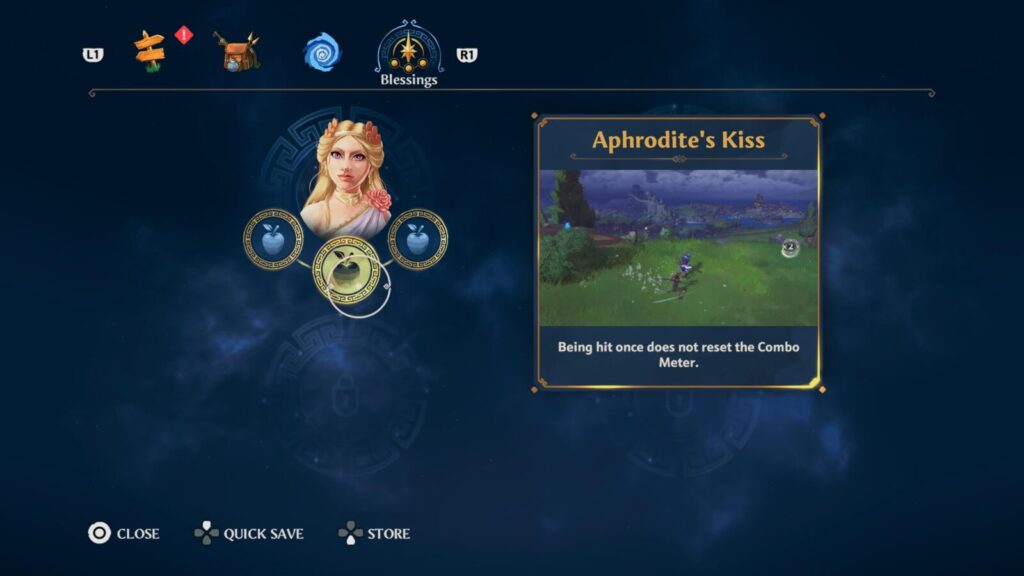
Additionally, the blessing “Aphrodite’s Kiss” will allow you to take one hit without the meter resetting. “Ares’ Command” is also useful, as it will make the combo meter last longer before resetting between hits.
The trophy will pop as your combo meter reaches 84.
It’s A Bird!
Perform a 25 hit combo while in air.
For this trophy, you will want the ![]() +
+![]() ability upgrade called “Herakles’ Leap”. This ability will let you pull yourself up to a flying enemy. Once up there, use
ability upgrade called “Herakles’ Leap”. This ability will let you pull yourself up to a flying enemy. Once up there, use ![]() +
+![]() as with the trophy “C-C-C-Combo” to increase your combo meter quickly.
as with the trophy “C-C-C-Combo” to increase your combo meter quickly.
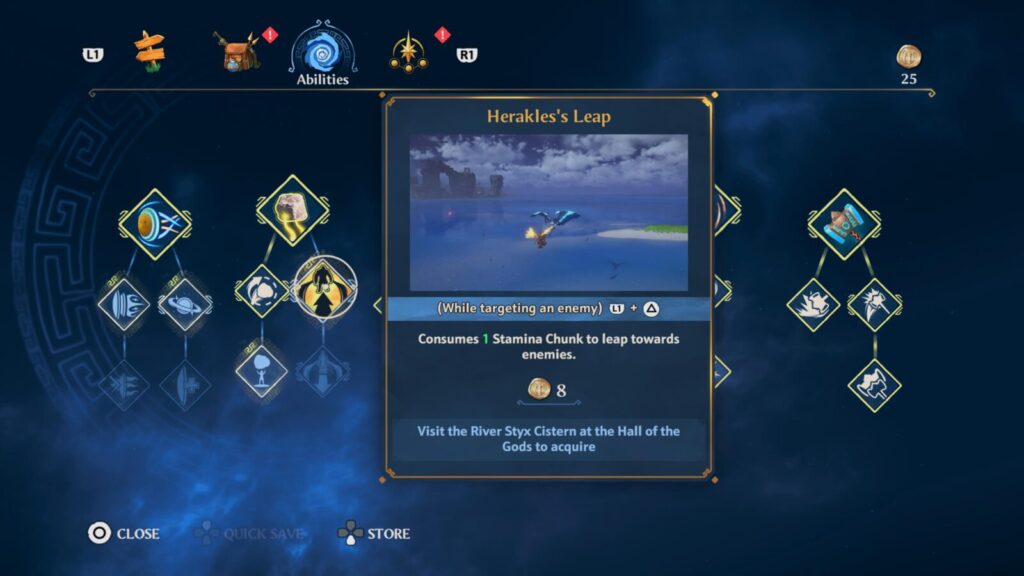
Once your combo meter reaches 25, this trophy will unlock.
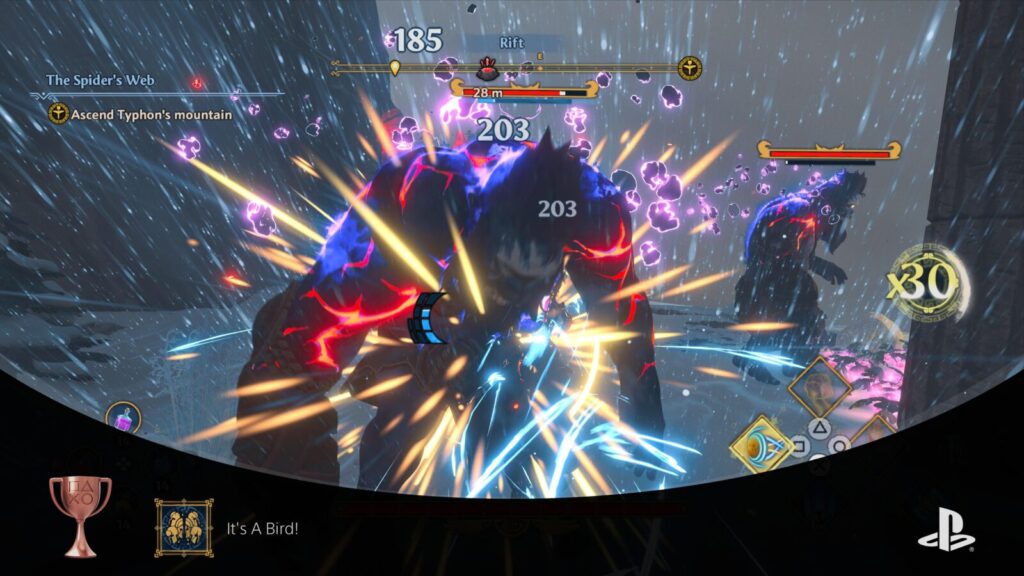
This is way easier if you are using the “Armor of Bright Divinity” as it has a perk which makes all Godly Powers add 5 hits to the combo meter.
This can also be done on tall enemies, of course. As long as all 25 hits in the combo are done while you are airborne. It’s just a little easier to pull off against flying creatures.
Your Own Medicine
Defeat an enemy with their own projectile.
To get this trophy, simply parry any yellow projectile by pressing ![]() +
+![]() just before the projectile hits you. It will be deflected and sent hurtling back towards the enemy who originally fired it.
just before the projectile hits you. It will be deflected and sent hurtling back towards the enemy who originally fired it.
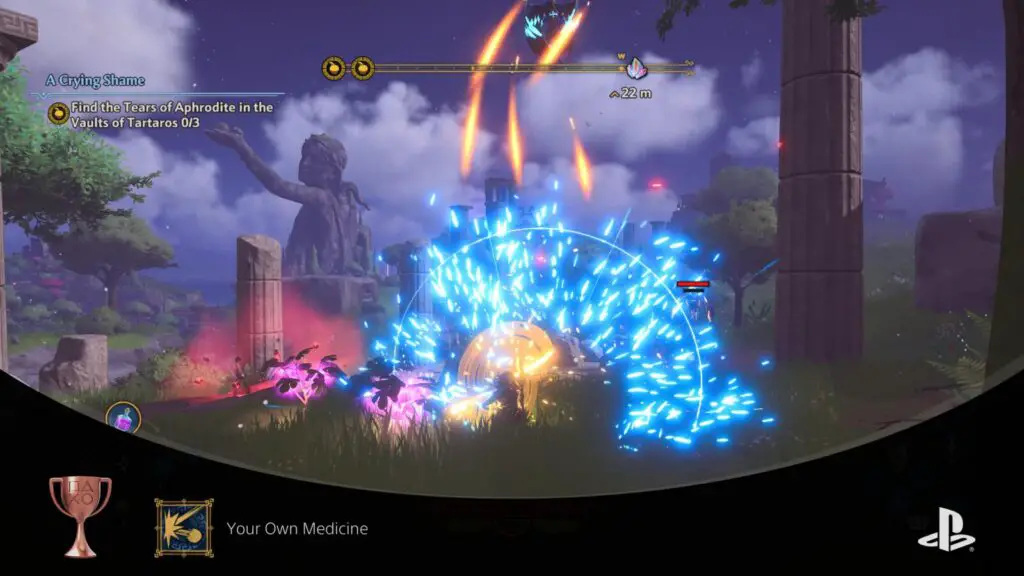
The trophy won’t unlock unless the reflected projectile kills them, but you can just keep doing this until the projectiles eventually defeat them. Harpies are pretty good for this as they have little health and fire projectiles frequently.
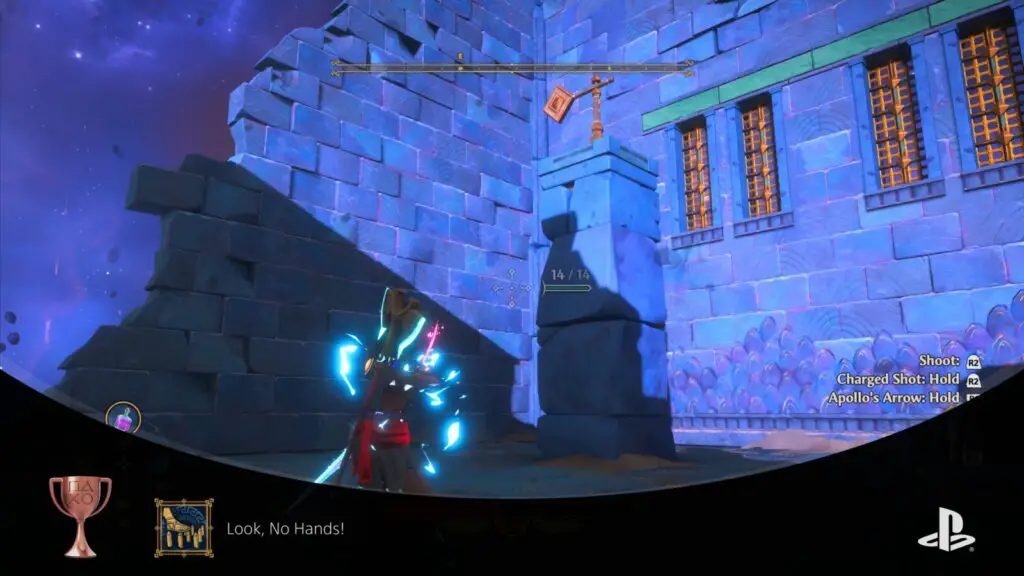
Look, No Hands!
Defeat 10 enemies using traps inside the Vaults of Tartaros.
It’s very unlikely, but this trophy could be missed.
In order to avoid potentially missing it, actively attempt this trophy whenever there’s an opportunity.
Some Vaults will have combat arenas within, where you’ll need to fight your way through waves of foes. typically, these arenas will contain traps such as floor spikes, cerberus-head fireball launchers, and lasers. They are known as “Arena” Vaults, the locations of which you can find in this Immortals Fenyx Rising Arena Vault Guide.
To unlock this trophy, you’ll need to bait enemies into traps so that the trap deals the damage that kills them. A good way to do this is to attack them with ![]() until their health is low, and then position yourself at the opposite side of a trap from the enemy. With a trap between you, the dumb enemies will walk right into the traps and take damage.
until their health is low, and then position yourself at the opposite side of a trap from the enemy. With a trap between you, the dumb enemies will walk right into the traps and take damage.
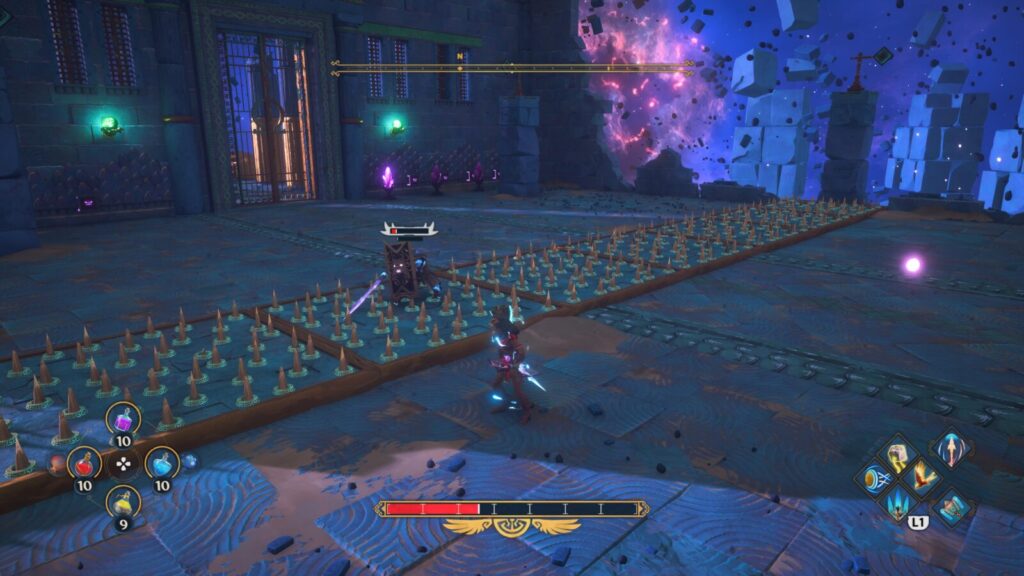
Achilles’ Trial from the Athena main questline sees you entering a Vault called “Dolos’s Stage of Trickery”. Here, you’ll find many traps that you can activate manually by shooting switches found around the arena. You can use these to get trap kills very easily and it is in fact where I got the trophy myself.
Once you’ve tricked an enemy into dying from a trap for the 10th time, this trophy will unlock.
Join the Creed
Perform 10 Stealth Attacks.
To perform a stealth attack, you must approach an enemy unnoticed and press ![]() once close enough for the prompt to appear. Successfully pressing
once close enough for the prompt to appear. Successfully pressing ![]() at this time will trigger a powerful attack which is a great way to lead off a fight against any foe.
at this time will trigger a powerful attack which is a great way to lead off a fight against any foe.
In order to unlock this trophy you simply need to do this 10 times, which is not a lot considering how much you should be using it for its high damage output.
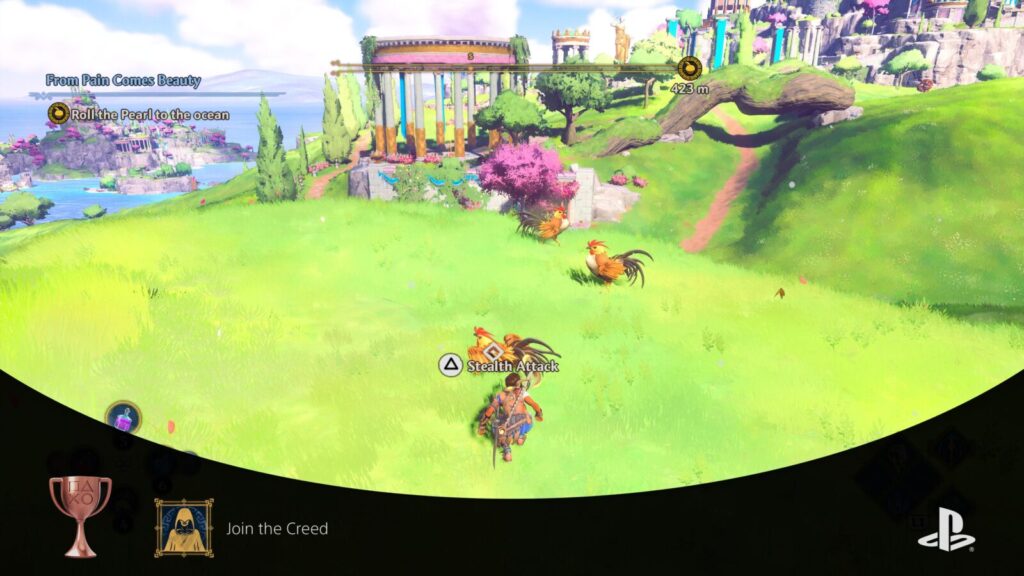
You will eventually get an ability called “Phosphor’s Cloak” which allows you to hold ![]() and become invisible, making Stealth Attacks incredibly easy to pull off.
and become invisible, making Stealth Attacks incredibly easy to pull off.
Misc Gear and Character Upgrade Trophies
The following trophies in this Immortals Fenyx Rising Trophy Guide are tied to upgrading Fenyx and their gear as well as equipping particular items.

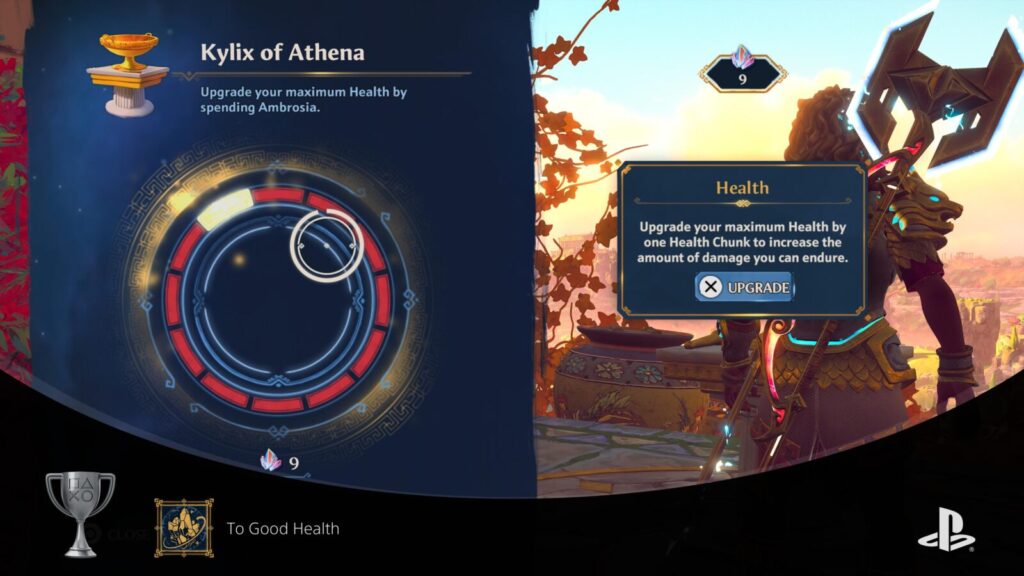
To Good Health
Fully upgrade your Health.
Throughout the game, you’ll find many brightly-coloured crystals called “Ambrosia”. These can be used at the Kylix of Athena in the Hall of the Gods to upgrade your Maximum Health.
Spend enough Ambrosia at the Kylix to buy 12 upgrades, maxing out your health, and this trophy will unlock.
Weapon Master
Fully upgrade one weapon to its final tier.
Armed and Dangerous
Fully upgrade everything at the Forge of Hephaistos.
The two trophies above are tied to Hephaistos’ forge in the Hall of Gods. There, you can spend Adamantine Shards to upgrade your armour types, weapon types, and carrying capacity for potions and arrows.
For the “Weapon Master” trophy, you will need to spend Adamantine Shards to upgrade a single weapons type; i.e. Sword, Axe, or Bow.
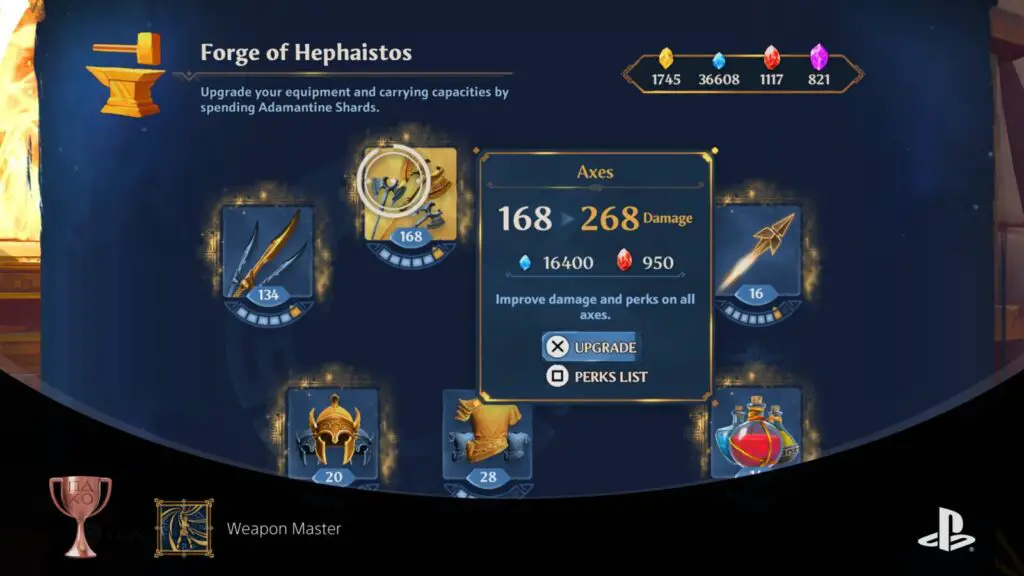
Of course, this trophy is guaranteed as you work towards the “Armed and Dangerous” trophy, for which you will need to purchase every possible upgrade at the forge; Swords, Axes, Bows, Helmets, Armour, Apollo’s Arrows, and the Potion Pouch.
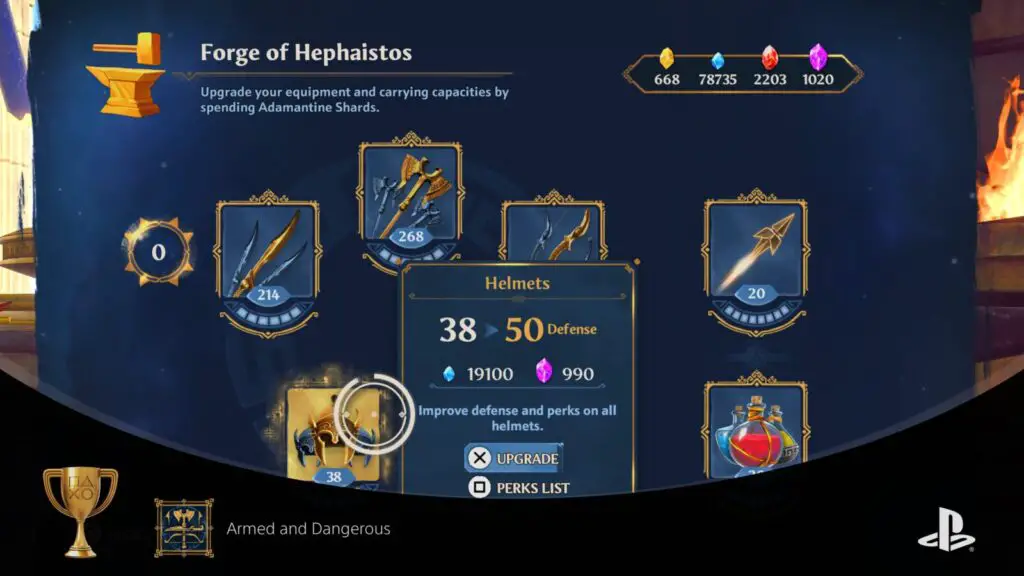
The trophy will unlock once you have every upgrade.
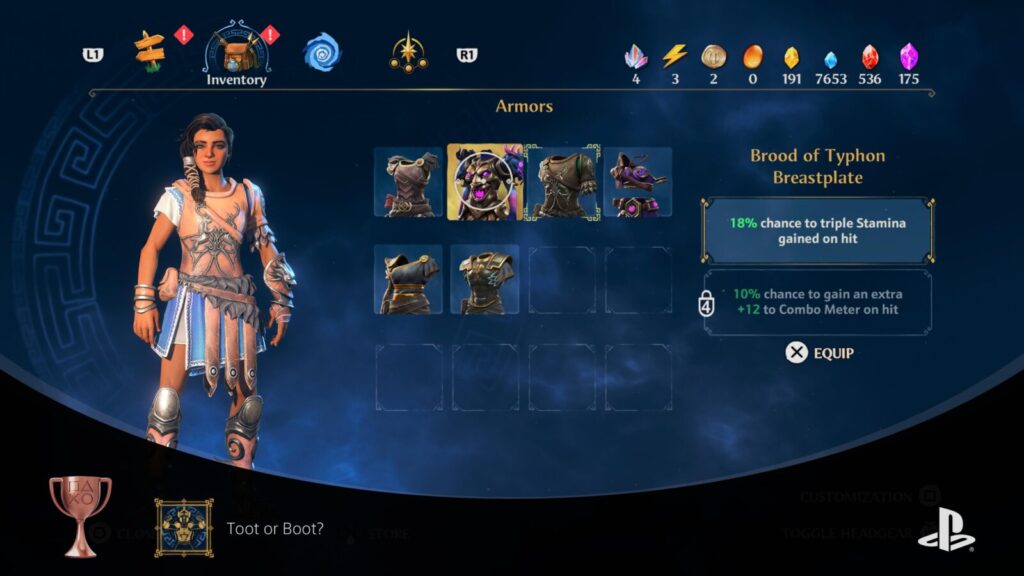
Toot or Boot?
Equip a matching helmet and armor.
To unlock this trophy you simply need to find a helmet and armour from the same set. For example, I managed to find both the “Brood of Typhon Breastplate” and the “Brood of Typhon Helmet”.
Once you have two items from the same set, just equip them at the same time, and the trophy will unlock immediately.
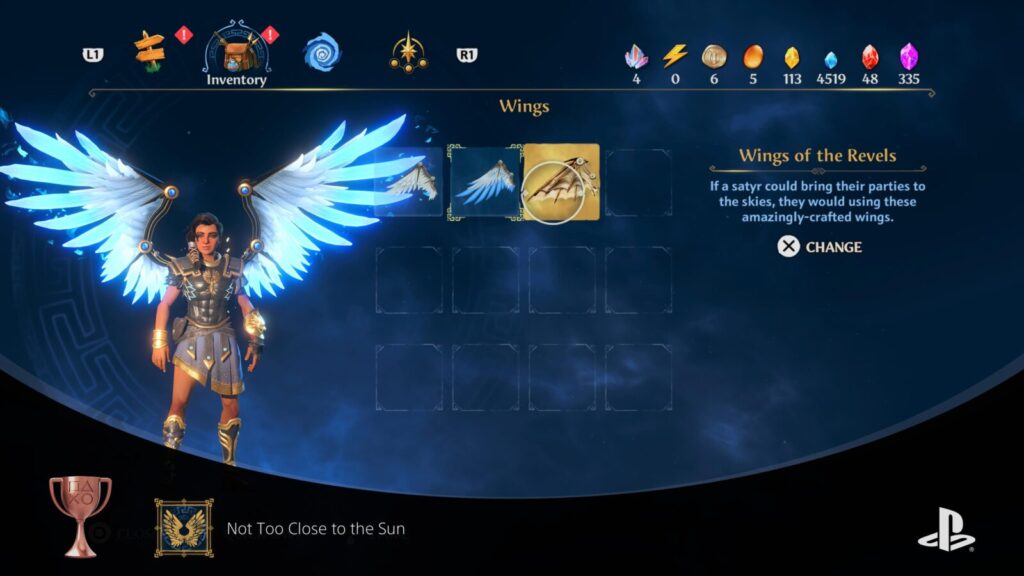
Not Too Close to the Sun
Equip new Wings.
Switching from the “Broken Wings” to the “Wings of Daidalos” you earn early in the game does not count for this trophy. You can acquire new Wings from defeating Lieutenants hidden throughout the world.
You will know when you have found a Lieutenant because a large health bar with their name will appear on-screen and the music will change. Their name will also say “Lieutenant of…”
Once you’ve unlocked a new set of Wings, equip them via the Inventory tab in the ![]() menu to unlock this trophy immediately.
menu to unlock this trophy immediately.

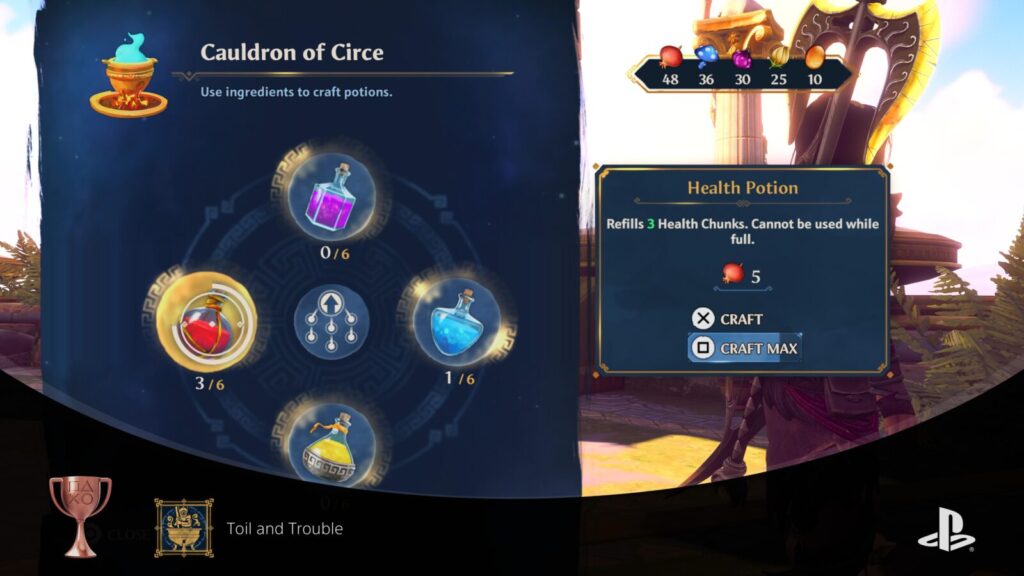
Potion Professional
Fully upgrade the Potion tree.
At the Cauldron of Circe in the Hall of Gods, you can upgrade your potion-making proficiency by selecting the option in the center to open the Potions skill tree.
You can purchase new potion-making proficiencies by spending Golden Amber which you’ll find throughout the game.
To unlock this trophy, you will need to purchase every single one of these skills.

This is probably the trophy which will take you the longest to unlock. Golden Amber is much scarcer than I think it should be. Your best bet is to traipse across the island for a few hours, opening every standard chest you come across, as Golden Amber is found in standard chests at a rate of three pieces per chest.
You can also find Golden Amber inside trees which are emitting gold particles from their roots. Hit them with ![]() to knock them down and pull the Amber from the stump. There are lots of trees like this in the Gates of Tartaros region.
to knock them down and pull the Amber from the stump. There are lots of trees like this in the Gates of Tartaros region.
Powered Up
Fully upgrade the Godly Powers tree.
At the River Styx Cistern in the Hall of Gods, you can upgrade your Godly Powers by opening the right-most option in the Cistern menu and accessing the Godly Powers skill tree.
You can purchase new powers by spending Coins of Charon which you’ll earn for solving puzzles throughout the world.
To unlock this trophy, you will need to purchase every single one of these powers and power upgrades.
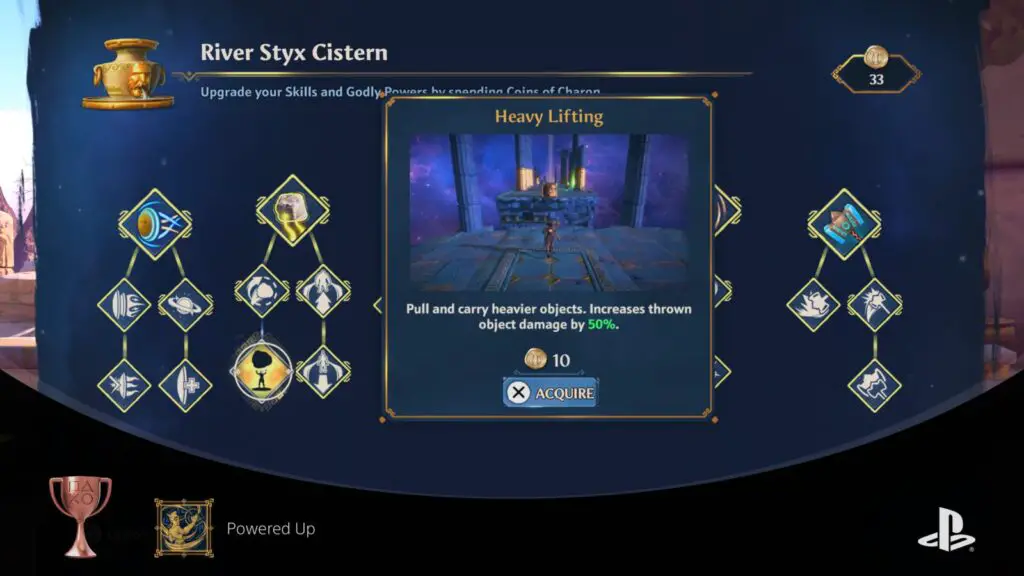
There are more Coins of Charon available in the game than what you will need to purchase all of these Godly Powers as well as the skills.
Show Your Moves
Fully upgrade the Skills tree.
At the River Styx Cistern in the Hall of Gods, you can upgrade your Skills by opening the left-most option in the Cistern menu and accessing the Godly Powers skill tree.
You can purchase new skills by spending Coins of Charon which you’ll earn for solving puzzles throughout the world.
To unlock this trophy, you will need to purchase every single one of these skills.
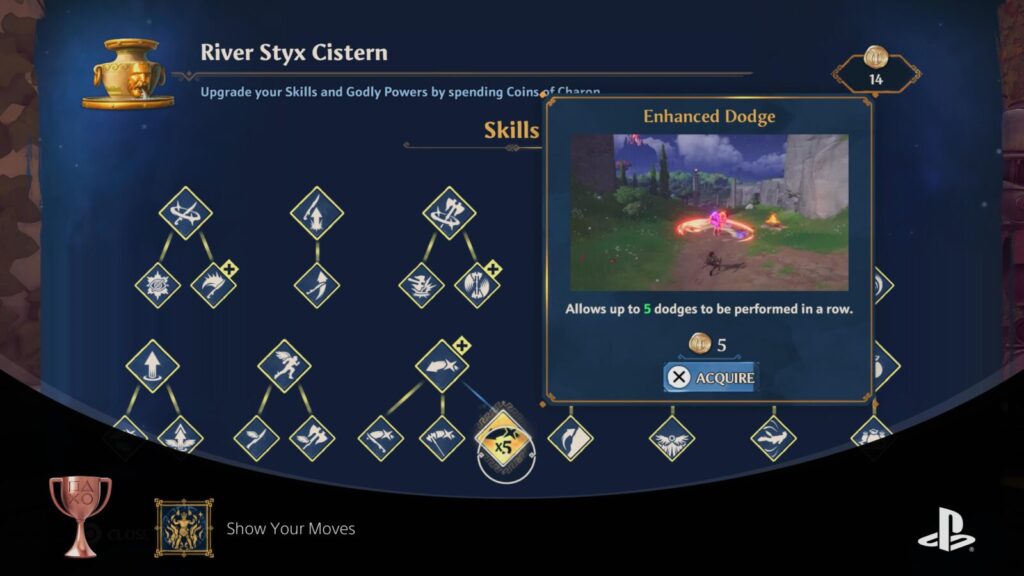
There are more Coins of Charon available in the game than what you will need to purchase all of these skills as well as the Godly Powers.
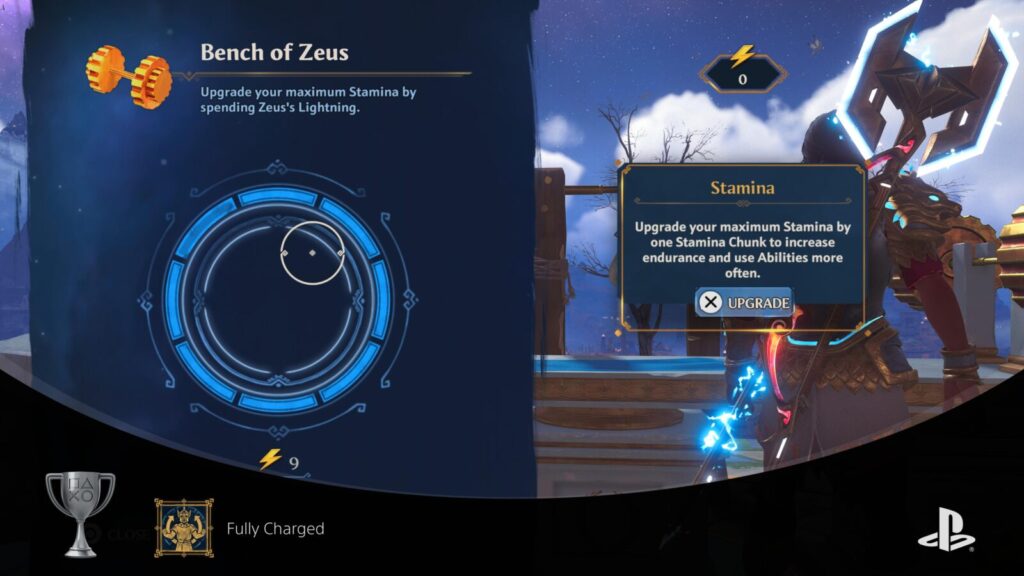
Fully Charged
Fully upgrade your Stamina.
At the bench of Zeus in the Hall of Gods, you can upgrade your stamina by spending Zeus’ Lightning, which you’ll get for completing Vaults and Heroic Tasks.
Spend enough Lightning to buy 8 upgrades, reaching maximum stamina, and you’ll unlock this trophy.
Other Misc Trophies
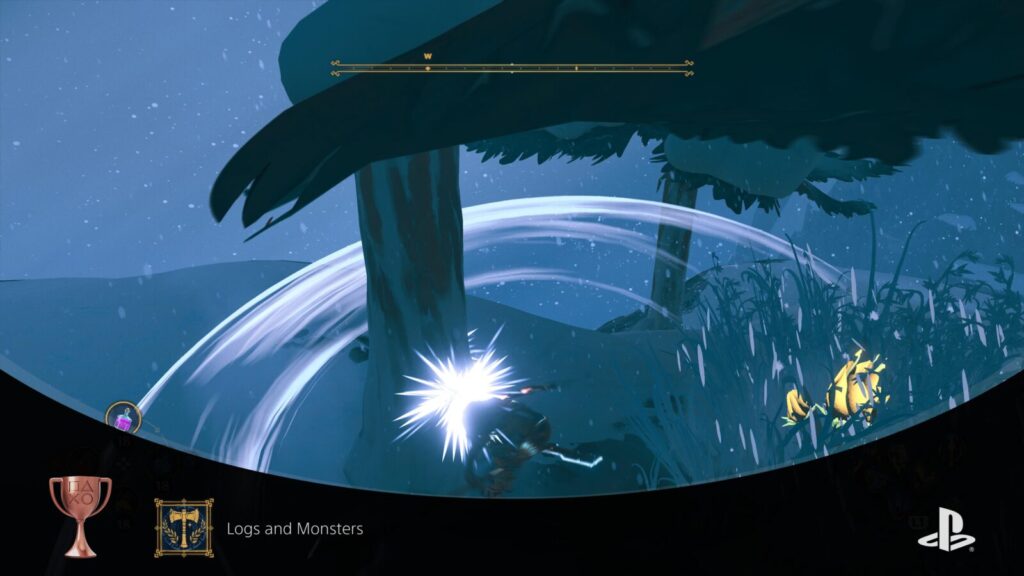
Logs and Monsters
Chop down 100 large trees.
Attacking most trees with the axe ![]() will cause them to fall. To unlock this trophy, you’ll simply need to do this 100 times.
will cause them to fall. To unlock this trophy, you’ll simply need to do this 100 times.

Tippy-Top
Reach the highest point on the island.
At Zeus’ Throne, found at the top of the King’s Peak region, you’ll find a golden eagle statue with some Ambrosia on it’s head. The camera will actually focus on it for a moment during the cutscene when you first arrive, just to show you that it’s there.
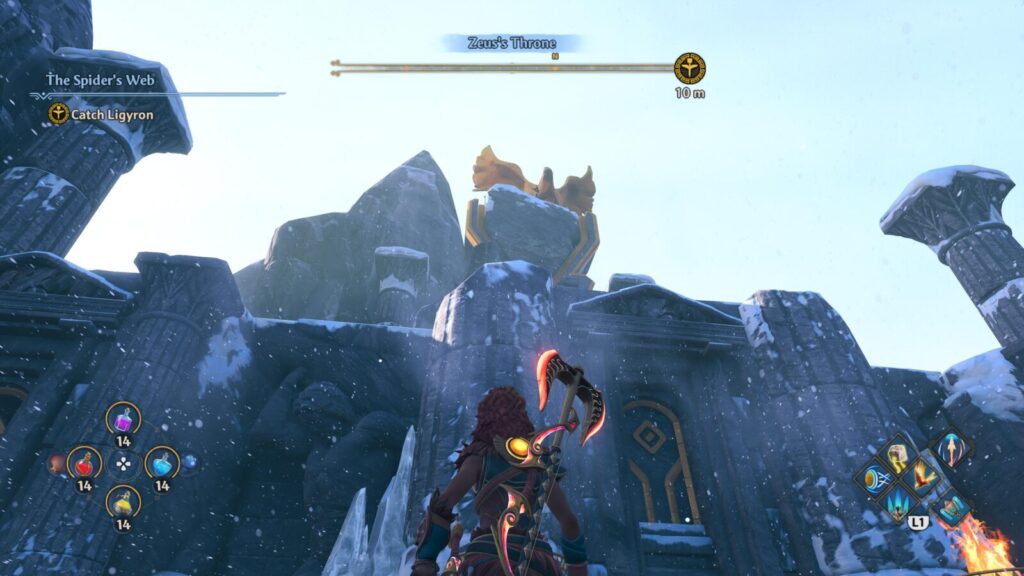
To unlock this trophy, climb up onto the Eagles head where the Ambrosia is and the trophy will pop.
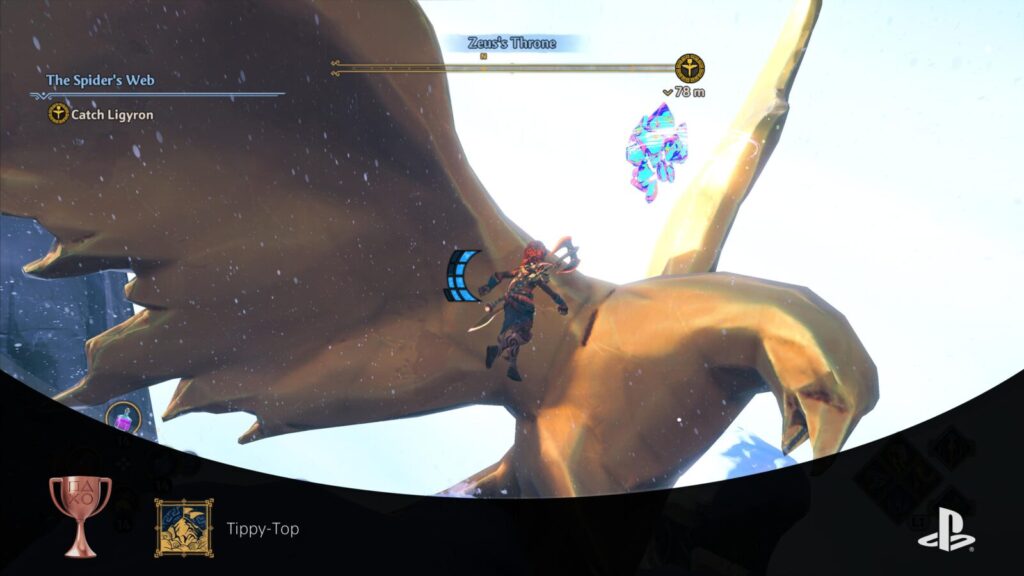
Interestingly, that’s not even the highest point, as the rock behind the Eagle is actually taller, but you don’t need to go up there.
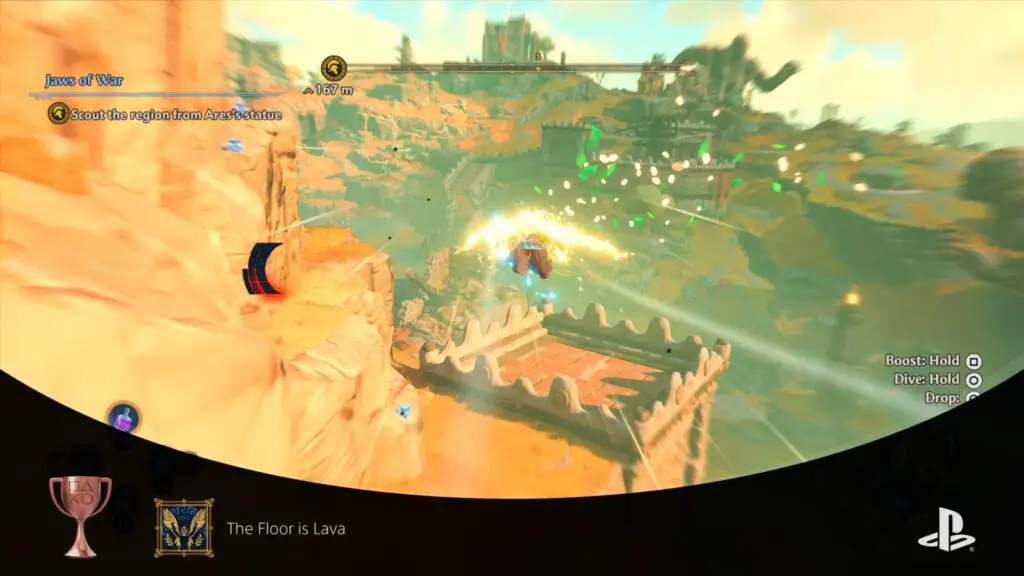
The Floor is Lava
Glide a total of 1,000 meters in one go.
For this trophy you just need to find a high enough point to jump from and then glide 1000 meters without touching the ground. I managed to do this with two and a half stamina bars, but any less and I wouldn’t have made it the full distance.
I was also using the “Glide Boost” ability, which allows you to glide faster and use less stamina to do so.

What worked for me was to glide from Hephaestus’ statue in the Forgelands to Ares’ statue in War’s Den, as they are just over 1000 meters apart.
Toil and Trouble
Craft your first Potion.
After first arriving at the Hall of the Gods, you’ll be able to explore the area. Introduce yourself to each of the stations there and what they do.
One of the stations is the Cauldron of Circe, a place where you can craft potions. Use the resources you’ve no doubt gathered up to this point in order to craft your first potion and this trophy will unlock.
Beauty’s in the Eye
Change your appearance at the Hall of the Gods.
After first arriving at the Hall of the Gods, you’ll be allowed to explore it freely. Take the time to stop at each of the stations and learn what they do. One of these stations is a stone chair, much like a barber-shop chair, found underneath a gold icon depicting scissors and a comb.
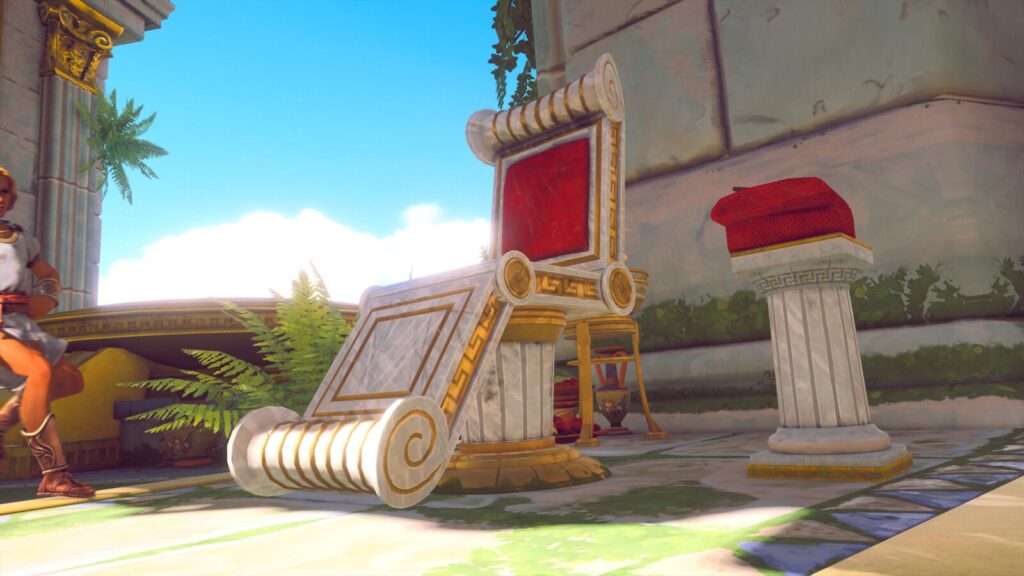
Access this station to change your appearance. Simply change a single thing about your appearance then hold ![]() to apply the changes and this trophy will pop immediately.
to apply the changes and this trophy will pop immediately.
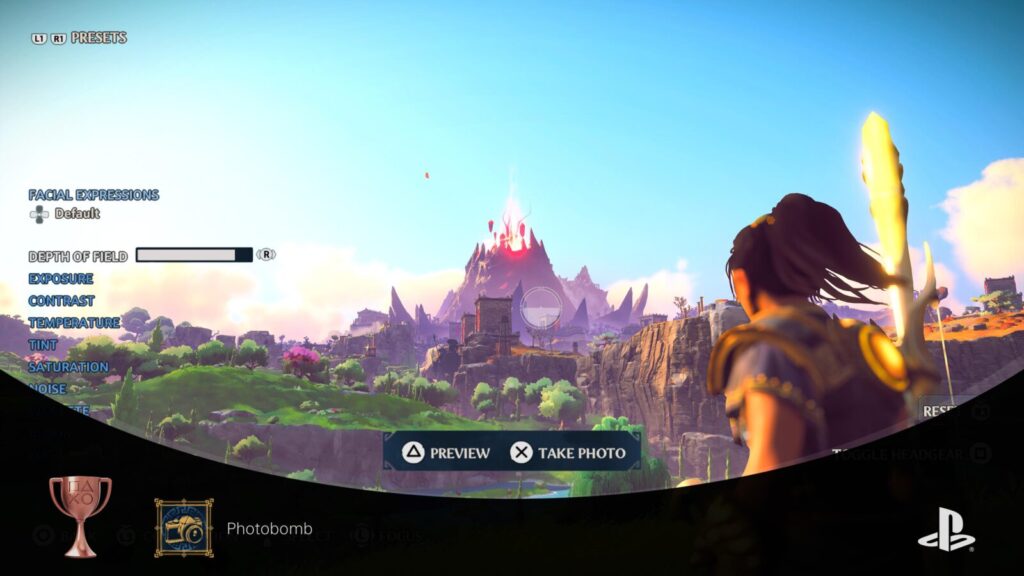
Photobomb
Take a photo.
At any point in the game (except vaults where it cannot be used) press ![]() +
+![]() together to activate photo mode. In here, simply set up your shot and press
together to activate photo mode. In here, simply set up your shot and press ![]() to take a photo. The trophy will pop immediately.
to take a photo. The trophy will pop immediately.
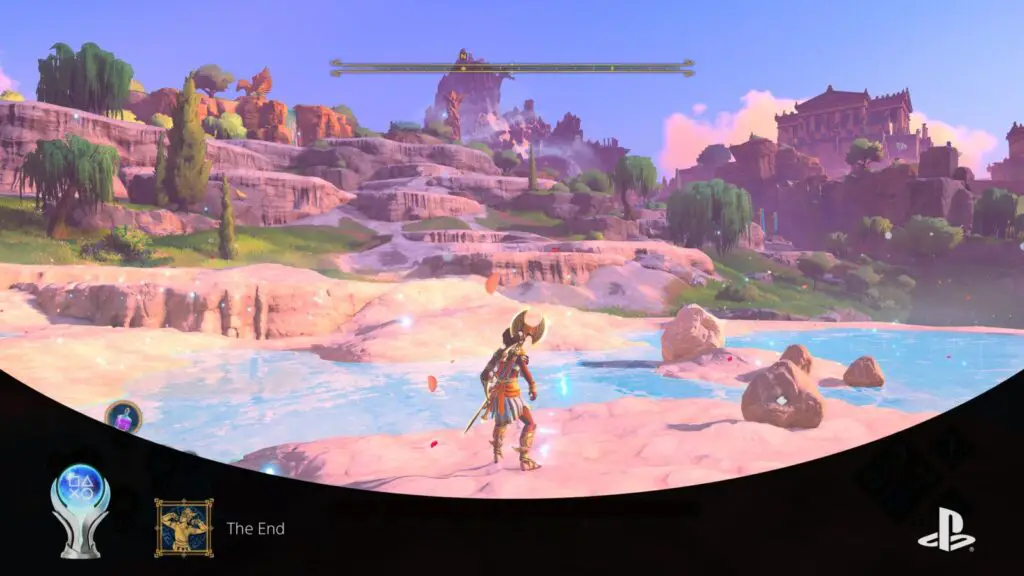
Plat Get!
The End
Obtain every Trophy.
And last but not least, once you have every single trophy in this Immortals Fenyx Rising Trophy Guide, this shiny new platinum is all yours to enjoy!
Thank you for choosing PlatGet as your source for this Immortals Fenyx Rising Trophy Guide.
Follow us on twitter @GetPlat or Instagram @platget for updates on new reviews and guides, as well as small anecdotes about our platinum journeys.