PlayStation 4, PlayStation 5
Far Cry 6 Trophy Guide


General Info
FAQ
How long does it take to beat Far Cry 6 and unlock all trophies?
About 30-35 hours.
How difficult is it to beat Far Cry 6 and unlock all trophies?
Very Easy (1/10).
Does Far Cry 6 have online trophies?
Yes.
Does Far Cry 6 have difficulty-specific trophies?
No.
Does Far Cry 6 have missable trophies?
Yes, Hidden in Plain Sight.
Does Far Cry 6 have glitched trophies?
No.
What is the minimum number of playthroughs required to unlock all trophies in Far Cry 6?
One.
Does Far Cry 6 have a Platinum Trophy?
Yes.
Other Useful Guides:
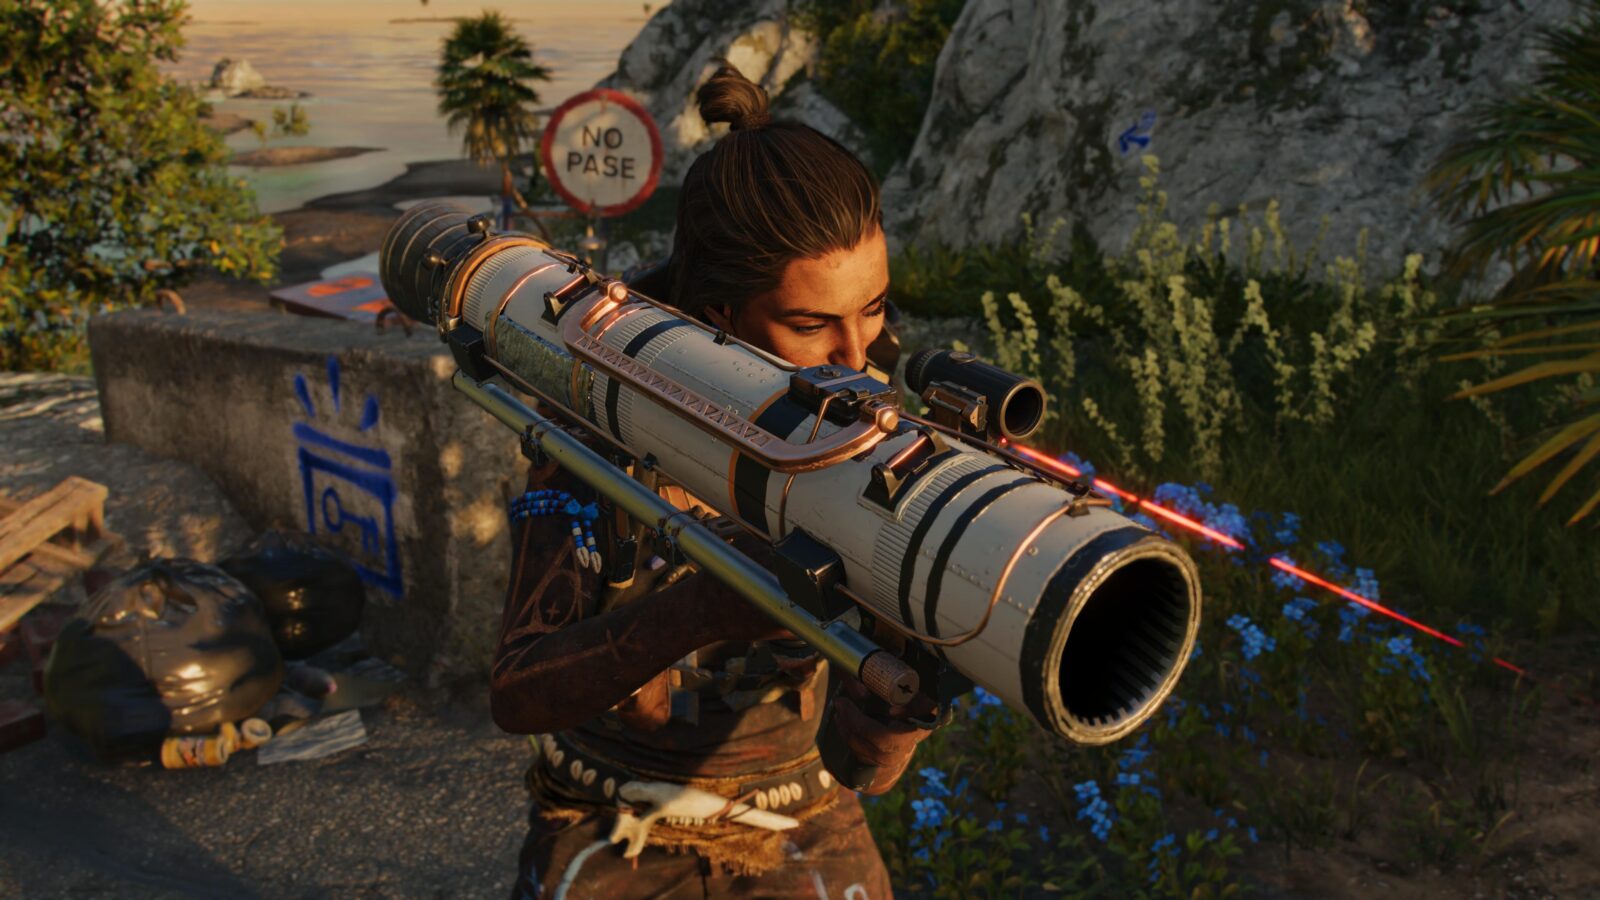
Far Cry 6 Unique Weapons Guide
Trophy Guide
Far Cry 6 Trophy Guide and Road Map
Welcome to our Far Cry 6 Trophy Guide. Far Cry 6 is the latest installment in Ubisoft’s Far Cry series and is–in our opinion–the strongest one yet. Totally out of character for Ubisoft, Far Cry 6 has minimal bugs and glitches, even at launch, and we’re pleased to say you’ll be able to unlock every trophy without any getting glitched!
Join us as we follow Dani Rojas across Yara, a fictional Cuban island under the regime of a terrifying dictator played by the excellent actor Giancarlo Esposito, of Breaking Bad fame. This extensive guide should give you all the info you need to complete just enough of Far Cry 6 to secure its Platinum Trophy.
Phase One – Complete the Story
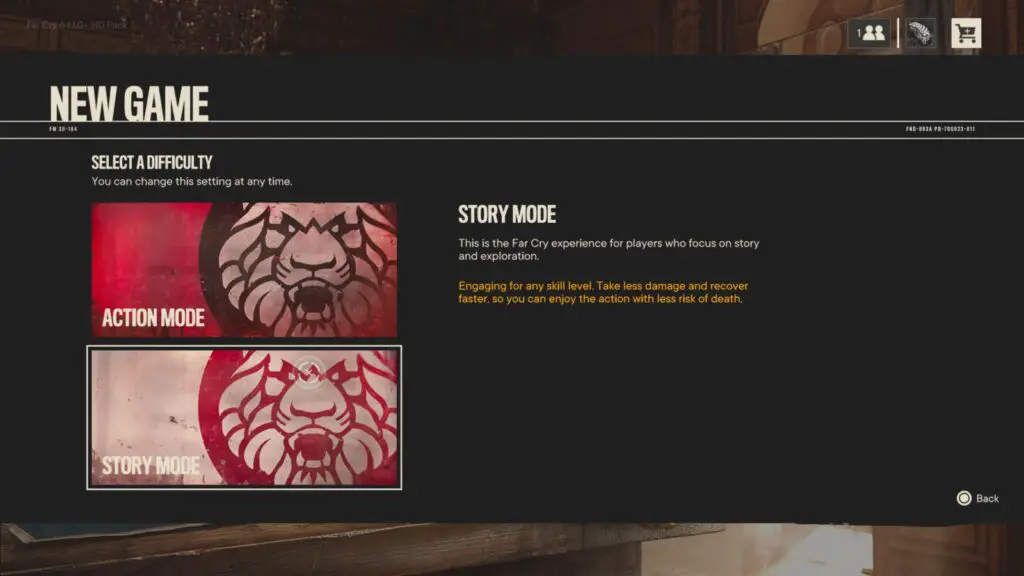
During this first phase of our Far Cry 6 Trophy Guide, you should just focus on completing the story. You can do as much or as little side content as you feel like doing, as long as you complete the Main Story operations and earn all story-related trophies.
You may play on any difficulty. Action Difficulty is a more traditional experience whereas Story Difficulty makes you a complete tank, you can take an insane number of bullets to the head and still walk away. There are no difficulty-specific trophies and no consequences if you want to play on Story Difficulty for an easier and more fun experience.
Note that there is one missable misc trophy that you must earn before finishing the story and that is the Hidden in Plain Sight trophy. My advice would be to earn this as soon as you possibly can.
Additionally, if you do decide to go off-piste a bit and do some side content, which is perfectly fine, then please very very aware of the Semi-Missable FND Base Trophies which you should earn before completing all FND Bases! If you complete them all without being aware of these, you will have to jump through some extra annoying hoops just to earn them later.
Story Trophies


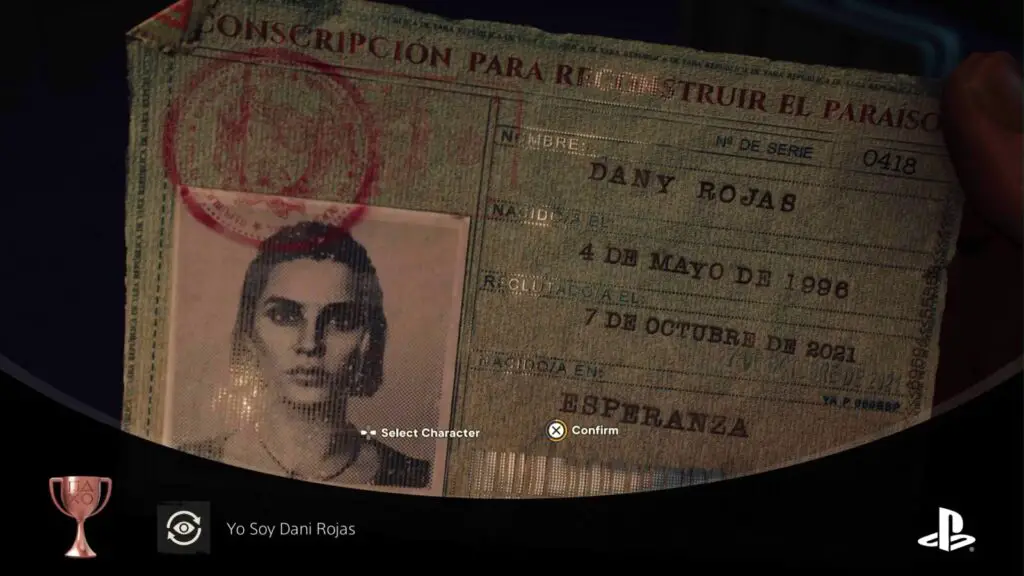
Yo Soy Dani Rojas
Select Dani’s look (Solo Campaign only)
At the start of the game, you’ll be asked to choose whether Dani is a male or female character. Simply make your preferred choice and this unmissable trophy will unlock.

This Missable Trophy must be earned before you complete the game’s story.
As soon as you can get into a boat or plane vehicle you should fly/sail outside the map’s bounds. As you approach the edge of the map, you’ll see a warning at the top of the screen that says “LEAVING YARA, TURN AROUND”.
Ignore it, and continue heading to the edge of the map and eventually, Hidden In Plain Sight will unlock and the screen will go black. A cutscene will then play, showing a secret ending to the game where Dani abandons the Yaran cause and goes to Miami instead.
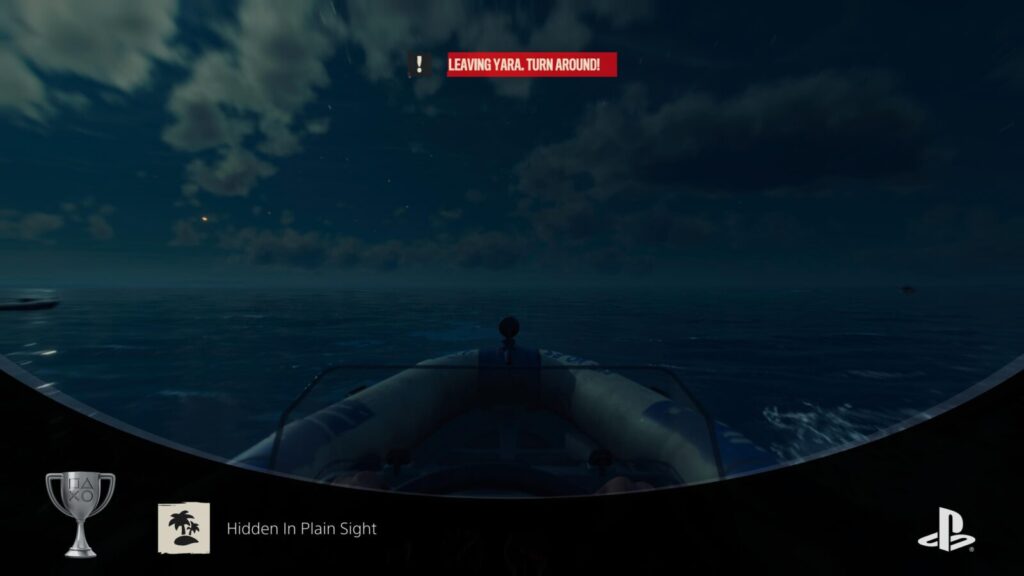
Once the credits are done (or you skip them) you’ll be brought back to the main menu. Select “Continue” to be brought into the game at a point before you left the map and can continue as normal. No progress will be lost.

Cutting Foreign Ties
Recruit the Legends of ’67 and La Moral
The Legends of ’67 are one of the three rebel groups you will need to help in order to complete the story. Cutting Foreign Ties is unmissable, simply follow the main quests to acquire it.

Montero Justicia
Recruit the Monteros
The Monteros are one of the three rebel groups you will need to help in order to complete the story. Montero Justicia is unmissable, simply follow the main quests to acquire it.

Voz del Pueblo
Recruit Máximas Matanzas
Máximas Matanzas are one of the three rebel groups you will need to help in order to complete the story. Voz del Pueblo is unmissable, simply follow the main quests to acquire it.


Viva La Revolución
Take back Yara
Viva La Revolución will unlock once you have completed every main mission in the game and thus finished the story.
Phase Two – Gather Collectibles
In this second phase of our Far Cry 6 Trophy Guide, you can now move on to completing side activities like FND Bases, Criptograma Chests, Rooster collecting, and more. You actually don’t need to complete everything in Far Cry 6, so don’t get ahead of yourself and go off completing every Side Story and Treasure Hunt, because only a few of these are actually required.
Just follow the guide below and anything you need to do will be made clear!
I’ve done what I can to prepare maps where possible below, but if you would prefer something in-game, you can actually purchase maps for most collectibles, but you’ll need Far Cry Credits, which cost real-world money.
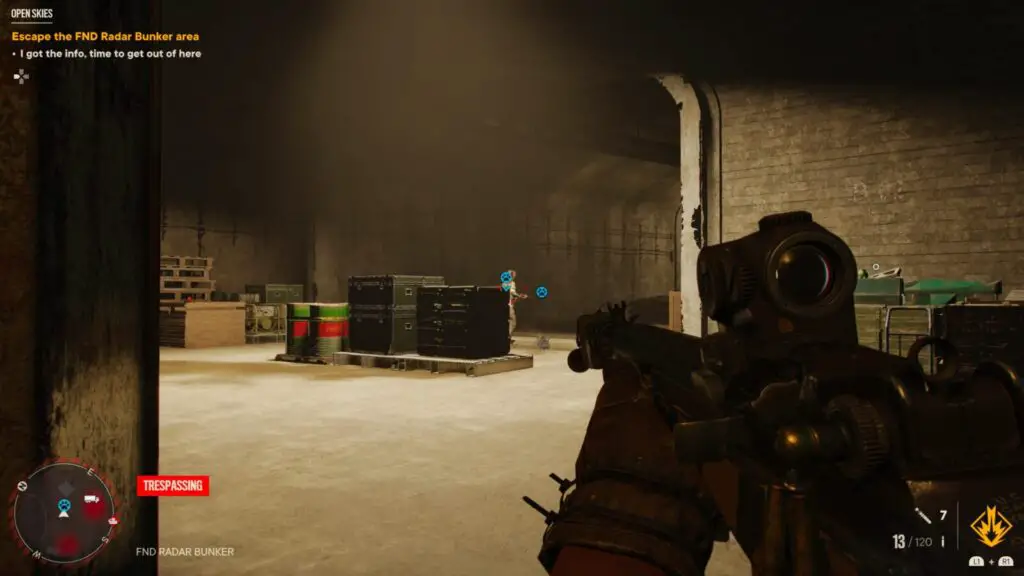
Semi-Missable FND Base Trophies
You should be very careful to ensure you unlock all of these trophies as a priority during this phase. If you miss any, you can still earn them, but the process is very arduous.

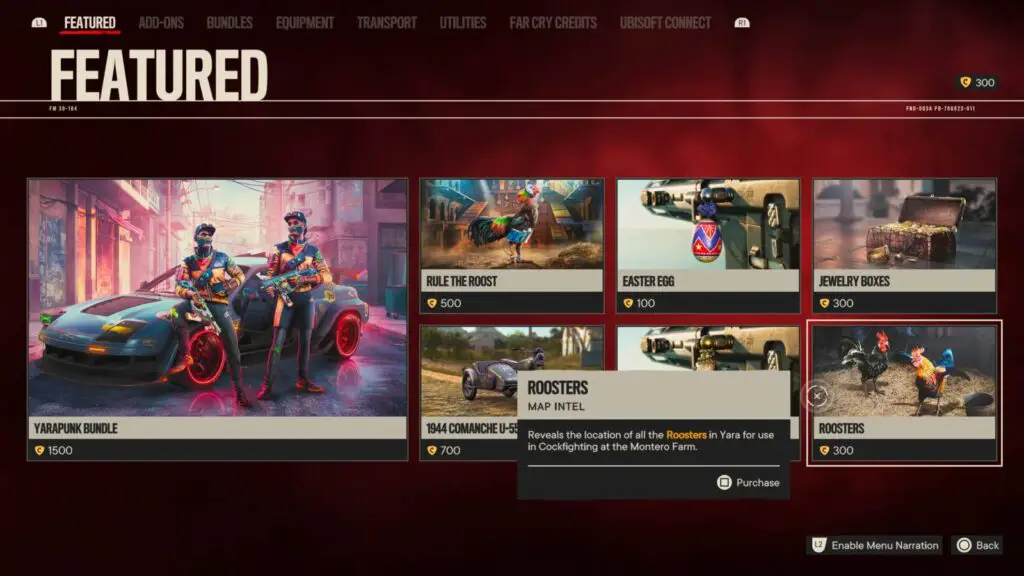
Co-Dependent
Capture an FND base with a Co-op partner
Simply complete any FND base with a co-op partner. See Liberty for more info about FND Bases, as well as their locations.
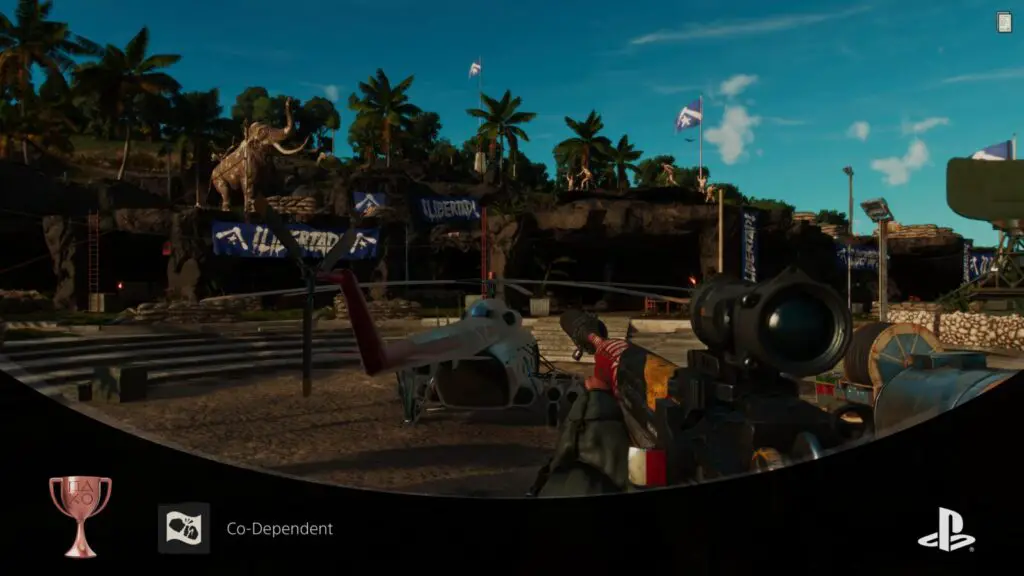
The trophy is semi-missable because there is no feature that will allow you to replay an FND base. After you complete the story, you will get access to weekly “Insurgency Challenges” which will allow you to replay one base per week, but that will be your only chance to replay them. See Oh No You Don’t! for a method allowing you to farm weekly challenges back-to-back. Try your best not to rely on this exploit as it has a high chance of permanently glitching your save.

Ninjerilla
Capture an FND Base without being detected (Solo Campaign only)
FND Bases are military camps that you can capture by killing all enemy soldiers. See Liberty for all FND Base locations.
To unlock Ninjerilla, you will need to complete an FND base without being detected. That means cameras can’t spot you, enemies can’t spot you, and no alarm should be sounded.
You should go in quietly with a silenced weapon or bow and take out all enemies from the shadows without raising suspicion.
If you are successful, you’ll get bonus resources for completing the base undetected, and the trophy will unlock once the liberation cutscene ends.
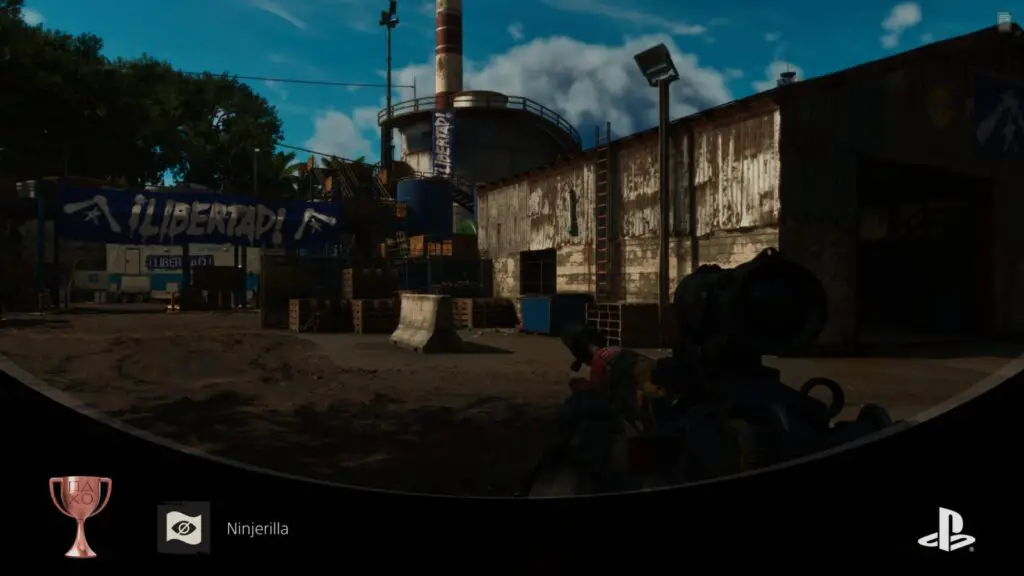
This trophy must be earned solo and will not unlock if you do it with a friend in co-op mode.
The trophy is semi-missable because there is no feature that will allow you to replay an FND base. After you complete the story, you will get access to weekly “Insurgency Challenges” which will allow you to replay one base per week, but that will be your only chance to replay them. See Oh No You Don’t! for a method allowing you to farm weekly challenges back-to-back. Try your best not to rely on this exploit as it has a high chance of permanently glitching your save.
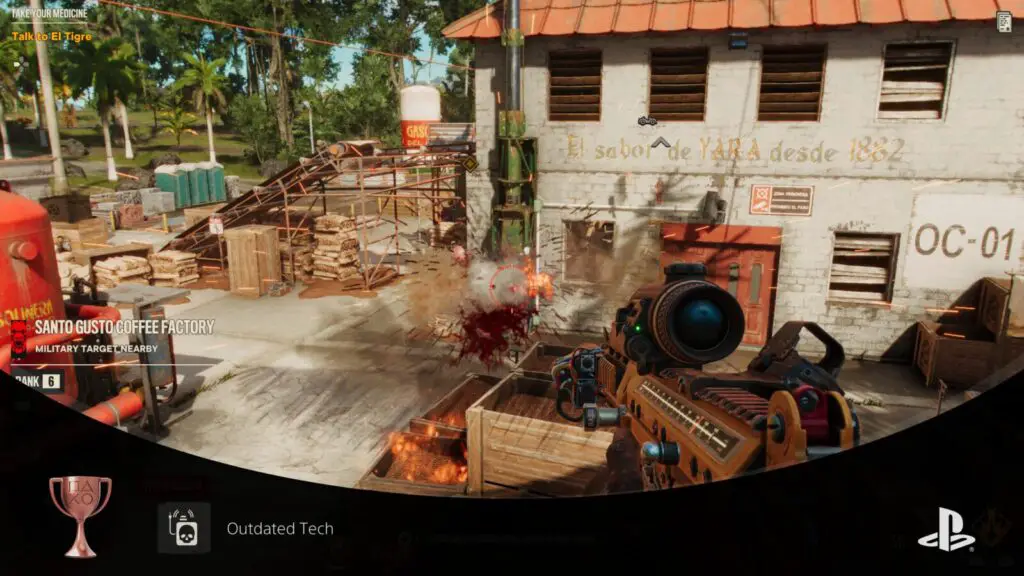
Outdated Tech
Take out a soldier by sabotaging an alarm
Before you can earn the Outdated Tech trophy, you must build the “Bandidos Barracks” Camp Facility at any of your Guerrilla camps. Then, you will need to upgrade it twice to Level 3.
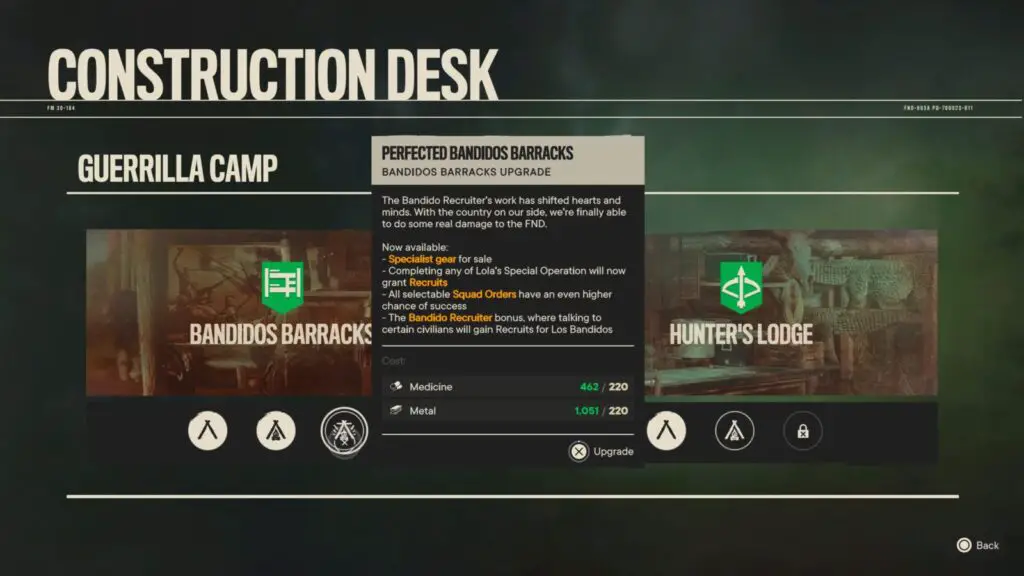
Once you have a Level 3 Bandidos Barracks facility, visit it and browse the store there for some wrist gear called “Techmaster Band”.

With that gear equipped, you can hold ![]() at a camp alarm to sabotage it.
at a camp alarm to sabotage it.
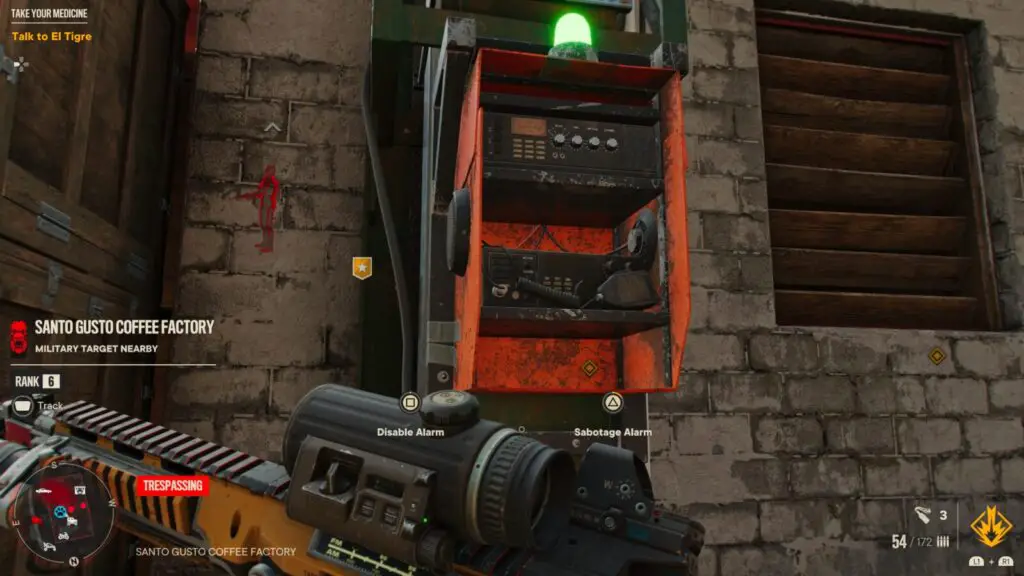
Do so at any FND base or Military Checkpoint and then, once one or more alarms have been sabotaged, draw attention to yourself by shooting a loud weapon or attacking a guard in plain sight.
Leave some soldiers alive so that one of them can go and attempt to activate the alarm, but they will receive quite a shock when the sabotaged alarm kills them. Doing this for the first time will unlock Outdated Tech.
The trophy is semi-missable because there is no feature that will allow you to replay an FND base. After you complete the story, you will get access to weekly “Insurgency Challenges” which will allow you to replay one base per week, but that will be your only chance to replay them. See Oh No You Don’t! for a method allowing you to farm weekly challenges back-to-back. Try your best not to rely on this exploit as it has a high chance of permanently glitching your save.
Note that you can also earn this trophy at Military Checkpoints and some Story locations which sometimes have alarms too, but there’s no way to replay those at all if you’ve already cleared them all.

Didn’t See That Coming!
Use a Security Control Center to disable all cameras and alarms
Some FND Bases have Security Control Centers in locked rooms, and you will typically need to find a Sergeant on the base and recover the key from them in order to get into the Control Center.
You can disable a control center in two ways; either by shooting it (which doesn’t count towards the trophy) or by approaching it and holding ![]() .
.
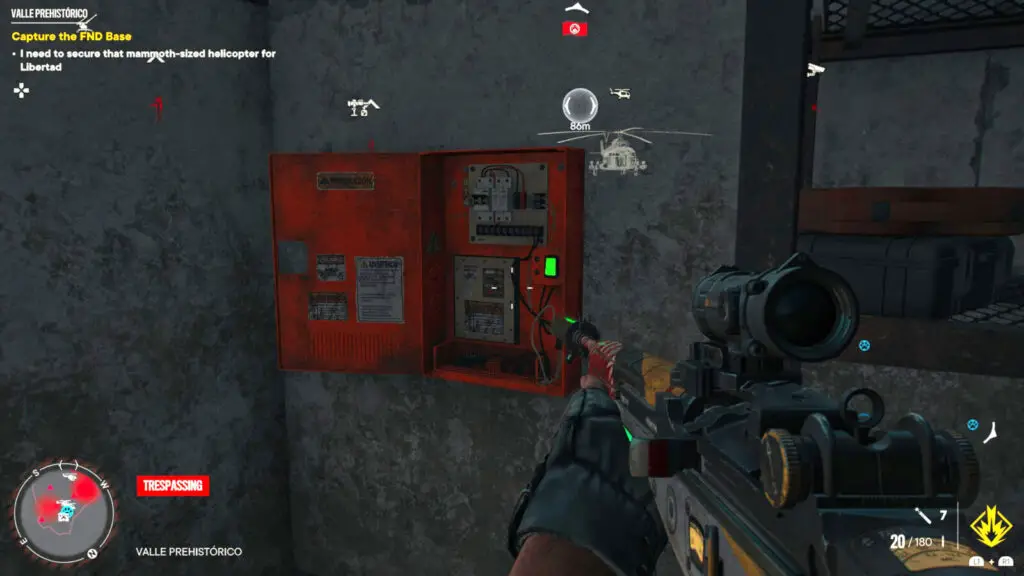
You will need to do this at least once in any FND base that has a Control Center to unlock Didn’t See That Coming!
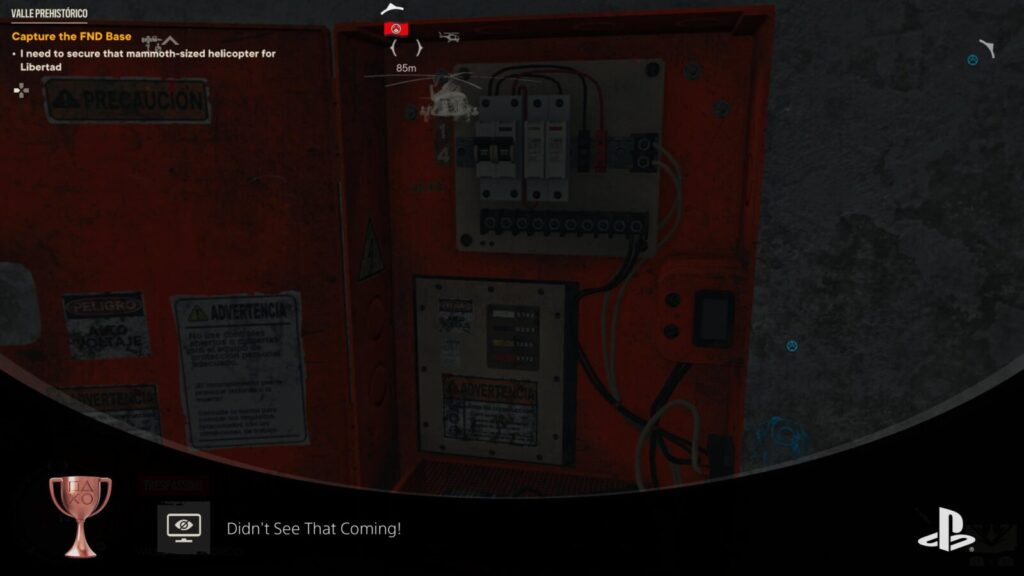
Some FND Bases to try are:
| Base Name | Region | Sub-Region |
|---|---|---|
| Valle Prehistorico | El Este | Conuco |
| Roca Pequena Sat Station | El Este | Conuco |
| Gran Roca Telecom Station | El Este | Sierra Perdida |
| Yaran Marine Maintenance | Valle de Oro | Noventarmas |
| Espinosa University | Esperanza | Esperanza |
| Fort Esperanza | Esperanza | Esperanza |
If you make a mistake or get spotted, just kill yourself or reload the last checkpoint to get another chance.
The trophy is semi-missable because there is no feature that will allow you to replay an FND base. After you complete the story, you will get access to weekly “Insurgency Challenges” which will allow you to replay one base per week, but that will be your only chance to replay them. See Oh No You Don’t! for a method allowing you to farm weekly challenges back-to-back. Try your best not to rely on this exploit as it has a high chance of permanently glitching your save.
Collectible Trophies


Friendly Skies
Blow up 16 Anti-Aircraft Cannons (Solo Campaign only)
There are 26 Anti-Aircraft Cannons to destroy by blowing them up with an explosive like Dynamite. In order to unlock the Friendly Skies trophy, however, you will only need to destroy 16 of them.
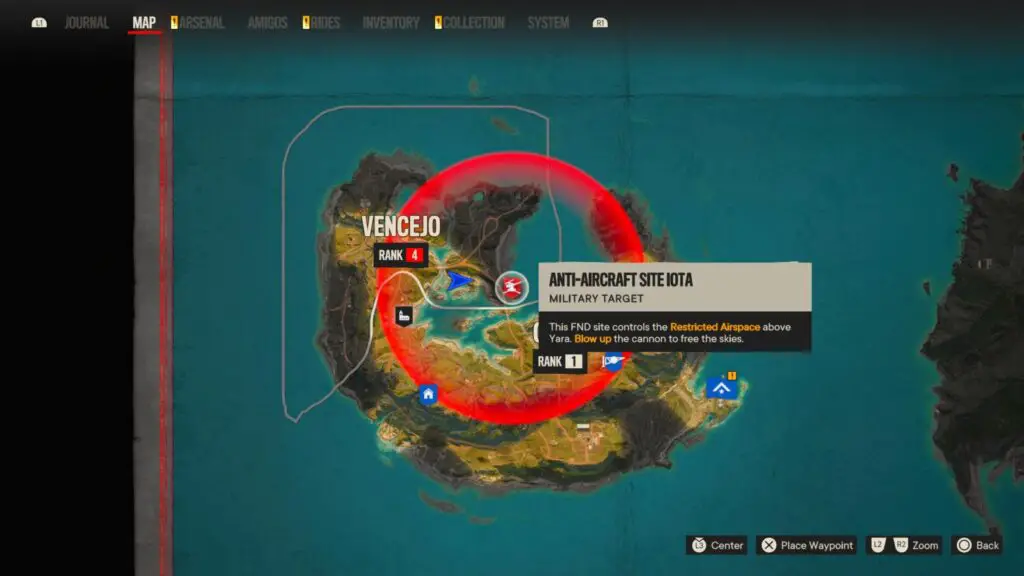
I recommend doing this first during this phase of our Far Cry 6 Trophy Guide because that will free you up to use the Airdrop fast-travel option, which spawns you high above Yara so that you can parachute/wing-suit from there and reach a wider range of locations quicker, which will be very helpful for completing collectible objectives.
You may even want to go out of your way to destroy all 26 Anti-Aircraft Cannons just to ensure you can freely Airdrop to any fast travel point on the map and have total free reign.
To aid you in finding the Anti-Aircraft Cannons, I’ve prepared this map which shows you where you can find them in-game:

When you arrive at an Anti-Aircraft Cannon base, clear out the enemy presence if you like, then blow up the cannon with an explosive. You should also be careful to collect the Depleted Uranium in the chest that can be found at every Cannon. You will need plenty of Uranium for the Backpacking trophy.

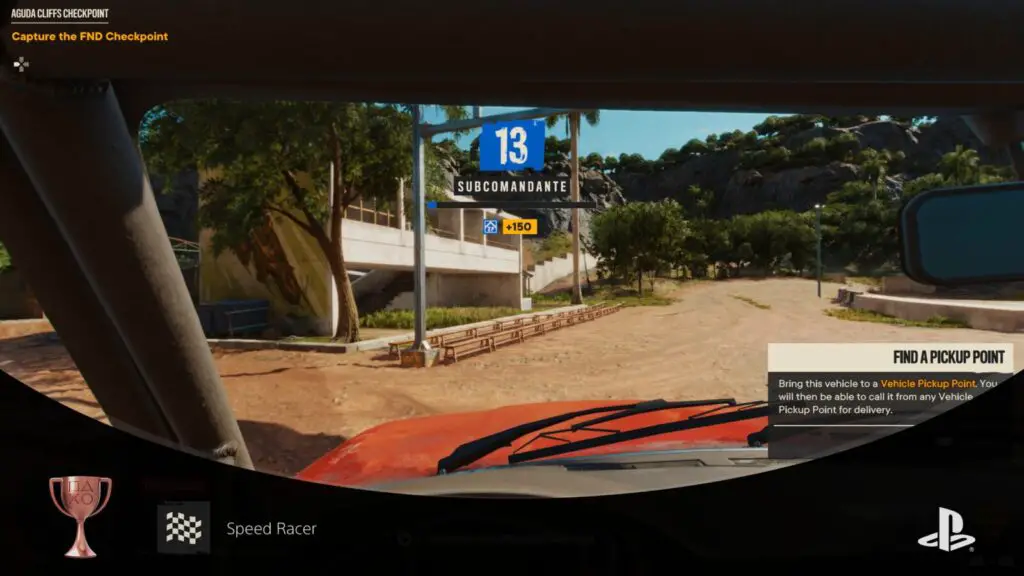
Liberty
Capture all FND Bases (Solo Campaign only)
Before you complete this trophy, be 100% certain you have unlocked all Semi-Missable FND Base Trophies.
There are 21 FND Bases in Far Cry 6. They are large enemy bases that contain many enemy soldiers. You will need to enter the base and kill every soldier in order to liberate it. How you do that is up to you.
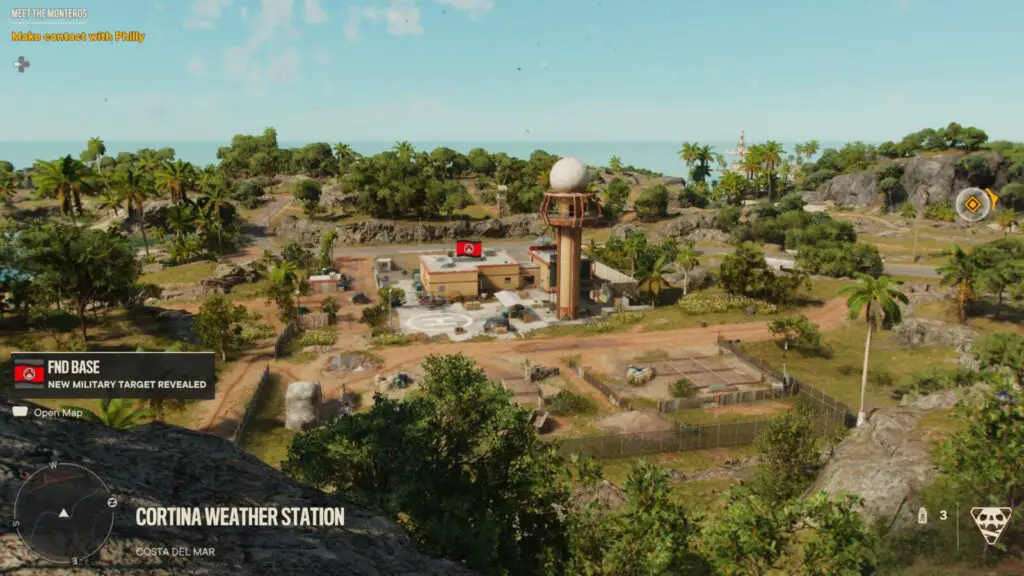
You could find high ground, tag all the enemies with your phone ![]() , take out the alarms and then silently kill every enemy without being spotted (You should do this at least once for Ninjerilla).
, take out the alarms and then silently kill every enemy without being spotted (You should do this at least once for Ninjerilla).
Or, you could just blast in there, guns blazing, and tear your way through the enemy forces.
Either way, you will need to find and liberate all 21 FND Bases for the Liberty trophy. To help you locate them all, I’ve prepared this map which shows you where to find them in-game:


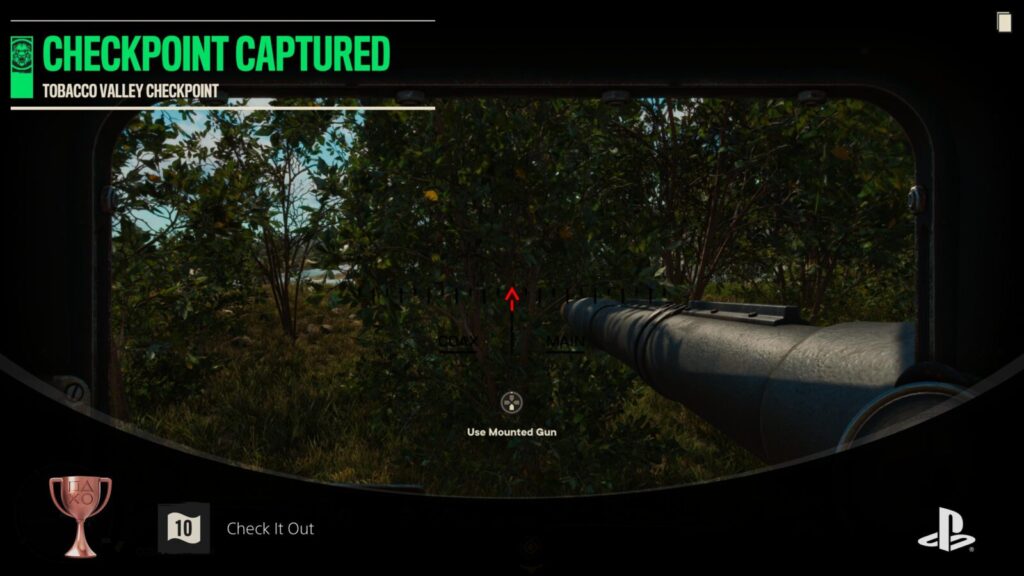
Check It Out
Capture 10 Checkpoints (Solo Campaign only)
There are a total of 20 Military Checkpoints in Far Cry 6, but you will only need to locate and capture 10 of them to unlock the Check It Out trophy.
To aid you in locating the Military Checkpoints, I’ve put together this map which shows where you can find them in-game:
To capture a checkpoint, just kill all of the enemy soldiers occupying it and any other objectives you might have (such as destroying a billboard).
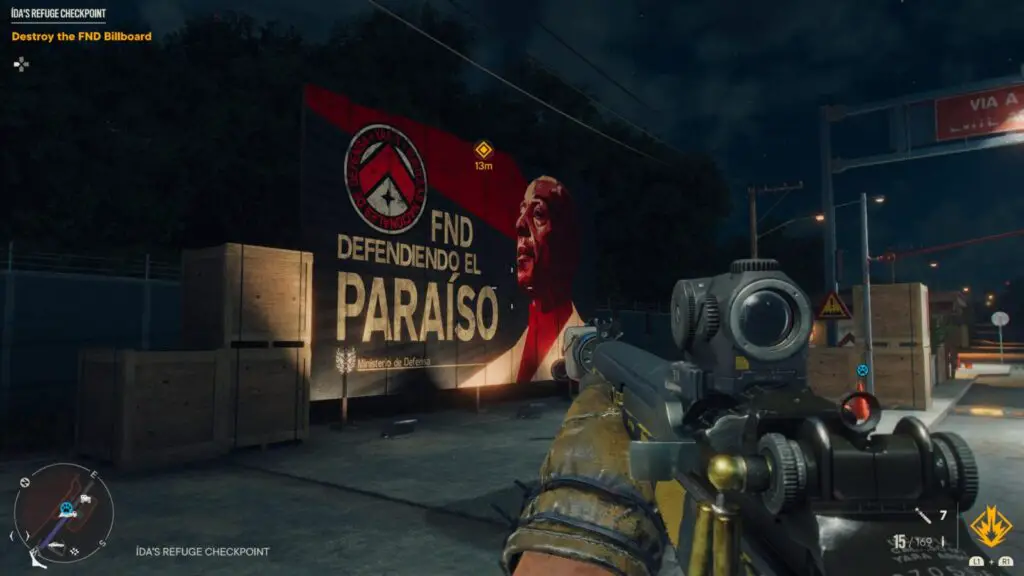
Do this for 10 Military checkpoints in total and the trophy is yours.

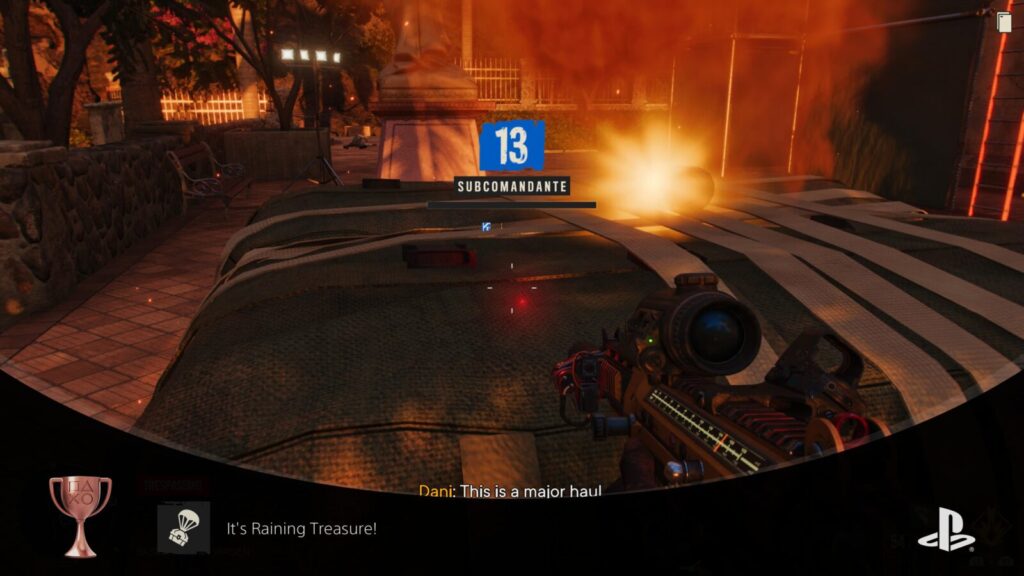
It’s Raining Treasure!
Intercept 10 Military Supply Drops (Solo Campaign Only)
There are a total of 20 Supply Drop locations in Yara. Supply drop events will always start at an enemy radio. Interact with the radio using ![]() to learn about a nearby supply drop and be given a marker for its location.
to learn about a nearby supply drop and be given a marker for its location.
You’ll then see a timer appear at the top of the screen. You need to race to the waypoint and reach the yellow smoke before time is up. There’s usually a vehicle of some sort nearby that you can use to get there quickly. When you get to the yellow smoke, collect the supplies there to complete the event.
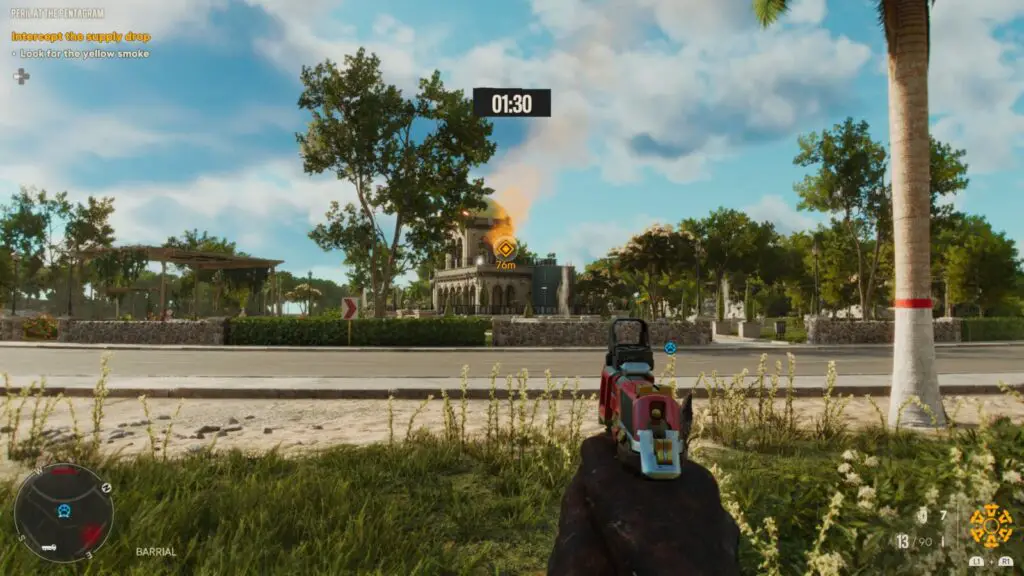
To unlock It’s Raining Treasure! you will need to complete only half of these Supply Drop events on the map. To help you locate them, I have prepared a map showing the locations of all 20:

Once you have collected all resources from 10 of the 20 Supply Drops in Yara, the It’s Raining Treasure! trophy is all yours.
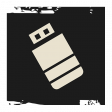
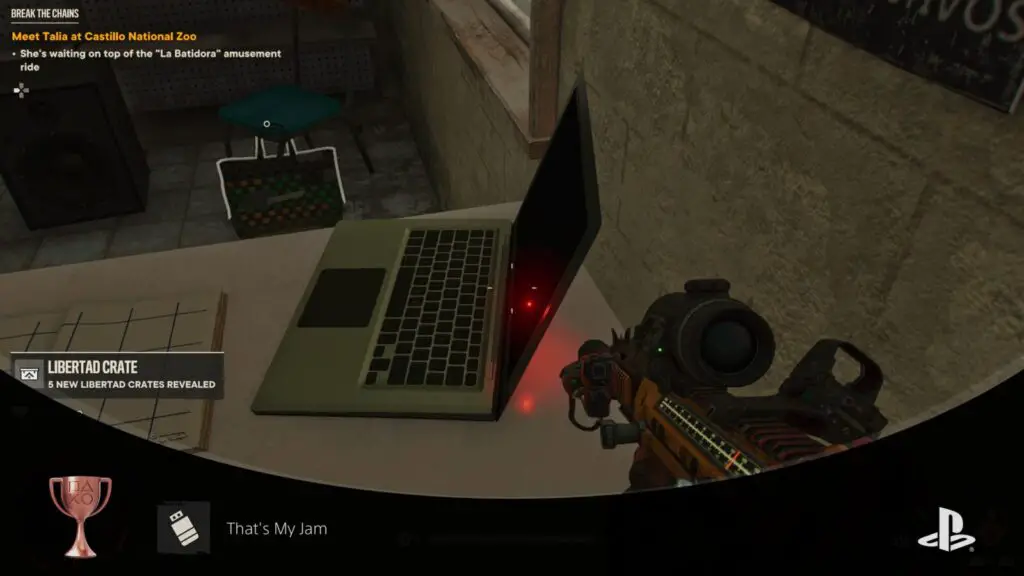
That’s My Jam
Find 15 USB Sticks
USB Song Collectibles are USB devices with music on them. They can be found all across Yara, but their small size and lack of map icon make them difficult to locate.
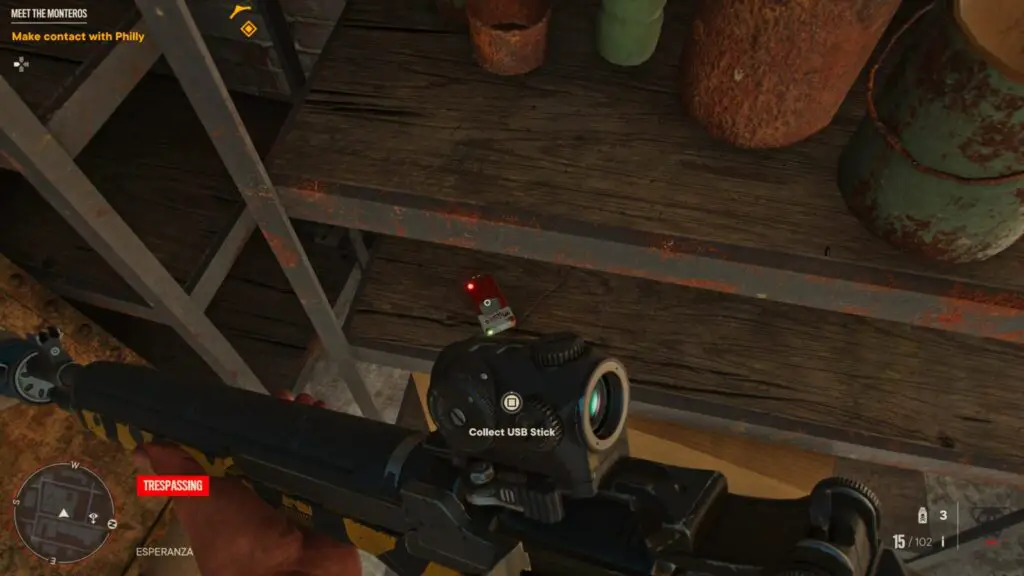
In an effort to help you better locate these devices, I’ve prepared a map that shows you where you can find each one in-game:
Keep an ear out, because you can hear the song they unlock when they are close by. You will need to locate and collect all 15 USB Songs to unlock That’s My Jam.

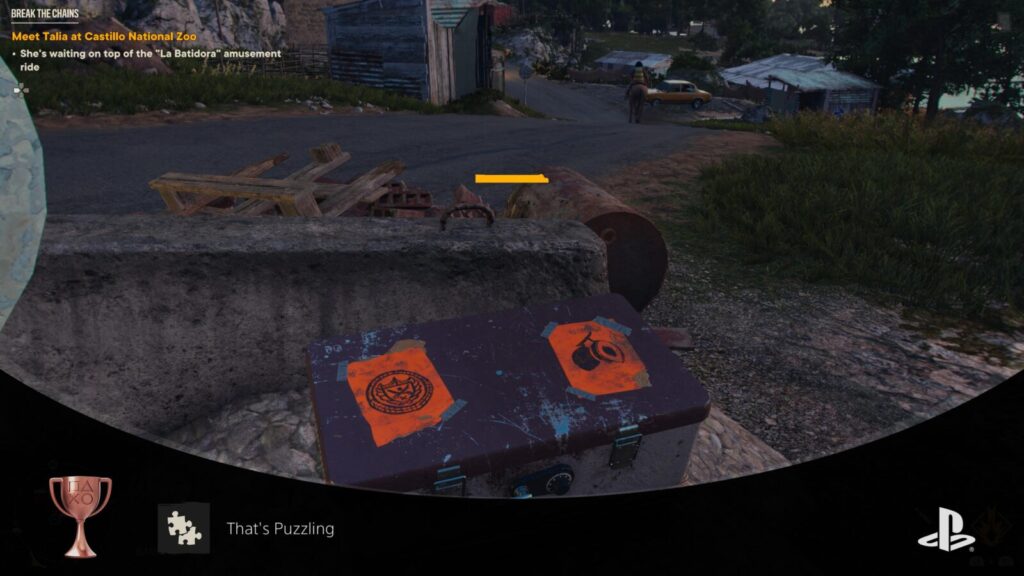
That’s Puzzling
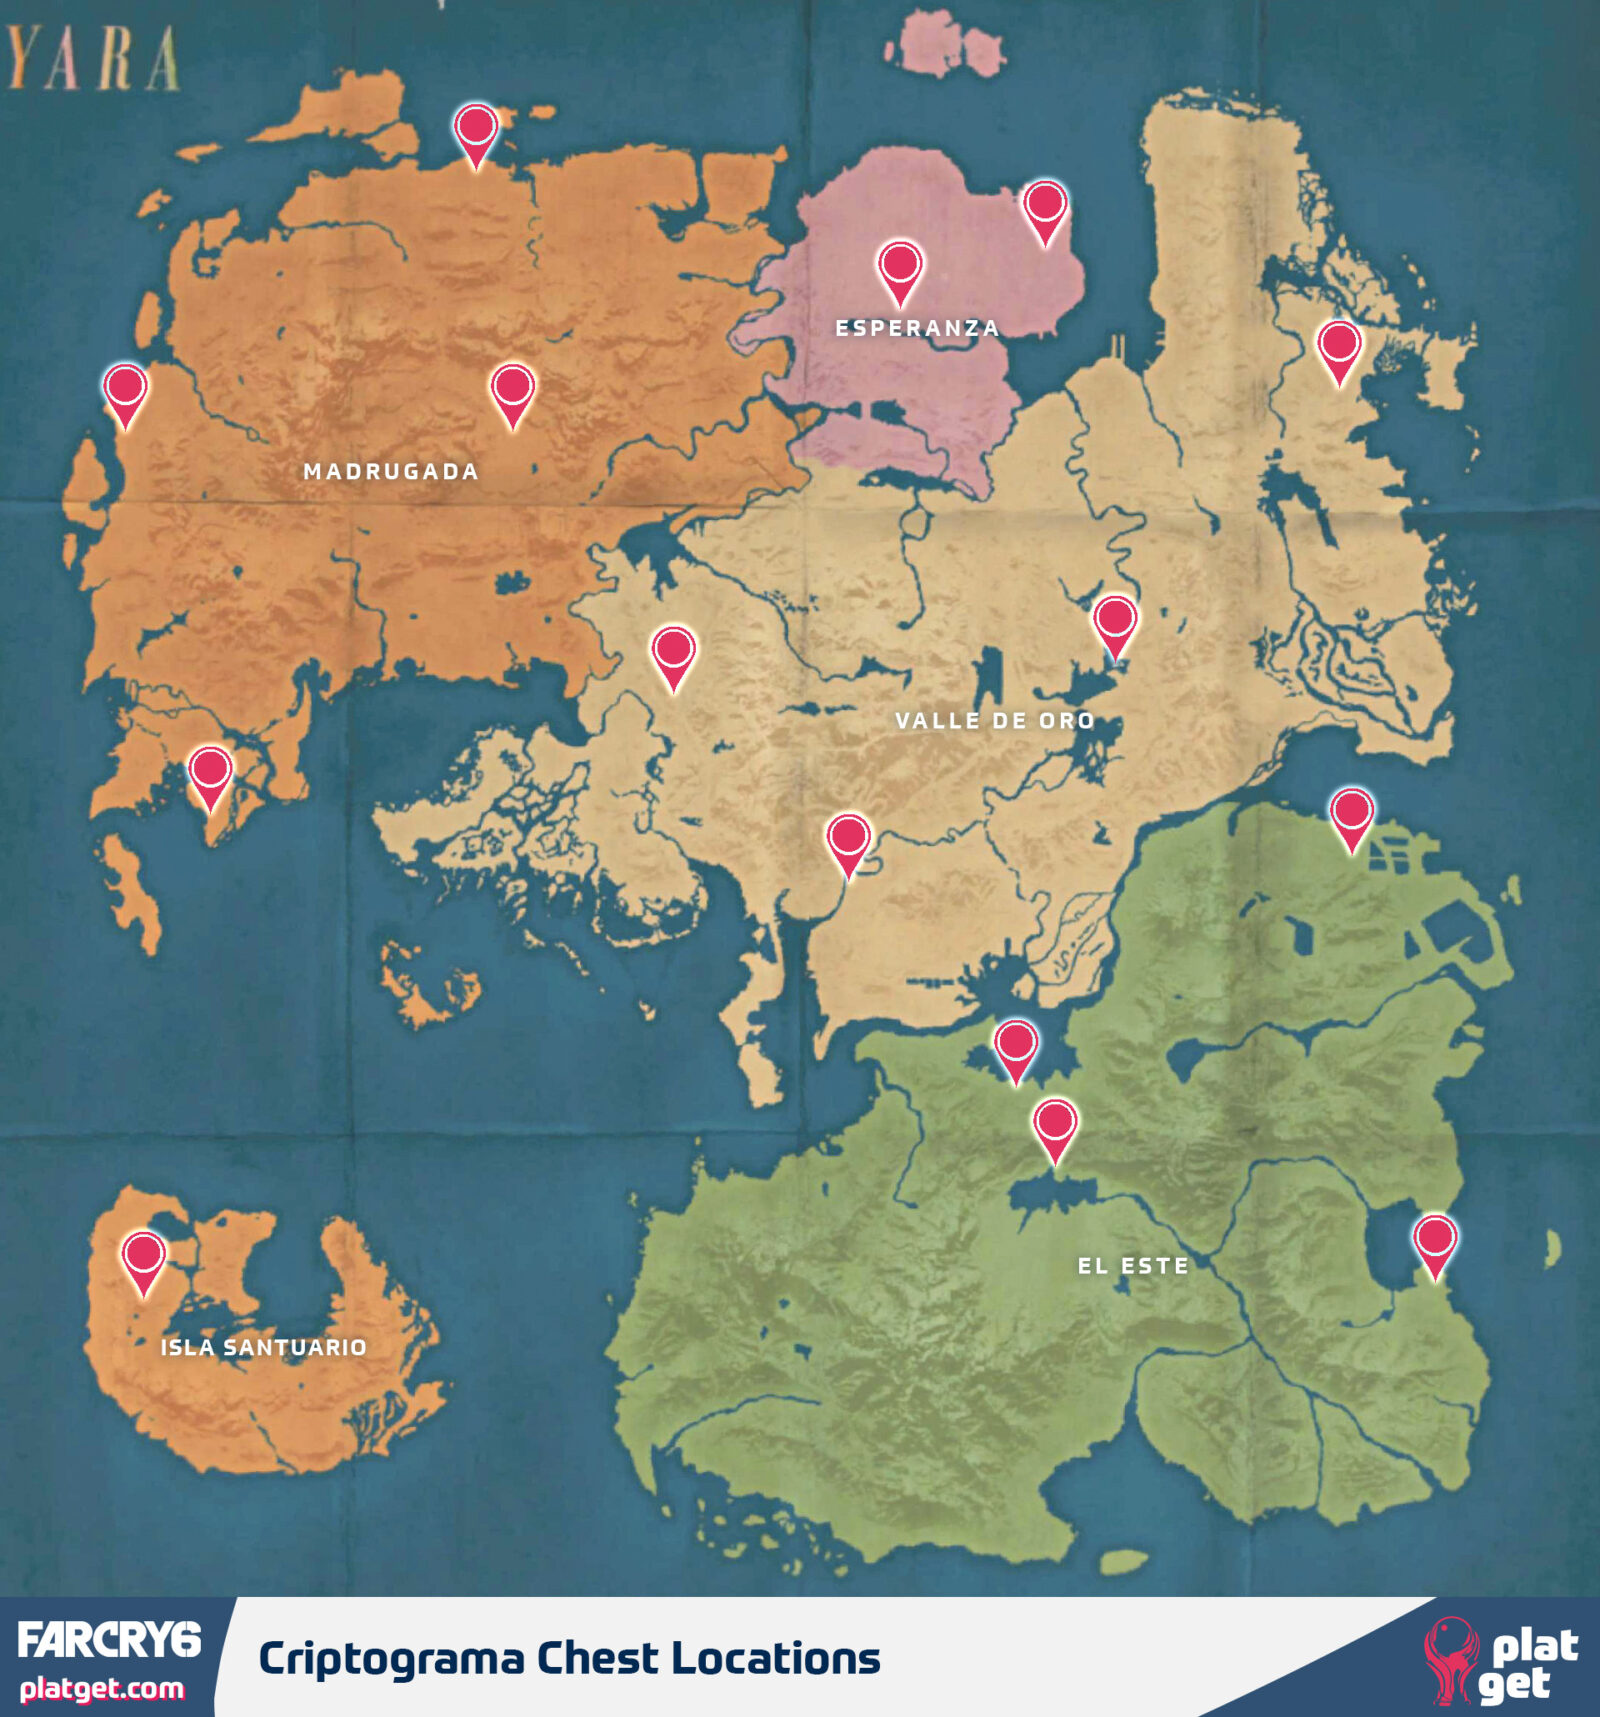
Unlock 15 Criptograma Chests
There are 15 Criptograma Chests hidden across Yara. When you are near one, you will see its icon appear on the map, which looks like a chest with a key on it. When you locate the chest, which will be next to a very loud wind chime, you’ll see two illustrations on top of it.
These two illustrations are hidden somewhere nearby, next to equally noisy wind chimes. Using the sound of the wind chimes (Headphones or Surround Sound will help you with this) locate the two illustrations (known as Criptograma Charts) and hold ![]() on them to collect them.
on them to collect them.
Look for clues in the form of blue objects and markings which will lead you to charts that are a little further away.
Once you have both related Criptograma Charts, head back to the chest and you’ll be able to open it. As every chest has two illustrations, there are a total of 30 Criptograma Charts to locate in order to unlock That’s Puzzling.
To help you with this objective, I’ve prepared a map which shows you the location of all 30 Criptograma Chests. Head to each location and then use the wind-chimes to locate both Criptograma Charts and open the chests:

Recrooster
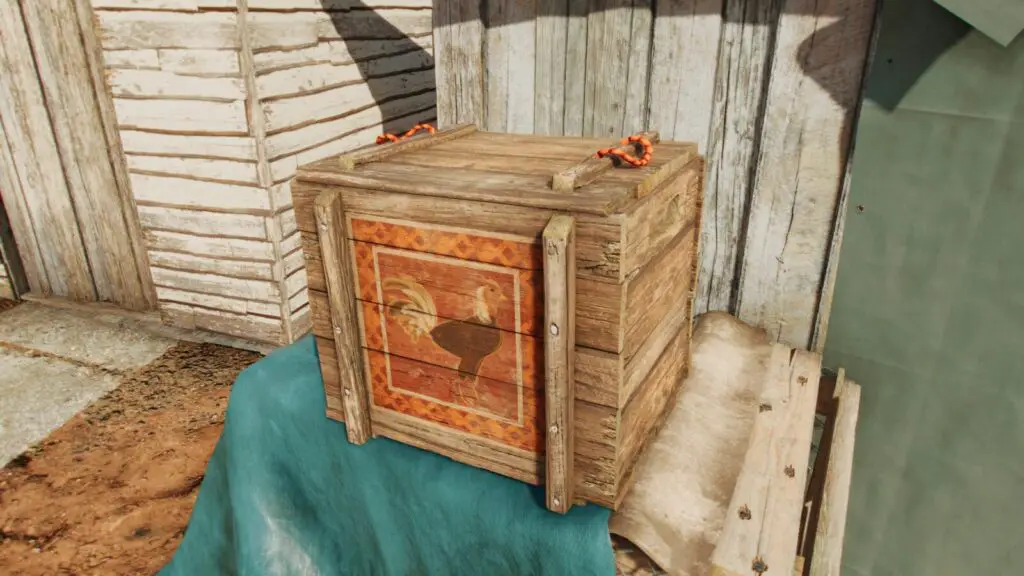
Find all Roosters
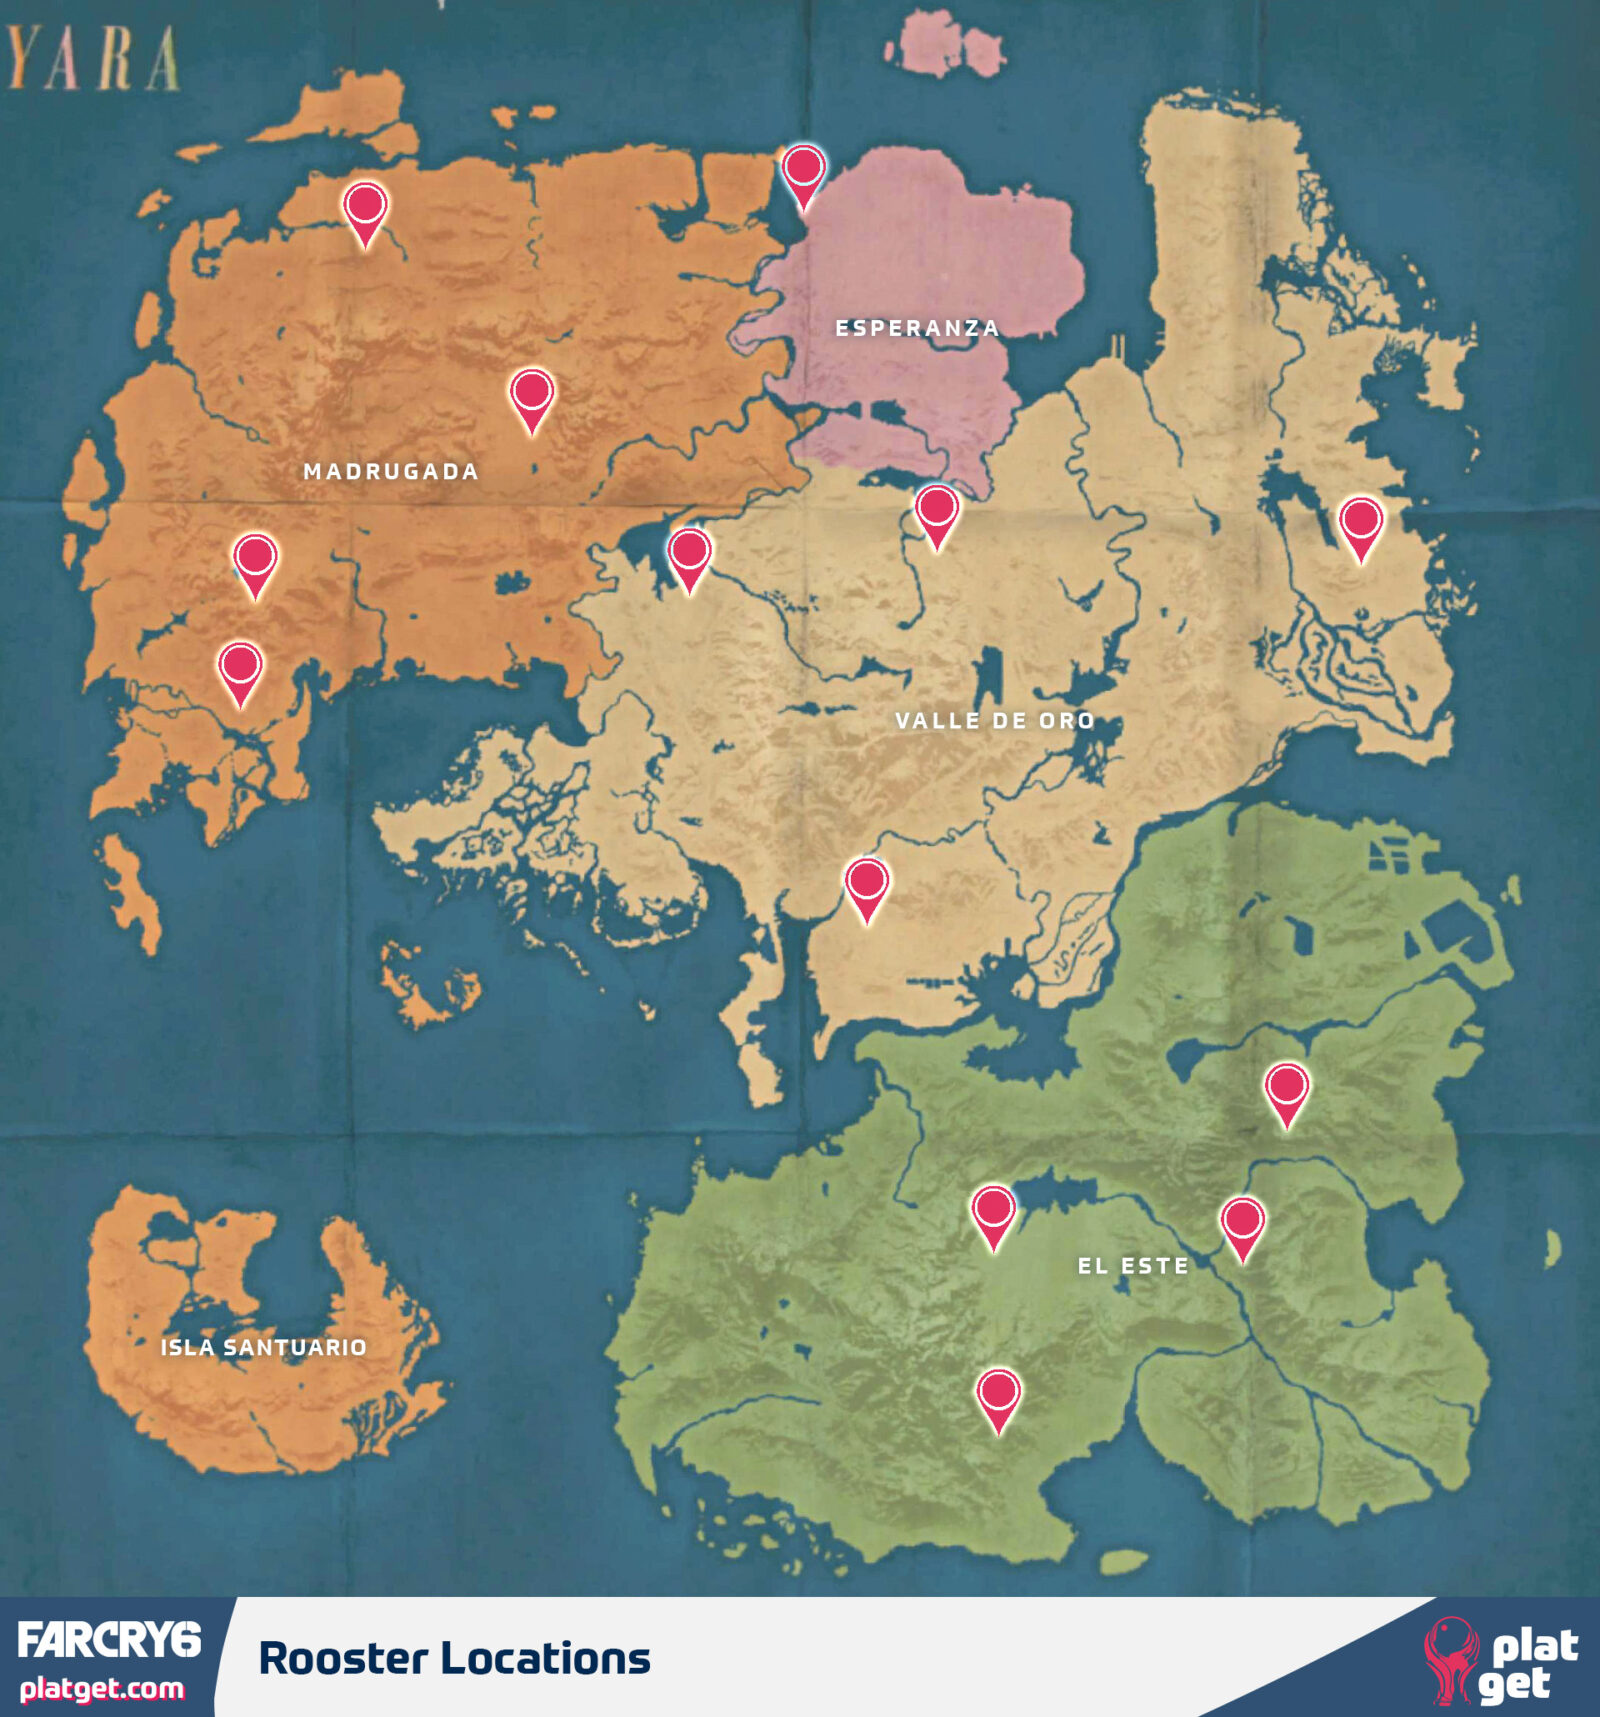
There are 19 collectible Roosters in Far Cry 6 which can then be used in the Cockfighting minigame. 6of these, however, are Ubisoft Connect rewards and are not actually required for the trophy. The remaining 13 are found in various places throughout Yara.
Roosters are always found inside wooden boxes with a Rooster icon on the side, and can be easily found when nearby thanks to the general chicken noises coming from the box.
This map I prepared will show you the locations of all 13 Roosters:
There are a few with specific requirements, which I will cover here:
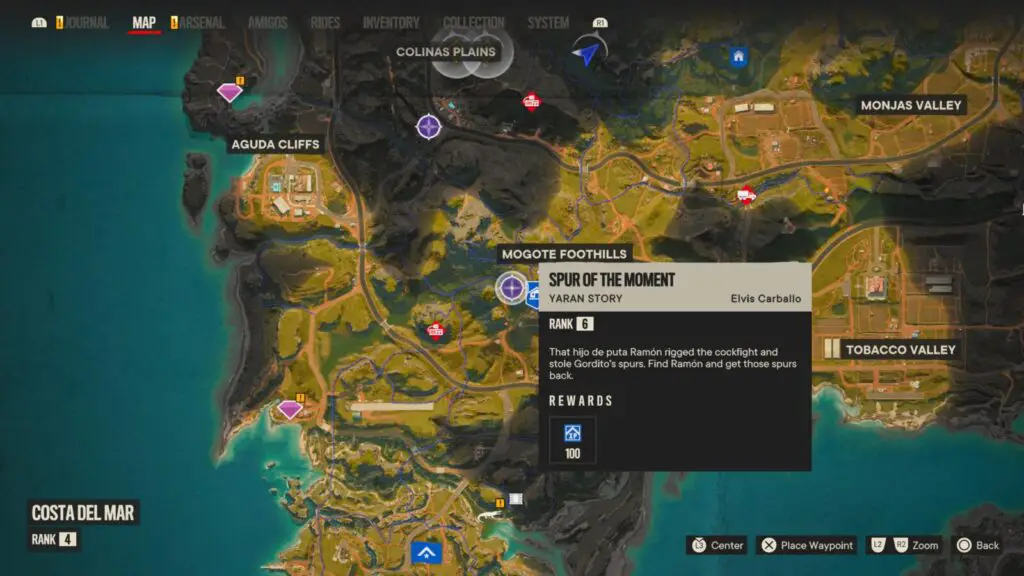
The northern-most Rooster–El Dorado–in Aguas Lindas, Madrugada, is hidden in an underground bunker that requires a key card to access. The key card will only spawn once you have accepted the Yaran Story side quest “Spur of the Moment”.
Spur of the Moment is a side-quest given by Elvis, who can be found next to the Cockfighting ring at Montero Farm in Costa Del Mar.
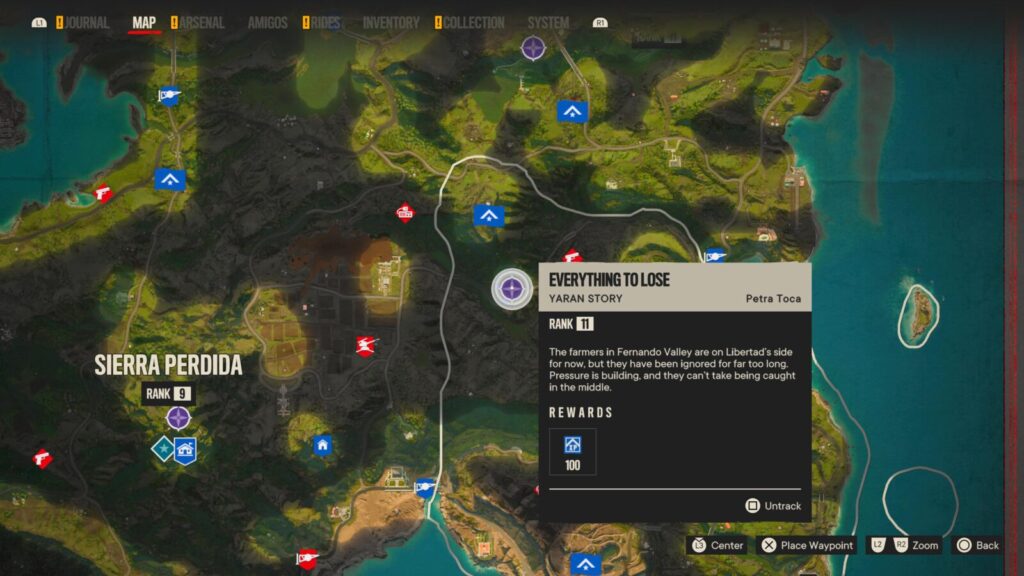
El Gallo Magnifico, the south-east Rooster in Conuco, El Este, is automatically acquired through the Yaran Story quest “Everything to Lose” and cannot be acquired outside of that.
Everything to Lose can be started by talking to Petra Toca at Toca Farm, in Conuco, El Este.
Note: In some cases, it may be possible to acquire El Gallo Magnifico outside of the “Everything to Lose” Yaran Story. If this happens, you will be unable to complete the Yaran Story should you eventually attempt to do so. This won’t impede your ability to unlock the Far Cry 6 Platinum Trophy, but some completionists may find themselves disappointed. Tip courtesy of @Markkymak on Twitter.
Once you’ve recovered the 13 main-game Roosters, the Recrooster trophy will unlock.


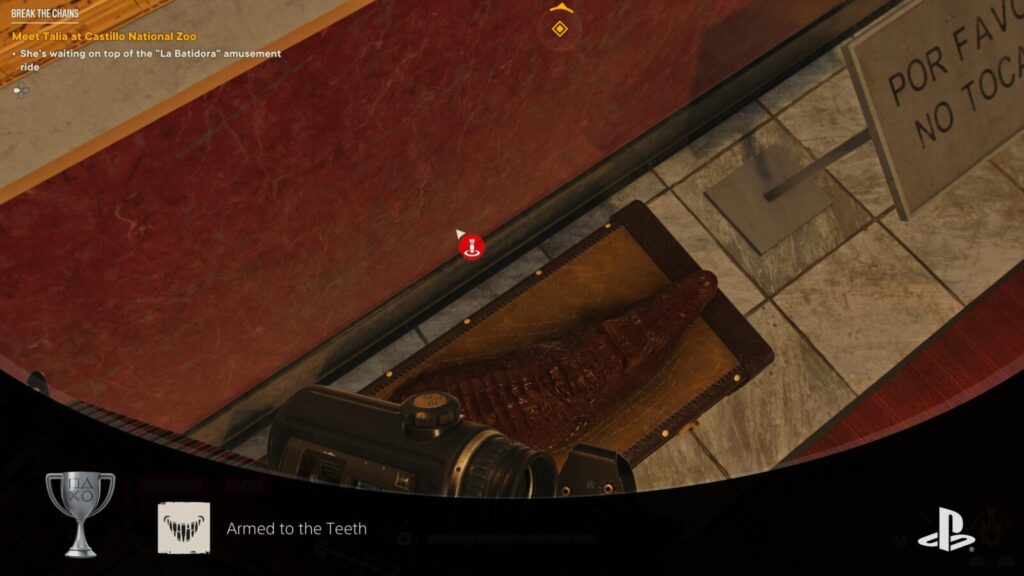
Armed to the Teeth
Collect 49 Unique Weapons
Armed to the Teeth is probably the longest trophy in the game. It will require you to collect every single Unique Weapon available in the game.
Fortunately, we’ve provided a separate Far Cry 6 Unique Weapons Guide that you can use to locate and acquire all 46 weapons with minimal hassle.

Speed Racer
Complete 3 Gran Premios
Gran Premios are race events available all across Yara. To get them to show up on the map, you either need to find the corresponding poster/intel somewhere in Yara, or find the actual race location.
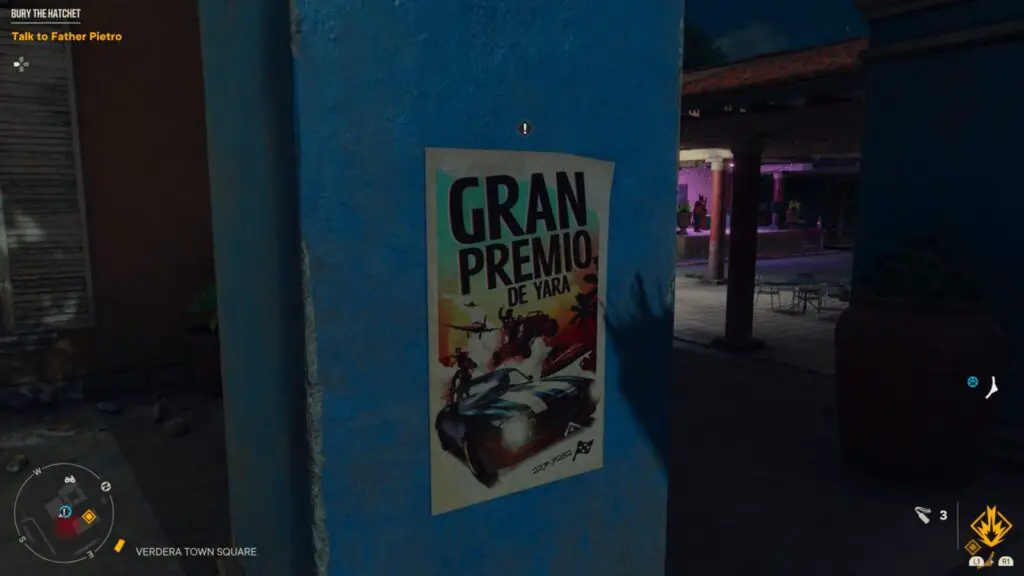
There are a total of 12 Gran Premios available in Yara but you can actually earn this trophy by finding only one and completing it three times. That being said, I recommend doing three different races to ensure you have enough parts for Furiously Fast.
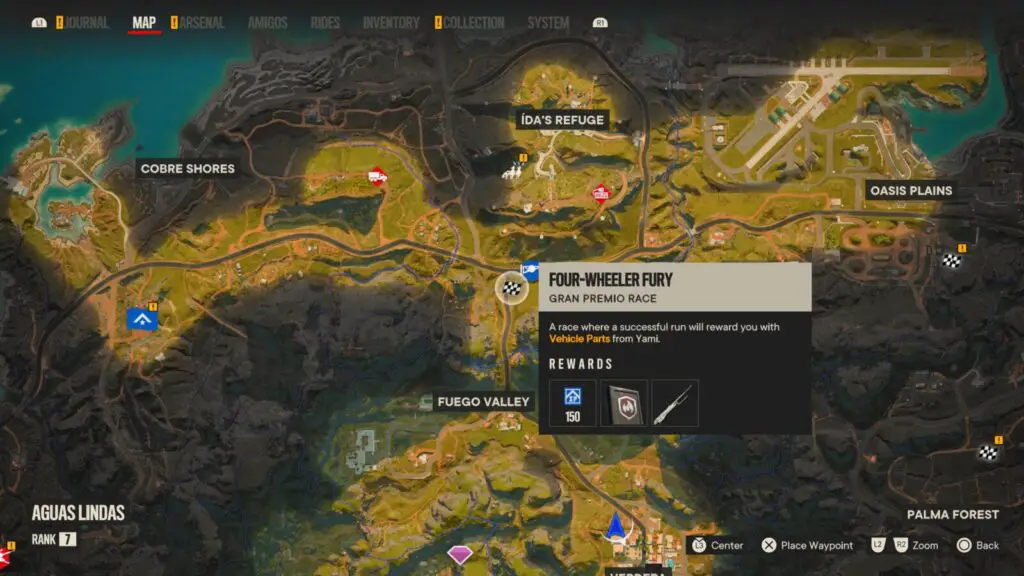
Completing a Gran Premio for the first time will unlock a Sniper Rifle needed for Armed to the Teeth, and a vehicle needed for Car Cry.
Finish a Grand Prix a total of three times and the Speed Racer trophy is all yours.

Car Cry
Collect all 4 Rides
Rides are special customisable vehicles that can be found in the ![]() menu under the “Rides” tab. There are 4 models to find and collect, and finding all four will unlock the Car Cry trophy.
menu under the “Rides” tab. There are 4 models to find and collect, and finding all four will unlock the Car Cry trophy.
The first is Juan’s 1956 Beaumont Valentina, which you will unlock automatically when introduced the Rides system.
The next one is the 1985 Tokai Sabuku, which can be found inside a warehouse at the FND Storage Facility in Catalina Ridge, La Joya, El Este.
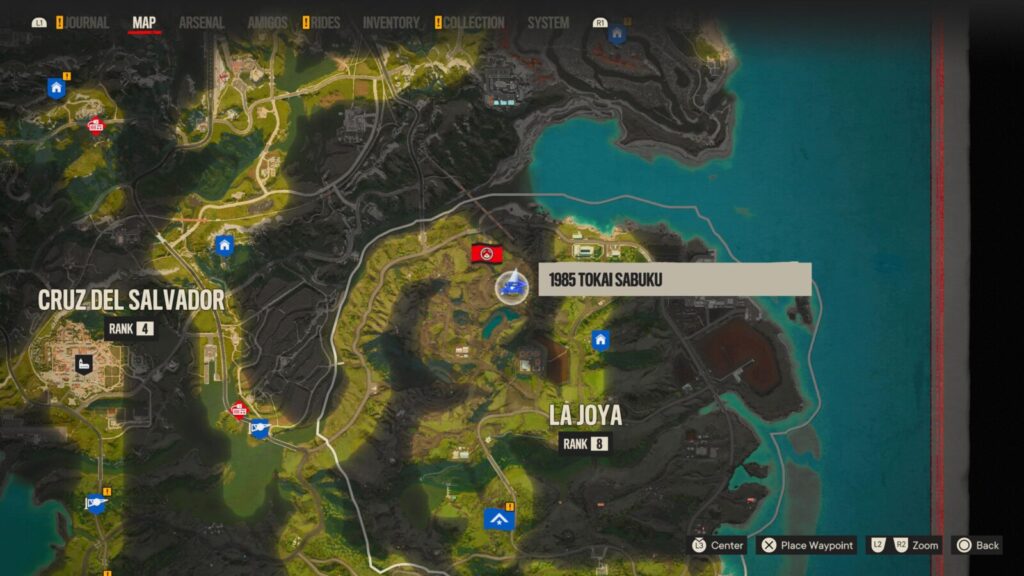
When you get there, the blue car icon should appear on your minimap, indicating the vehicle’s location. To reach it, though, you’ll need to climb up the yellow construction vehicle and jump to the open door on the second floor of the warehouse.
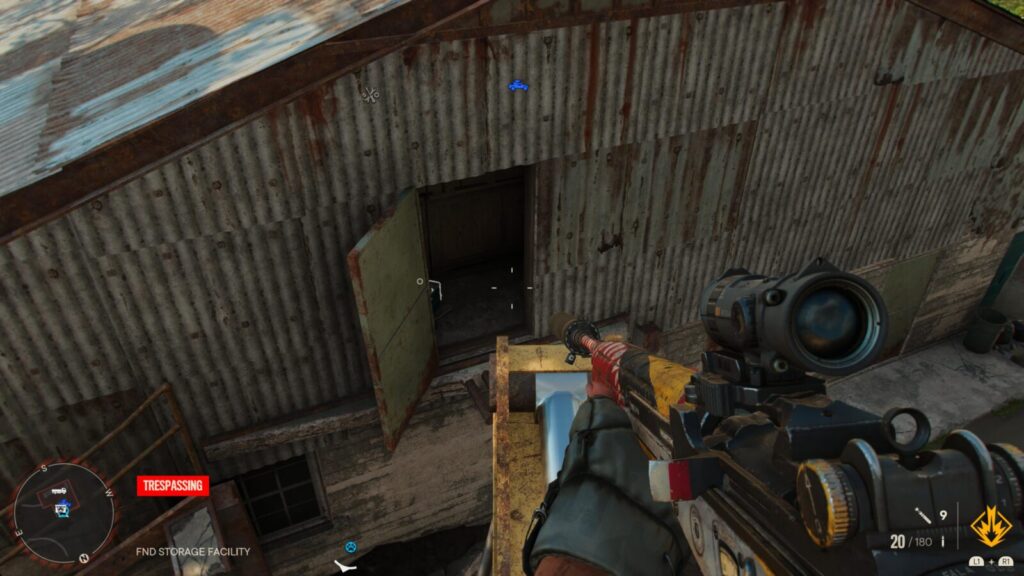
Destroy the wooden and cardboard obstacles in your way as you follow the linear path deeper into the building and you’ll see the blue SUV waiting for you on the ground floor.

Get into the vehicle and the garage door will open automatically so that you can drive it out.
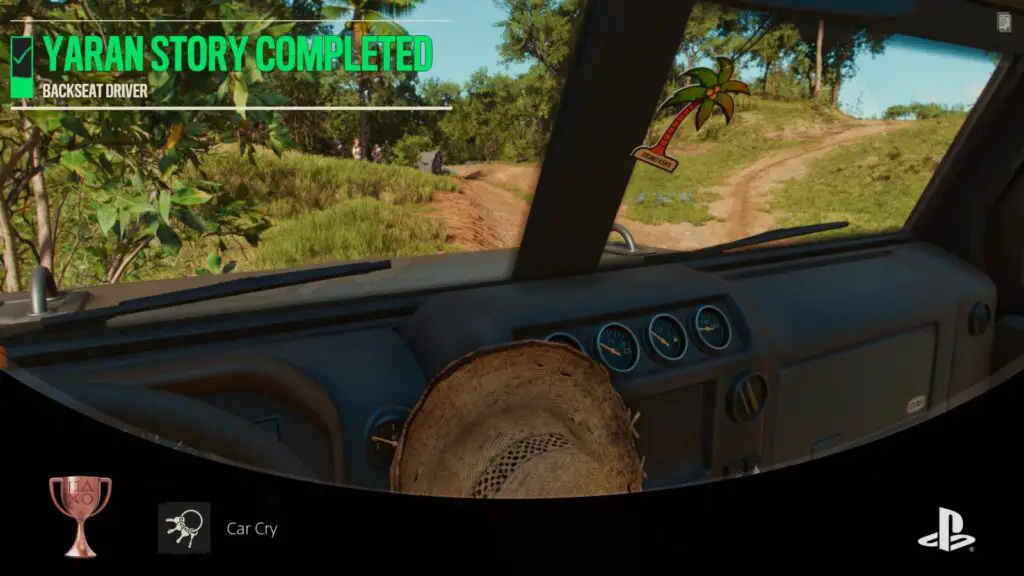
The third Ride is Yami’s 2008 KAG TG which you can acquire in Madrugada. Visit Yami’s Chop Shop in Costa Del Mar and speak to Yami to accept her Side Story; “Backseat Driver”.
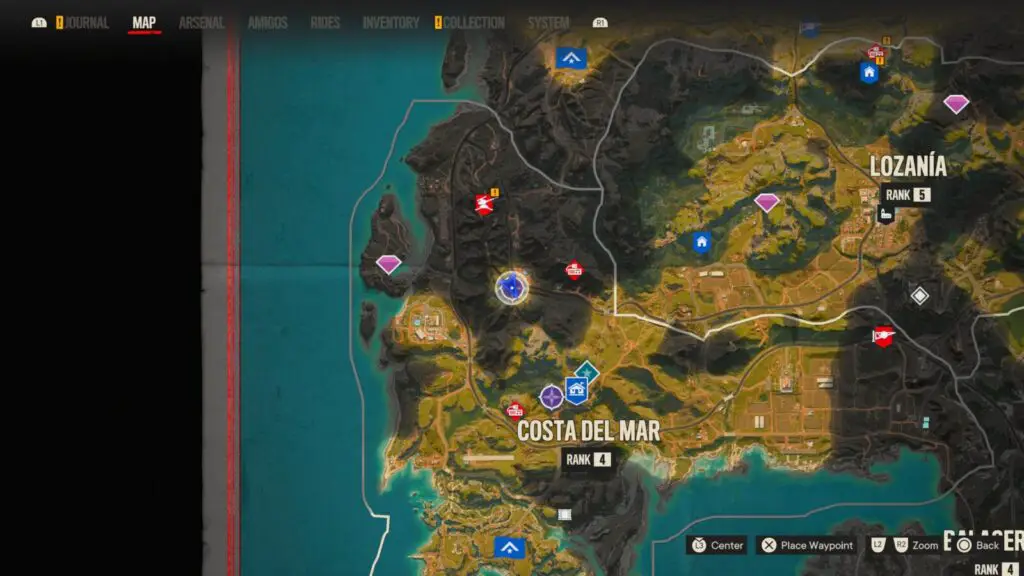
Complete the Side Story and the vehicle will be unlocked!
The last ride is the 1962 Verrazzano Bravo, which you will unlock for simply completing your first Gran Premio event.

Loyal Army
Recruit 5 Amigos
Amigos are animal companions that you can acquire who will follow you around and help you in different ways. In order to unlock the Loyal Army trophy, you will need to find all 5 Amigos and unlock them.
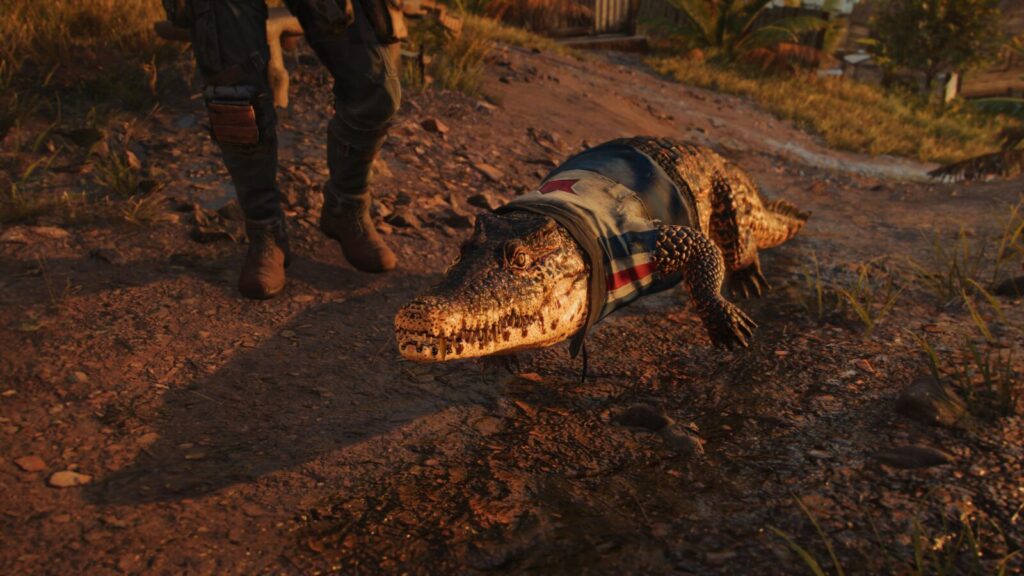
The first Amigo you unlock is Guapo, the crocodile. You don’t need to do anything extra to acquire Guapo, he’ll simply be added to your team as part of the story when you go to meet Juan. He’s a good combat companion, proving a useful distraction when he clamps down onto the limbs of your enemies and death-rolls them off.
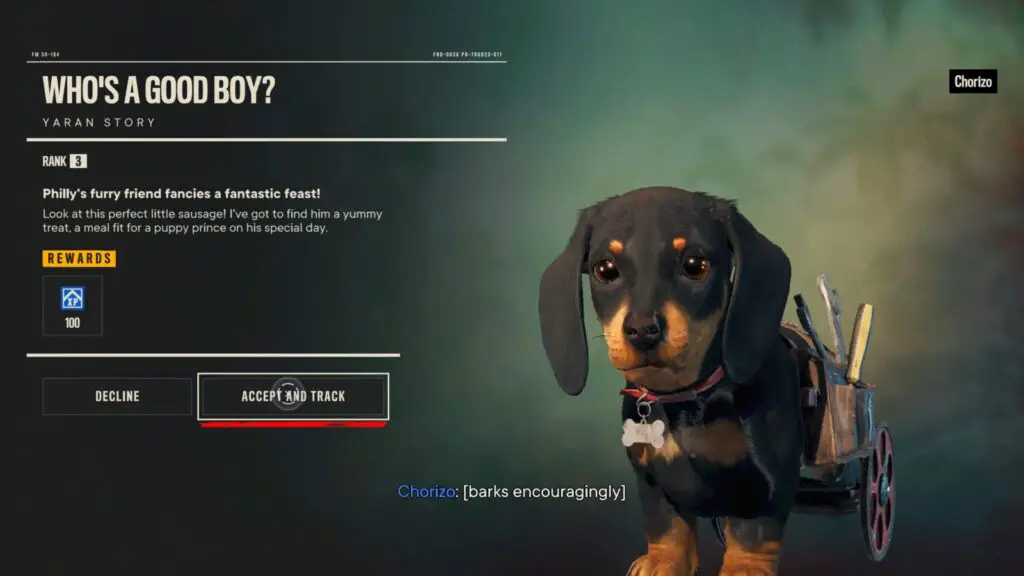
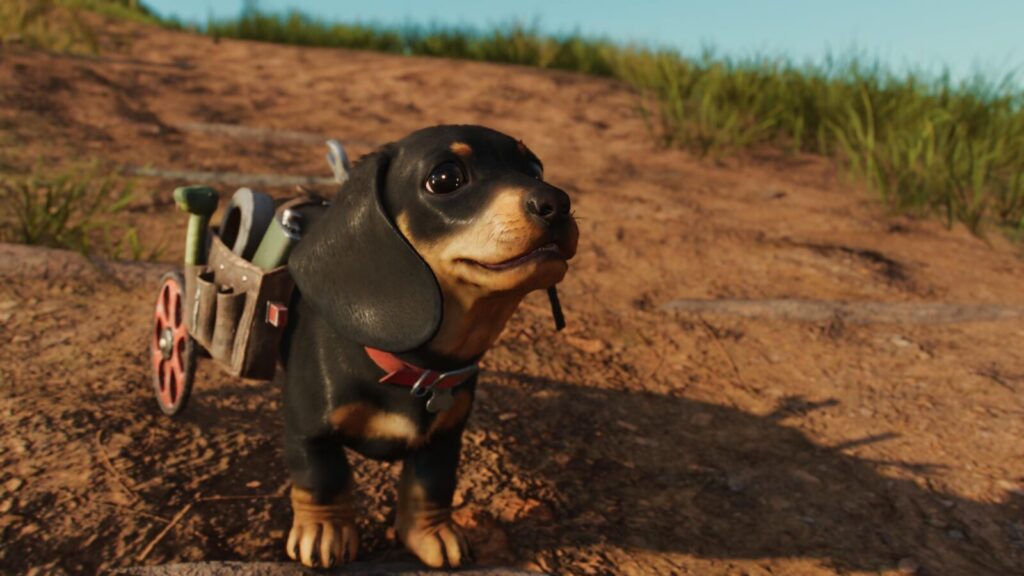
The next Amigo on the list is Chorizo. To unlock Chorizo you’ll need to complete a few quests for him. The first is called “Who’s a Good Boy?” and will become available when you first arrive at the Montero Farm Guerilla Camp as part of the story.
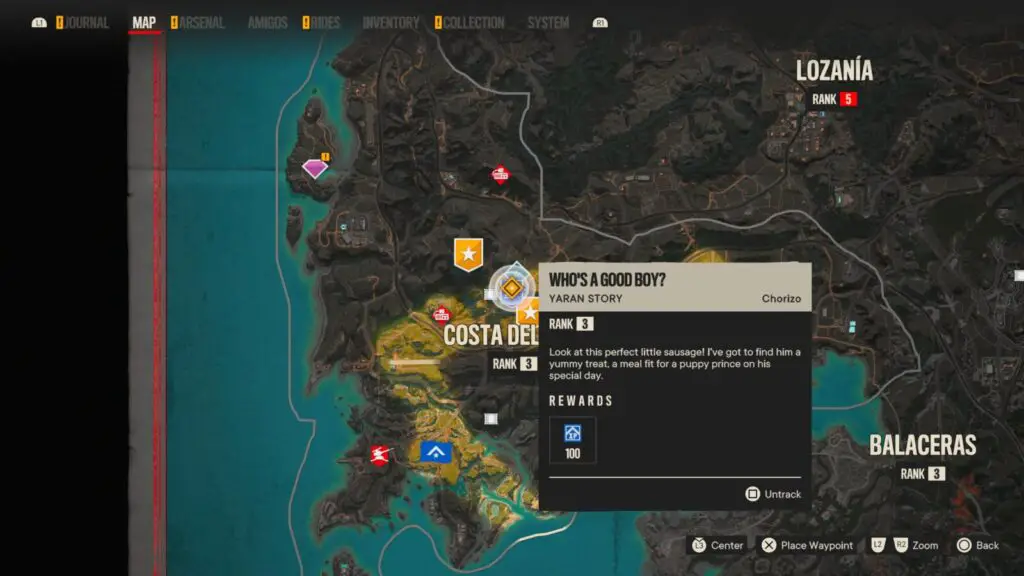
To start the quest, approach Chorizo and pet him with ![]() , then accept the quest prompt that comes up on-screen. Read the note next to his dog house which will let you know that he wants to eat some Croc meat… So go get some!
, then accept the quest prompt that comes up on-screen. Read the note next to his dog house which will let you know that he wants to eat some Croc meat… So go get some!
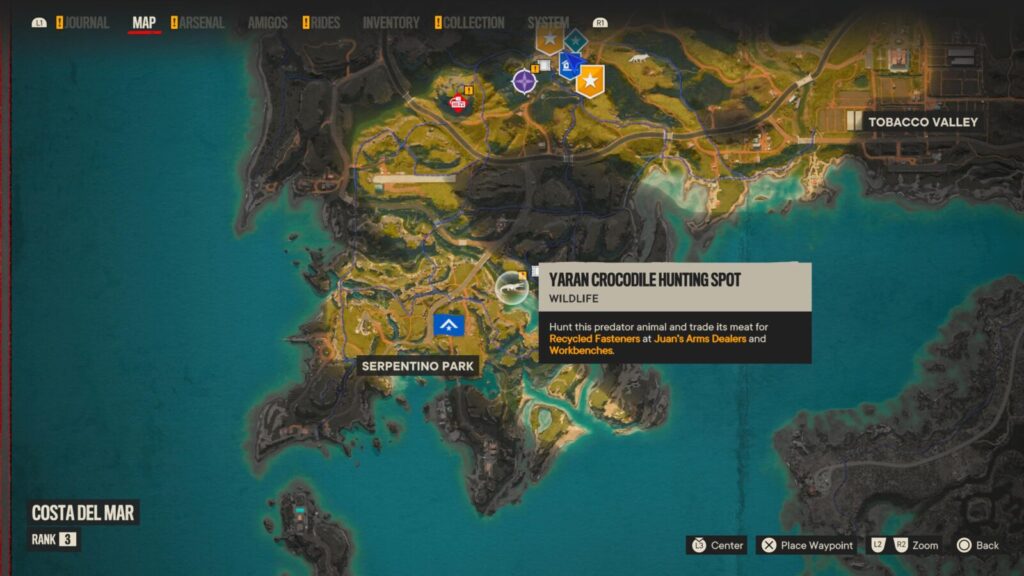
There’s a Crocodile Hunting Spot south of Montero Farm, slightly northeast of the Cortina Weather Station Military Target. Go there and kill a crocodile to automatically collect its meat.
Fast-travel back to Montero Farm and put the meat into Chorizo’s food bowl. He’ll then have another quest for you! Hold ![]() on him again to get the “Fetch Quest” quest prompt. This is an extremely easy side quest, all you have to do is follow Chorizo around the camp as he excitedly takes you to various resource caches as a way to thank you for the croc meat.
on him again to get the “Fetch Quest” quest prompt. This is an extremely easy side quest, all you have to do is follow Chorizo around the camp as he excitedly takes you to various resource caches as a way to thank you for the croc meat.
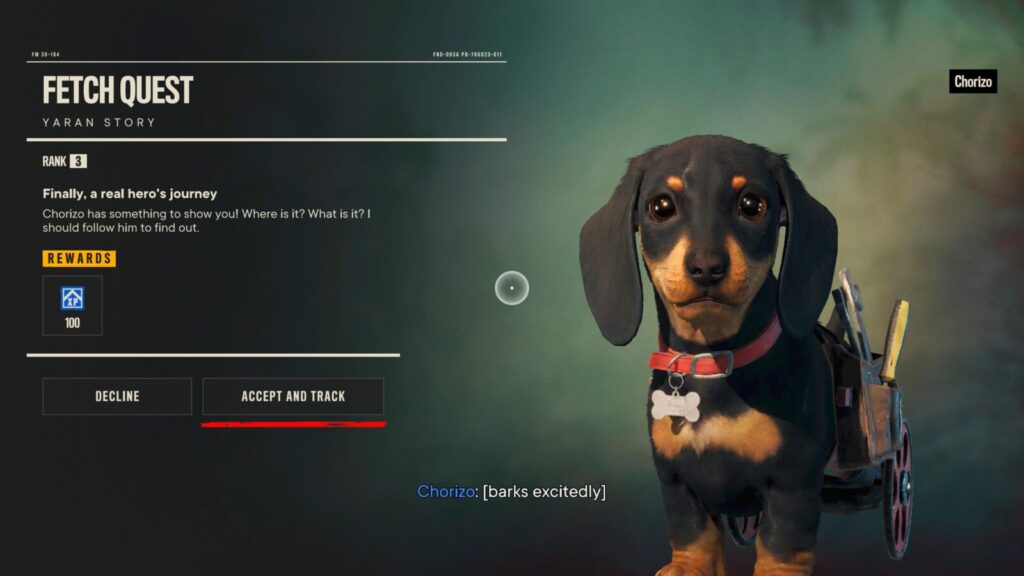
Follow him until the quest ends and he’ll become available as an Amigo.
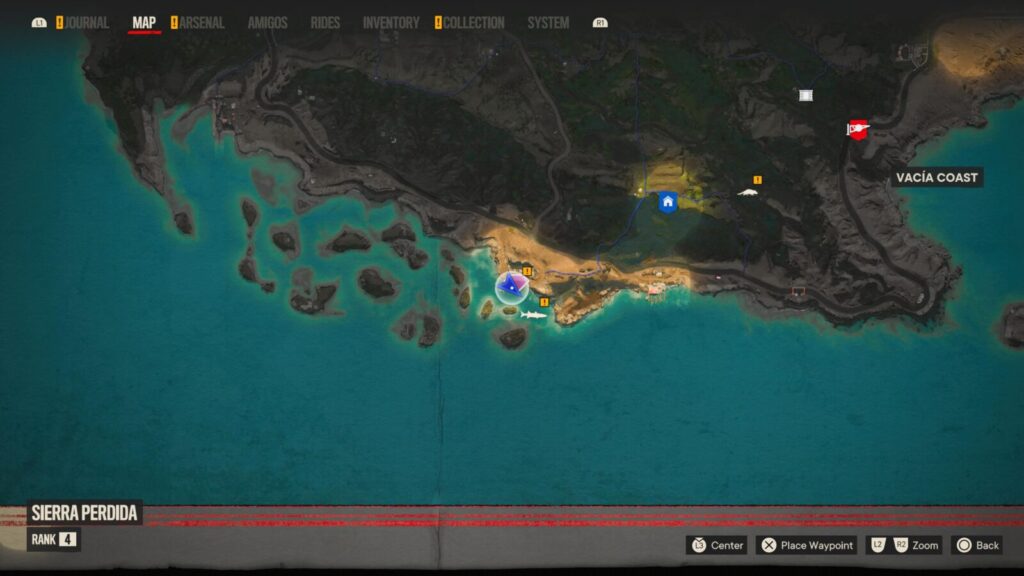
Next, there’s Chicharron, the Rooster. You will need to complete three Yaran Side Quests to unlock this amigo; “Man’s Best Enemy”, “Pecking Order”, and “Wingman”.
These are found in Sierra Perdida, El Este, in one of two ways; either progress the main story until you have the Patriotas Peak Guerrilla Camp and then read the Yaran Story note there, or you can go straight to the quest giver if you know where they are (see screenshot below).
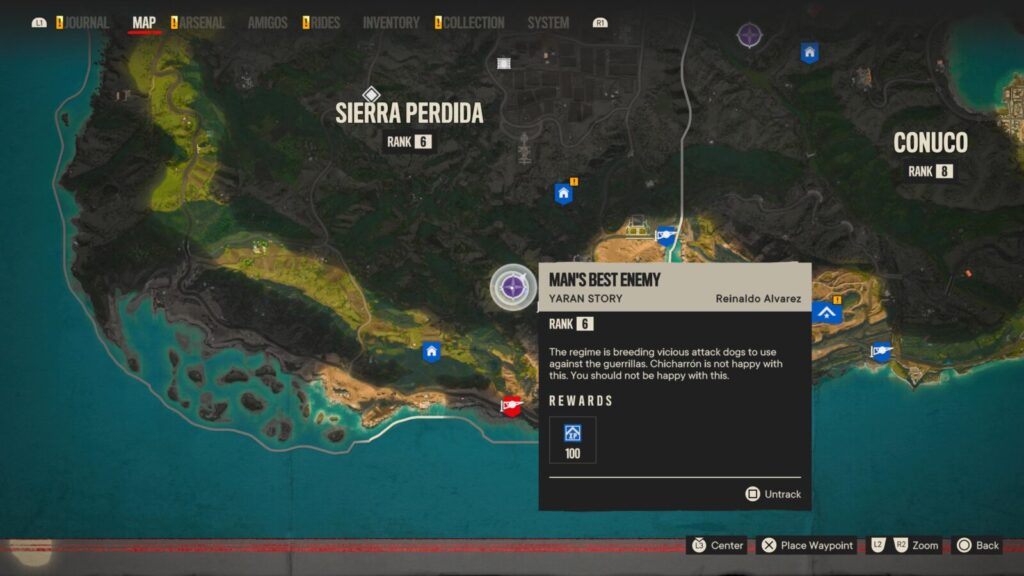
Once you’ve found them, complete the three quests in the line and you’ll unlock Chicharron along the way!
Next, there’s “Boom Boom“, a large dog who is clearly in reference to Boomer from Far Cry 5. There’s two ways to unlock Boom Boom; you can either complete a Yaran Story side quest called “Boom or Bust”, or you can just save yourself some time and go rescue him without starting the quest.
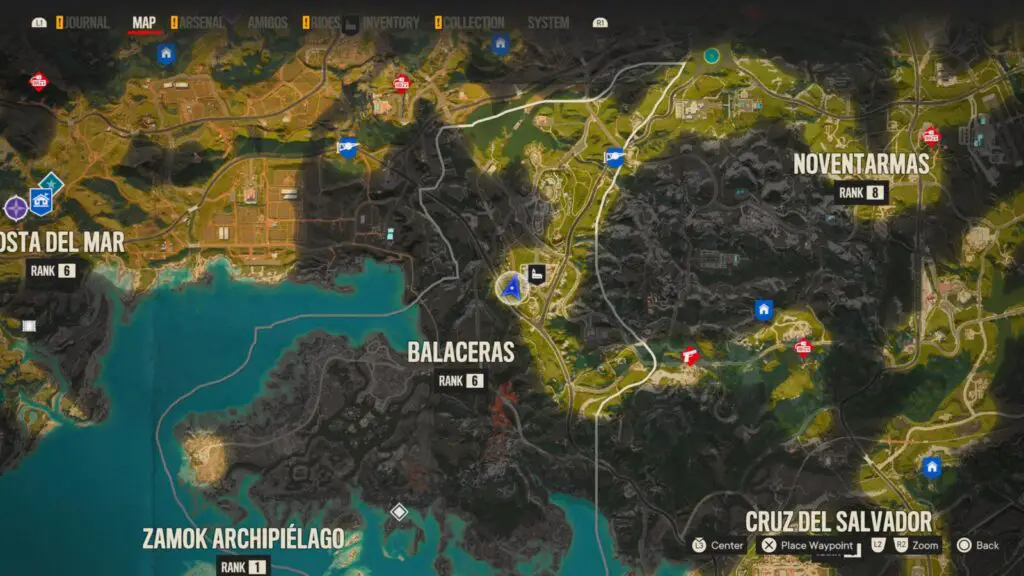
Go to the town called “Feroza” in Balaceras, Valle De Oro, and look for a Blue Container to the west. He’s trapped inside, you just need to shoot the lock off.
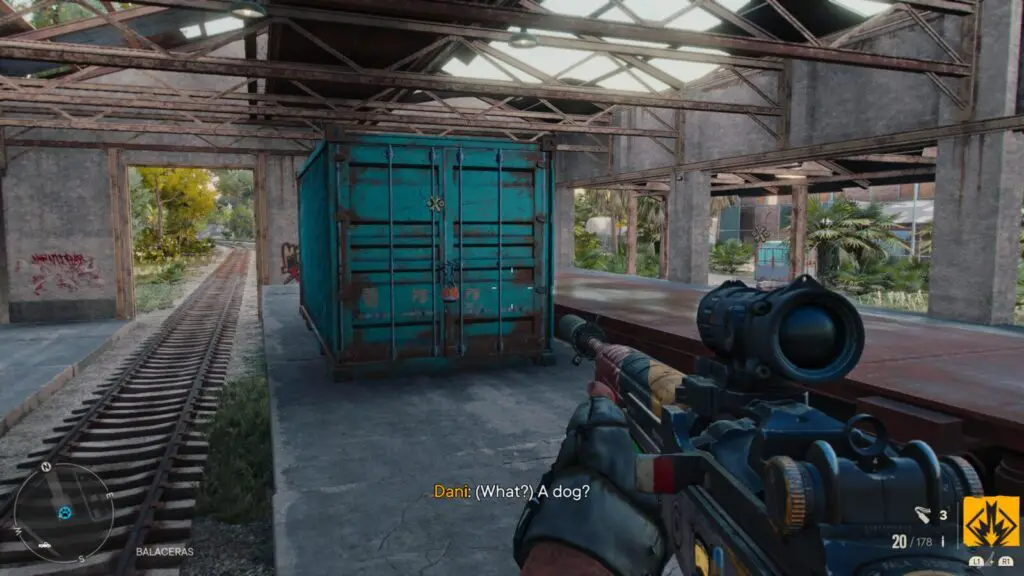
Once you’ve found him, he’ll be unlocked as an amigo!
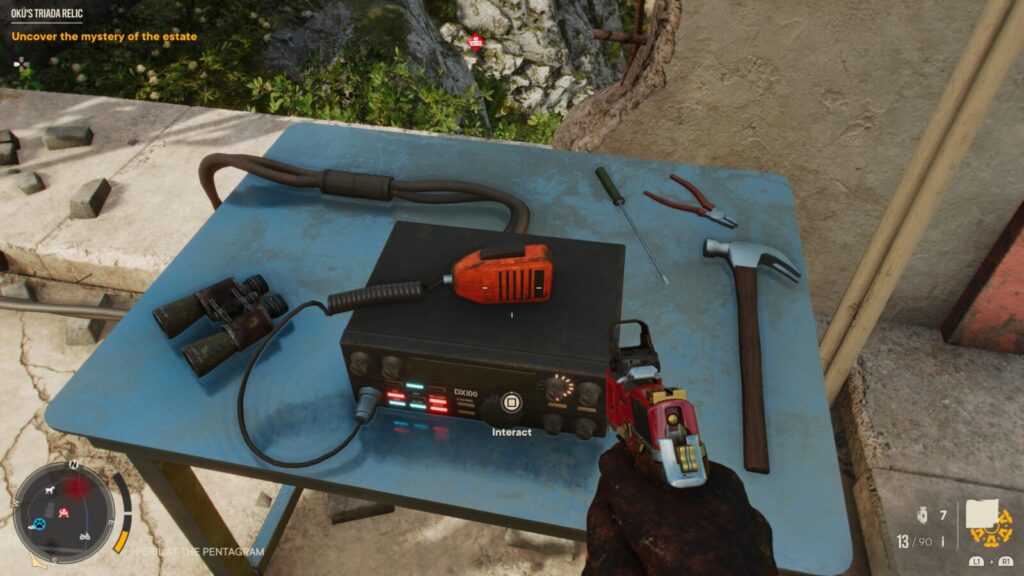
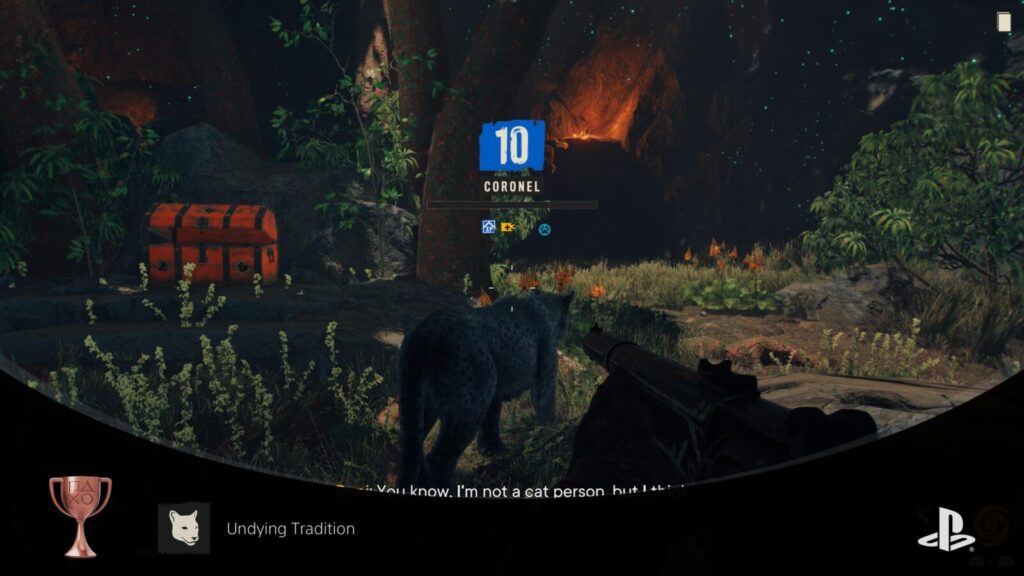
Finally, there’s Oluso, a Panther. Oluso is unlocked as a reward for completing the Yaran Story side-quest “Triada Blessings”. See Undying Tradition.
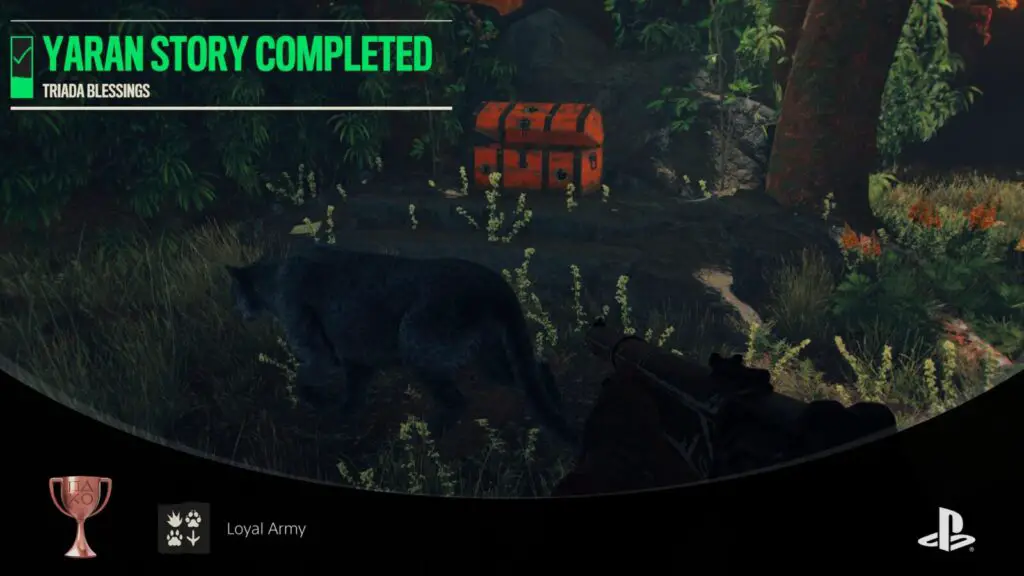

Undying Tradition
Complete the Yaran Story “Triada Blessings”
The Undying Tradition trophy is awarded for unlocking Oluso as a companion by completing the “Triada Blessings” side story , which you acquire from a document in Oluwa Cave on Isla Santuario:
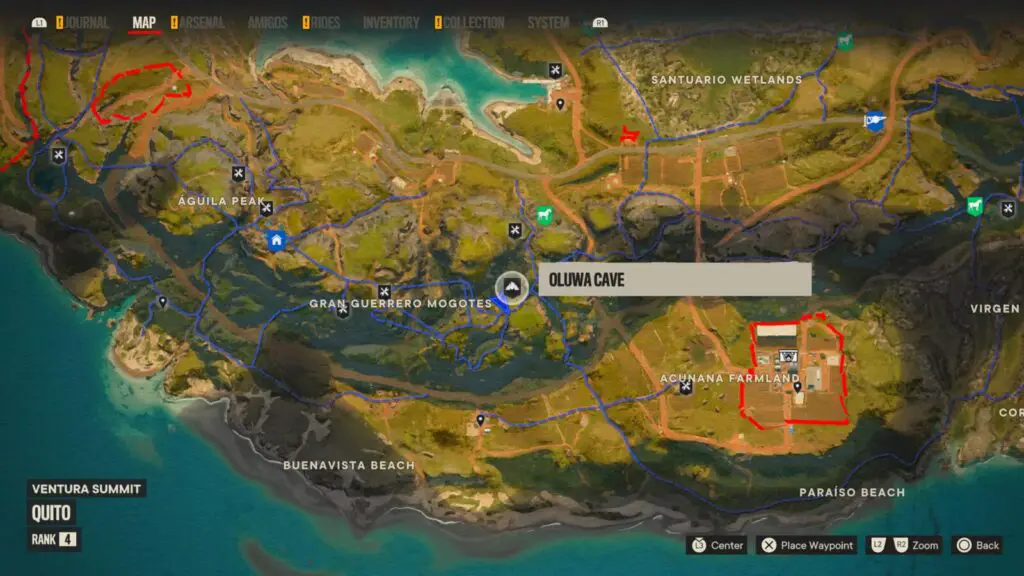
The quest requires you to complete three Treasure Hunts which will be marked on your map after you start the quest;
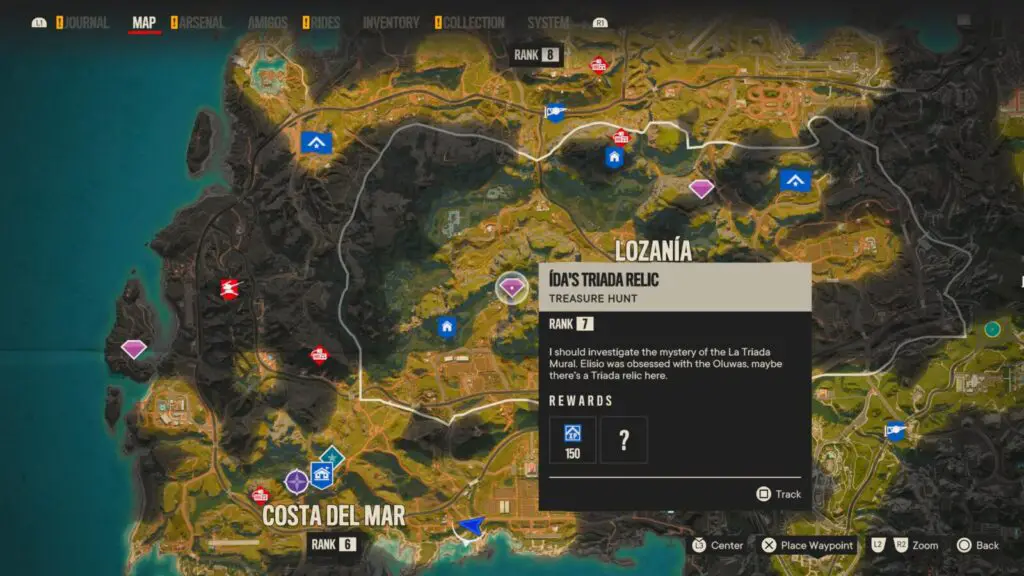
“Ida’s Triada Relic” in Madrugada, which is more of a platforming puzzle. You just need to make your way through the cave by using a system of ziplines and grapple points, nothing too difficult!
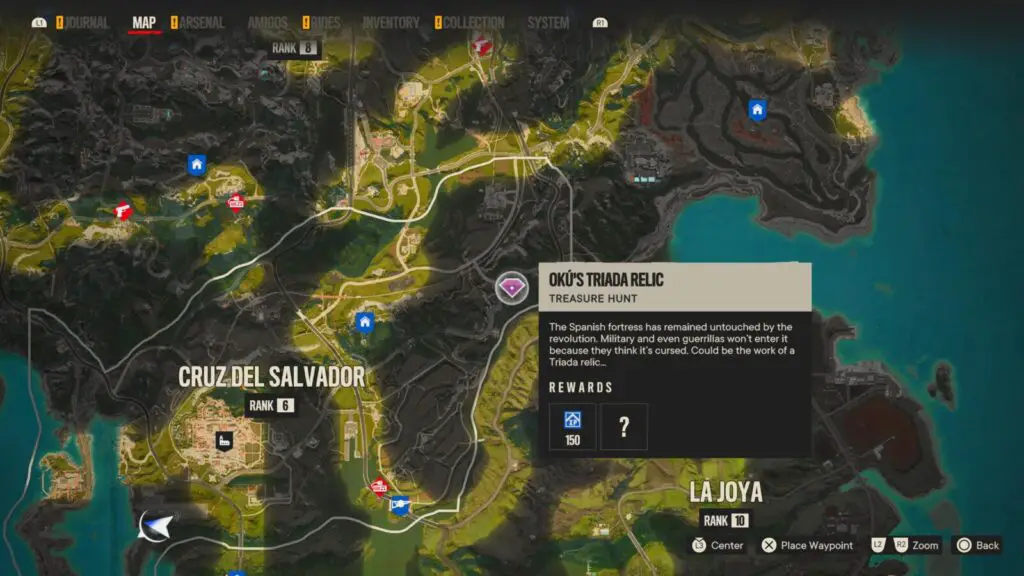
“Oku’s Triada Relic” in Valle de Oro, which is a fun little Haunted House section. It can only be completed at night, so come back after sunset. At night, the mansion door will open automatically, so head inside and do the following:
- Break all mirrors in the dining room and press the switch behind the one near the door.
- Head into the room with all the TVs and switches on a table in front of them. Press the middle switch, the left switch, then the right switch.
- Go upstairs and read the note on the piano to open a door behind it.
- Grab the key in the room behind the piano and then use it on the basement door downstairs.
- Head through the basement and push the button on the pillar past the scarecrow guards.
- Go through the door opposite the button, grapple up to the roof, then zipline over to the well.
- Grapple into the well and wing from your rope to the relic on a nearby ledge.
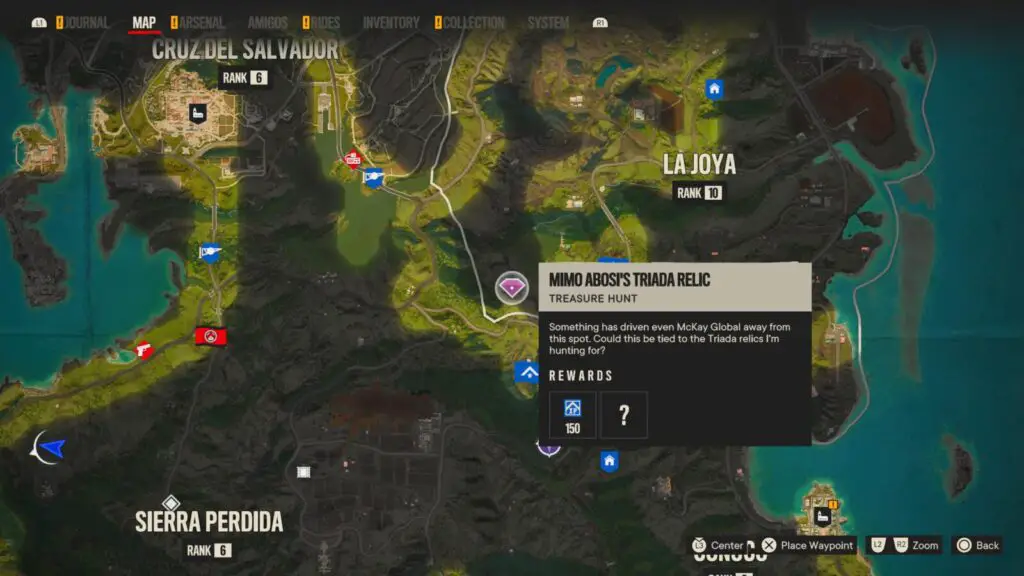
“Mimo Abosi’s Triada Relic” in El Este, a much shorterand simpler event. Head to the construction site, pull the plug from the back of the generator, press the switch in the fan room, and then grapple into the shaft and recover the relic.
Once all three are complete, bring the treasures back to the Triada Blessings quest marker and you’ll receive Oluso as an Amigo, a new Resolver weapon, and the Undying Tradition trophy.

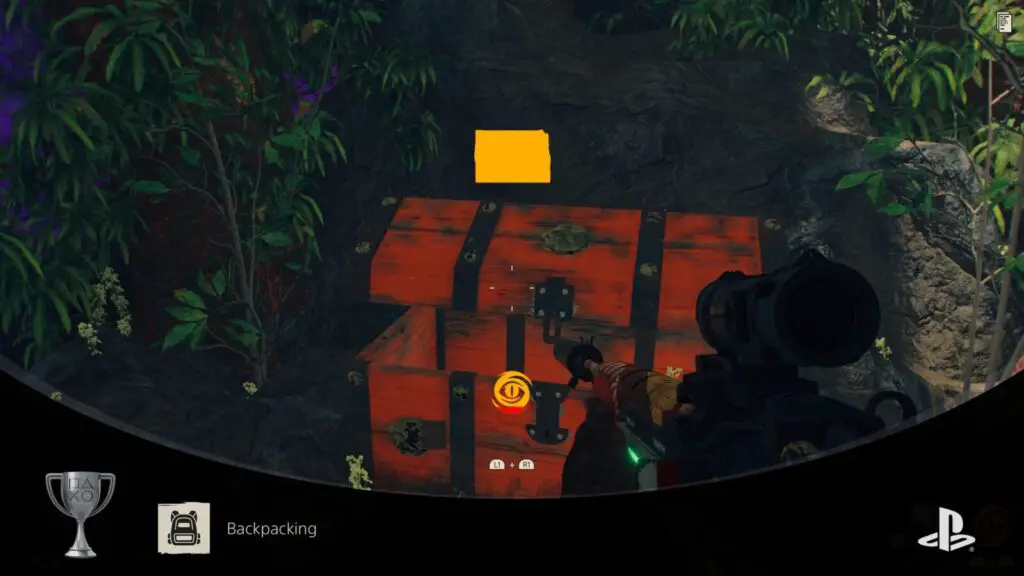
Backpacking
Acquire every Supremo in Yara
Most Supremo weapons can be purchased from Juan Carlo’s shop. Approach the workbench near him with the Supremo on it, and then you can spend Depleted Uranium there to acquire each Supremo.
To acquire Depleted Uranium, you will need to open special chests only found at Anti-Aircraft Cannon sites. See Friendly Skies for all Anti-Aircraft Cannon locations.

The only one not acquired from Juan’s shop is Triador (see below).
Some of the Supremos have specific unlock requirements:
Furiso, the fire Supremo, requires you to reach Rank 3.
Medico, the healing Supremo, requires you to reach Rank 4.
Gladiador, the adrenaline Supremo, requires you to reach Rank 5.
Triador, the stealth Supremo, requires you to unlock Oluwa as an Amigo. See Undying Tradition.
Once all Supremos are unlocked, purchase them using Uranium and the Backpacking trophy will unlock when you own all 7.

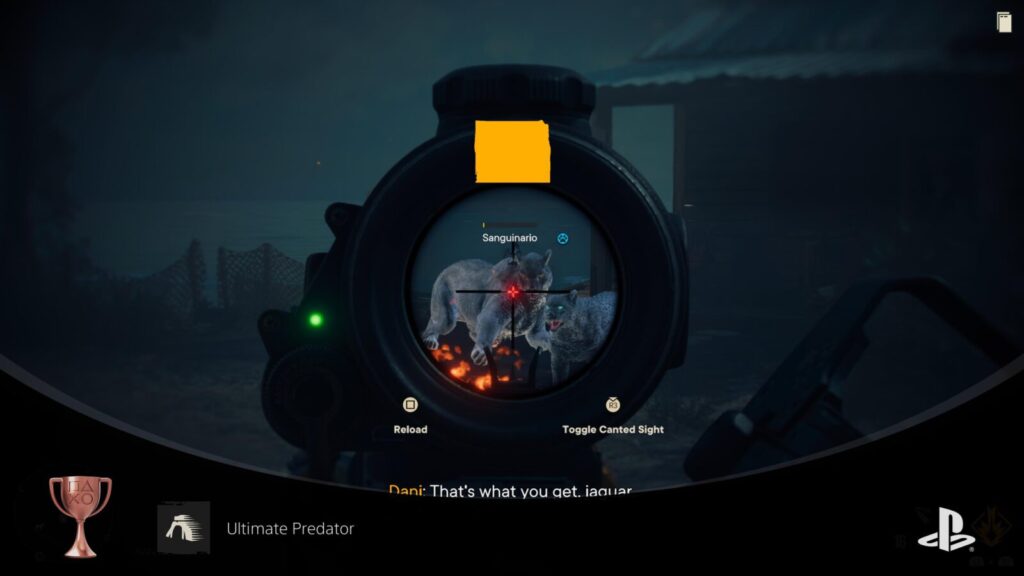
Ultimate Predator
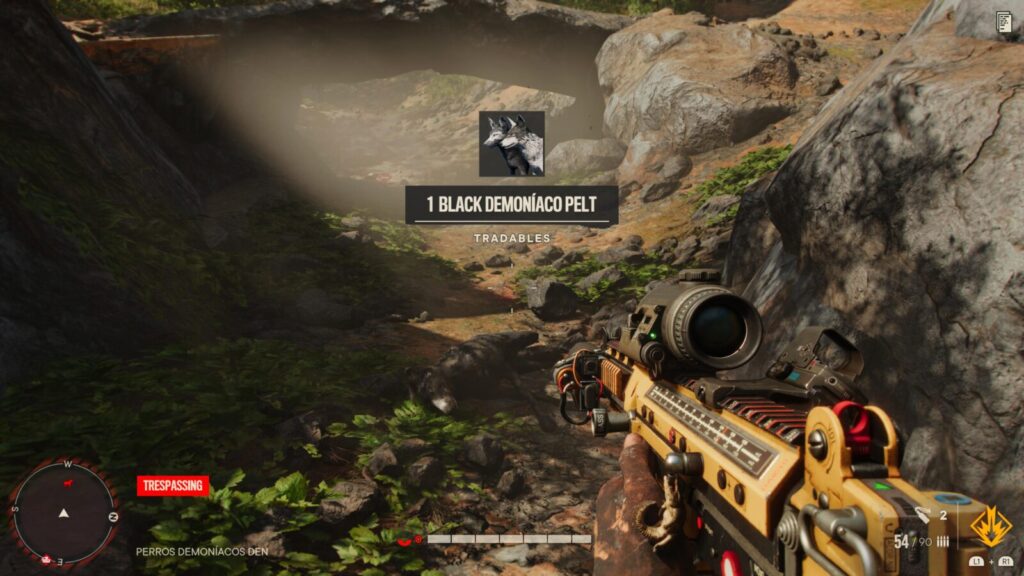
Hunt all Mythical Animals (Solo Campaign only)
There are 5 Mythical Animals in Far Cry 6, found at 4 different locations. To unlock Ultimate Predator, you simply need to find and kill all 5 Animals. Nothing more. Nothing less.
To help make this trophy as easy as possible, I’ve put together this map of all four locations:
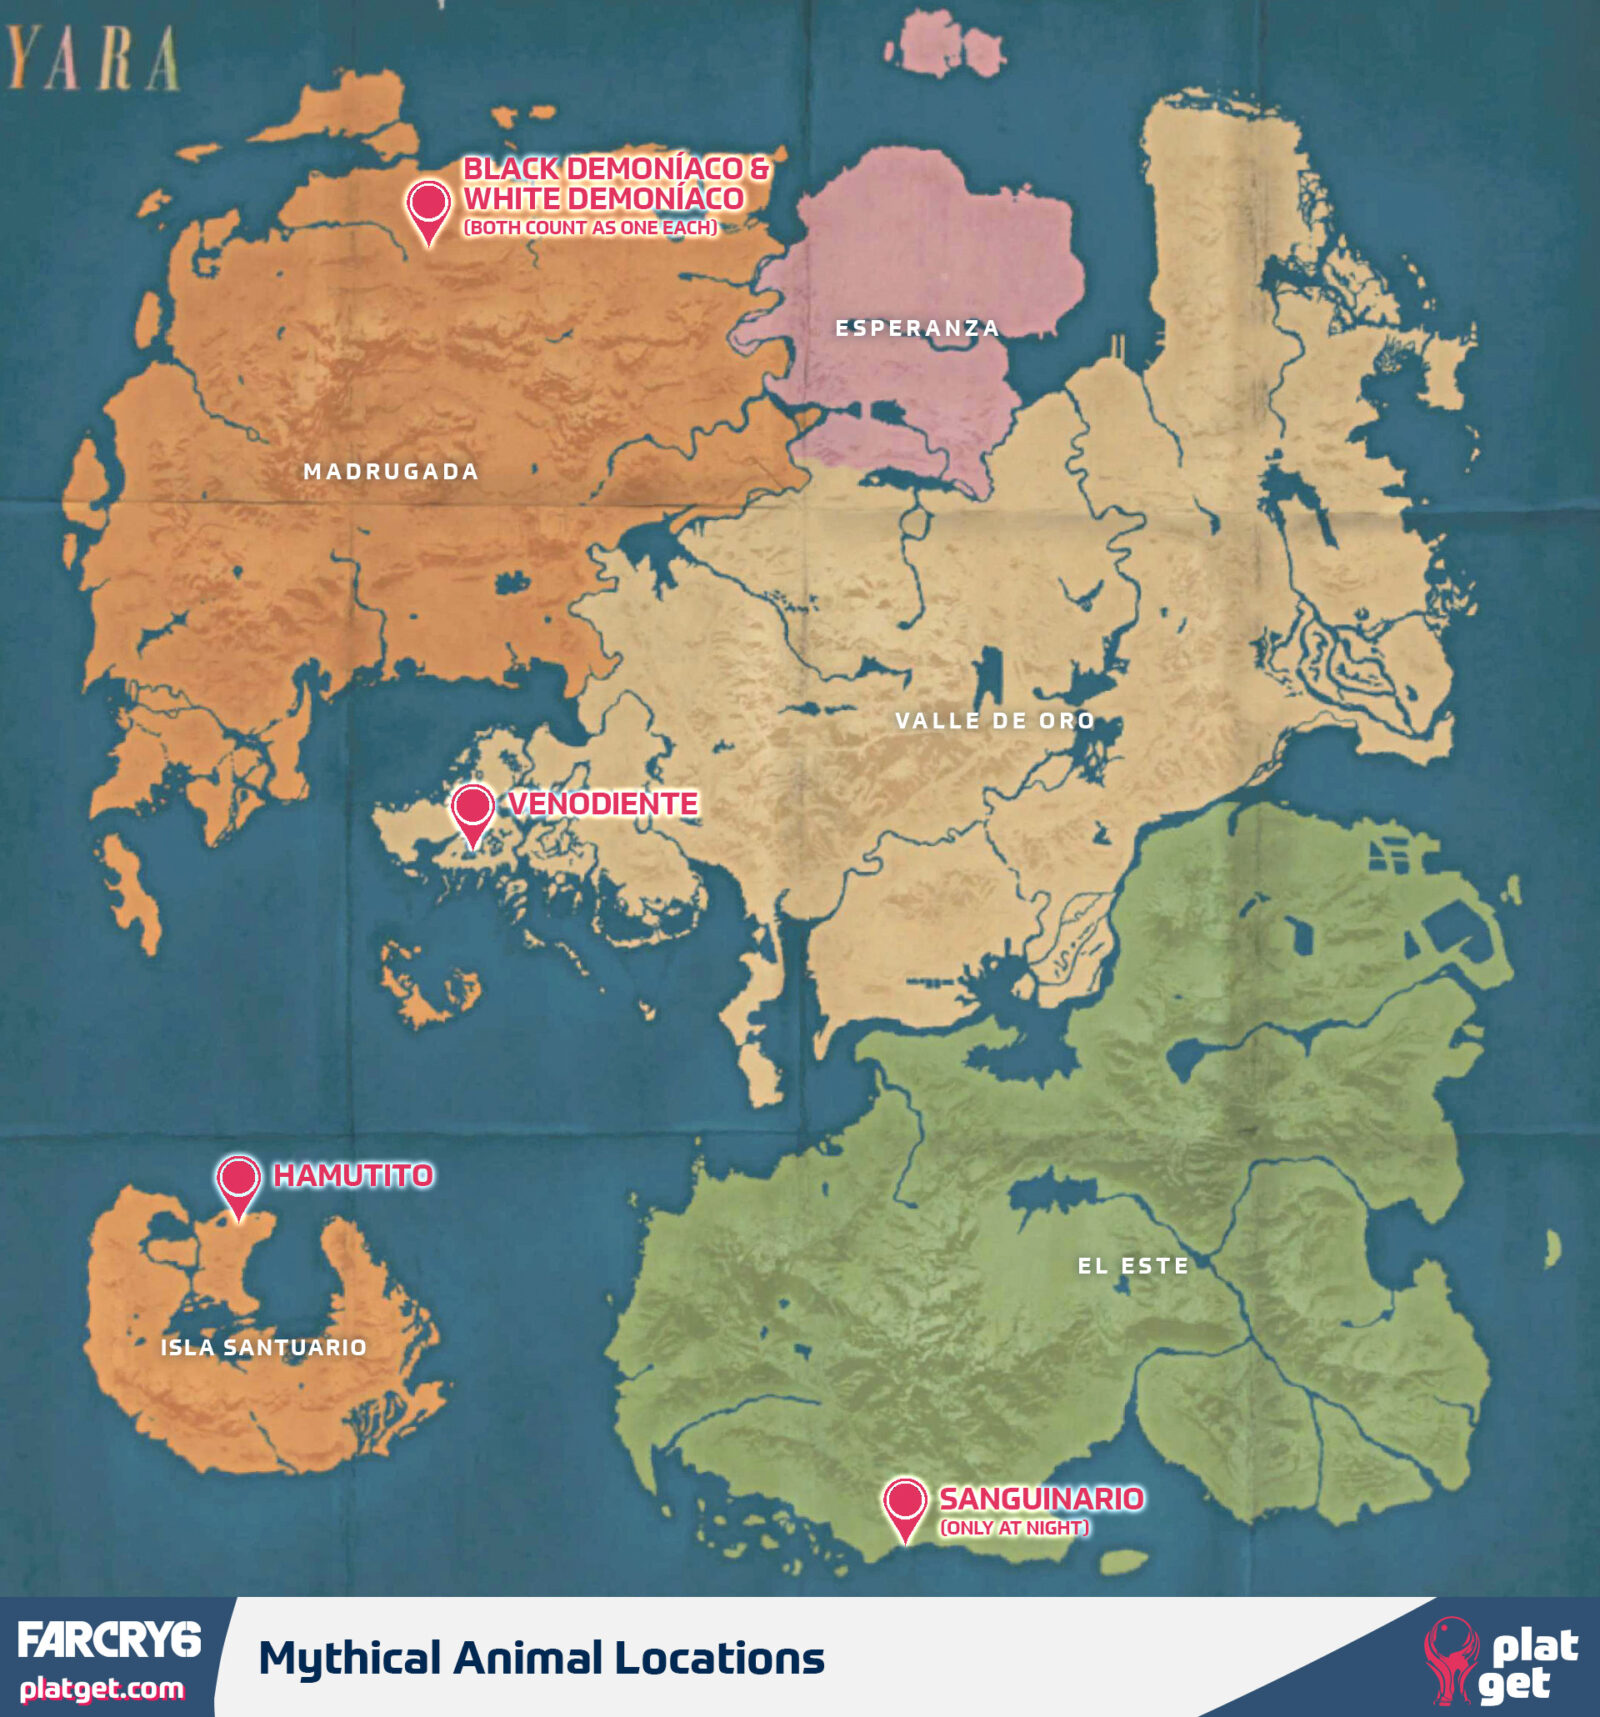
As the map states, Sanguinario can only be found at night, and the Black & White Demoniaco Wolves appear together in the same spot.
Head to the Animal Dens at those four locations and kill all 5 animals to unlock the Ultimate Predator trophy.
Phase Three – Spec Ops
This third phase of our Far Cry 6 Trophy Guide pertains to Special Operations mode, available at any Guerrilla Camp from an NPC called Lola with a green star icon above her head.
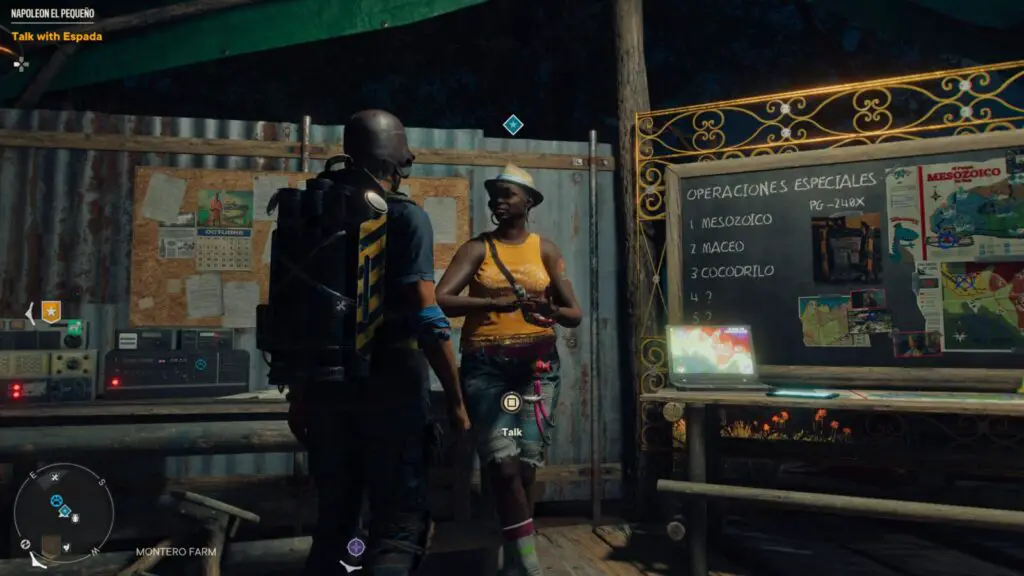
You will need to complete a few of these missions, but can complete them solo if you like, although they’re easier with a friend.
You will need an internet connection to play Special Operations, even if you play them alone.
Spec Ops Trophies

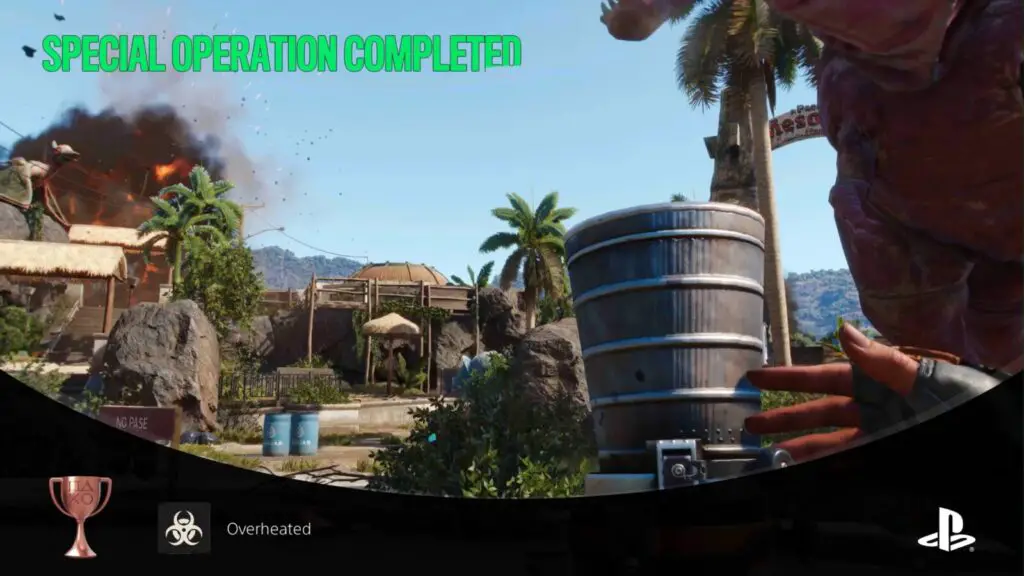
Overheated
Complete a Special Operation
At any Guerrilla base, you’ll find an NPC with a green star icon above their head. Speaking to them will let you choose from a selection of Special Operations which can be completed either solo or with a friend. However, you will need to be connected to the internet to even play them, so it counts as an online trophy.
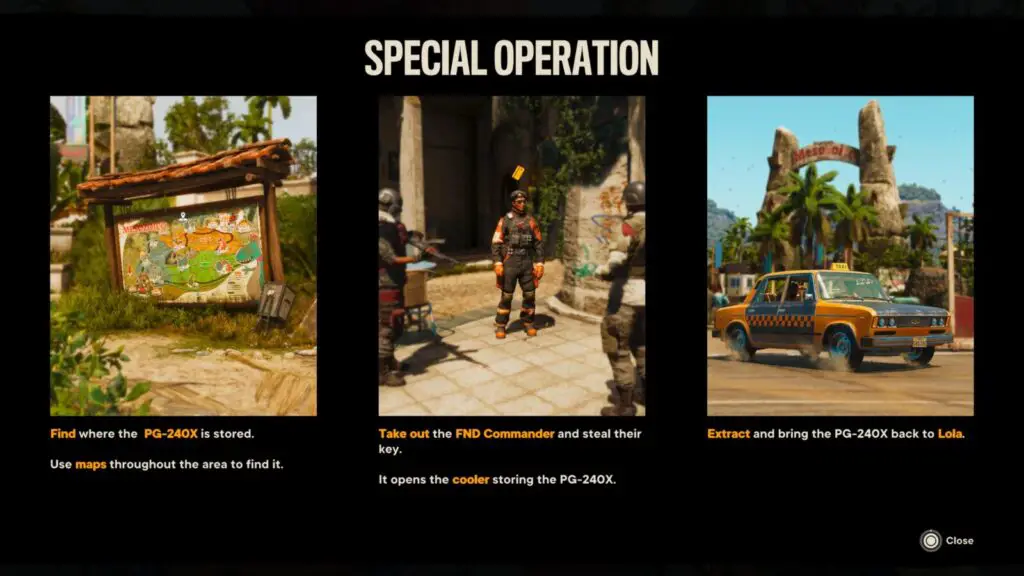
To unlock the Overheated trophy, you simply need to complete any. You’ll likely be completing more than just one anyway in order to earn Stay Cool, Hidden Cash, and Termination Phase.

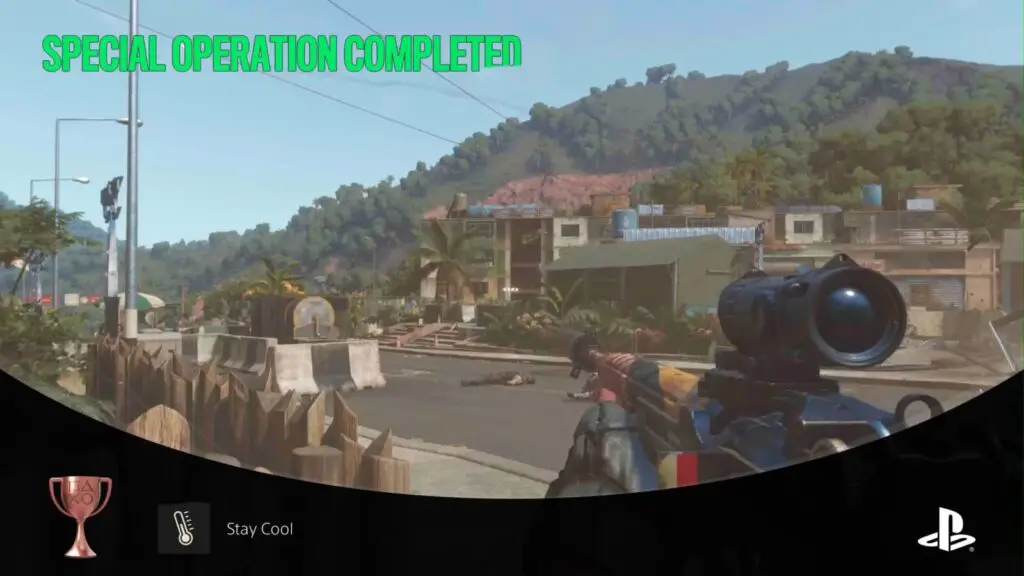
Stay Cool
Complete any Special Operation without exceeding 50% on the PG-240X’s temperature meter
For more about Special Operations, see Overheated.
I recommend earning the Stay Cool trophy on the 2nd Special Operations mission, Maceo, as there are a lot more trees and the water sources are closer together.
Once you have the PG-240X, your objective will be to keep it cool. To do so, you need to stay in the shade to stop it from heating up, but you’ll also need to make frequent stops at Water Sources to cool the battery down.
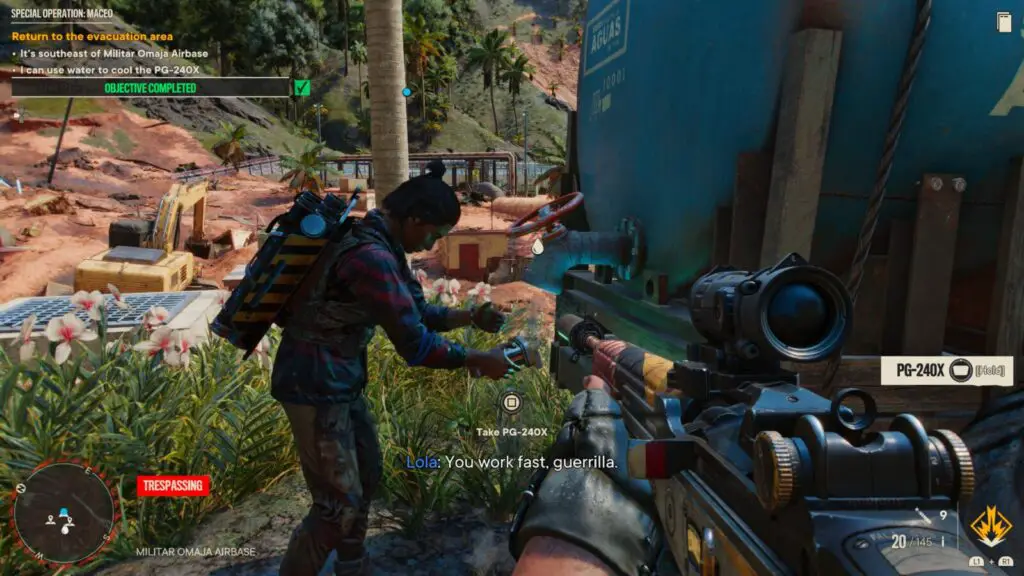
To unlock the Stay Cool trophy, the battery must not exceed 50% on the temperature meter. You can stow the battery like any weapon, and can pull it out from the weapon wheel to check on the temperature meter.
This trophy is a lot easier to earn with a friend, who can take care of enemies while you focus on carrying the battery and keeping it cool.
Successfully complete the entire operation without the PG-240X exceeding 50% heat at any time, and the trophy will unlock at the results screen.

For more about Special Operations, see Overheated.
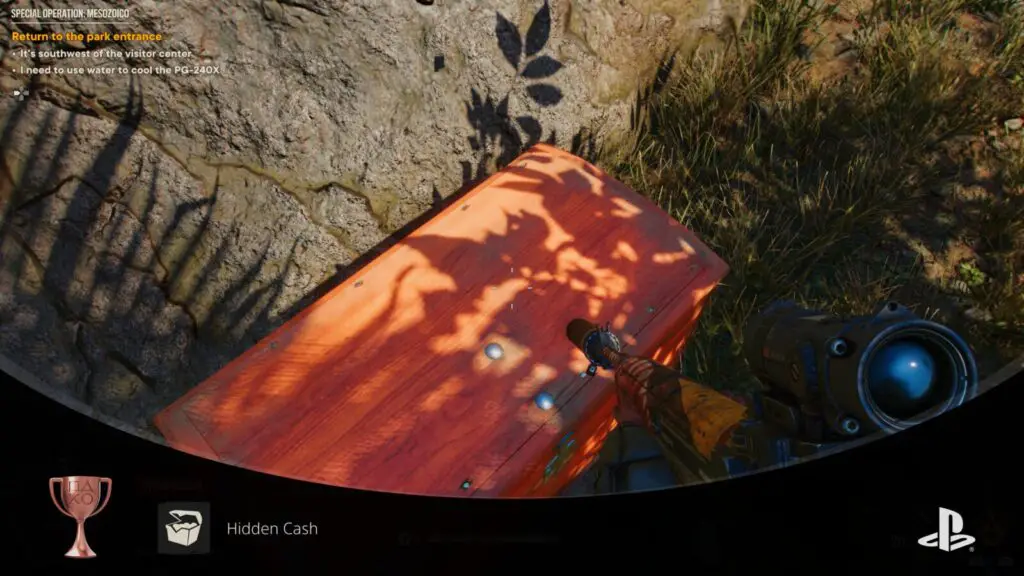
I recommend earning the Hidden Cash trophy on the Mesozoico Special Operation. To begin, head to the building where the PG-240X is being kept (Visitor’s Center) and look for a big display case with a T-Rex skull on it. Next to the skull, you’ll find a key on a blue lanyard. Collect it.
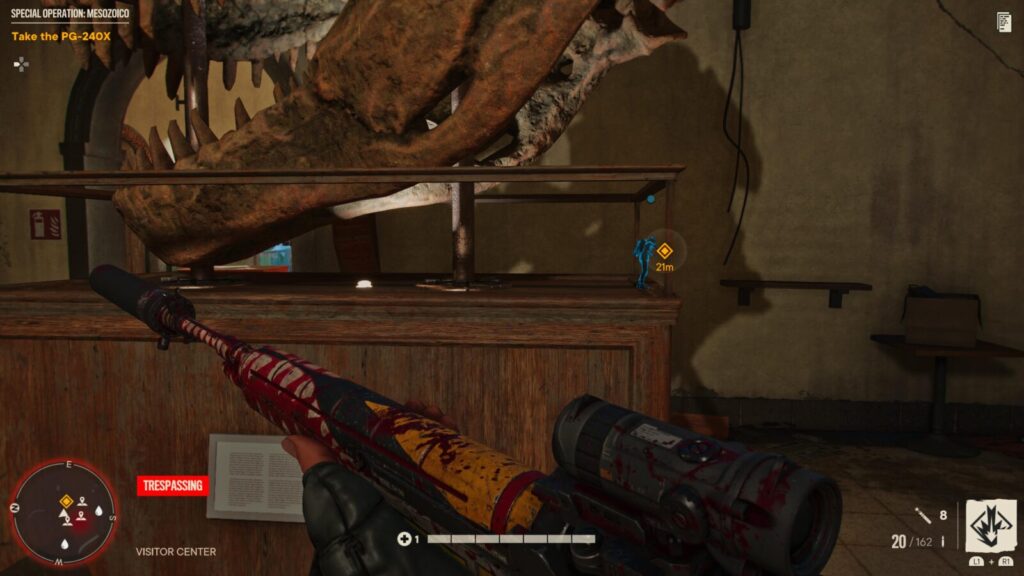
This key can be used to open the level’s secret stash, if you find it. To find the one in the Mosozoico Spec Op, go out through the main entrance and follow the road heading west, you should be able to see a big Pterodactyl next to some buildings (This Pterodactyl is visible on the park map, which you can review by pressing ![]() ).
).
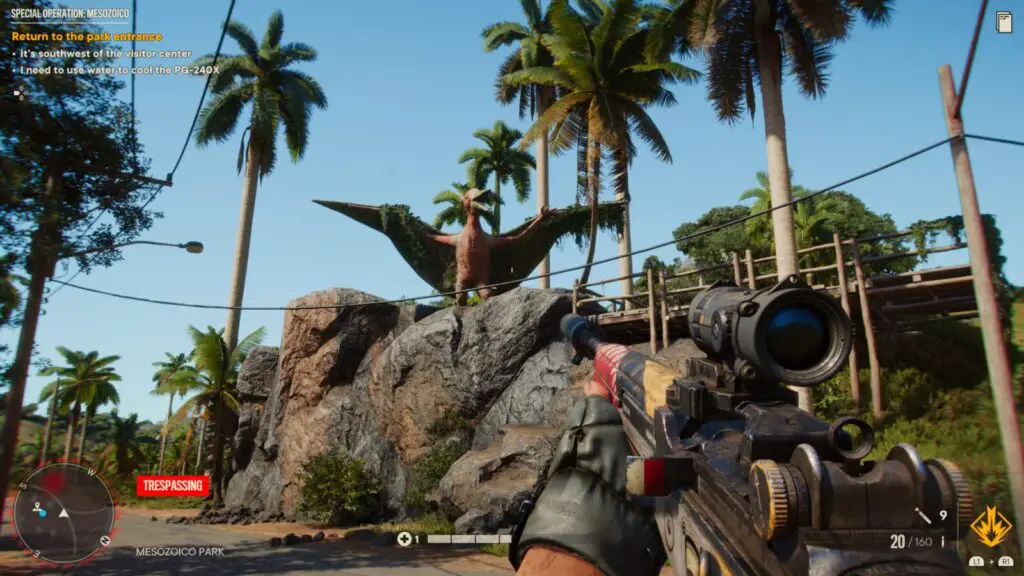
The stash is actually behind the Pterodactyl, so just climb the hill to the side of it and look for the chest behind it.

Termination Phase
Free 30 hostages during a Lola’s Informants challenge in any Special Operation
For more about Special Operations, see Overheated.
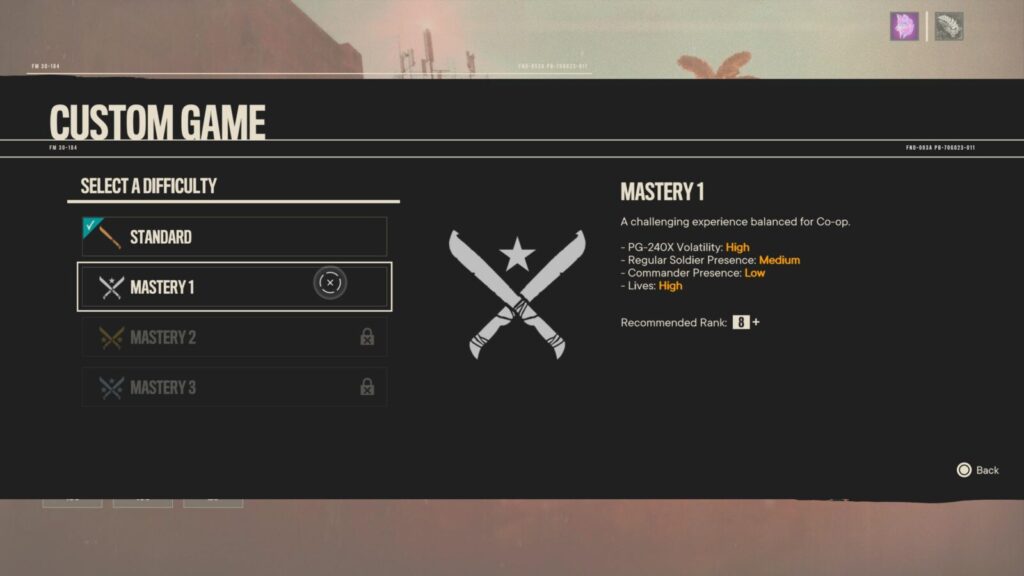
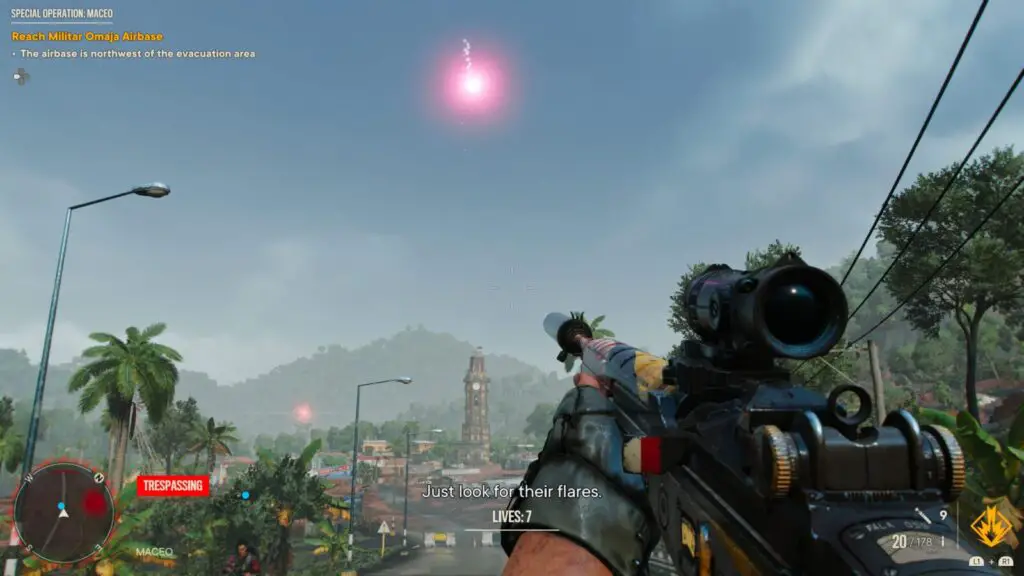
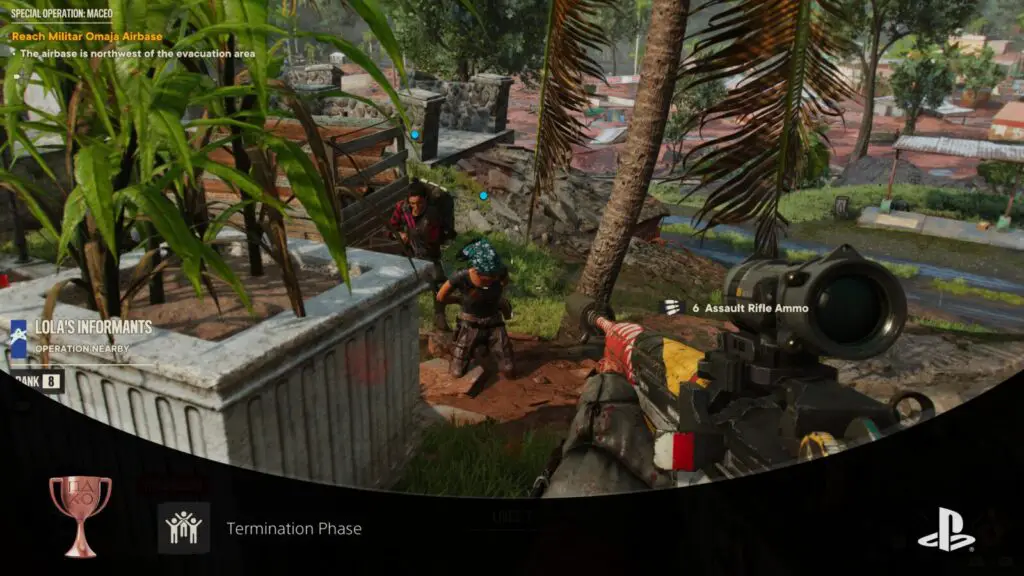
I recommend attempting to unlock the Termination Phase trophy on the 2nd Special Operation; “Maceo”. You will want to first complete it normally to unlock Mastery Levels. This is a good opportunity to earn Stay Cool.
Once you have done so, load up Maceo with the Difficulty set to Mastery 1. On Mastery Difficulty (1, 2, or 3, but 1 is easier and quicker) hostages will start spawning on the map.
You can find them under pink flares, so check the air for pink flares after Lola mentions informants near the start of the mission.
Head to the location under the flare and you’ll find three hostages with blue dots on the minimap. To free them, you’ll need to kill the surrounding enemies and then untie each hostage by approaching them and holding ![]() .
.
If you are spotted, they will start killing the hostages, annoyingly, so you’ll need to attempt to stealth the rescue.
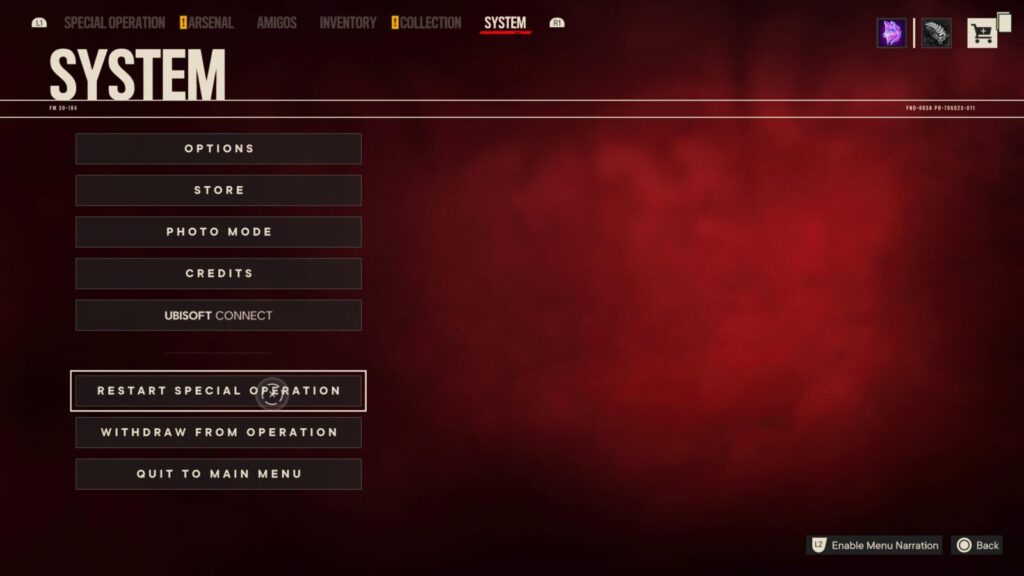
Once all three hostages have been untied and the nearby enemies are dead, you will see “Optional Objective Completed” at the top of the HUD. At that point, immediately pause the game with ![]() and go to the System tab. At the bottom, select “Restart Special Operation”.
and go to the System tab. At the bottom, select “Restart Special Operation”.
You don’t need to finish the Special Operation for those three rescued hostages to count towards this trophy, you simply need to complete the optional objective.
As each operation only spawns 3 hostages, and you need to save a total of 30 to unlock Termination Phase, you will have to repeat this process at least 10 times. If some hostages die during any of your rescue attempts, then you’ll obviously need to do extra runs to make up for it.
Unfortunately, the hostages will be in a different place each time you replay the operation, but they are always grouped together, thankfully.
Phase Four – Miscellaneous Cleanup
This wouldn’t be a Ubisoft game without a final cleanup phase of miscellaneous trophies. In this final phase of our Far Cry 6 Trophy Guide, get yourself acquainted with the misc trophies listed below and head out to collect any that you haven’t yet earned naturally.
Note that there is one online trophy in this phase which will prove to be a little bit of a pain.
Miscellaneous Trophies

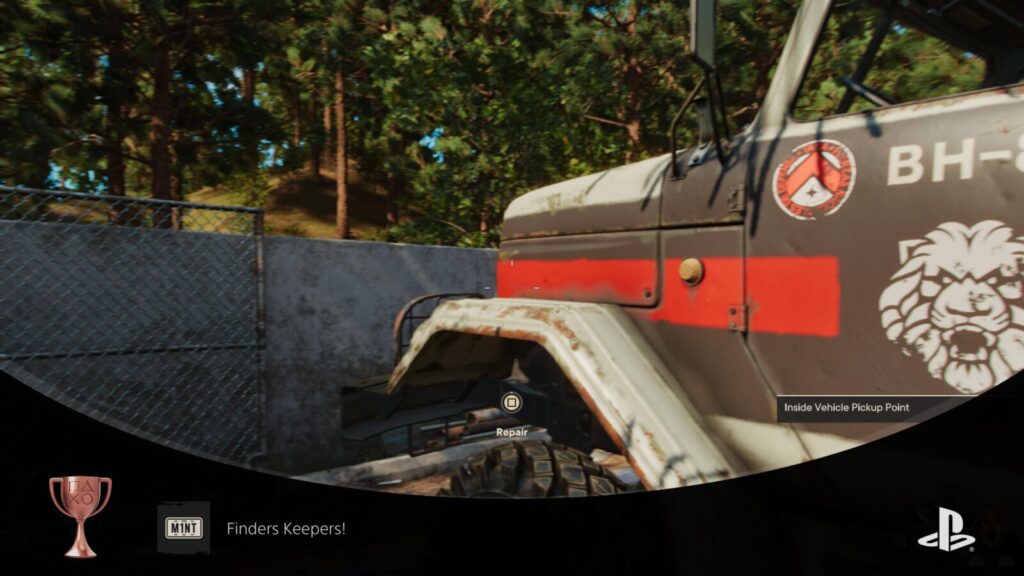
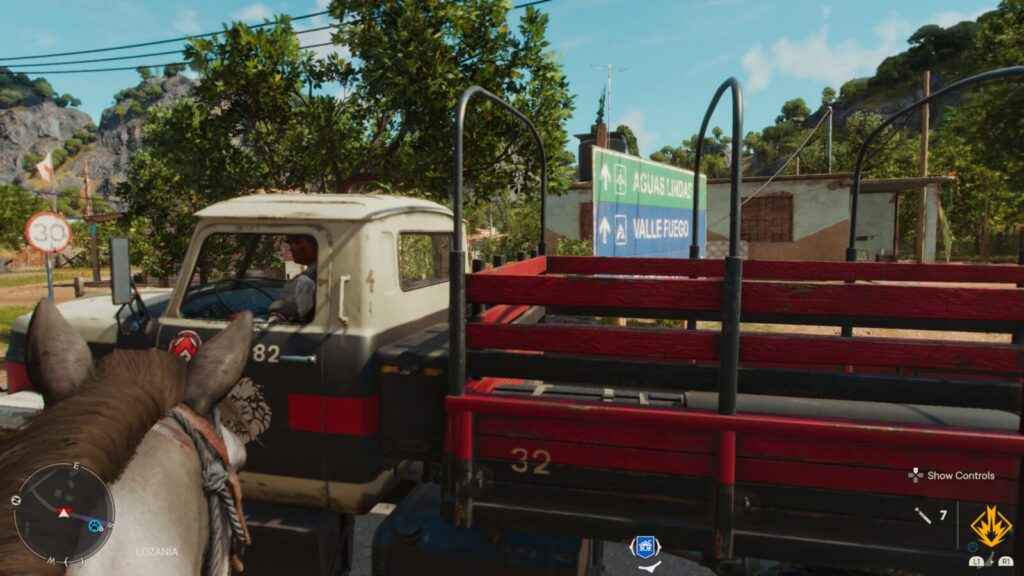
Finders Keepers!
Return 3 FND Resource vehicles in mint condition
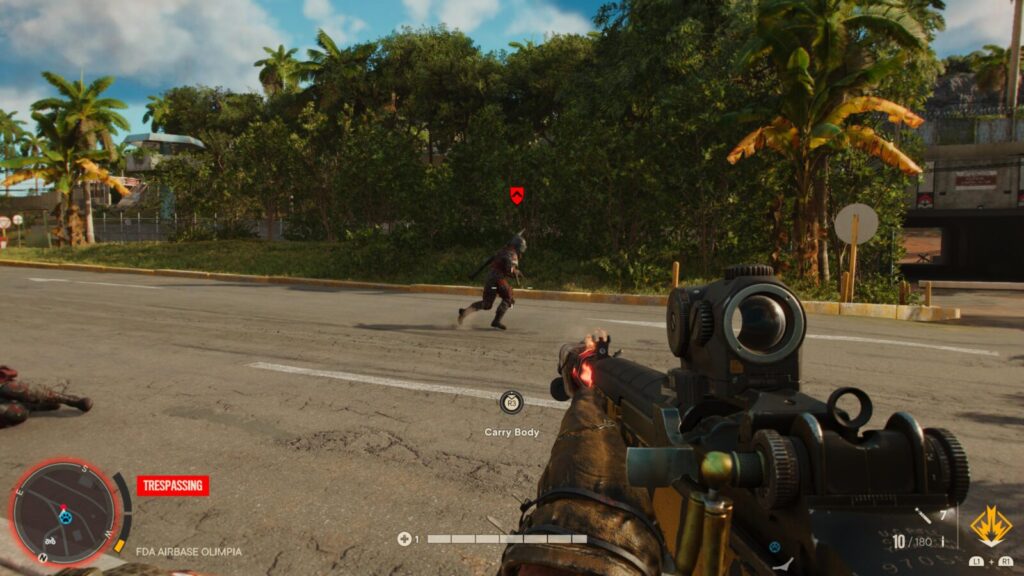
FND Resource Vehicles are enemy-driven vehicles found all over Yara, mostly on main roads or within large enemy facilities. You will know when a vehicle is a resource vehicle and not just a normal enemy vehicle because the icon on the minimap will be inside a large red diamond shape.
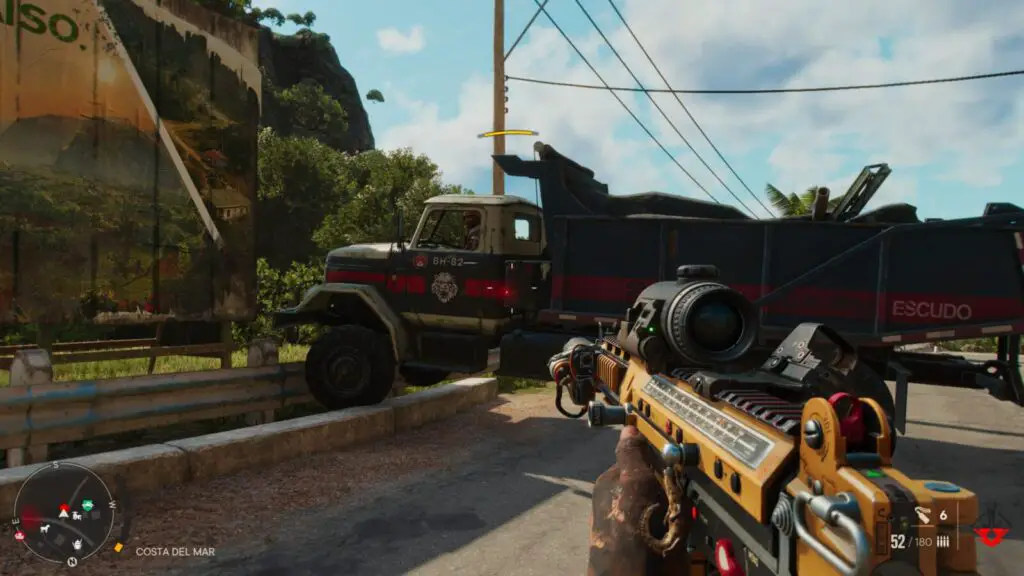
Whenever you see a resource vehicle, you can kill the driver and hijack the vehicle to then take it to a Vehicle Spawn Point. When you park the vehicle inside a spawn point (found at green vehicle markers on the map) you will earn Resources. The less damaged the vehicle is when you deliver it, the more resources you will be awarded.
In order to unlock Finders Keepers!, you will need to deliver three FND Resource vehicles in mint condition. This doesn’t quite mean that they can’t take any damage at all, but they must be unscathed enough for you to get the full 50 resources for delivering the vehicle.
A very easy way around this is to park the vehicle before you deliver it, get out of the vehicle, and then repair it with your repair tool. Then, when it is fully repaired, get back in the vehicle and deliver it to get the fullest possible reward!
Now then, to save you the bother of driving all over Yara in search of a vehicle, you’ll be pleased to know that there’s a particular road (near a vehicle spawn point, too!) where these vehicles drive by very frequently. All you need to do is sit by the side of the road and wait for one to come past (usually every minute or two), and then hijack it when it does!
The road is in Costa Del Mar, in Madrugada, and it runs past Yami’s Chop Shop, where there’s a handy Vehicle Spawn Point!

Deliver three mint condition vehicles and collect the Finders Keepers! trophy here with ease.
Note that the truck won’t disappear just because you delivered it, so consider spawning a different vehicle to make it disappear, so that another resource truck can spawn on the road.

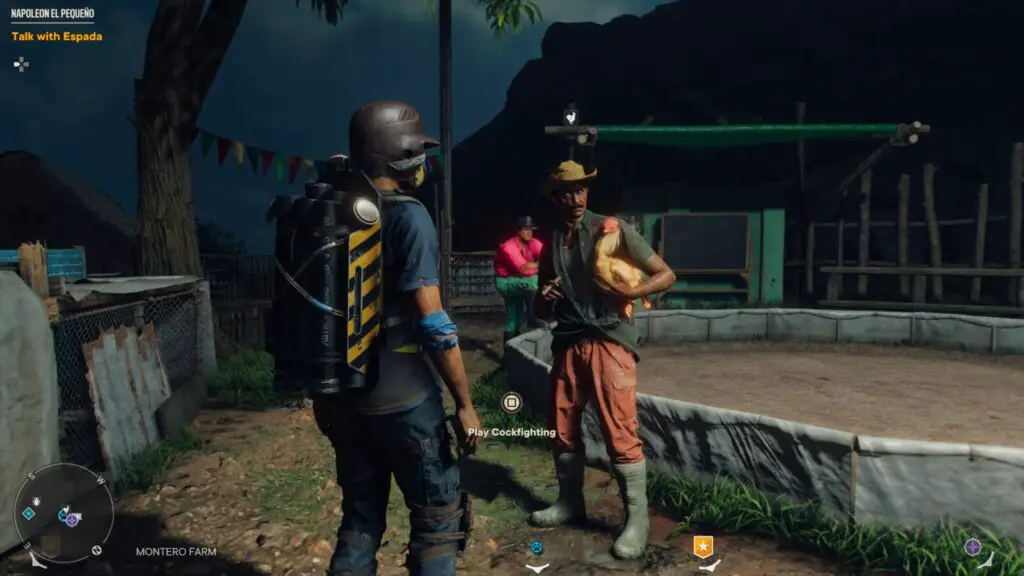
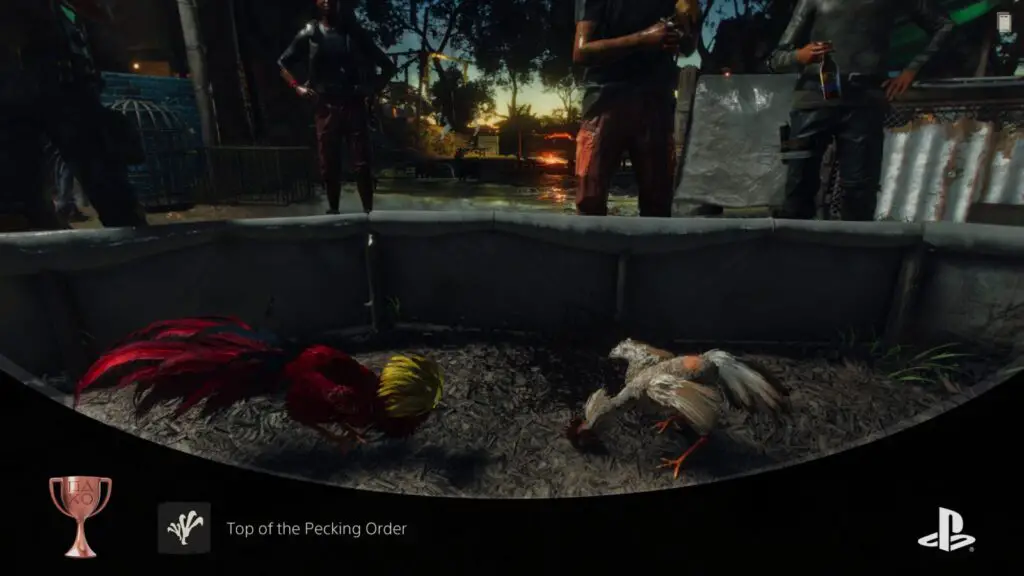
Top of the Pecking Order
Win a Cockfighting match
Cockfighting rings can be found in a few places, but the first you’ll probably run into is the one at Montero Farm in Costa Del Mar, Madrugada.
When you find one, approach the NPC with the cockerel icon above his head and hold ![]() to “Play Cockfighting”. You can then select any of the Rooster’s you’ve unlocked and use them in the Street Fighter-esque minigame.
to “Play Cockfighting”. You can then select any of the Rooster’s you’ve unlocked and use them in the Street Fighter-esque minigame.
When fighting, press ![]() to do a light attack,
to do a light attack, ![]() for a heavy attack, and
for a heavy attack, and ![]() to dash. When your special meter is full, you can press
to dash. When your special meter is full, you can press ![]() and
and ![]() together to trigger a powerful attack that deals a tonne of damage.
together to trigger a powerful attack that deals a tonne of damage.
Deplete the health bar of the opponent Rooster 3 times to win the match and unlock the Top of the Pecking Order trophy.

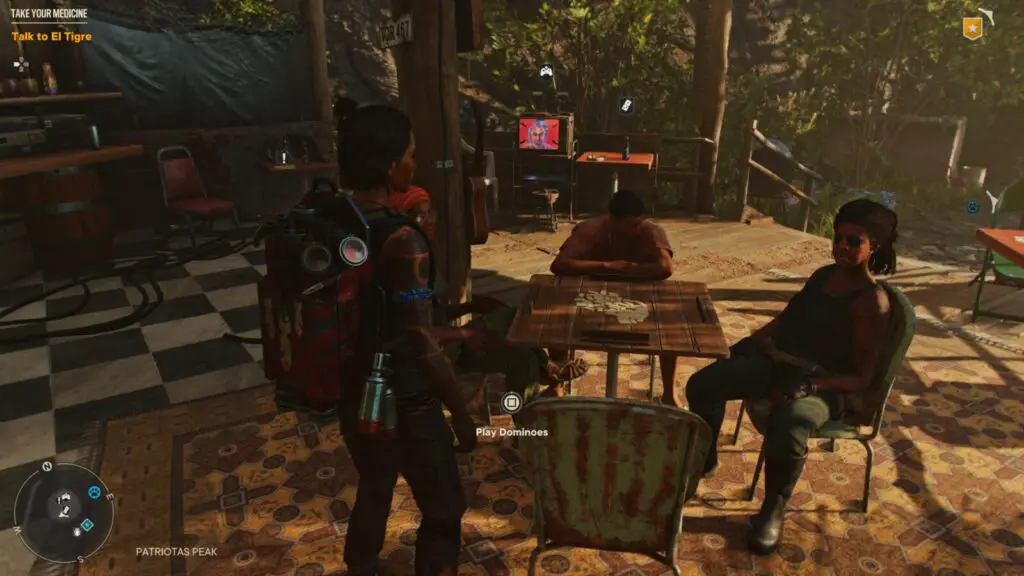
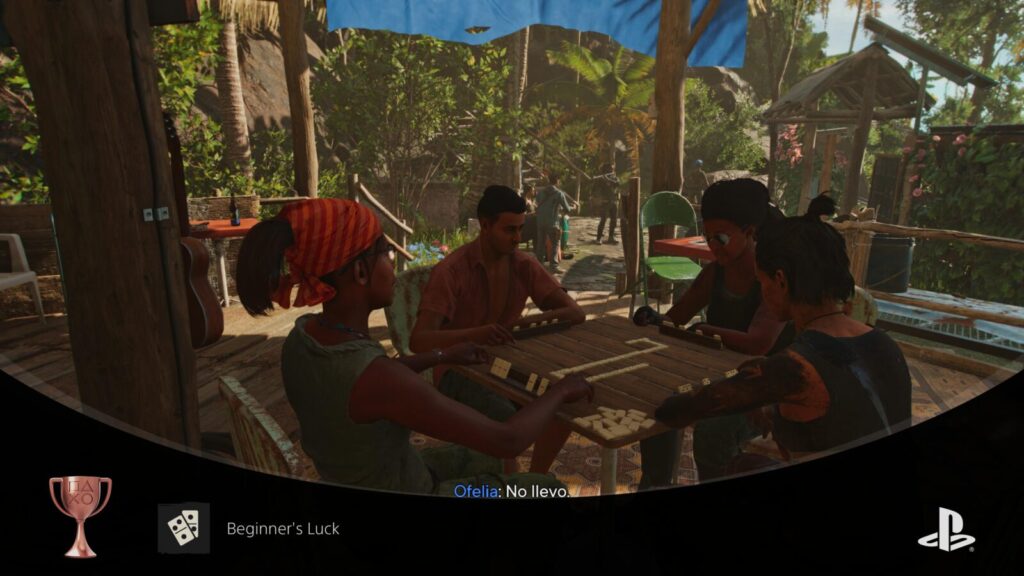
Beginner’s Luck
Win a Dominoes game
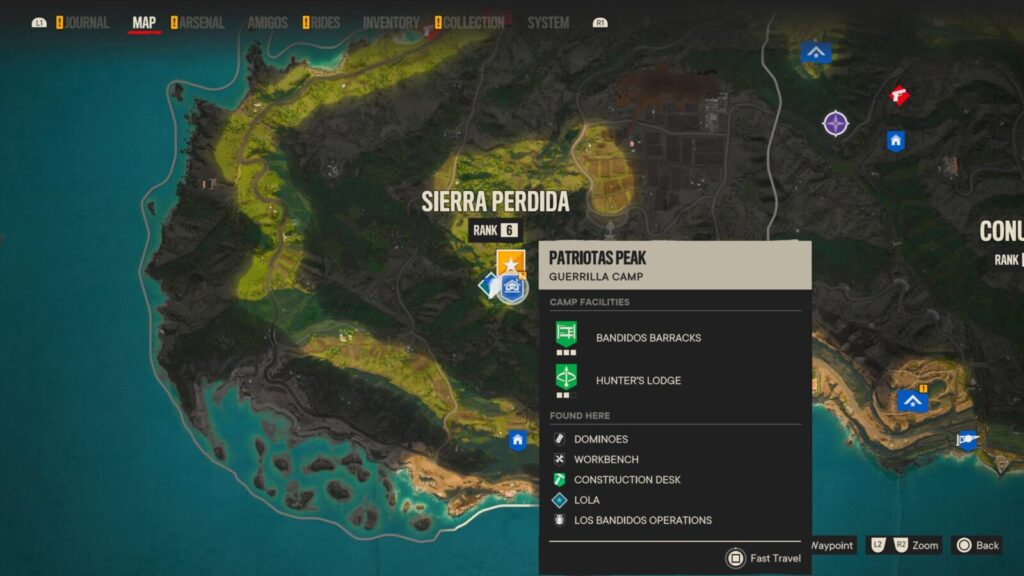
Dominoes can be played at a table under a gazebo at the Patriotas Peak Guerrilla Camp in El Este.
If you’ve never played Dominoes before, it pretty much goes like this;
You have a set of domino tiles with two numbers on them. You must place your tiles on the table so that the numbers match the adjacent tile. Your goal is to get rid of as many high-value tiles as possible. For example, if there is a 2 on the table and you have two tiles with a two; 2 | 6 and 2 | 4, you would want to place the 2 | 6 tile as it has the highest total value.
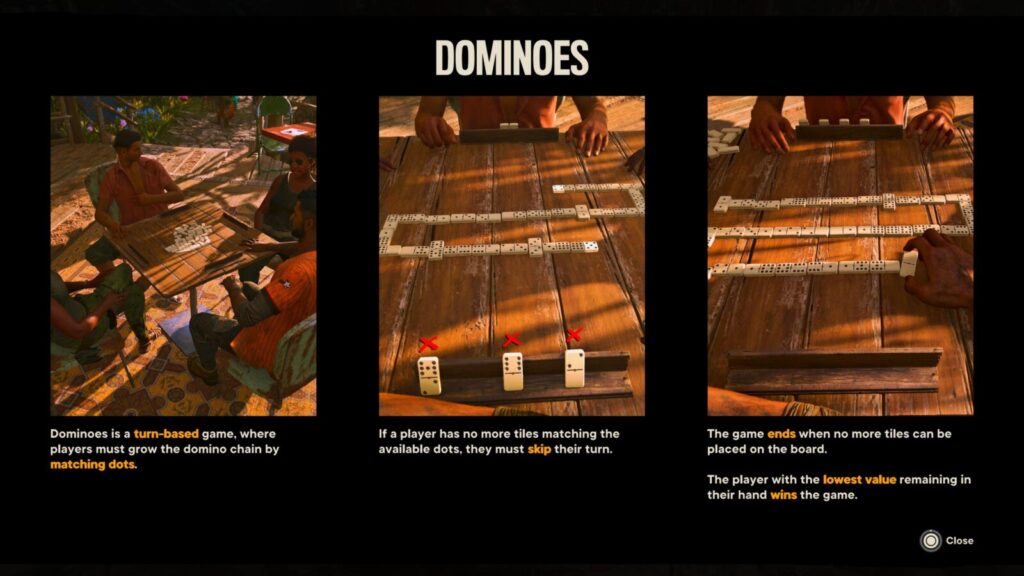
You must continue placing tiles until nobody in the game has any tiles left that they can place. At that time, the game will end, and the total value of each player’s tiles will be calculated. The player with the lowest total domino value will win the game.
Win a game of dominoes for the first time and the Beginner’s Luck trophy will unlock.

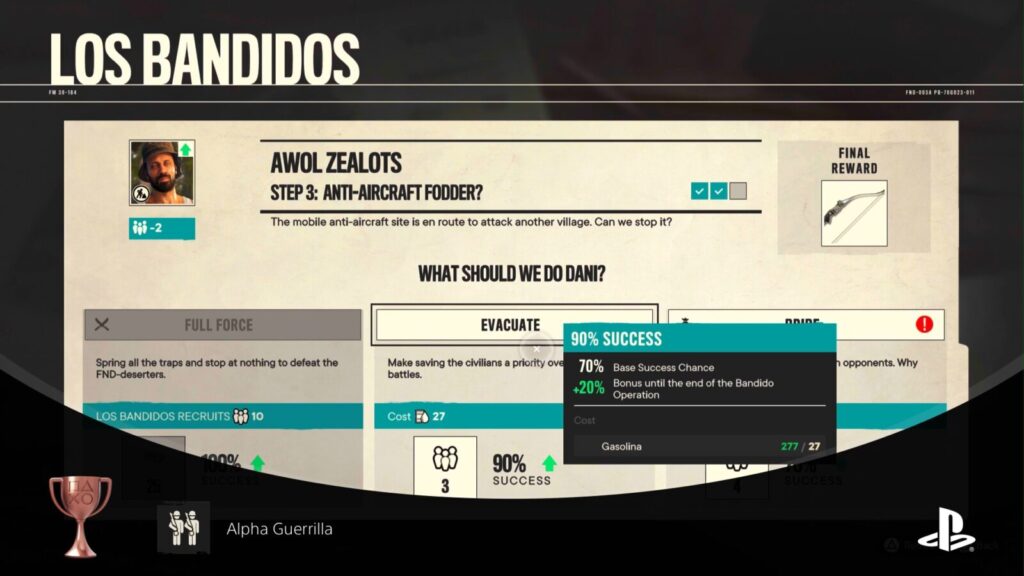
Alpha Guerrilla
Successfully complete 5 Bandido Operations
Bandido Operations can be managed from Los Bandidos Operation Boards at Hideouts and Guerrilla Bases.
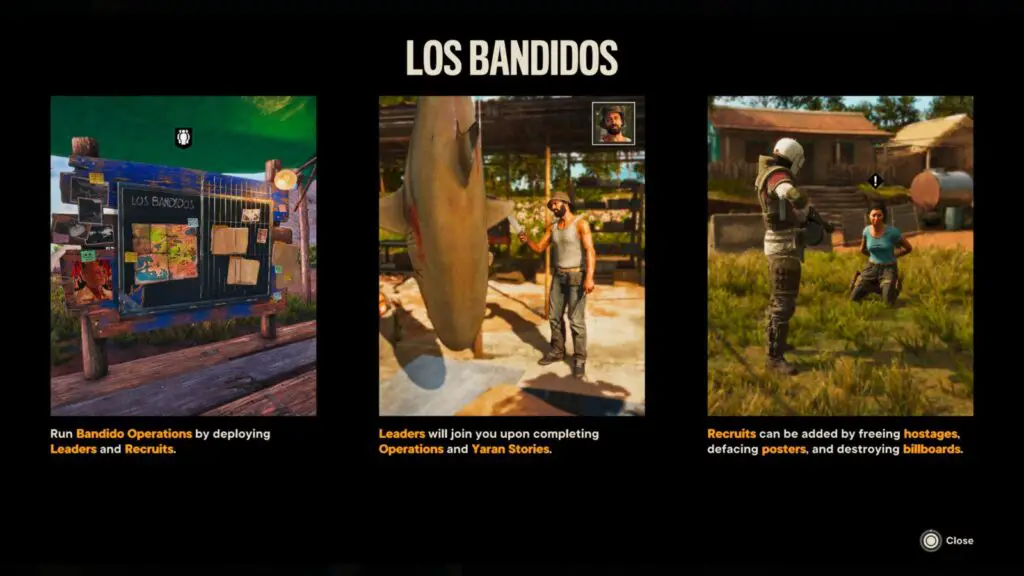
When you interact with the board, you’ll get a list of operations you can complete as well as any rewards you’ll earn fro them. At the top of each operation, you will see the number of Bandidos required for completion and the time it will take to complete.
Activate an operation by sending one of your leaders out and then wait the allotted amount of time. When the time is up, you’ll be prompted to return to the board. Do so, and select the operation in progress which is awaiting orders.
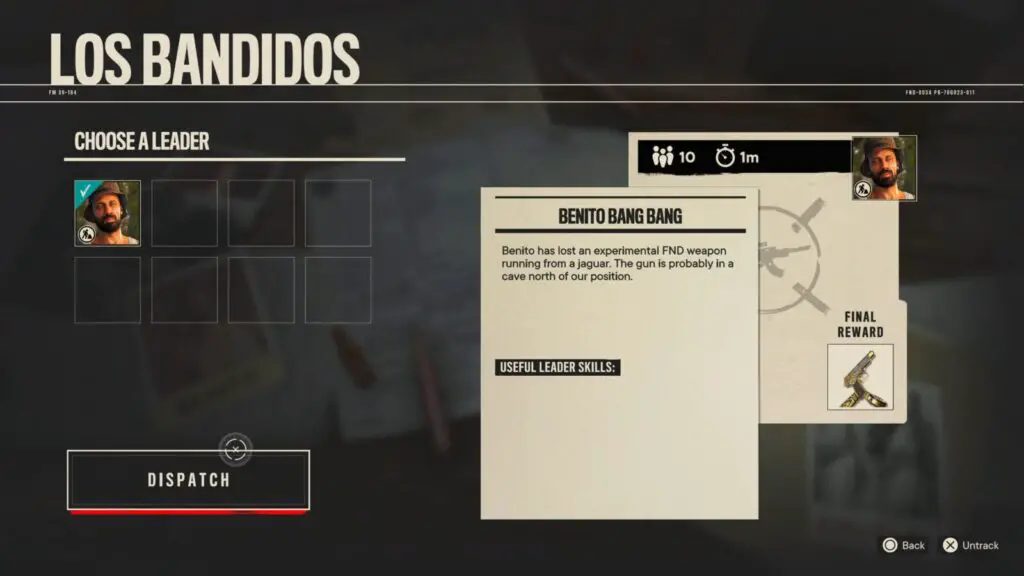
You’ll then need to make three choices, instructing your leader and his bandidos through the operation. If you are successful in completing all three choices without failing or getting all of your Bandidos killed, the operation will complete and you’ll earn the proposed reward.
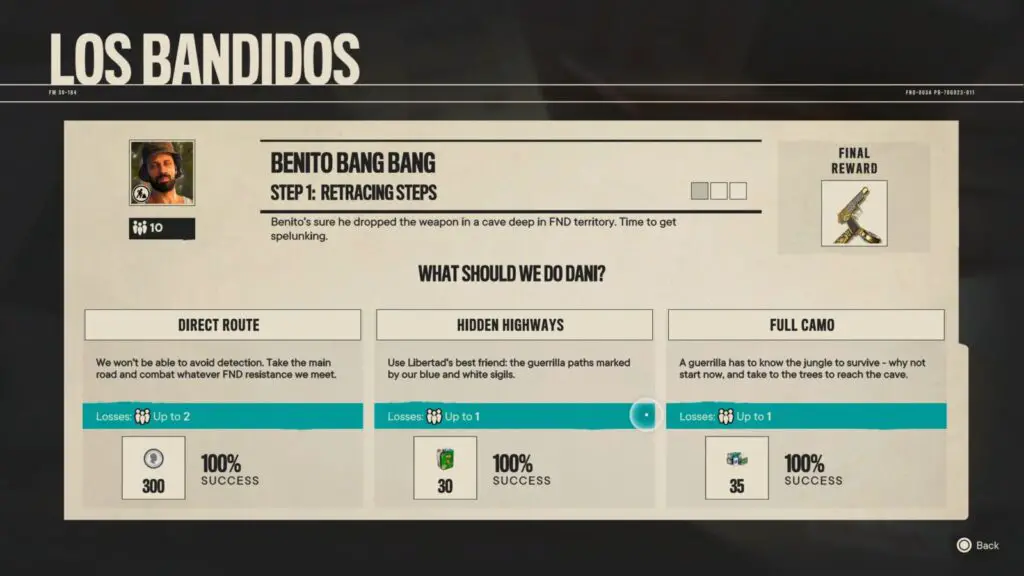
Repeat this for 5 operations and the Alpha Guerrilla trophy will unlock once the fifth operation is successfully completed.

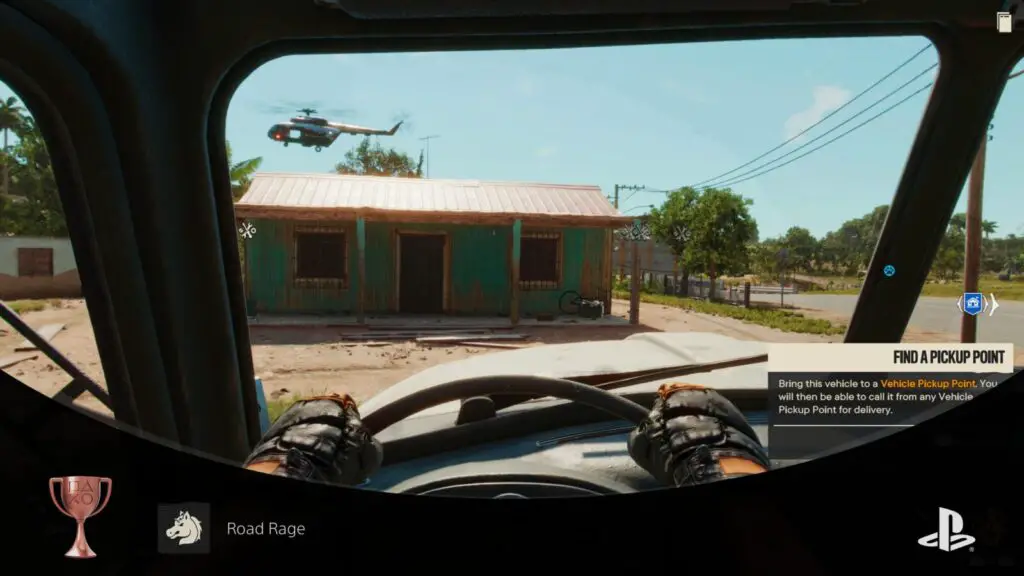
Road Rage
Perform a Vehicle Machete Kill from a horse
To unlock the Road Rage trophy, you will first need to be on a horse. Look for one on a roadside or at a horse spawn point and then mount it by approaching it and holding ![]() .
.
Once you’re on a horse, ride along the roads of Yara, keeping your eye out for an enemy vehicle. They will have red and black paint jobs, and will have a red icon on the minimap.
Once you have one, ride up alongside the vehicle on the driver’s side, and then use ![]() to look at the driver. You should see a “Hijack” prompt appear at the bottom of the screen. Hit
to look at the driver. You should see a “Hijack” prompt appear at the bottom of the screen. Hit ![]() and Dani will leap from the horse onto the door of the enemy vehicle and thrust their machete into the enemy.
and Dani will leap from the horse onto the door of the enemy vehicle and thrust their machete into the enemy.
After doing so, they’ll climb into the drivers seat and take control of the vehicle, thus unlocking the Road Rage trophy.

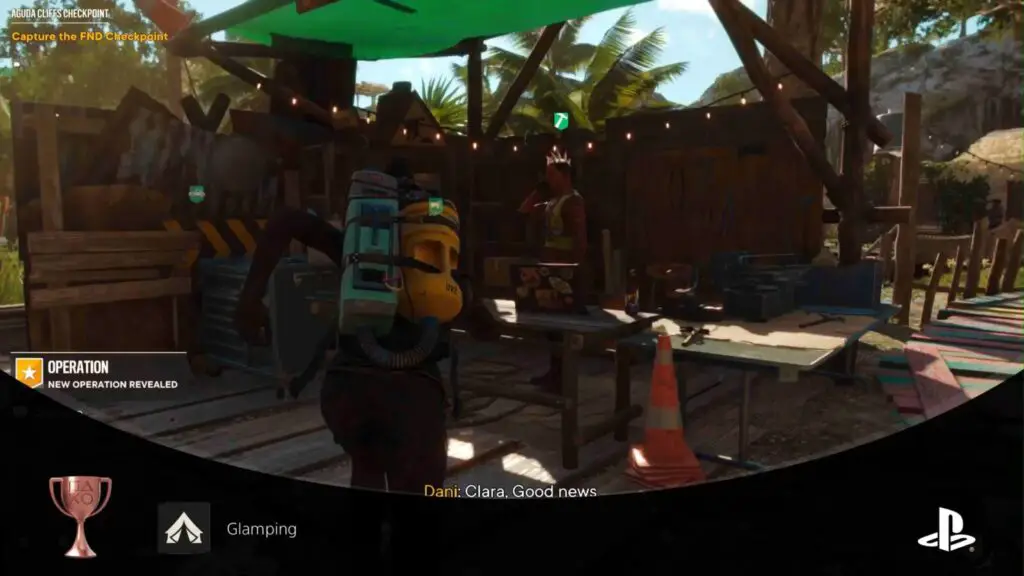
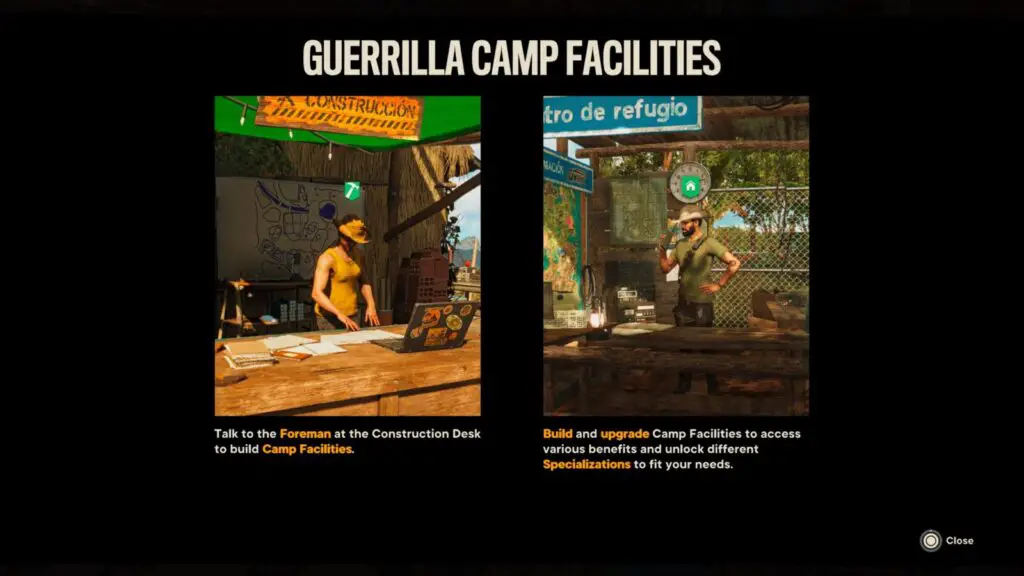
Glamping
Build one of each Camp Facility (Solo Campaign only)
There are 6 Camp Facilities available in the game, which can be purchased using resources at the Foreman in Guerrilla Camps. You can only install 2 facilities per camp and you cannot purchase the same facility twice.
Therefore, across the three Guerrilla Camps in the game, there is room for all 6 facilities. That’s all it takes to unlock the Glamping trophy, just visit the foreman at all three camps and purchase a facility for each available slot!

Hogar Dulce Hogar
Fully upgrade one Camp Facility at any Guerrilla Camp (Solo Campaign only)
Once you have a Guerrilla Camp, you can visit the Construction Desk there to request new facilities, up to two per Camp. Once you have built a facility, it can then be upgraded up to 2 times, improving the benefits that facility provides.
To unlock Holgar Dulce Holgar, you will need to upgrade any one of these facilities to level 3 by using various resources that you can find on your journey across Yara.
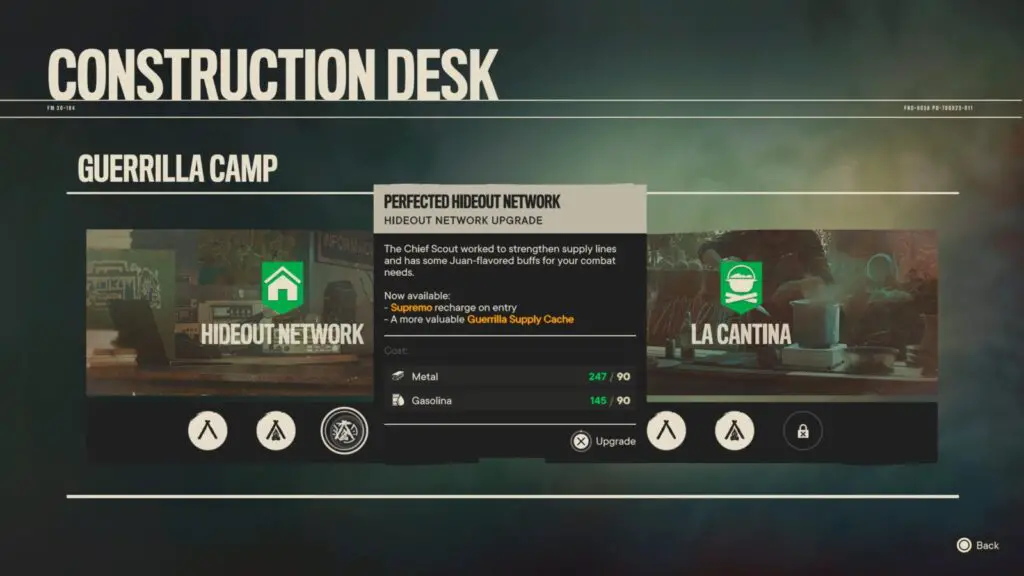
I recommend building and upgrading the Hunting Lodge if you only intend on upgrading one, as this will award you one of the Unique Weapons you need; El Depredador.
You will need to fully upgrade the Hunting Lodge for Armed to the Teeth and the Bandidos Barracks for Outdated Tech, so I would recommend just focusing on those, you won’t need to fully upgrade any others.

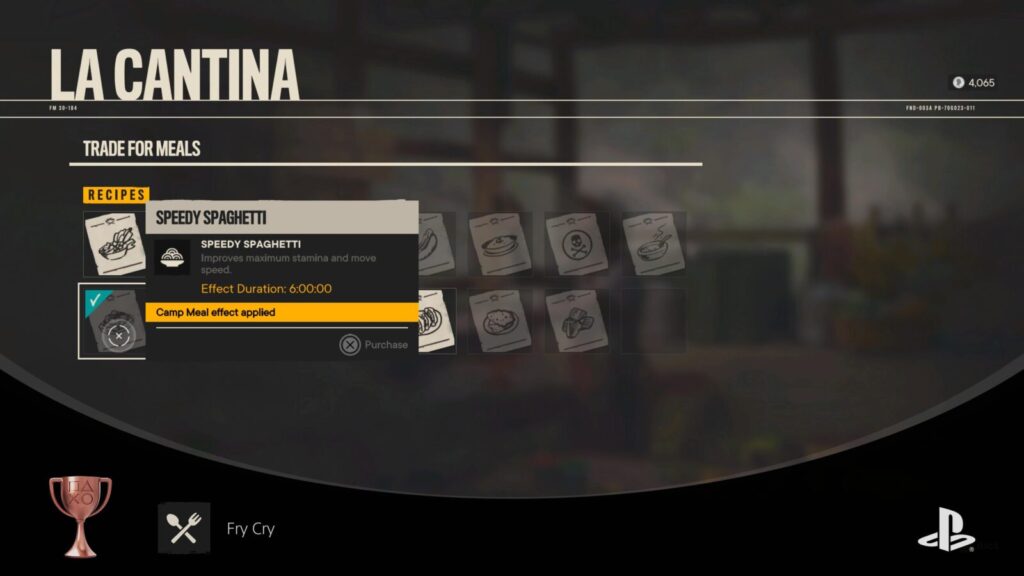
Fry Cry
Purchase 15 Meals
To unlock the ability to make meals, you will first need to purchase the La Cantina facility from a Foreman at any Guerrilla Camp. Once you have access to it, you will be able to cook meals at the La Cantina facility, and any safe houses you acquire across Yara.
For the Fry Cry trophy, you will need to cook 15 meals using various animal meat. You can see from La Cantina what animal meat is required to cook each meal, and it will help you to note that you do not need to cook 15 unique meals. You can cook the same meal 15 times if you want, as long as you make a total of 15 meals throughout your playthrough.
Upgrading La Cantina will make more meals available to you, but isn’t required for the trophy.
Once you have cooked your 15th meal, the Fry Cry trophy is all yours!

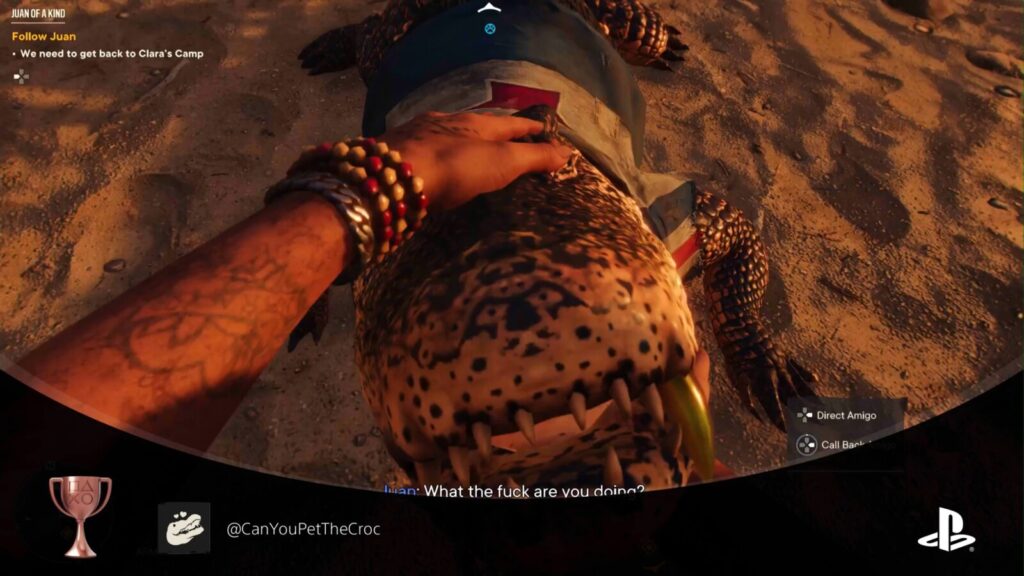
@CanYouPetTheCroc
Pet Guapo
Guapo the Crocodile is the first Amigo you will unlock. You’ll acquire him automatically as part of the story very early in the game when you go to retrieve Juan. Once you acquire Guapo, he’ll automatically be equipped as your Amigo and will begin following you.
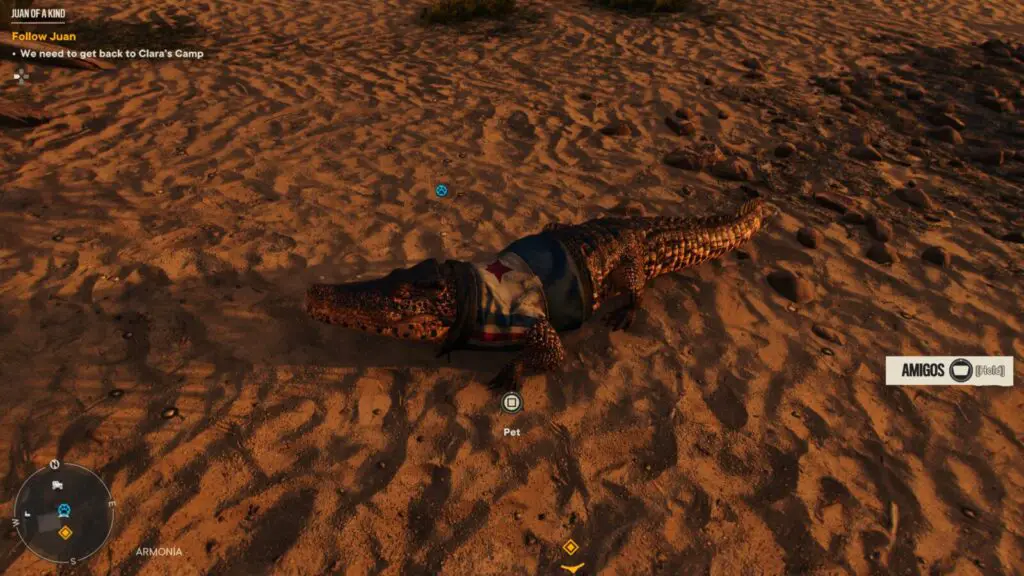
Simply approach him and hold ![]() to pet him. The @CanYouPetTheCroc trophy will then unlock immediately.
to pet him. The @CanYouPetTheCroc trophy will then unlock immediately.

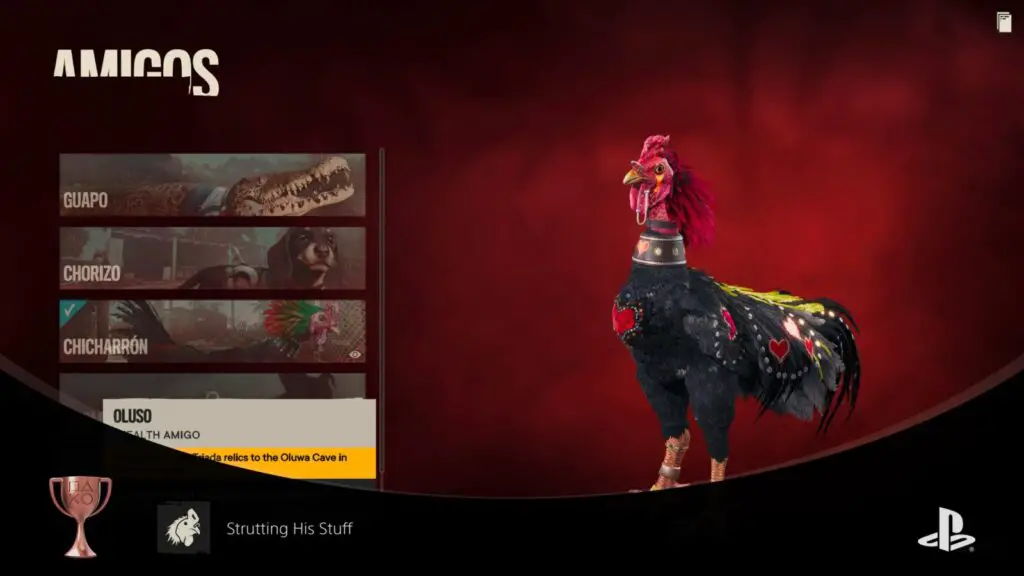
Strutting His Stuff
Equip Chicharrón with the Motherclucker Outfit
Once you have unlocked Chicharron (see Loyal Army), go to the Amigos menu and press ![]() on Chicharron to view more details.
on Chicharron to view more details.
In the bottom left corner, press ![]() on the Appearance button to change his outfit. Select “Motherclucker” which should be unlocked from the start, and equip it with
on the Appearance button to change his outfit. Select “Motherclucker” which should be unlocked from the start, and equip it with ![]() .
.
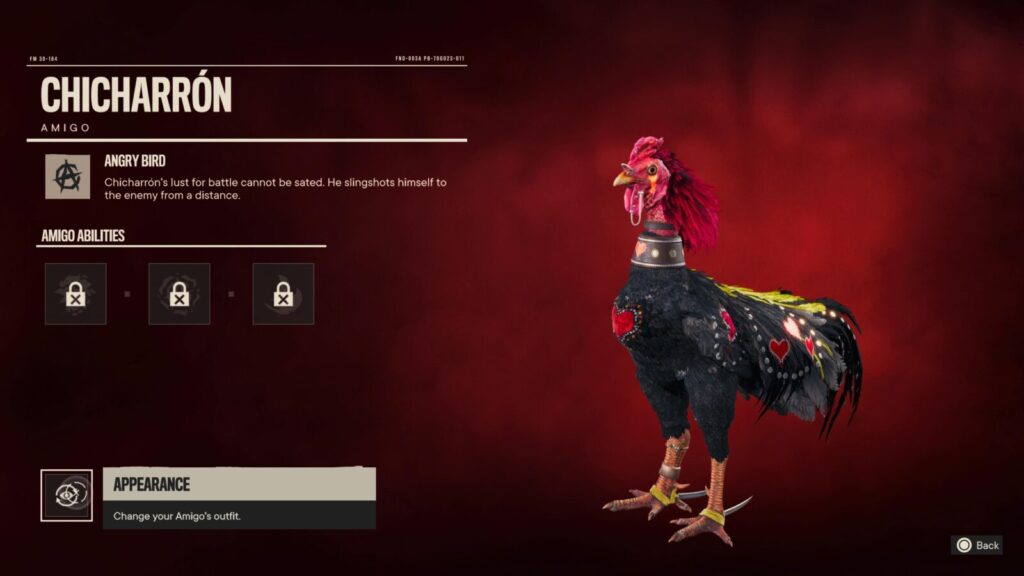
Close the menu and the Strutting His Stuff trophy will then unlock right away.

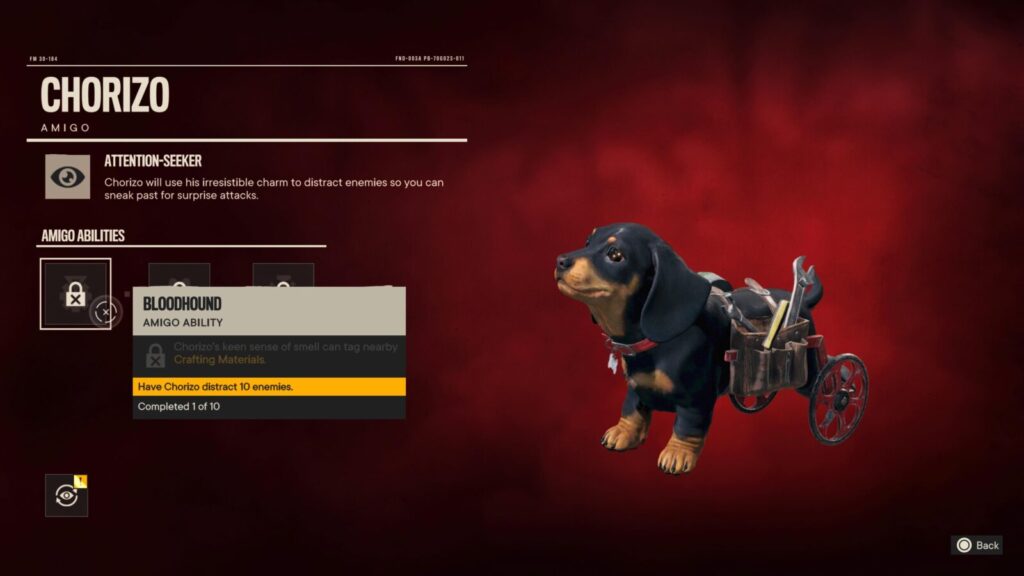
Secret Weapon
Distract 10 soldiers with Chorizo
To unlock Secret Weapon, you must first unlock Chorizo as a companion. See Loyal Army.
Once you’ve done that, you will need to start using Chorizo during stealth combat. When you have Chorizo equipped as an Amigo, you can press ![]() while looking at an enemy to instruct him to distract them. He’ll run up to the enemy and start barking at them.
while looking at an enemy to instruct him to distract them. He’ll run up to the enemy and start barking at them.
The enemies will either find him adorable and try to pet him, or find him annoying and shoo him away. Either way, kill the enemy while they are distracted by Chorizo.
You will need to do this a total of 10 times, cumulatively, in order to unlock the trophy.

This can be tracked by going to the Amigos tab in the ![]() menu and pressing
menu and pressing ![]() on Chorizo to view more details. There, you’ll see the “Bloodhound” ability is locked until you complete the requirements of this trophy. It will show you how many times you’ve successfully killed a guard distracted by Chorizo.
on Chorizo to view more details. There, you’ll see the “Bloodhound” ability is locked until you complete the requirements of this trophy. It will show you how many times you’ve successfully killed a guard distracted by Chorizo.

Heated Conflict
Take out 10 soldiers with active Heat
Whenever you kill an enemy soldier in Far Cry 6, your heat meter — visible to the right of your minimap — will fill slightly. To unlock the Heated Conflict trophy, you must first kill enough enemies that your heat meter fills to level 2, at which point the meter will turn red. This indicates that the Special Forces are hunting you.
Instead of running and hiding when this happens, you should stick around and find some more enemies to shoot at. Kill an additional 10 enemy soldiers while your heat meter is red and the Heated Conflict trophy will unlock.
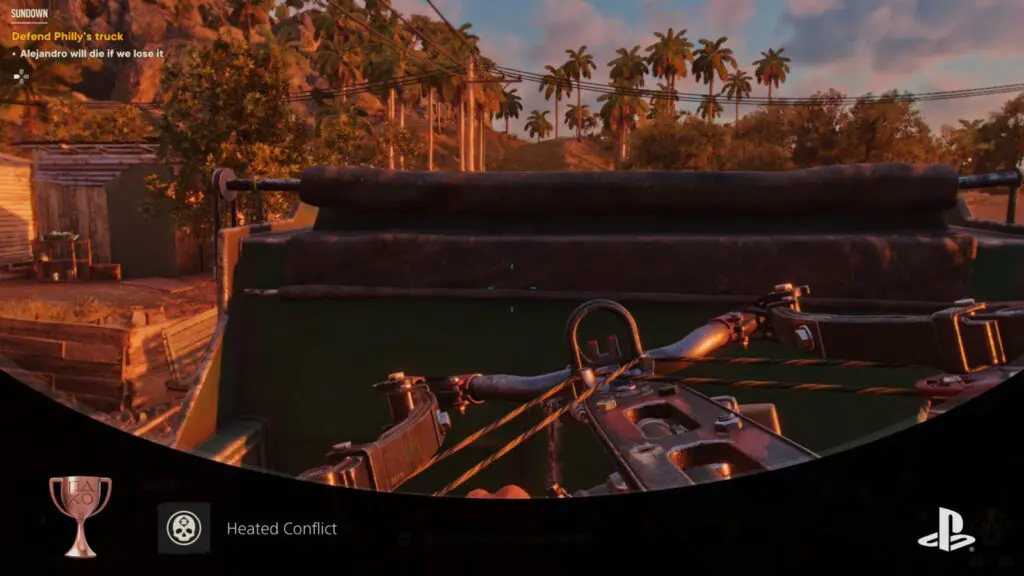
You don’t need to kill all 10 soldiers in one instance of level 2 heat, the trophy is cumulative, so you can kill 6 in one instance and then fill your heat meter again to kill 4 more and still unlock the trophy.
As a filled heat meter happens often as part of the story, there’s a fairly big chance of you earning this trophy naturally, with no additional effort.

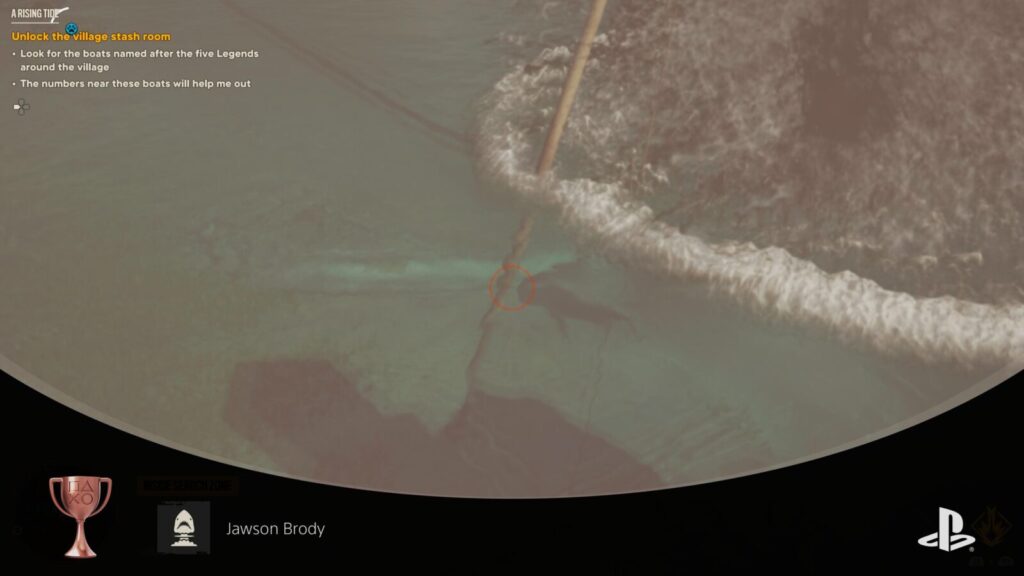
Jawson Brody
Take out a shark with an explosion
For the Jawson Brody trophy, you will first need some explosives, such as grenades or dynamite. A Rocket Launcher or Grenade Launcher should also work too. You will also need to find somewhere that Sharks spawn close enough to land (or you could sail a boat out to shark-infested waters).

I found some sharks spawning near a fishing village called Yarabi, on the southern coast of El Este.
While standing on one of the wooden piers overlooking the sharks, I started lobbing dynamite into the water in quick succession until one of the sharks took enough damage from the blast radius that they died, thus unlocking the Jawson Brody trophy.

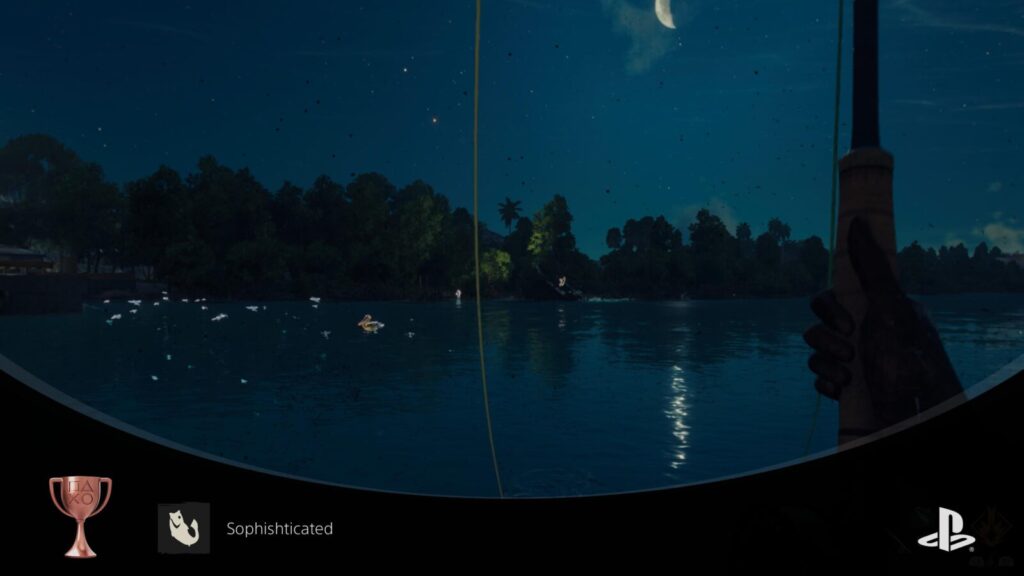
Sophishticated
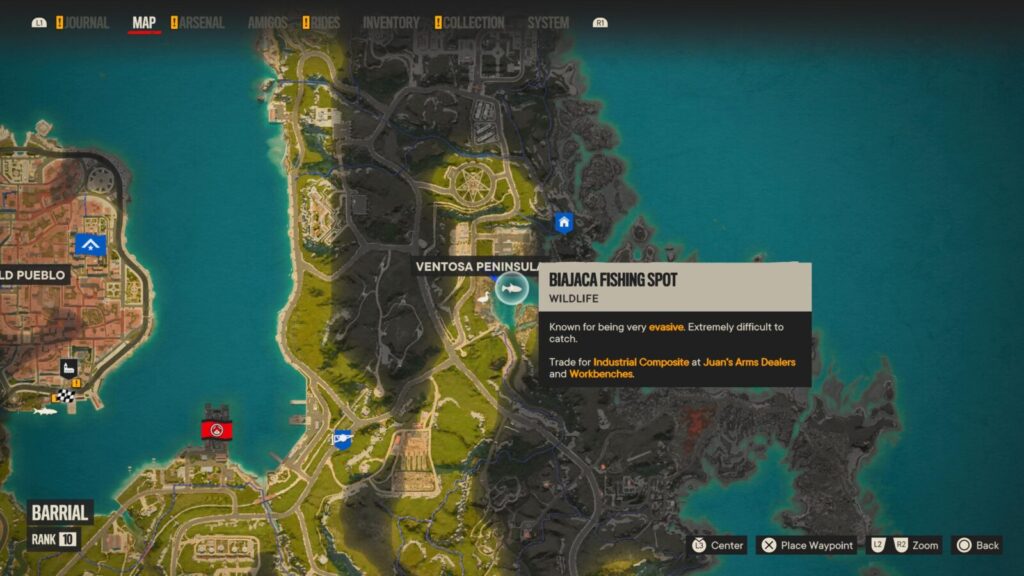
Catch 10 fish
To fish in Far Cry 6, you will first need the Fishing Rod, which will be given to you automatically near the start of the game. You then need to find a fishing spot. Any fishing spot will do, but you can’t find fish everywhere so you must make sure you’re at a fishing spot or you won’t find anything.
Next, pull your fishing rod out from your weapon wheel.
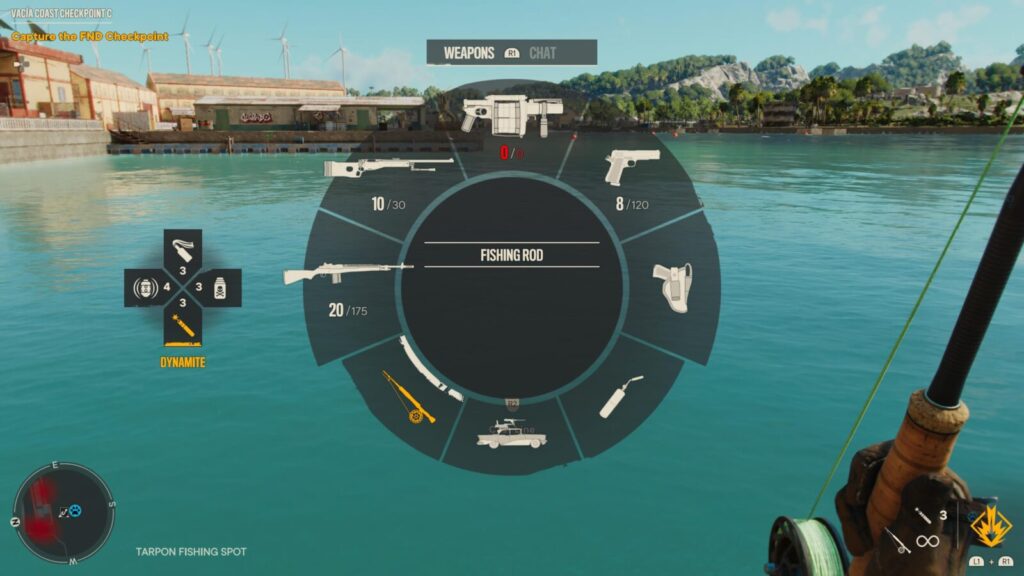
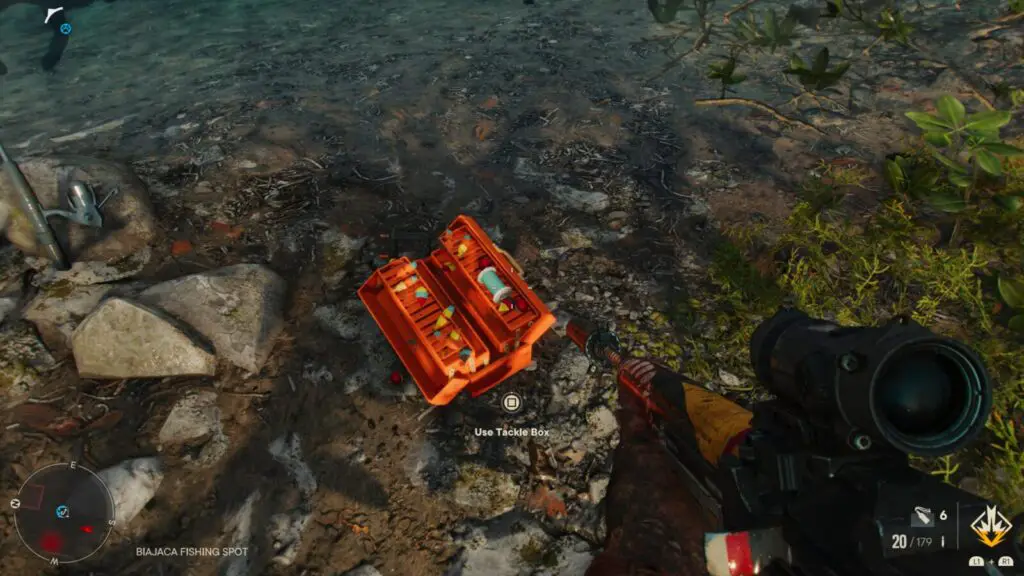
All fishing spots have Tackle Boxes near them, at which you can upgrade your fishing rod’s lure, reel, and line, to make it more durable and effective. Feel free to upgrade your rod to make this trophy go a little smoother.
With your rod ready, hold ![]() to pull it back and then release
to pull it back and then release ![]() to cast your line. With your line in the water, you should be able to see ripples on the water’s surface, to indicate where the fish are. Gently tap
to cast your line. With your line in the water, you should be able to see ripples on the water’s surface, to indicate where the fish are. Gently tap ![]() to make your lure seem like live prey to the fish, who will be attracted by its movement across the water.
to make your lure seem like live prey to the fish, who will be attracted by its movement across the water.
Once a fish has a hold on your lure, hit ![]() to hook it.
to hook it.
Now you need to use ![]() to pull your rod in the opposite direction that the fish is swimming, this will tire it out. While you do that, hold
to pull your rod in the opposite direction that the fish is swimming, this will tire it out. While you do that, hold ![]() to reel the fish in. Once the fish reaches the water’s edge, Dani will automatically grab it.
to reel the fish in. Once the fish reaches the water’s edge, Dani will automatically grab it.
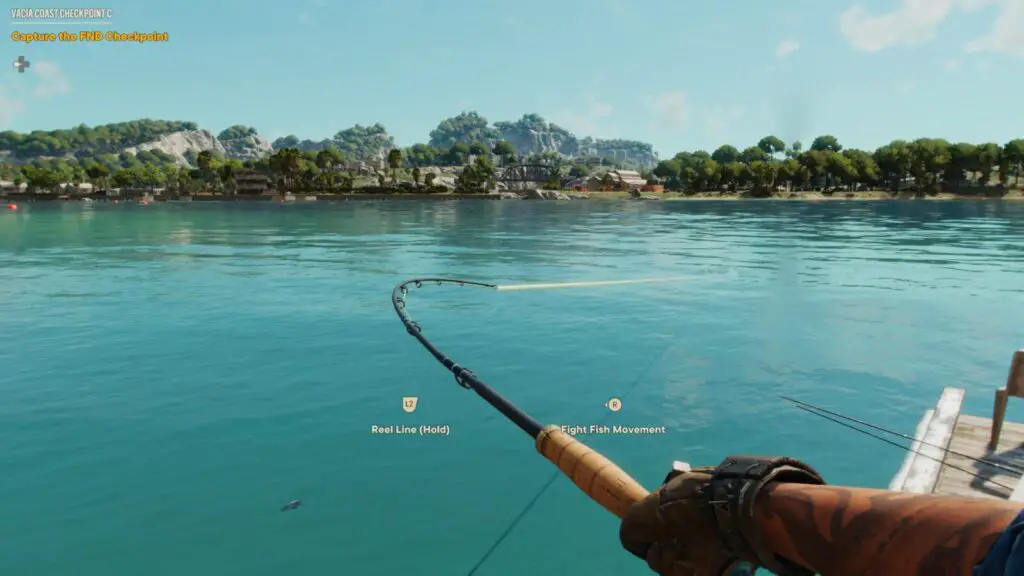
Keep a close eye on the color of your line throughout the whole process, if it starts to go red, you need to release ![]() and stop reeling, otherwise the line will snap!
and stop reeling, otherwise the line will snap!
To unlock the Sophishticated trophy, catch any 10 fish. It can be the same species of fish 10 times if you wish, as long as you make 10 catches.

Not So Special
Take out 10 Special Forces soldiers
Special Forces Soldiers stand out due to their heavy armour and full-face helmets. The icons above their heads are also increased in a shield shape, just like what you see in the trophy icon.
These enemies will come out quite a lot throughout the story. You’ll find yourself quite often facing off against them and even unlocking this trophy naturally due to that.
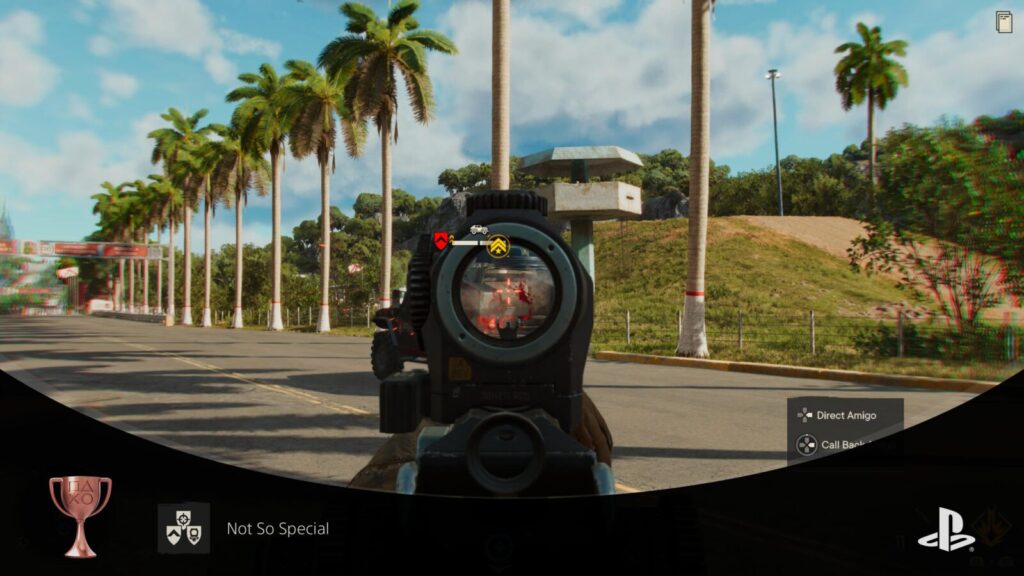
However, it helps to know that these guys will also come out and even hunt you down when you reach Heat Level 2, and your Heat gauge (next to the mini-map) has turned red. Your Heat bar is increased by killing enemy soldiers in succession.

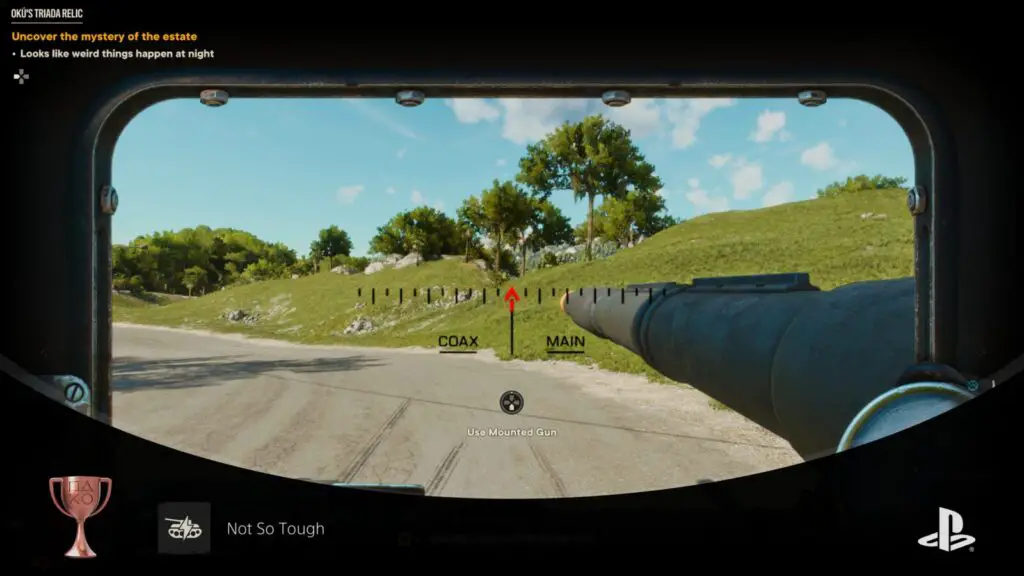
Not So Tough
Disable and hijack a tank using an EMP device
The best way to unlock Not So Tough is to use the “Volta” Supremo backpack. See Backpacking for info on Supremos.
You can also use EMP gadgets like grenades and sticky mines, but Volta is the most effective way to do this.
Next, you need to find an enemy tank. They tend to drive a lot on the main roads and appear near Military Checkpoints at the north end of Valle de Oro, near Esperanza.
Once you have found an enemy tank, approach it with a full Supremo charge and activate Volta by pressing ![]() +
+ ![]() together, thus firing an EMP charge which completely disables the tank.
together, thus firing an EMP charge which completely disables the tank.
Climb onto the roof of the tank and look down at the hatch, press ![]() to hijack the Tank and the Not So Tough trophy will unlock.
to hijack the Tank and the Not So Tough trophy will unlock.

Slip Sliding Away
Slide 200m at once
For the Slip Sliding Away trophy, you will need to sprint with ![]() and then hit
and then hit ![]() to begin sliding, but you need to maintain the slide across 200 meters. This means you will need to find a long enough slope.
to begin sliding, but you need to maintain the slide across 200 meters. This means you will need to find a long enough slope.
The best place we found for doing this is Sotomayor Farm near the south coast of Sierra Perdida in El Este. See the image below:
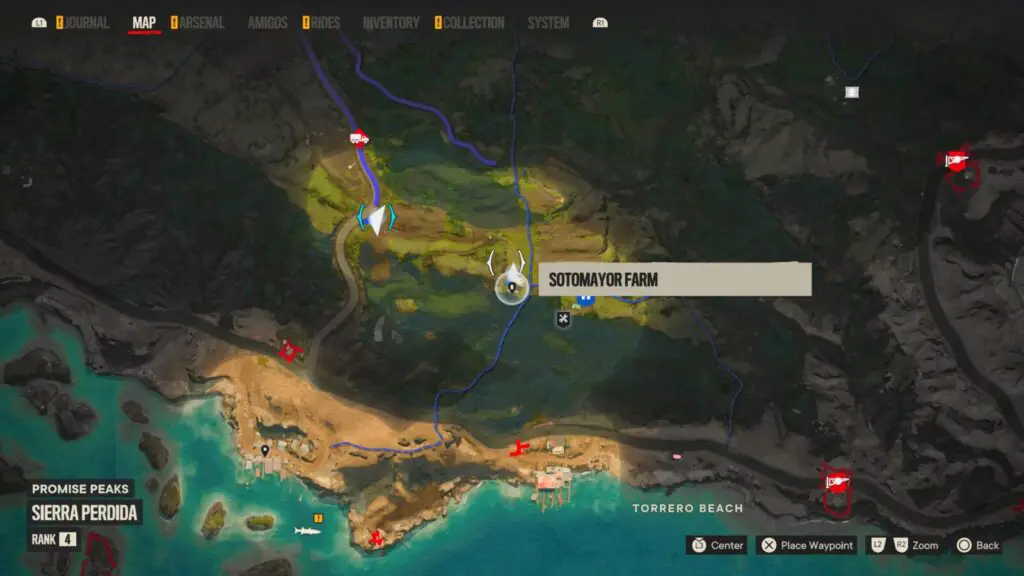
We started at the white waypoint and began our slide at the entrance to the farm. We then maintained the slide by using ![]() to guide our characters down the muddy slope all the way to the short wooden bridge at the blue waypoint in the screenshot above.
to guide our characters down the muddy slope all the way to the short wooden bridge at the blue waypoint in the screenshot above.
See the below video if you need more guidance:
There may well be better or simply alternative places to earn this trophy, but we found this worked well for us.

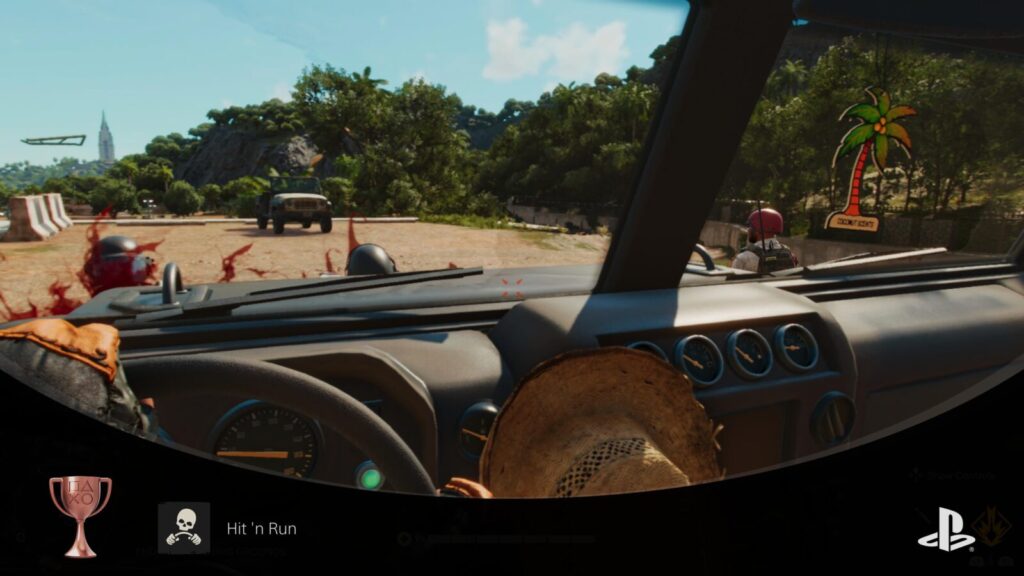
Hit ‘n Run
Run over 10 soldiers in a vehicle
This one’s simple! To unlock Hit ‘n Run, just drive around the roads in Yara, keeping your eye out for enemy soldiers who spawn quite frequently on road-sides, especially near FND-controlled facilities.
Whenever you see one, point your hood at them and them slam on the accelerator to hit them with your car. Repeat this until you’ve hit a cumulative total of 10 Soldiers in a vehicle.

Death From Above
Take out a soldier from 50m above them
Death From Above is a much easier trophy to acquire than it sounds. You just need to kill an enemy while parachuting over 50 meters above them. This is very easy to do with an explosive weapon like a Grenade Launcher or a Rocket Launcher.
I recommend Air Dropping at a location near enemy-occupied territory and then firing a rocket or grenade at the enemies below while parachuting overhead.
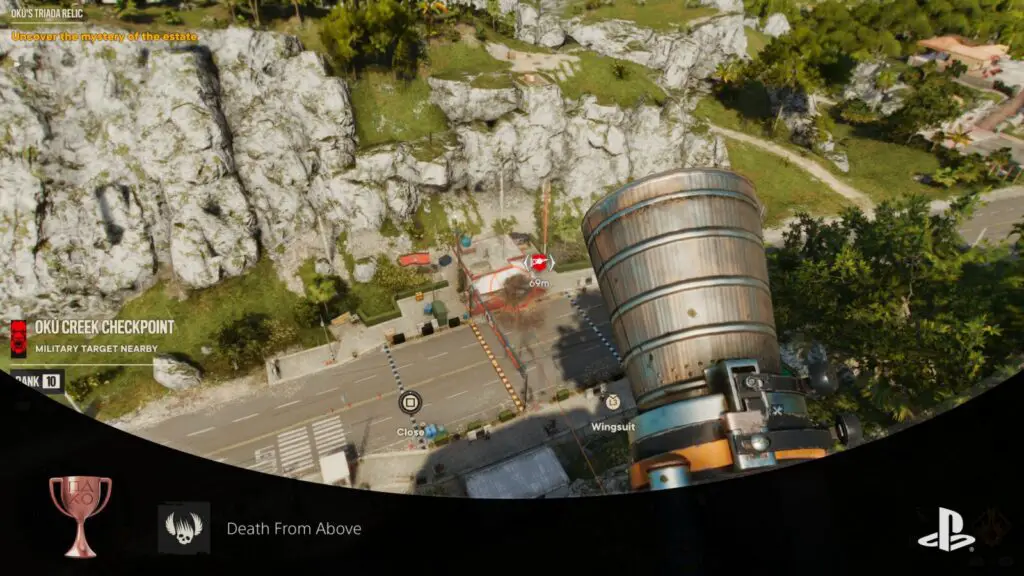
You can use a non-explosive weapon, of course, but you’ll need some pretty good aim!

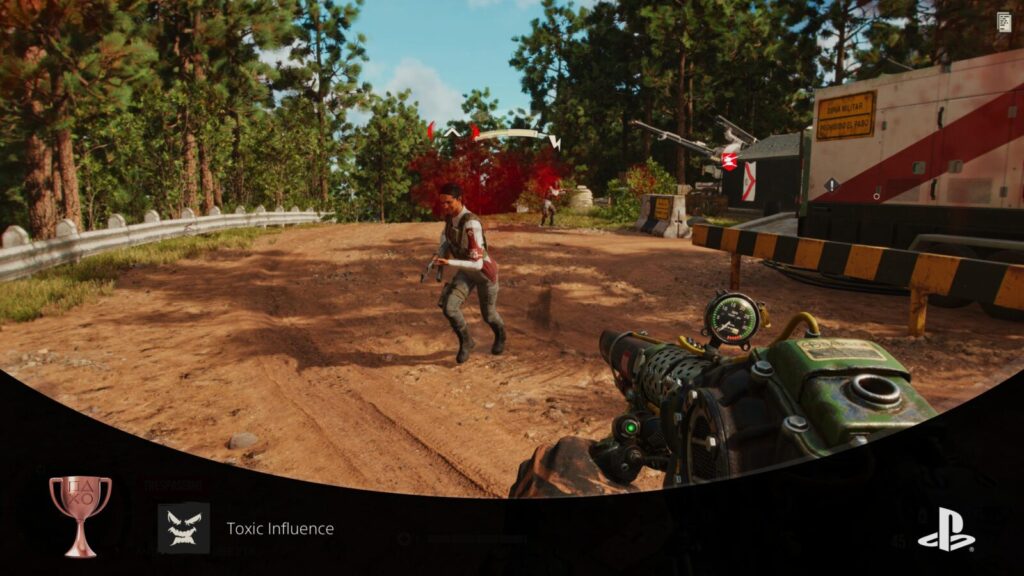
Toxic Influence
Have poisoned soldiers kill 5 other enemies
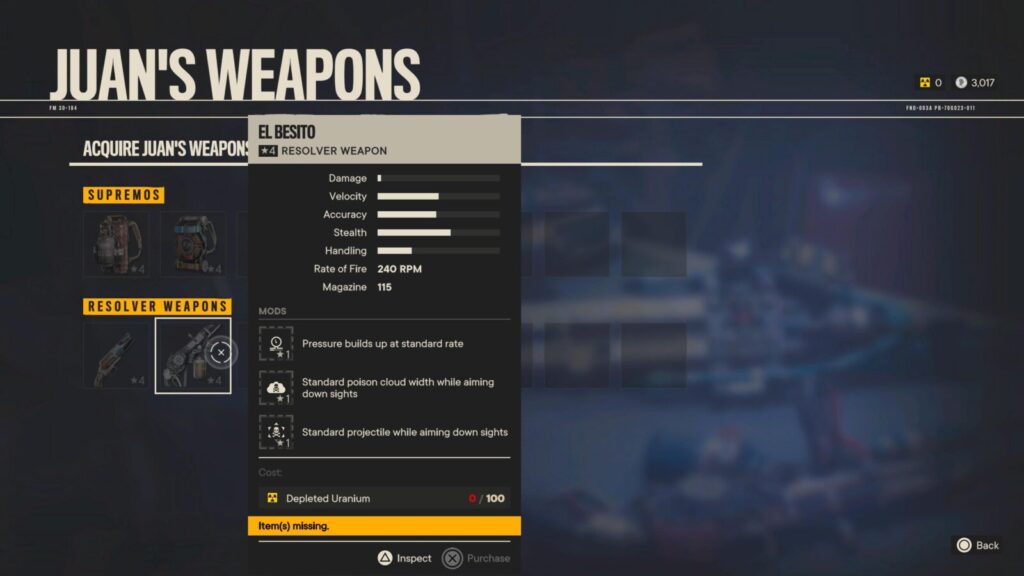
The Toxic Influence trophy requires you to use the enemy’s red poison clouds against them. There are a few ways to do this; Poison gadgets (like grenades), the poison Supremo “Fantasma”, and the poison gas Resolver Weapon “El Besito”. The Resolver Weapon and Supremo Backpack can both be acquired by spending Depleted Uranium from Anti-Air Cannon Sites at Juan’s Store.
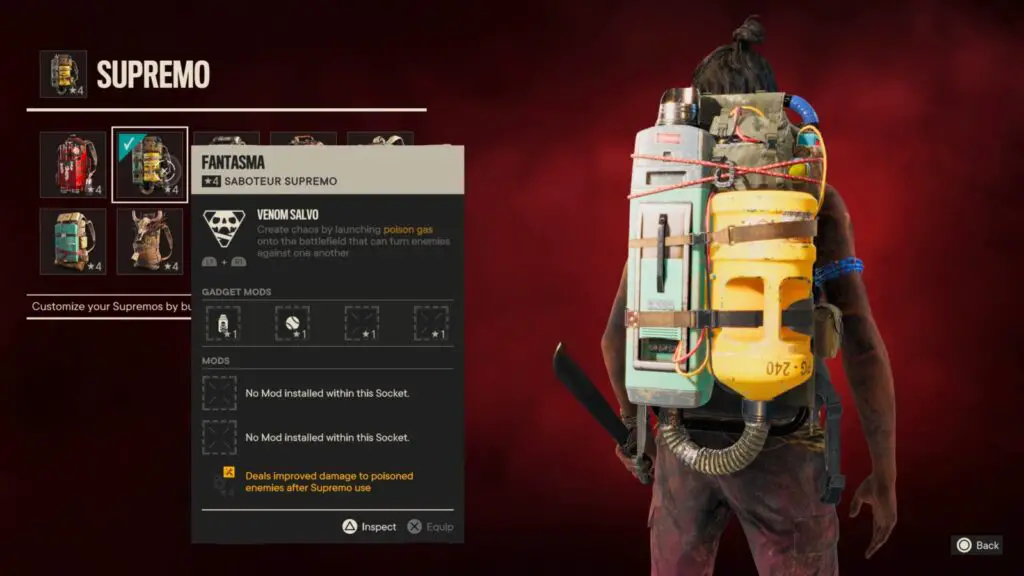
You can then purchase poison grenades as a Supremo mod at a workbench.
Once you have your preferred poison gas delivery method, it’s time to start using it on enemies. You’ll need to find groups of two or more enemies and then afflict at least one of them with the gas. They’ll be driven into a blind frenzy and will start attacking their allies. They’ll even prioritise their allies over attacking you, provided their ally is in their field of view.
Once you have used this affliction to get at least 5 enemies to kill an ally, the Toxic Influence trophy should unlock. This isn’t guaranteed though, and there seems to be some other indeterminable influence affecting whether or not a kill counts towards this trophy.
I recommend that you just keep using the poison gas in every conflict you find yourself in until the trophy unlocks, as it’s rather inconsistent.

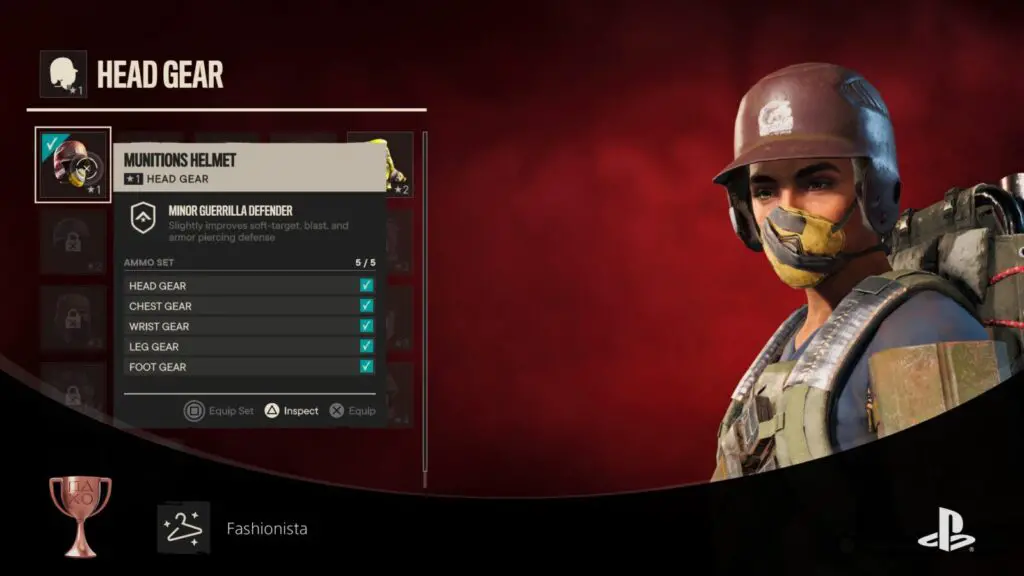
Fashionista
Equip a full matching Gear Set
The Fashionista trophy requires you to equip all pieces of gear from a single set, which means Headgear, Chest gear, Leg gear, Footgear, and Wrist gear.
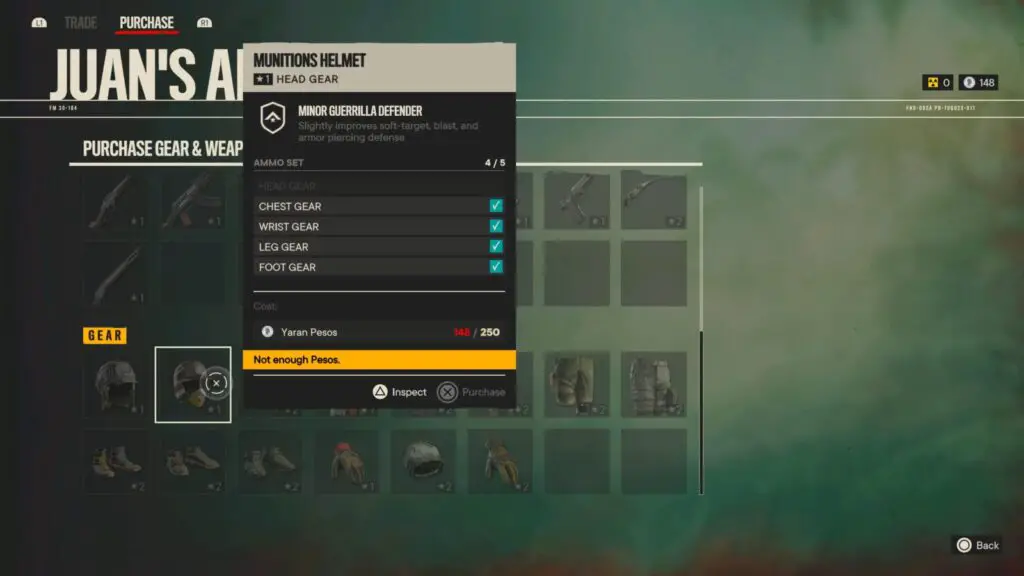
You will find gear in many ways, the most common sources being blue equipment chests hidden all over the map. However, it can be hard to get a full set when simply randomly exploring the map.
The easiest way to get a full set of gear would be to either buy one from the online store with Far Cry Credits (purchased with real money) or to buy one from an in-game store using Pesos. Check out one of the vendor stores to see if there are any sets you can afford. If not, save up until you have enough.
Once you have a full set, go to the ![]() menu and equip the full set (you can hold
menu and equip the full set (you can hold ![]() on a single item from a set to equip every other item that you have from that same set). The Fashionista trophy will then unlock right away.
on a single item from a set to equip every other item that you have from that same set). The Fashionista trophy will then unlock right away.

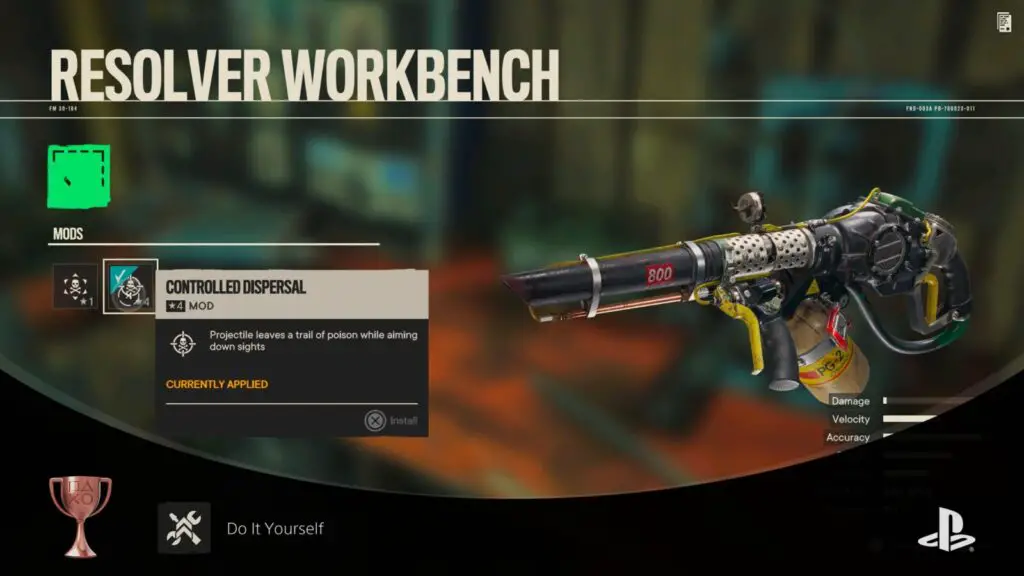
Do It Yourself
Install every Mod on a single Resolver Weapon
Resolver Weapons are powerful weapons hand-built by Juan, and so buying them will require you to have Depleted Uranium from Anti-Aircraft Cannon sites.
You will get your first Resolver Weapon, the “Tostador” flamethrower for free near the start of the game, though, and so can simply use that one to unlock the Do It Yourself trophy.
Go to a workbench and go to the “Resolver” tab under Primary Weapons. Select the Resolver you wish to upgrade by pressing ![]() on it and you’ll get a closer look at the mods it has installed. They will all be 1-star mods.
on it and you’ll get a closer look at the mods it has installed. They will all be 1-star mods.

Press ![]() on any of those mods to open the upgrade menu where you can purchase the four-star equivalent of that mod. You will need to do this for all mods on any Resolver Weapon. If you choose to use the Tostador, you will need to purchase three mods in total, using resources you find throughout the game.
on any of those mods to open the upgrade menu where you can purchase the four-star equivalent of that mod. You will need to do this for all mods on any Resolver Weapon. If you choose to use the Tostador, you will need to purchase three mods in total, using resources you find throughout the game.
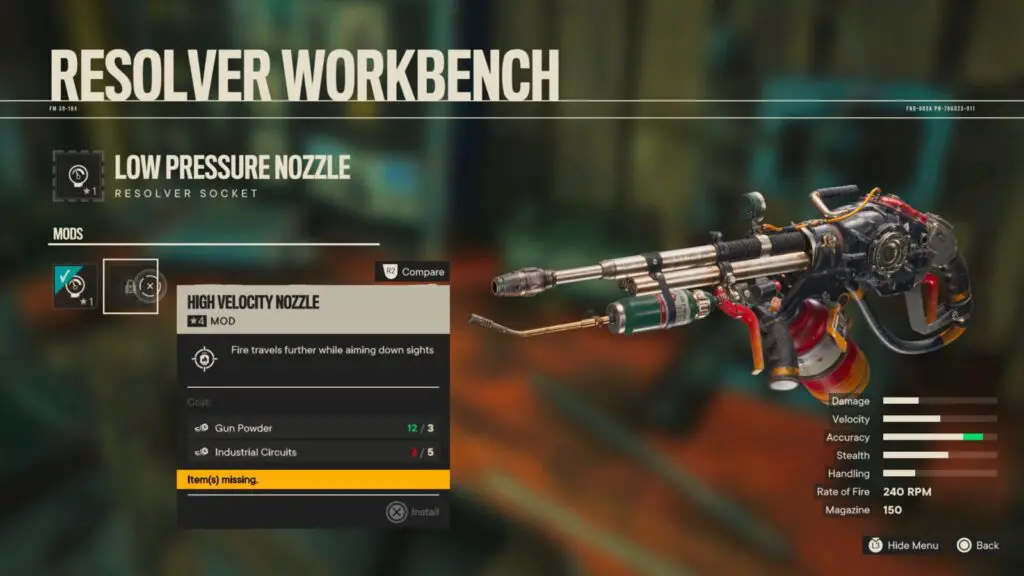
Once you have upgraded every mod on a Resolver weapon to the four-star equivalent, the Do It Yourself trophy will unlock.

Furiously Fast
Have 10 parts installed on a Ride
To unlock “Furiously Fast” in Far Cry 6, you must equip something in all 10 available upgrade slots on a Ride of your choice.
Go to the “Rides” tab in the ![]() menu and you’ll see 10 customisation slots in the bottom-left corner;
menu and you’ll see 10 customisation slots in the bottom-left corner;
| Customisation Slot | Customisation Type |
|---|---|
| Turrets | Offense |
| Countermeasures | Offense |
| Armor | Defense |
| Rams | Defense |
| Exterior Colors | Cosmetic |
| Interior Colors | Cosmetic |
| Rim Styles | Cosmetic |
| Mirror Props | Cosmetic |
| Dashboard Props | Cosmetic |
| Horns | Cosmetic |
For any ride, you will always have at least one default item for every slot except Countermeasures and Armor. Both those types of upgrade can only be found in Gran Premio races, so if you want to unlock this trophy you will need to complete a few.
Once you have unlocked an upgrade item for all 10 slots, make sure they are equipped and then the Furiously Fast trophy will unlock!

Glorious Leader
Reach the Rank of Comandante
In Far Cry 6, you gain EXP from completing all sorts of activities, from main story Operations to FND Base captures to simply shooting down billboards on the side of the road. EXP increases your rank.
To unlock the Glorious Leader trophy, you will need to earn enough EXP to increase Dani’s rank to Rank 14. Rank 14 is titled “Comandante”. You can check your current rank from the “Arsenal” tab in the ![]() menu. Hover over your rank and you’ll be able to see what the next rank is and how much EXP is required to reach it.
menu. Hover over your rank and you’ll be able to see what the next rank is and how much EXP is required to reach it.
Completing the game’s story and all of the collectible activities in Phase Two of this Far Cry 6 Trophy Guide are more than enough to reach Rank 14 so this trophy will unlock naturally on your journey to the Platinum.


Oh No You Don’t!
Take out 3 Insurgent Leaders
The Oh No You Don’t! trophy requires you to play Insurgency Challenges. Insurgency Challenges cannot be accessed until you have completed all Main Story Operations.
Once you have done so, you will see a new “Insurgency” tab in the ![]() menu. These challenges recur only once per week, which means that without one of the two exploits described below, you will need to wait a week between attempts. The trophy would take 3 weeks in that case.
menu. These challenges recur only once per week, which means that without one of the two exploits described below, you will need to wait a week between attempts. The trophy would take 3 weeks in that case.
Insurgency Challenges will have four objectives; some are completed in the main game by going to specific locations marked on your map, and one will require you to complete a Special Operations mission, which can be done solo, but requires an internet connection.
Once the objectives are complete, the location of the Insurgency Leader will be revealed and you can go to take them out.
Note that during insurgencies, all FND Bases in the region are reset, which is great, because the exploit below can then also be used to unlock Semi-Missable FND Base Trophies if you’ve already cleared all Bases.
Now then, to the much-needed exploit;
You should be very careful to follow the steps below exactly or you risk a glitch that happened to me. If you wait too long to reconnect to the internet and complete some of the objectives while offline, your insurgency tab will reset when you reconnect to the internet.
You’ll then be stuck in a sad purgatory where you cannot complete the insurgency challenge objectives. Even if you use the exploit to change the clock, when you reconnect to the internet you’ll be given the same impossible-to-complete Insurgency challenge again. Even if you wait for the Insurgency Challenges to reset naturally the next week, there will be no new Insurgency Events spawning on the map, and the Oh No You Don’t! Trophy will be unobtainable without making a new save.
Start by completing the first Insurgency Challenge like normal. Check the Insurgency tab in the ![]() menu for your objectives and complete them, crossing one Insurgency Leader off your list.
menu for your objectives and complete them, crossing one Insurgency Leader off your list.
Once done, to make sure your game gets saved, open the ![]() menu, go to the “System” tab and then select “Quit to Main Menu”.
menu, go to the “System” tab and then select “Quit to Main Menu”.
Next, go to your console dashboard and close the game. Go into the console settings and disconnect your console from the internet. On PS4 and PS5 this setting is found in the “Network” option.
Still in your console settings, go into the System options and select “Date and Time”. From there, manually set the date and time. The Insurgency Challenges in Far Cry 6 are on a 12-week cycle, and refresh every week. The Region changes weekly and loops back to the same region after 12 weeks.
So, if you just want a new Insurgency Region, set the date forward just one week (7 days). However, if you want the exact same Insurgency Region again, so that you know what you’re doing already, set the date forward 12 whole weeks (84 days).
Now you can load the game up again and continue from your last save. Check the Insurgency tab in the ![]() menu to make sure there is a new challenge available and that the Spec Ops mission is one you have available (at the time of writing, you can only do the Mesozoico and Maceo Spec Ops missions).
menu to make sure there is a new challenge available and that the Spec Ops mission is one you have available (at the time of writing, you can only do the Mesozoico and Maceo Spec Ops missions).
If everything looks good, reconnect to the internet (you can’t do the Spec Ops mission if you don’t), and then complete the Challenge again. If you fail to reconnect correctly at this point, you risk breaking the insurgency challenges and will need to make a new save and beat the game again to play insurgency challenges ever again.
After that, you should have killed 2/3 Insurgency Leaders, so just repeat the above process one last time to collect your Oh No You Don’t! trophy.
Here is a much safer exploit, if you only need Insurgency Leader kills. You cannot use this method to reset bases for the Semi-Missable FND Base Trophies, though.
This method has mixed reports, it has been working for Xbox users (who cannot use the clock exploit), worked when we tested it, and has been reported as working by a few PlayStation users, though some claim it does not work. It seems that sometimes it does not register and you will need to repeat this exploit as many as 8 times to get a kill to register, so keep that in mind.
Basically, complete all of the Insurgency Challenges as normal to find out where the Insurgency Leader is. Once you have his location, go to the base where he’s located and hunt him down. Make sure you only kill him, and leave plenty of other soldiers on the base alive.
Kill yourself with an explosive like a rocket launcher and you’ll respawn just before the base. Do not complete the FND Base Liberation or this won’t work.
When you respawn, go back inside and kill the leader again. As before, kill yourself to respawn.
Now, head back into the base a third time and kill the leader a final time to unlock your trophy!
Plat Get!


Conquistador
Unlock all trophies
After you have successfully earned all other trophies in this Far Cry 6 Trophy Guide, the “Conquistador” Platinum Trophy will unlock.
Thank you for choosing PlatGet as your source for this Far Cry 6 Trophy Guide, consider checking out our reviews and other guides!
Follow us on Twitter @GetPlat or Instagram @platget for updates on new reviews and guides, as well as small anecdotes about our platinum journeys.