PlayStation 5
Oceanhorn 2 White City Region Collectibles Guide
Collectible Guide
Where to Find All White City Region Collectibles in Oceanhorn 2
Welcome to our Oceanhorn 2 White City Region Collectible Guide. This is part of a full Oceanhorn 2 Trophy Guide and includes 6 other chapters. Browse below:
- Arne Region Collectible Guide
- Sernoa Region Collectible Guide
- White City Region Collectible Guide
- Pirta Region Collectible Guide
- Submeria Region Collectible Guide
- Source Region Collectible Guide
- Outlands Region Collectible Guide
In this specific section, we’ll be focusing on collectibles in the White City Region which will unlock the Sleepless in Arcadia trophy.
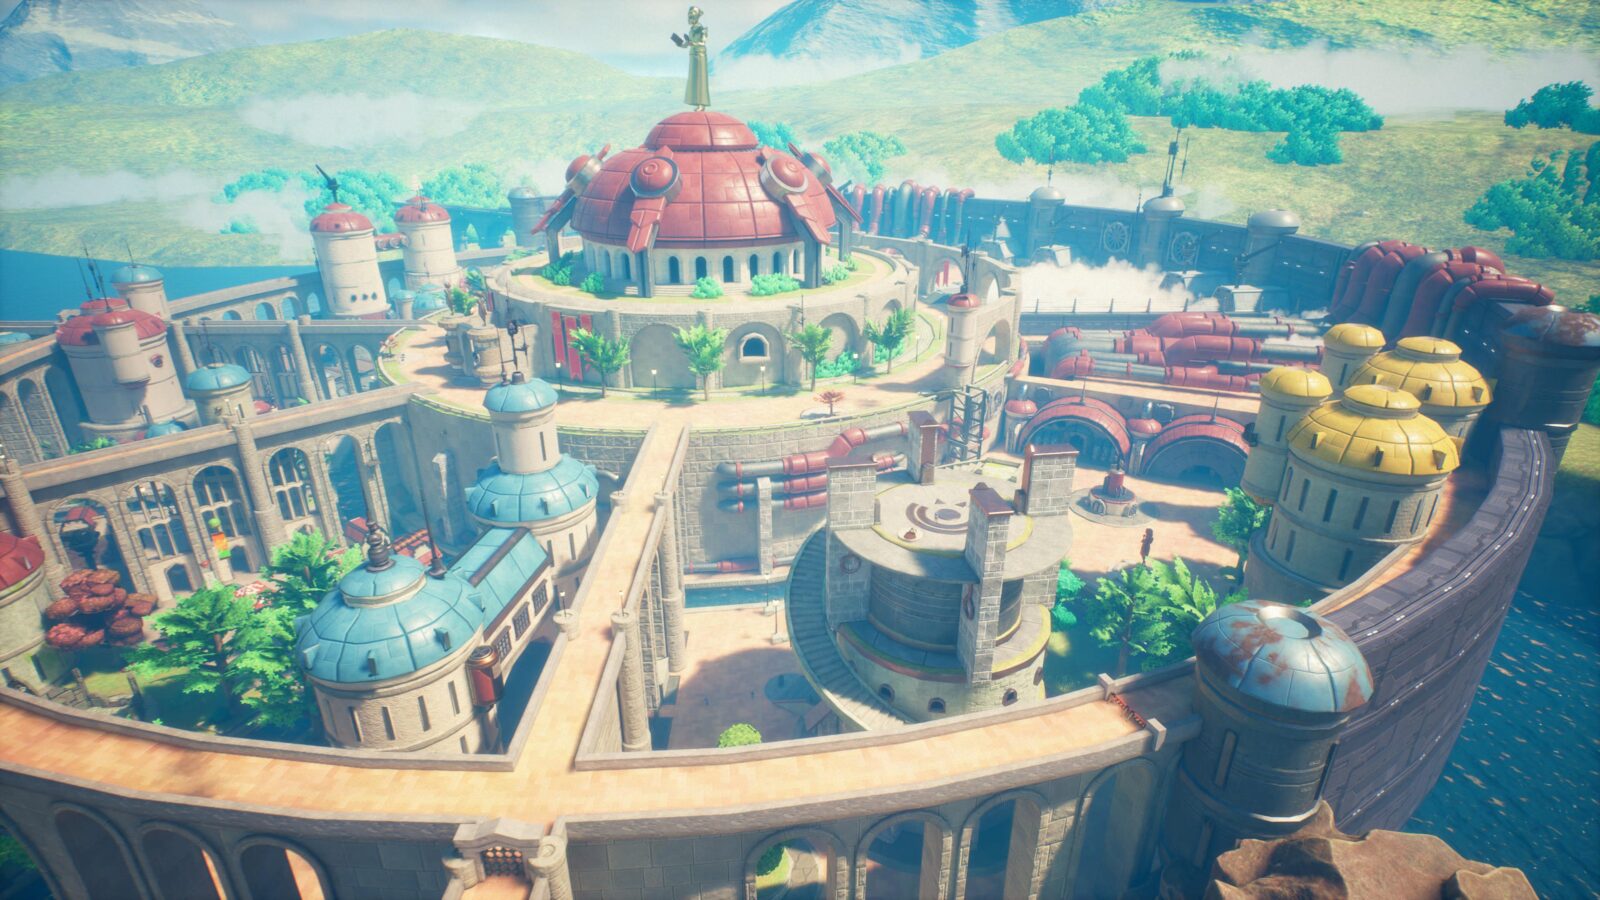
The White City
The White City is the capital of Arcadia, sitting in a central spot on the overworld map. It contains a lot of buildings that you’ll want to pretty thoroughly search through.
| Bloodstone | On the ledge above the shop near the Train Station. Climb the ladder near the entrance to reach it. |
| Bloodstone | Starting from the Train Station in the West, make your way along the pipes on the walls of Upper Town. |
| Treasure Chest (Centaur’s Leap Shard) | At the base of the Upper Town walls, drop down from the above collectible or use Ice Magic to cross the canal. |
| Treasure Chest (Atonement of Gaia Shard) | In the southwest of town there’s a chest behind a locked gate. You can open this gate by lighting the 2 pyres on nearby rooftops with Fire Spells. |
| Bloodstone | Opposite the inn you’ll see this Bloodstone up high on the roof of a building. Use the nearby pipes and rooftops to reach it. |
| Treasure Chest (Miniature Airship) | Opposite the inn, there’s an alleyway area where Fire Kaktos drop down to attack you. In this area, there’s a chest high up. Climb on the pipes and use a bomb to clear a blockage to reach the top of the building and retrieve the chest. |
| Treasure Chest (Watch of Pleiades Shard) | Near the harbor, you’ll see a chest high up on a pillar surrounded by other pillars, some of which have spikes on them.
To reach the chest, you need to climb up the ladder to the safe pillar and then jump across to the button. From there, make your way to the chest. All while avoiding being impaled. |
| Grand Core treasure chest key | At the harbor, look for a night next to a tent. Speak to him and he’ll give you this very important key. |
| Bloodstone | On the roof of Warehouse 2. Climb the nearby boxes to get onto the roof and then cross the wooden beam. |
| Treasure Chest (Emerald Crystal) | Inside the Train Station, but you need the Conductor’s Key. |
| Treasure Chest (Key to Warhouse Chest) | Underwater near a bridge close to the harbor. You’ll need the Diving Helmet, obviously. |
| Bloodstone | Near the Palace Elevator, there’s a waterfall coming from a drainage pipe and flowing into the canal. Below this waterfall, underwater, you will find this Bloodstone. Obviously you need the Diving Helmet. |
| Teleporter | The gold ball for this teleporter is at the top of the ladder behind the Tech Shop by the Harbor. You’ll need to bring it to the teleporter at its blue icon on the map and place it on the gold button. |
Palace Interior
At the center of White City, there’s a huge palace. Enter via the front door on the south side of the palace.
| Treasure Chest (Aquarius’s Gaze Shard) | Inside the library on the northeast side of the Palace. |
Arcadian Officer's House
From the train Station, go towards the Upper Town walls to find this house tucked away in the corner.
| Treasure Chest (Wooden Statue) | Clearly visible in this building. |
House Number 1 A
One of the enterable homes near the Train Station.
| Treasure Chest (Tech Tinkerer’s Key) | Clearly visible inside this home. |
Storage Room
In the Lower Town region of White City, look for a building that says “City Brew Hall” on the sign.
| Bloodstone | Inside this building, head down the ladder and then bomb the wall to reveal this Bloodstone. |
House Number 3 B
Remember that chest you got in White City? The one which required you to light the pyres on the rooftops?
Well, above the locked gate where that chest was, you’ll find the door to this room.
| Treasure Chest (Rough Diamond) | Step on the blue button to reveal a target you can shoot. When you shoot it, another target will appear, then another. After hitting all three targets, the Treasure Chest will become accessible and you can retrieve your Rough Diamond. |
House Number 2 A
The entrance to this room is below House Number 3 A, next to the previously-locked gate I mentioned.
| Treasure Chest (Pearl Necklace) | Clearly visible within this room. |
Tech Shop
Near the harbor, a weird-shaped metal building within an area surrounded by big metal walls. Inside, you can buy various items and there’s a curious green chest.
| Treasure Chest (Picture of Trin) | Very visible inside this shop, but it requires the Tech Tinkerer’s Key from House Number 1 A. |
Round House Number 2
Near the harbor, close to Warehouse Number 2, there’s a circular home you can enter.
| Bloodstone | Just climb down the ladder to find it hidden in the basement. |
Warehouse Number 2
Warehouse Number 2 is the big Warehouse at the Harbor, the one with the wooden beam on the roof, connecting it to a building that you cannot enter. Warehouse Number 2 connects to the Sewers which in turn connects to Warehouse Number 1’s secret entrance.
| Treasure Chest (Corona Australis Shard) | Follow the series of vents and ladders to reach this chest. |
| Treasure Chest (Bag of Gold) | Follow the series of vents and ladders to reach this chest. |
| Treasure Chest (Rough Diamond) | You will need “Key to Warehouse Chest” to open this one. |
Sewers
There are two entrances to the Sewers; One in Warehouse 2 at the Harbor, one behind the Knight’s Order in White City’s streets. There’s also another entrance in Warehouse 1 but you cannot access it from that side.
| Bloodstone | Near the ladder from Warehouse Number 2, look for another ladder near a lever to the west. Climb up it to find this bloodstone. |
| Bloodstone | Drain the water in the sewers using the drainage lever and then drop down into the lower levels. From there, continue south until you find this Bloodstone. |
| Treasure Chest (Pearl Necklace) | Drain the water in the sewers using the drainage lever and the go to the east side and drop down to the bottom. |
| Treasure Chest (West Hall key) | Same area as the above but at the top instead. |
| Bloodstone | Access the southeast side using the West Hall Key. From there, look for another ladder to your west and you’ll find this bloodstone at the top. |
| Treasure Chest (Rough Diamond) | Access the southeast side using the West Hall Key. From there, look for two blue buttons. Use barrels to press them simultaneously and gain access to this chest. |
Warehouse Number 1
Although you can access Warehouse Number 1 from the outside, I recommend coming up through the sewers, as this will allow you to access a chest you cannot reach from the other side.
| Treasure Chest (Obsidian Necklace) | Right in front of you if you enter from the Sewers. Otherwise inaccessible. |
| Treasure Chest (Conductor’s Key) | Break some barrels on the ground floor to reveal a vent you can crawl through, leading to a ladder. Climb the ladder to find this chest. |
The Knight's Order
The Knight’s Order is a huge tower in White City, hard to miss as it has the region’s overlook on its roof.
| Bloodstone | In the canteen on the lower floor, look for a vent you can crawl through under the bookshelves. |
| Bloodstone | In the library on the upper floor, look for a vent you can crawl through, obscured by barrels you can break. |
| Treasure Chest (Wake of Titan Shard) | After bringing the 19 Mysterious Daggers to the Knight Scholar in The Knight’s Order, you’ll receive a Knight Scholar’s Treasure Key. Use that key on the statue and then jump into the area below it to open this chest. |
| Treasure Chest (Emerald Crystal) | After bringing the 19 Mysterious Daggers to the Knight Scholar in The Knight’s Order, you’ll receive a Knight Scholar’s Treasure Key. Use that key on the statue and then jump into the area below it to open this chest. |
The Grand Core
The Grand Core is an optional dungeon in The White City. The entrance to it is next door to the airport on the northeast side of town. Inside this dungeon, you can get the shield prototype required for the “Prototype” trophy. There’s also a chest inside which you can open provided you have the Grand Core Treasure Chest Key.
| Treasure Chest (Pearl Necklace) | In the Grand Core Breakroom at the northwest side of the map. This chest requires the Grand Core Treasure Chest key from the knight at the harbor. |
Drainage Complex
This is probably one of the most well-hidden areas in the game and so if you’re looking for just one or two collectibles you still need, they’re probably in here. To access the Draining Complex, go underwater in the canal that leads to Warehouse Number 2, next to the boarded-up building, and you’ll find a secret entrance.
| Bloodstone | You’ll see this when you enter. Swim up through the slow-moving turbine and then swim around to reach the Bloodstone. |
| Treasure Chest (Rough Diamond) | Head to the surface of this area and climb out of the water. Place a barrel on the button to gain access to this chest. |
White City Prison
The prison is found near the Train Station. It looks rather sinister and has two guards and a gravestone posted up out front. Inside the Prison, there are several chests that you can only open once you have beaten the corresponding escaped prisoners.
Earn the Bounty Hunter trophy and then return to the prison to loot your spoils!
Miscellaneous Regions
The following areas do not seem to fit into any of the game’s provided Regions. However, whether or not they contribute to the 100% completion of any Regions, they do contain Bloodstones and Chests that you will need for other trophies anyway, so it’s best to go and clean up in these areas too!
Wayford Caverns
On the overworld map, between Arnes and Sernoa, there’s a large hole in the ground with a crane over it. Hanging from the crane, there’s a rope you can climb down to access this area.
| Treasure Chest (Bag of Gold) | This is a very linear cave, so just follow it around until you reach this chest. You’ll need to use a Fire Spell to clear the spiky plants away. |
The Sky Pillar
You can only reach the Sky Pillar via Yellow Bird. Pilot the vehicle and fly it northwest of Source to find the Sky Pillar. Land there and begin exploring!
| Bloodstone | Behind a tree on the north side of the Pillar. |
| Treasure Chest (Health Container) | At the bottom of a ladder on the northeast side of the Pillar. |
Zomon Island
You can only access this island by boat. It’s best to depart from the White City docks and then sail east to find this small island on the water.
| Bloodstone | Near the dock you’ll find an alcove blocked by debris. Blow up the boulders with a bomb to access the Bloodstone beyond. |
| Treasure Chest (Health Container) | Go to the middle of the lake and dive underwater with the Diving Helmet to find this chest. |
Faroah Crypt
Faroah is a historical region of the map. You can access it only on foot. It’s situated in the very northeastern corner of the map. It also just so happens to be the hiding place of a very special sword.
| Treasure Chest (Faroah Crypt Key) | Bomb the wood panels on your left and then climb up the vines to reach this chest in plain view. |
| Treasure Chest (Pearl Necklace) | In the southwest challenge room. |
| Treasure Chest (Obsidian Necklace) | In the southeast challenge room. |
| Treasure Chest (Rough Diamond) | In the northeast challenge room |
Thanks for Reading
Plat Get!
Thank You!
Thank You for choosing PlatGet as your source for this Oceanhorn 2 White City Region Collectibles Guide.
Wondering what to complete next? Browse our complete guide selection or check out our friends at PlatPrices.com to filter the PS Store based on price, trophy difficulty, or completion time.
Got a question, some feedback, or just want to say thanks? Drop a comment in the discussion section below, we'd love to hear from you! No account required!!