PlayStation 4, PlayStation 5
Young Souls Trophy Guide


General Info
FAQ
How long does it take to beat Young Souls and unlock all trophies?
Around 5 hours with Accessibility Options.
How difficult is it to beat Young Souls and unlock all trophies?
Easy (3/10).
Does Young Souls have online trophies?
No.
Does Young Souls have difficulty-specific trophies?
Yes.
Does Young Souls have missable trophies?
Yes, No Pain No Gain.
Does Young Souls have glitched trophies?
No.
What is the minimum number of playthroughs required to unlock all trophies in Young Souls?
One.
Does Young Souls have a Platinum Trophy?
Yes.
Trophy Guide
Young Souls Trophy Guide and Road Map for PlayStation 4
Welcome to our Young Souls Trophy Guide. Young Souls is a fantastic side-scrolling beat-em-up with light rogue-like influences and one of the best indie-game art styles I’ve seen since Hades.
In Young Souls, you take on the roles of Tristran and Jennm young delinquents who stumble into a world of Magic and Goblins as they find themselves trying to save their adoptive father from an underground overlord known as Dwarvengobben.
The trophy journey can be as short as 5 hours or as long as 20, depending on how you choose to approach it.
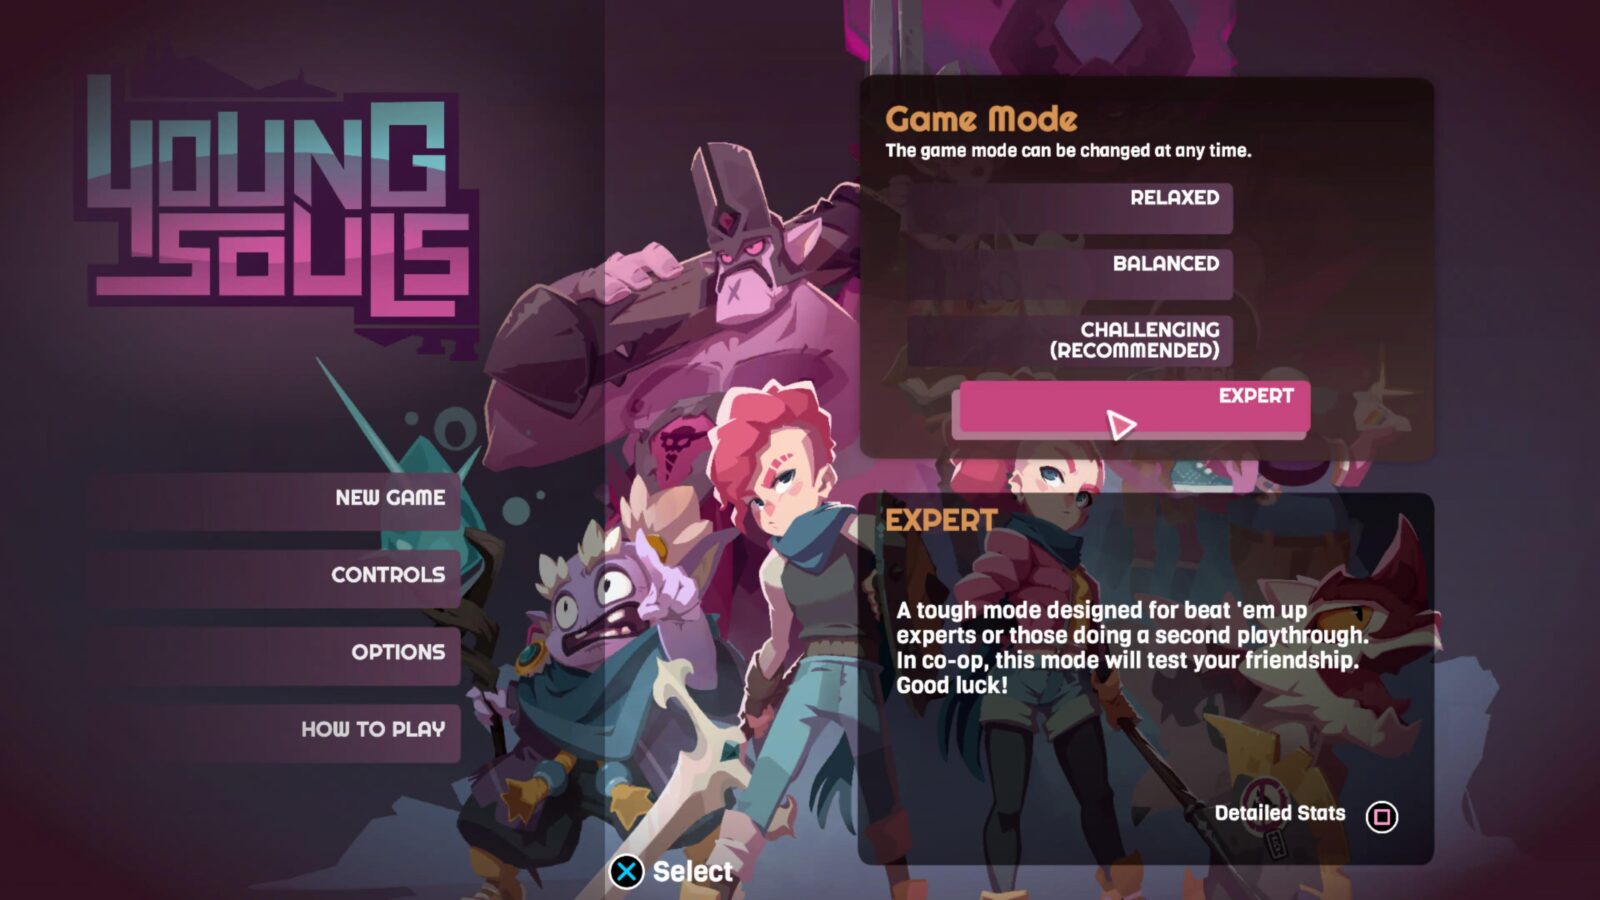
Phase One – Complete the Game on Expert Difficulty
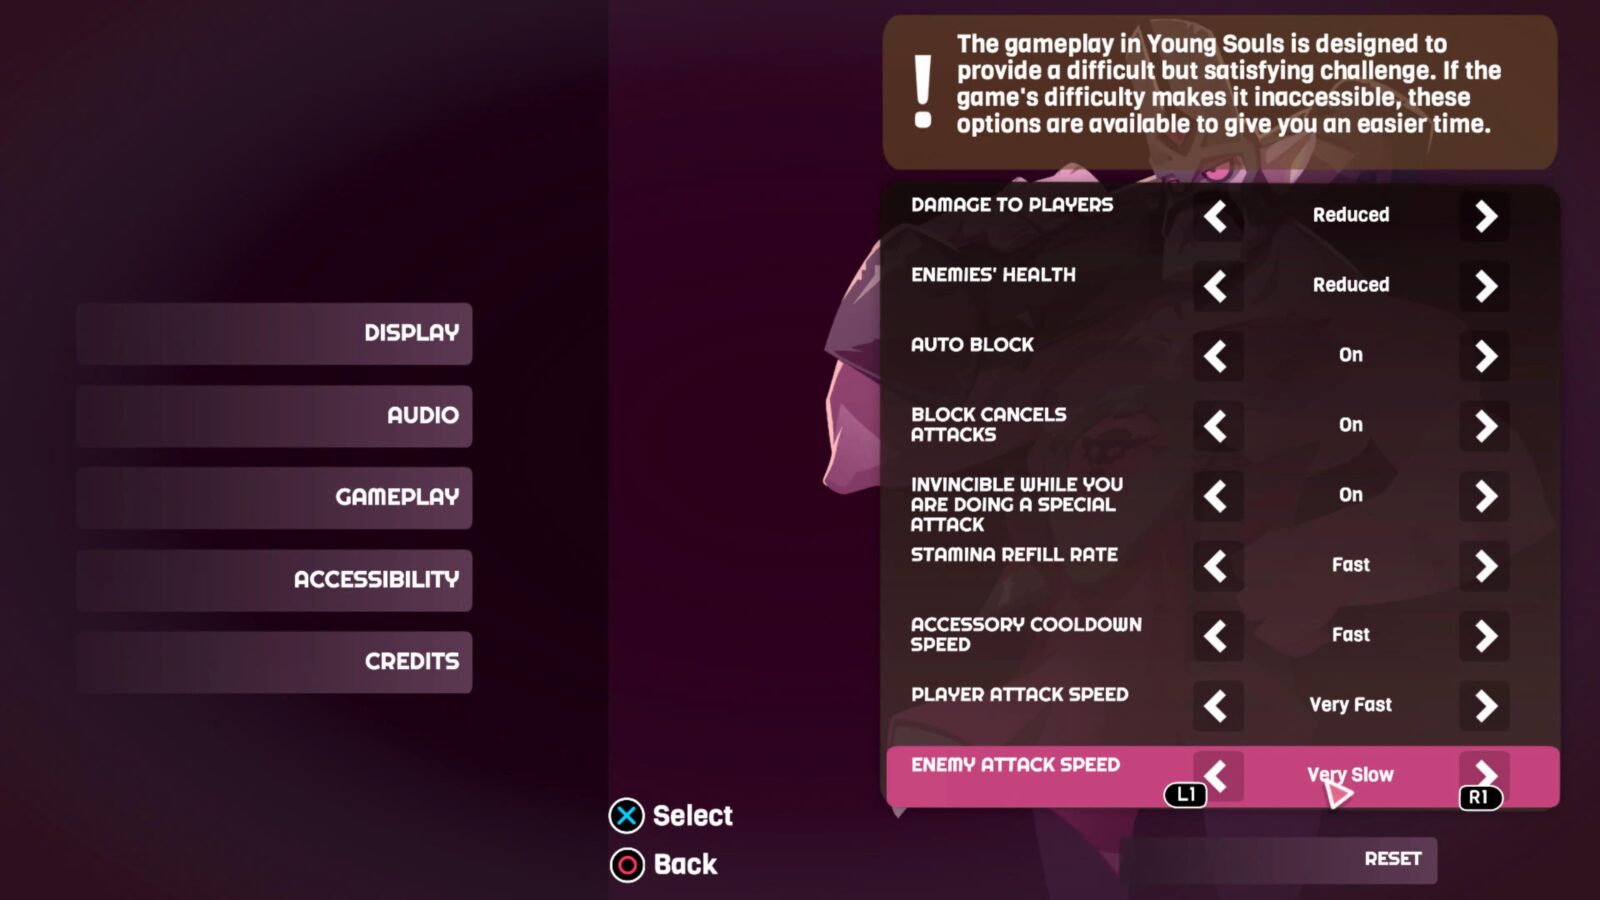
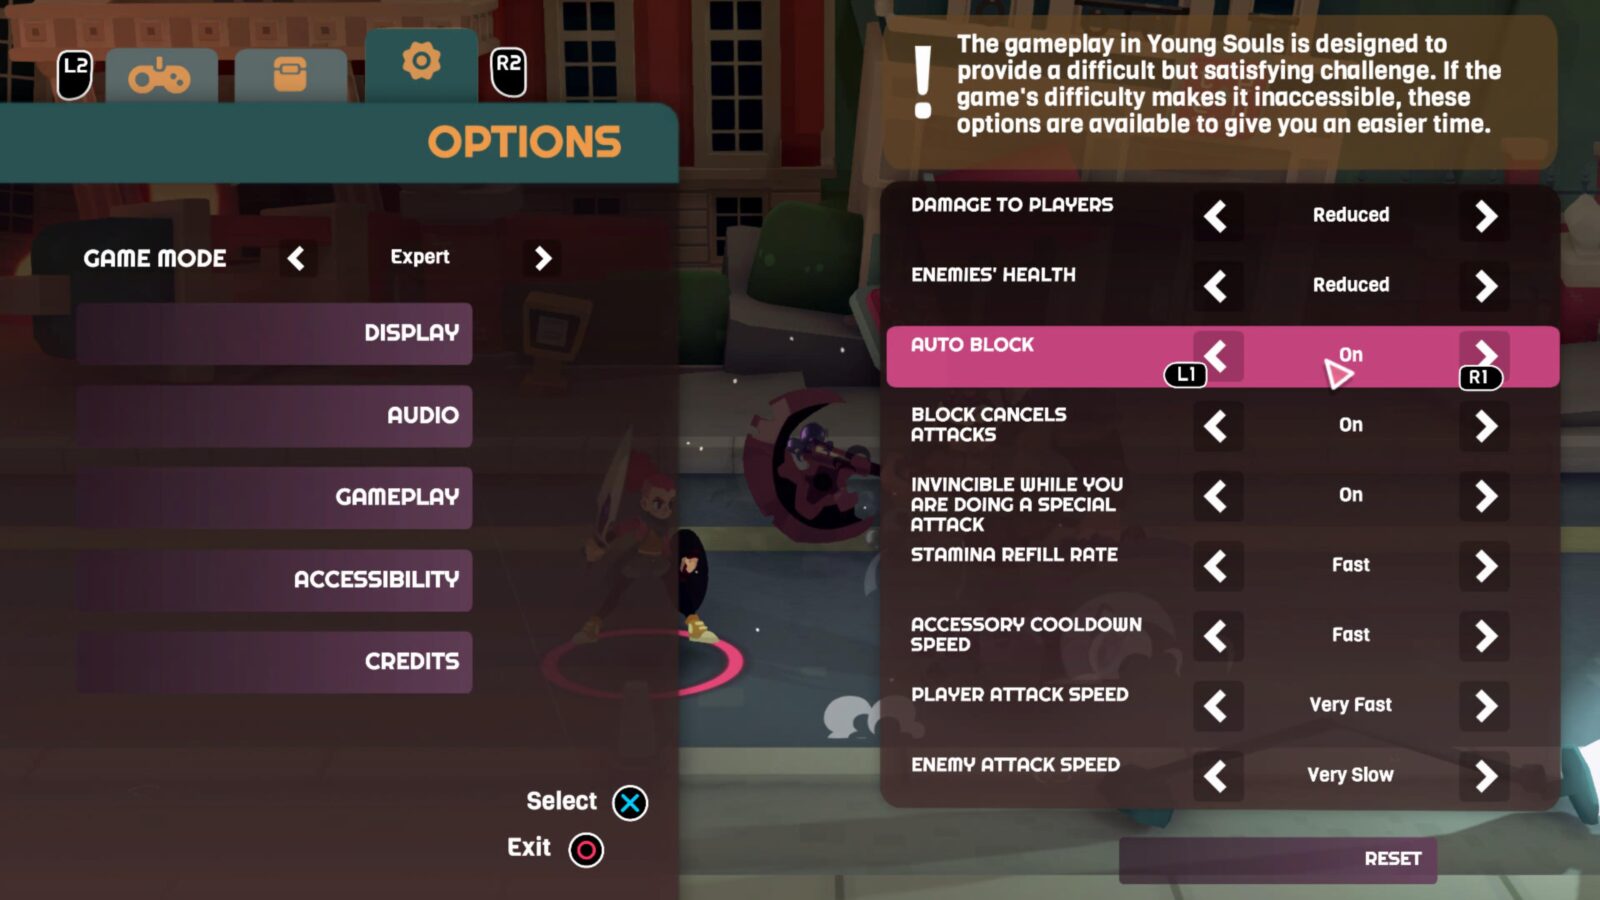
Wait, don’t let that title discourage you! Sure, the game has difficulty-specific trophies and you’re going to need to complete the game on the hardest possible difficulty, but you may be pleased to learn that there are Accessibility options that make everything much easier.
Under “Options > Accessibility” you can customize an array of settings that will allow you to modify the gameplay experience to your liking.
In my opinion, you should give the game an honest try first and see if you enjoy the challenge. If it’s too much for you then there’s nothing wrong with that, but at least you know you’re not missing out on an experience you might otherwise really enjoy.
On Expert Difficulty, enemies are harder to kill and deal more damage. You’ll also find fewer healing items and won’t have any lives to spare, so it’s certainly a challenge, to say the least.
If you don’t want to use Accessibility Options, then you could consider splitting this first phase of our Young Souls Trophy Guide into two phases; play on Challenging first to get to know the game, and then play on Expert once you’re… well, an expert!
Once you get into the real meat of the game at around Chapter 3, you’ll start to explore a series of dungeons (also called “Zones”) within one of four maps. Over time, you’ll gain access to each of the maps until you have full access to all areas of the game. My recommendation would be that you do take the time to explore every area you can.
Not only will this make the trophy journey a lot easier with less post-game cleanup, but you’ll also find powerful weapons & armor, earn plenty of XP, and gather a lot of money and resources. These things will all inevitably help you stay tough enough to handle anything the game can throw at you.
Lastly, there’s just one missable trophy to look out for; No Pain, No Gain. You don’t necessarily need to earn it in this phase, but the sooner you get it the better, so check that trophy out now so you know what you’re in for.
Unmissable Story Trophies

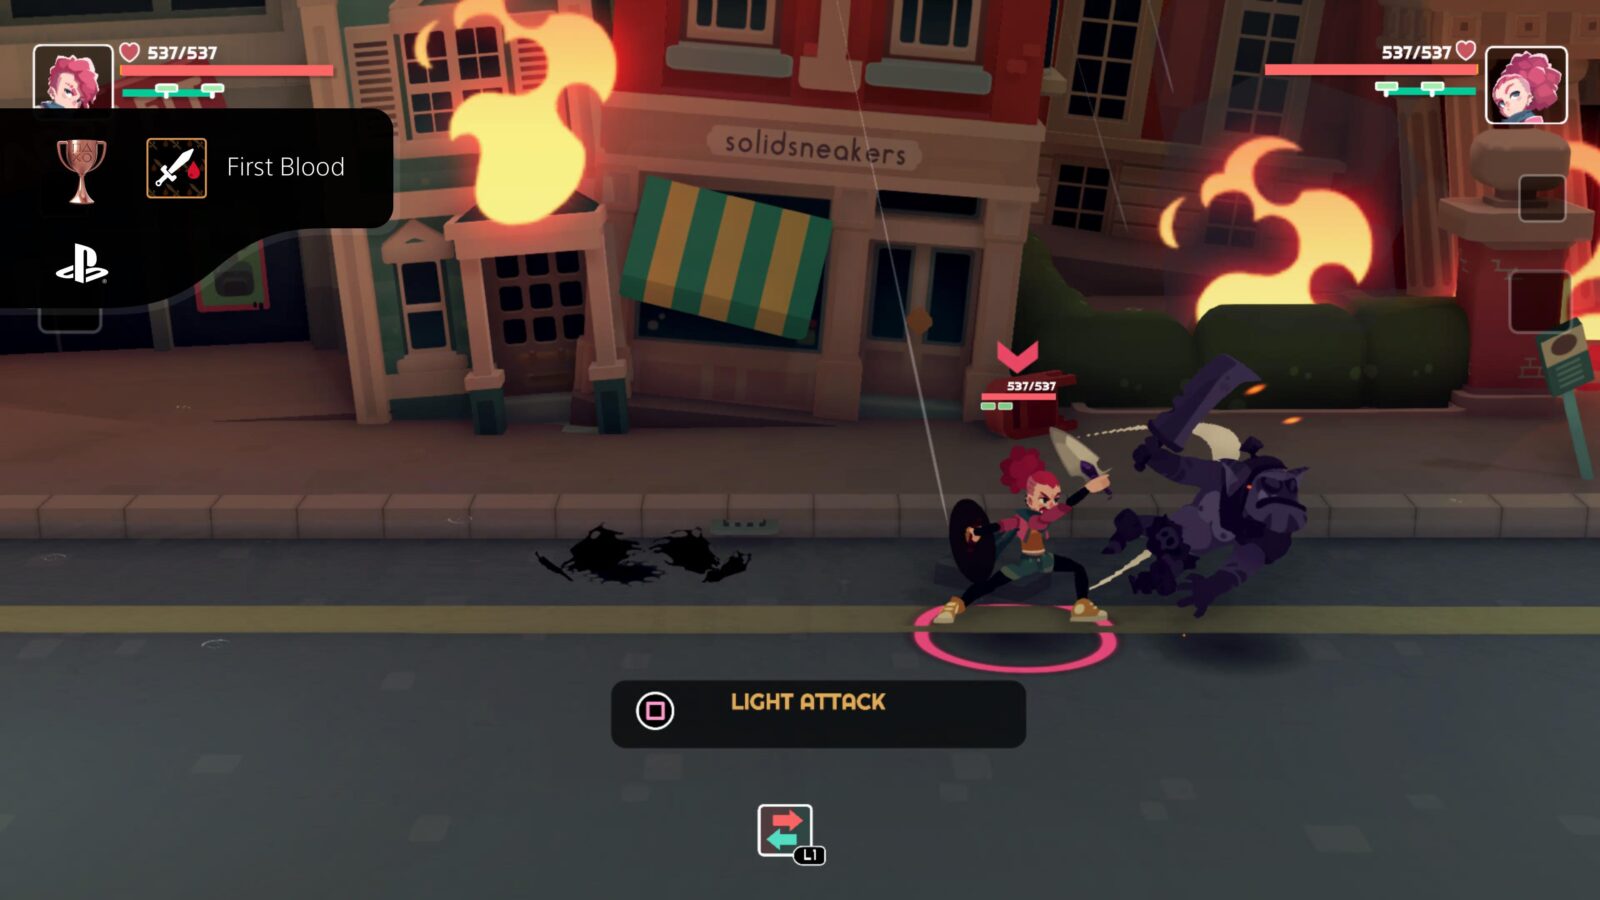
First Blood
Kill a goblin for the first time
The First Blood trophy is totally unmissable. You’ll earn it during Chapter 1, which also acts as a tutorial for the game’s main mechanics. After the cutscene, walk right and use ![]() to attack the Goblin until it dies, unlocking the trophy.
to attack the Goblin until it dies, unlocking the trophy.

So Much for the Master of Magic
Beat Dinkoy
Dinkoy is the game’s first boss, who you’ll face during Chapter 3. Reach and defeat him to unlock the “So Much for the Master of Magic” trophy.

Definitely Silent
Kill Marl
Marl is a boss that you will face in the Forbidden Jail in an area at the top-right side of the map called Assassin’s Den, just before collecting the Power Rune in that map. Defeat them to unlock the “Definitely Silent” trophy.

She Became One With Her Machine
Kill Tetcha
Tetcha is the boss you will face in the Laboratory’s Core zone of the Drowned Caverns map, just before getting the Power Rune there. Defeat them to unlock the “She Became One With Her Machine” trophy.

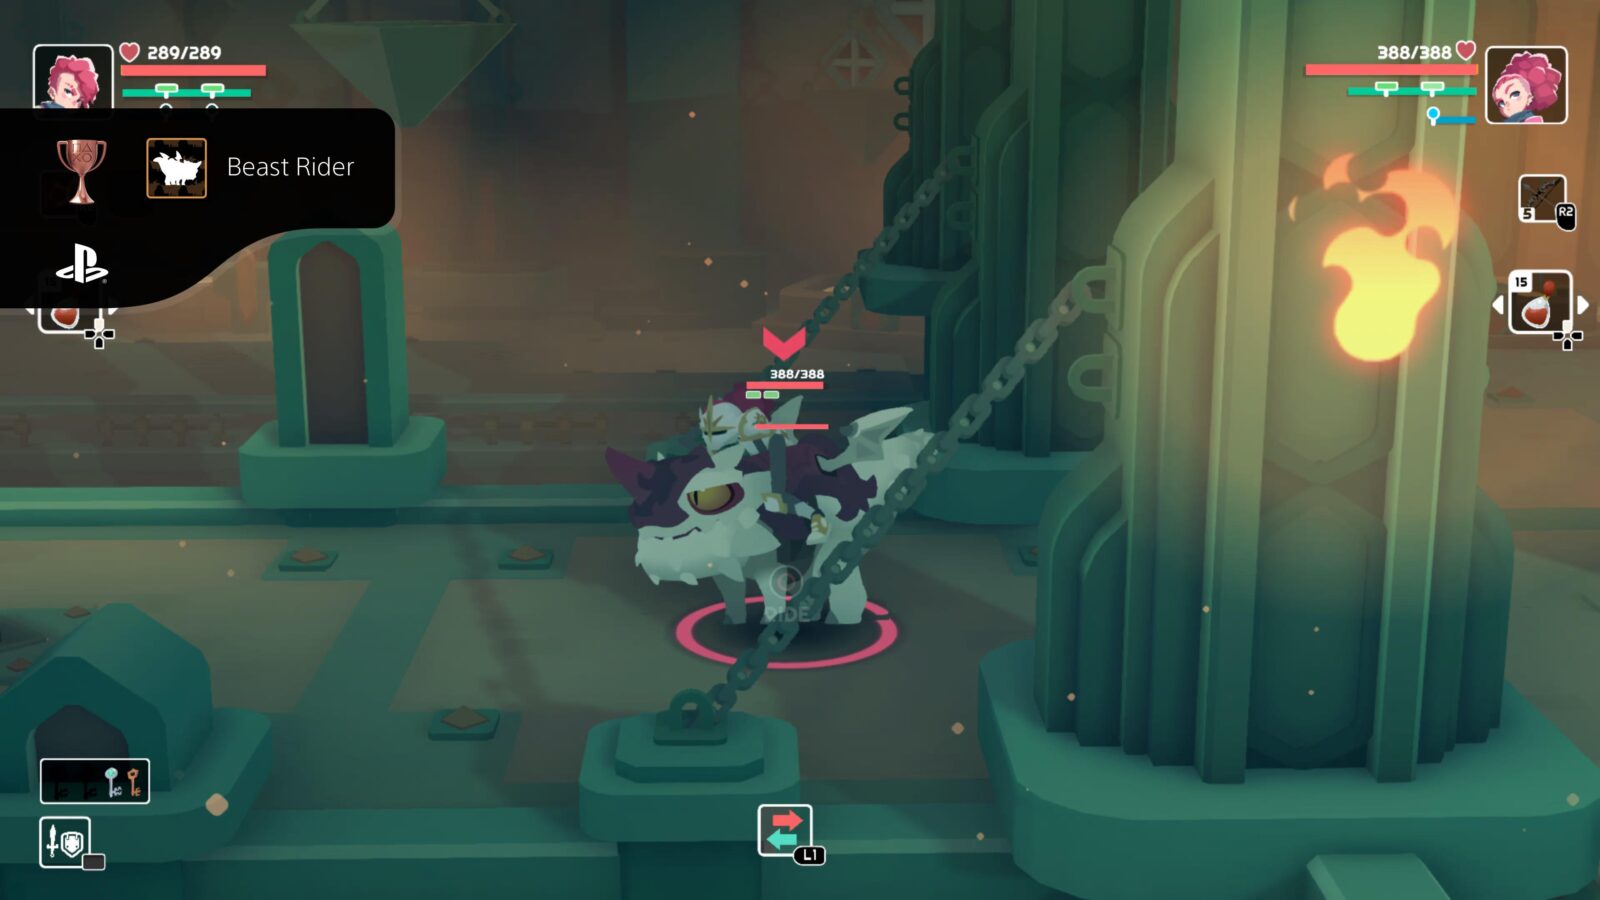
Beast Rider
Ride a dragon for the first time
In the Steel Workshop Zone of the Molten Lands map, you’ll come across a Dragon, which the two protagonists will discuss upon first seeing one.
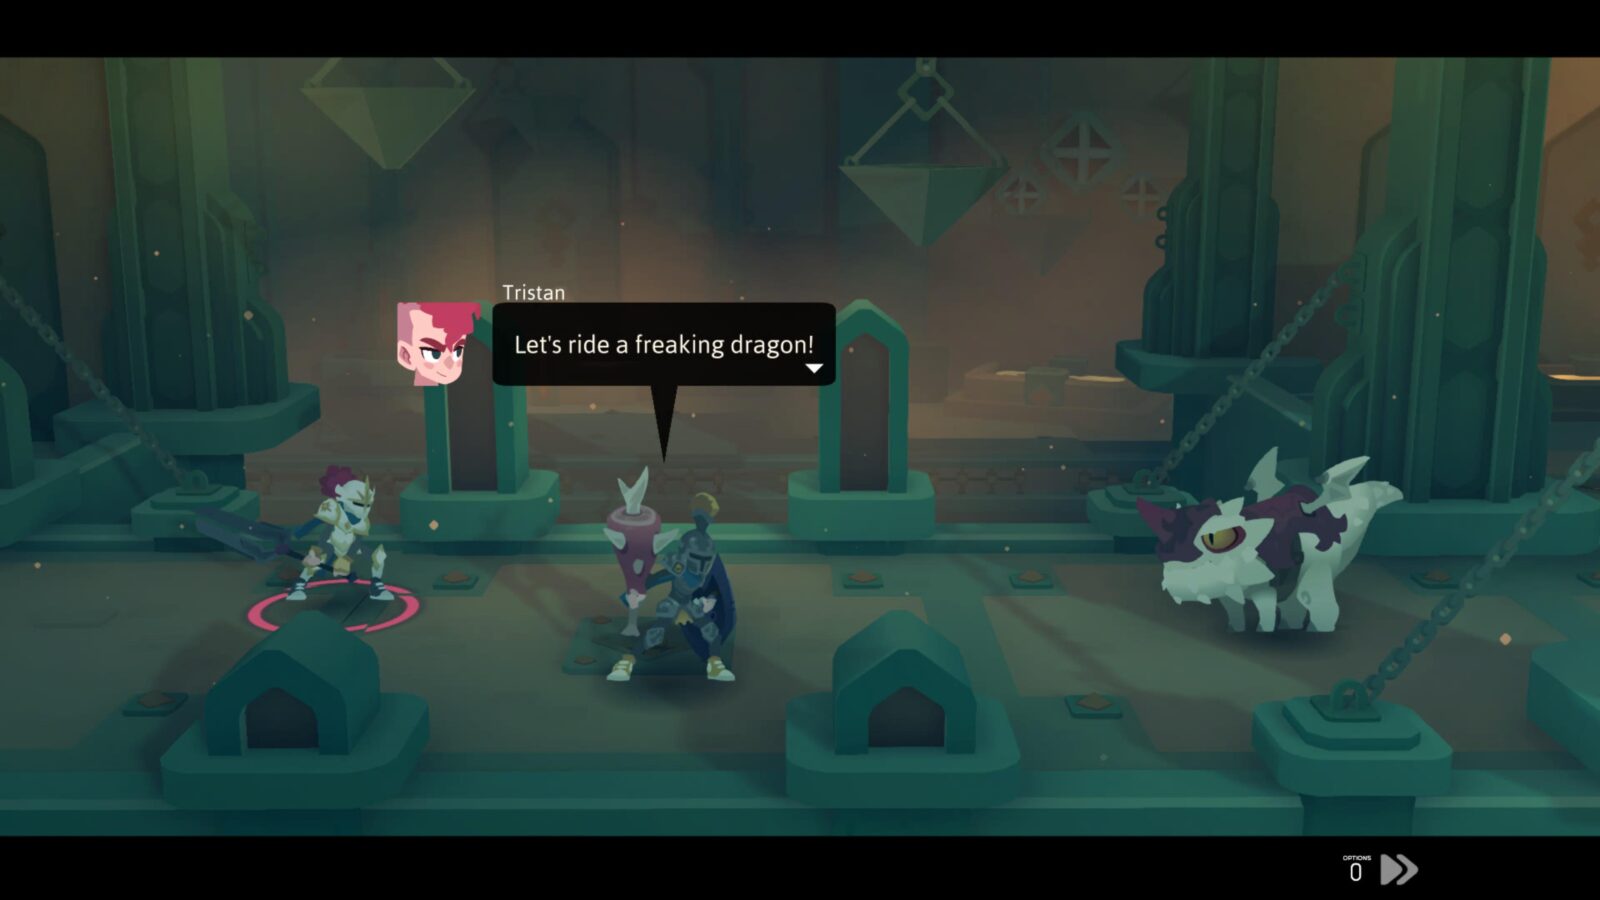
After the short cutscene, approach the dragon and press ![]() to mount it. Immediately, the Beast Rider trophy will unlock!
to mount it. Immediately, the Beast Rider trophy will unlock!
Faster Than His Shadow
Kill Fazmore
Fazmore is the main boss of the Molten Lands map, found in the Master Laboratory zone, you will face him just before collecting the Power Rune here. Reach and defeat him to unlock the Faster Than His Shadow trophy.
Still Not A “Master”
Kill Dinkoy
You will face Dinkoy a second time while making your way through the Dark Lands map. This time, however, you’ll kill him for good. The fight can be quite difficult because you need to use Spectral Weapons in this area, which means taking just a single hit will kill you.
If you’re struggling to complete the fight without taking a hit, then consider turning on “Auto-Block” and “Block Cancels Attacks” in the Accessibility Settings. Then, make sure you have a shield equipped alongside the “Ghost Crusher” one-handed Spectral Weapon. This way, you’ll be virtually untouchable.
Reach and defeat Dinkoy and the Still Not A “Master” trophy will unlock.

NINJA!
Kill Shinjo
As with Dinkoy, you’ll face Shinjo while making your way through the Dark Lands map. Simply reach and defeat him to unlock the “NINJA!” trophy.

All Brawn and No Brains
Kill Kah-Kon
As you may have guessed by the way the Dark Lands has gone so far, you’ll come face-to-face with Kah-Kon while making your way through the Dark Lands map. Reach and defeat him in battle to unlock the “All Brawn and No Brains” trophy.
Reunited At Last
Rescue the Professor
You will rescue the professor as part of the story when you reach the end of the Dark Lands map. The Reunited At Last trophy will unlock after the cutscene of you bringing him back home.

Too Big a Price to Pay
Help the Professor to bury the Driller under rocks
The Too Big a Price to Pay trophy will unlock naturally as part of the story shortly after Reunited At Last does. There will be very little gameplay between the two trophies, it’s mostly just cutscene.

Just Deserts?
Defeat Dwarvengobben
Dwarvengobben, as you may have guessed, is the final boss in Young Souls. Reach the end of the game’s story to face him and then take him down. The “Just Deserts?” trophy will unlock once you are successful.
Difficulty Trophies

Challenger
Complete the game at least in Challenging mode
To unlock the Challenger trophy, you must start a new save on at least Challenging difficulty and then reach and defeat Dwarvengobben at the end of the story campaign without changing the difficulty at all.
You may use Accessibility settings to make the game a lot easier, however, so this trophy is not as difficult as it sounds.
If you play the game on Expert Difficulty, you can earn this trophy and the Expert trophy simultaneously.

Expert
Finish the game in Expert mode
The Expert Trophy will only unlock if you complete the full game on the hardest available difficulty; “Expert”.
You must select Expert difficulty when creating a new game and then keep it active throughout the entire story until you have reached and defeated Dwarvengobben at the end of the story.
Expert difficulty is really difficult. You’ll take more damage and deal less, all while having limited access to health items and having zero extra lives per dungeon run.
That being said, by using the Accessibility settings you can modify the gameplay to your liking and even make it extremely easy. Even on Expert Difficulty.
The Expert trophy will unlock when the credits play at the end of the game if you successfully complete the whole thing on Expert Difficulty.
Phase Two – Cleanup
With the main story complete, you can select Continue on the title screen to load back in from just before the final chapter. This way, you’re free to explore the dungeon, town, and market some more without worrying about being locked out of anything.
If you still haven’t got a 5-star rating on a Happy Fit training session then you definitely need to do it soon, before it gets too difficult to earn more levels and get more Happy Fit Tokens. See No Pain, No Gain.
Other than the missable trophy, you’ll just be collecting and upgrading gear, getting 100% completion on all maps, and trying to complete a Zone without taking damage.
Since you should now have the trophy for completing the game on Expert Difficulty, feel free to drop the difficulty down to something you’re more comfortable with for this phase of our Young Souls Trophy Guide.
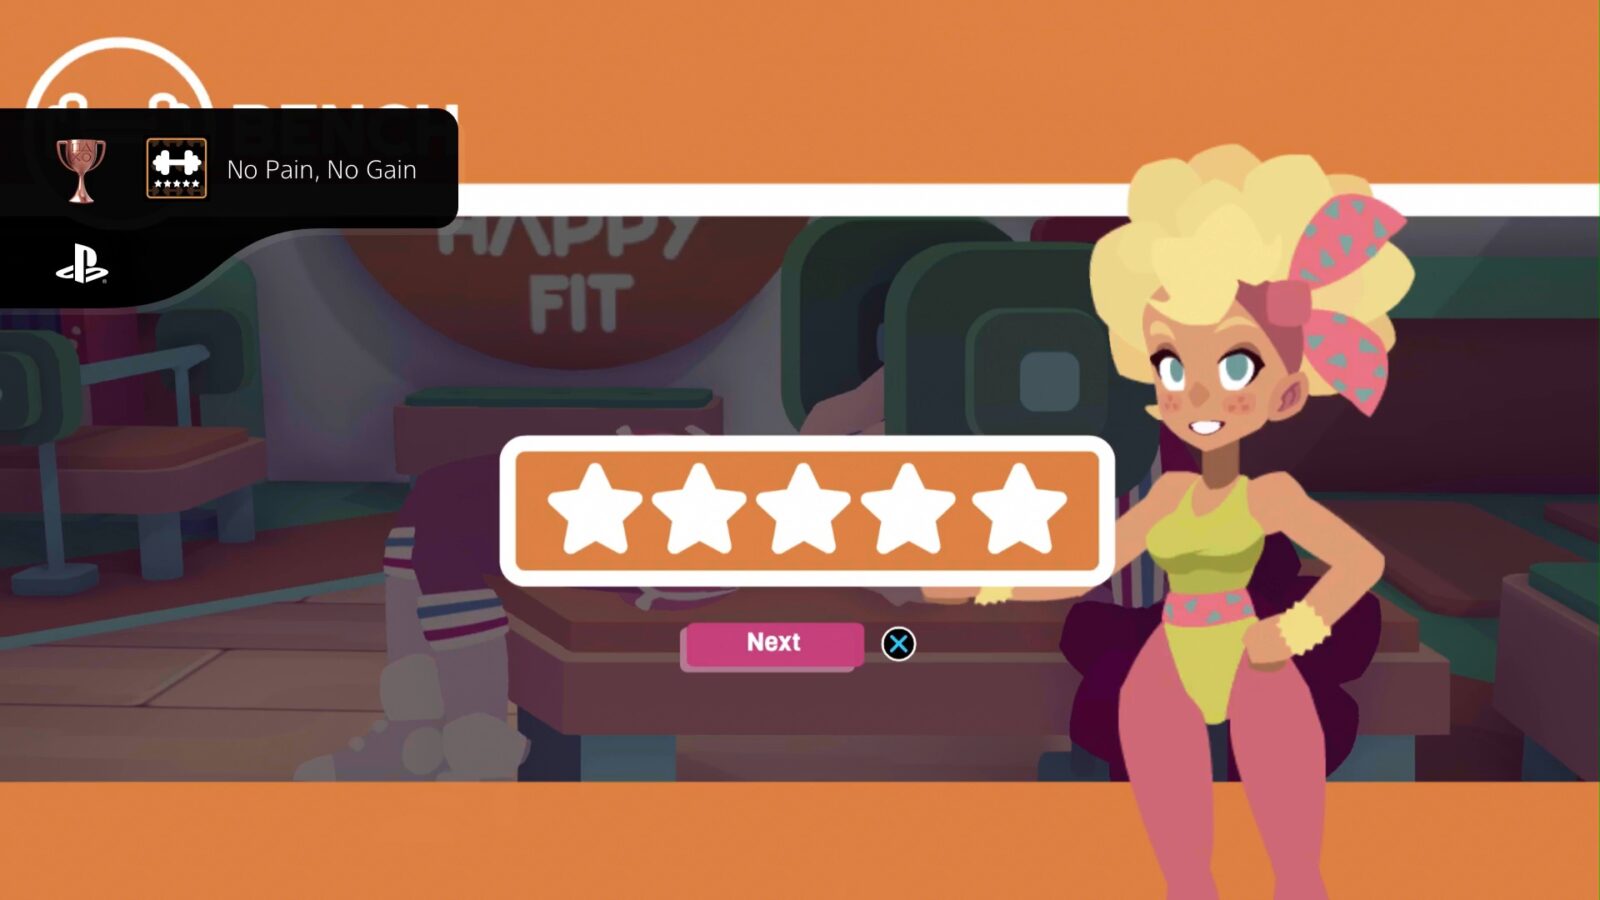
Five-Star Training Session

No Pain, No Gain
Earn 5 stars on a Happy Fit training session
After resting in your bed and leveling up, there’s a chance that you’ll receive a Happy Fit Token, which gives you access to a training session at the Happy Fit gym in town. You should get one for every second level you earn (i.e. Lvl 2, 4, 6, 8, etc.)
You will only get to do one training session but each one includes two minigames, one for each character.
When you visit the gym in town with a token, speak to the receptionist and then select the stat you would like to improve. The minigame will differ depending on the stat that you select.
You then need to try and complete the minigame without making any mistakes. The better you do, the higher your star rating. The higher your star rating, the more the stat gets improved.
To unlock the No Pain, No Gain trophy, you will need to achieve a 5-star rating. This trophy is Missable due to the fact that you’ll really only get a few opportunities to get a 5-star rating. I recommend that you make a save before going into the Happy Fit gym and then you immediately close the game if you fail to get a 5-star rating in both minigame attempts.
This way, you can reuse your token and make another attempt to get a 5-star rating without having to earn another Token.
To get a 5-star rating you’ll essentially need to stay in the green zone for pretty much the whole exercise. Dropping out of it for more than a few milliseconds could already be enough to lock you into a 4-star rating.
In my opinion, the Bench is the easiest one to achieve a 5-star rating on, so if you select Bench for both characters you’ll get two attempts per Token.
Combat Trophies

Block Master
Block 10 attacks
You can hold ![]() during combat to bring your shield up. While your shield is active, any attacks that hit you from the front will be blocked and therefore won’t damage you.
during combat to bring your shield up. While your shield is active, any attacks that hit you from the front will be blocked and therefore won’t damage you.
Use your shield to block a total of 10 attacks and the Block Master trophy will unlock!
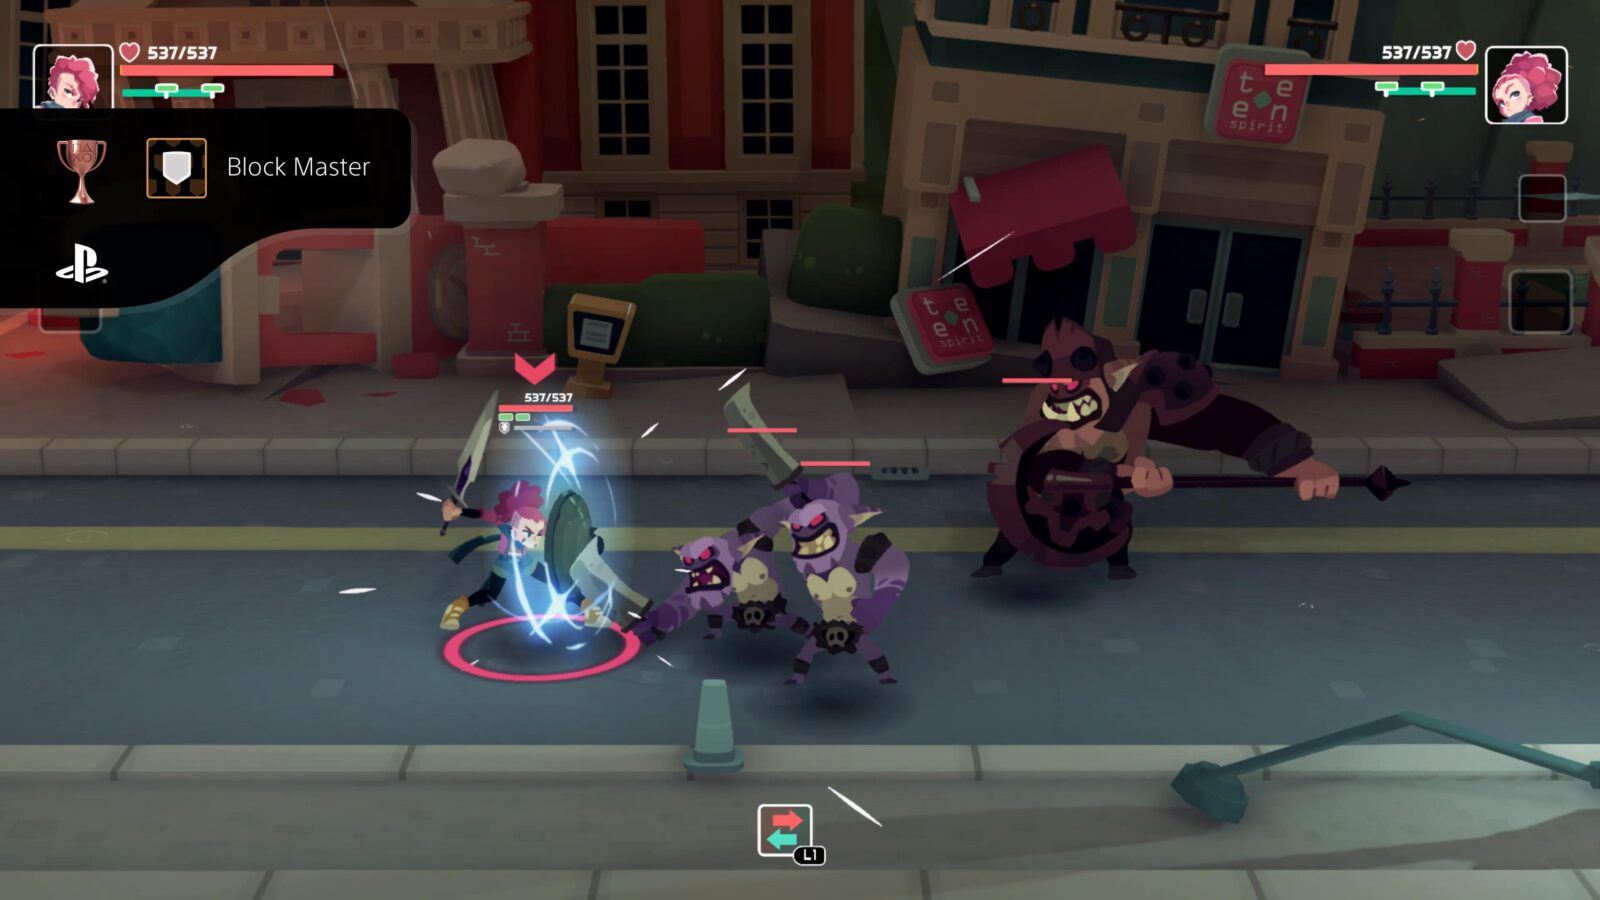
If you have “Auto Block” turned on in the accessibility settings, then you can just stand still during any battle and let the enemies hit you until the trophy unlocks.

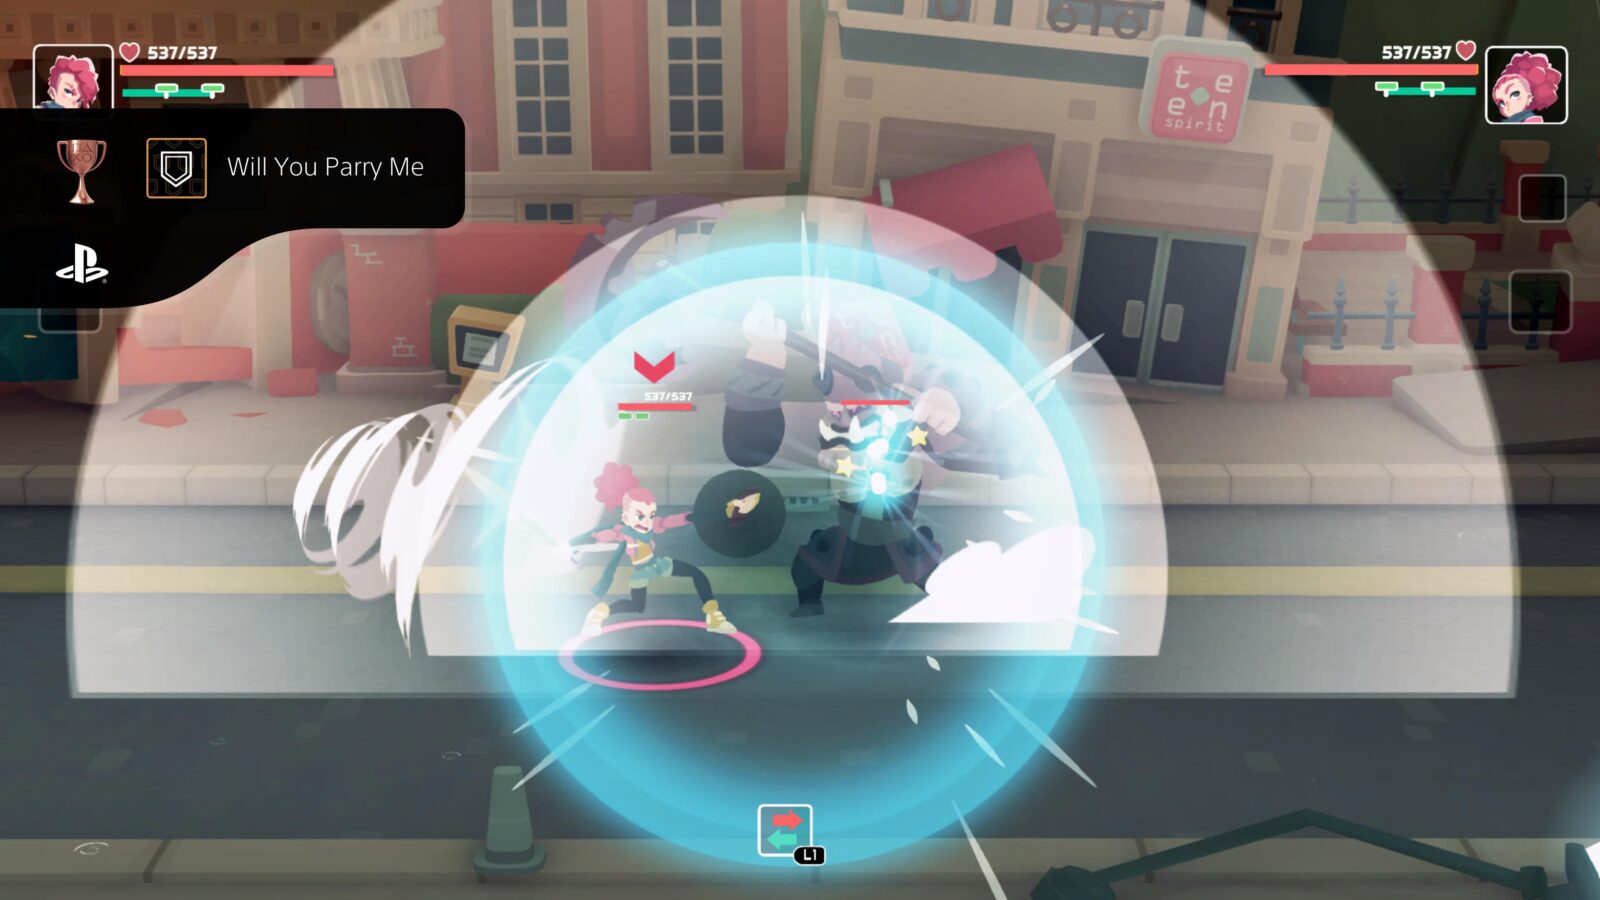
Will You Parry Me
Parry an attack
Parrying is fairly easy, but requires a bit of timing so you may need to attempt it a few times to get it right. Simply press ![]() at the exact moment that an enemy’s attack hits you, and your character will deflect it.
at the exact moment that an enemy’s attack hits you, and your character will deflect it.
This will stun the enemy for a short moment allowing you to get a few hits in.
Parrying for the very first time will unlock the Will You Parry Me trophy. You only need to do it once.

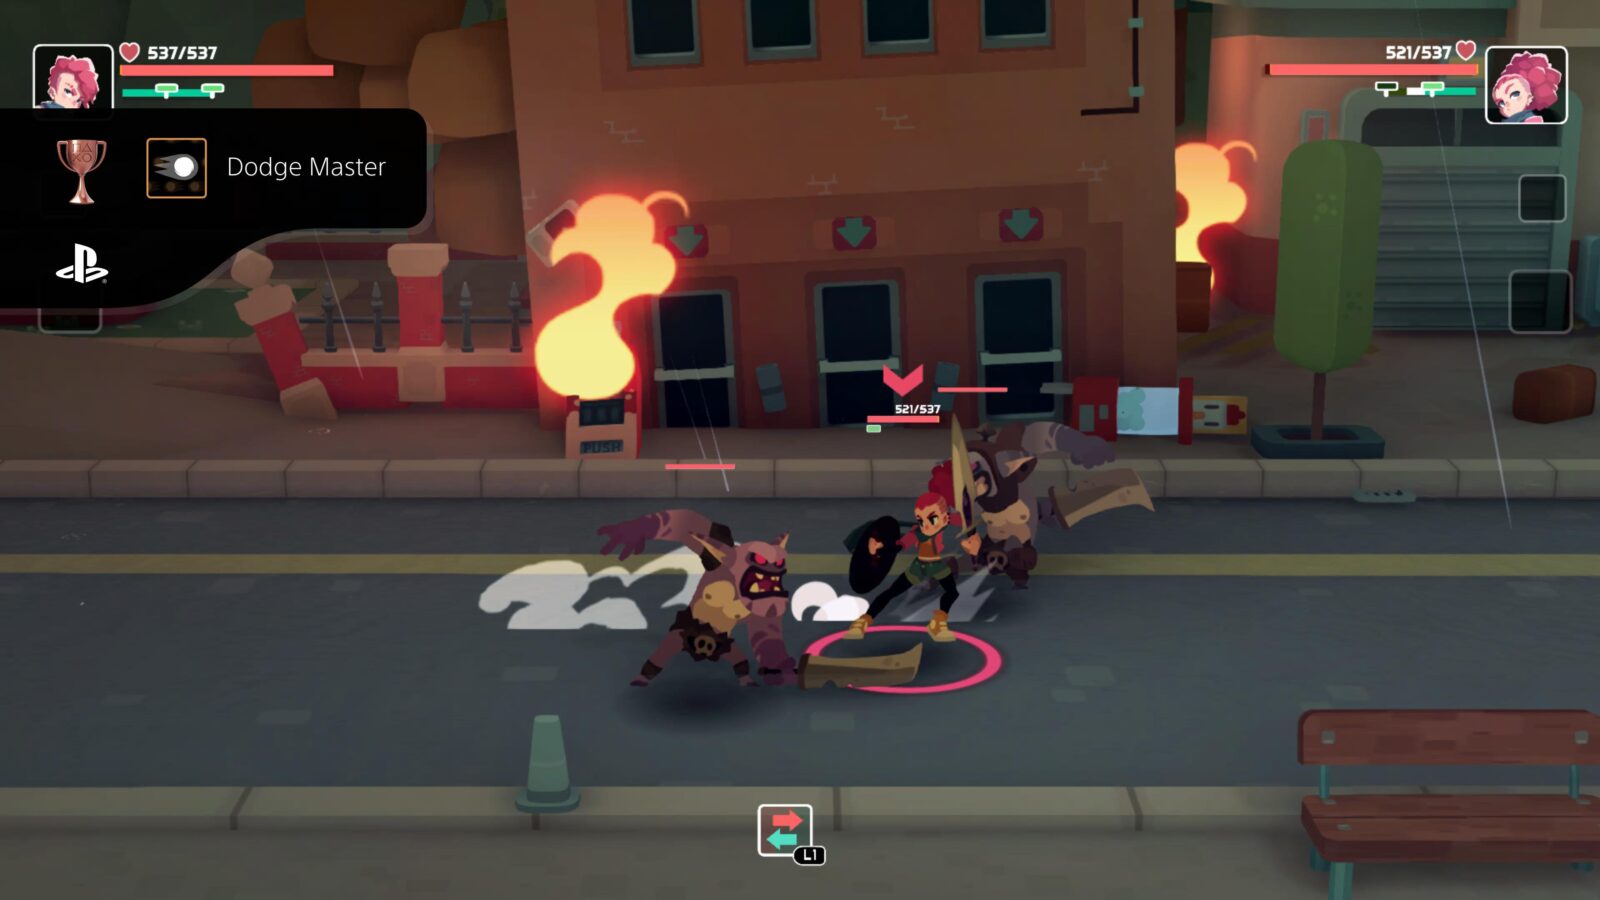
Dodge Master
Dodge an attack by rolling
In Young Souls, you can dodge by tapping ![]() . To do a Dodge Roll, you need to tap
. To do a Dodge Roll, you need to tap ![]() while holding
while holding ![]() either left or right.
either left or right.
To unlock the Dodge Master trophy, you need to avoid an attack by dodge rolling away from it. You’ll get some invincibility frames while rolling which you can use to dodge roll straight through an attack.
You’ll only need to do this once to unlock the trophy.

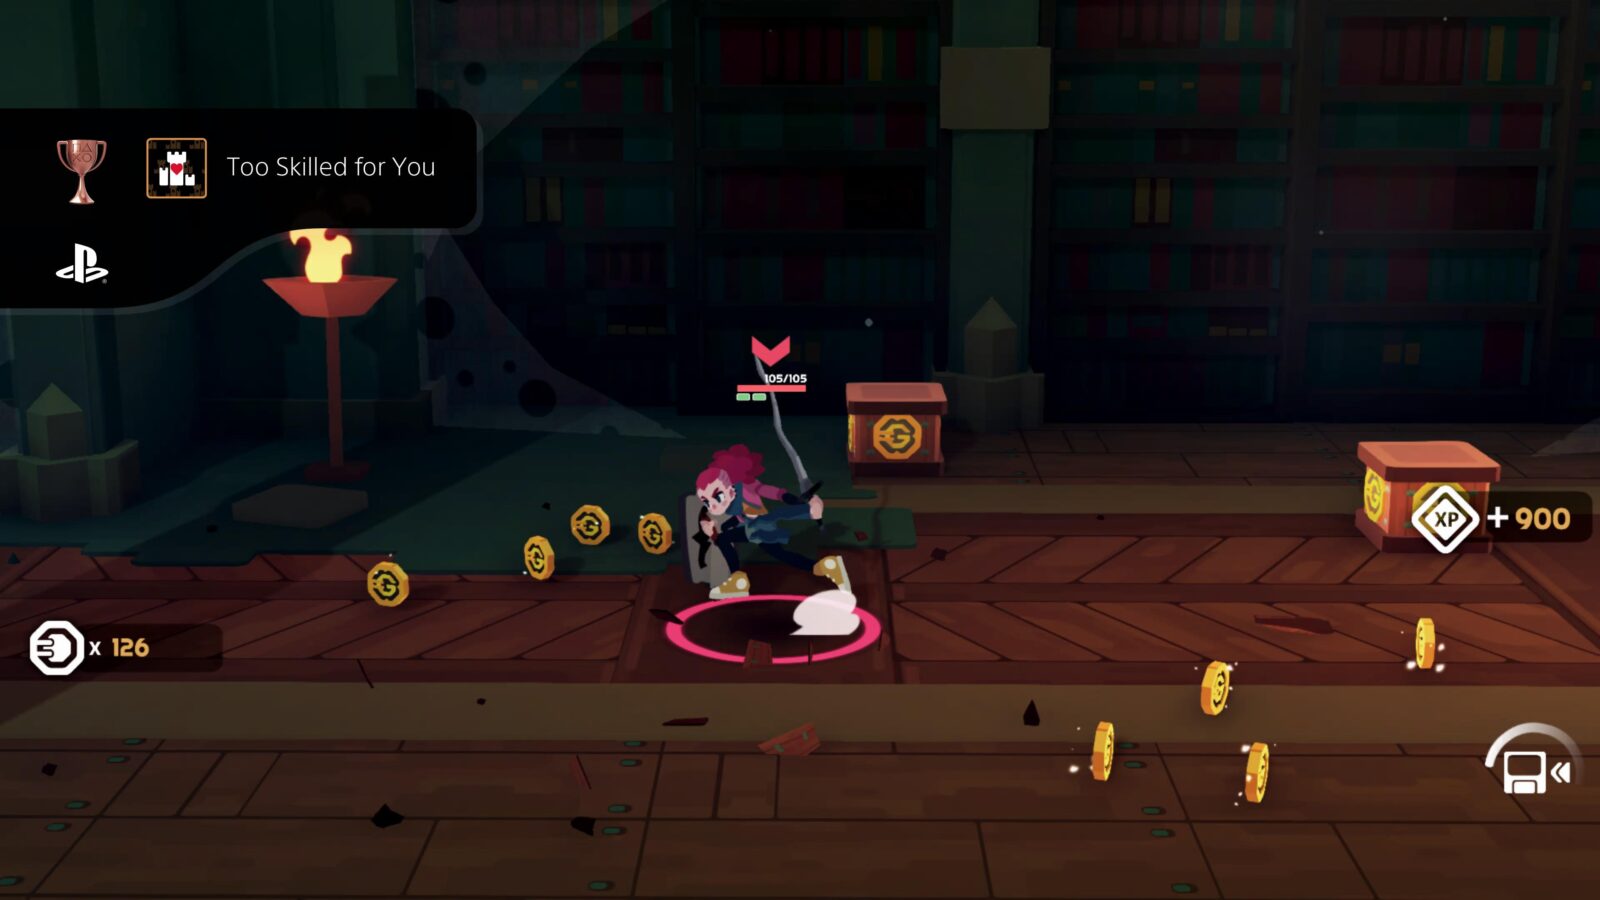
Too Skilled for You
Complete a dungeon without taking any damage
To unlock the Too Skilled for You trophy, you will need to complete any dungeon without getting hit by any enemy attacks. Dungeons are also called “Zones” in-game and the first and shortest Dungeon you come across in the game is the Goblin Library of Chapter 3.

Unfortunately, you can’t replay the Goblin Library, but once you have access to the Moon Gates in Chapter 5, you can play and revisit the “Small Gaol” stage, which is also very short and easy to complete.
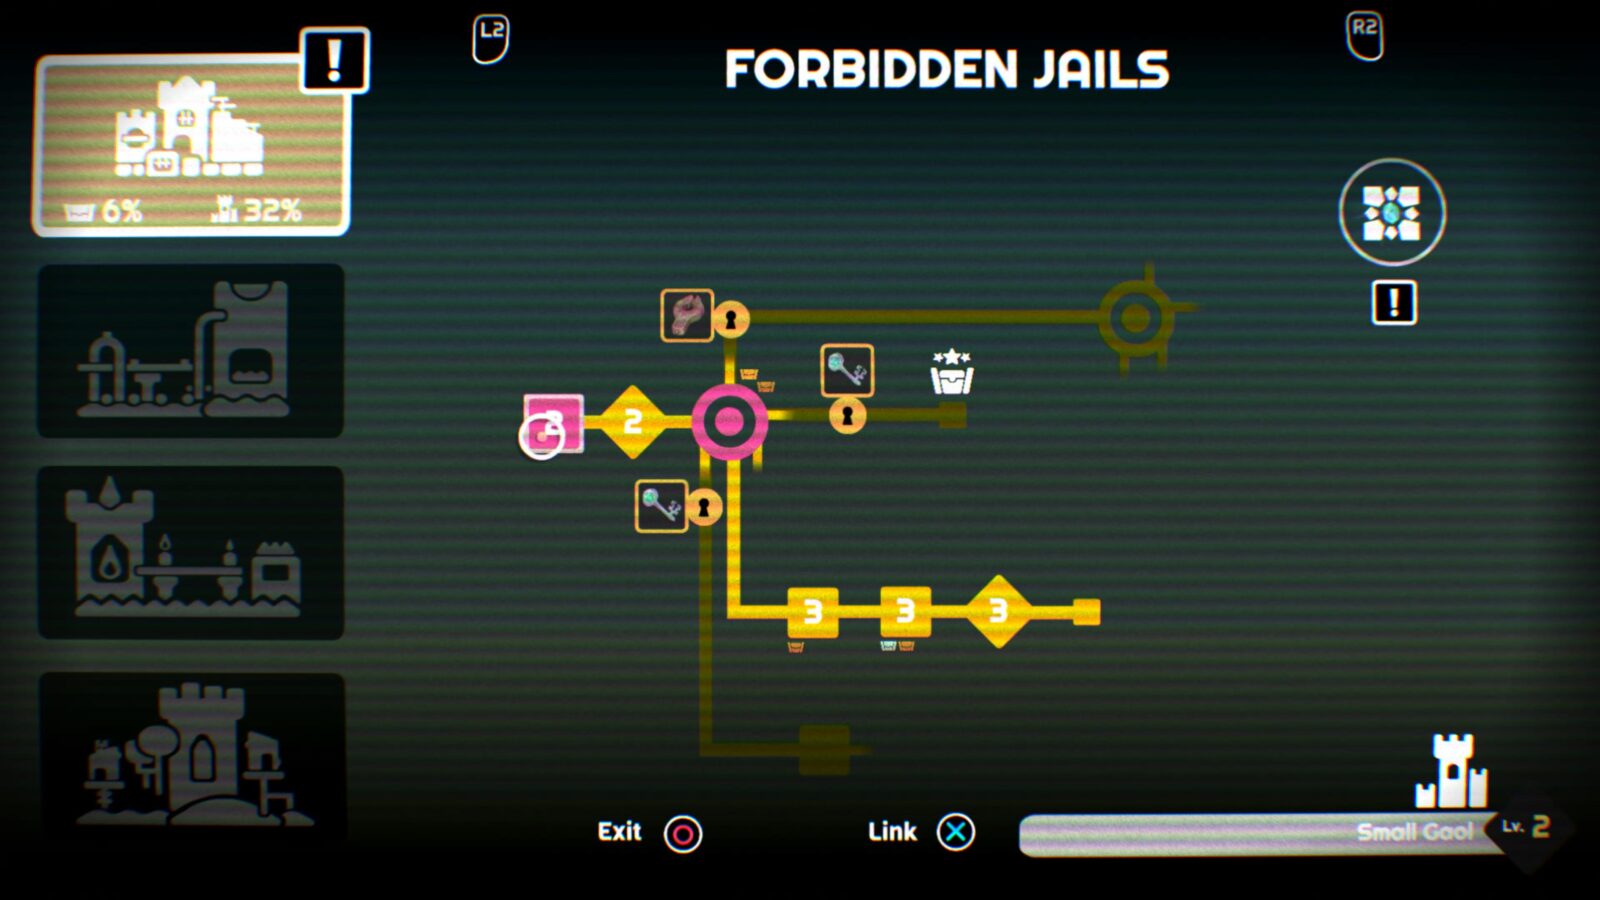
Getting through a whole dungeon without taking damage can be very difficult, especially on Expert Difficulty where up to 5 enemies can be attacking you at once, but if you do your best to keep all the enemies on one side of you and are quick to block, parry, and dodge any attacks, you should be okay.
If this trophy proves to be a big struggle, you could change the difficulty in the Settings, but make sure you’ve earned Expert before changing difficulty or you’ll void the trophy.
Using Accessibility Options is a great way to get through a dungeon unscathed. If you activate “Auto Block” and “Block Cancels Attacks” you’ll be near-impossible to hit.
Note that although you can block with two-handed weapons, you will still take damage unless you have a shield equipped. So make sure you’re using a shield if you plan to block attacks rather than dodging them.
Additionally, setting Player Attack Speed to “Very Fast” and Enemy Attack Speed to “Very Slow” will further increase your advantage and your chances of avoiding taking any damage.
Once you receive your reward at the end of any Zone, you’ll unlock the Too Skilled for You trophy.
Gear & Upgrade Trophies
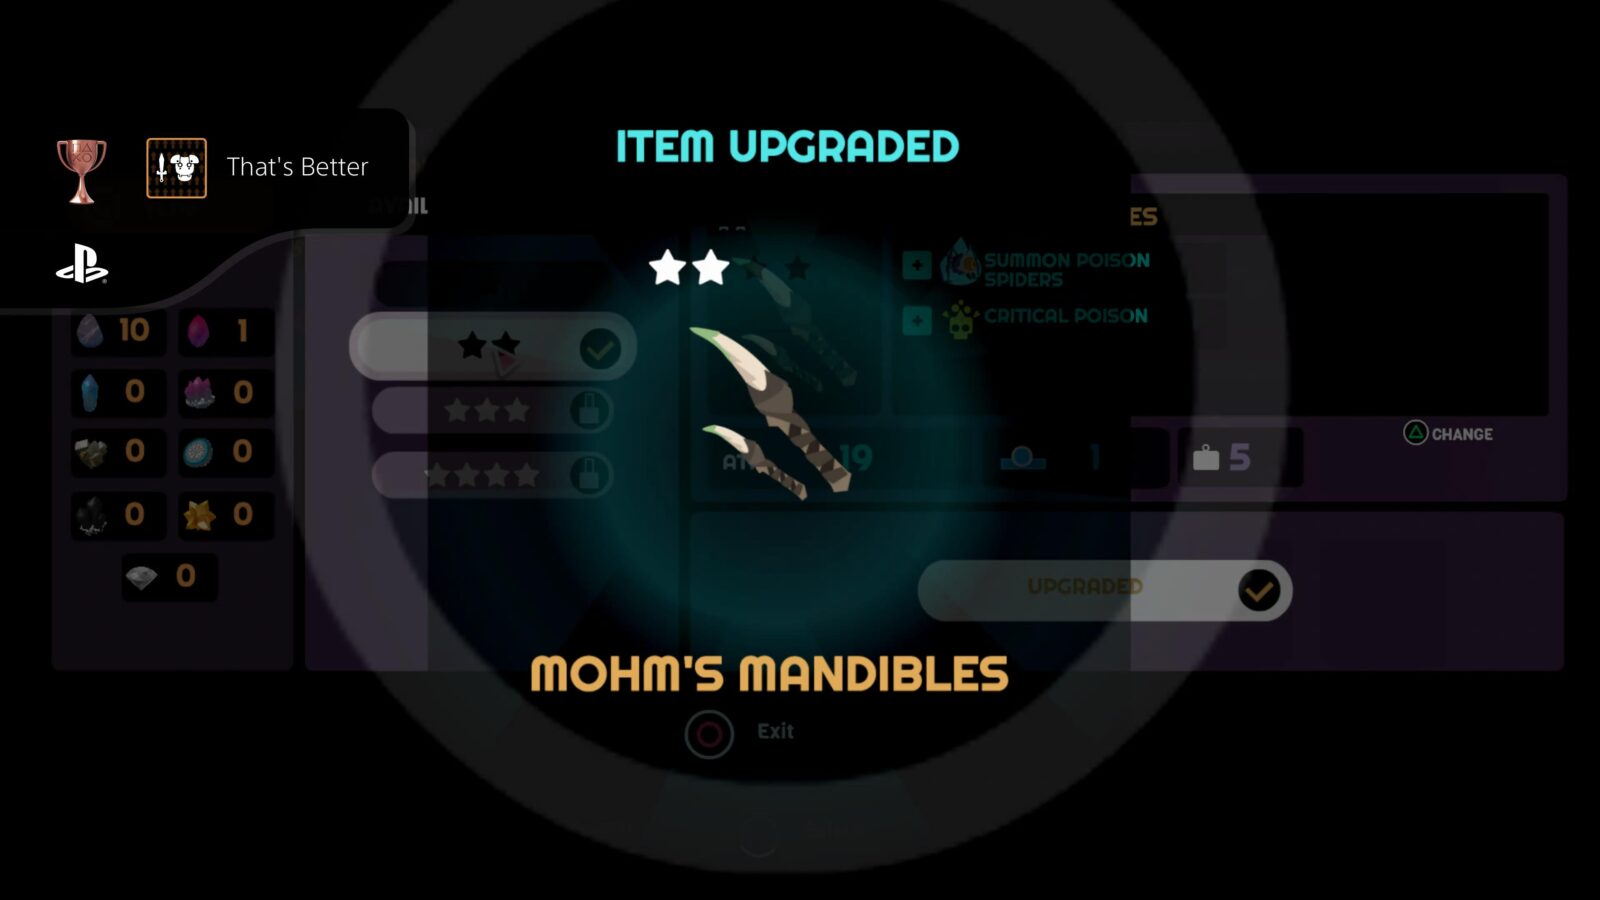
That’s Better
Upgrade a weapon or armor
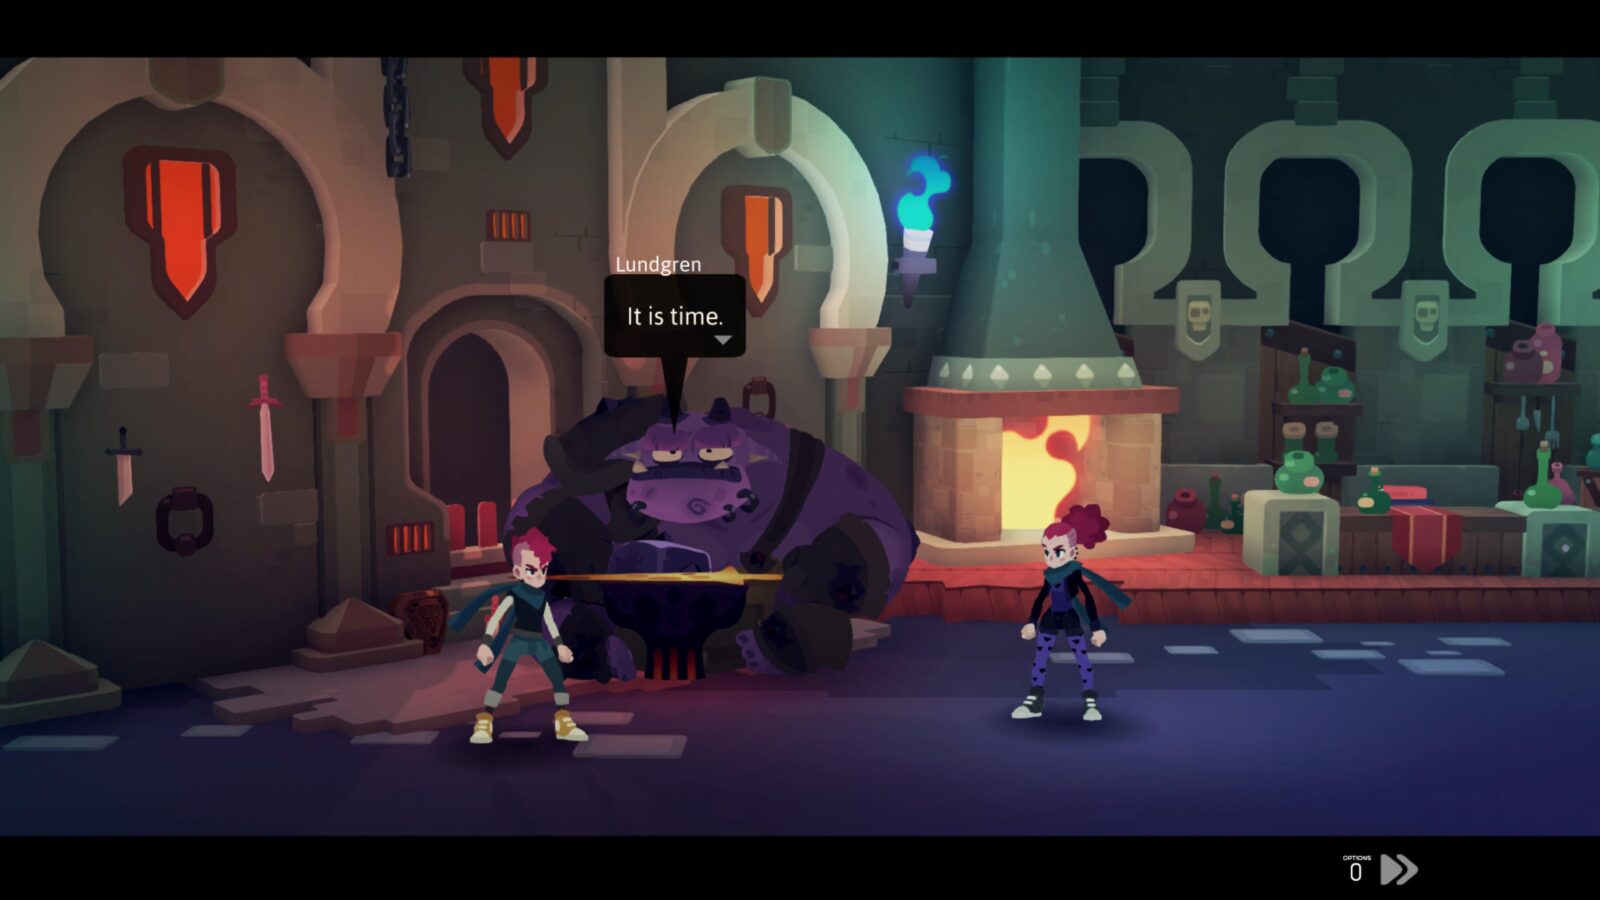
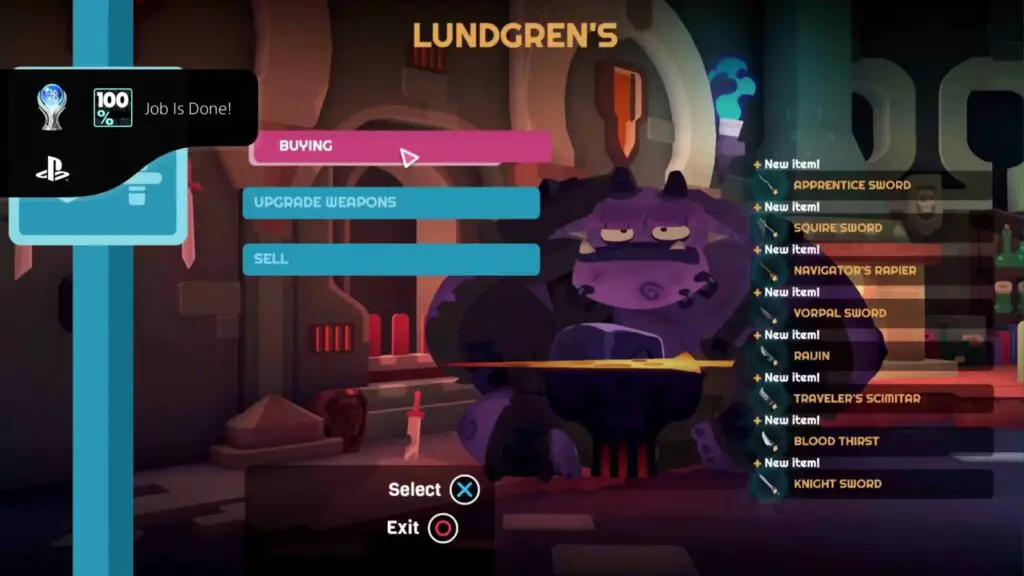
Progress through the game until you have freed the Goblin Blacksmith Lundgren from the Forbidden Jails and he’ll then go to the Goblin Market at the bottom of the Well in the Town.
Once he’s there, visit the Goblin Market and speak to him. Select “Upgrade Weapons” and then choose the weapon you’d like to improve.
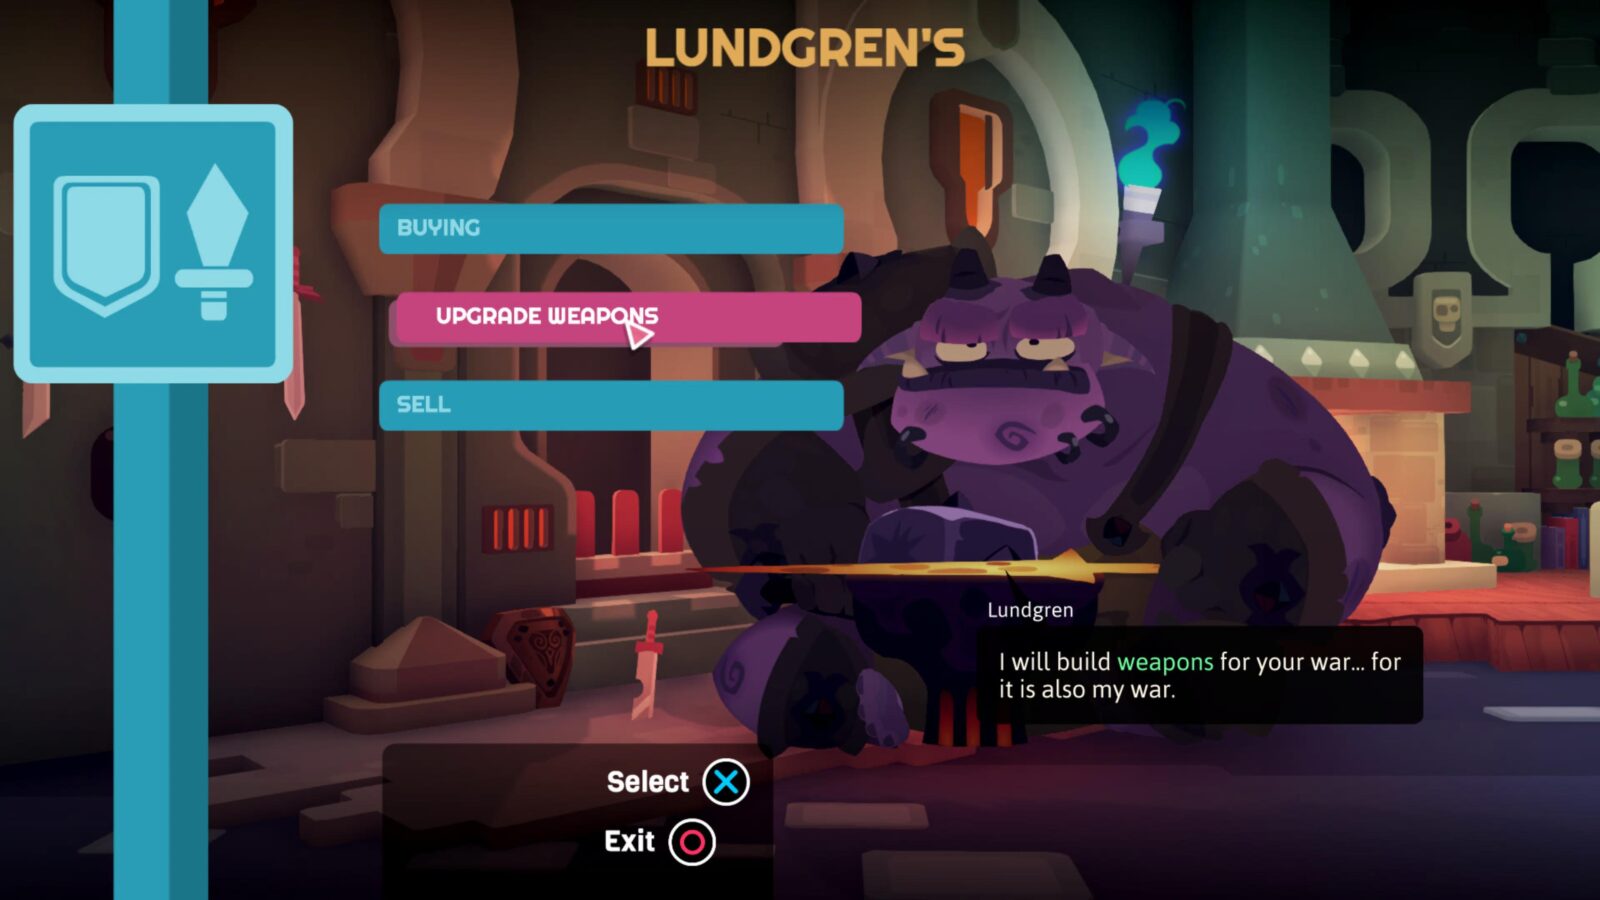
You’ll be able to select the next upgrade and purchase it using gold and resources. The first upgrade for any weapon should only require Common Rock resources, which are very easy to find in boxes and from enemies you’ve defeated.
Once you have purchased a weapon upgrade for the first time, the “That’s Better” trophy will unlock!
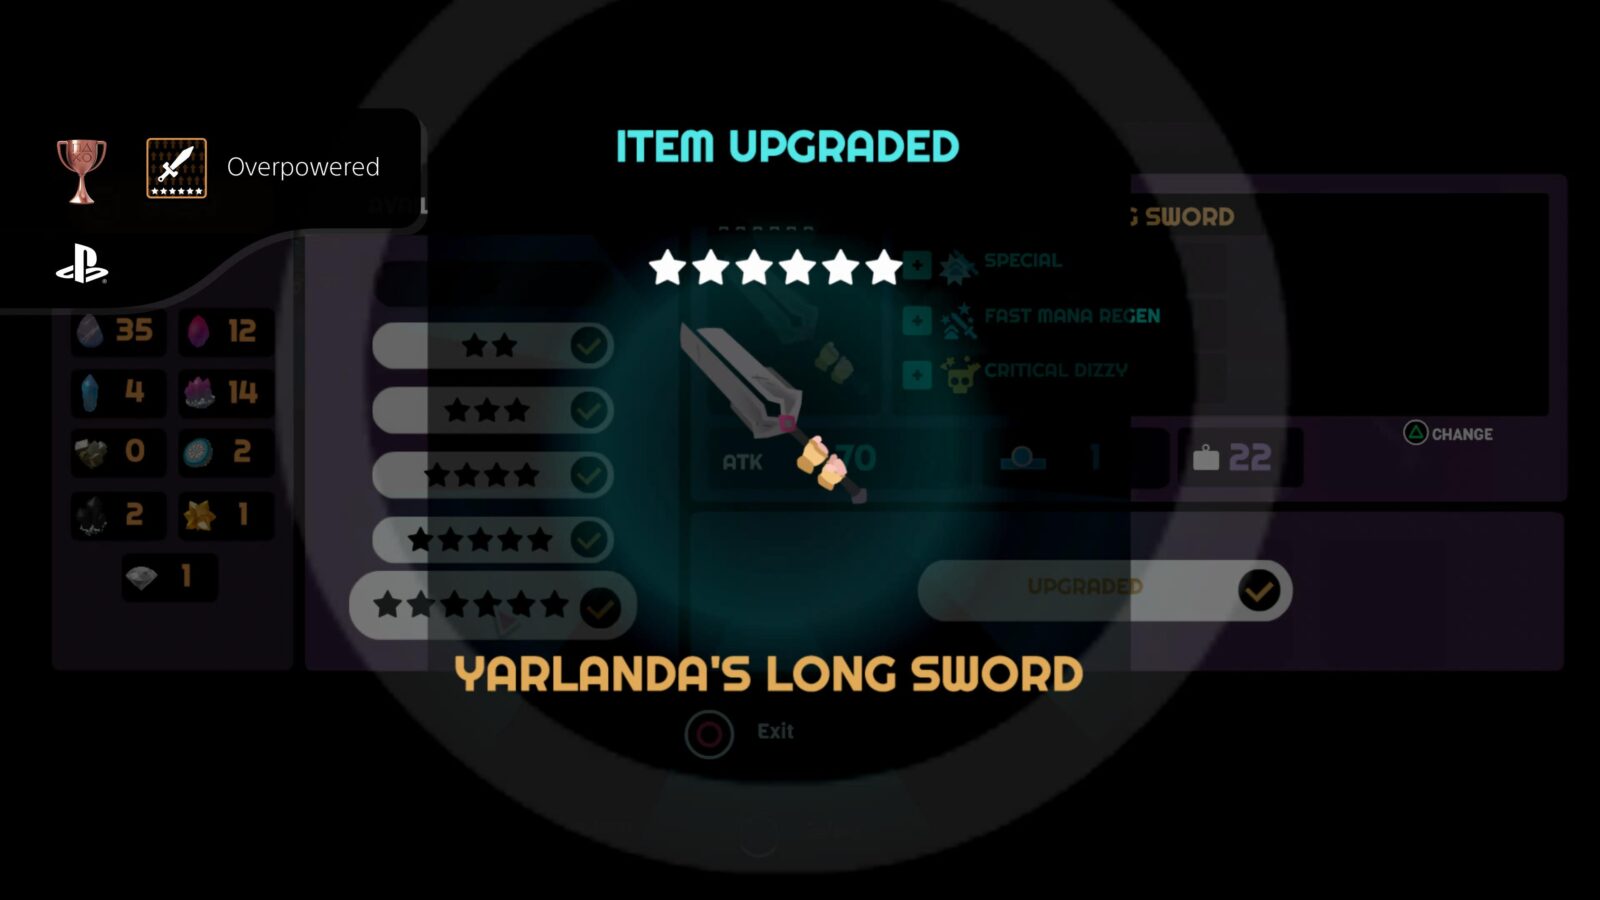
Overpowered
Upgrade a weapon to 6 stars
Before you can earn the “Overpowered” trophy, you will need a weapon that can be upgraded to 6 stars. When you find a new weapon, it will have one white star and several grey stars. The white star is the current level and the grey stars is how many times it can be upgraded.
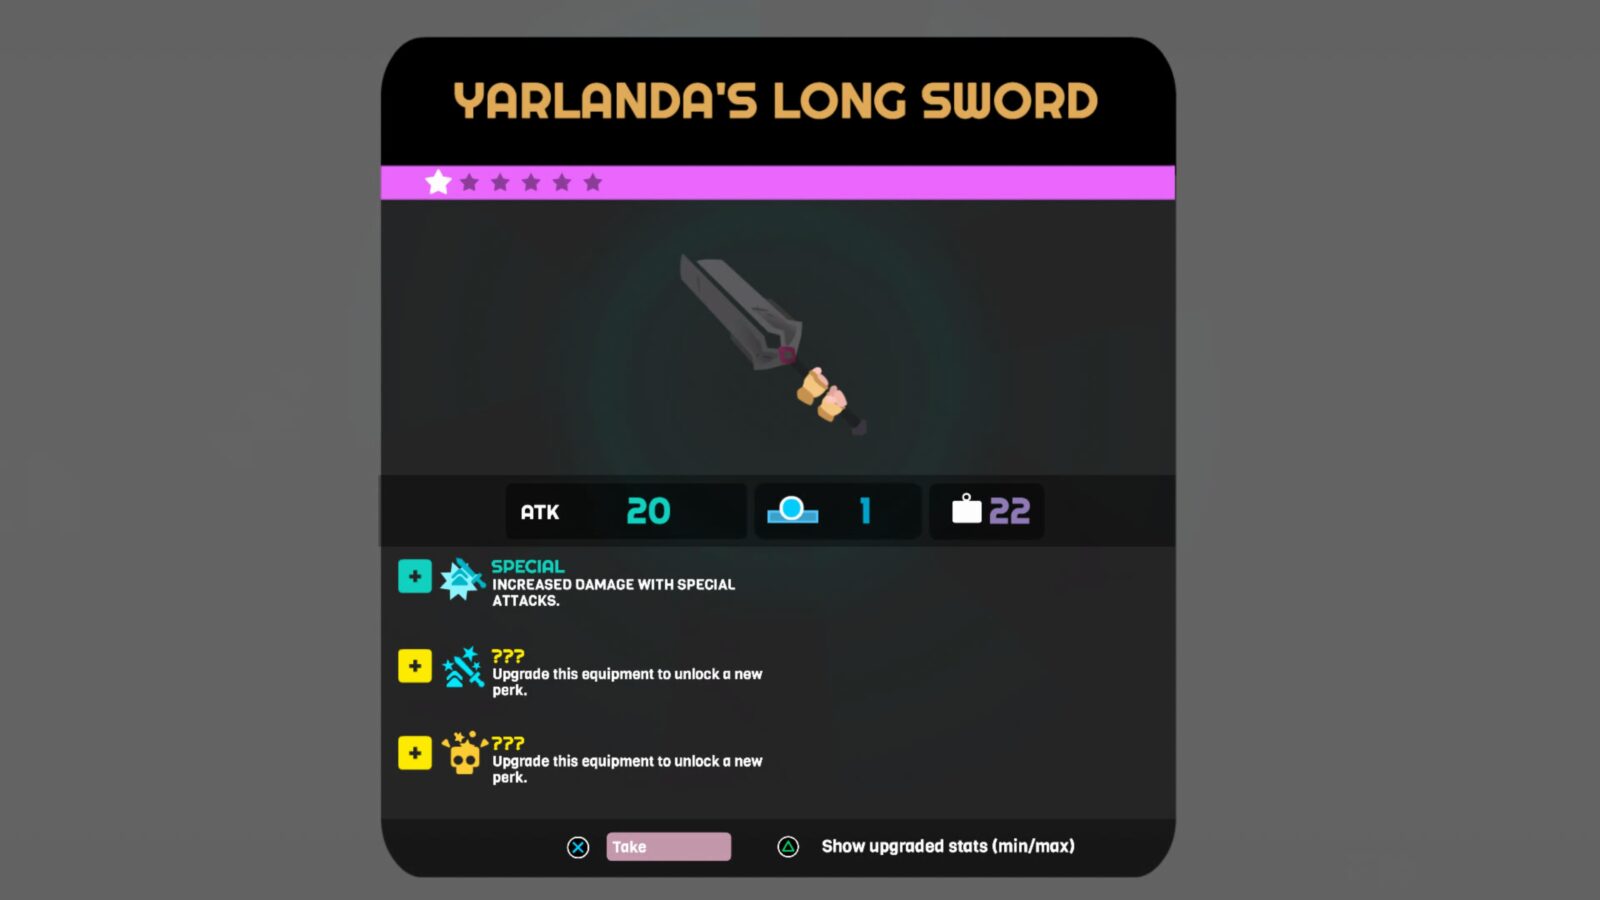
Once you have a weapon with 1 white star and 5 available star slots, take it to Lundgren in the Goblin Market to use gold and resources to fully upgrade the weapon.
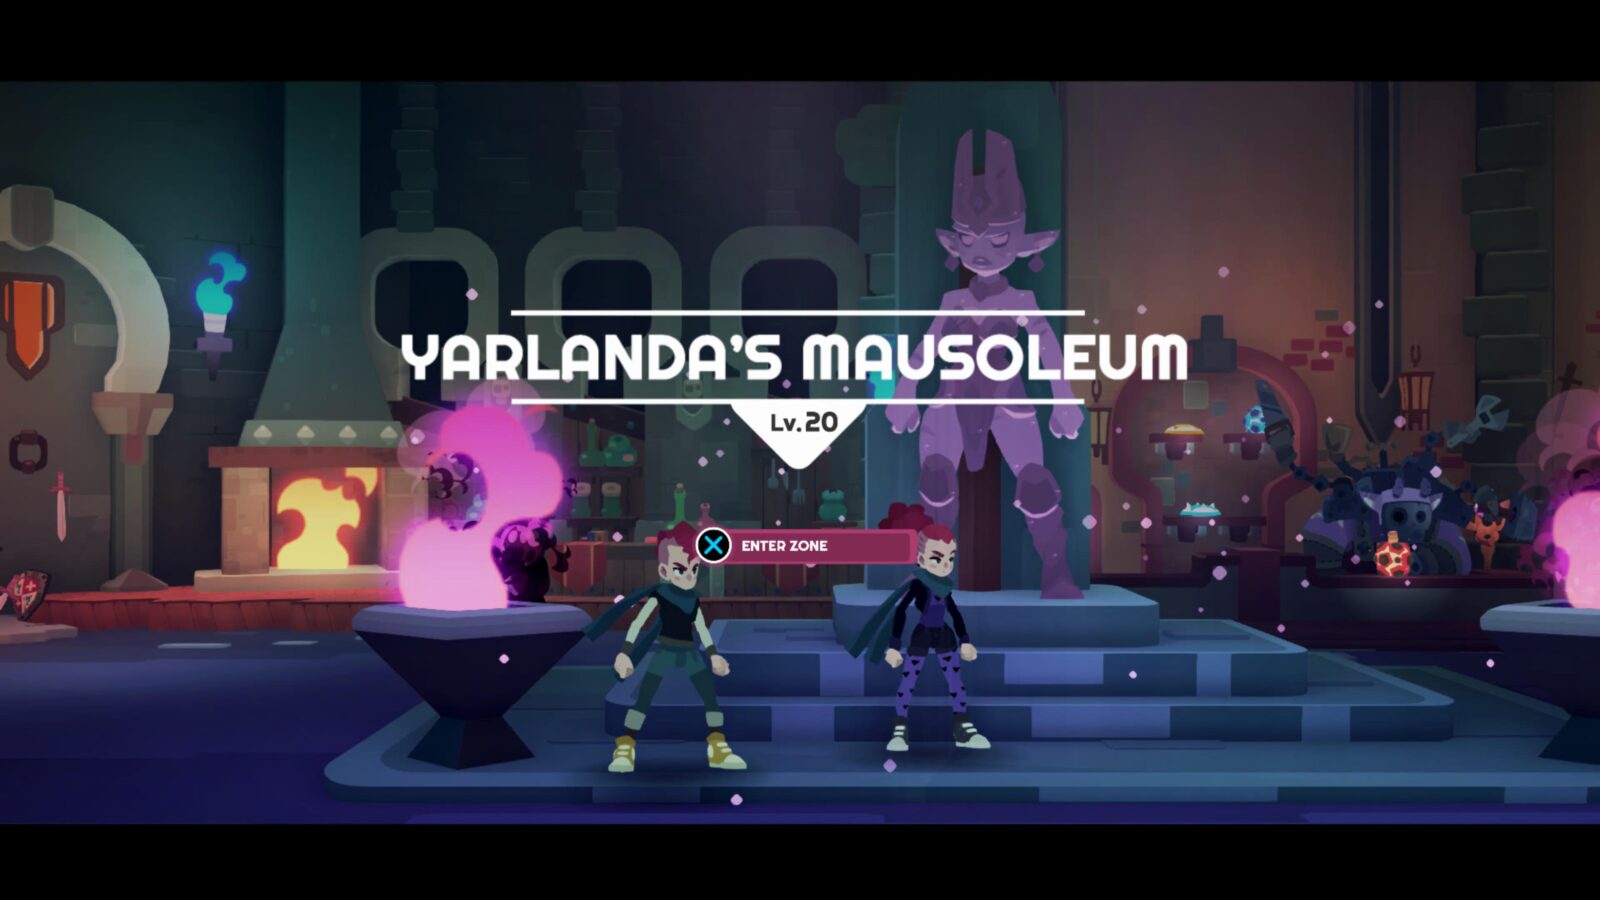
The easiest 6-star weapon to acquire is Yarlanda’s Long Sword. You can get this by defeating Yarlanda’s Ghost in Yarlanda’s Mausoleum found in the Prisoner’s Path area.
When you successfully upgrade a weapon to 6-star quality, the Overpowered trophy will unlock.
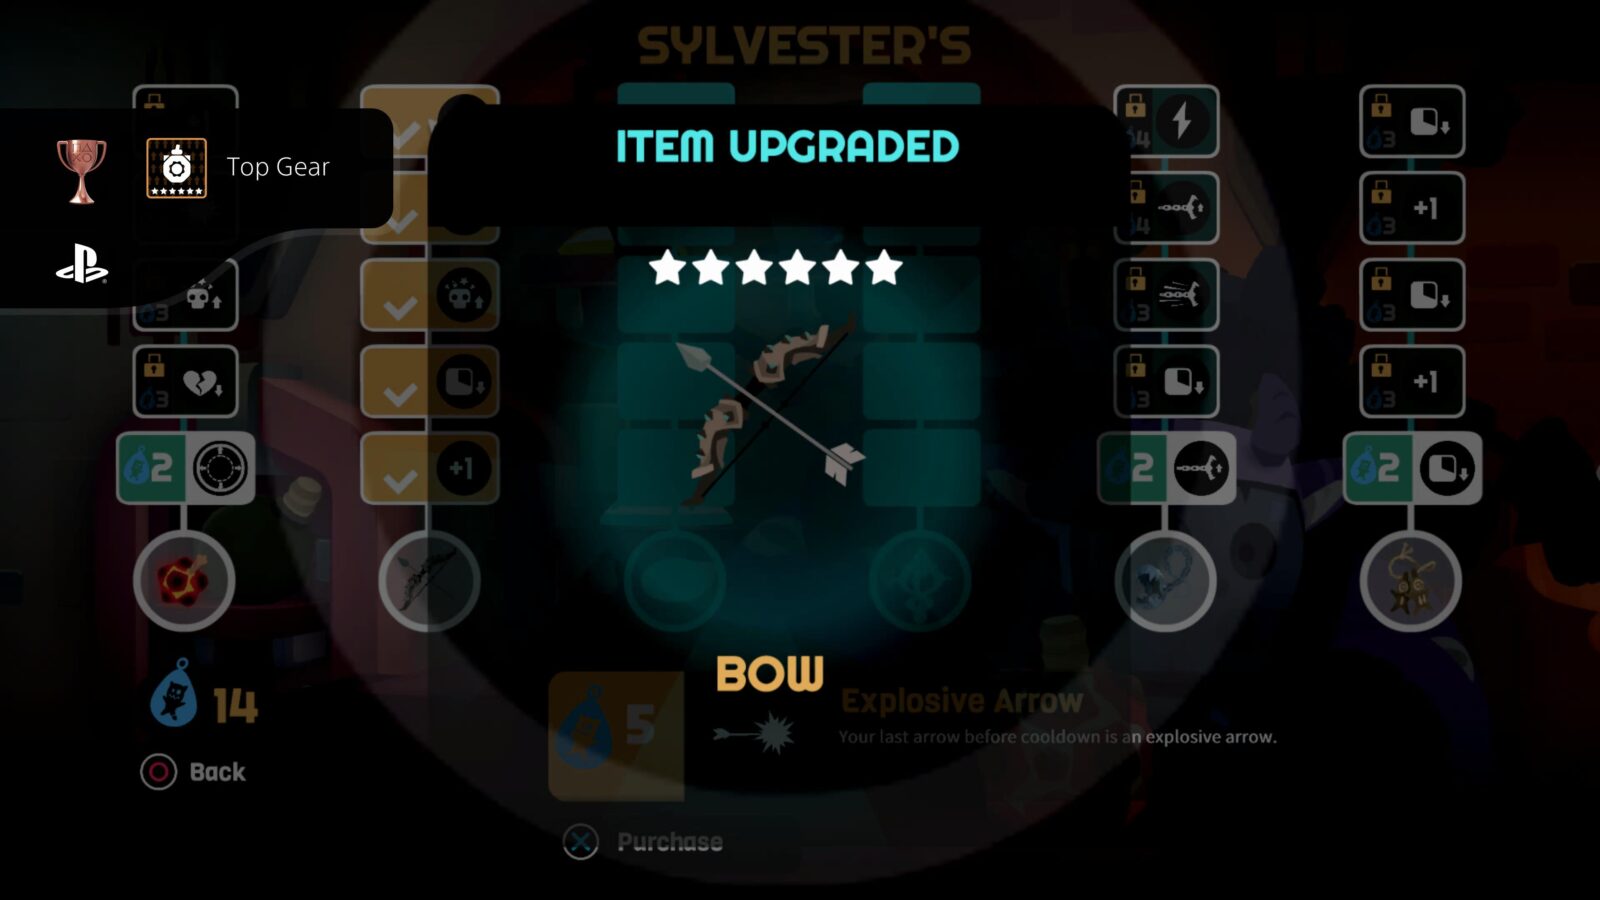
Top Gear
Upgrade an accessory to its maximum level
Once you have found an accessory in the game and you have freed Sylvester on your way through the Forbidden Jail map, you can visit them in the Goblin Market and upgrade your accessory by using Guardian Tears. You get Guardian Tears by defeating bosses.

All accessories have the same number of upgrades available, you just need to pick which upgrade you’d like to max out and then purchase every available upgrade once you have enough Guardian Tears to do so.
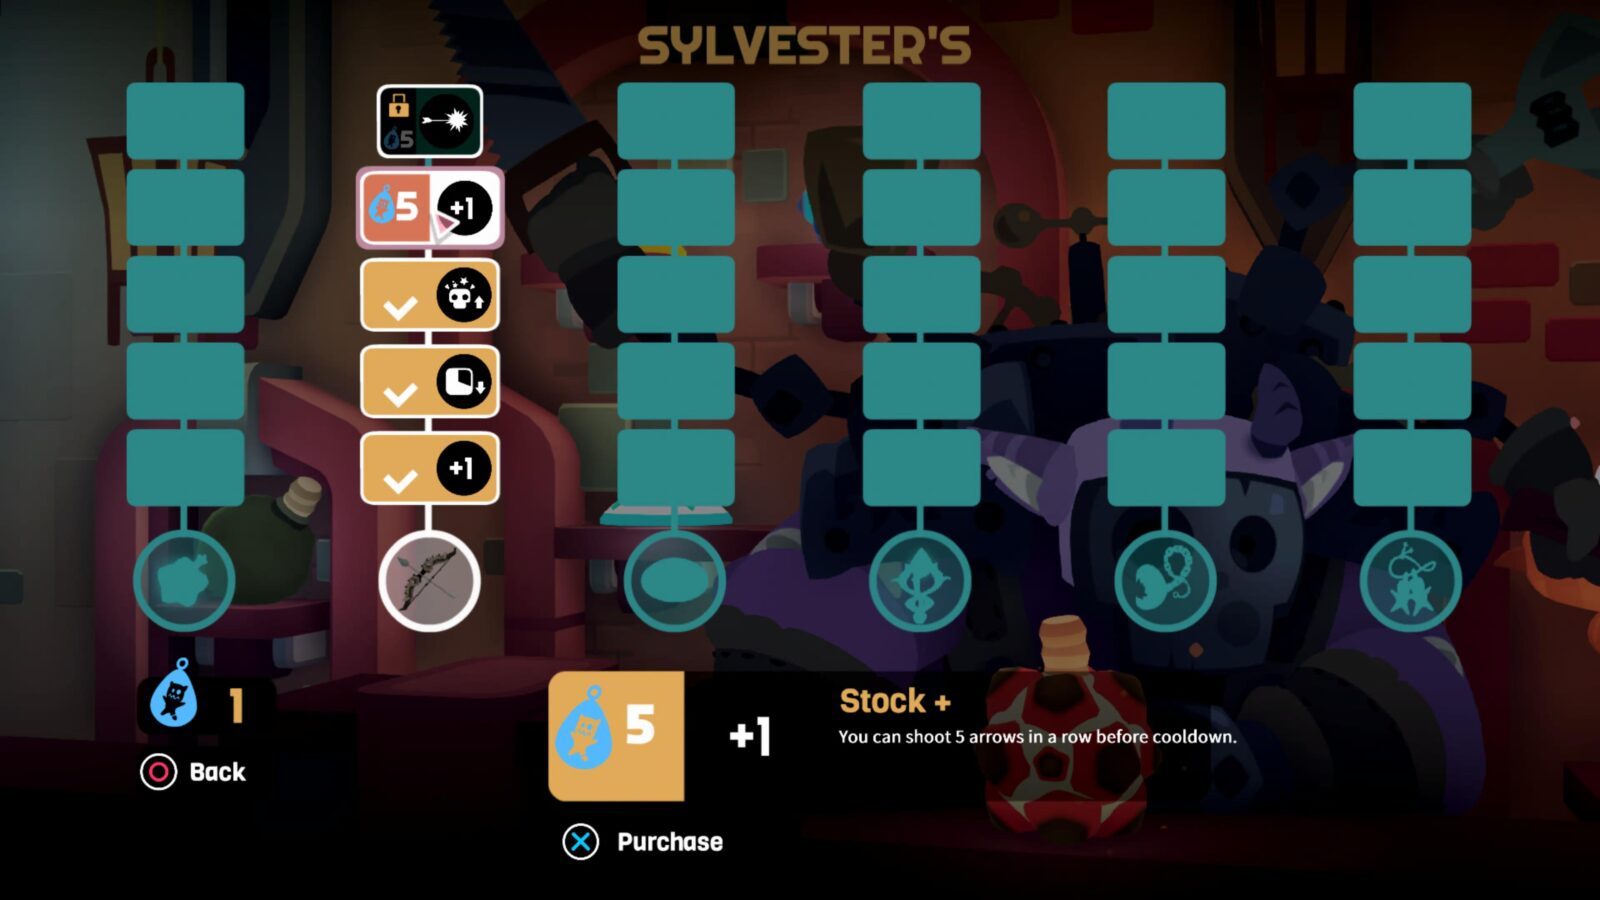
Purchase all 5 upgrades for any of the 6 Accessories in the game and the Top Gear trophy will unlock.
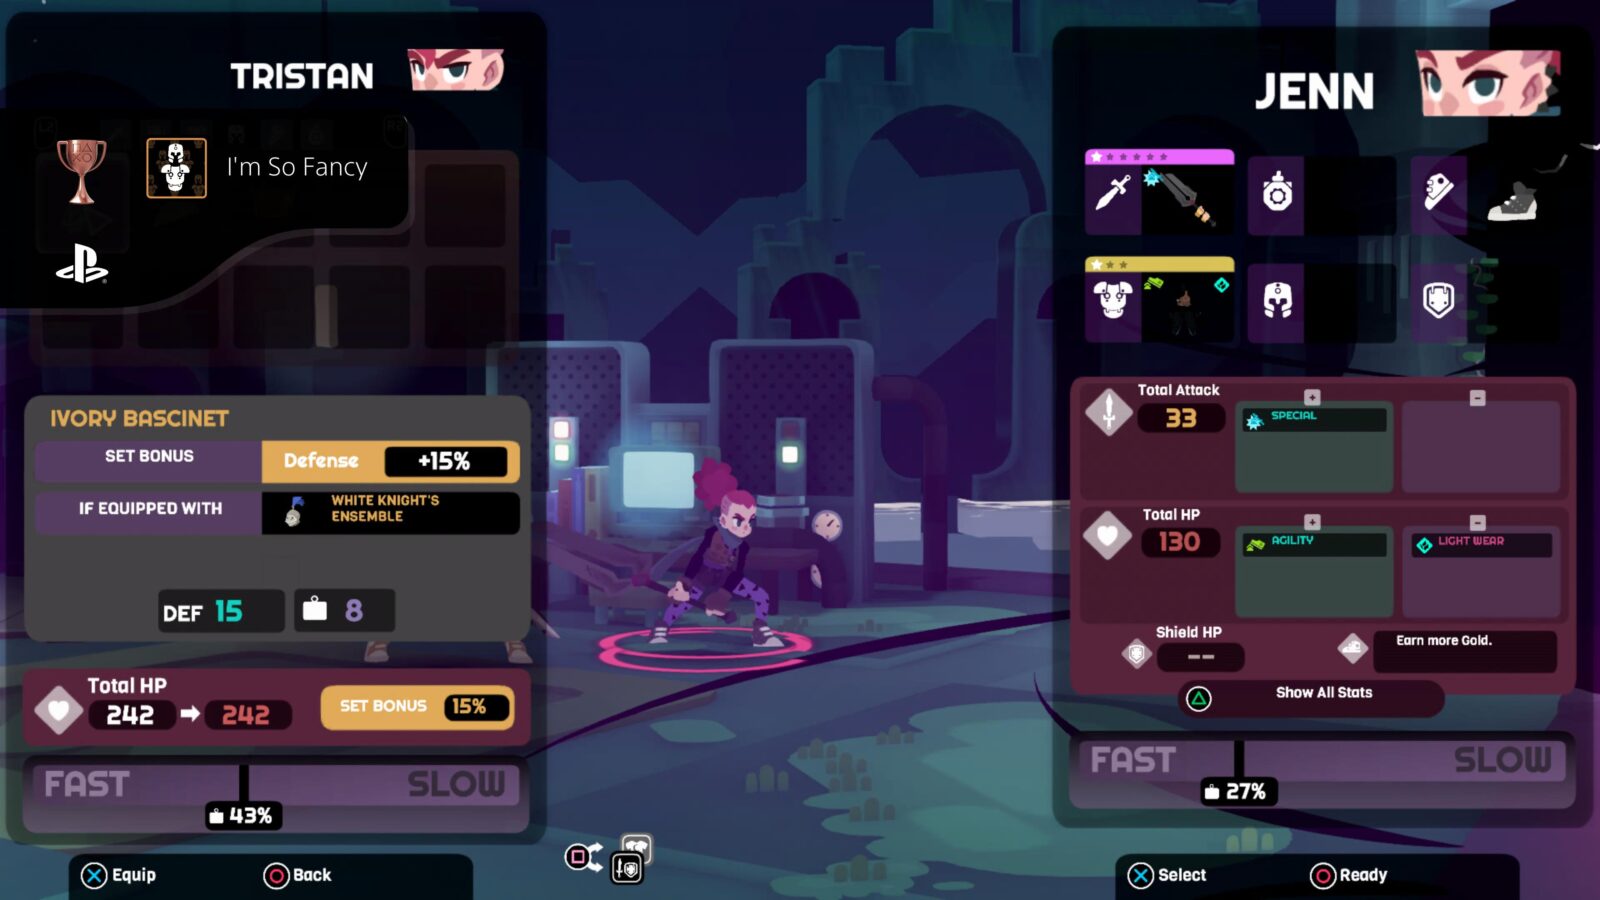
I’m So Fancy
Equip an armor and helmet combo
To unlock the I’m So Fancy trophy, you will need to equip armor and a helmet from the same set.
The Pots and Pans & Cook’s Cap armor set you start with doesn’t work for this trophy so you’ll need to acquire a different armor set. Just play through the game, opening chests and defeating bosses until you eventually have a matching armor and helmet combo.
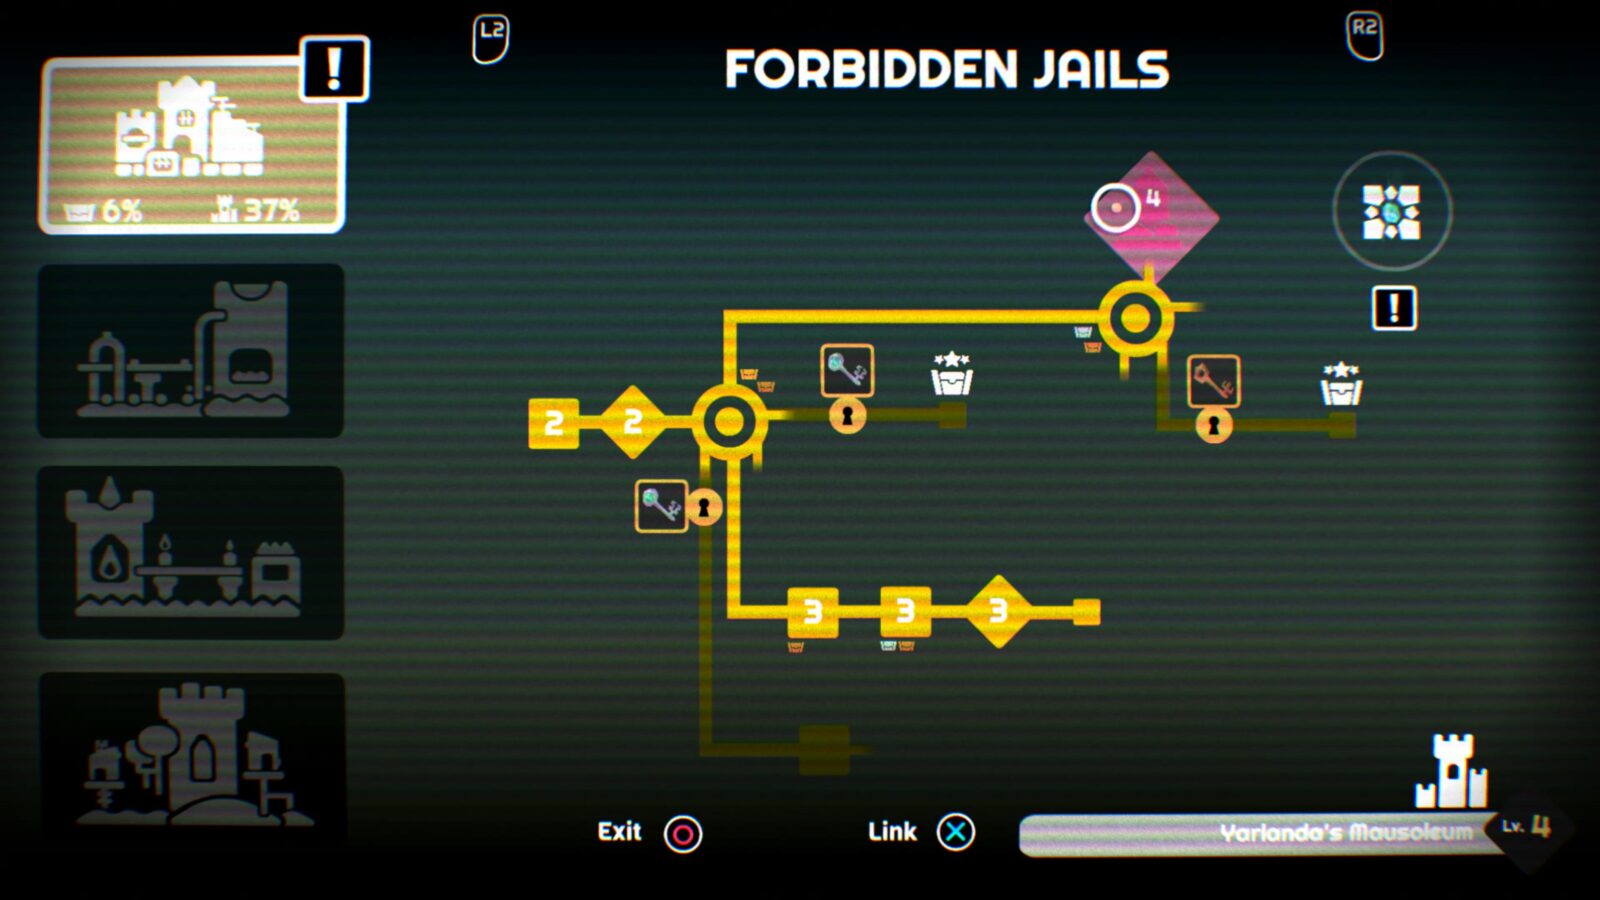
If you defeat the boss named Hokin in the Deadly Tower zone of the Forbidden Jails, you will free a Goblin NPC called Connery who sells armor sets. You can reach the Deadly Tower through the Jail Cesspit from the Prisoner’s Path.
You can then find Connery in the Goblin Market and buy armor sets from them using gold.
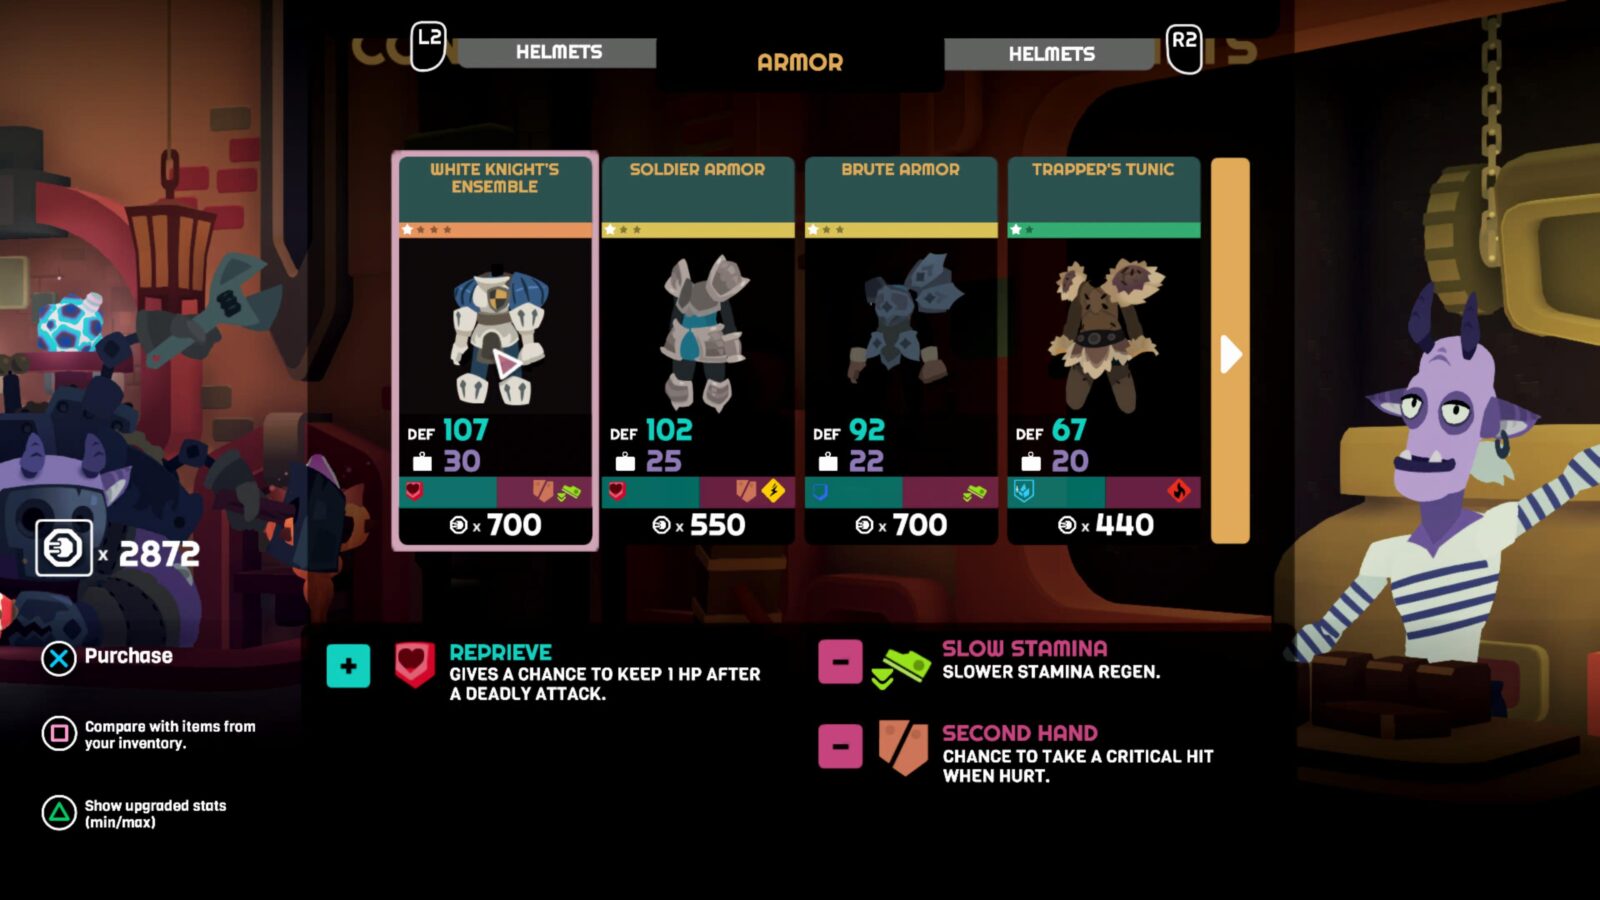
Buy any armor set with matching helmet (you can see which armor set a helmet goes with underneath it in the store). Once you have a matching set, equip it and the I’m So Fancy trophy will unlock.
Gold Trophies
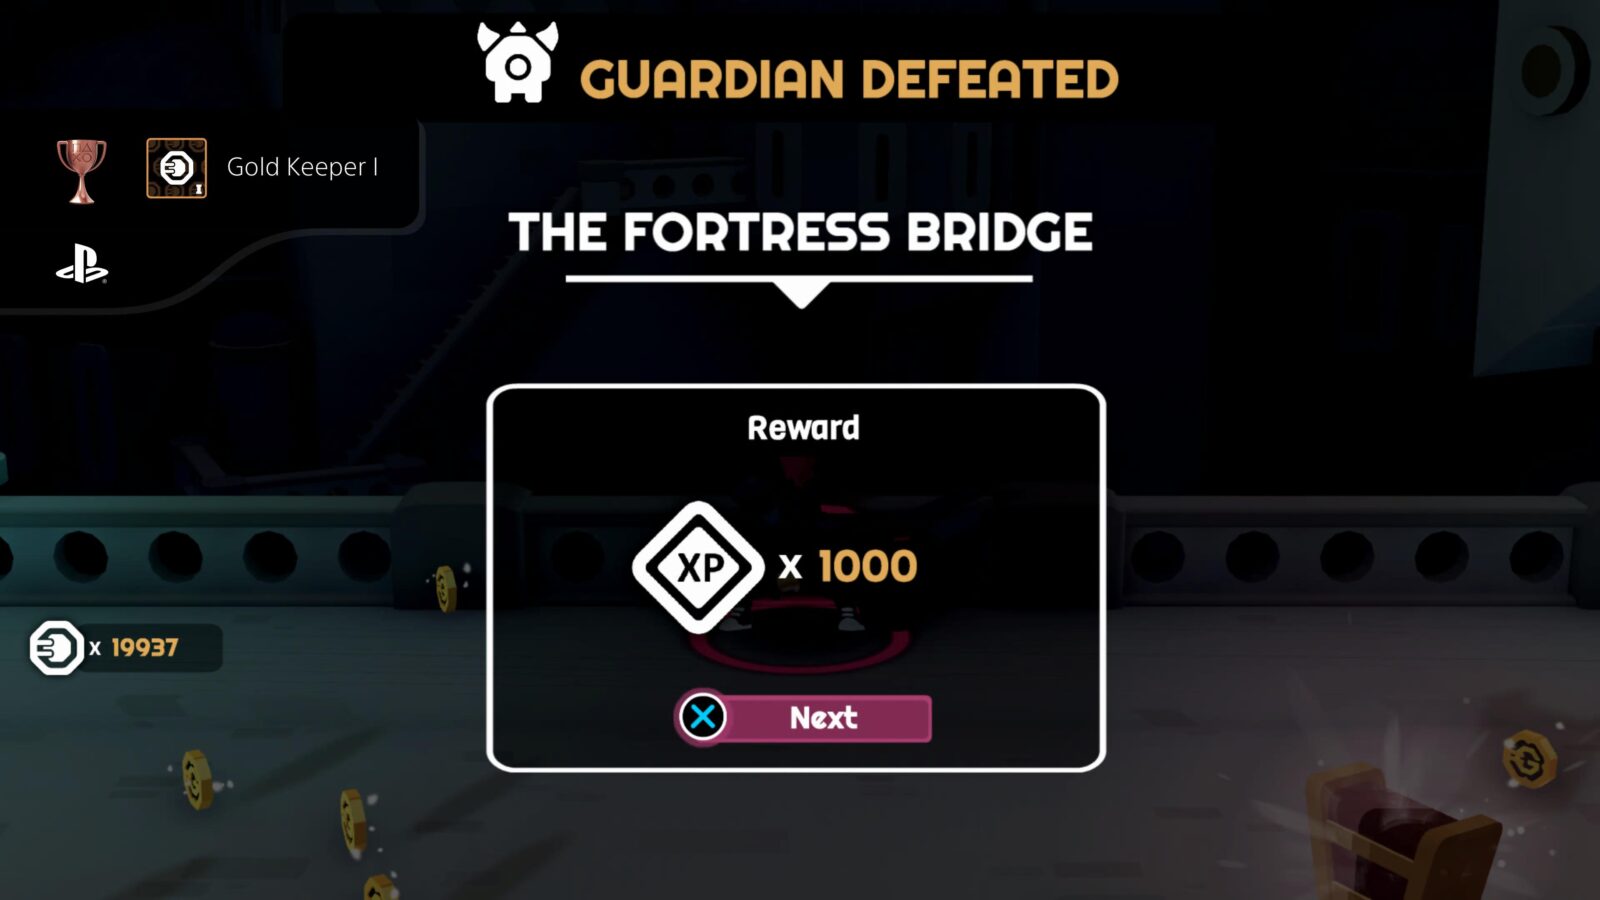
Gold Keeper I
Collect 25,000 gold
To unlock Gold Keeper I, you must acquire a cumulative total of 25,000 gold. See Gold Keeper III for more details.

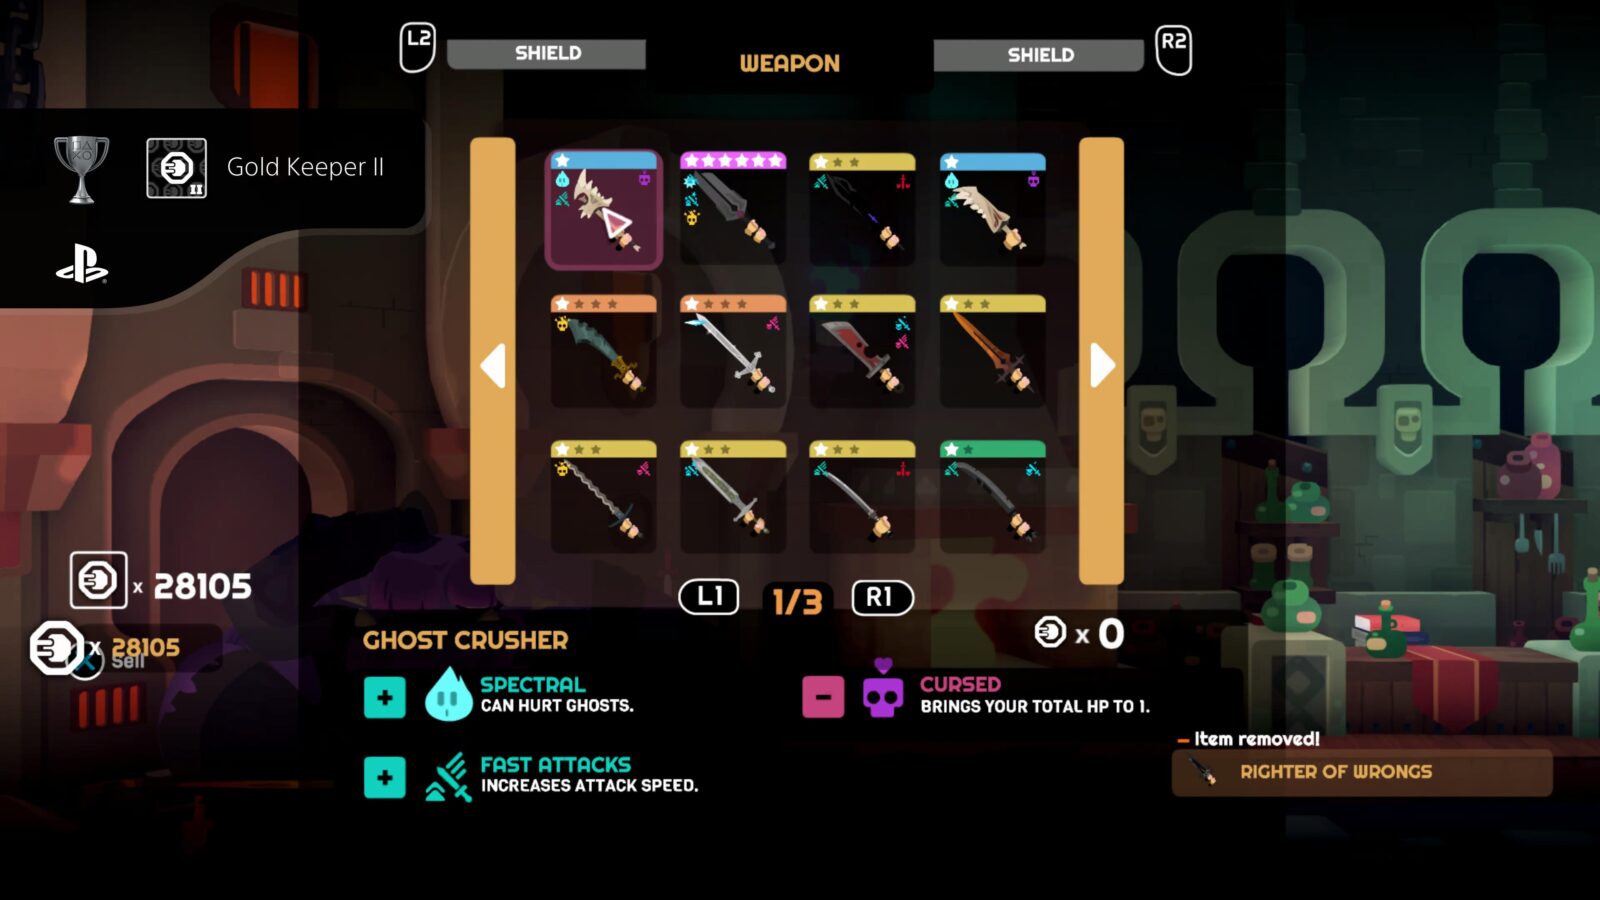
Gold Keeper II
Collect 50,000 gold
Gold Keeper II will unlock when you acquire a cumulative total of 50,000 gold. See Gold Keeper III for more details.

Gold Keeper III
Collect 100,000 gold
In Young Souls, you will get Gold from chests, destructibles, and enemies. The gold coins will drop on the floor and you’ll need to run over them to collect them. You’ll gain gold very slowly at first but by the time you’re travelling through the Dark Lands map, you should find yourself earning gold quite quickly.
That being said, you won’t earn the 100,000 gold required for the Gold Keeper III trophy naturally, there will be some farming involved.
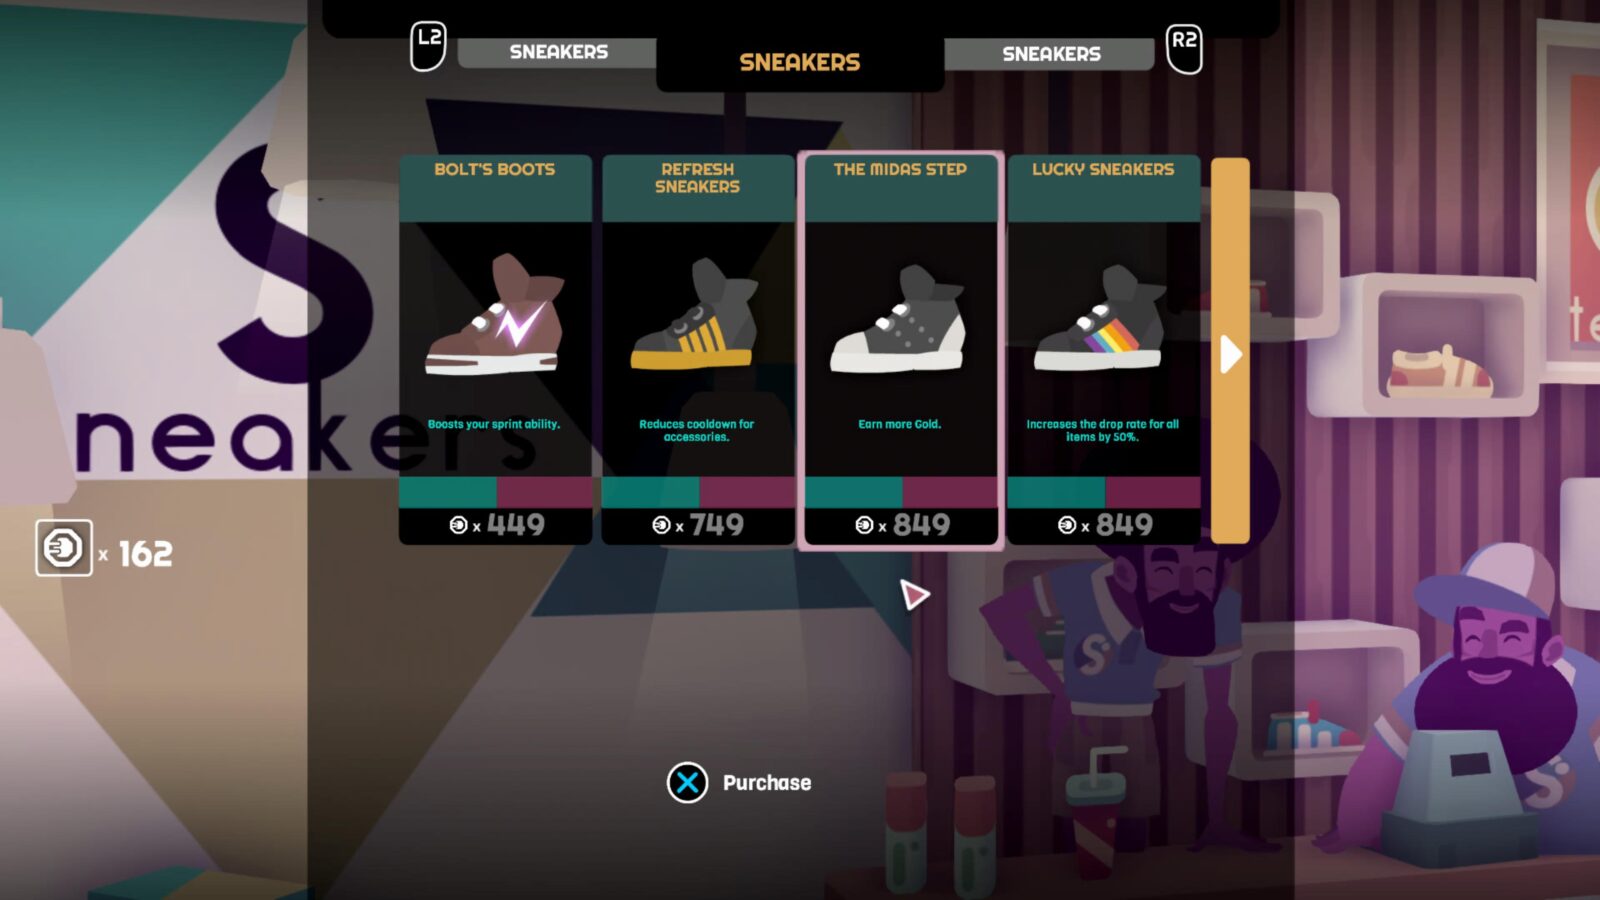
Firstly, you should go to the Sneaker Shop in Downtown and purchase the Sneakers called “The Midas Step” as soon as you can. These sneakers will increase the amount of gold you earn, speeding up this whole process.
Once you reach the end of the game and have unlocked all of the Gear & Upgrade Trophies, feel free to sell any weapons or armor that you won’t use. Keep the best gear for your two characters but everything else should be sold, you’ll earn a lot of gold this way.
After all that, there shouldn’t be too much farming left to do.
All of the Gold Trophies track the cumulative total of Gold earned, so you will not impede your progress if you spend gold, and are free to spend your gold however you like. You don’t need to have 100,000 gold in your inventory all at once, essentially.
What this also means is that you can simply repeatedly buy an NPC’s entire stock, and then immediately sell it back to them. If you have at least 30,000 Gold in your inventory (you should have around 40-45,000 if you followed the advice above) then you will be able to farm the rest of the gold you need by just buying and reselling weapons or armor from NPCs.

Map Completion Trophies

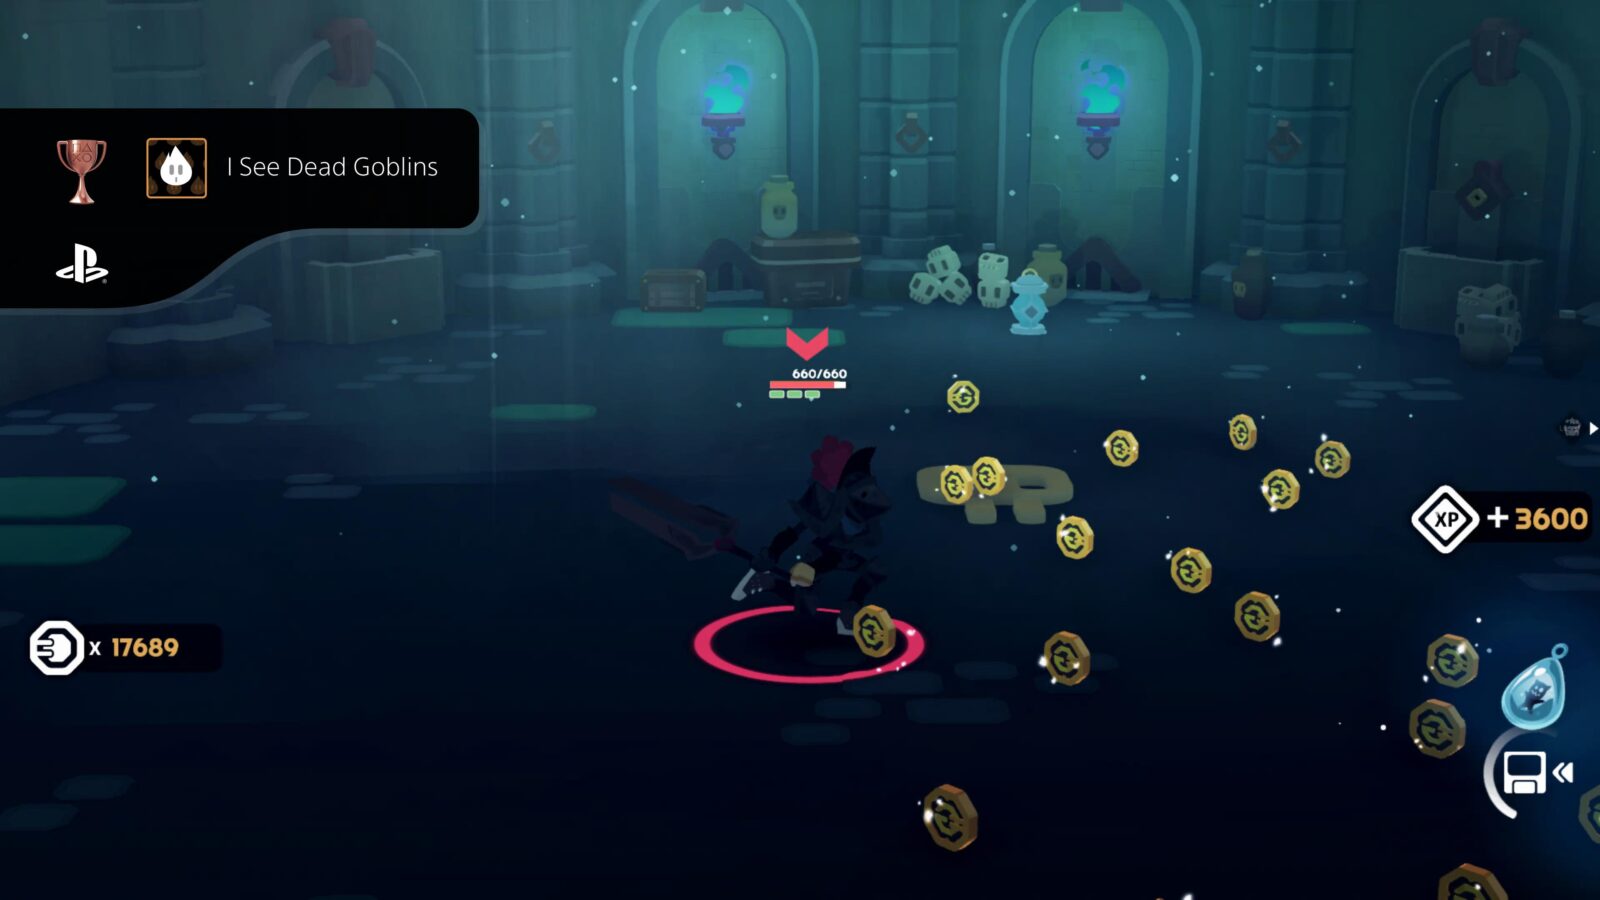
I See Dead Goblins
Clear all Catacombs
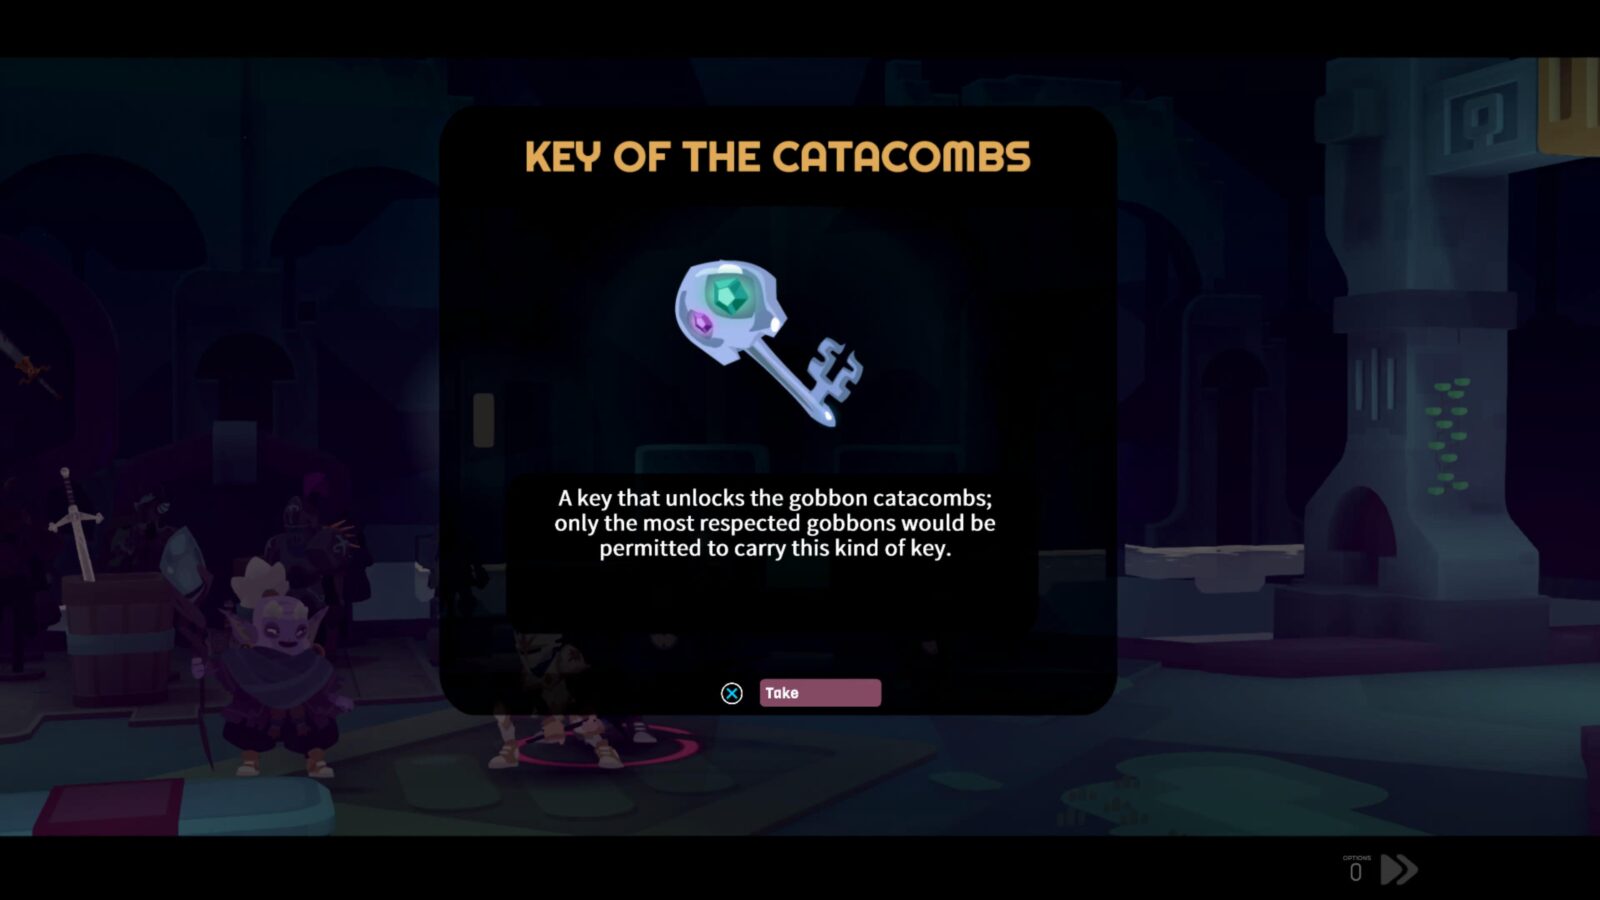
After you have collected the third Power Rune, you will receive the Key of the Catacombs from Baldwin, which allows you to access locked paths in both the Forbidden Jail and Molten Lands maps.
You will need to visit at least one of these catacombs as part of the story to acquire Spectral Weapons so that you can defeat ghosts in the Dark Lands map.
You don’t need to complete every Catacomb to progress the story, but you will need to if you want this trophy. You’ll also probably want both of your characters to have a spectral weapon rather than just one of them.
So, visit both locked Catacomb Key Doors and complete the full paths beyond them and the I See Dead Goblins trophy will unlock.

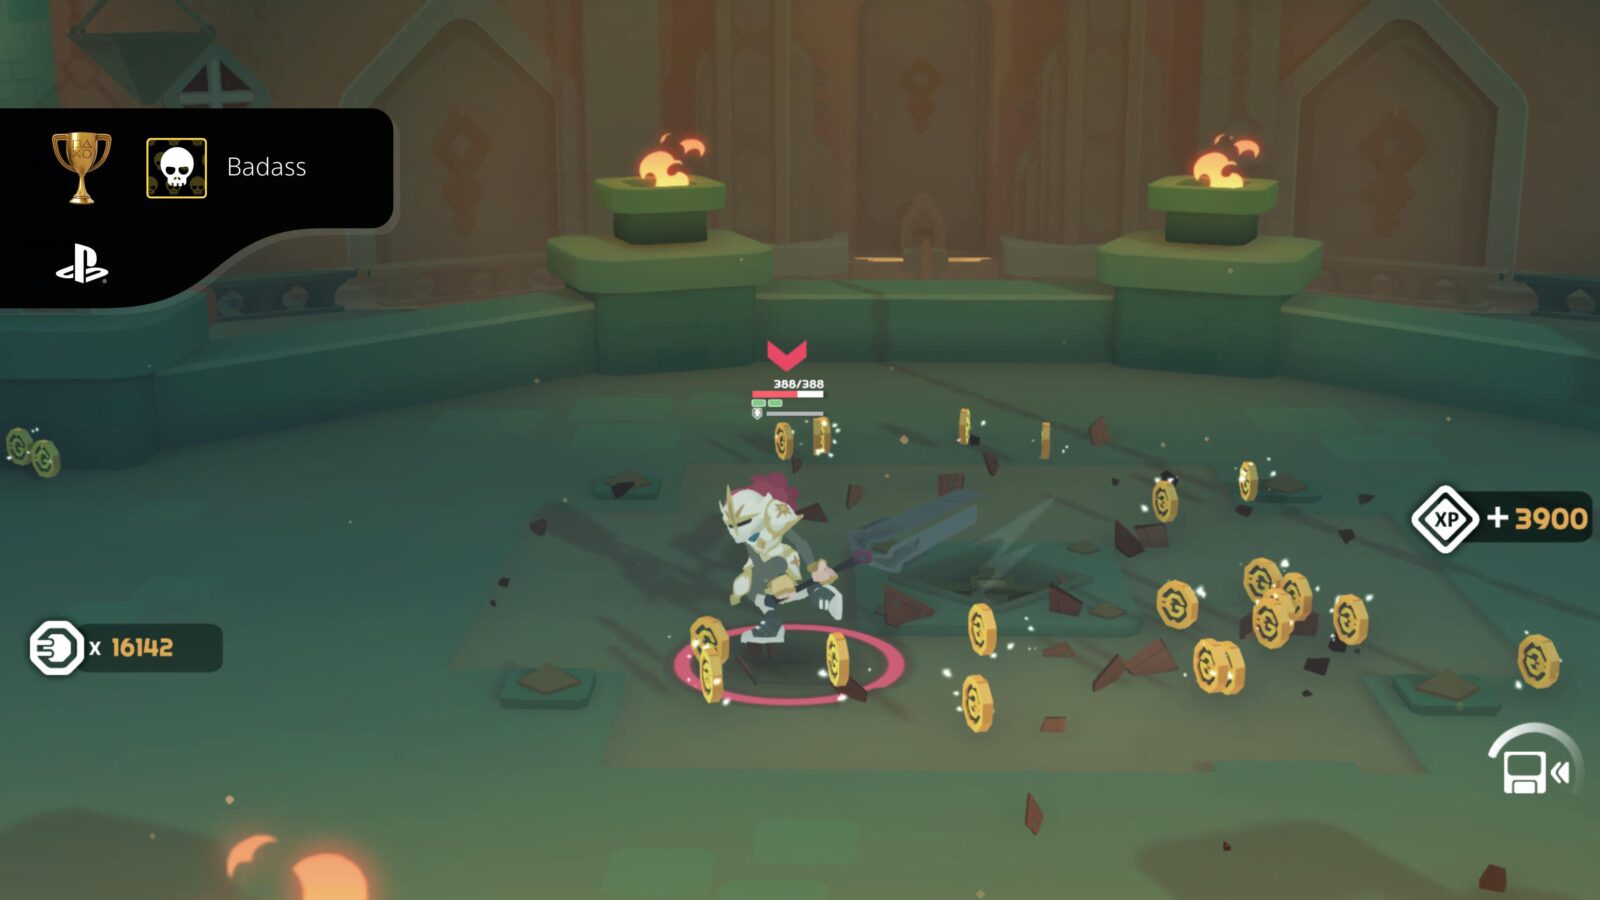
Badass
Clear all hard branches
Three of the maps in Young Souls have one optional path which is harder than all others. These hard branches will feature back-to-back minibosses with a very tough boss at the end.
They are marked with skull icons both on the doors leading to them and on the actual zones on the map.
To unlock the Badass trophy, you will need to complete all of these hard branches in Forbidden Jails, Drowned Caverns, and Molten Lands.

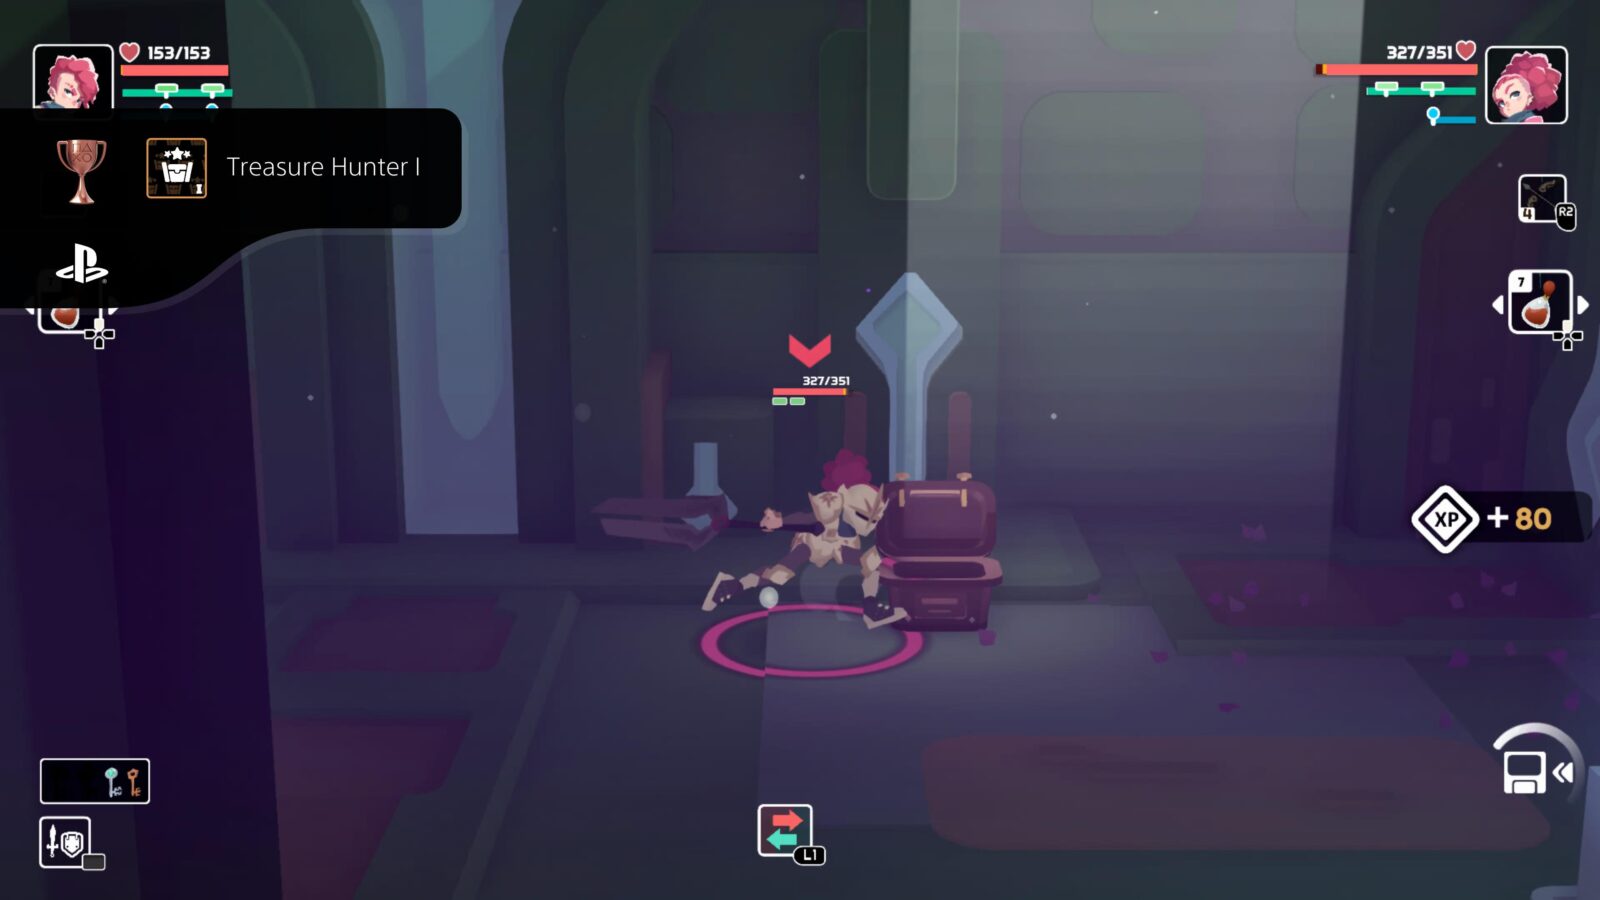
Treasure Hunter I
Open all bronze key chests
Before you can open any Bronze Key Chests, you will need to acquire the Bronze Master Key by defeating the boss named Hokin in the Deadly Tower zone of the Forbidden Jails. You can reach it through the Jail Cesspit from the Prisoner’s Path.
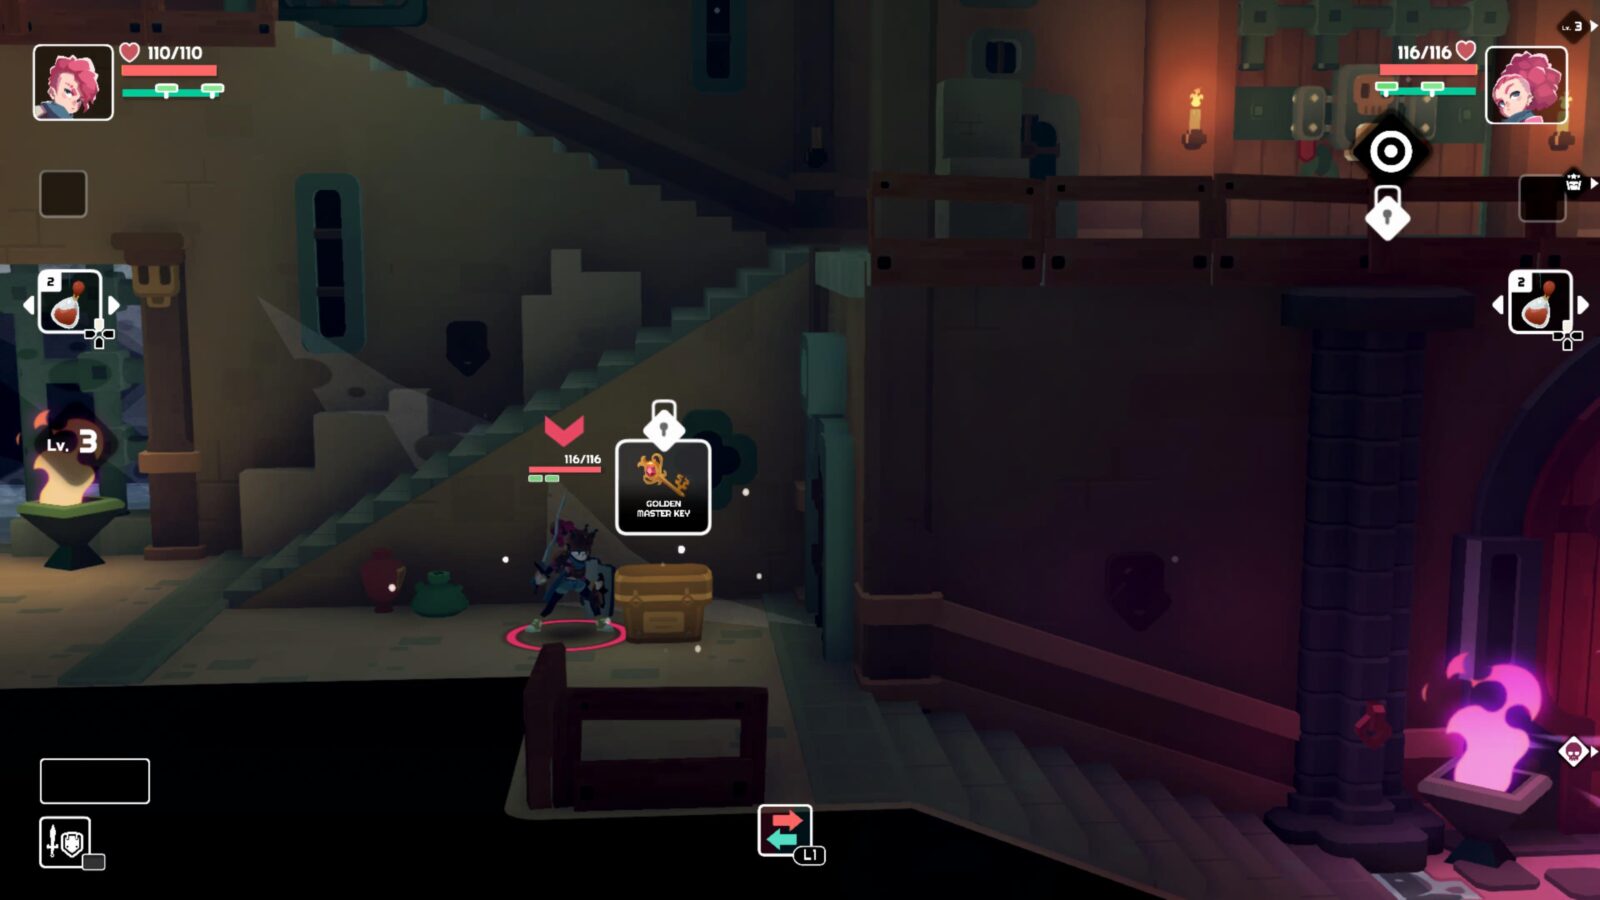
Once you have the Bronze Master Key, you can open all Bronze Key Chests and Bronze Key Doors. You’ll then need to replay every stage that contains a bronze chest or bronze door and make sure you open them all.
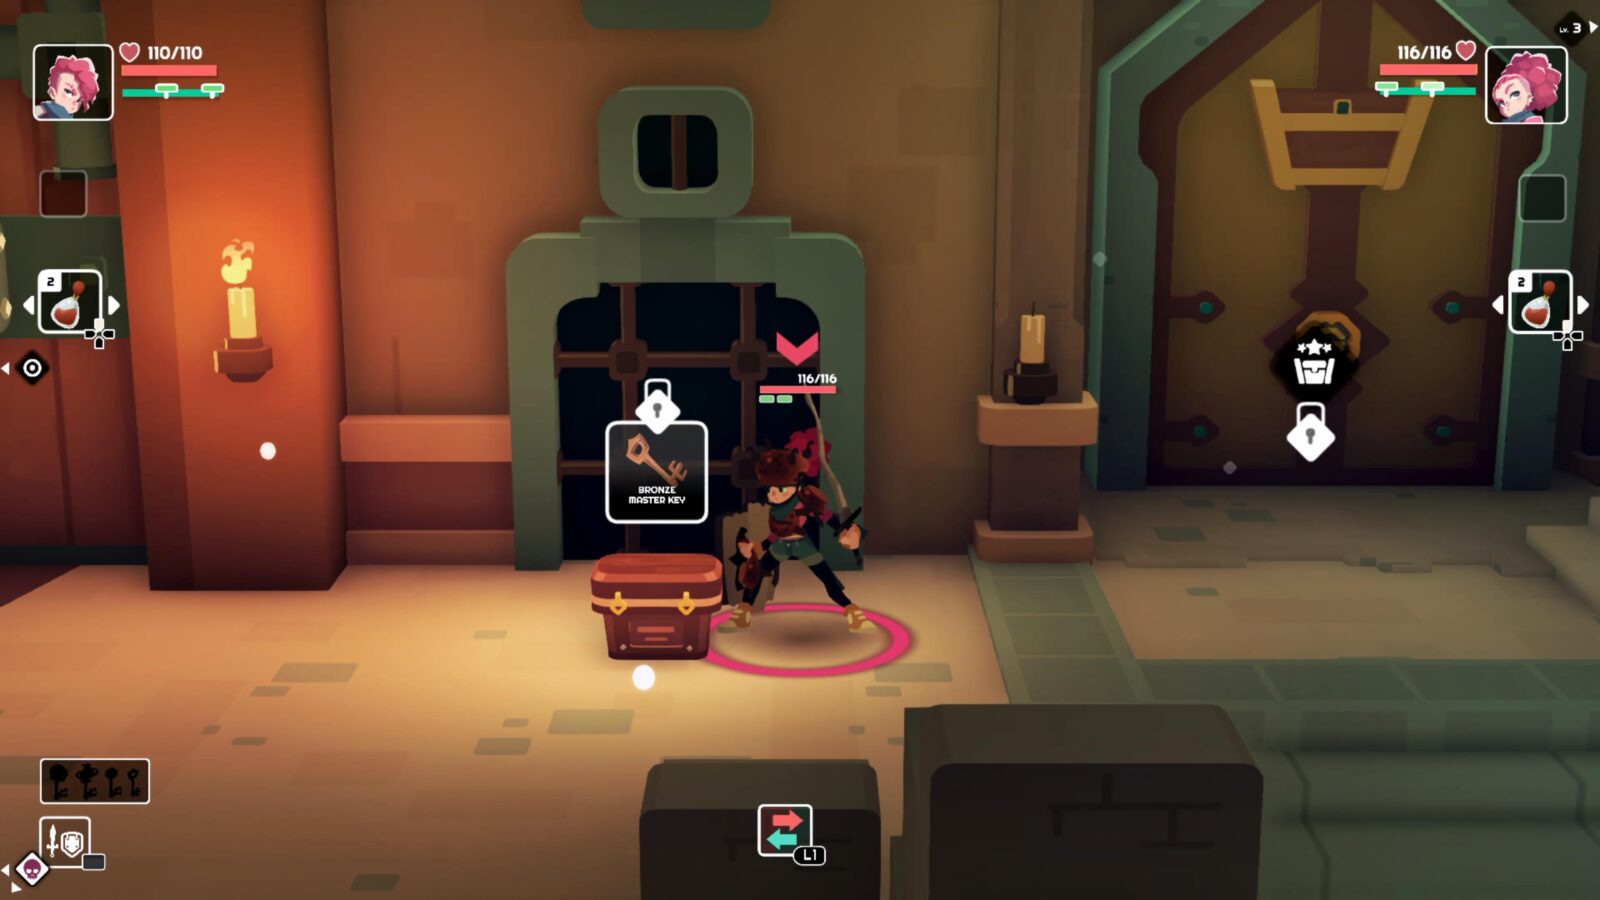
Fortunately, every level with a bronze chest inside is clearly labeled on the map, with a small bronze chest icon. It’s up to you if you want to replay these levels as soon as you have the Bronze Key or if you wish to wait until you have the Silver and Gold Keys too, to save replaying some levels again. Either way, you’ll get some useful gear and resources from the chests.
You can fast travel to zones you’ve already visited by pressing ![]() to open the map from the
to open the map from the ![]() menu while already in a zone. This way, you can just travel to a zone that contains a chest, reach and open the chest, then immediately teleport to the next zone.
menu while already in a zone. This way, you can just travel to a zone that contains a chest, reach and open the chest, then immediately teleport to the next zone.
Once you have opened every single Bronze Key Chest in all 4 maps, the Treasure Hunter I trophy will unlock.
Treasure Hunter II
Open all silver key chests
To open Silver Key Chests and Silver Key Doors you will need to acquire the Silver Master Key. To get it, you will need to enter the Full Moon zone within and defeat the boss names Balkin.
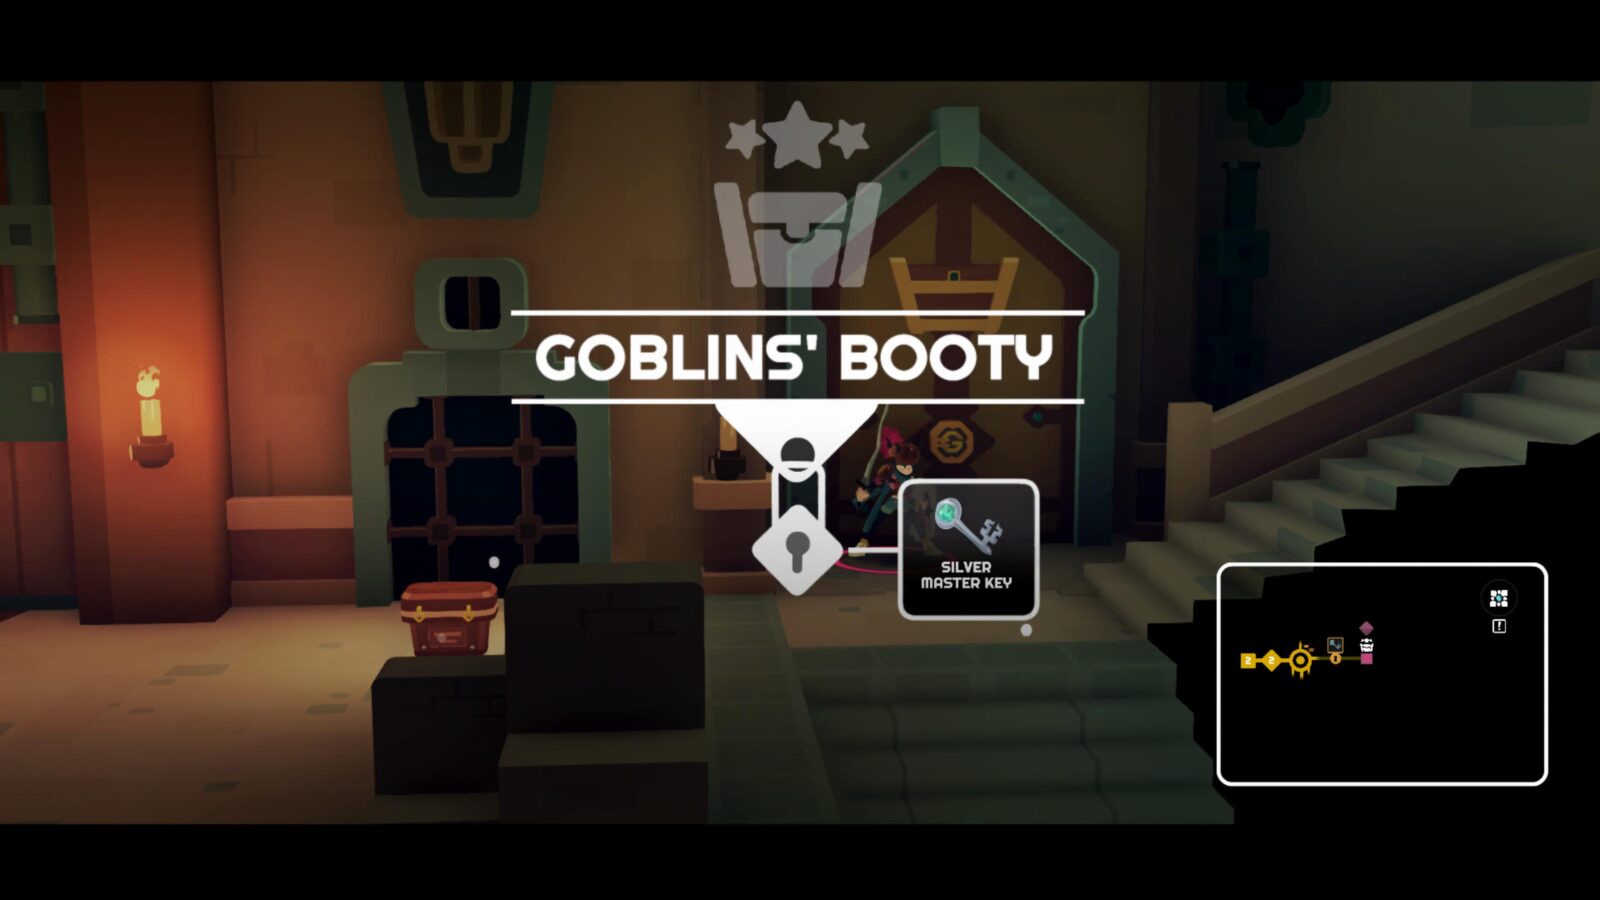
Once you have the Silver Master Key, you will need to replay any areas that contain a Silver Key Chest and open all of the chests. As with the bronze chests, you will see silver chest icons on the map which indicate the presence of a Silver Key Chest.
Once you’ve opened every single Silver Key Chest in the game, the Treasure Hunter II trophy will unlock.

Treasure Hunter III
Open all gold key chests
In order to open Gold Key Chests and Gold Key Doors, you will need to get the Gold Master Key from the boss named Bhrisch.
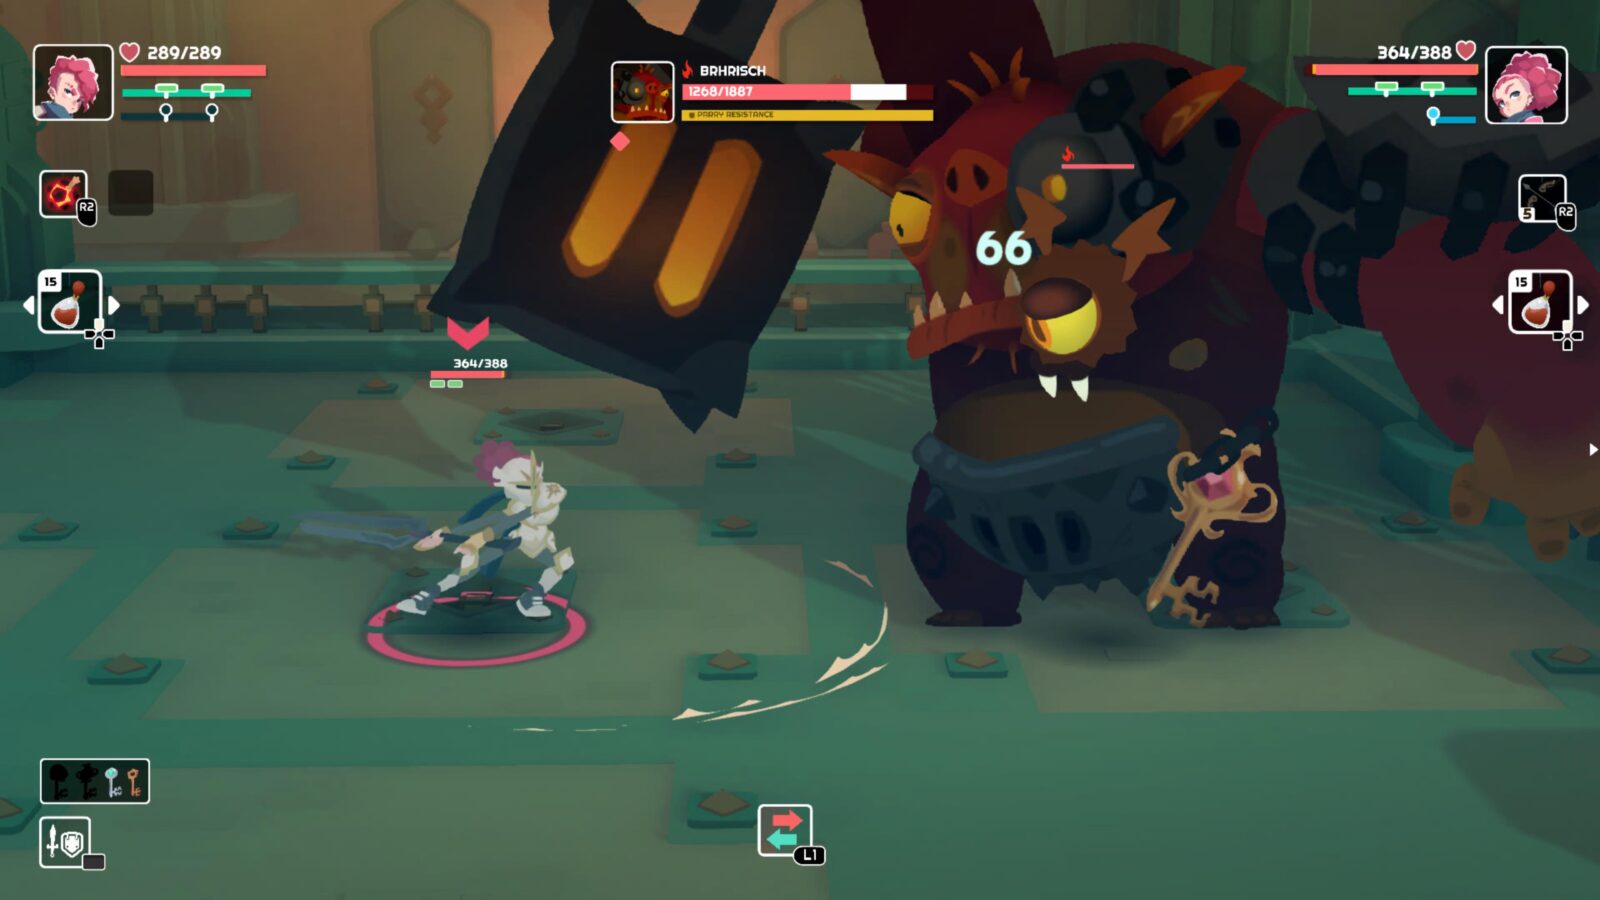
Bhrisch can be found in the Sultry Chamber zone within the Molten Lands map.
Once you have the key, you will need to revisit all zones that contain a Gold Key Chest (indicated by a small gold chest icon on the map) in all 4 maps and open all of them. Once you have done so and there are no unopened Gold Chests remaining, the Treasure Hunter III trophy will unlock.
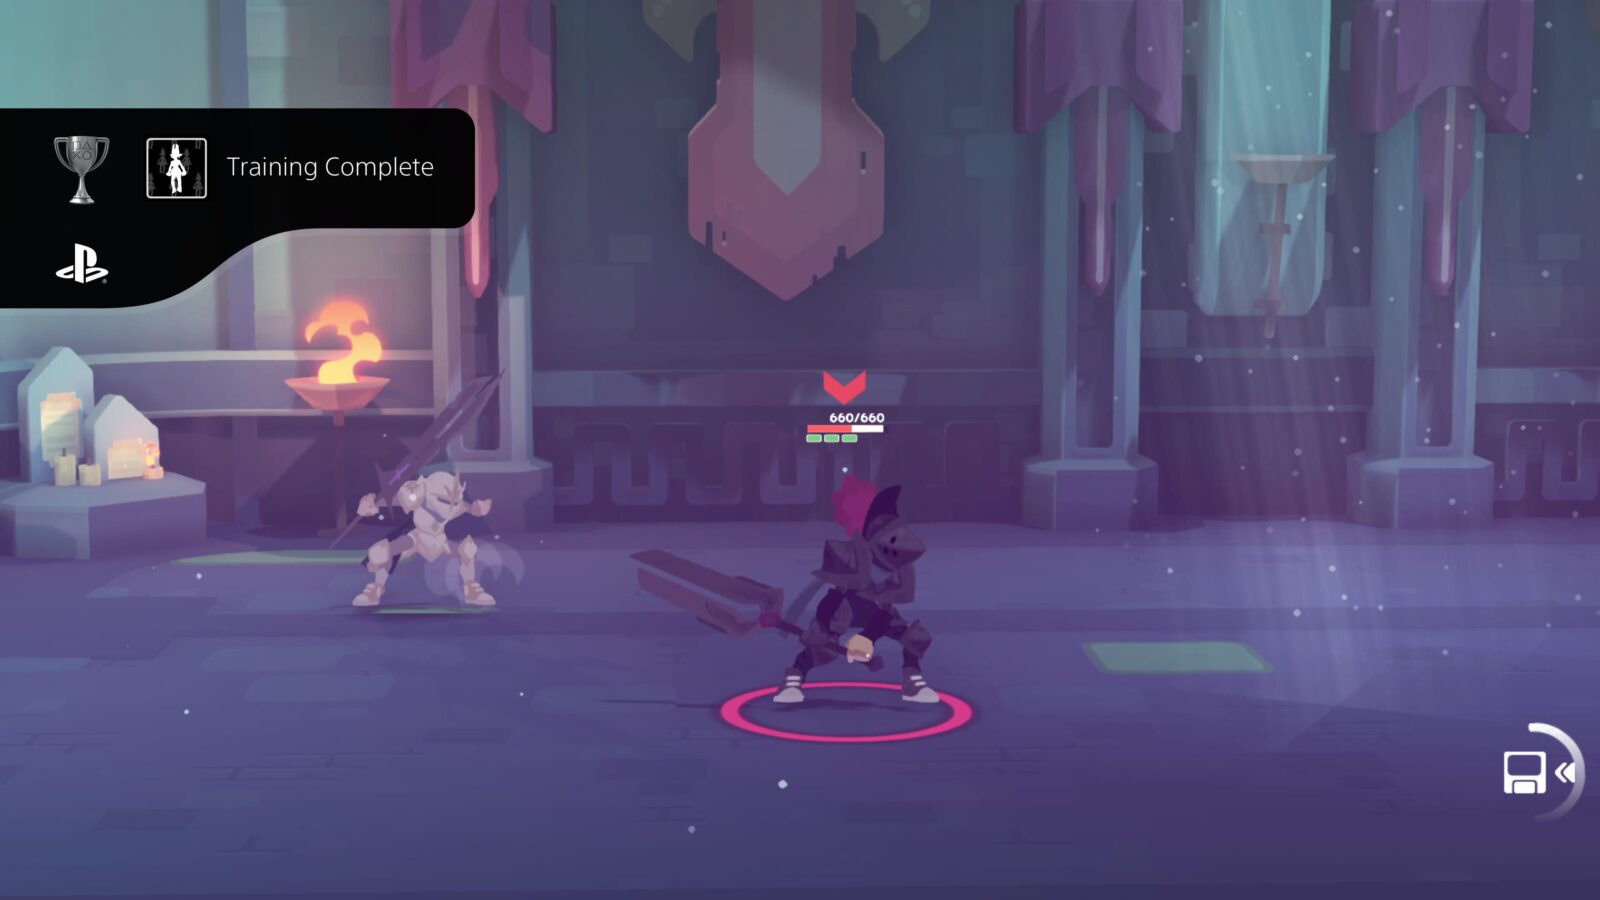
Training Complete
Beat Yarlanda in the last Mausoleum
Throughout the game, you can find Mausoleums in the first three maps; Forbidden Jails, Drowned Caverns, and Molten Lands. They can be found by accessing Yarlanda Statues in specific areas of each map.
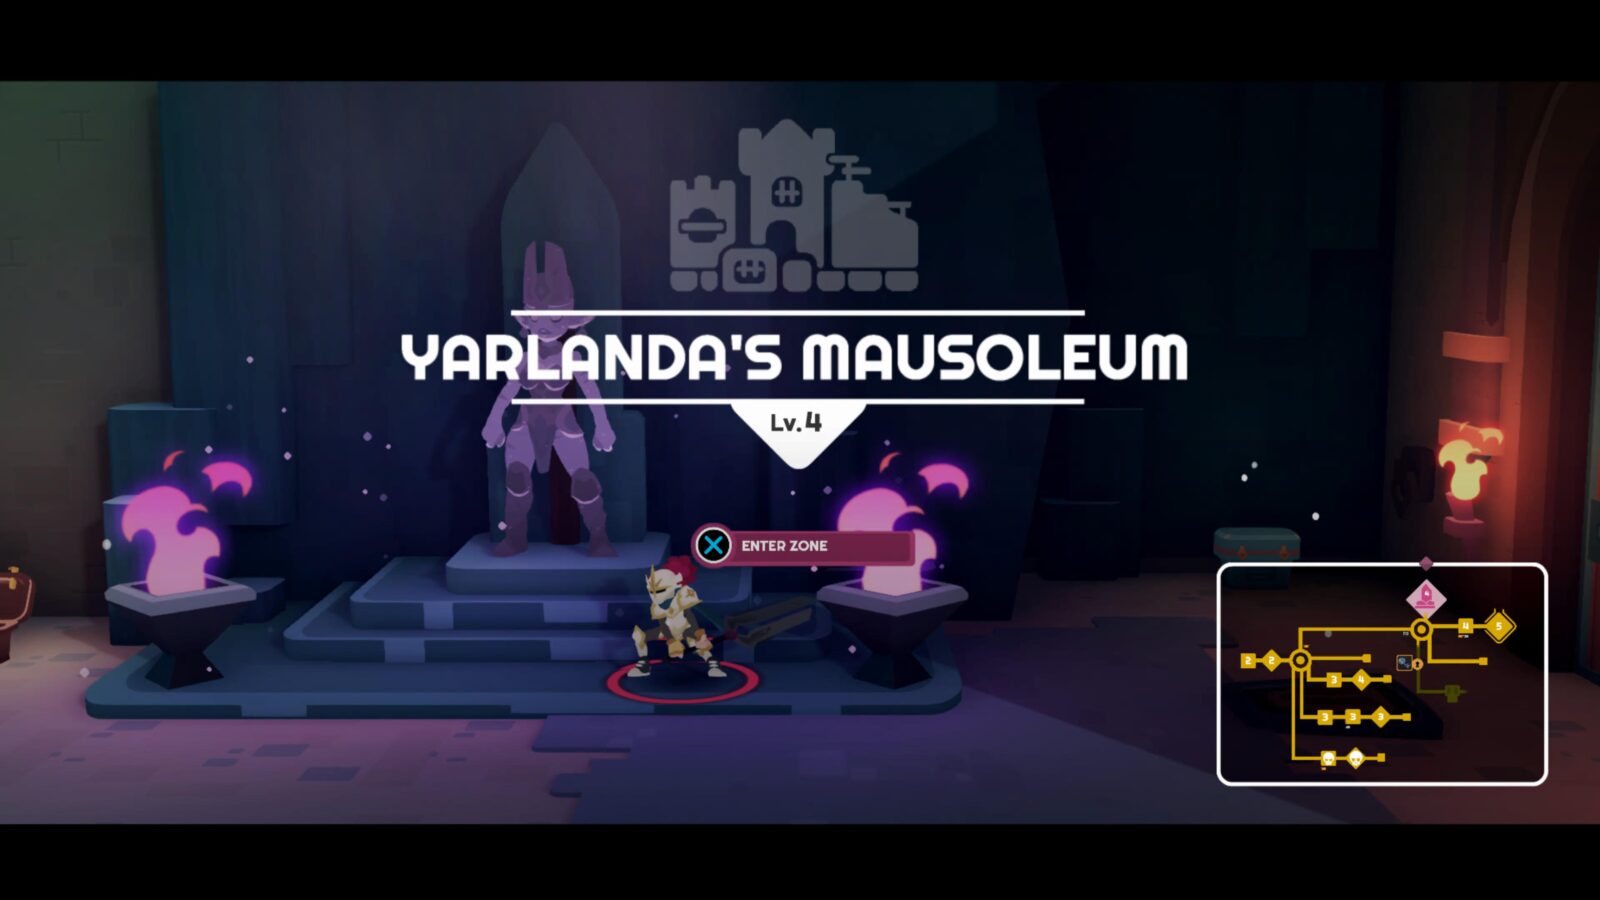
Once you have completed all three of these Mausoleums and defeated Yarlanda’s Spirit in each one to unlock powerful weapons, return to the Goblin Market and speak to Lundgren. After each weapon you receive from Yarlanda, Lundgren will add a new weapon type that you can buy from him.
Leave his shop after unlocking all three weapon types and then speak to him again. He will have some special dialogue about the final Mausoleum, which is right here in the Goblin Market.
Enter the Mausoleum and defeat Yarlanda for the fourth and final time to unlock the Training Complete trophy.
This fight is easily one of the most difficult in the game. She has a lot of health and will hit incredibly hard on top of having the ability to poison you. Avoid her attacks and take her on patiently. Whenever she attacks she will be exposed from behind so try to dodge around her and hit her while she’s vulnerable.
Plat Get!


Job Is Done!
Complete the game at 100%
Once you have acquired every other trophy in this Young Souls Trophy Guide, the “Job is Done!” platinum trophy will unlock.
Thank you for choosing PlatGet as your source for a Young Souls Trophy Guide. Consider checking out our other guides!
Follow us on Twitter @GetPlat or Instagram @platget for updates on new reviews and guides, as well as small anecdotes about our platinum journeys.