PlayStation 4, PlayStation 5
Resident Evil 4 Remake Collectibles Guide
Collectible Guide
Where to Find All Collectibles in Resident Evil 4 Remake for PS4 & PS5
Welcome to our Resident Evil 4 Remake Collectibles Guide. In this remake of Resident Evil 4 there are three types of collectibles that you’ll be collecting; Treasures, Clockwork Castellans–which need to be destroyed and can be pinpointed by the noise they make–and Merchant Requests.
Treasure comes in 3 types. You have standard treasure which can be sold immediately for a quick bit of cash but aren’t usually worth all that much. Then there is treasure which has empty slots that you can place gems in to increase the overall value of the treasure. These slots range from 2 to 5 total and the more gems you inlay the pricier the treasure becomes. This is increased further with Gem Bonuses which in a nutshell comes down to what gems you are slotting into the treasure. If you slot 3 gems of the same colour into a 3-slot treasure then you increase the treasure’s value by x1.4. Lastly, the gems you slot into treasure also count towards the collectible trophies. You can spend Spinels at the Merchant to buy Treasure Maps which will pin all the treasures in that area on the map, however, these maps aren’t required for any trophies so you can save your Spinels for something else.
Clockwork Castellans are your typical Resident Evil collectible just like Mr. Everywhere in Resident Evil 3, and Mr. Raccoon in Resident Evil 2 etc. This time around the statues take on the appearance of Ramon Salazar and make a sound like spinning cogs inside a clock.
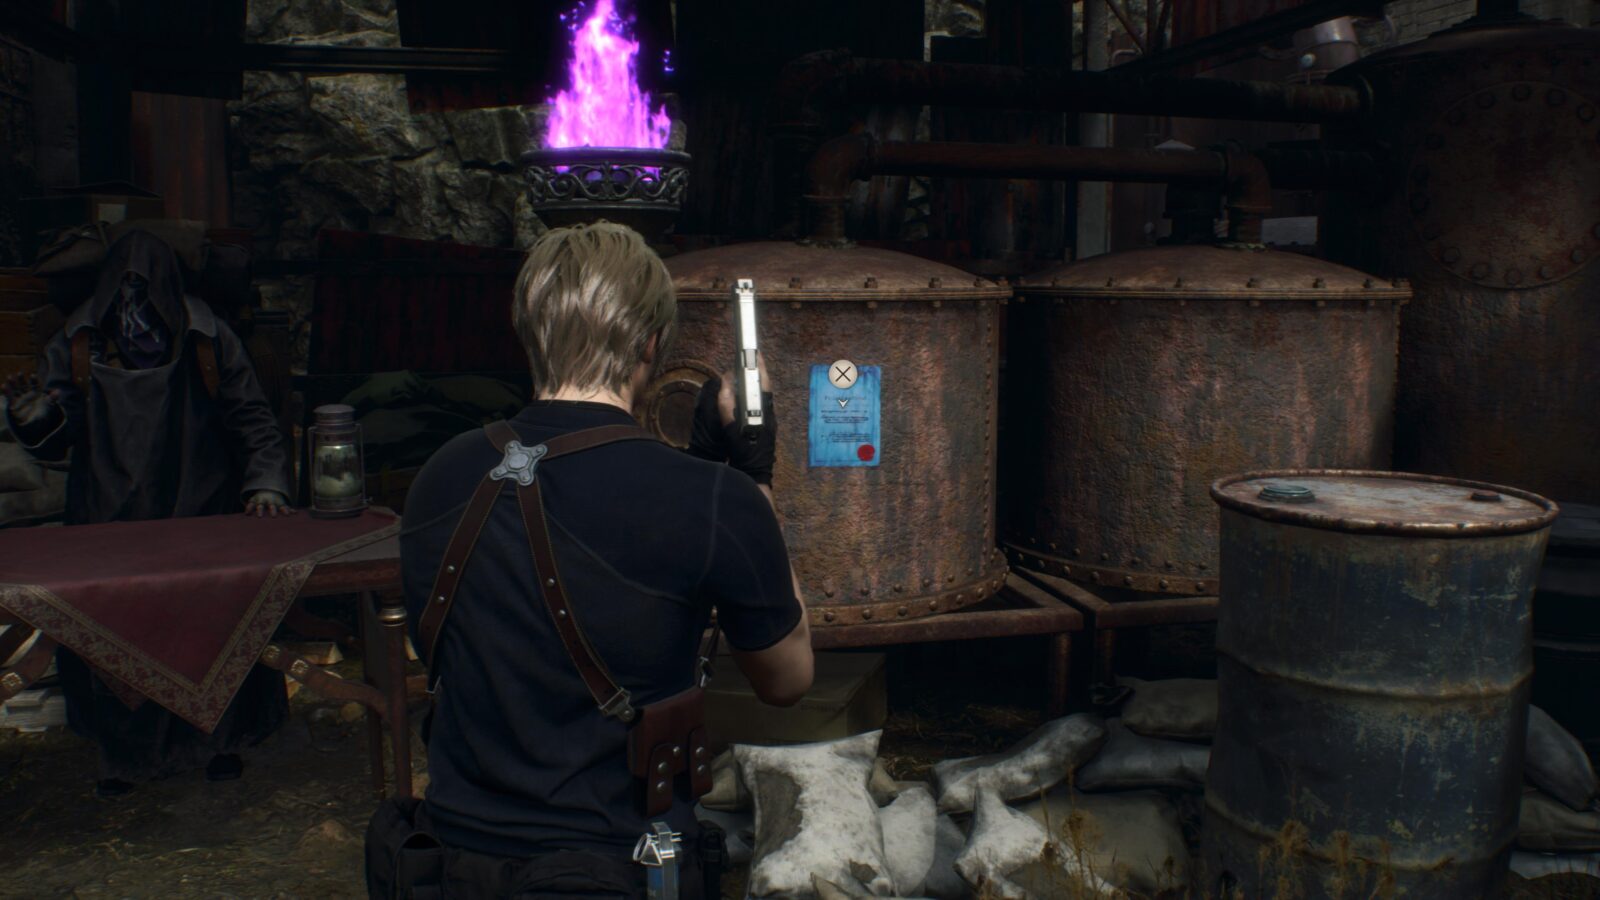
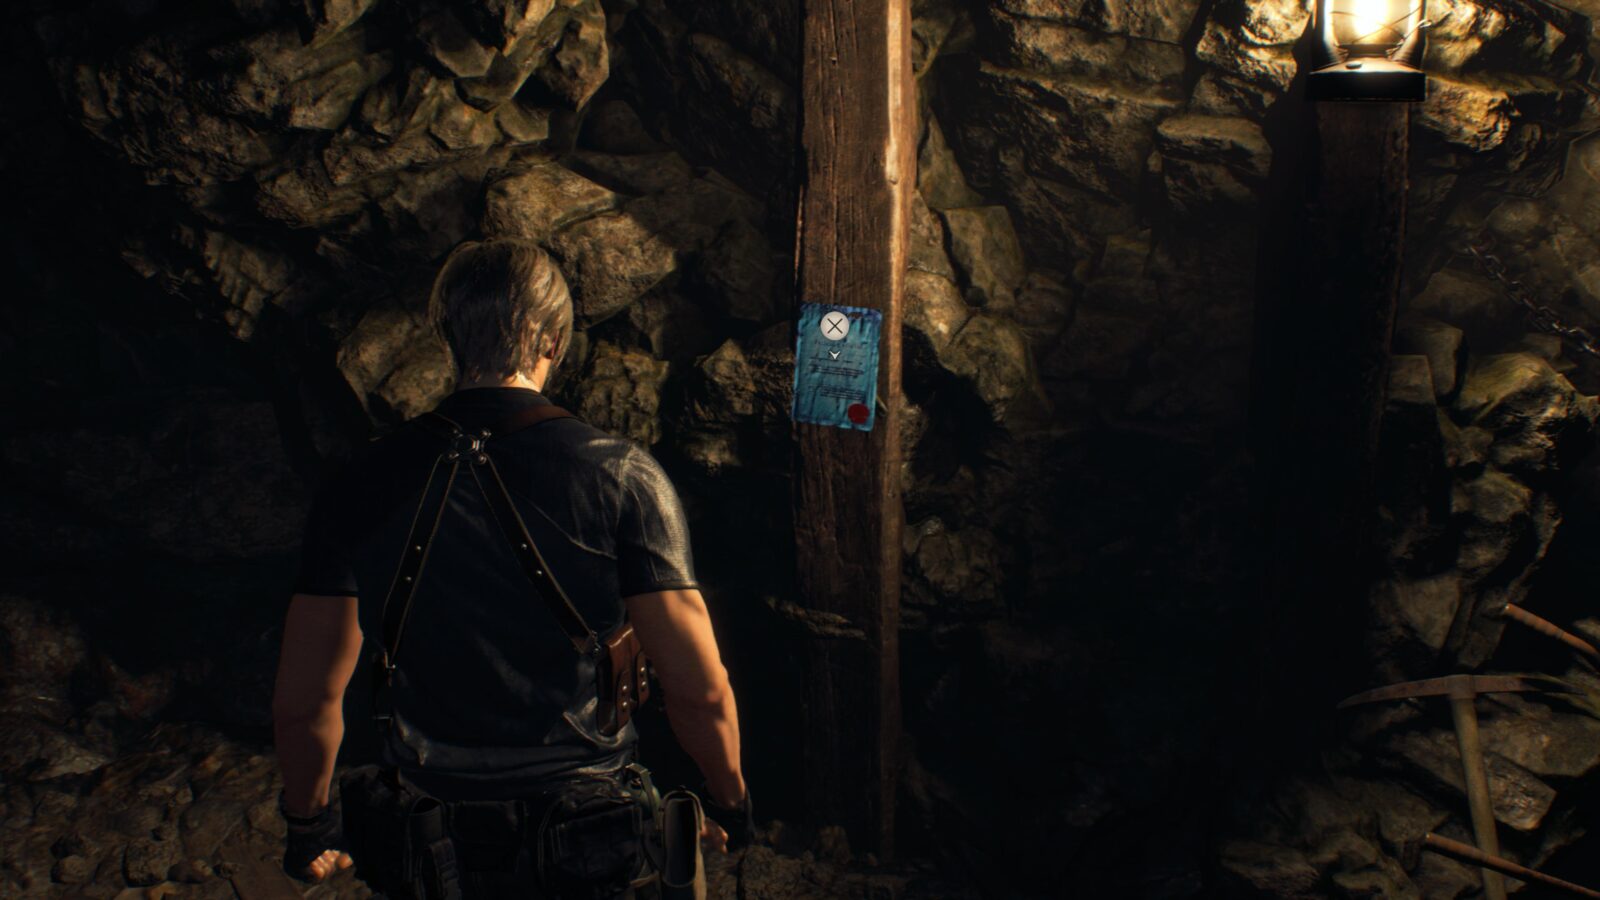
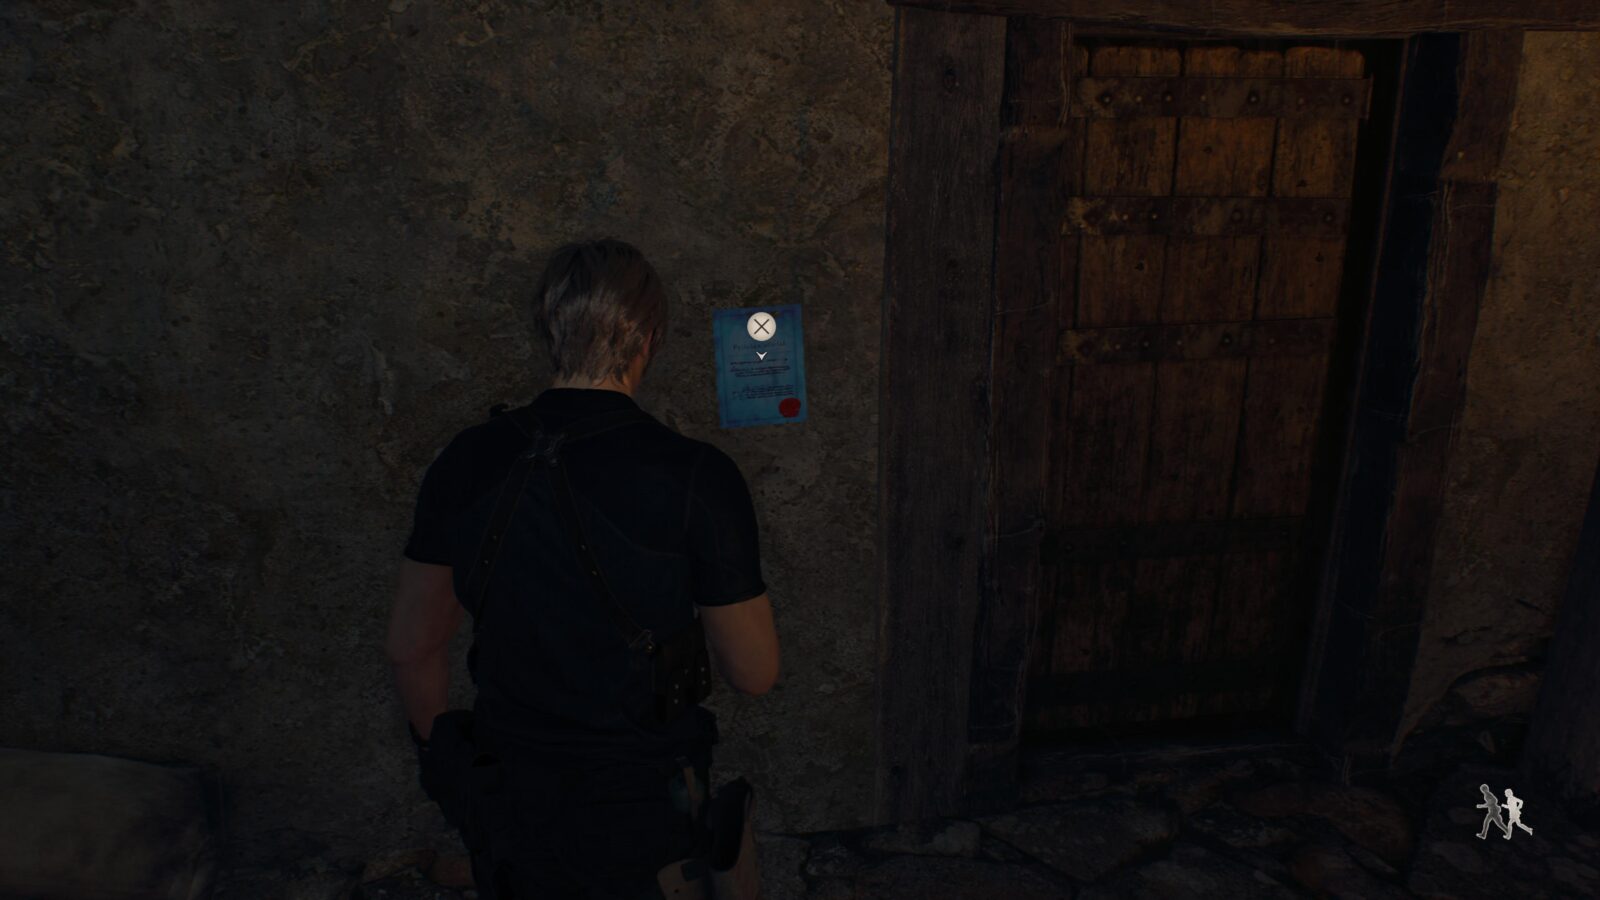
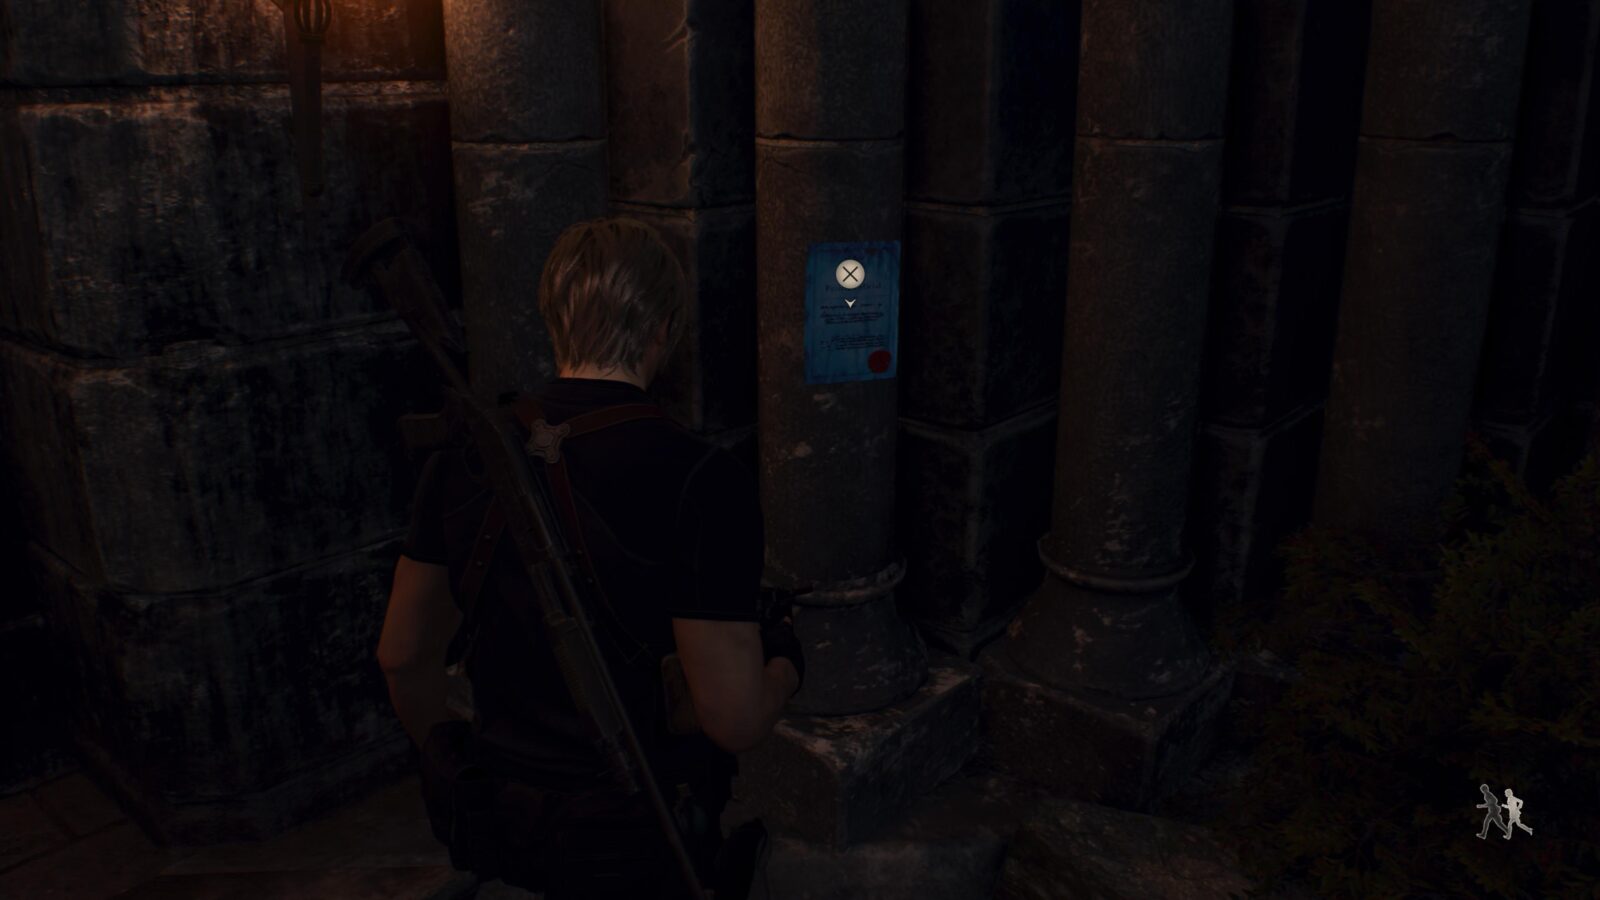
Lastly, there are Merchant Requests which appear in the form of a blue piece of paper pinned to walls usually near the Merchant himself. These are like little sub-quests that aren’t typically complex or difficult and are quickly completed in most cases.
Before you continue you should know that the Deluxe Edition of Resident Evil 4 Remake comes with the Expanded Treasure Map DLC which adds additional treasure to the world and pins them on your map. These treasures are completely optional and can be ignored if you don’t want to find them or don’t have the DLC, however, collecting them–if you can–will grant you plenty of extra pesetas to spend at the Merchant so they are worth it.
Don’t use an Exclusive Upgrade Ticket until after you finish the game and unlock the Primal Knife. Once you have the knife you can reload your save at the last merchant and fully upgrade it to make it completely indestructible. You should do this so your next playthrough can be a Guns & Knives Only run combined with a No Merchant run.
Chapter 1
There are a total of 1 Weapon, 1 Clockwork Castellan, 1 Merchant Request, and 5 Treasures in Chapter 1. This chapter also has 2 Expanded Treasures which can only be obtained with the Expanded Treasure Map DLC.
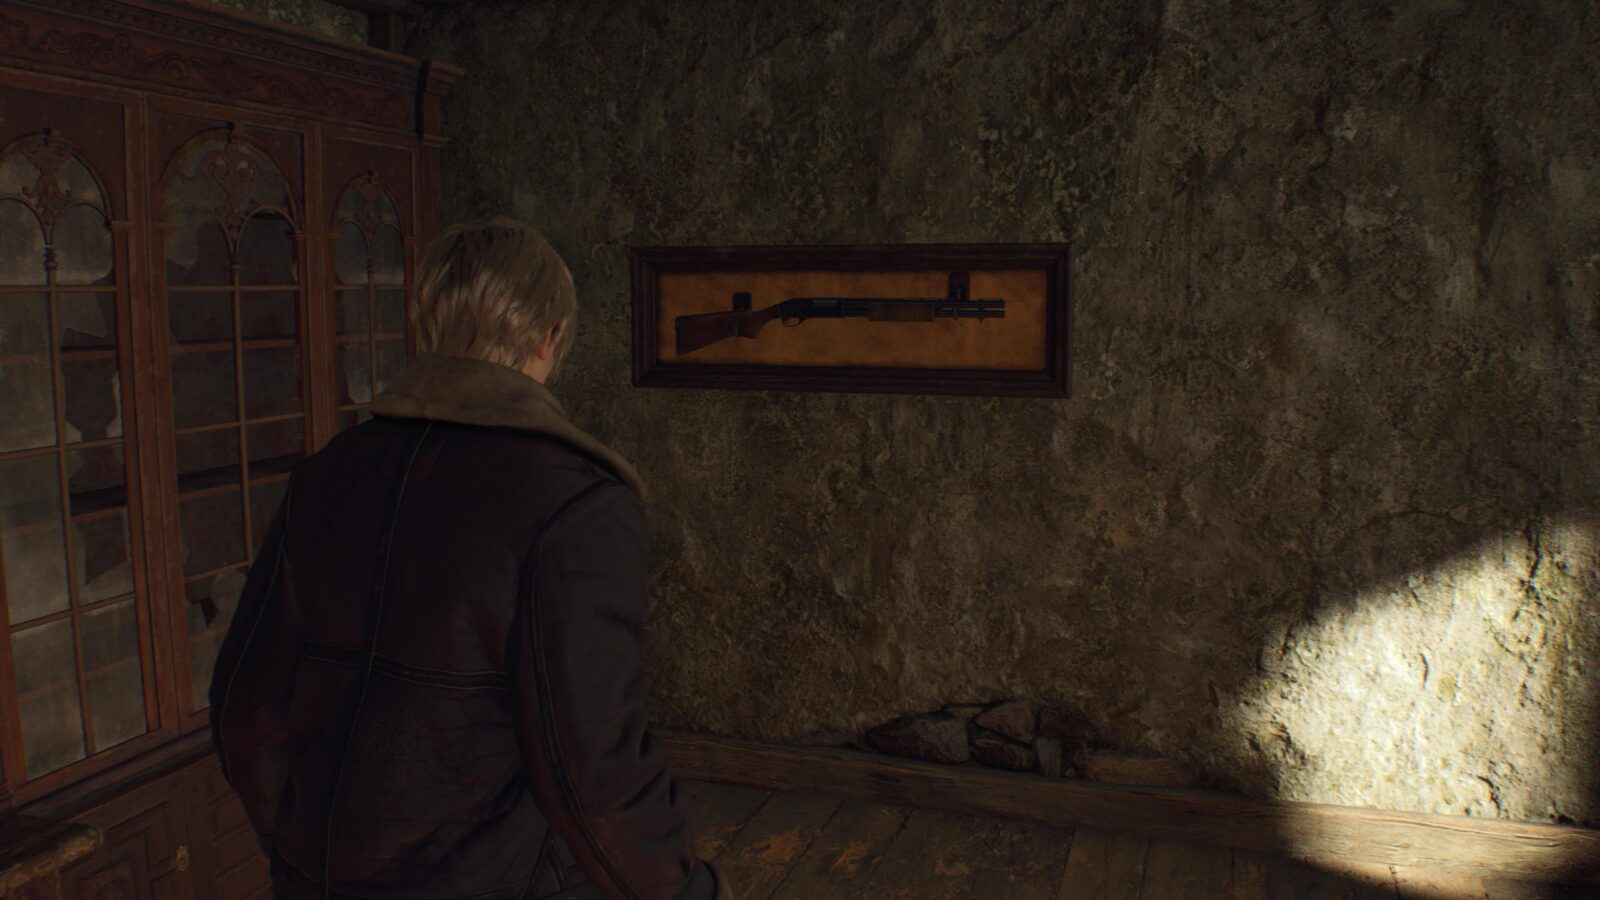
W-870 Shotgun
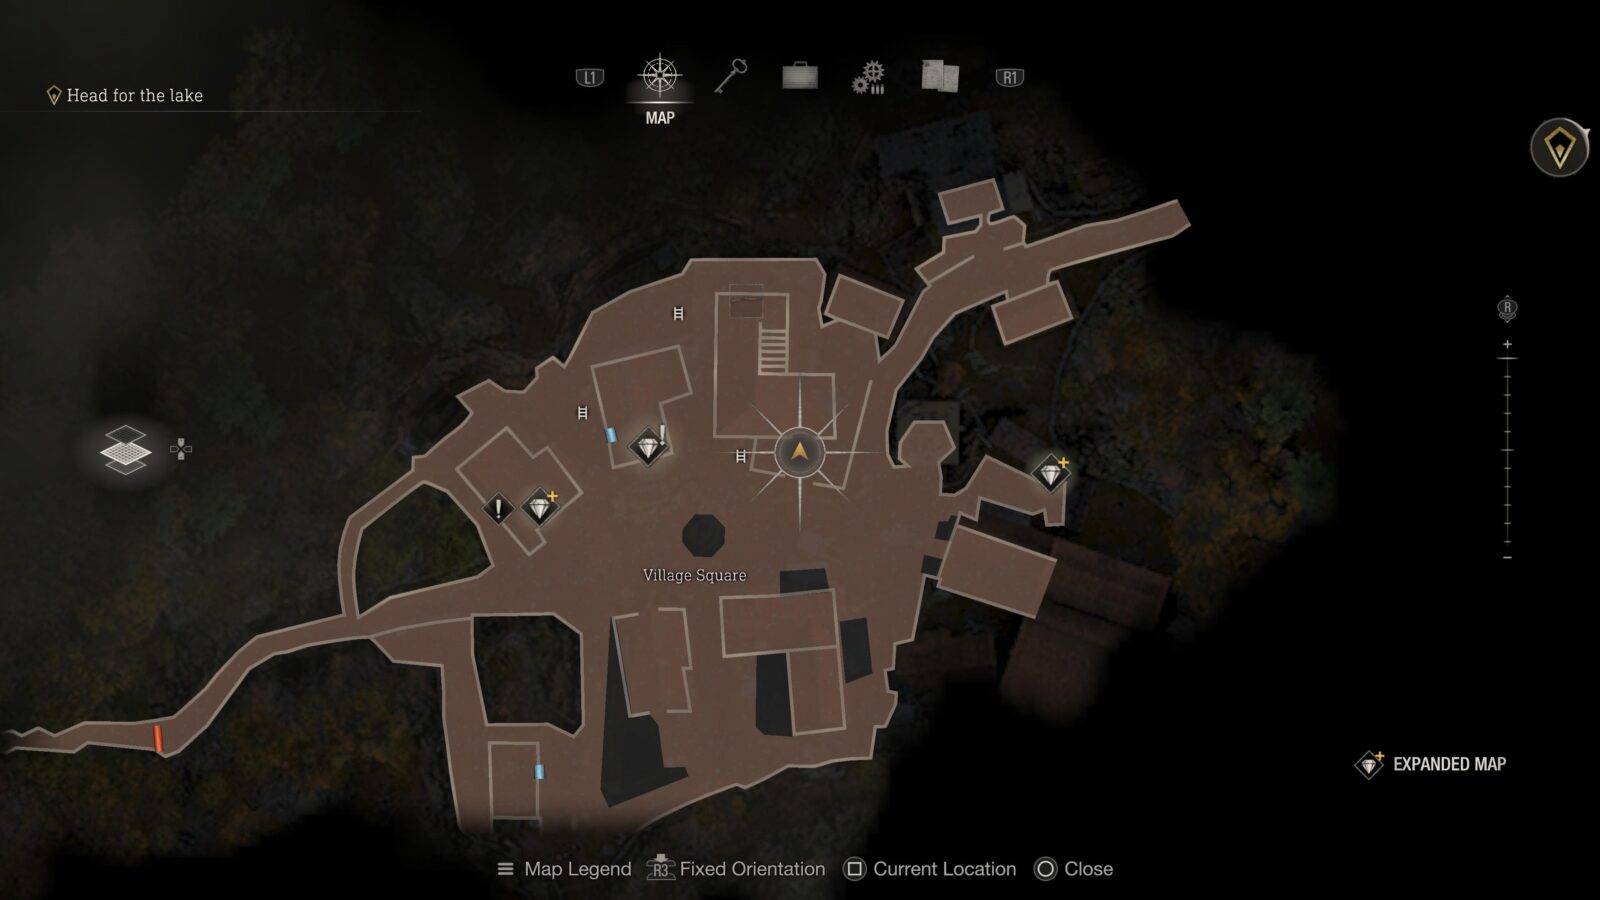
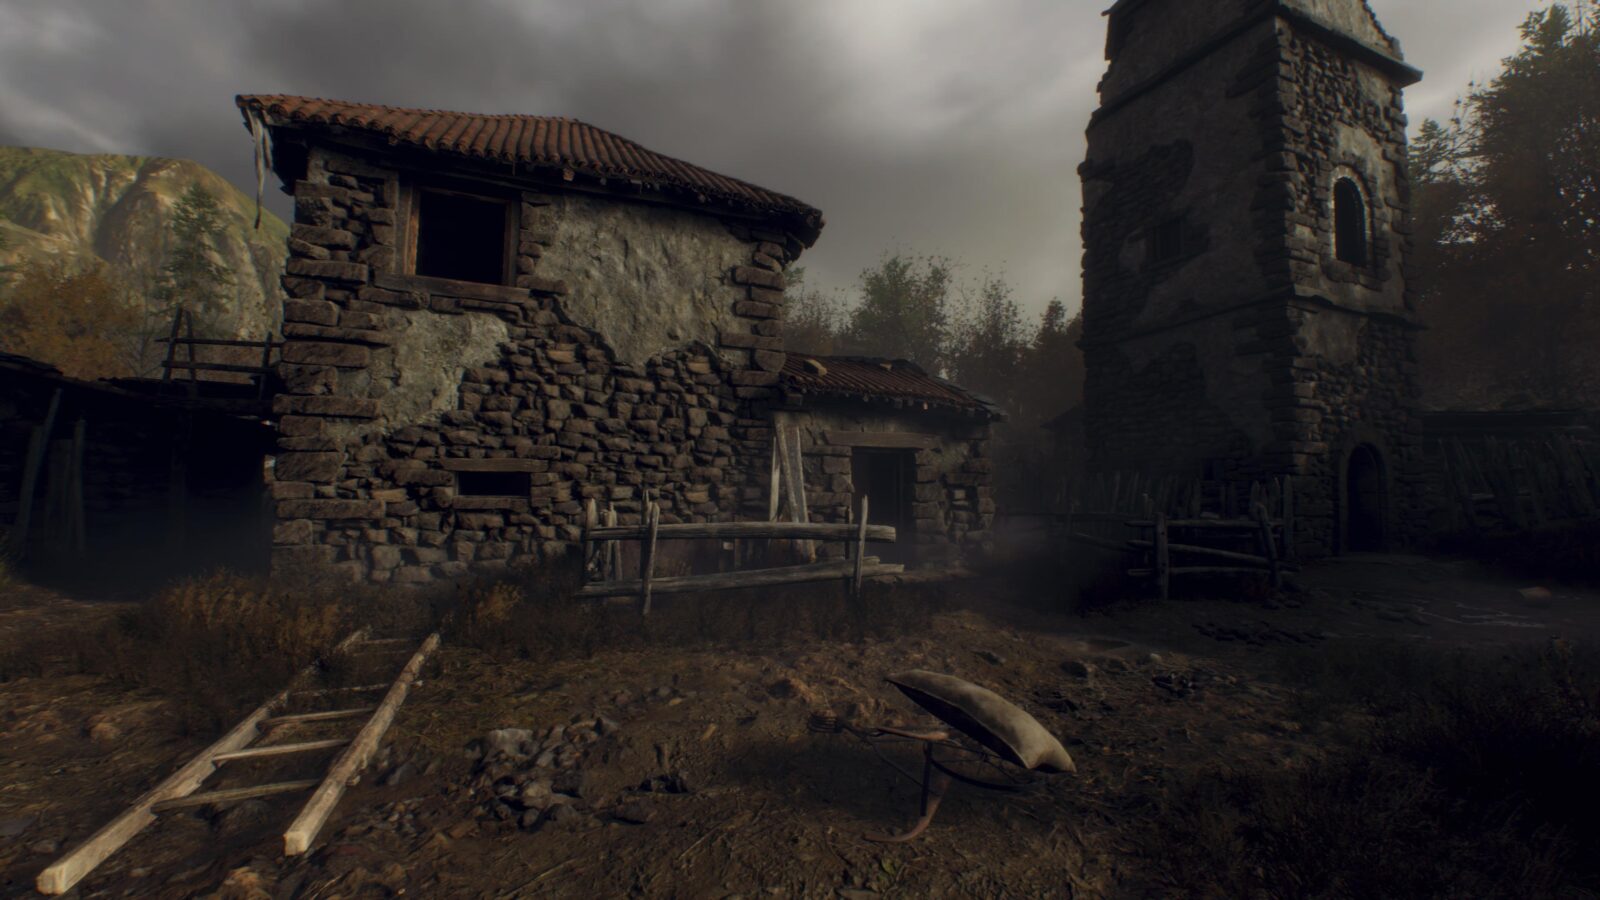
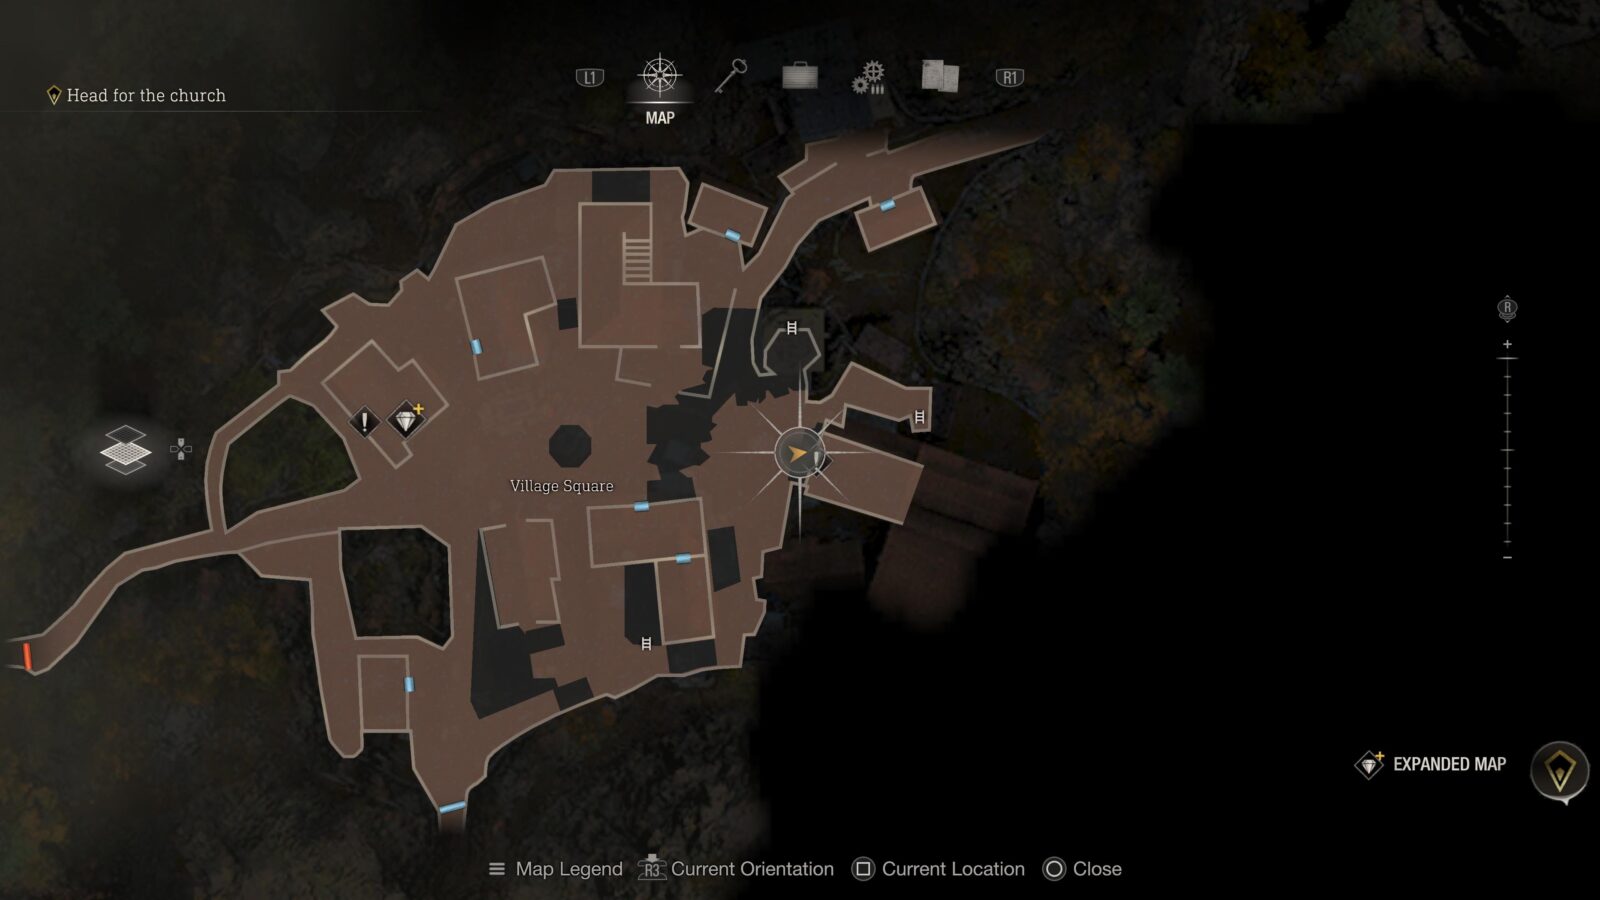
When you reach the Village Square you will see a bonfire in the middle of the area. To the left of this bonfire is a house that you can enter during the skirmish (a cutscene of Leon barricading the door will play when you enter) and upstairs is a shotgun in a glass case on the wall.
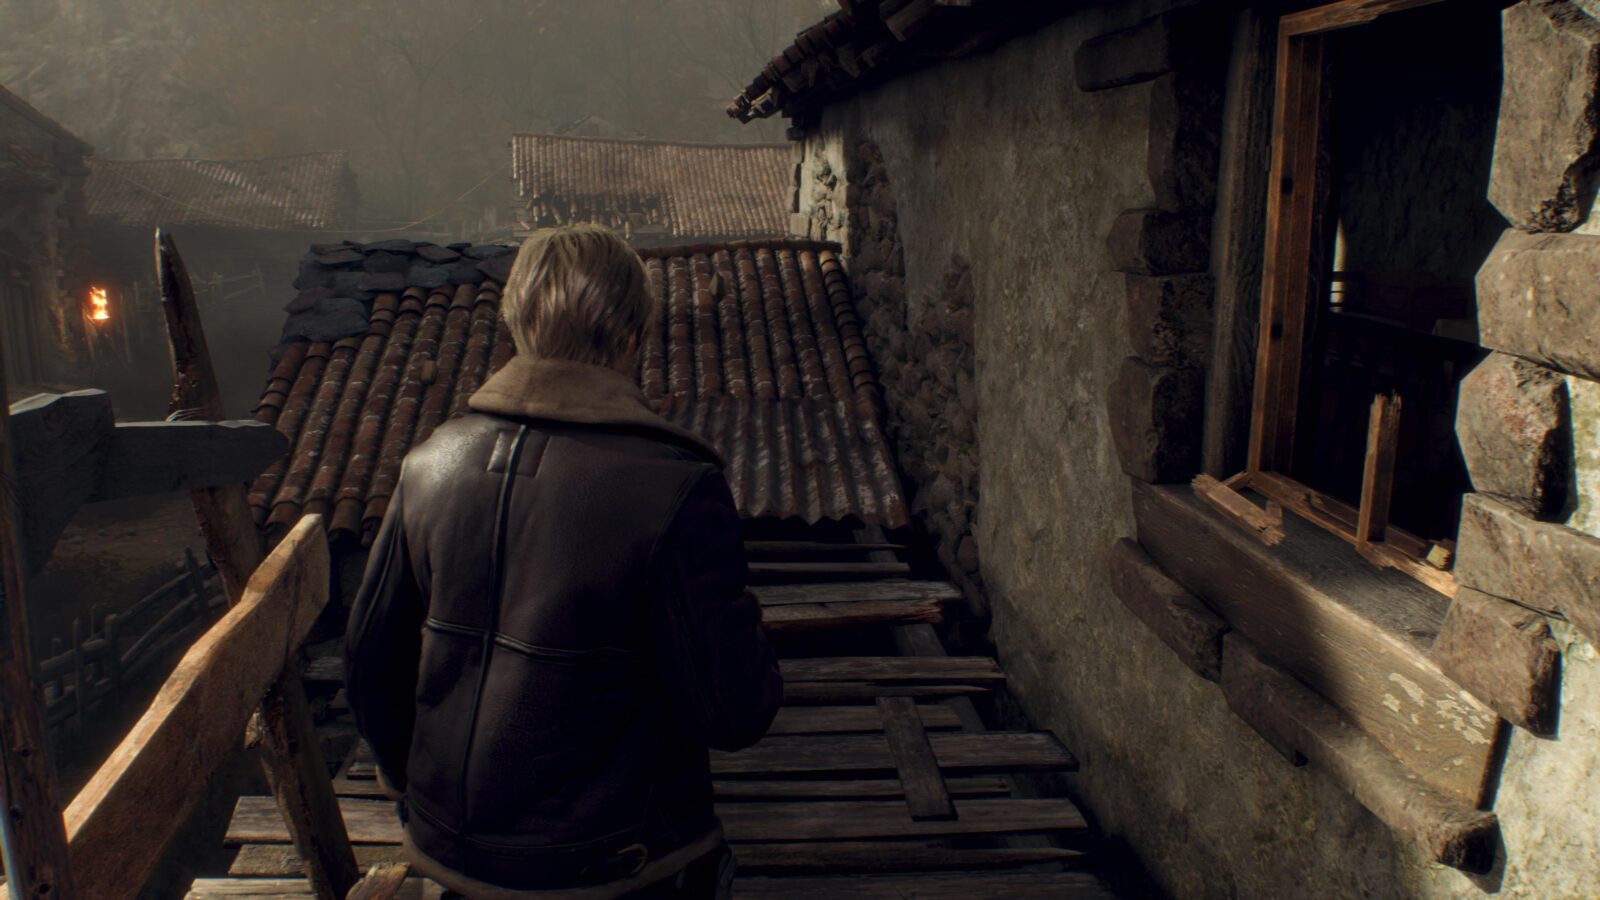
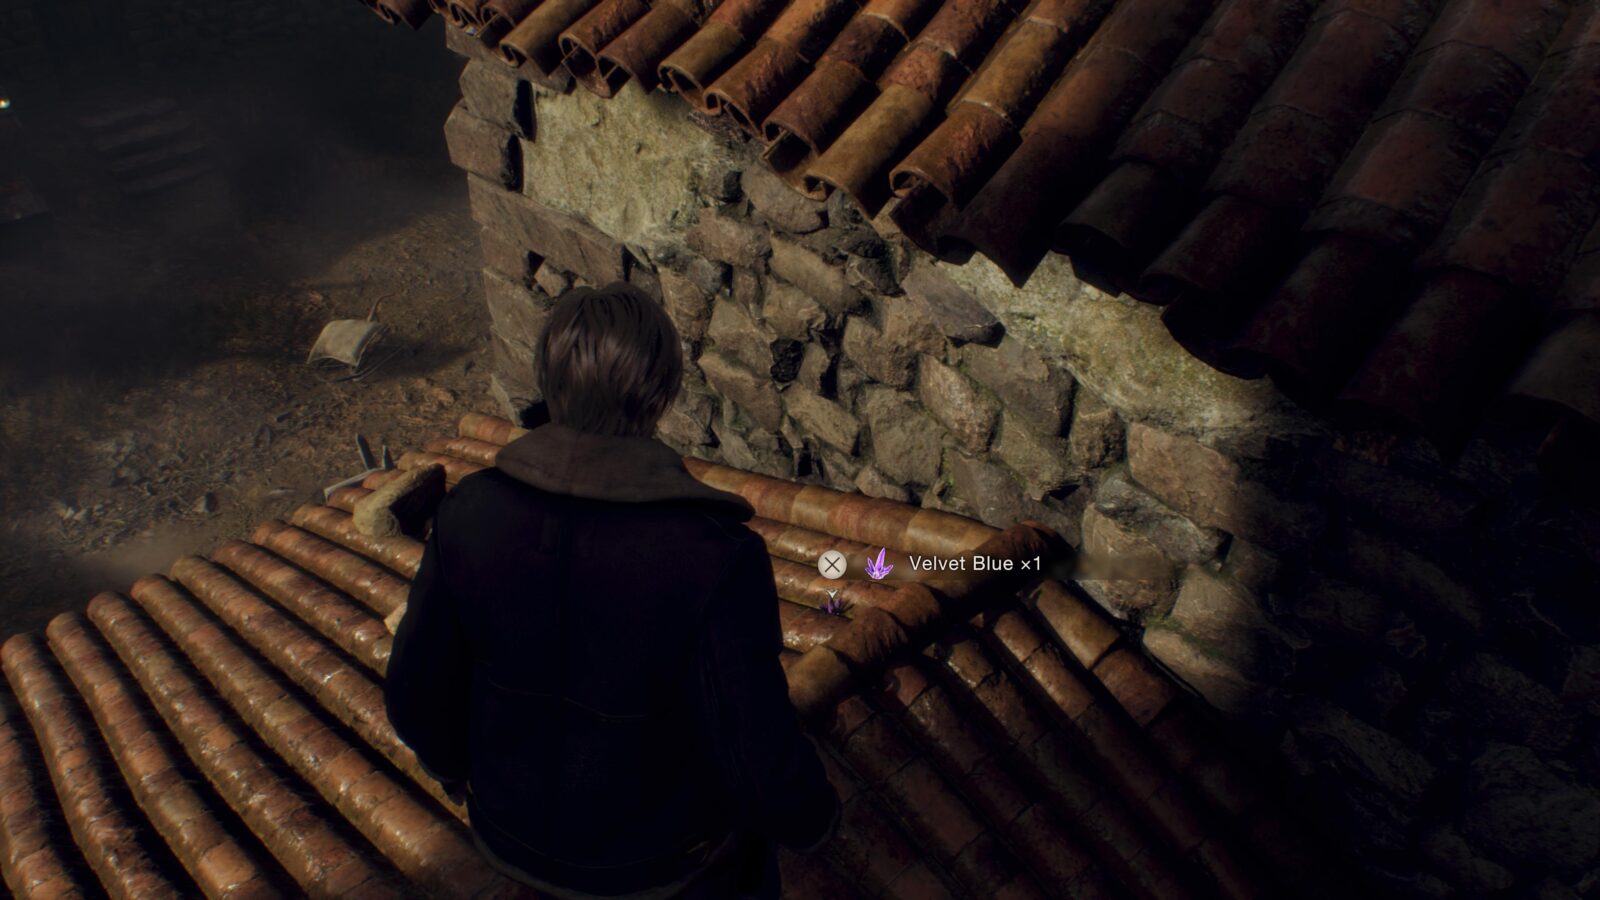
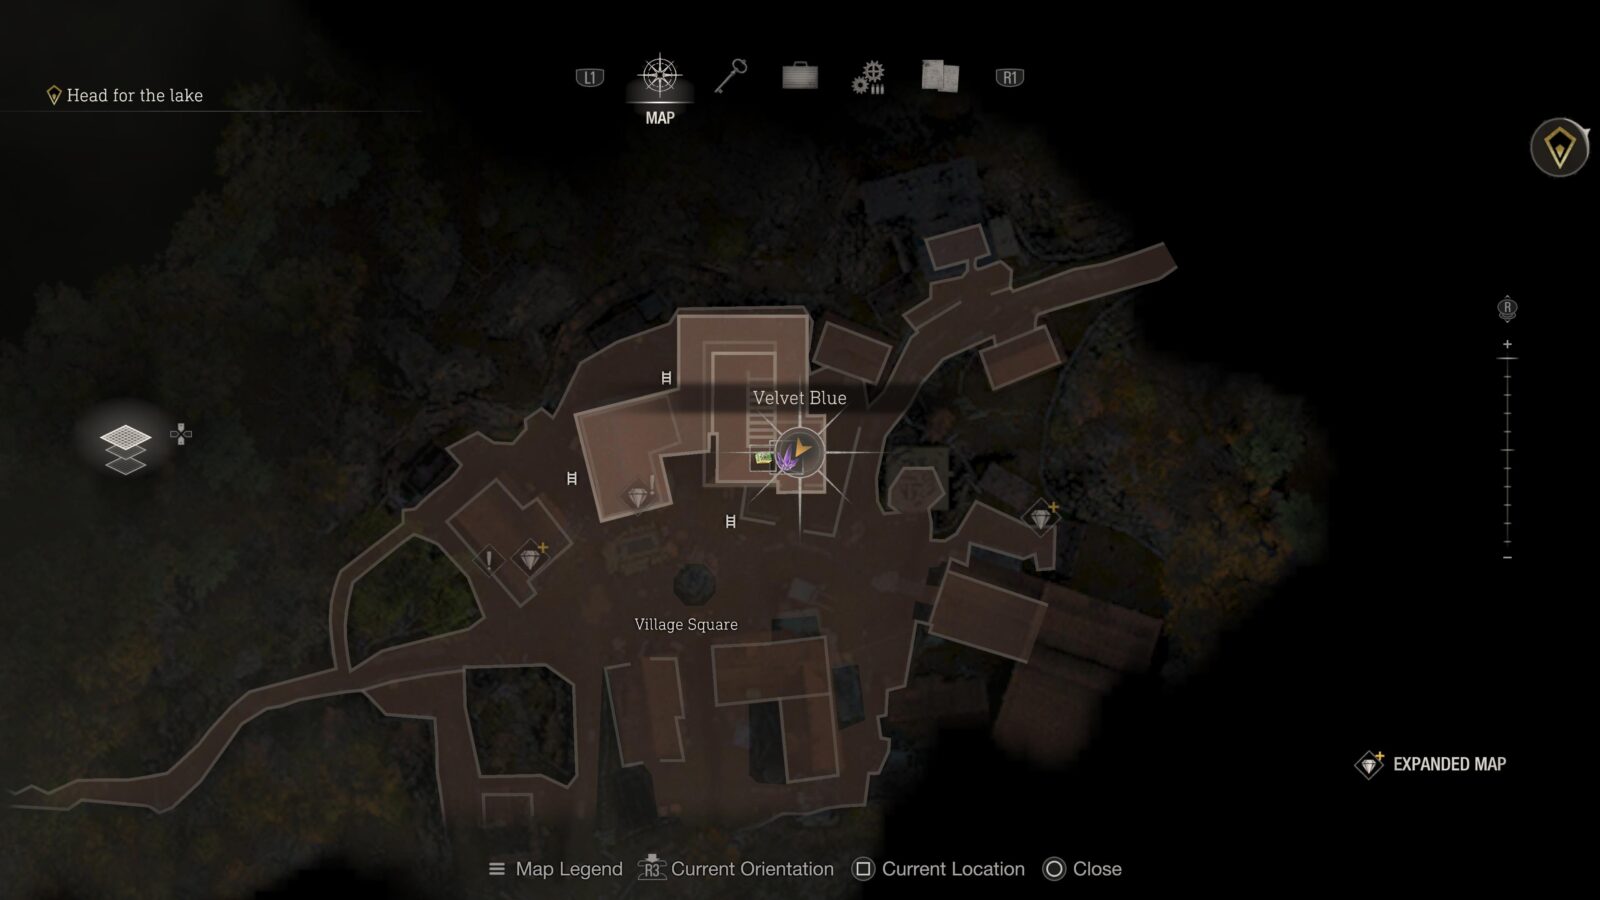
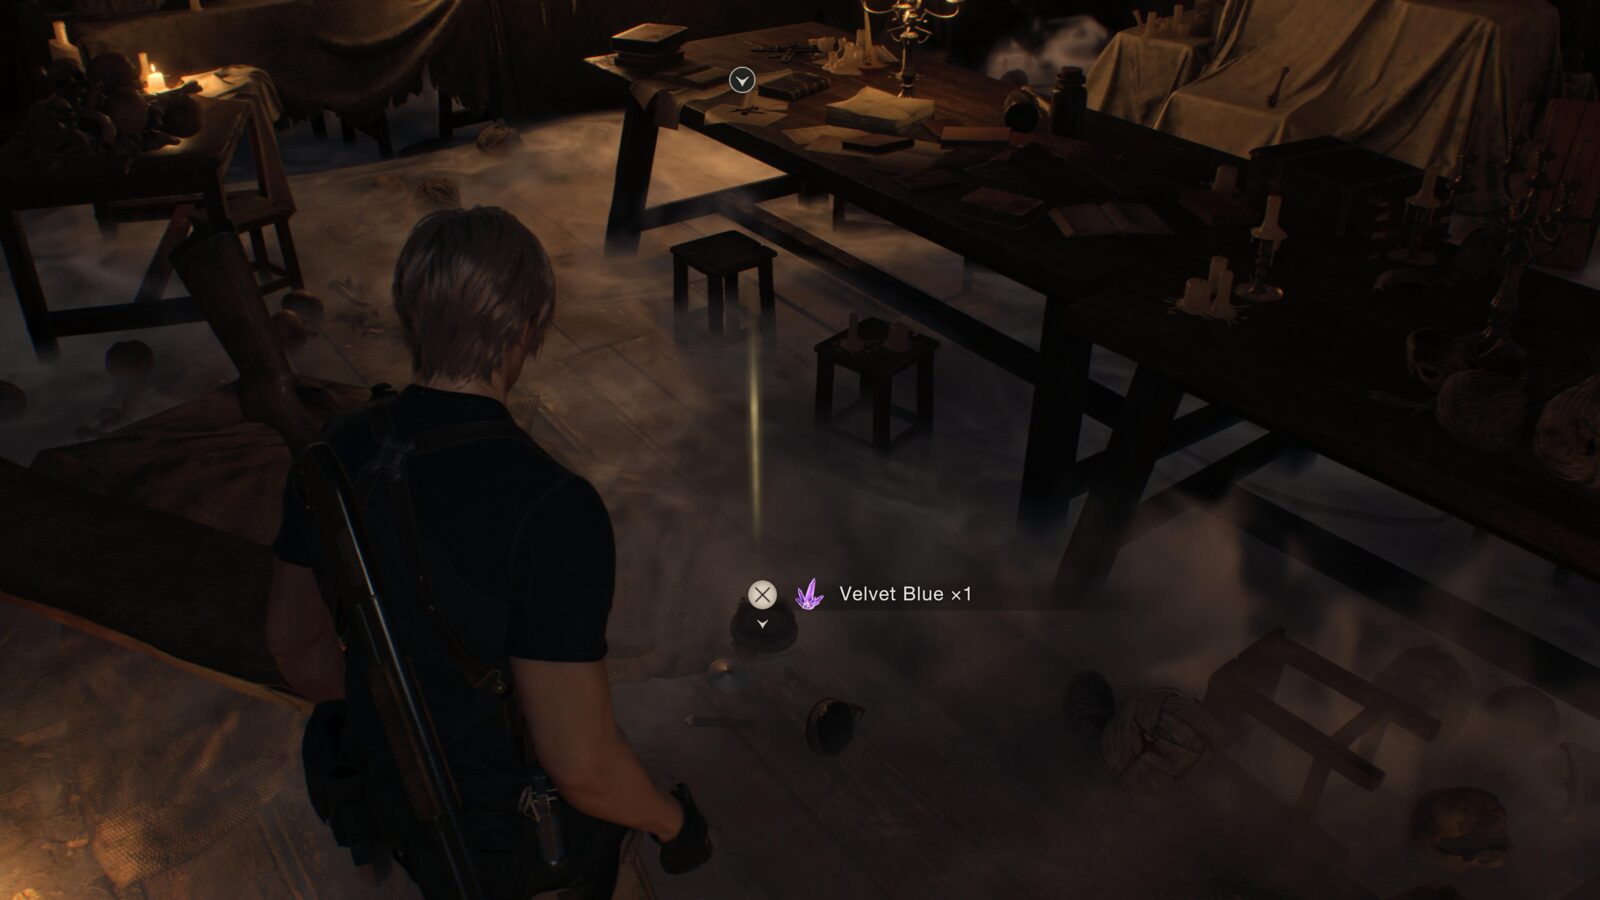
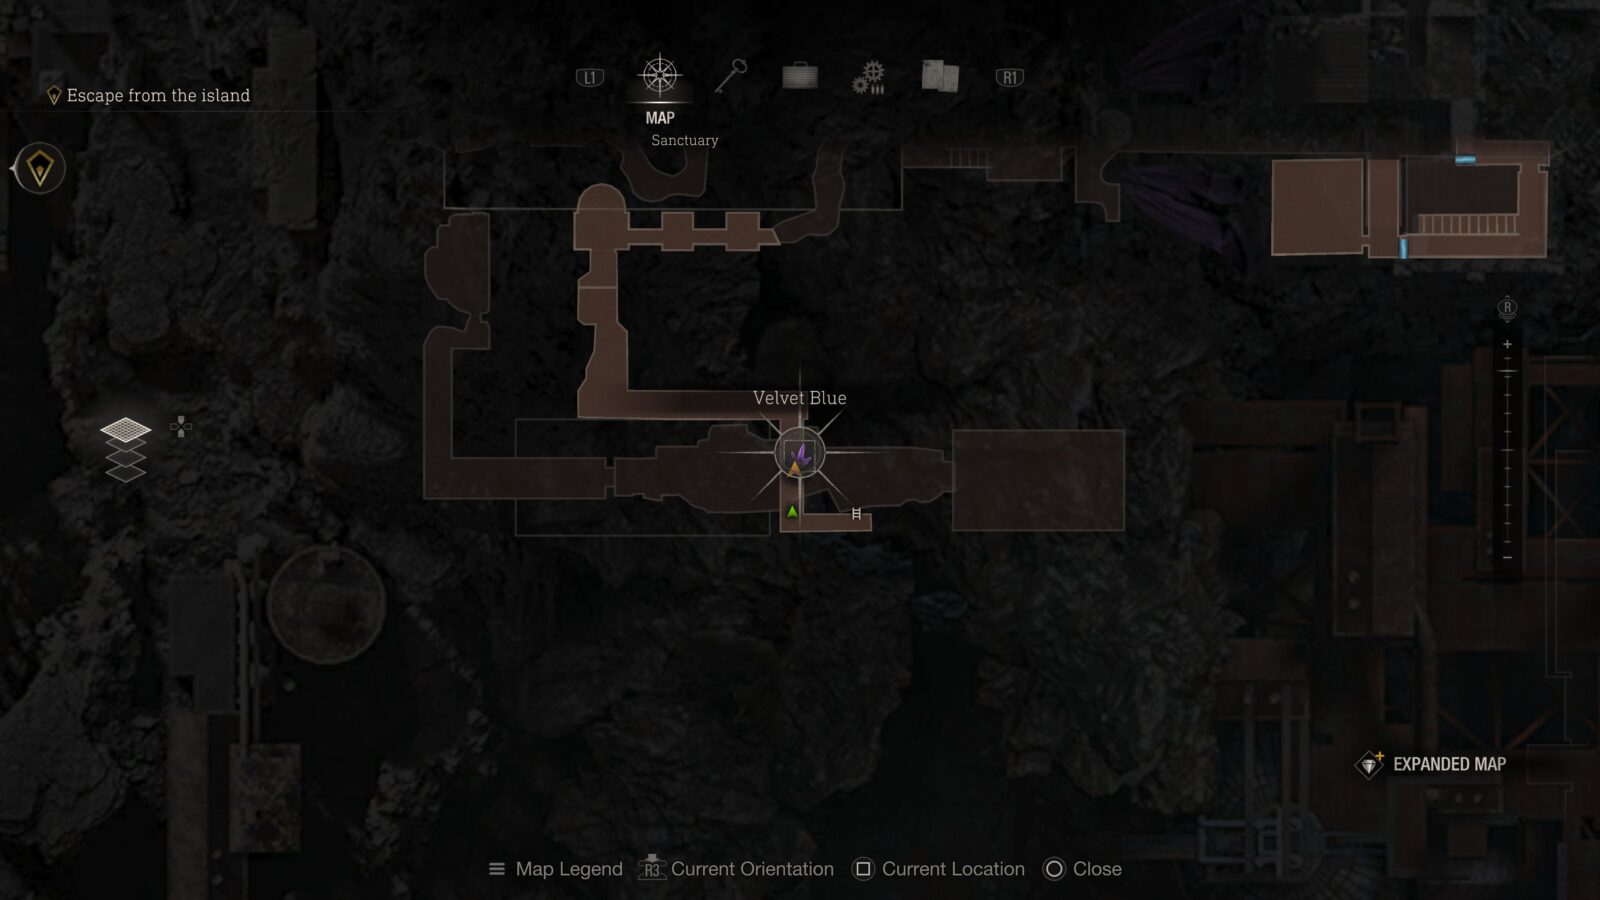
Velvet Blue
After grabbing the Shotgun turn to your right and jump out of the window. From here you can access a small roof to your right. The Velvet Blue is on the roof next to the wall.

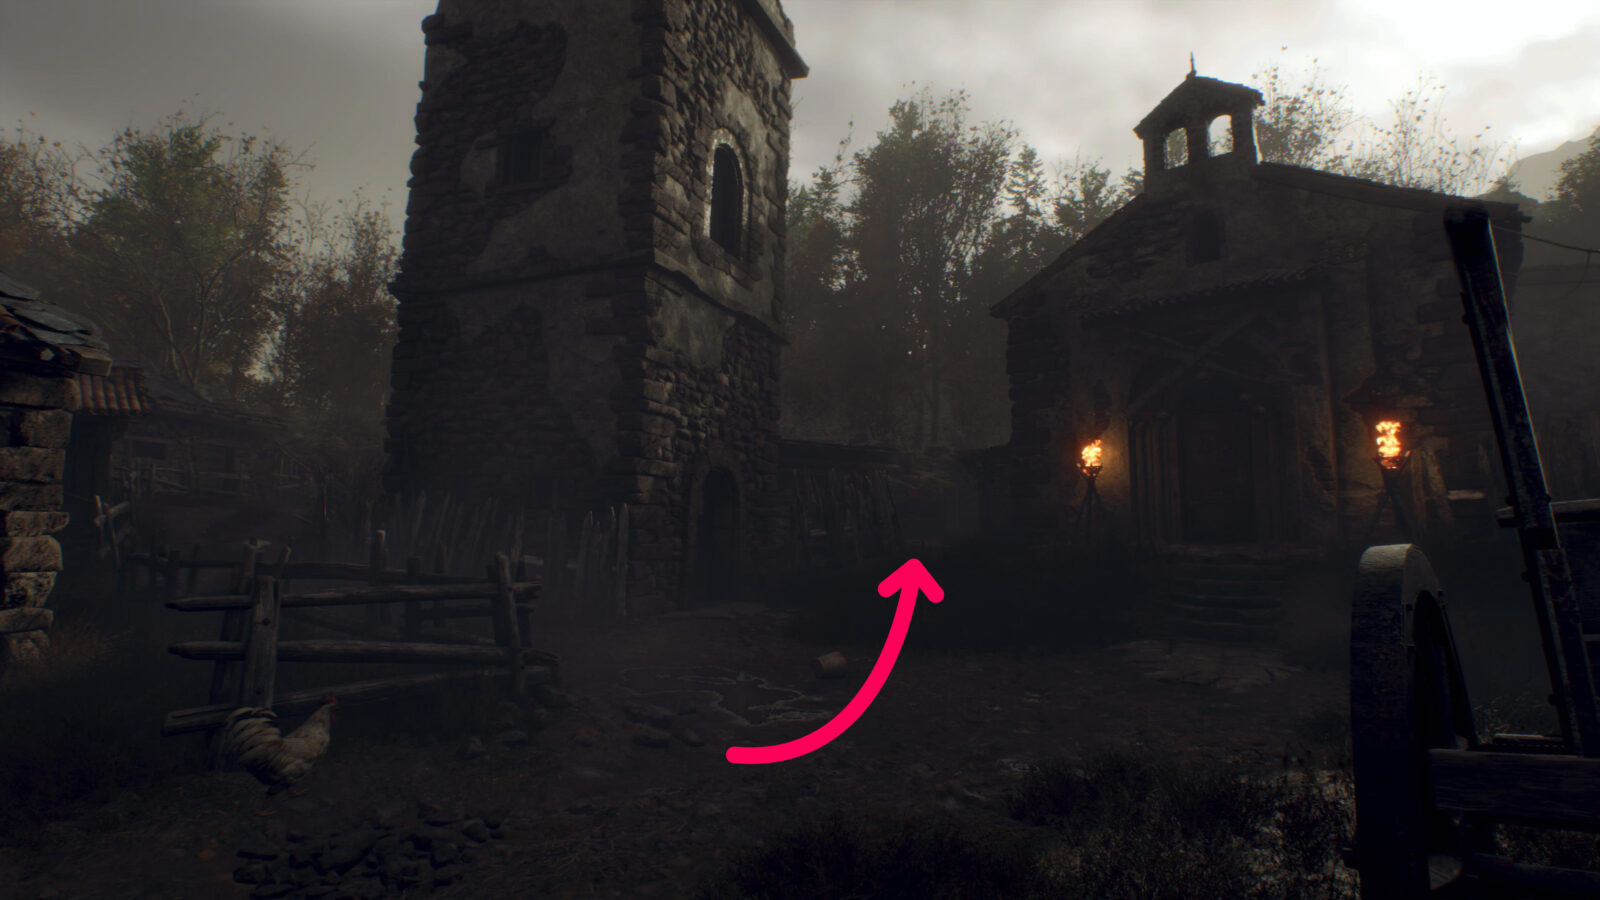
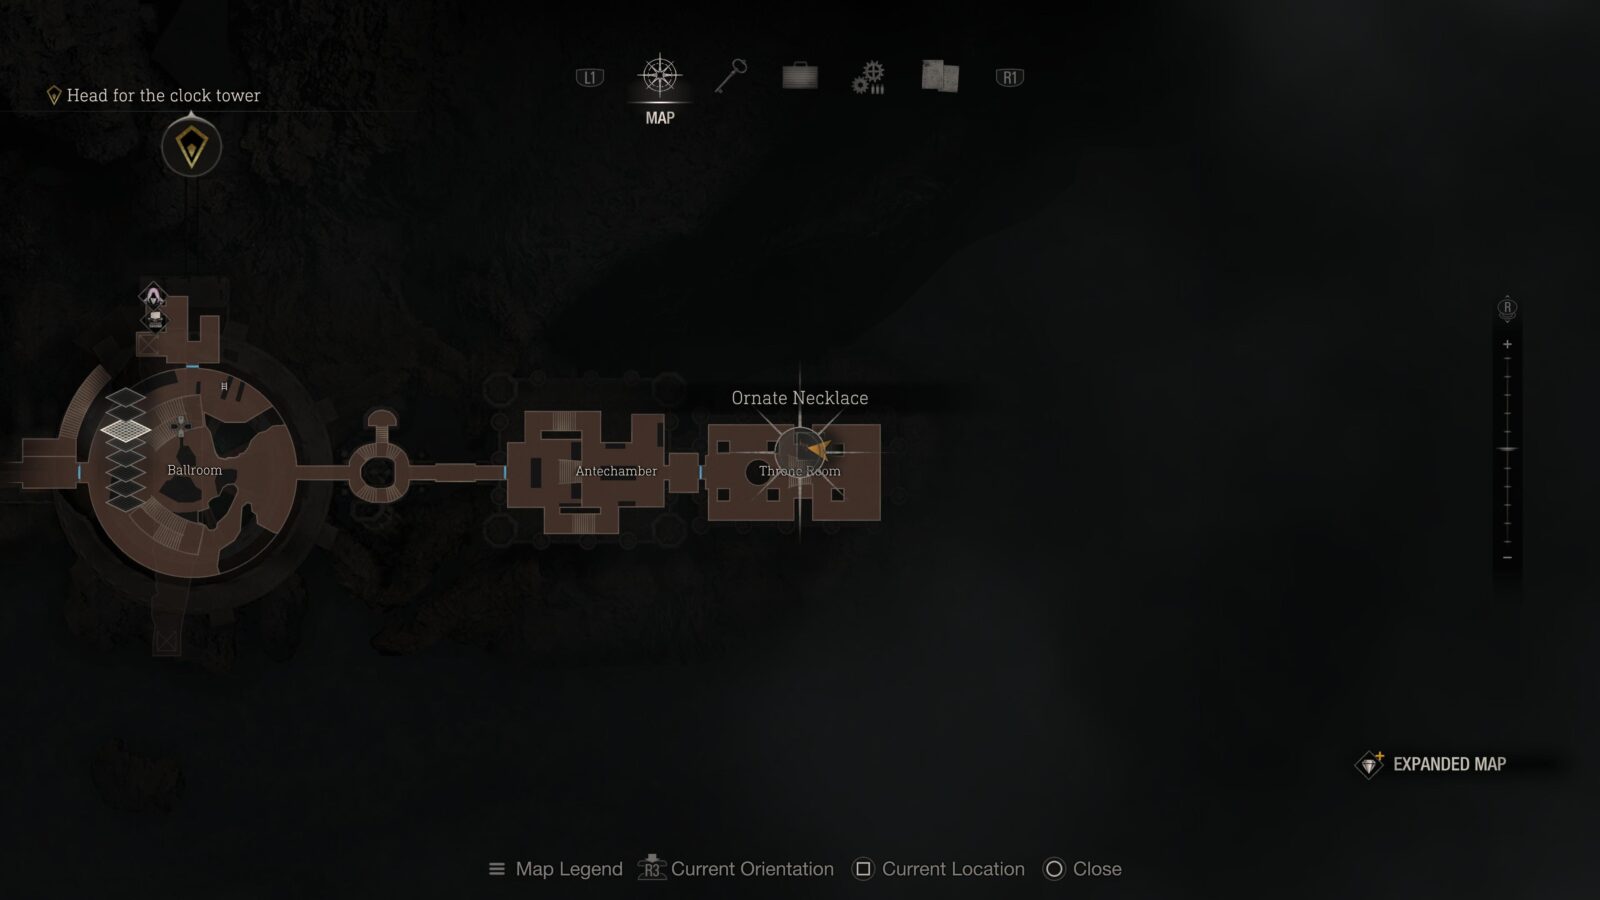
Ornate Necklace (Expanded Treasure)
To the right of the broken bell-tower is a small area with a blocked ladder and a small lockbox with an Ornate Necklace inside. This Ornate Necklace has 4 slots, 2 rectangular, and 2 circular and will only appear to those who have the Expanded Treasure Map DLC.

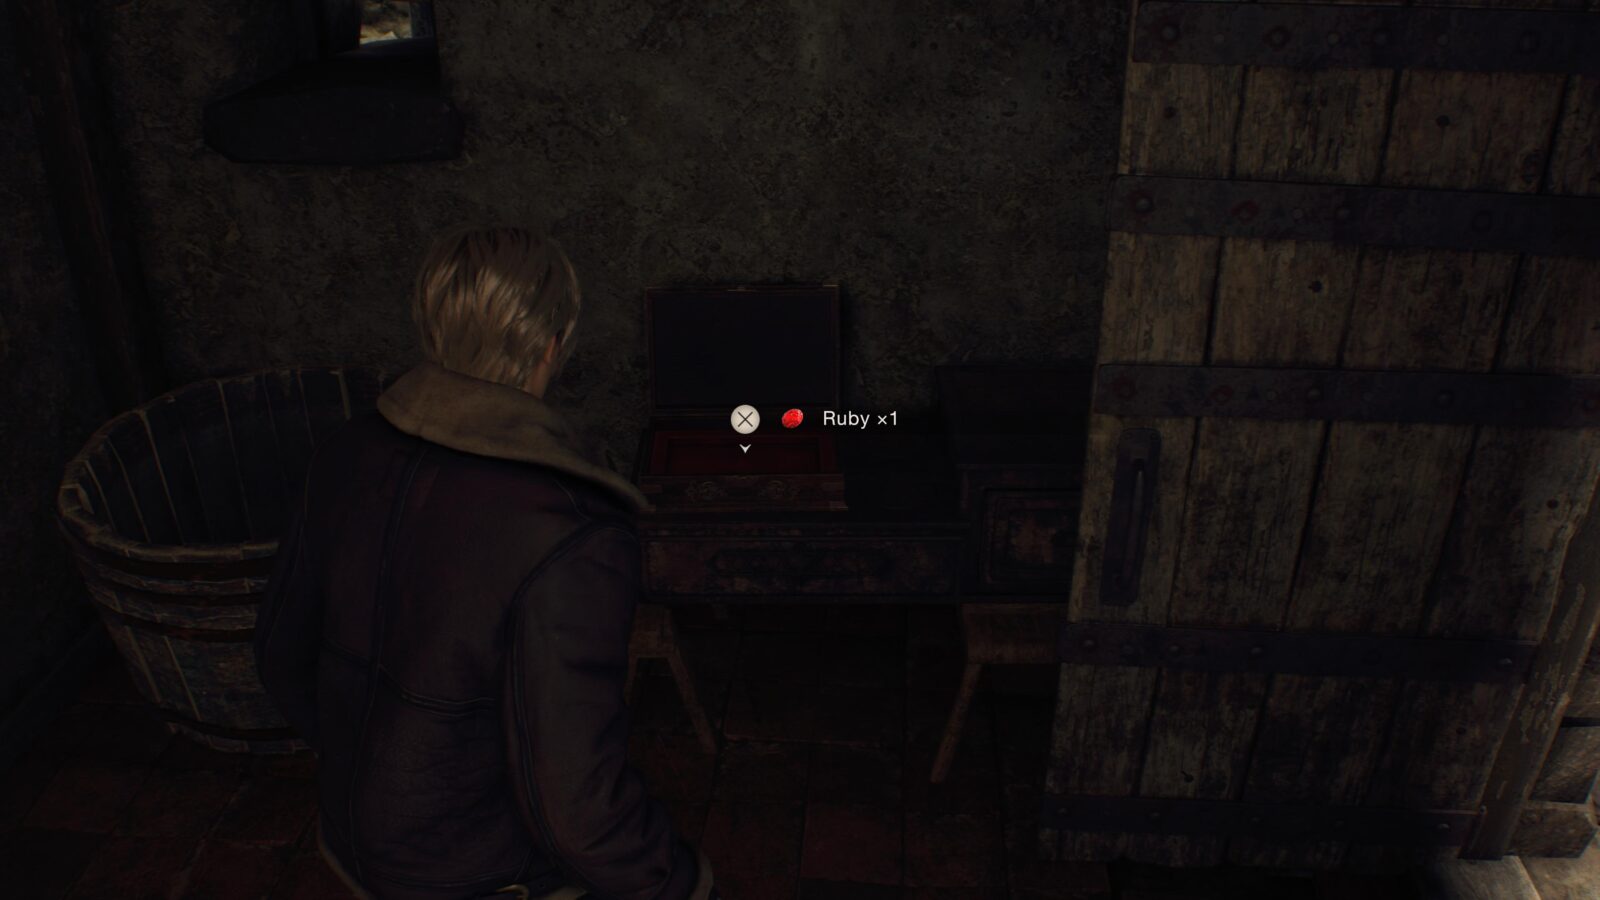
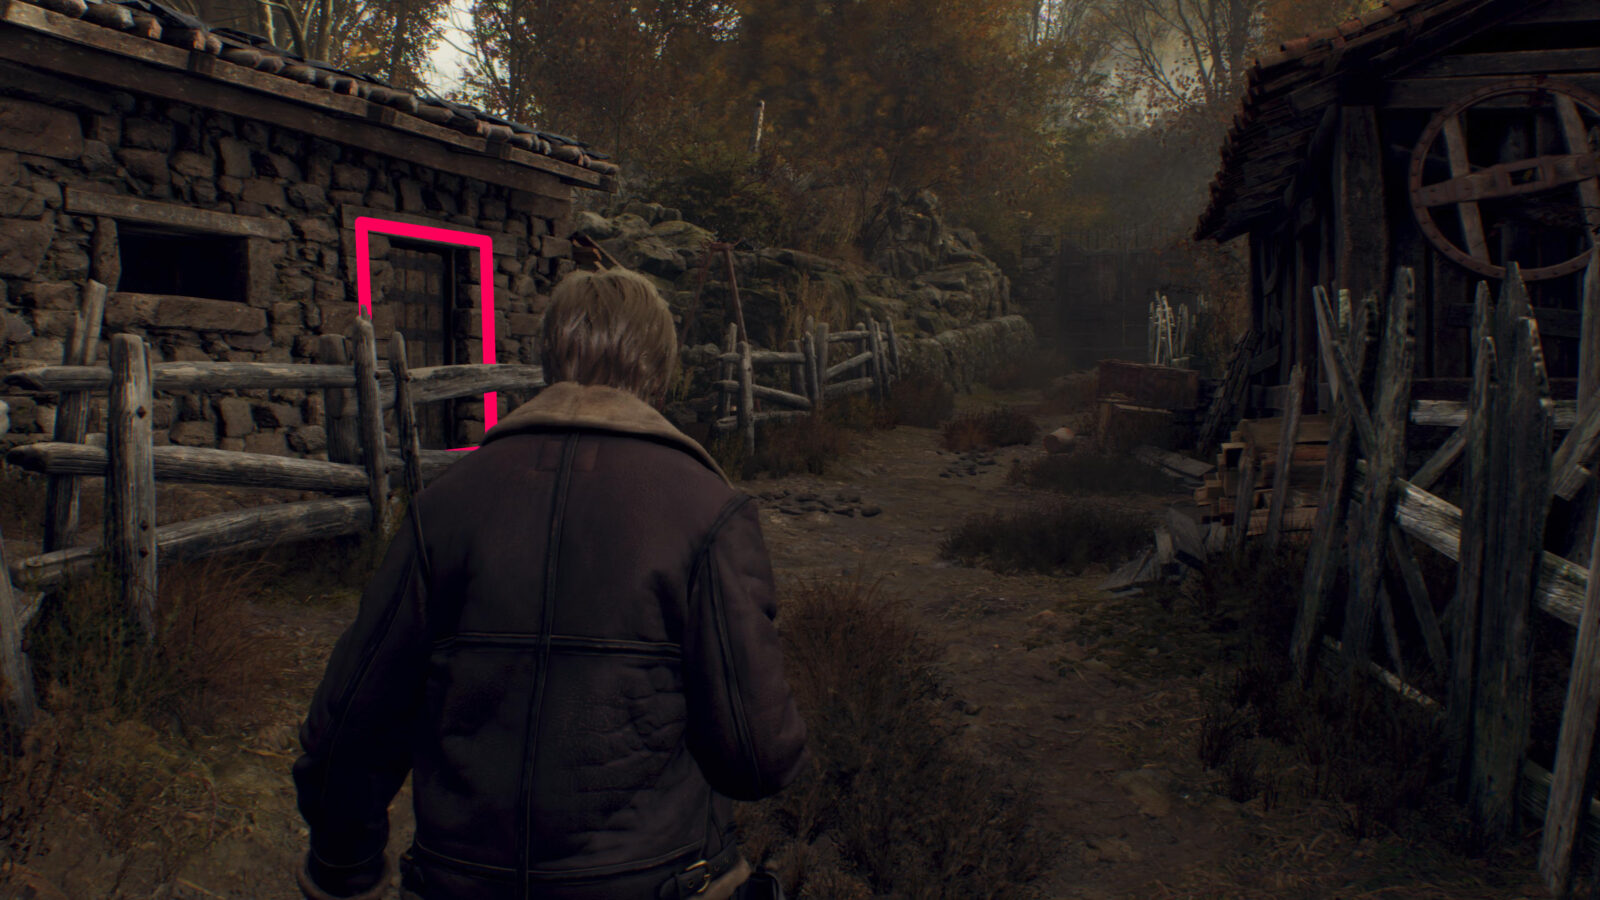
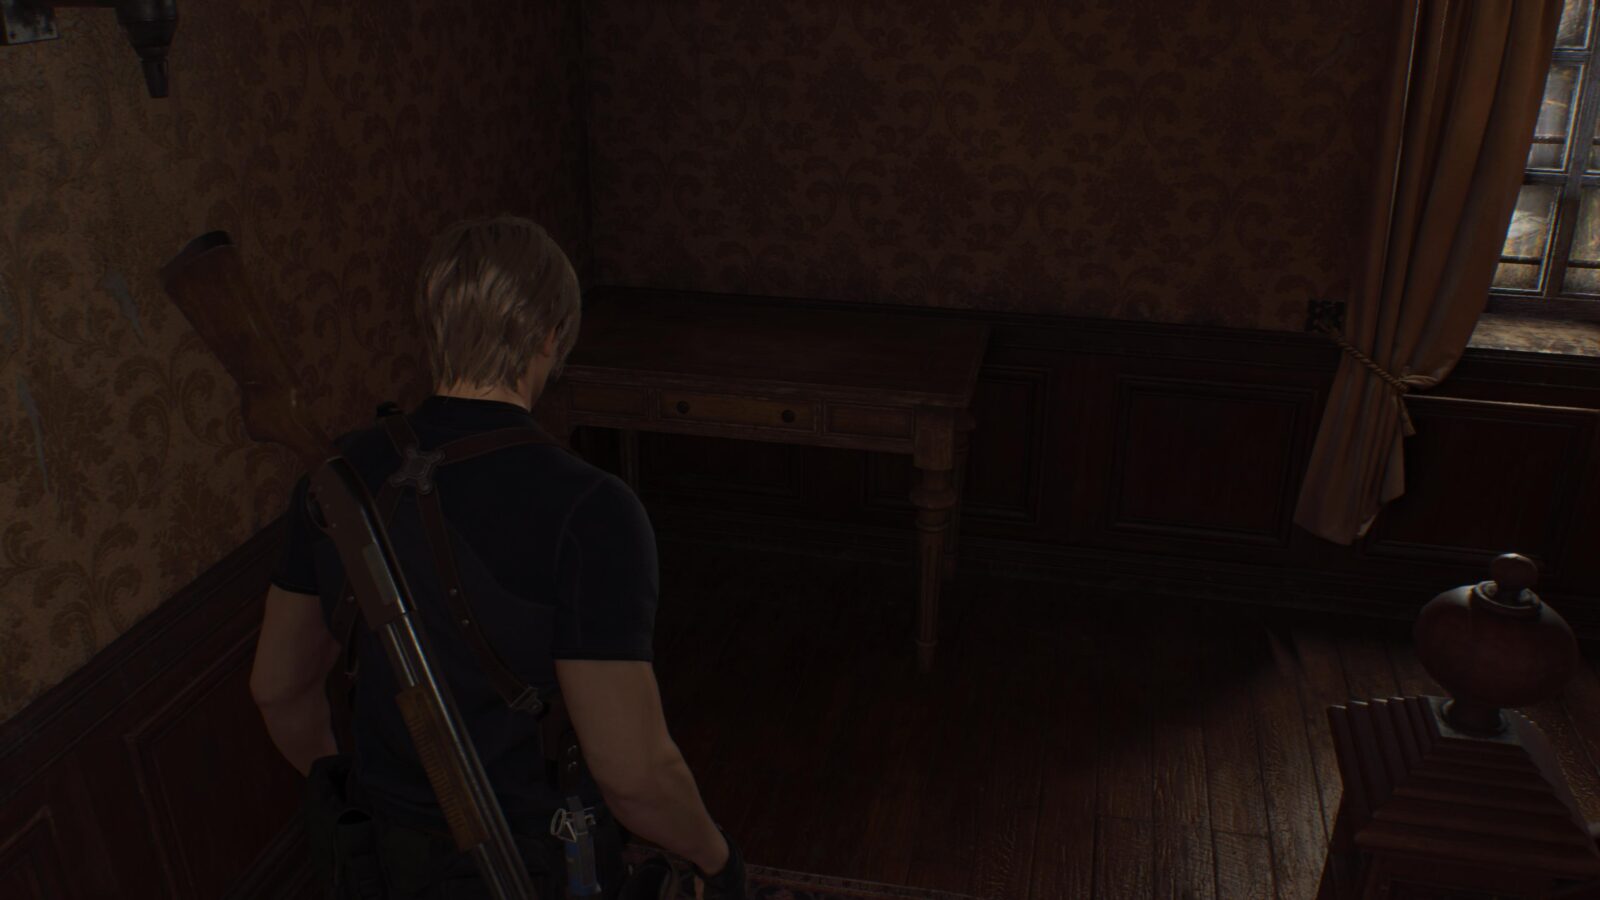
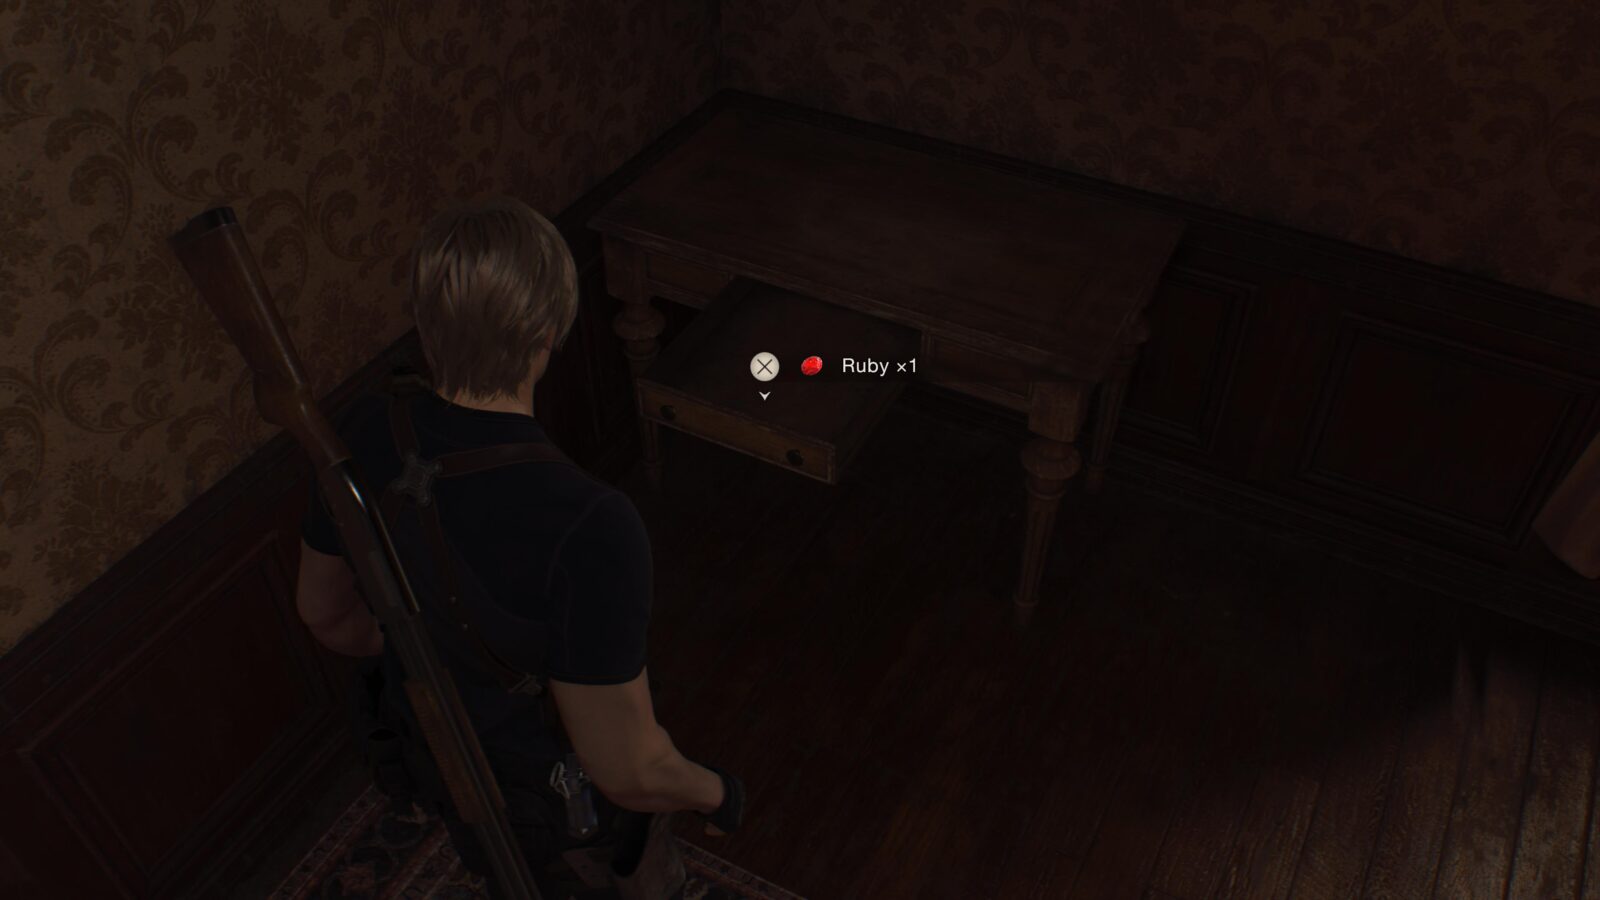
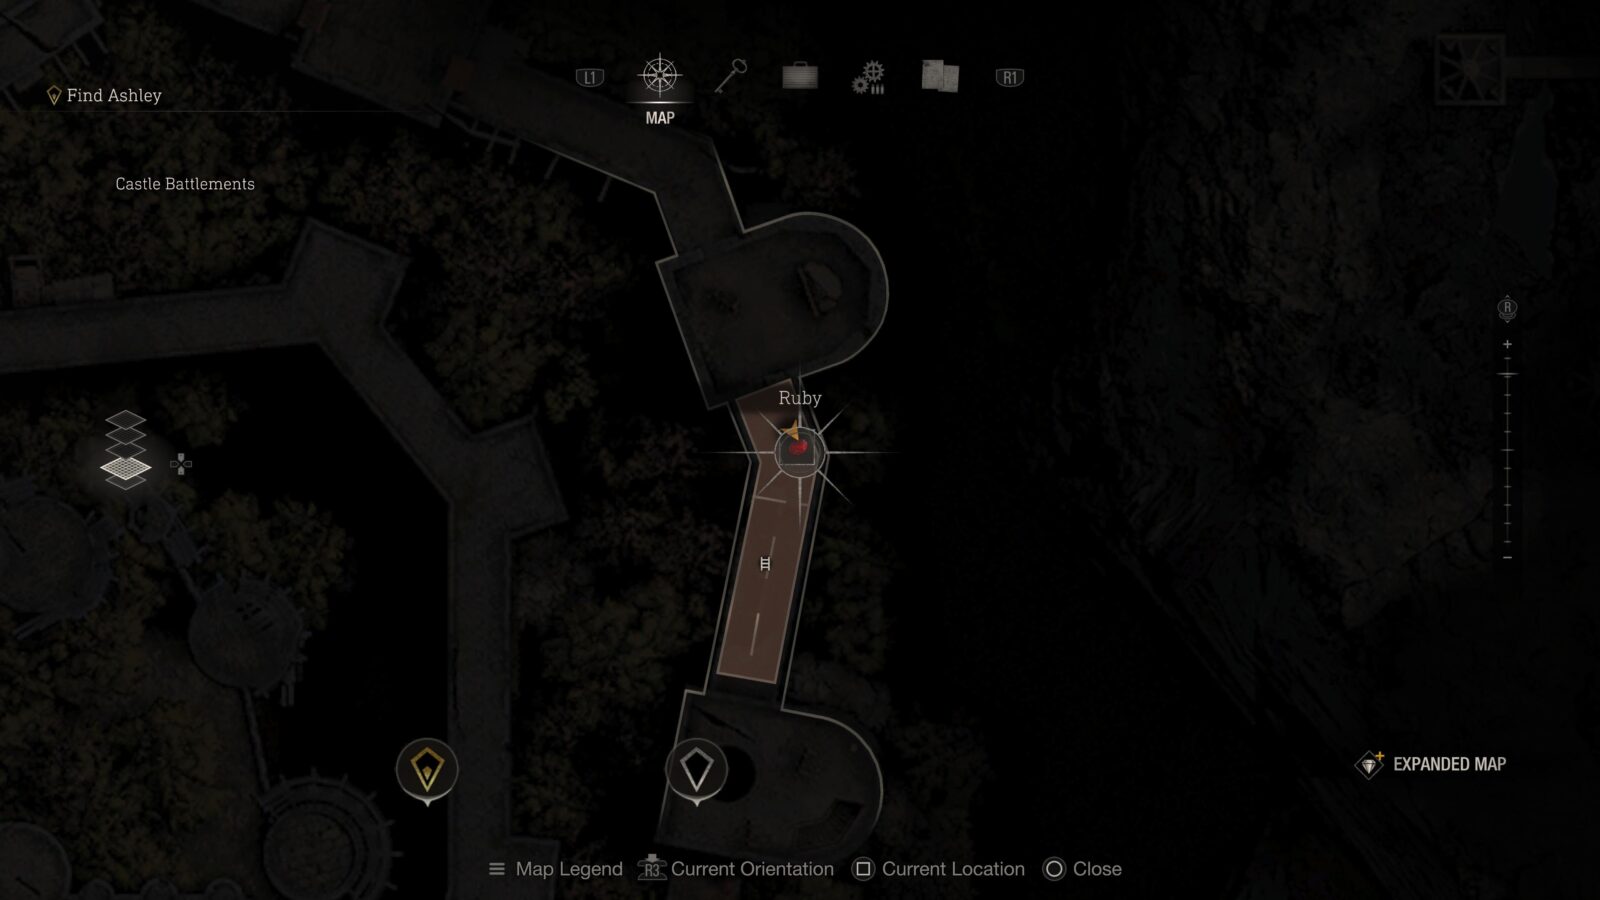
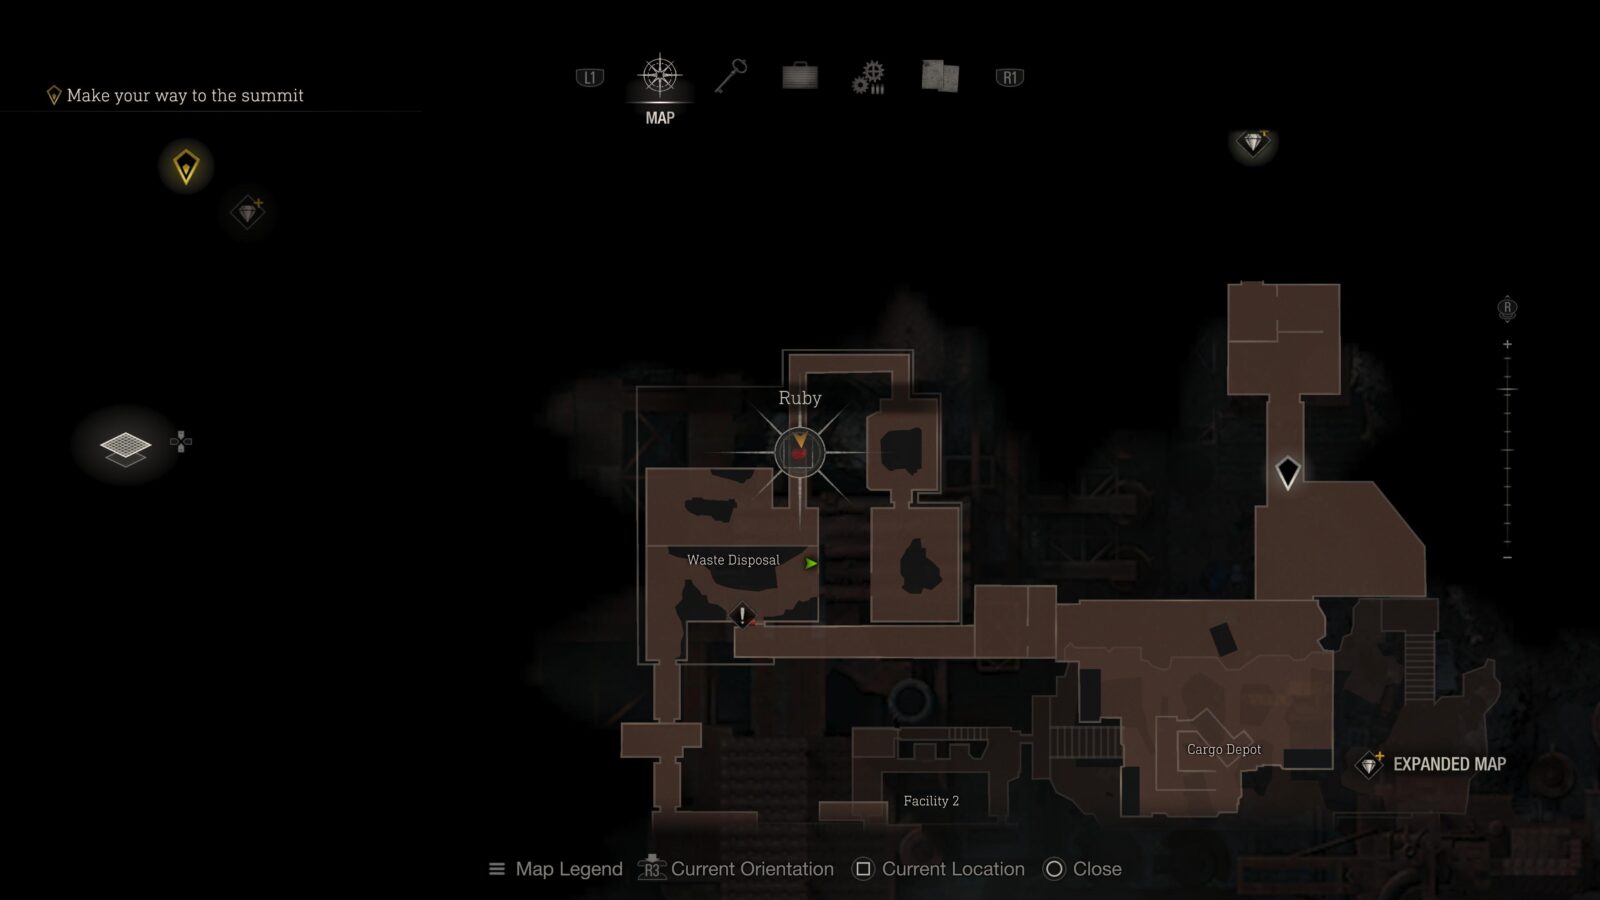
Ruby
Just before you leave the Village Square via the gate at the end of the North-East path check the house on the left to find a lockbox with a Ruby inside. This Ruby can be slotted into a Treasure later on to increase its sale value.
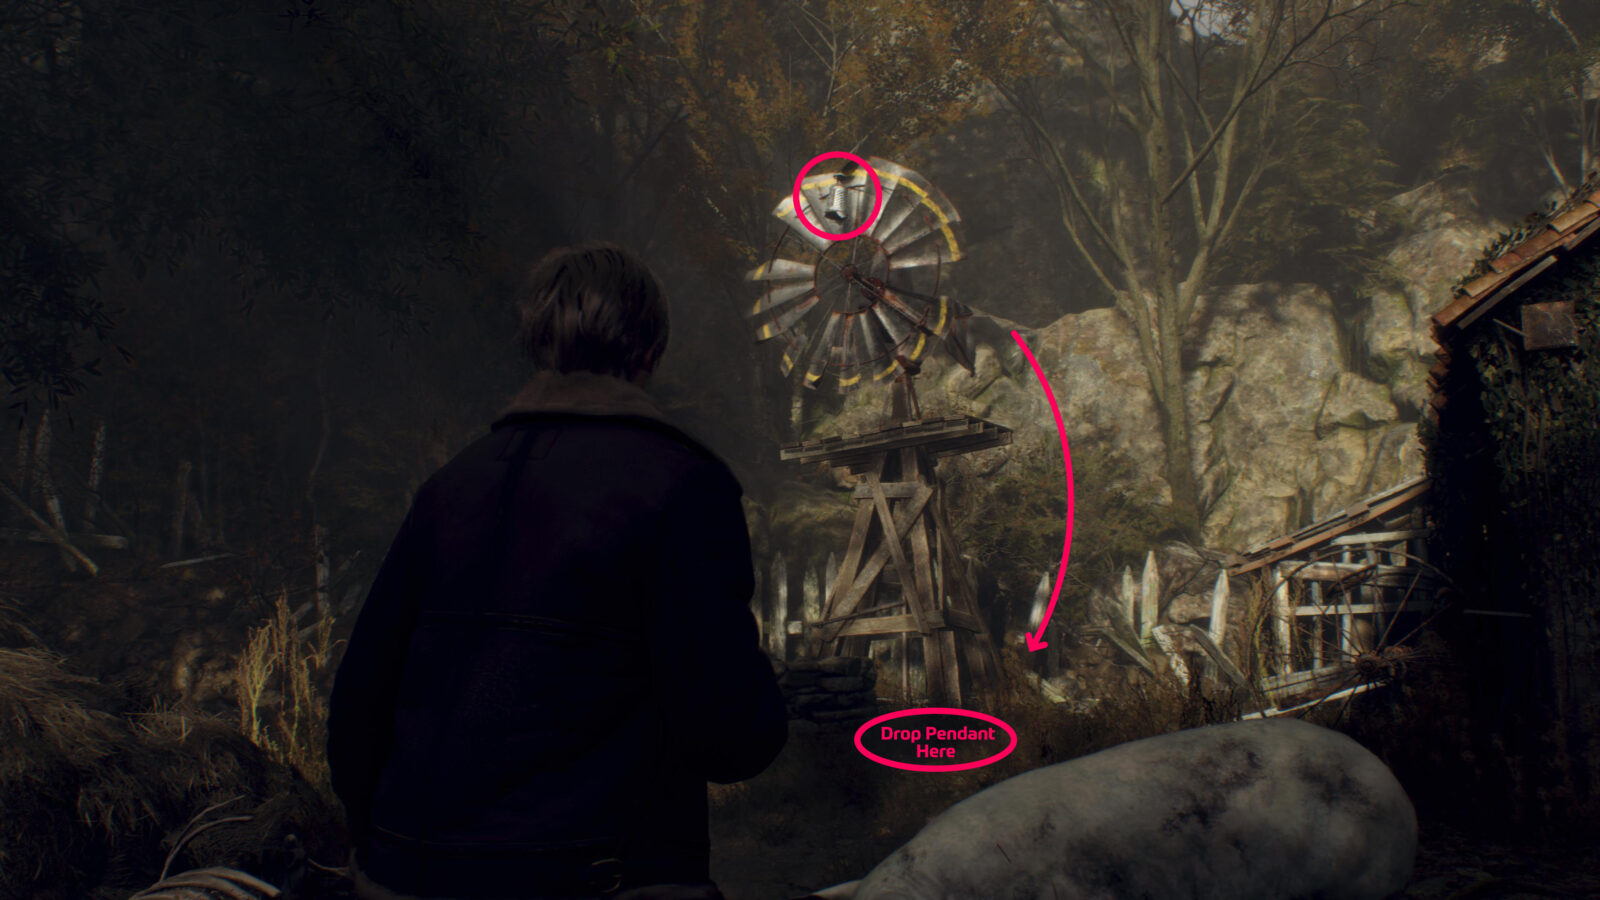
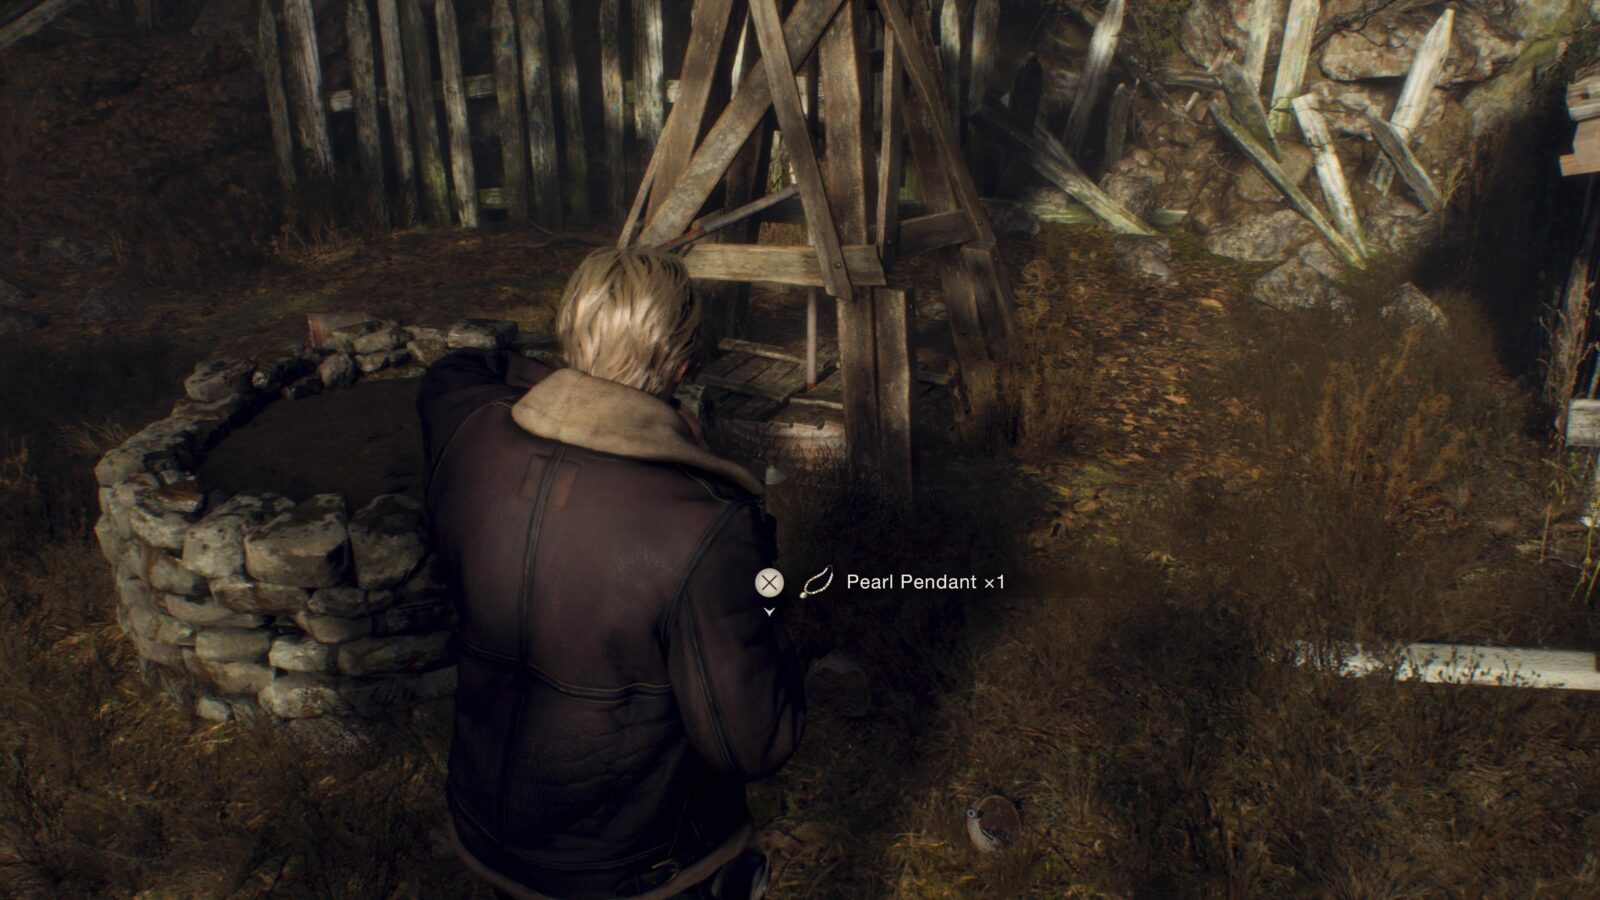
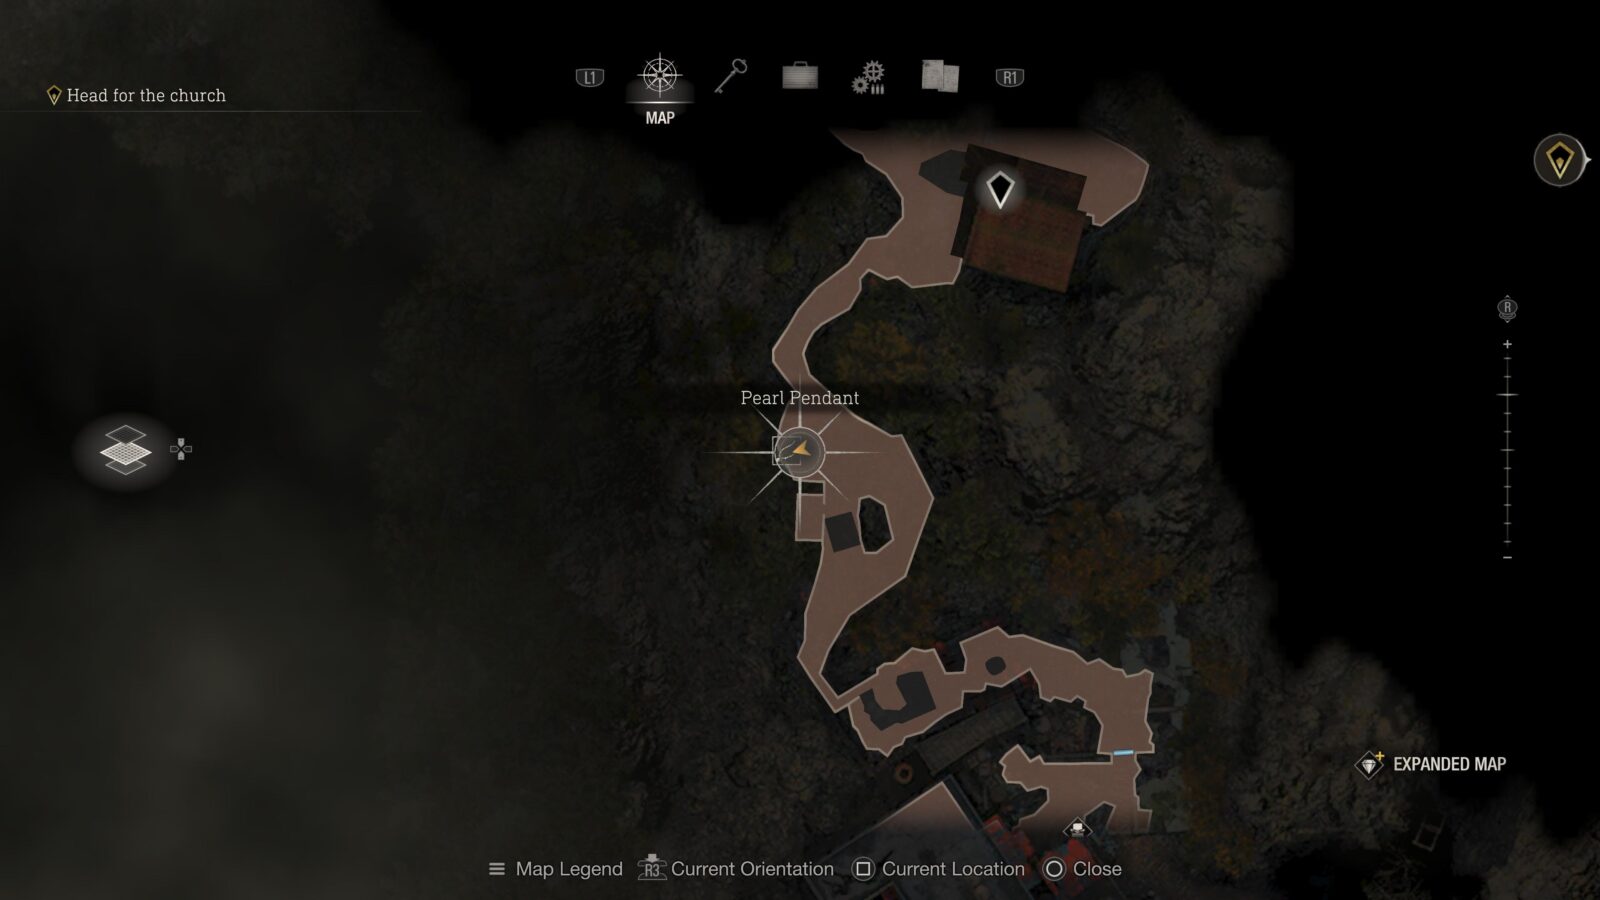
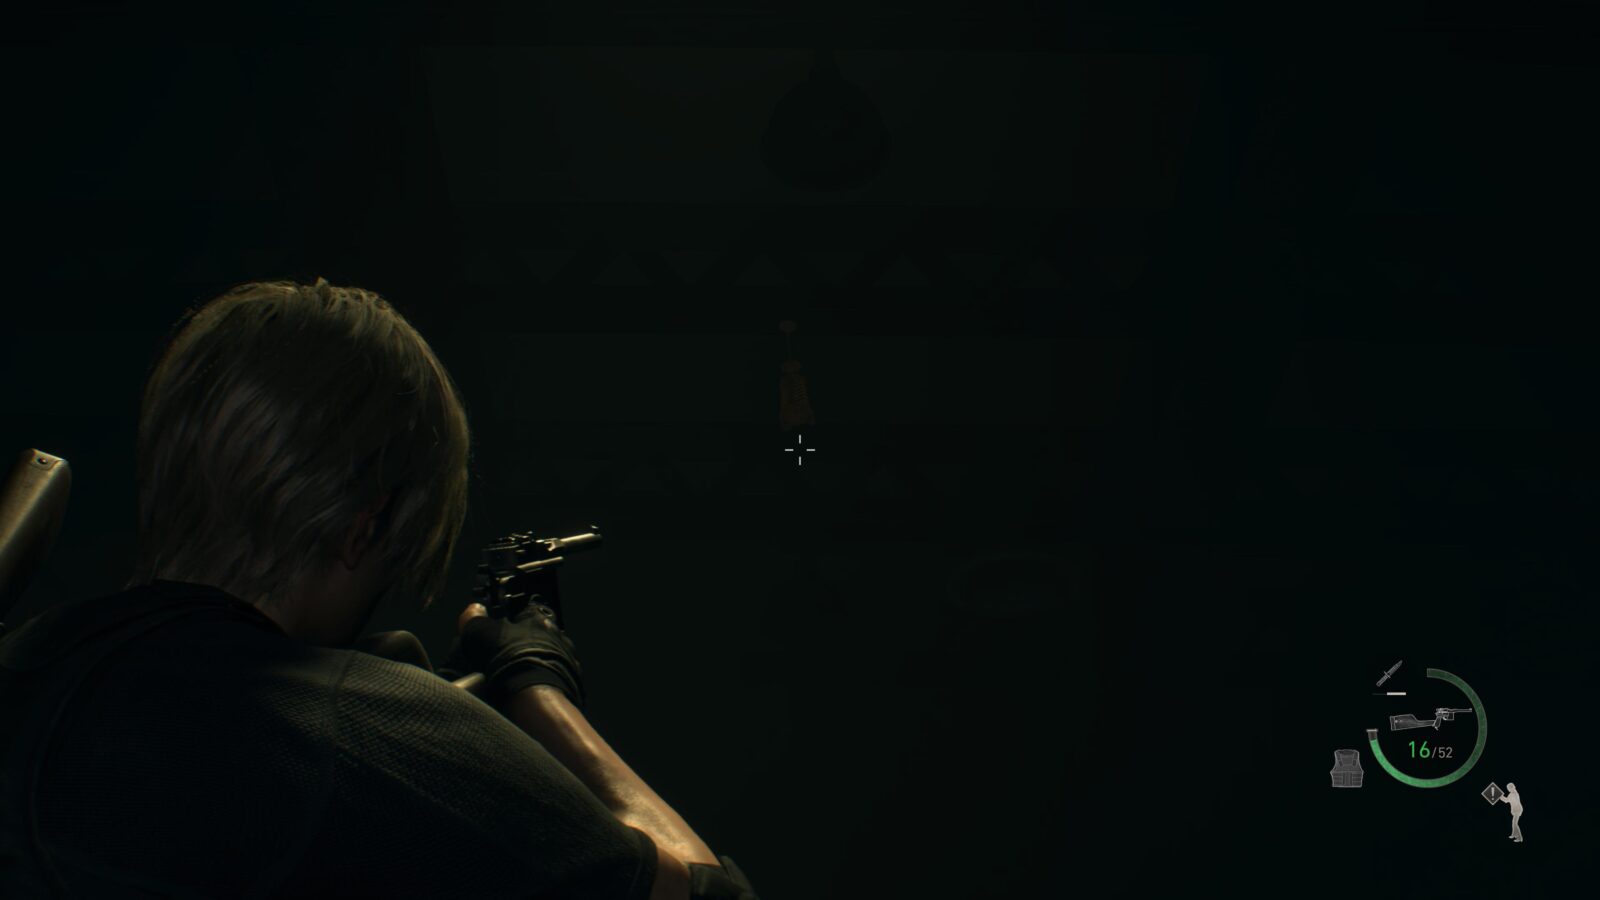
Pearl Pendant
When you reach the Farm you can find a small windmill in the far left corner. This windmill will have a metal container stuck to it which you can shoot down, however, only shoot it down when it isn’t over the well below it. If it drops into the well it will become a Dirty Pearl Pendant and won’t be as valuable as the cleaned version. No slots, sell as is.

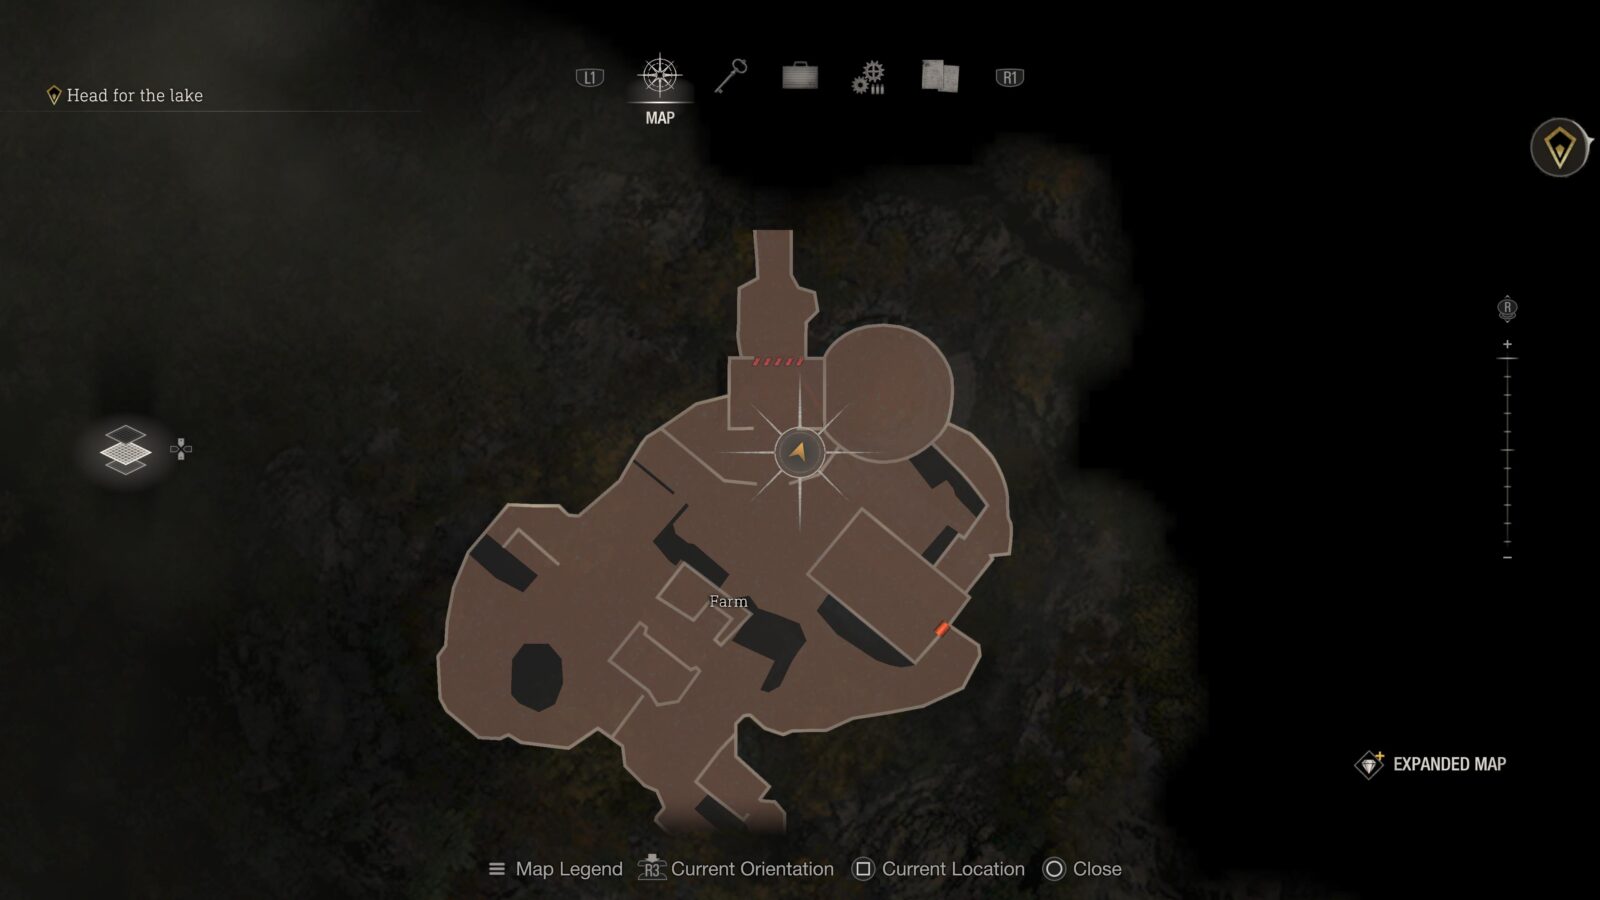
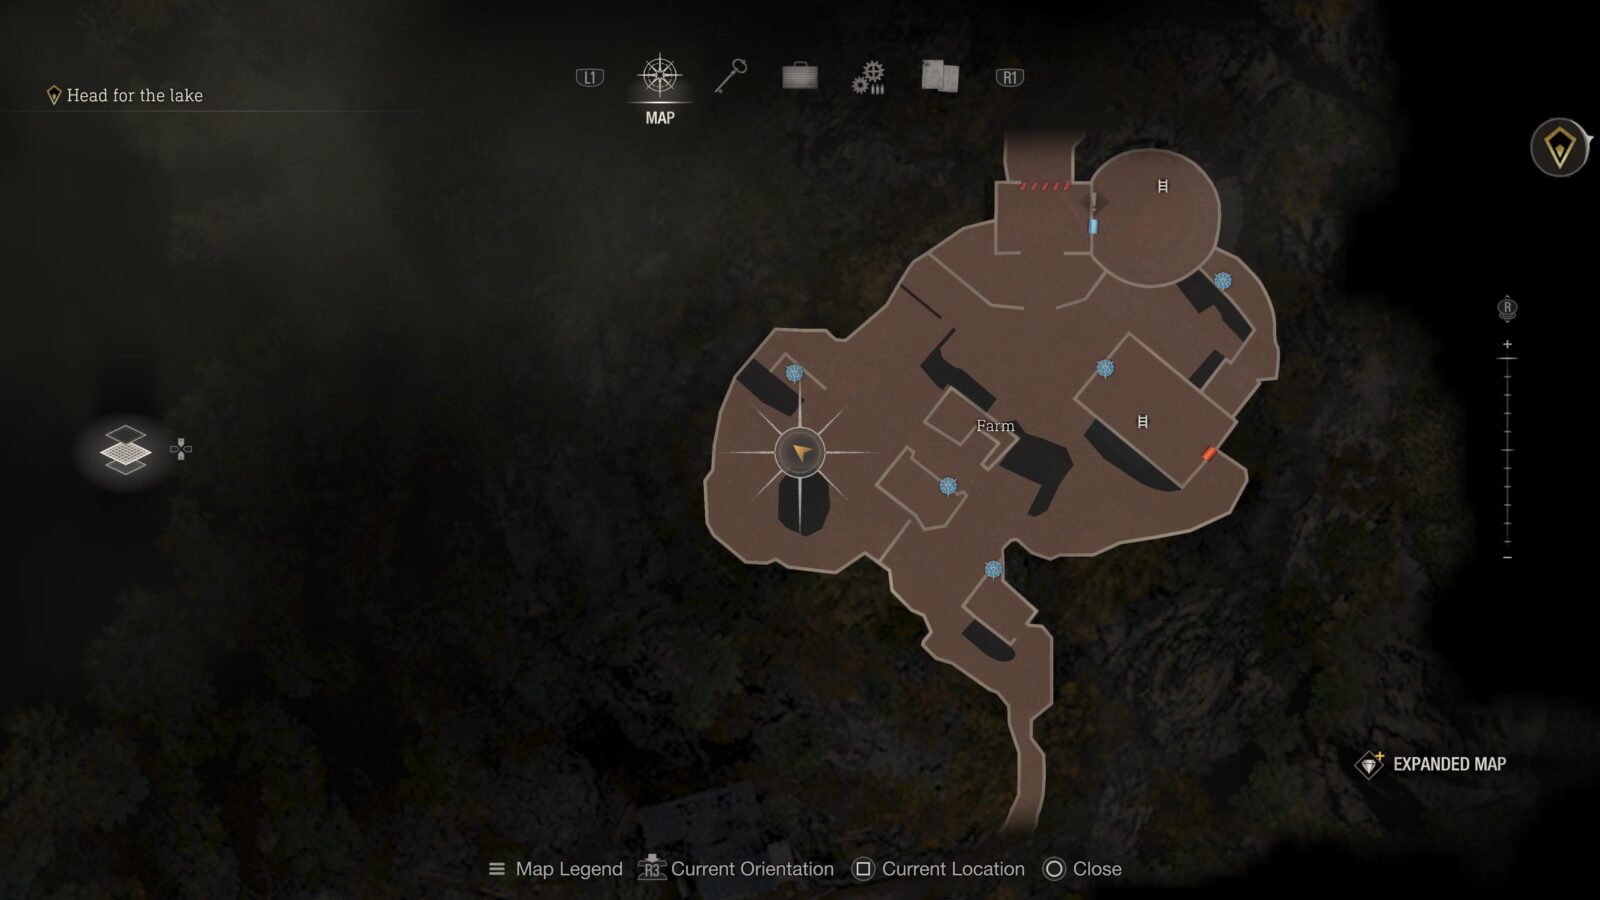
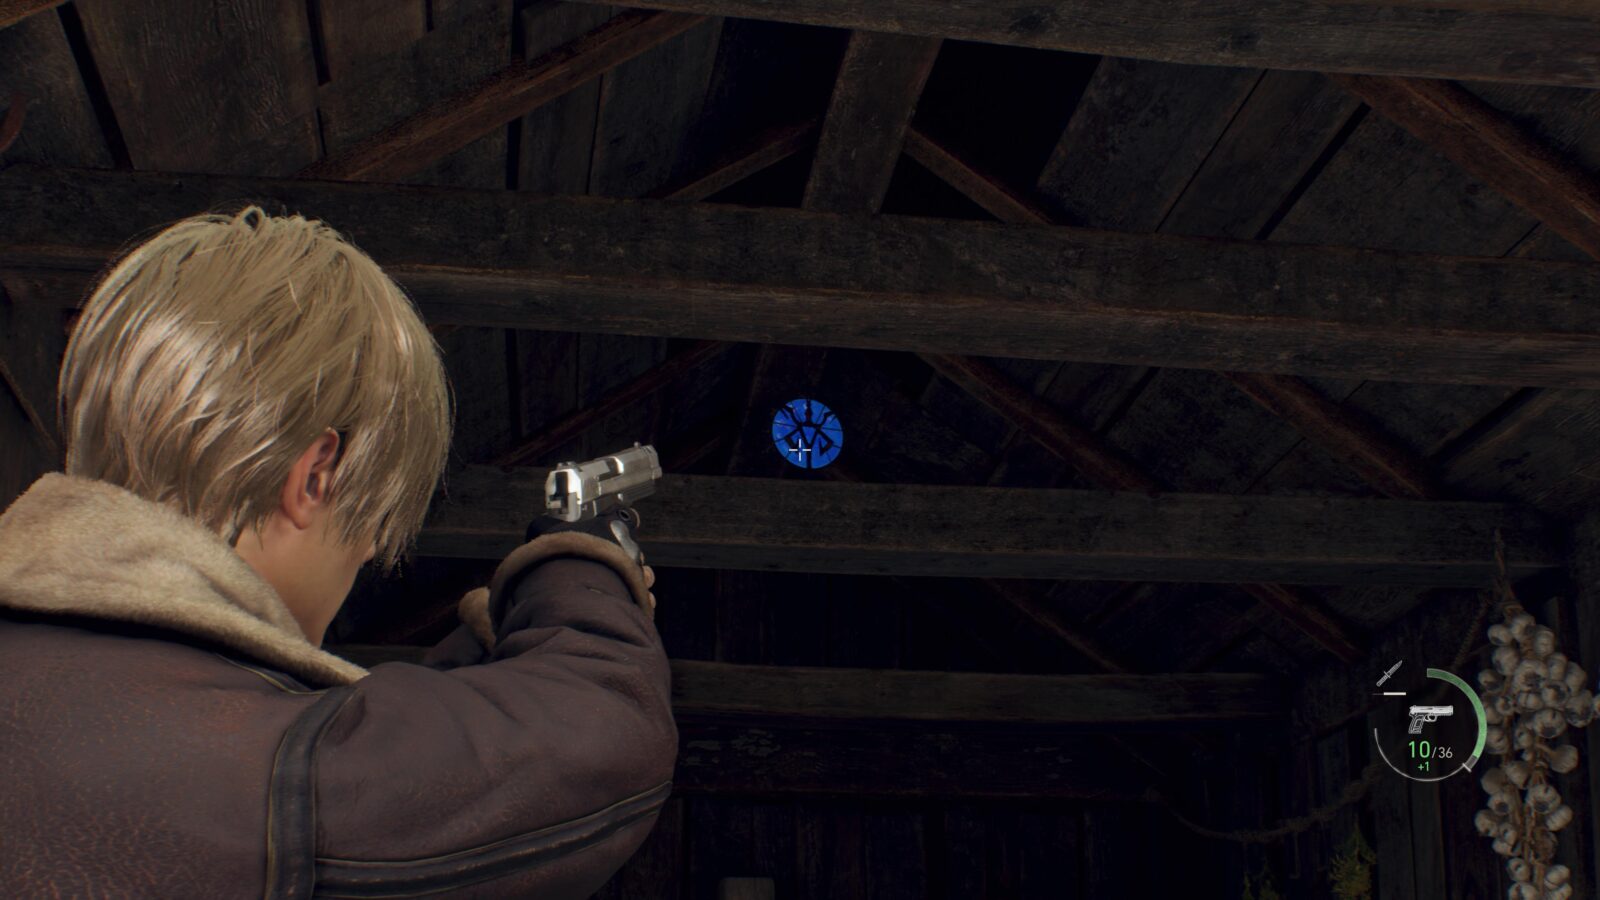
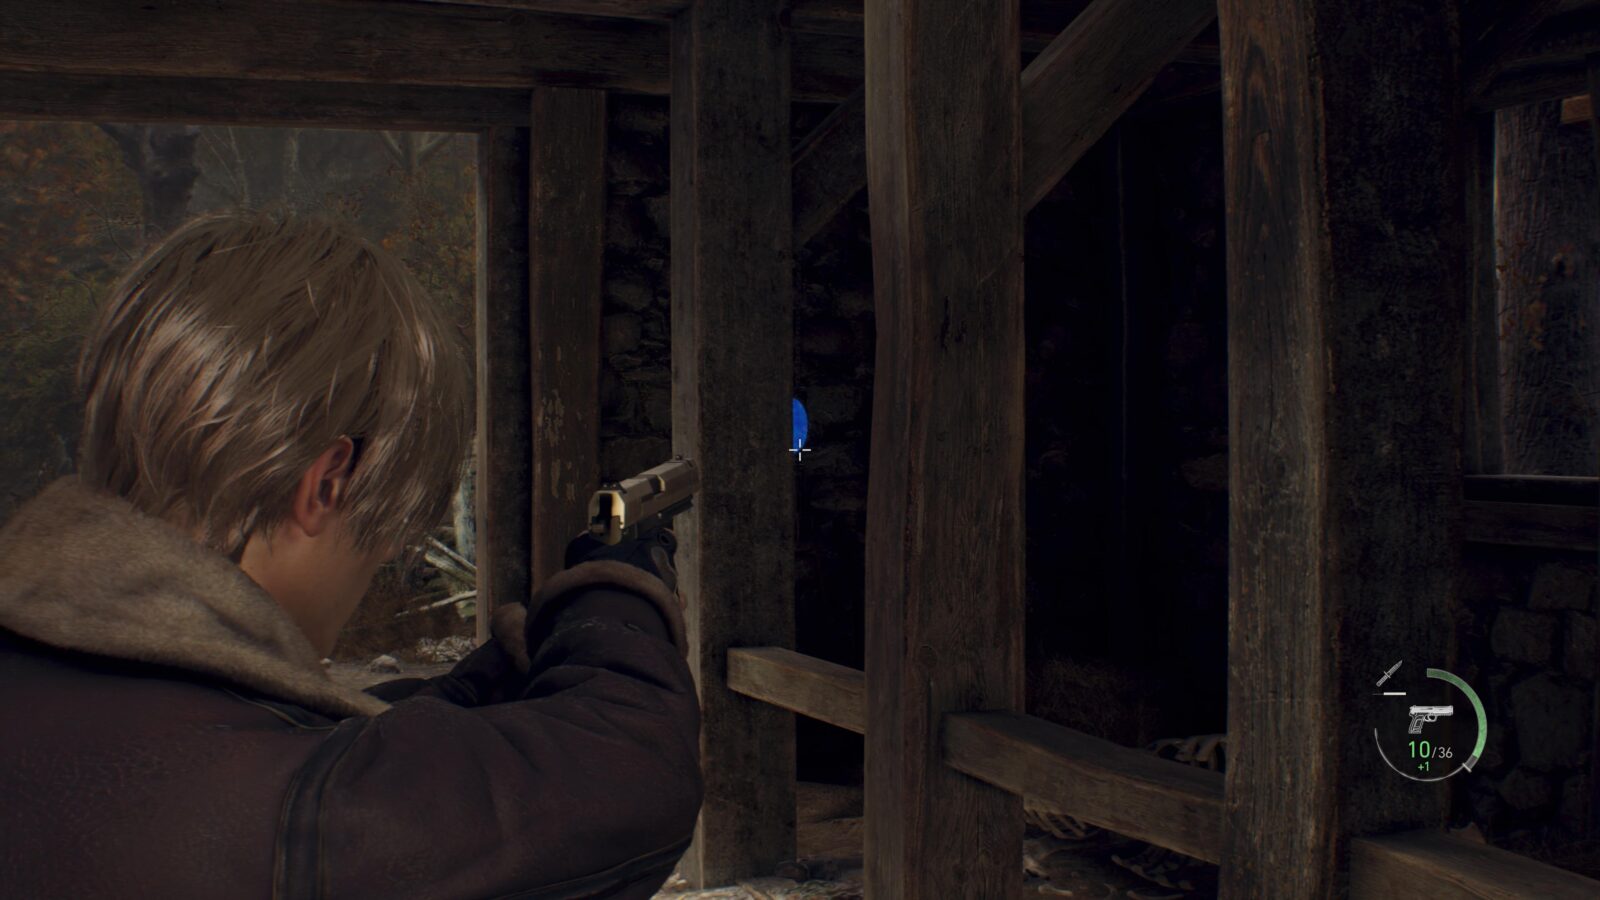
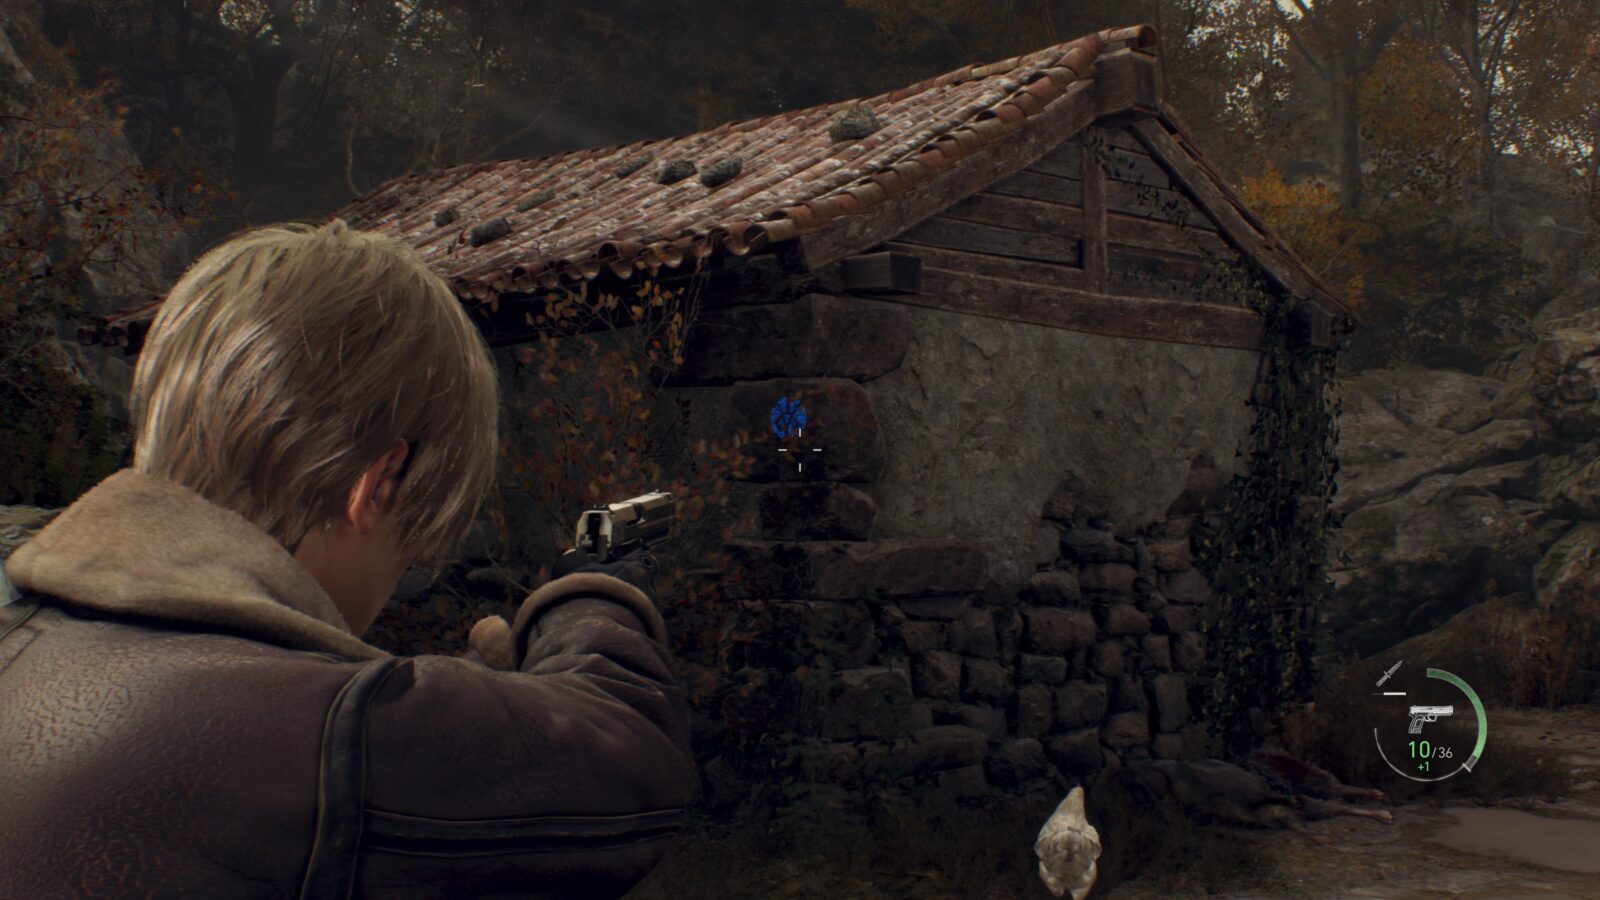
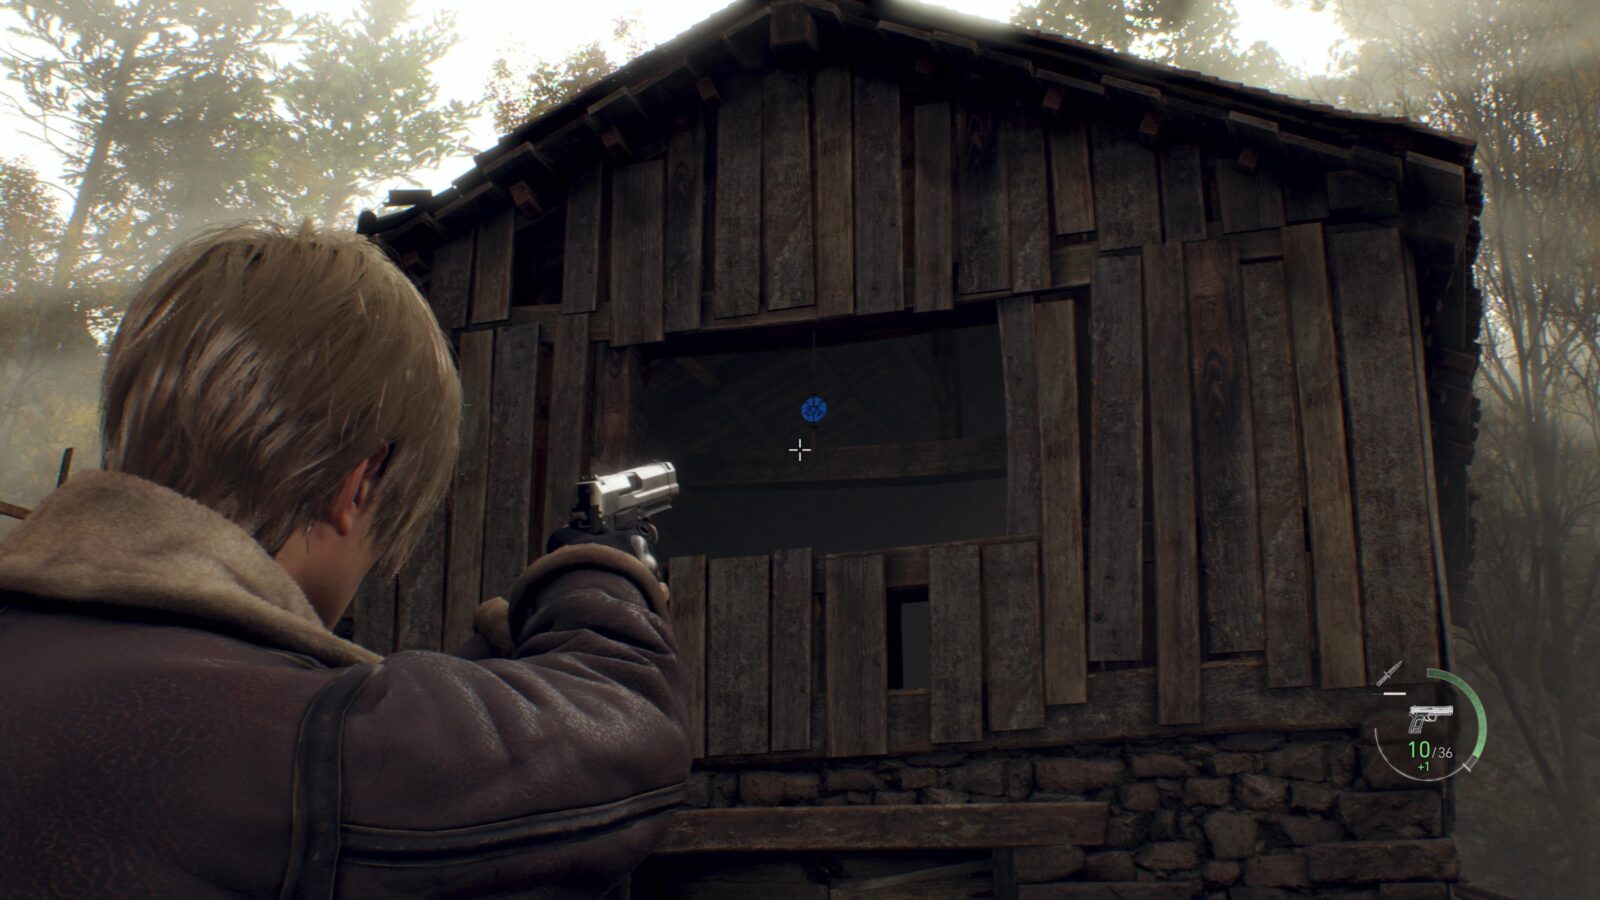
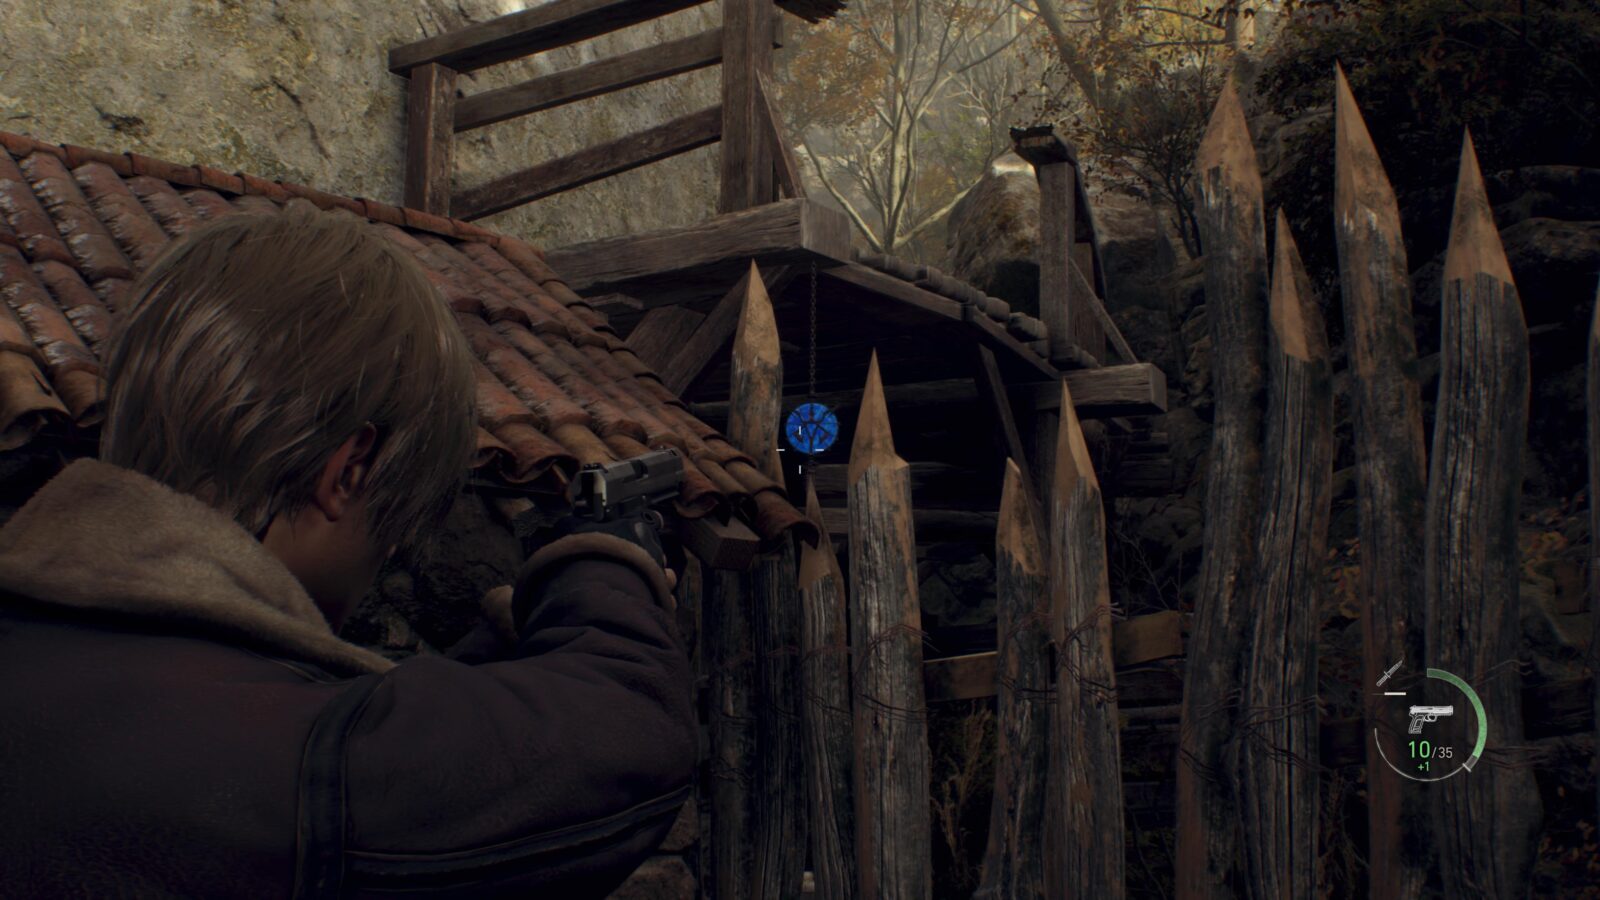
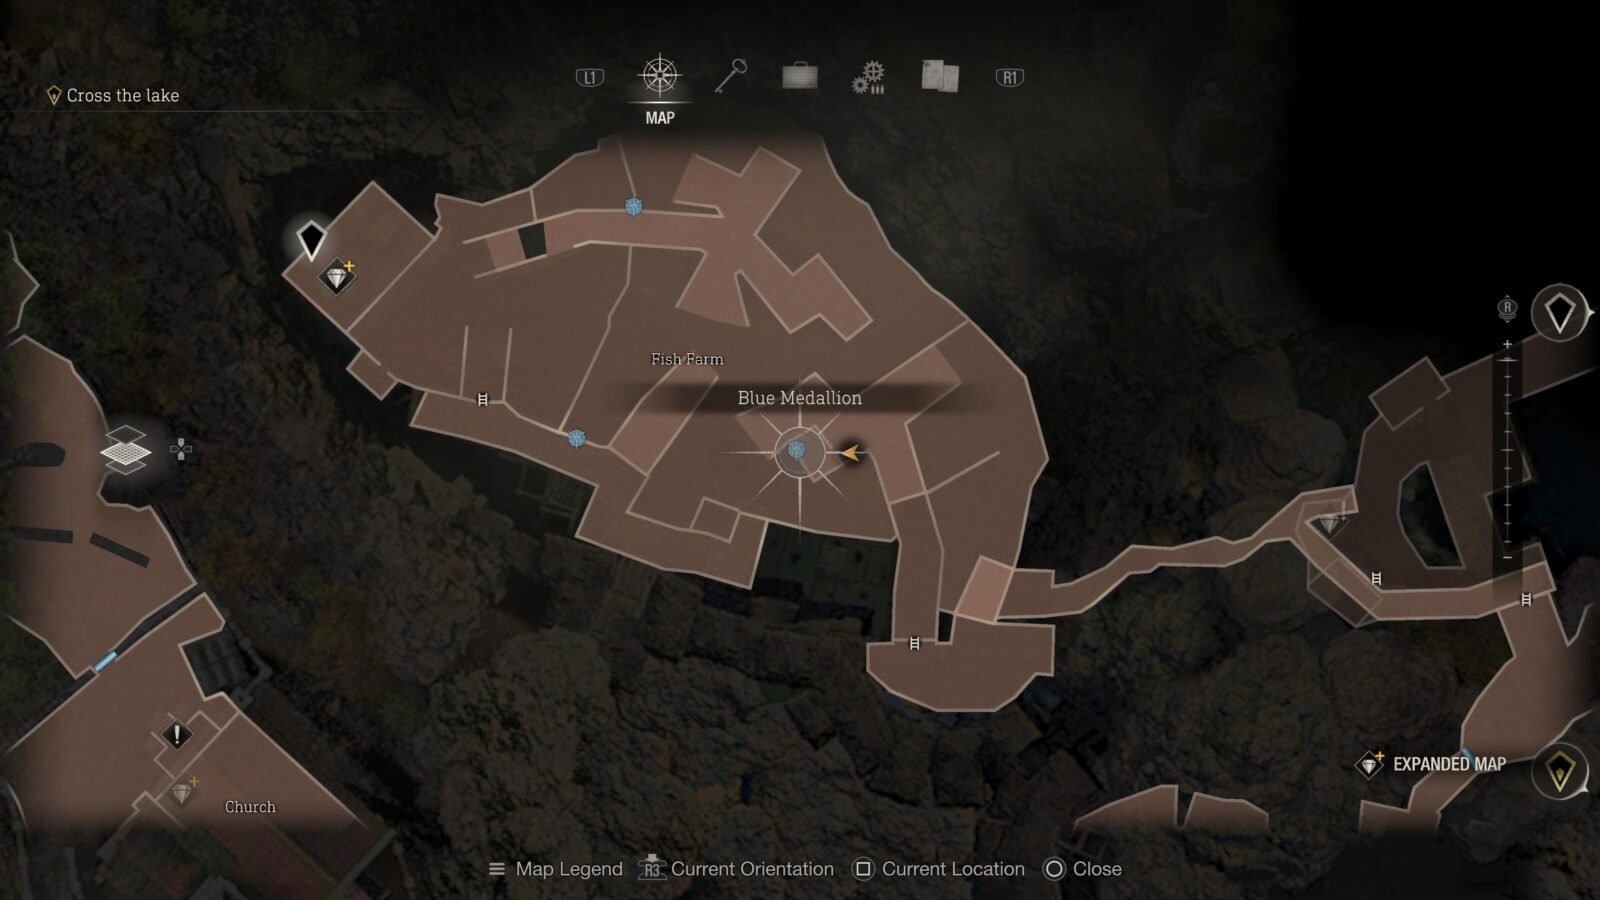
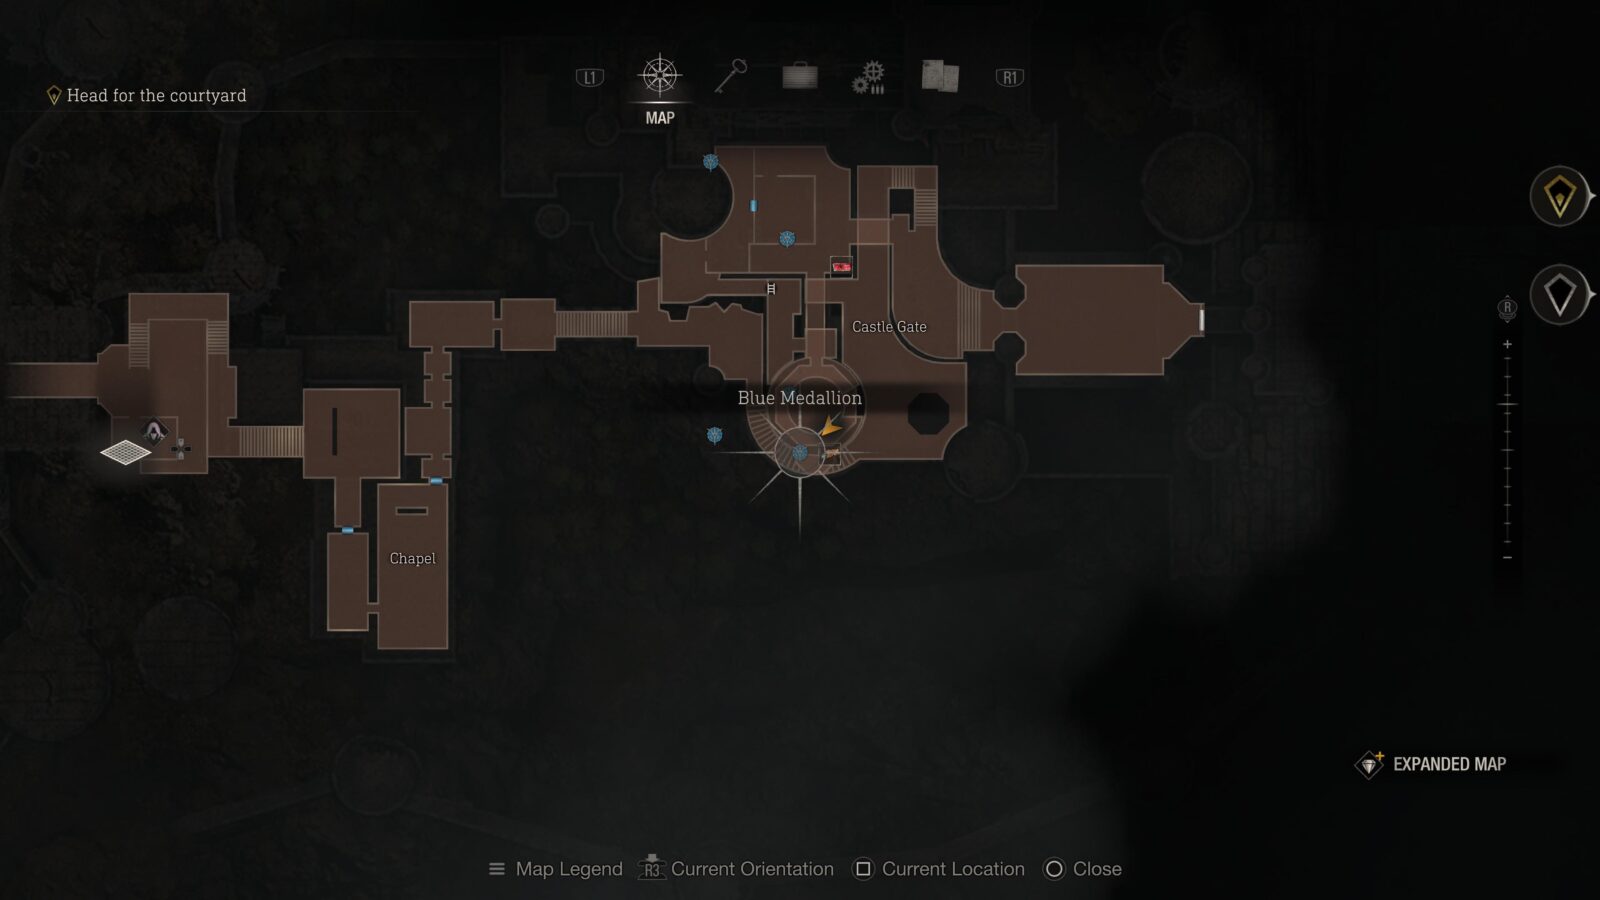
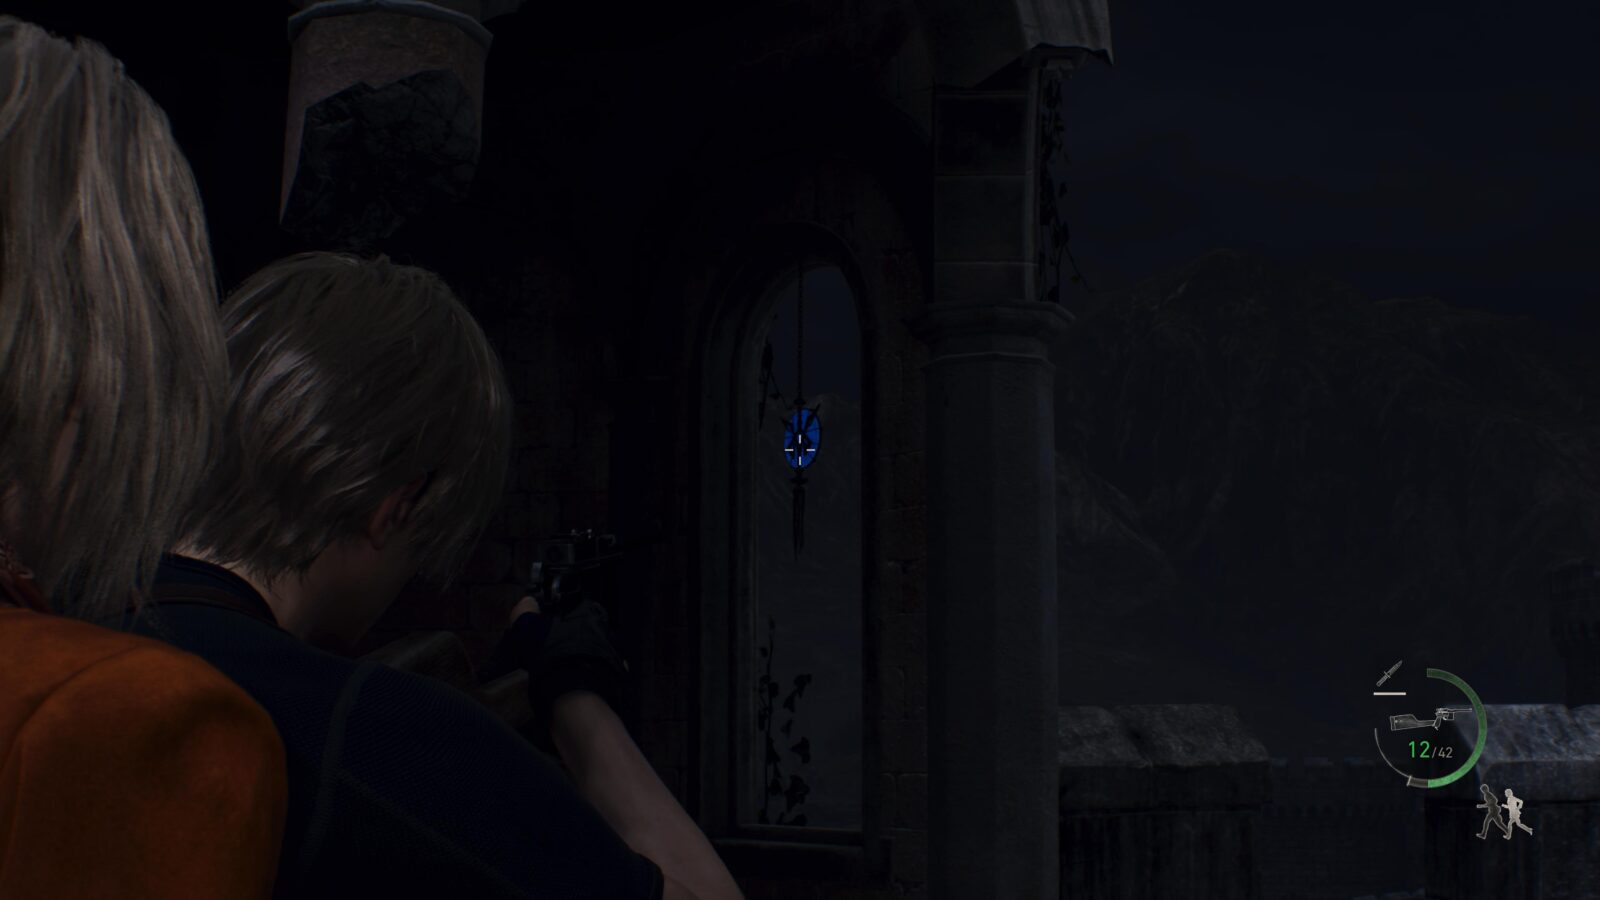
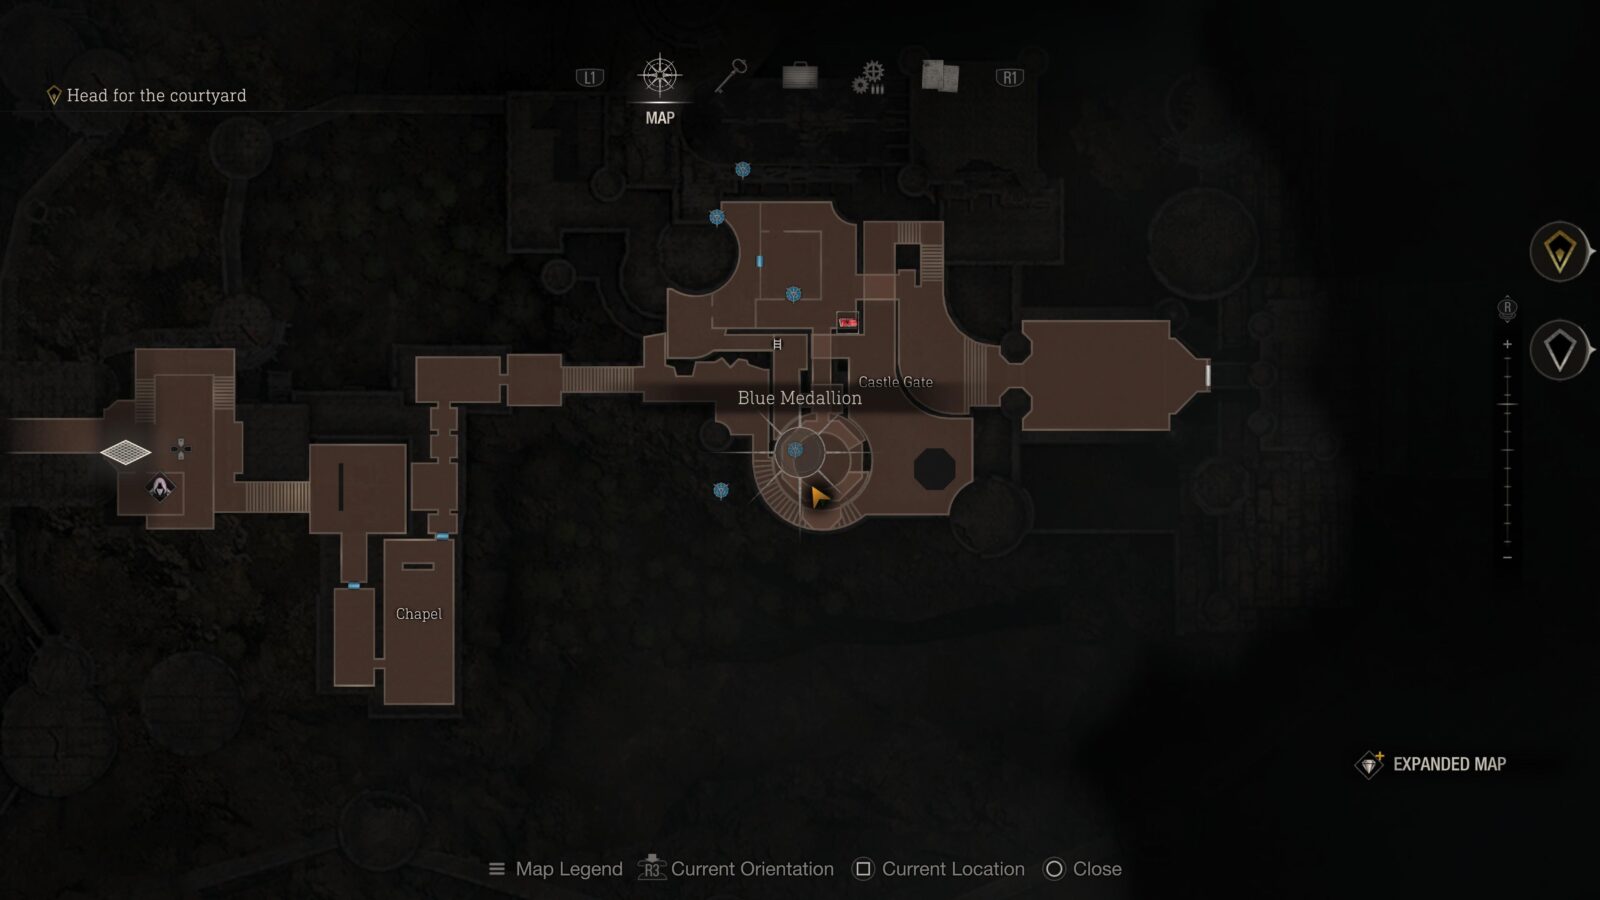
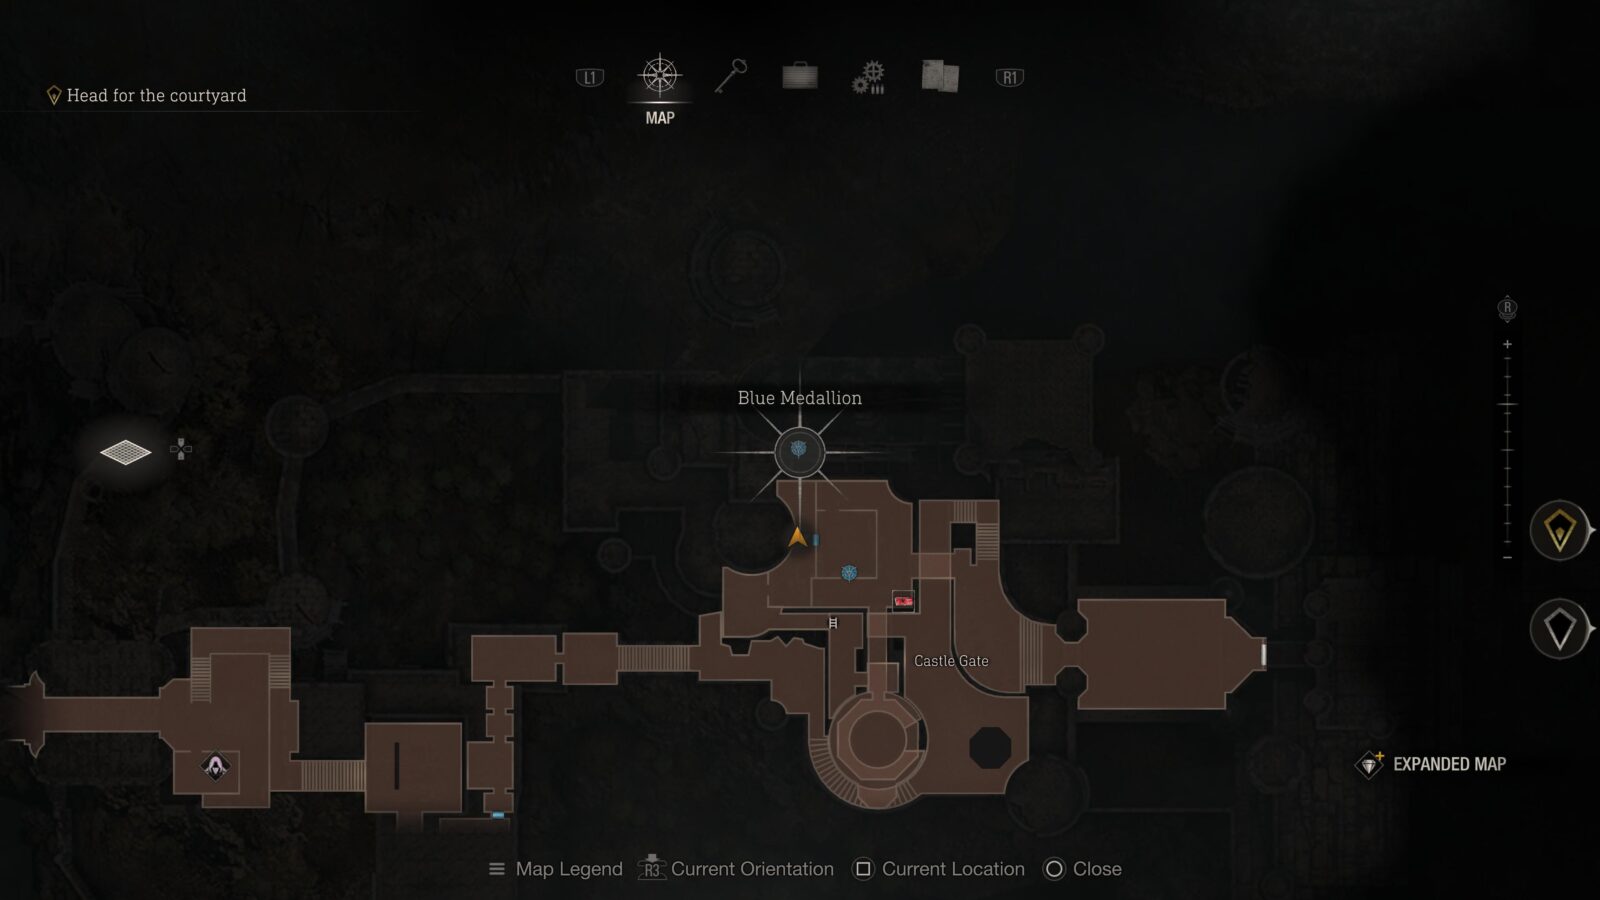
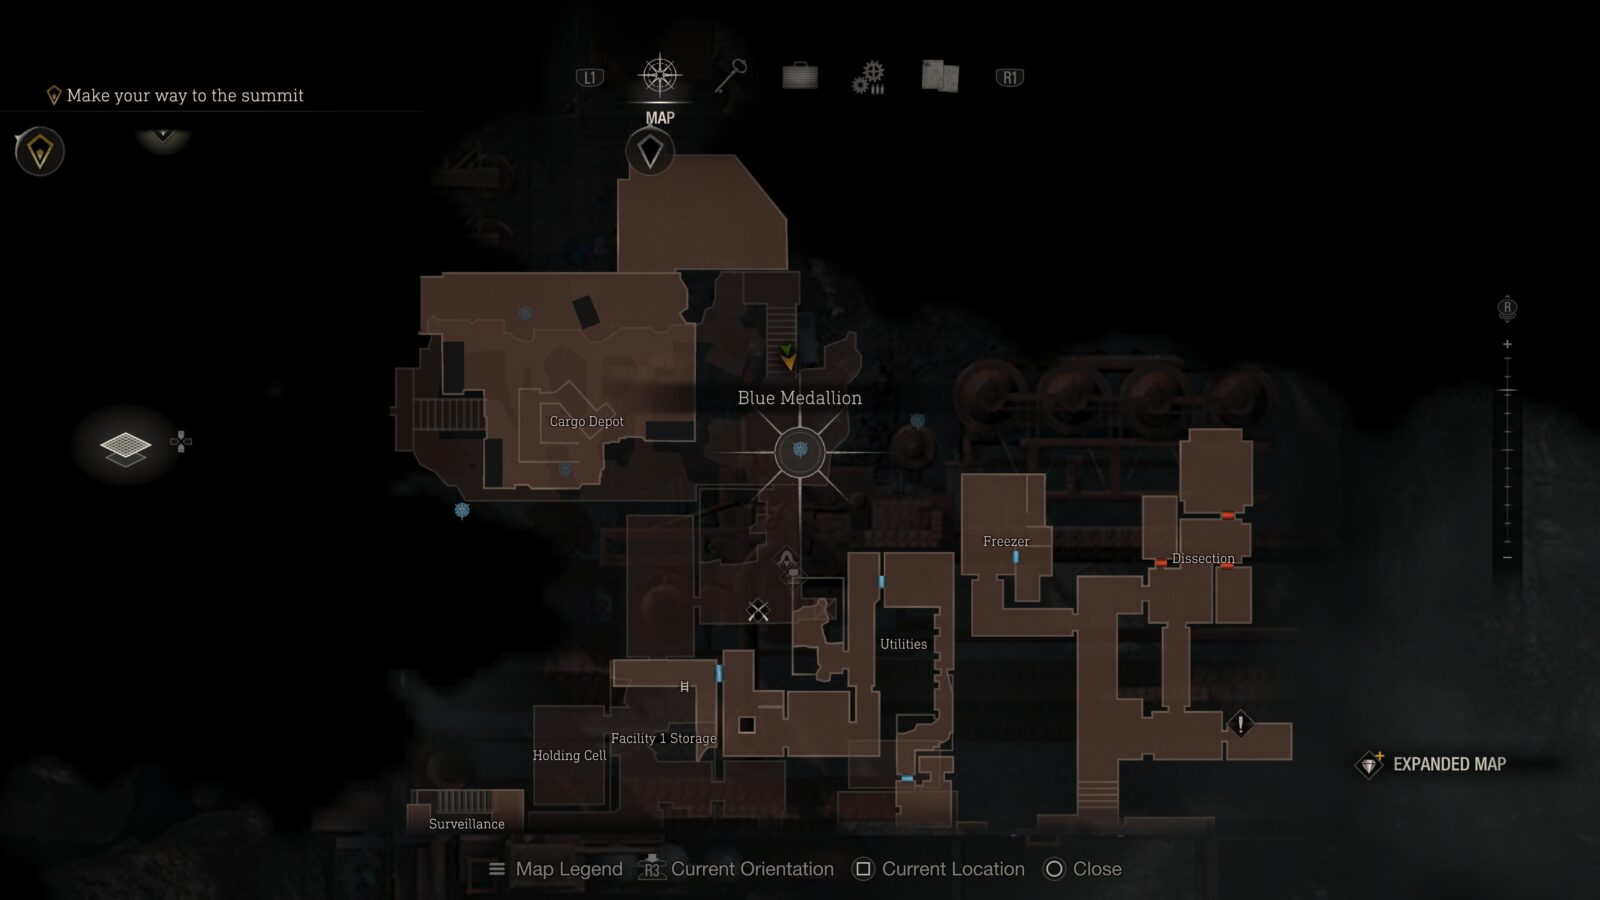
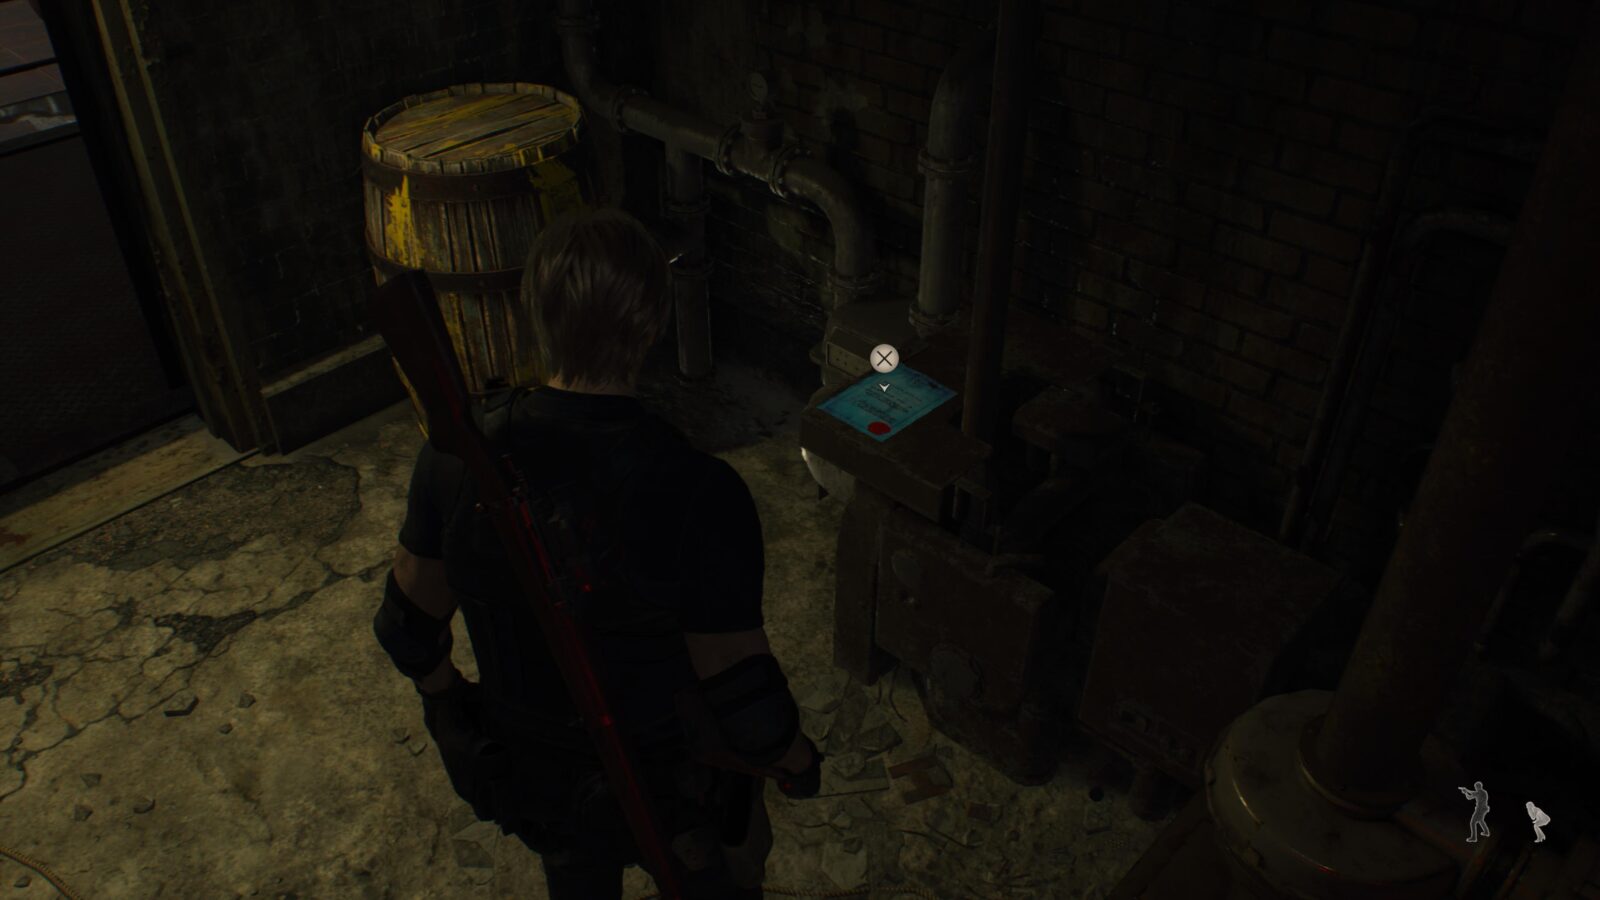
Merchant Request: Destroy the Blue Medallions
At the Northern part of the Farm you can find a blue note stuck to the wall of the large windmill. Read the note and search the farm for the little blue medallions. Once you have destroyed all 5 you can turn the request it at the Merchant later. All the blue medallions are within the farm area so I won’t be listing them as separate items this time but later there will be medallions that appear across multiple areas. (check the images below for the location of each medallion).

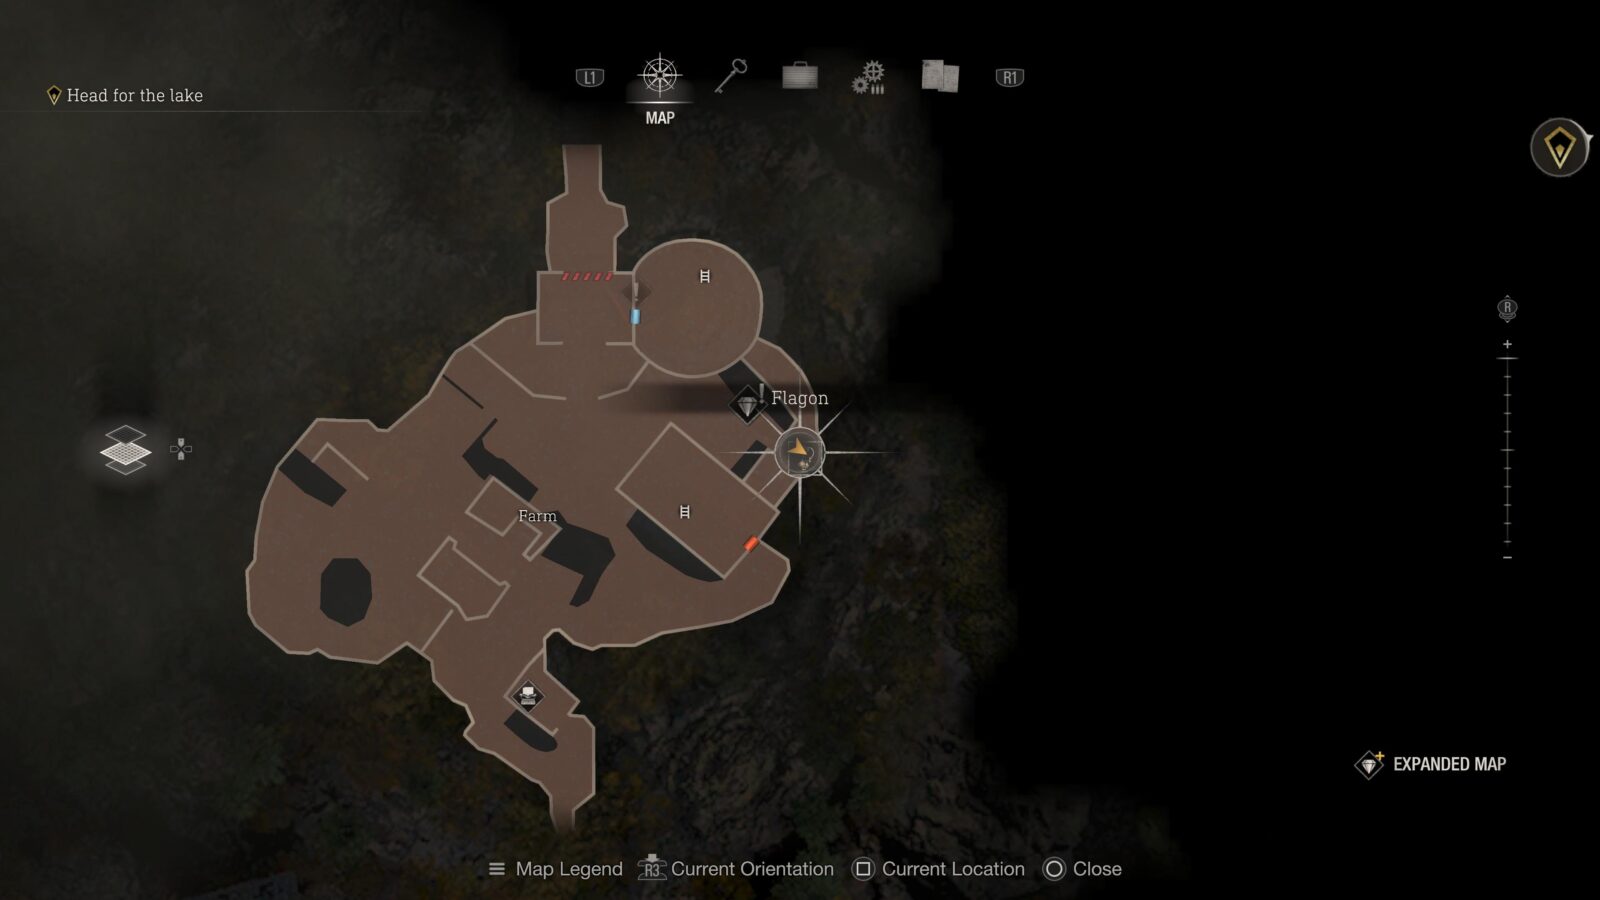
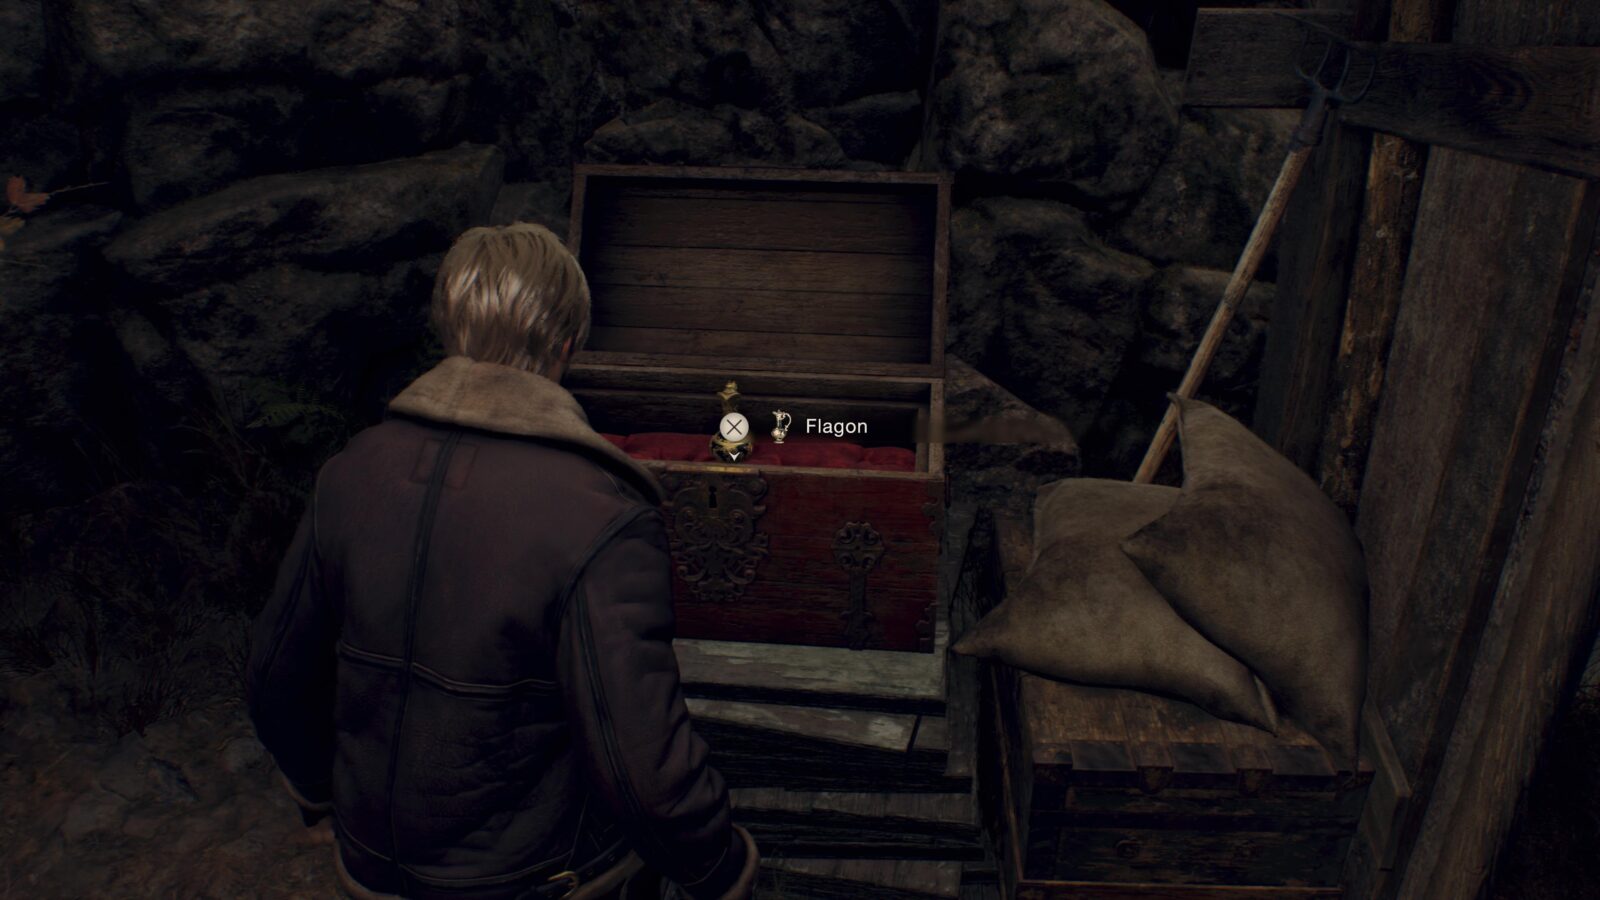
Flagon
Climb up to the 2nd floor of the windmill and look for a door to the left of the large whole in the wall. The door will lead to an area you can drop down which holds a chest with a Flagon. Has 2 circular slots.
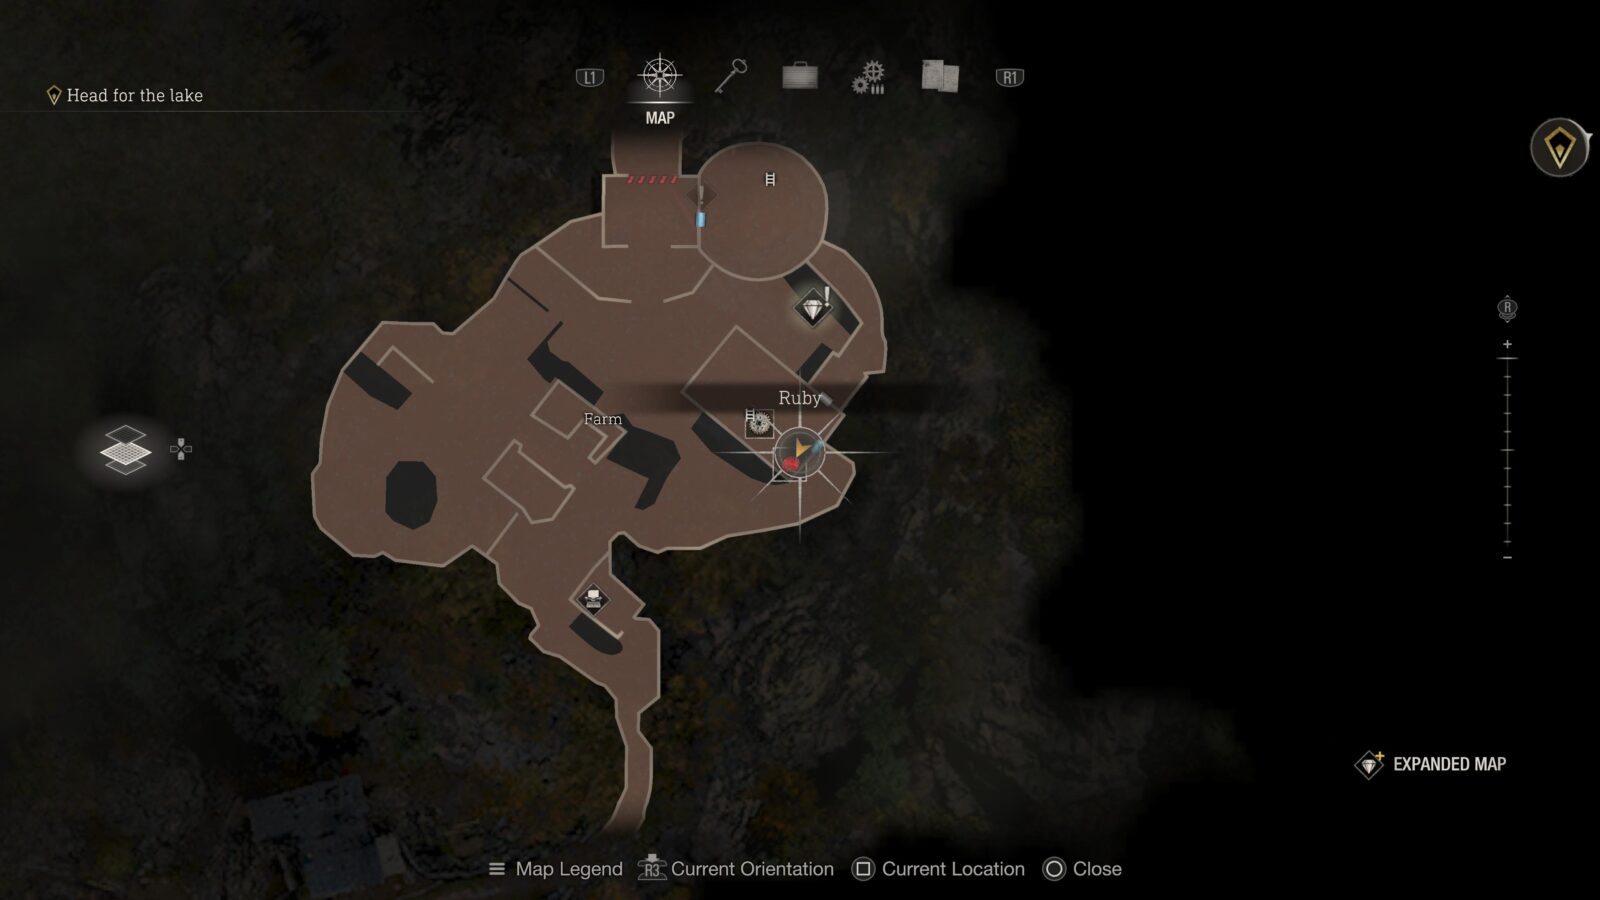
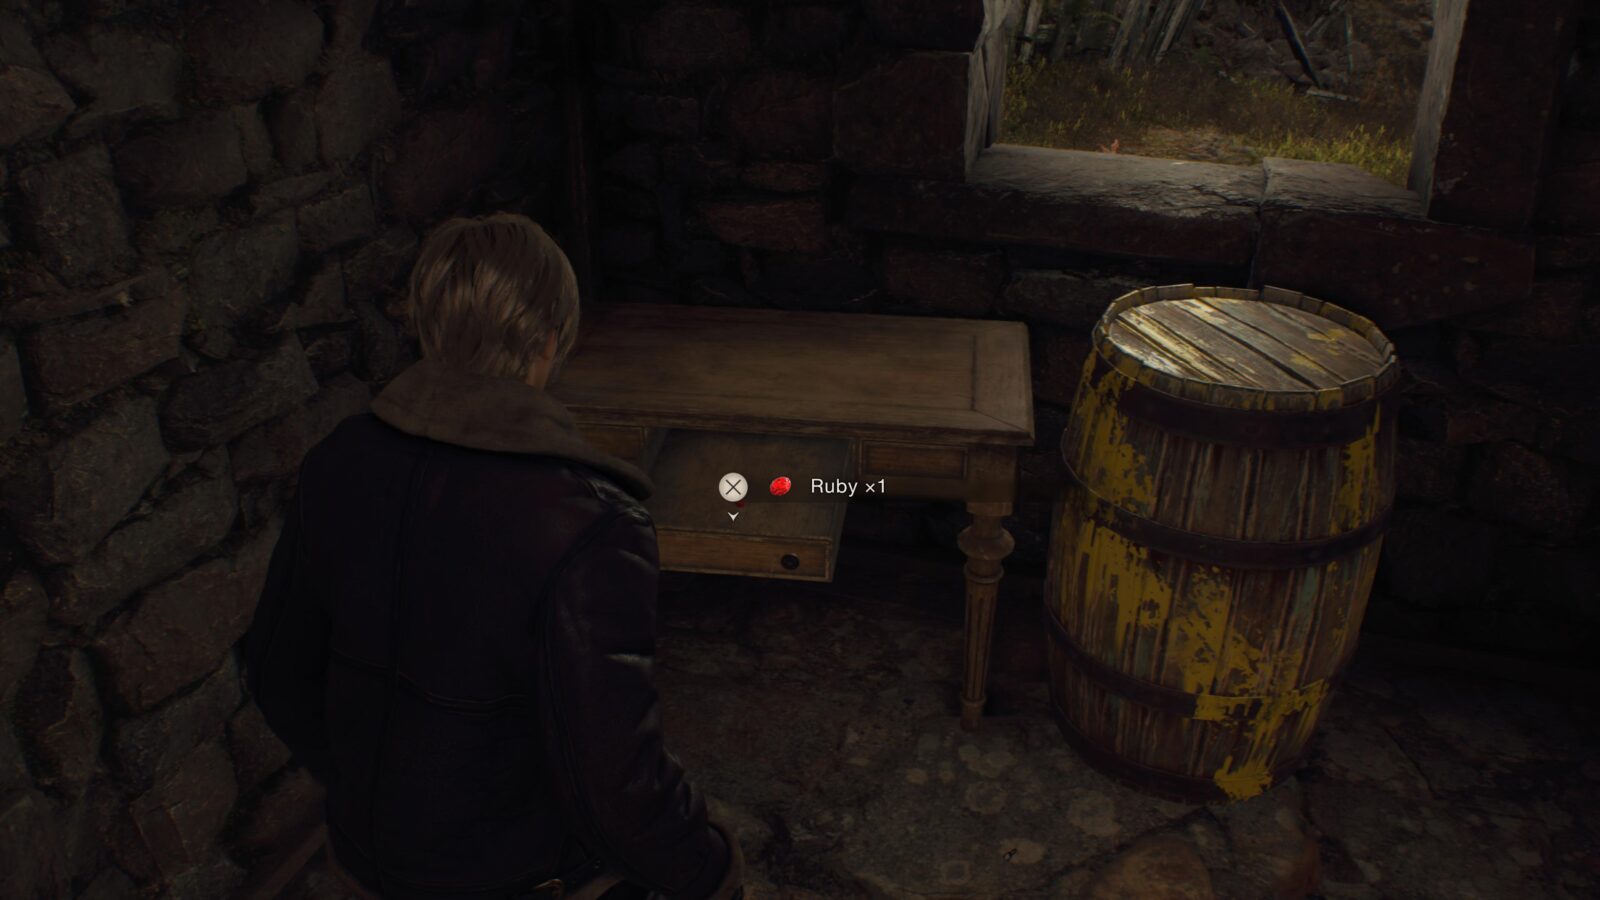
Ruby
Inside the barn where you find the Wooden Cog for the windmill is a Ruby in the corner of the room inside a desk.
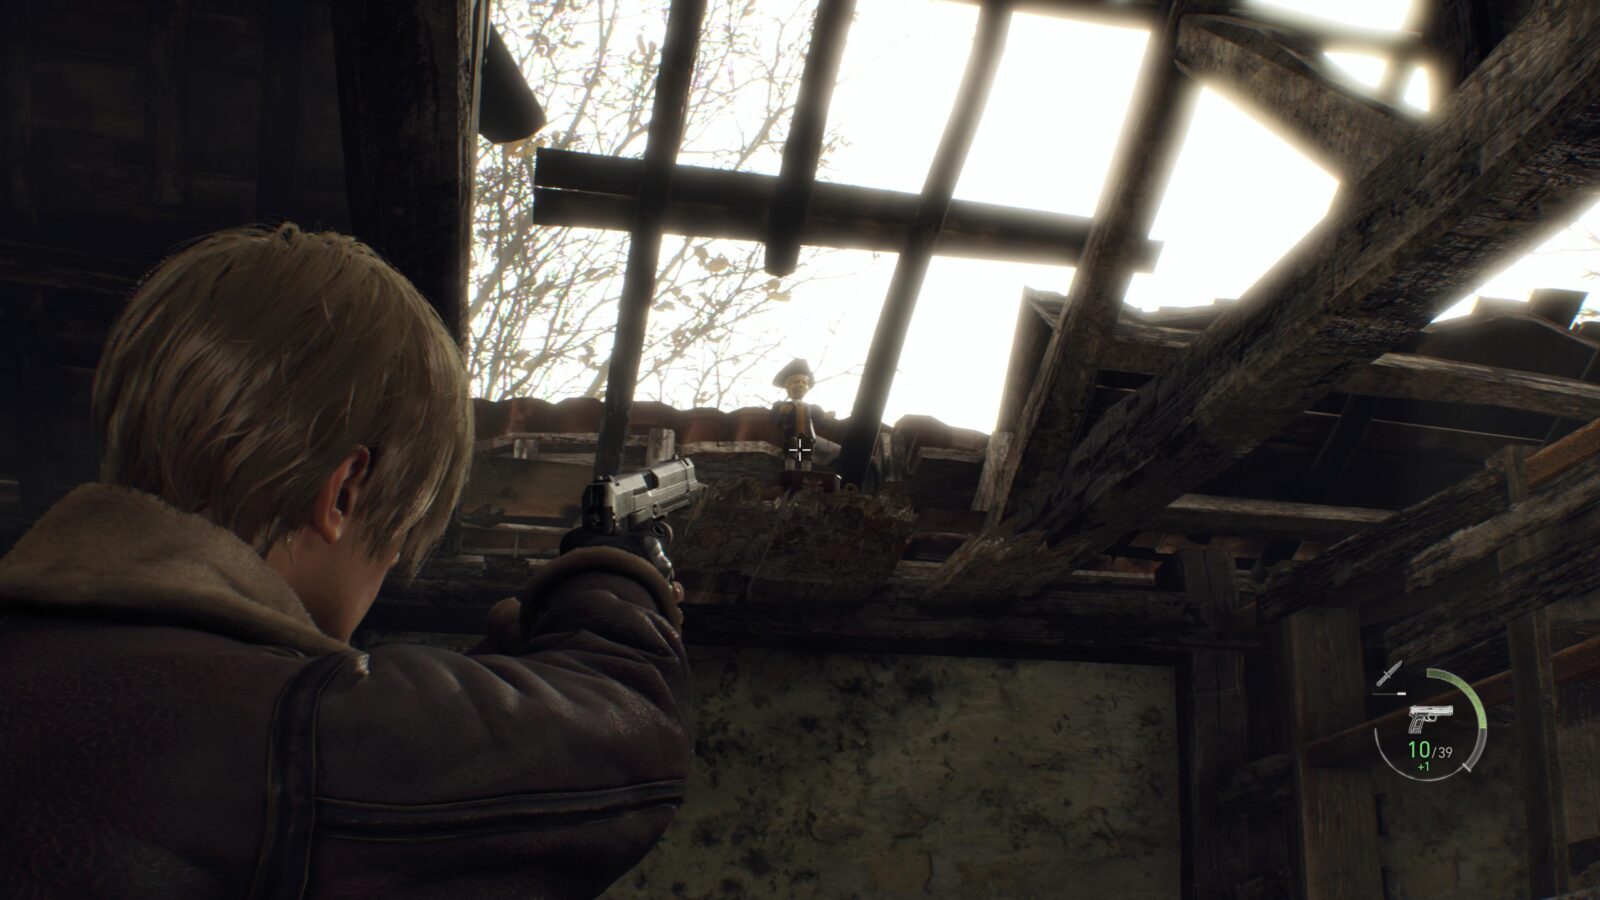
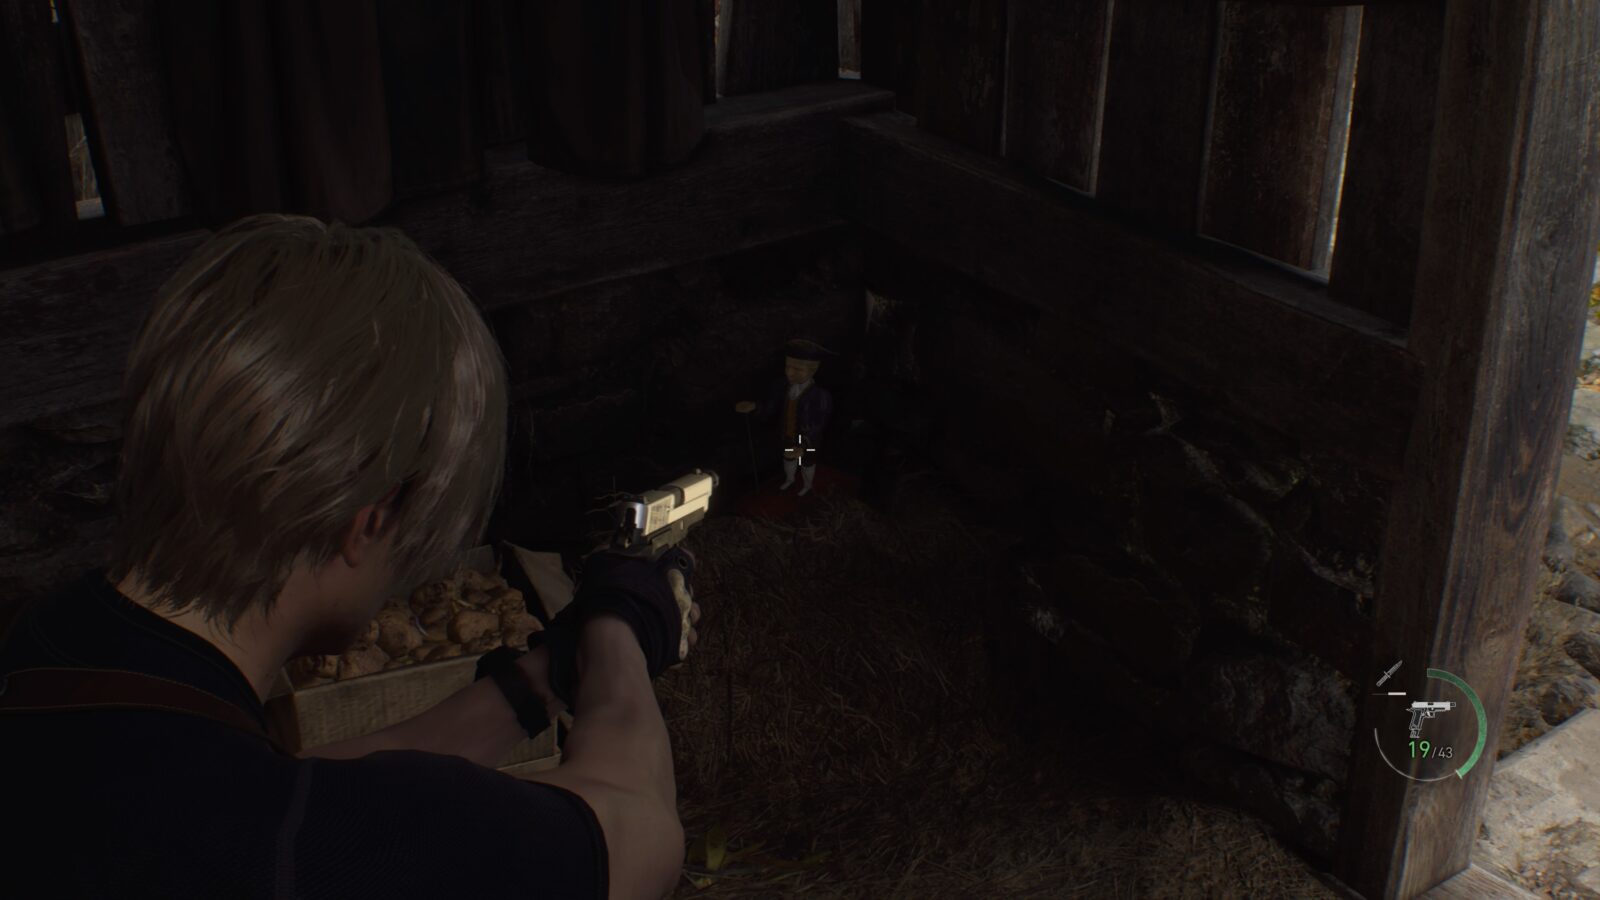
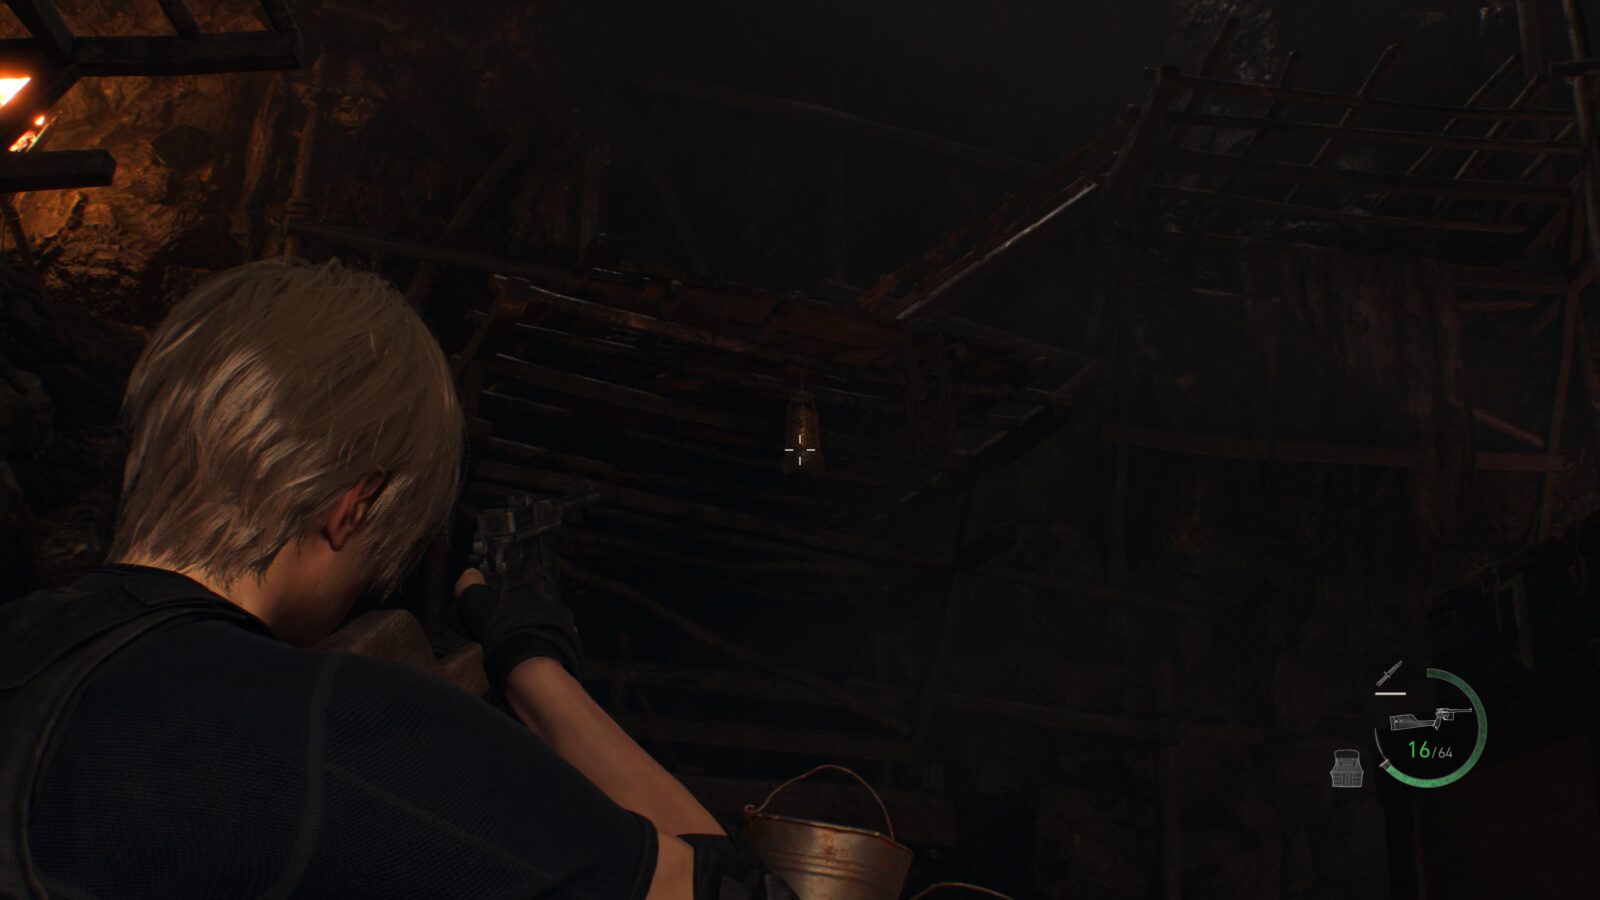
Clockwork Castellan #1
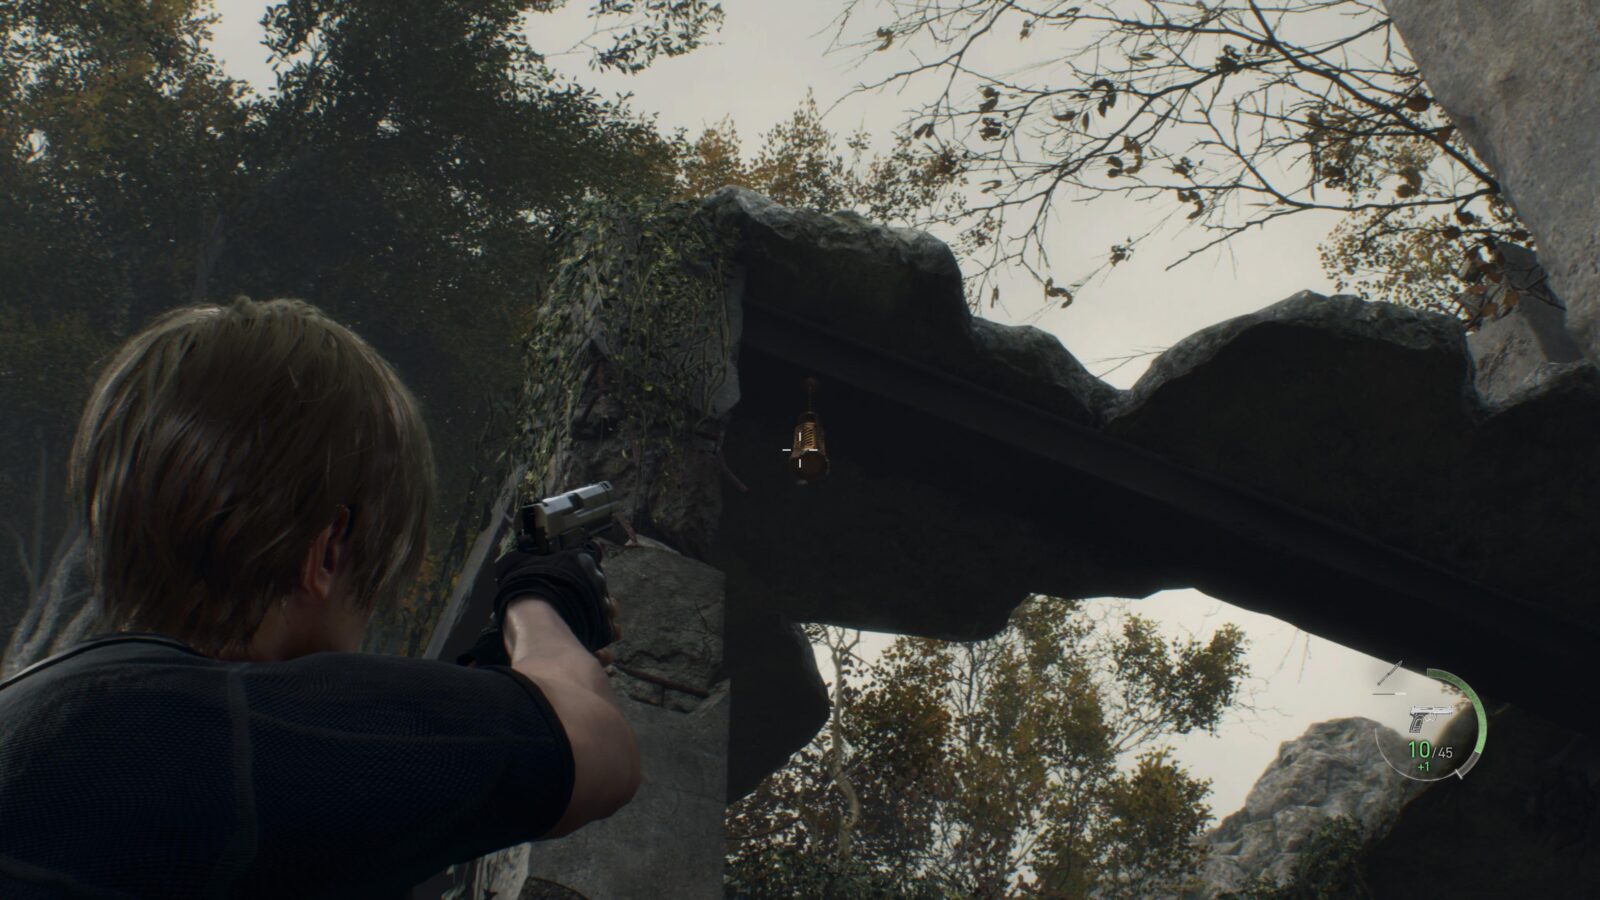
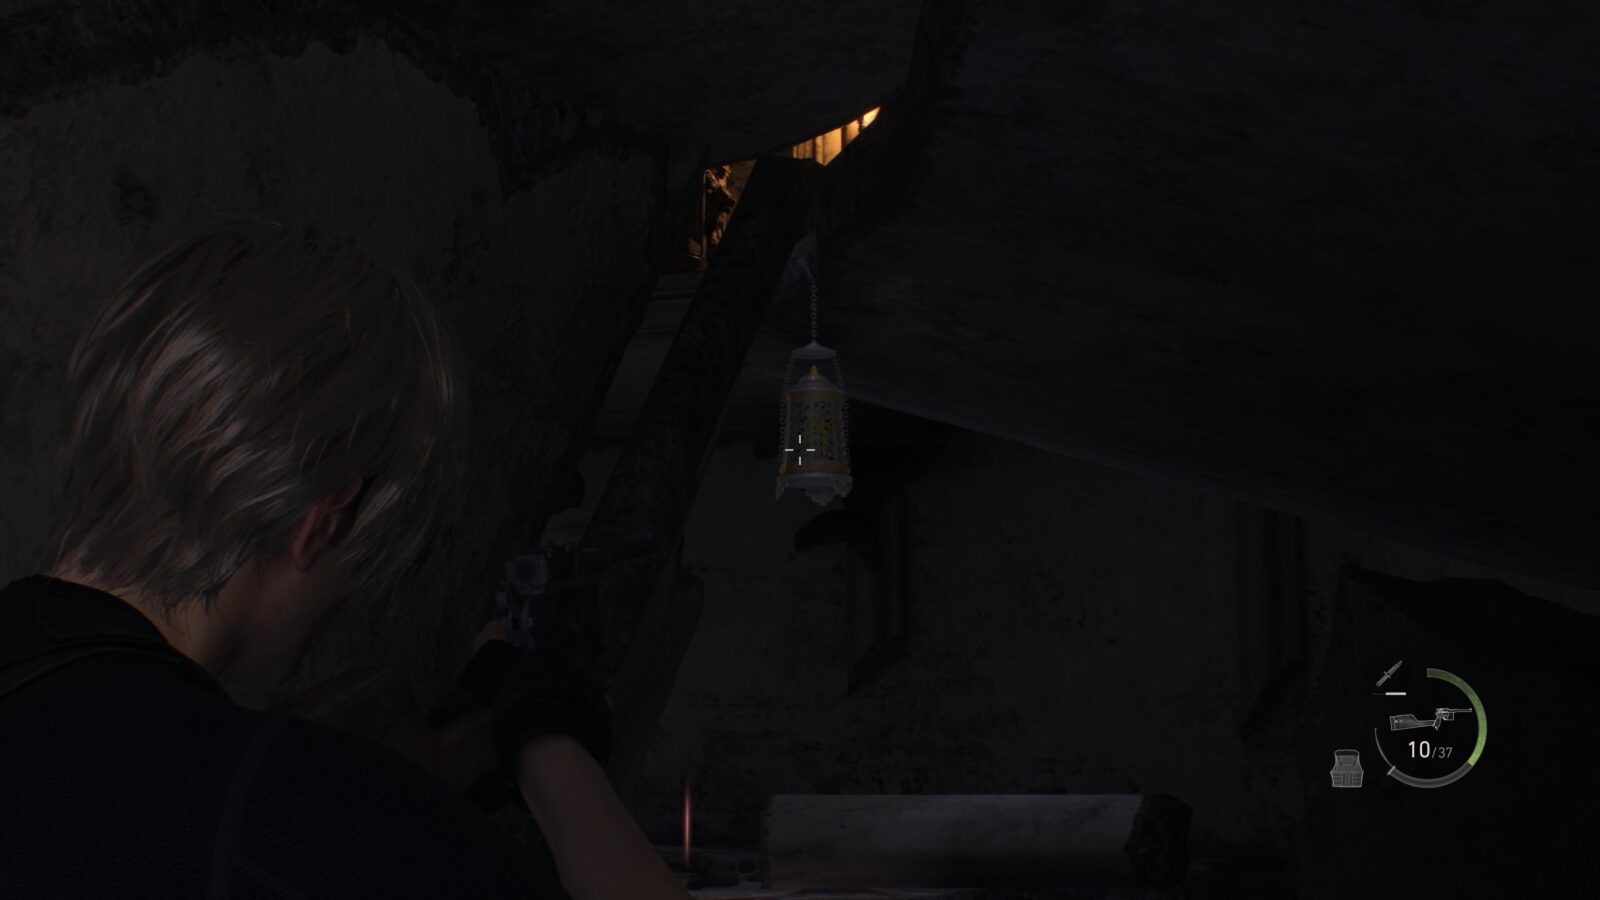
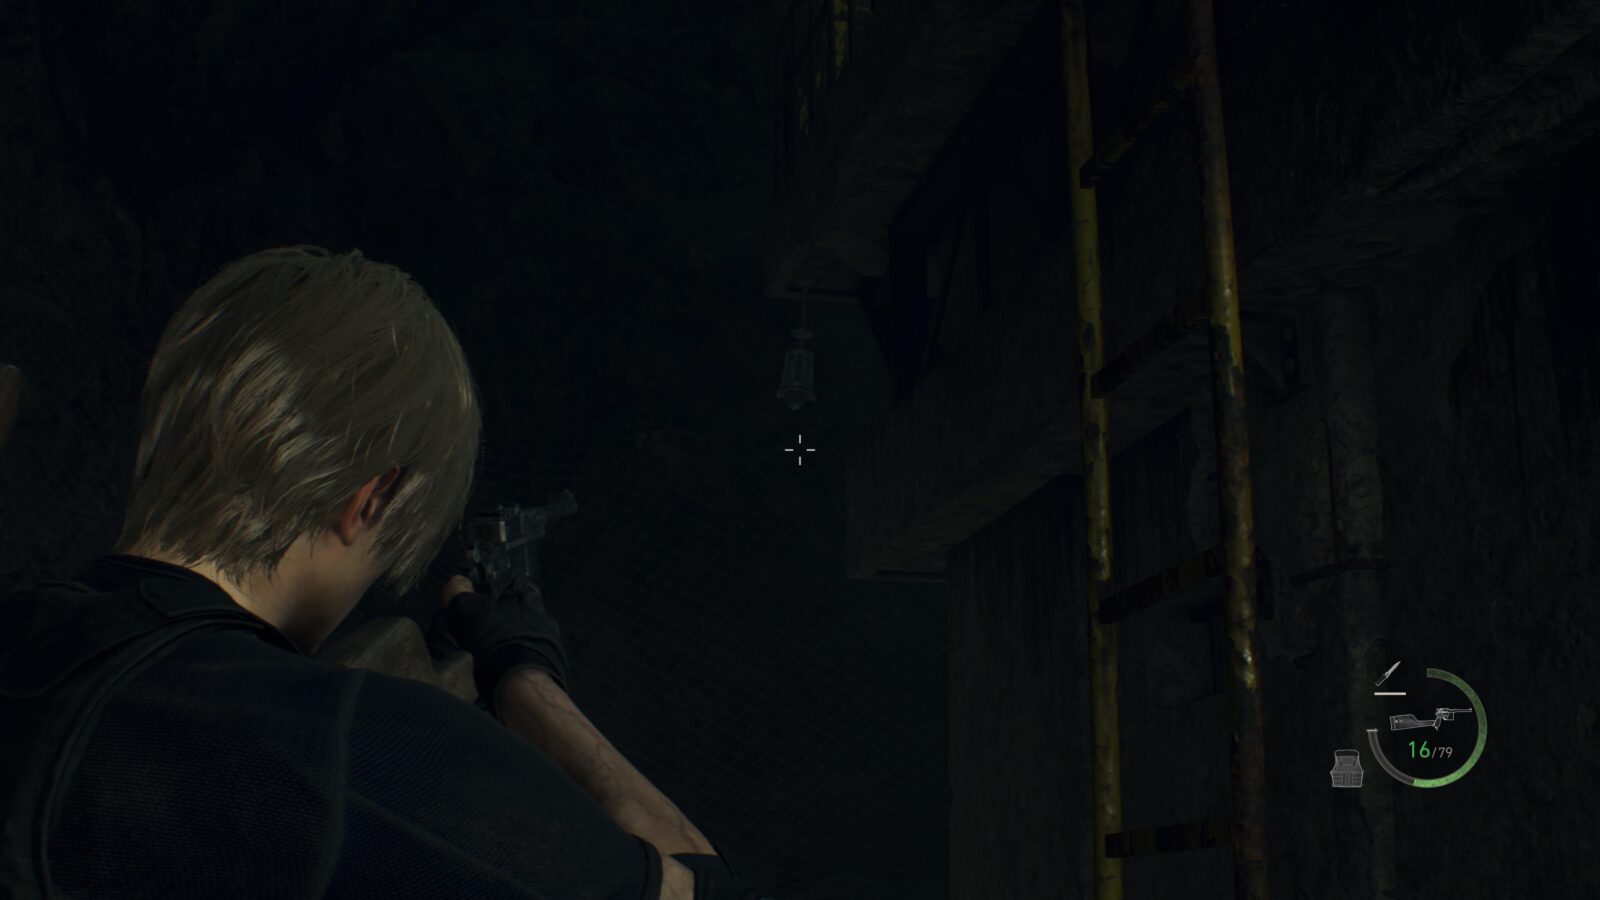
When you reach the next area there will be a man throwing dynamite at you from inside a house. Defeat some of the enemies in the area and return to that house with the dynamite throwing enemy. Inside is a Clockwork Castellan sitting on the broken roof rafters.
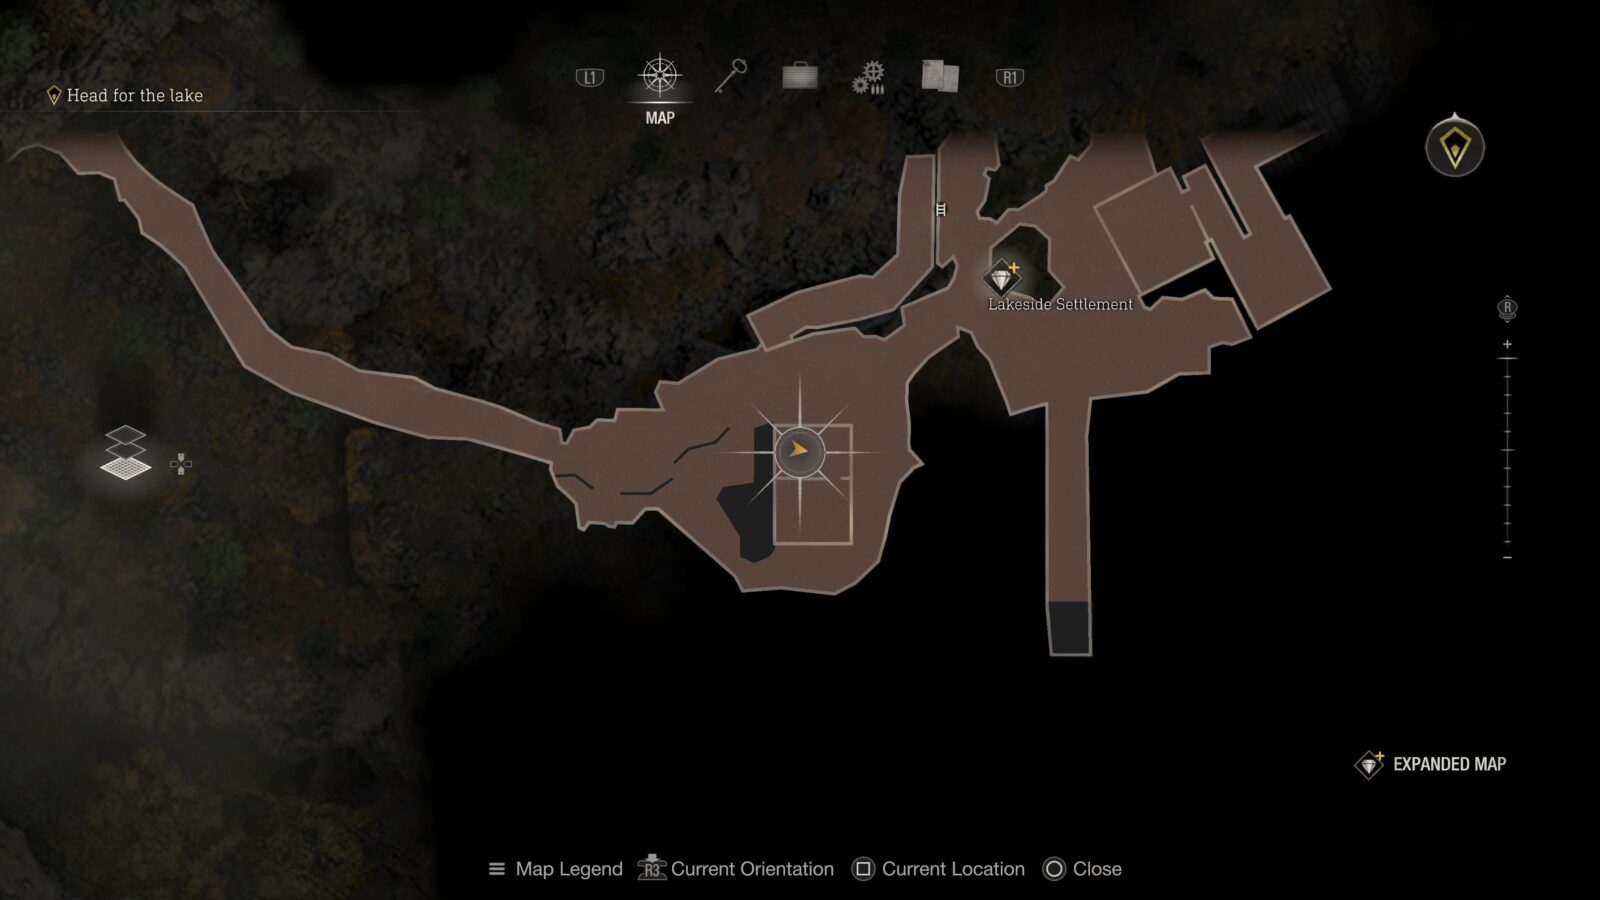
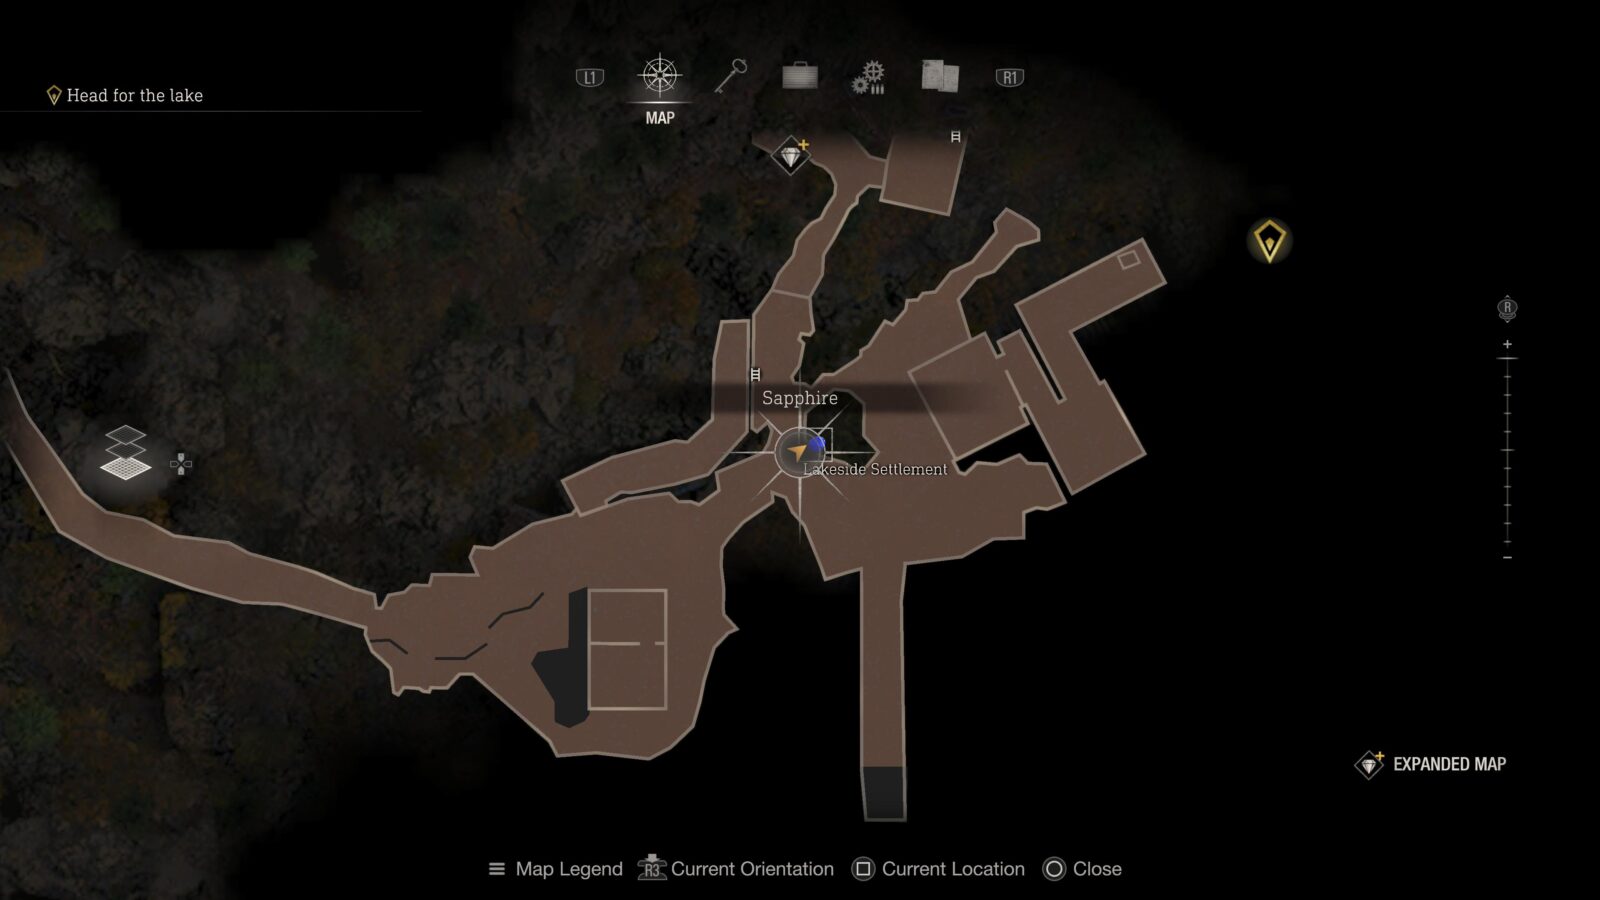
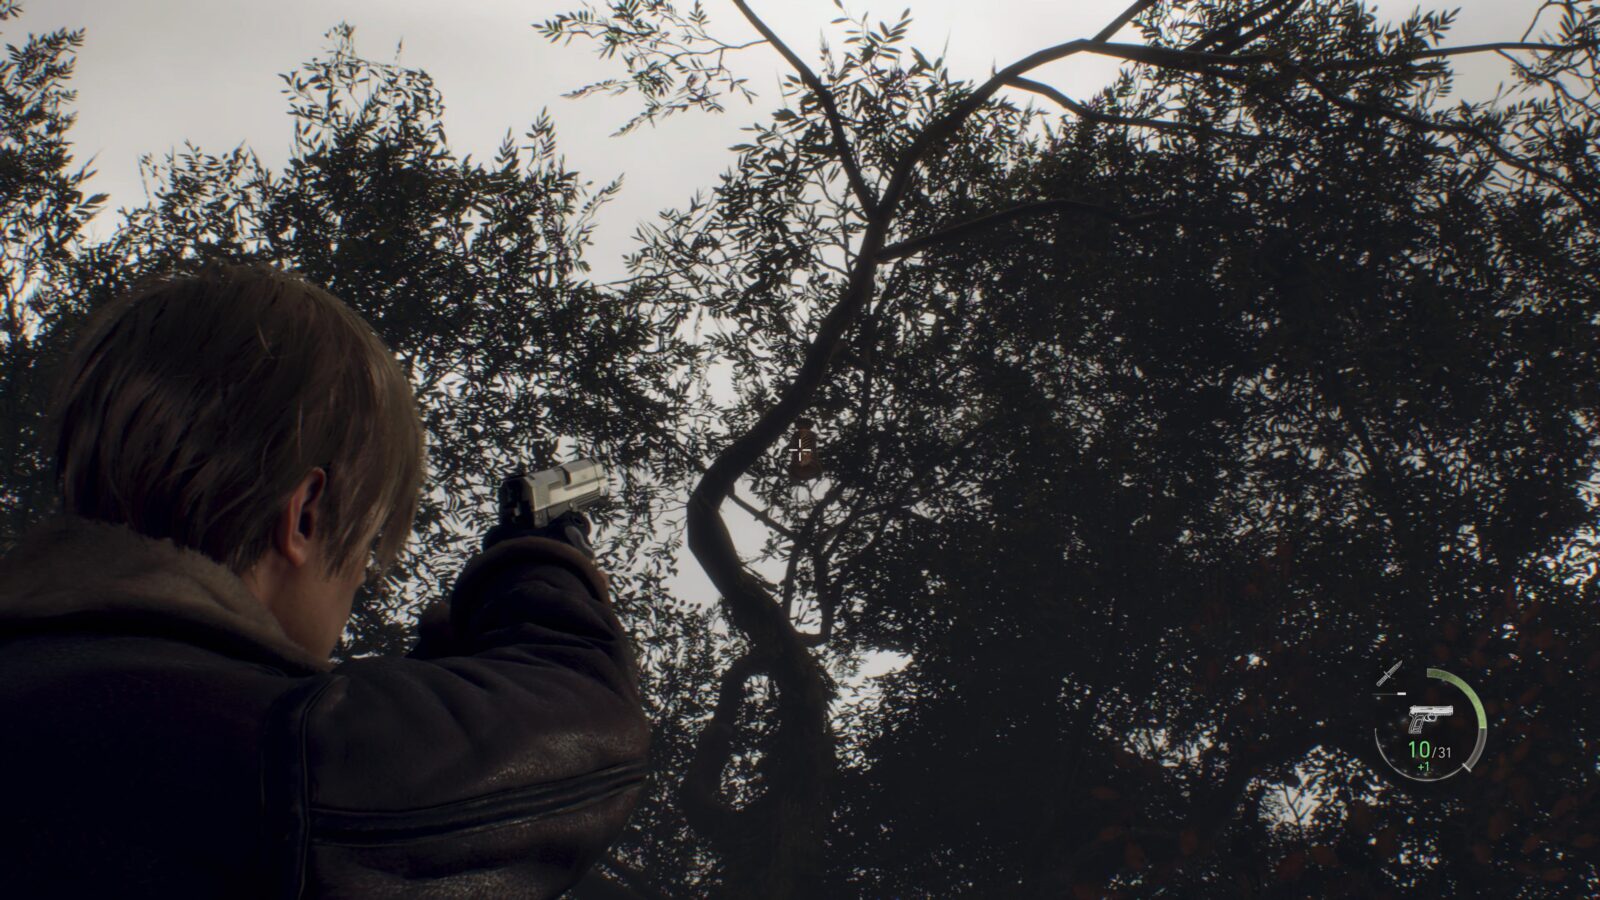
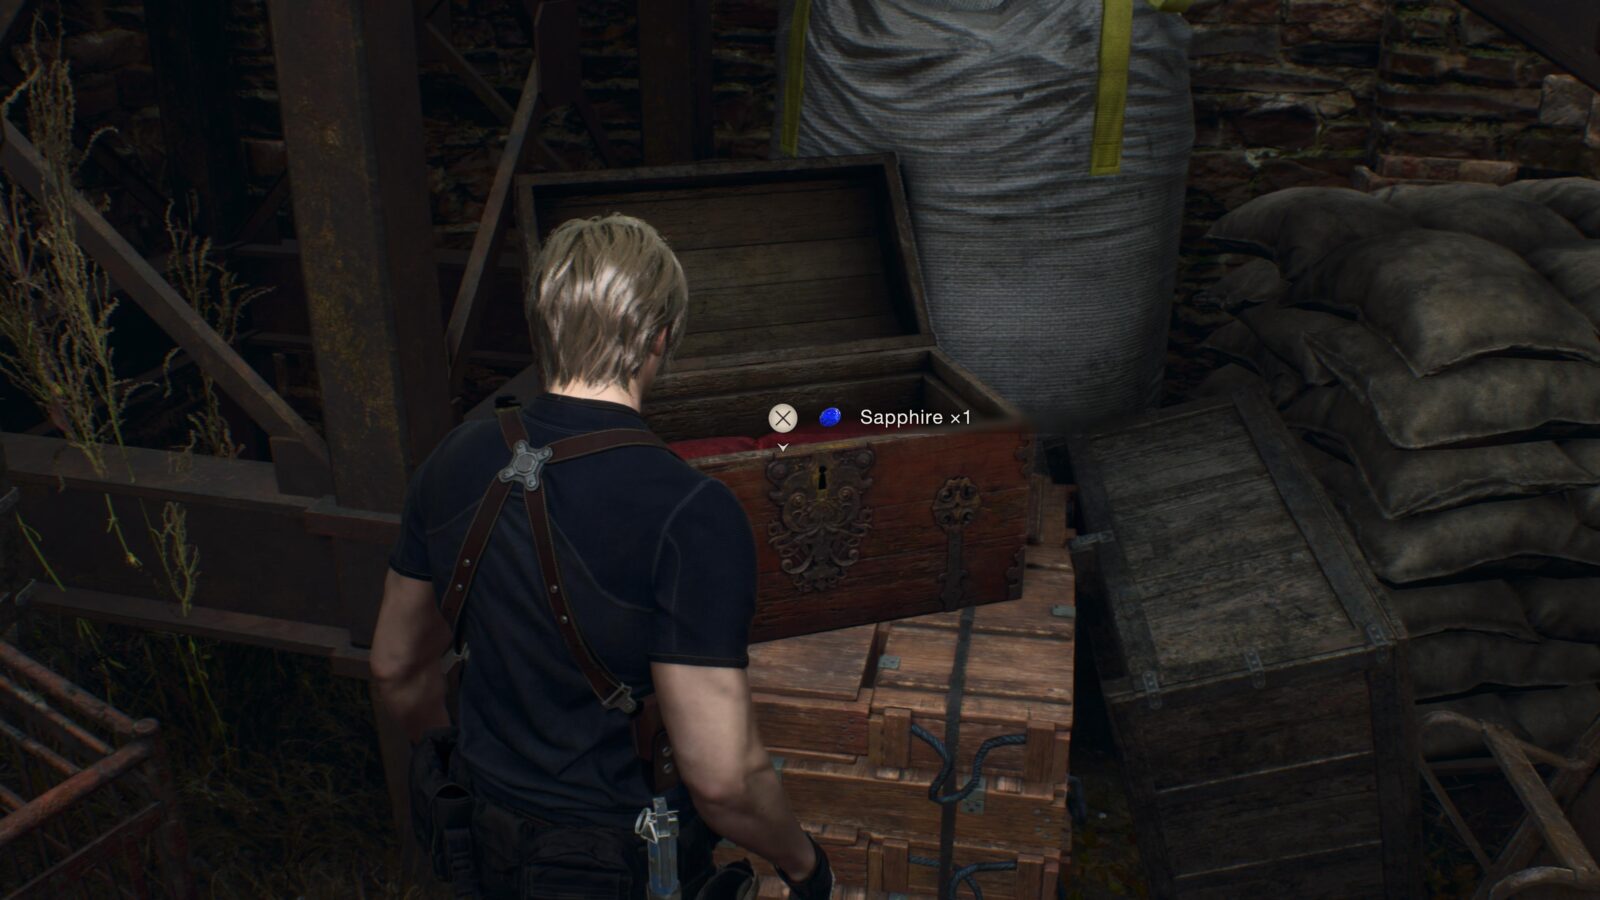
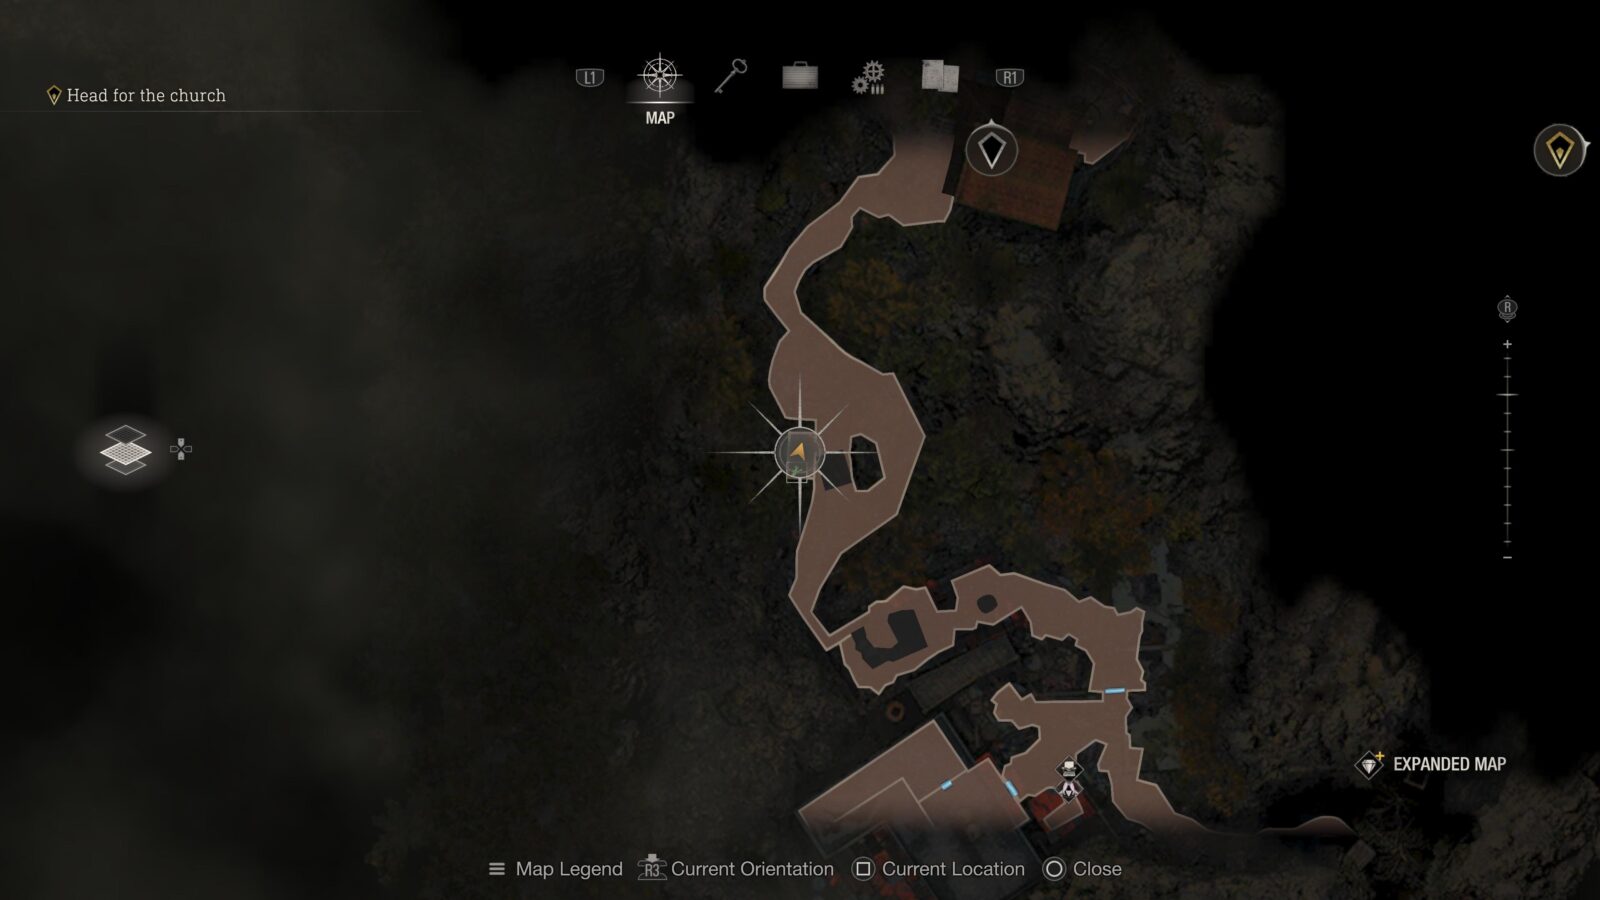
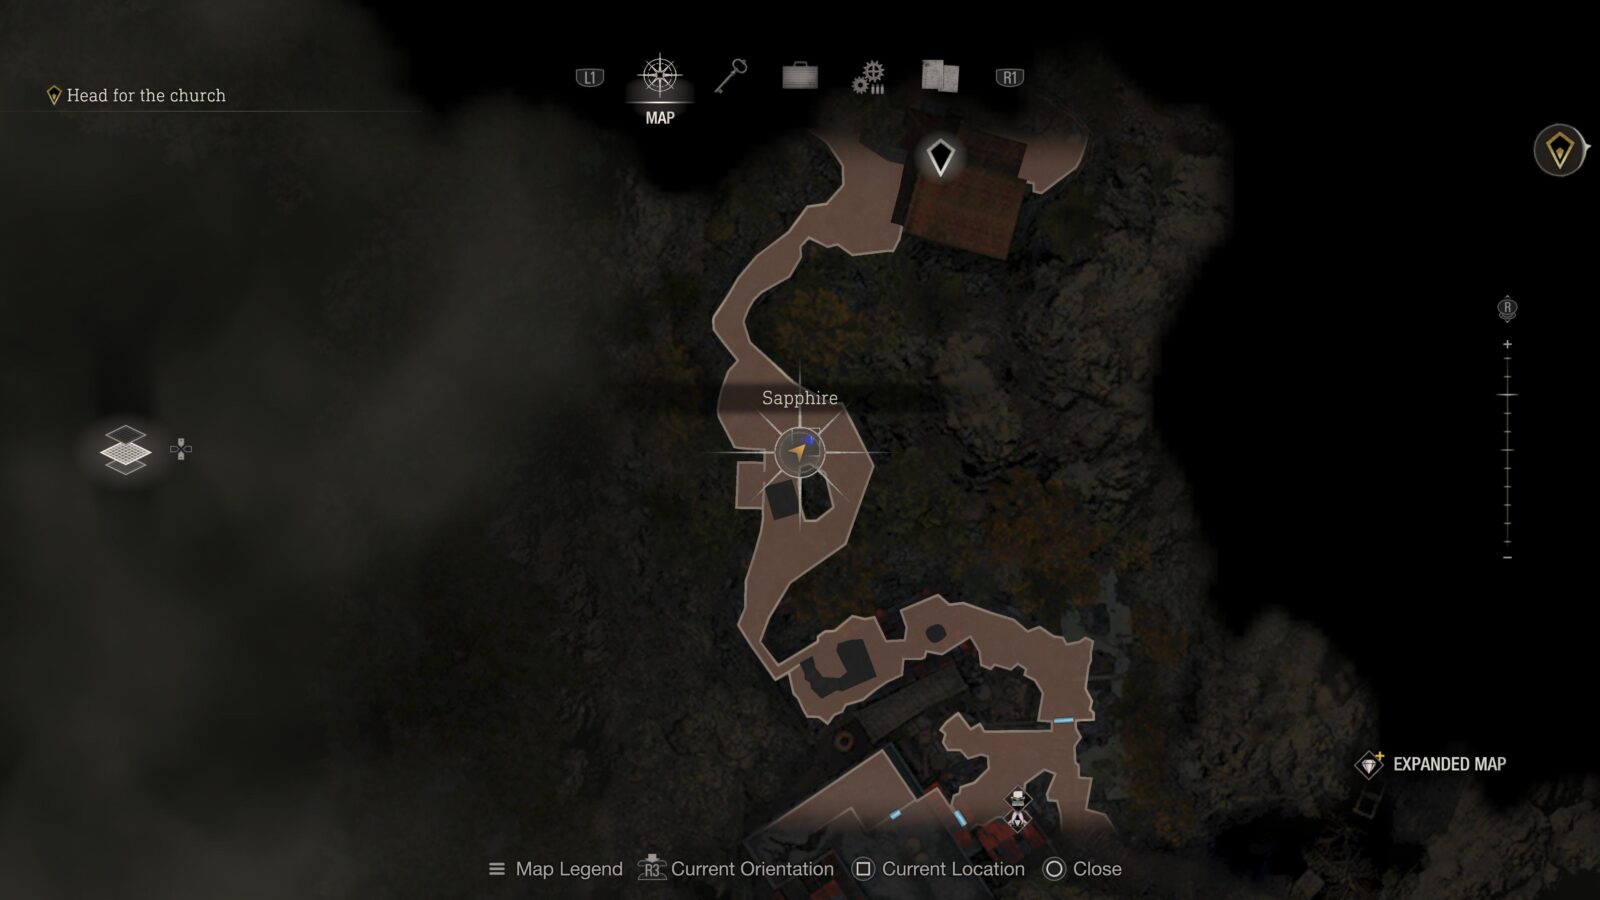
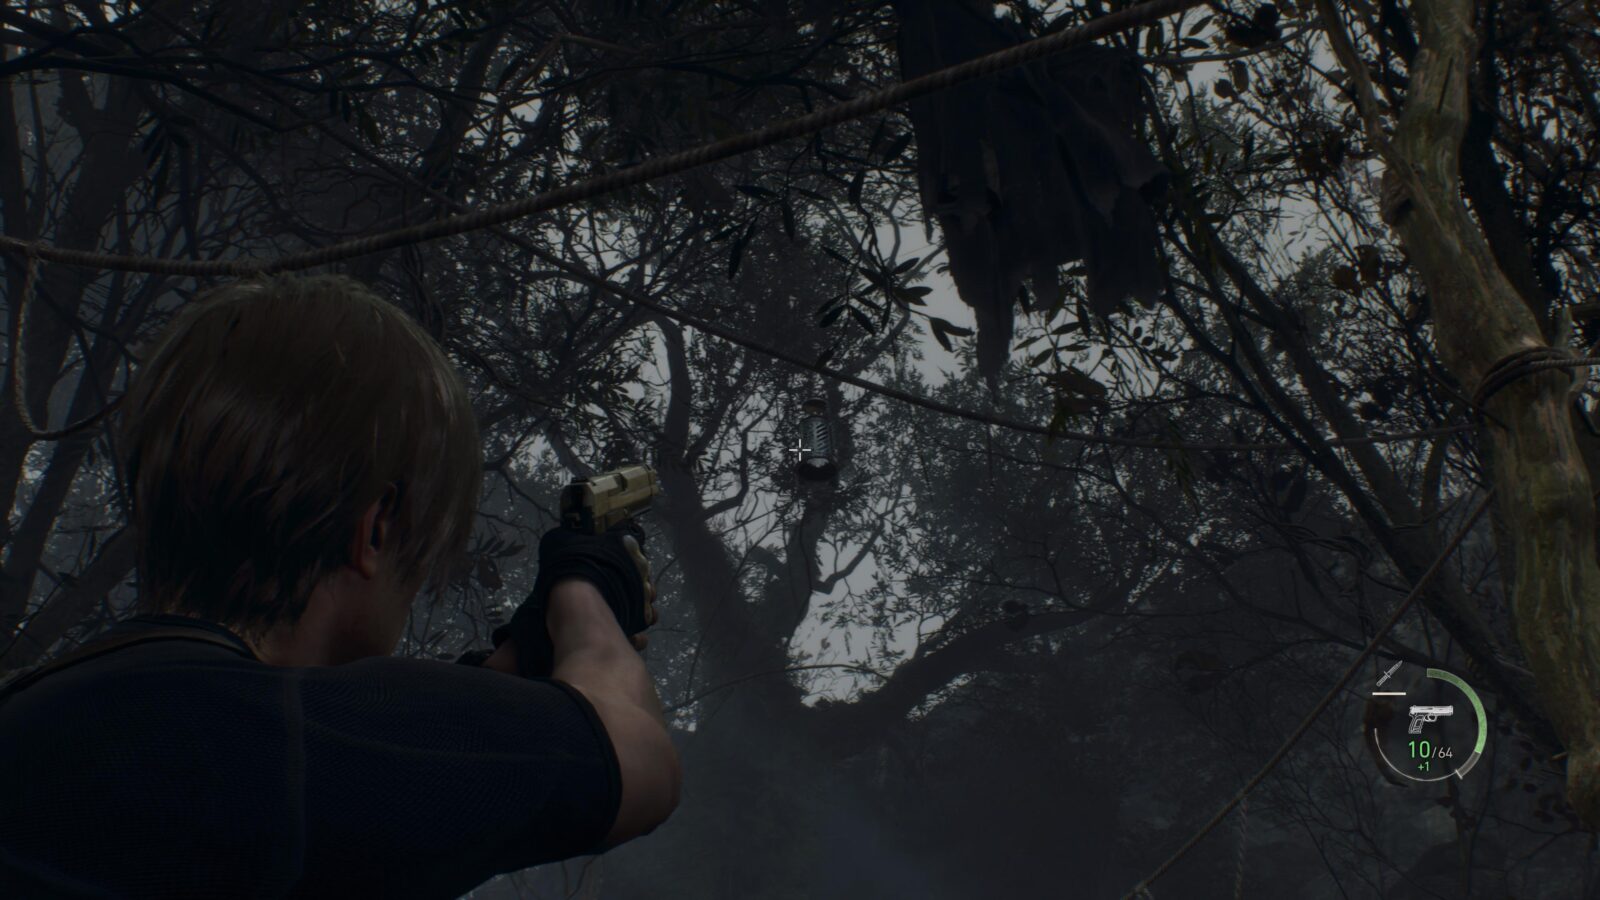
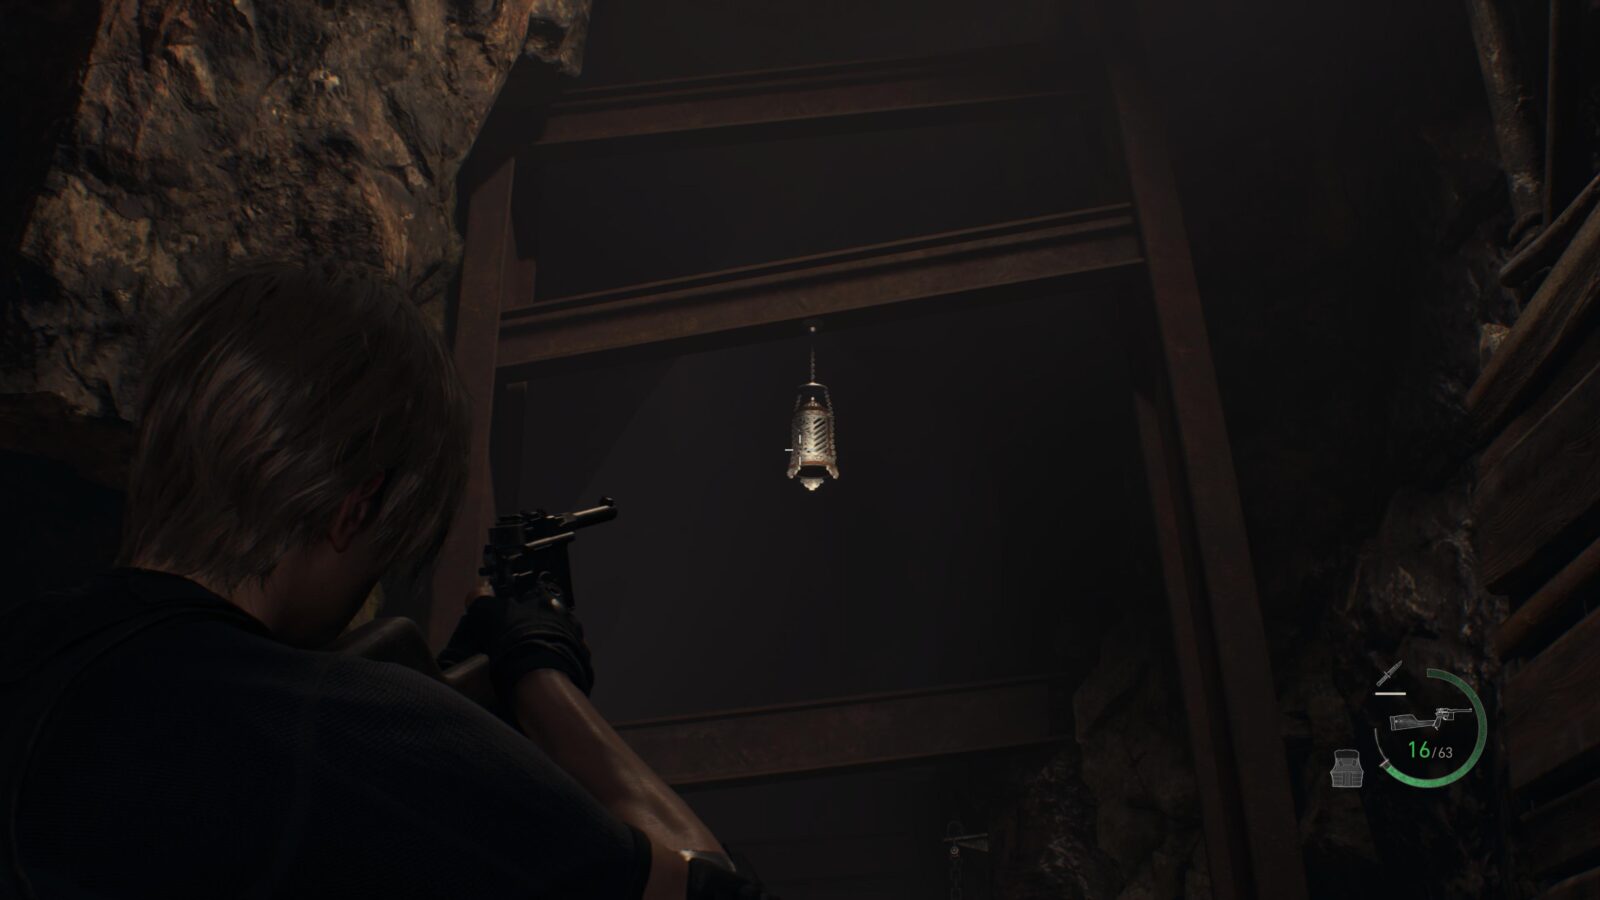
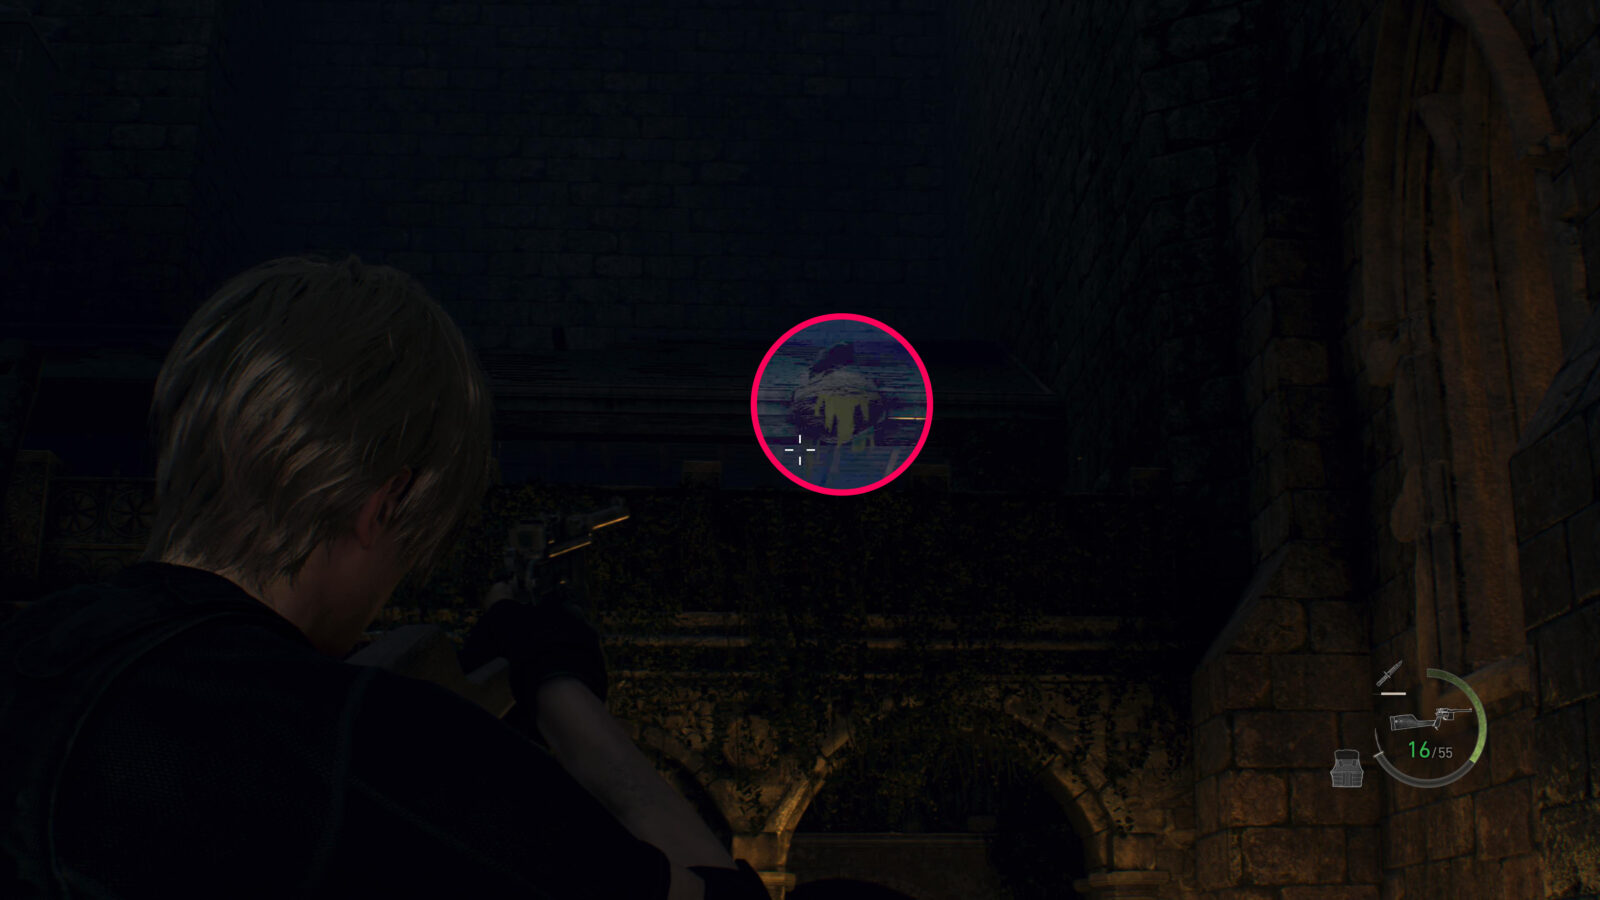
Sapphire (Expanded Treasure)
Hanging from a tree in the middle of the Lakeside Settlement area is an object hanging from a branch. Shoot it down and a sapphire will pop out. This is only available to those who have the Expanded Treasure Map DLC.
Chapter 2
There are a total of 1 Clockwork Castellan, 1 Merchant Request, 1 Small Key (used to unlock locked drawers hiding additional treasure) and 6 Treasures in Chapter 2. This chapter also has 2 Expanded Treasures which can only be obtained with the Expanded Treasure Map DLC.
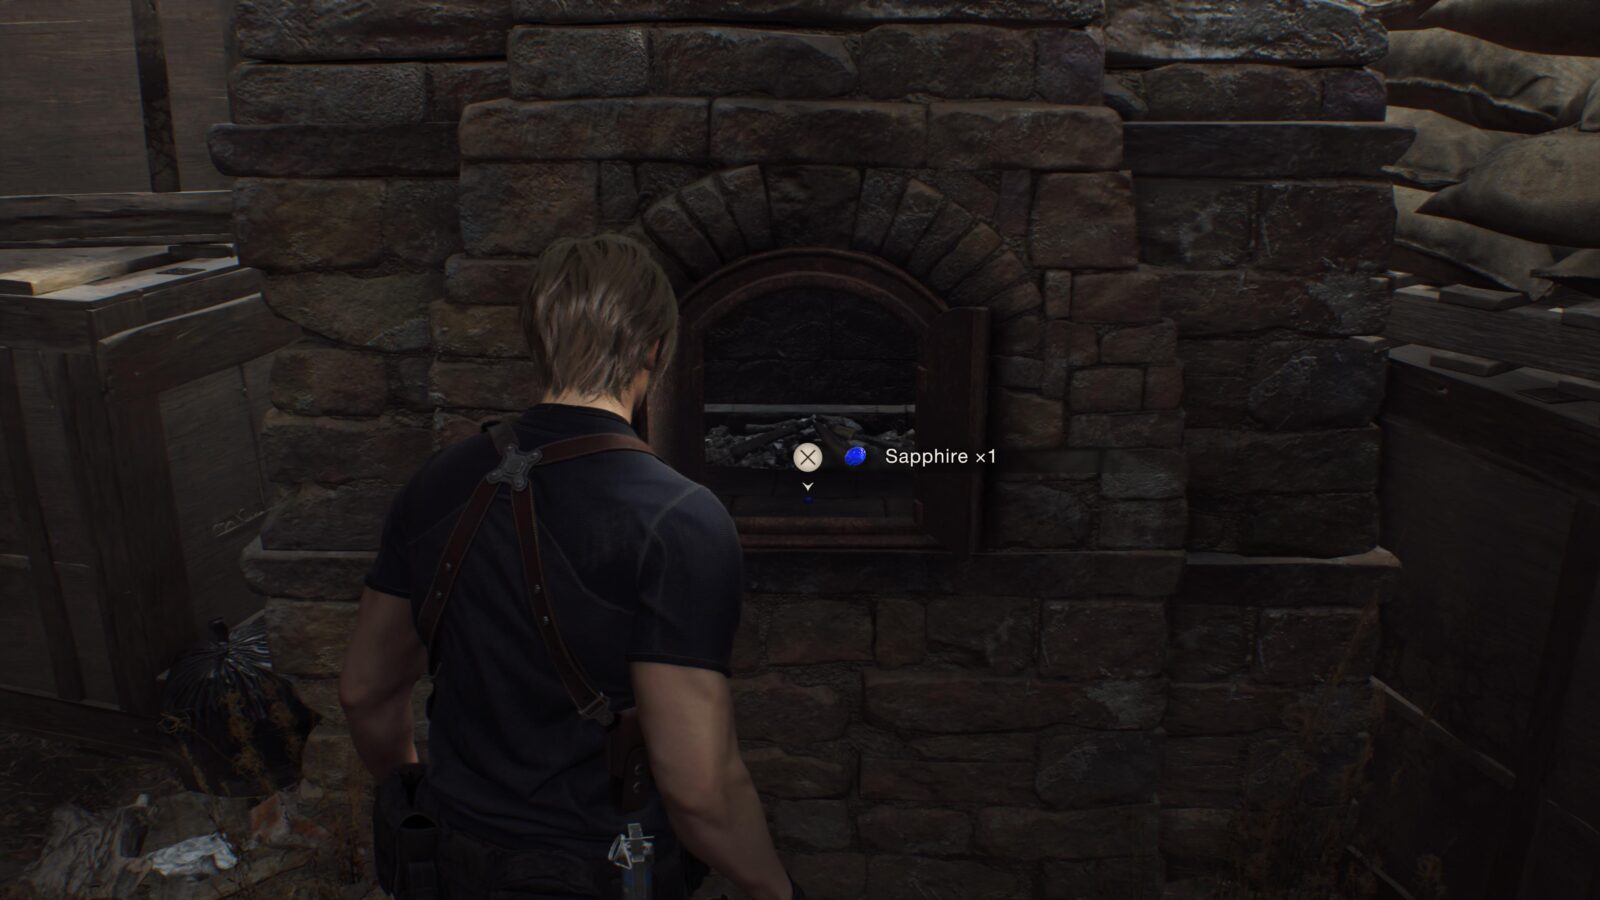
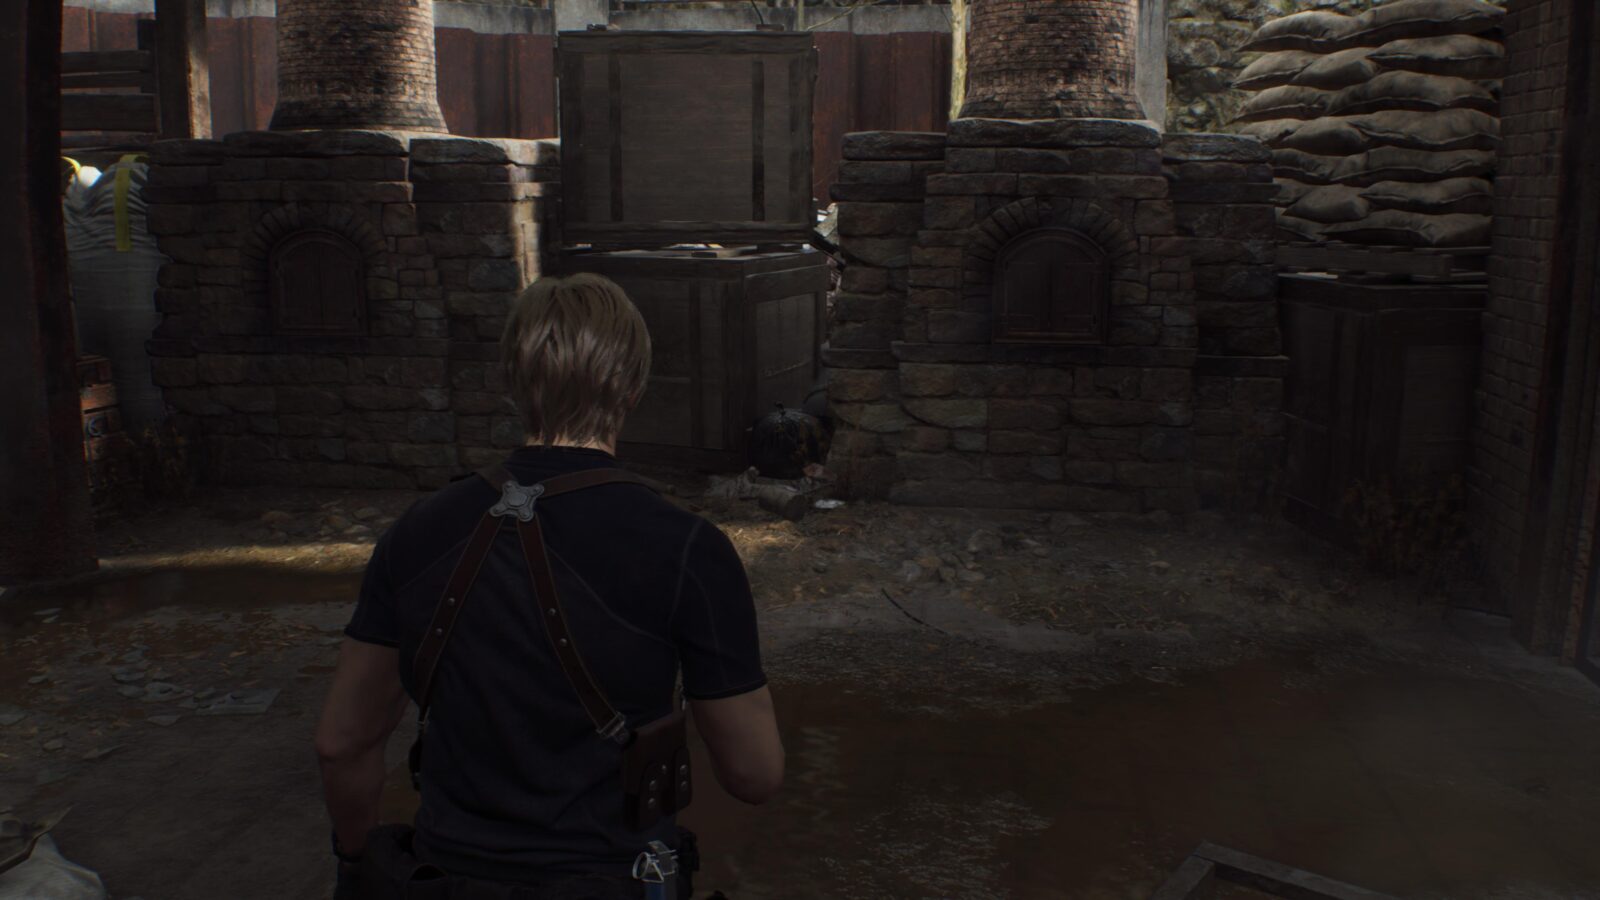
Sapphire
At the start of the chapter you will be sneaking around with a knife. In the room where you kill the 2nd guy there are two large stone ovens. In the one on the right is a sapphire.
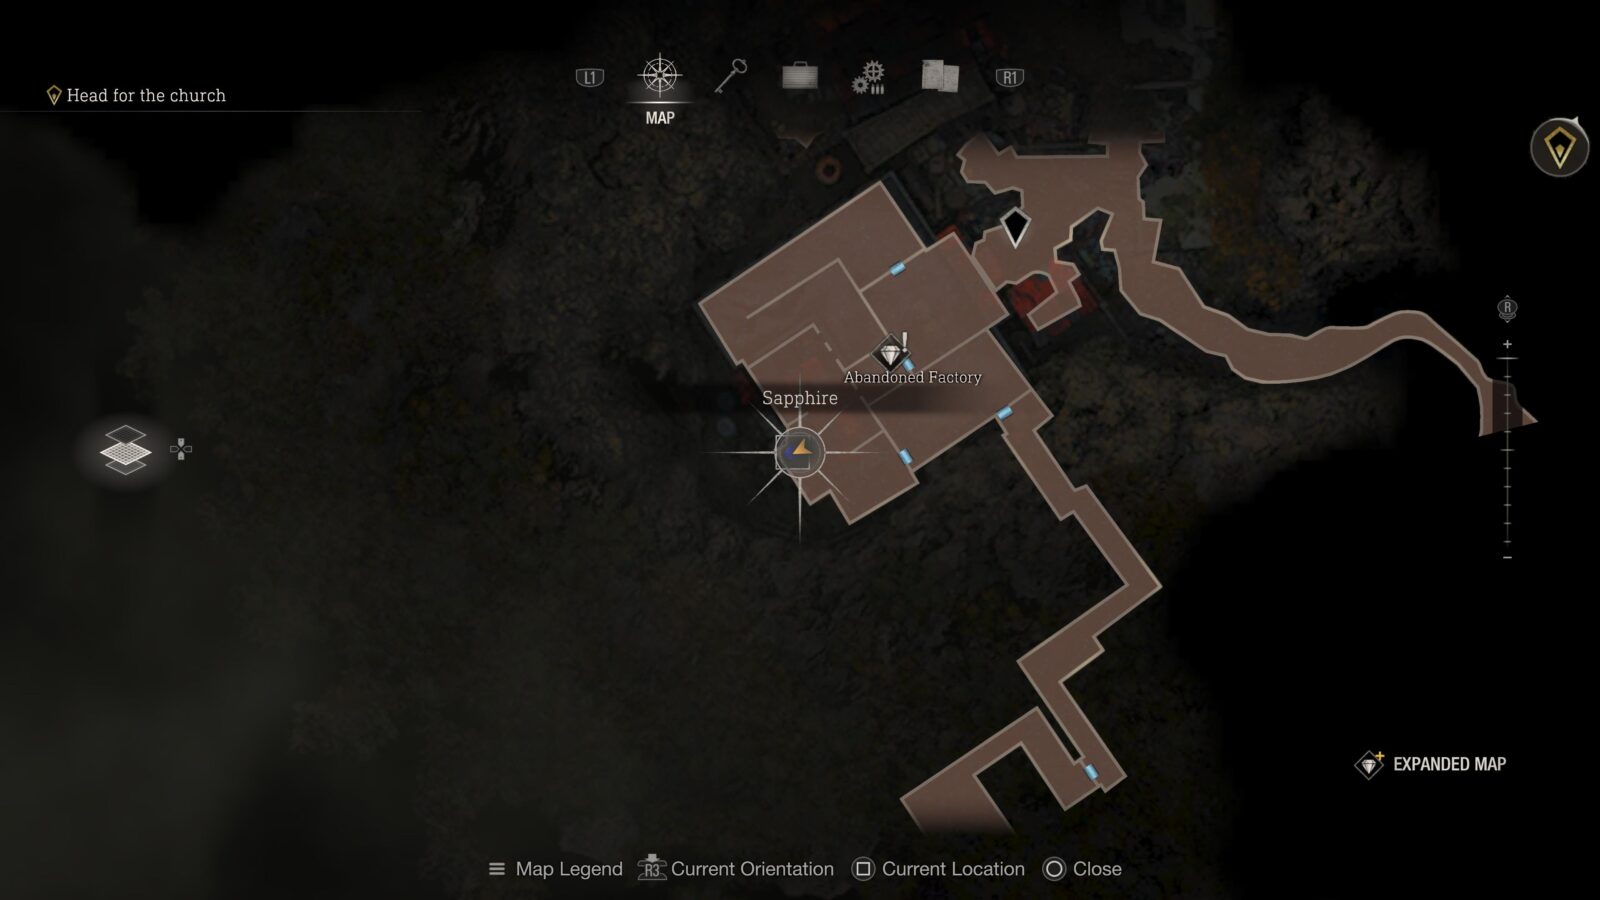
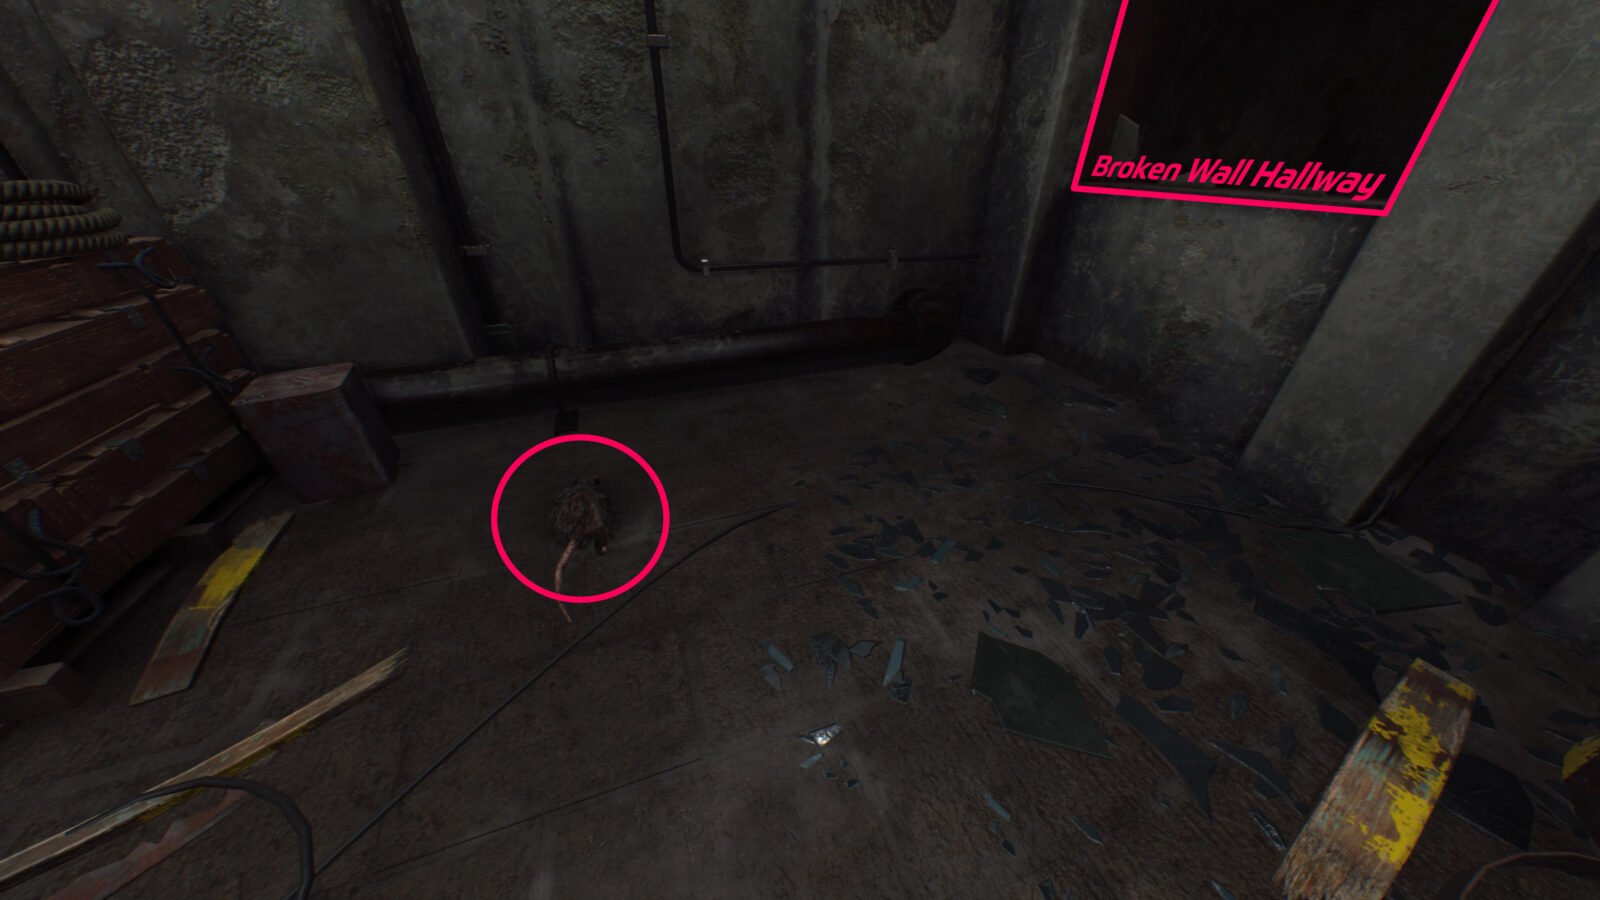
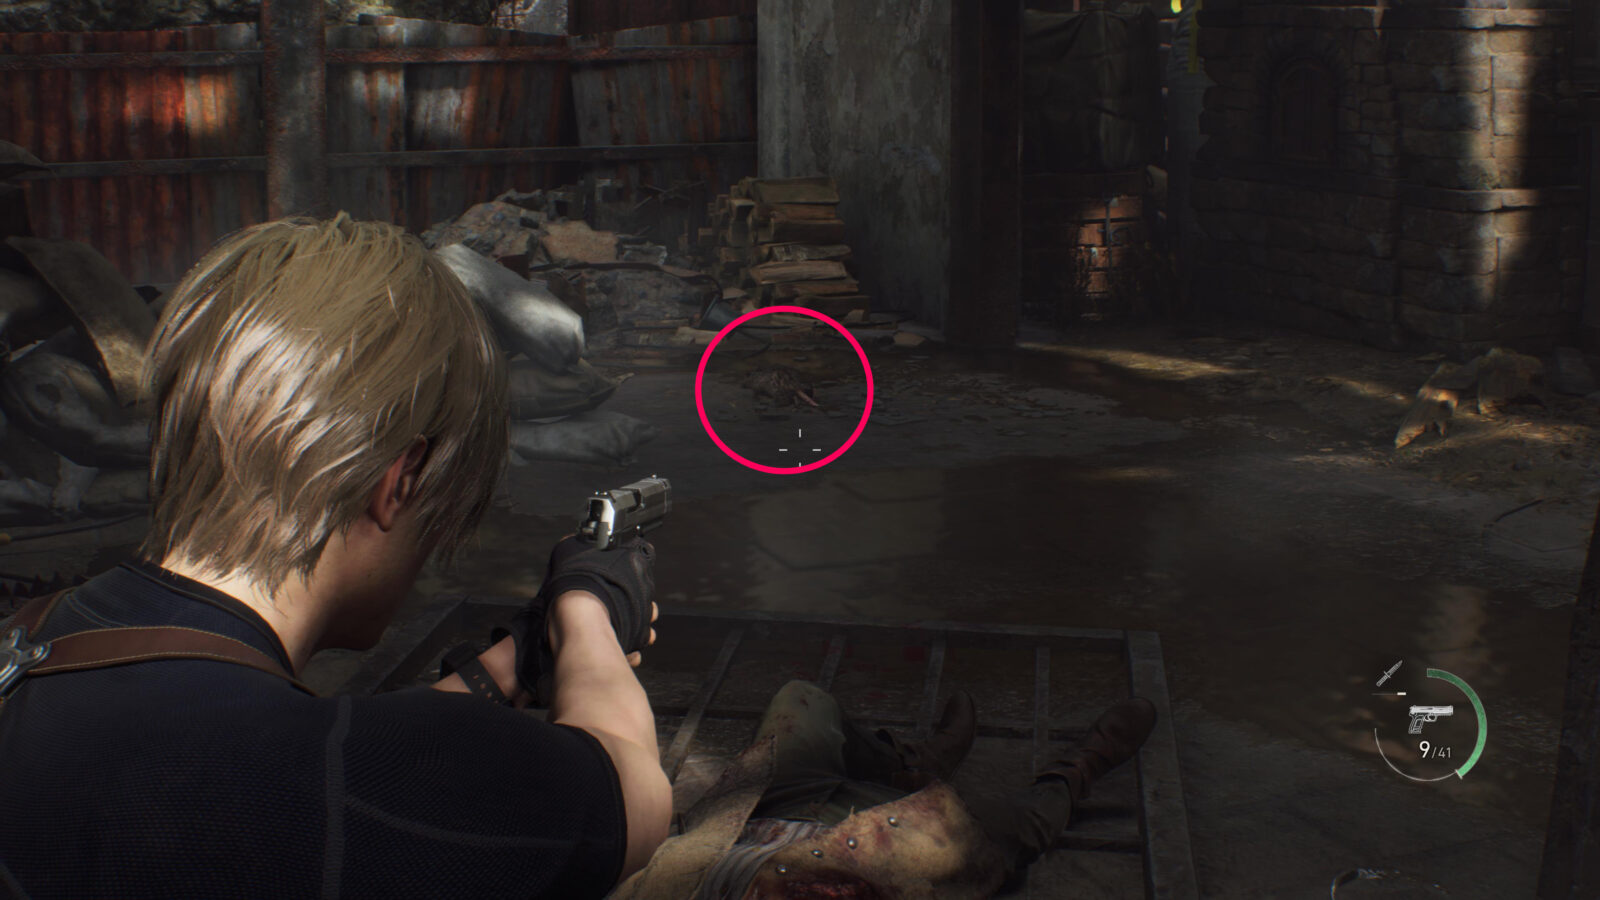
Merchant Request: Pest Control
Just outside the Abandoned Factory where you started the chapter is the Merchant. On the metal object next to him is a new request to kill 3 rats inside the Abandoned Factory. 1 rat is in the hallway with the broken walls you can vault over and the other 2 are in the room with the large stone ovens.


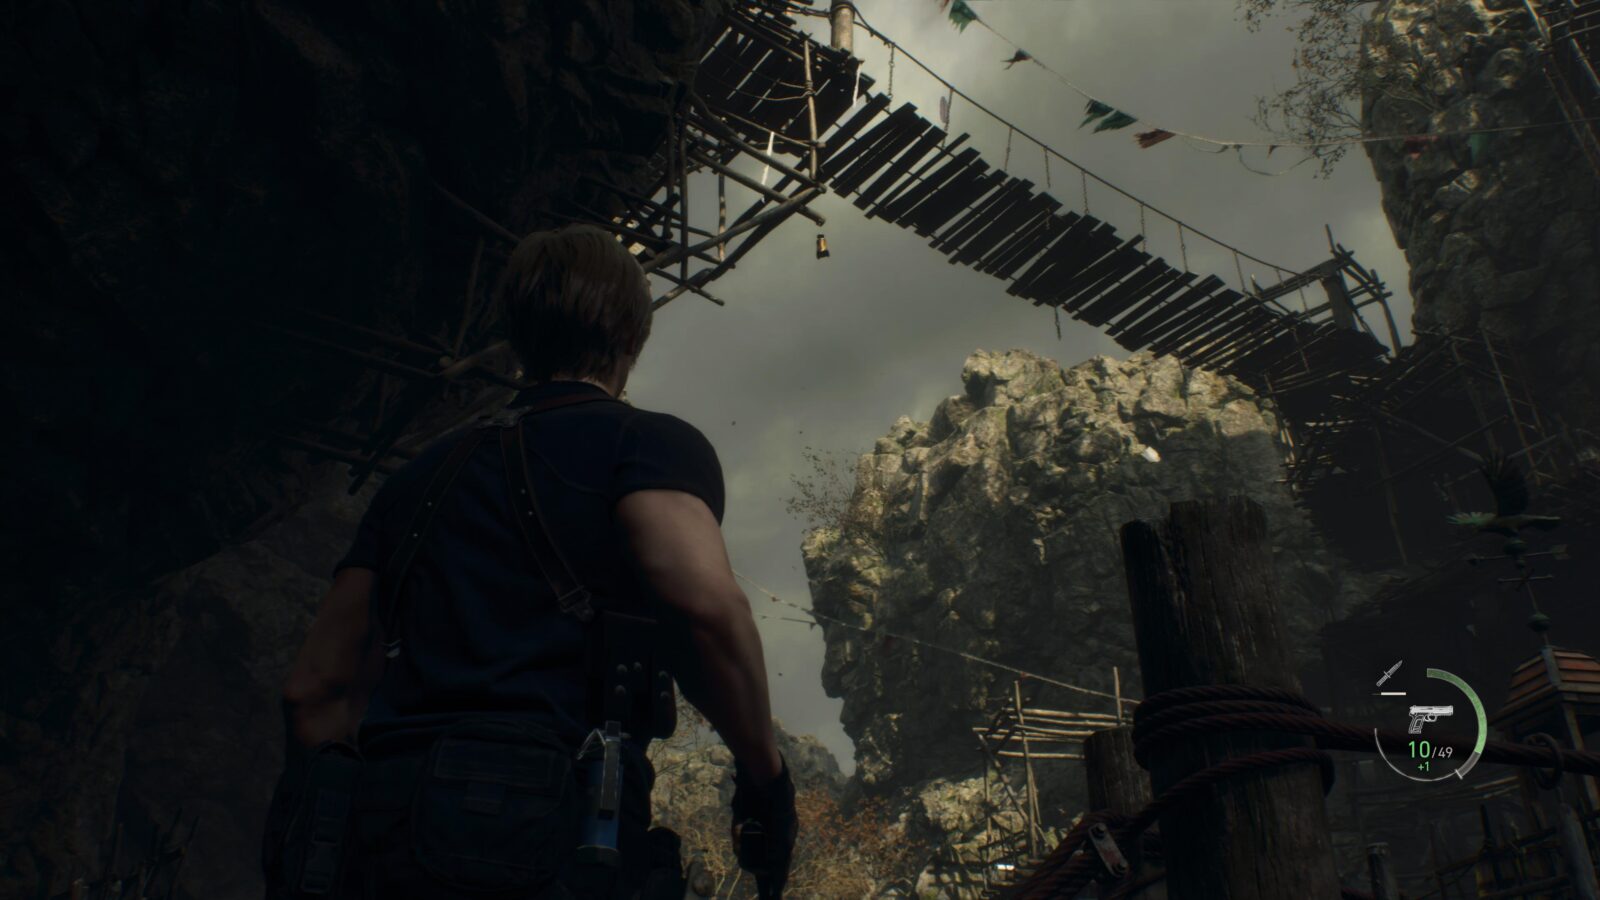
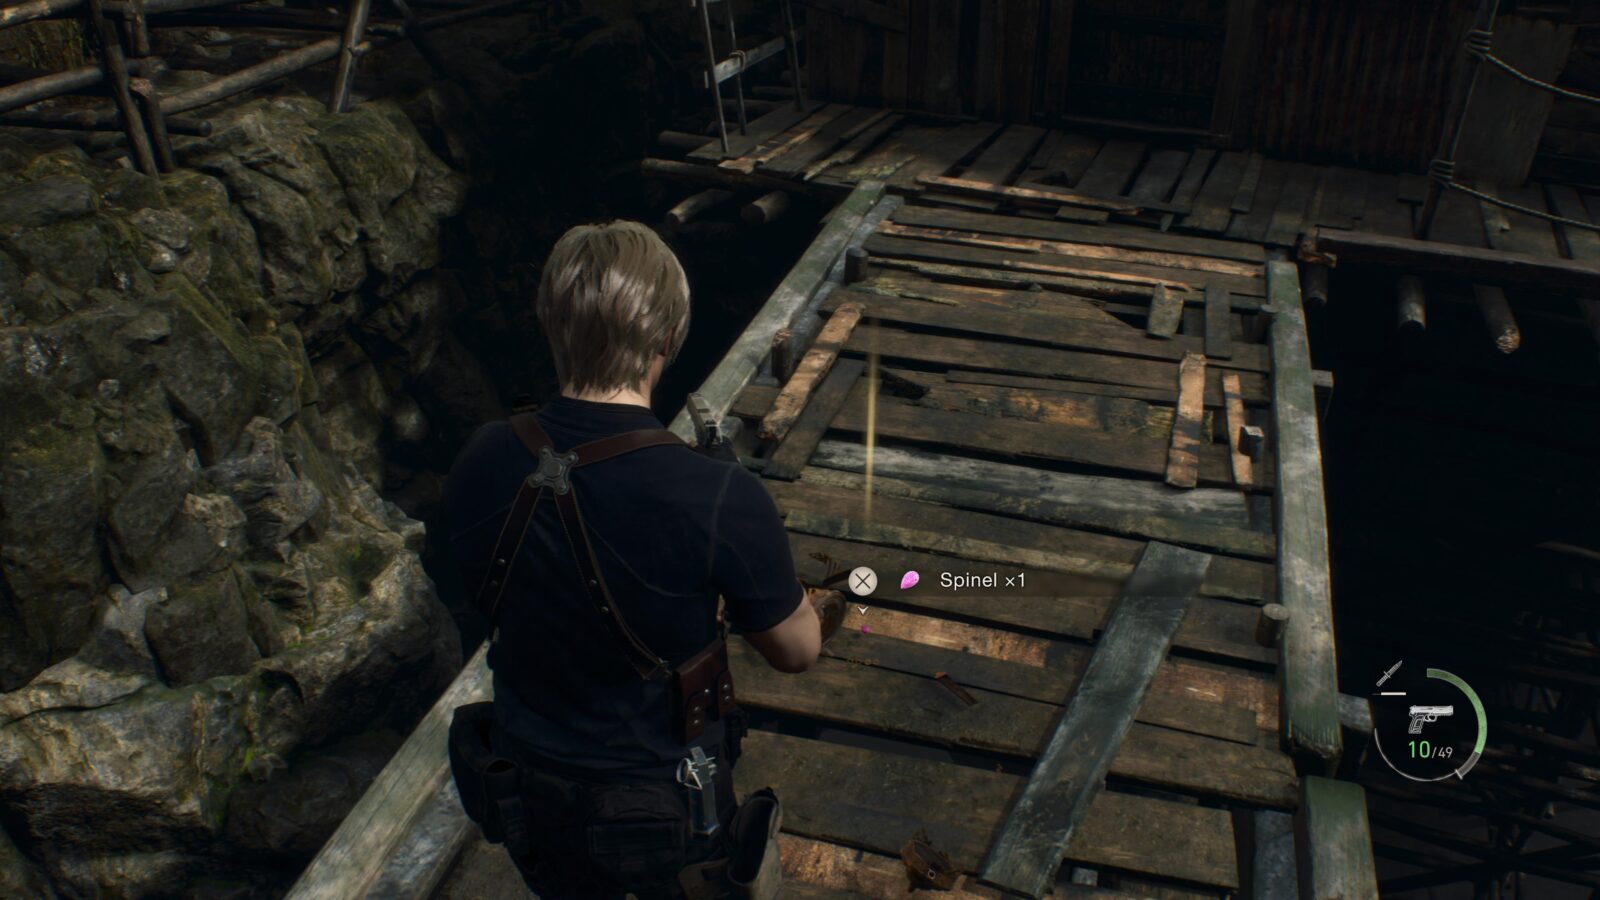
Spinel (Expanded Treasure)
Hanging above the Valley is an object that you can shoot down. When you do shoot it down it will land on the wooden bridge that extends through the middle of the Valley. This is only available to those who have the Expanded Treasure Map DLC.

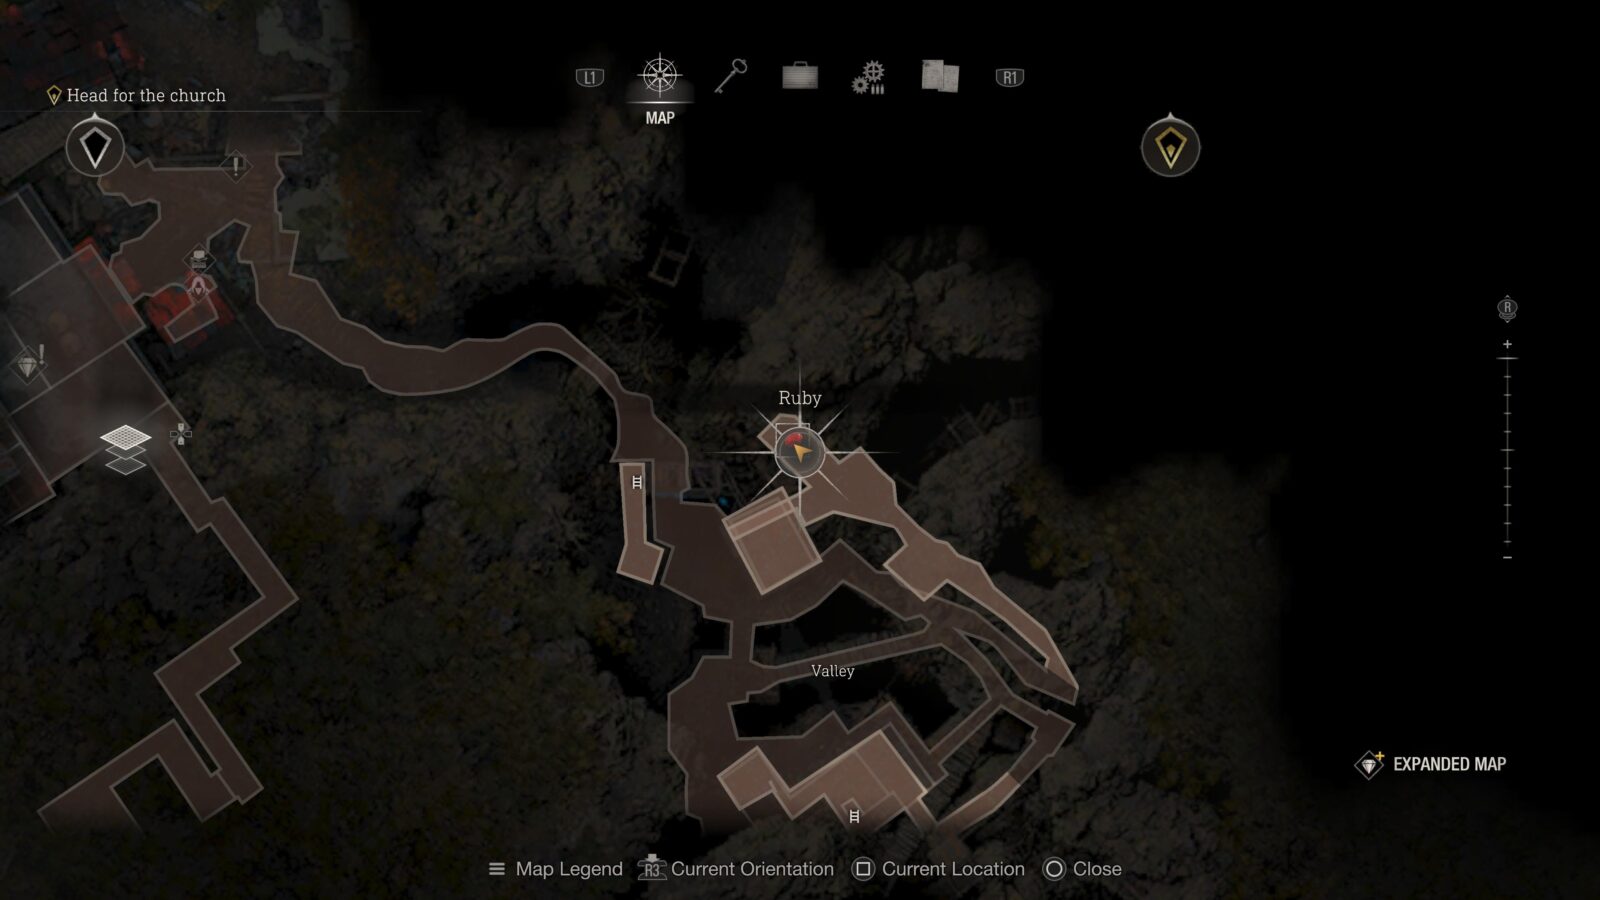
Small Key
In a small room–under where you collect the Hexagonal Emblem key item at the very South of the Valley is a lockbox on a shelf with a Small Key inside. This key will open locked drawers that hide additional treasures.
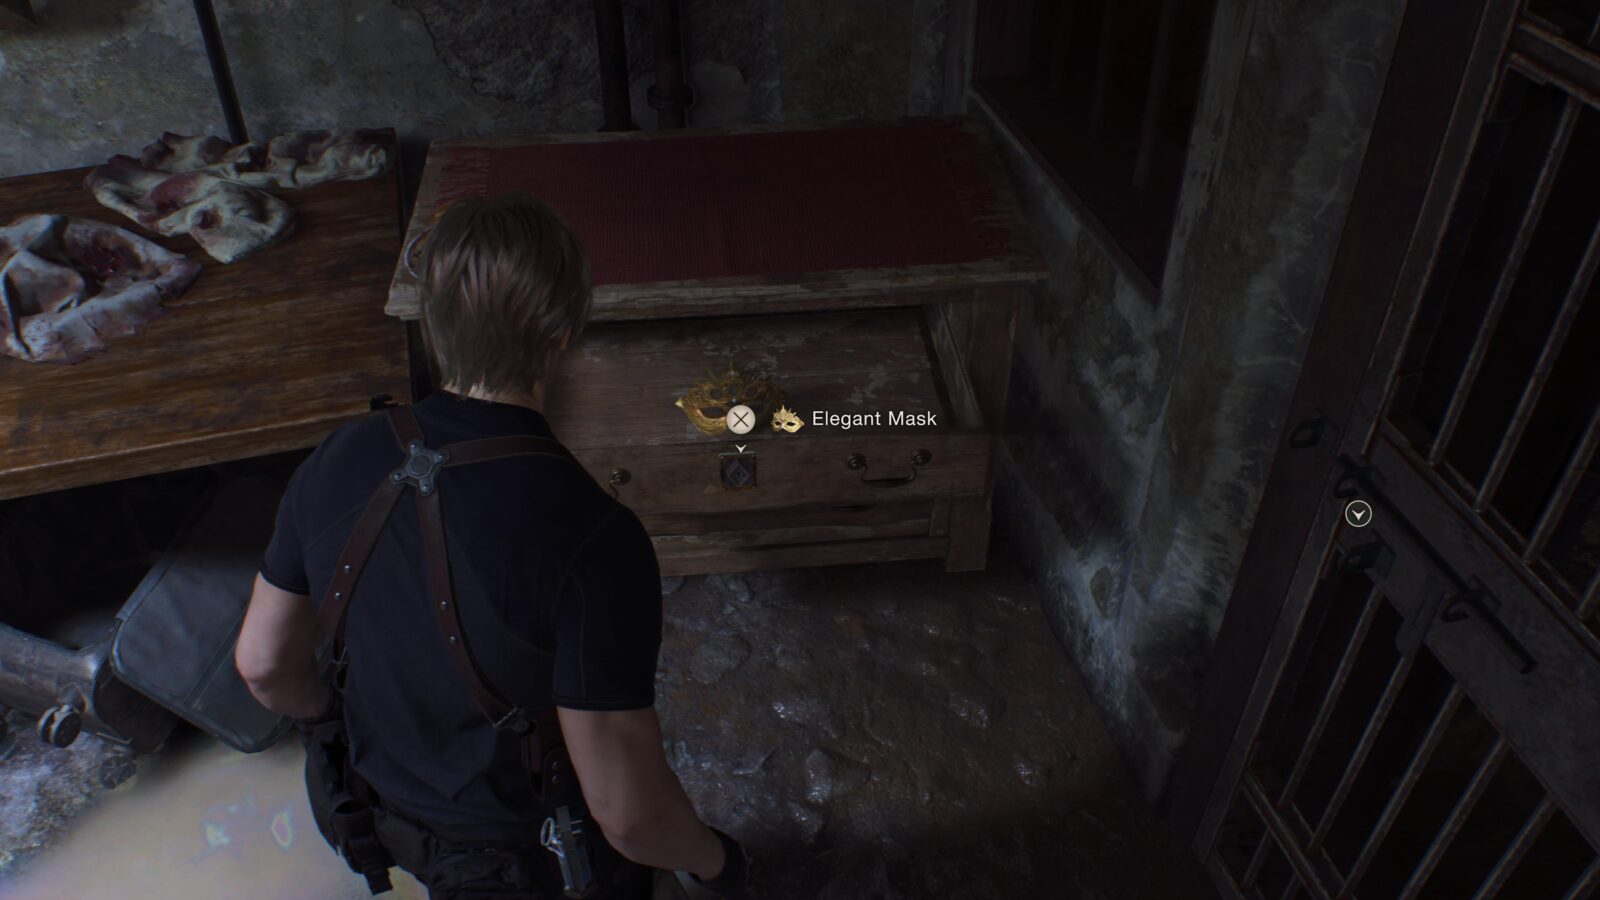
Elegant Mask
Head back to the Merchant and go inside the room where you regained your gear in the Abandoned Factory. Use the Small Key you got just a bit ago to open the locked drawer in this room to find the Elegant Mask which has 3 circular slots.

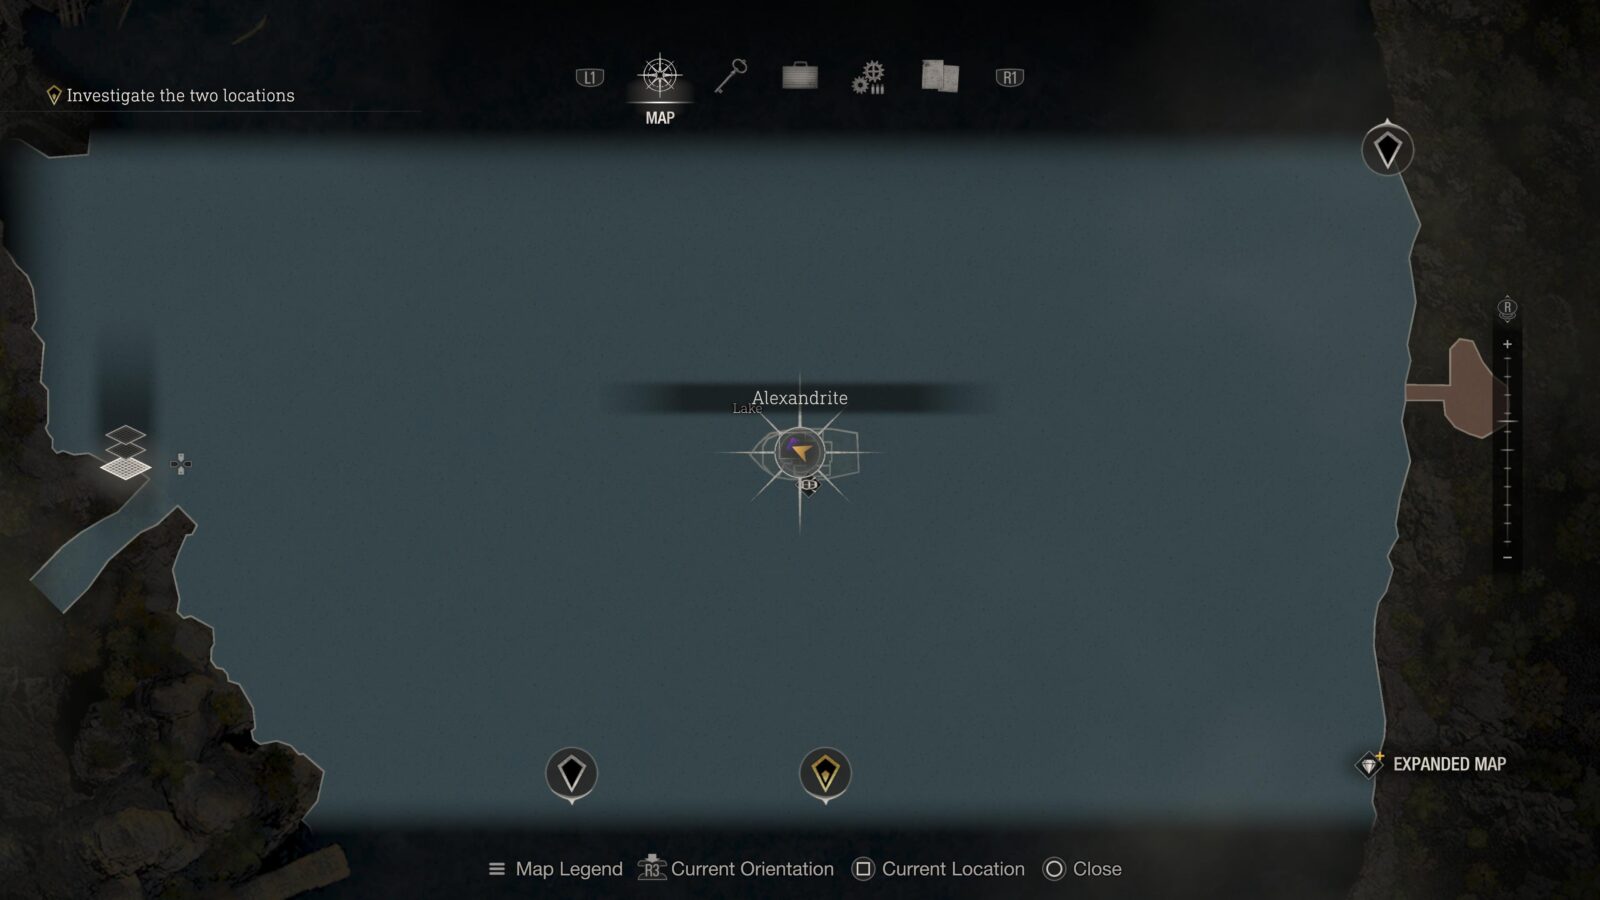
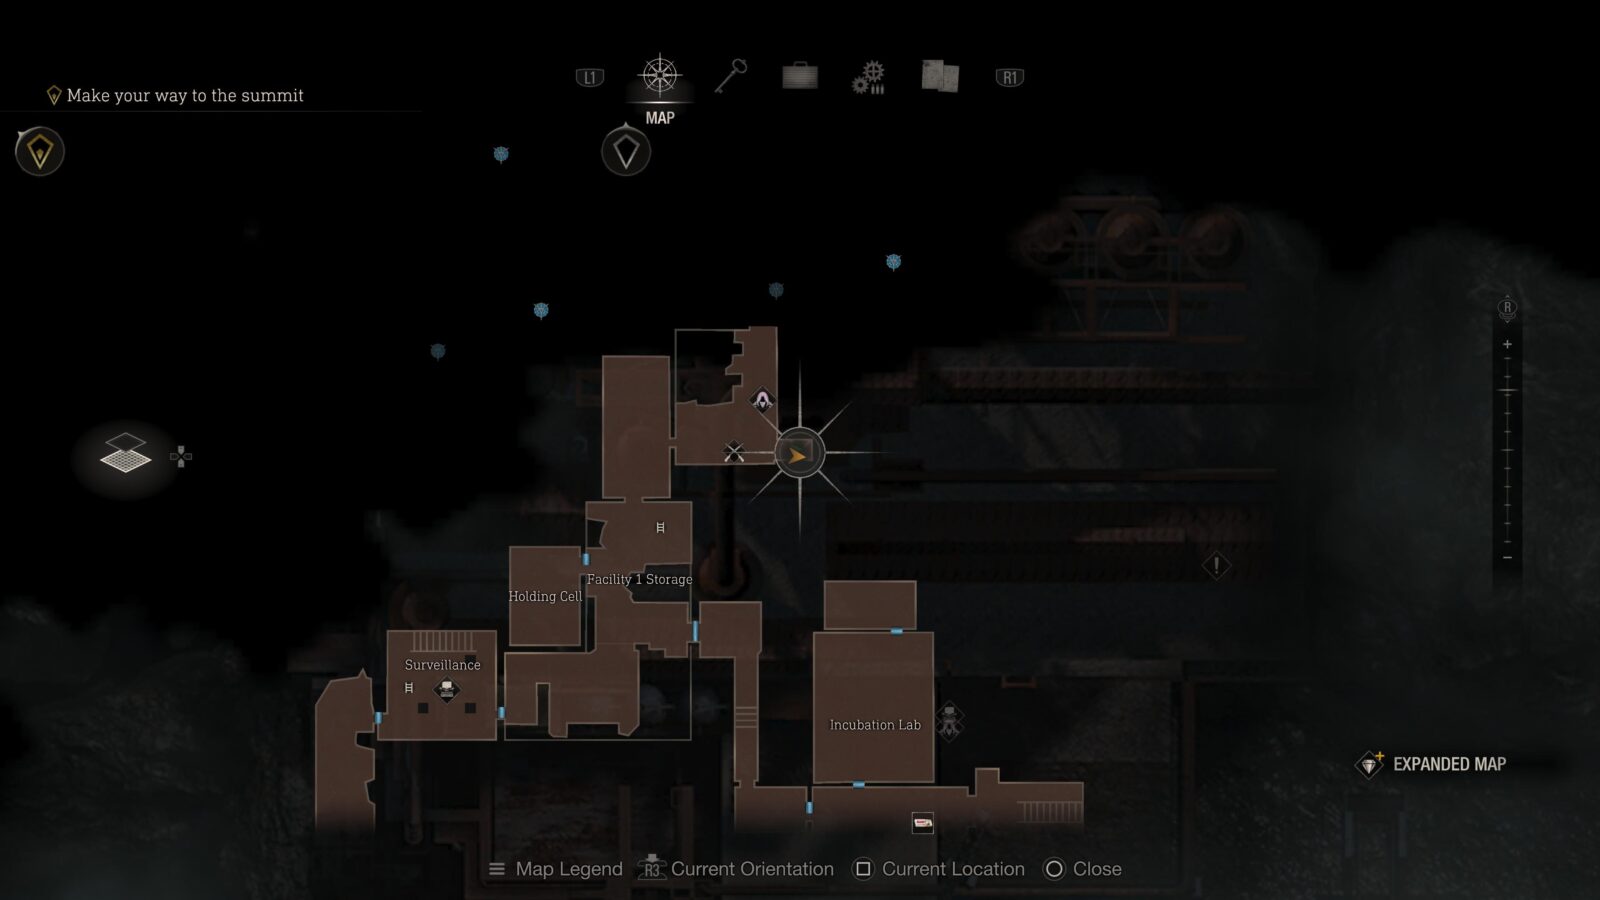
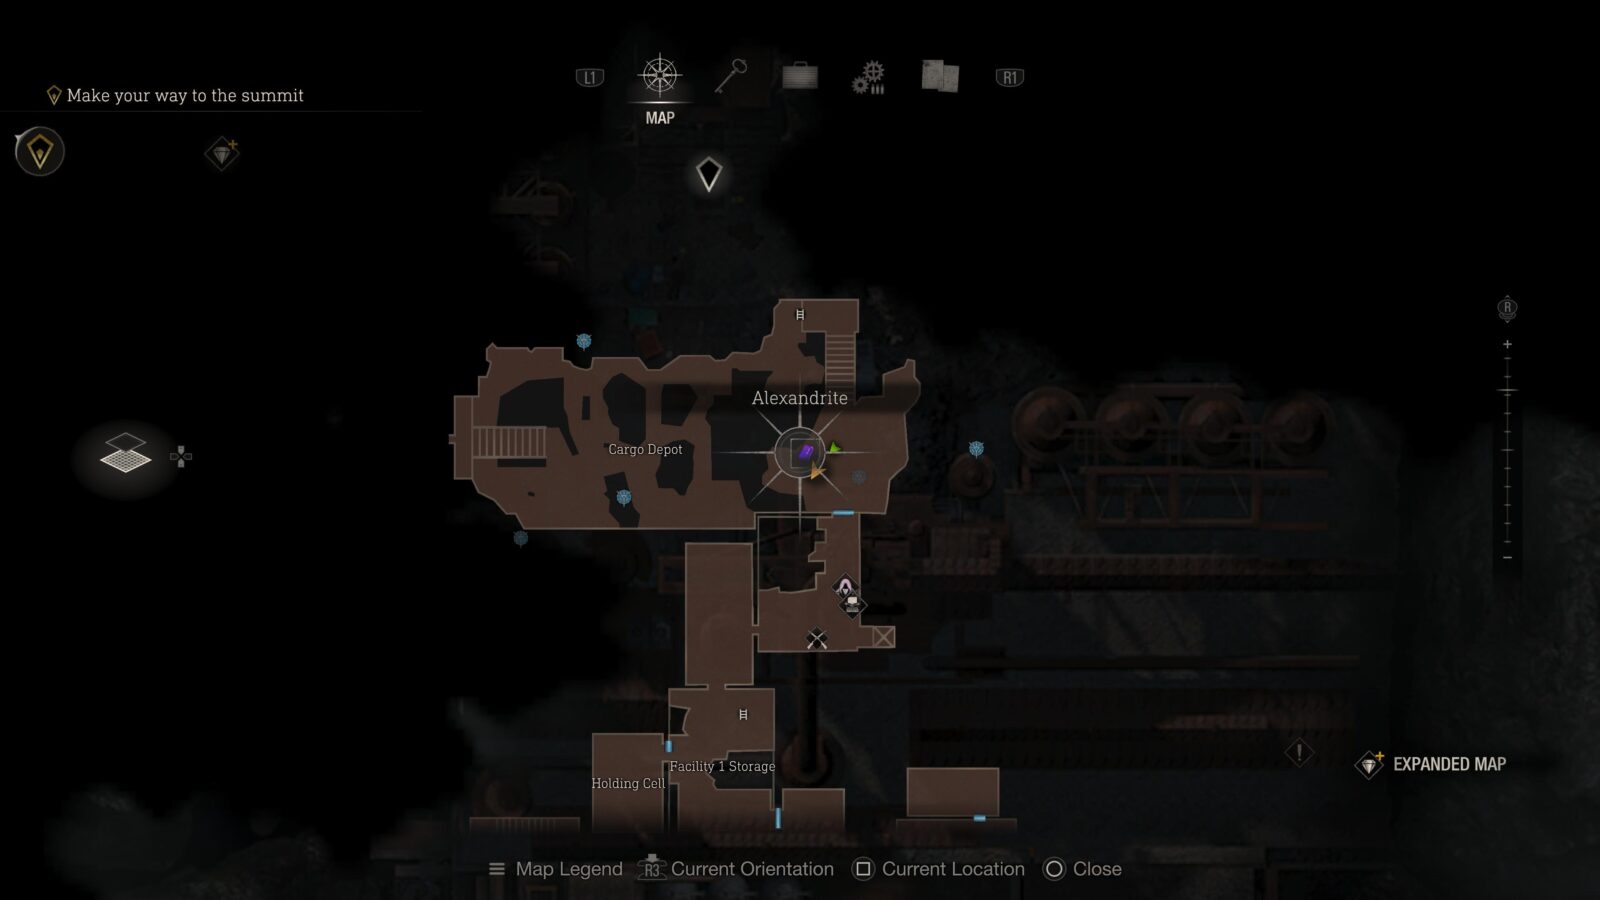
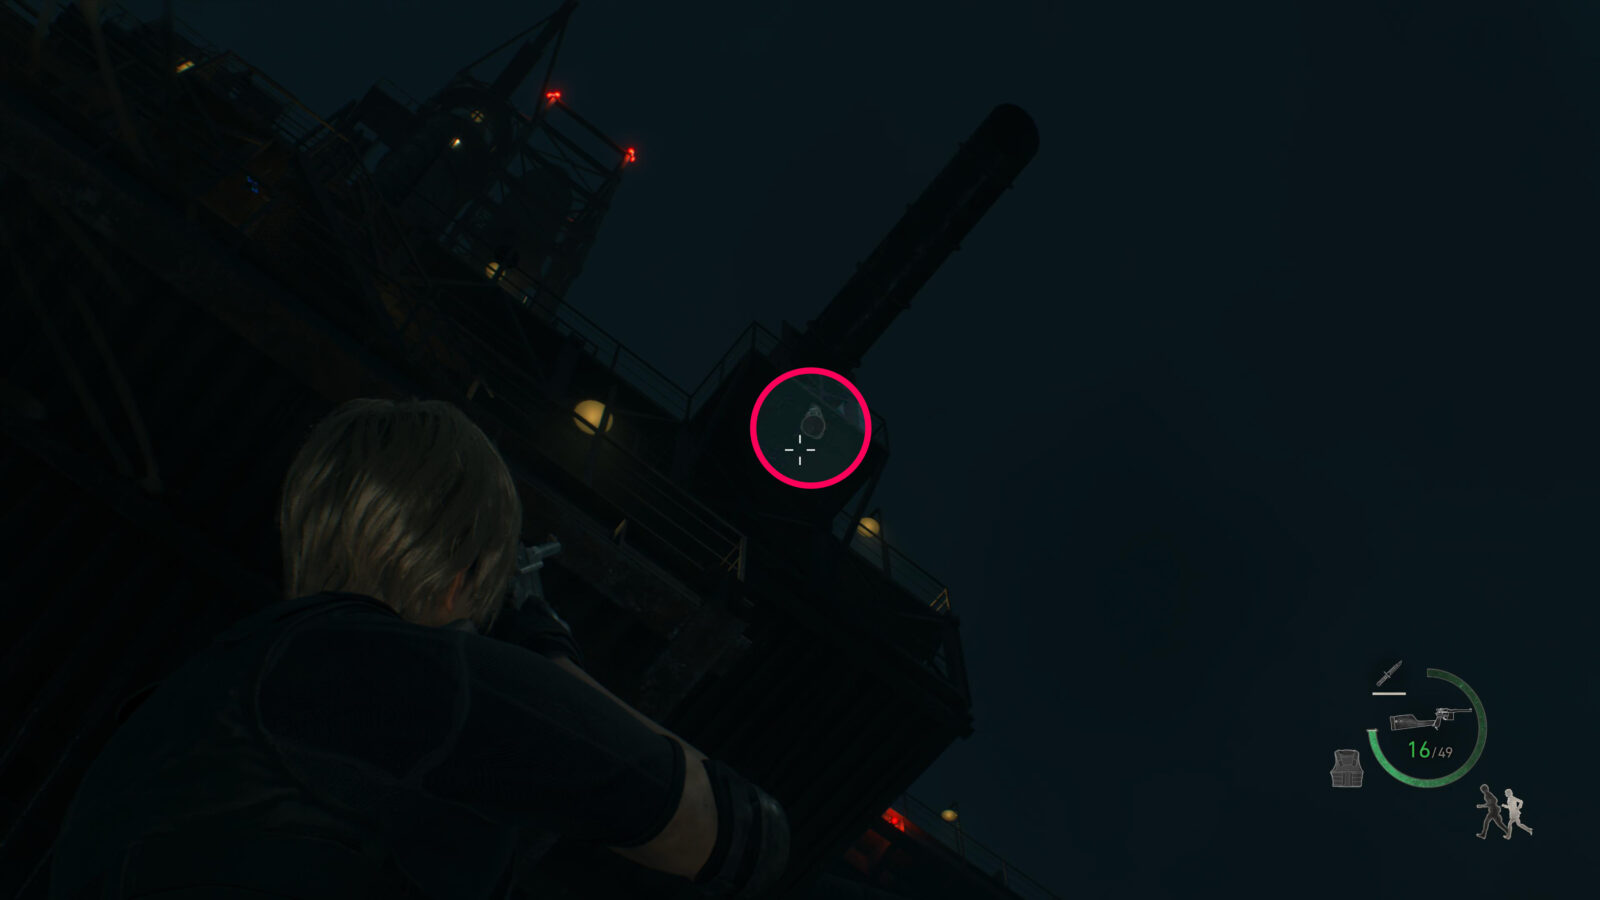
Alexandrite (Expanded Treasure)
Use the Hexagonal Emblem to open the large double doors and immediately look up at the ceiling of the crumbled building in front of you to find a container you can shoot down to reveal an Alexandrite gem. This is only available to those who have the Expanded Treasure Map DLC.

Sapphire
Head through the Hexagonal Emblem door and you will come to an area with some boxes. To the left are some boxed you can duck under and on the other side is a chest with a Sapphire inside.


Clockwork Castellan #2
Head up the metal stairs and you will reach an area with a stone slab (for sacrificing people?). To the left of the stone slab is a wooden shack with a Clockwork Castellan sitting in the doorway.
Sapphire
Between the wooden shack and the stone slab is a metal container hanging from a tree you can shoot down to get a sapphire.
Pearl Pendant
In the same area as the Sapphire and Clockwork Castellan is another Pearl Pendant. Just like the last one this can get dirtied if you aren’t careful. Look for a well with a metal container hanging from it. Shoot the wooden stick holding up the lid on the well and then shoot the container. This way the Pearl Pendant stays clean and you can sell it for more.


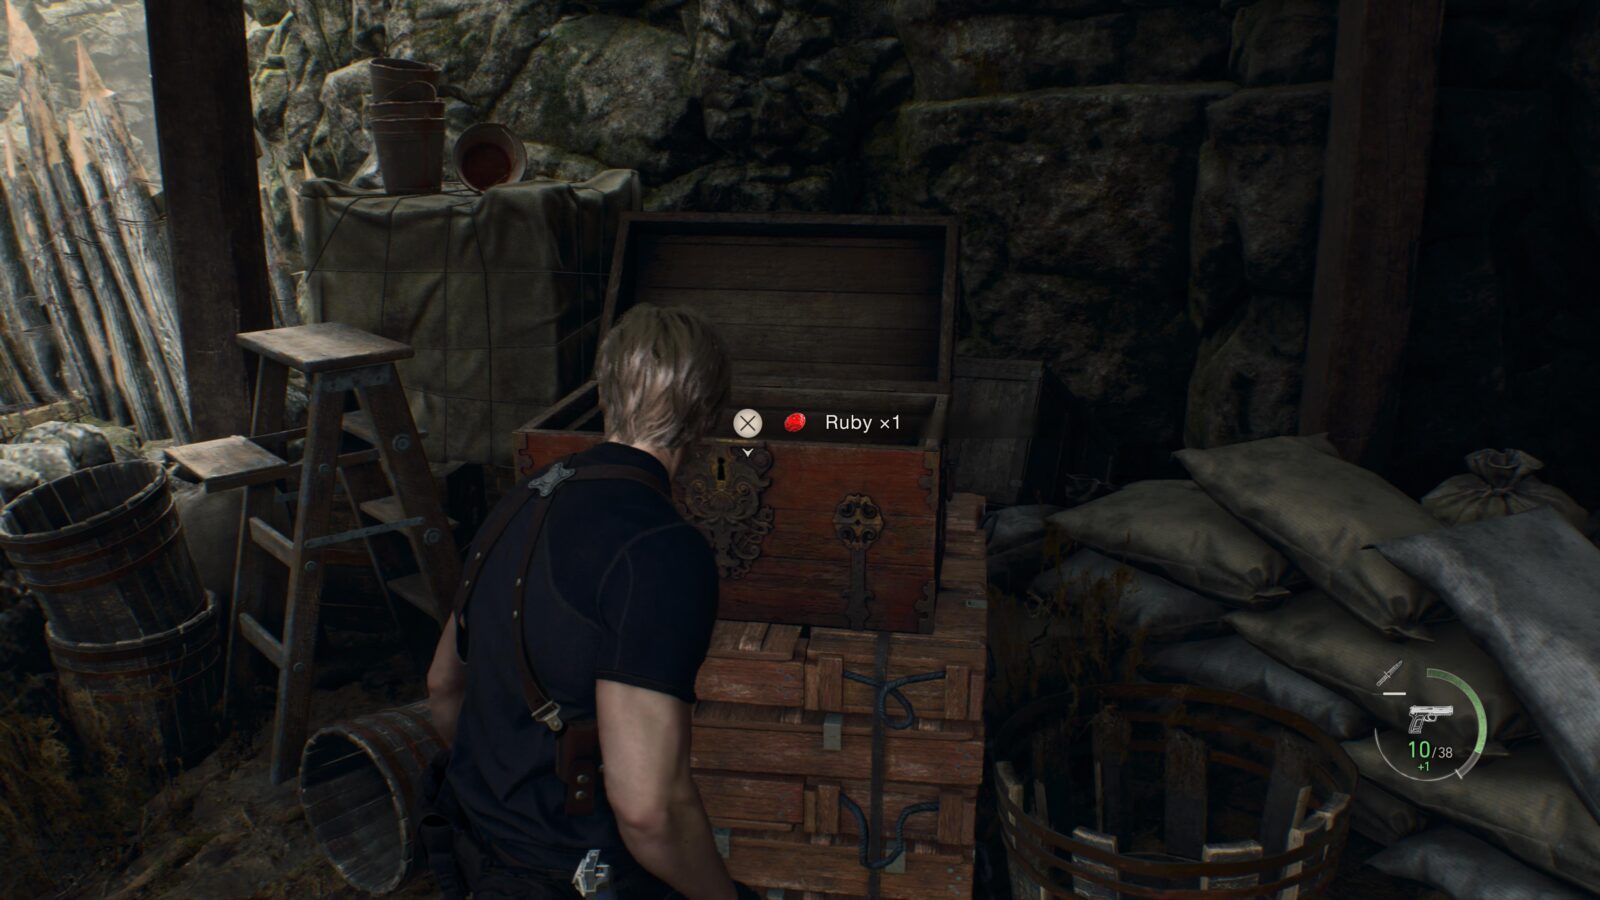
Ruby
Inside the Village Chief’s Manor is a ruby in a desk at the foot of the stairs.
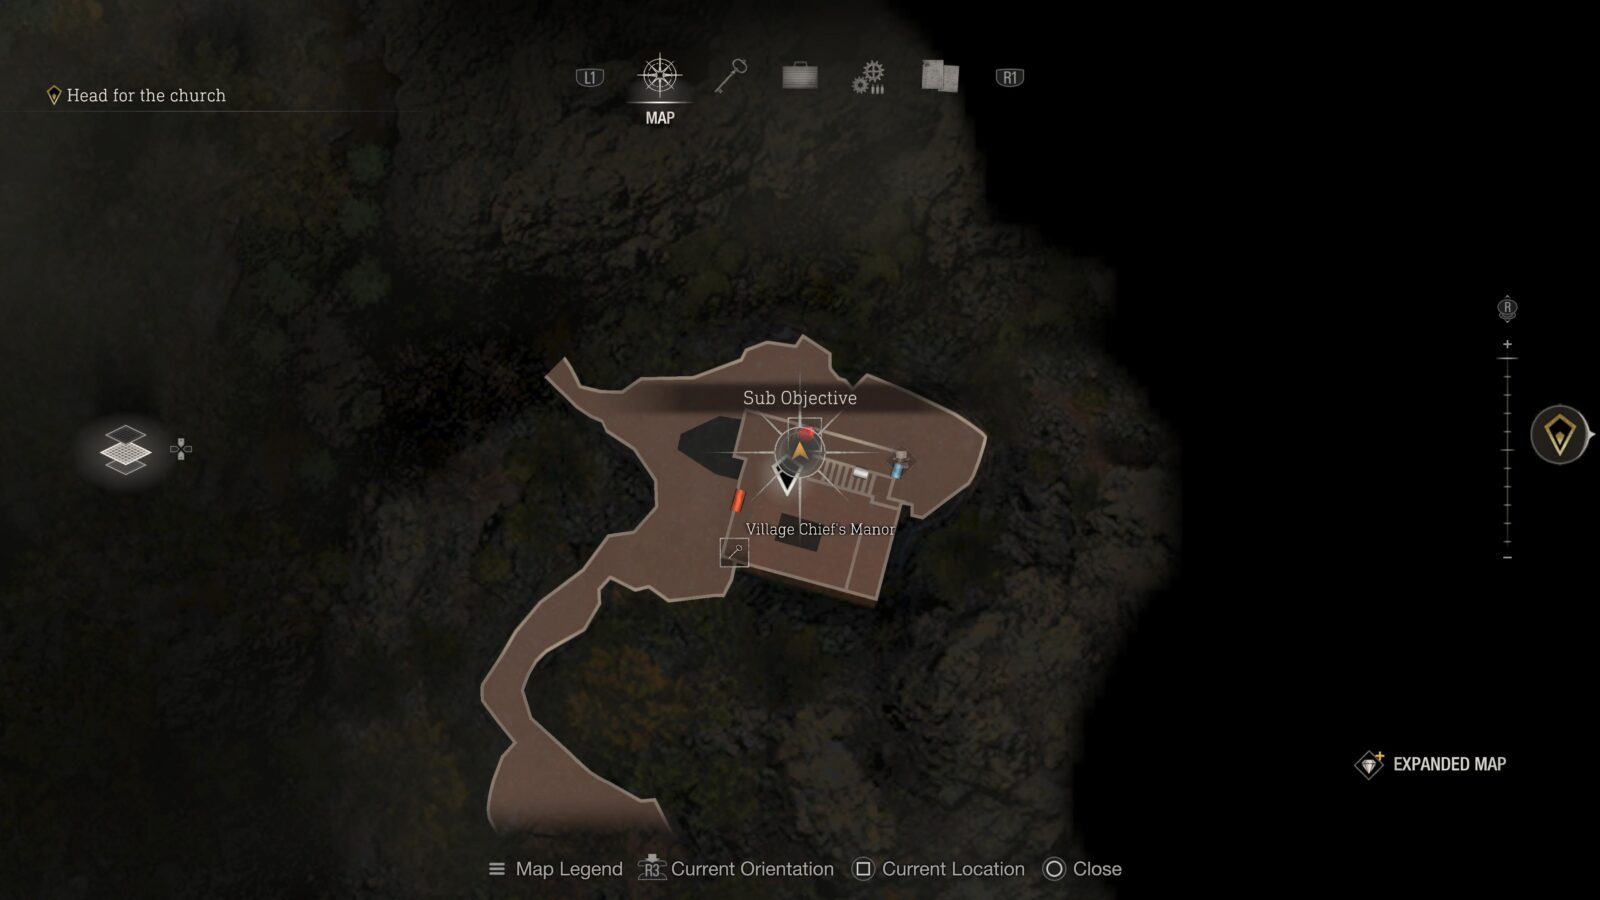
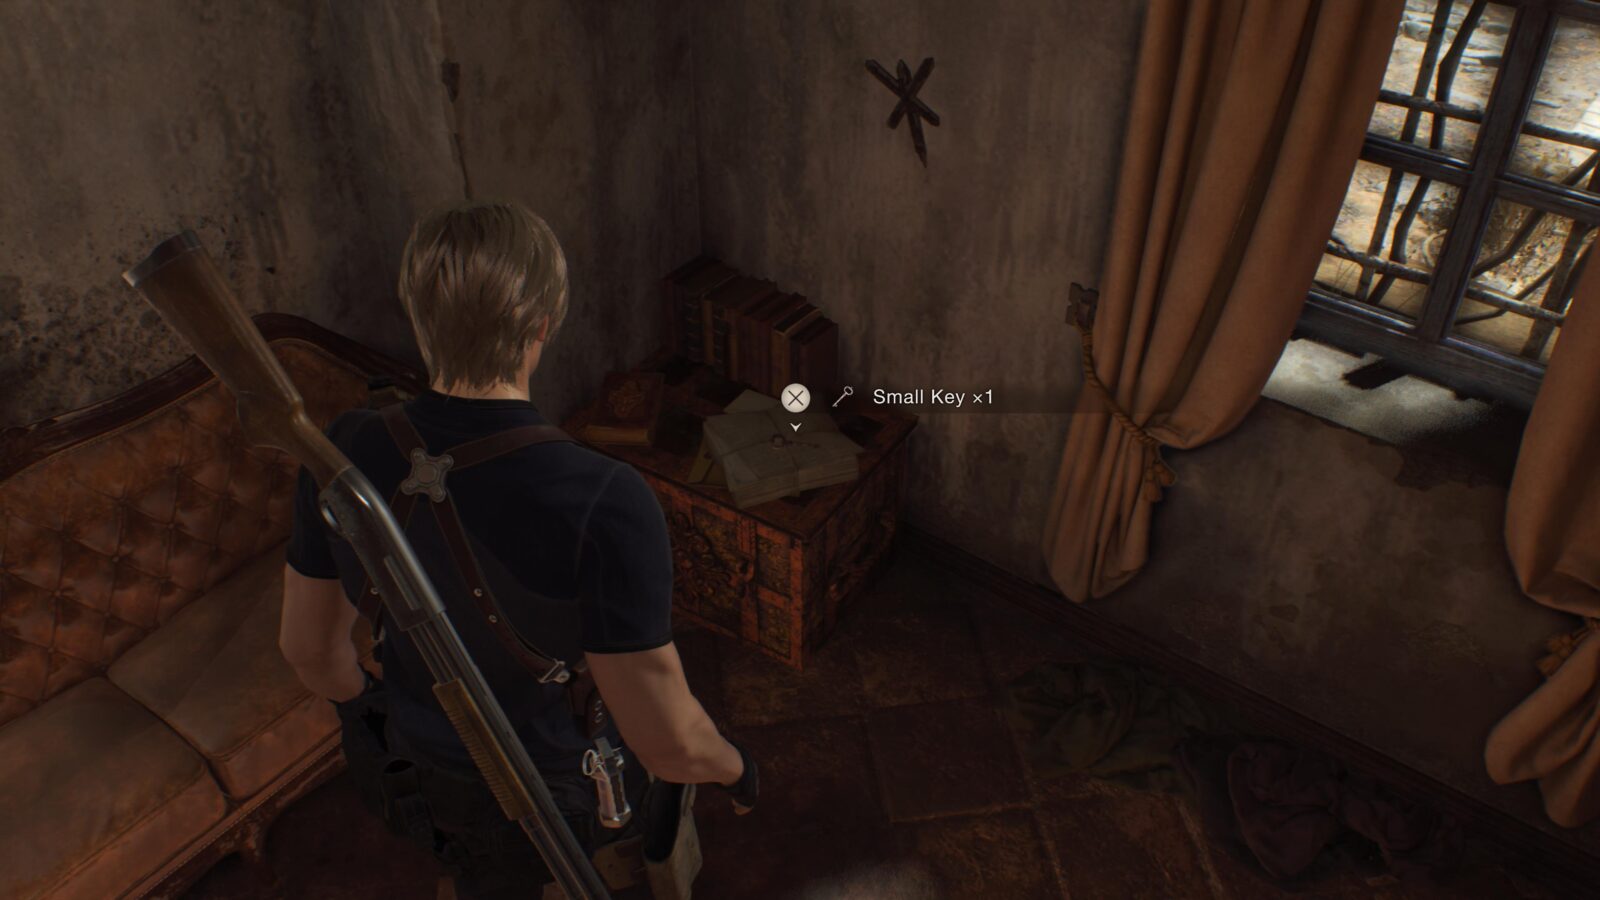
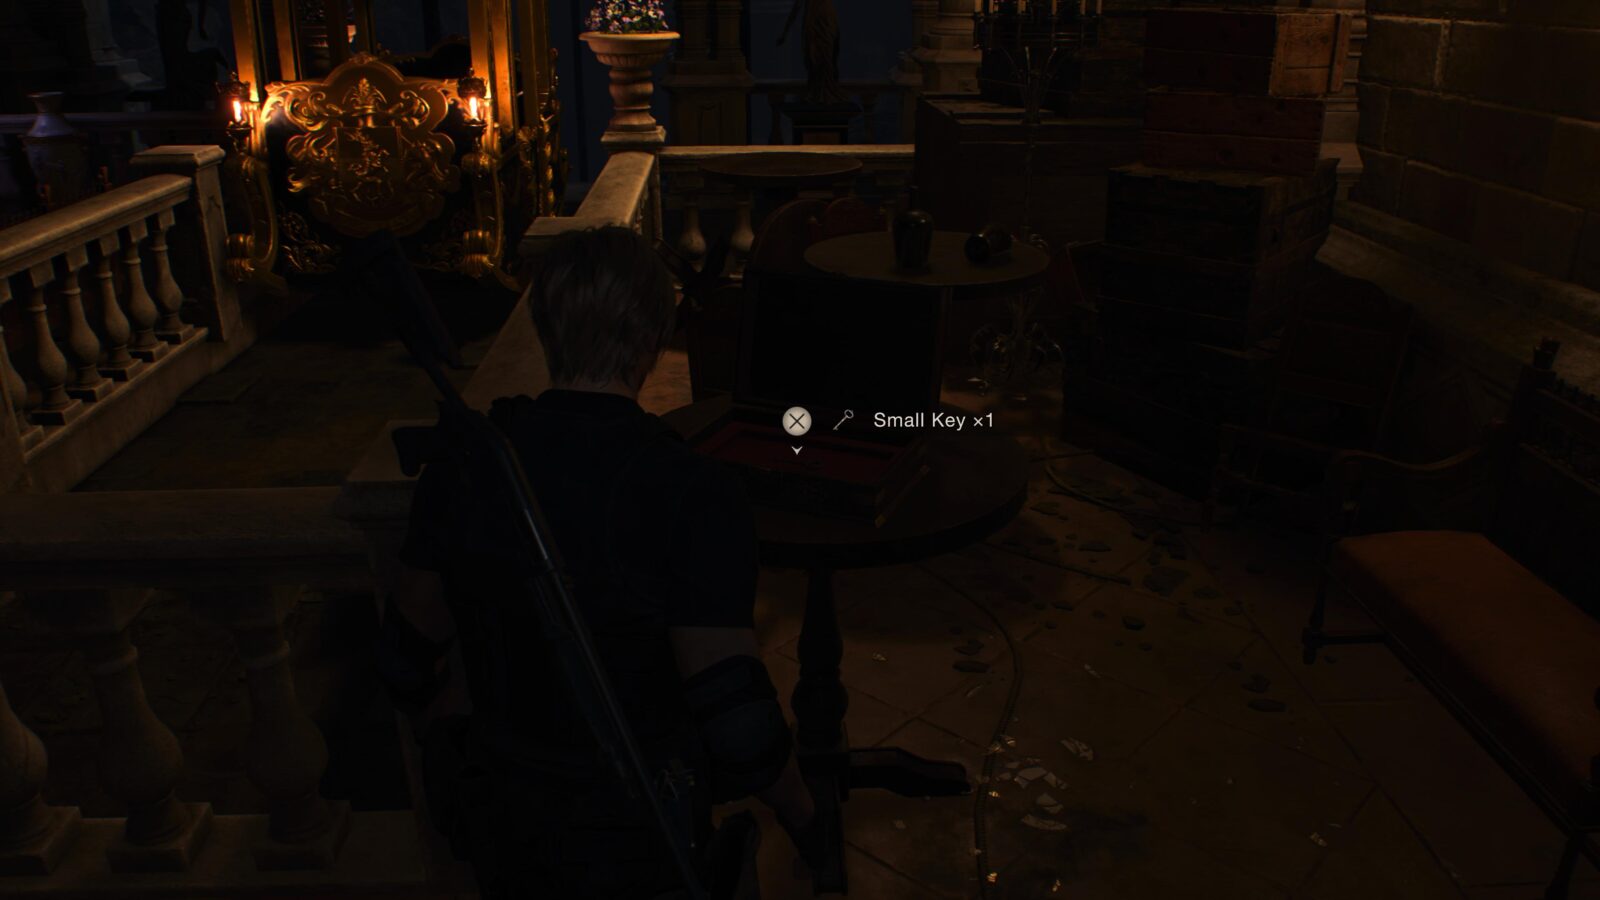
Small Key
In the next room by the main doors is a small key on a stack of papers.
Chapter 3
There are a total of 1 Clockwork Castellan, 3 Merchant Requests, 1 Small Key (used to unlock locked drawers hiding additional treasure) and 8 Treasures in Chapter 3. This chapter also has 3 Expanded Treasures which can only be obtained with the Expanded Treasure Map DLC.
Vintage Compass
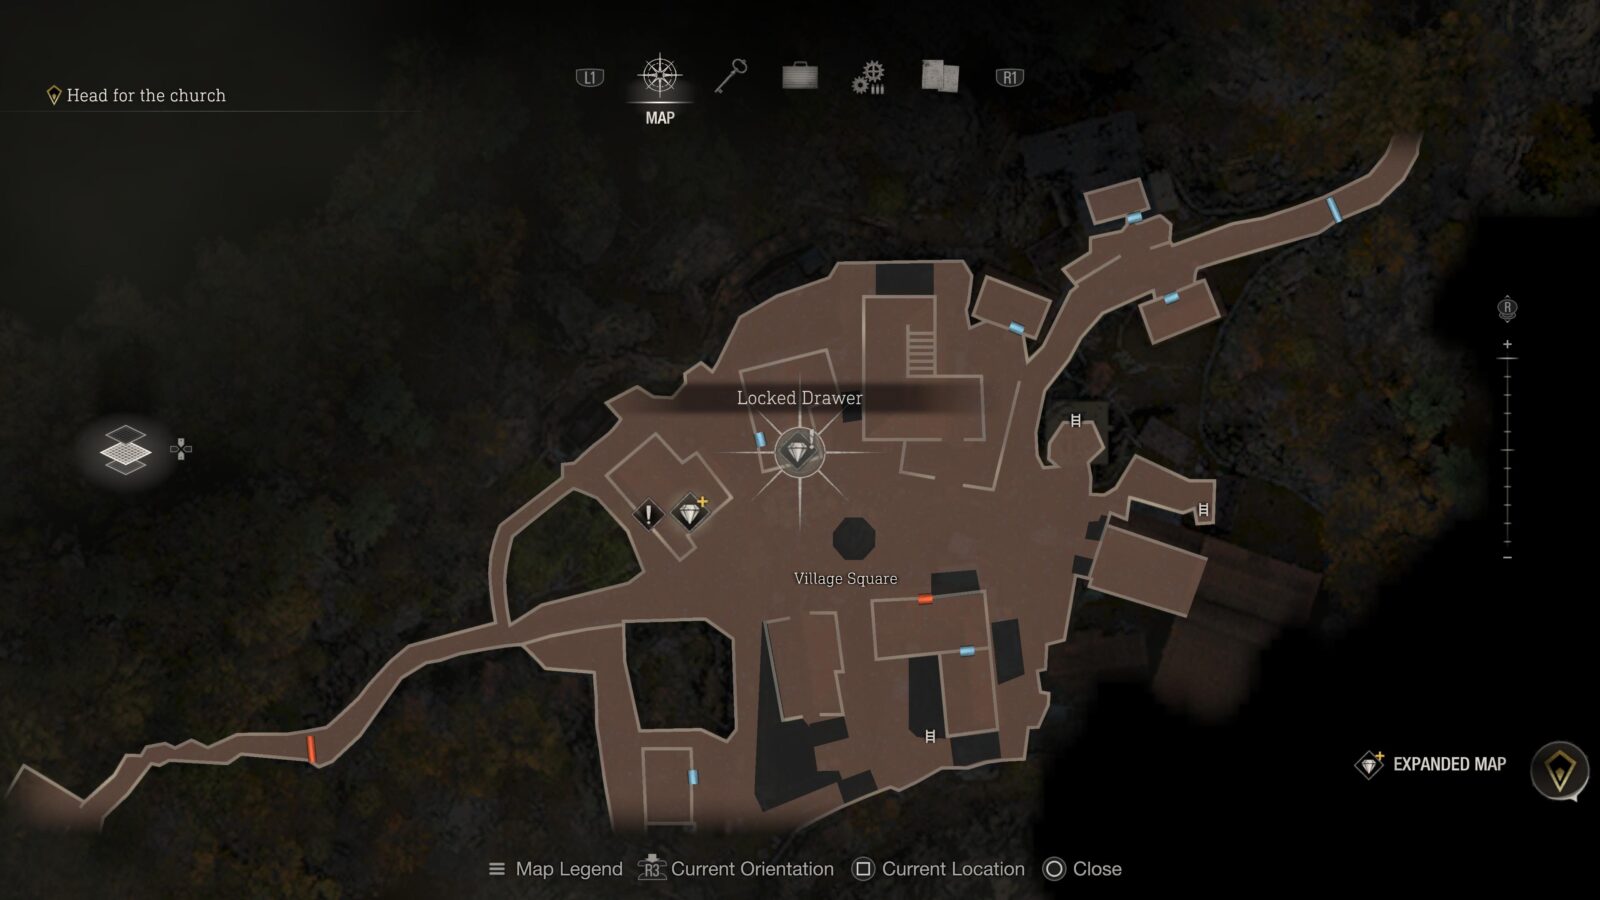
After returning to the Village Square again head into the house to the left of where you found the shotgun in Chapter 1. Inside the house by the door is a locked drawer that you can use the Small Key from the Chief’s Manor to unlock. Inside is a Vintage Compass. Has no slots.

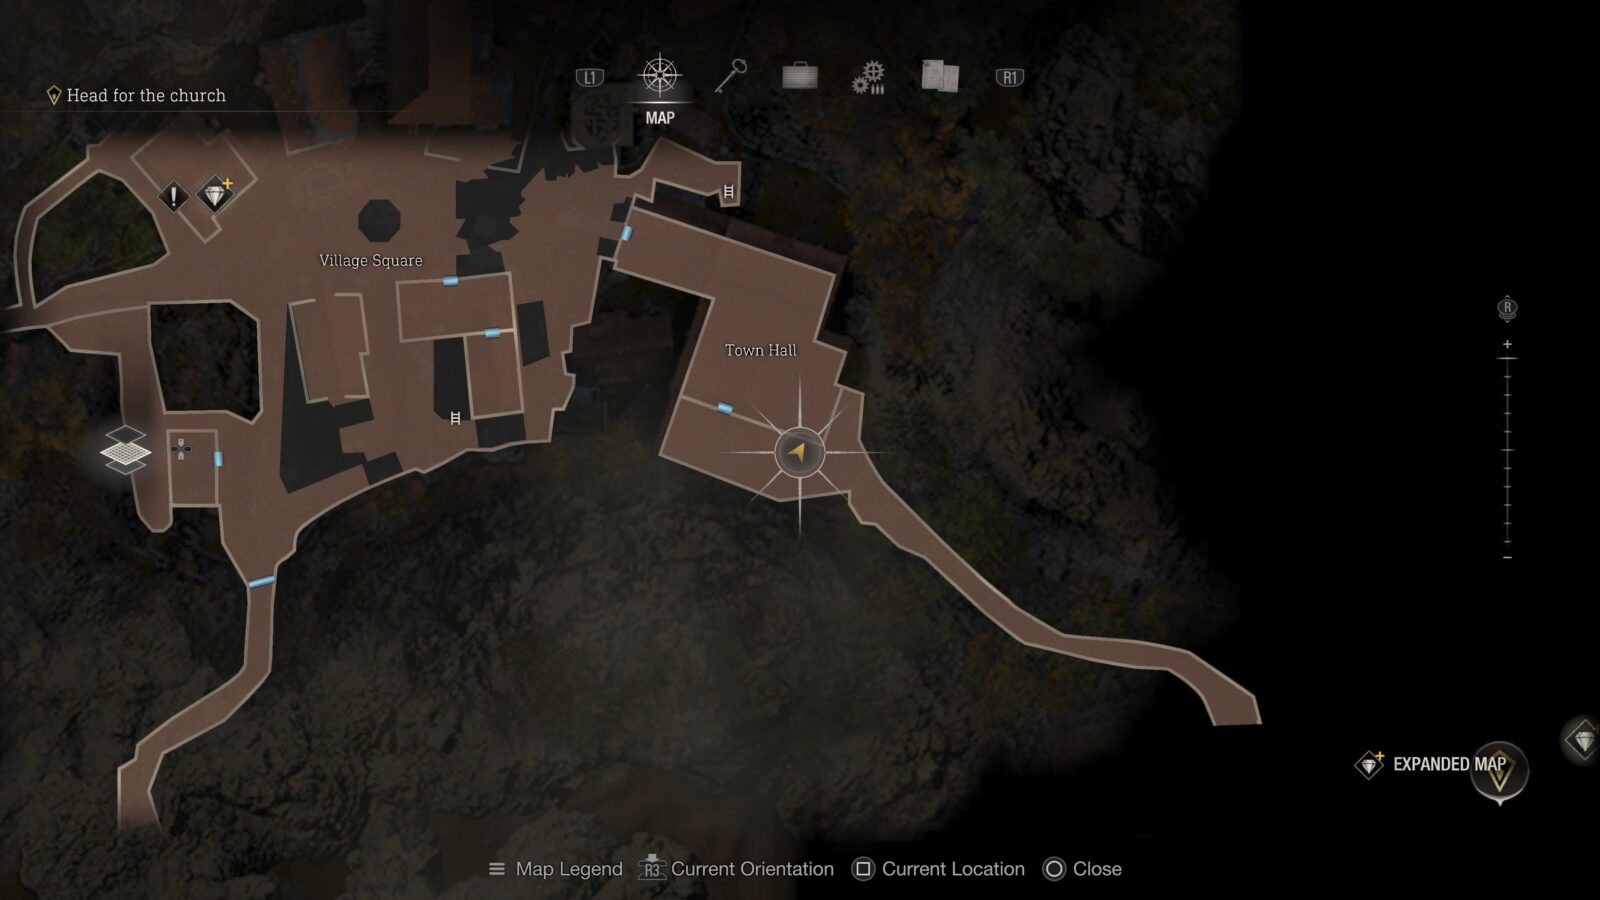
Velvet Blue
Use the Insignia Key to unlock the Town Hall door and head inside. In the next room with the tables will be a silver cage hanging from the ceiling that you can shoot down to get a Velvet Blue.

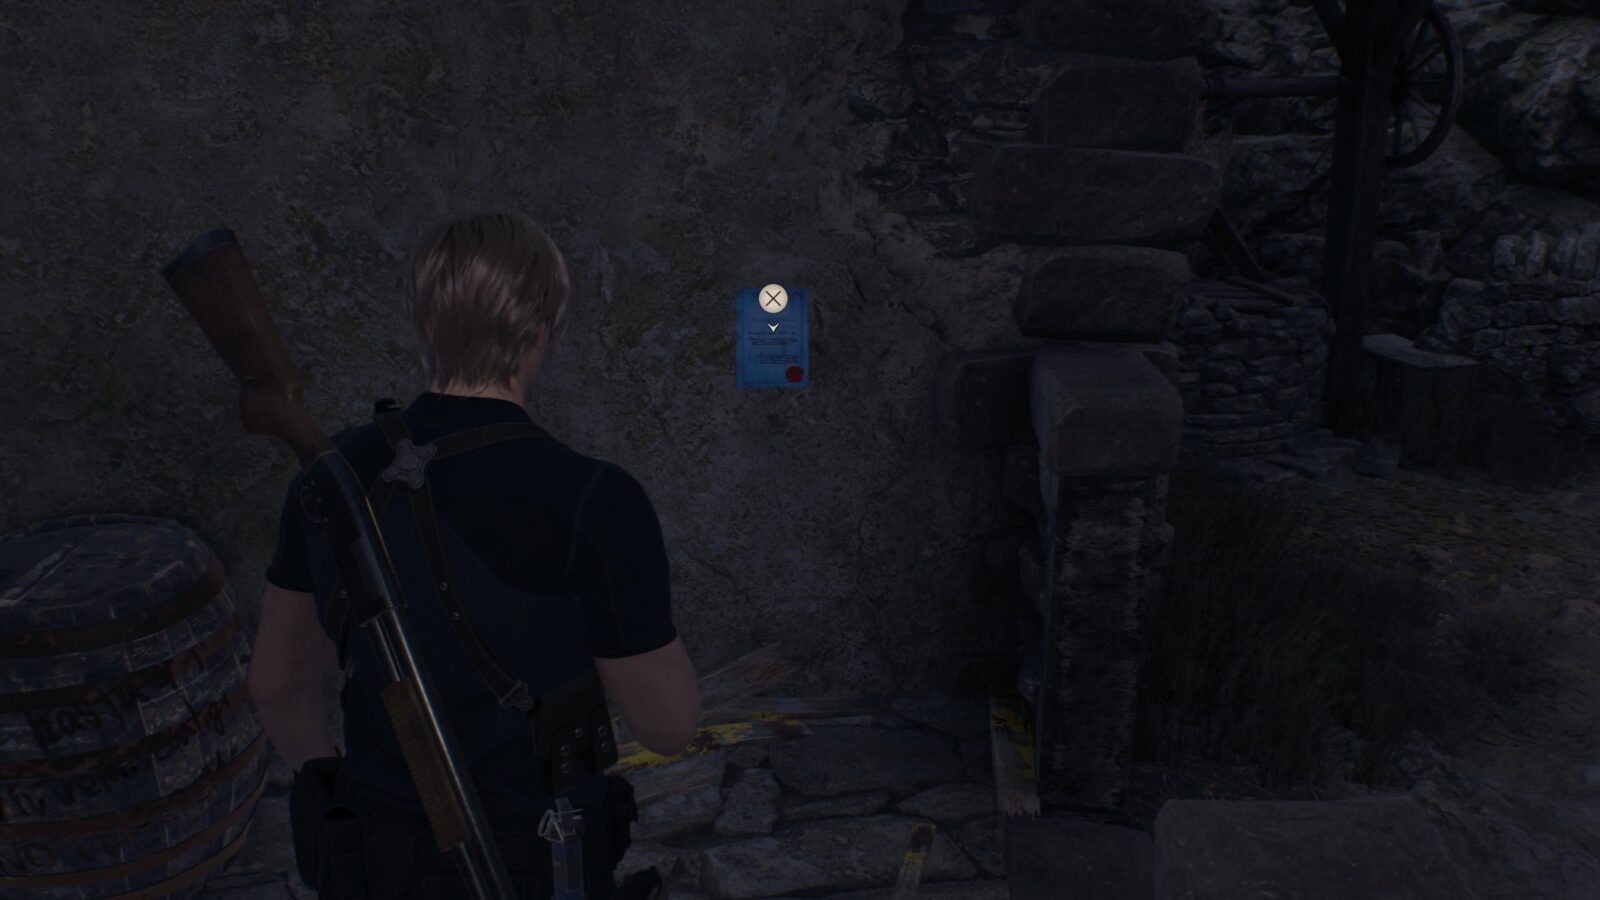
Merchant Request: Viper Hunter
As you exit the Town Hall you will bump into the Merchant again. On the wall opposite him will be another request. This time you need to find and kill 3 vipers in order to pick them up. Once you have 3 vipers you can sell them all to the Merchant to complete the quest. Vipers will spawn inside some breakable crates so it’s a good idea to slash them with your knife twice–once to break the crate, another to kill any viper hiding inside–just to be safe. Vipers can also be found in the world so keep your eyes peeled.
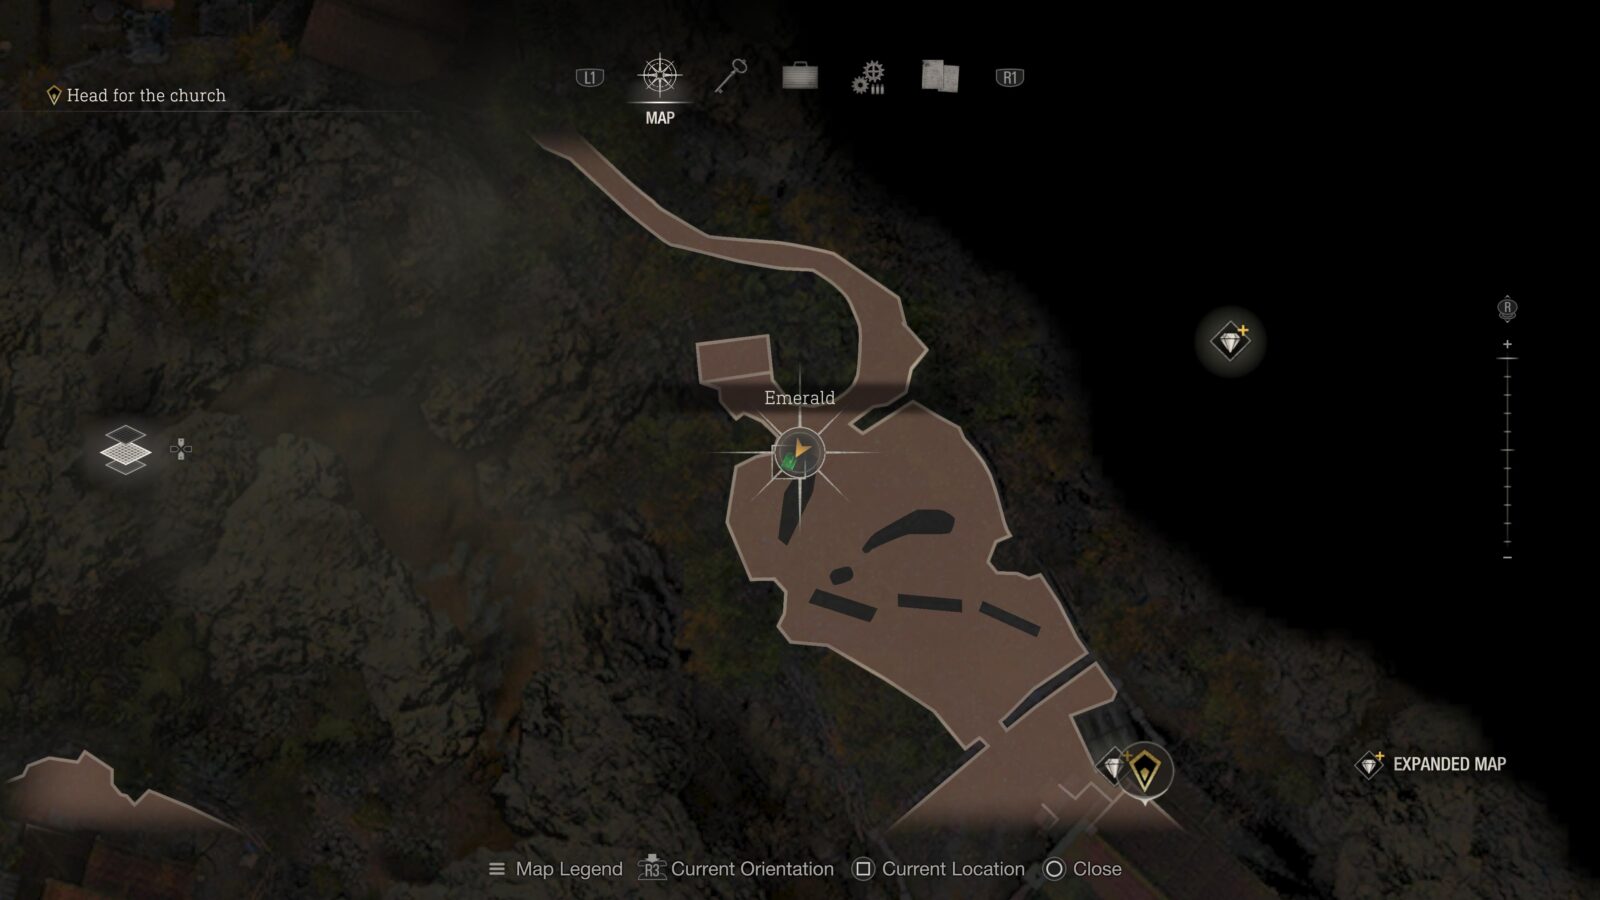
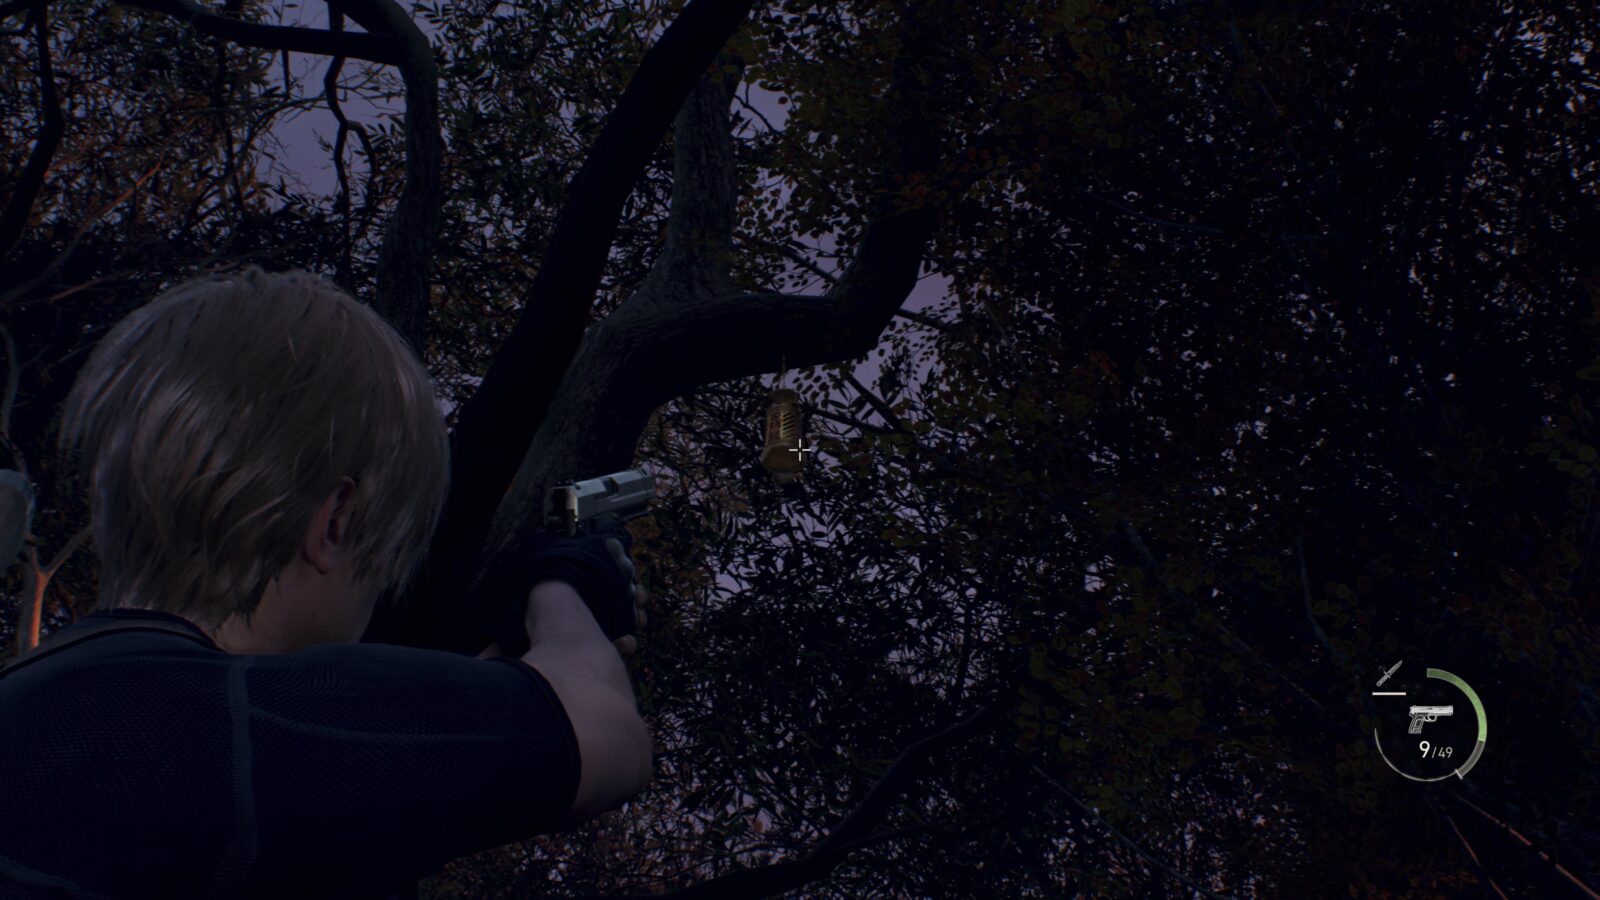
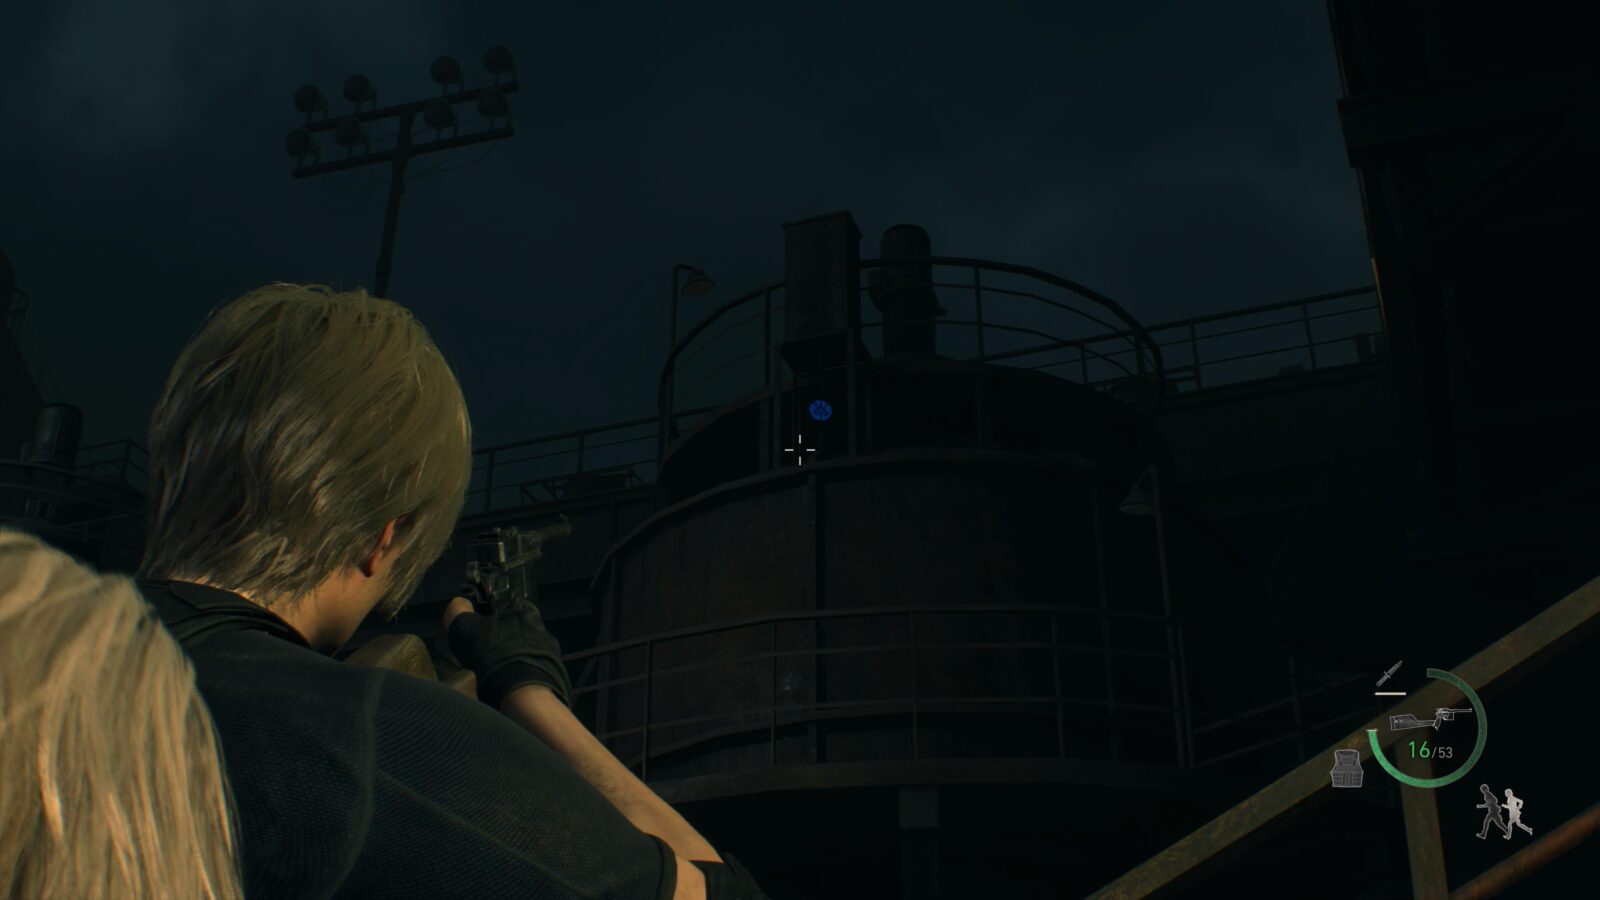
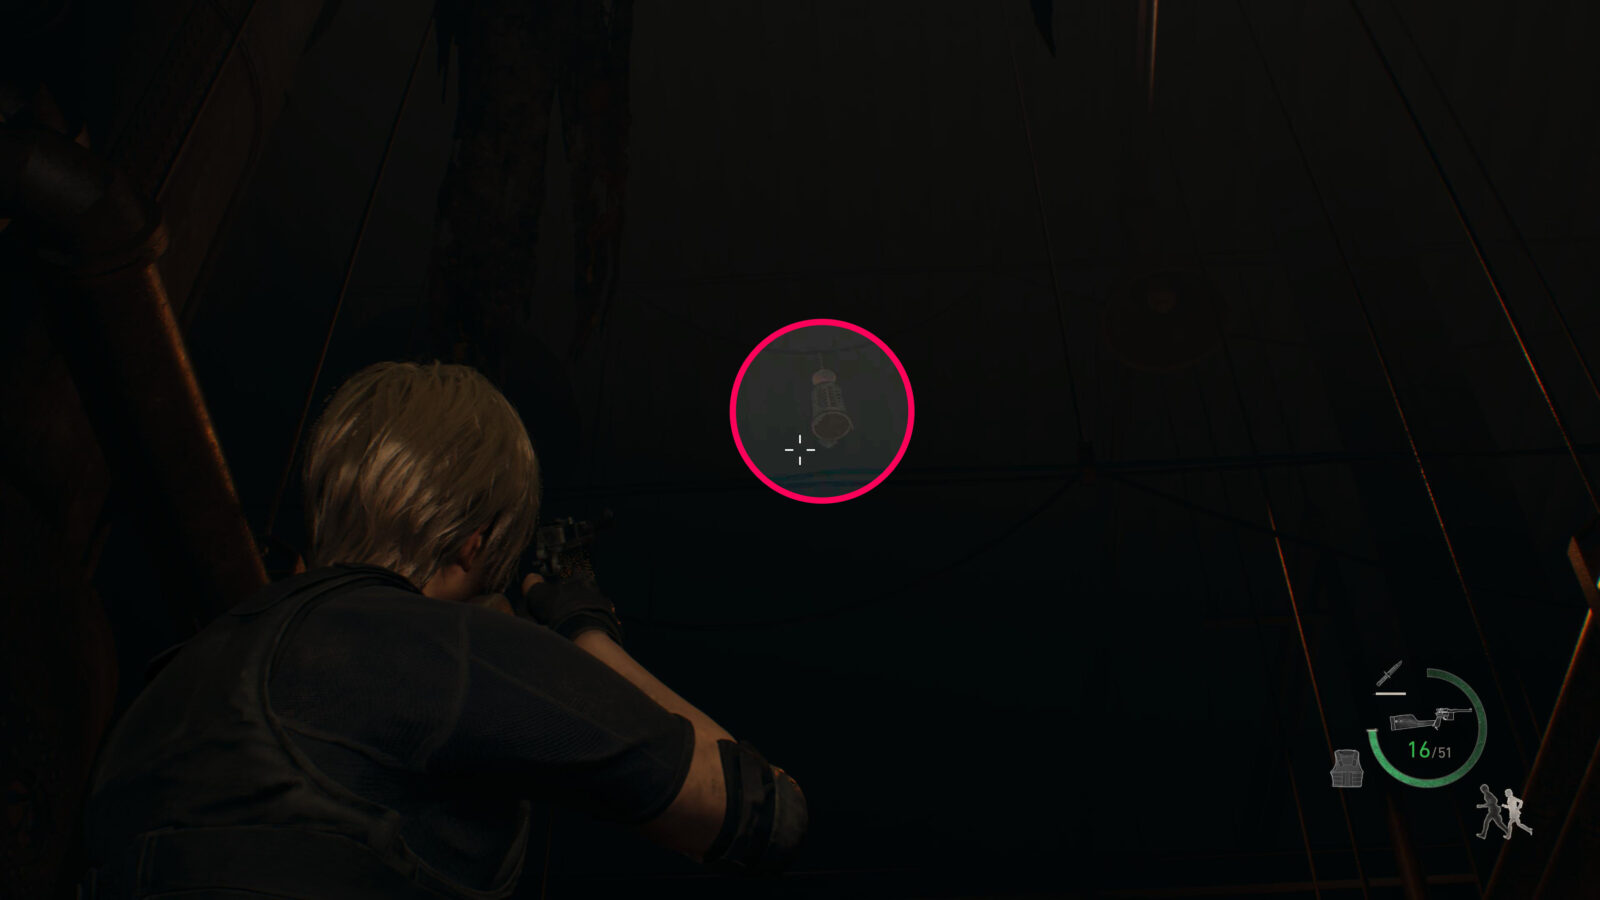
Emerald (Expanded Treasure)
As you enter the Graveyard in front of the Church there will be a gold cage hanging from a tree to your immediate right. Inside is an Emerald that can be slotted into other Treasure. This is only available to those who have the Expanded Treasure Map DLC.
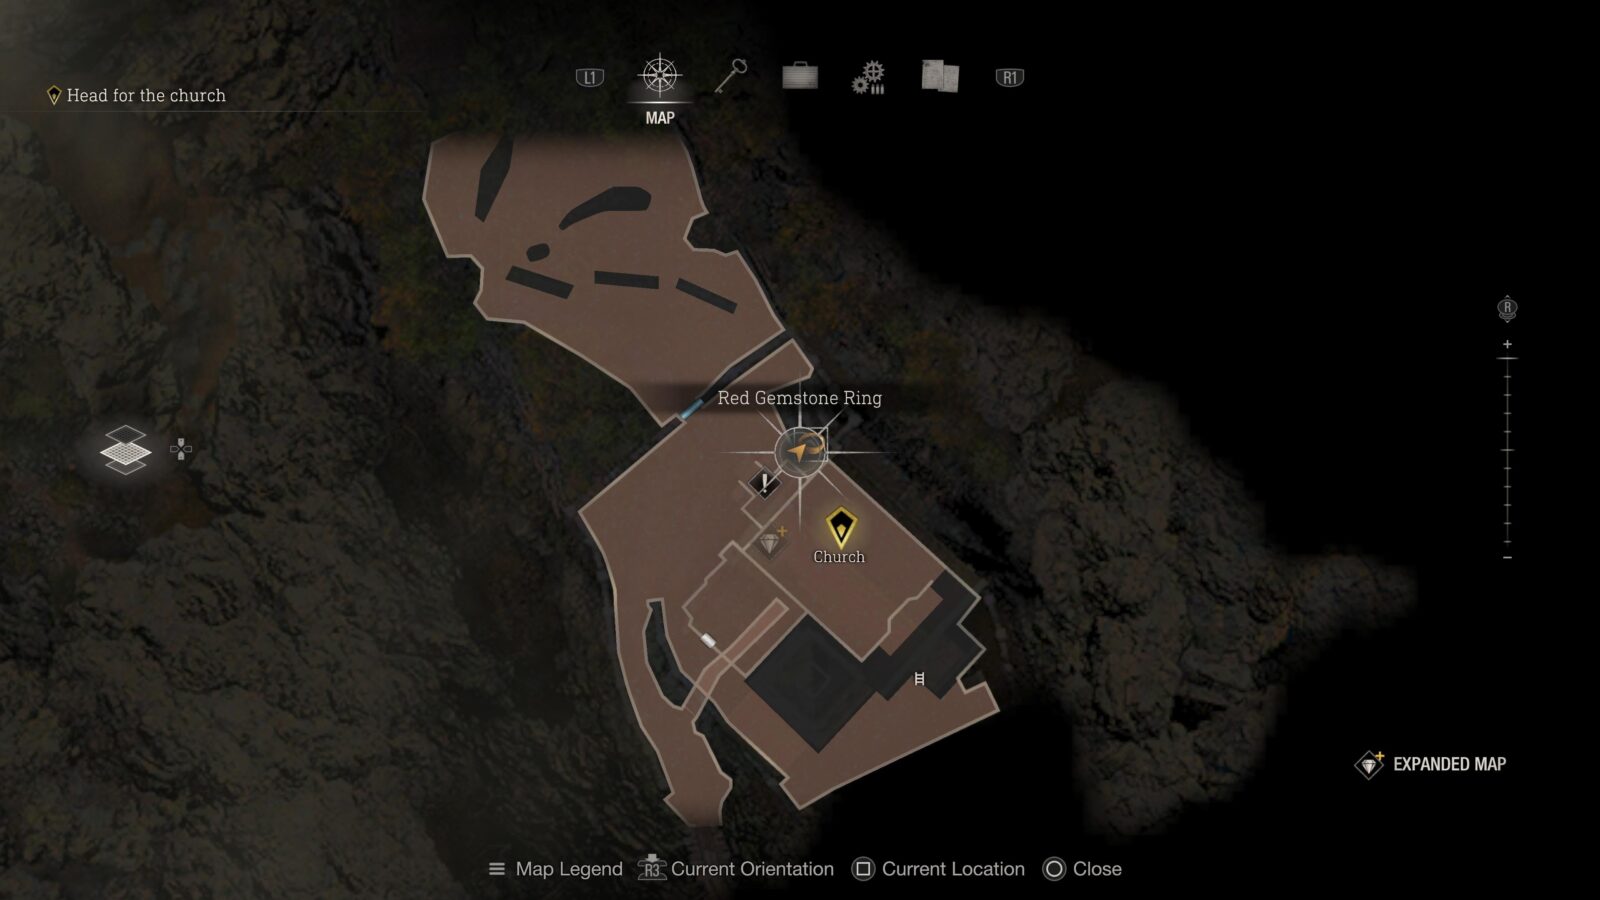
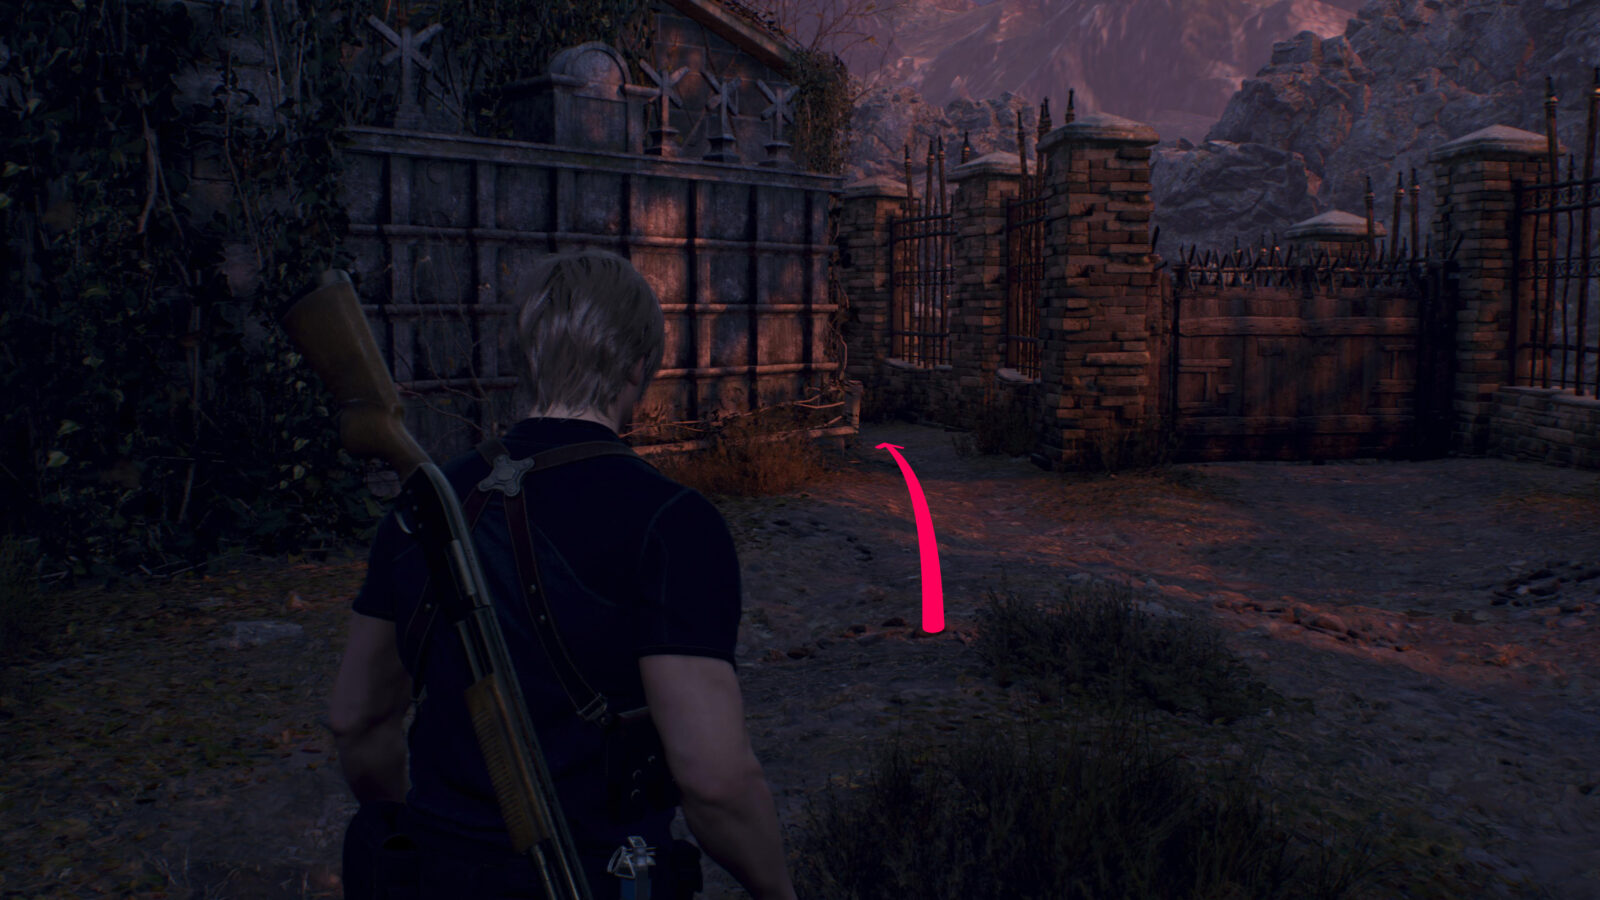
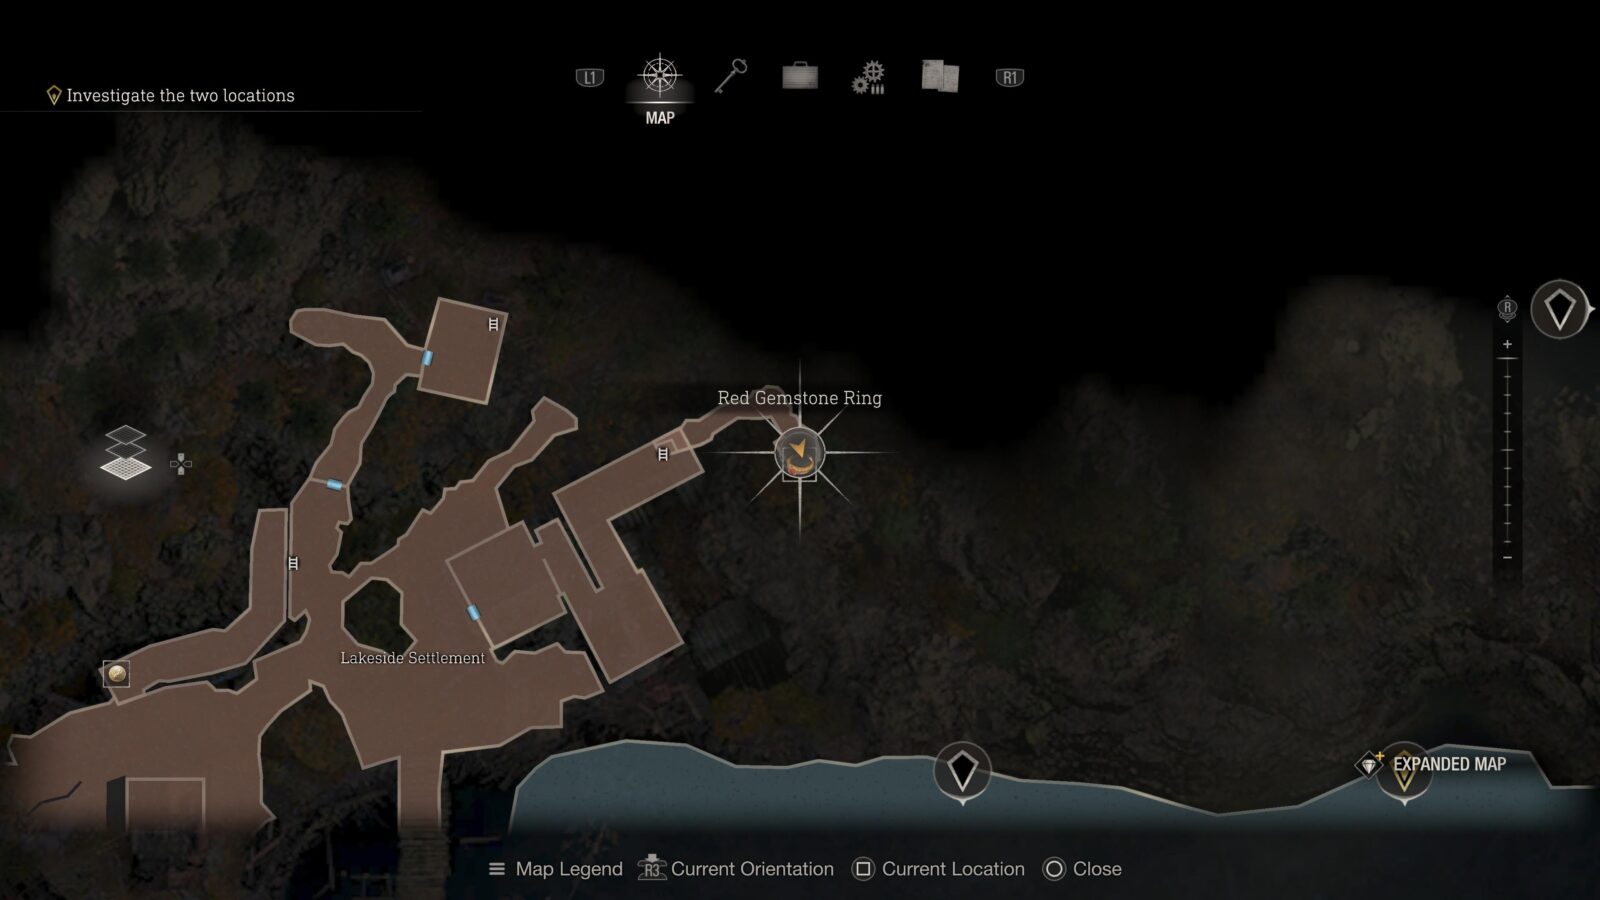
Red Gemstone Ring (Expanded Treasure)
To the left of the Church entrance is a small gold chest with a ring inside. This is only available to those who have the Expanded Treasure Map DLC.

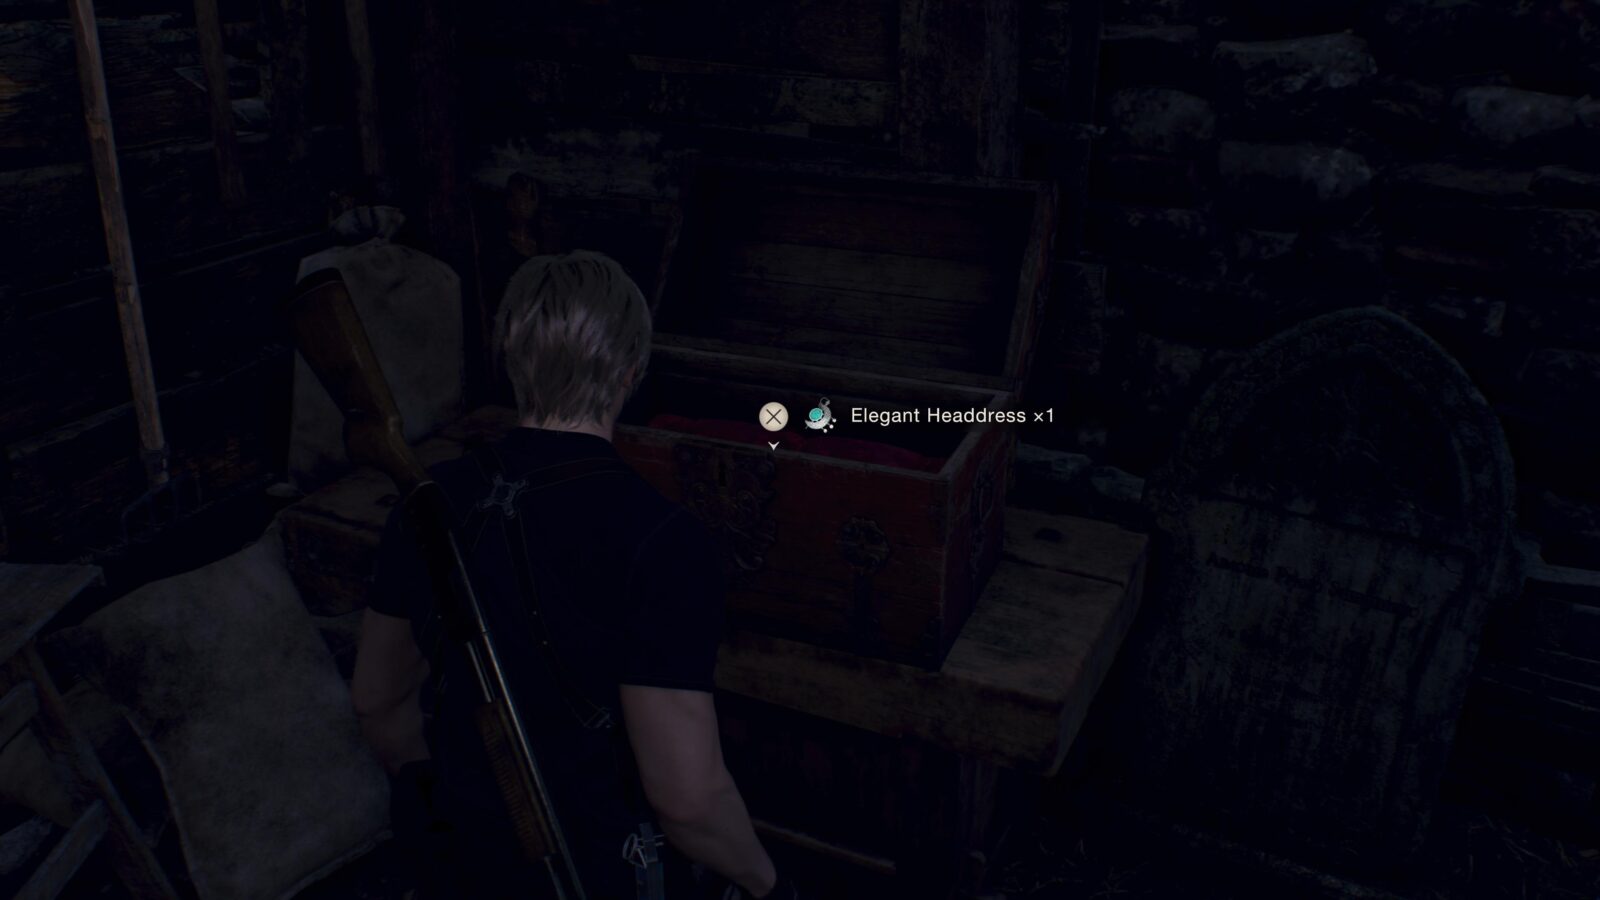
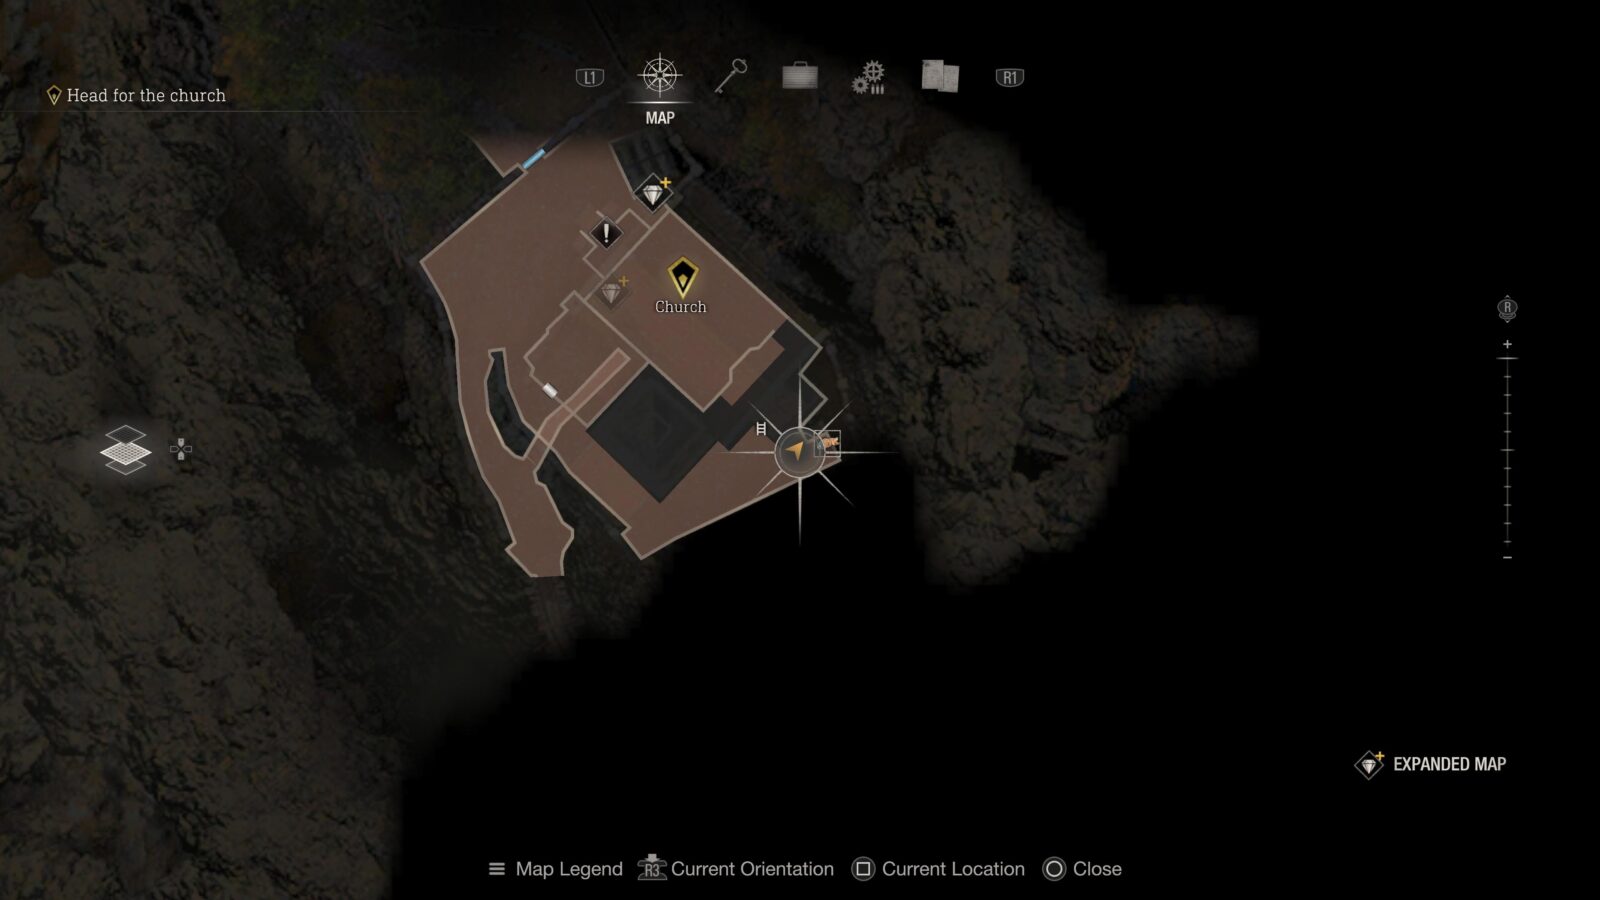
Elegant Headdress
There is a passage on the right of the Church that will lead behind it. Here you can find a small chest with a headdress inside.

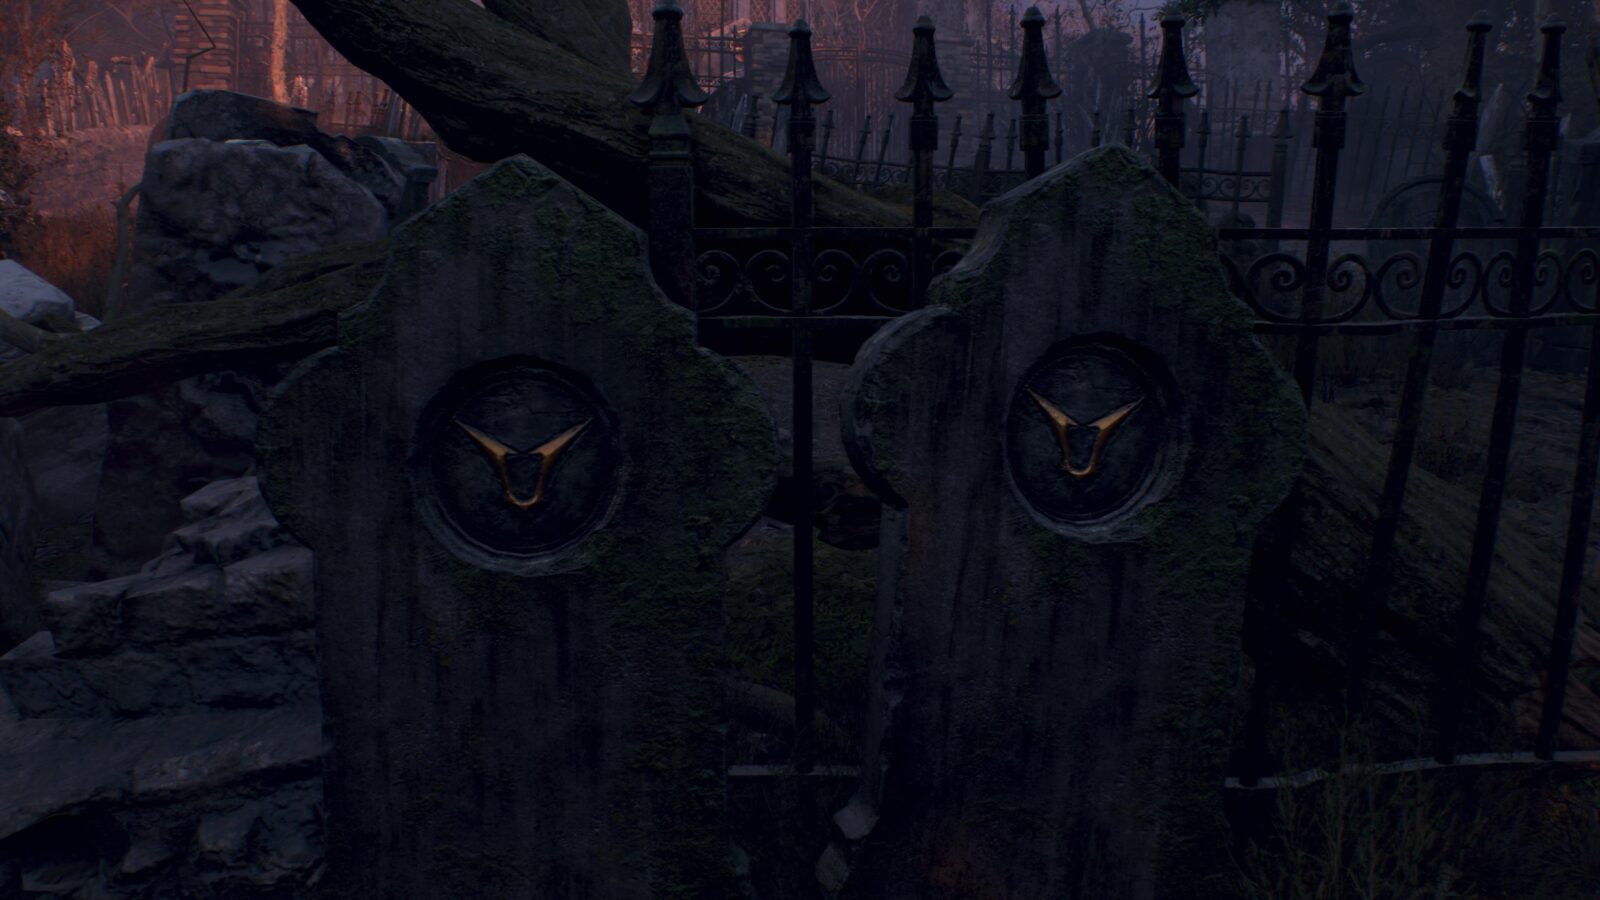
Merchant Request: Grave Robber
Behind the Church where the Elegant Headdress is will also be another request from the Merchant. This time you must shoot two grave markers with a V symbol on it. These two grave markers are located at the center of the Graveyard in front of a collapsed tree.
Viper (Guaranteed Spawn)
After you leave the Church area you will reach some wooden walkways with enemies on them. In the first building on the left will be a box with a guaranteed viper inside.

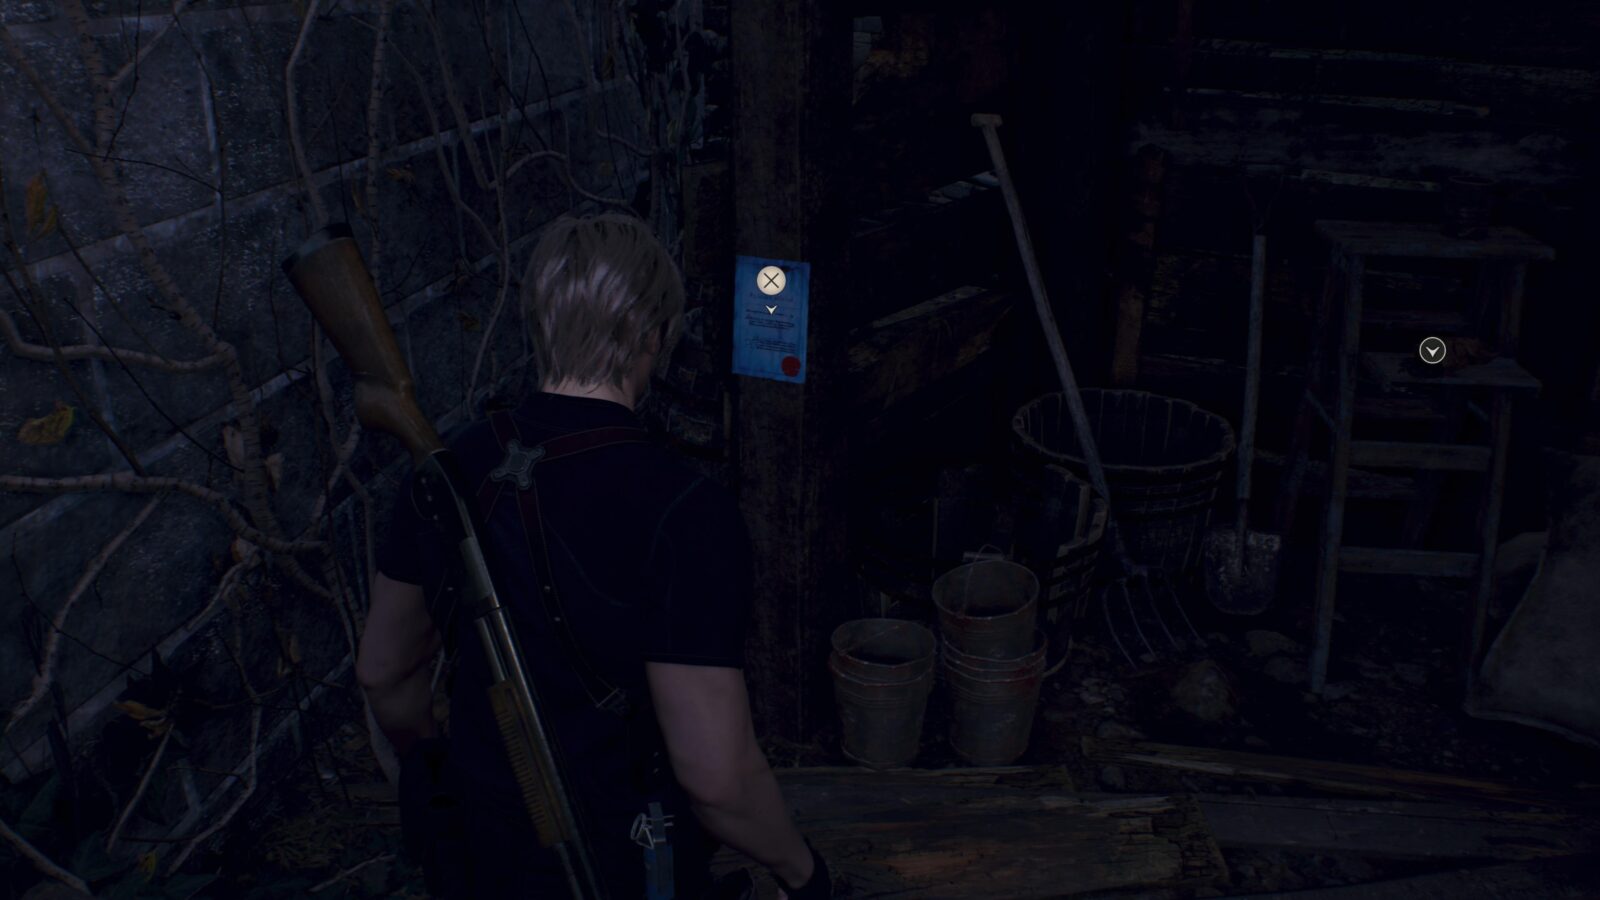
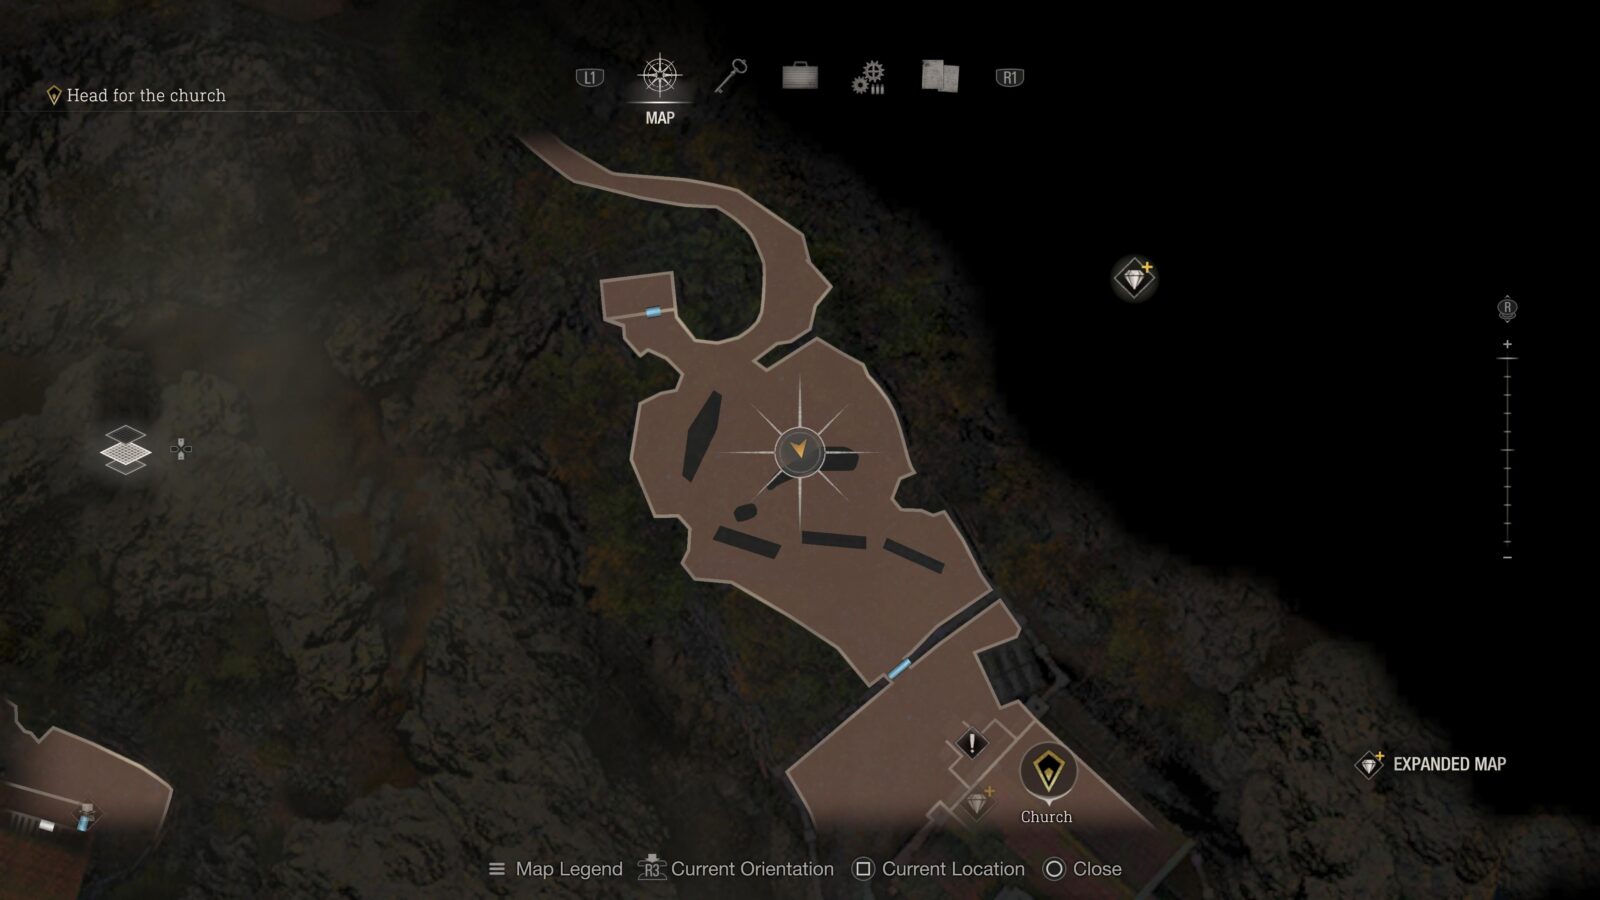
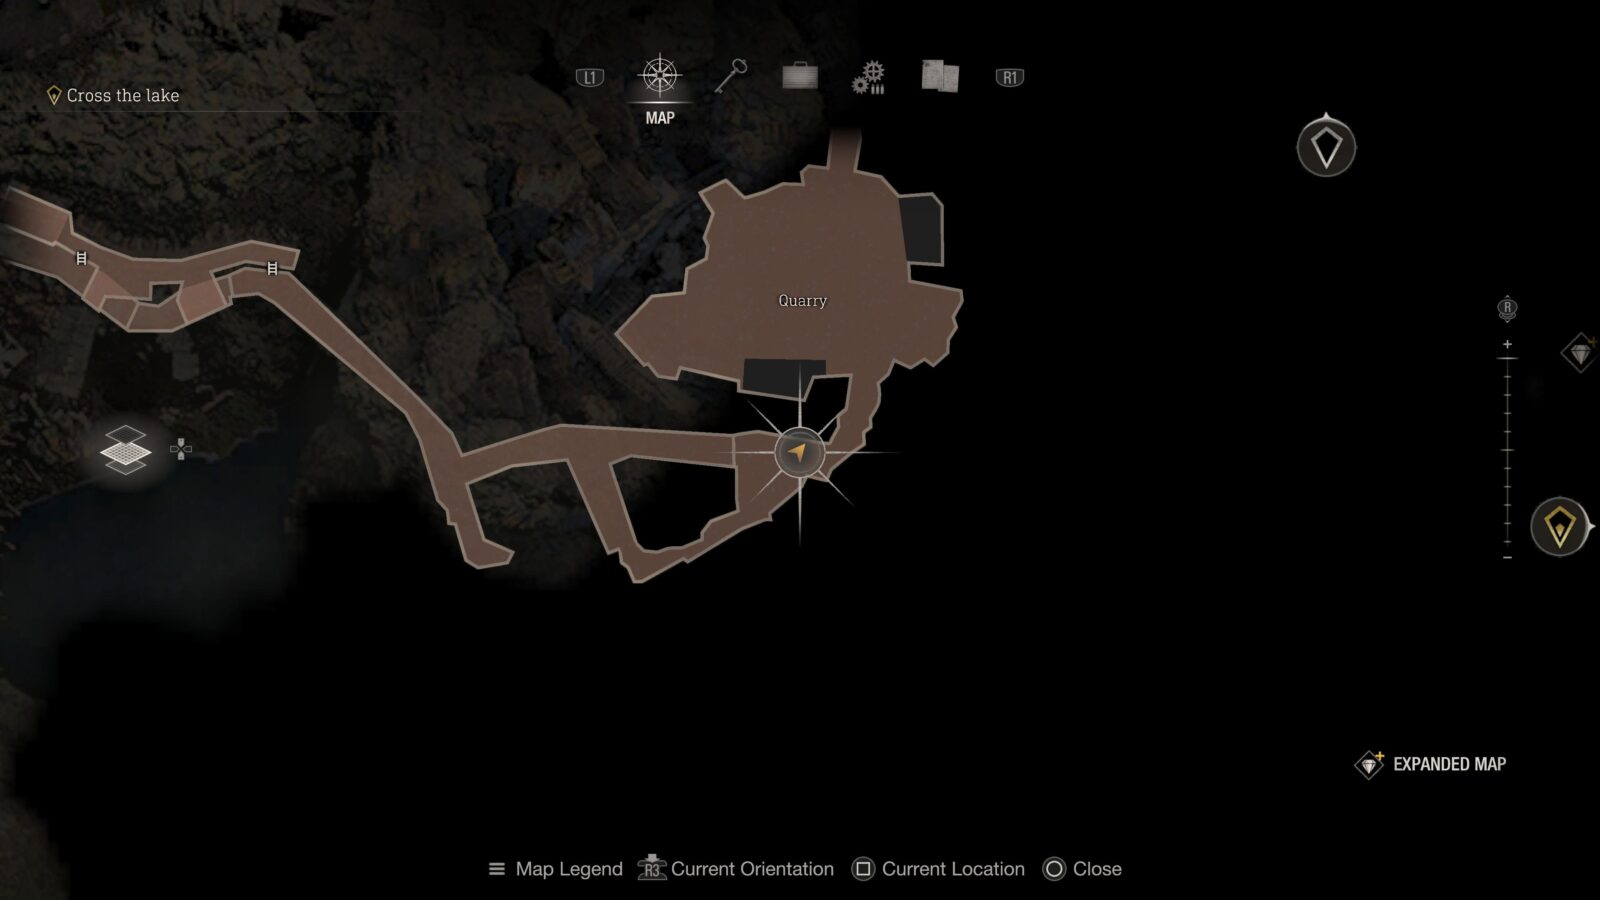
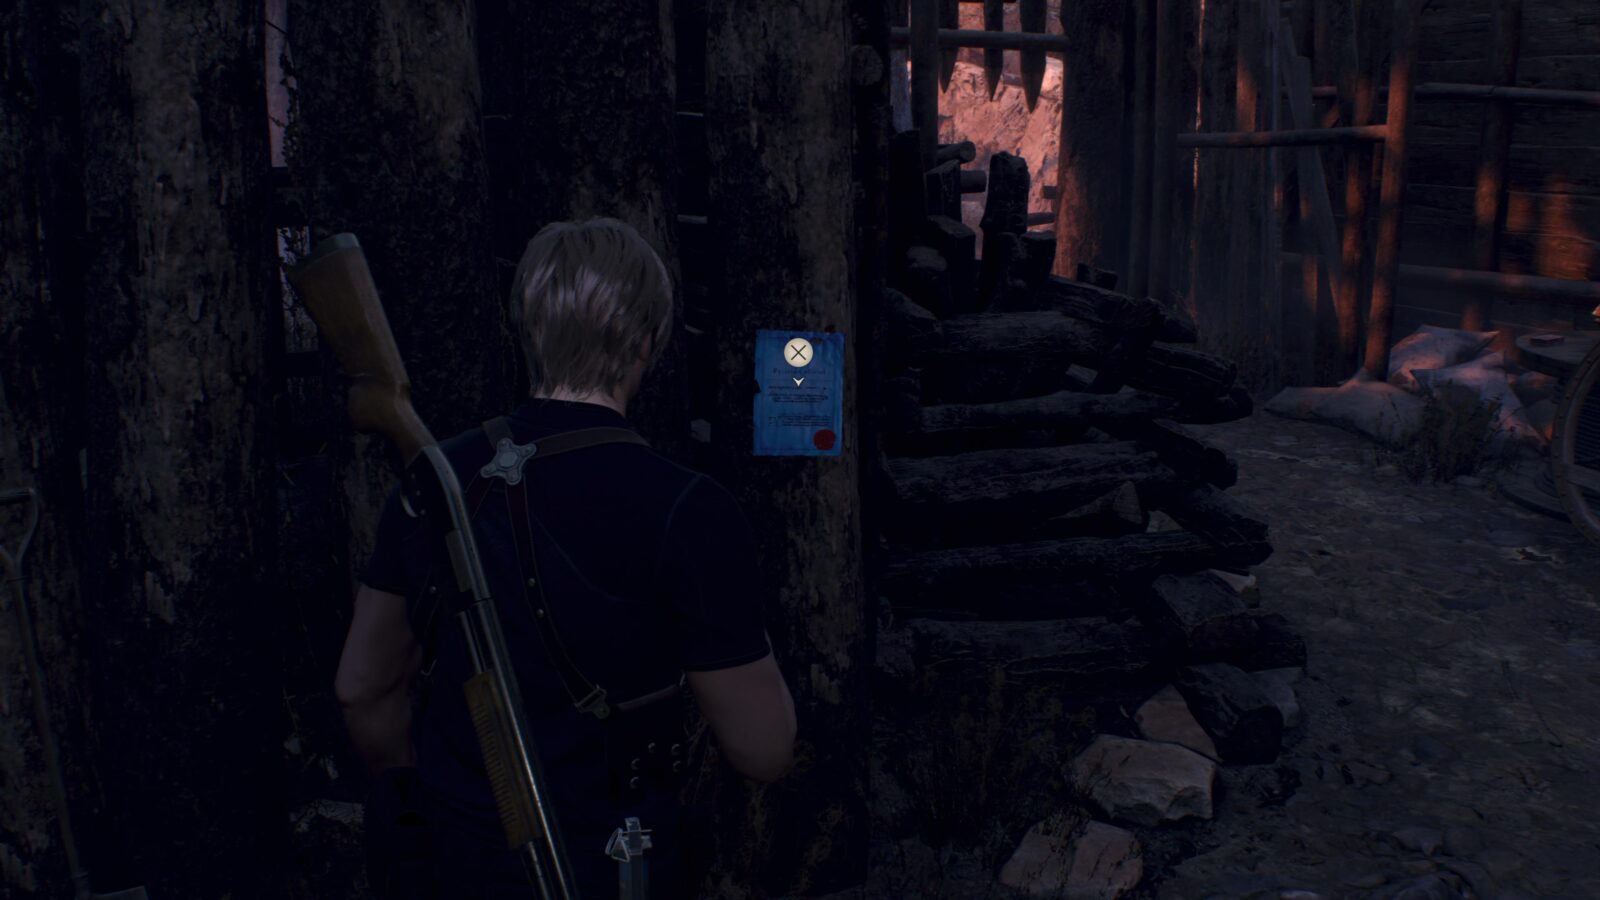
Merchant Request: Destroy the Blue Medallions 2
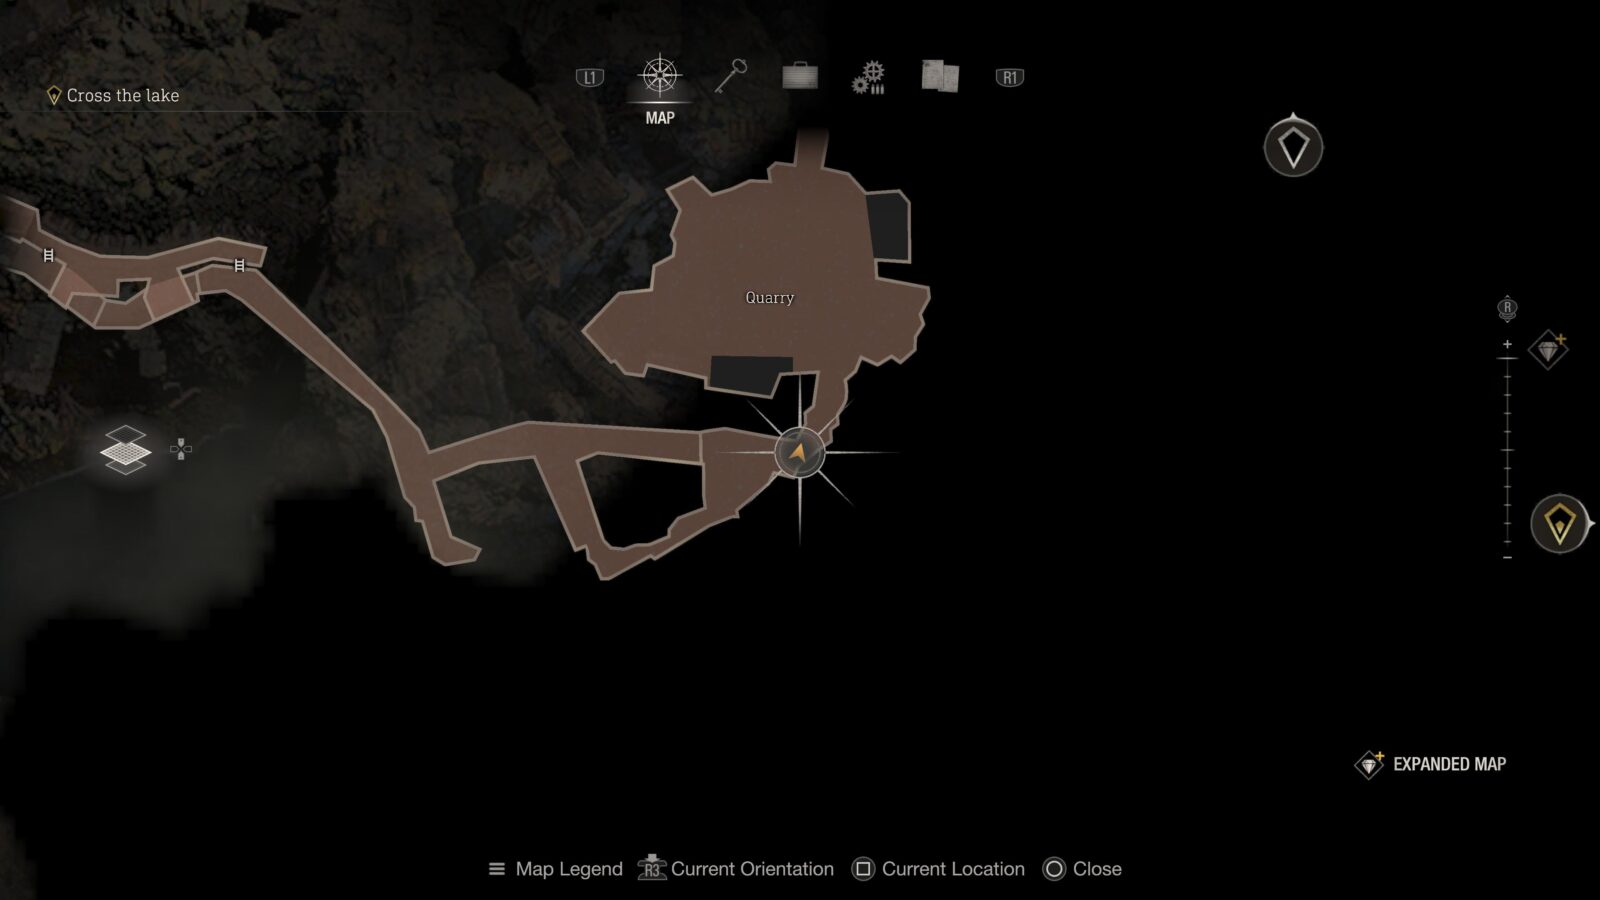
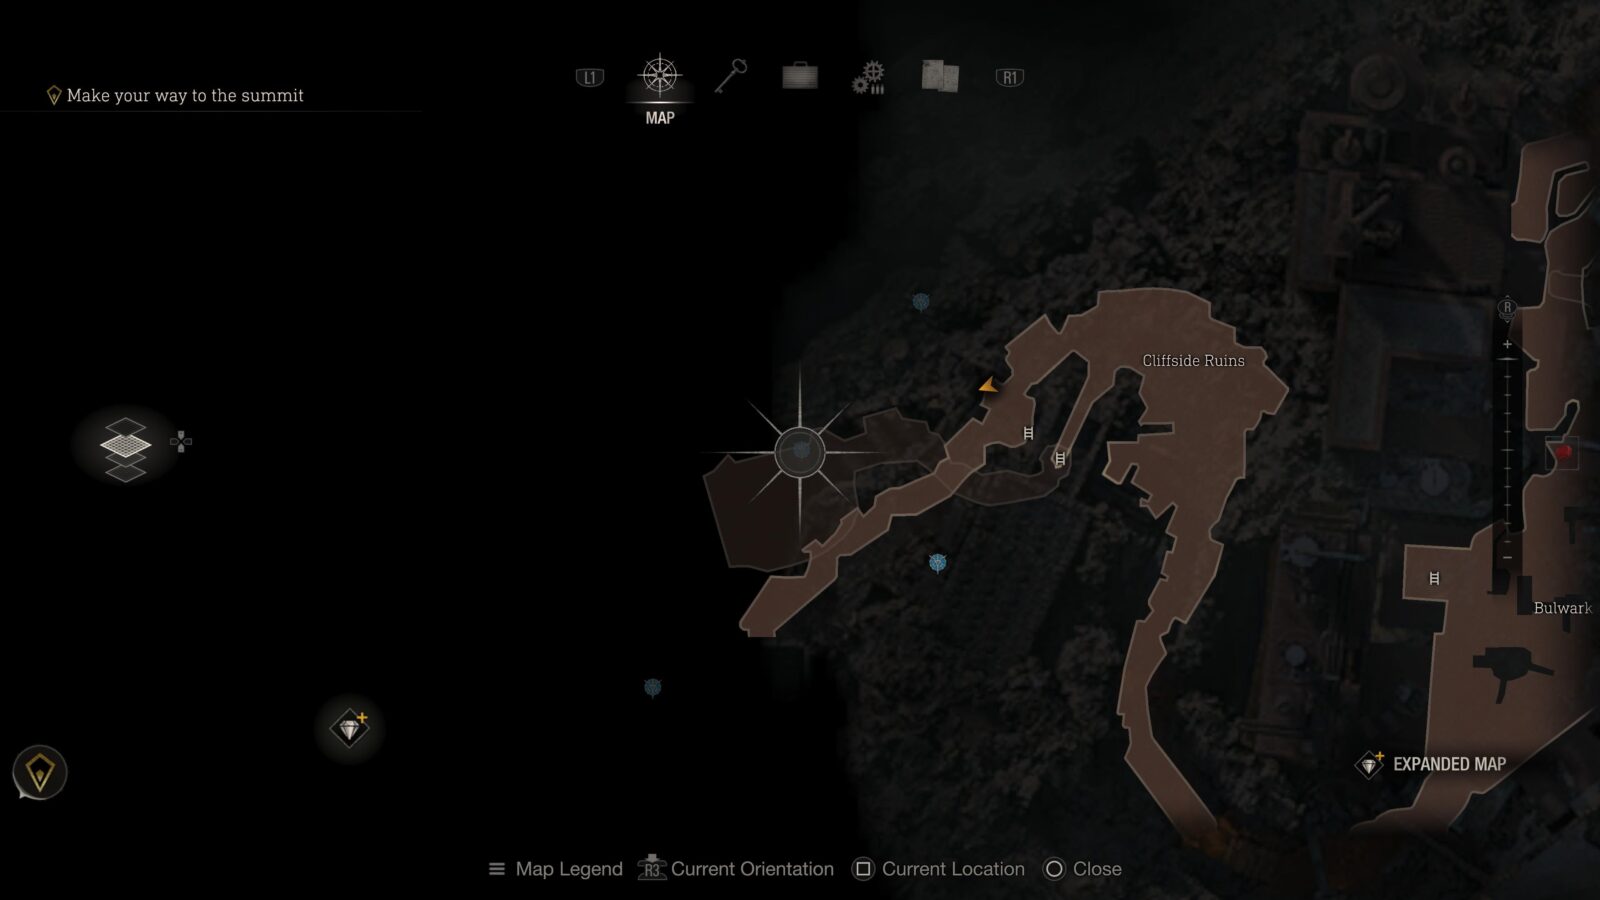
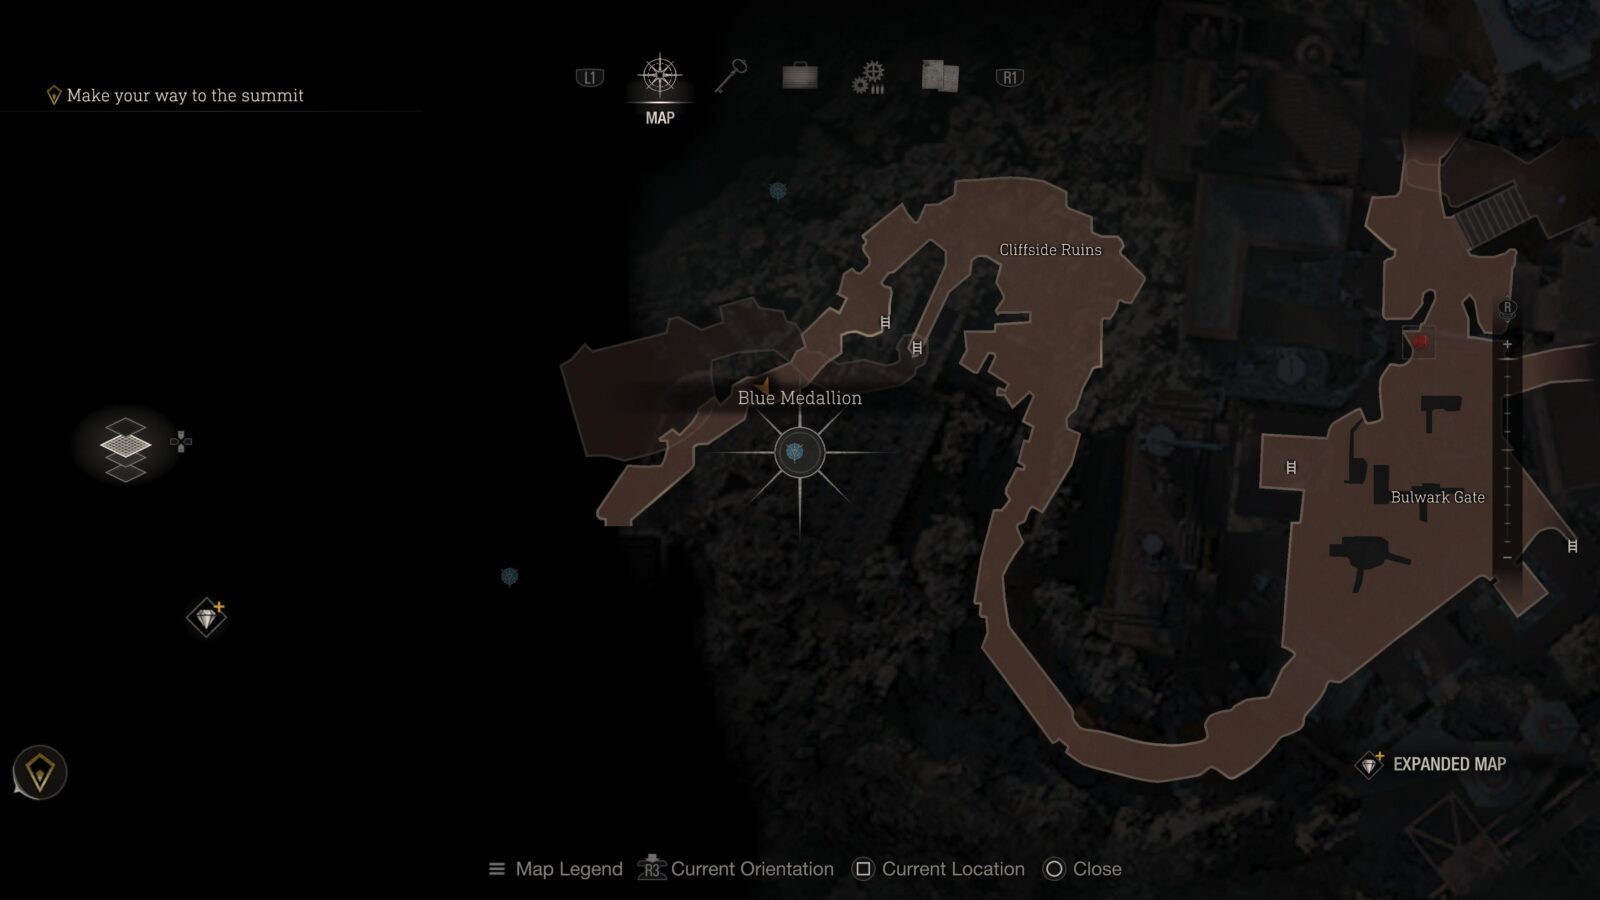
Just before entering The Quarry you will see a giant hammer propped up against a wall. To the right of the hammer is a request pinned to the wall. For this request you need to shoot 5 more Blue Medallions. (check the images below).
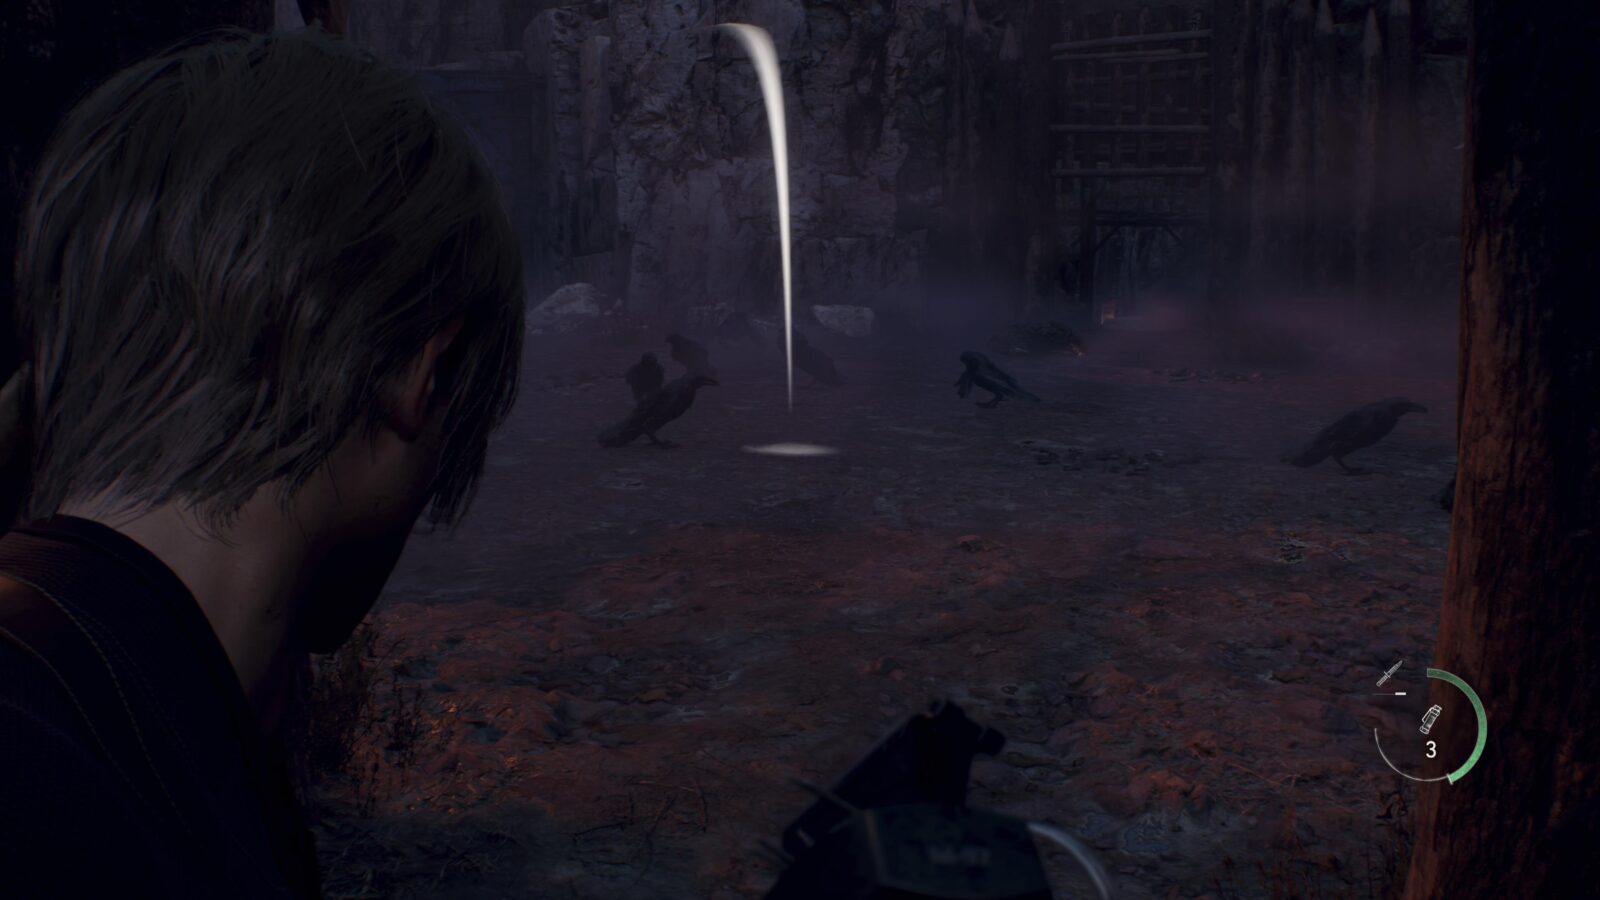
Shield Your Eyes (trophy)
Immediately after collecting the request from the wall walk slowly towards The Quarry entrance and you should spot a bunch of crows hanging around. If you get too close they will fly away so keep your distance and equip a Flash Bang. Throw it into the middle of the crows and when it goes off it will kill them all which will pop Shield Your Eyes for killing 3 enemies with a Flash Bang.
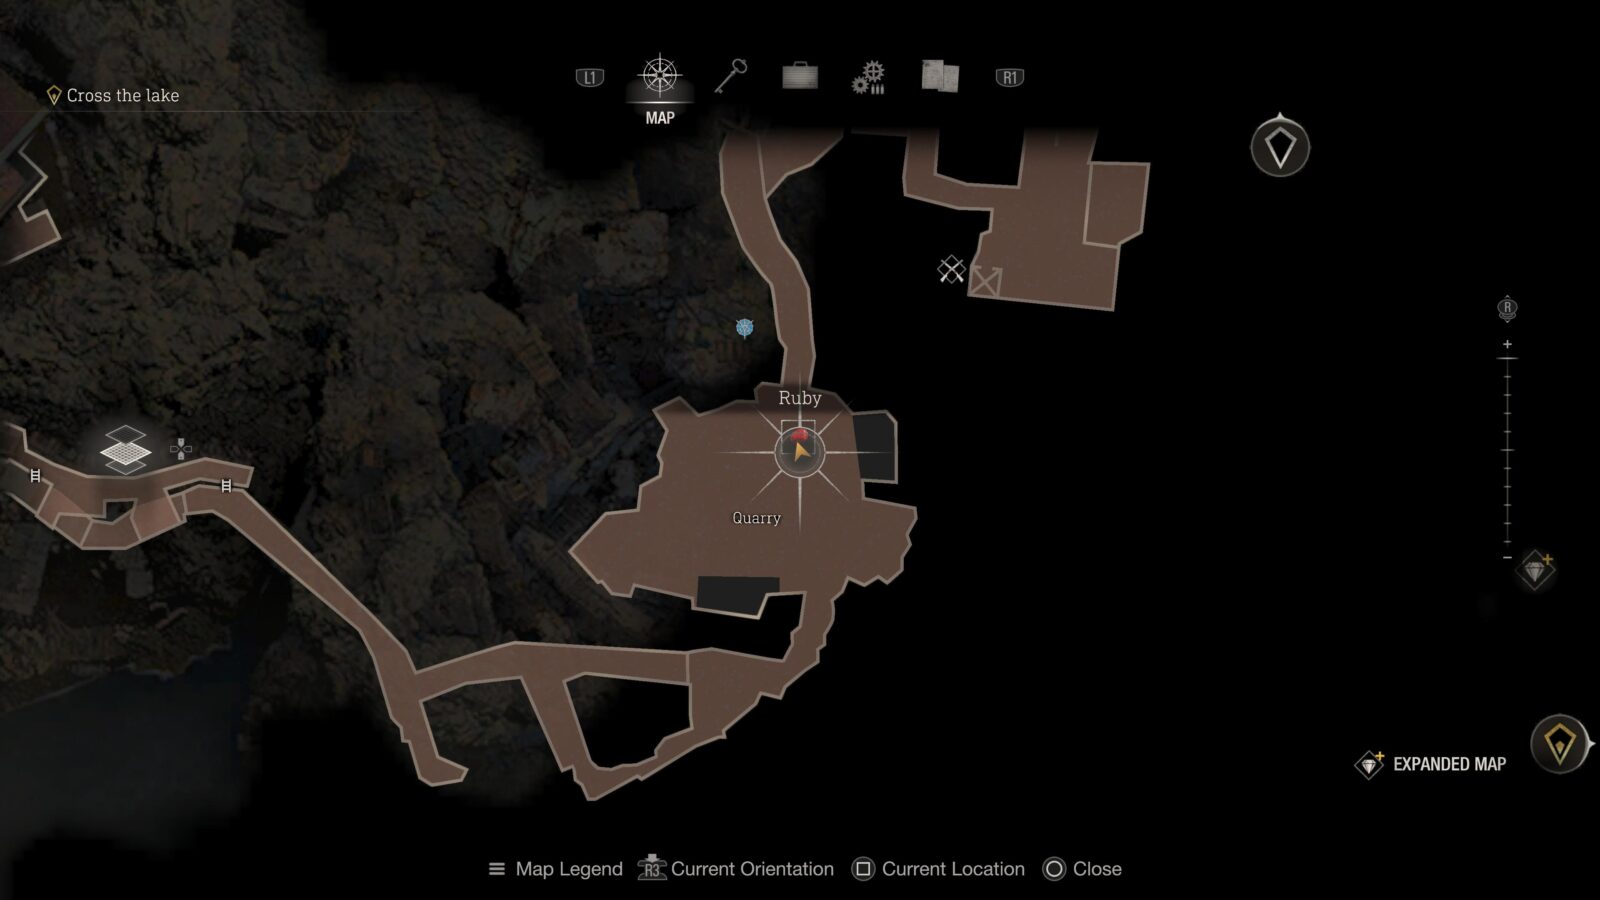
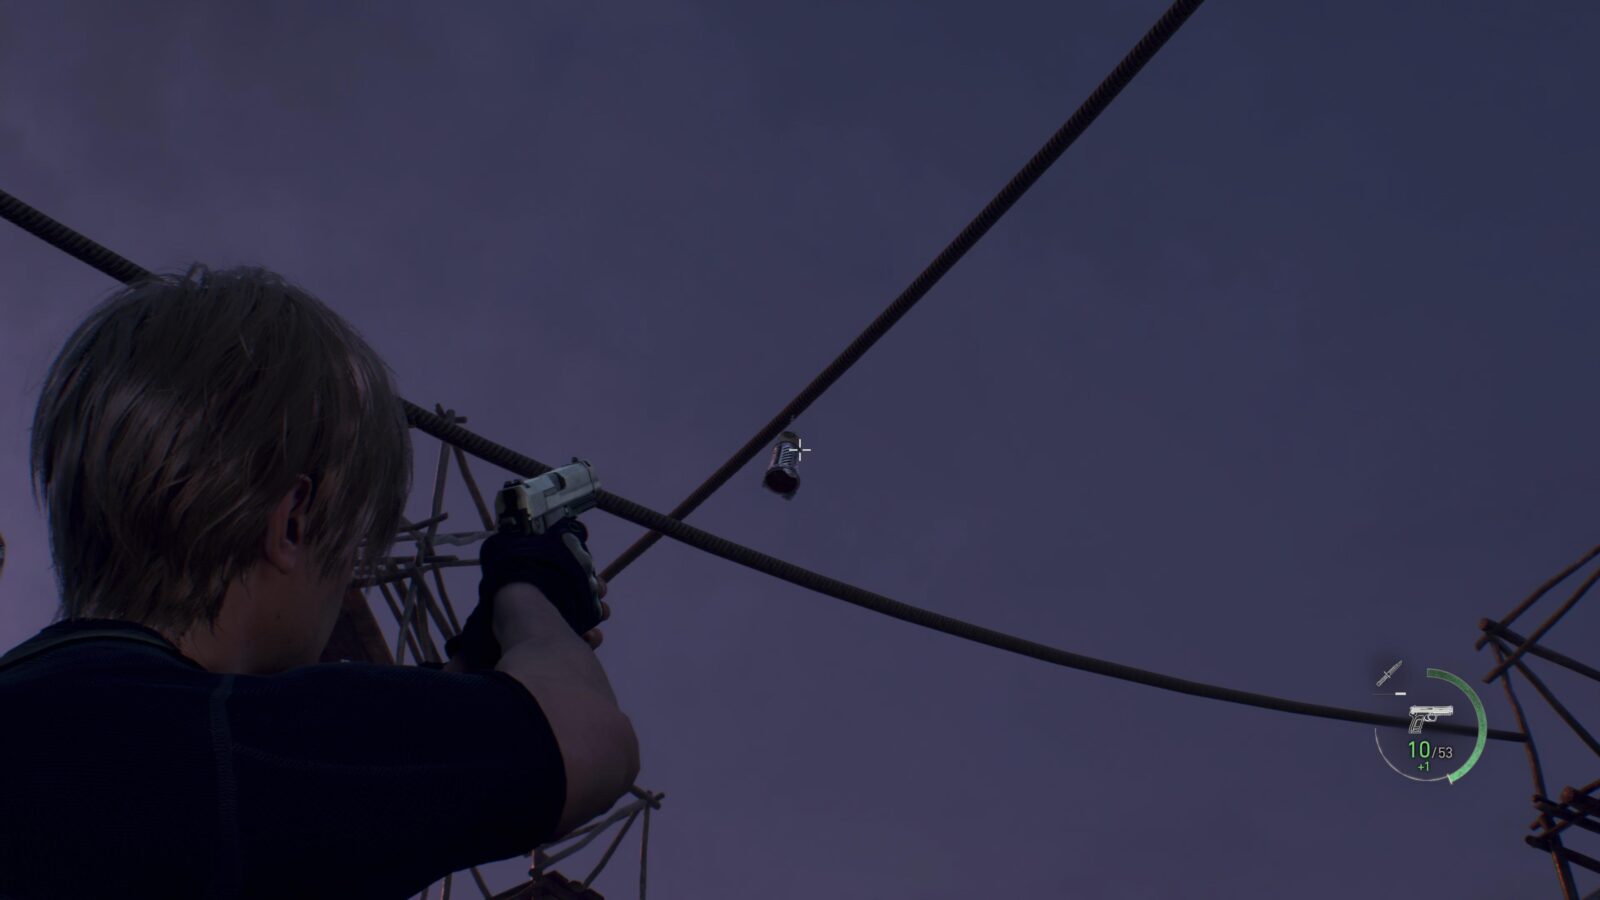
Ruby
Directly above where the crows were in The Quarry is a metal cage hanging from a rope. Shoot it down to get a Ruby.
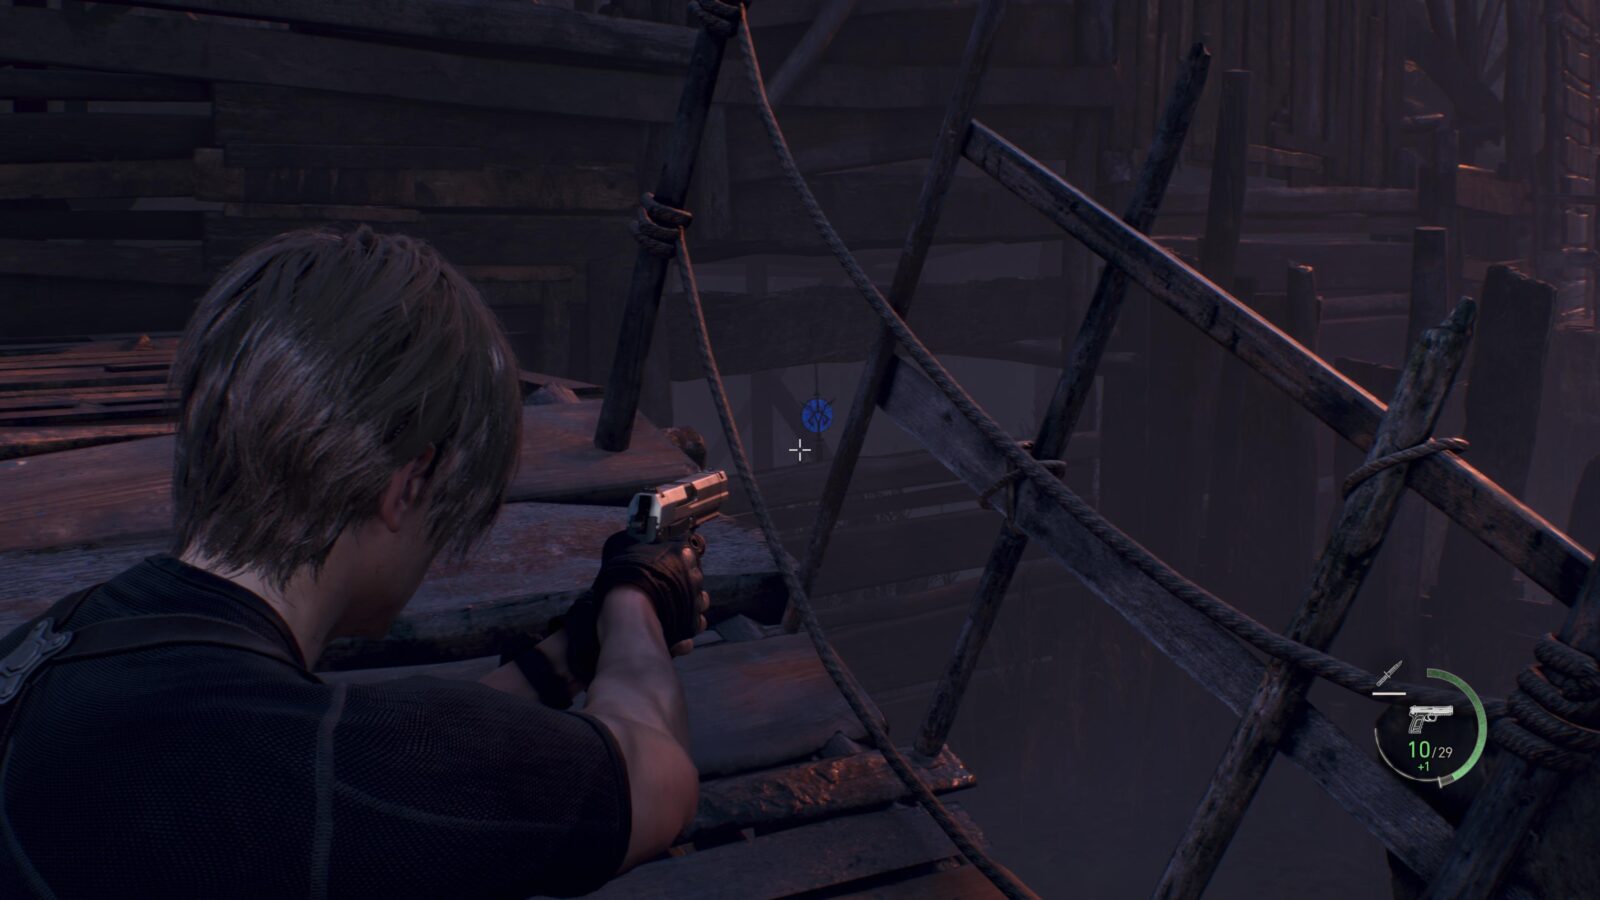
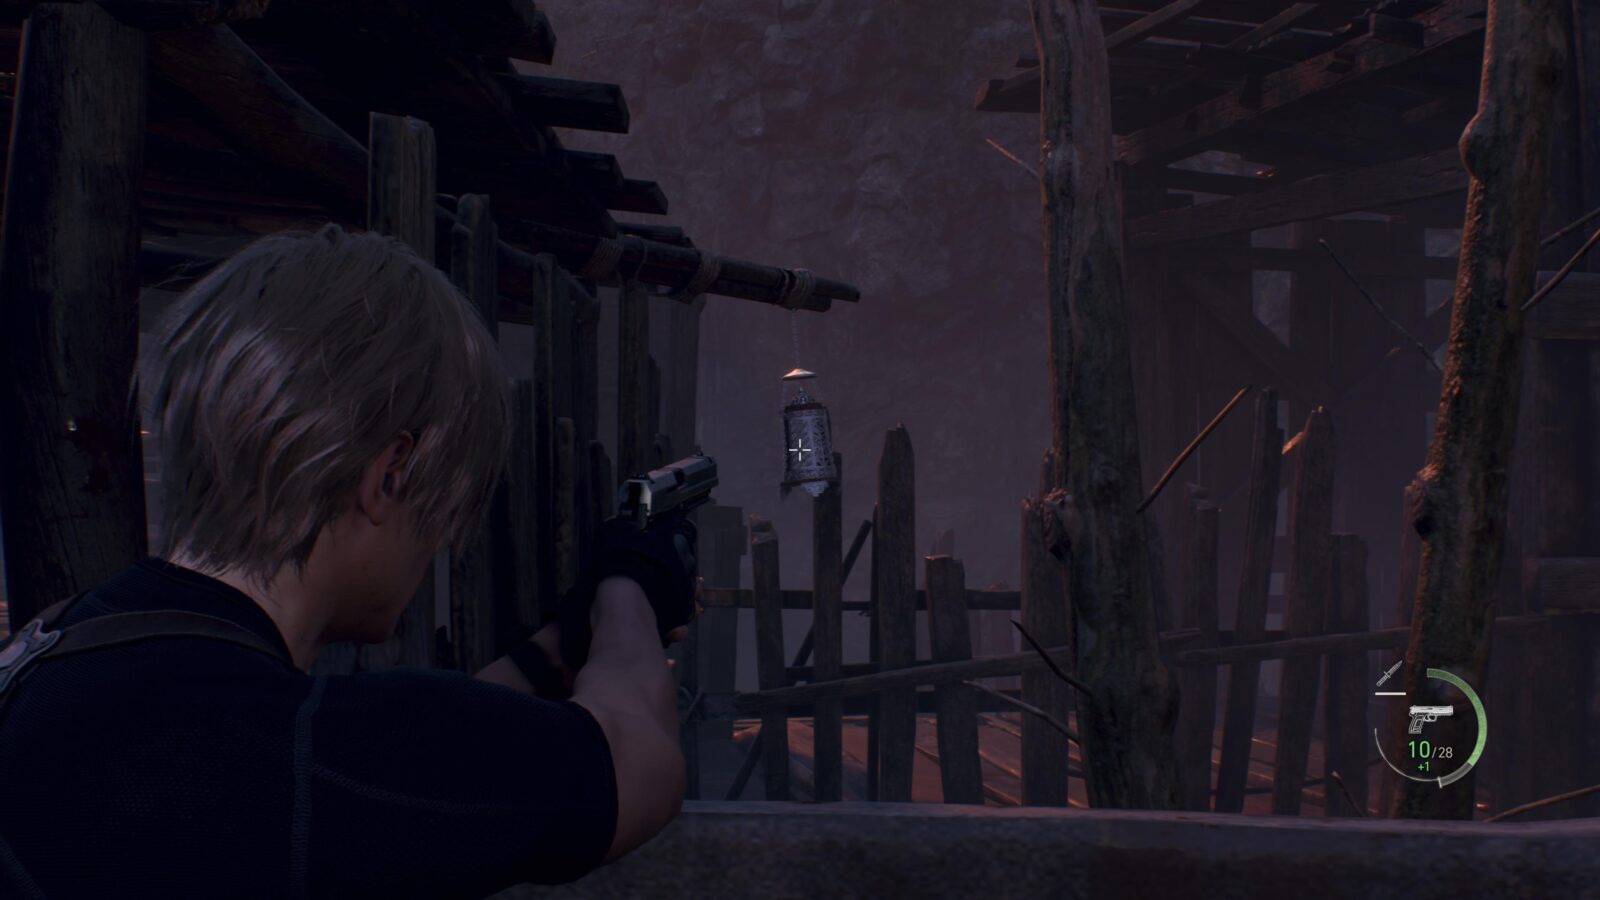
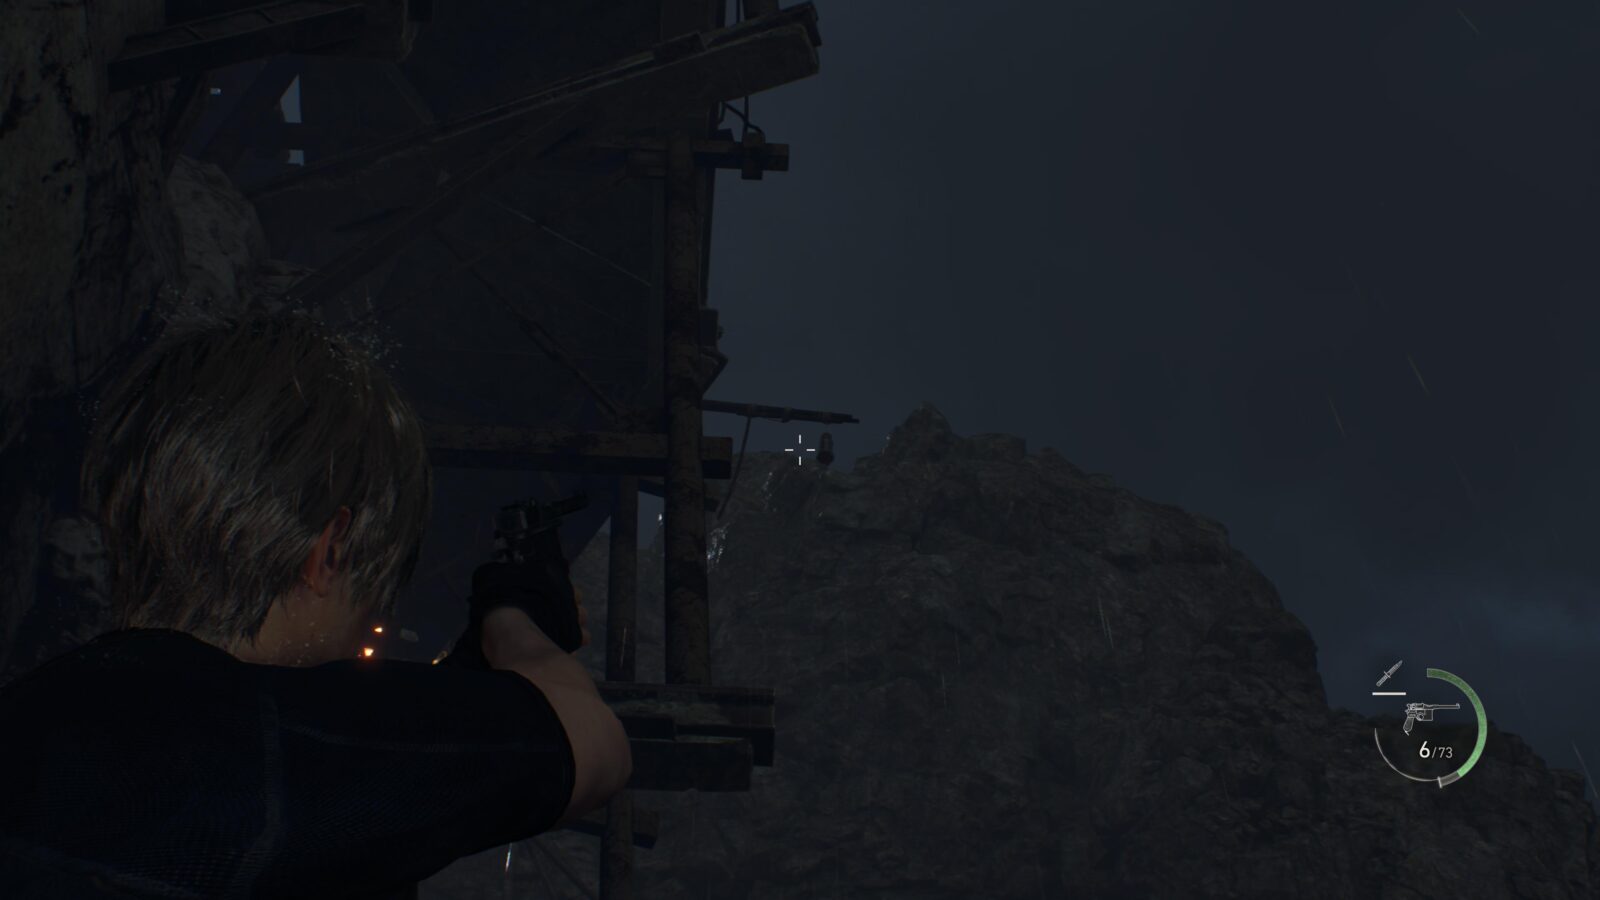
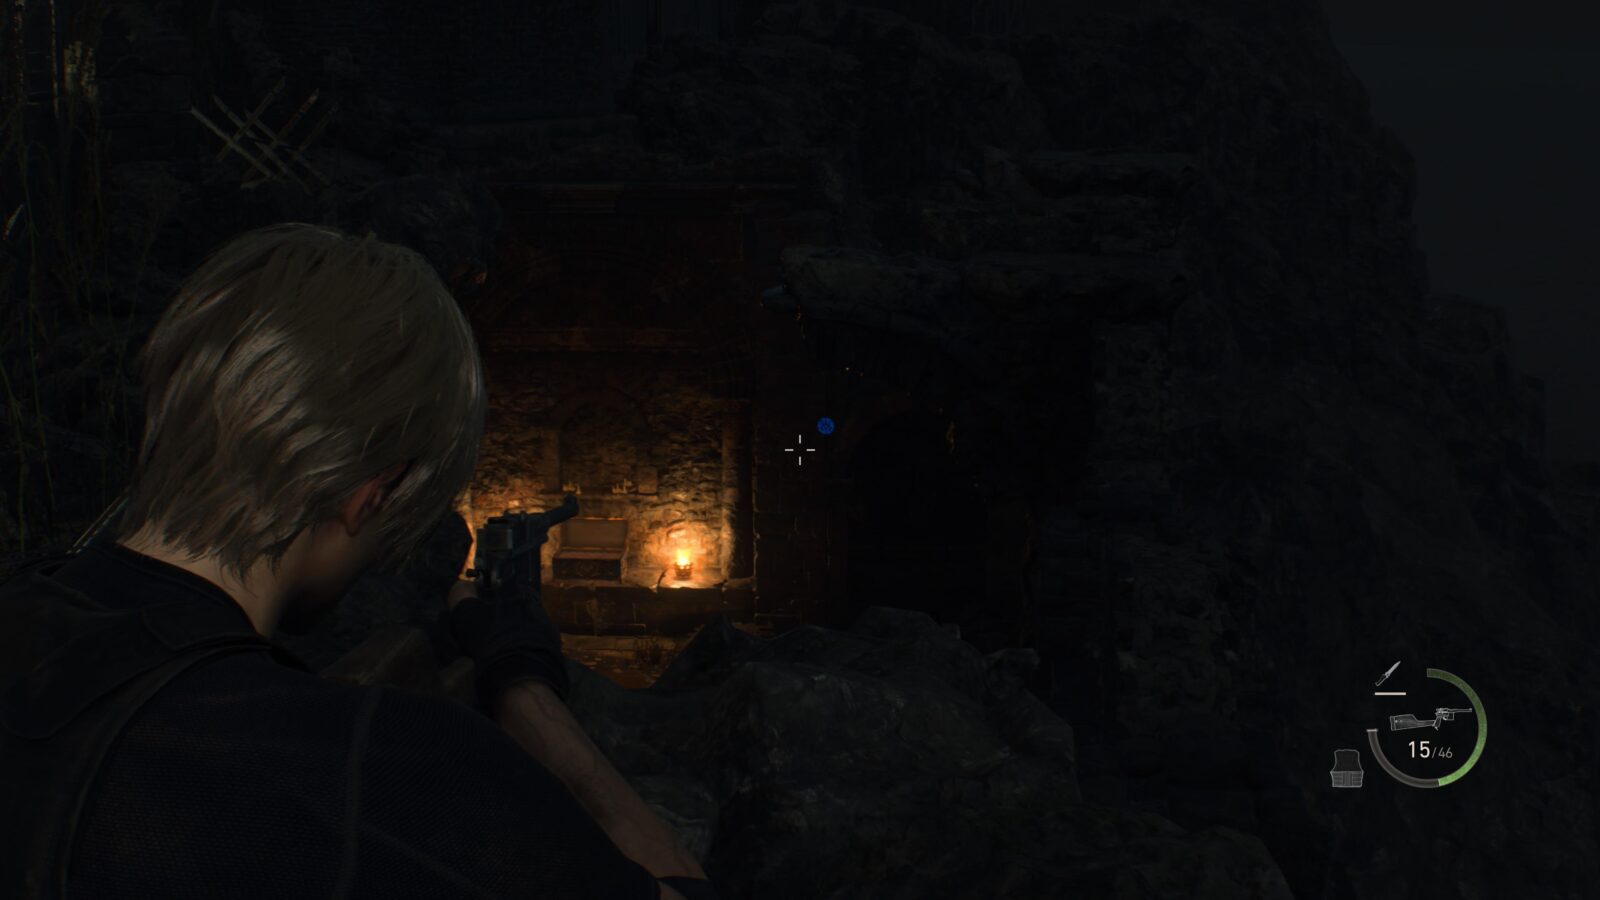
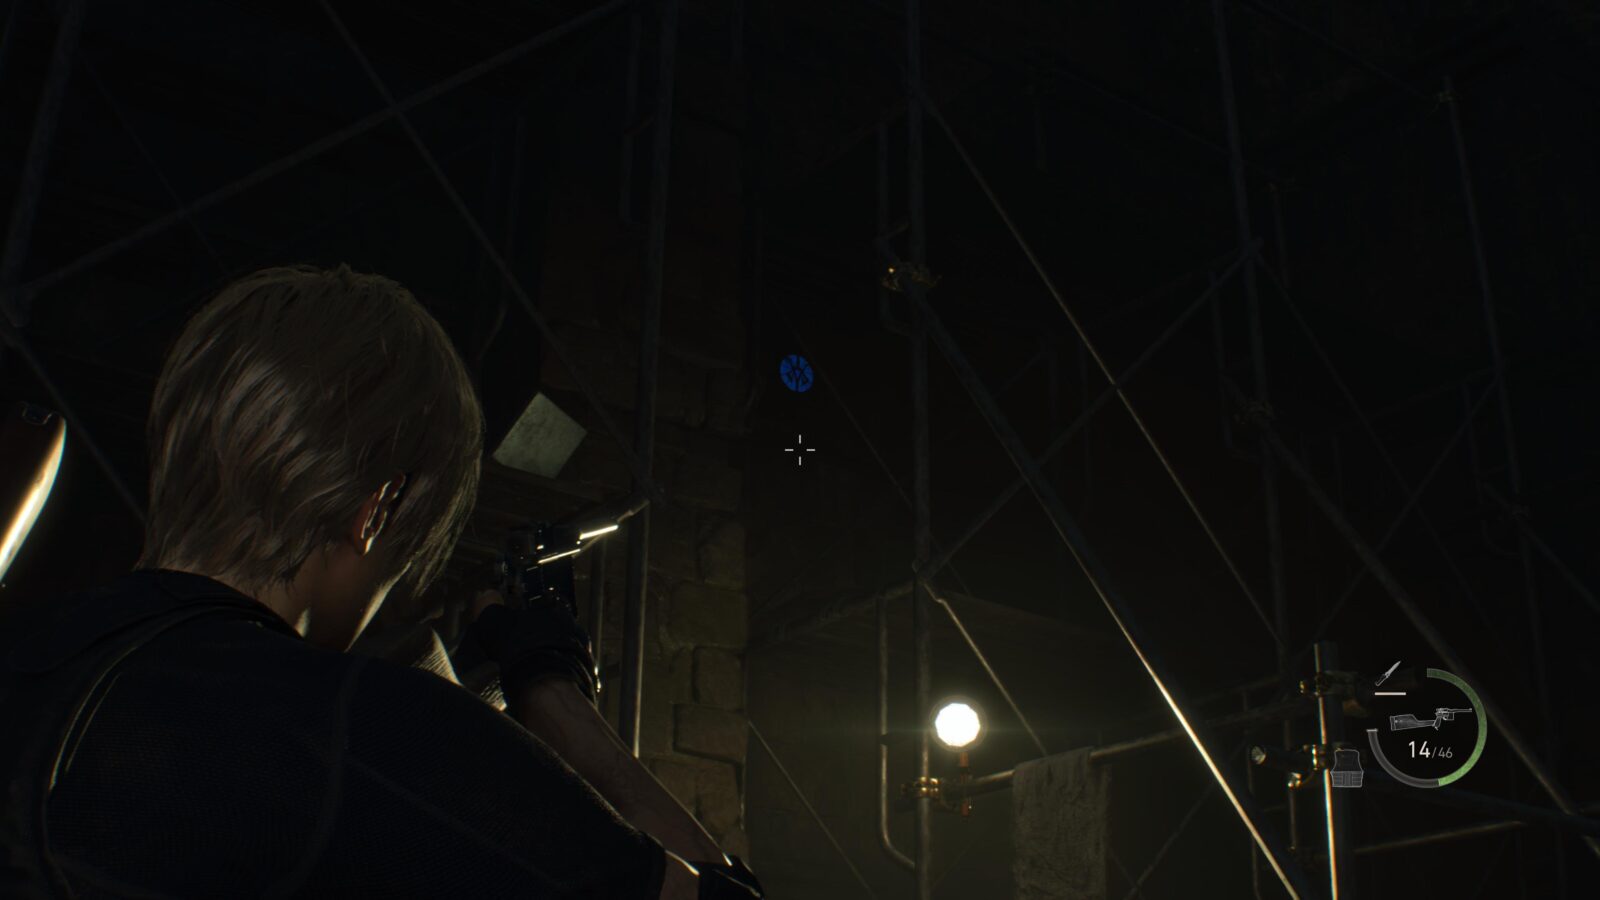
Blue Medallion #1
Before you leave the Quarry look up and to the left of the exit to find a medallion hanging on some scaffolding.

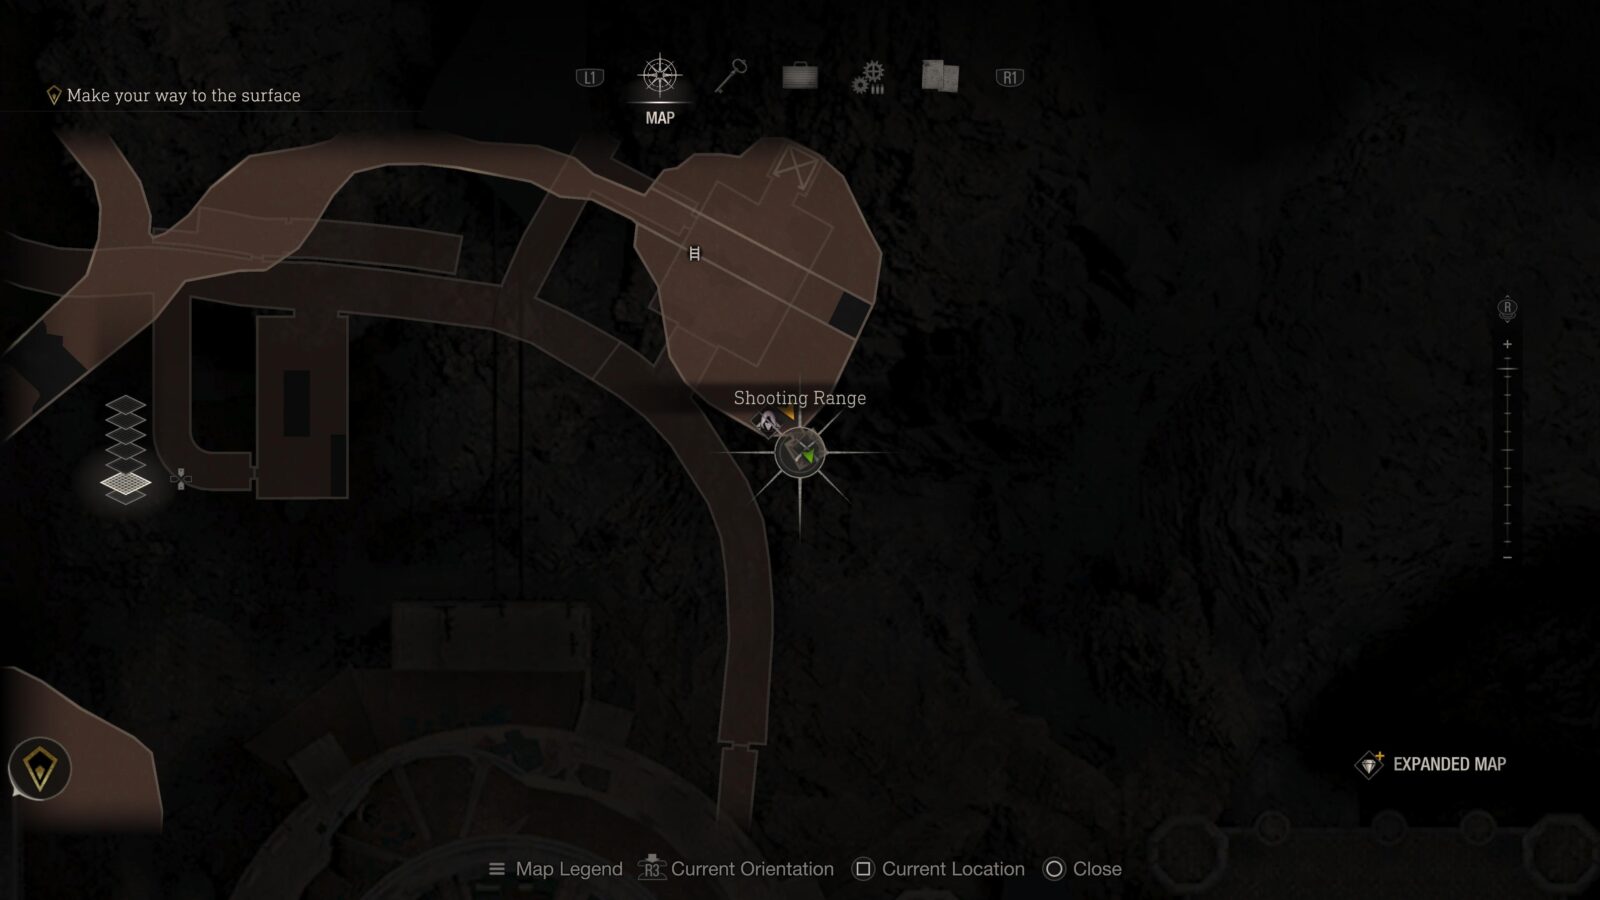
Shooting Range
When you meet the Merchant again after the Quarry you will see an elevator to his right. Take the elevator and it will bring you to the Shooting Range. When you first visit you will only be able to take on 3 challenges–1A, 1B, and 1C–out of the total 12. You will need to obtain S Rank on all challenges to unlock the Real Deadeye trophy.

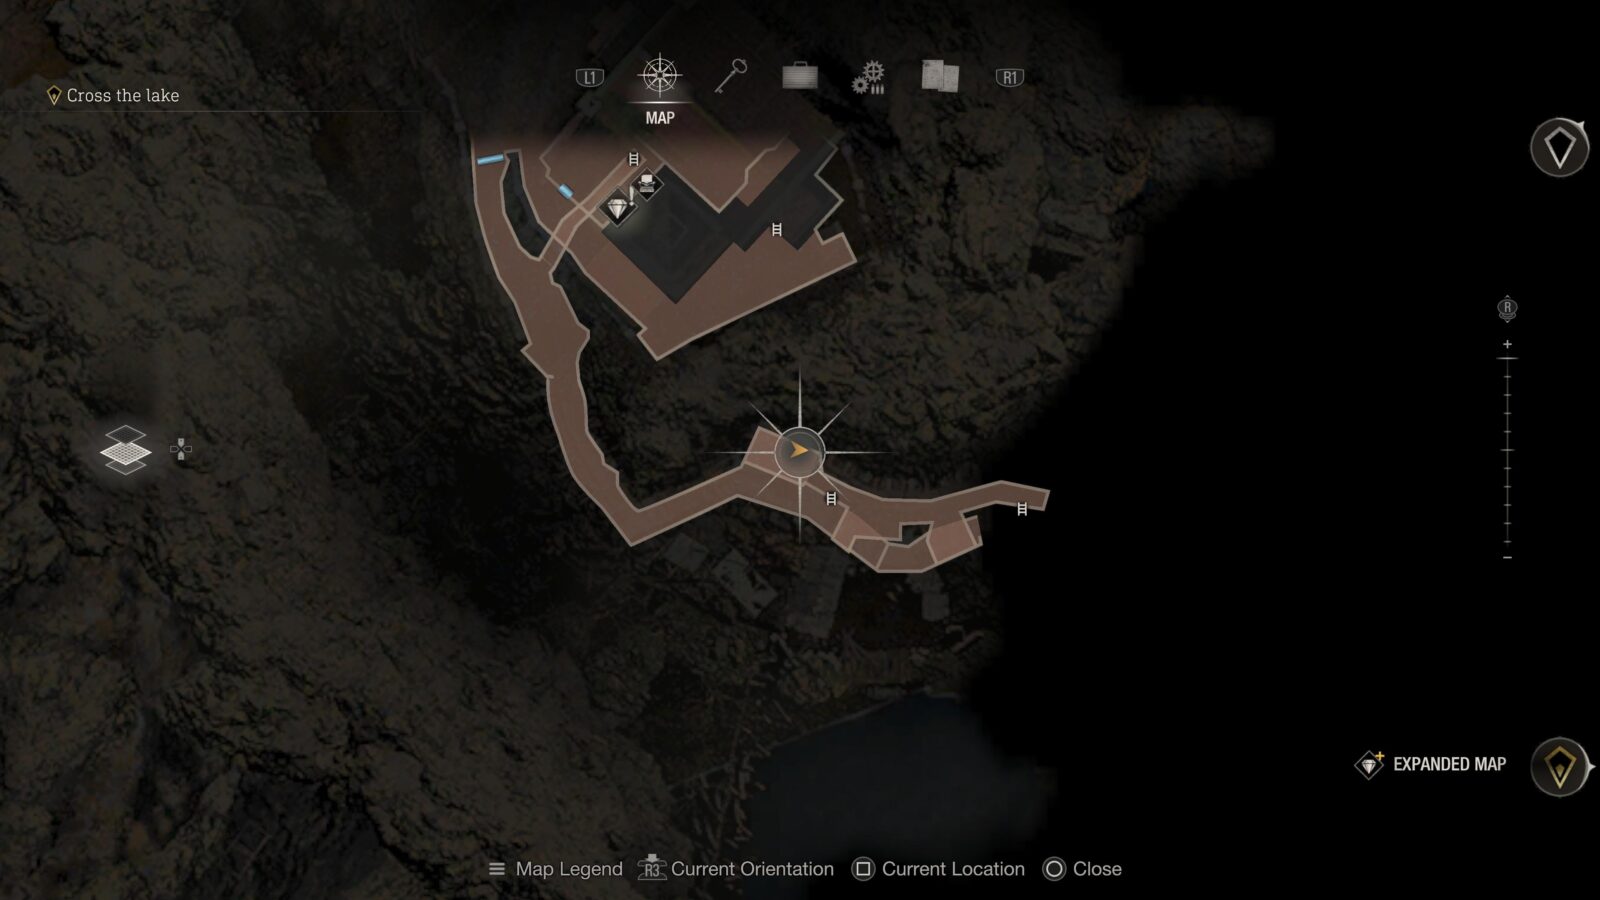
Clockwork Castellan #3
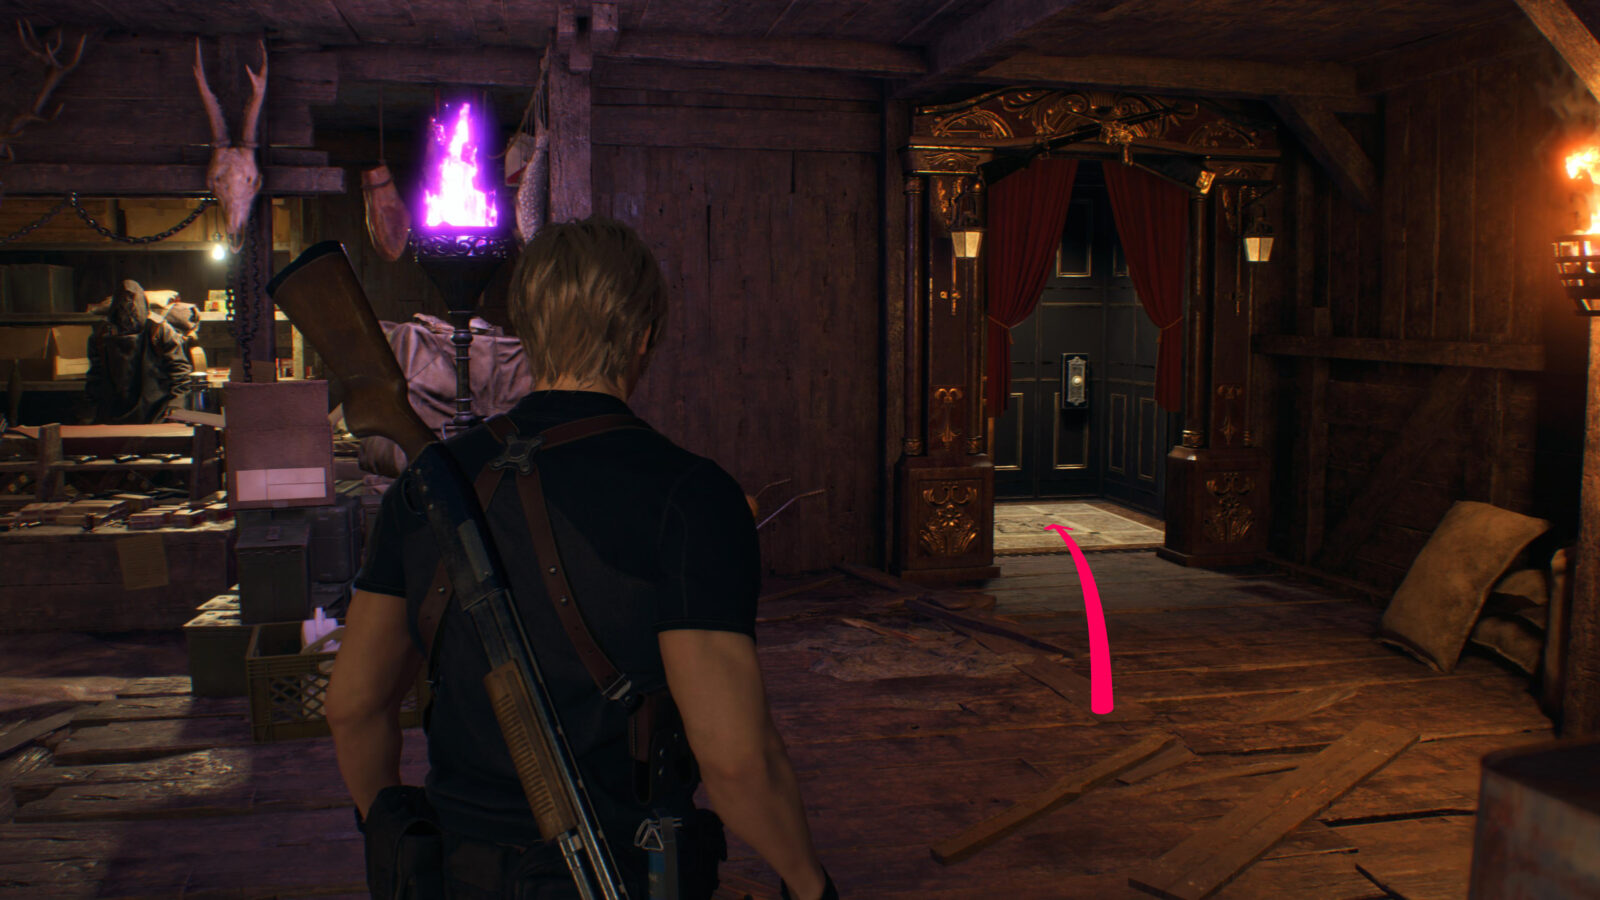
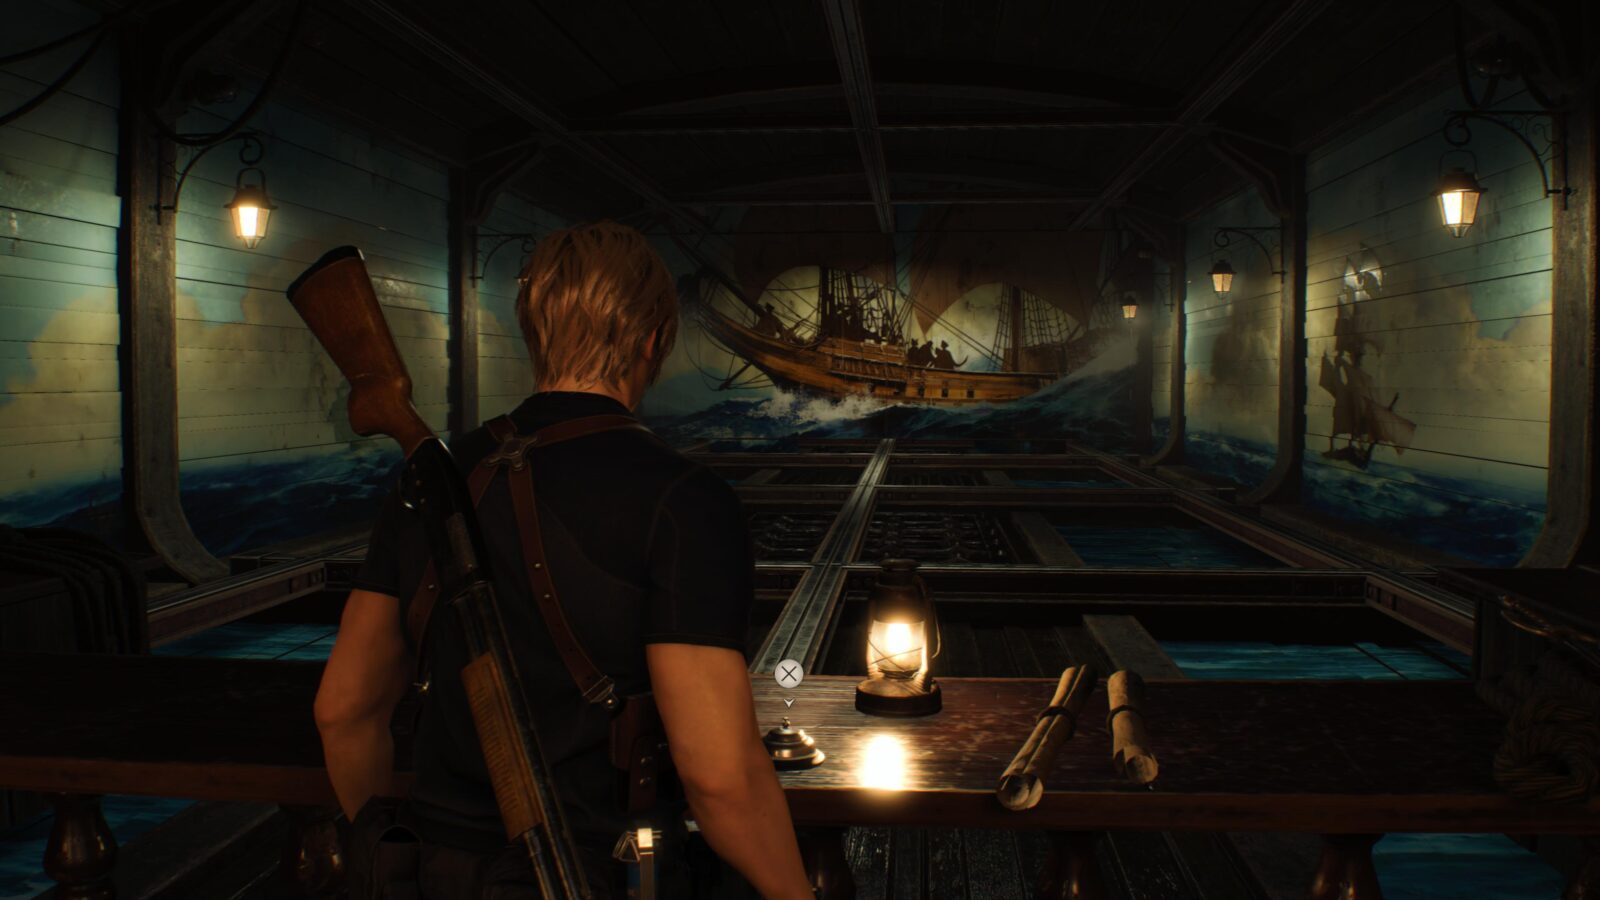
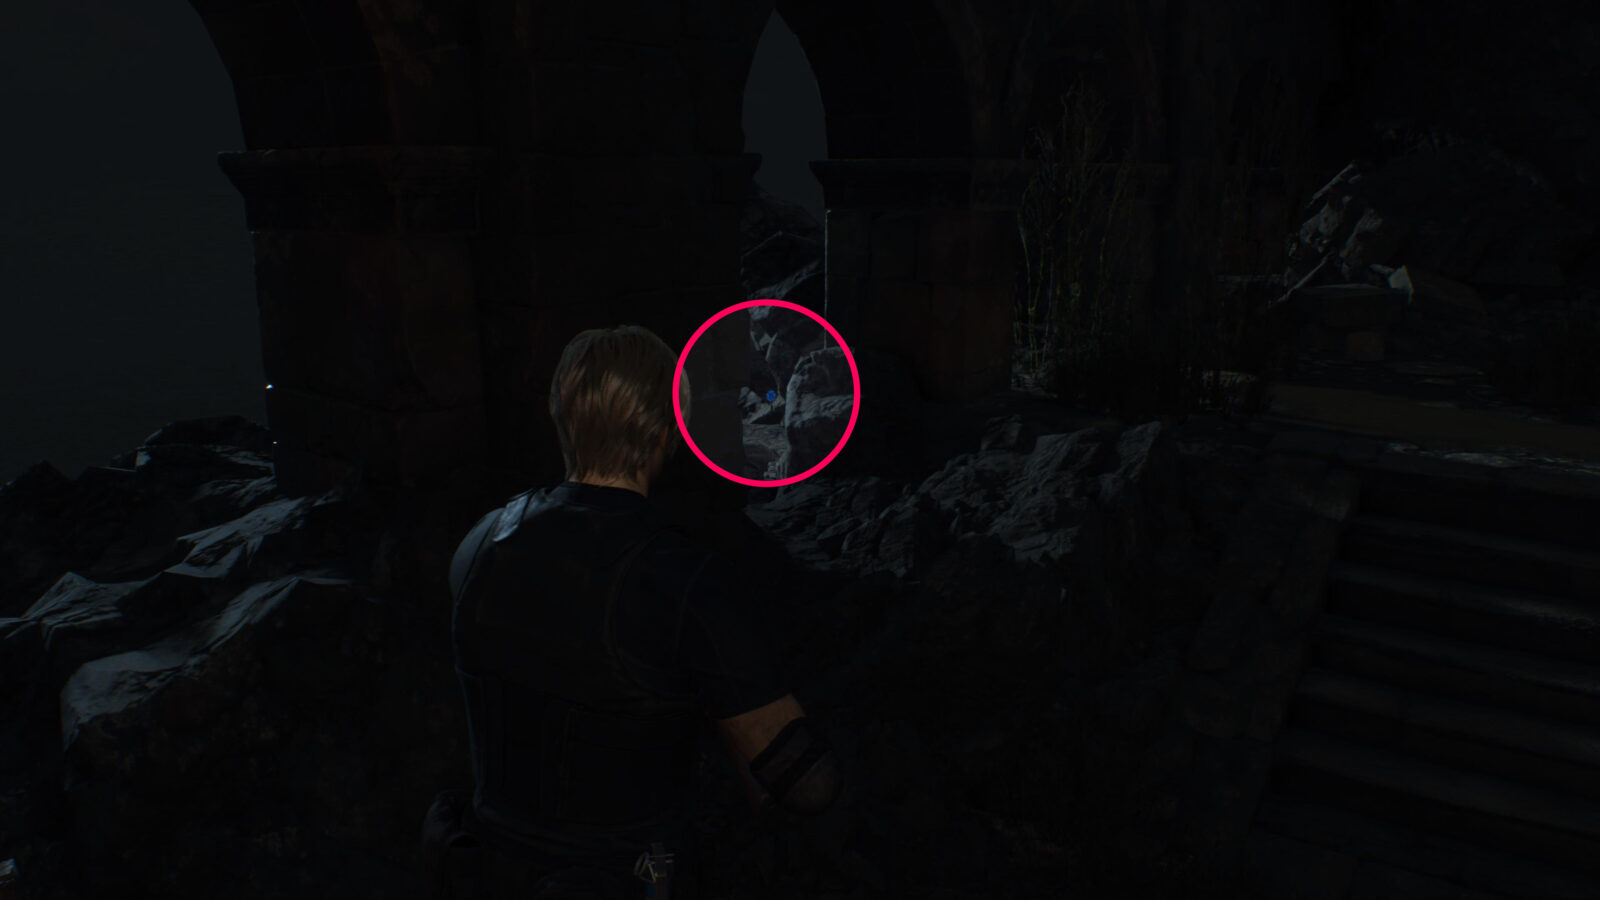
From the Merchant drop down the ladder and head to the right. Walk towards the water and when the path turns right look at the stacked boxes ahead of you. There will be a small gap between the stacked boxes and the corrugated metal roofing where you can see the statue.


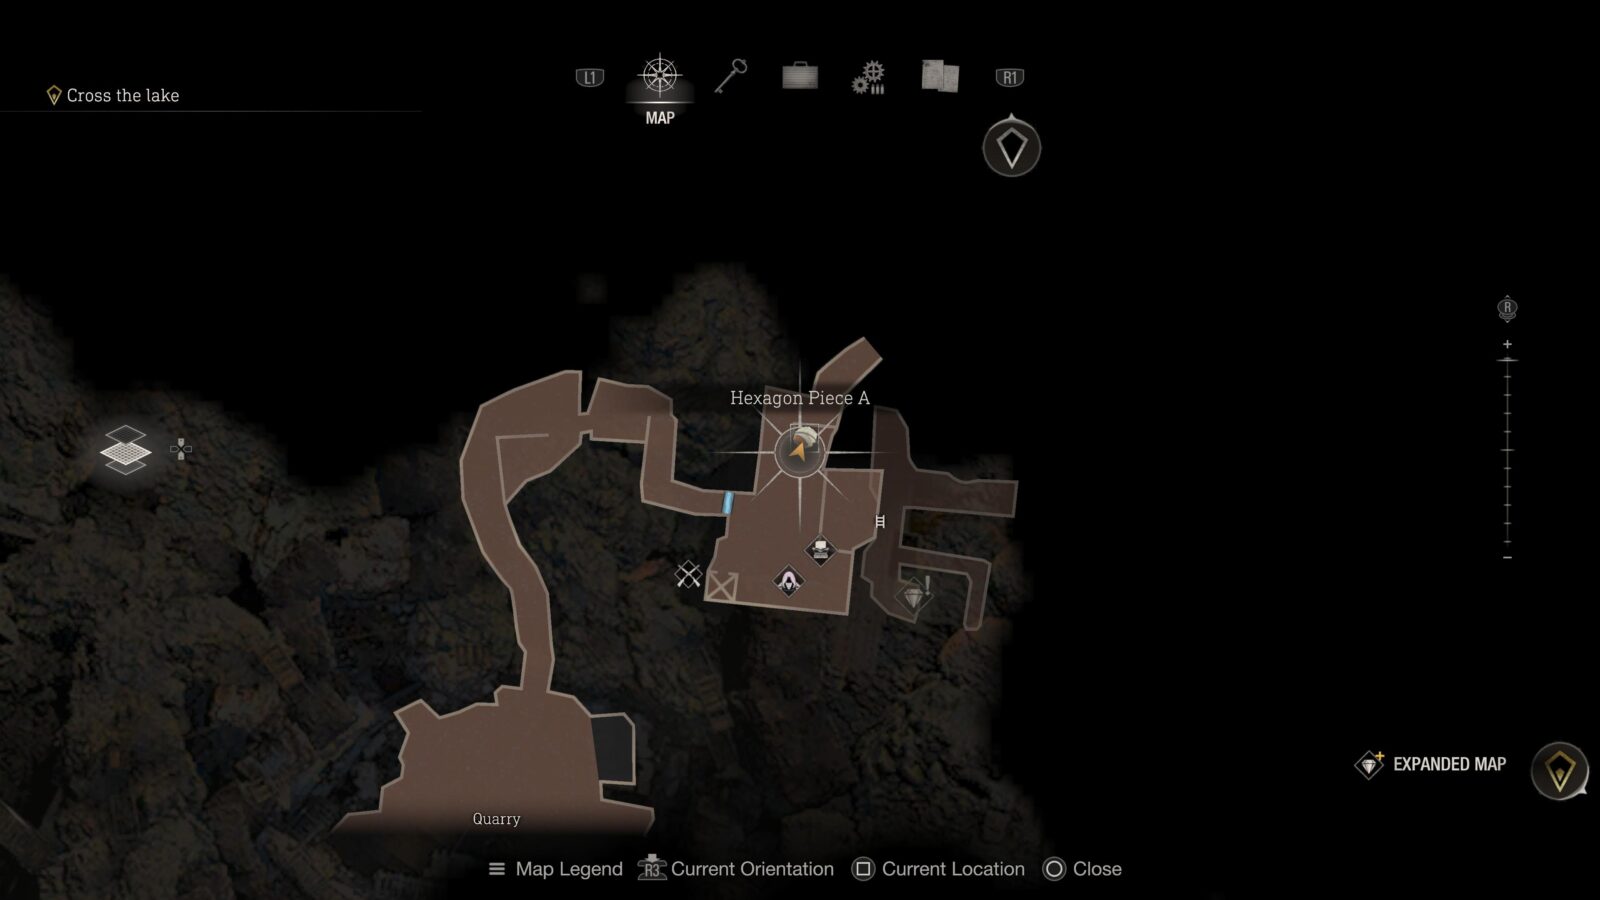
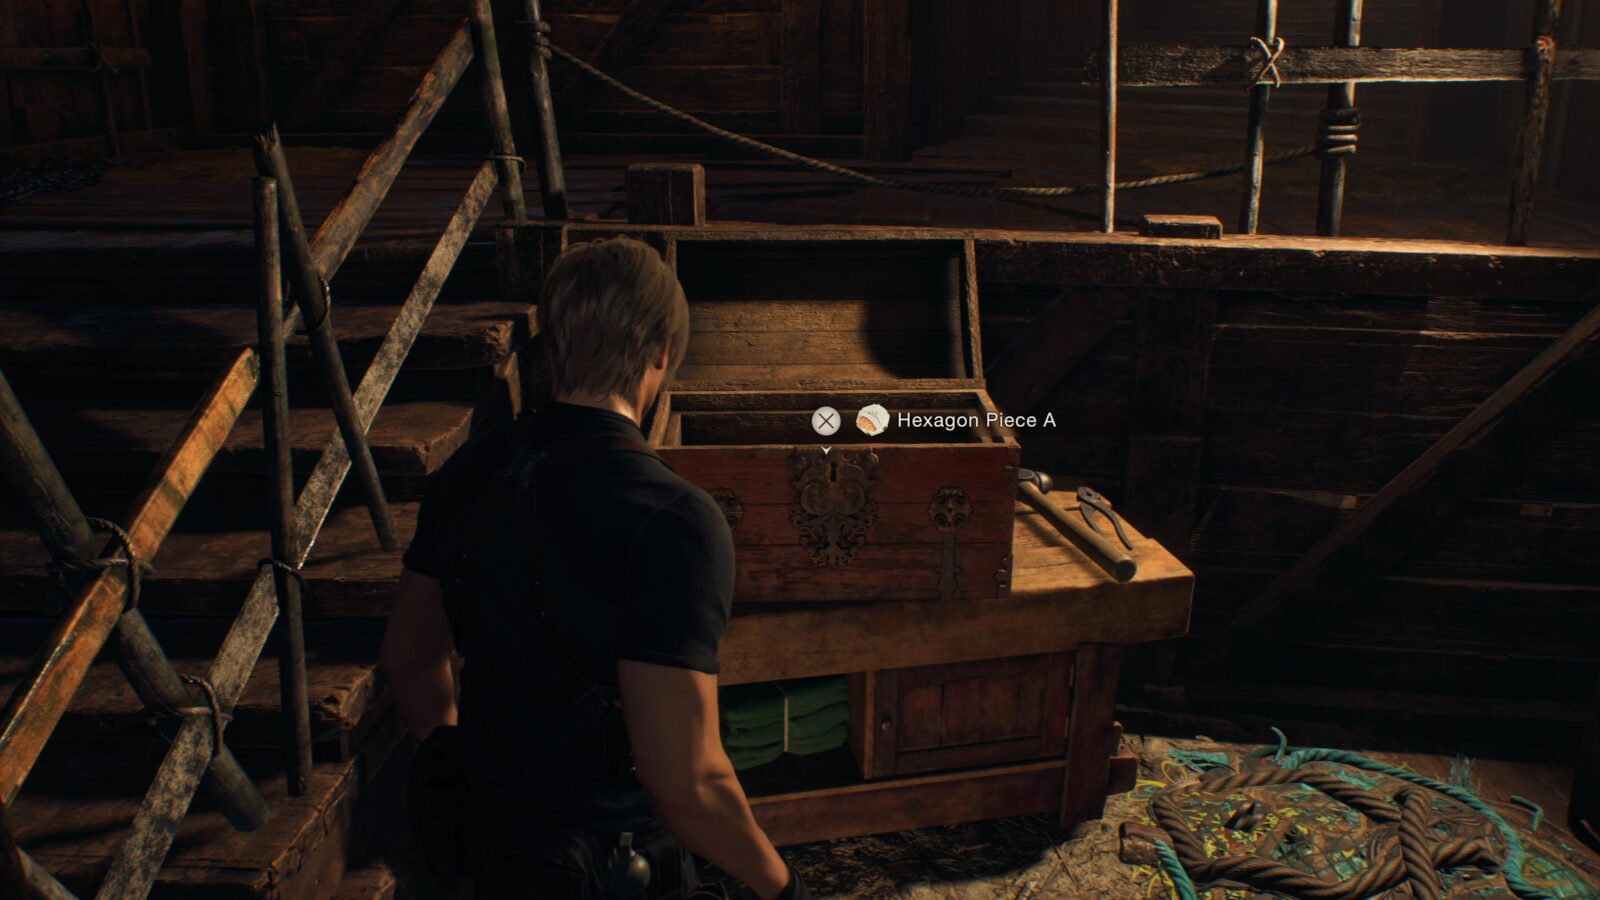
Hexagon Piece A
Directly across from the Merchant is a small chest with a puzzle piece inside. There are 3 of these to collect for use later.
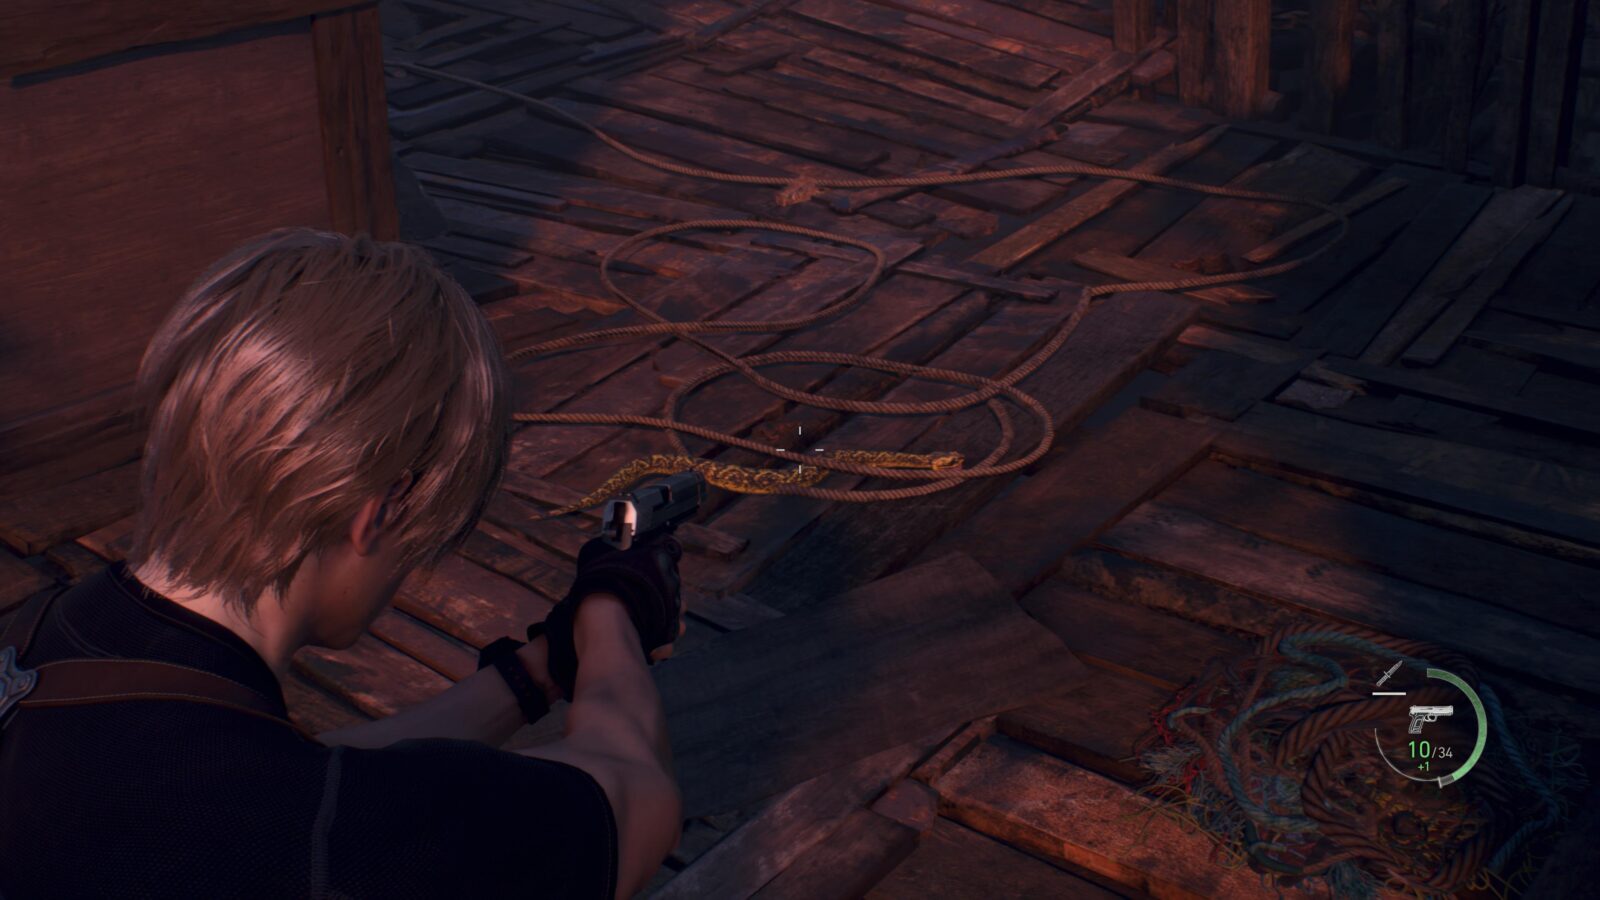
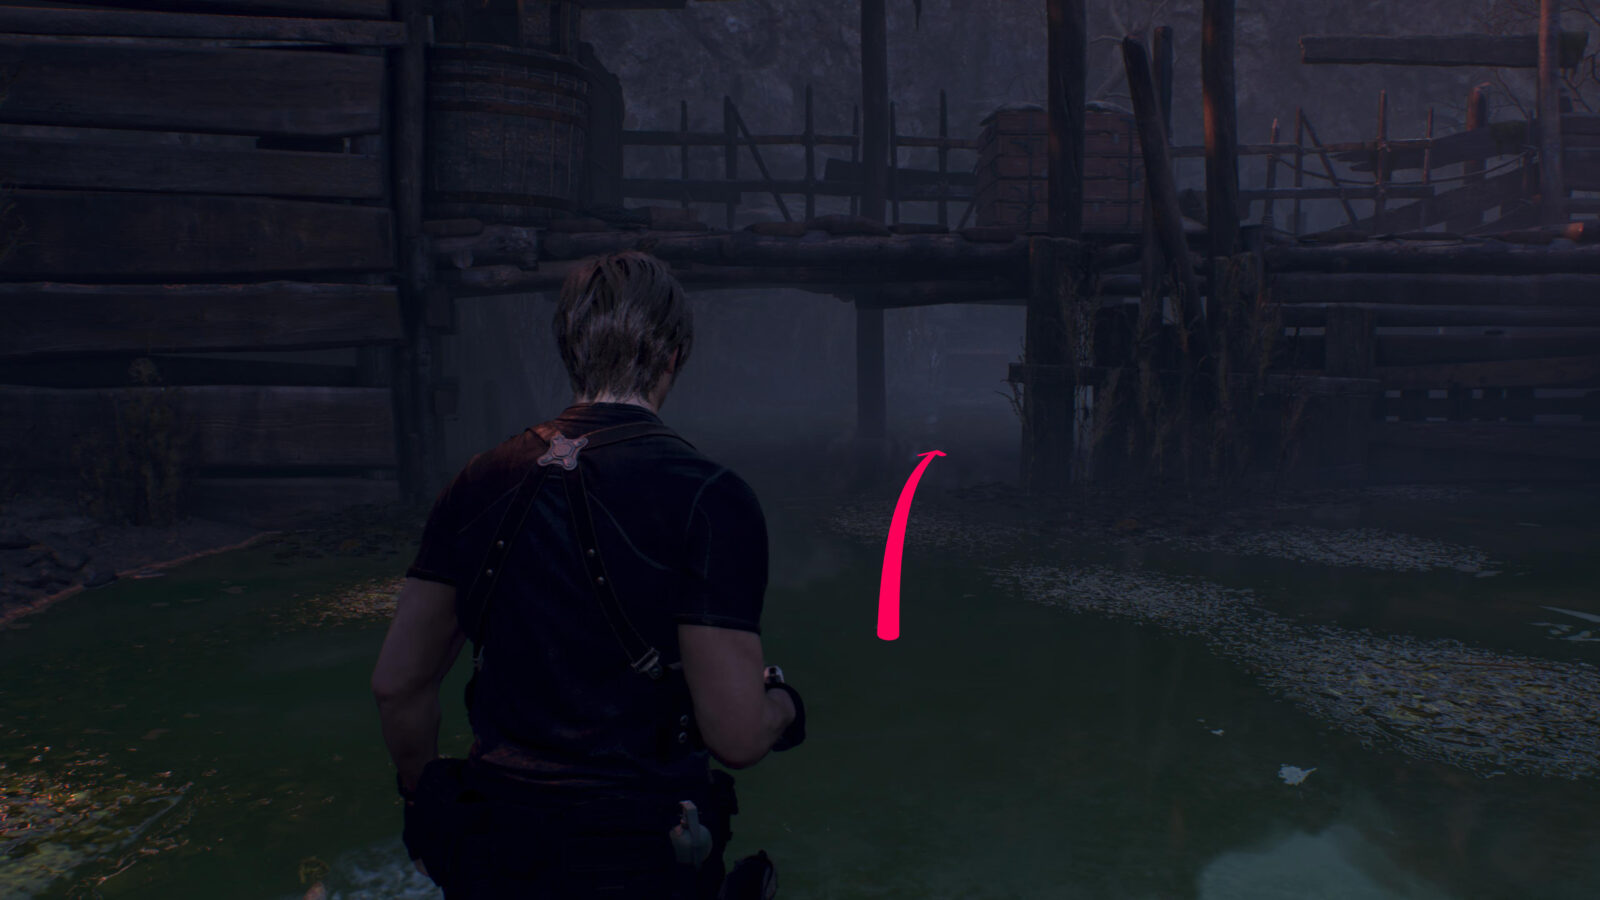
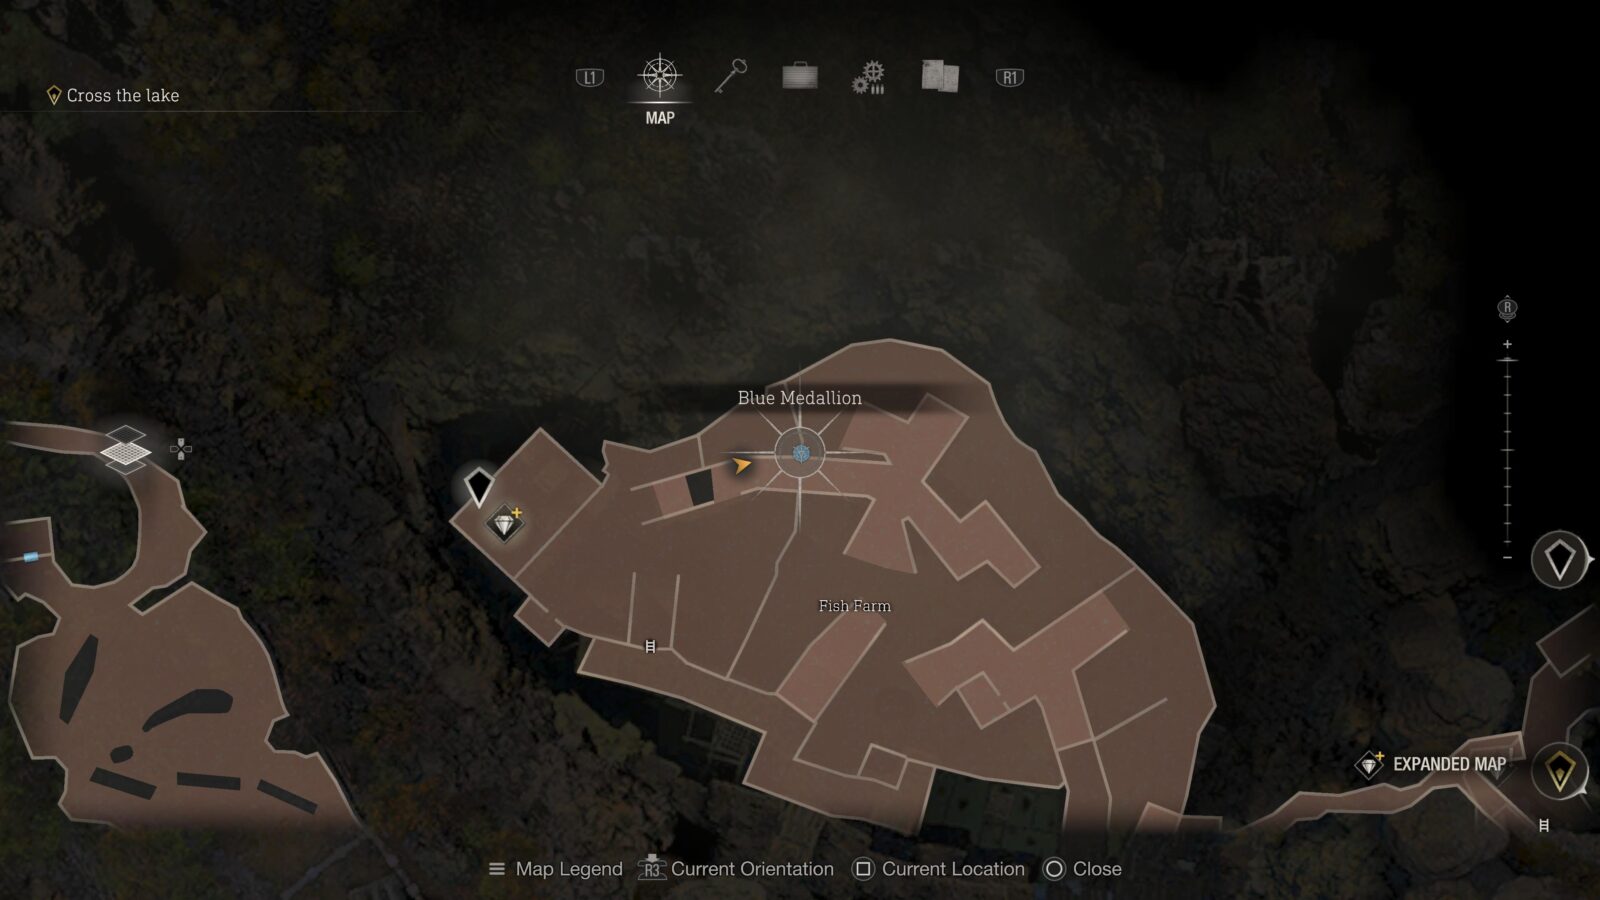
Blue Medallion #2
Leave the room with the Merchant and head outside. You will come to a wooden dock where the boat is. Jump down and look for a blue medallion under the floor. (see the below image for the exact location where you can see it).


Blue Medallion #3
In the Fish Farm in the first small wooden hut you can enter is a Blue Medallion.

Vipers (multiple)
There will be several vipers that spawn inside the Fish Farm area. Keep an eye out on the floor and kill any you see.
Blue Medallion #4
On the far left of the Fish Farm will be a medallion that you can spot pretty easily when walking up the ramp there.

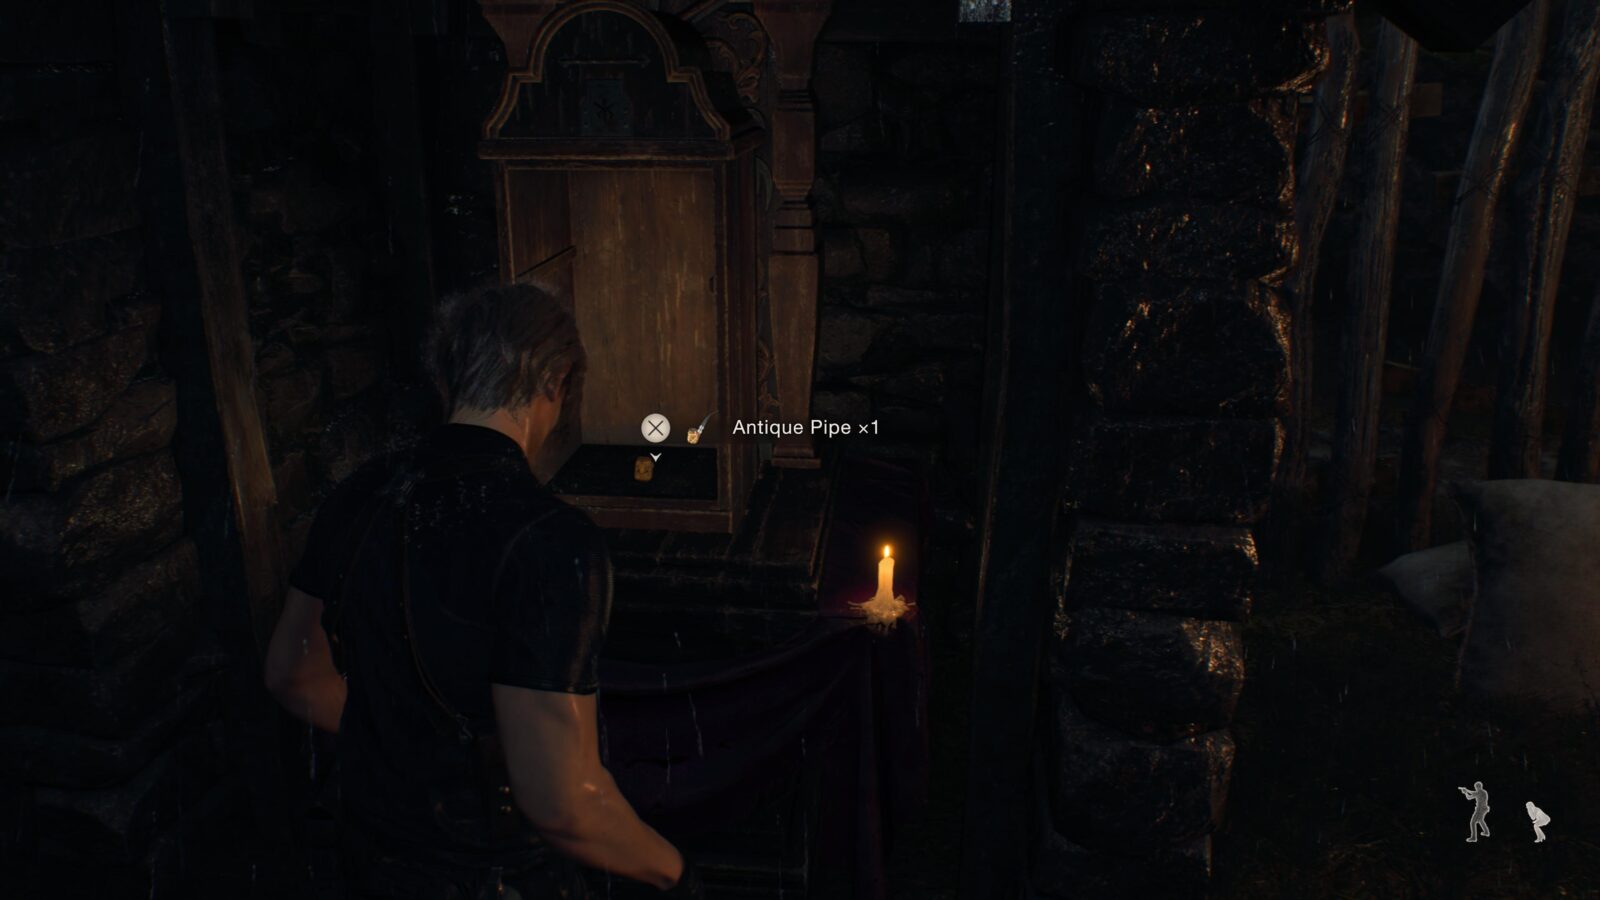
Antique Pipe
On the right side of the Fish Farm opposite Blue Medallion #4 is a silver cage hanging from a wooden beam. Shoot it down and go into the water to pick up the pipe. No slots, can be sold.

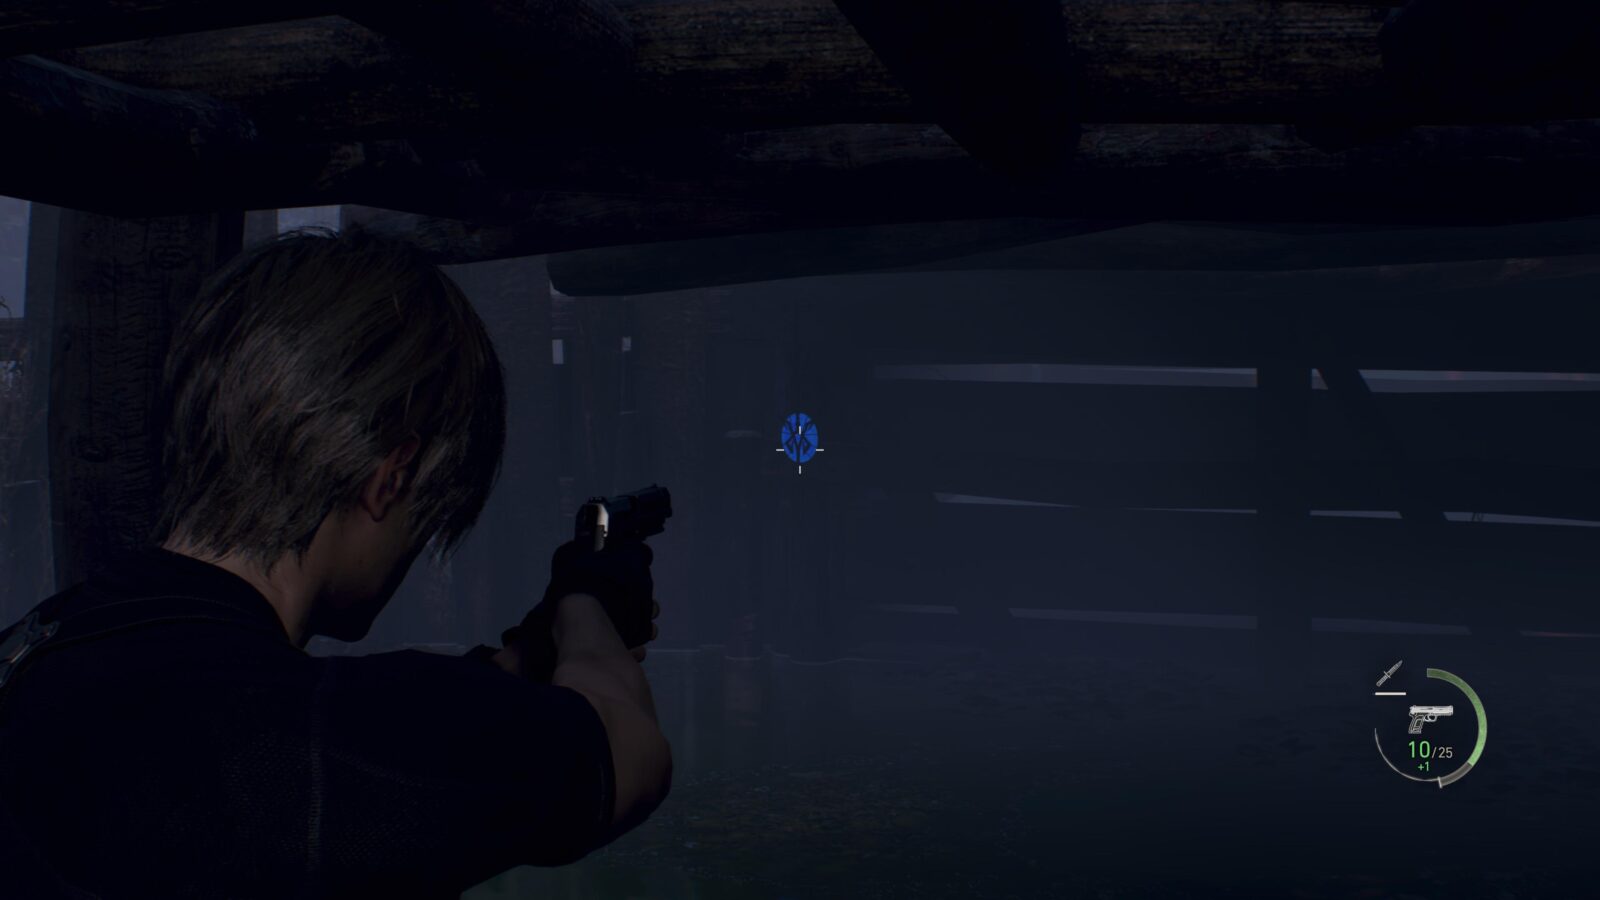
Blue Medallion #5
At the end of the walkway in the Fish Farm you can drop into the water on the left side. As soon as you land turn around and you should see an opening that you can walk under. On the other side is the last medallion.
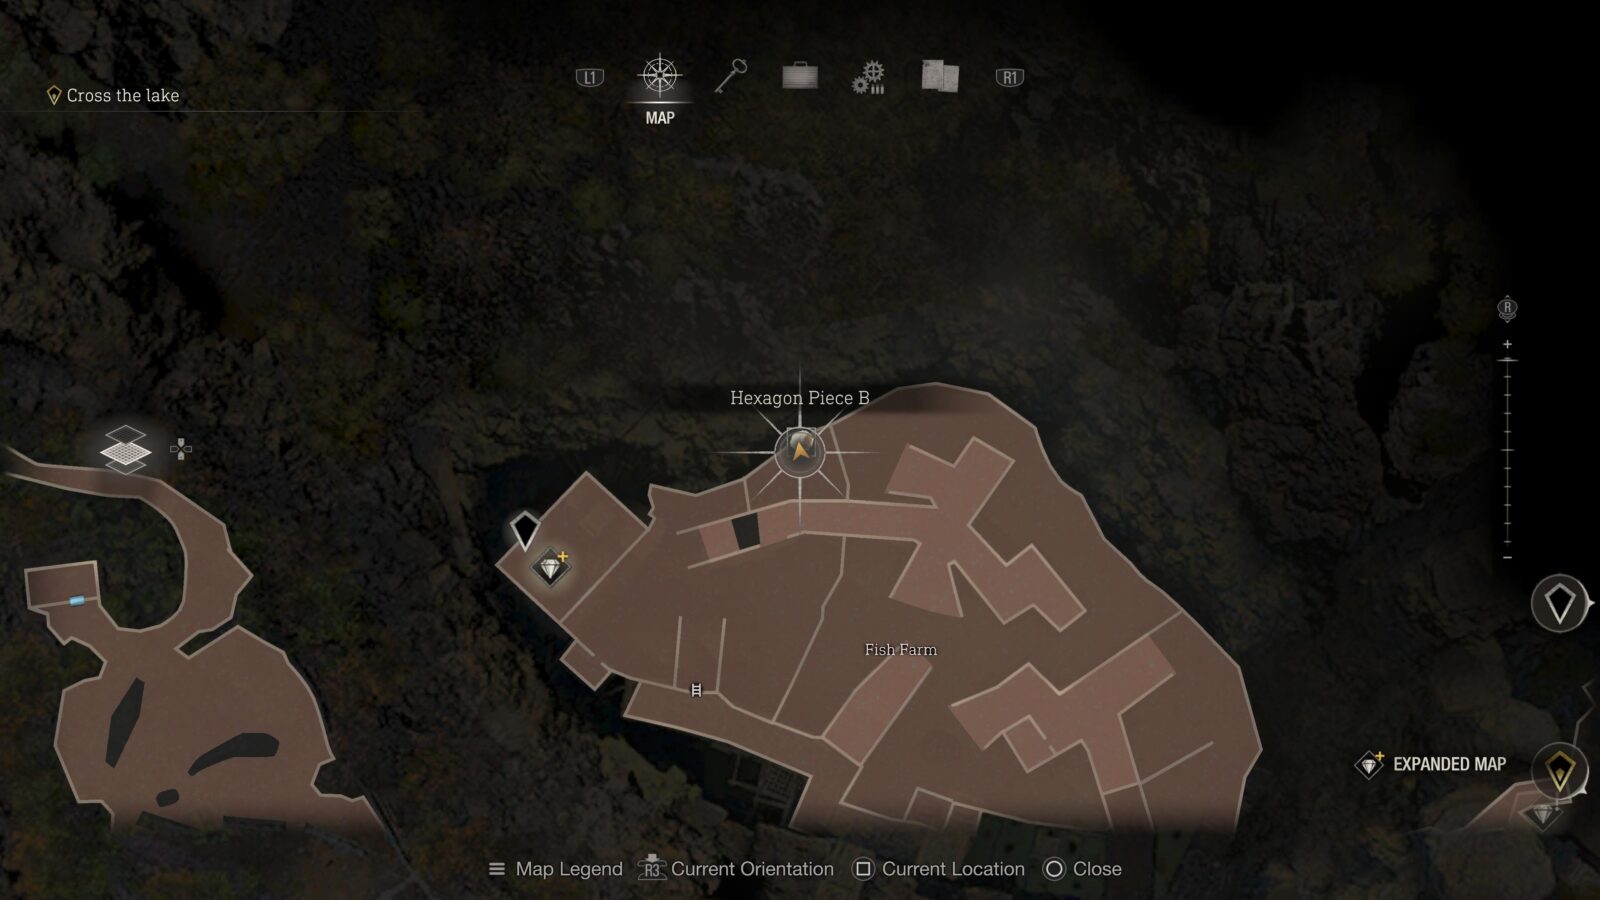
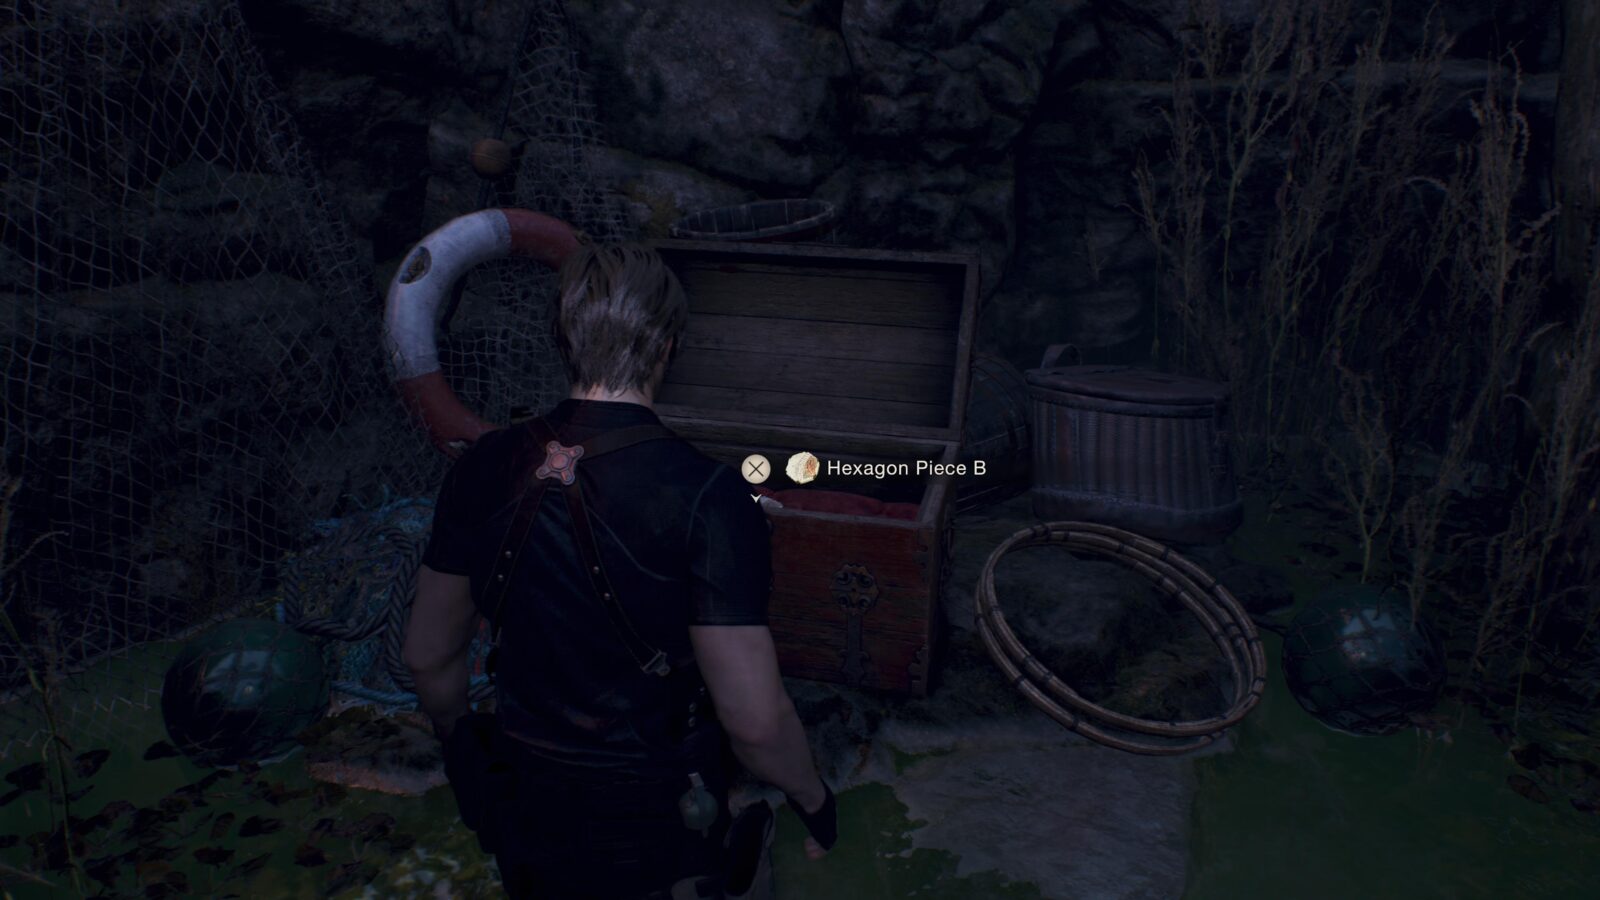
Hexagon Piece B
In the same area as Blue Medallion #5 is a chest with a hexagon piece inside.
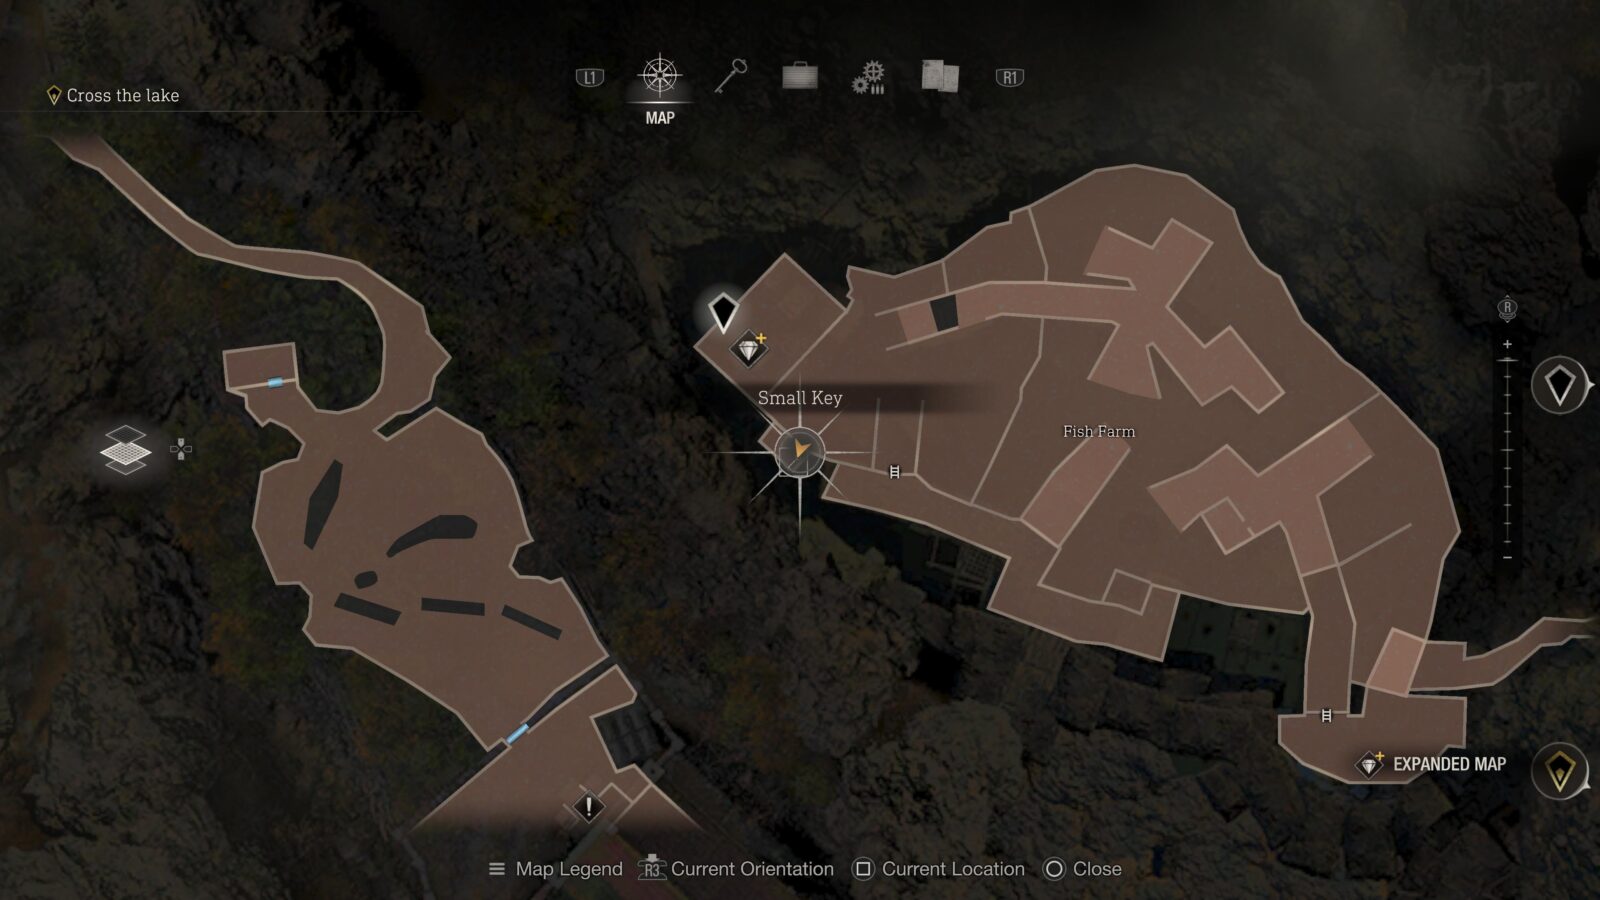
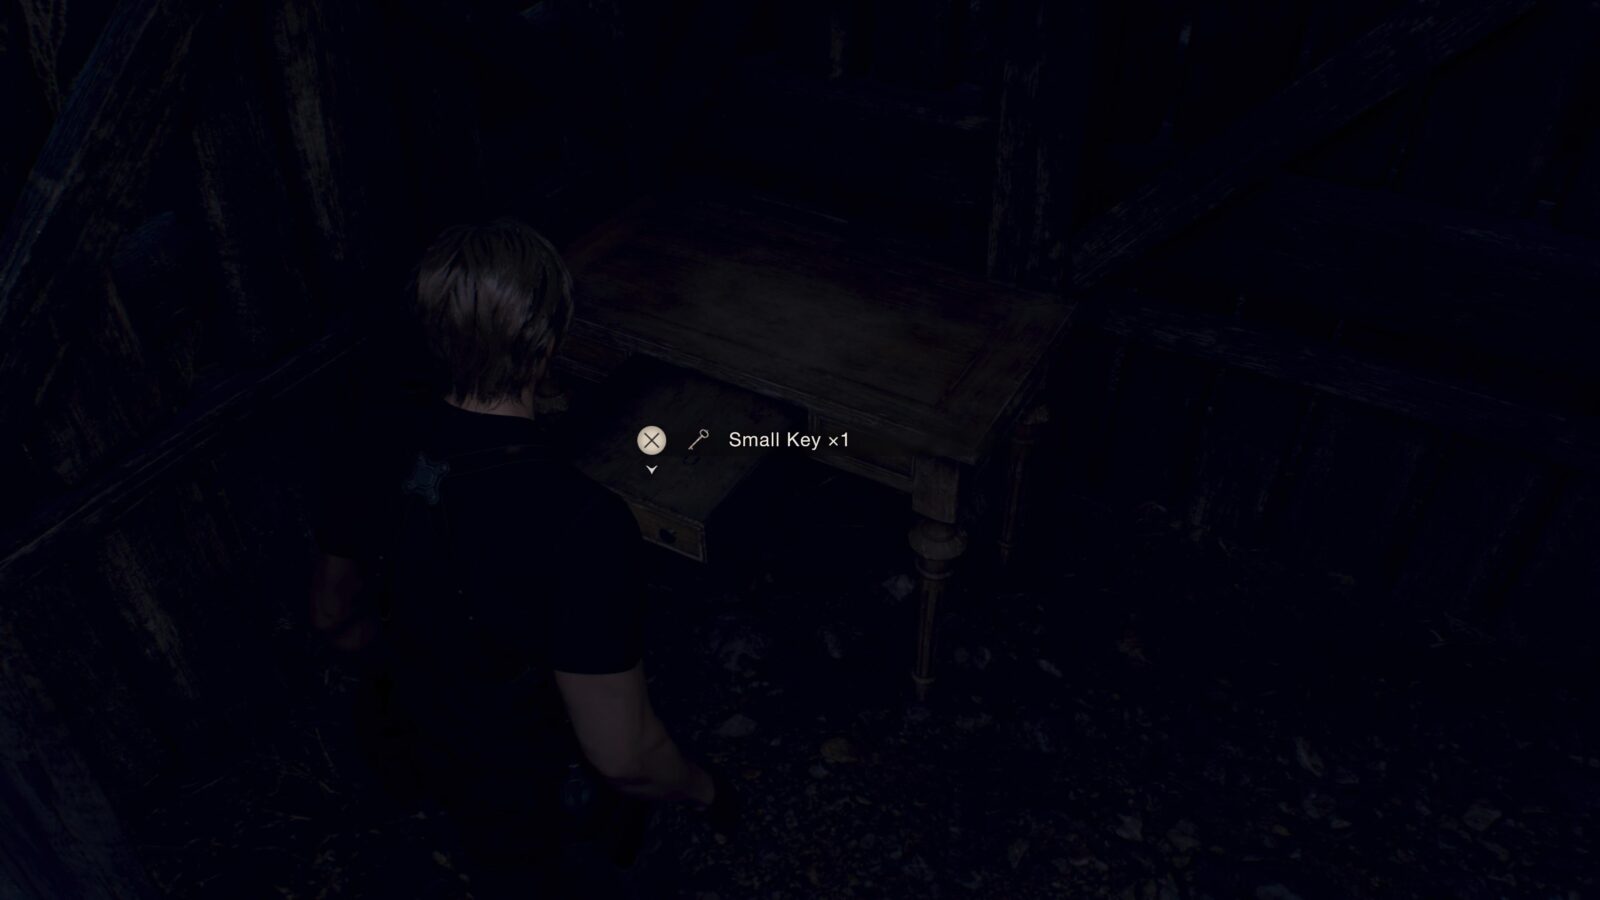
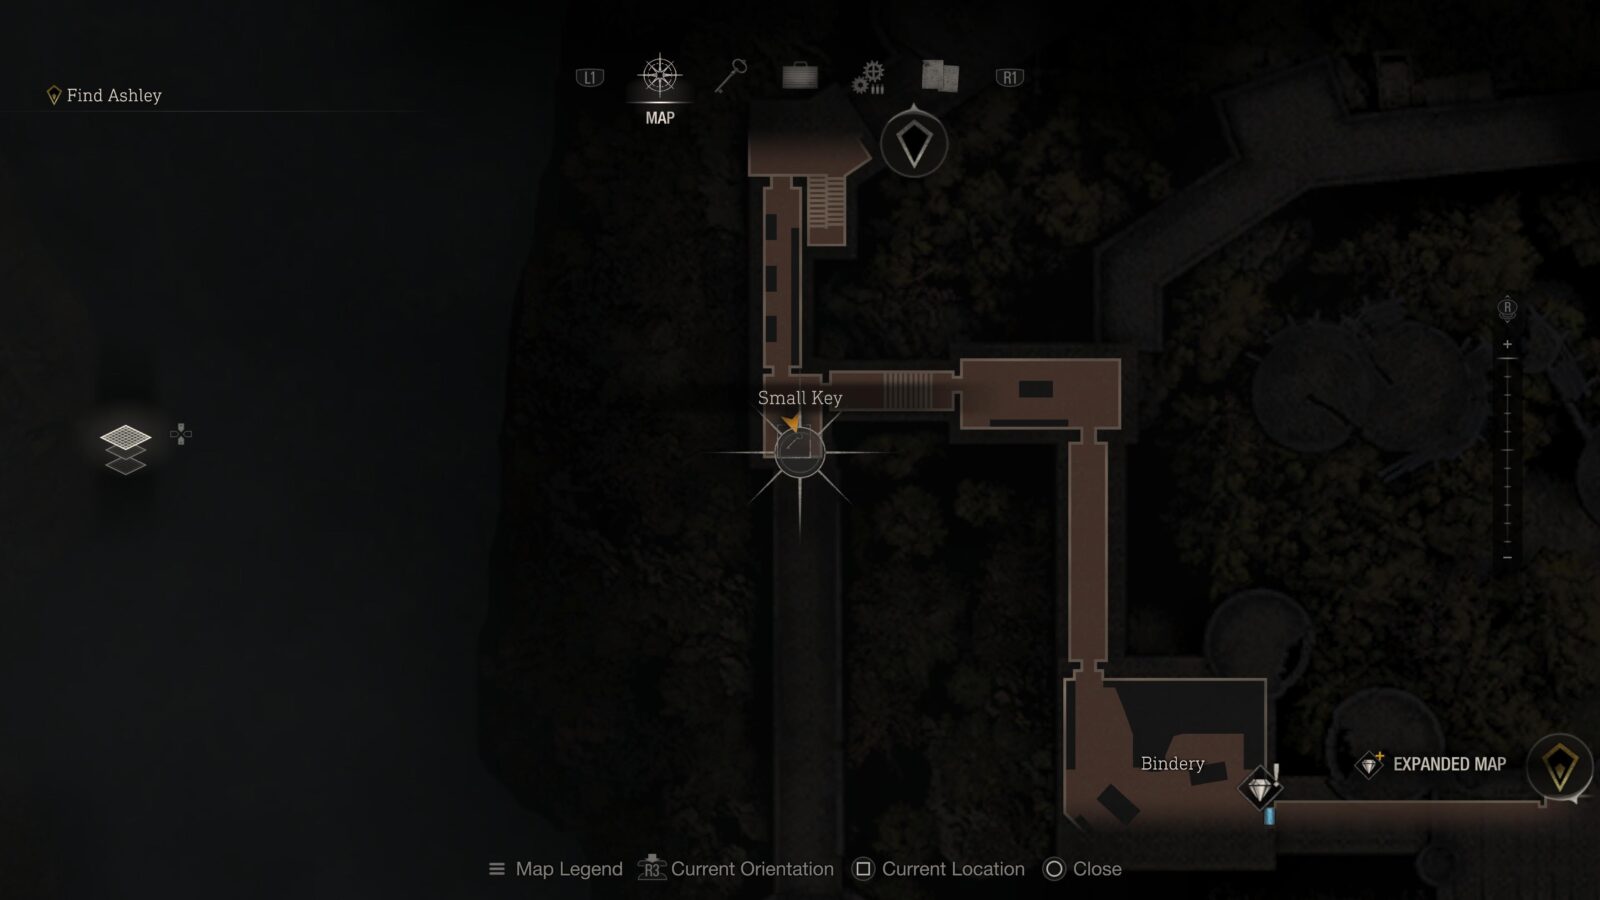
Small Key
At the far end of the Fish Farm where you find the boat fuel is a small room to the left that has a drawer with a Small Key inside.
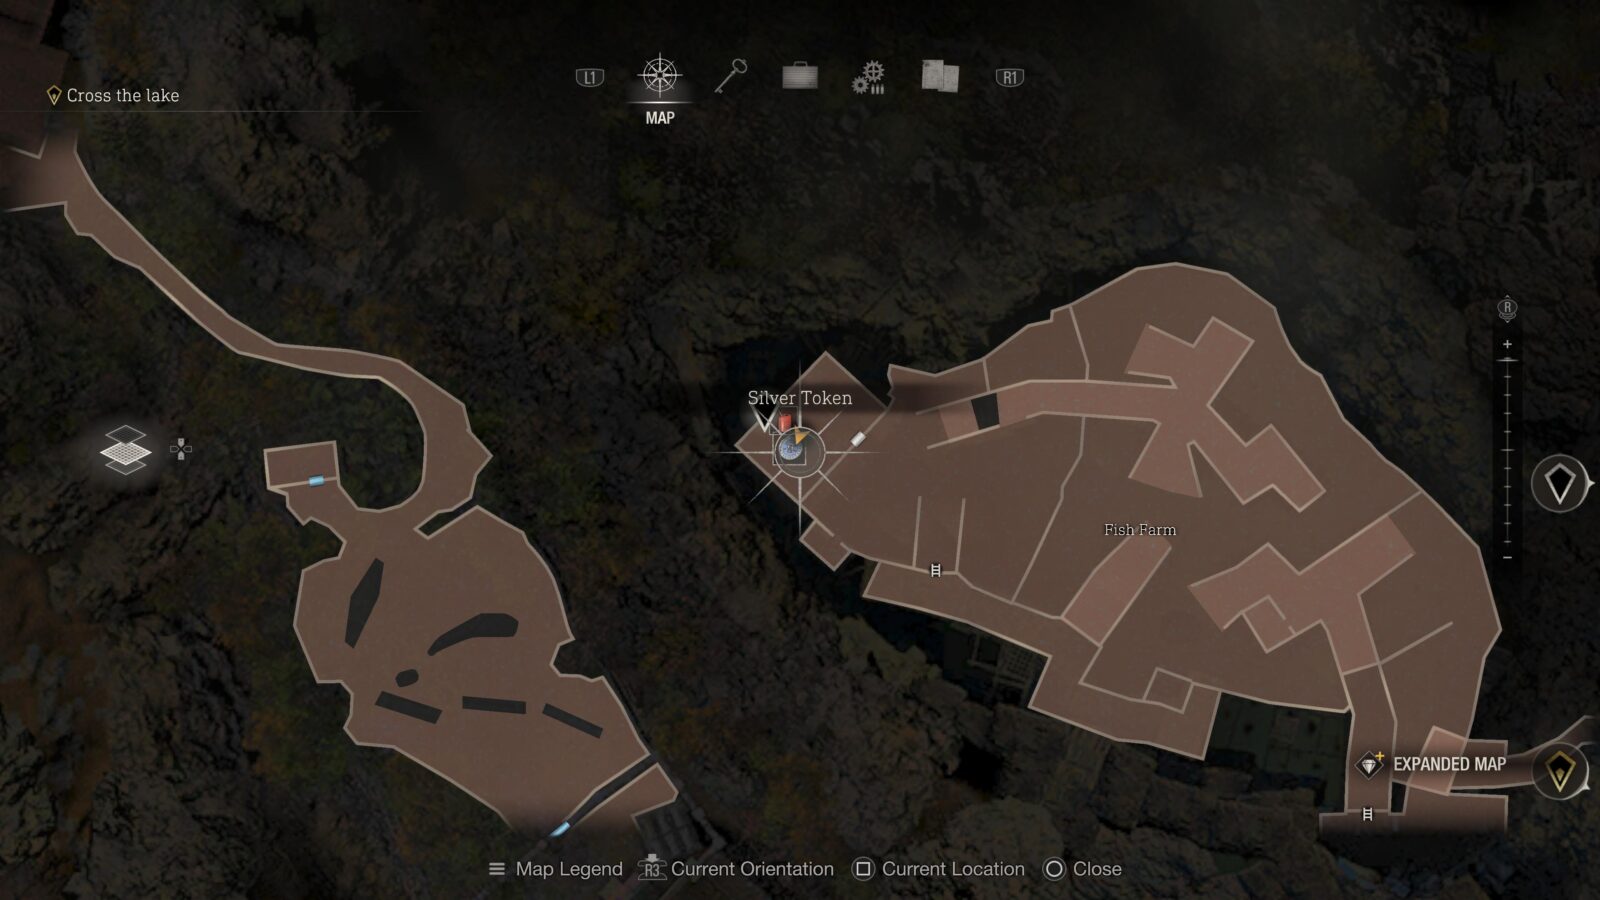
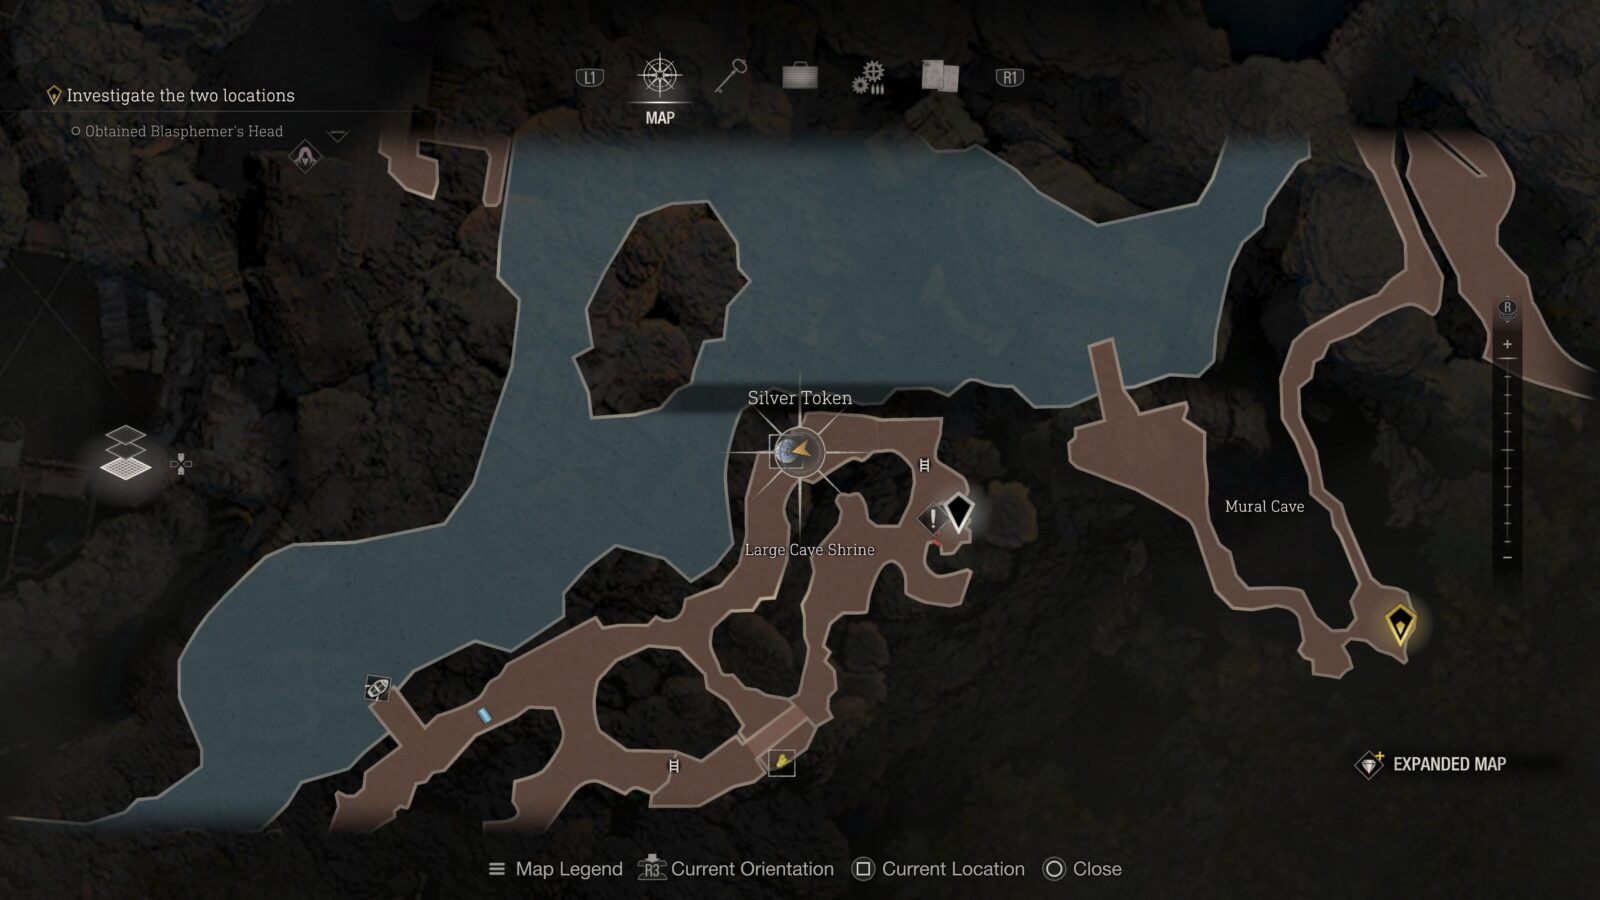
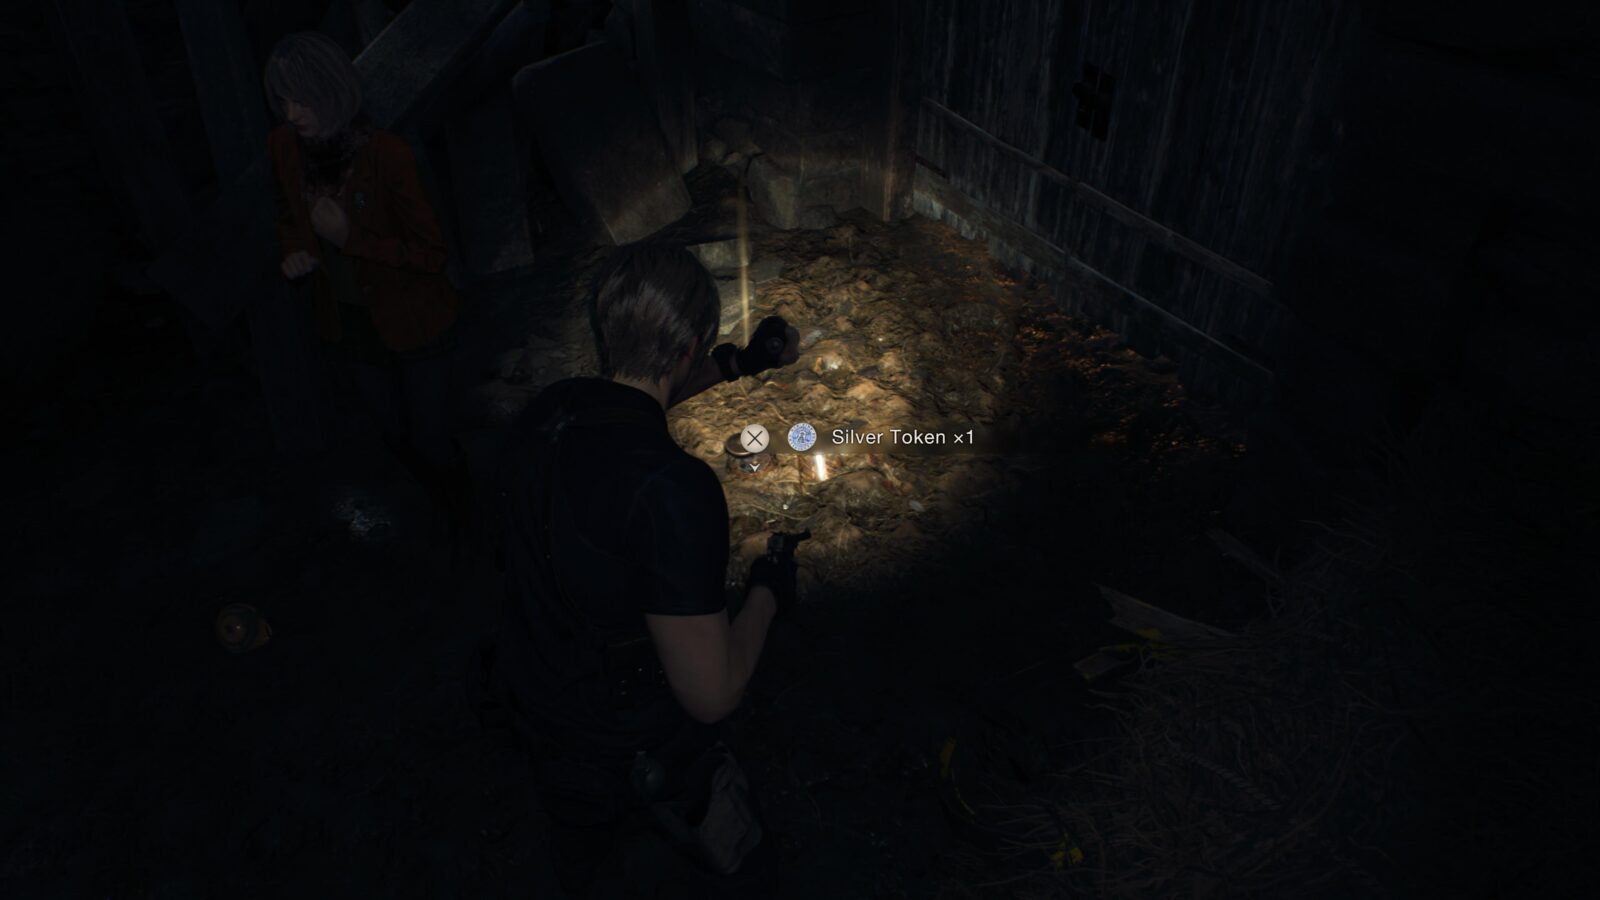
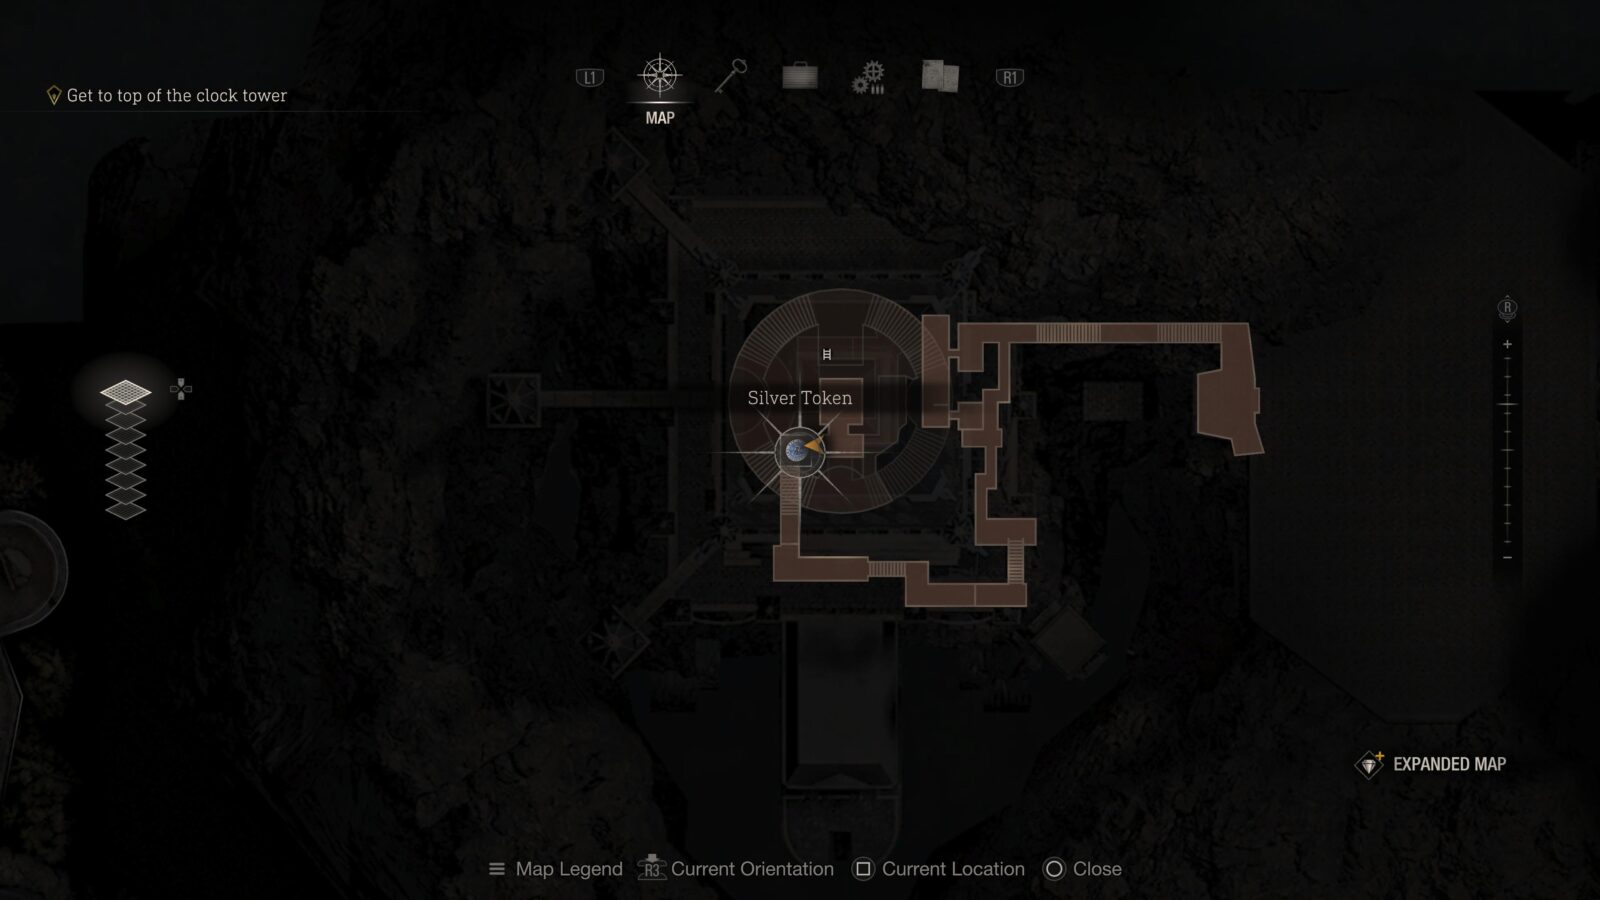
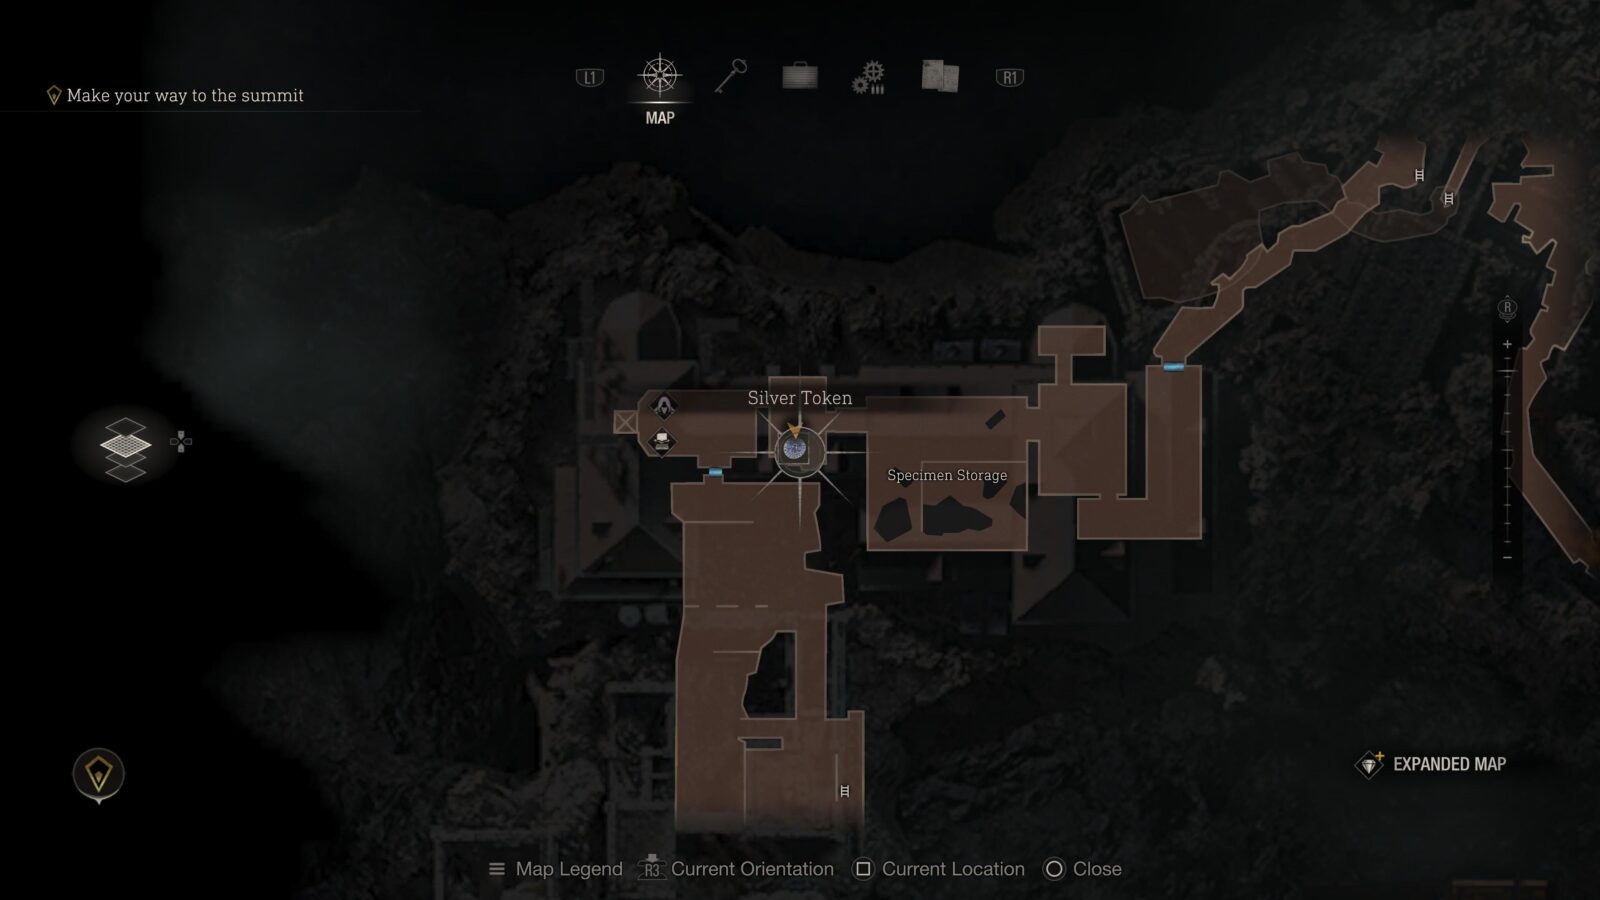
Silver Token (Expanded Treasure)
Inside the room where you find the boat fuel in the Fish Farm is a gold cage hanging from the ceiling. Shoot it down to get a Silver Token. Silver Tokens can be used at the Shooting Range to acquire various Gun Case Trinkets. This is only available to those who have the Expanded Treasure Map DLC.

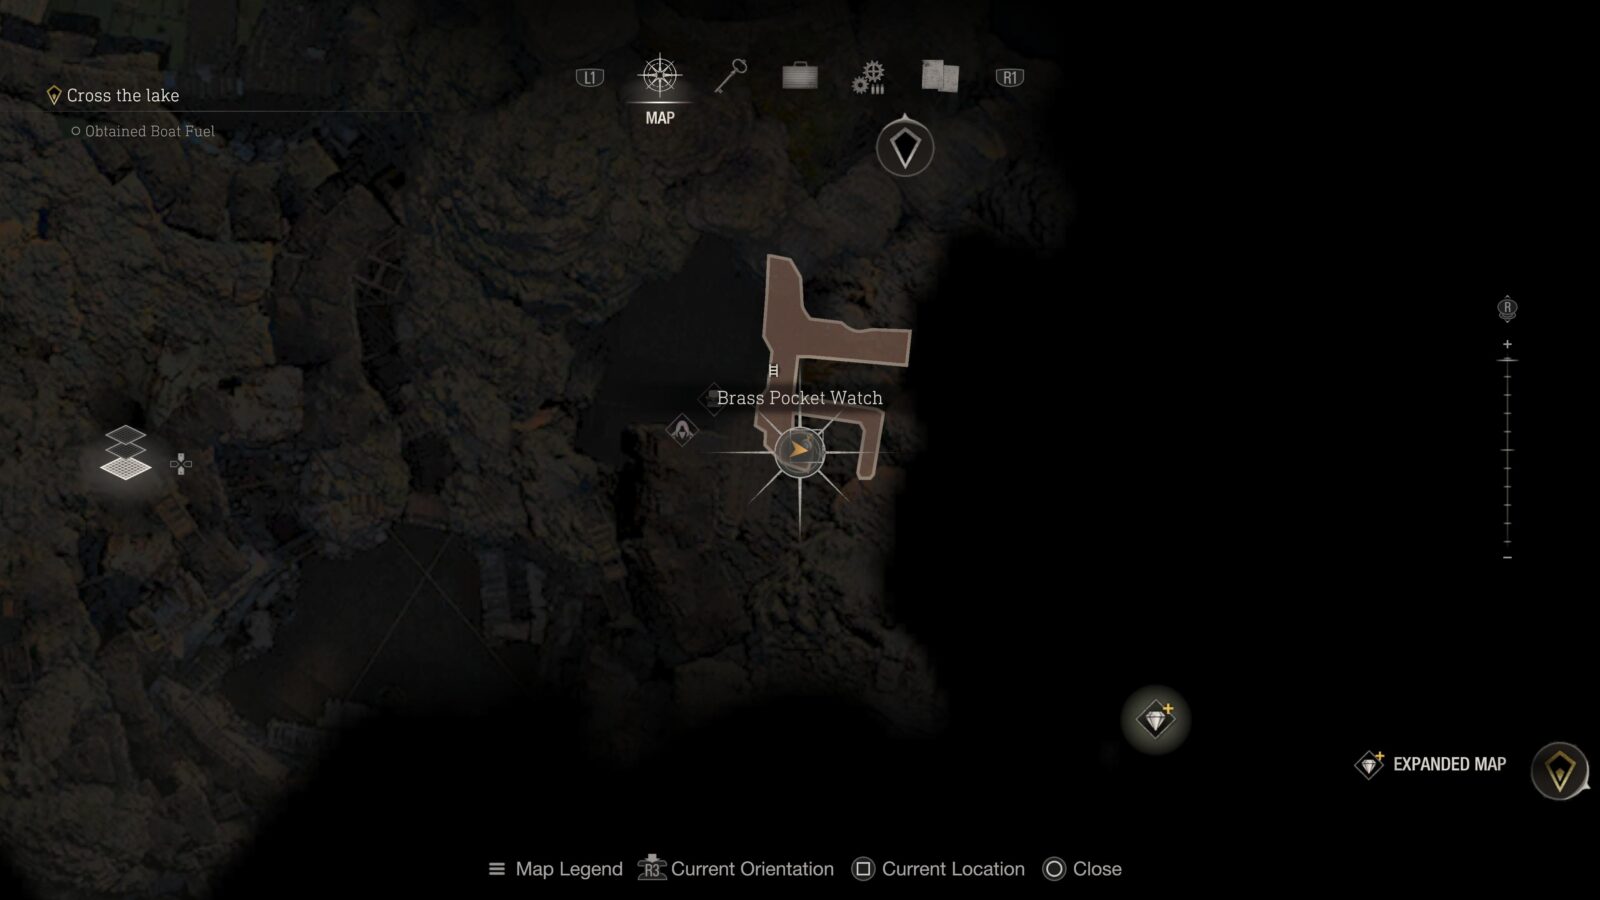
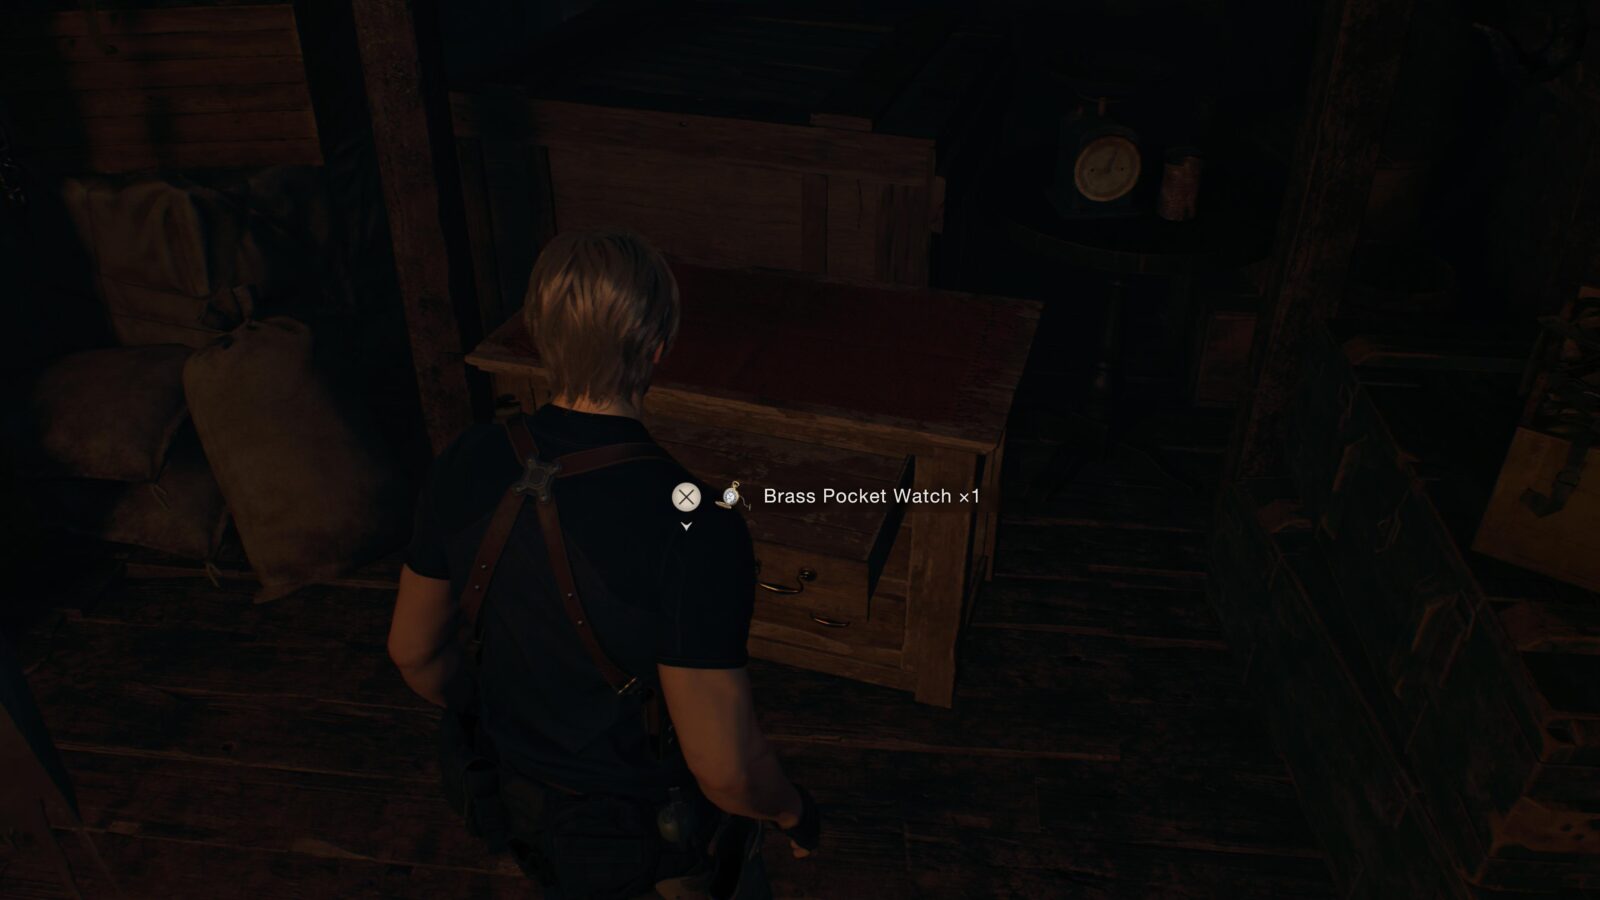
Brass Pocket Watch
Back track all the way to the Merchant before hopping in the boat and hand in your completed Requests (make sure to sell him 3 vipers for the Viper Hunt Request). While you’re here you can go down the ladders at the dock and open the locked drawer with your Small Key to get a Brass Pocket Watch.
Chapter 4
There are a total of 1 Weapon, 1 Clockwork Castellan, 2 Merchant Requests, 2 Small Keys (used to unlock locked drawers hiding additional treasure) and 13 Treasures in Chapter 4. This chapter also has 3 Expanded Treasures which can only be obtained with the Expanded Treasure Map DLC.
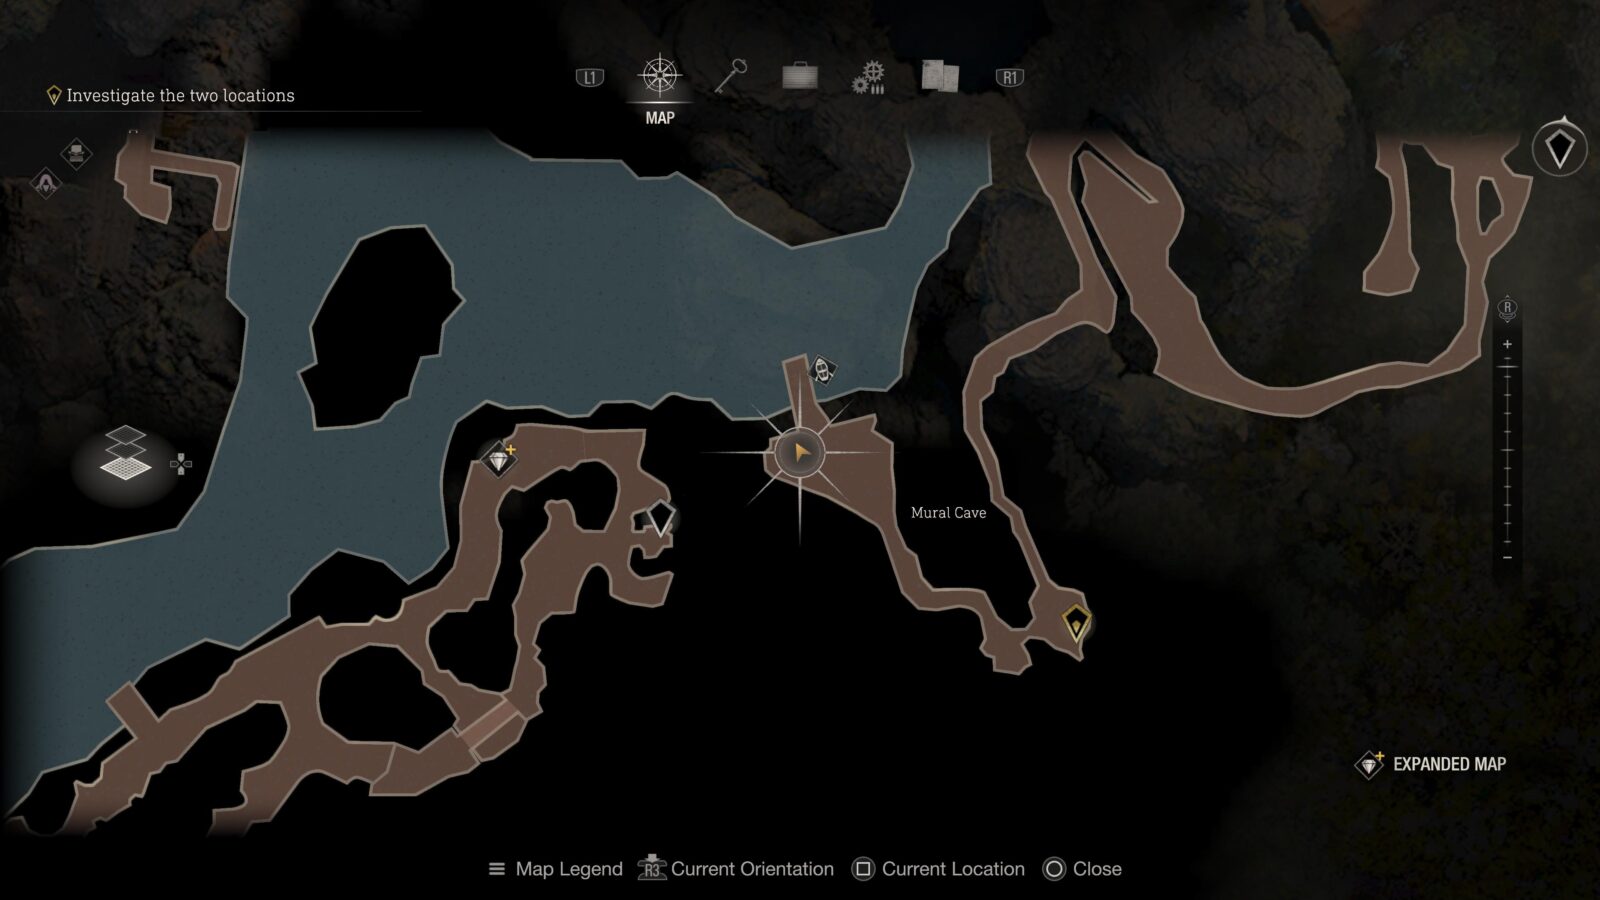
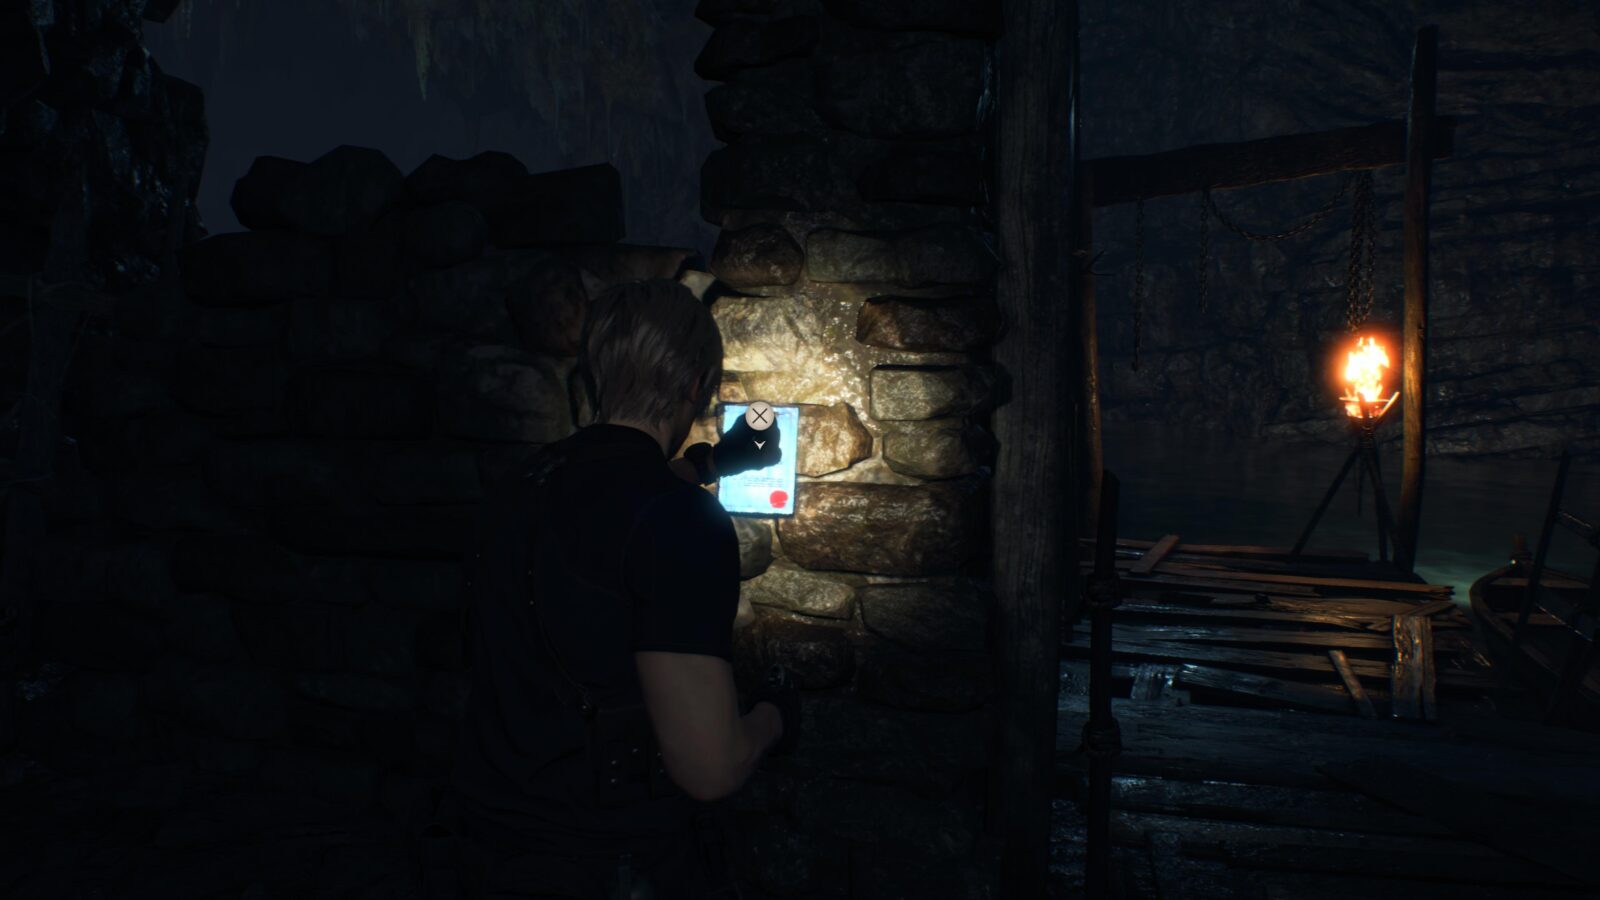
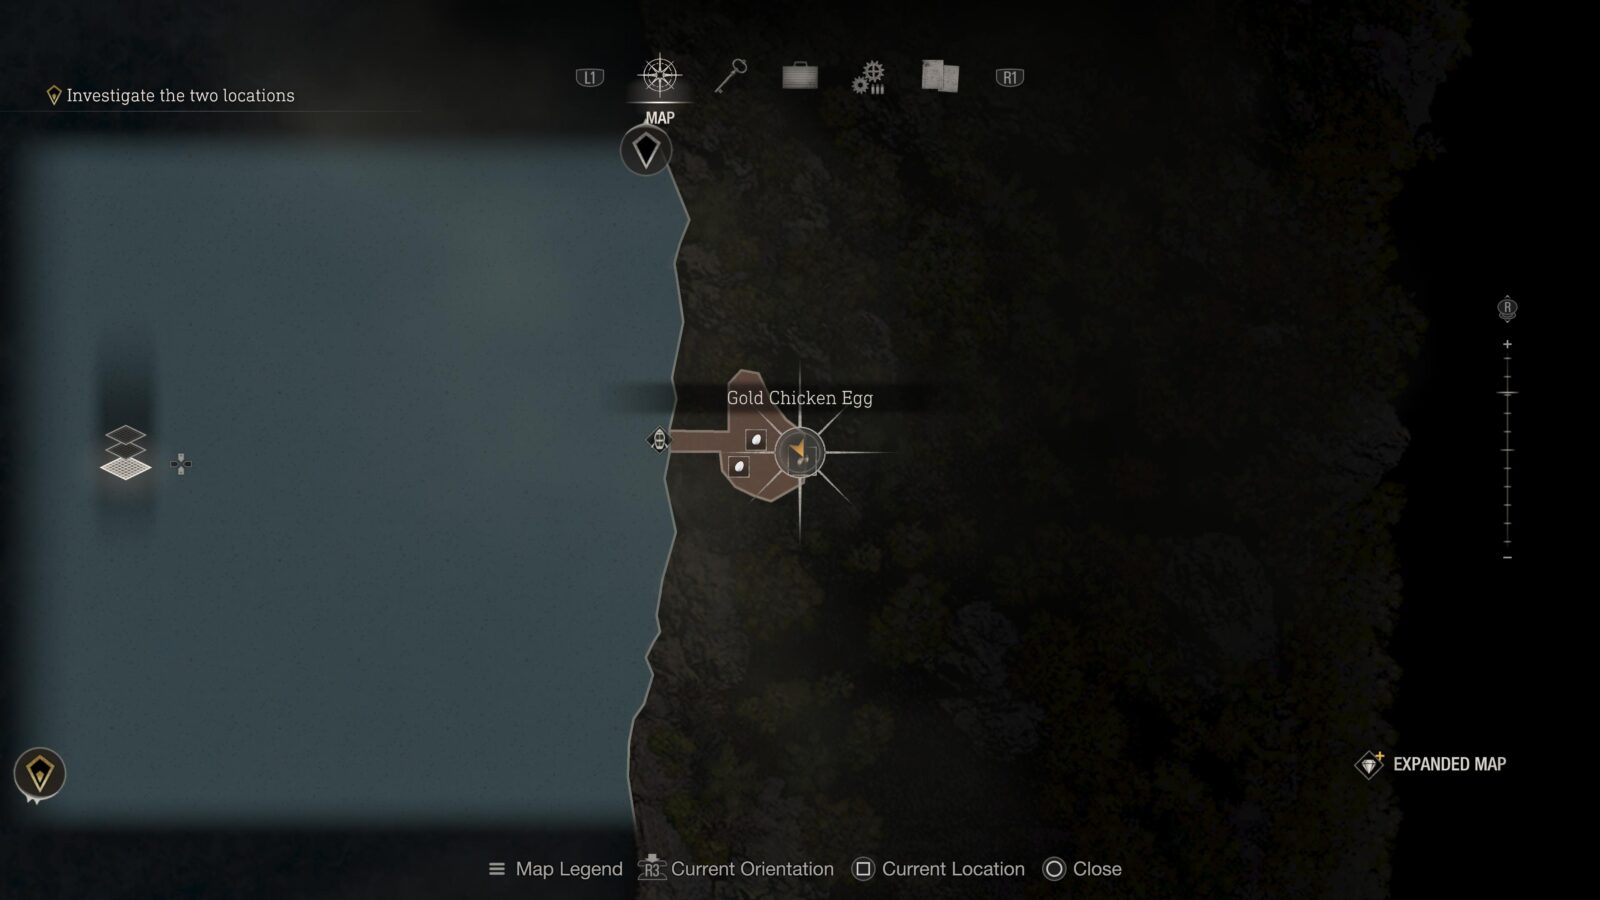
Merchant Request: Egg Hunt
As you leave the Mural Cave and pick up the Old Wayshrine Key look to your left before walking onto the boat dock to find a new request pinned to the wall. For this request you must find and sell a Golden Egg. The best place to find it is on a chicken farm on the East side of the lake.
Alexandrite
Jump in the boat and head to the shipwreck at the center of the Lake. Once onboard you can find a chest with an Alexandrite gem inside.
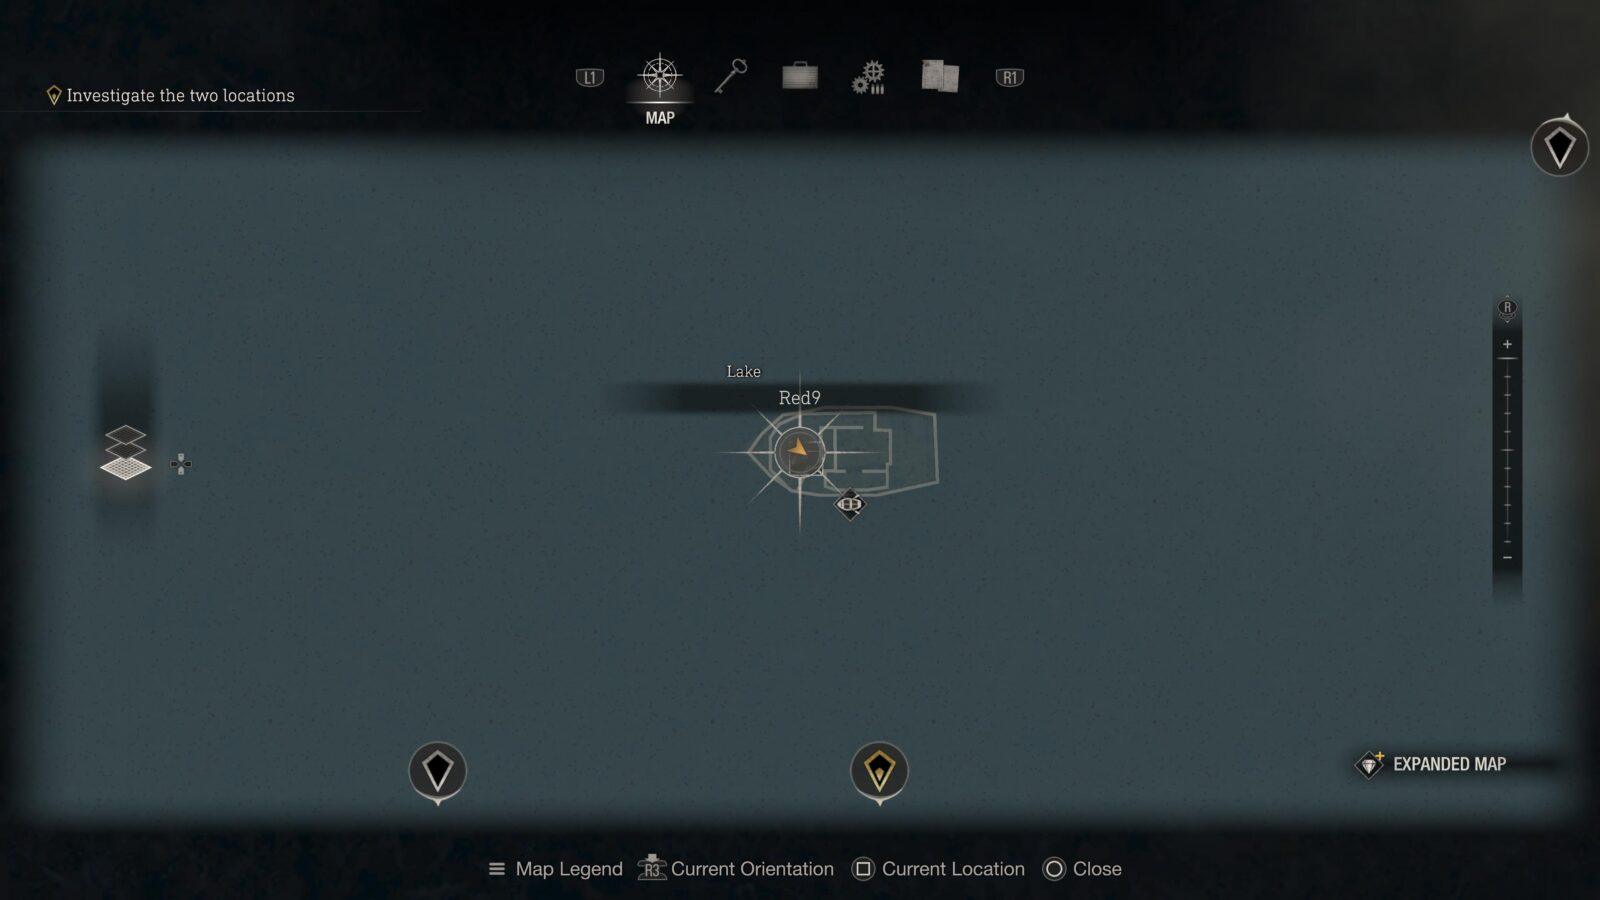
Red9 Pistol
Head onto the bow of the shipwreck and you can find another chest with the Red9 Pistol inside. When fully upgraded the Red9 as 4.05 making it the strongest hand gun in the game.

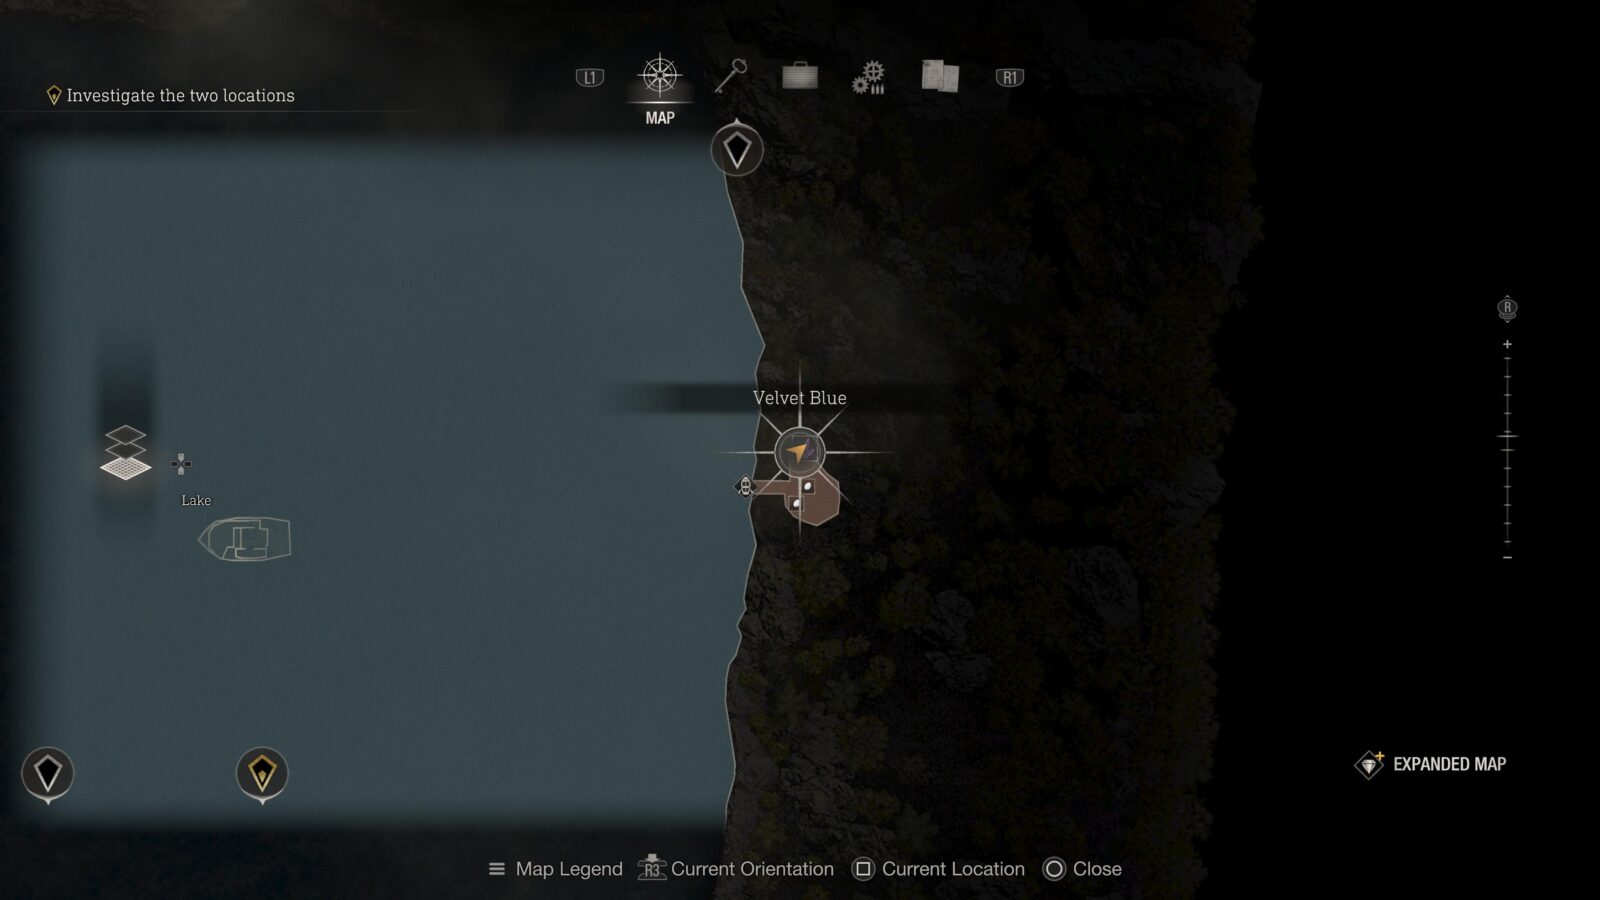
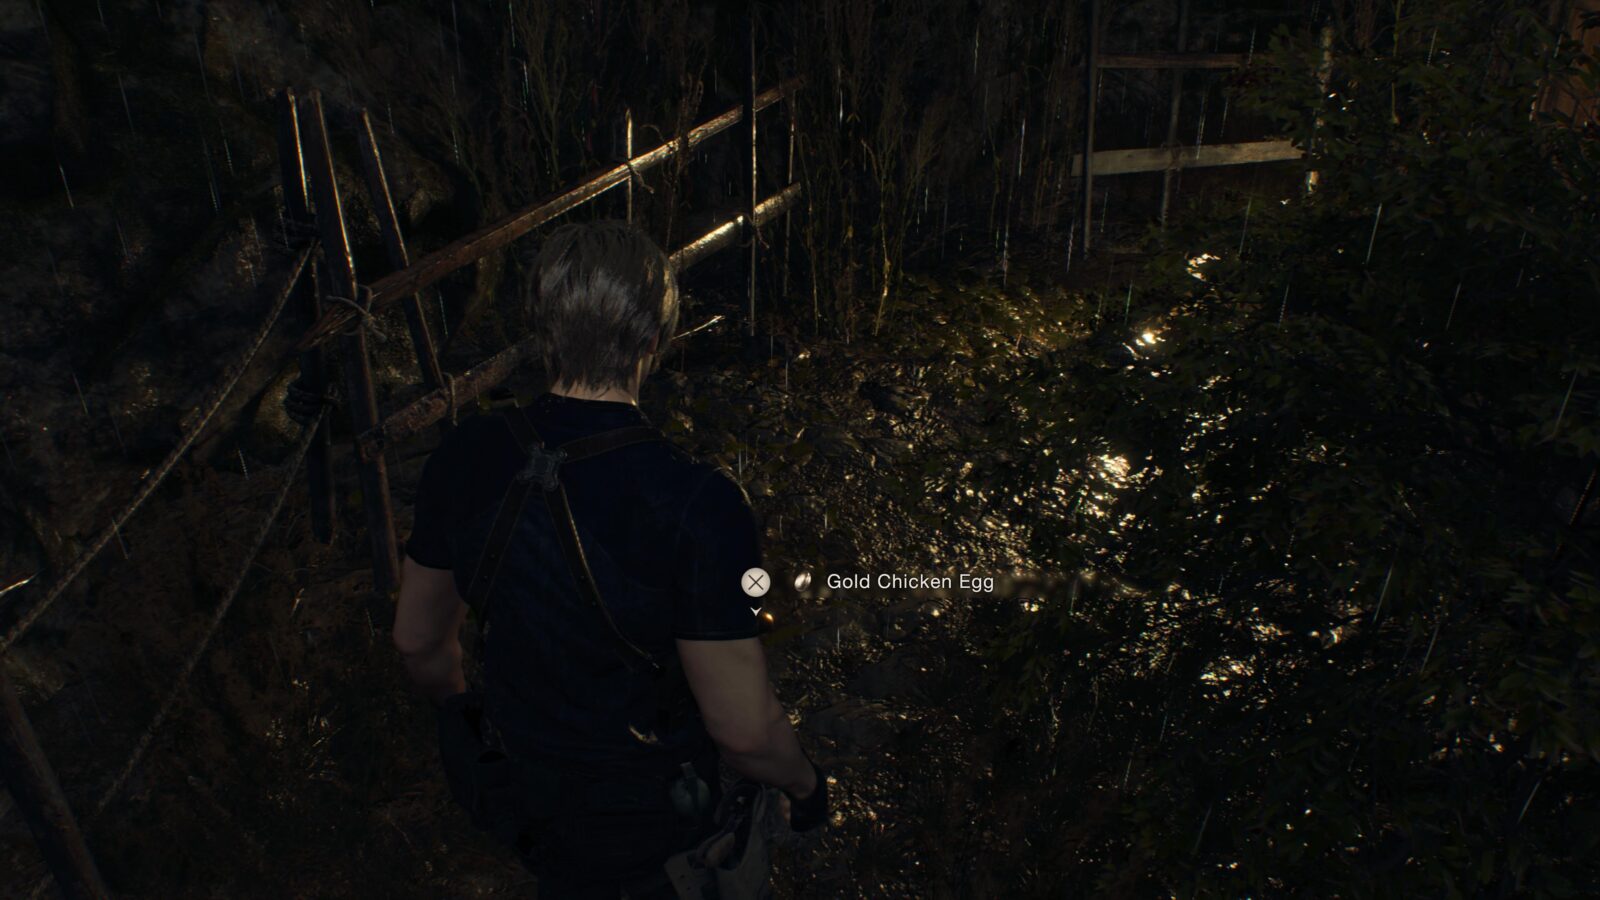
Velvet Blue + Gold Chicken Egg
From the Shipwreck head to the East side of the Lake to find a small island filled with chickens. On this island is a Velvet Blue on a barrel at the North side of the island. Lastly, on the far East side of the island is a Golden Egg hiding behind some bushes.

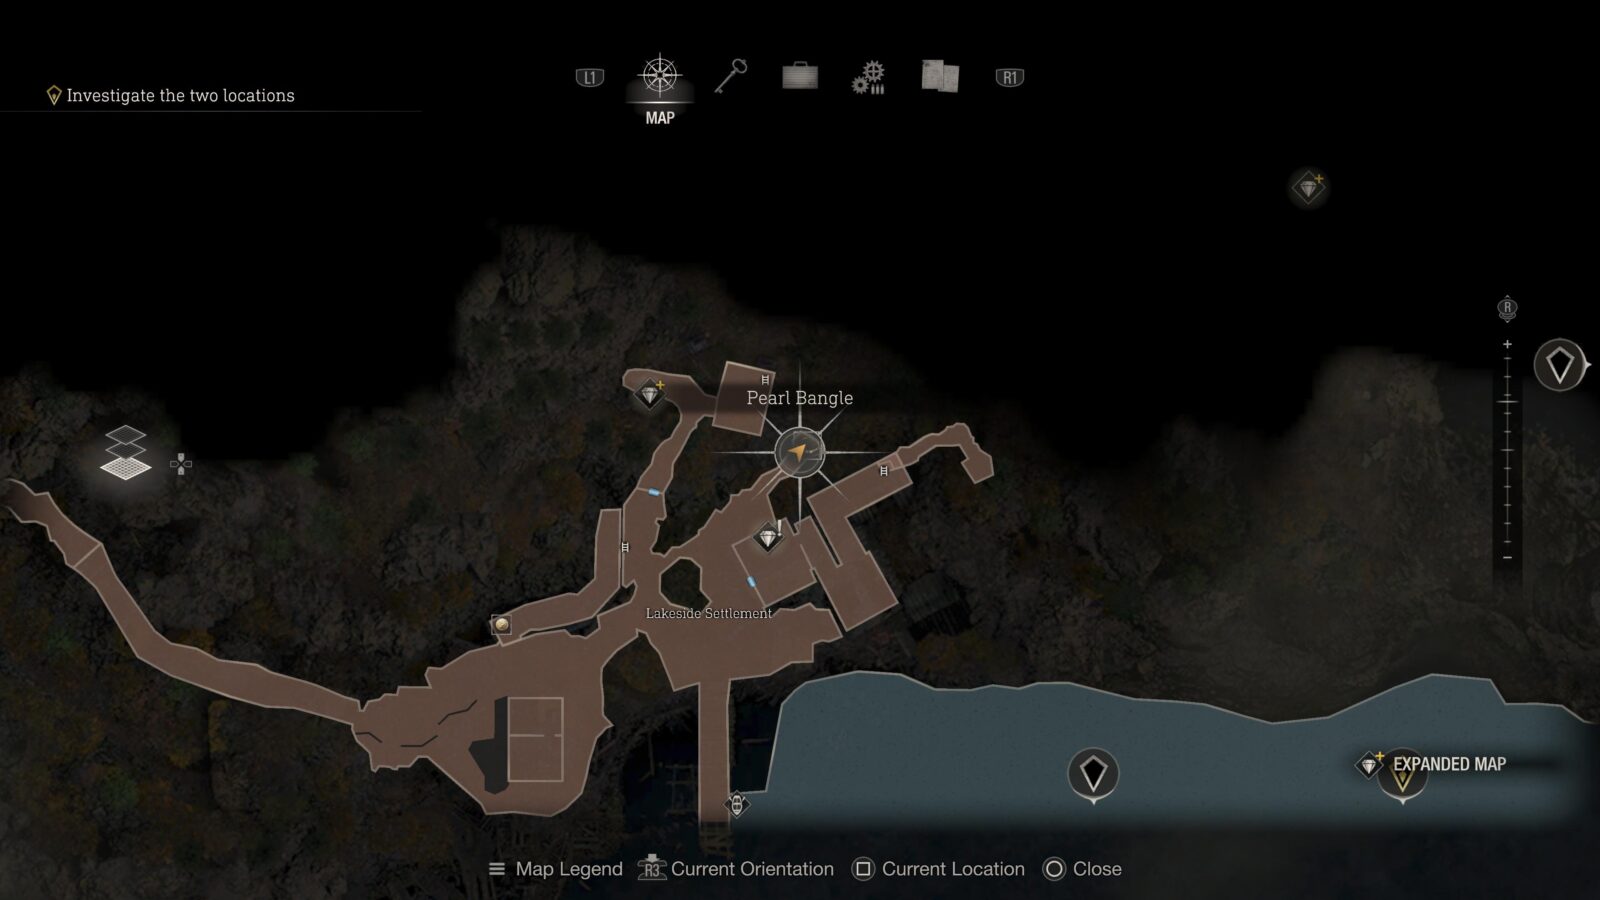
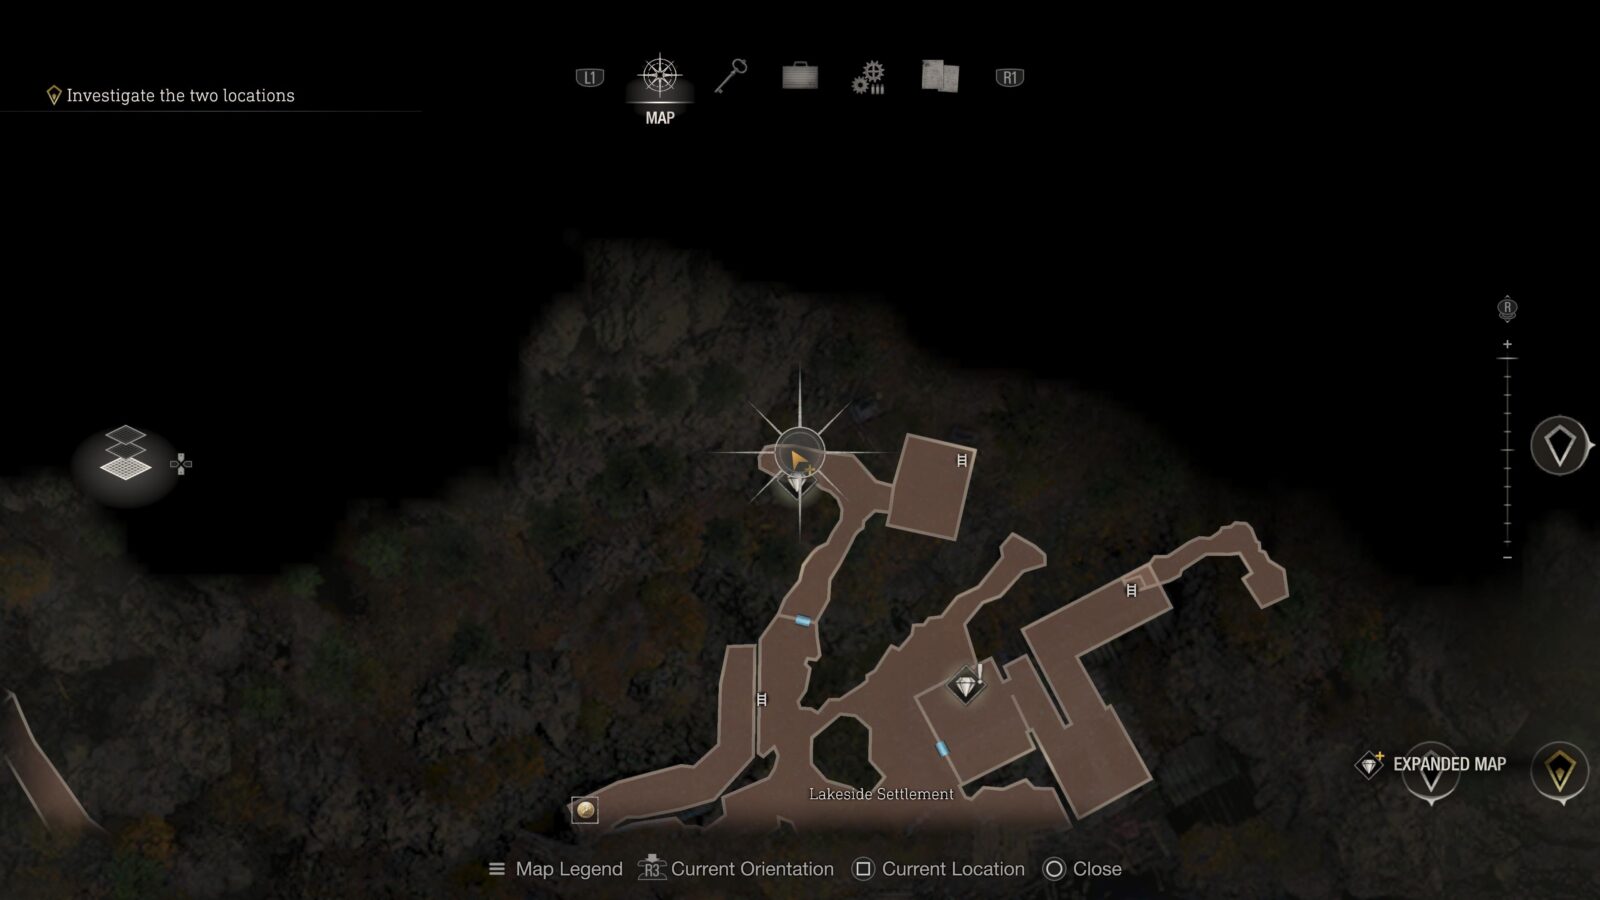
Pearl Bangle
Head to the Lakeside Settlement at the North-West side of the Lake. Once there you can open the Wayshrine at the Northern tip of the area using the key you got at the start of the chapter. The Pearl Bangle has no slots.

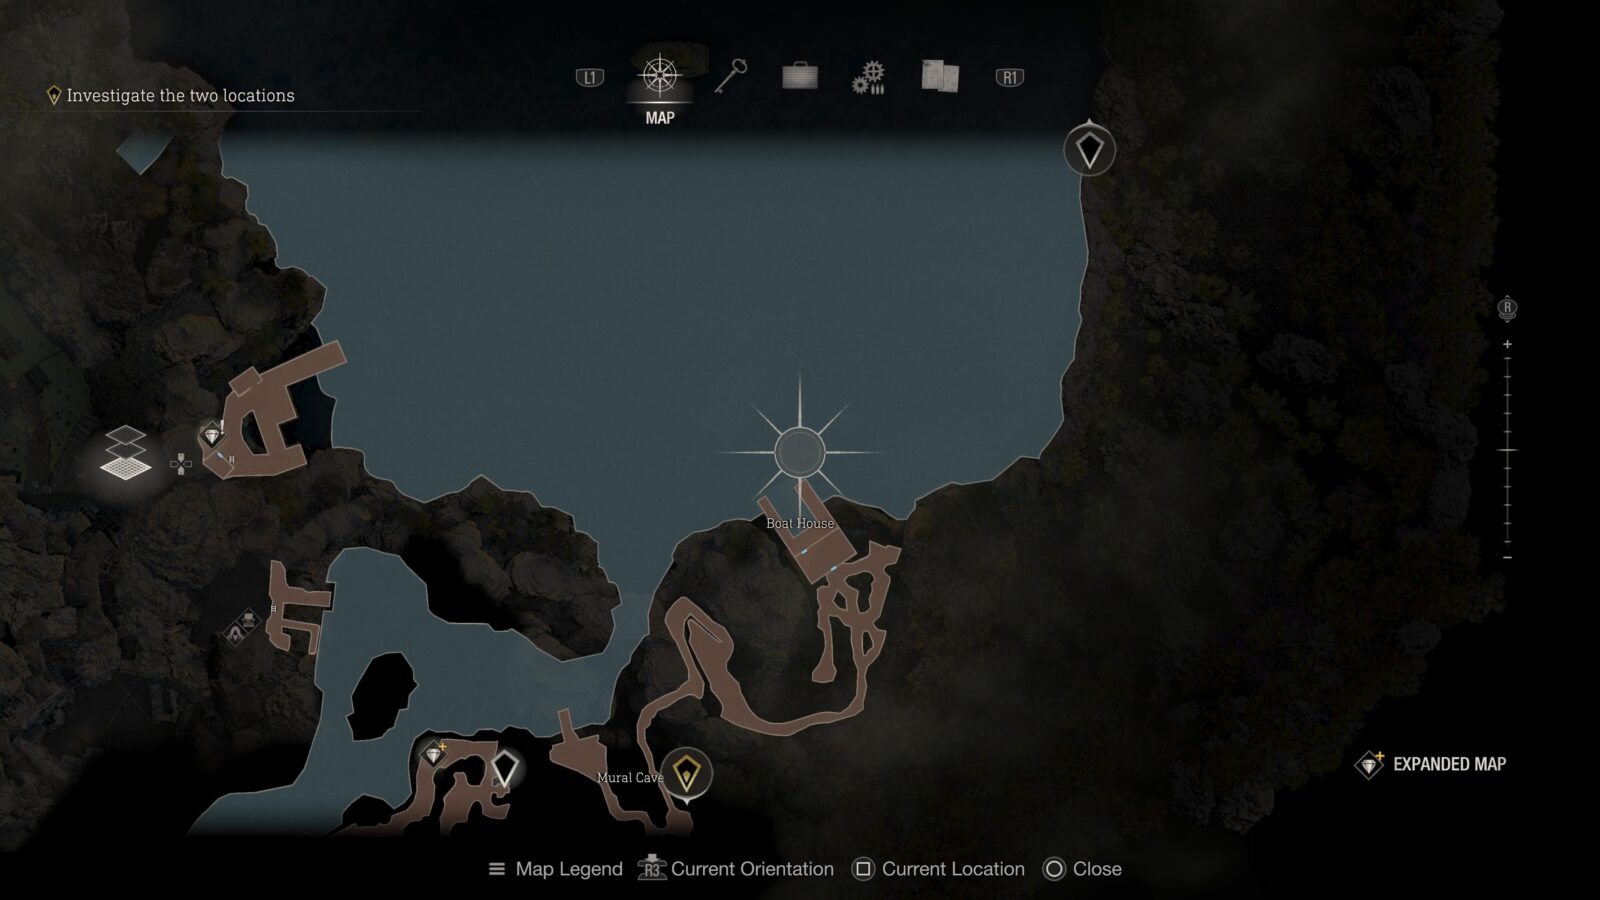
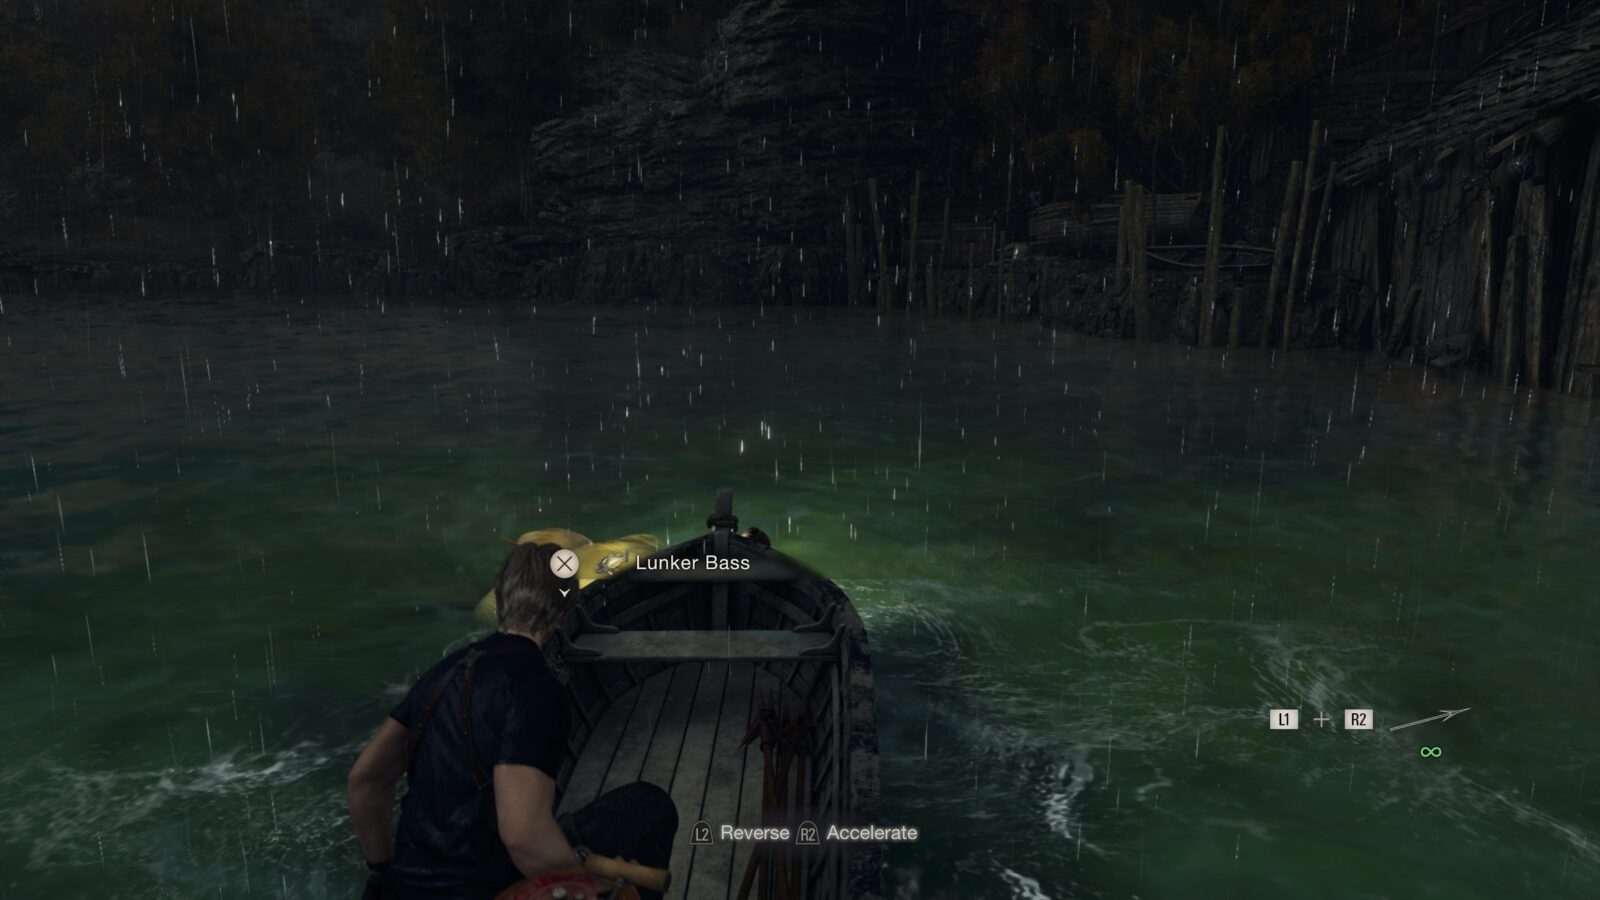
Merchant Request: Catch Me A Big Fish
At the Lakeside Settlement open the Insignia Door using your Insignia Key and head to the end of the cave to find a blue notice pinned to a wooden beam. For this request you will need to catch a Lunker Bass Fish which can be found outside the Boat House.
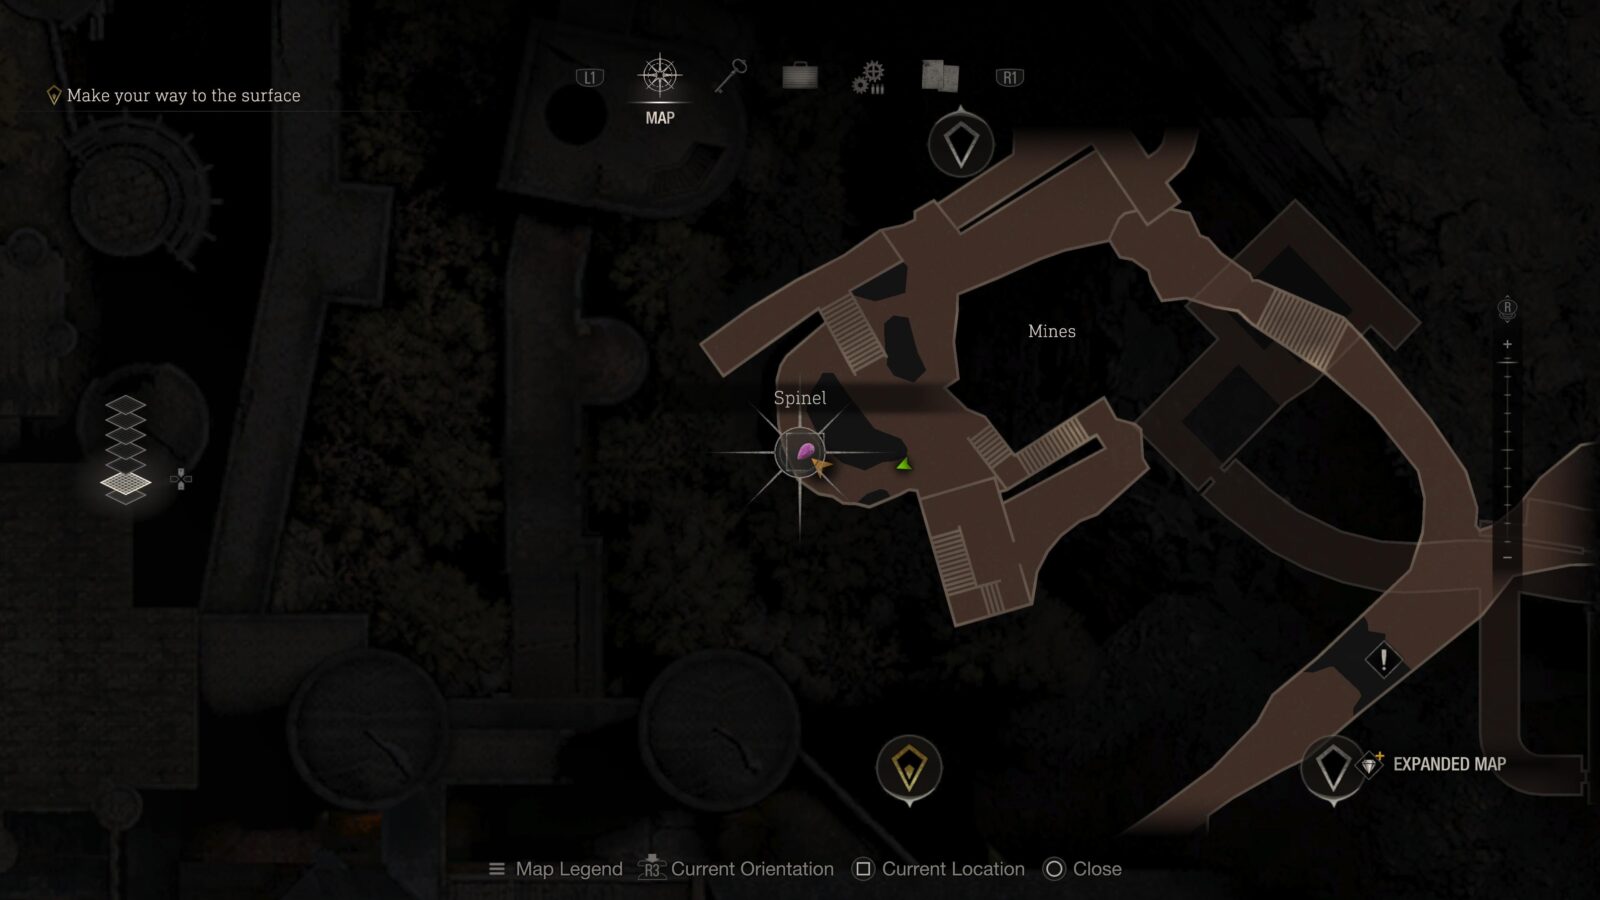
Spinel (Expanded Treasure)
Directly opposite from the Merchant Request is a cage hanging from the ceiling. Shoot it down to get a Spinel. This is only available to those who have the Expanded Treasure Map DLC.

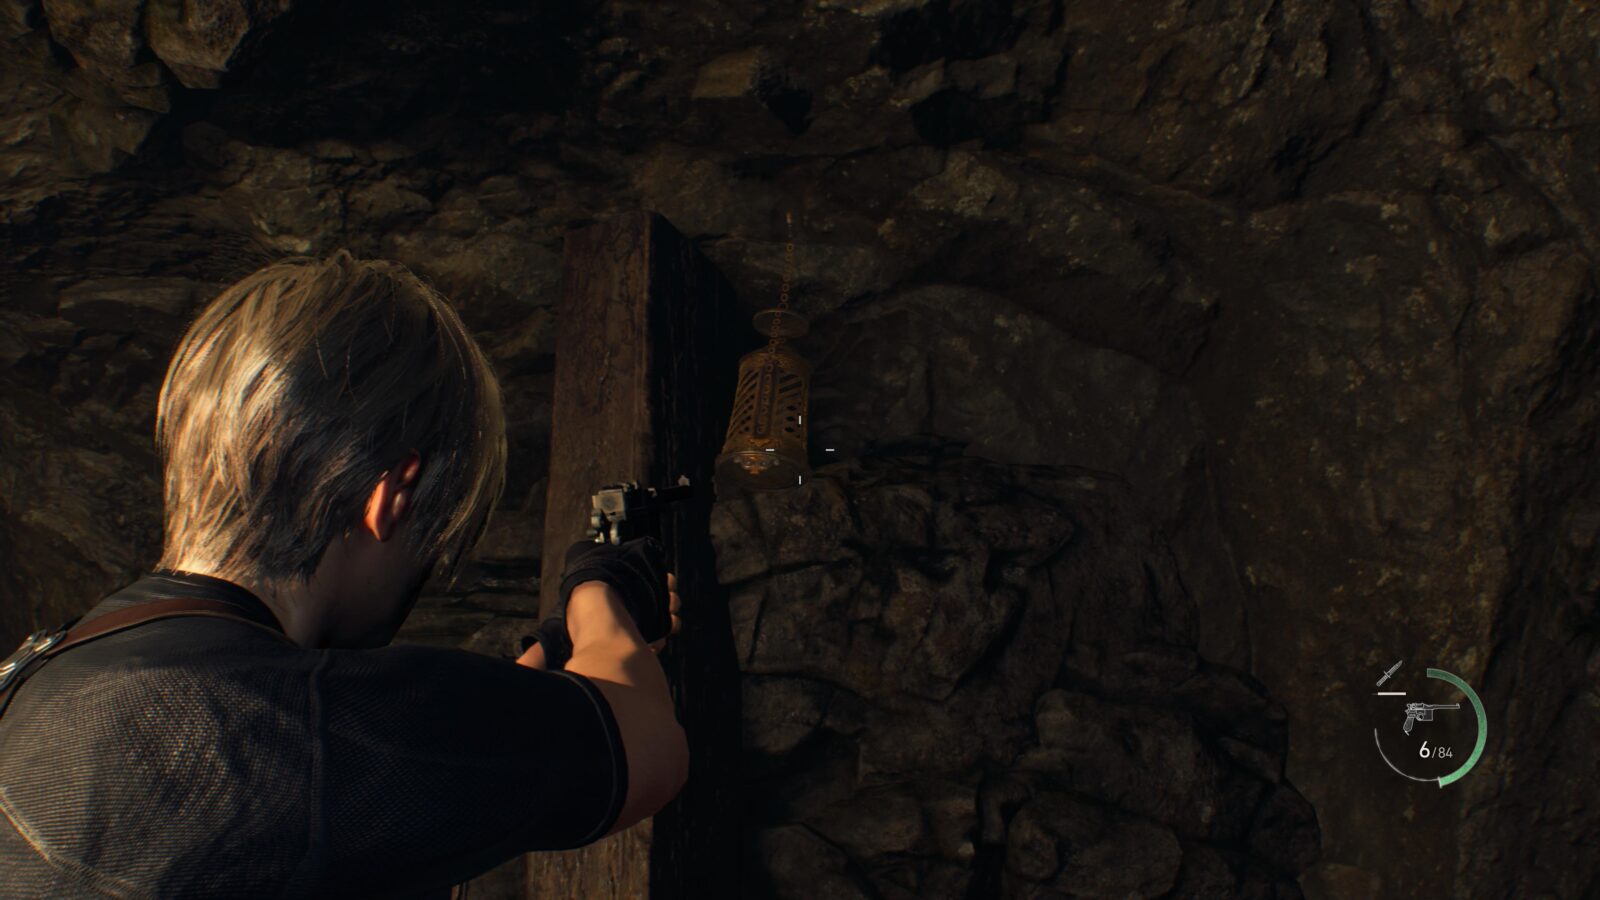
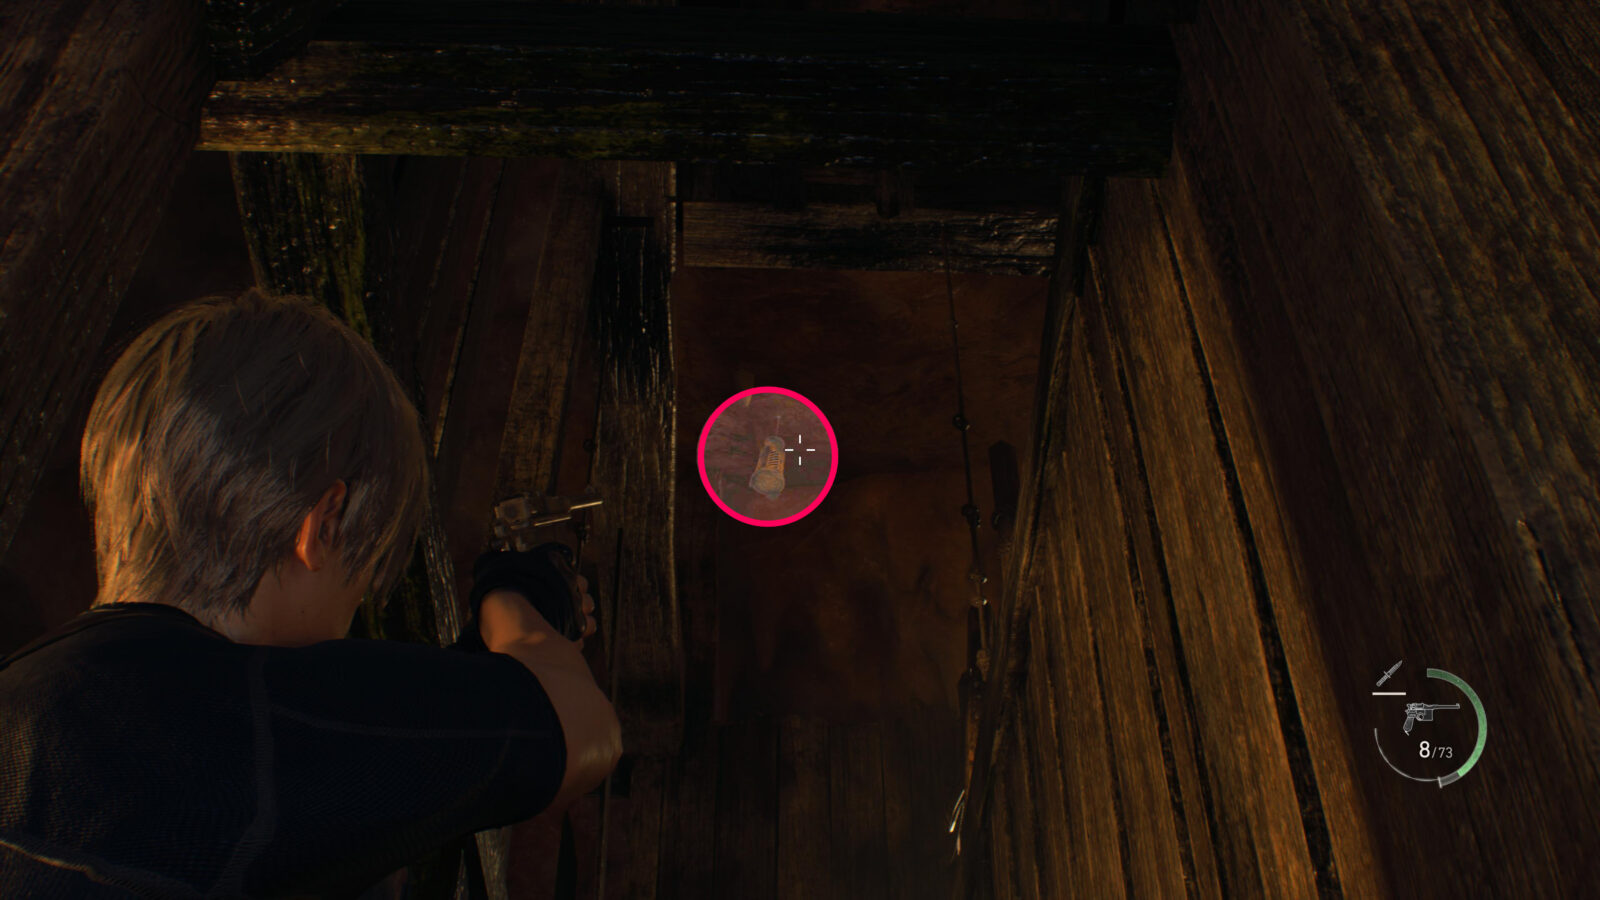
Clockwork Castellan #4
Head through the metal gate inside the cave and climb up the ladder into a forested area with an altar. Walk to the Northern most part of the wooden fence and look on the floor behind it to find a statue.
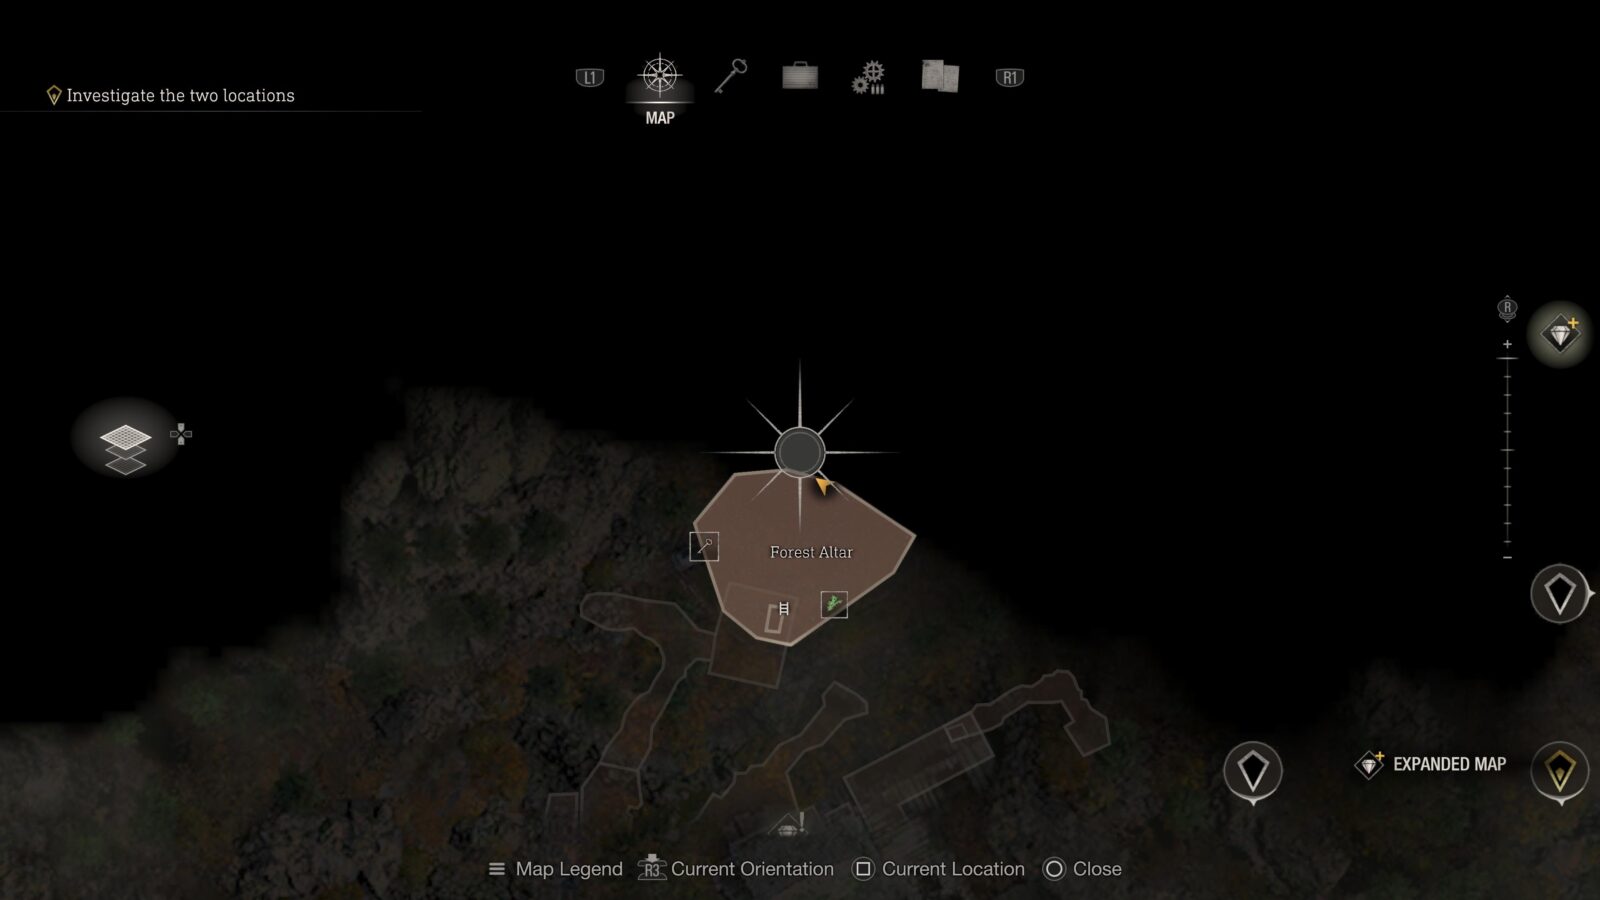

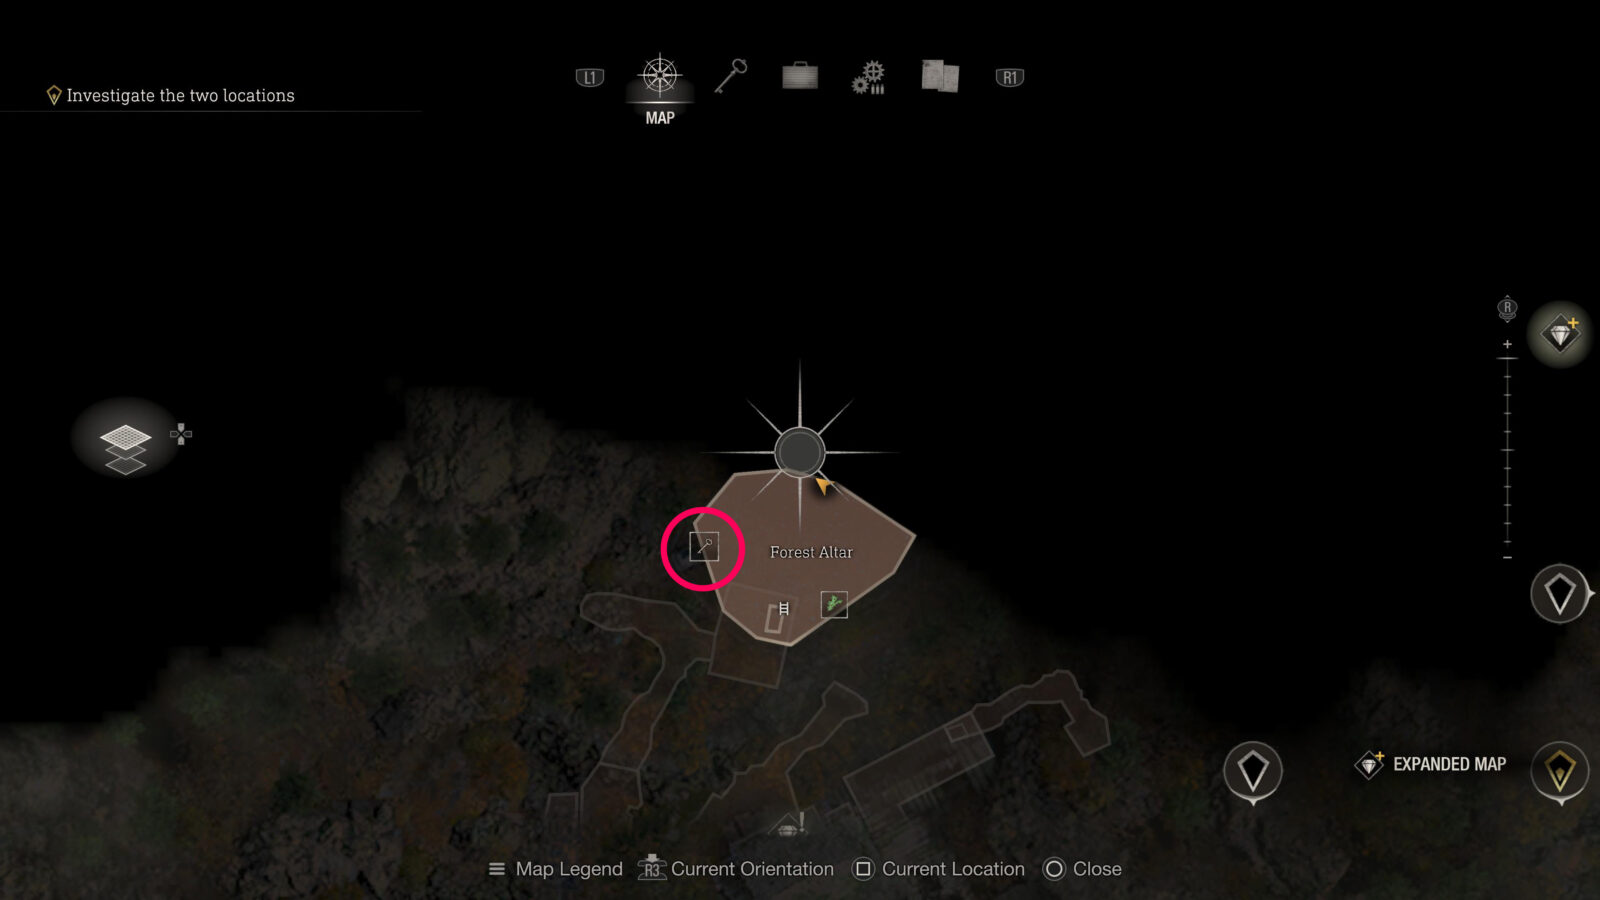
Small Key
Turn back towards the ladder you climbed and you will see a cart with a Small Key on it.
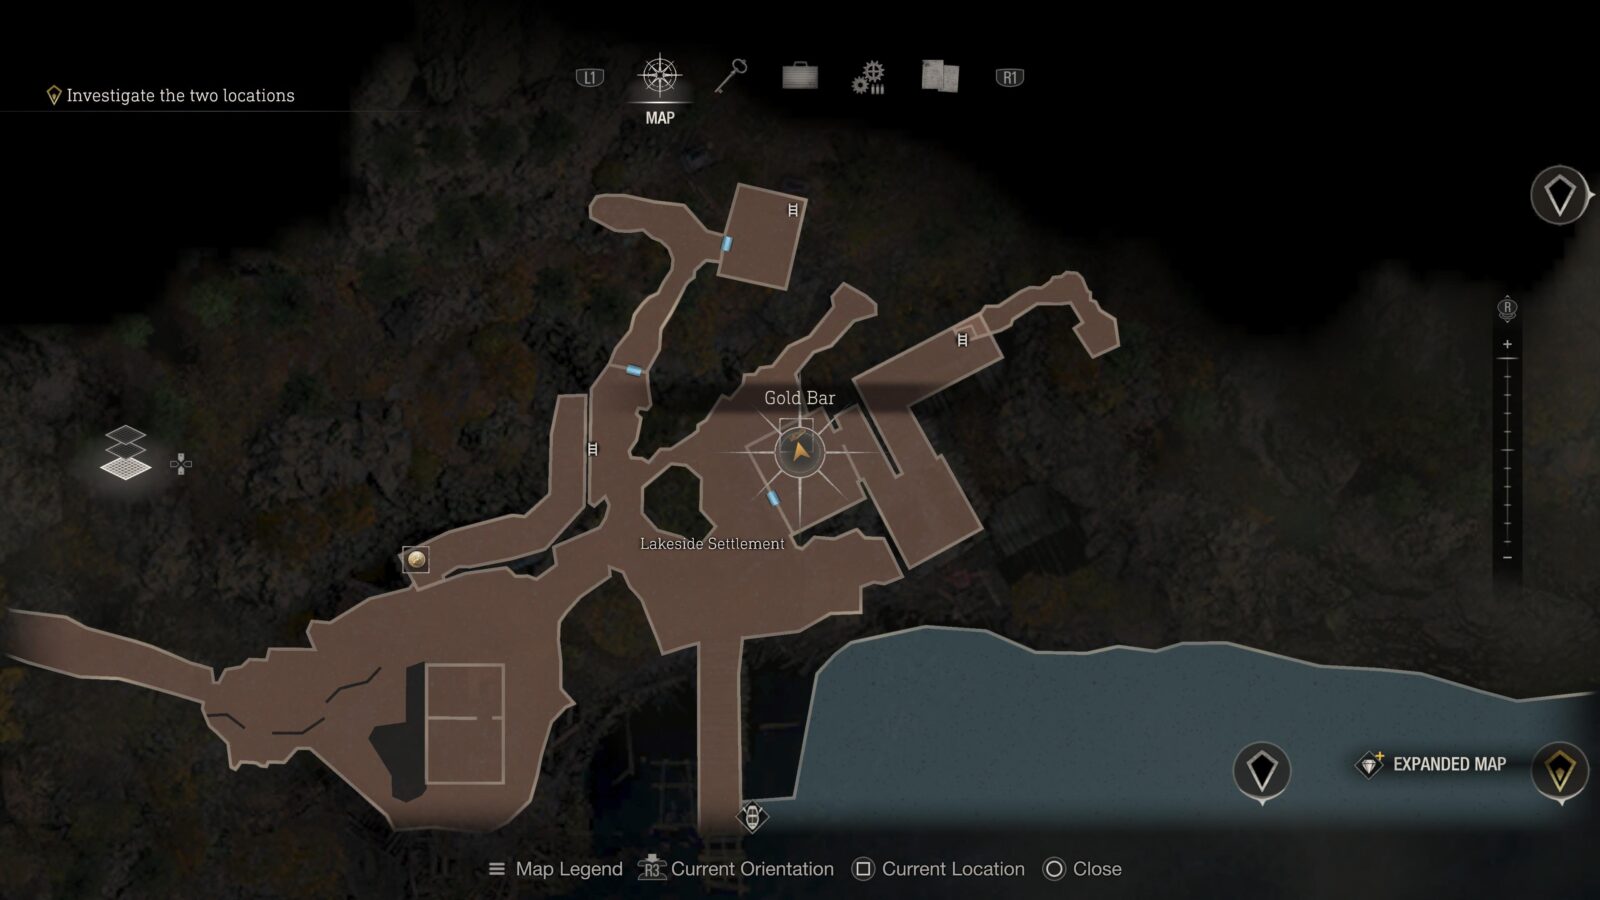
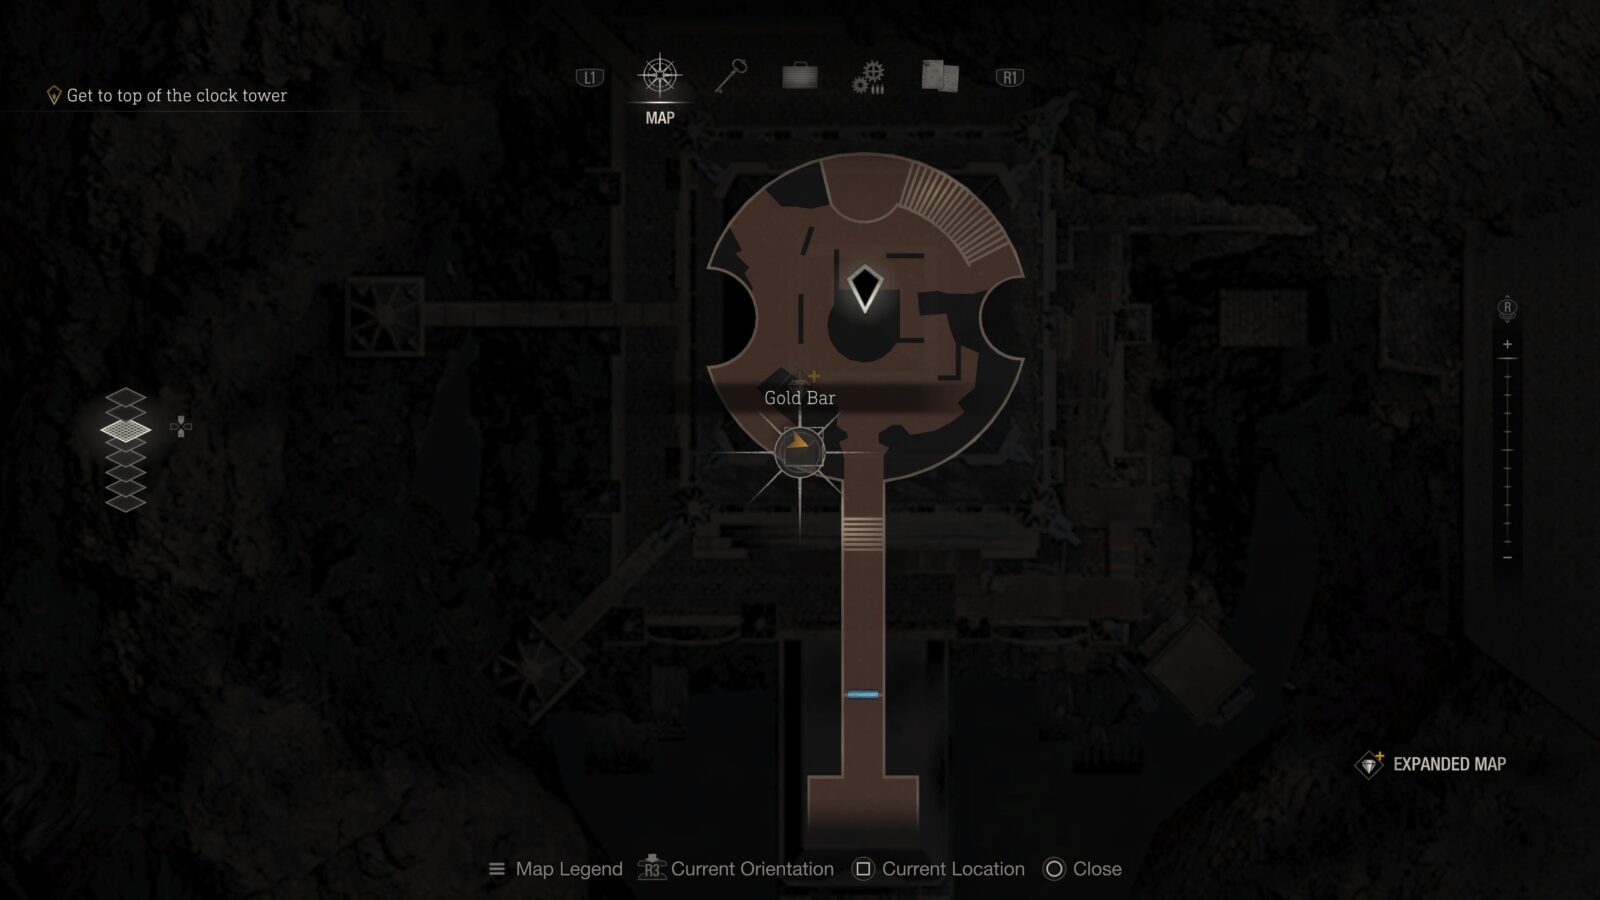
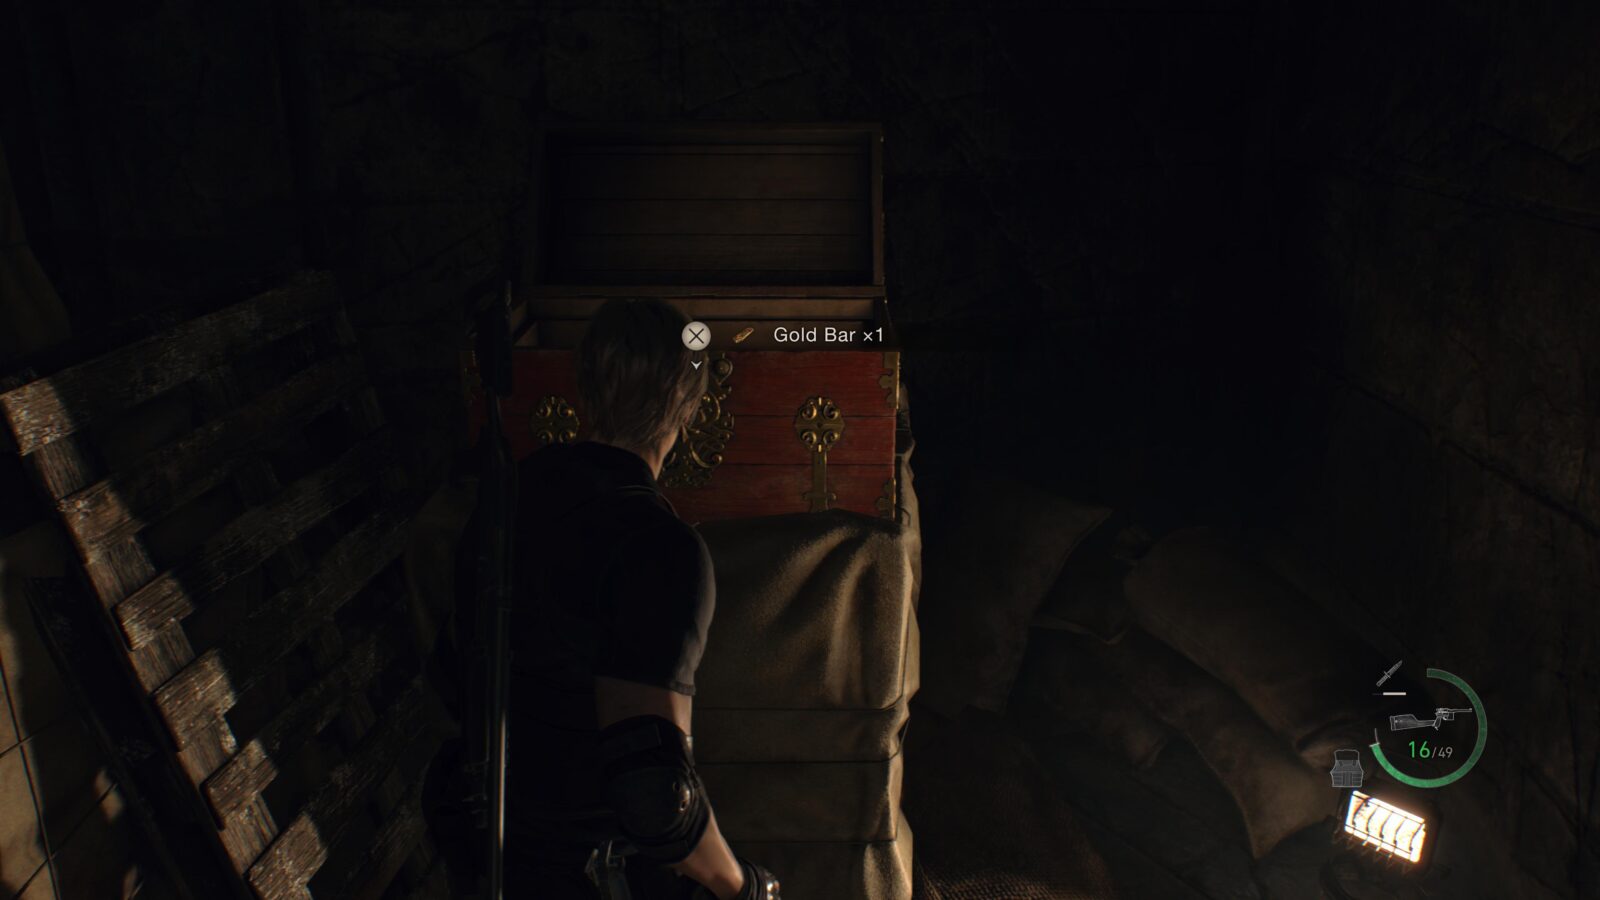
Gold Bar
Now you have a Small Key you can go back to the center of the Lakeside Settlement and open the locked drawer inside the house to get a Gold Bar.
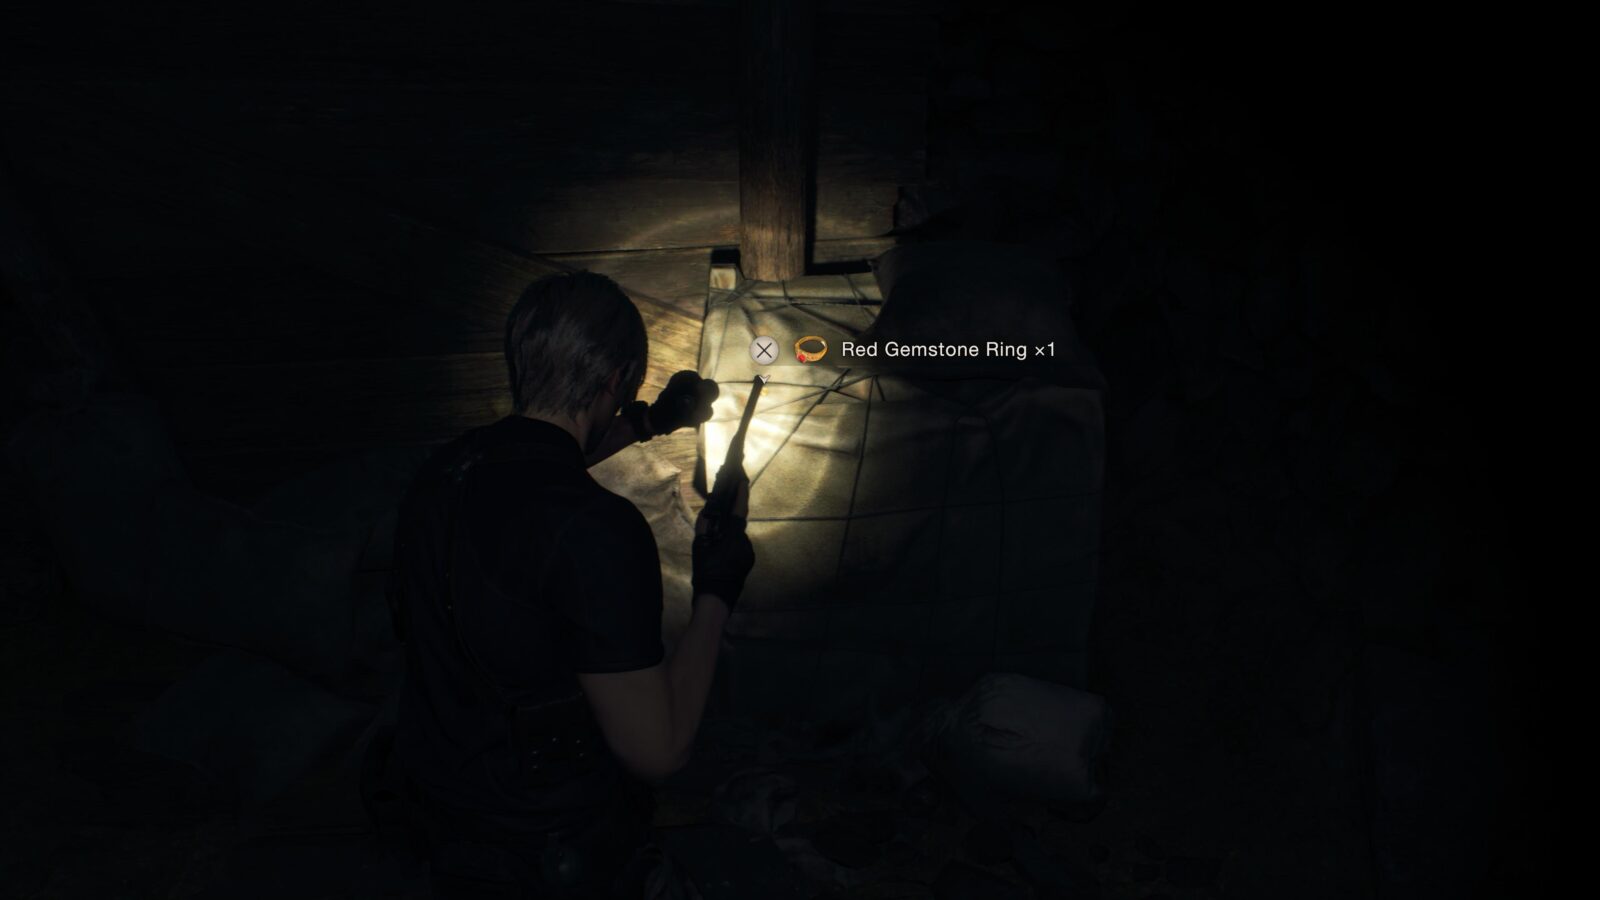
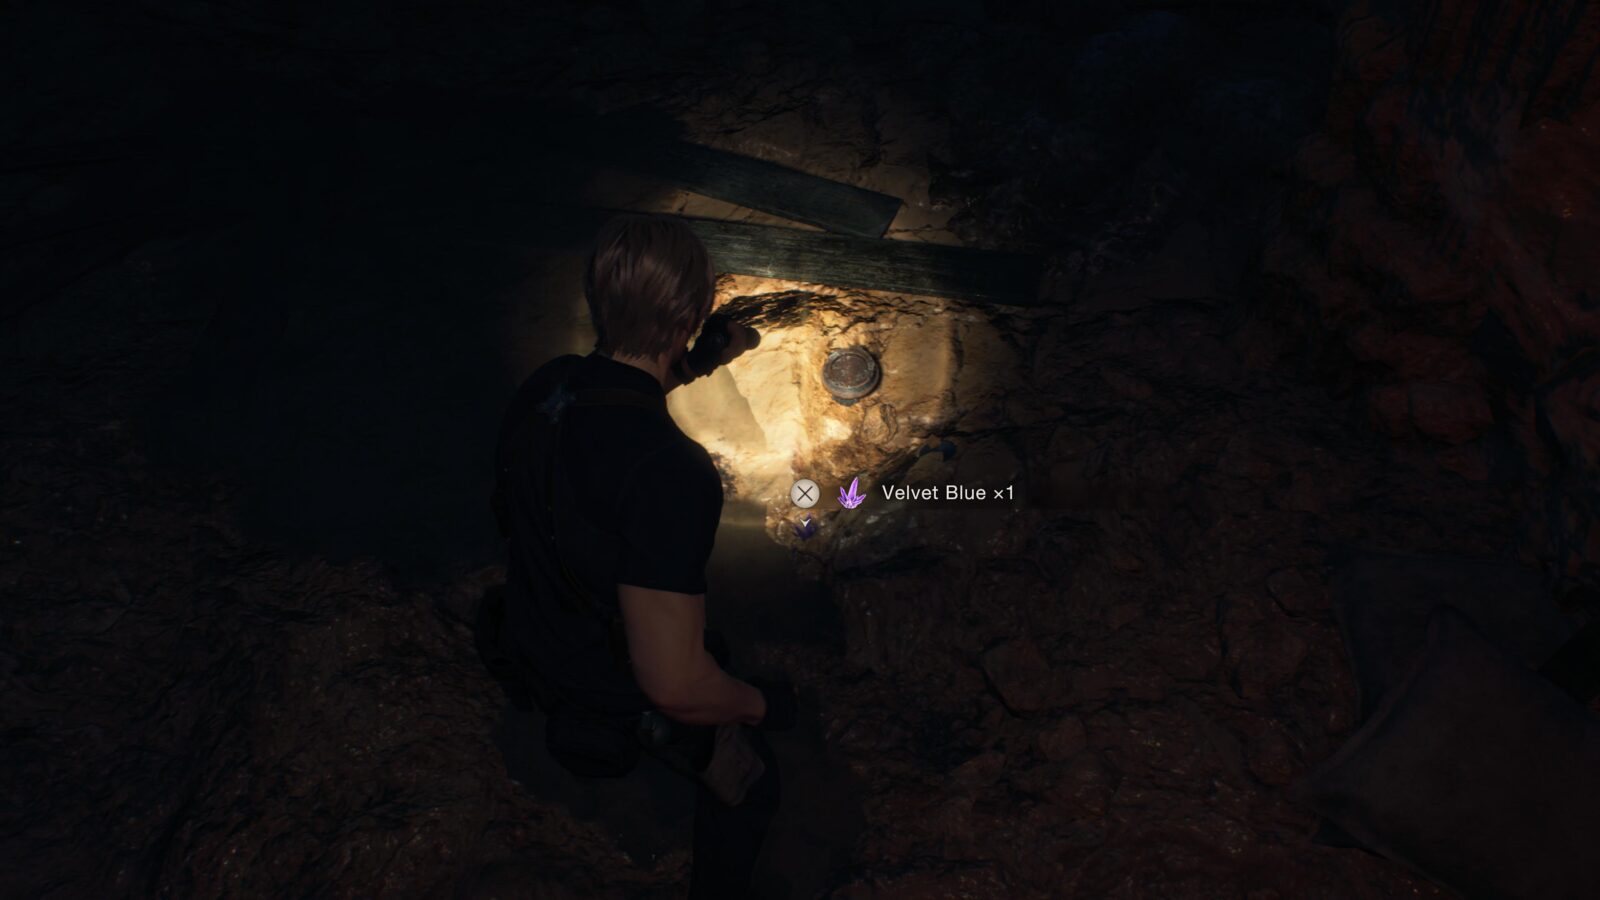
Red Gemstone Ring
Head into the basement where you ended Chapter 1 and you will find a ring at the end of the tunnel.
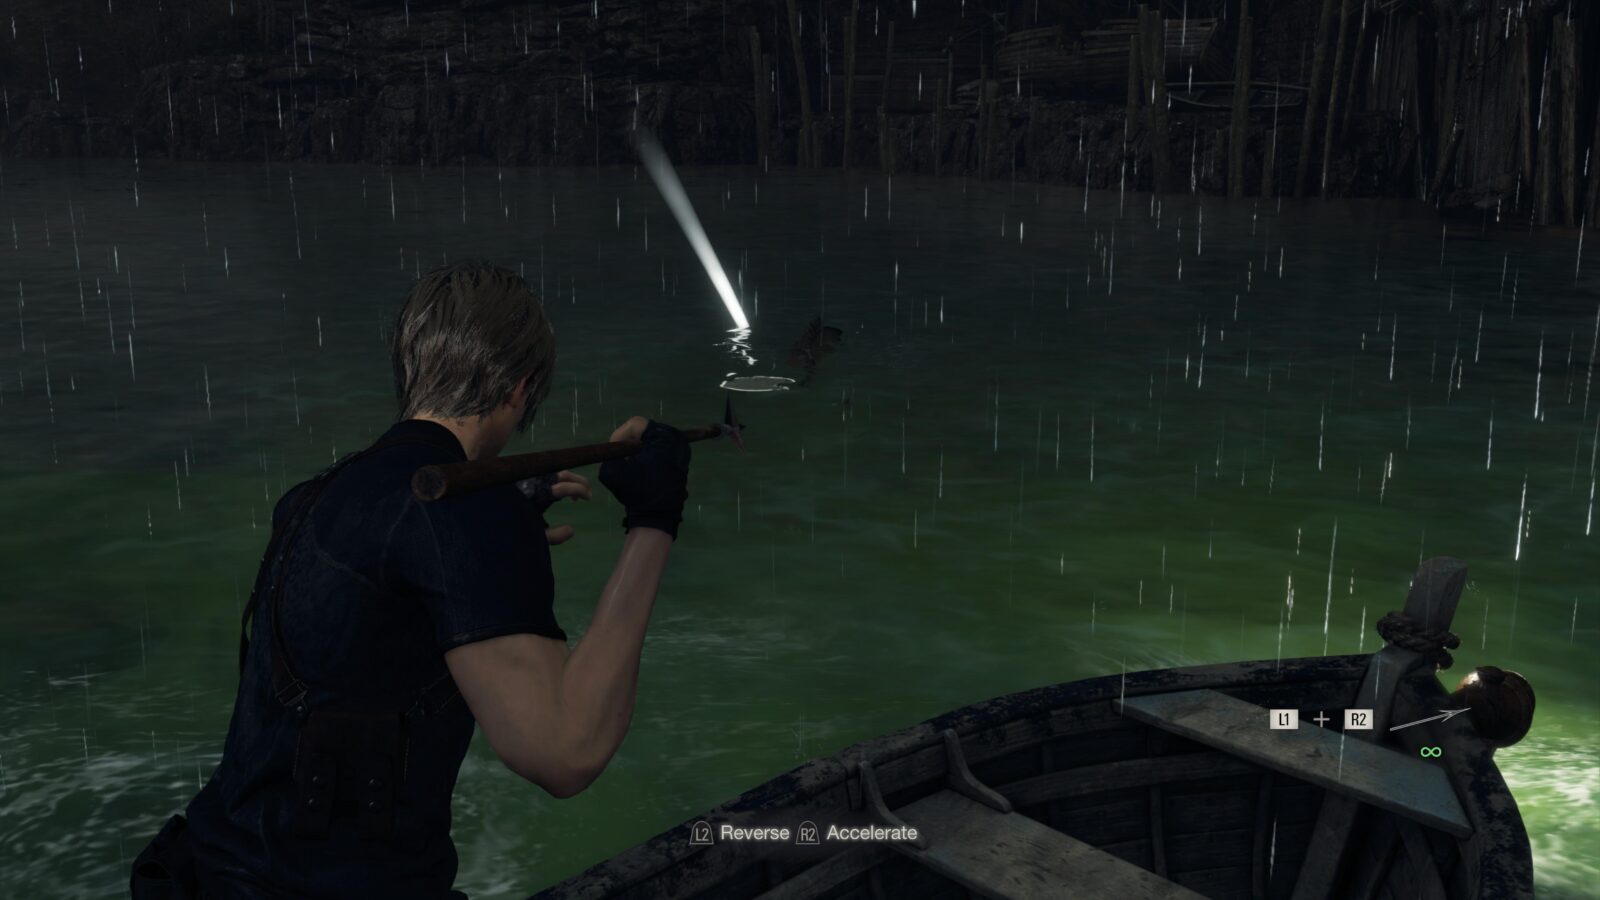
Lunker Bass
Head to the Boat House at the Southern part of the Lake and scan the water for a rather large fish. Once you spot it, hold ![]() and aim at the fish. Release
and aim at the fish. Release ![]() or press
or press ![]() to throw the harpoon. Collect the fish and head to the Merchant.
to throw the harpoon. Collect the fish and head to the Merchant.
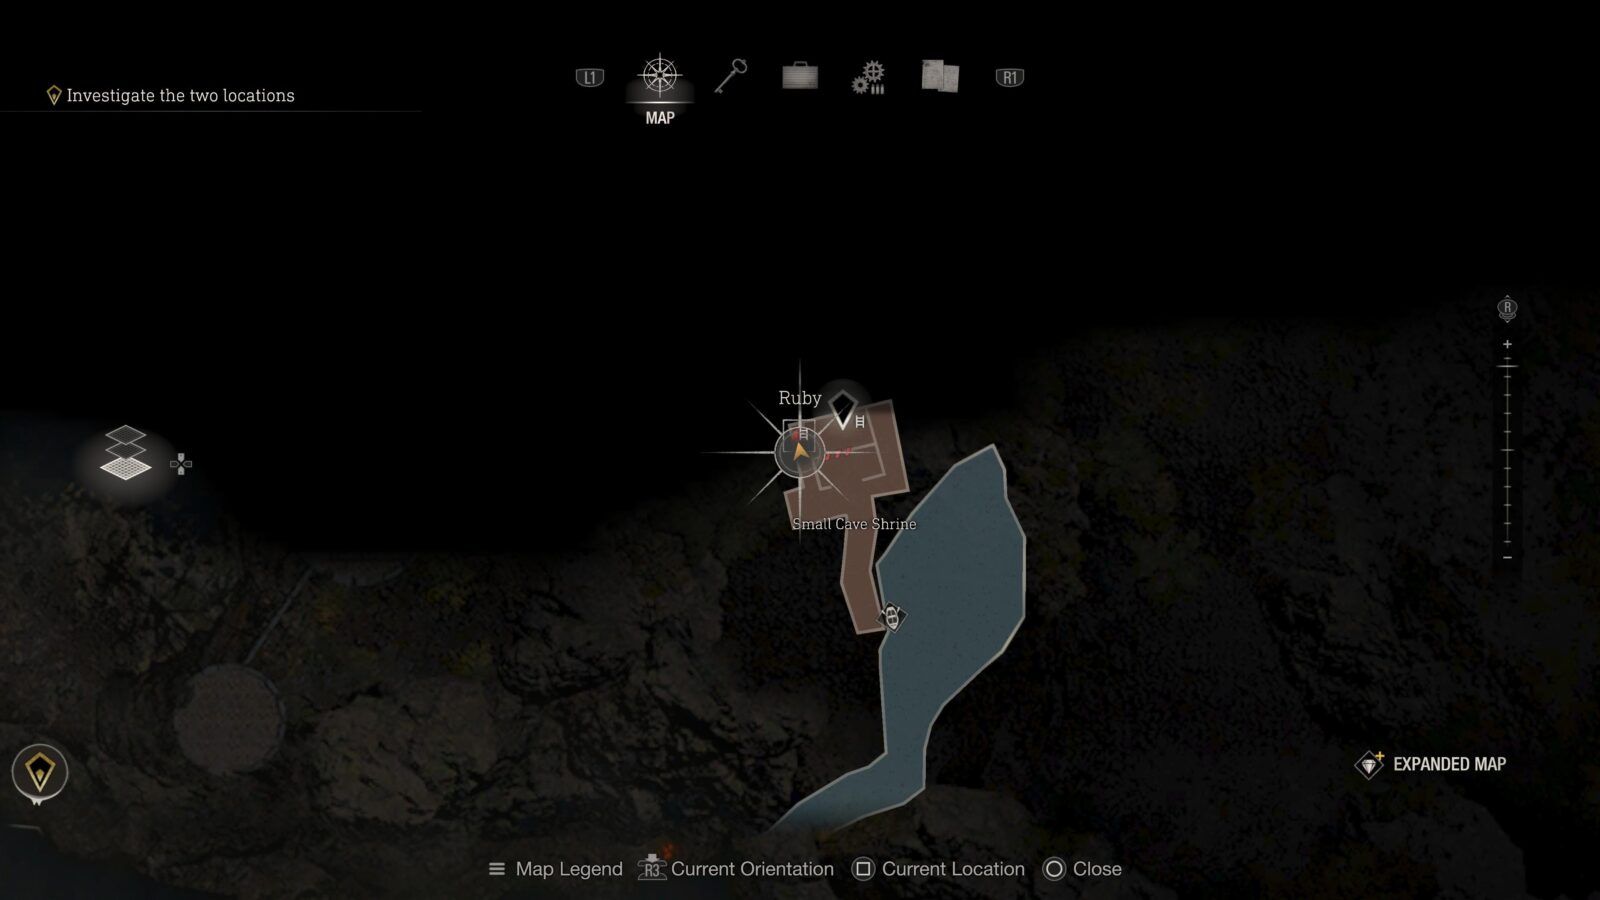
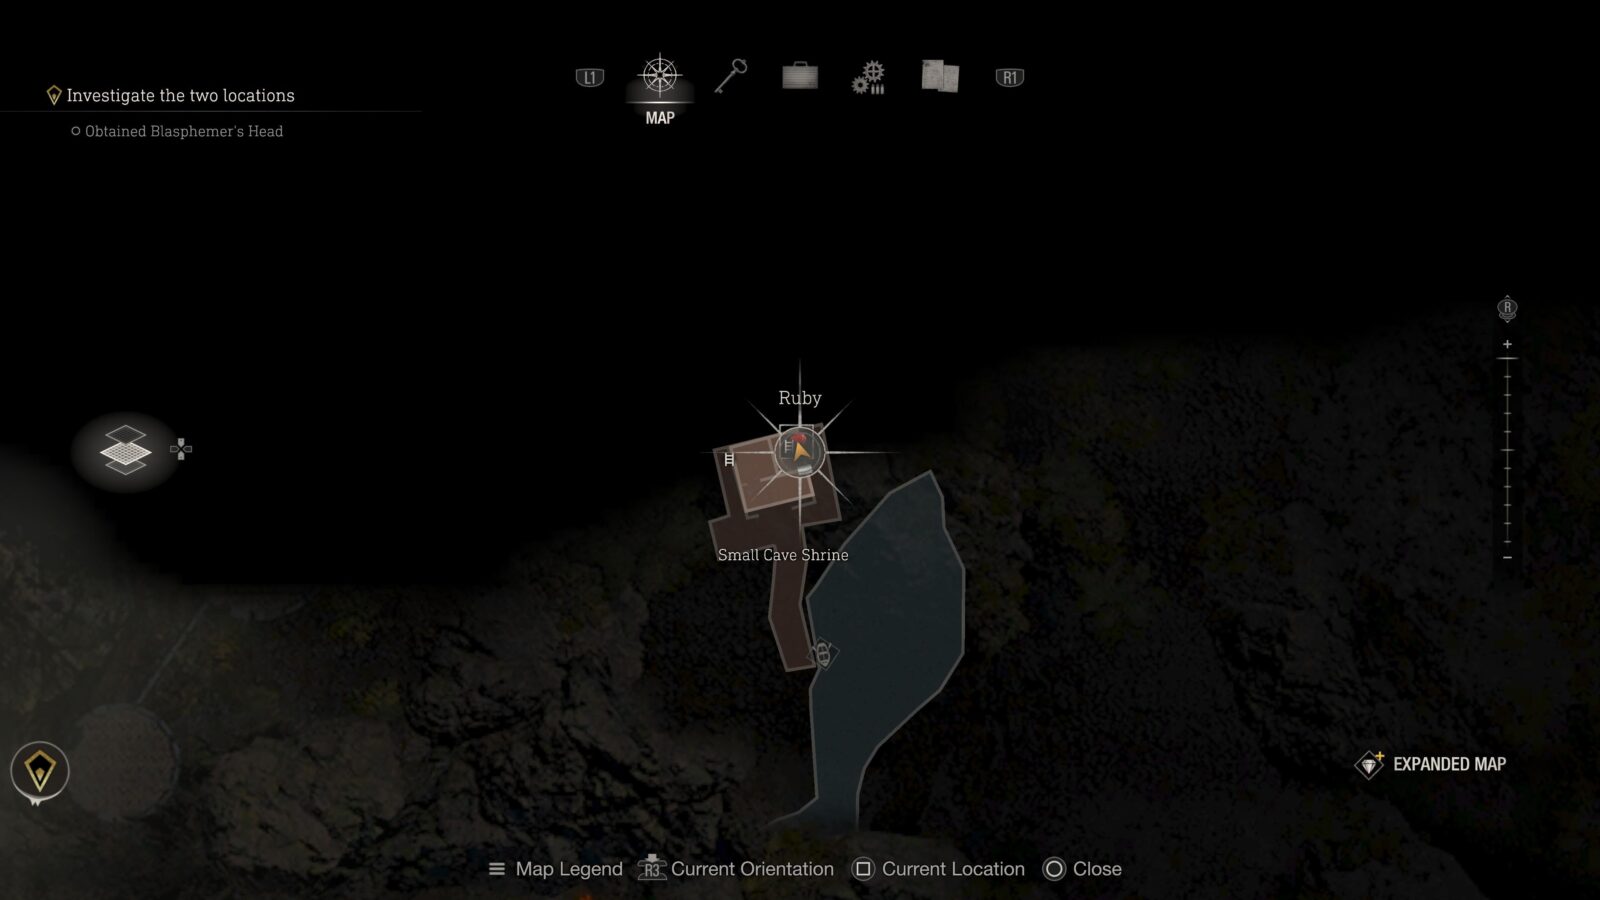
Ruby (Expanded Treasure)
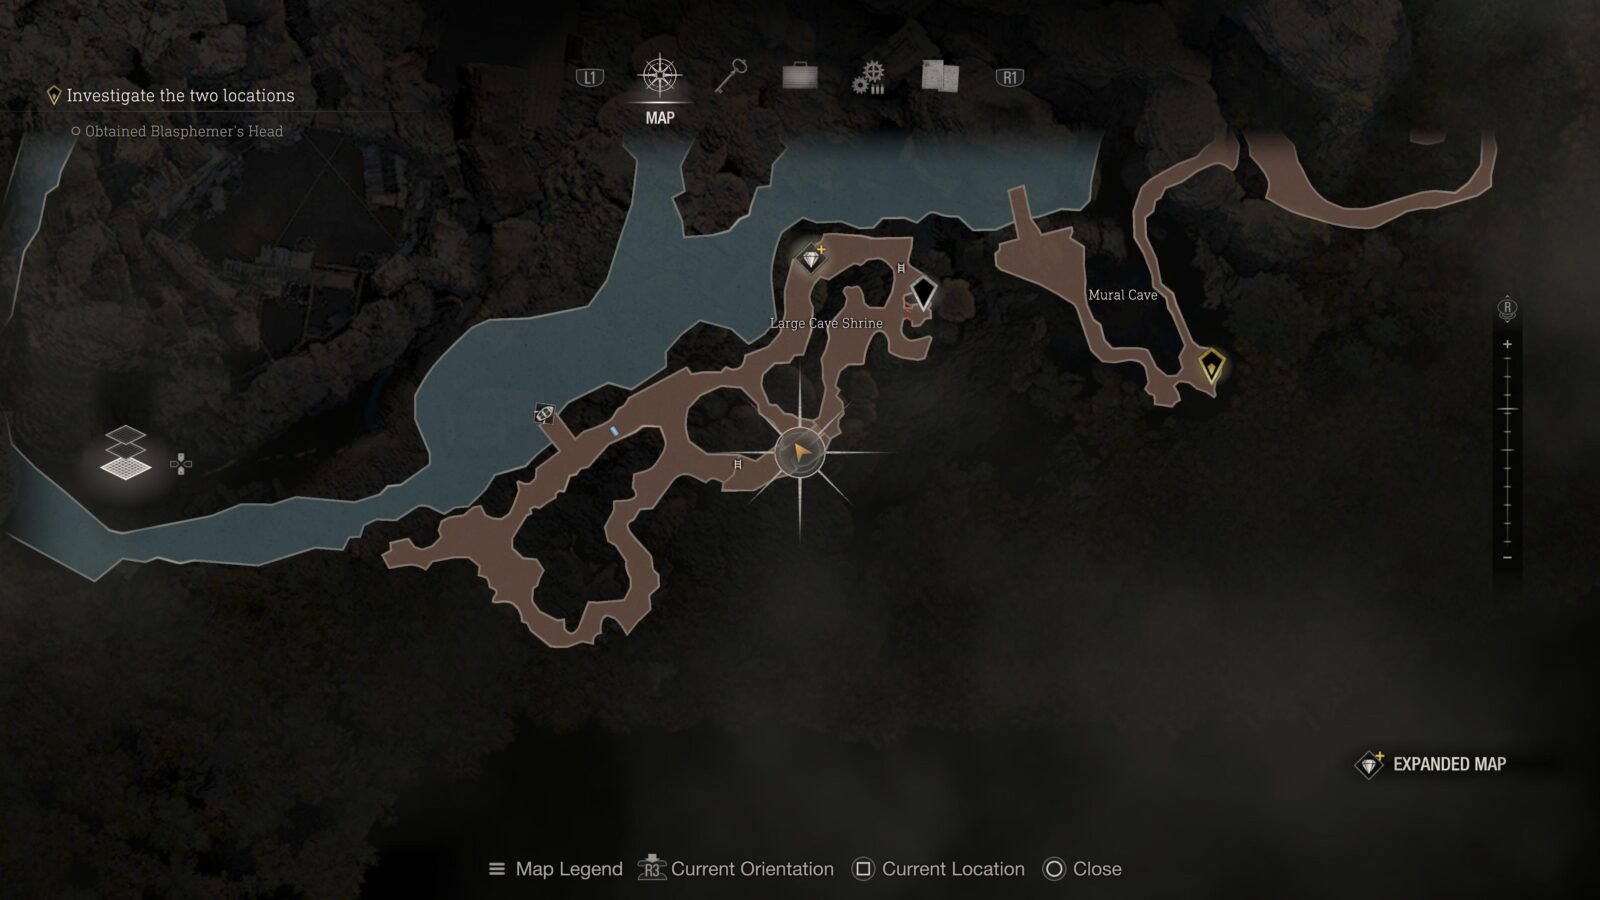
Head to the North-Eastern corner of the Lake and enter the Small Cave Shrine. When docked head around to the left of the hut and look up to find a metal cage with a Ruby inside. This is only available to those who have the Expanded Treasure Map DLC.
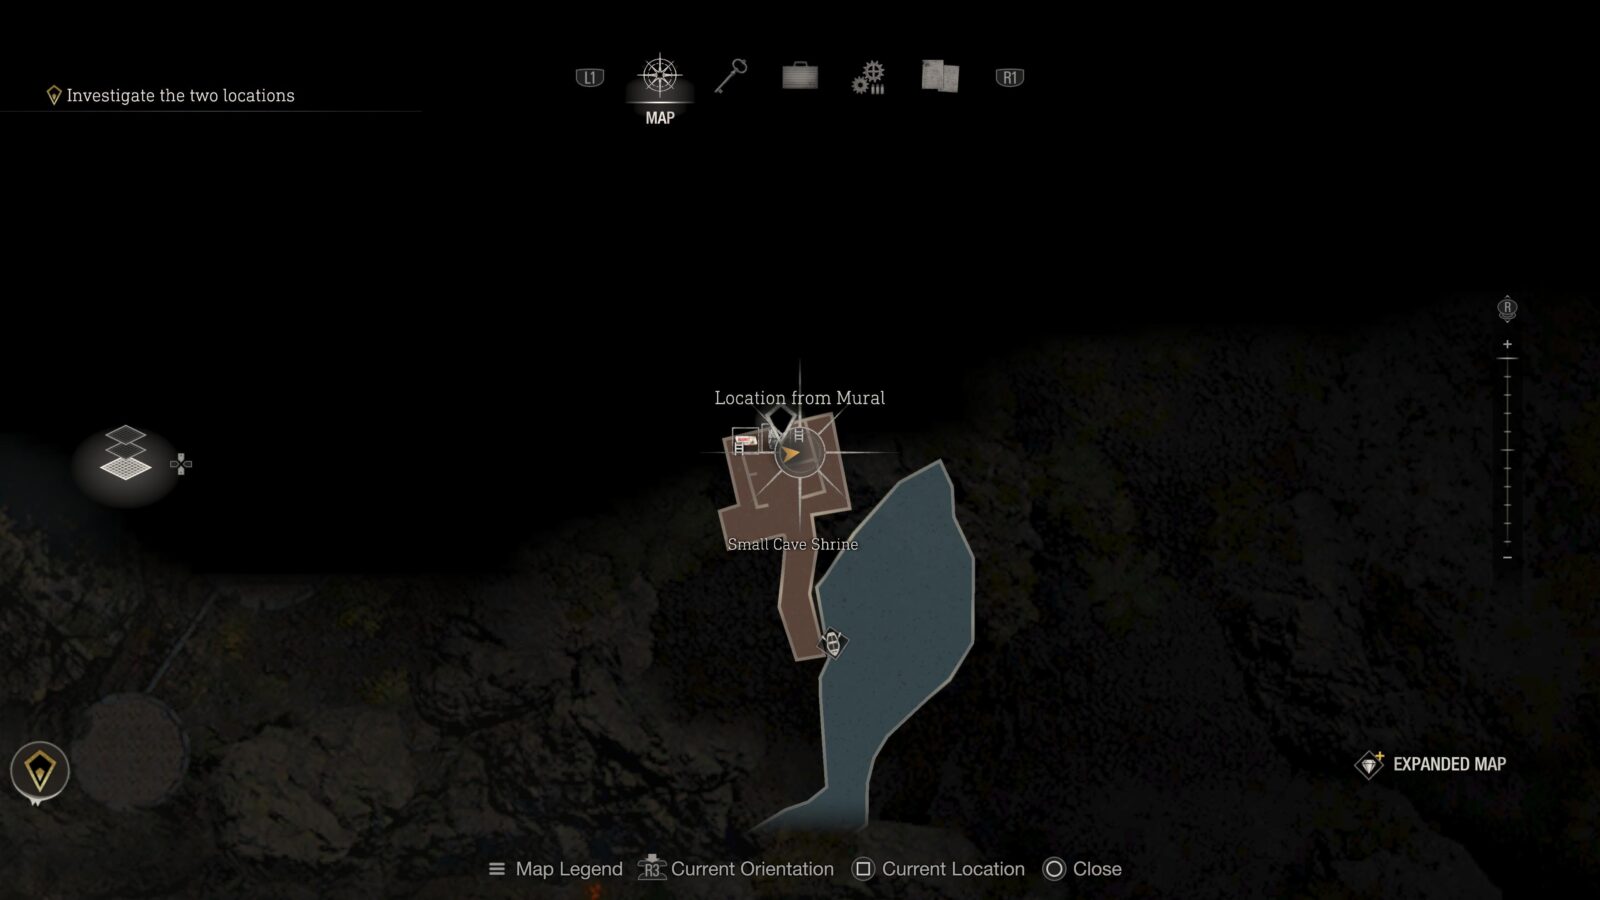
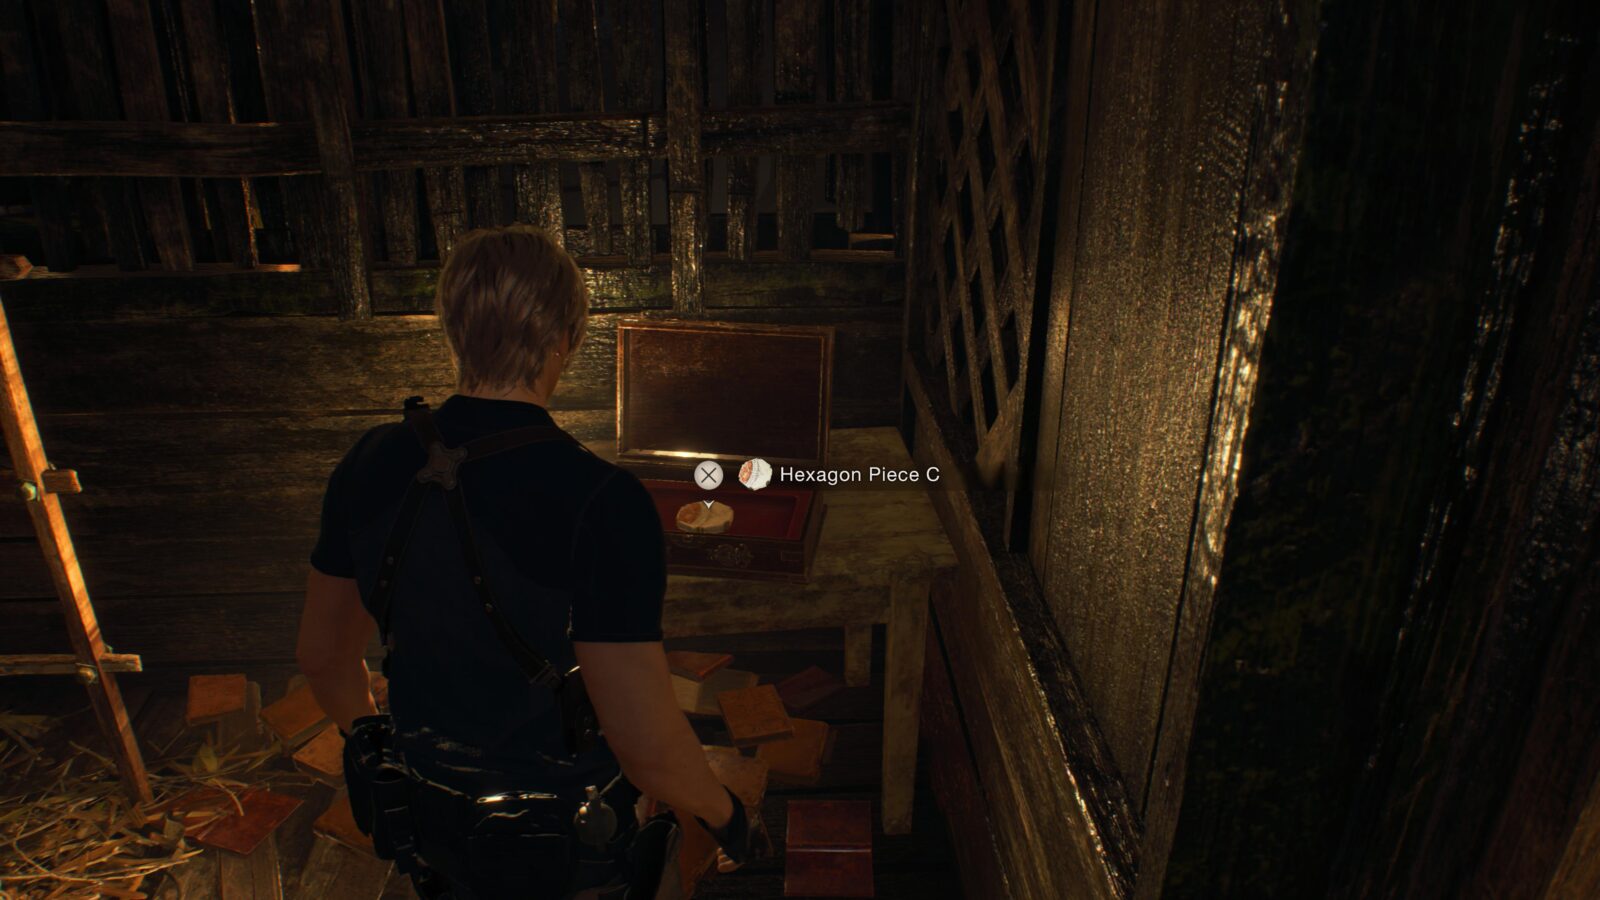
Hexagon Piece C
In the same hut as the Blasphemer’s Head key item is another hexagon puzzle piece inside a case on a table to the right.
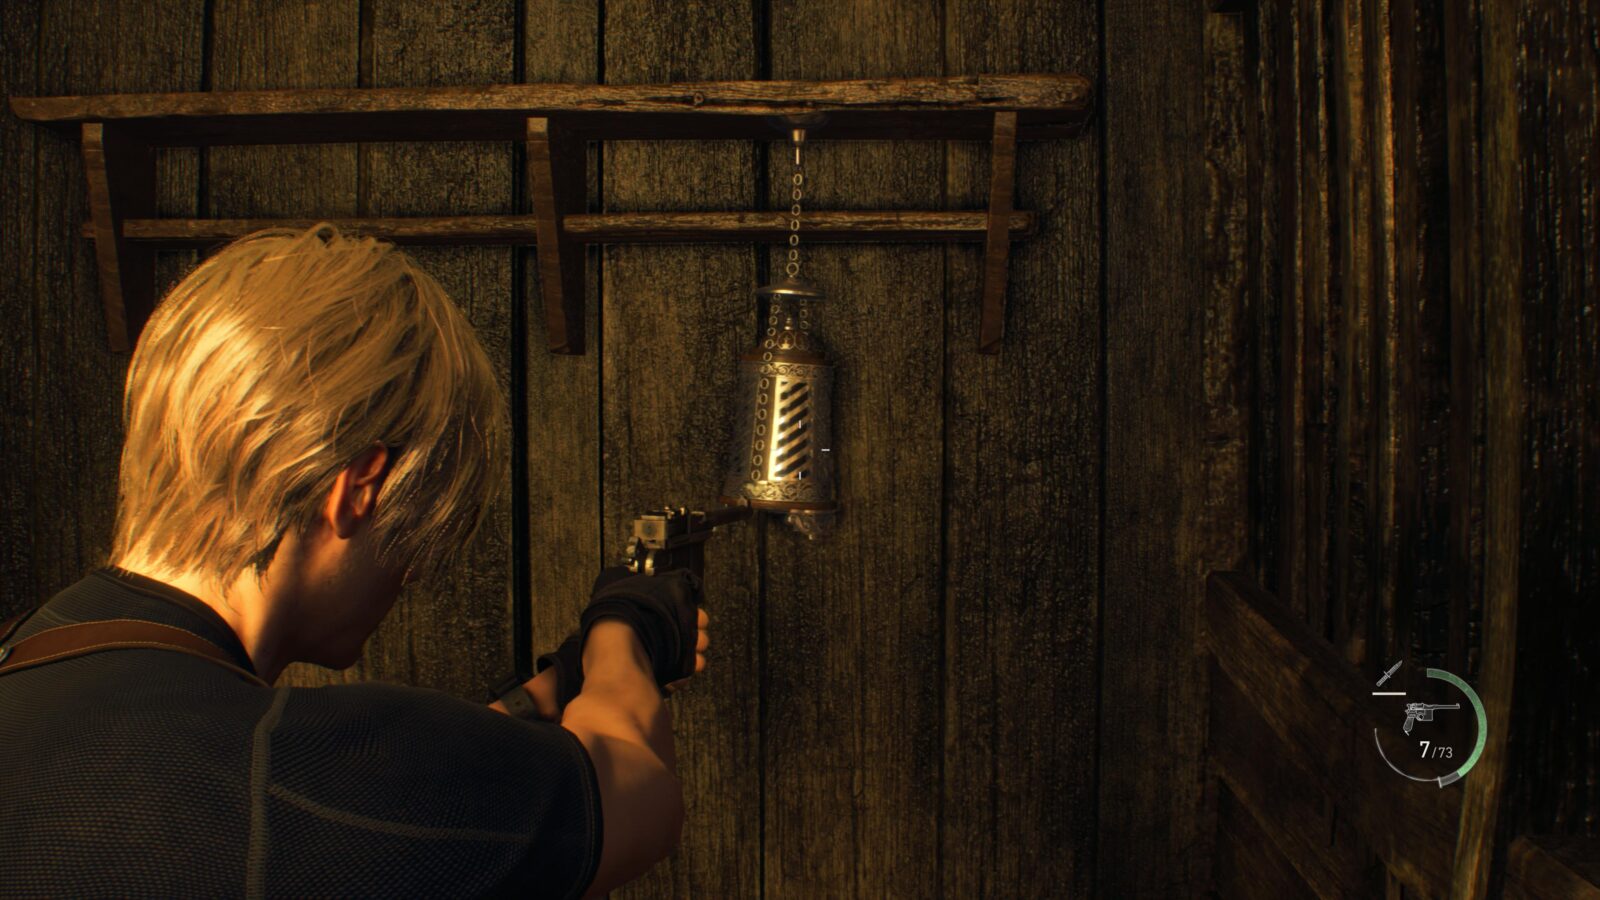
Ruby
Head up the ladders from the Blasphemer’s Head room and there will be a metal cage hanging right in front of you with a ruby inside.
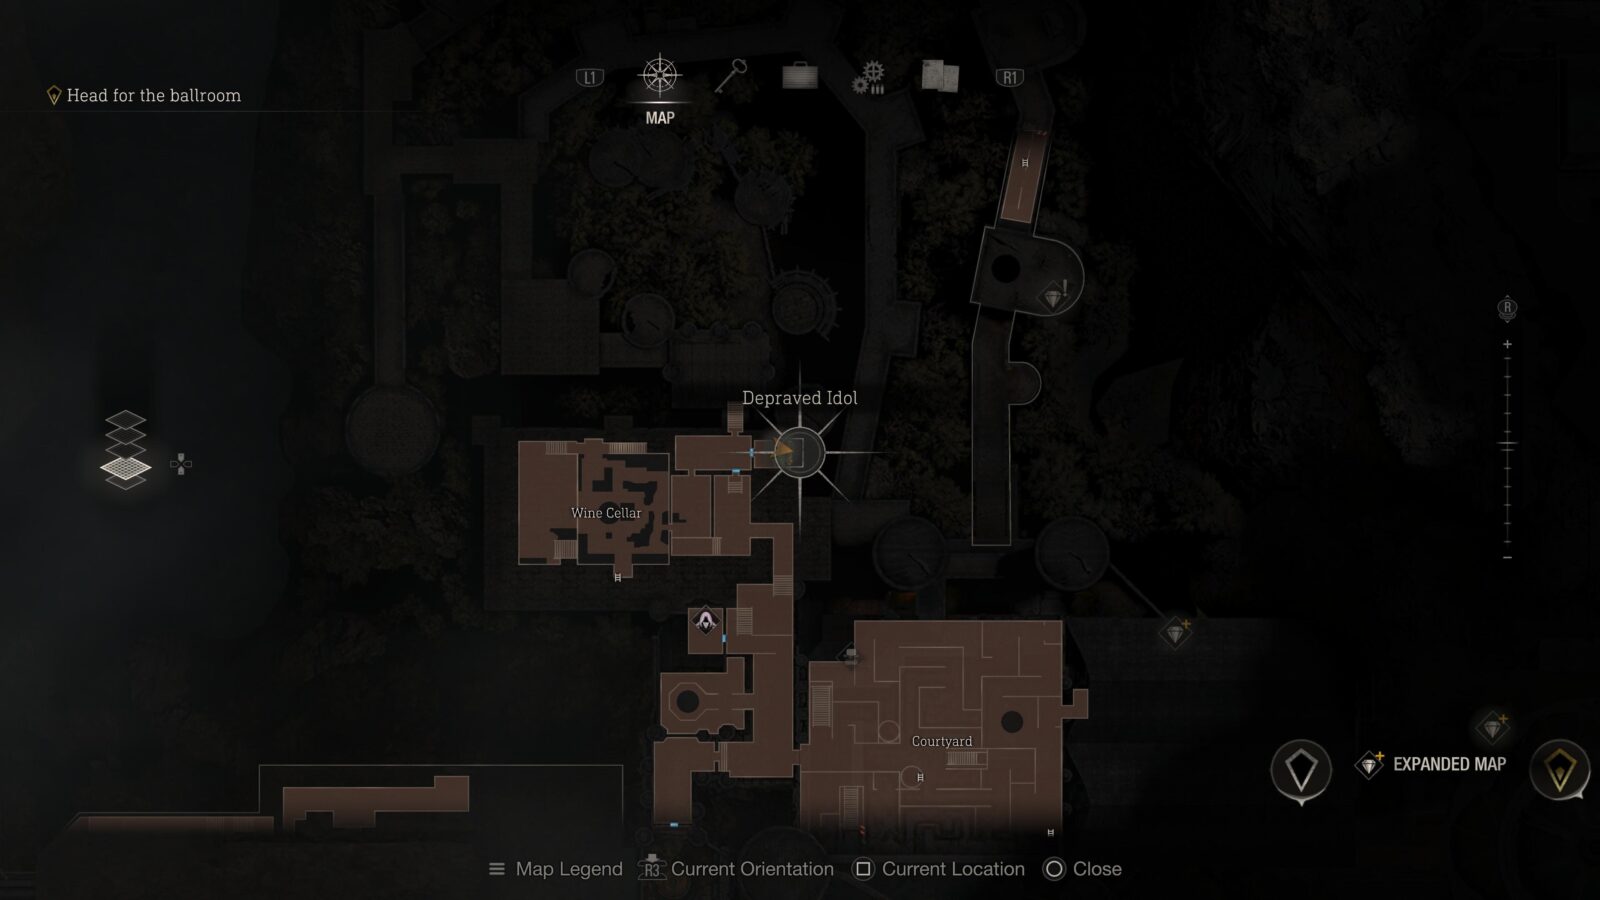
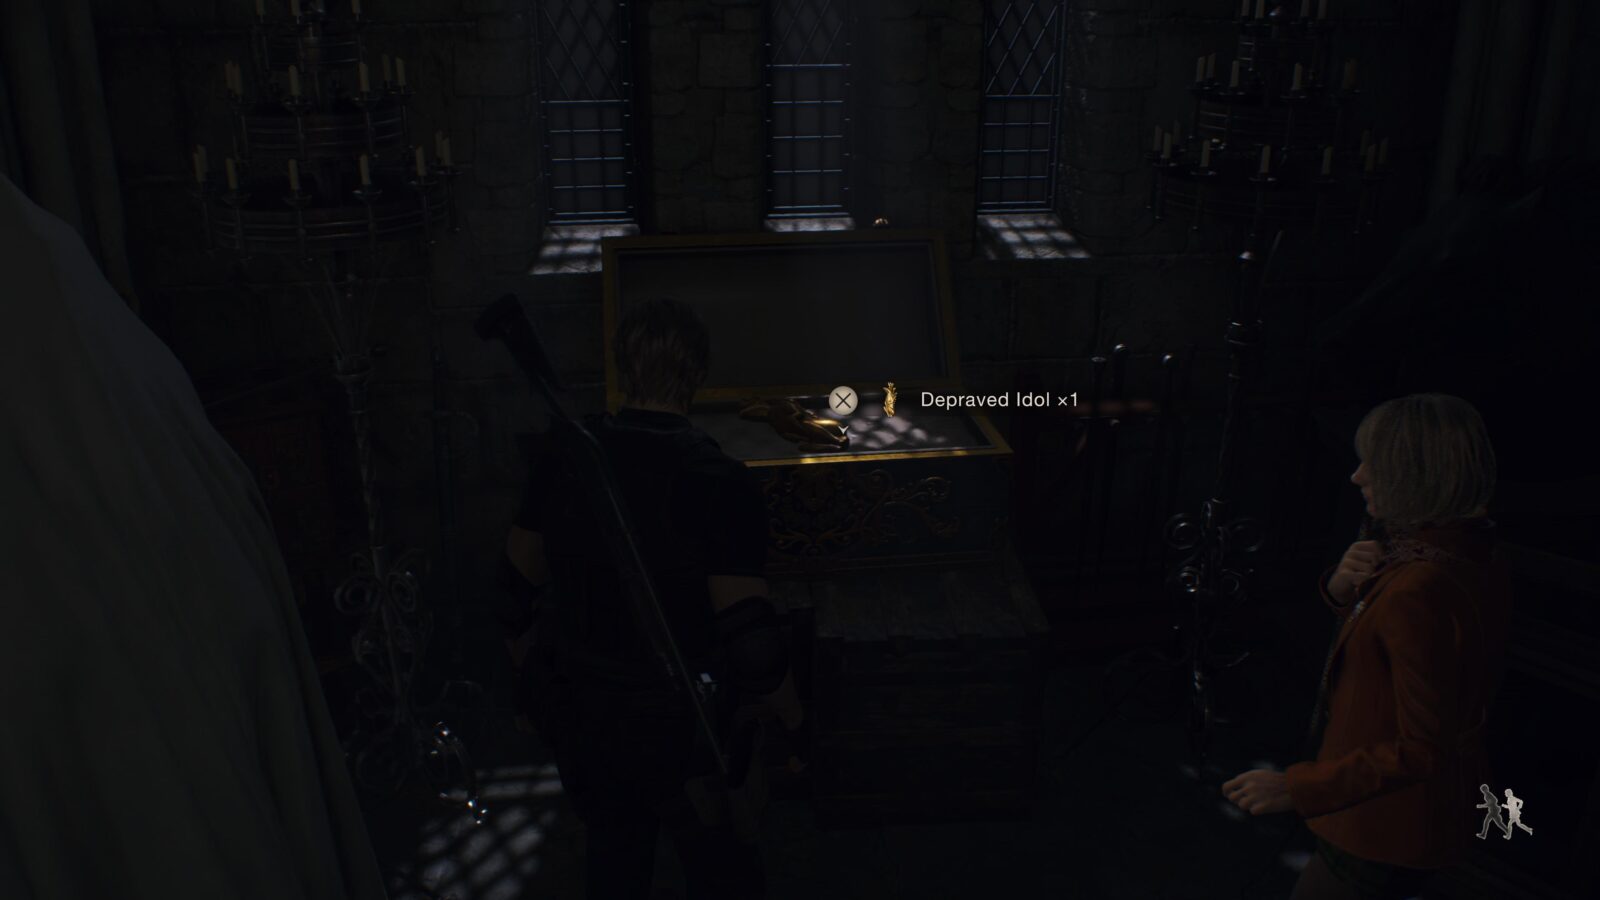
Depraved Idol
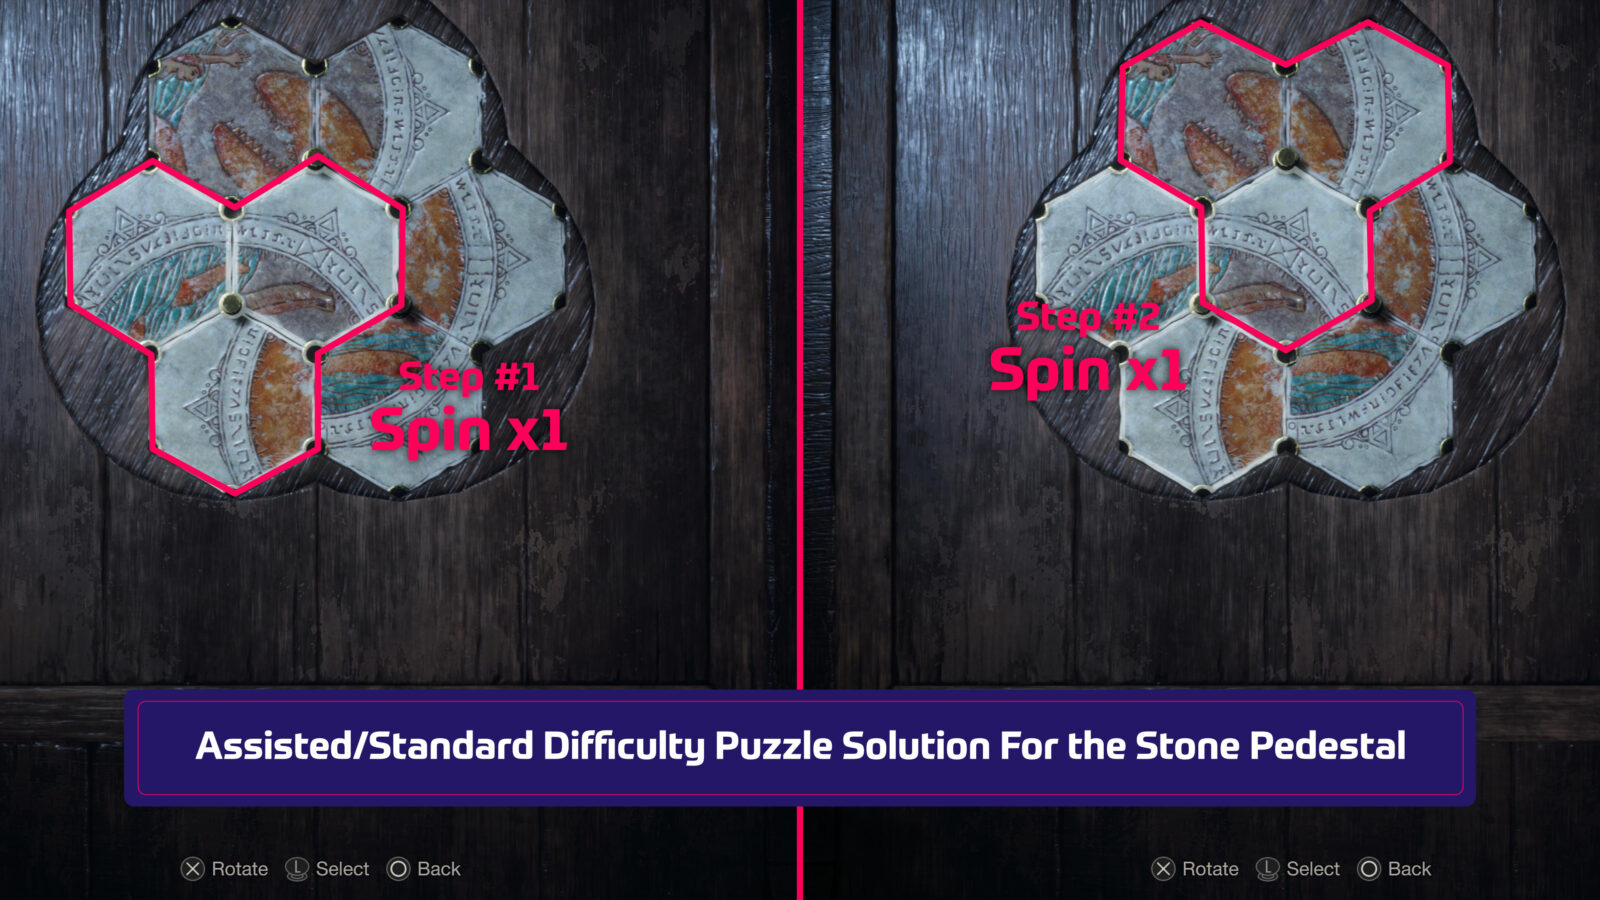
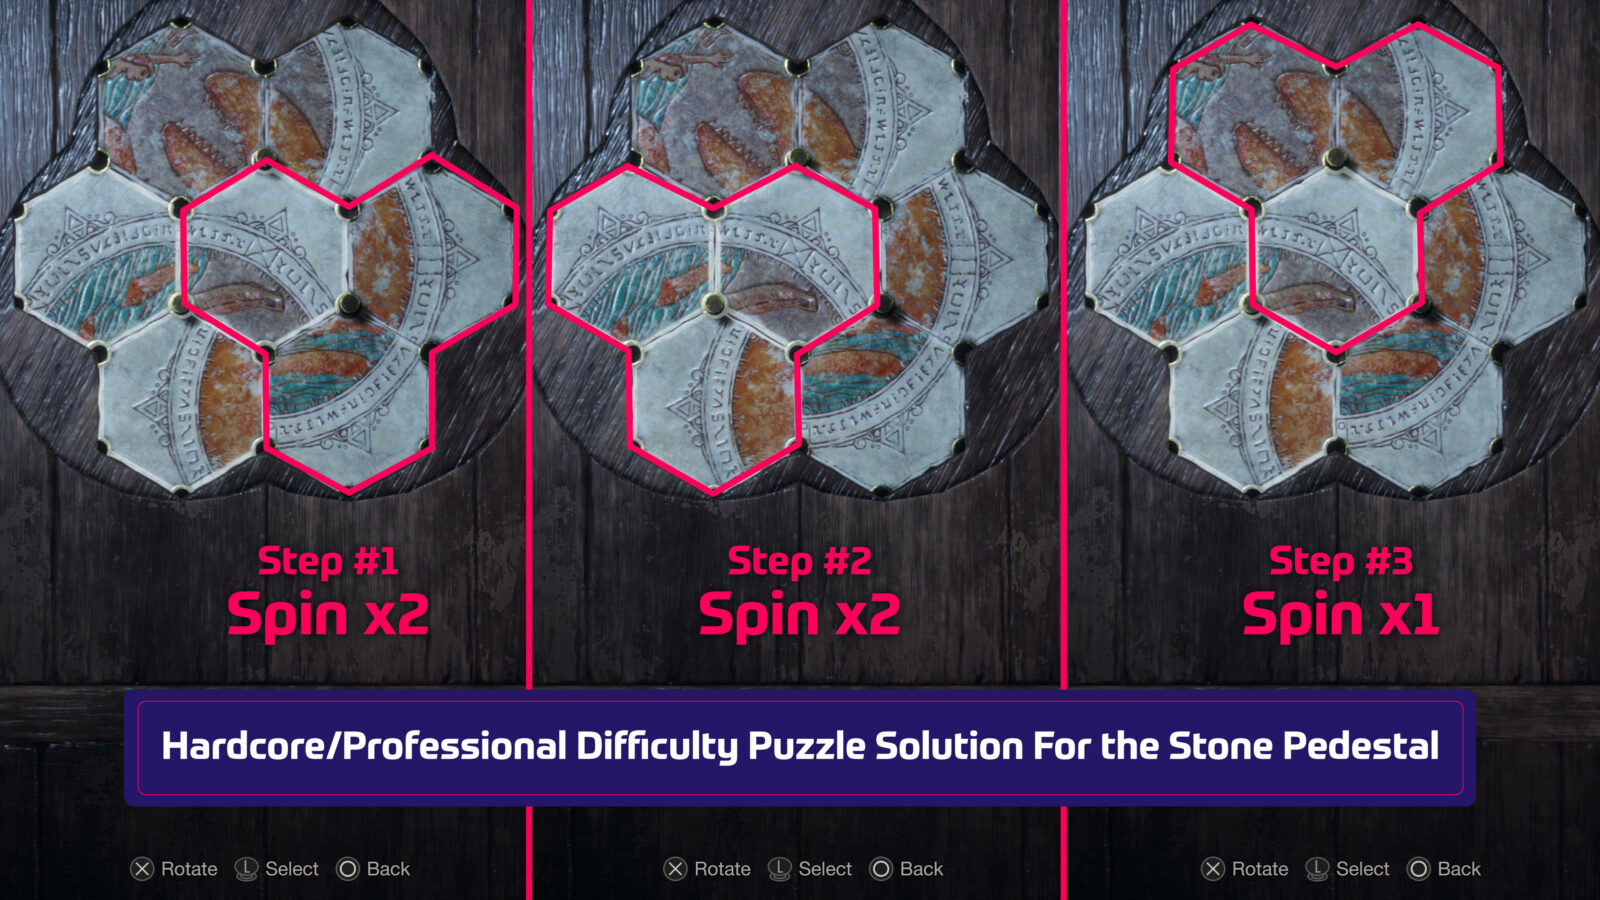
Now that you (hopefully) have all 3 of the Hexagon pieces you can take them to the dock where you first found the boat all the way on the Western side of the Lake. There will be a Stone Pedestal where you can place the pieces. Solve the puzzle in order to get the Depraved Idol; or follow the instructions below.
For Assisted and Standard difficulty the solution is:
- Spin the left segment one time
- Spin the top segment one time
For Hardcore and Professional difficulty the solution is:
- Spin the right segment two times
- Spin the left segment two times
- Spin the top segment once


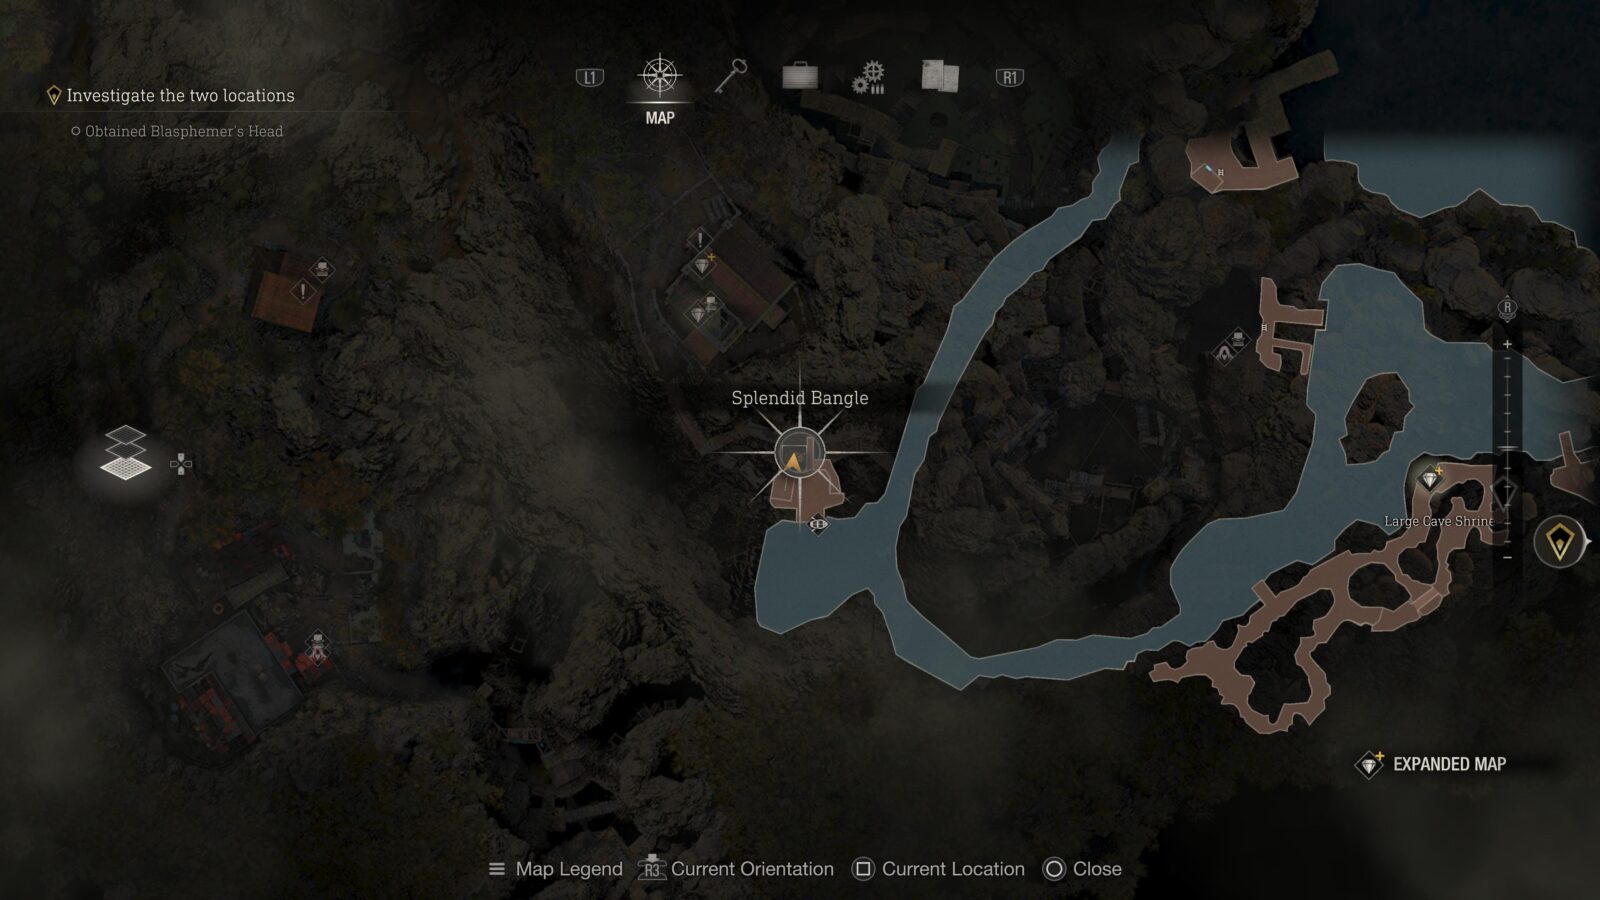
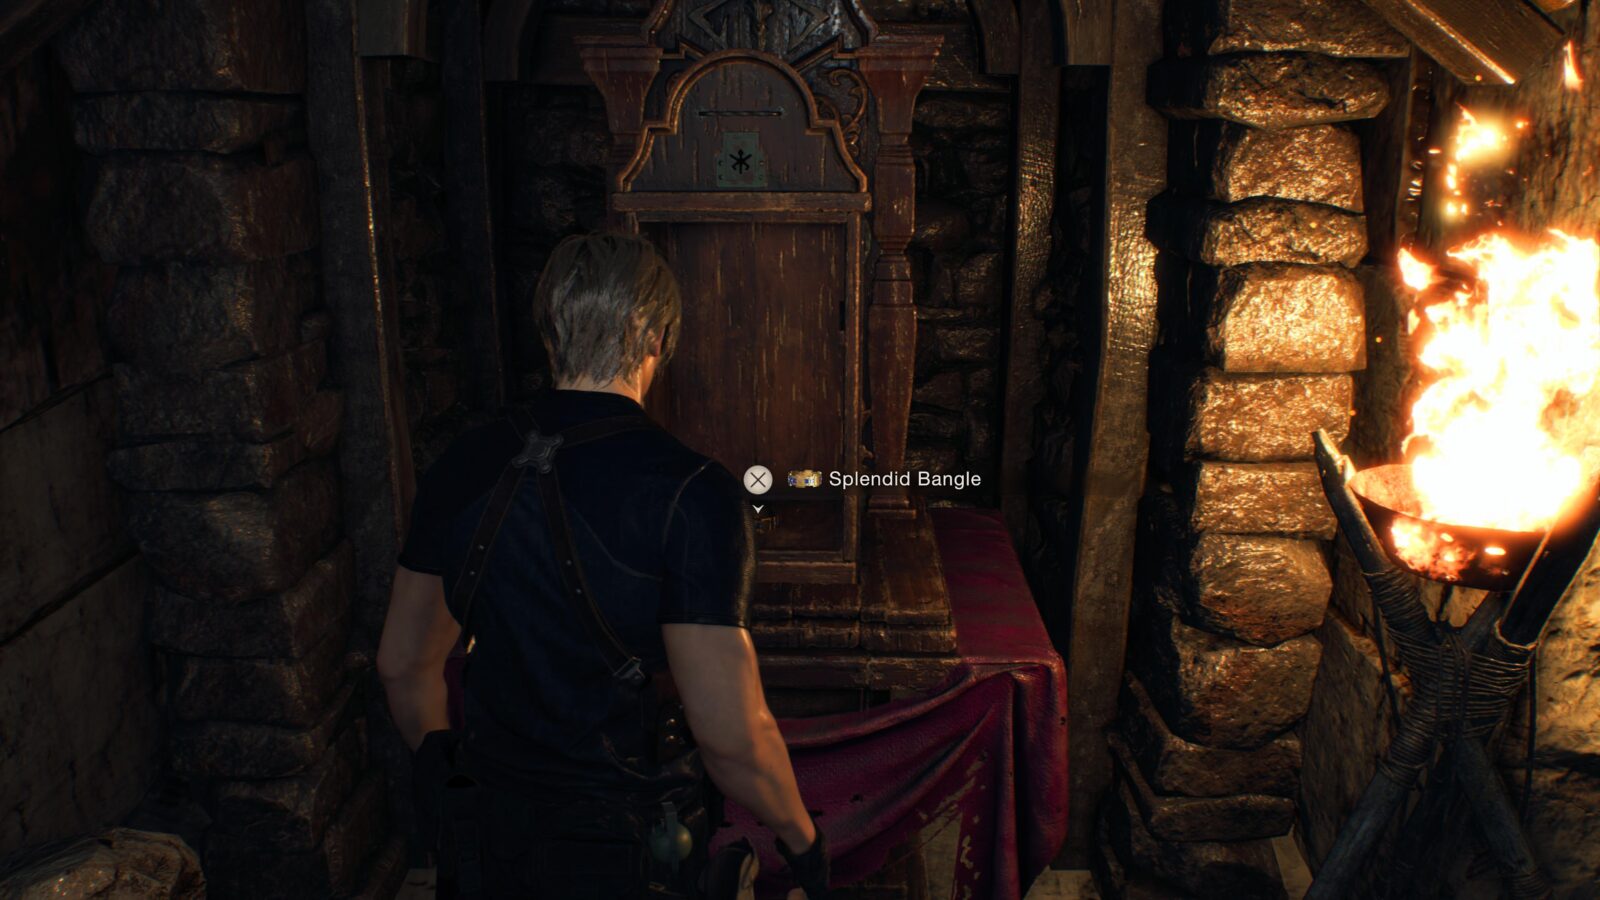
Splendid Bangle
Get back on the boat and go through the tunnel via the Western entrance or the Southern entrance. You will reach an area where you can dock and there will be a wayshrine you can open to grab the Splendid Bangle.
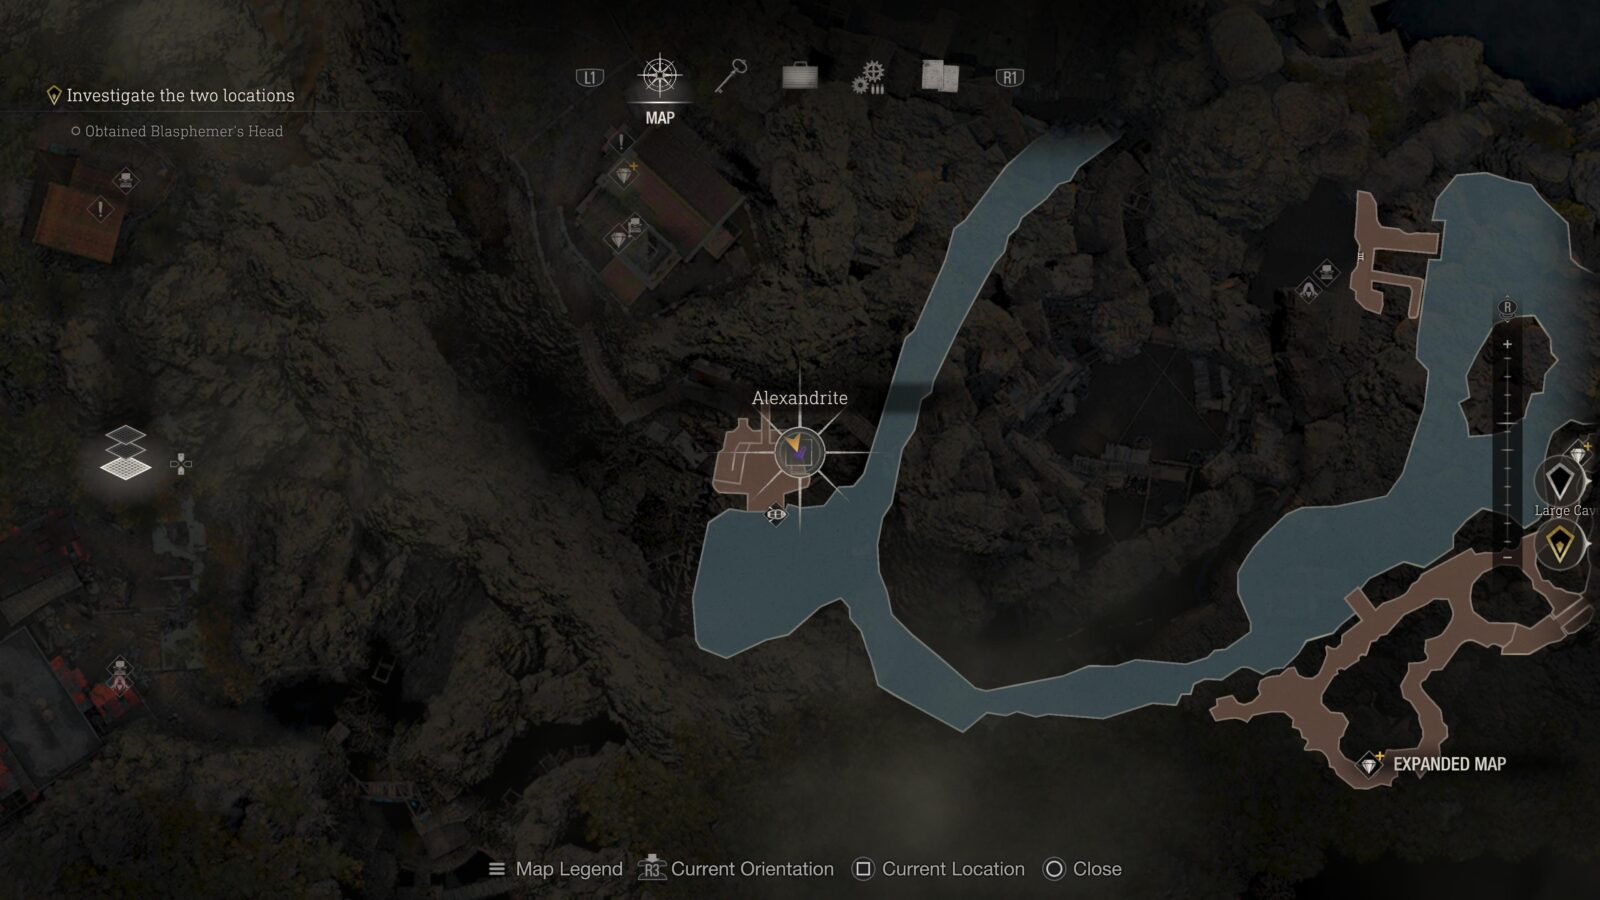
Alexandrite
Still in the area with the Splendid Bangle look up and to the right to spot a cage hanging from a wooden strut. Shoot it down and grab the Alexandrite inside.
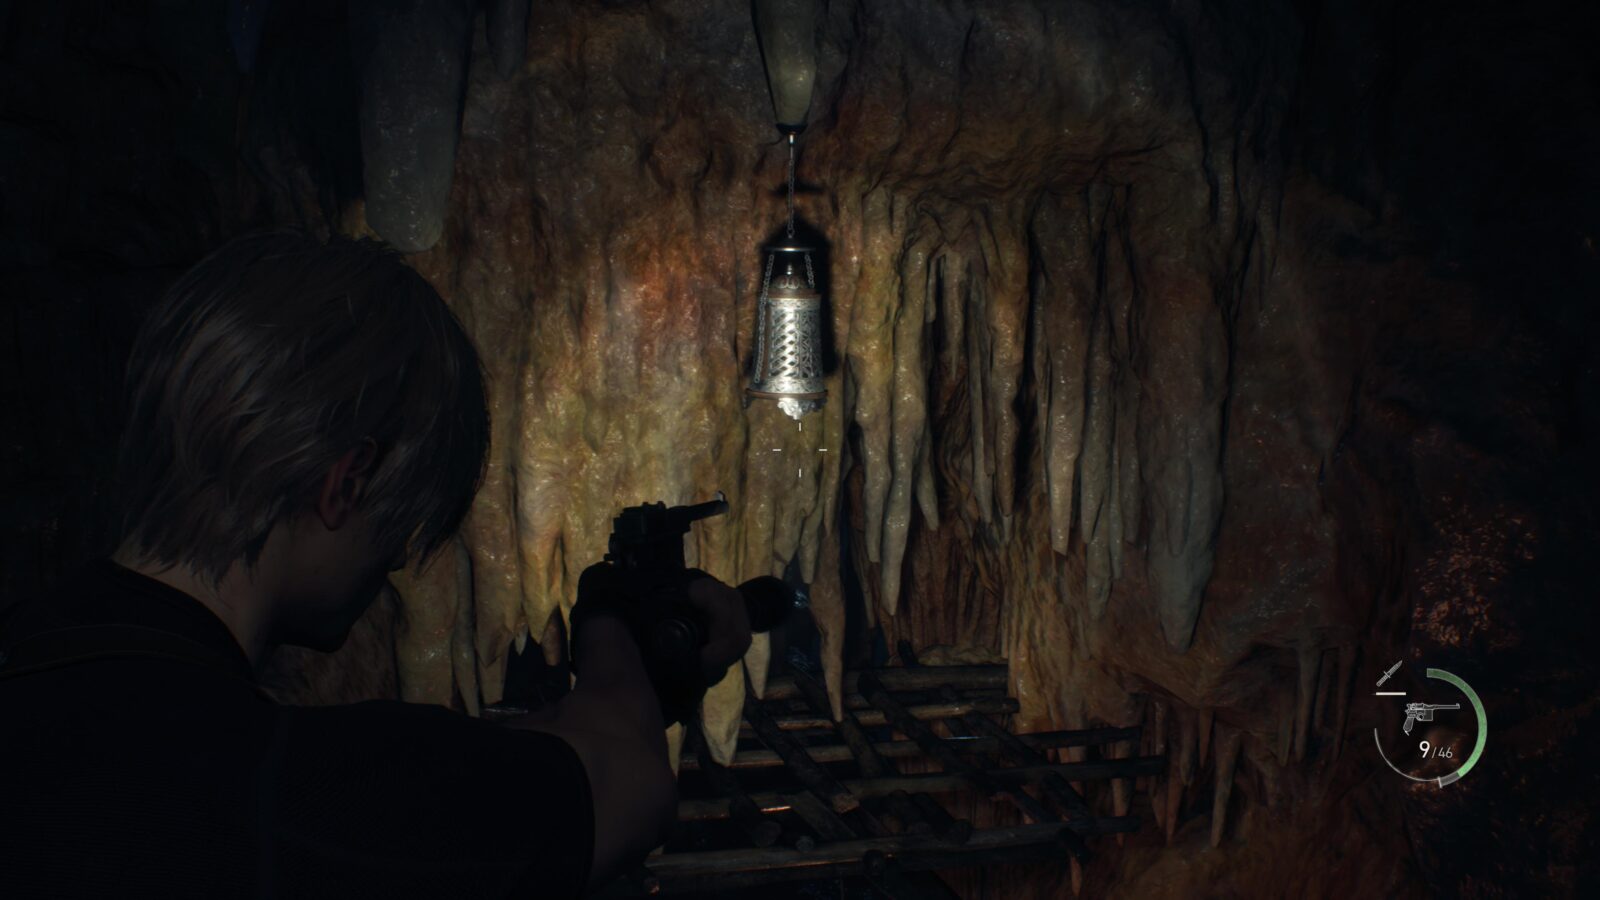
Velvet Blue
Head back into the boat and follow the tunnel to the Large Cave Shrine. Follow the caverns until you climb a wooden ladder. At the top of the ladder walk forward a bit and look to your left to find a silver cage hanging from the ceiling of a lower passage next to you. Shoot the cage down and jump down to collect the Velvet Blue.
Silver Token (Expanded Treasure)
Head to the Apostate’s Head puzzle and go past it and down the ladders on the other side. You should be very close to the water when you land. Look up to the ceiling with the water on your right shoulder and look for a bronze cage hanging from the ceiling. Shoot it down and collect the Silver Token inside. This is only available to those who have the Expanded Treasure Map DLC.

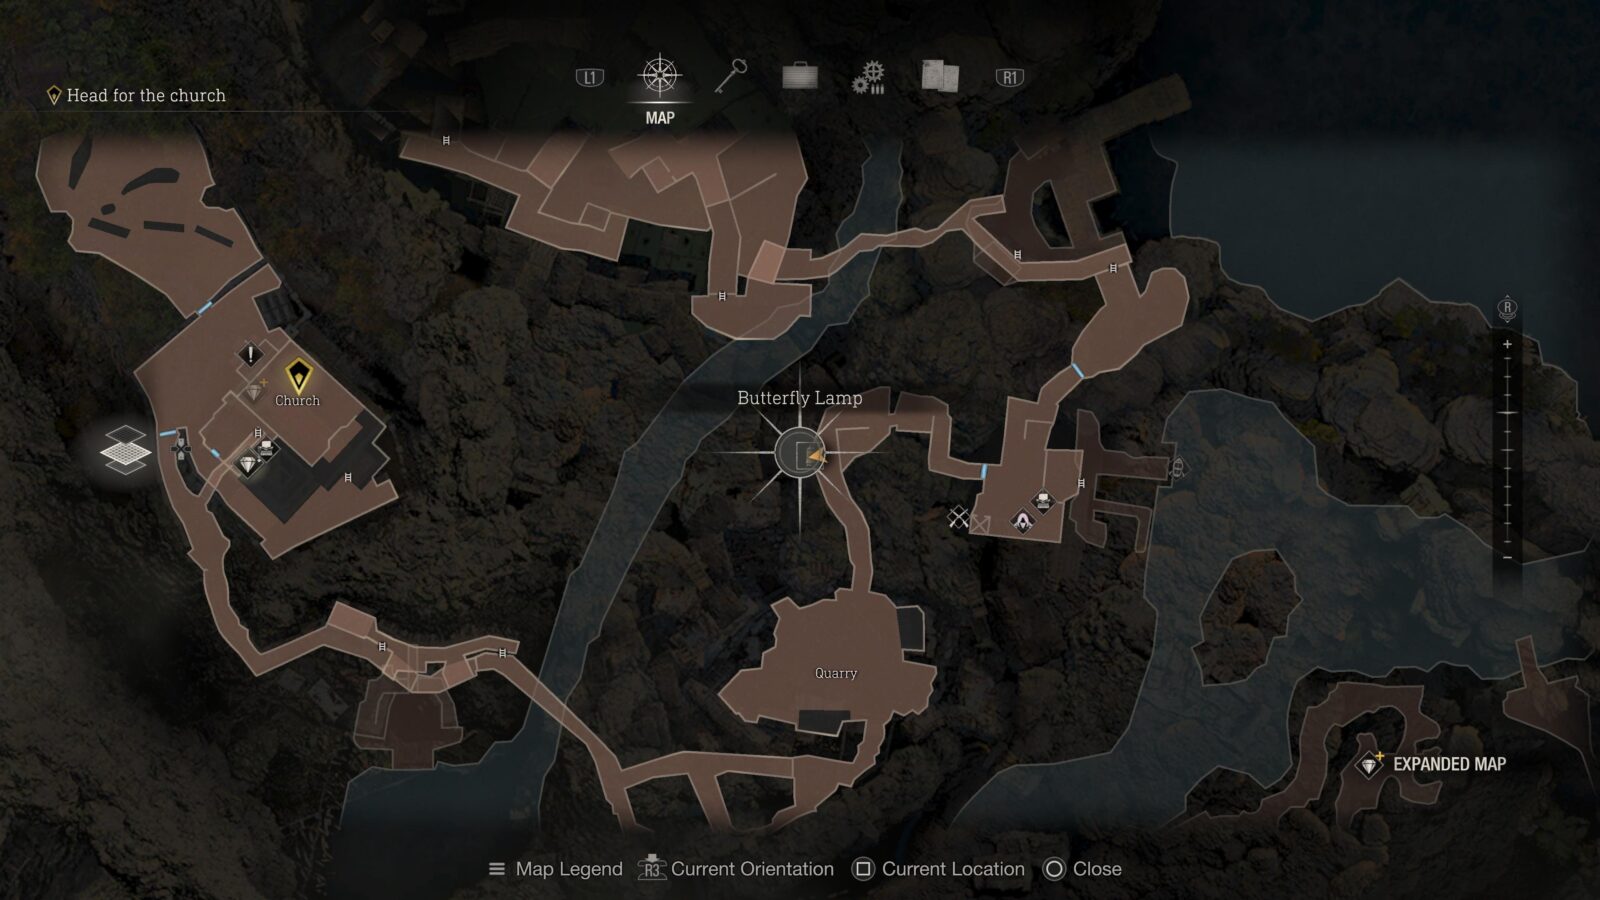
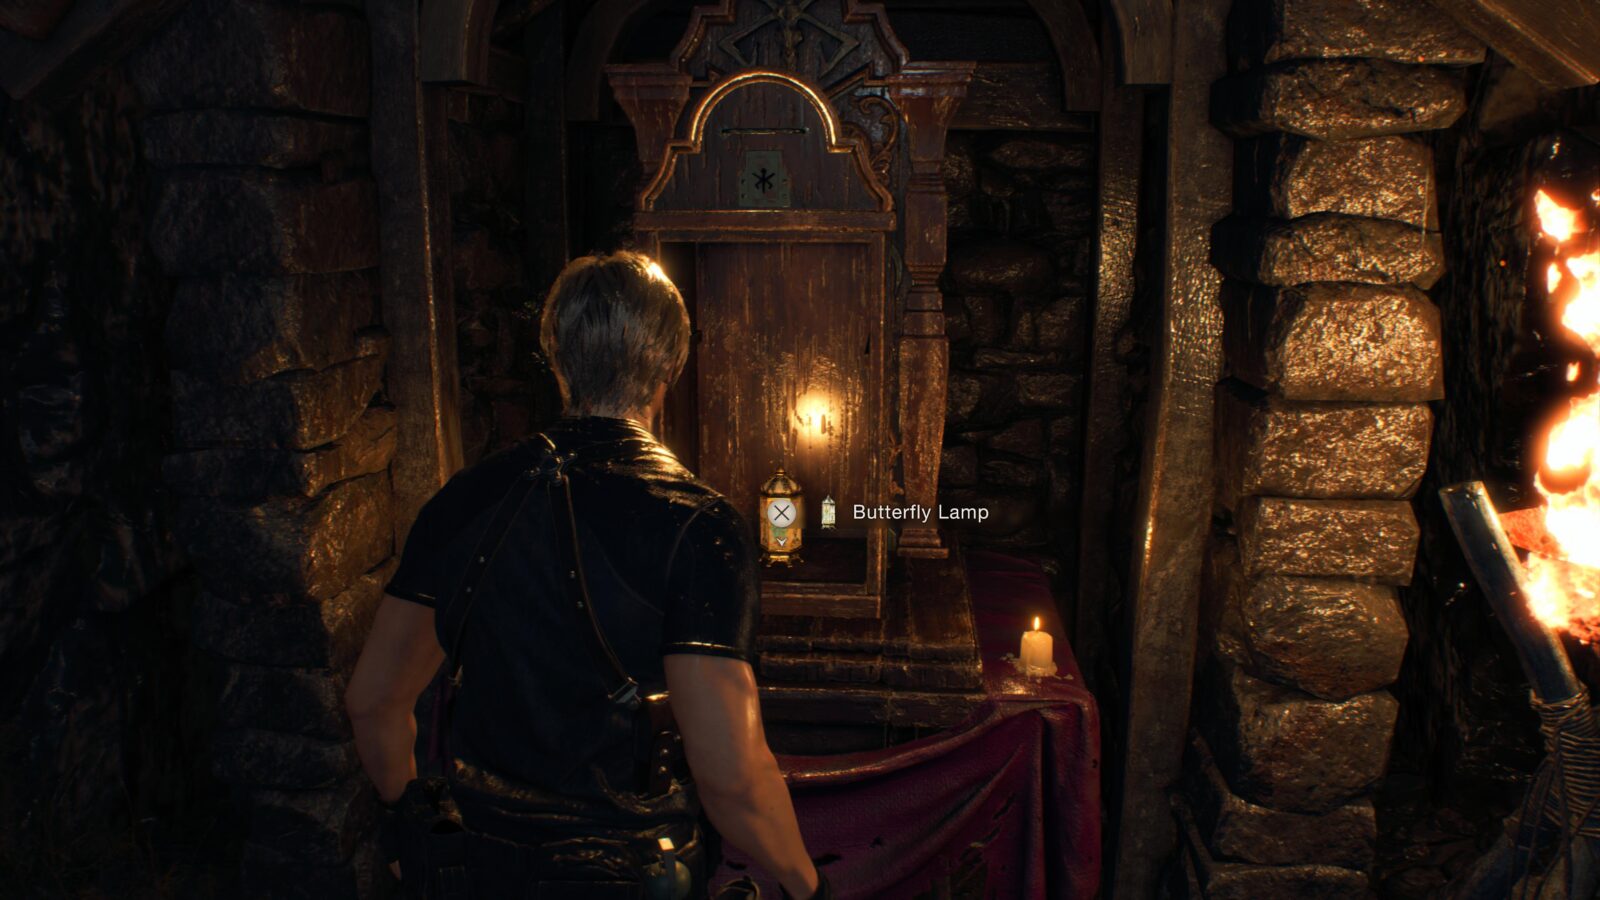
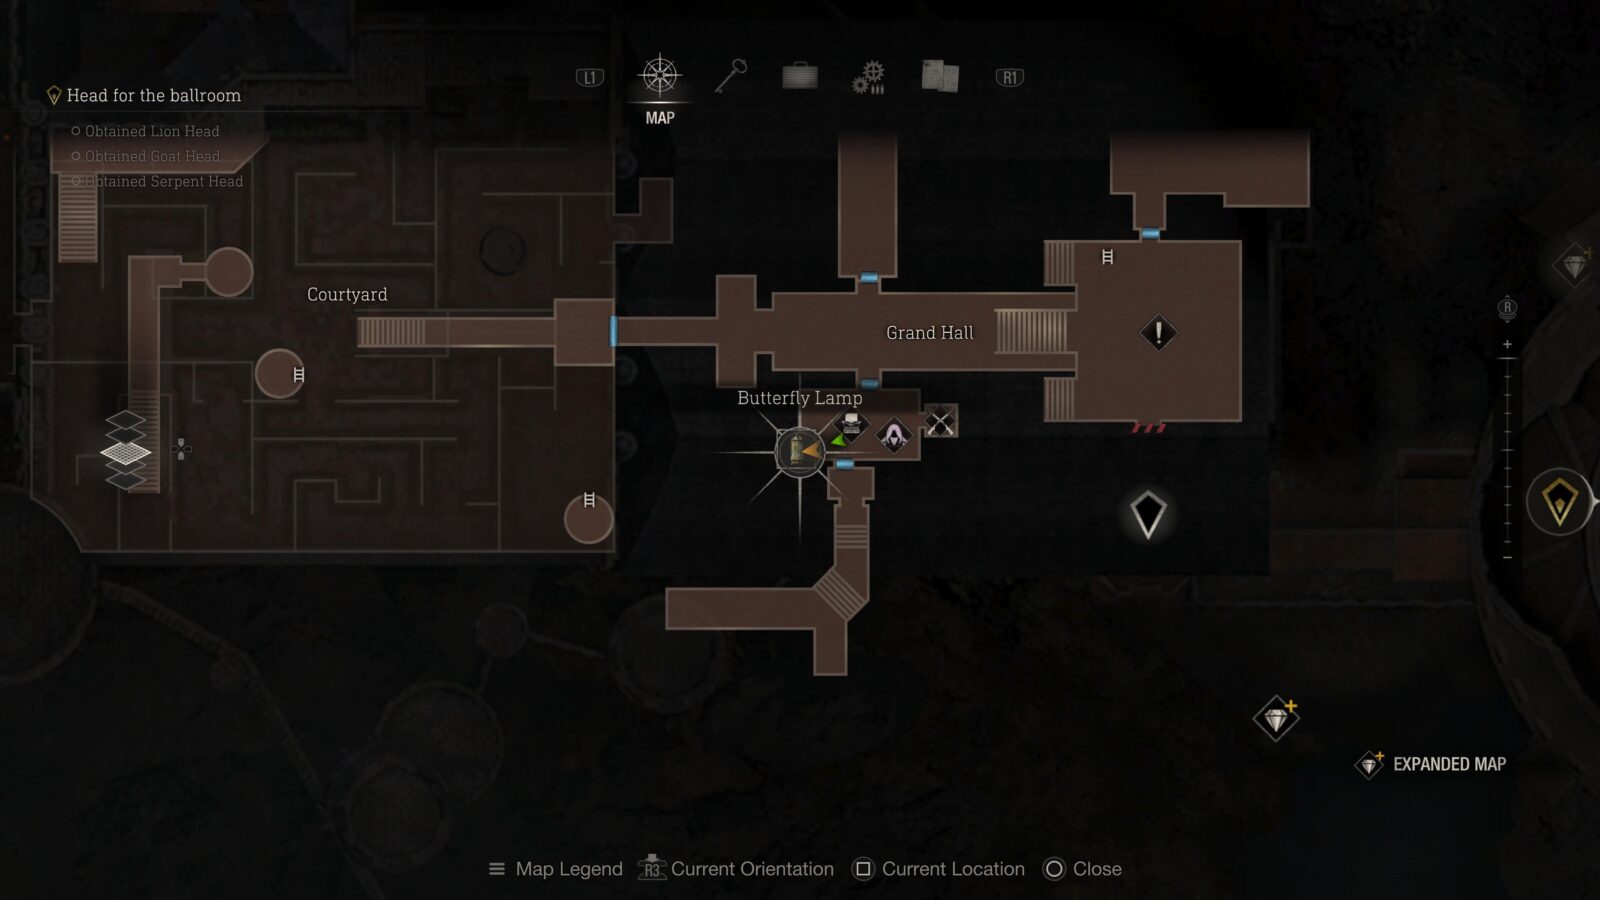
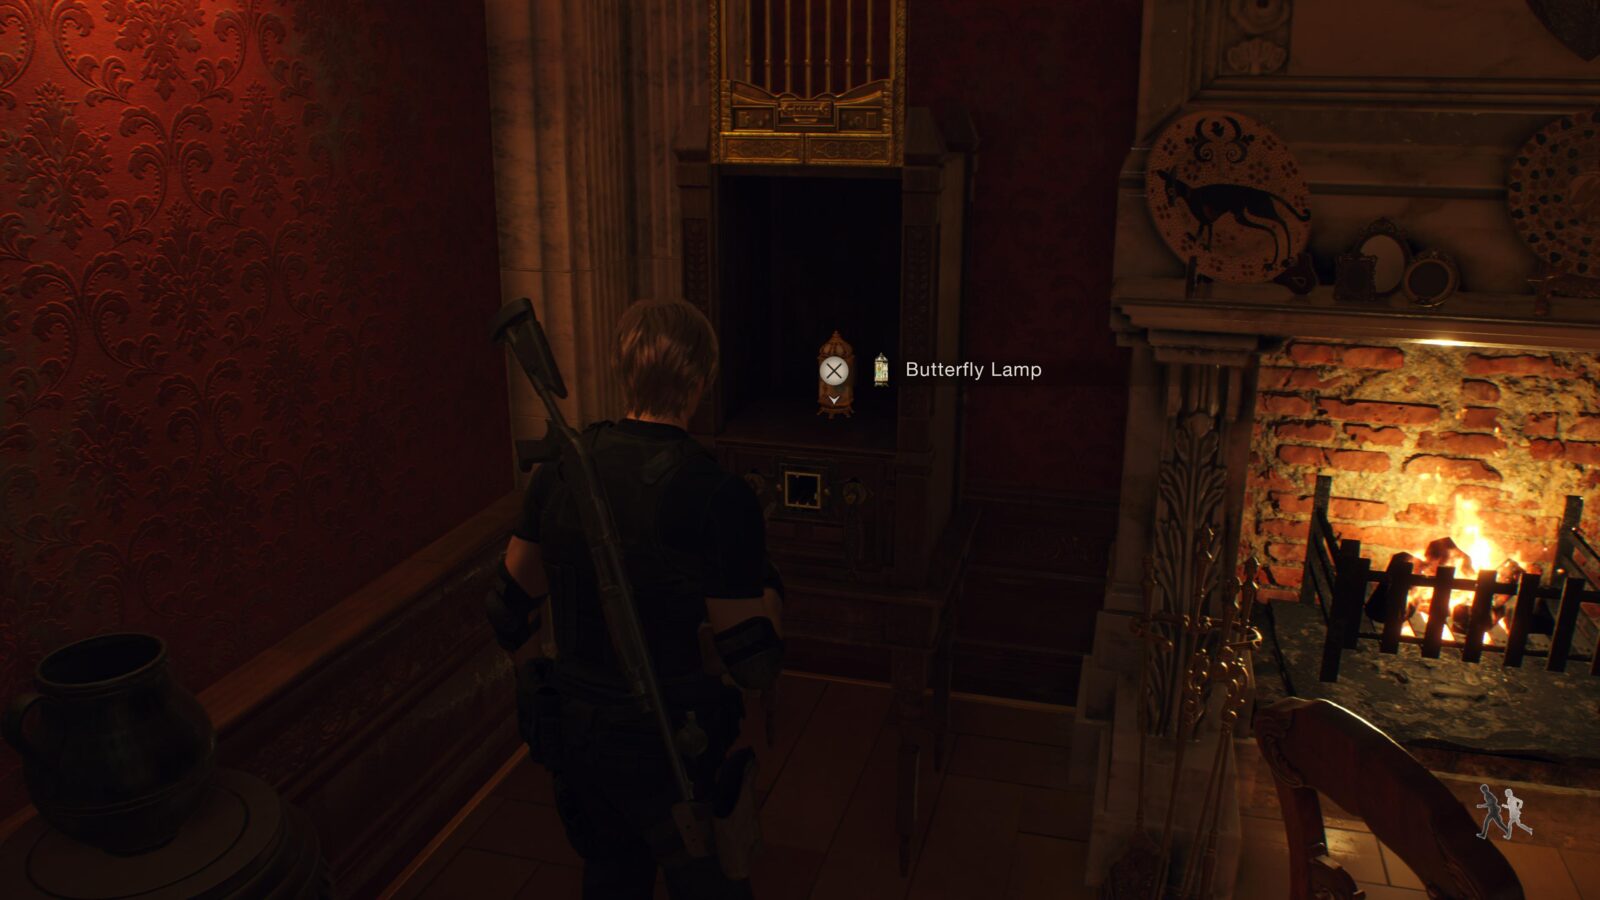
Butterfly Lamp
Return to where the Merchant is and head back towards the Quarry. On your way you will pass a wayshrine that can be opened on your right. Inside is the Butterfly Lamp. Has 3 slots.
Small Key
Head to the Church and once inside you can find a Small Key to the right of the altar.
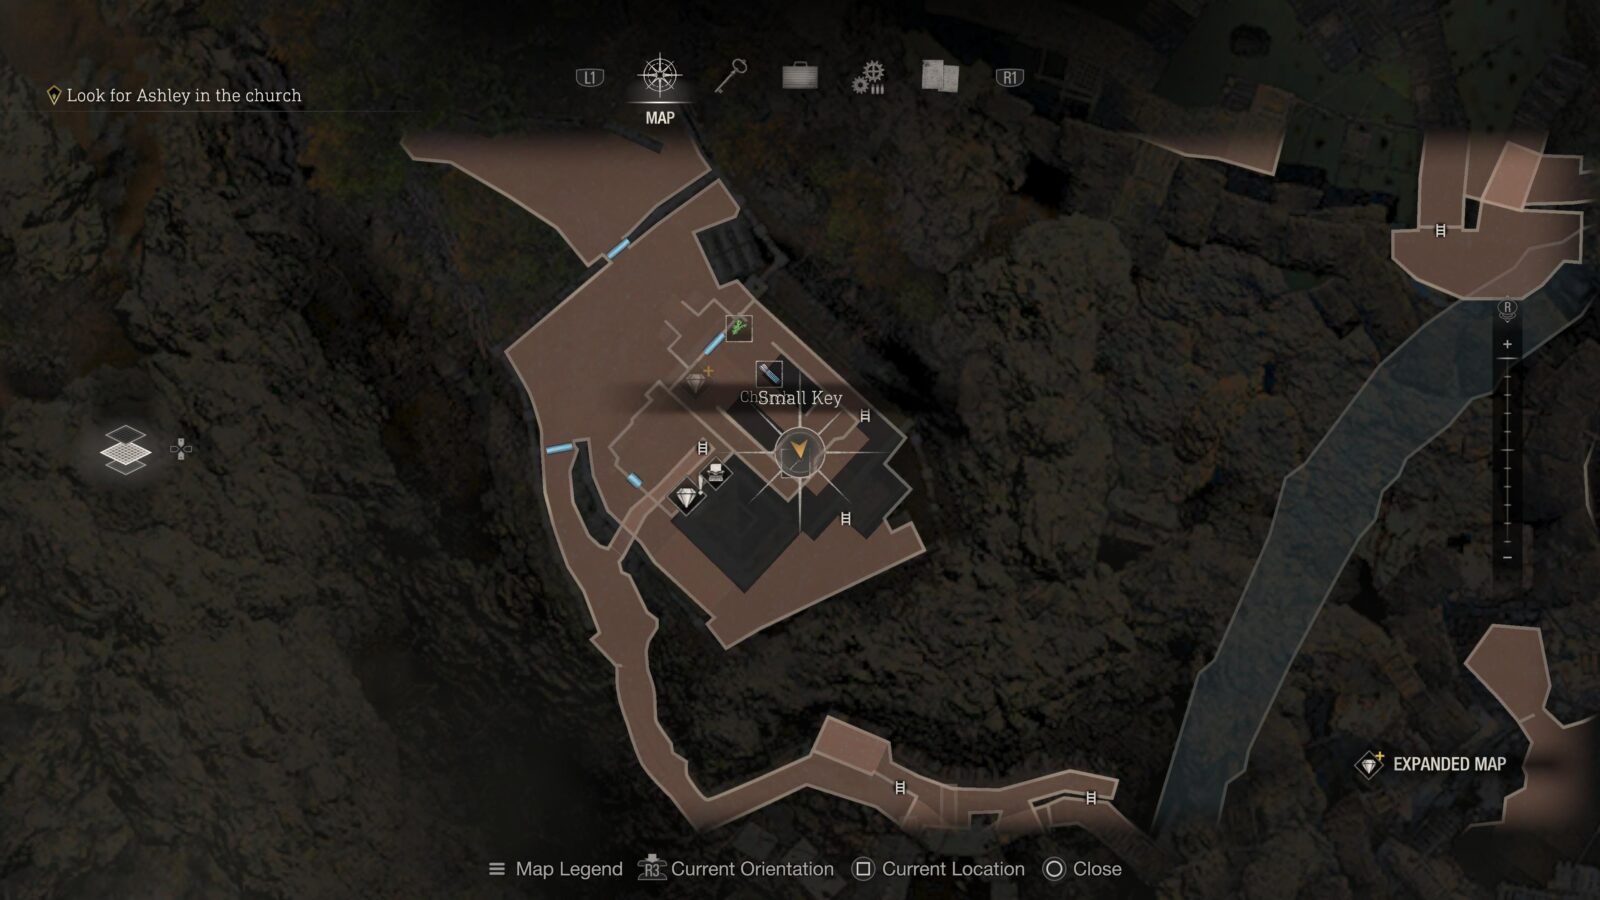
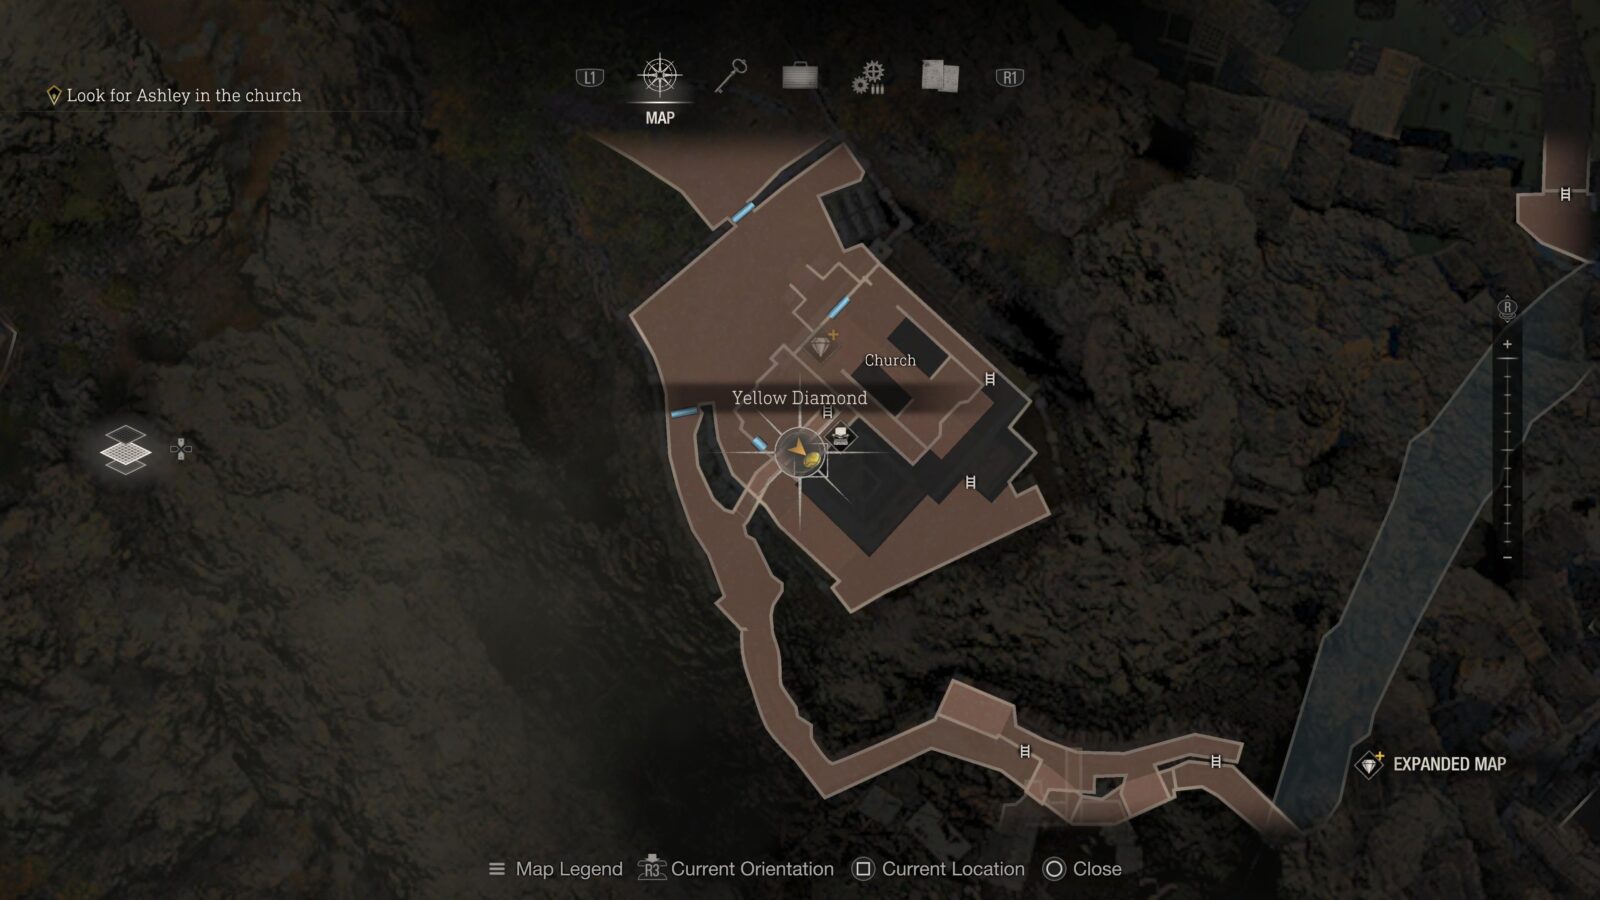
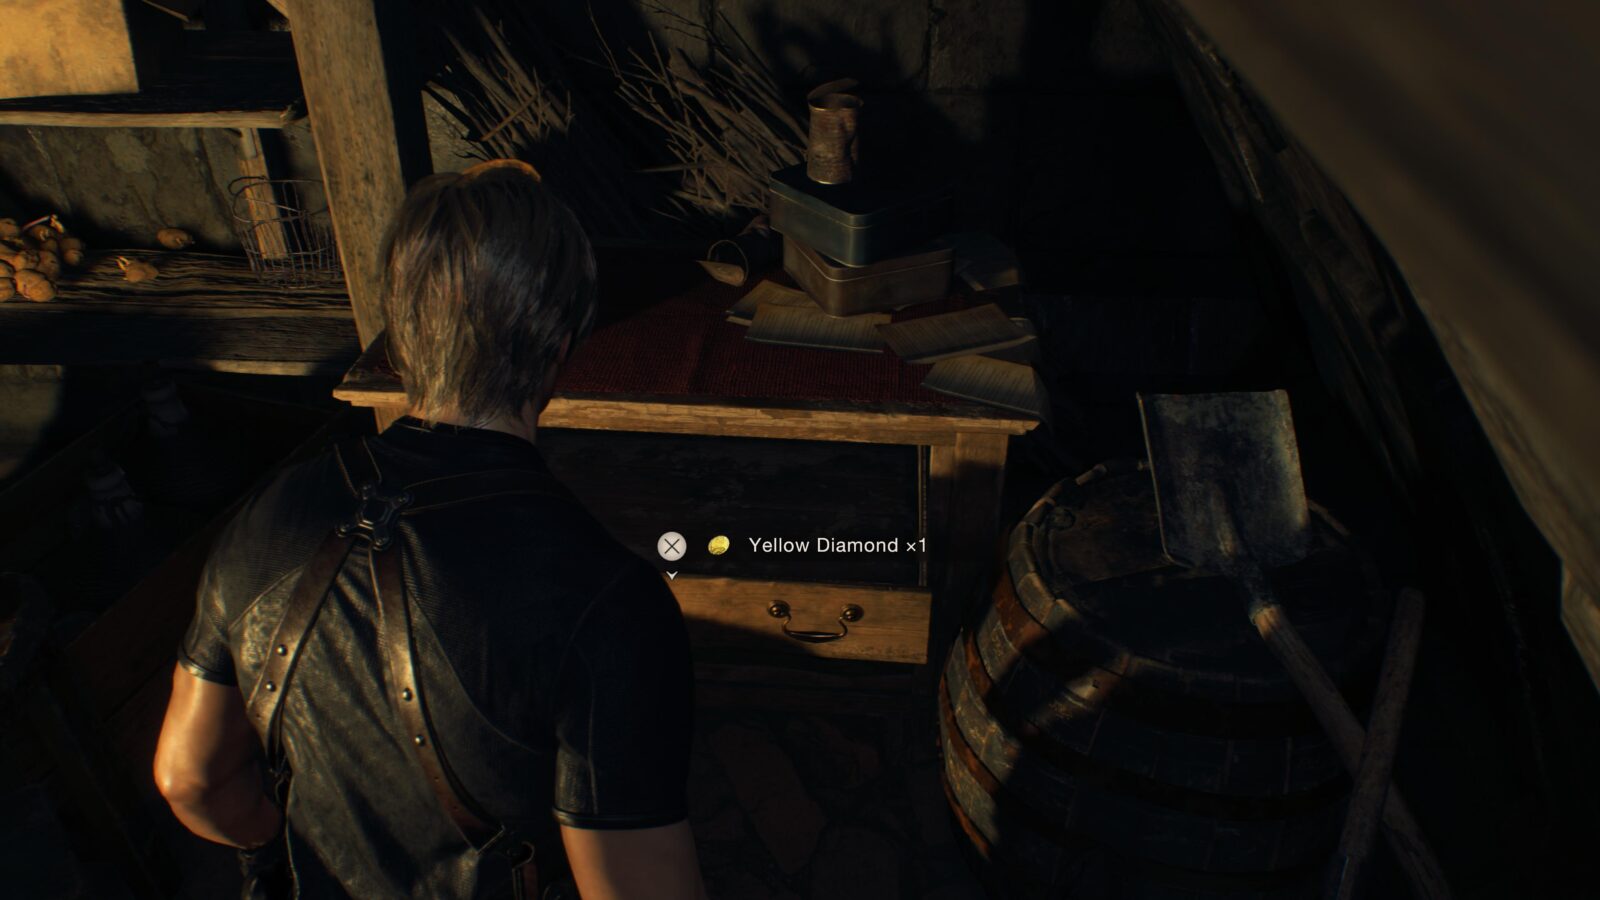
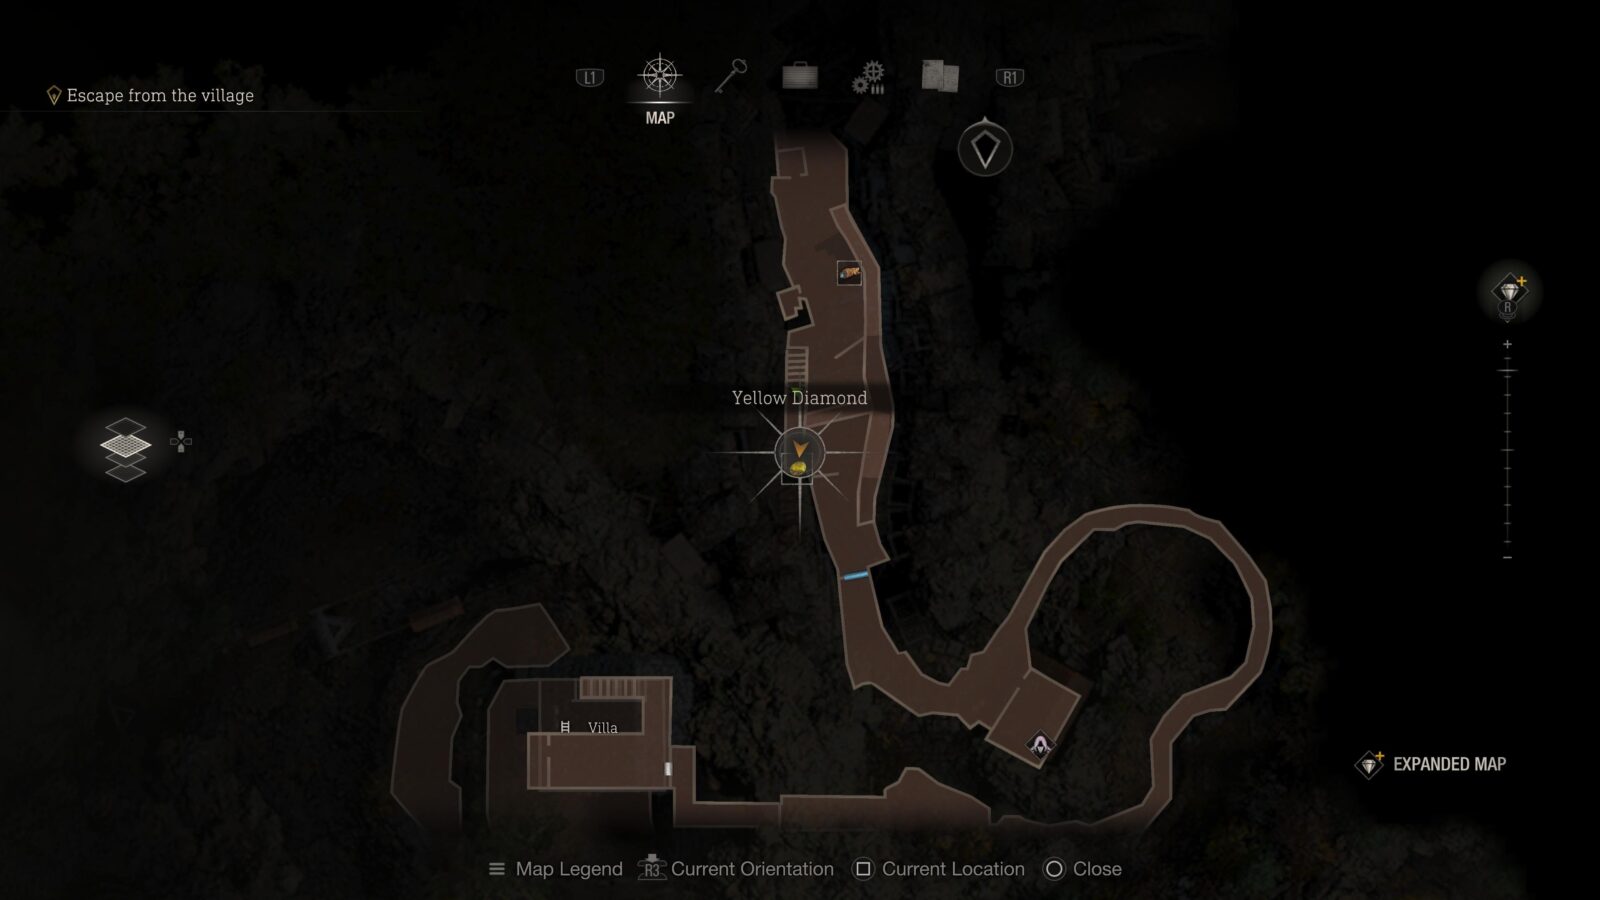
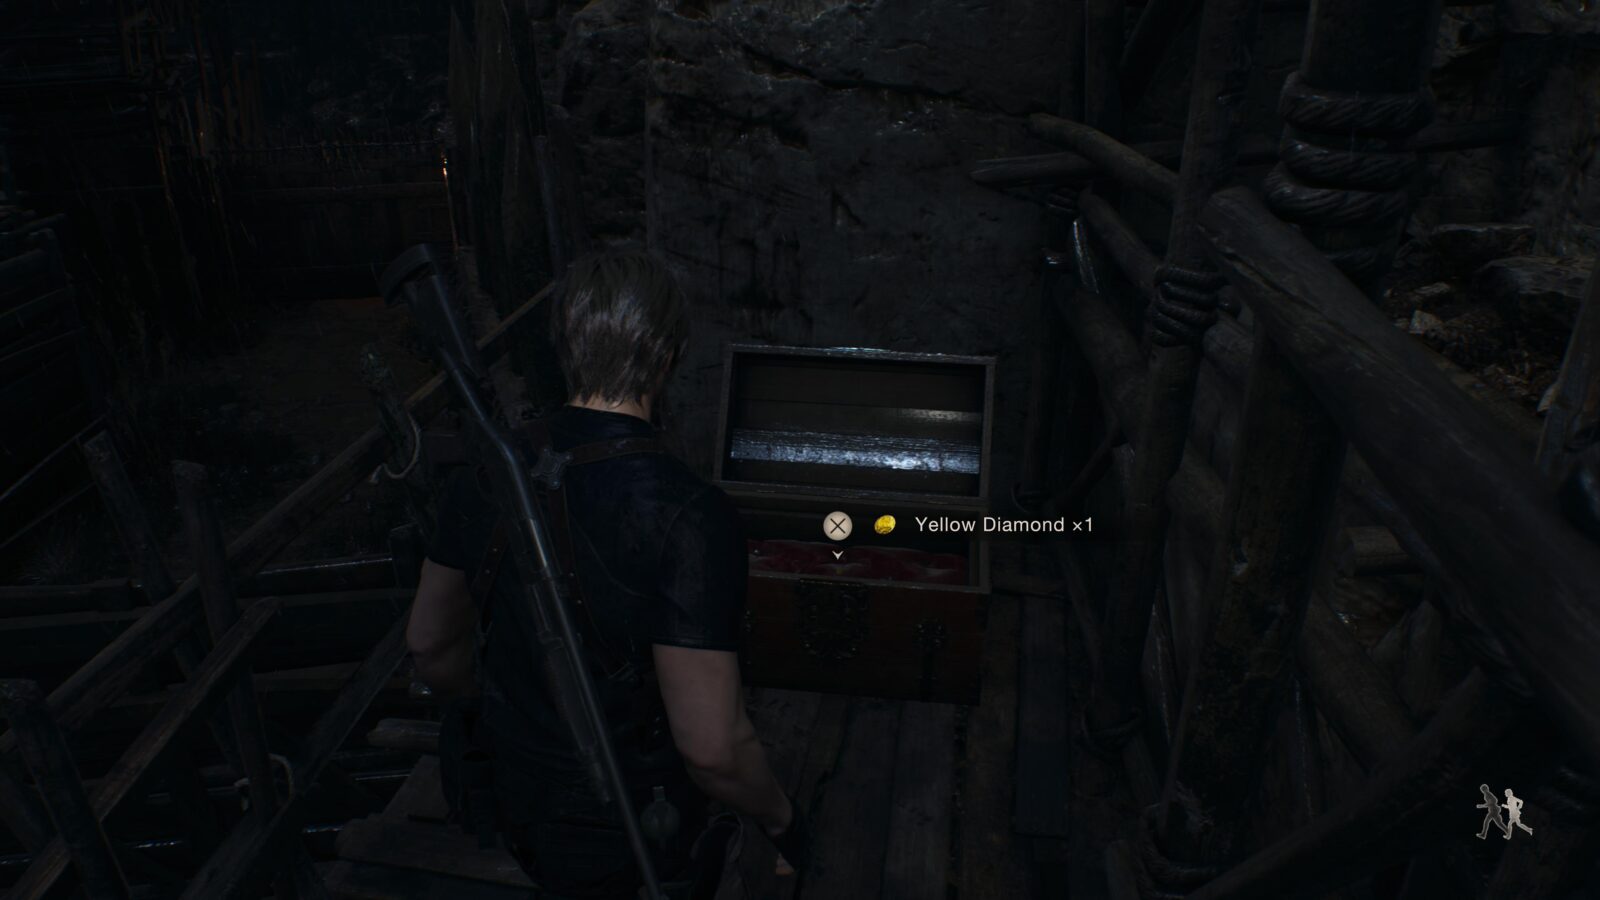
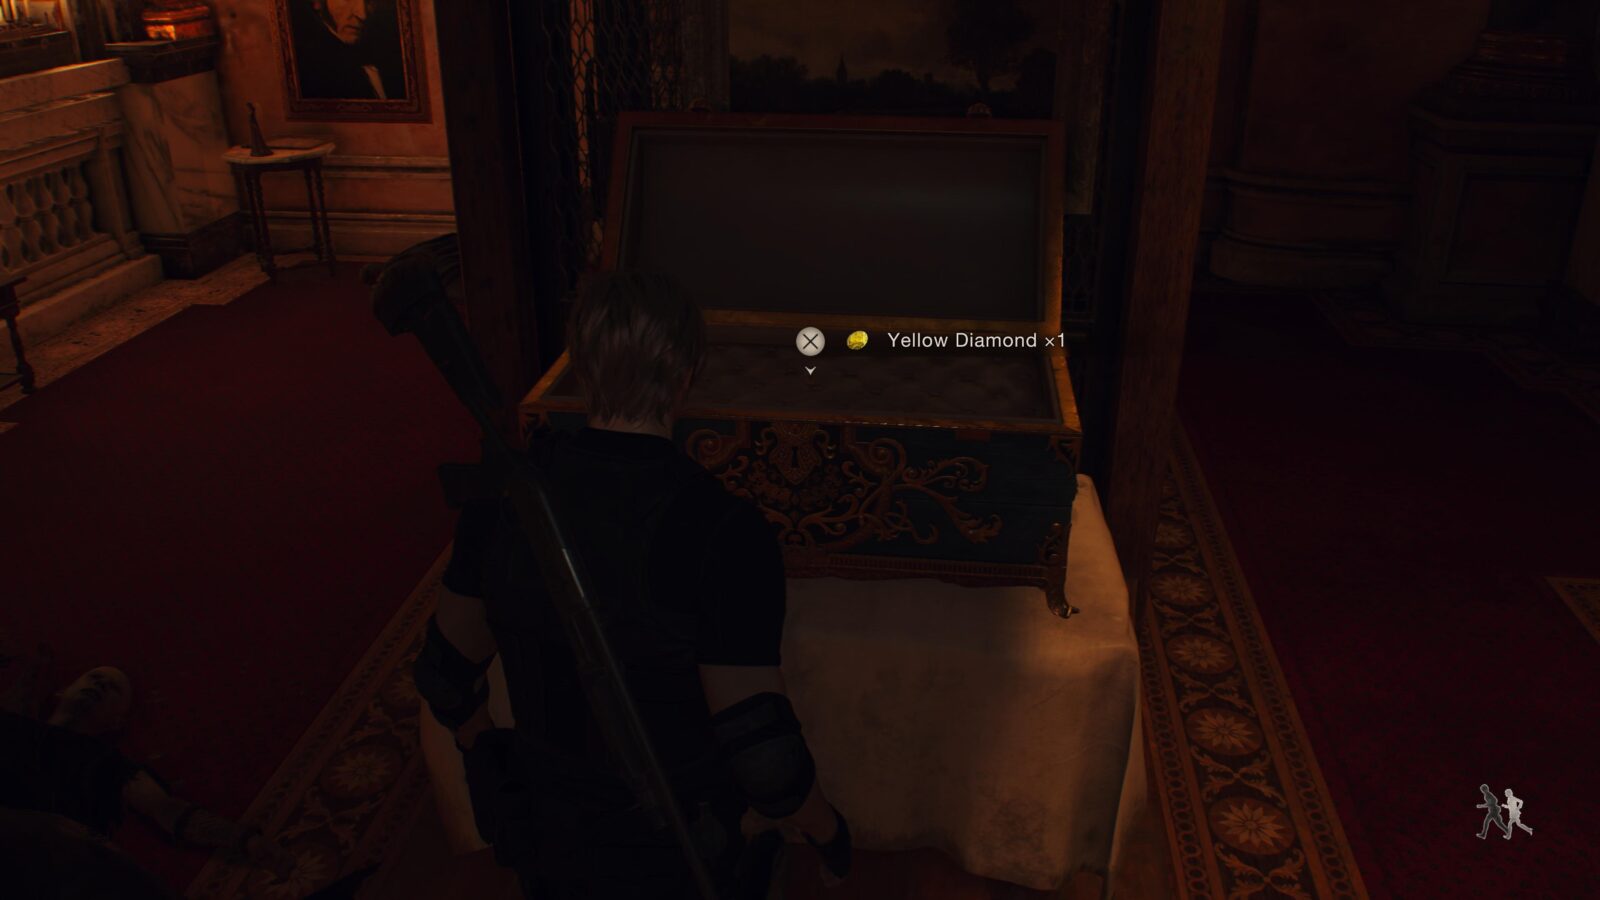
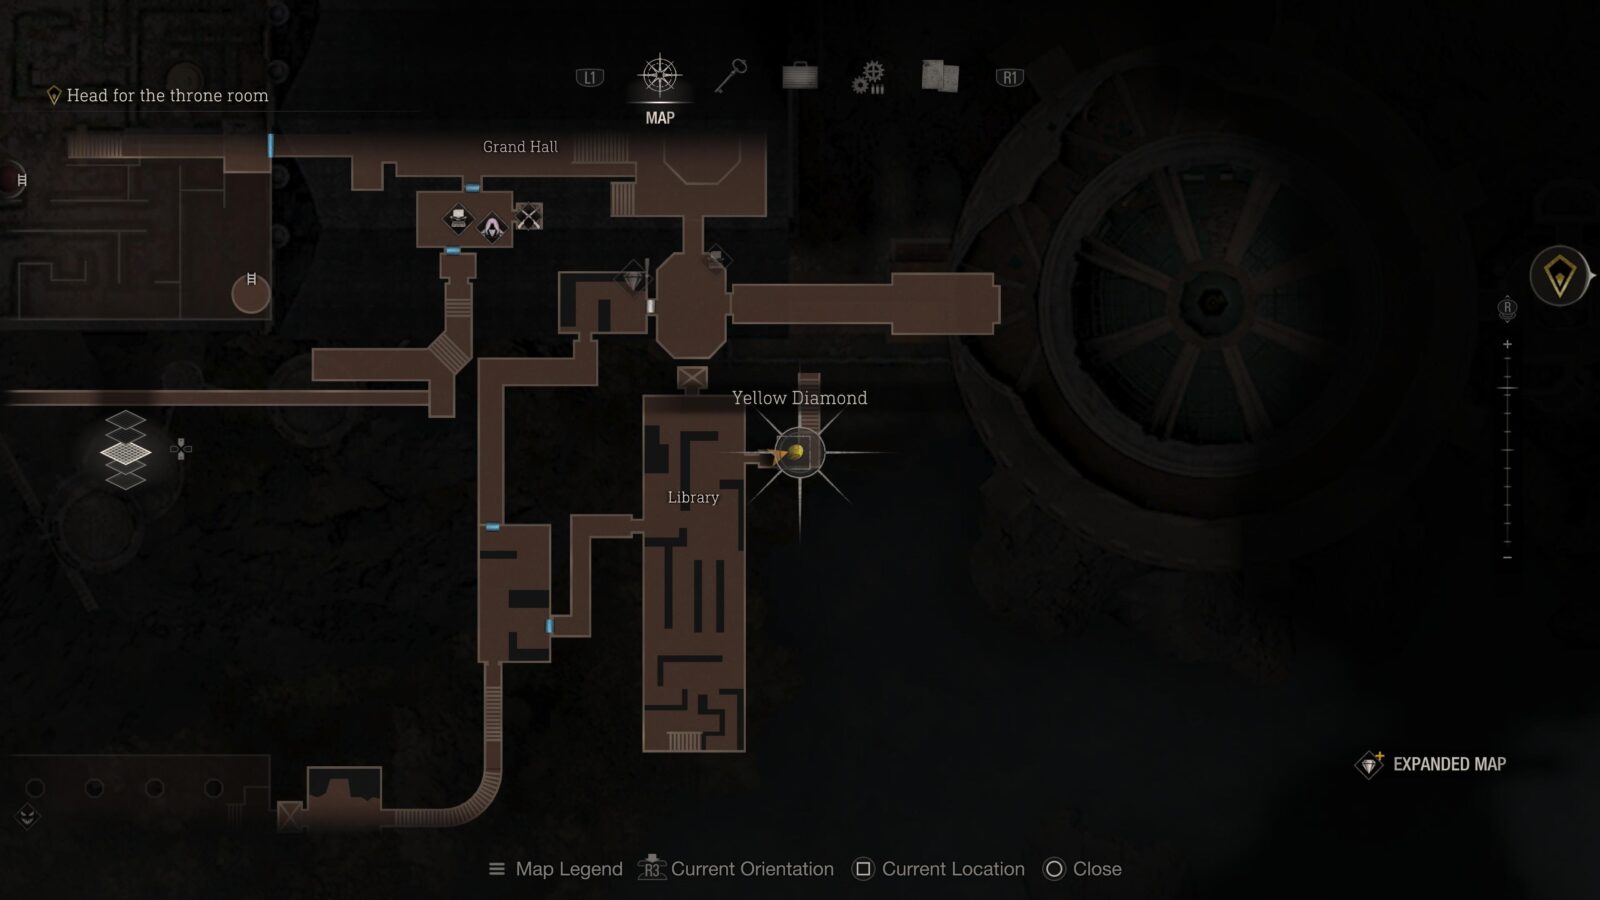
Yellow Diamond
Now you have the Small Key from inside the Church head back outside and into the side room with the Typewriter to unlock the Locked Drawer in there to find a Yellow Diamond.
Chapter 5
There are a total of 1 Clockwork Castellan, 1 Merchant Request, and 4 Treasures in Chapter 5. This chapter also has 2 Expanded Treasures which can only be obtained with the Expanded Treasure Map DLC.
Yellow Diamond
As soon as the chapter starts re-enter the room where Ashley was being held and look up at the ceiling to see a hanging silver cage with a Yellow Diamond inside.
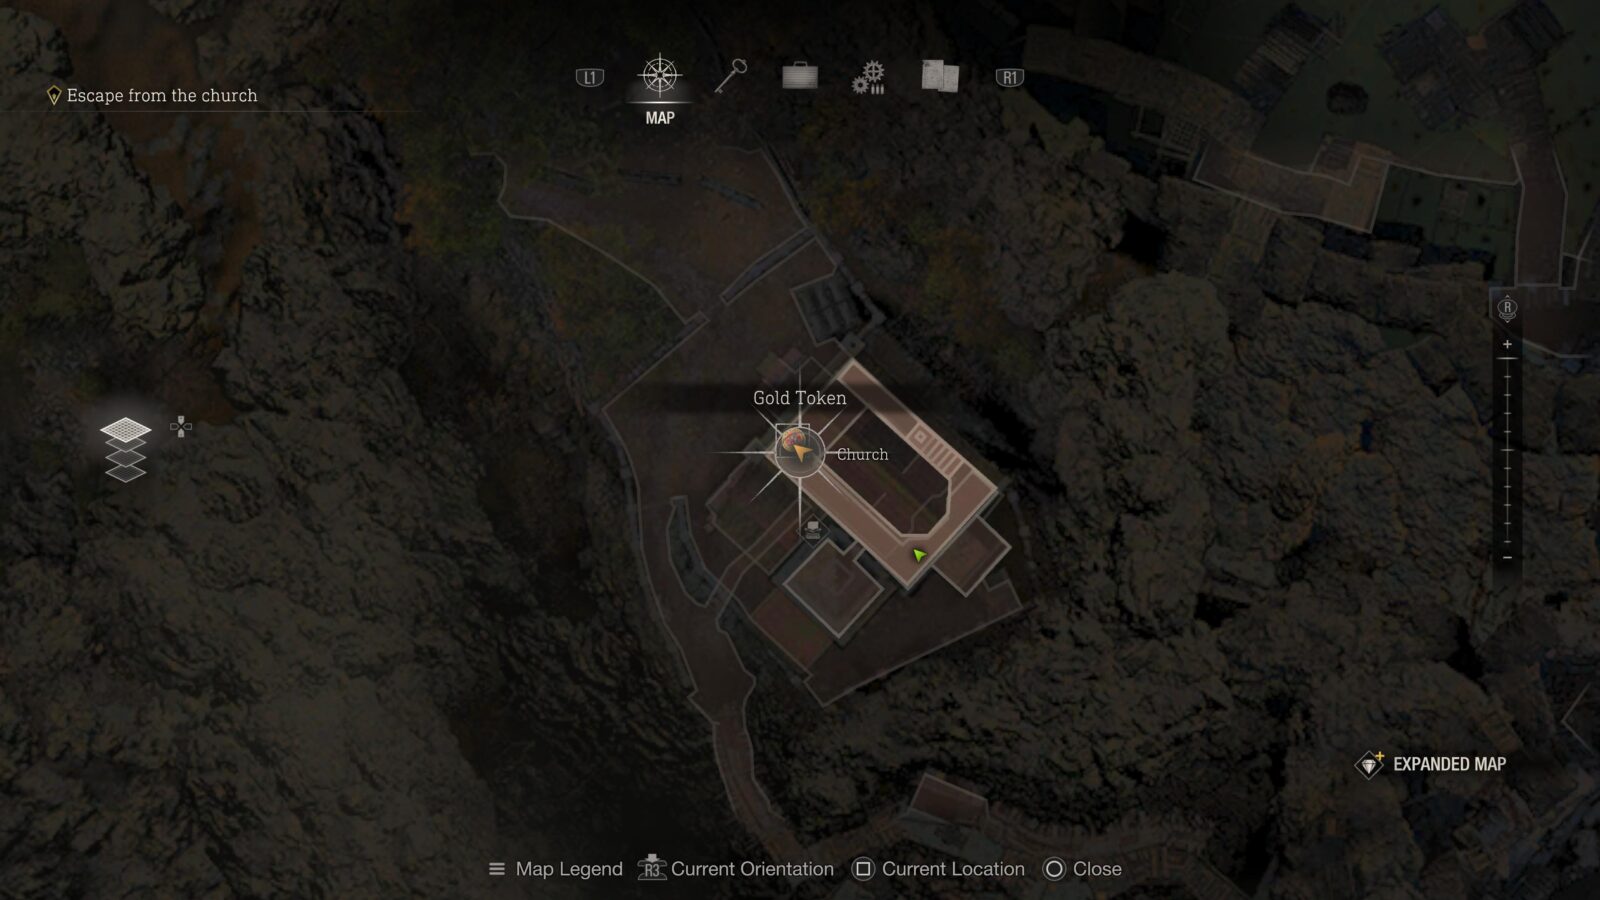
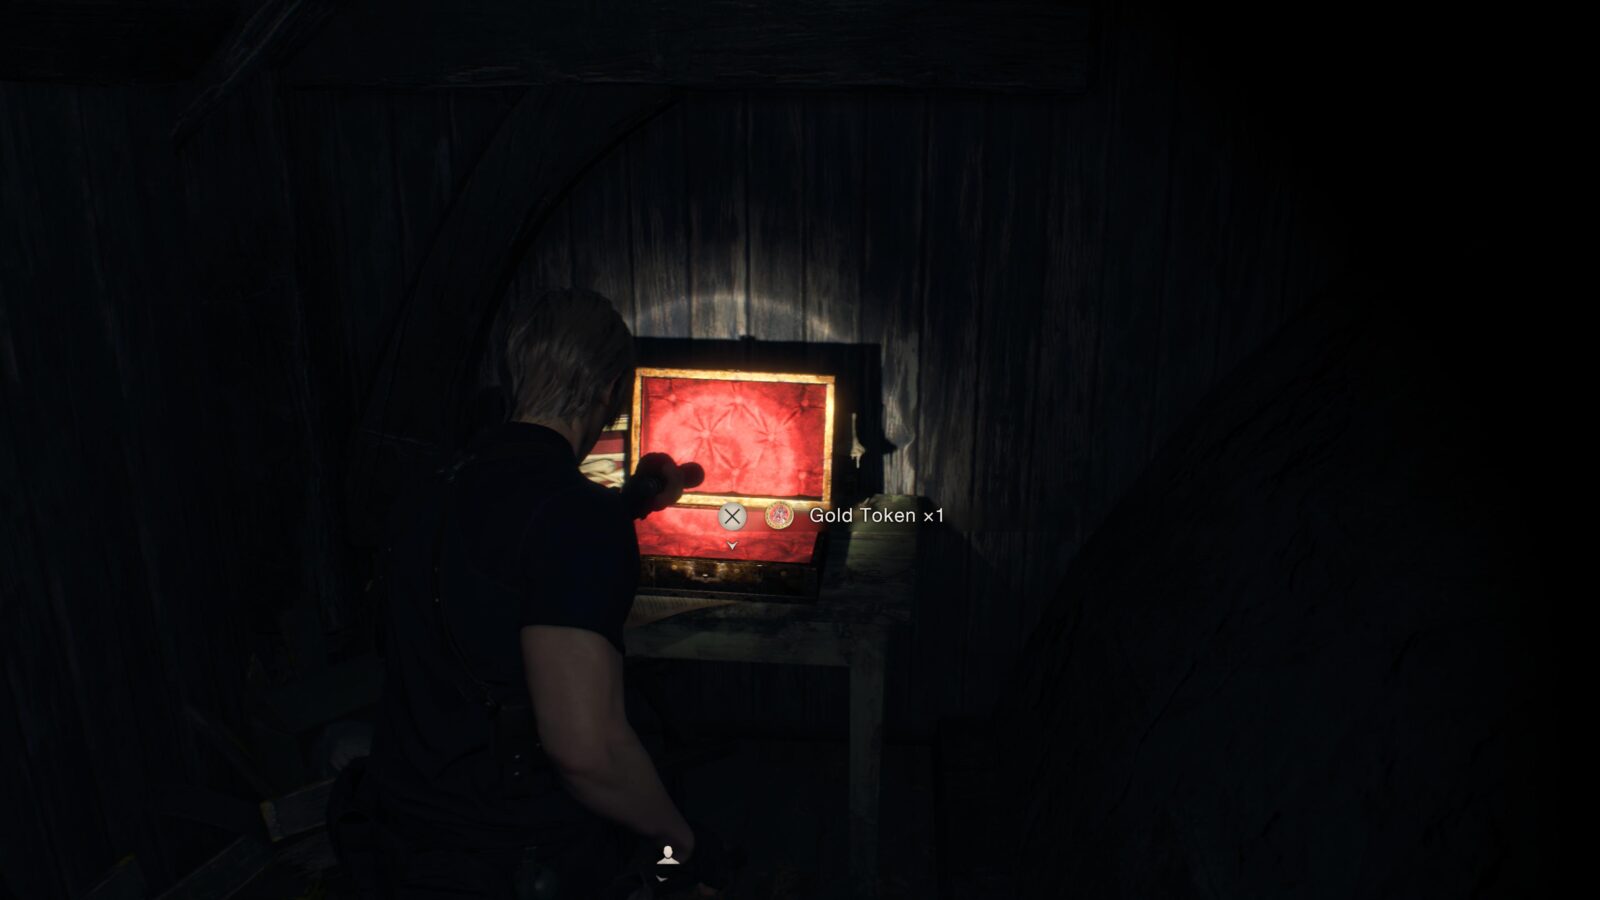
Gold Token (Expanded Treasure)
Once you have Ashley following you go to the ladder on the 2nd floor of the Church to have her climb on your shoulders and knock it down. Once you climb up into the top floor of the Church, head to the back of the room away from the open window to find a chest with a Gold Token inside. This is only available to those who have the Expanded Treasure Map DLC.
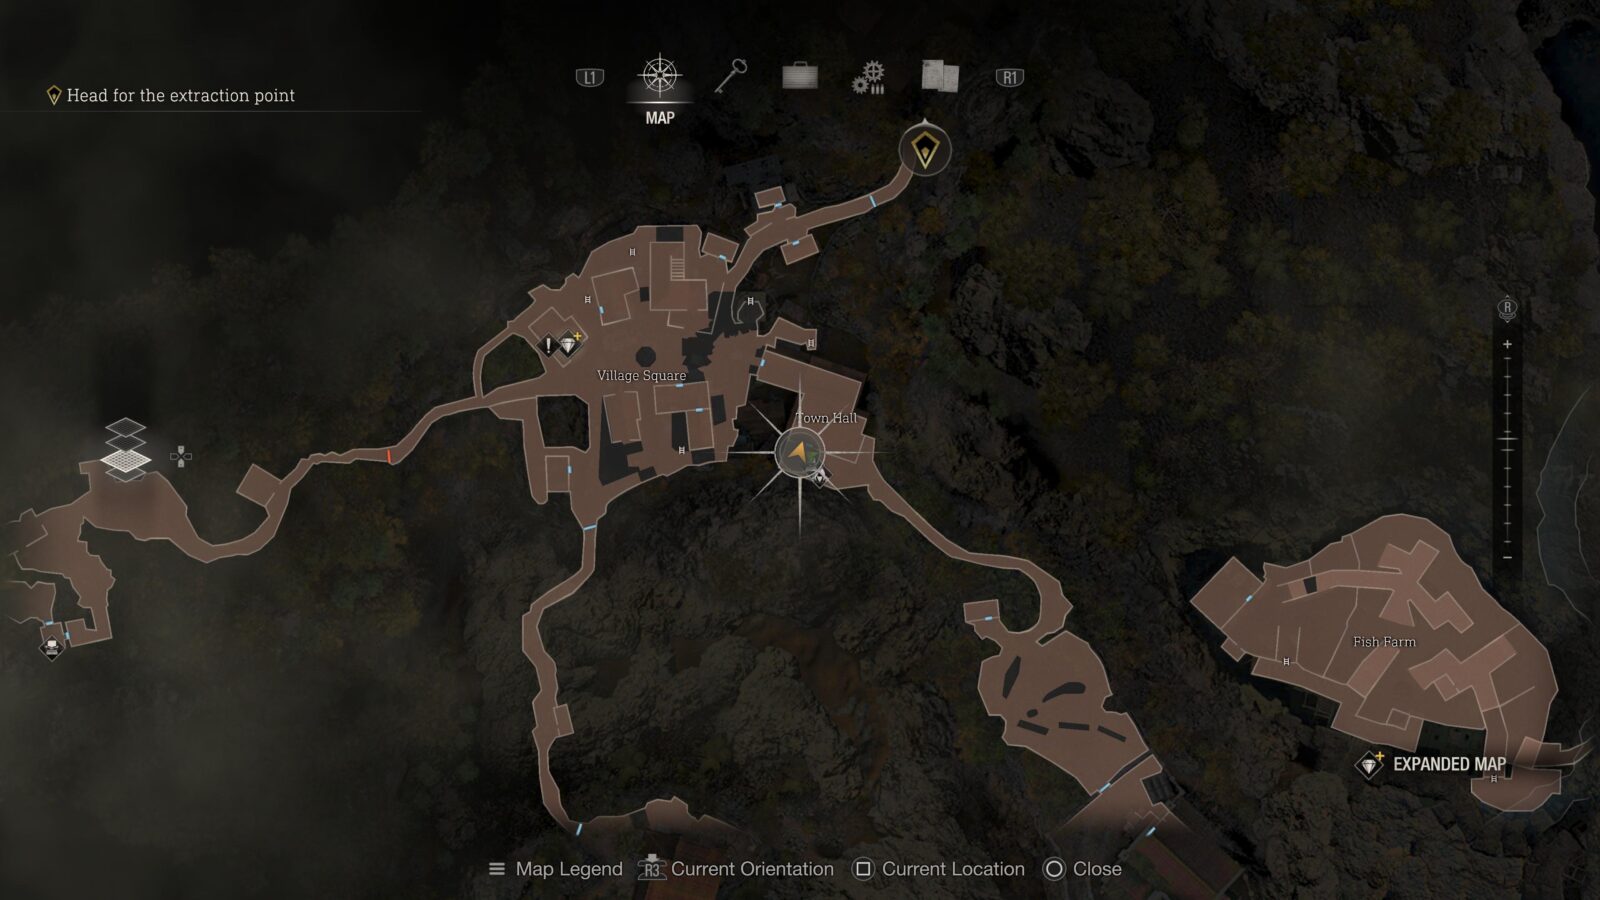
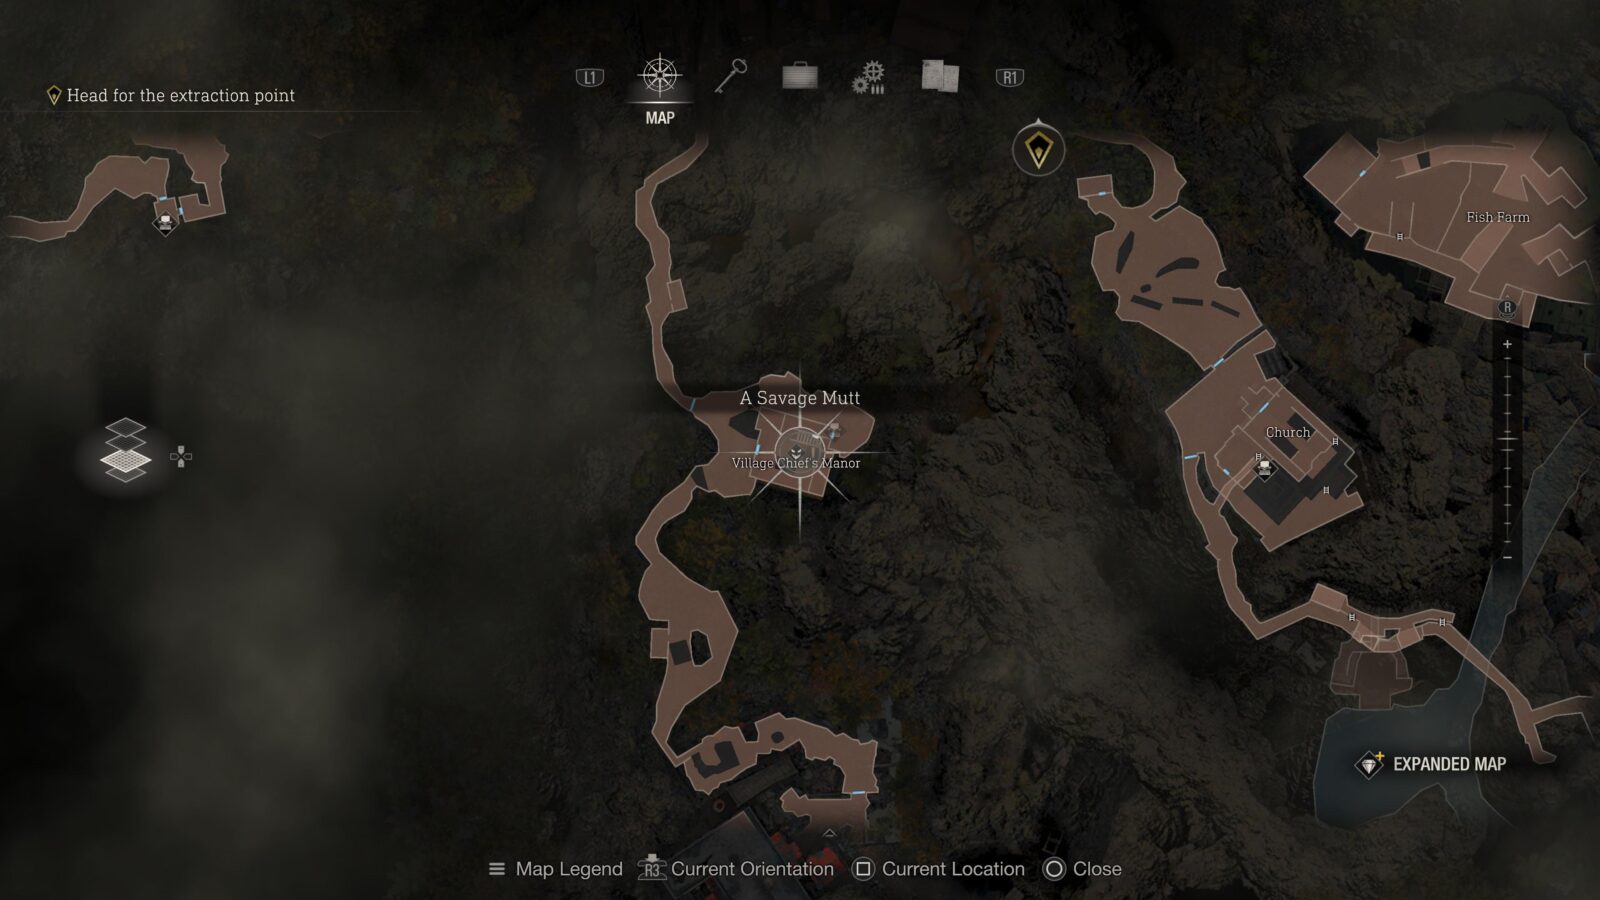
Merchant Request: A Savage Mutt
When you reach the Merchant outside the Town Hall there will be another request pinned to the wall nearby. This time you will need to kill a mutated dog, however, you first need to backtrack to the Chief’s Manor in order to make the dog spawn in the Village Square. There is a Clockwork Castellan at the Chief’s Manor so we’ll be going there anyway which means the dog is guaranteed to spawn at attack you when you backtrack through the Village Square later.

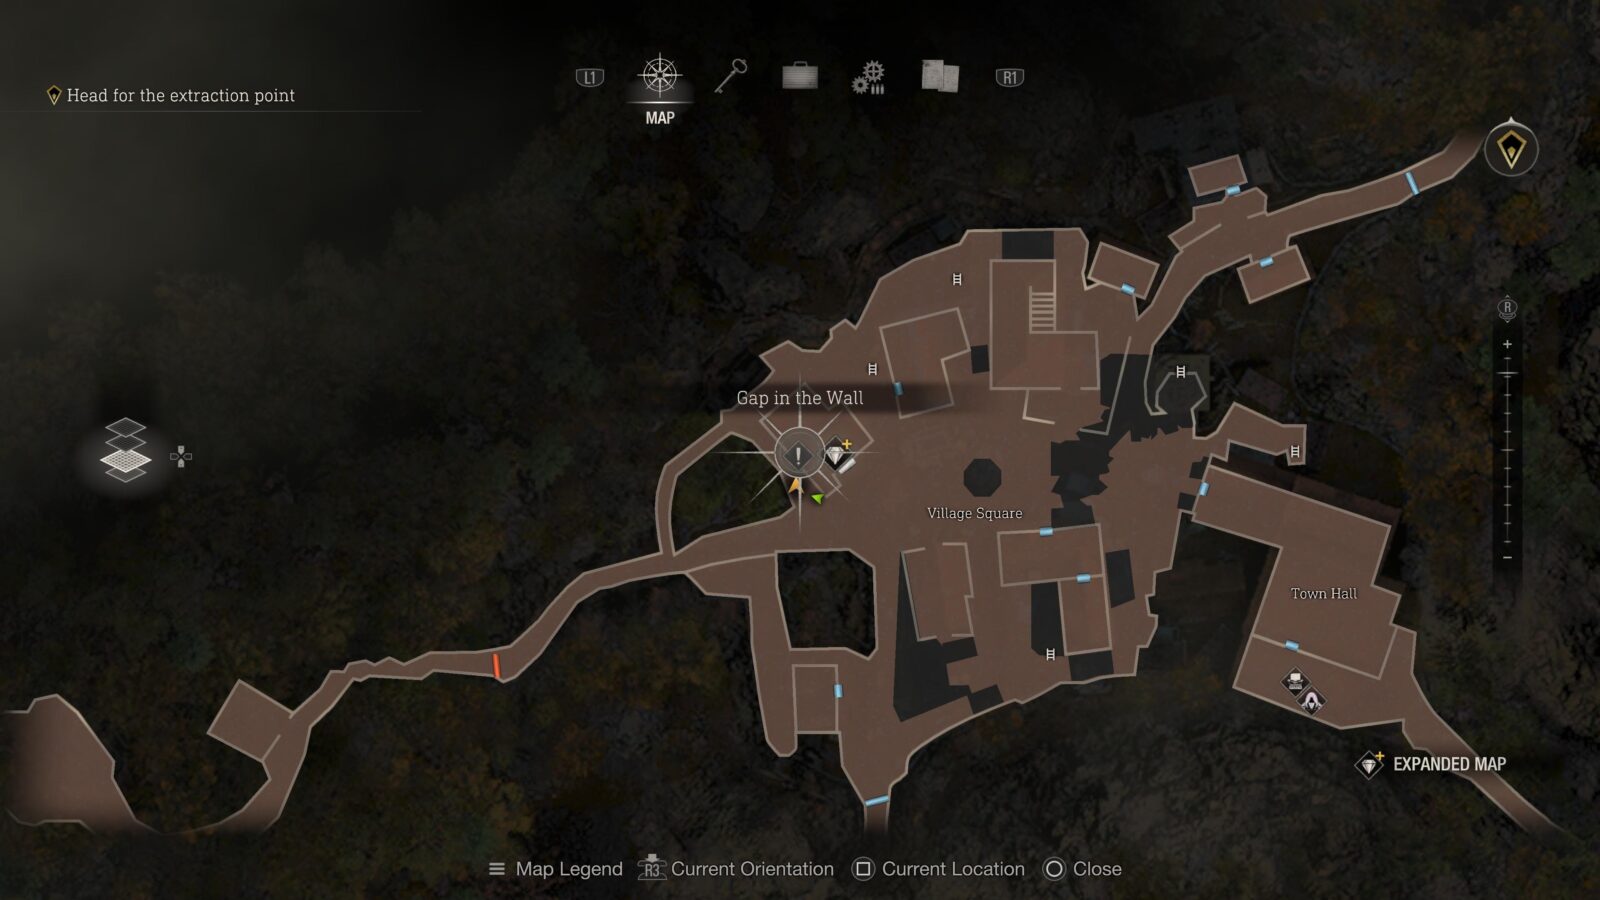
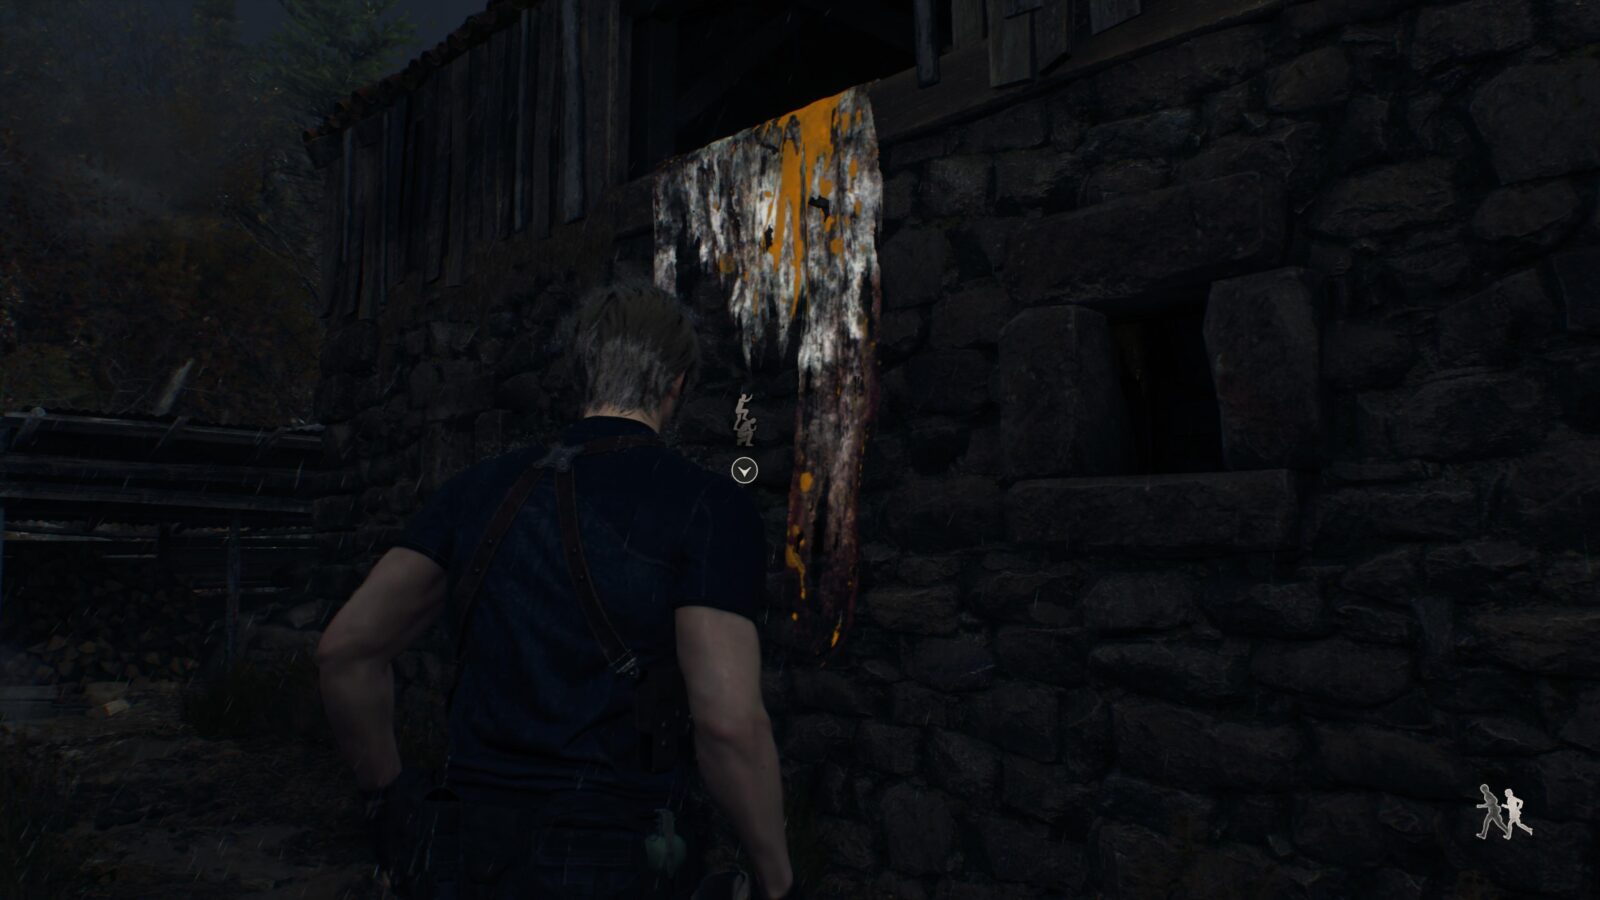
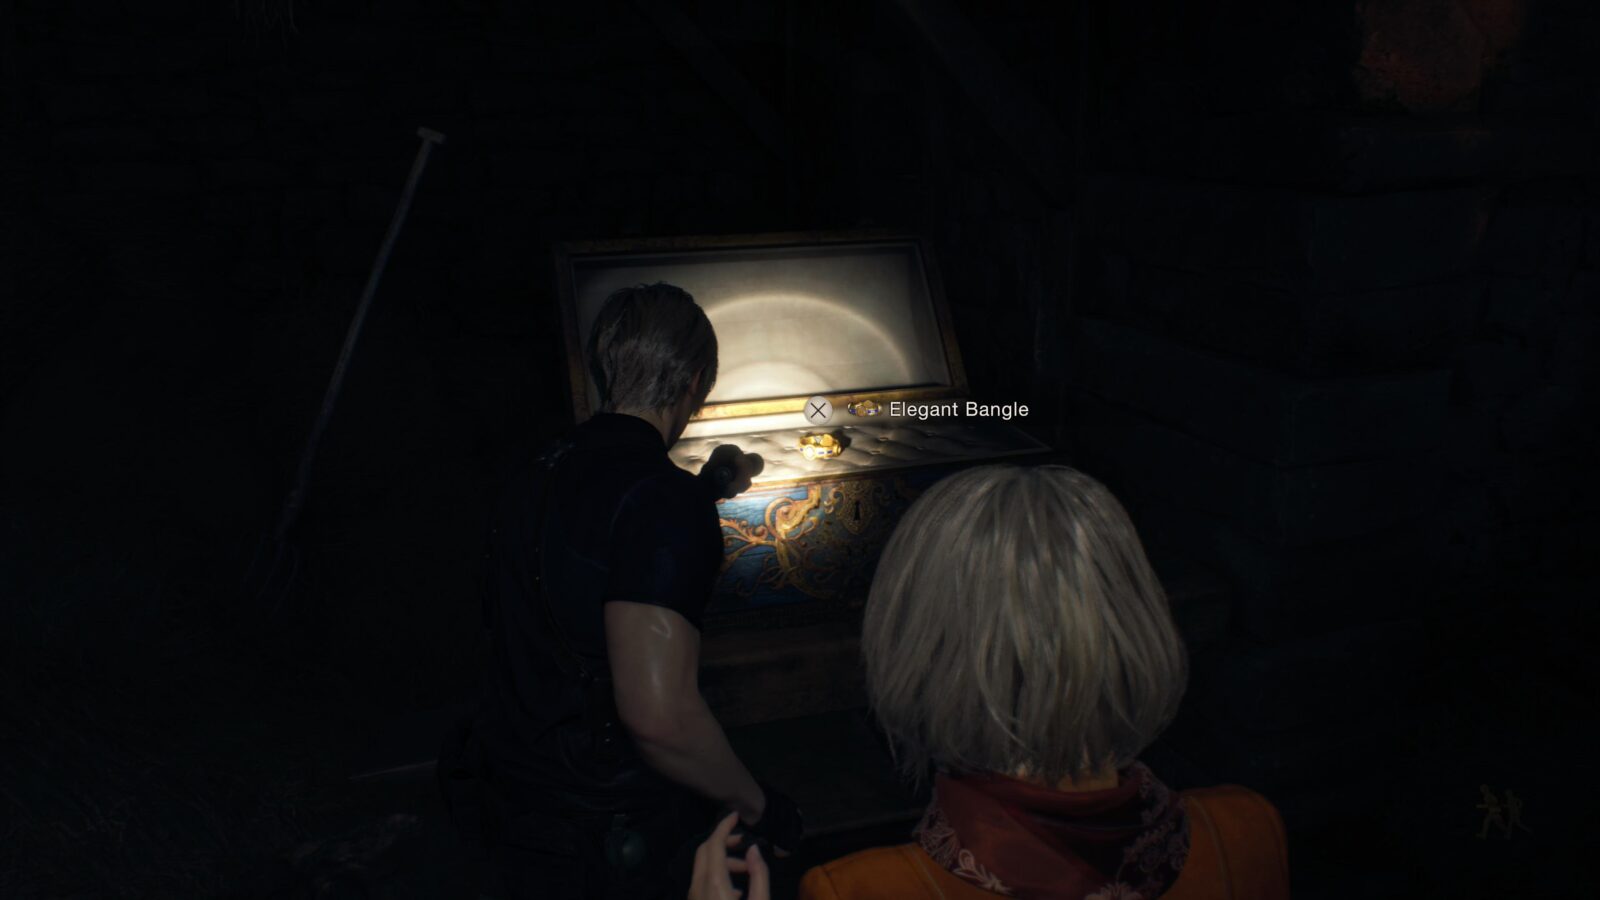
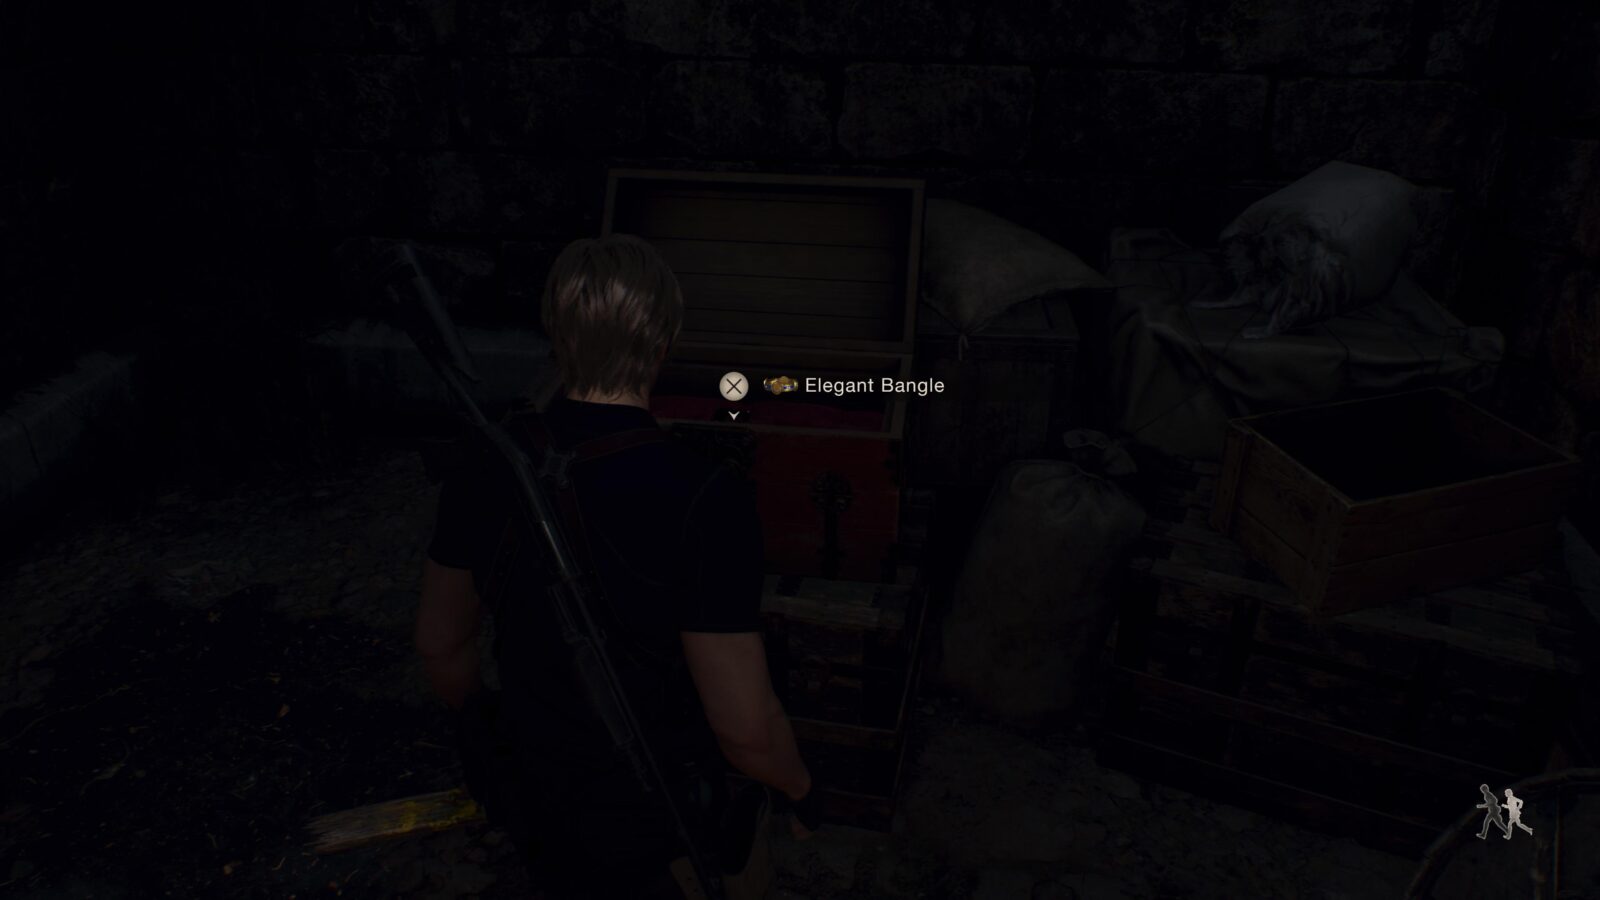
Elegant Bangle
In the Village Square there is a building with double doors that are locked, however, there is a gap in the wall on the left side. Now that Ashley is with you she can climb through the gap and open the doors. Inside in a chest is a treasure.
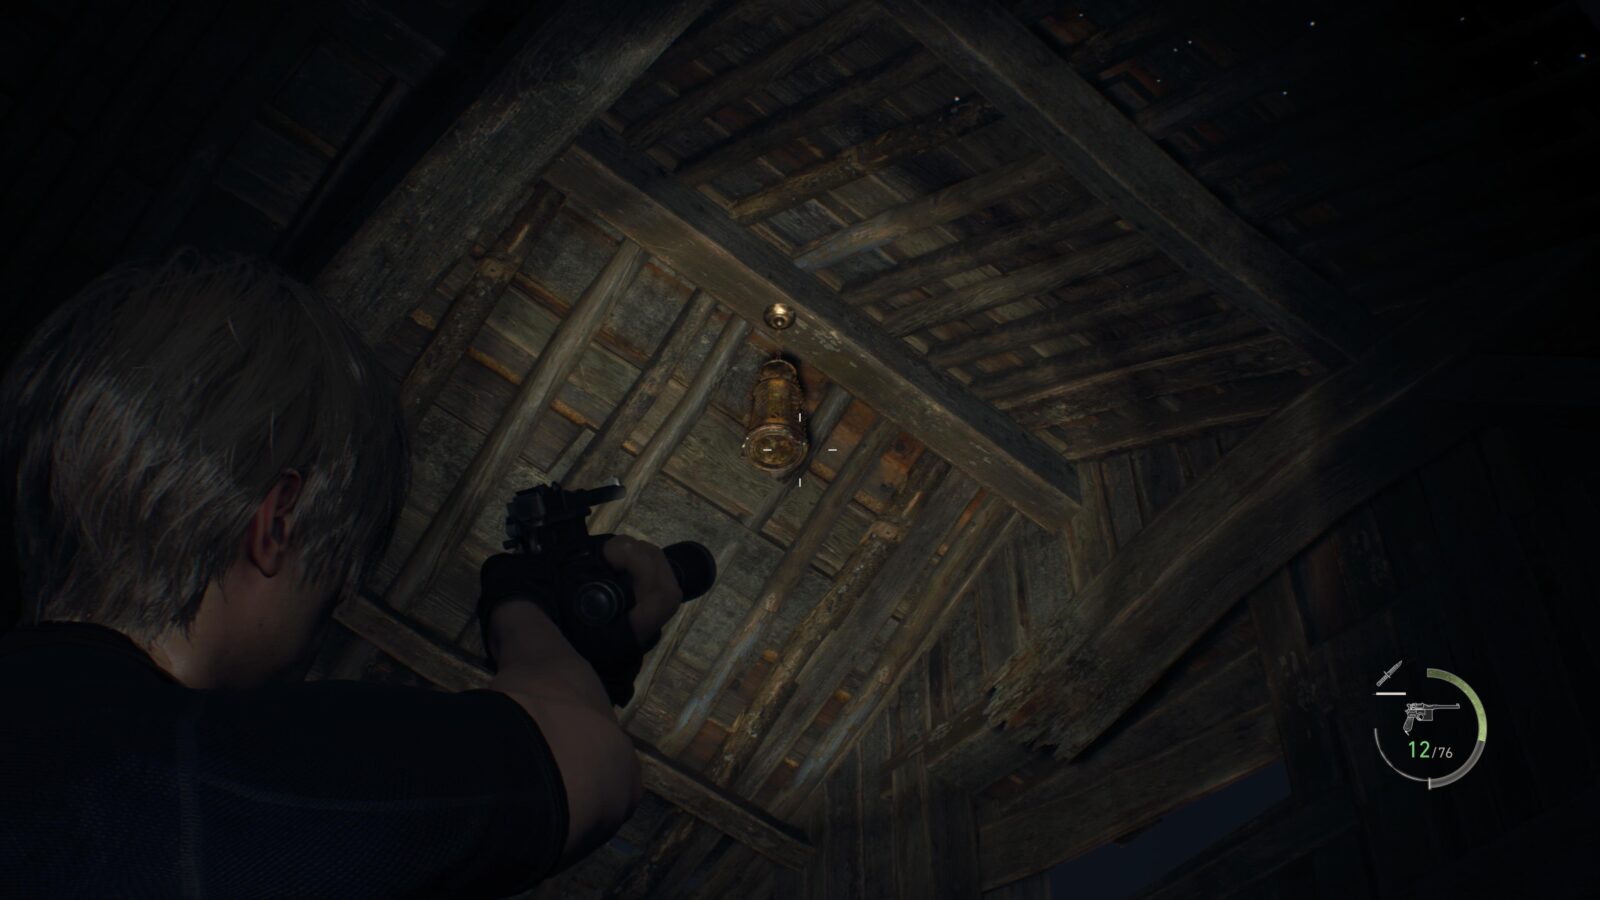
Silver Token (Expanded Treasure)
Inside the same building where you found the Elegant Bangle there is a cage hanging from the ceiling with a Silver Token inside. This is only available to those who have the Expanded Treasure Map DLC.
Clockwork Castellan #5
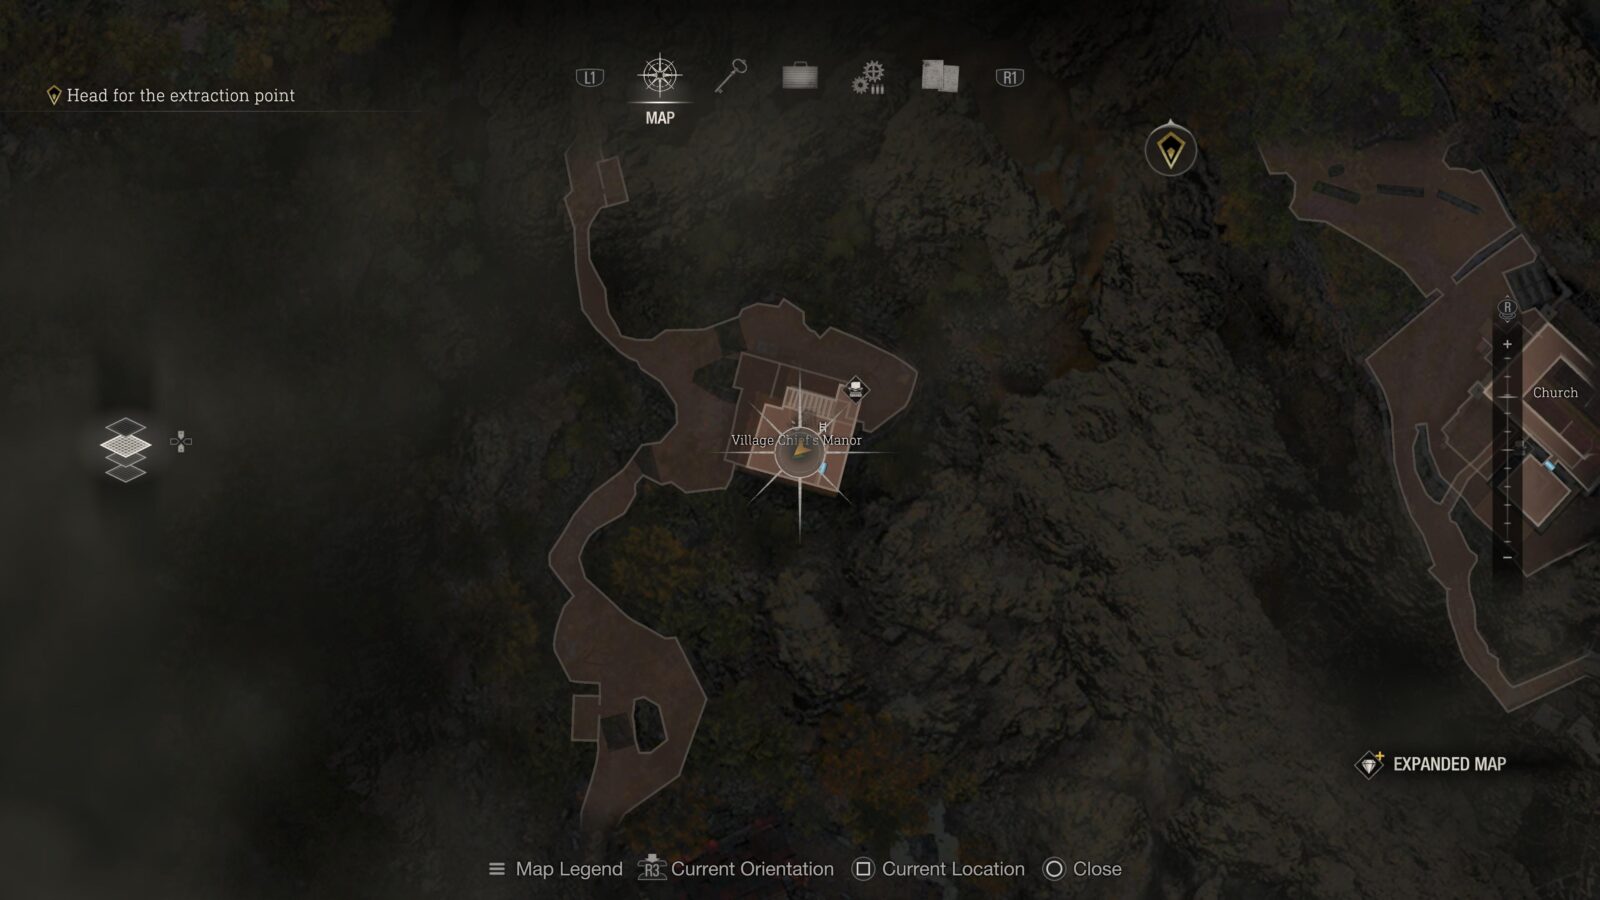
Inside the Chief’s Manor on the 2nd floor is a switch behind a painting that reveals a ladder in the ceiling. Ashley can be hoisted up where upon she will lower the ladder for Leon. In the attic is a Clockwork Castellan hiding behind a broken wall.
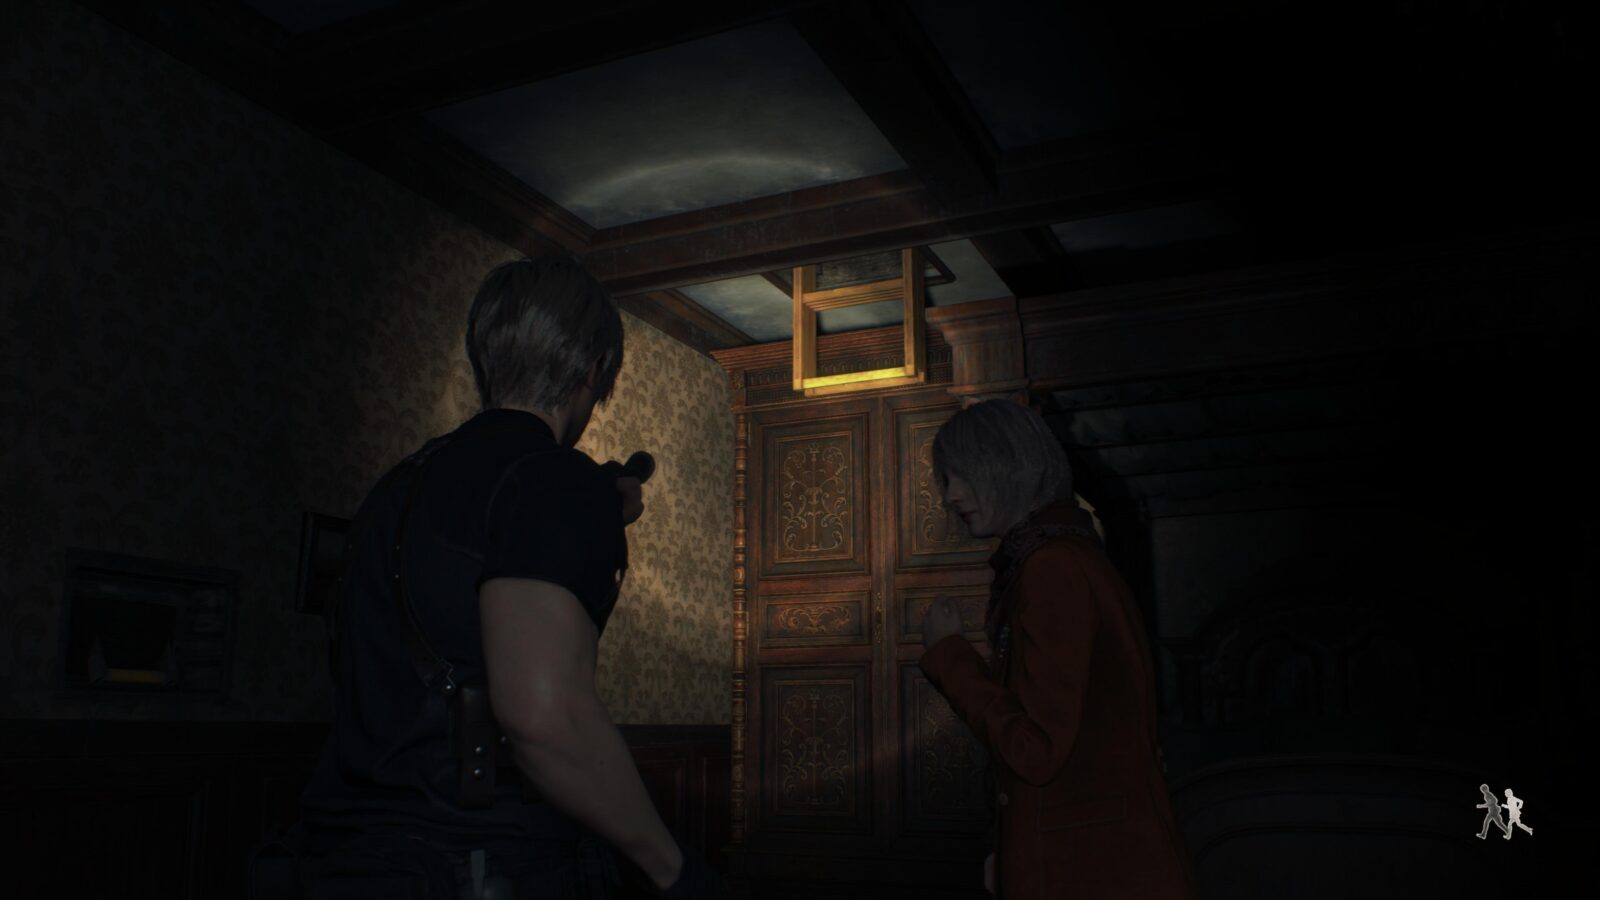
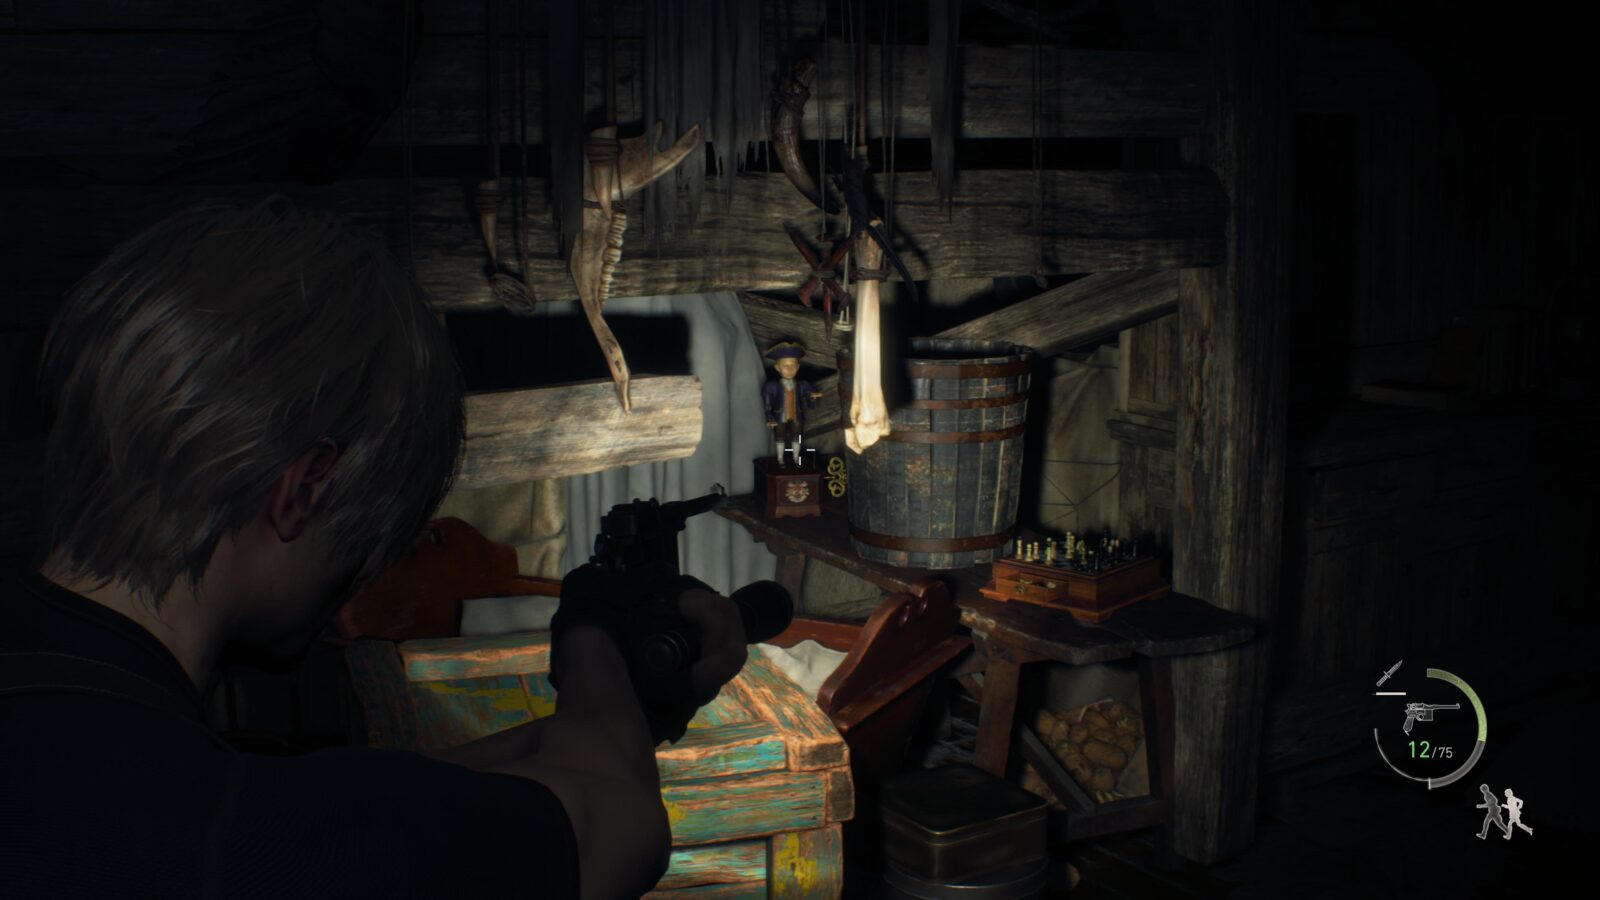
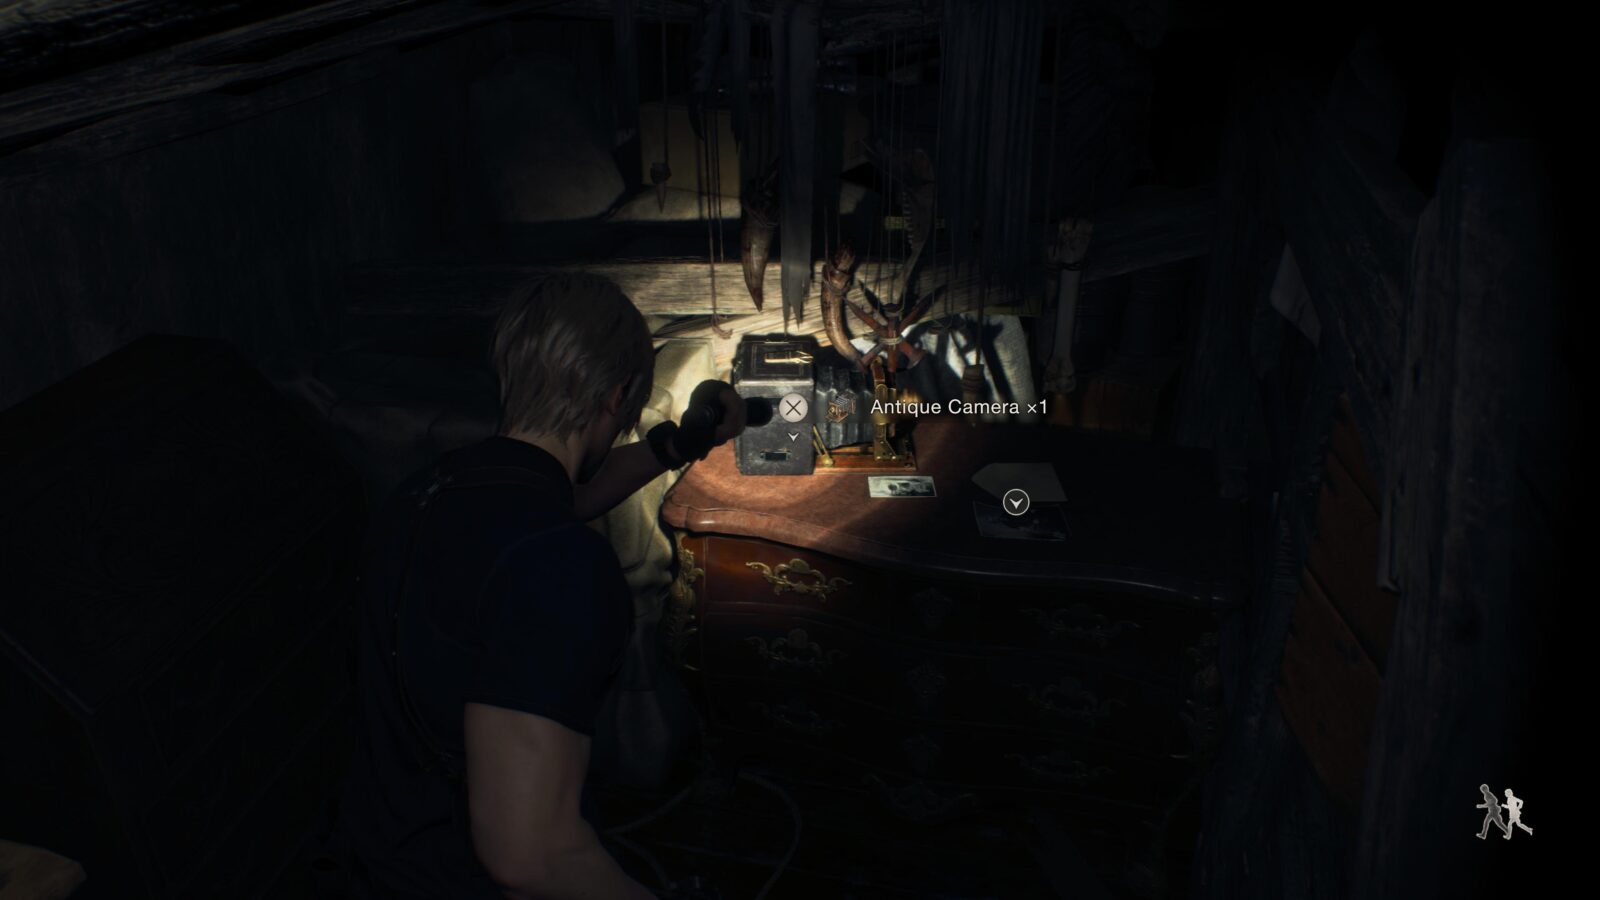
Antique Camera
Still inside the Chief’s attic there is a crawl space where you can find an Antique Camera.
Alexandrite (Optional)
When you kill the mutated dog it will drop an Alexandrite gem. This gem isn’t needed for the Bandit trophy for collecting all treasures in the Village map.
Antique Pipe
When you reach the Farm where you first shot 5 Blue Medallions and fixed the large windmill, there is a wayshrine that you might have spotted but couldn’t do anything with. Now you have the Old Wayshrine Key you can open it up and collect the Antique Pipe inside.

Chapter 6
There are a total of 1 Clockwork Castellan, 1 Merchant Request, and 4 Treasures in Chapter 6. This chapter also has 2 Expanded Treasures which can only be obtained with the Expanded Treasure Map DLC.
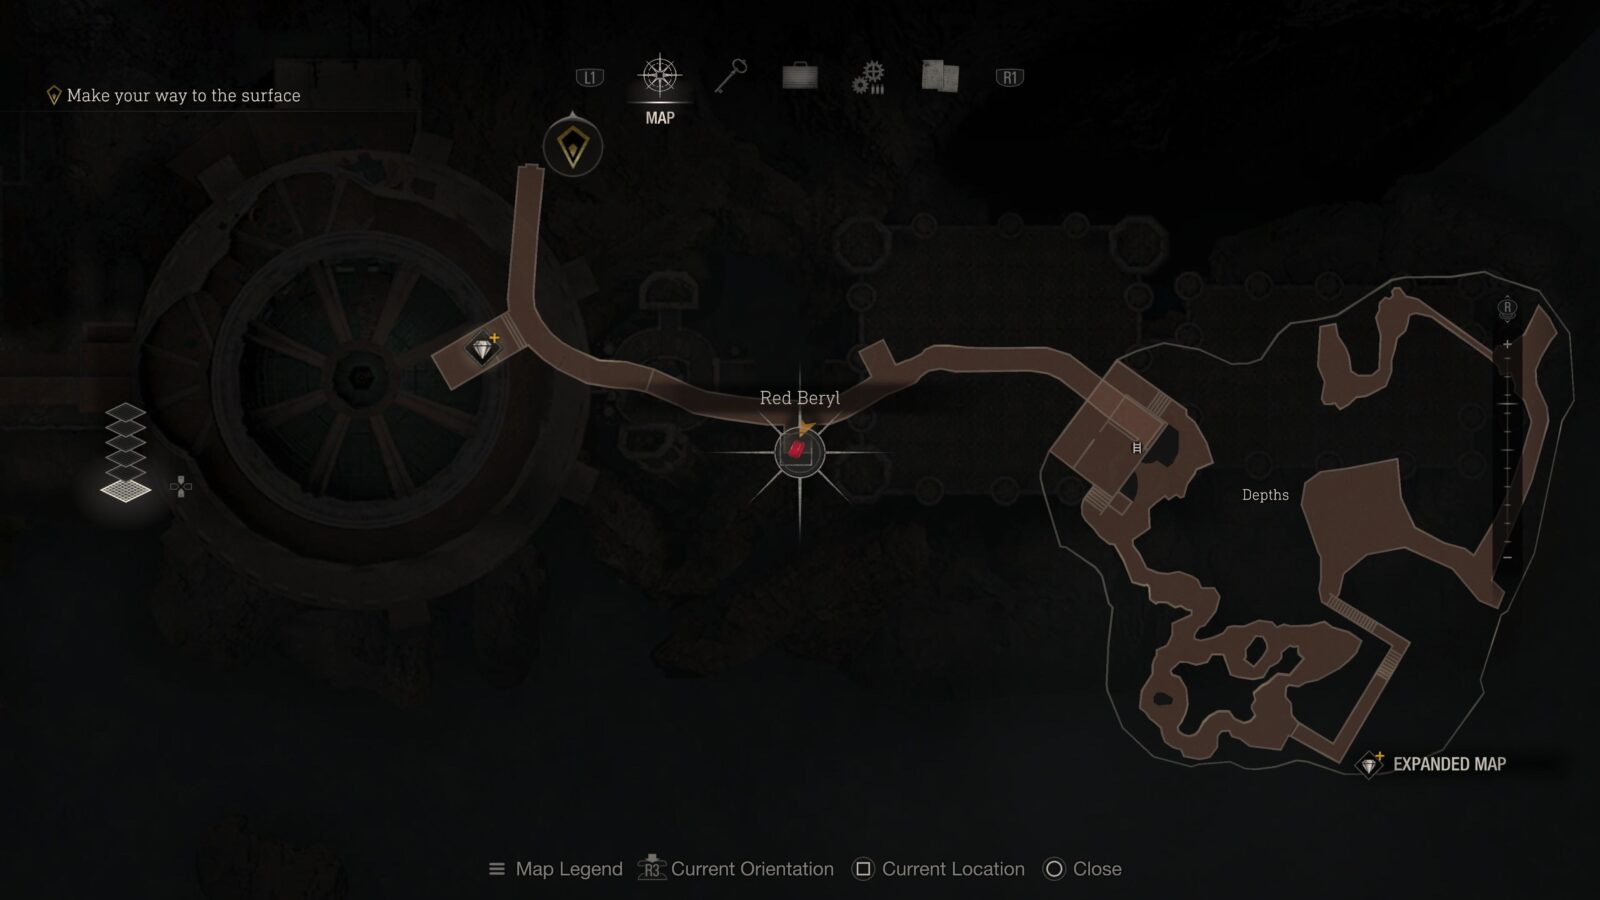
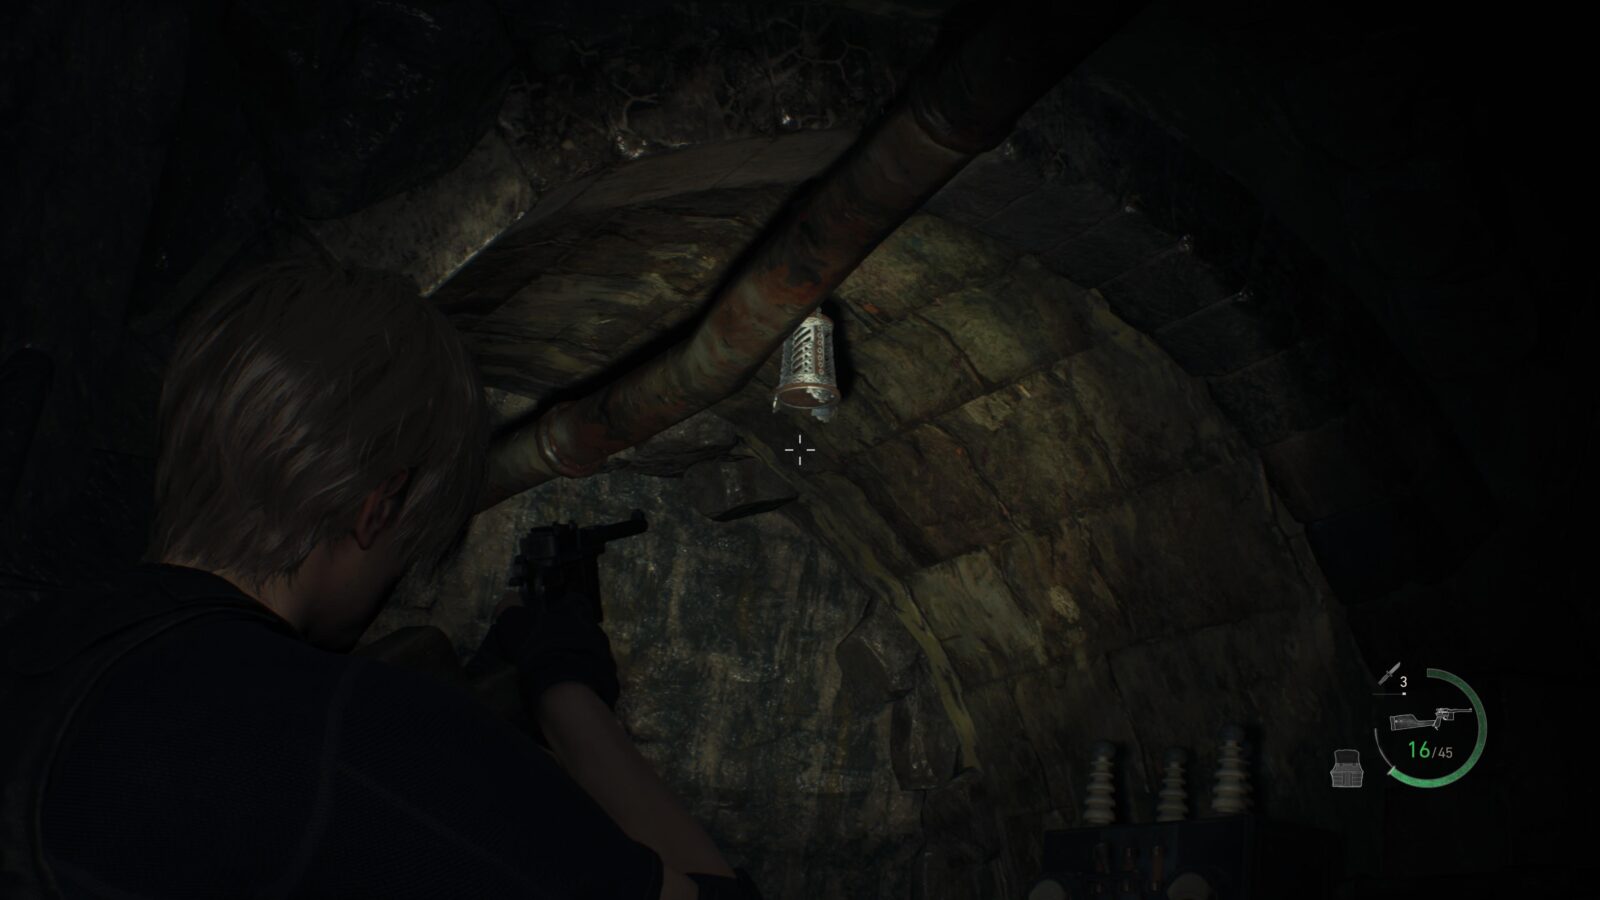
Red Beryl (Expanded Treasure)
As you make your way to the Merchant and Typewriter at the start of the chapter there will be a metal cage hanging from some wooden beams above some steps. Shoot it down to reveal a Red Beryl gem.


Yellow Diamond
After heading through the next gate after the Merchant room there will be some stairs to your immediate left that lead up to some wooden walkways. At the top of the stairs is a chest. You can see the gate you came through while stood in front of the chest.
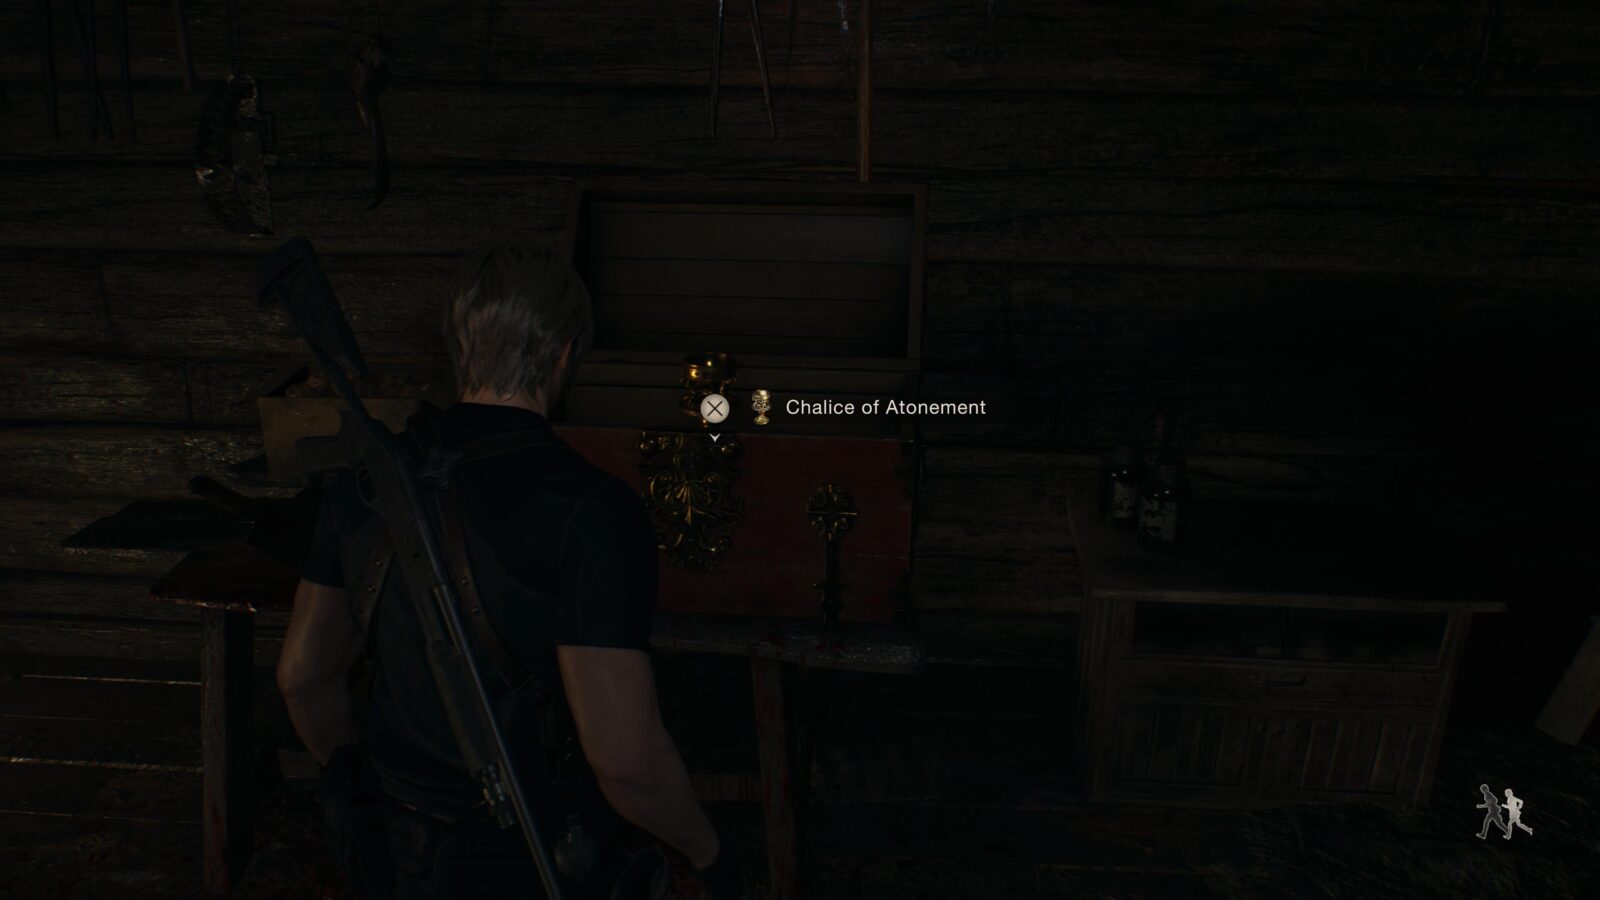
Chalice of Atonement
Head through the next gate and you will see some steps leading to a building on your left. Inside is a chest with this chalice inside.
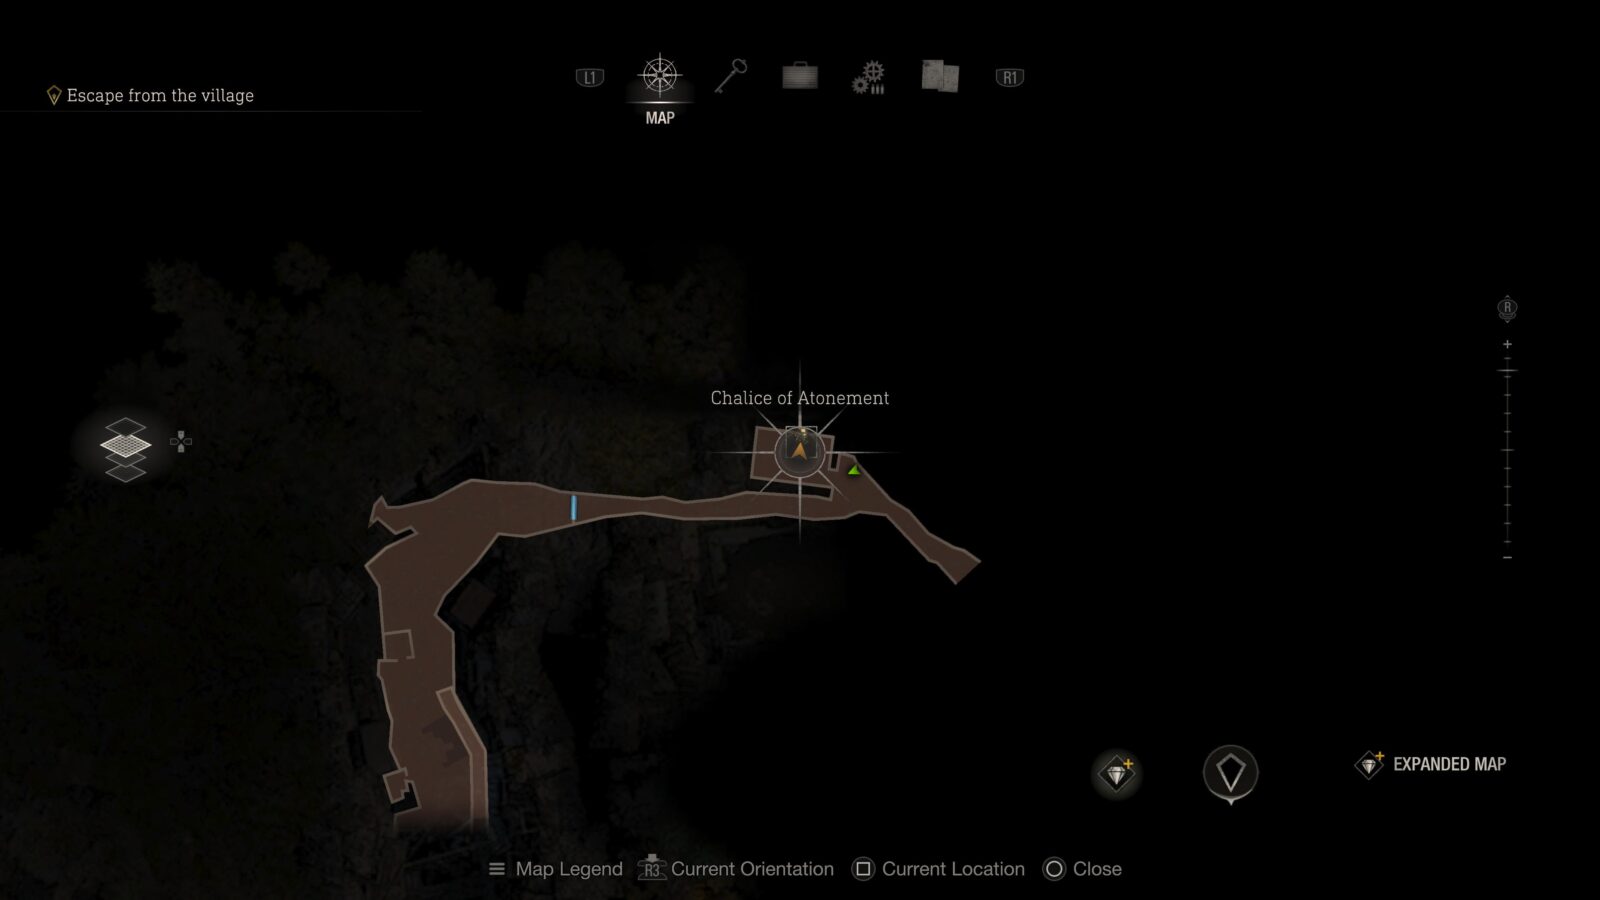
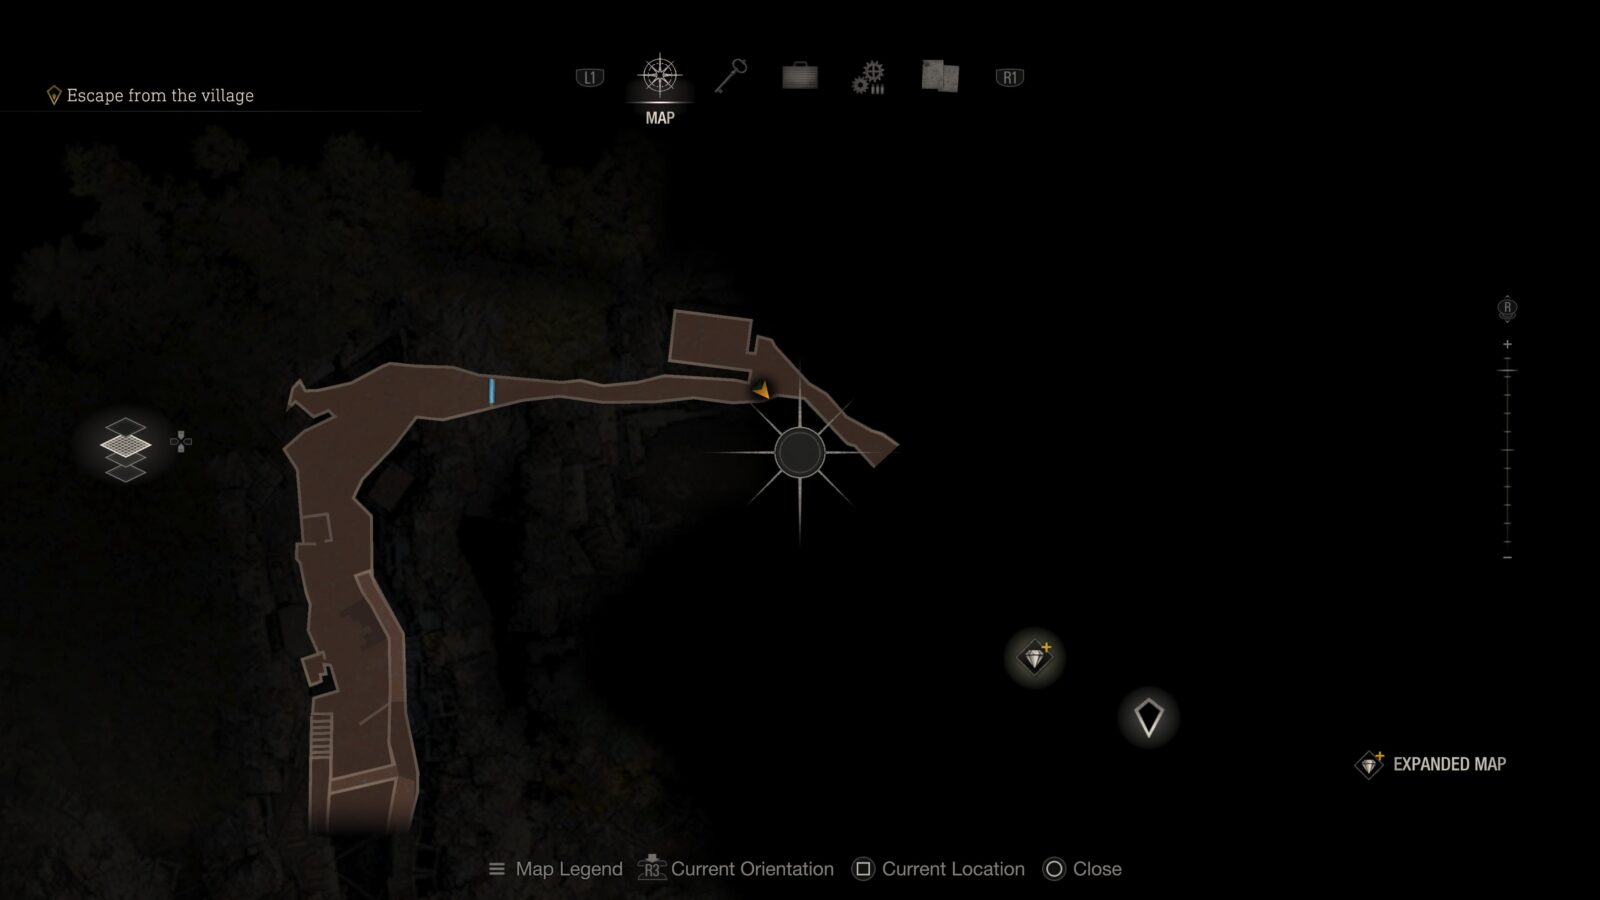
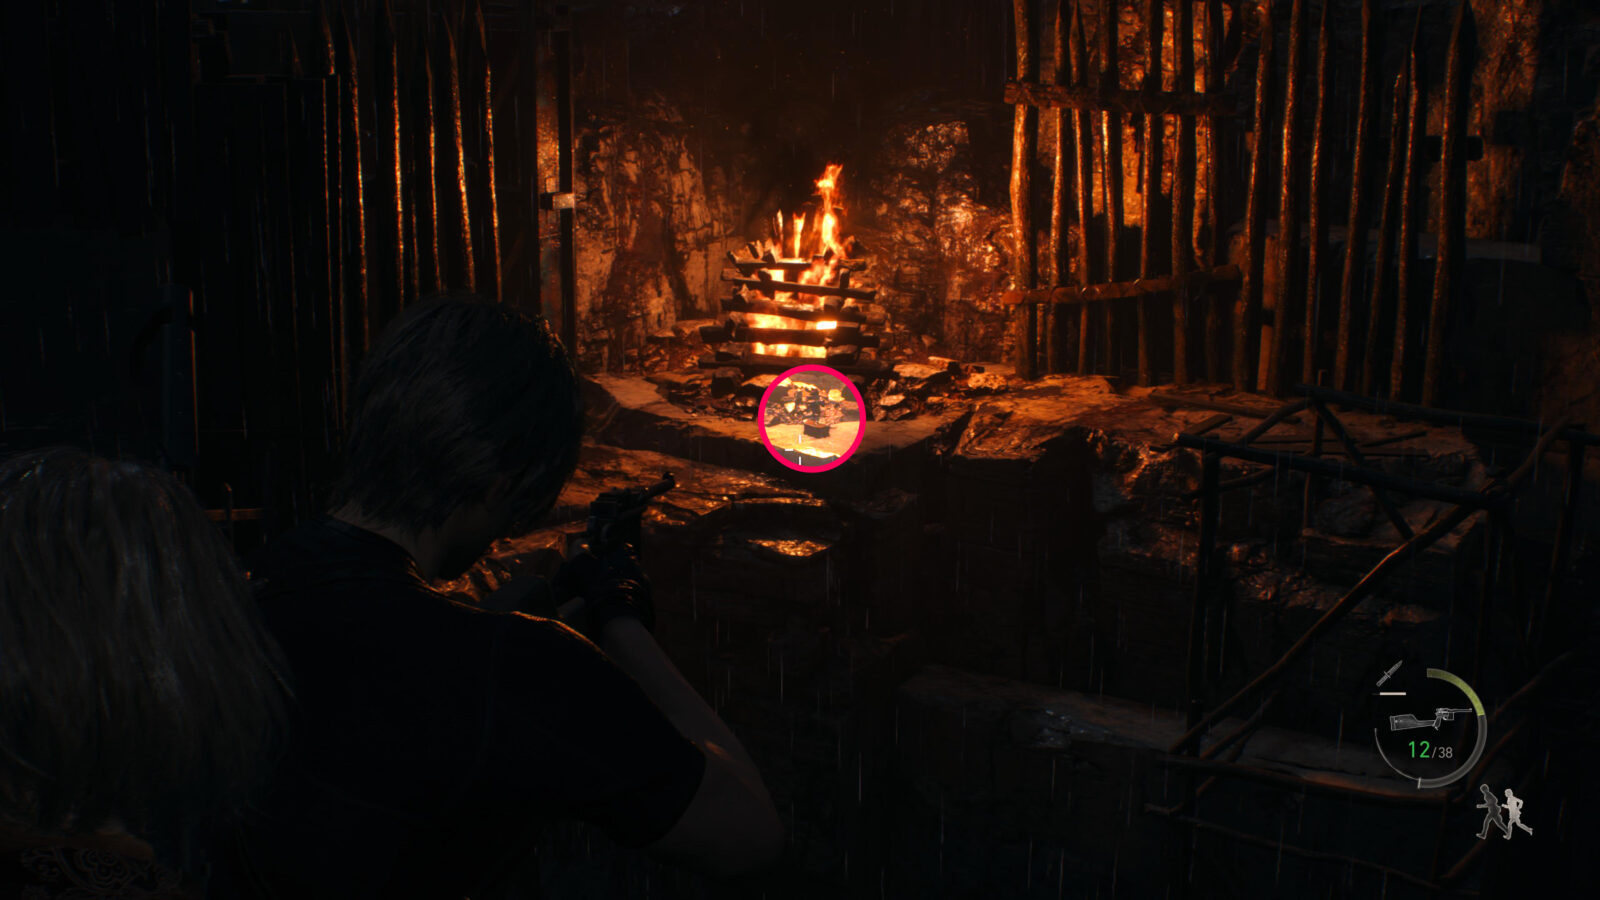
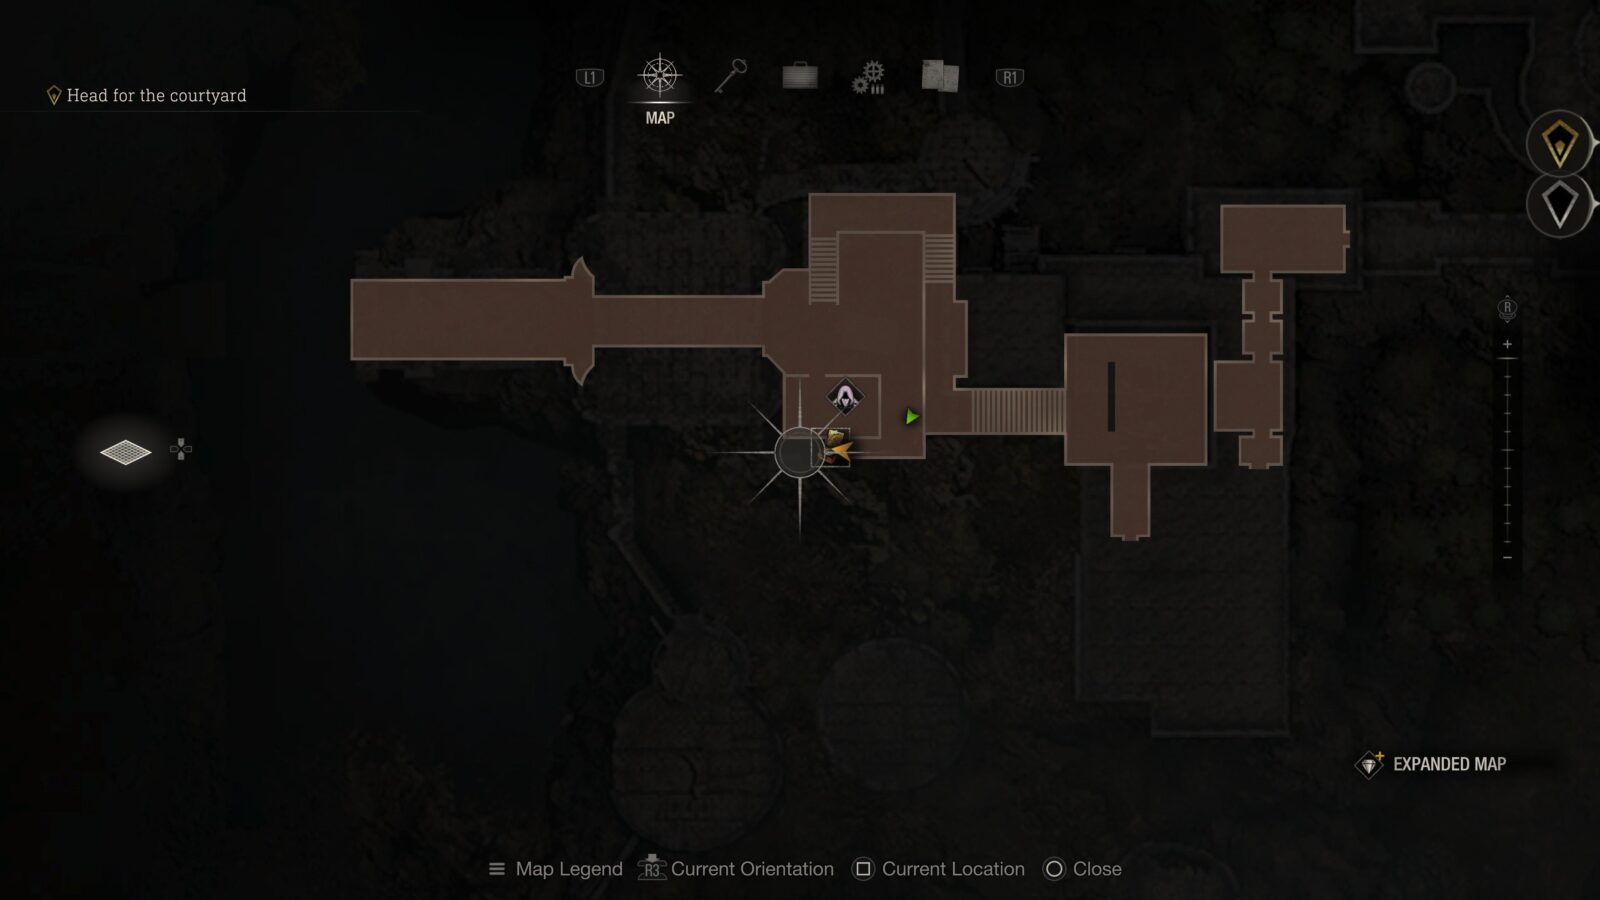
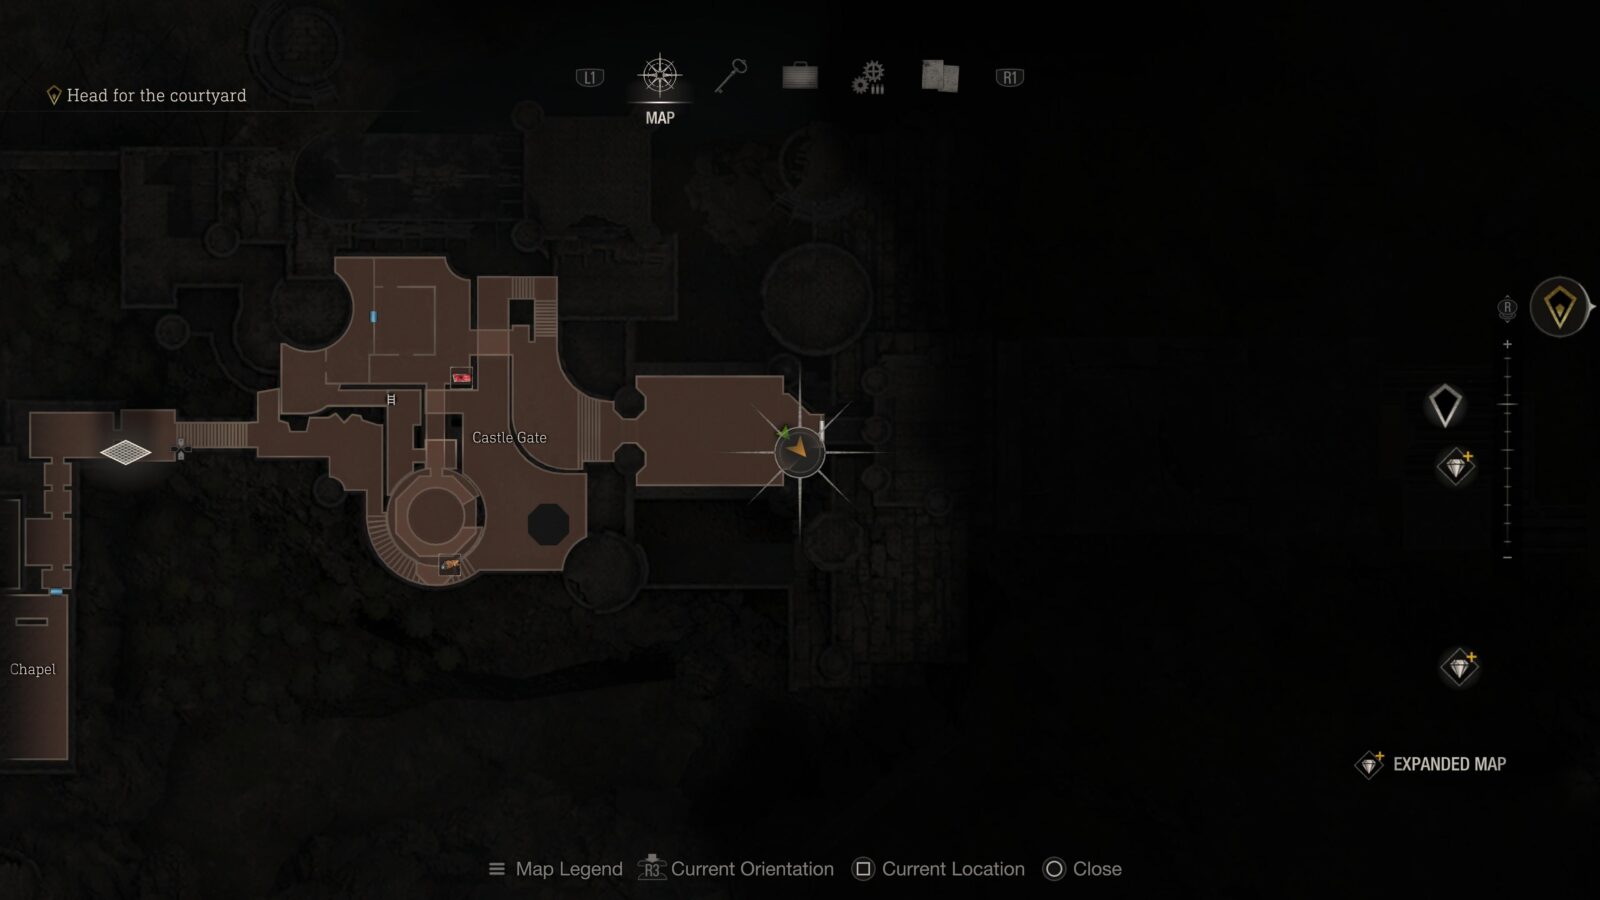
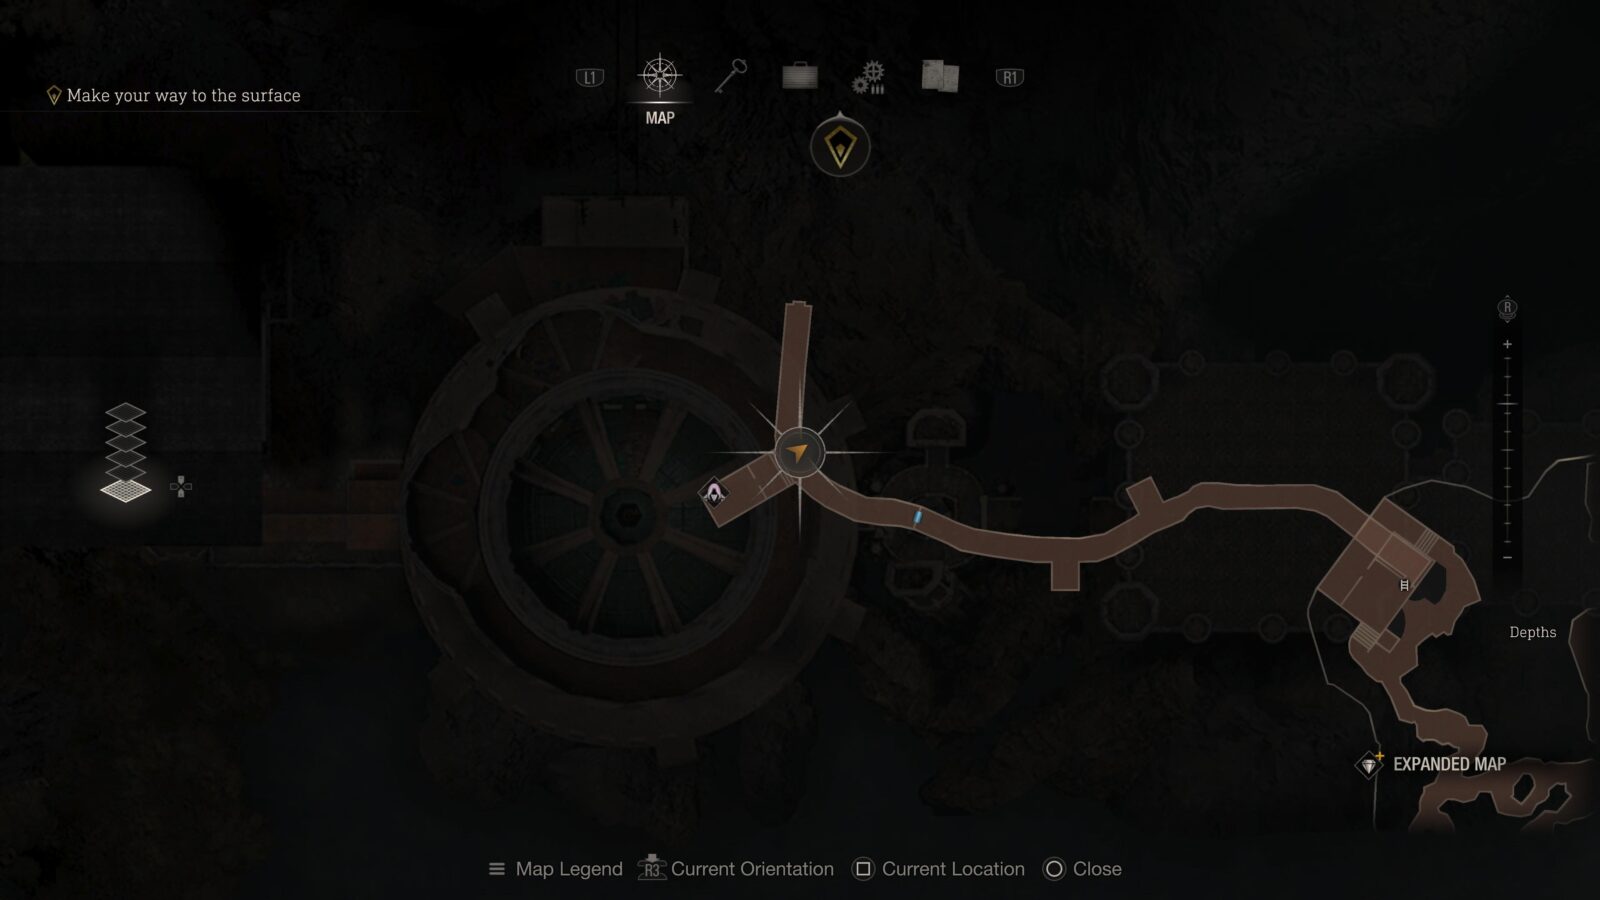
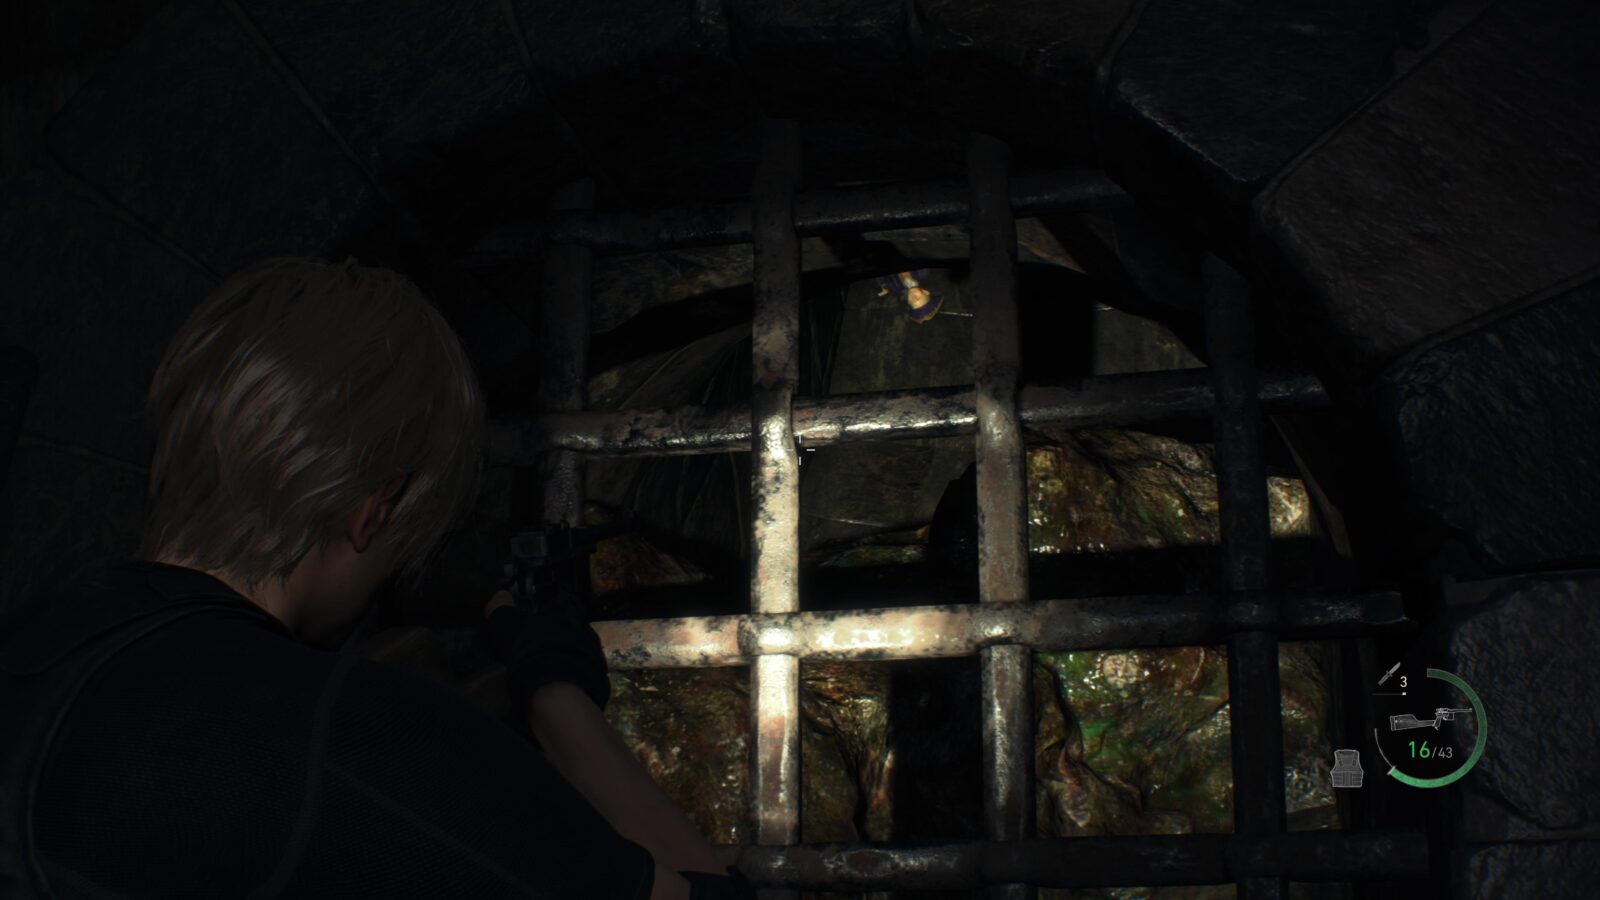
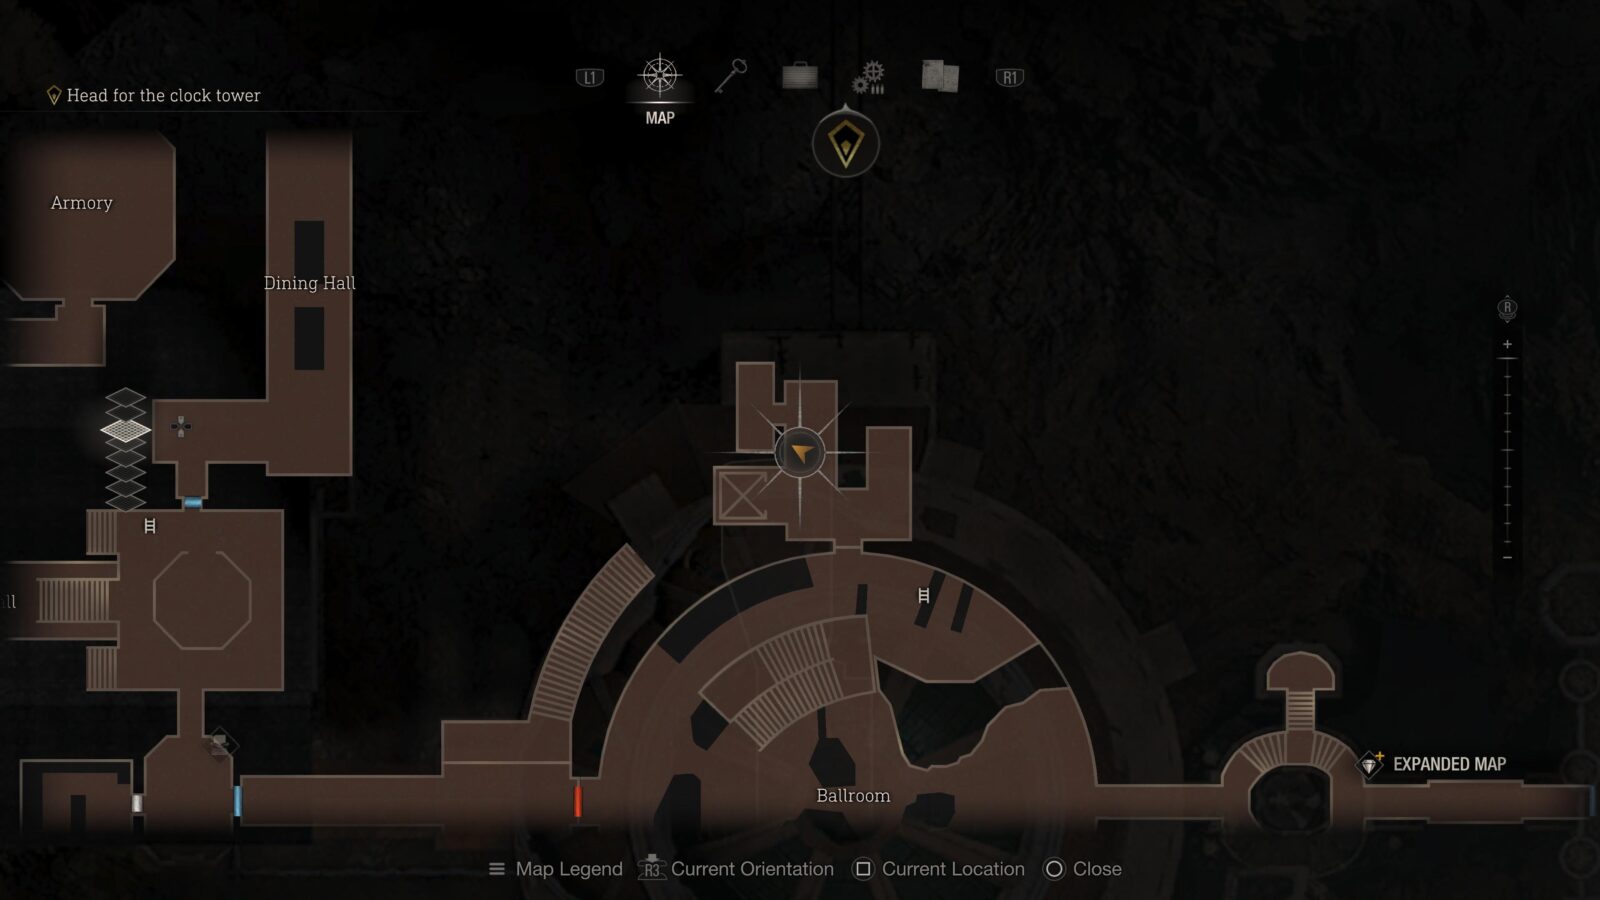
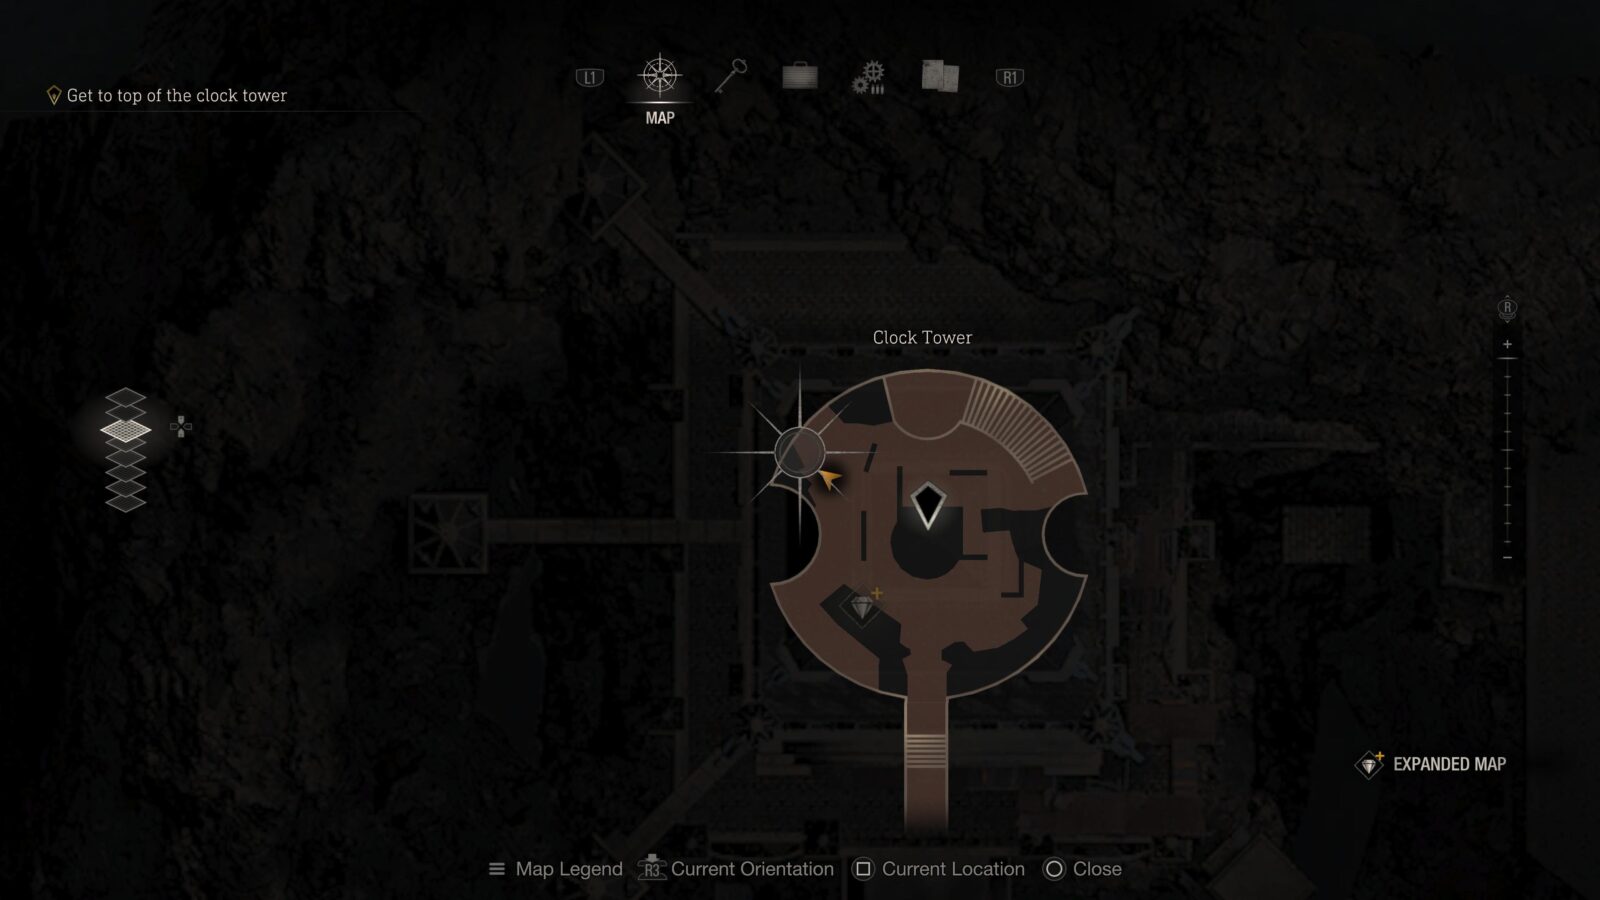
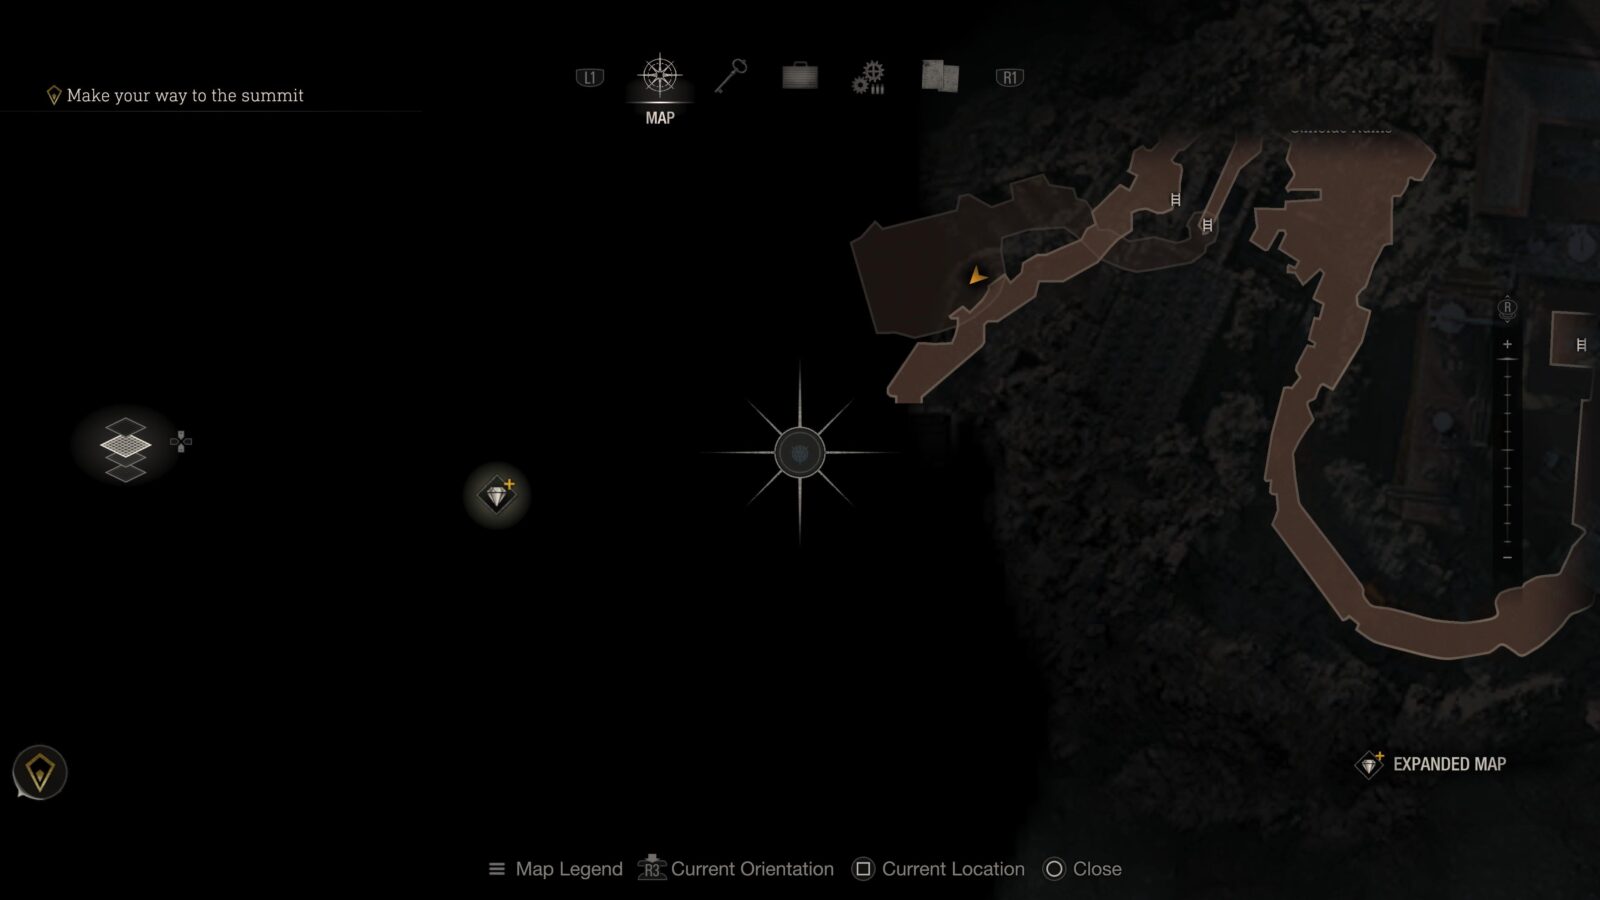
Clockwork Castellan #6
Leave the building that had the Chalice of Atonement and you will see a bonfire across the gap ahead of you. At the base of this bonfire on the stone ground is a statue. See the below image for the direction to look on the map.
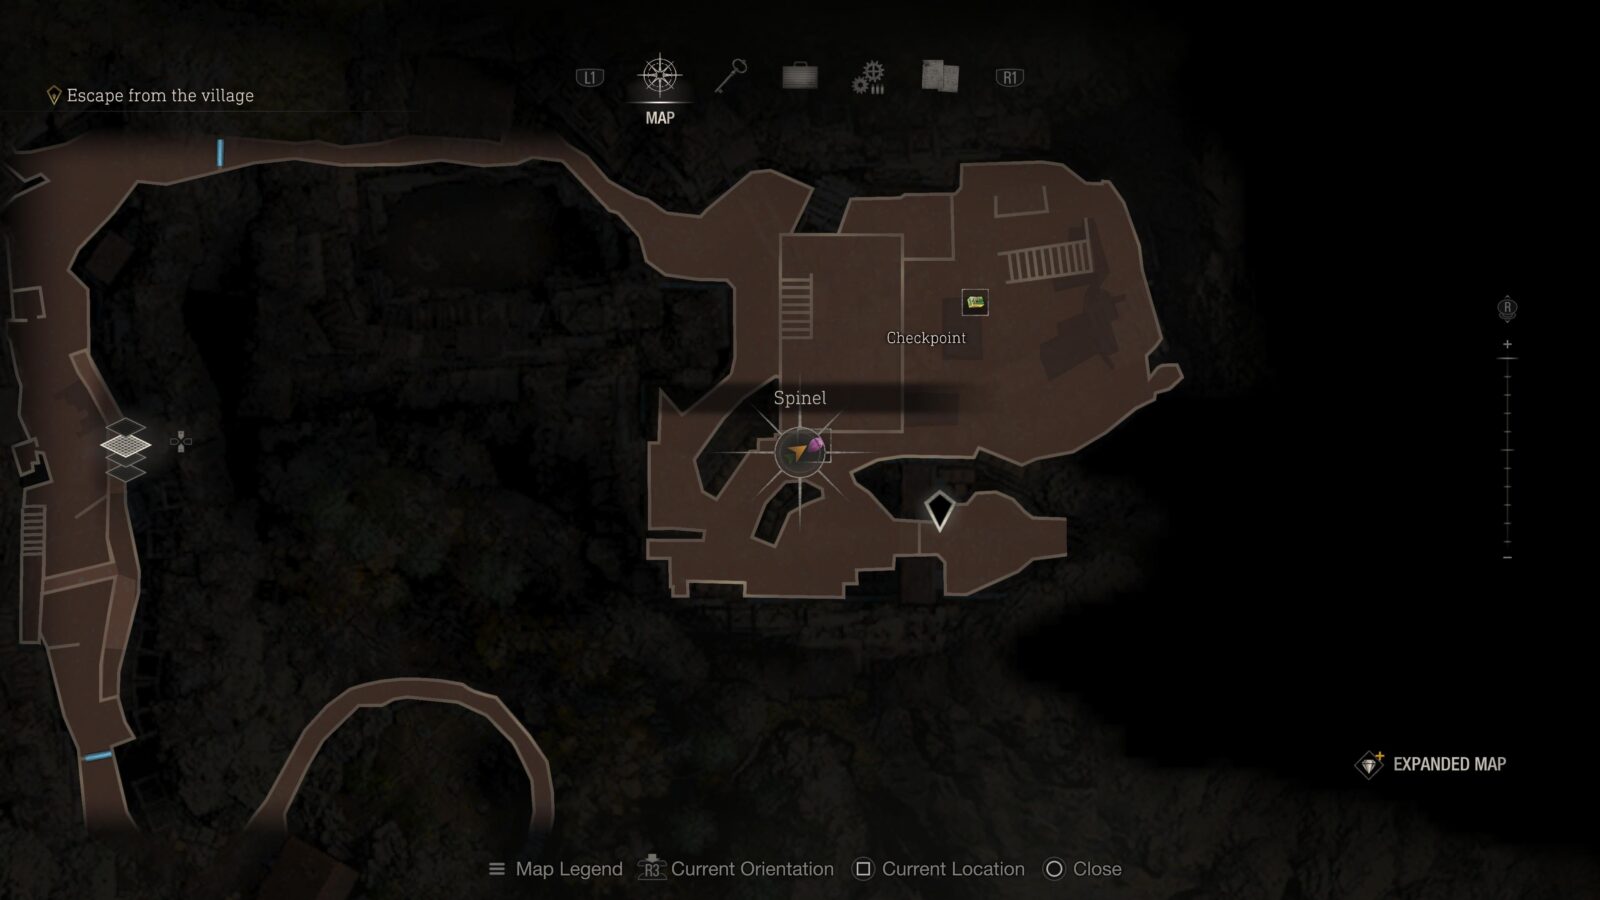
Spinel (Expanded Treasure)
As you enter the next area called Checkpoint you can find a cage hanging from a corrugated roof as you follow the path left. Check the map for the exact location. This is only available to those who have the Expanded Treasure Map DLC.

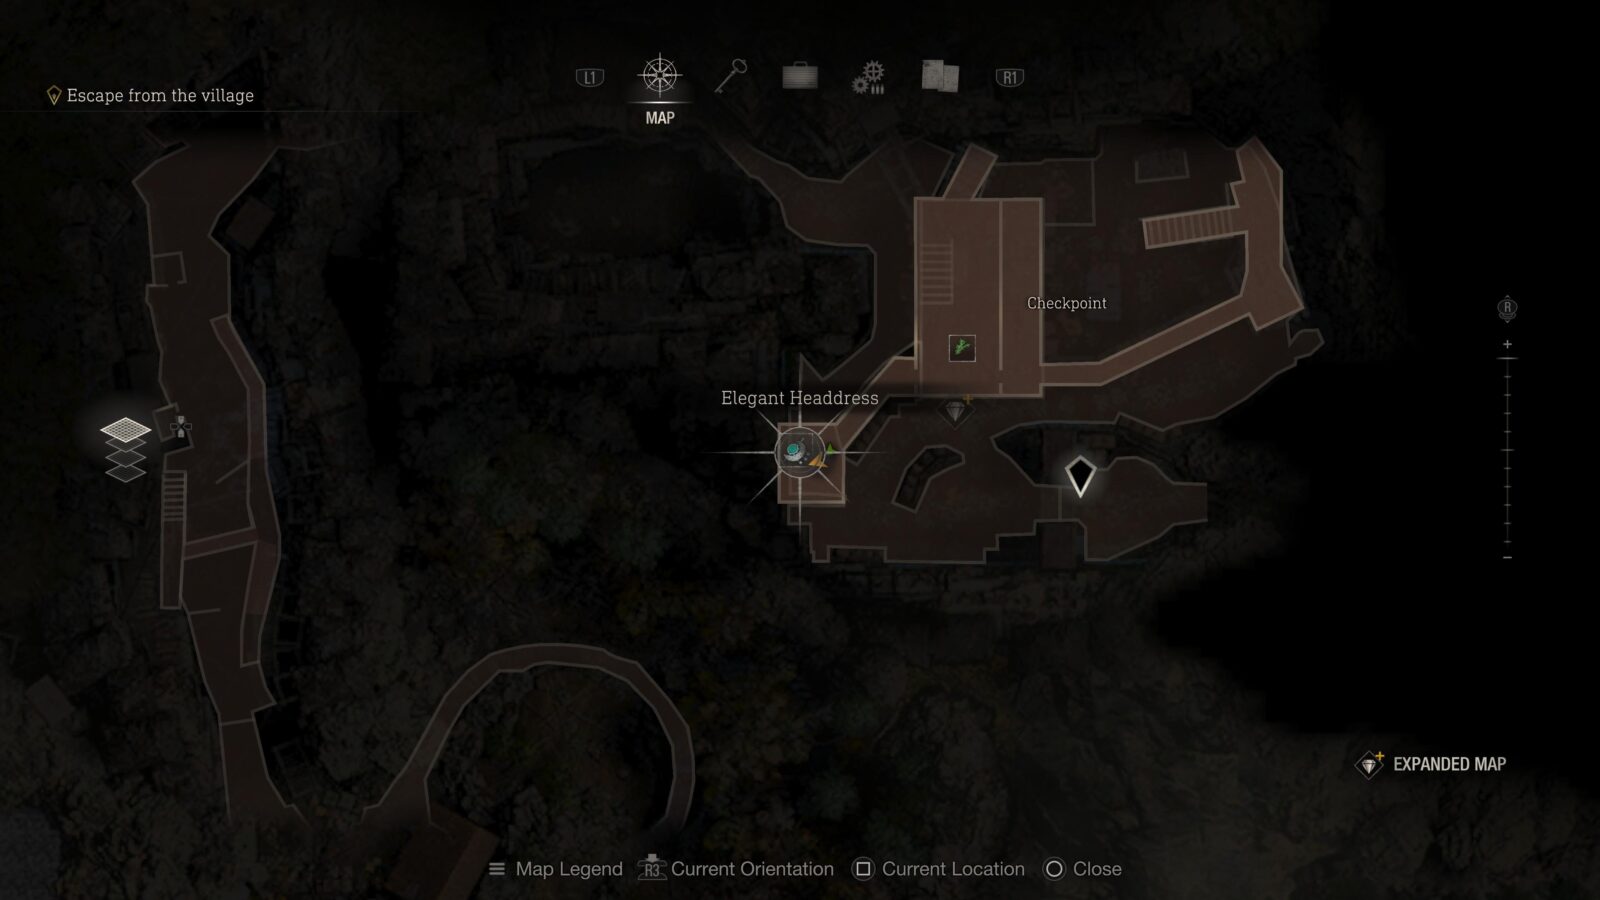
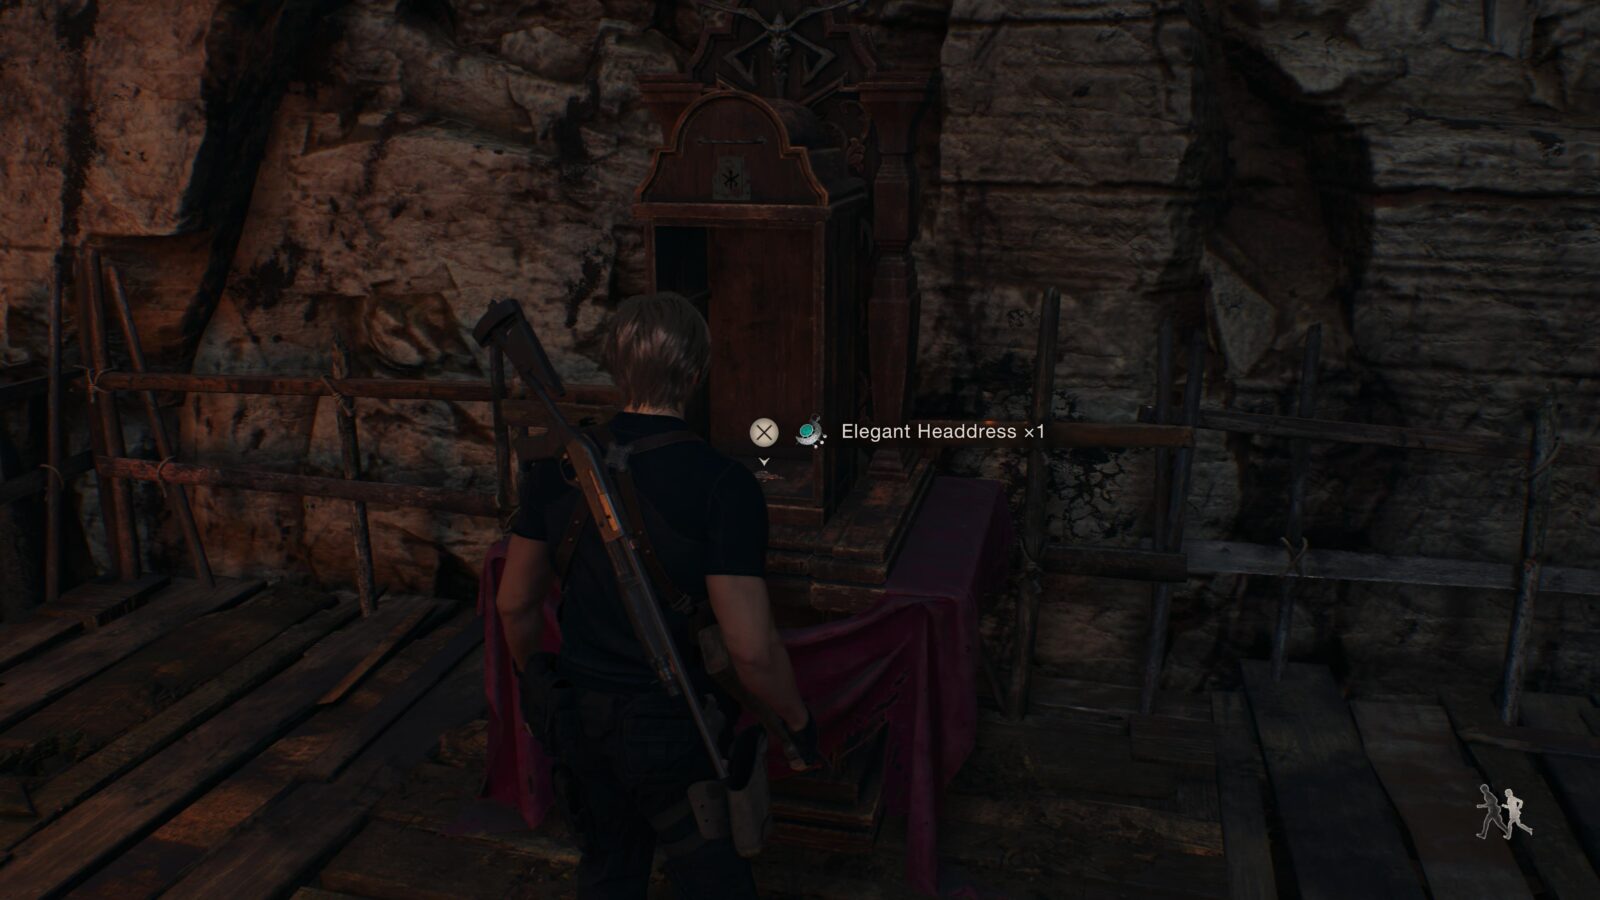
Elegant Headdress
In the North-Eastern part of the Checkpoint area are some stairs that lead to a walkway. Follow the walkway all the way to the South-Western part of the area to find a Wayshrine with this treasure inside.
Méndez' False Eye
You can get this treasure by defeating Bitores Méndez. Make sure to pick it up off his body before you leave the boss arena. I’m not sure if this treasure counts towards the Bandit trophy but it can be sold at the Merchant so it’s safer to pick it up.
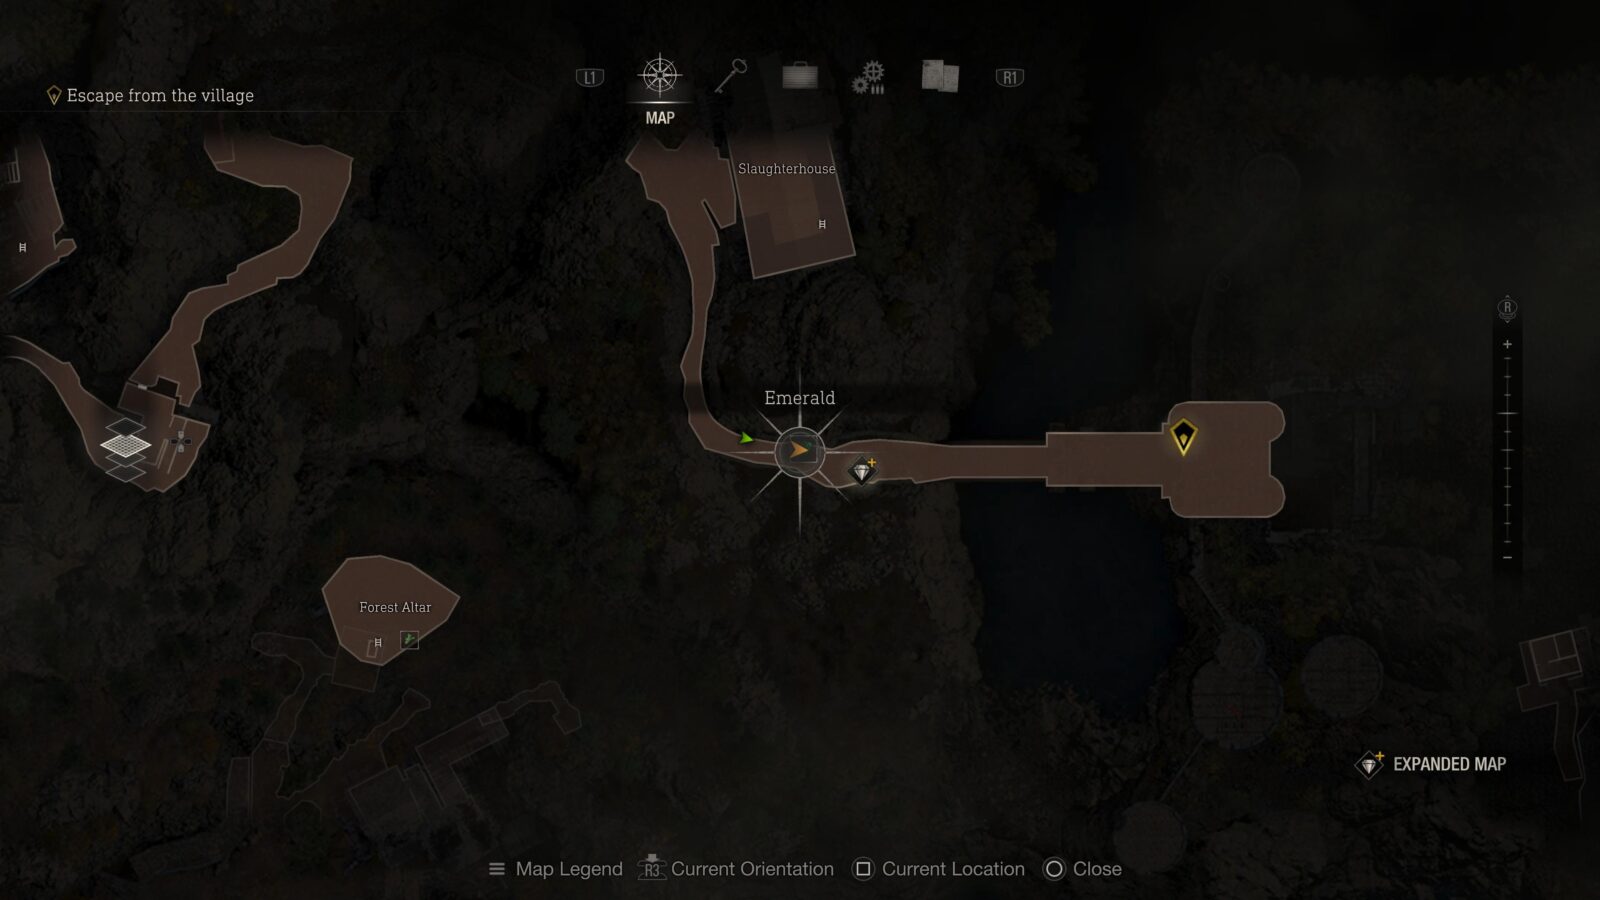
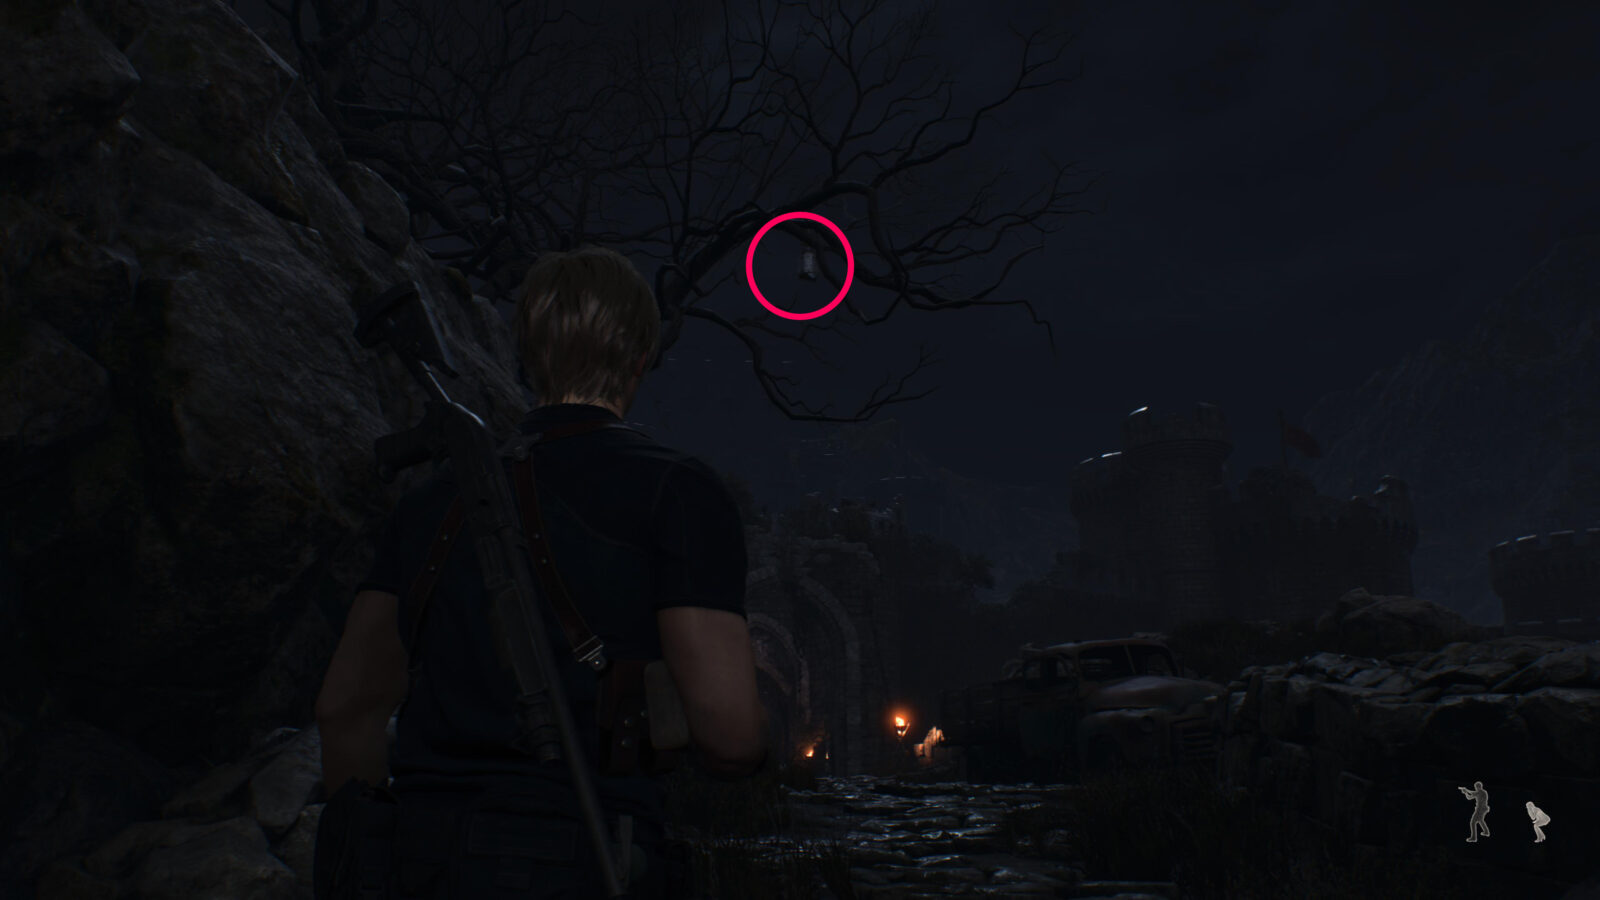
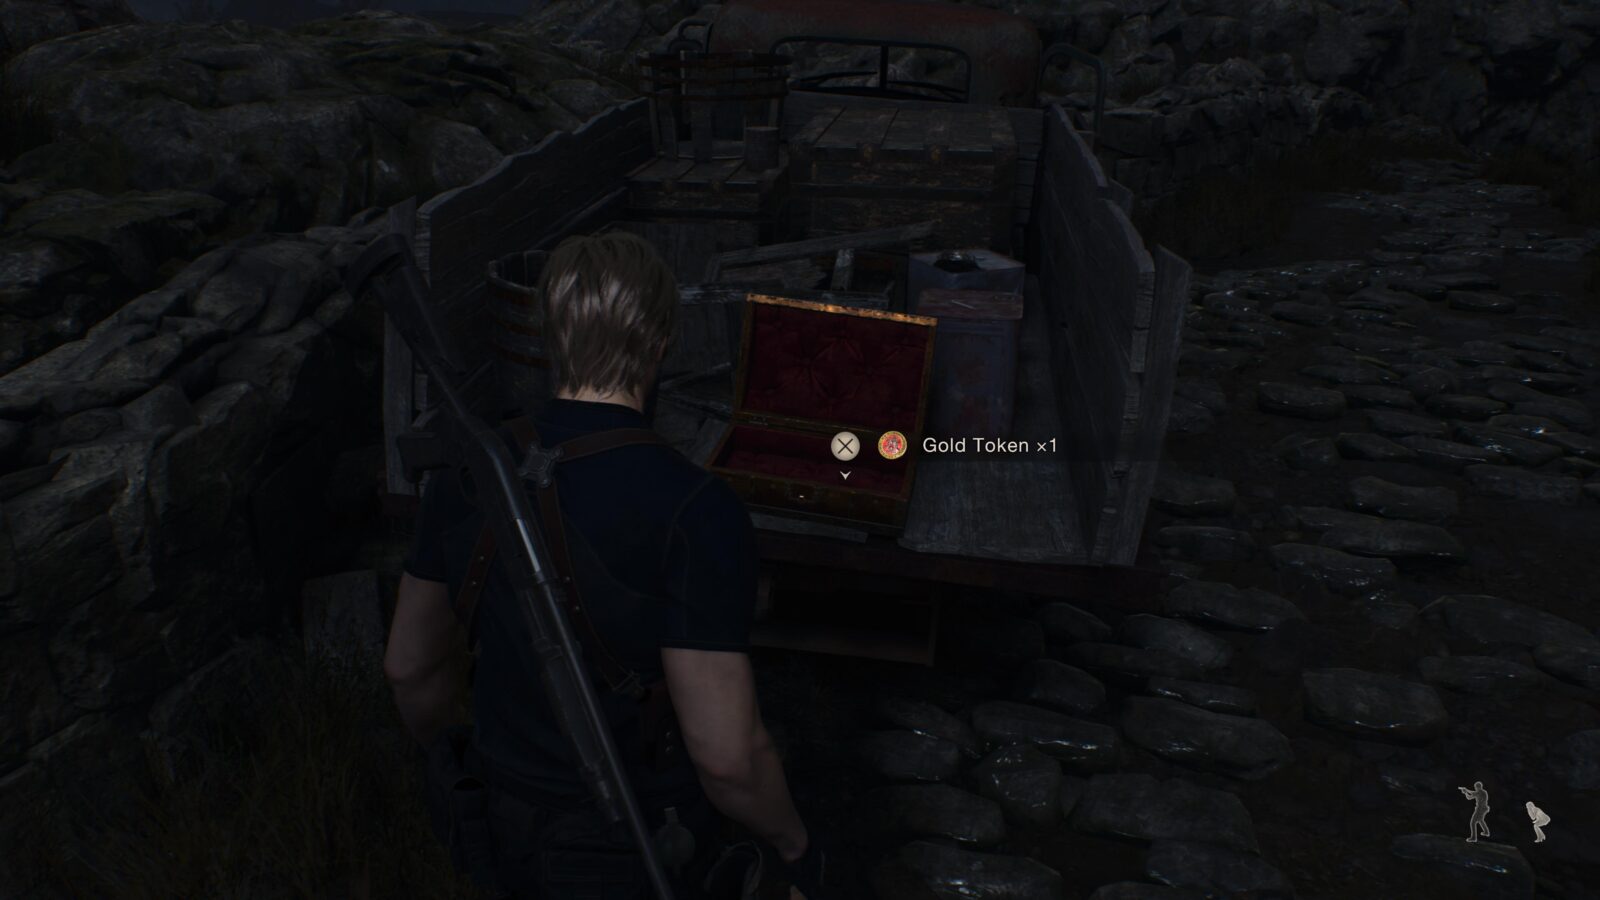
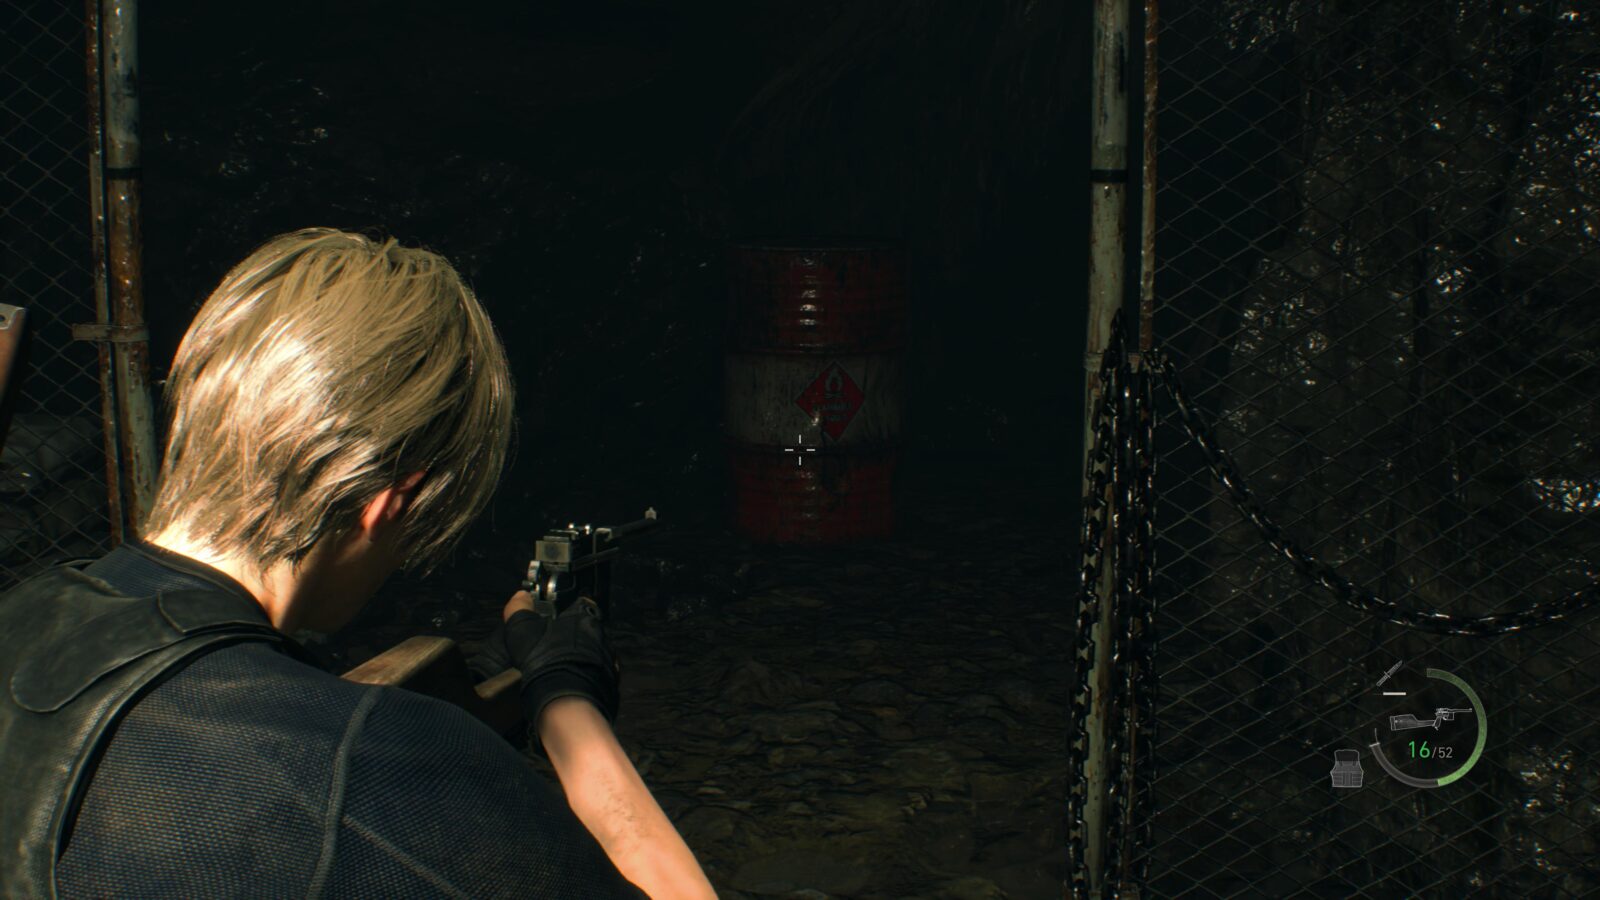
Emerald
Finally, the very last treasure required for the Bandit trophy is located on the path between Bitores Méndez’s boss arena and the Castle gates. There will be an old truck on the path to your right and above it will be a metal cage hanging from a tree. Shoot it down and you will get an Emerald and the Bandit trophy.
Gold Token (Expanded Treasure)
In the bed of the broken down truck where you grabbed the Emerald is a small chest with a Gold Token inside. This treasure doesn’t count towards the Bandit trophy but technically is the very last treasure in the Village. This is only available to those who have the Expanded Treasure Map DLC.

Chapter 7
There are a total of 1 Clockwork Castellan, 1 Merchant Request, 1 weapon, 2 Trophy Opportunities and 9 Treasures in Chapter 7. This chapter also has 2 Expanded Treasures which can only be obtained with the Expanded Treasure Map DLC.
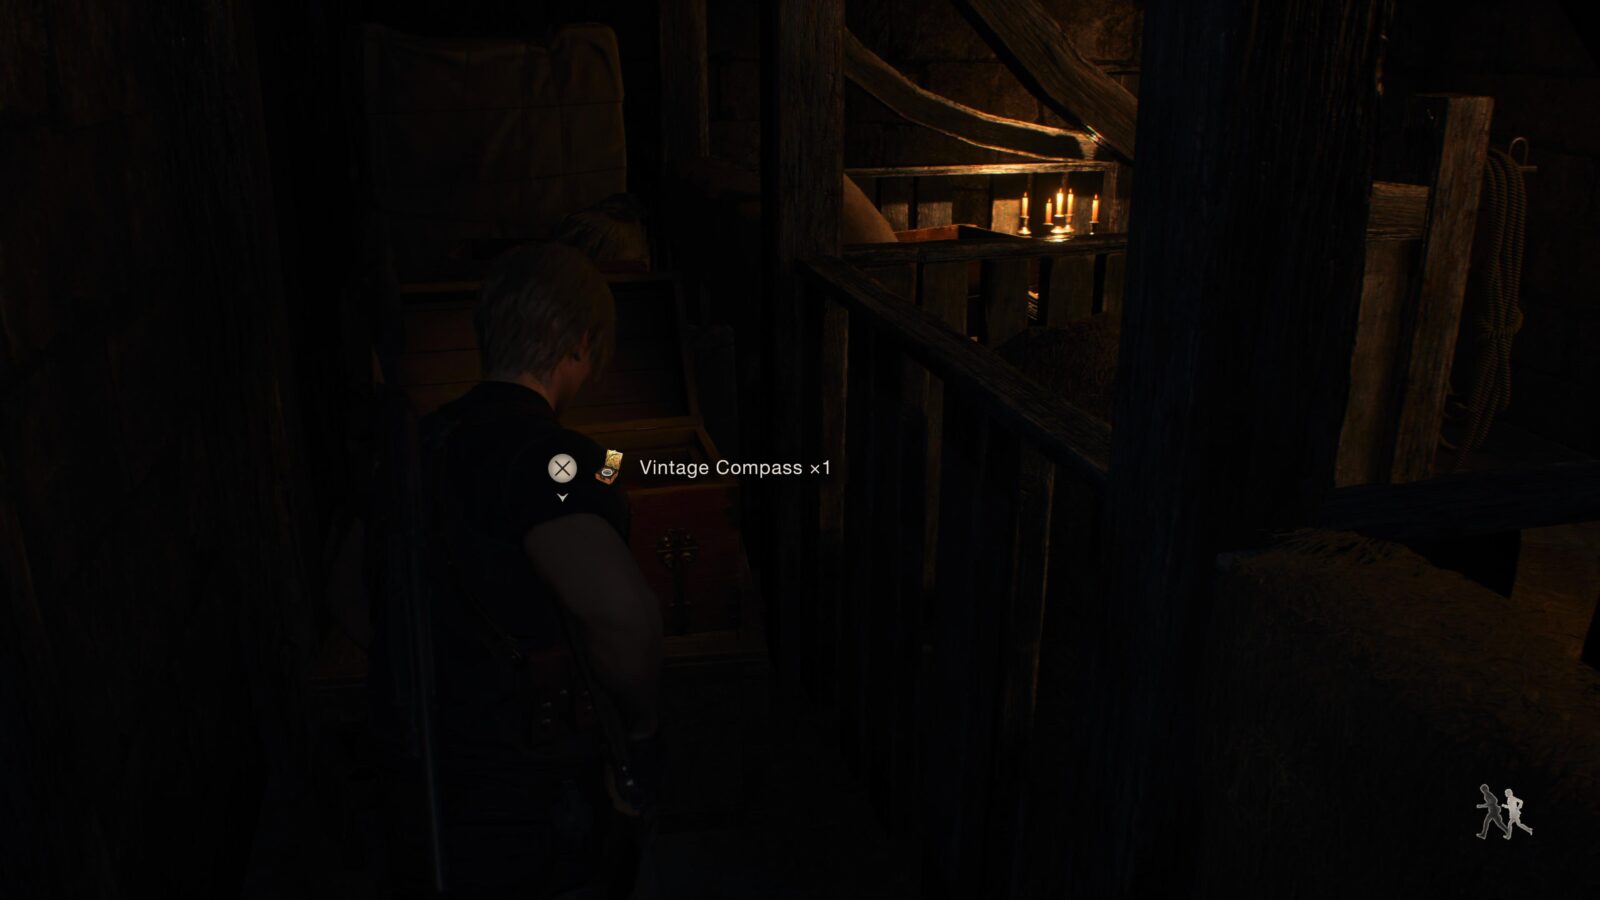
Vintage Compass
At the start of the chapter you will come to a small area similar to a courtyard with the Merchant in a small building to your right. Behind this building is a chest with a treasure inside.
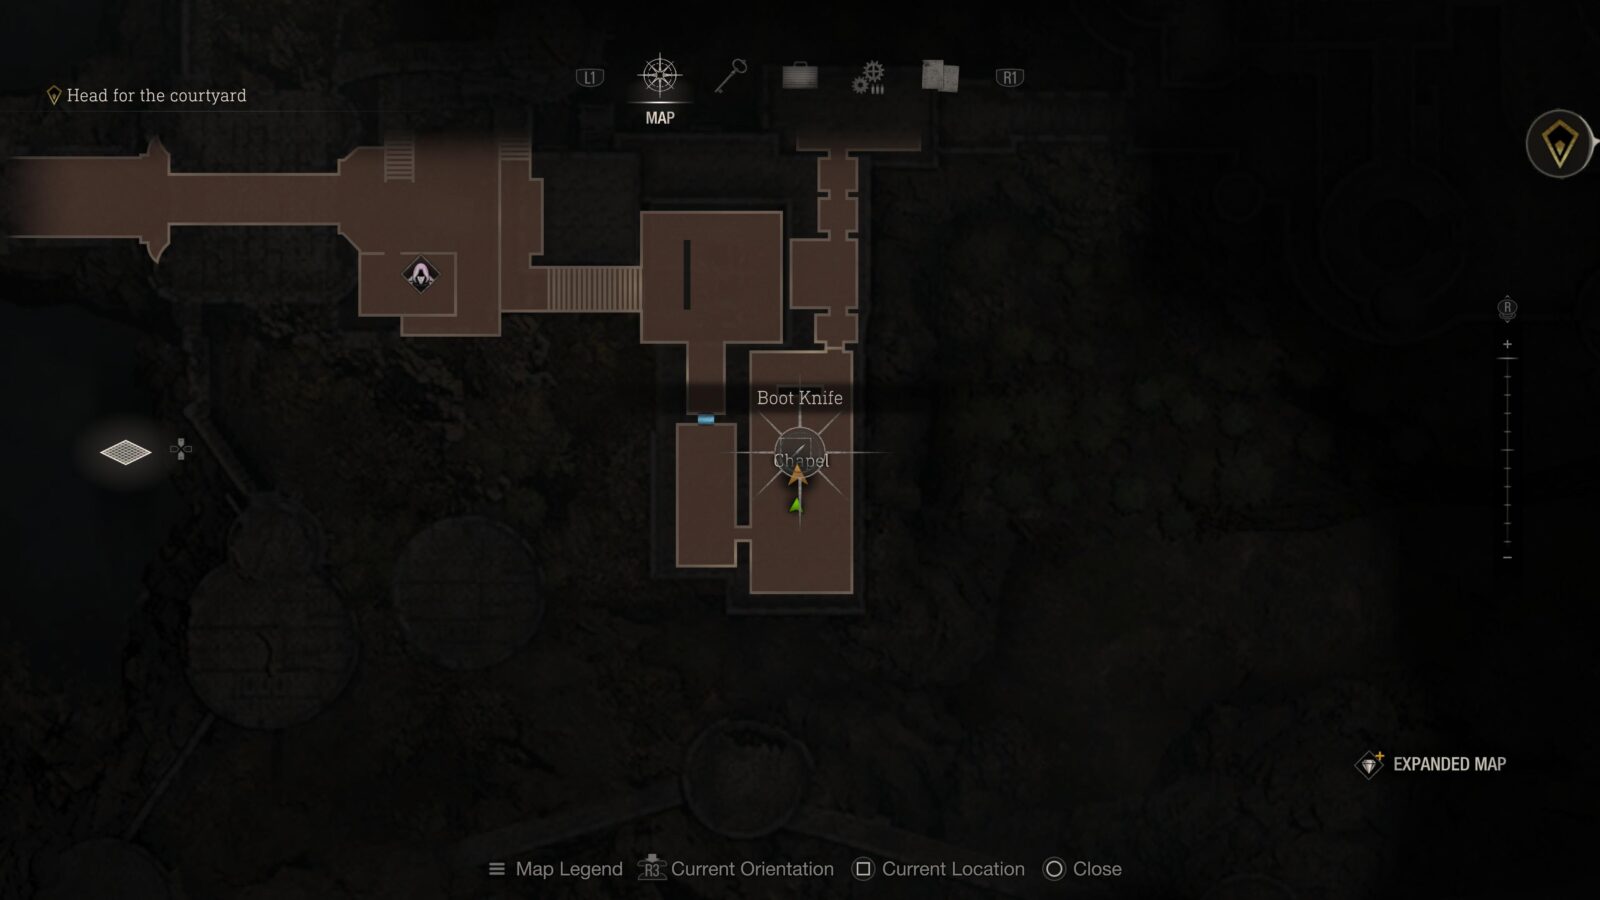
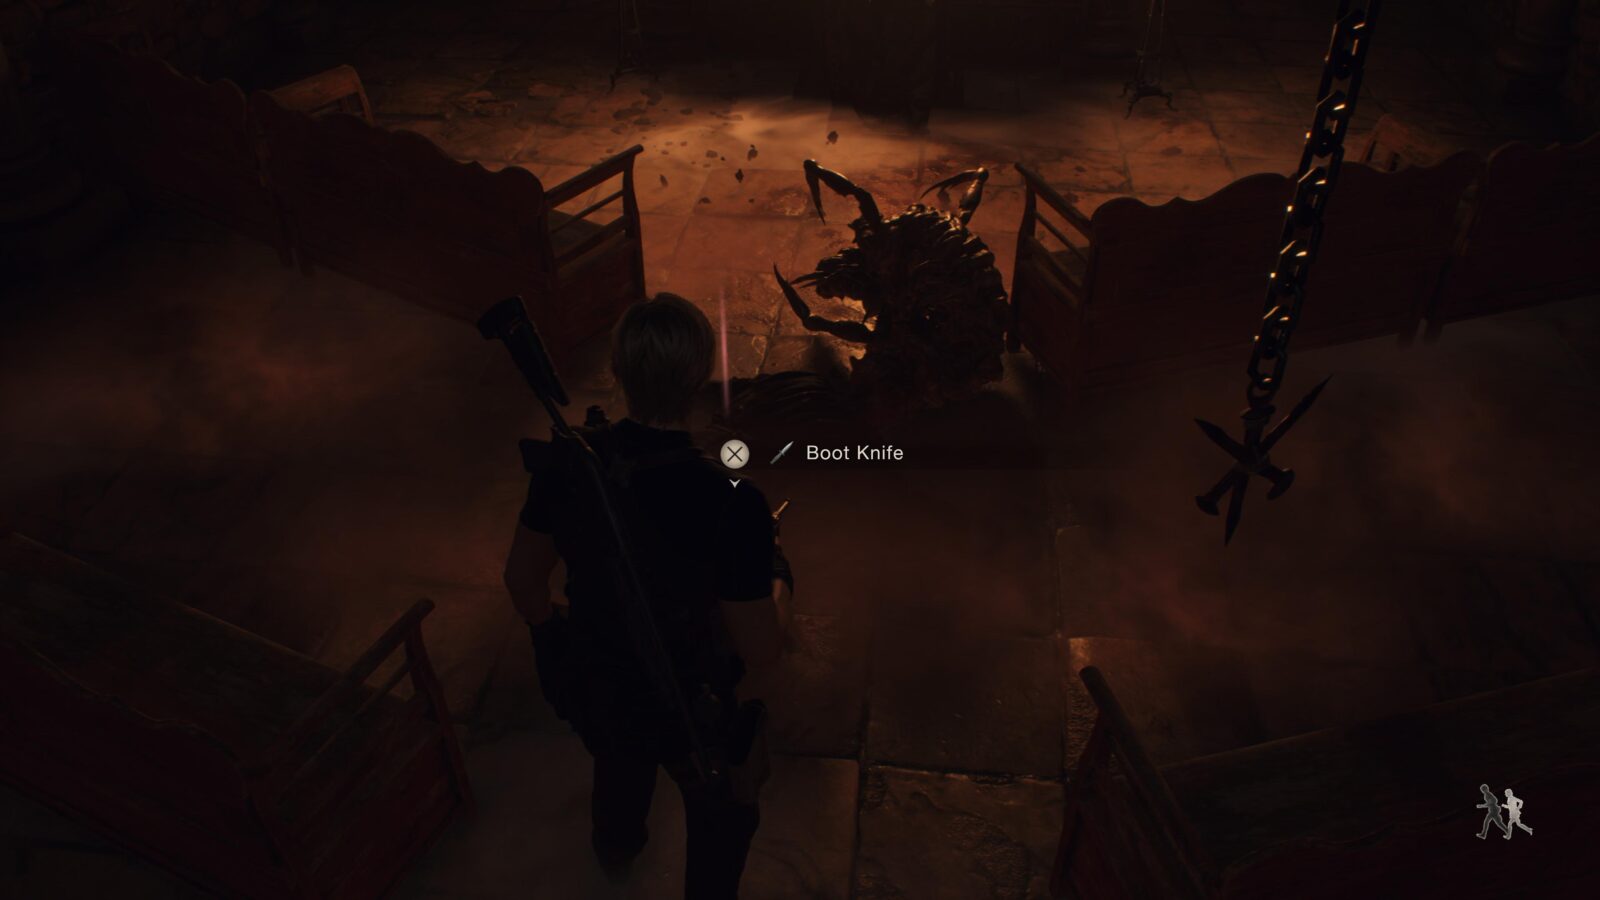
Boot Knife
This weapon will drop from the very first enemy you kill in this chapter in the Chapel room, however, it is rather easy to miss so make sure you’re prepared and pick it up before moving on.
Sapphire (Expanded Treasure)
As soon as you get attacked by catapults, walk forward and check the left for some stairs leading to a large iron gate. Hanging on the ceiling above this gate is a cage you can shoot down to get a Sapphire. This is only available to those who have the Expanded Treasure Map DLC.


Elegant Bangle
During the catapult attack you will jump down to where the cannon is and have to shoot a counterweight to raise it. After doing this you will climb a ladder to where there are 3 breakable barrels and a chest. Inside the chest is a treasure.

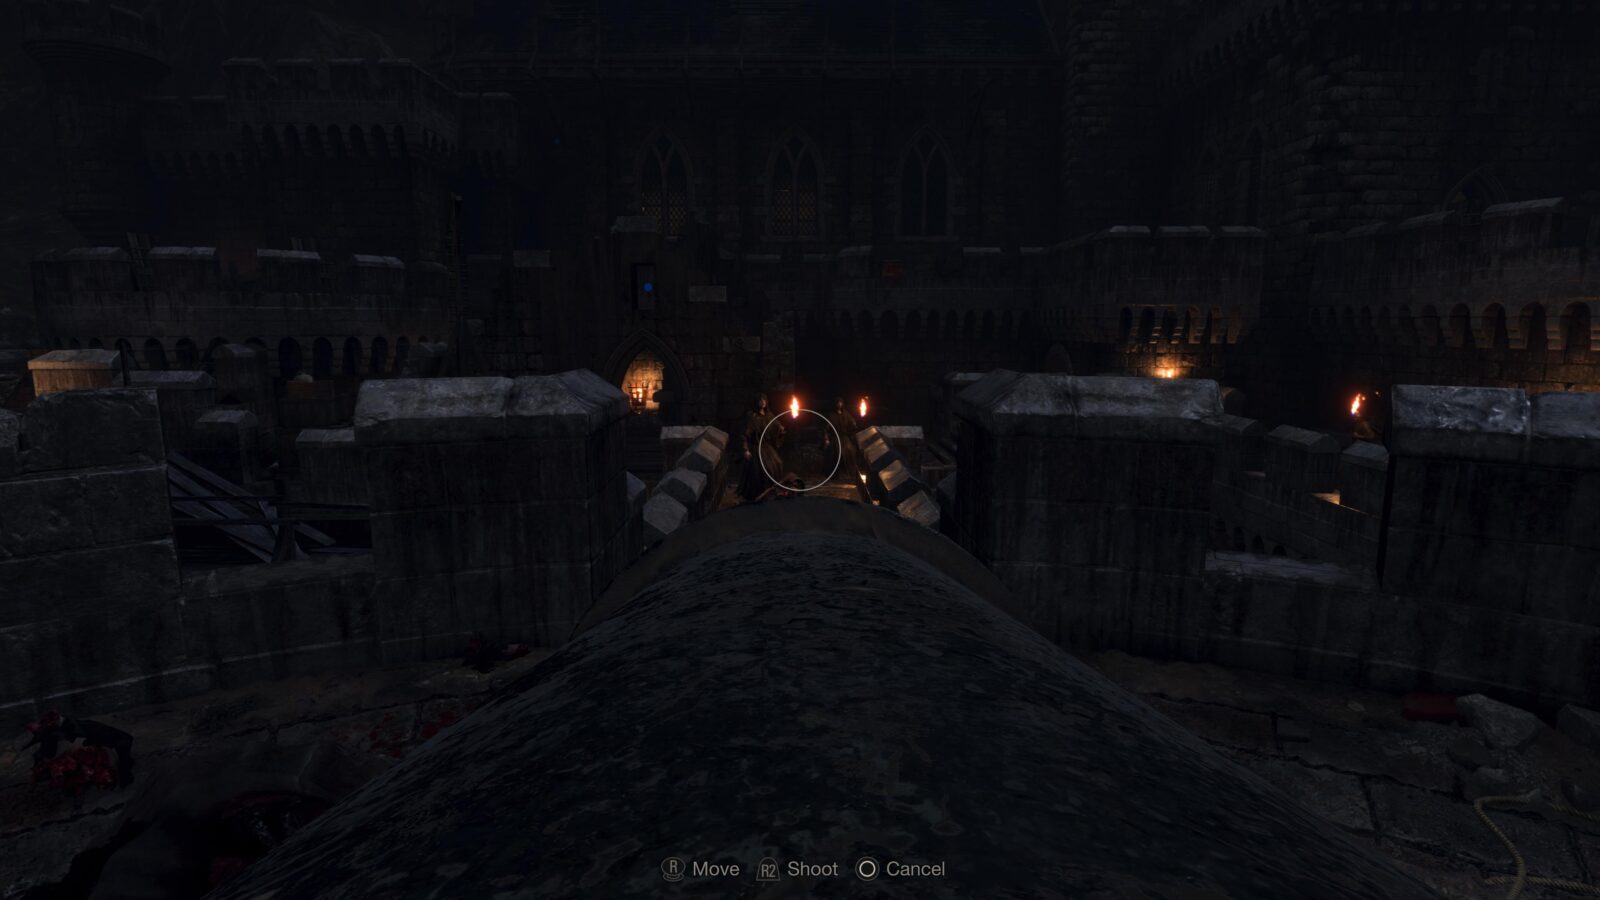
Overkill (Trophy)
Once the cannon has been raised you can use it to destroy the catapults and the castle gate. During this you can aim the cannon at any of the enemies trying to rush you and shoot them with ![]() to unlock the Overkill trophy.
to unlock the Overkill trophy.
Merchant Request: Destroy the Blue Medallions 3
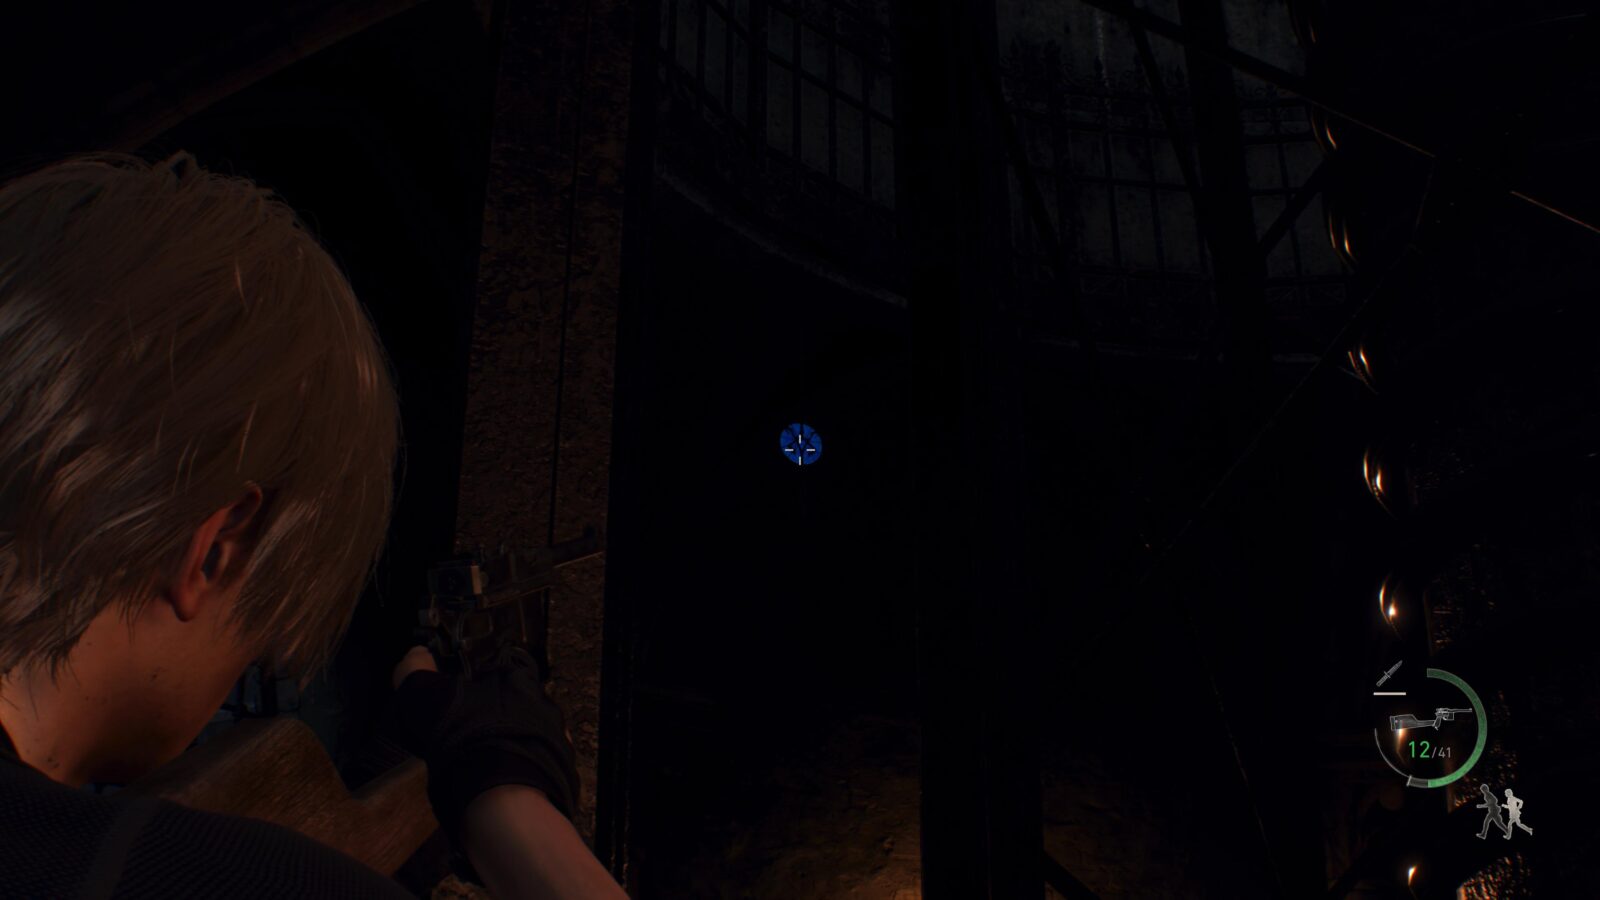
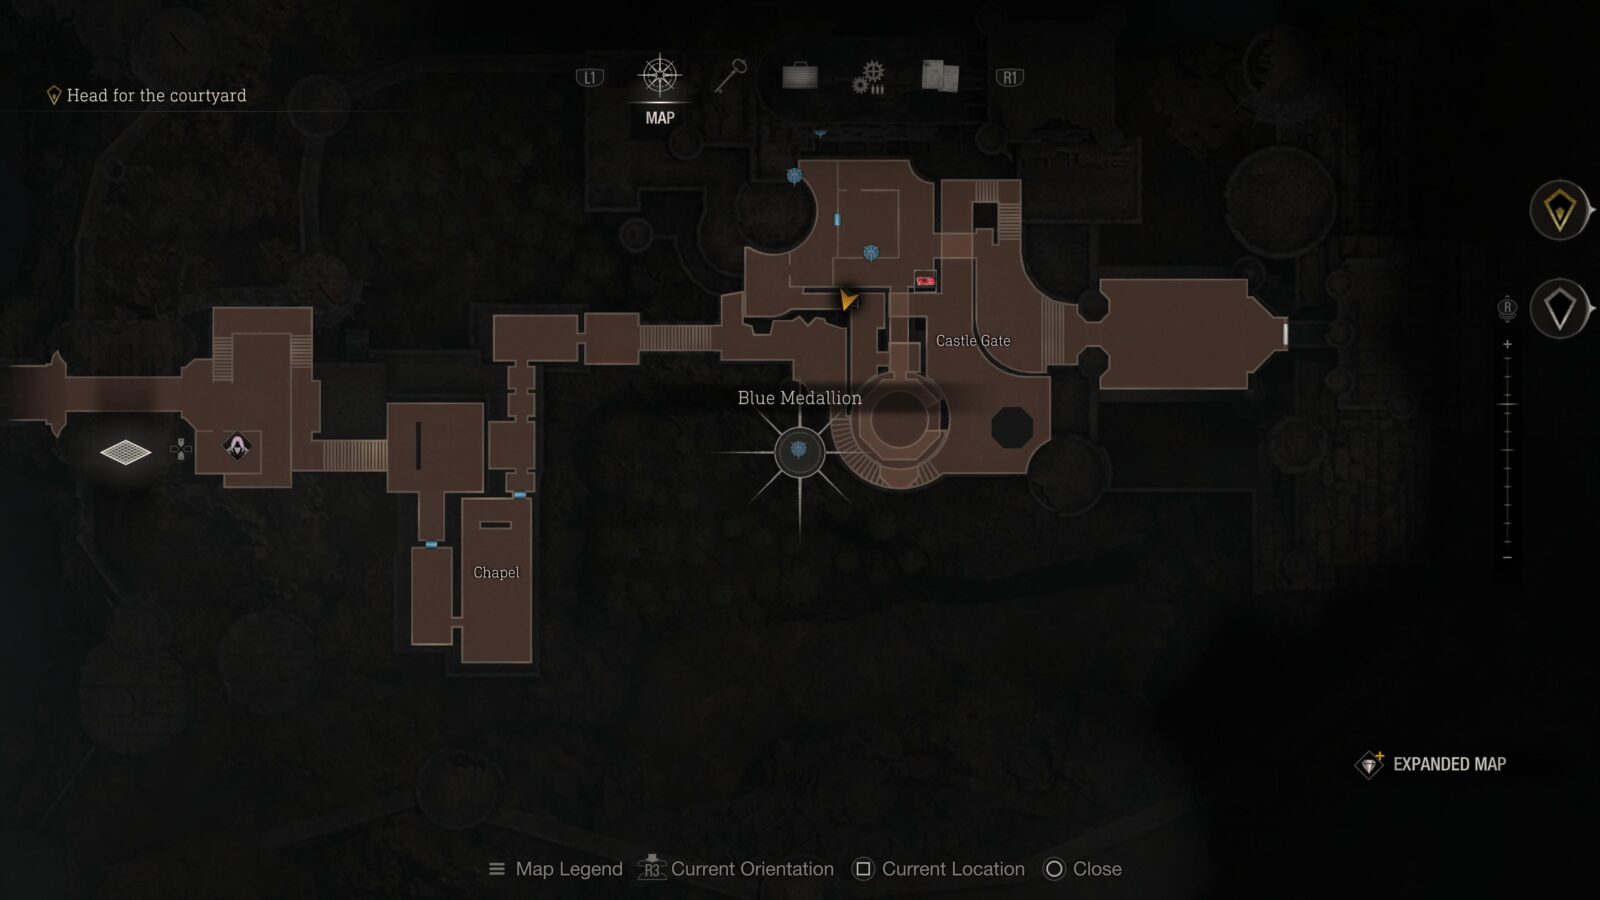
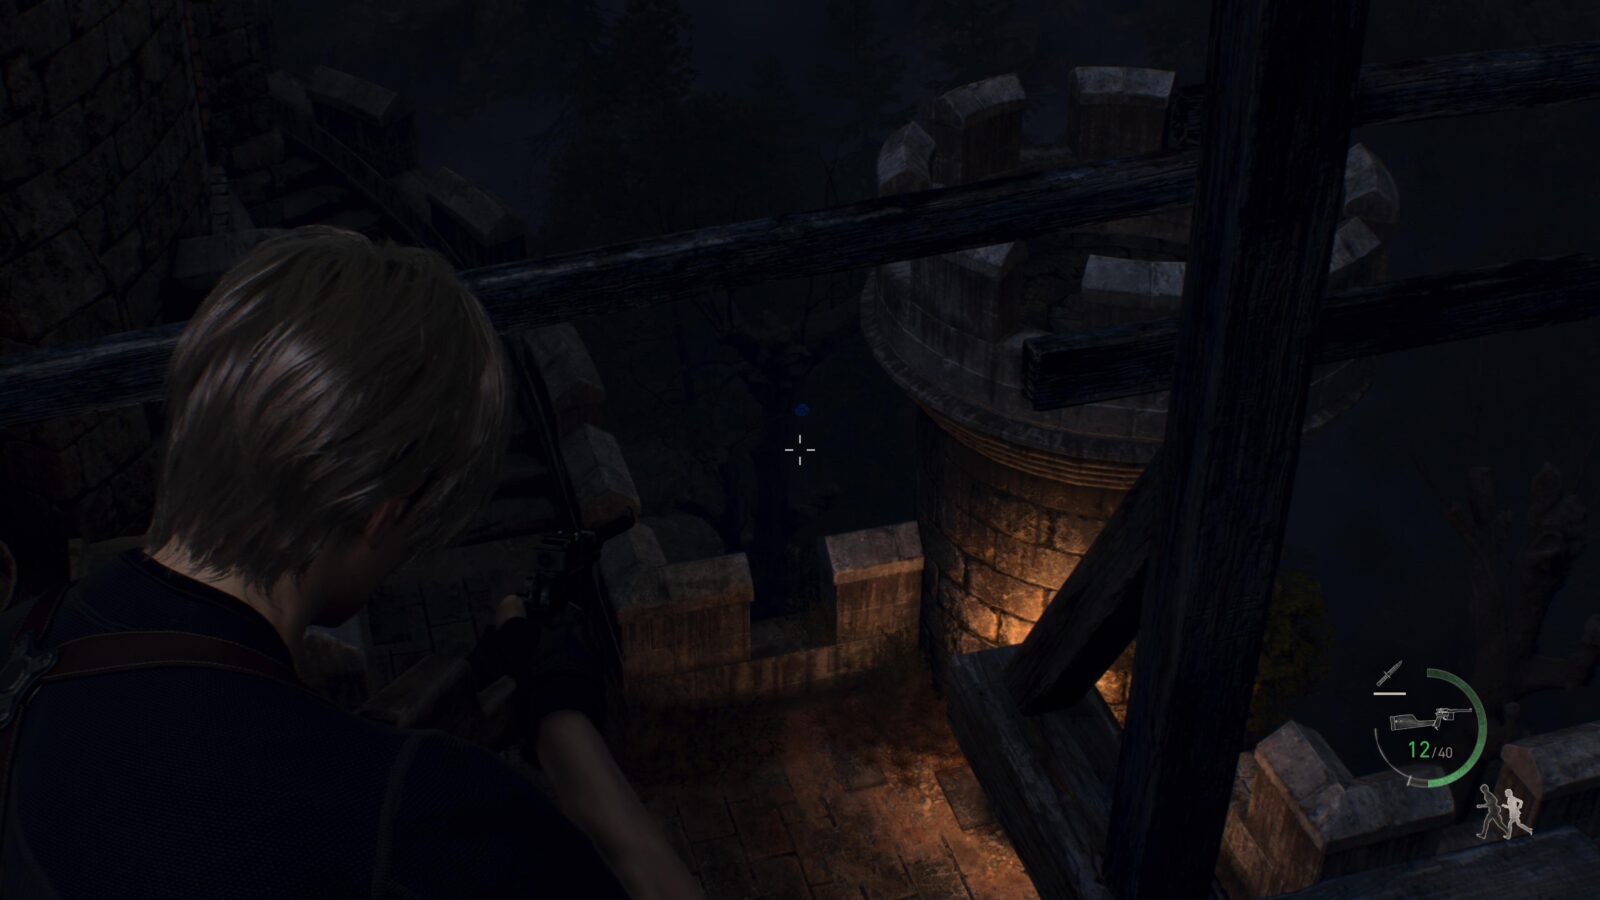
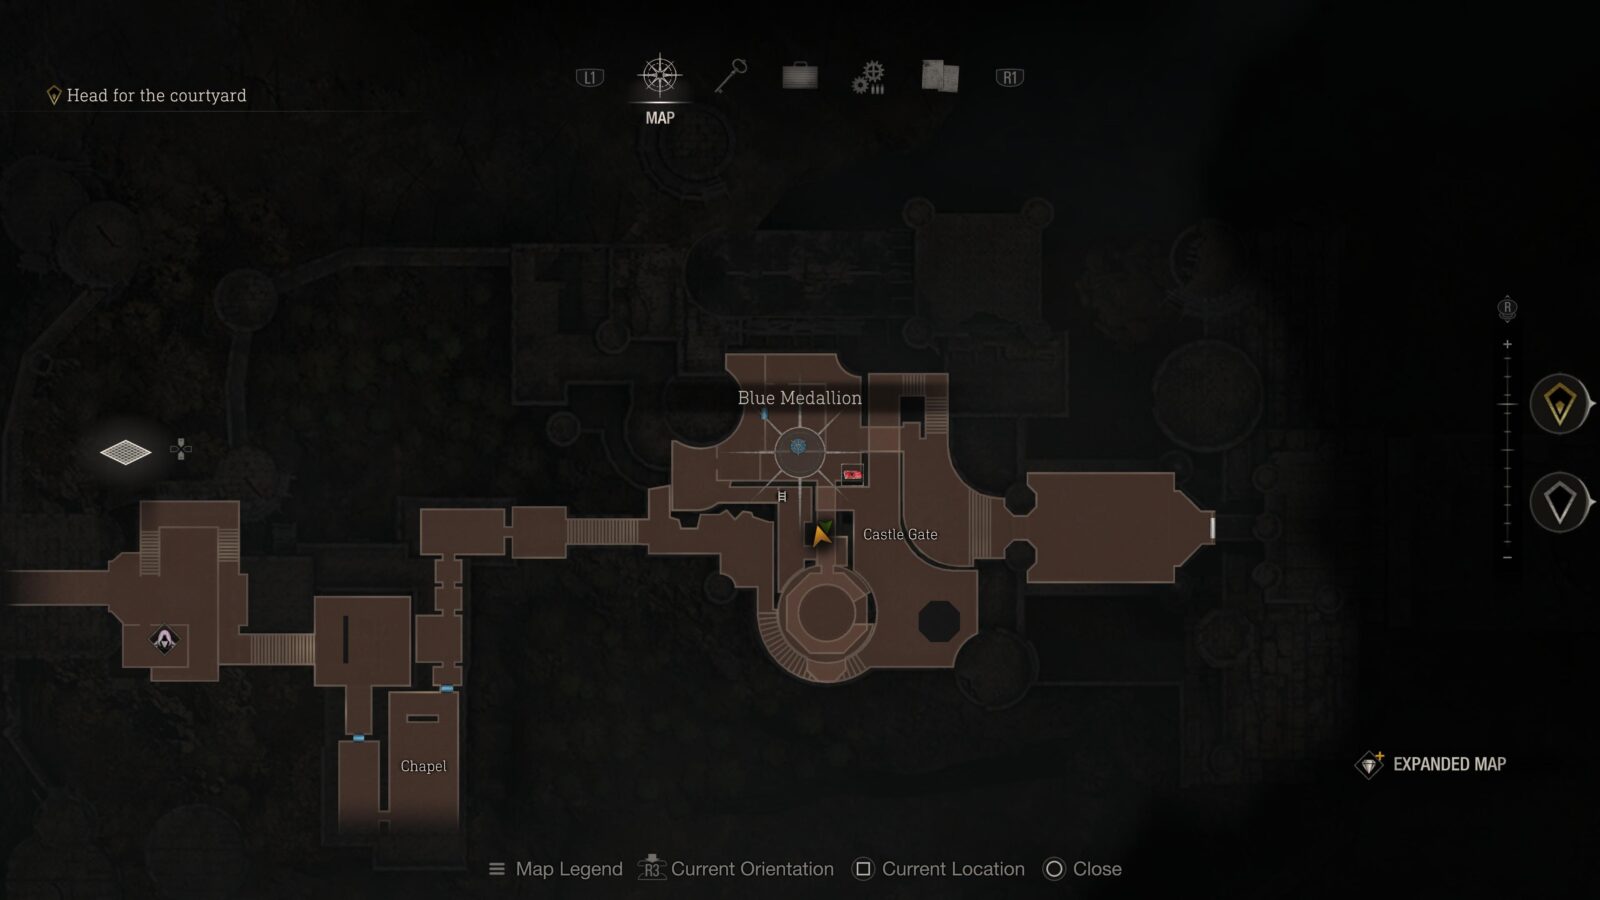
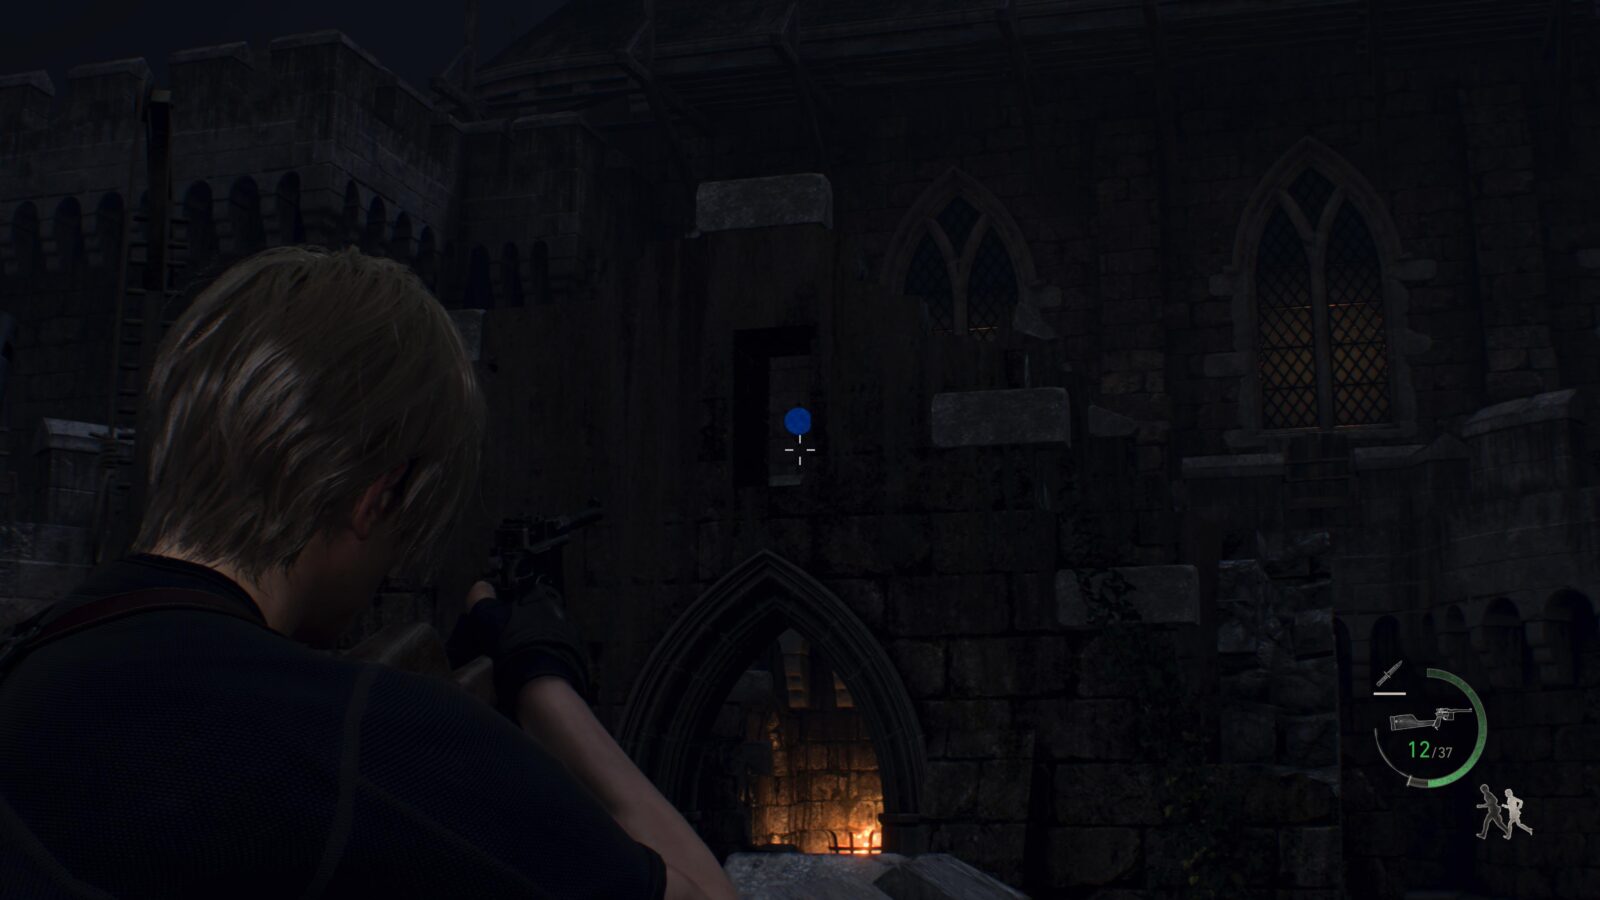
After you have dealt with all the catapults and enemies you can head through the Castle gate. Near the doors to the Castle itself is a request pinned to the wall. Like the previous two requests you need to destroy some blue medallions in the area. You may have already spotted and destroyed some; either way you can see the locations of each medallion below.

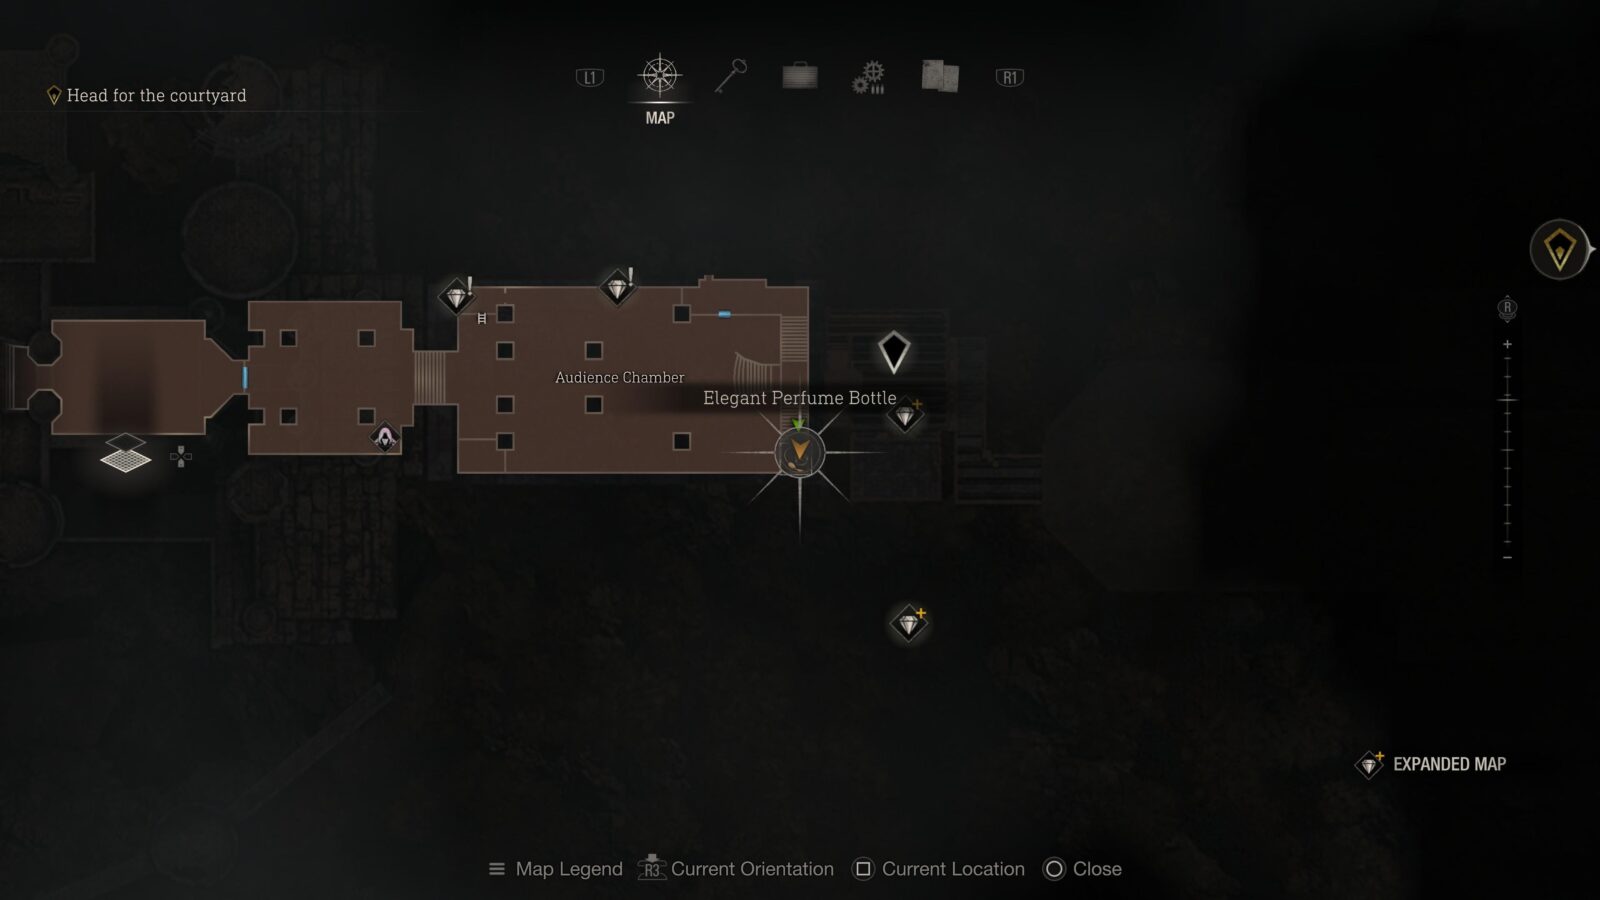
Elegant Perfume Bottle
After clearing the ambush in the Audience Chamber you can get Ashley to hop over a wall and open a metal gate on the left side of the room. Once the gate is open you can follow the passage around the back of the staircase to find a chest with a treasure inside.

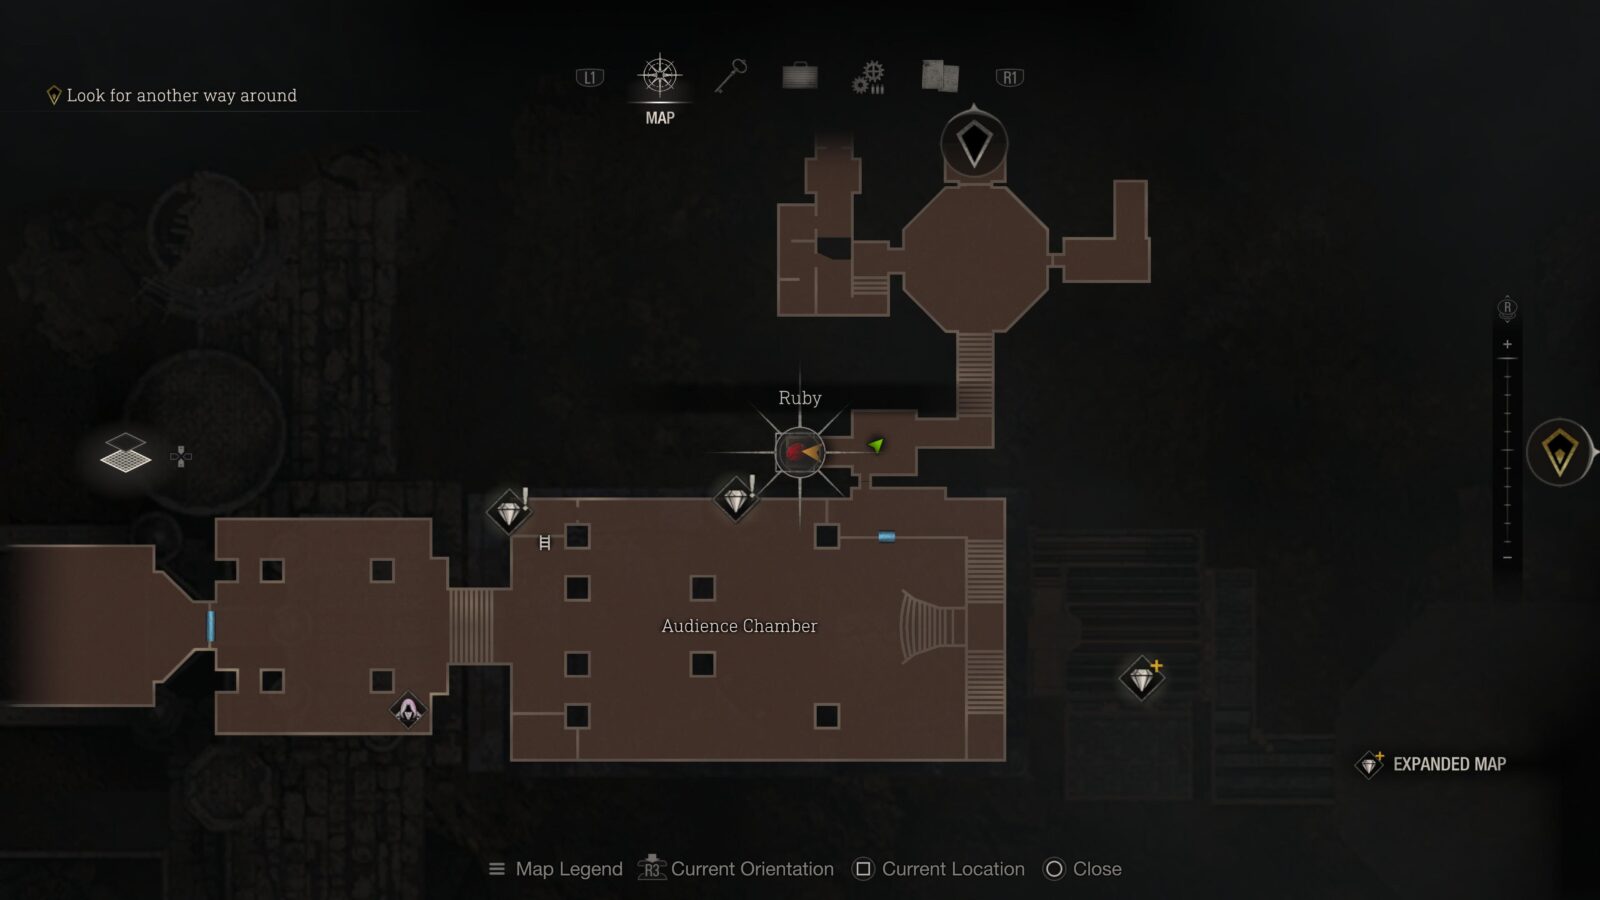
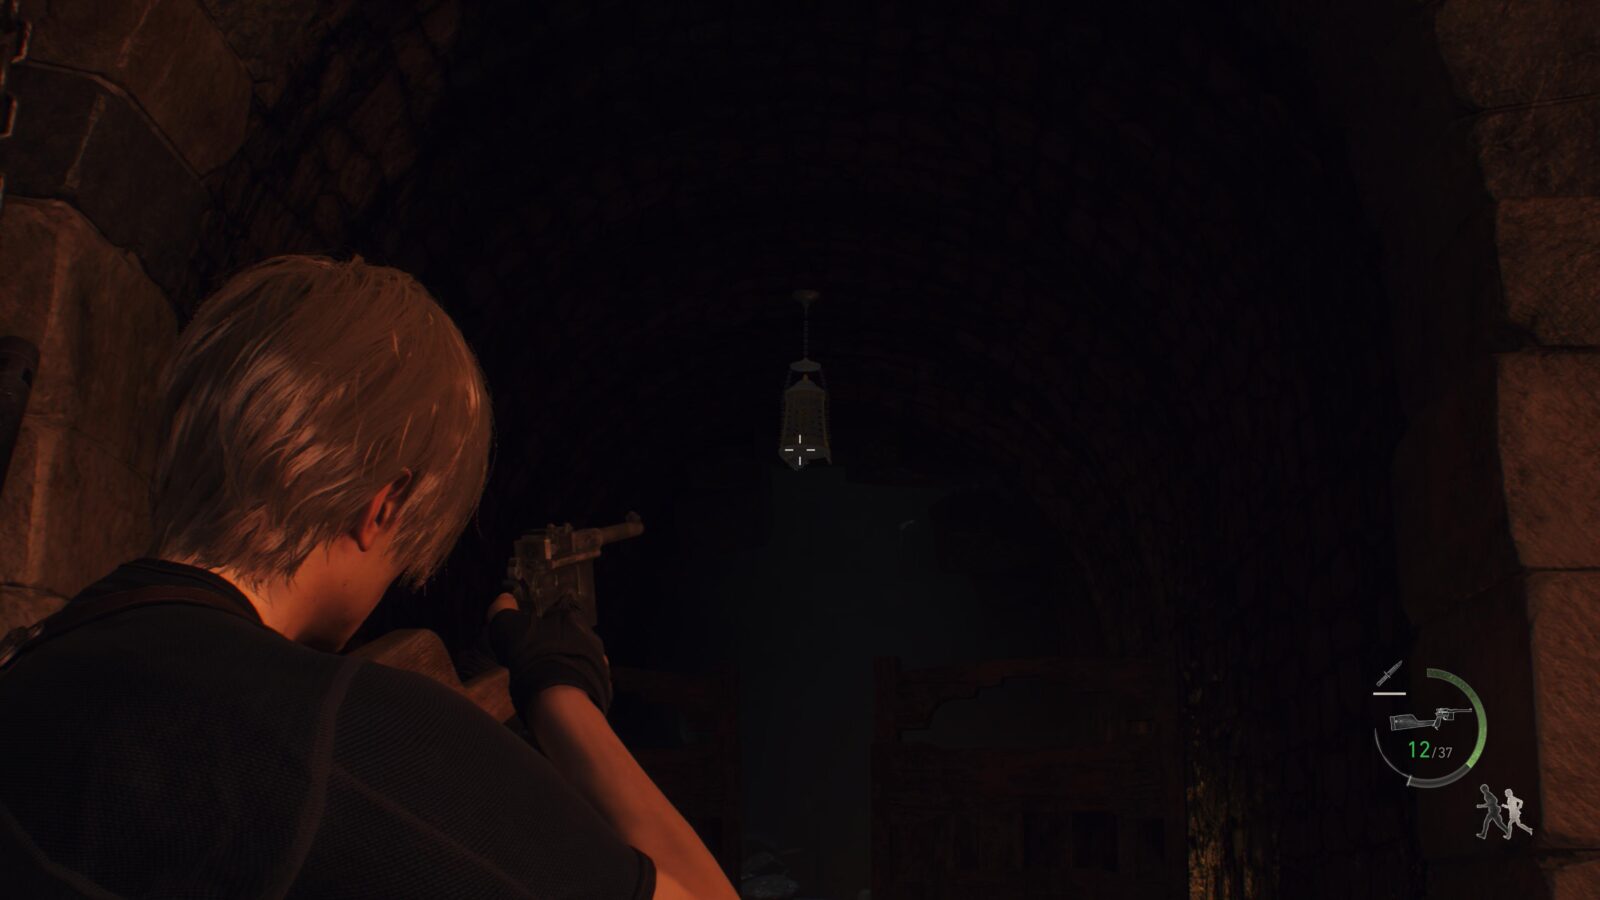
Ruby
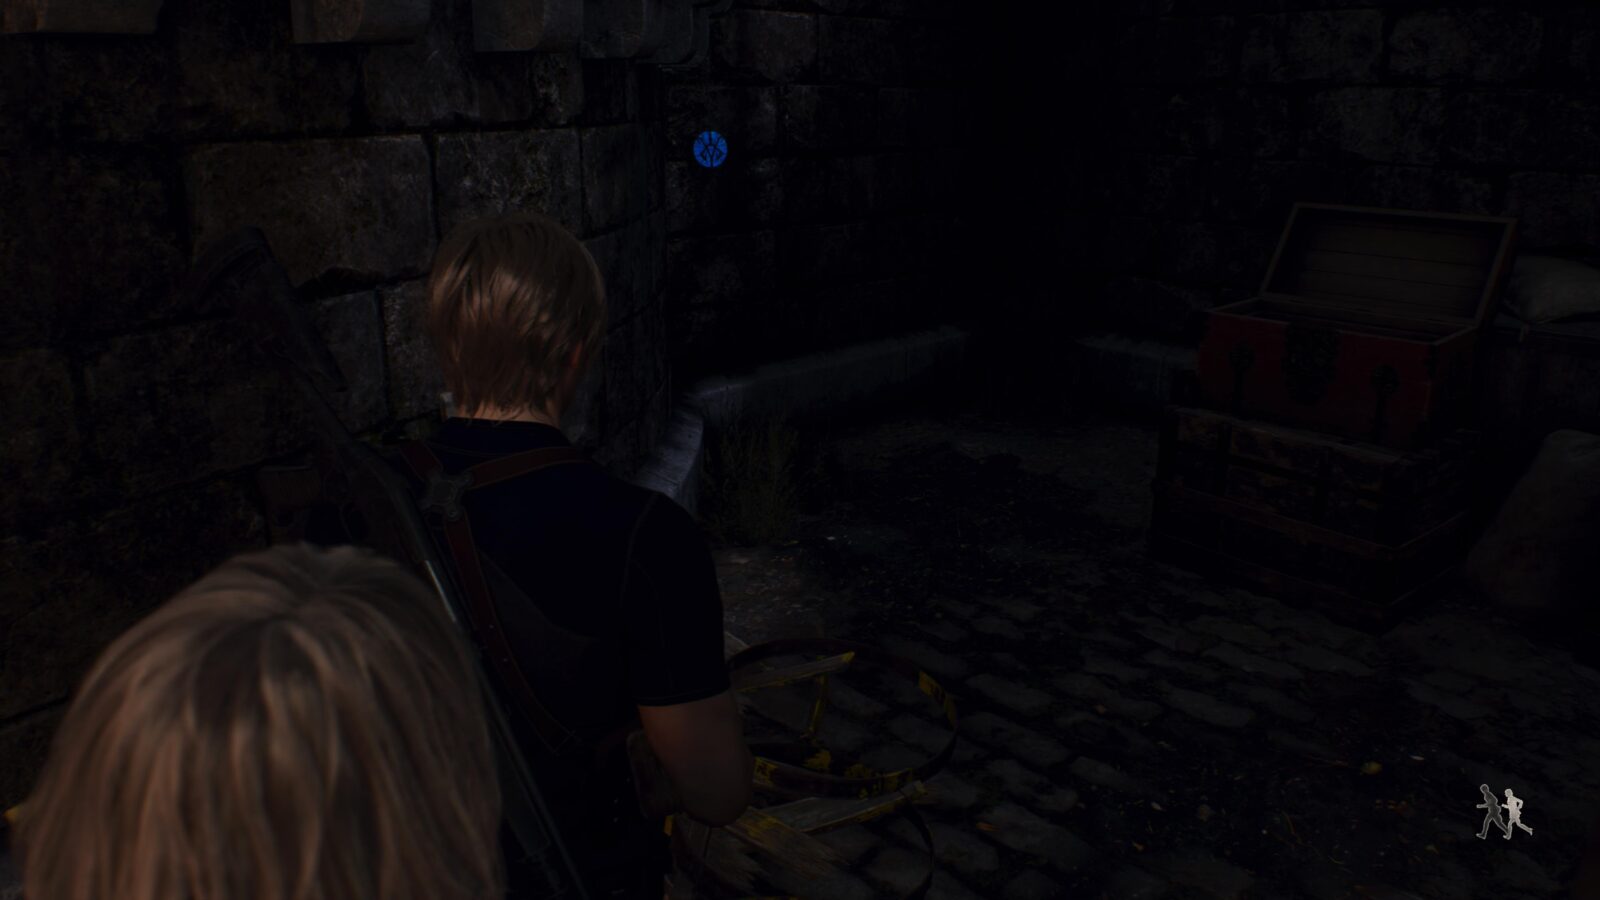
Back at the gate that Ashley opened there is a gap in the stone wall you can squeeze through. On the other side you can find a metal cage hanging from the ceiling to your left.
Never Heard It Coming (Trophy)
Leon and Ashley will become separated with the former being trapped in a dungeon with a Garrador–a large blind enemy with giant 3-prong knives for hands–that you must defeat in order to escape. For this trophy you will need to defeat the Garrador using only a knife. This is actually a lot easier and probably the safest way to kill this Garrador as you only need to crouch (![]() ) and sneak around him to the plagas growth on his back where you will see an
) and sneak around him to the plagas growth on his back where you will see an ![]() prompt appear. Once you stab him in his back he will flail his arms wildly which is your opportunity to sneak away from him and get ready for the next backstab. In total you need to stab him in the back 3 times to kill him.
prompt appear. Once you stab him in his back he will flail his arms wildly which is your opportunity to sneak away from him and get ready for the next backstab. In total you need to stab him in the back 3 times to kill him.
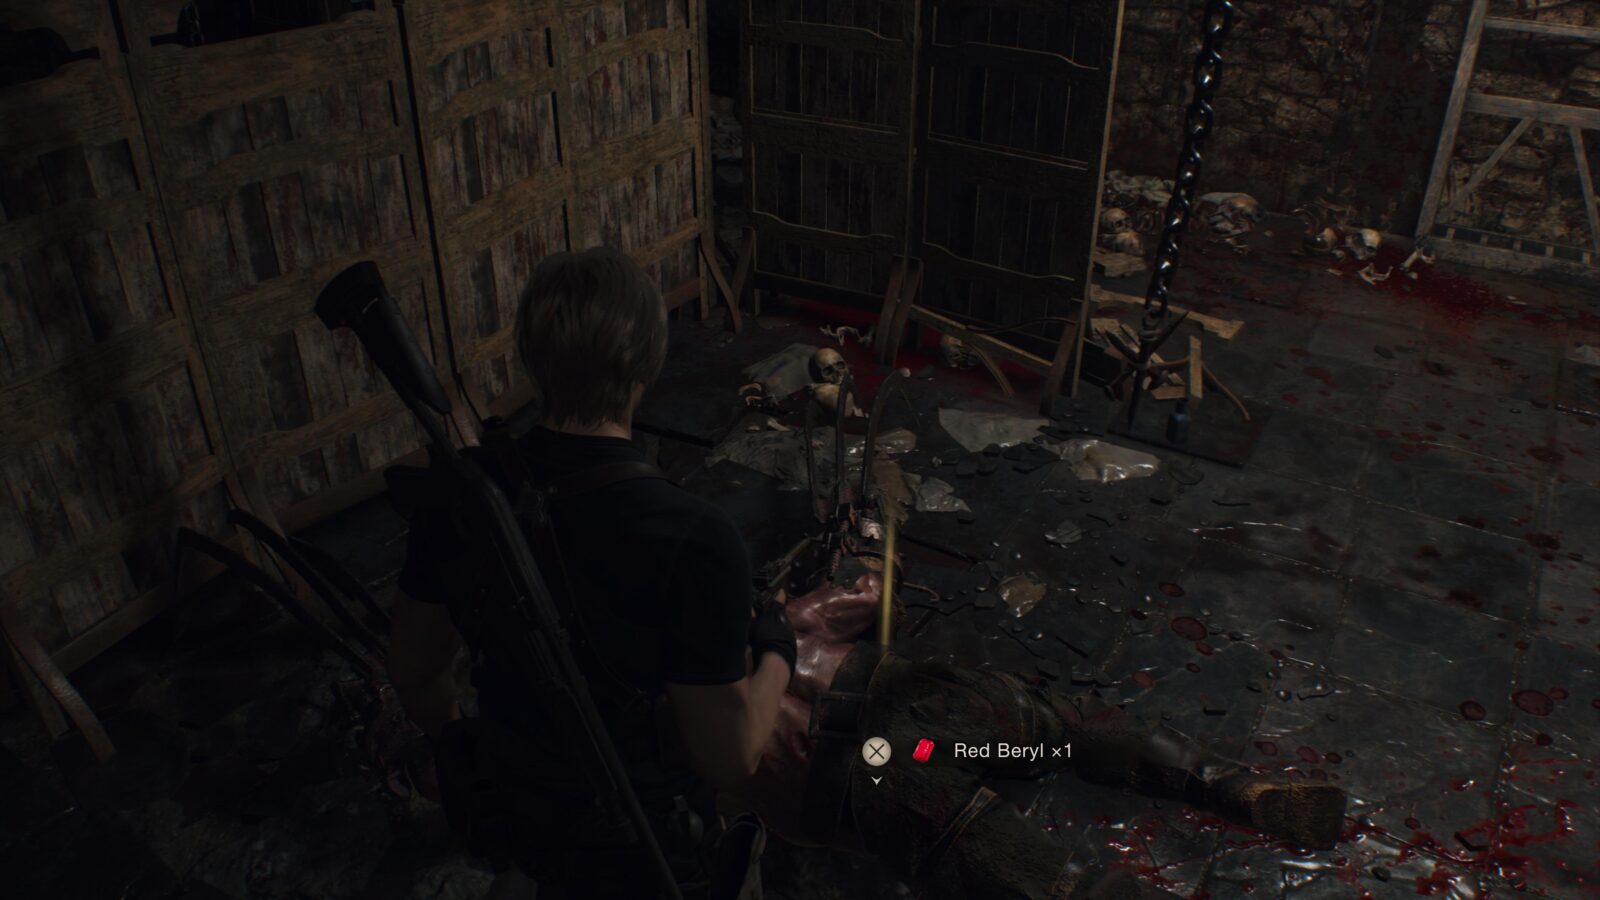
Red Beryl
A Red Beryl drops from the Garrador when you kill him. I don’t think this one counts towards the Raider trophy for obtaining all treasures in the Castle area but it’s worth picking up regardless.
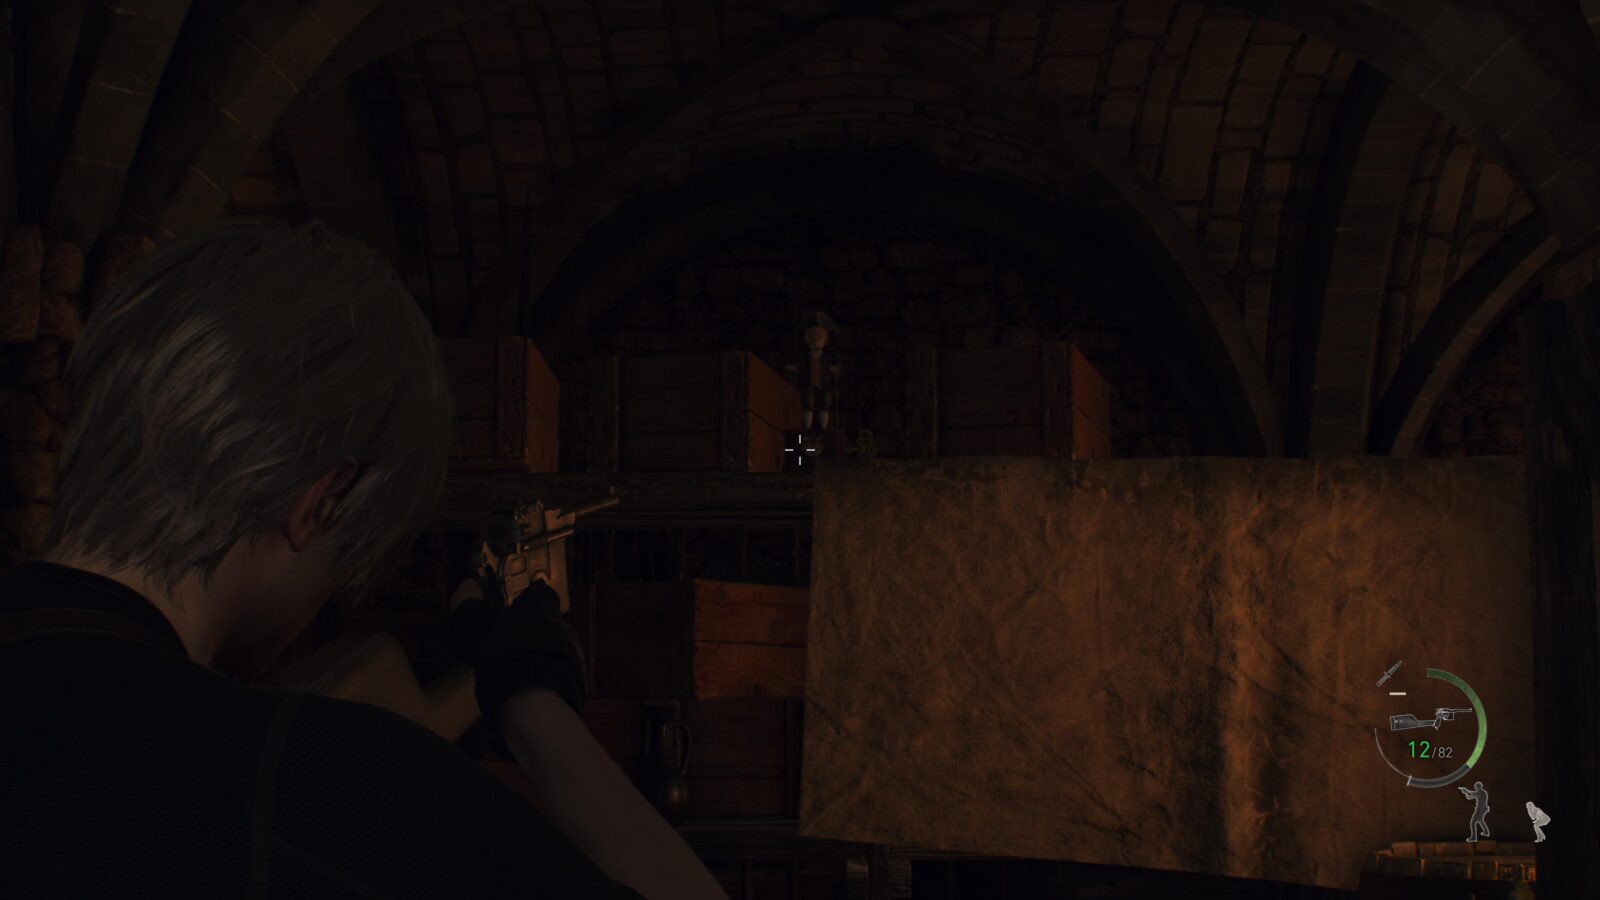
Spinel
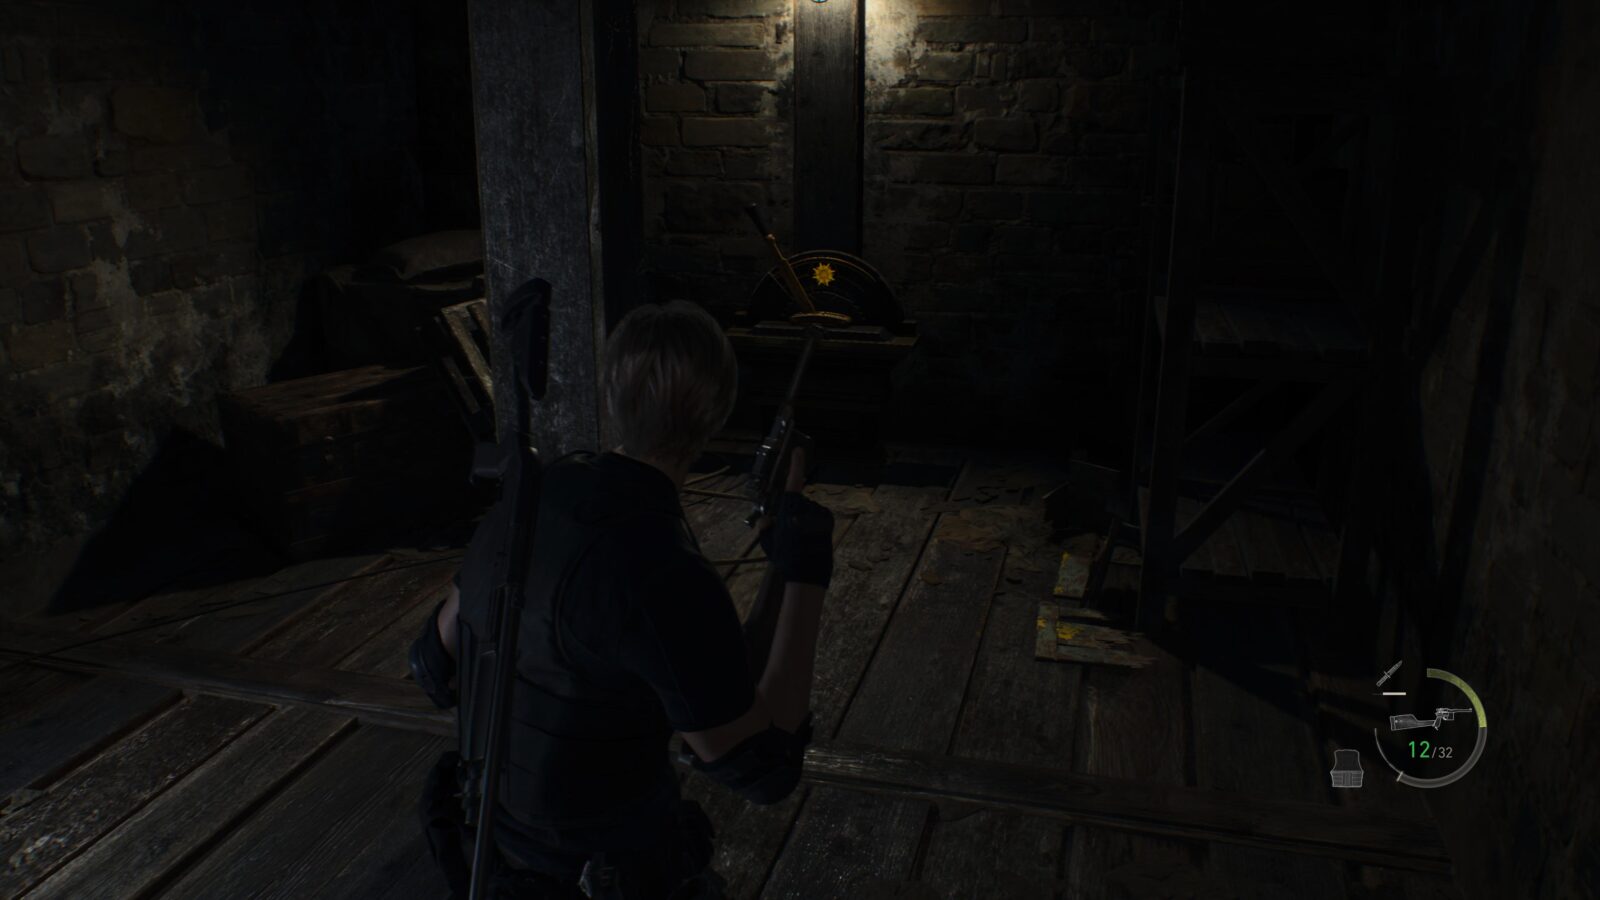
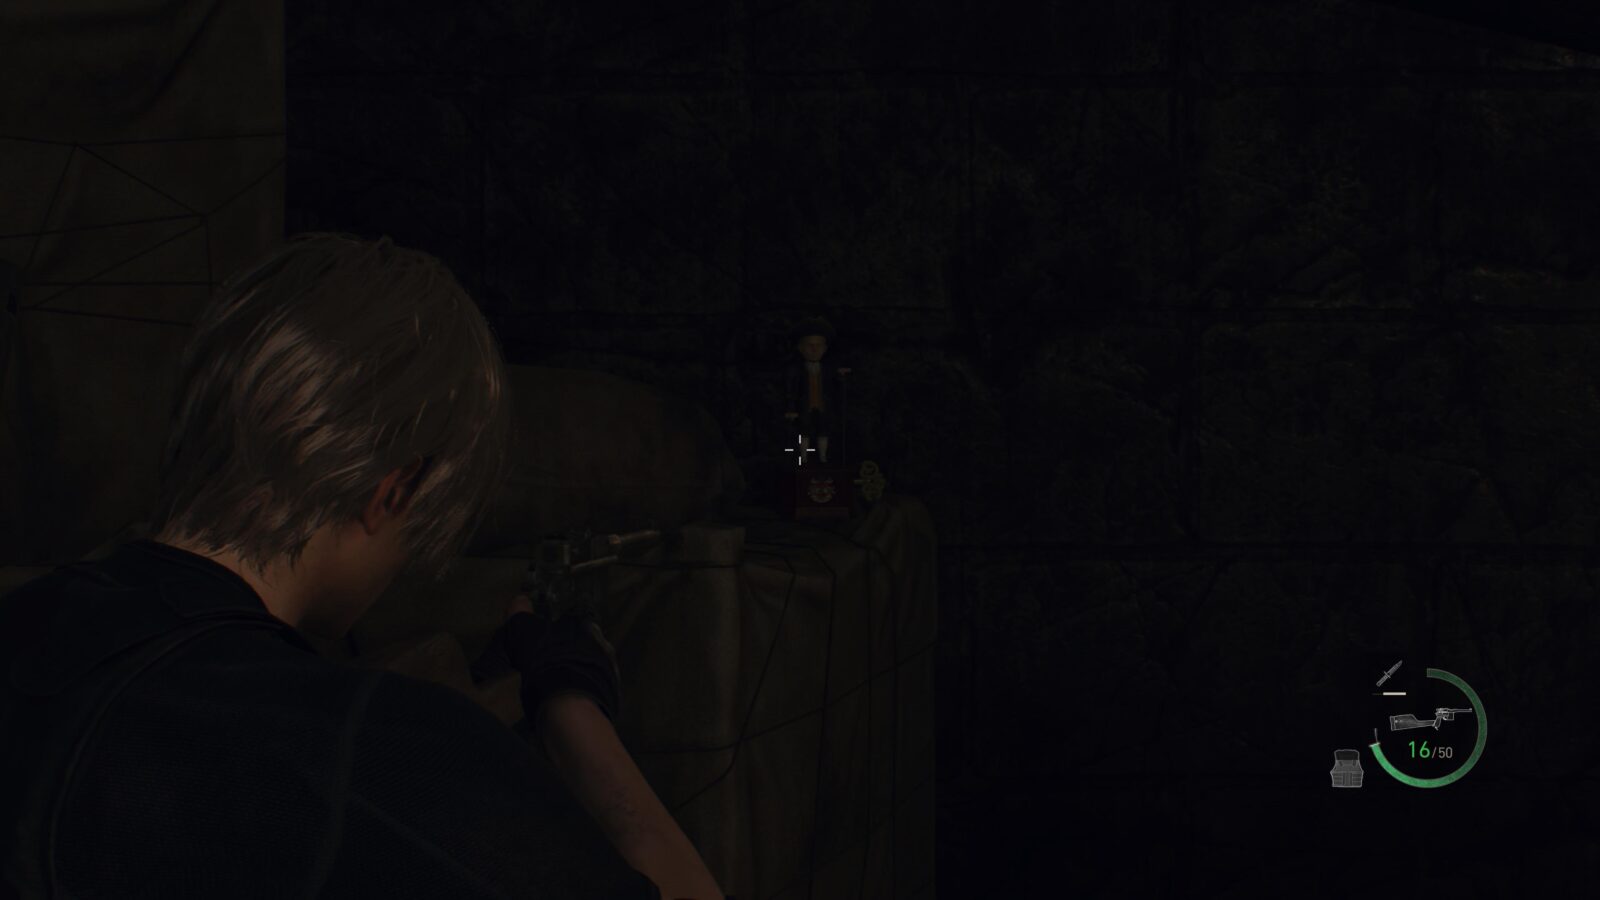
After reuniting with Ashley you will climb some ladders into a storage room. Walk through the room and you will see a spinel on a cabinet in front of you.
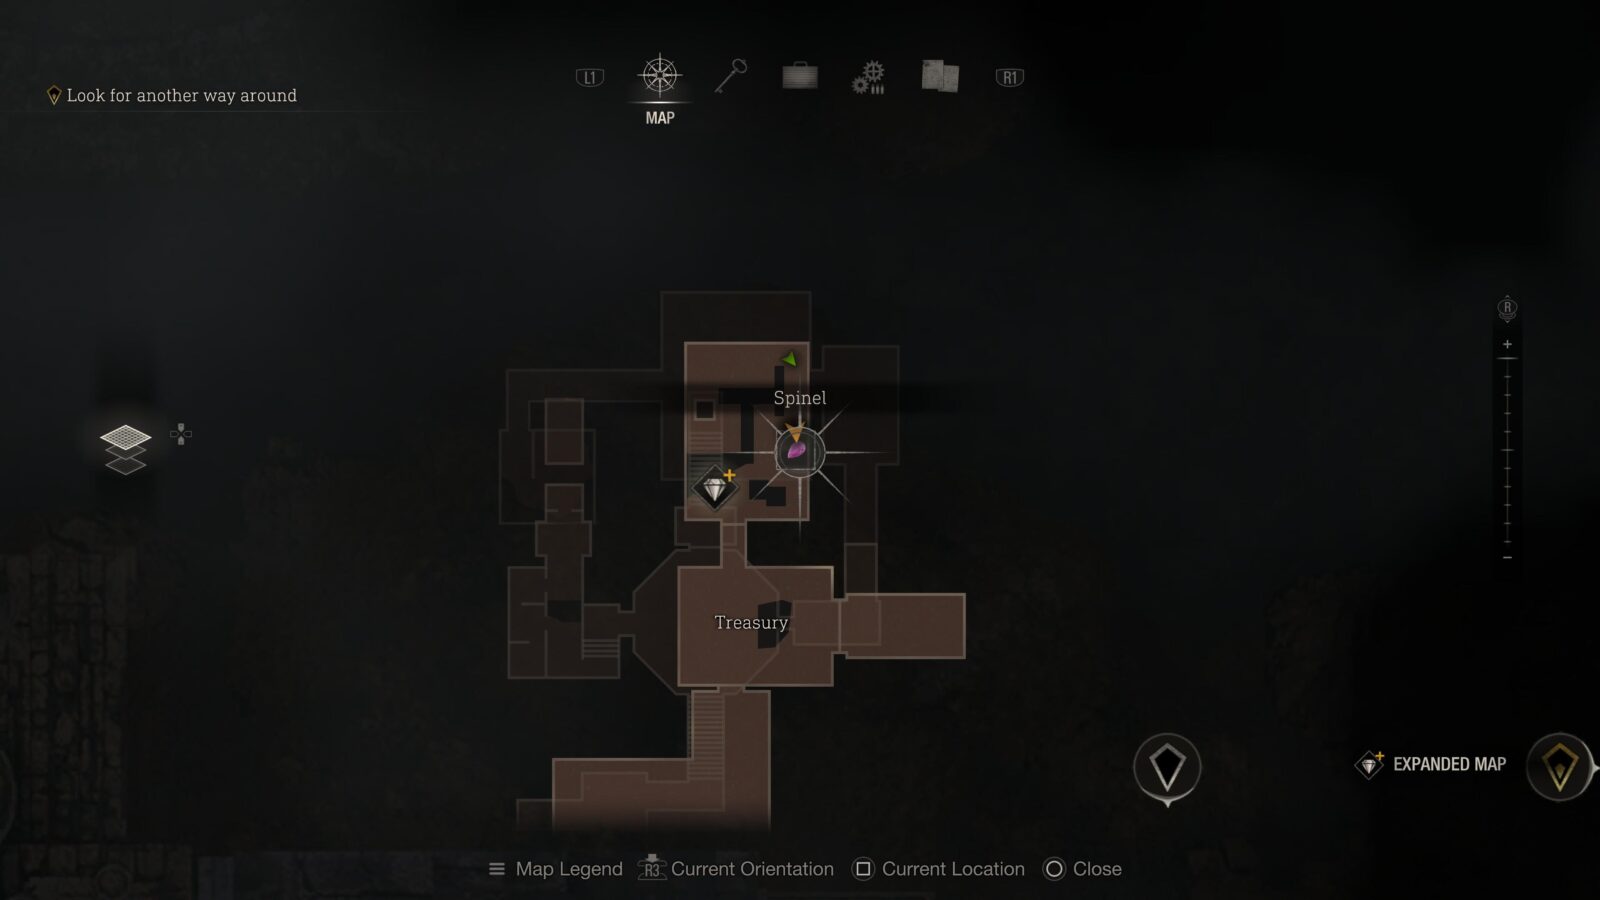

Clockwork Castellan #7
While still stood in front of the cabinet where you picked up the Spinel, turn to your right and you should see the Castellan sitting on top of some shelves.

Silver Token (Expanded Treasure)
Just before you take the door to the Treasury there will be a cage hanging from the ceiling you can shoot down. This is only available to those who have the Expanded Treasure Map DLC.
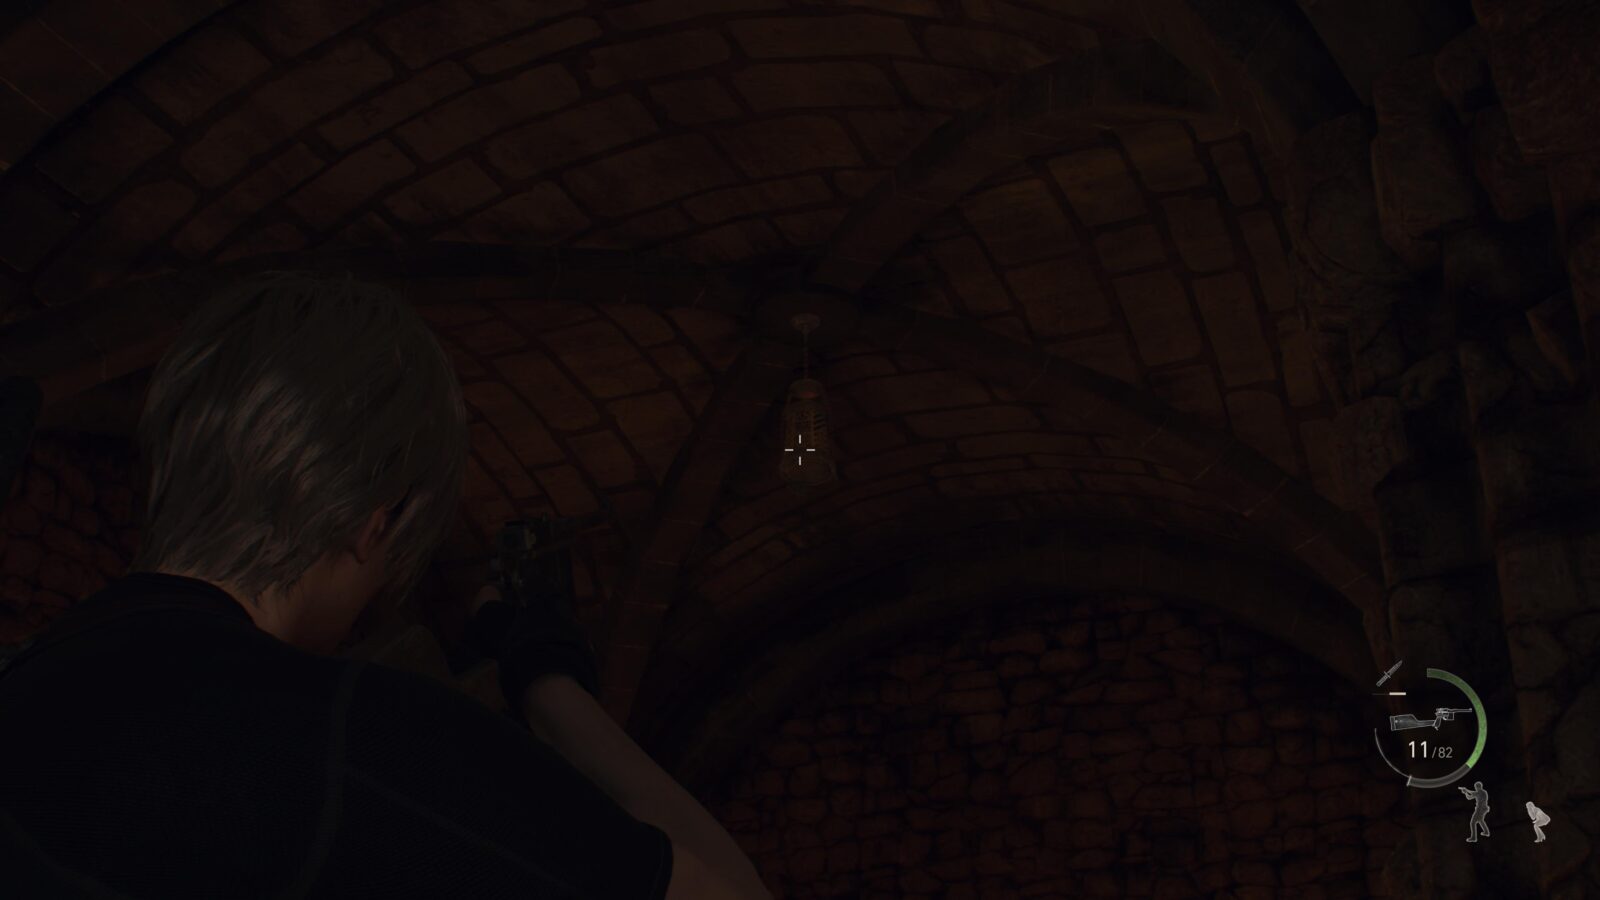
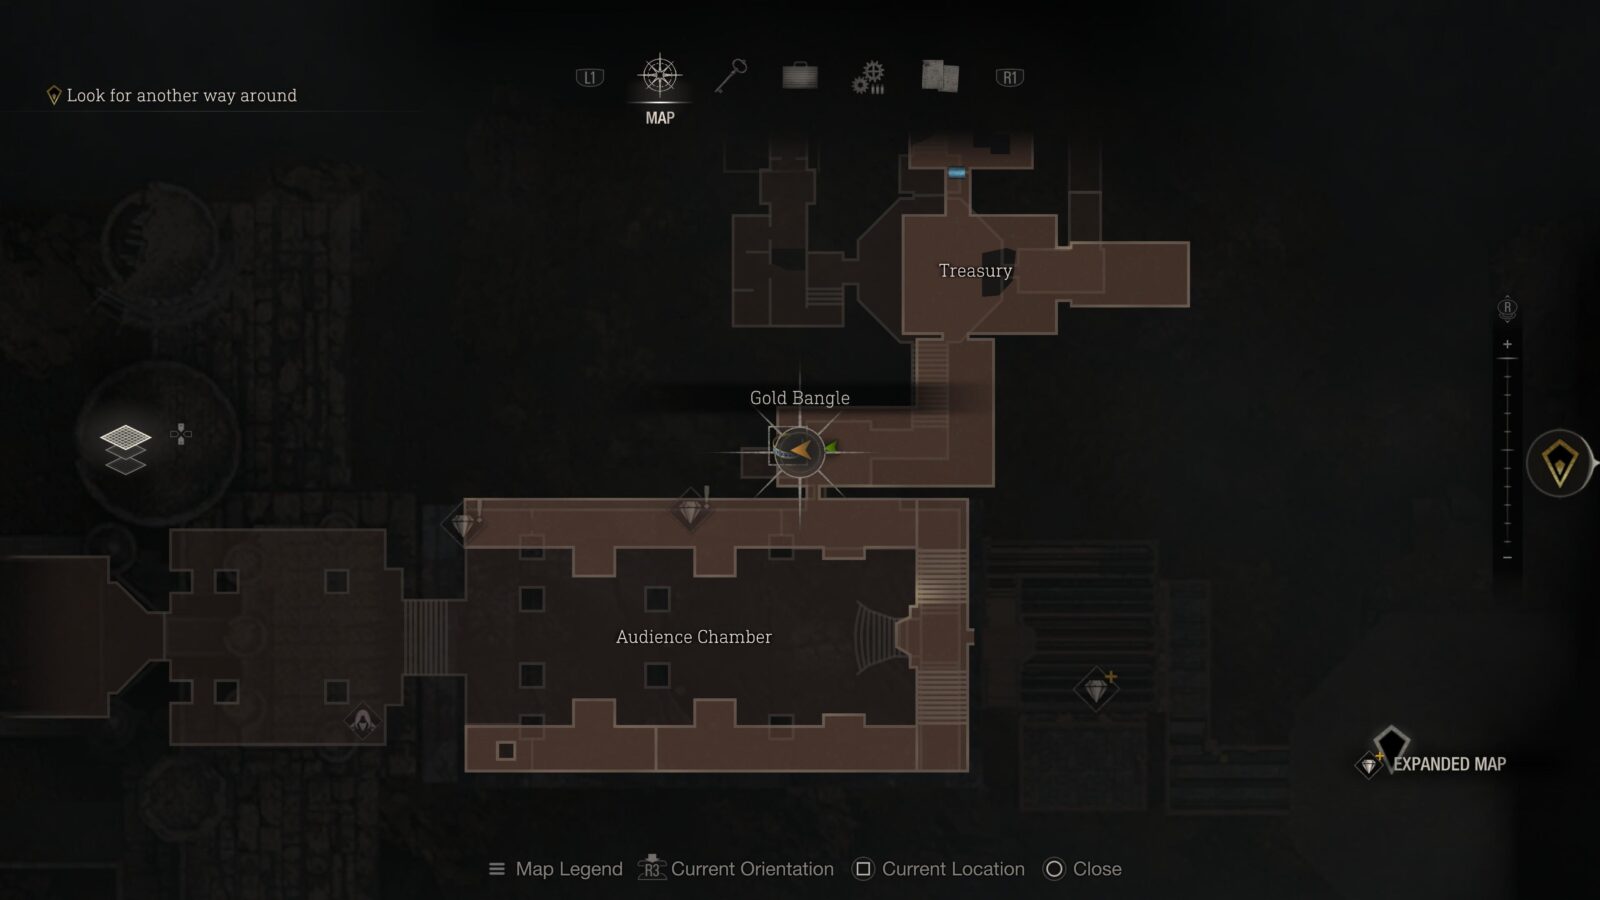
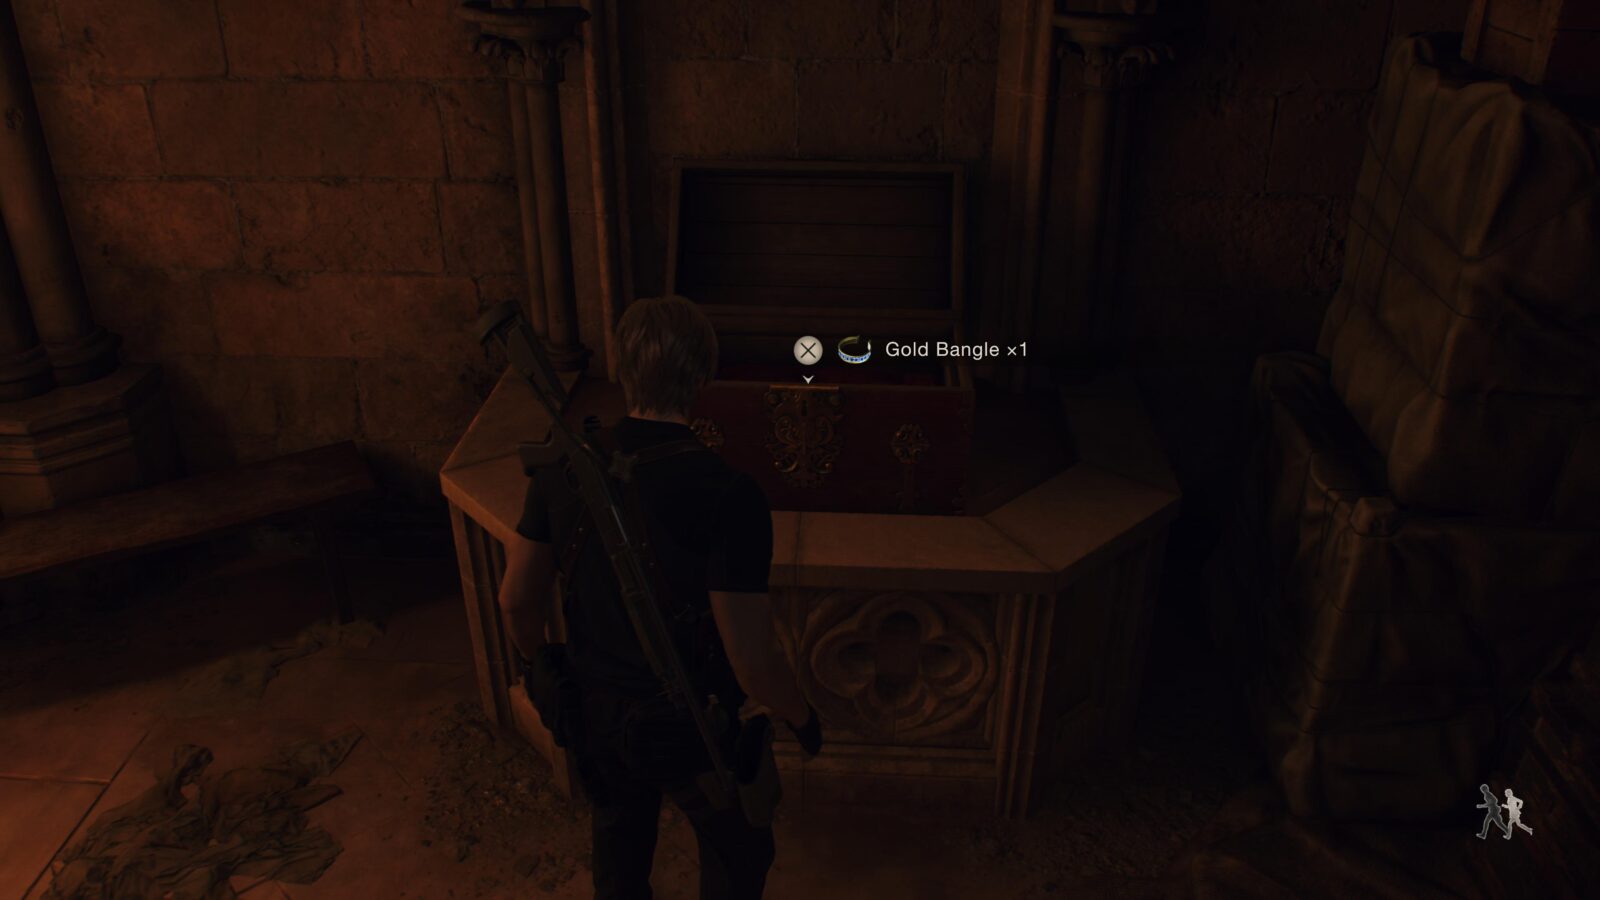
Gold Bangle
At the end of the corridor after the Treasury room will be a chest with a Gold Bangle inside.
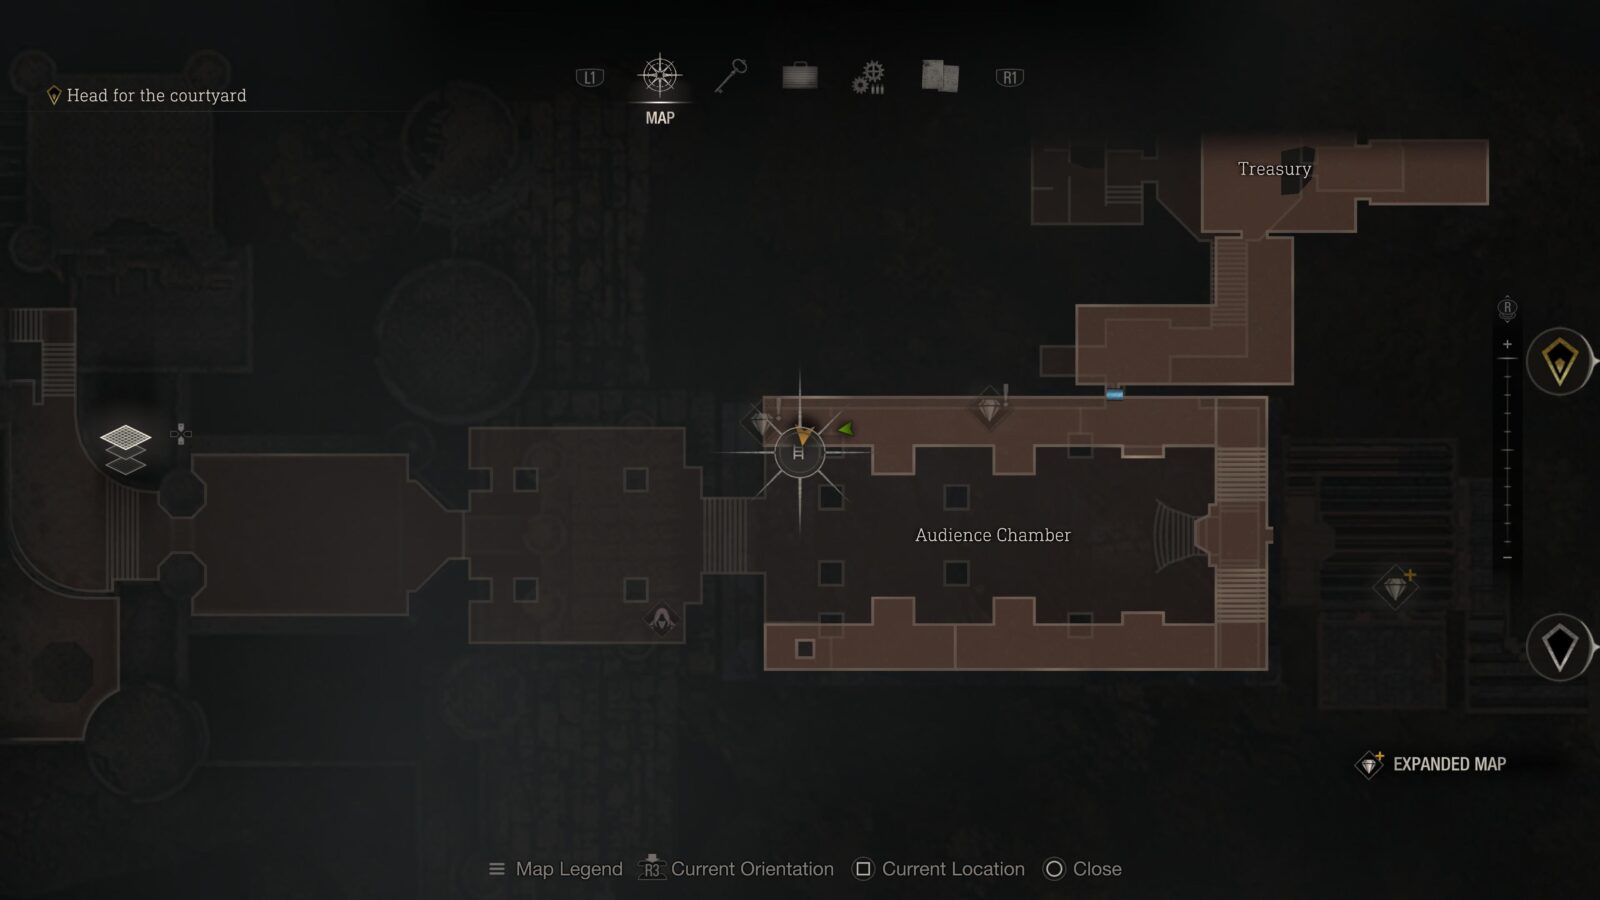
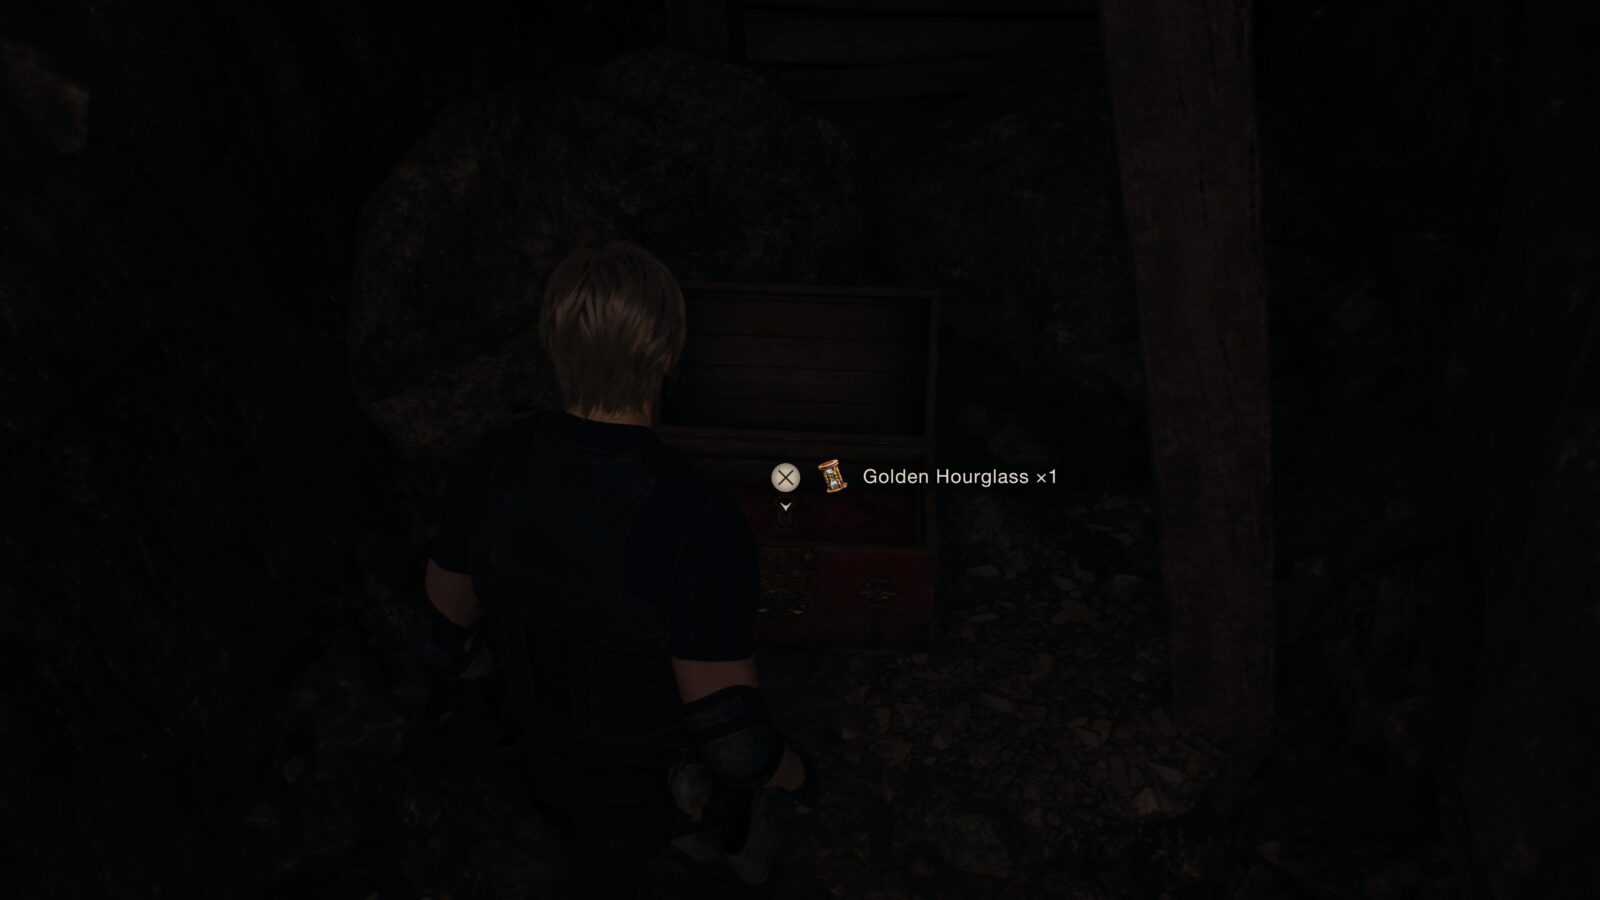
Golden Hourglass
As soon as you enter the next room which the 2nd floor of the Audience Chamber you will need to walk all the way to the right to kick down a ladder. Then you can jump across the chandelier to the left of the ladder to get to the opposite side of the room. From there you can drop down a hole in the floor to find a chest with a treasure inside.
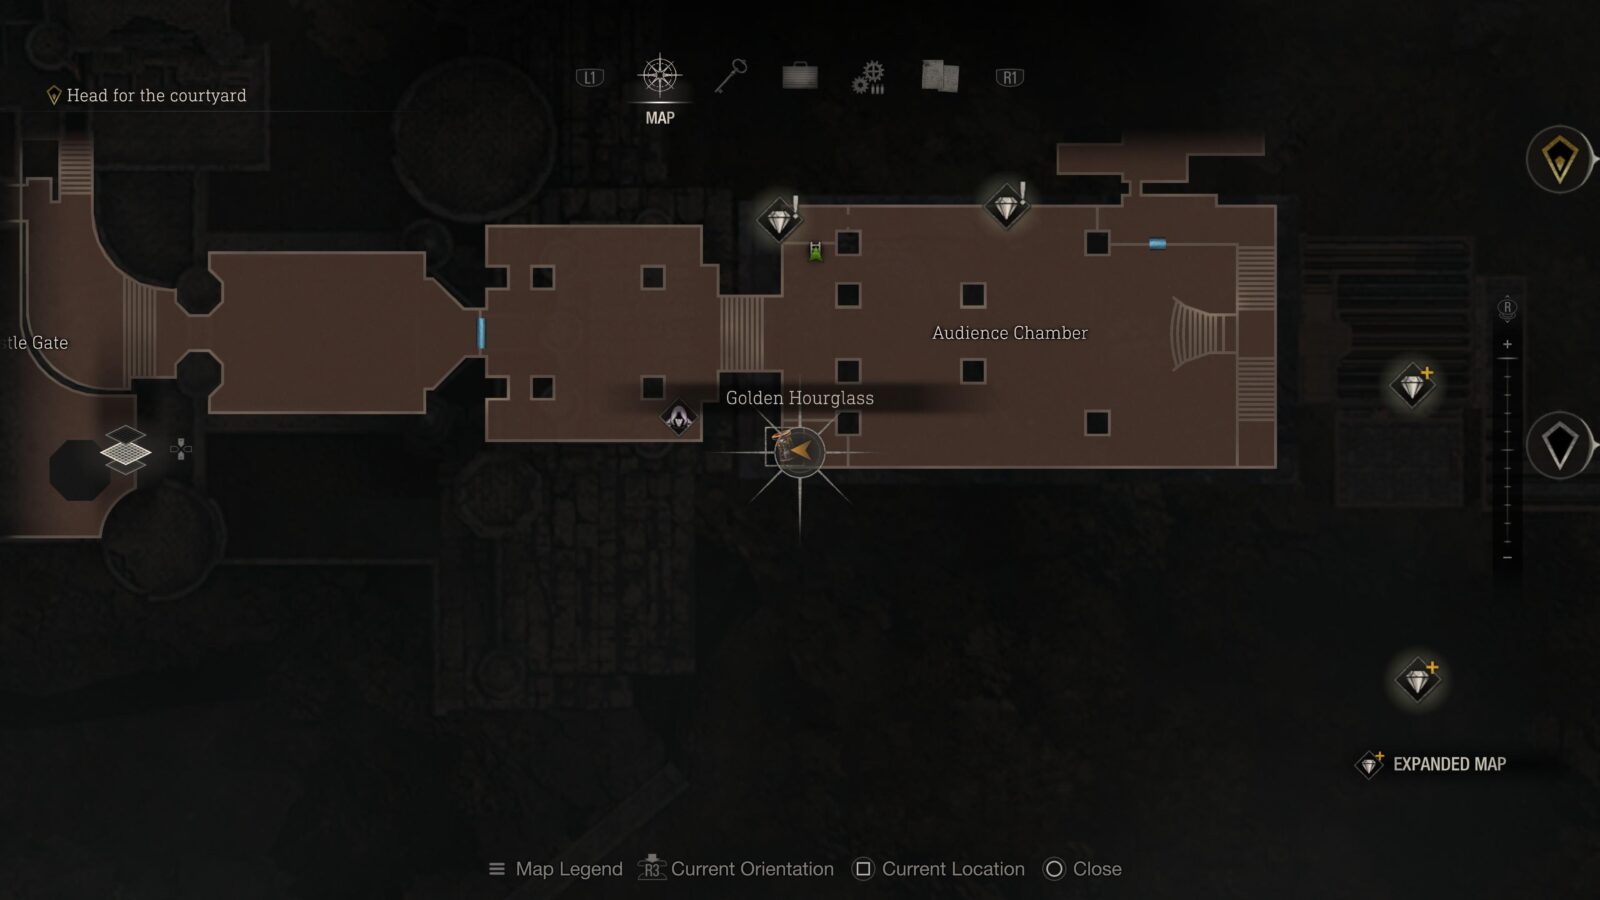
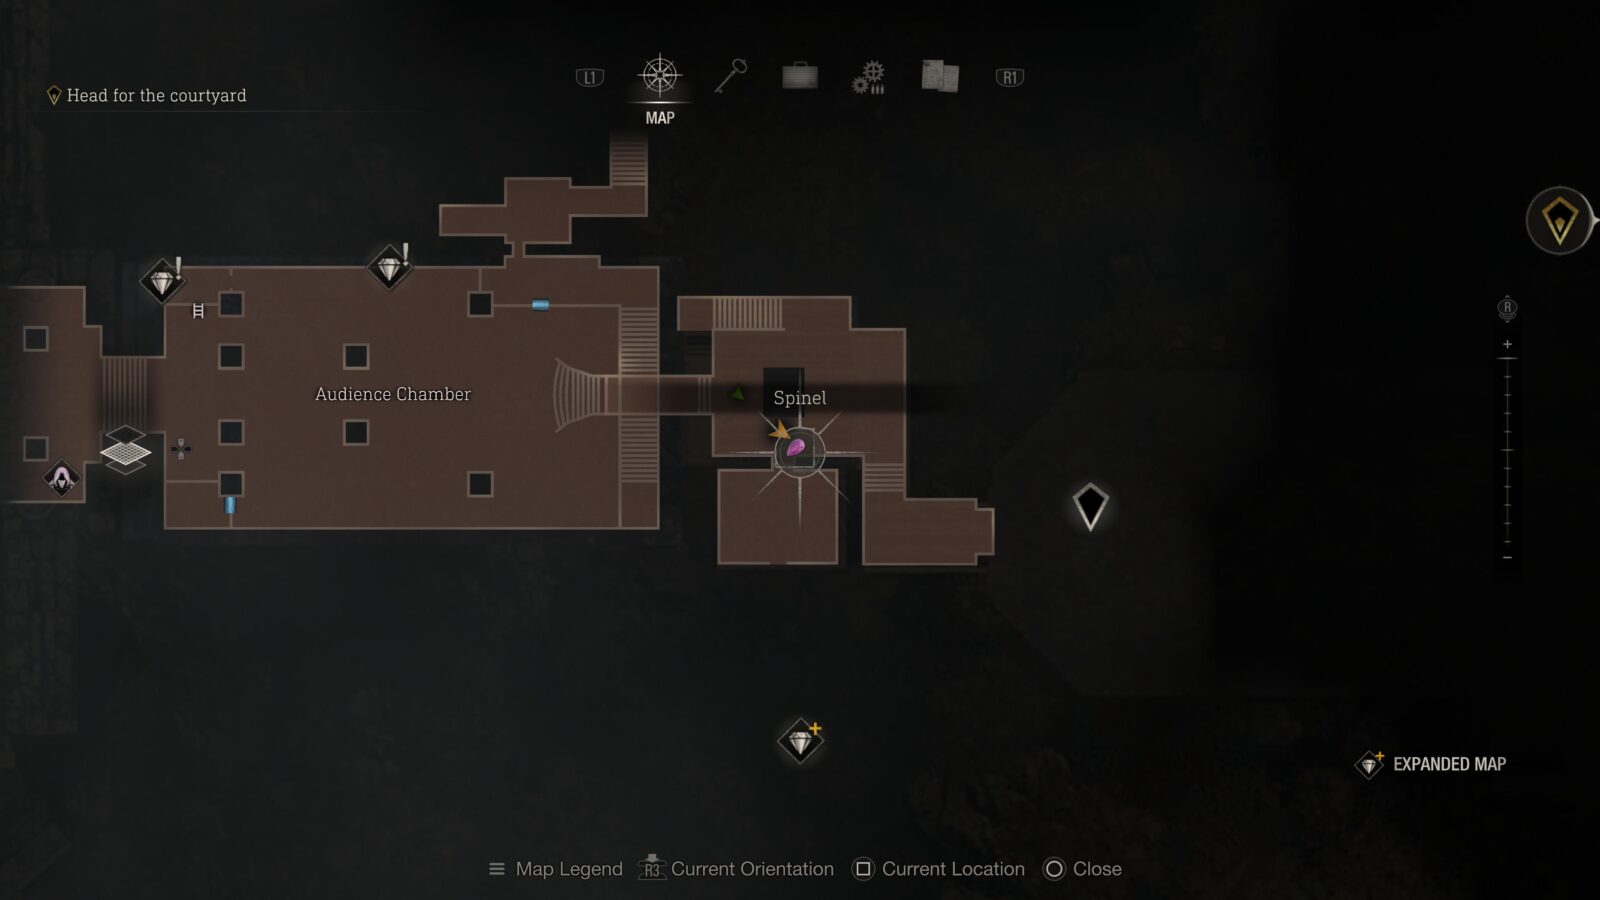
Spinel
In the next room on the 2nd floor will be a cage hanging from the ceiling above the door to a room with a typewriter inside. This is only available to those who have the Expanded Treasure Map DLC.
Chapter 8
You may notice a Locked Drawer in the third battlement that I don’t list in this section. This is because we can’t open it yet but we will grab it in a later chapter.
There are a total of 1 Clockwork Castellan, 1 Small Key (used to unlock locked drawers hiding additional treasure) and 6 Treasures in Chapter 8. This chapter also has 3 Expanded Treasures which can only be obtained with the Expanded Treasure Map DLC.
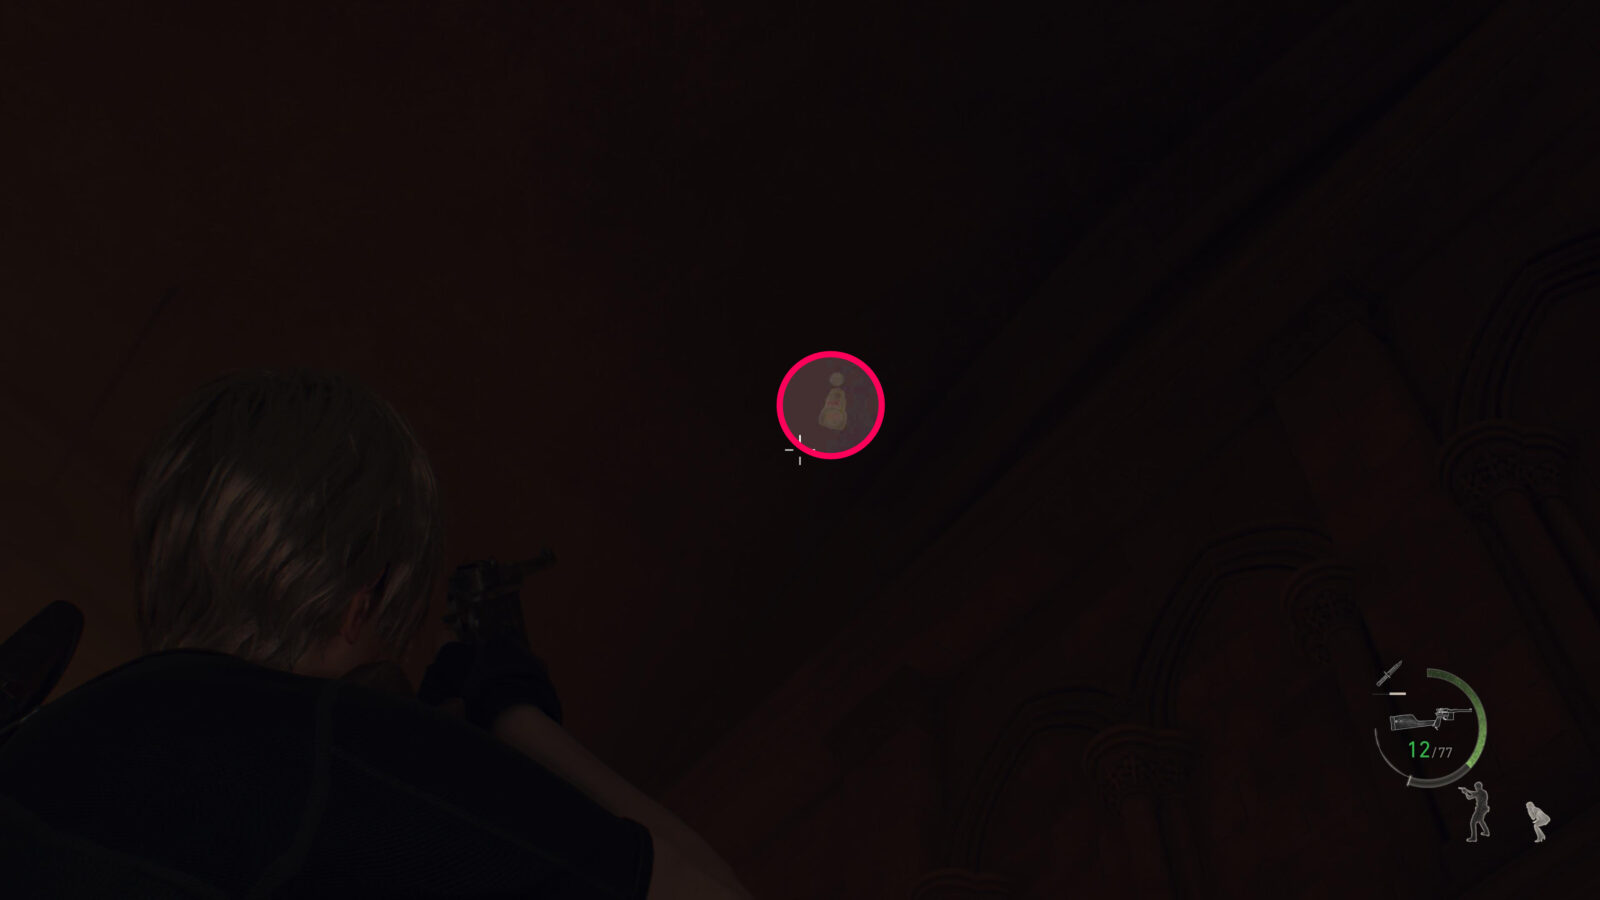
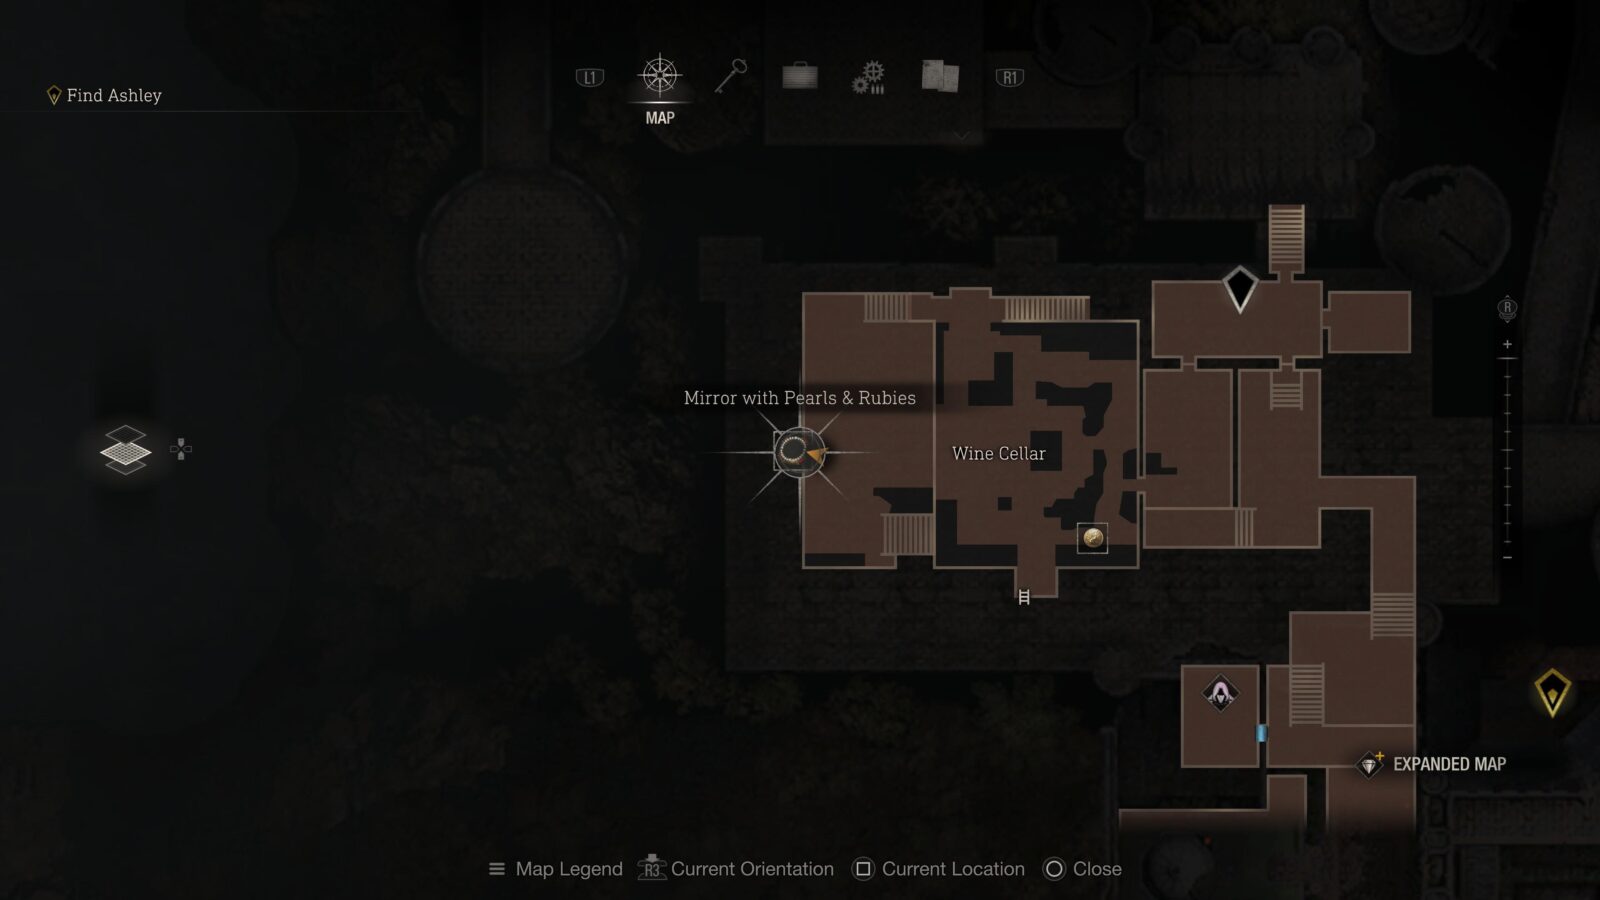
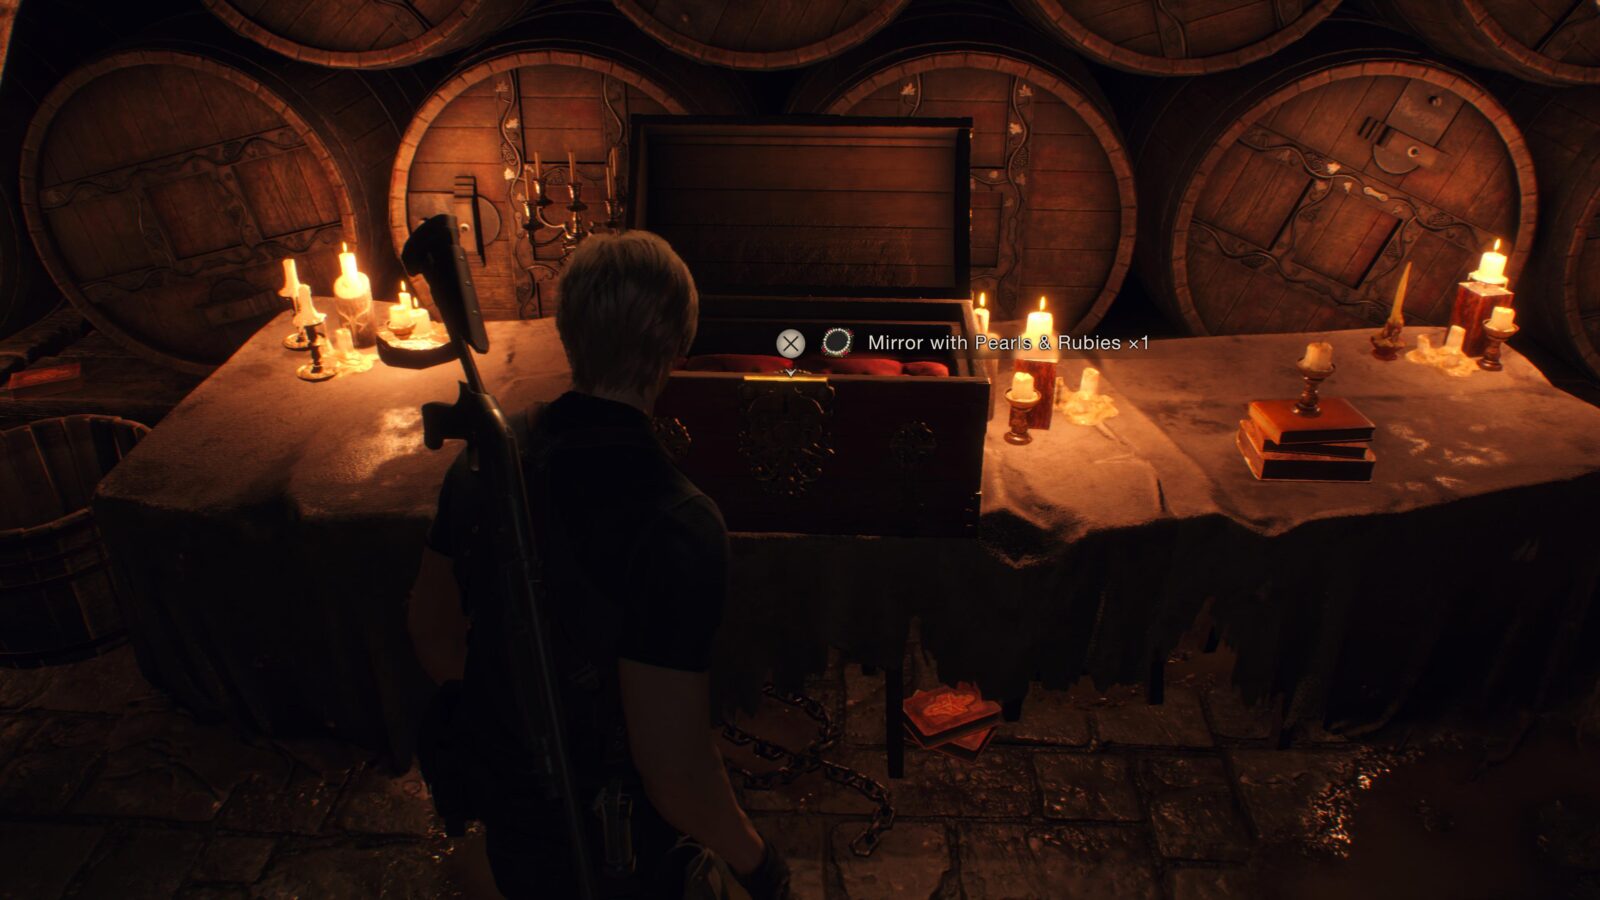
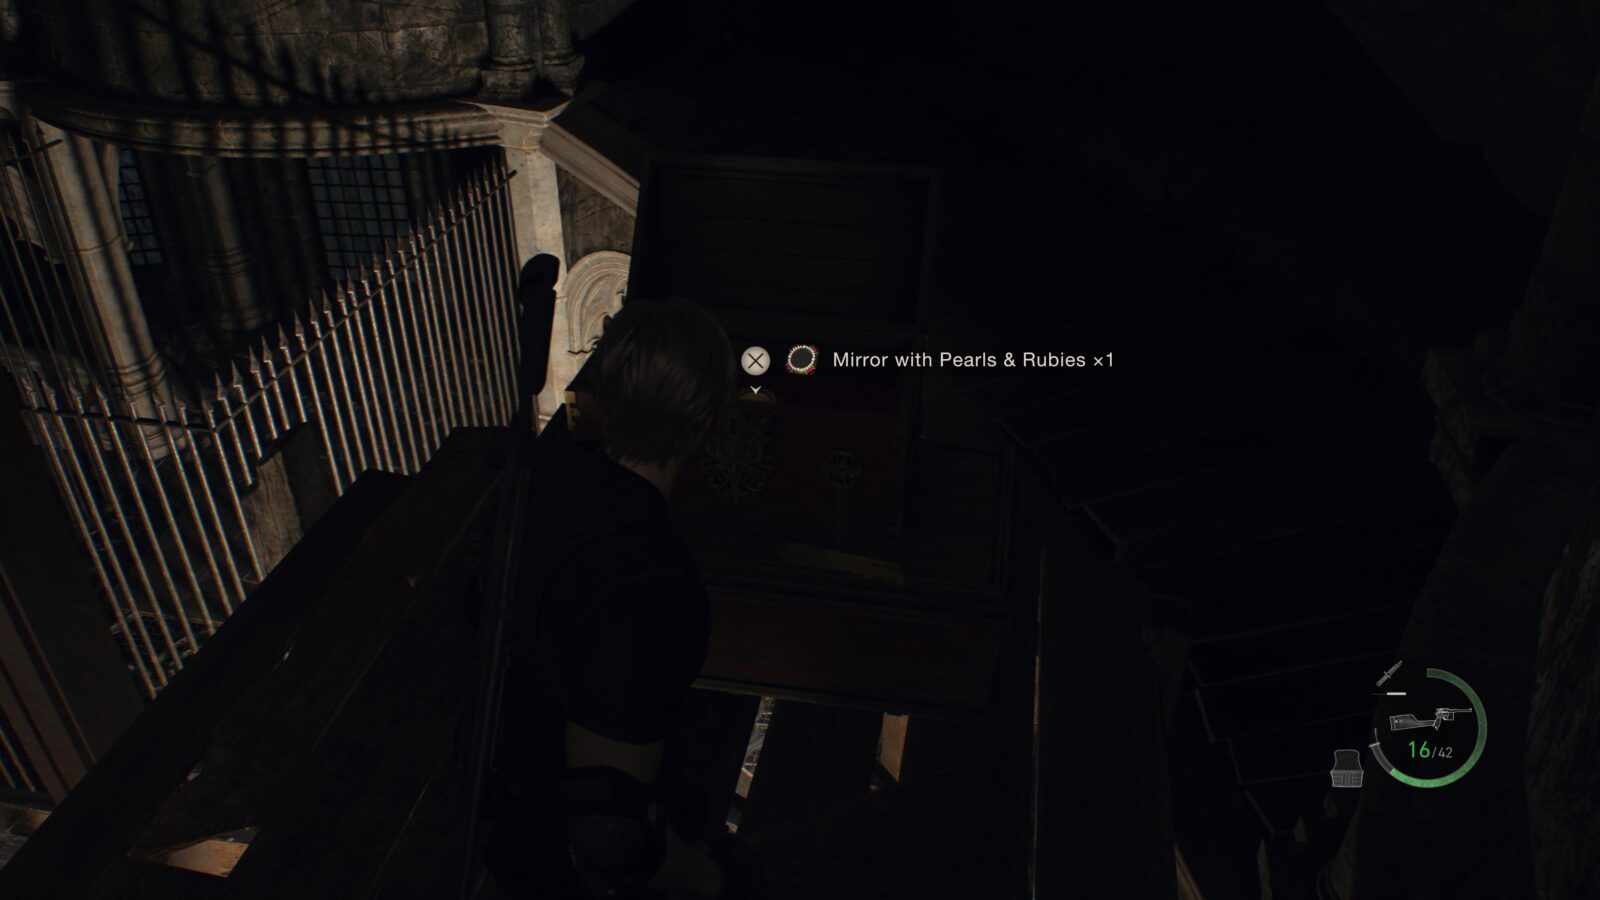
Mirror with Pearls & Rubies
In the Wine Cellar behind where the Summoner enemy was standing is a chest with a treasure inside.
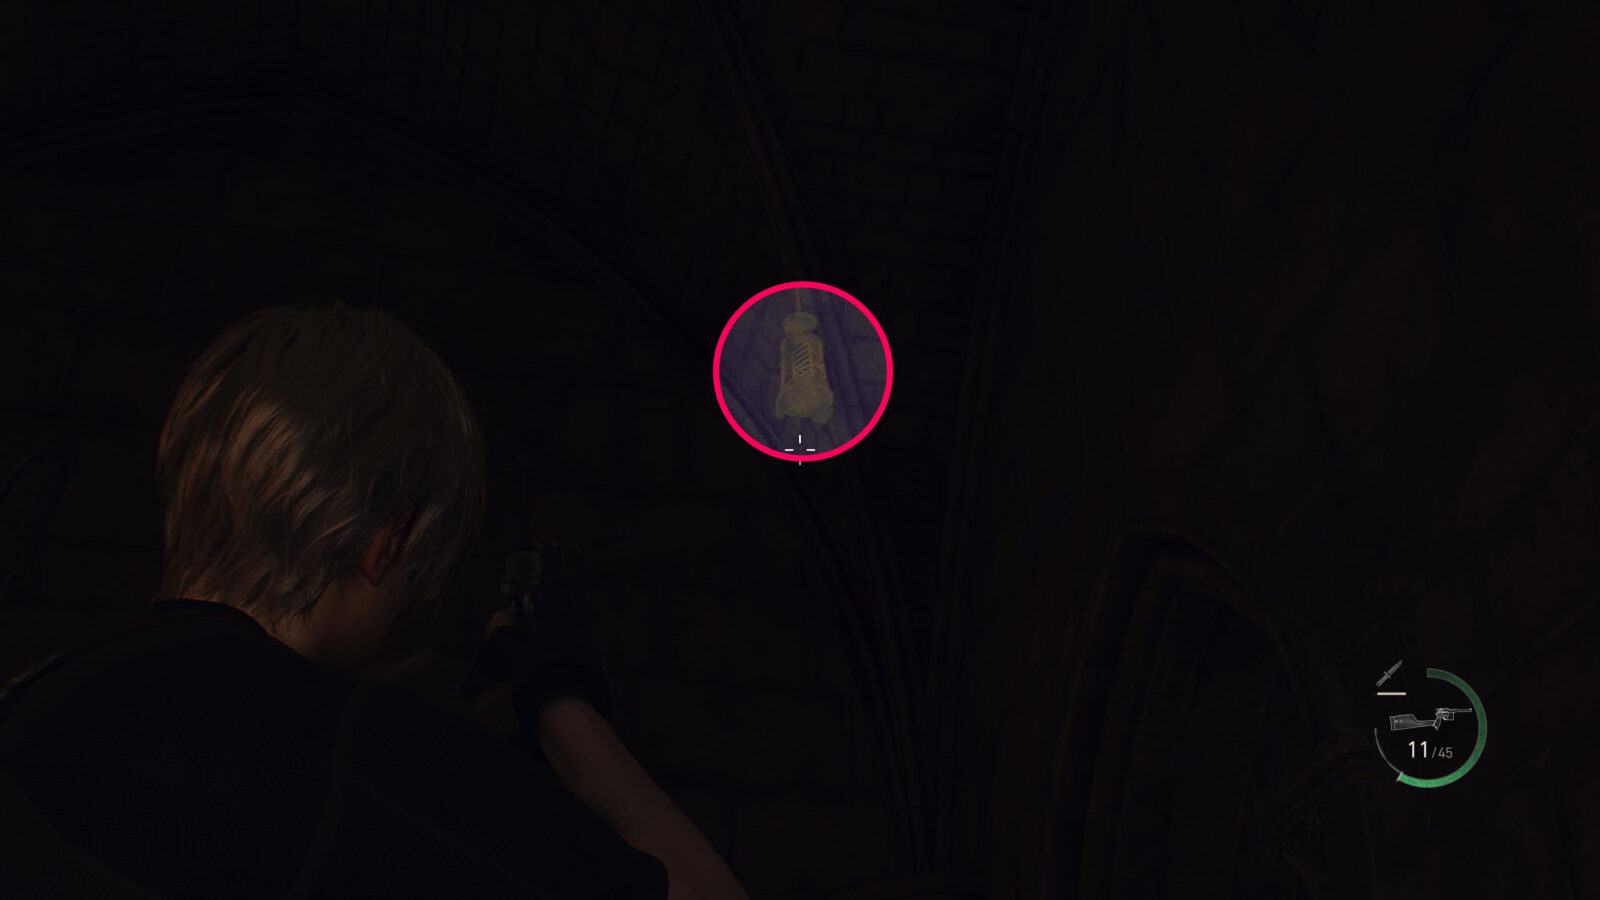
Alexandrite (Expanded Treasure)
As you leave the Wine Cellar you can spot a metal cage hanging from the corner of a corridor. If you go too far and end up in the Bindery you can still come back into the corridor to grab this treasure. This is only available to those who have the Expanded Treasure Map DLC.

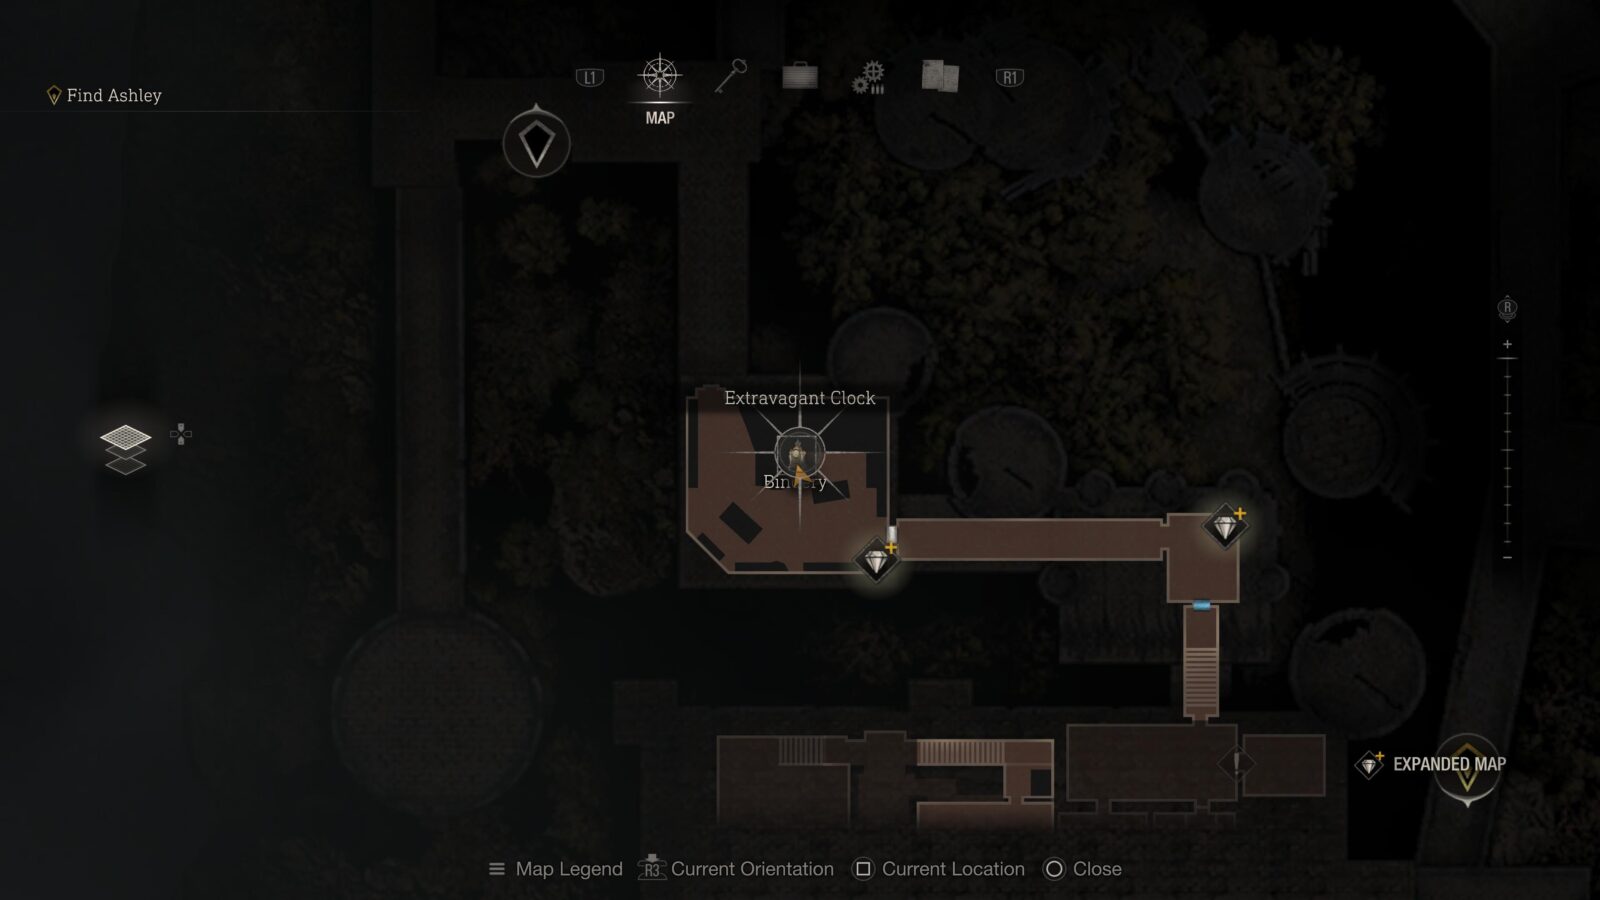
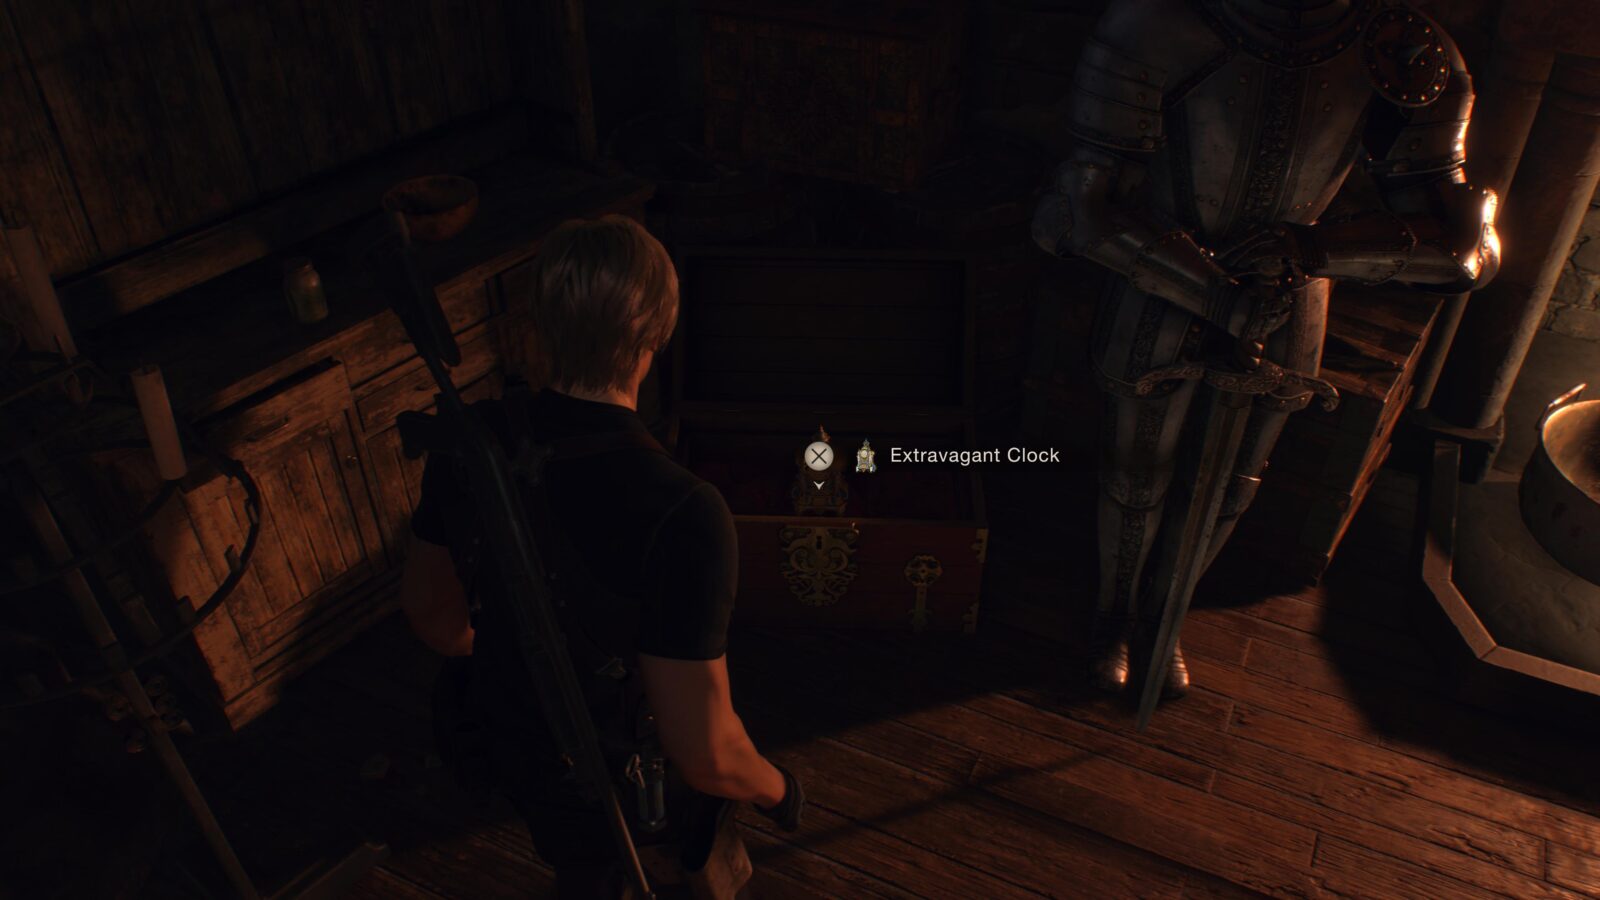
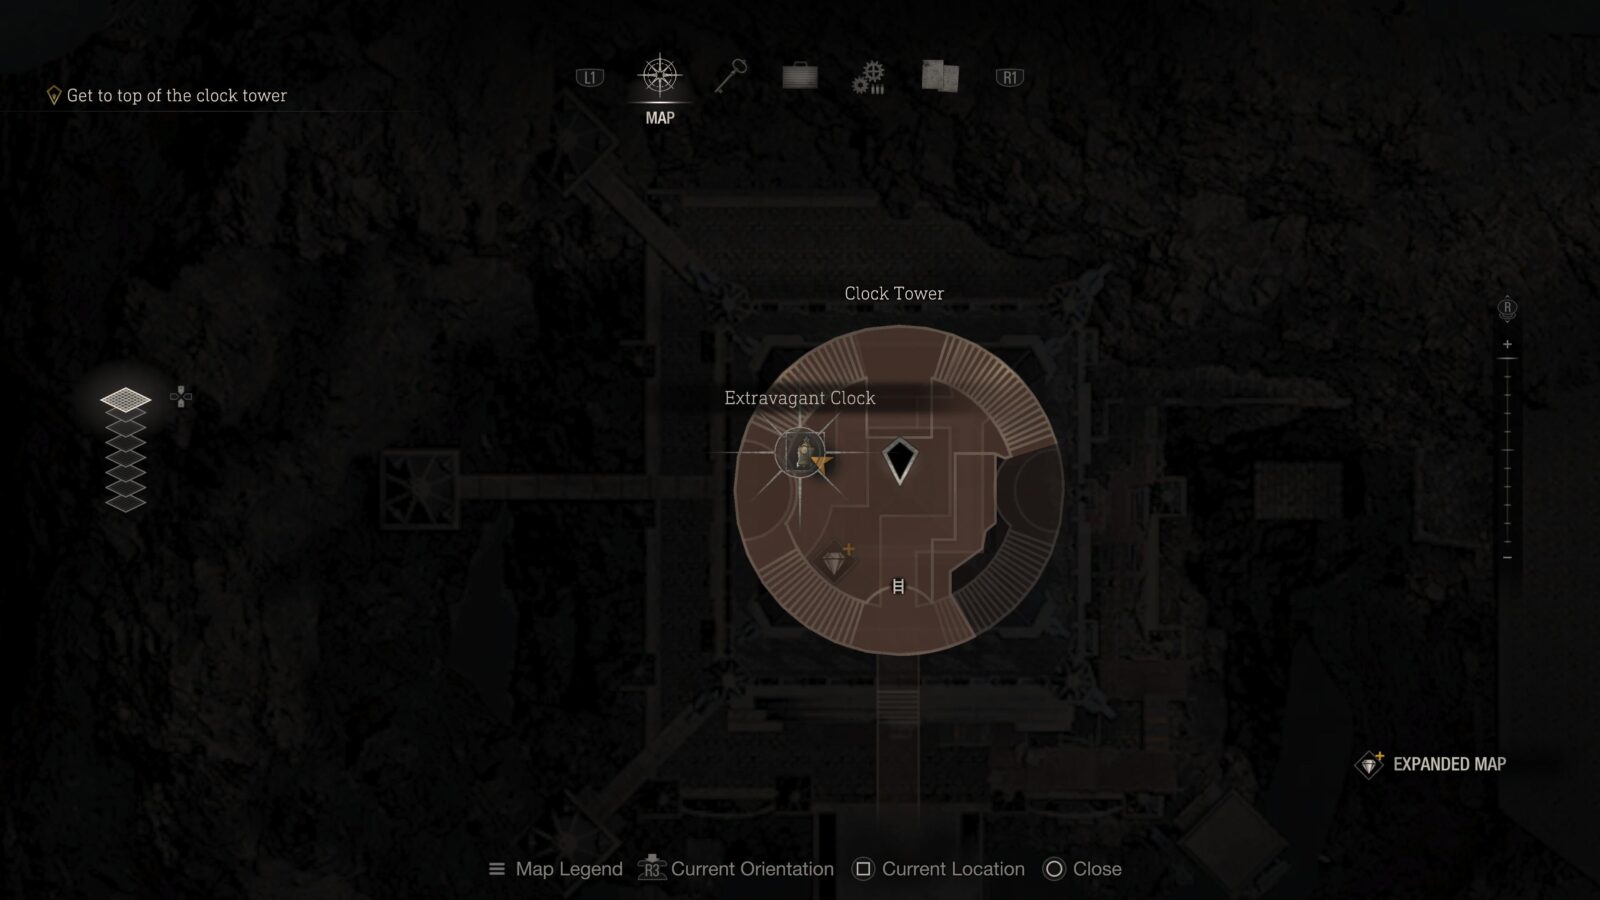
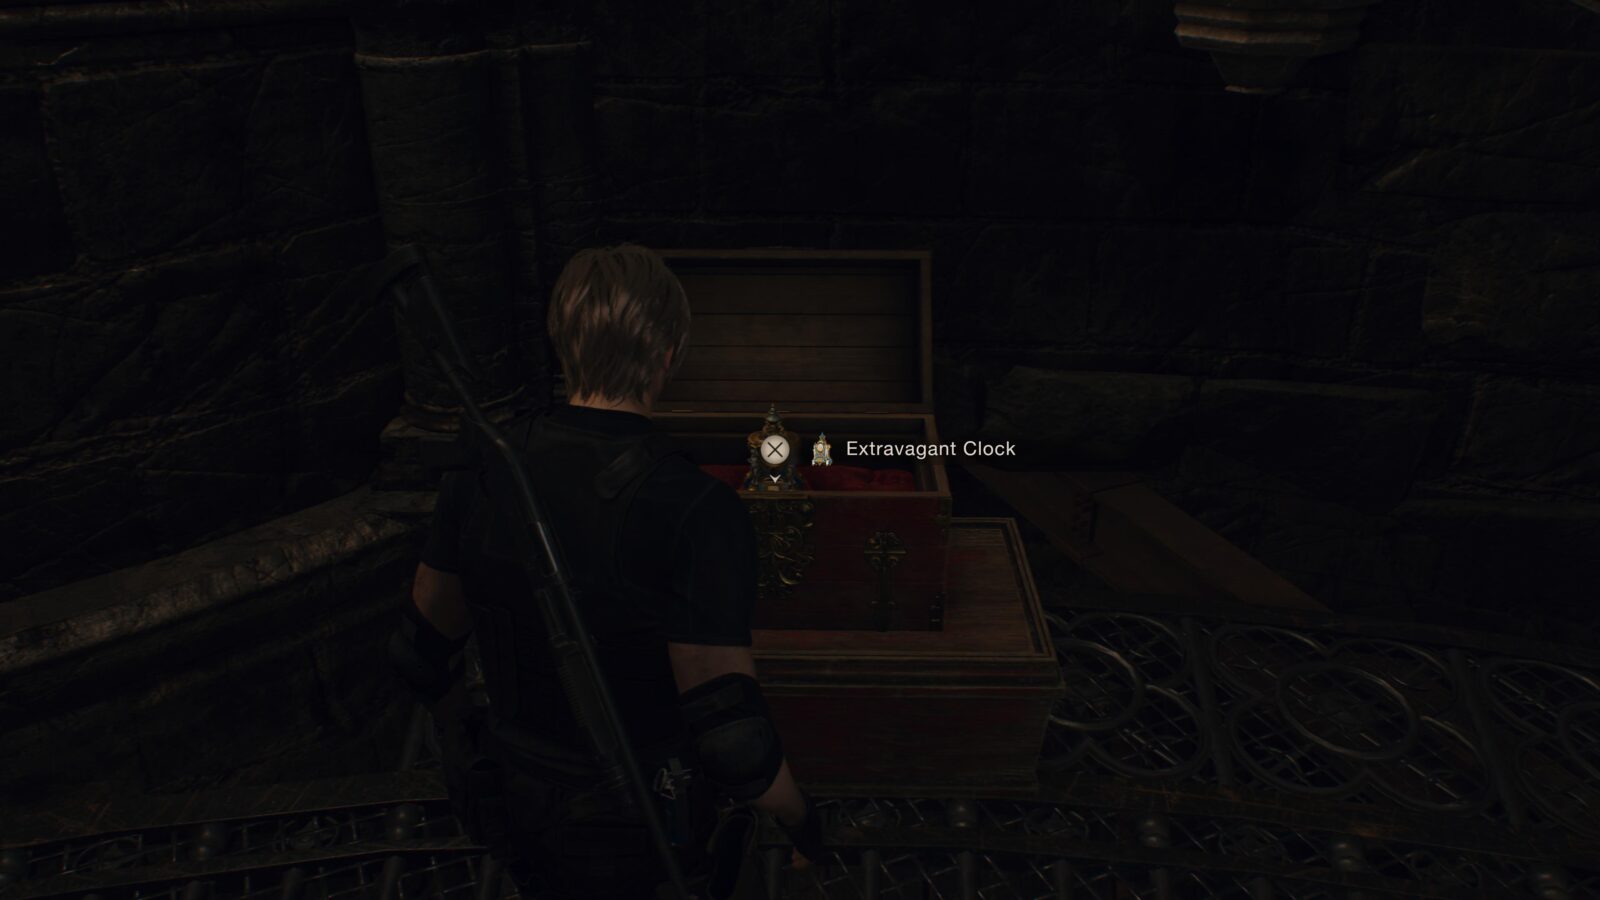
Extravagant Clock
After Leon bumps into a familiar face he will be in a room called the Bindery. In this room is a suit of armor near a fireplace with a chest by its feet. Inside is a clock.
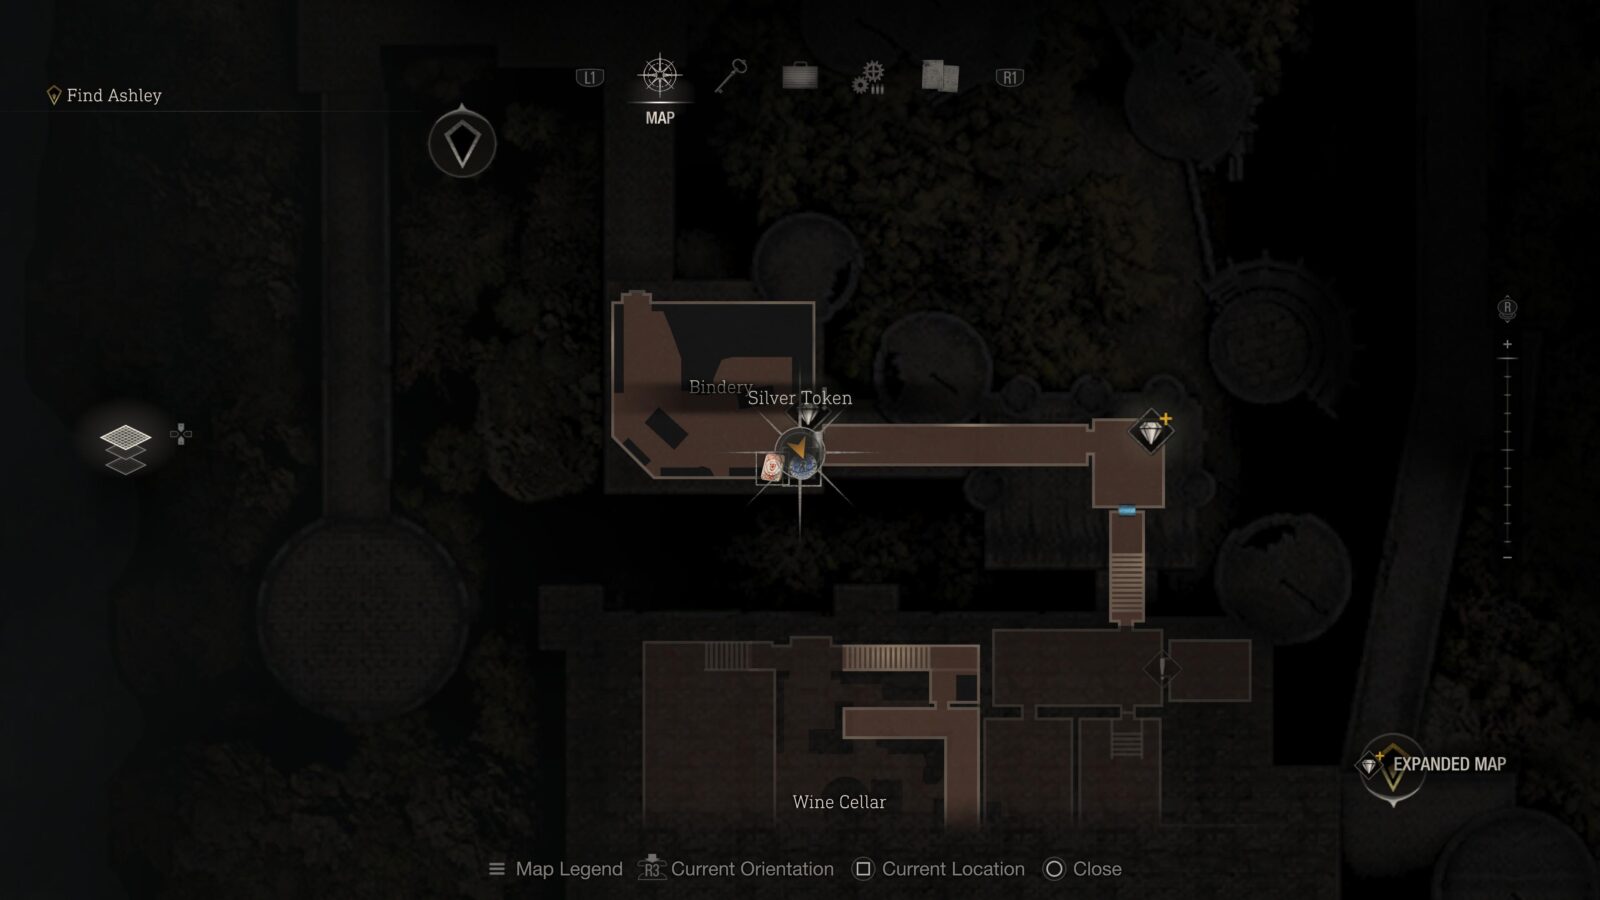
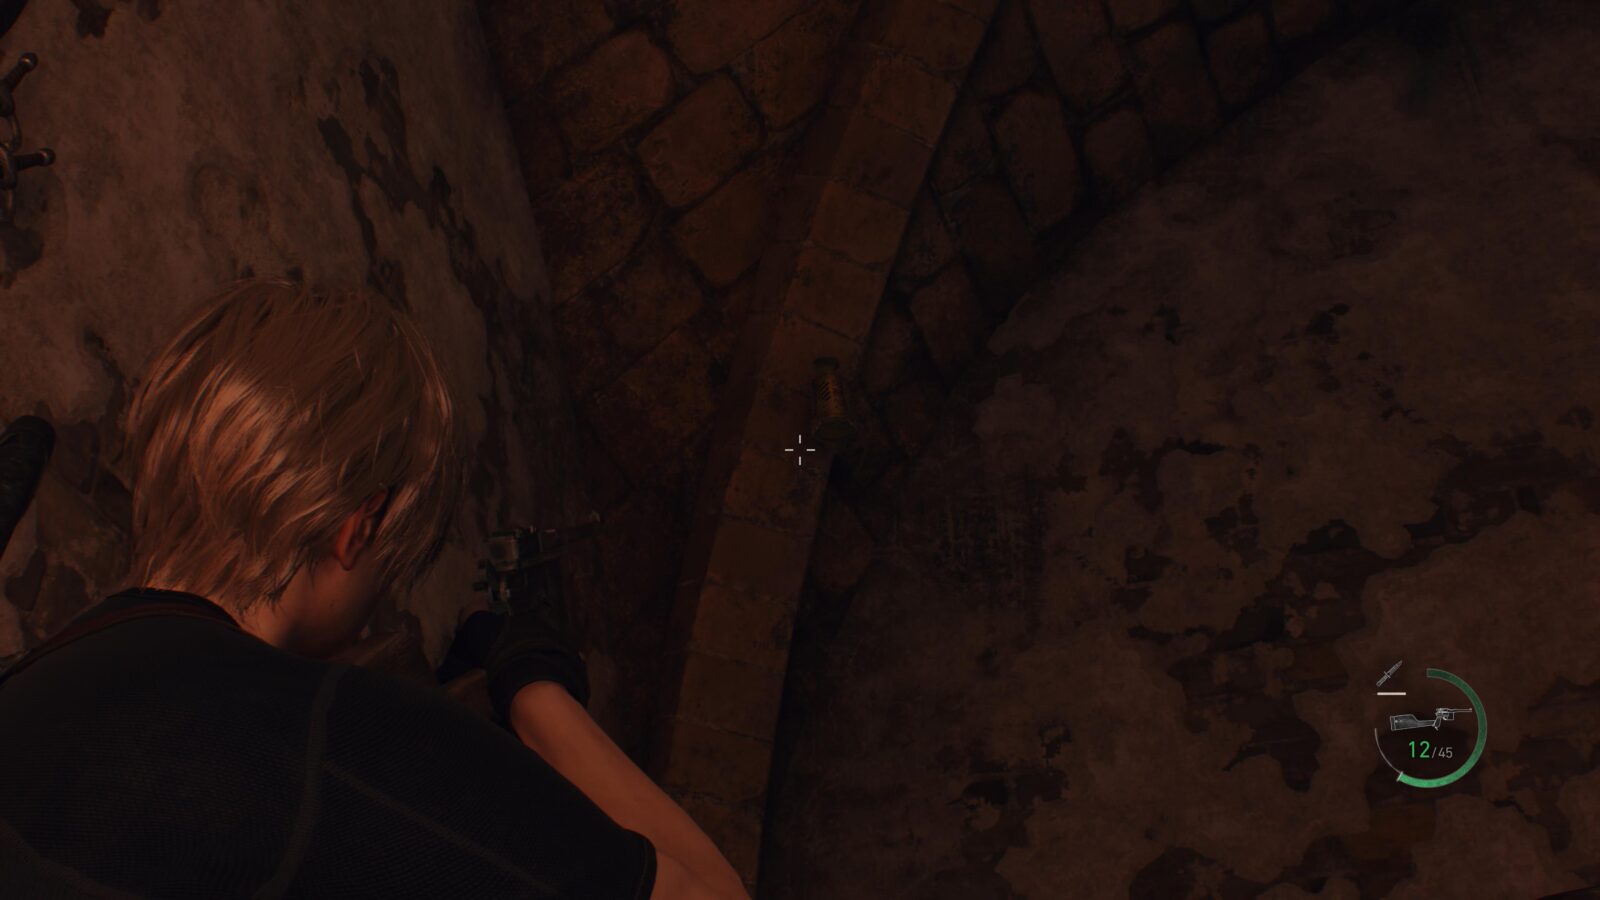
Silver Token (Expanded Treasure)
Inside the Bindery there is a metal cage hanging from the ceiling in the corner of the room. This is only available to those who have the Expanded Treasure Map DLC.
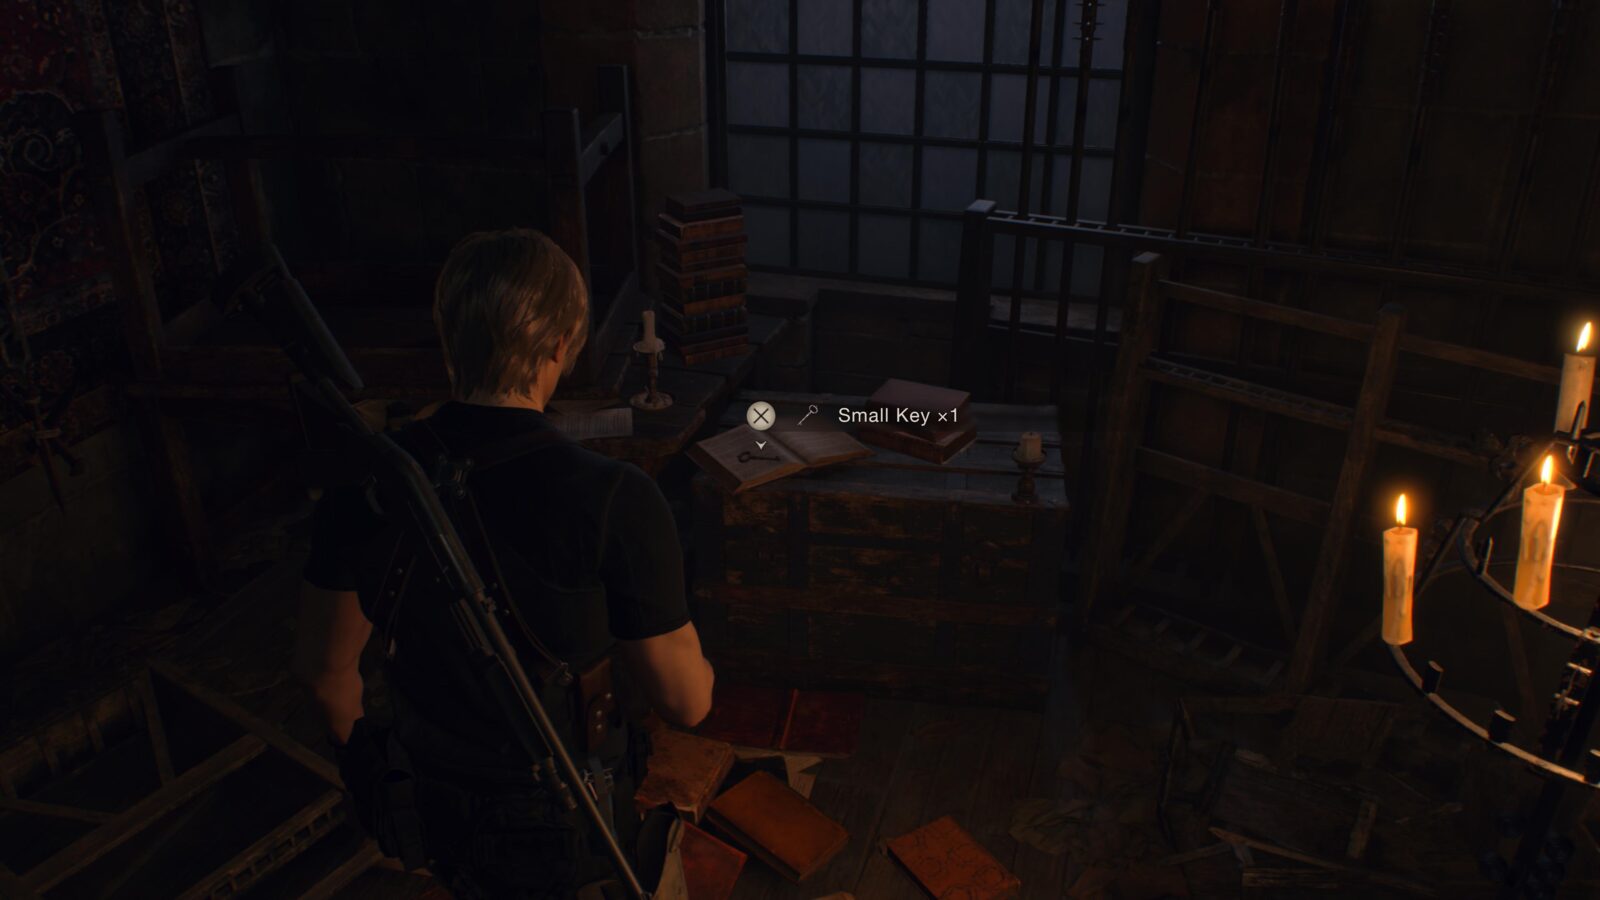
Small Key
After you solve the puzzle door in the Bindery you will walk through a series of corridors until you reach a room with a knocked over cupboard just outside. In the room is a small key on an open book.
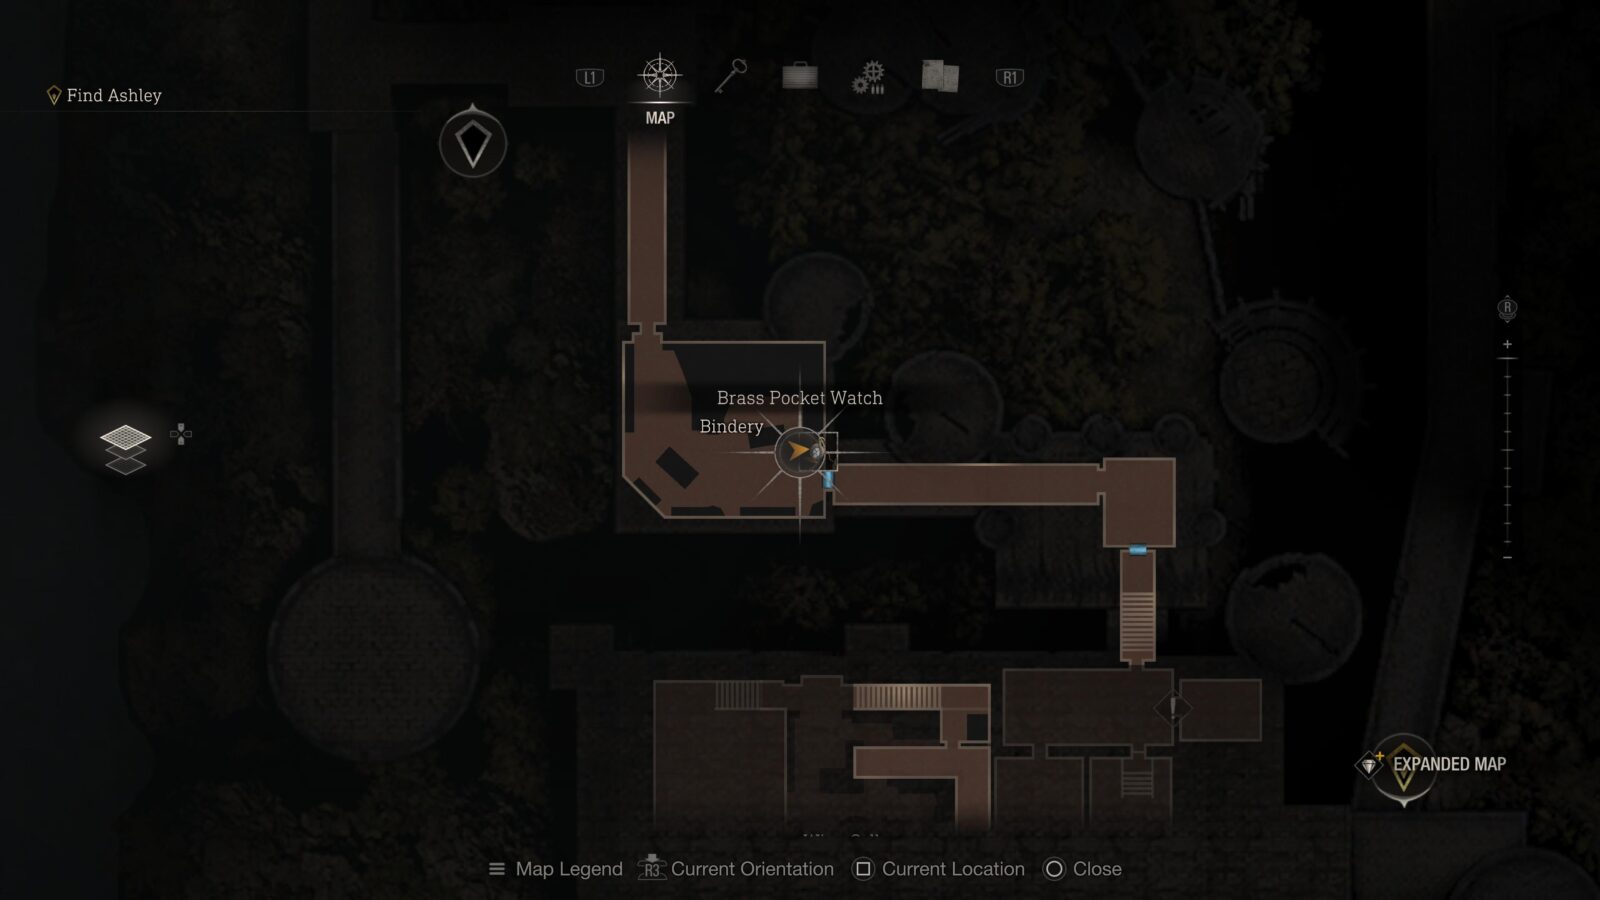
Brass Pocket Watch
Now that you have a small key you can return to the Bindery and open the locked drawer in there to grab the pocket watch.
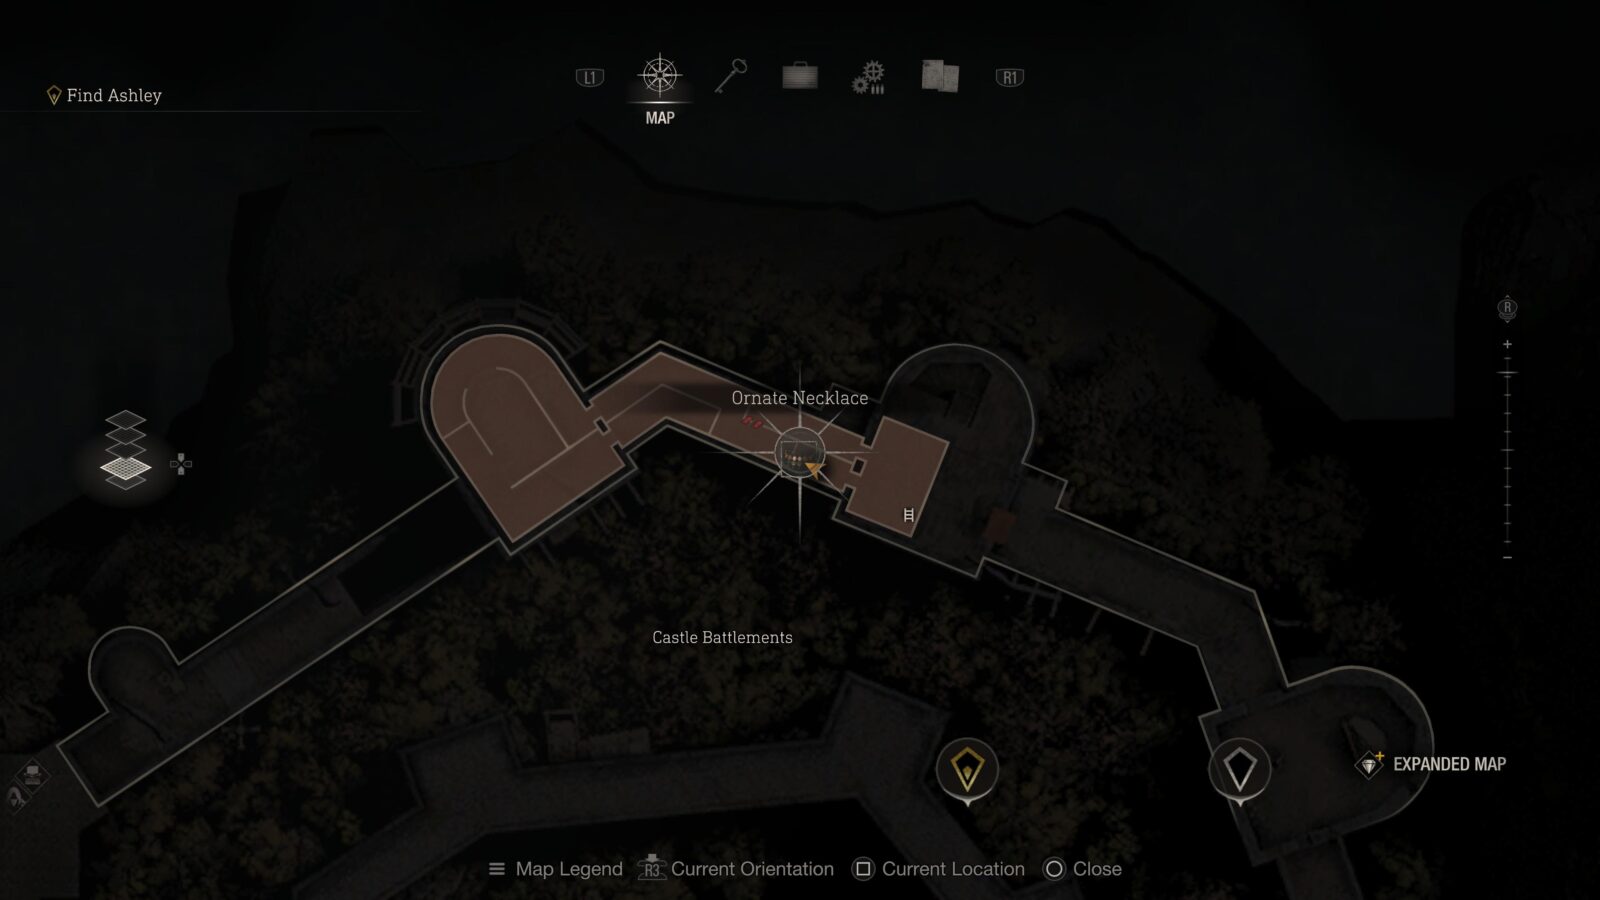
Ornate Neckless
Getting this treasure can be a little tricky. You will be flipping levers with either a sun or a moon logo on it. These will open and close doors when you use them. Proceed through the are until you see some collapsed wooden beams and flooring with yellow spray paint all over them. You need to climb them and drop down a hole on your left. You will also see another sun/moon lever to your left but if you flip it you will close the door that leads to the chest.

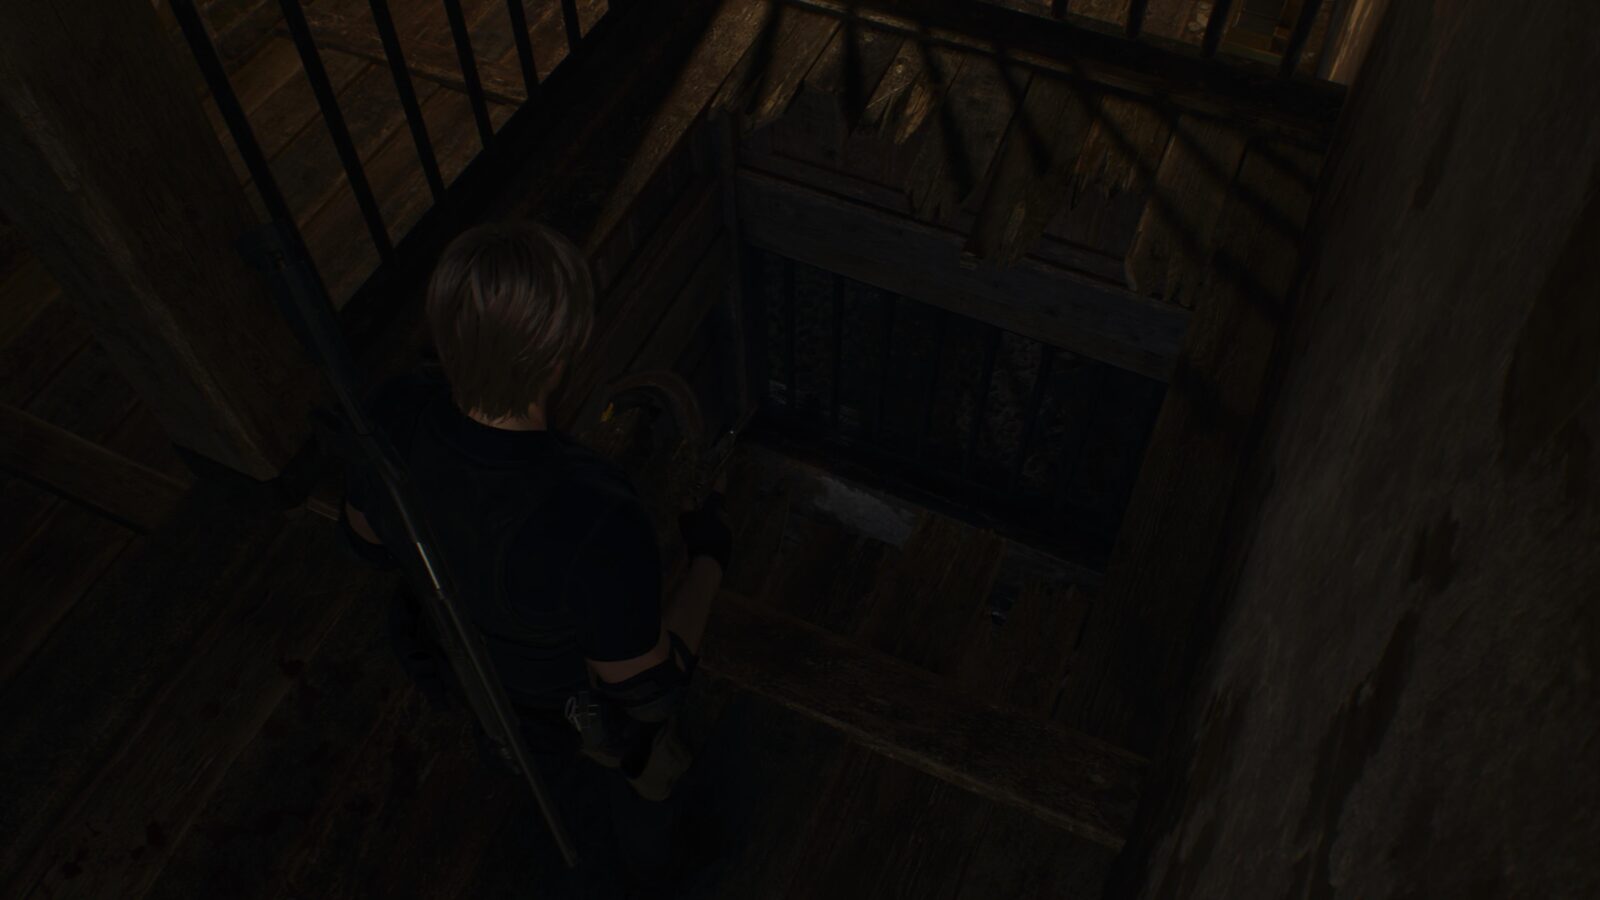

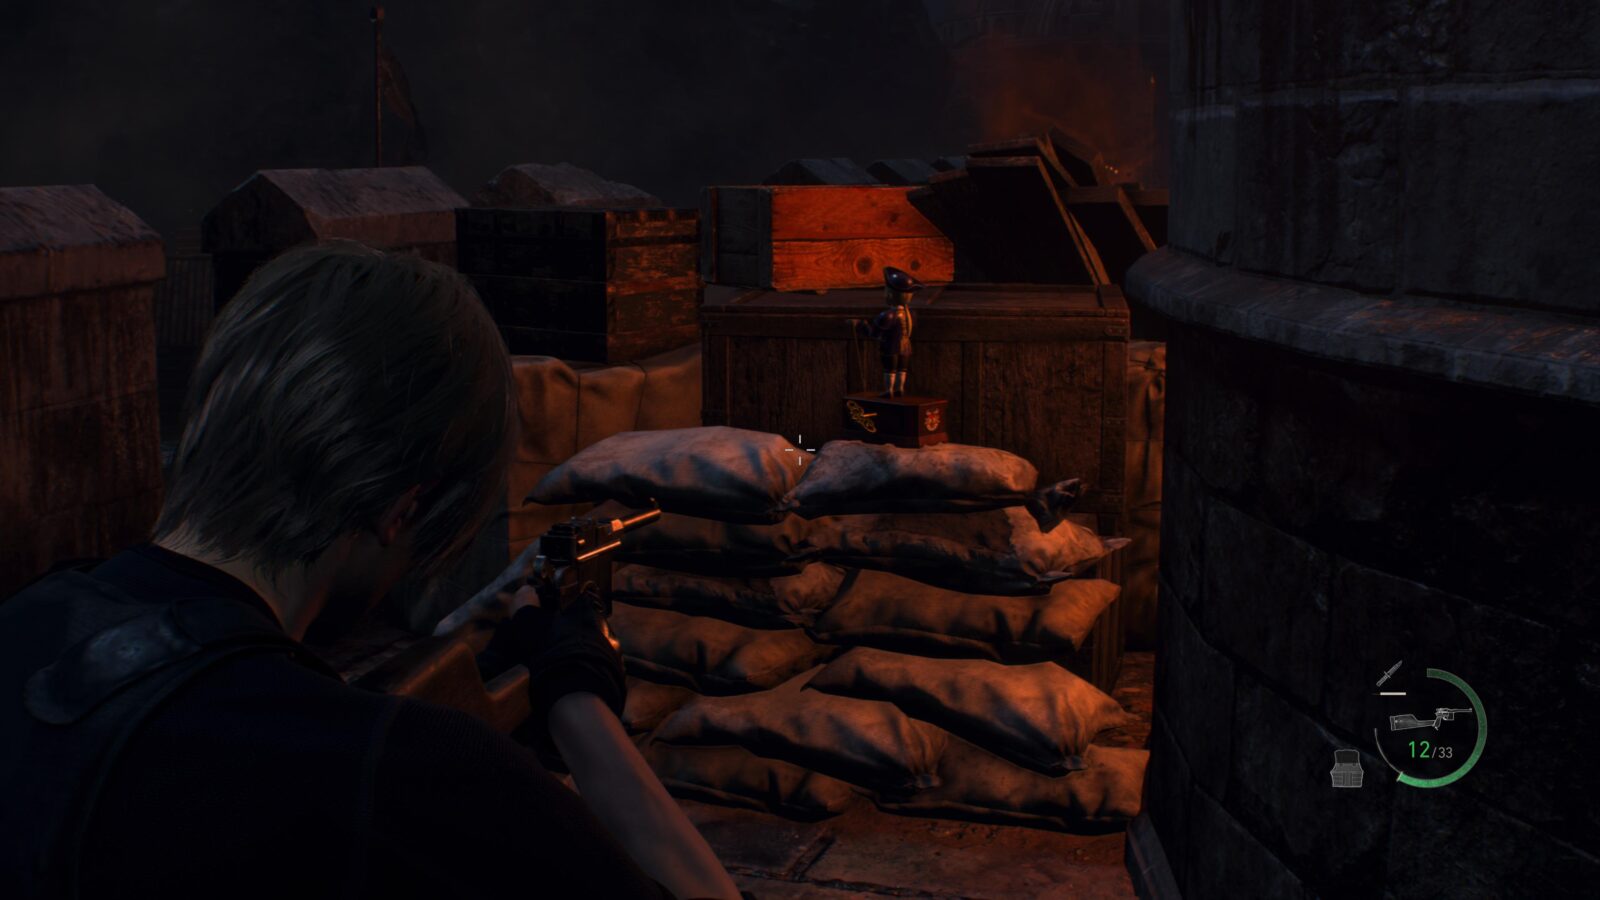
Clockwork Castellan #8
During the section where the Ogre throws rocks are you on top of the Castle battlements you can find a Clockwork Castellan. If you open the map you can see 3 battlements. The 1st battlement (I’ve marked them on the map below for you) will have a Castellan on some sandbags.
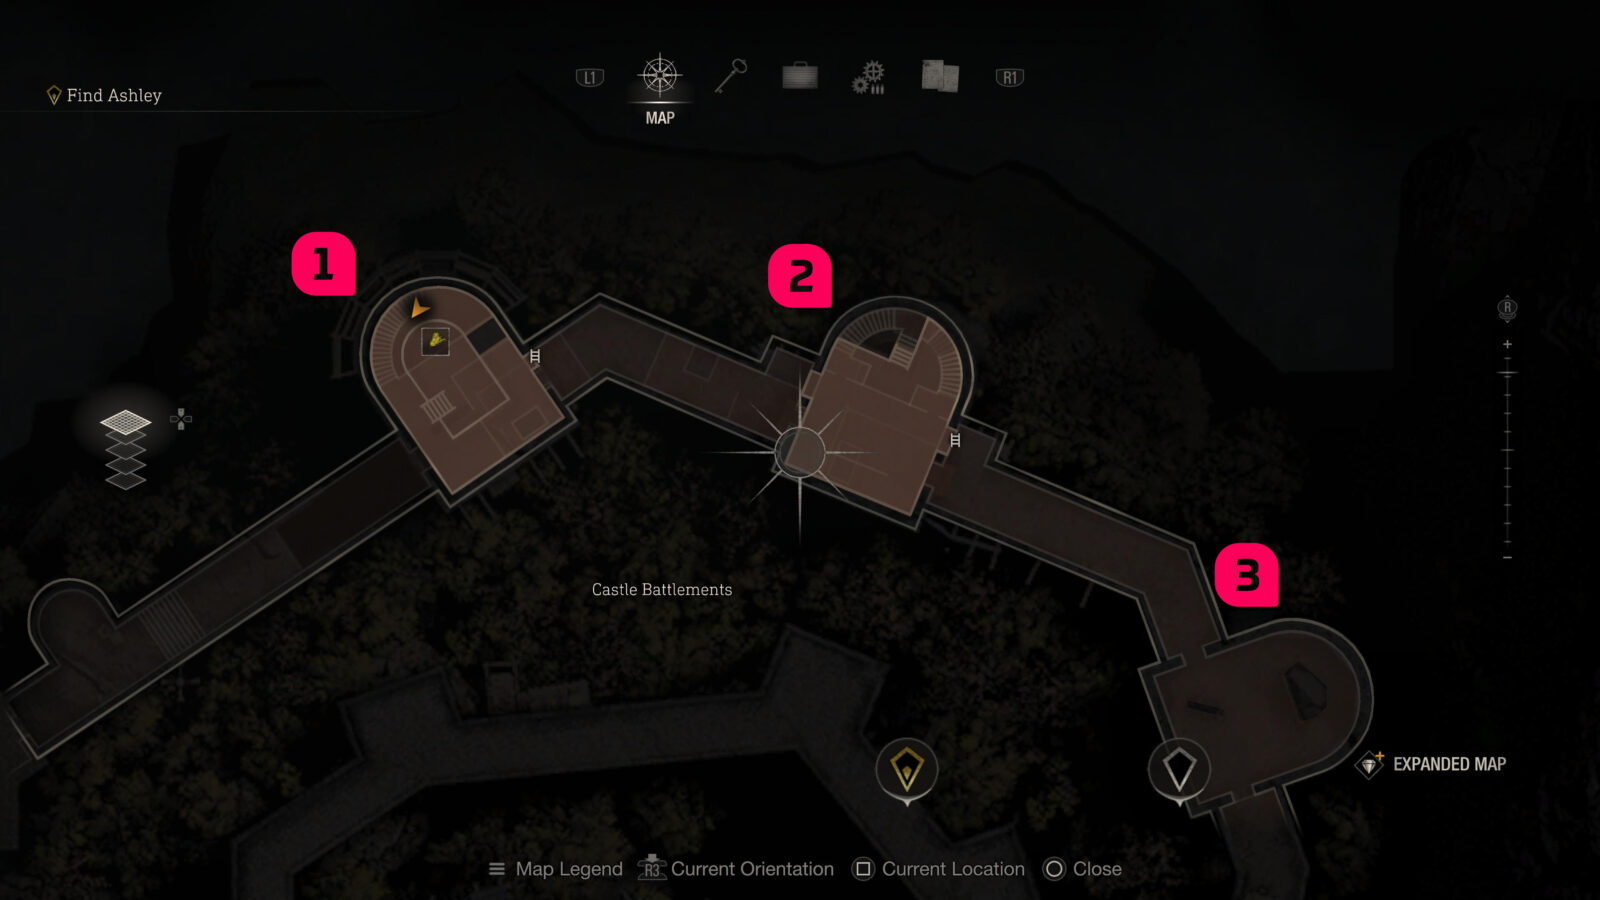
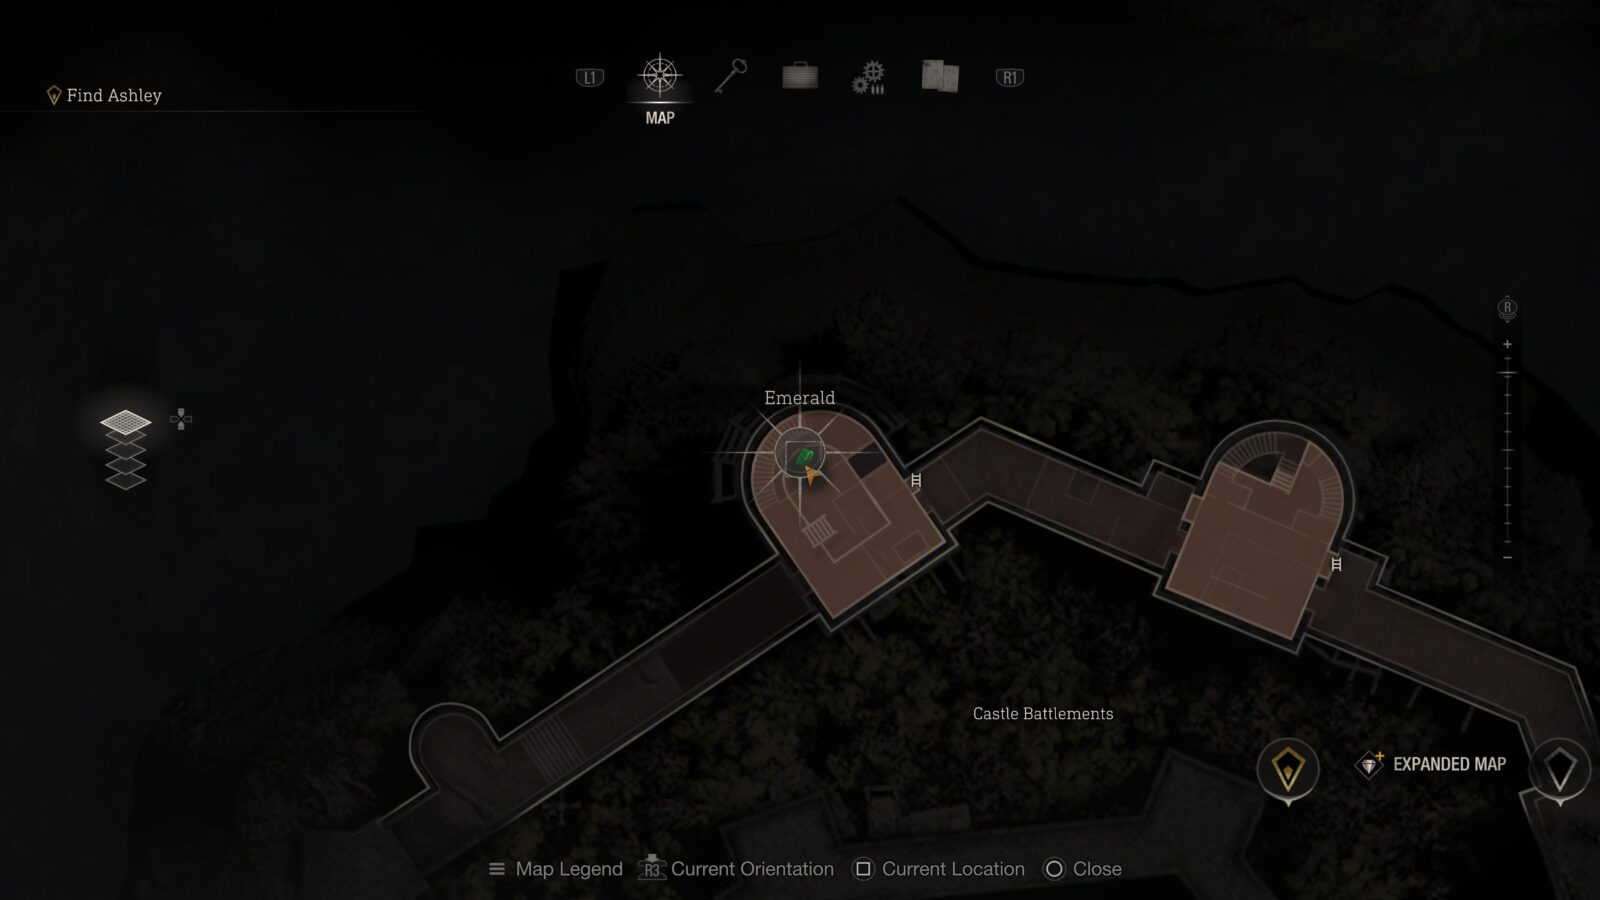
Emerald
On the same battlement as the Clockwork Castellan is a chest with an Emerald inside up some stairs. i.e. the raised middle of the battlement.

Ruby
At the far right battlement you will have to drop down to the floor below and right behind you is a sun/moon lever. Flip it and drop down again to another floor below you. Behind you will be a room with a silver cage hanging from the ceiling.

Gold Token (Expanded Treasure)
Just before you enter the room at the top of the courtyard you can find a small chest on a stack of crates. Inside is an accessory–a Stylish Mask–and a Gold Token. If you trigger the cutscene where you reunite with Ashley again you can still backtrack out of the room to collect this treasure. This is only available to those who have the Expanded Treasure Map DLC.

Chapter 9
There are a total of 1 Clockwork Castellan, 2 Merchant Requests, 1 Shooting Range, 1 Small Key (used to unlock locked drawers hiding additional treasure) and 7 Treasures in Chapter 9. This chapter also has 2 Expanded Treasures which can only be obtained with the Expanded Treasure Map DLC.
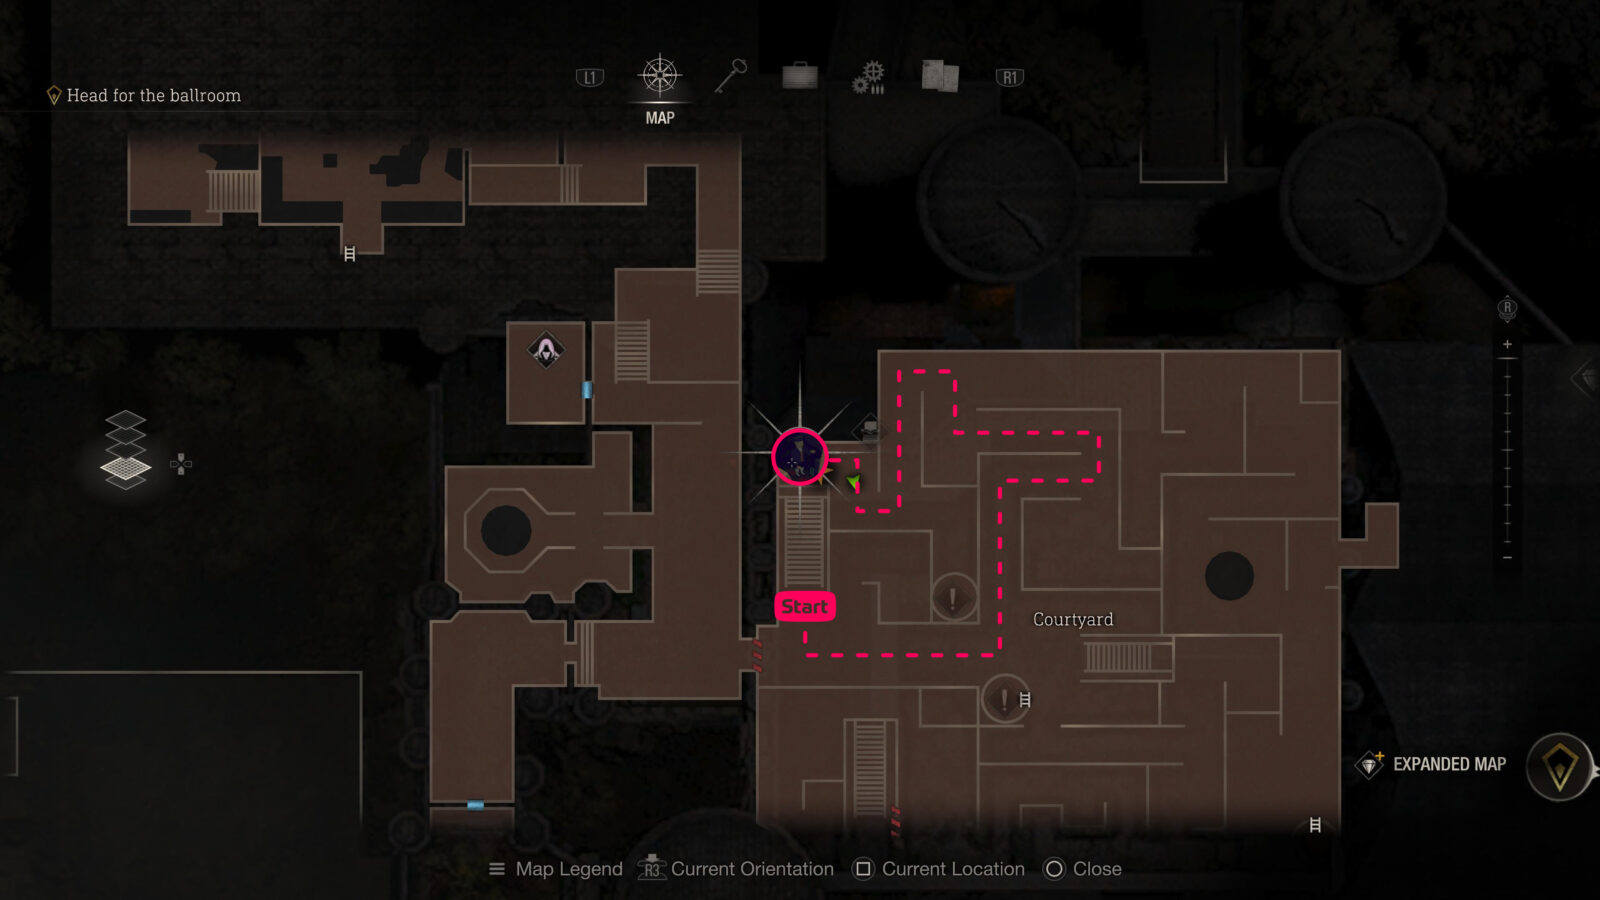
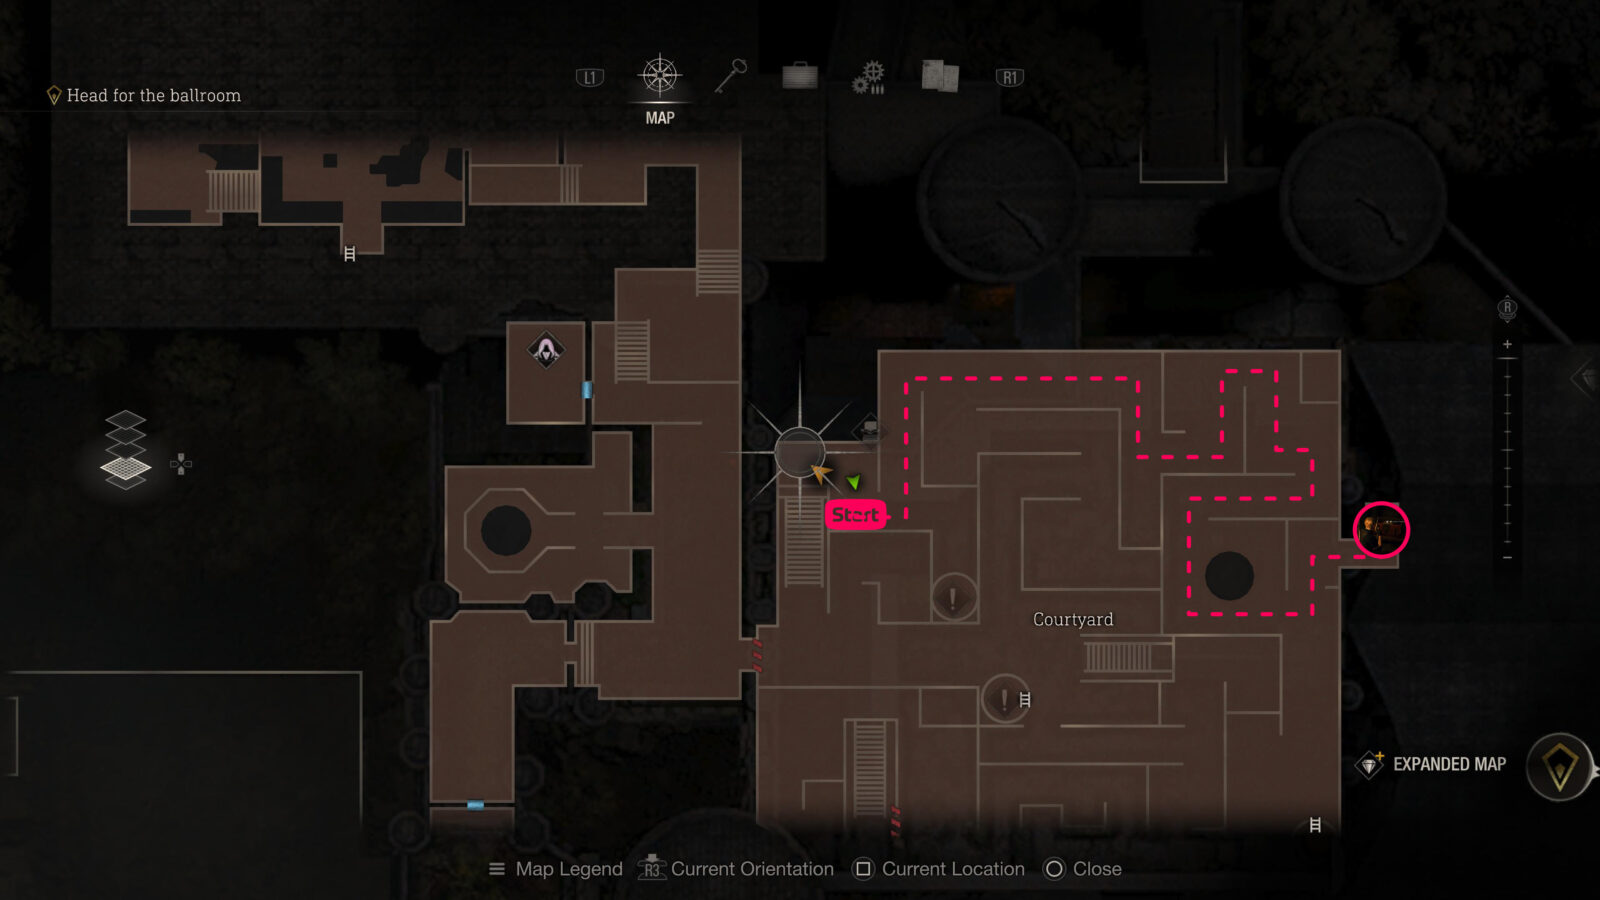
Clockwork Castellan #9
At the start of the chapter leave the room and walk down the steps into the courtyard. Take a left and go forward until you see some crows. Take the path to the left of where the crows were and go straight, then right, straight, then left, straight again and you’ll see a mutant dog and run in the direction we’re heading. After seeing the dog, head right again, then immediately left twice, and then right. In the corner by some wooden planks leaning against a wall is a Clockwork Castellan.

Elegant Chessboard
From the Castellan you will need to turn around and take the left path back to where the dog appeared. Inside of taking a right down the path back towards the middle of the maze you want to head forward to the end and then take a right. Halfway down the path you need to take a left, then a right and head straight where you will go right and then left. In this area you will see a water fountain with an opening on the other side. Head through the opening and take a left and you should see an alcove with a chest inside. The chest will have the chessboard.

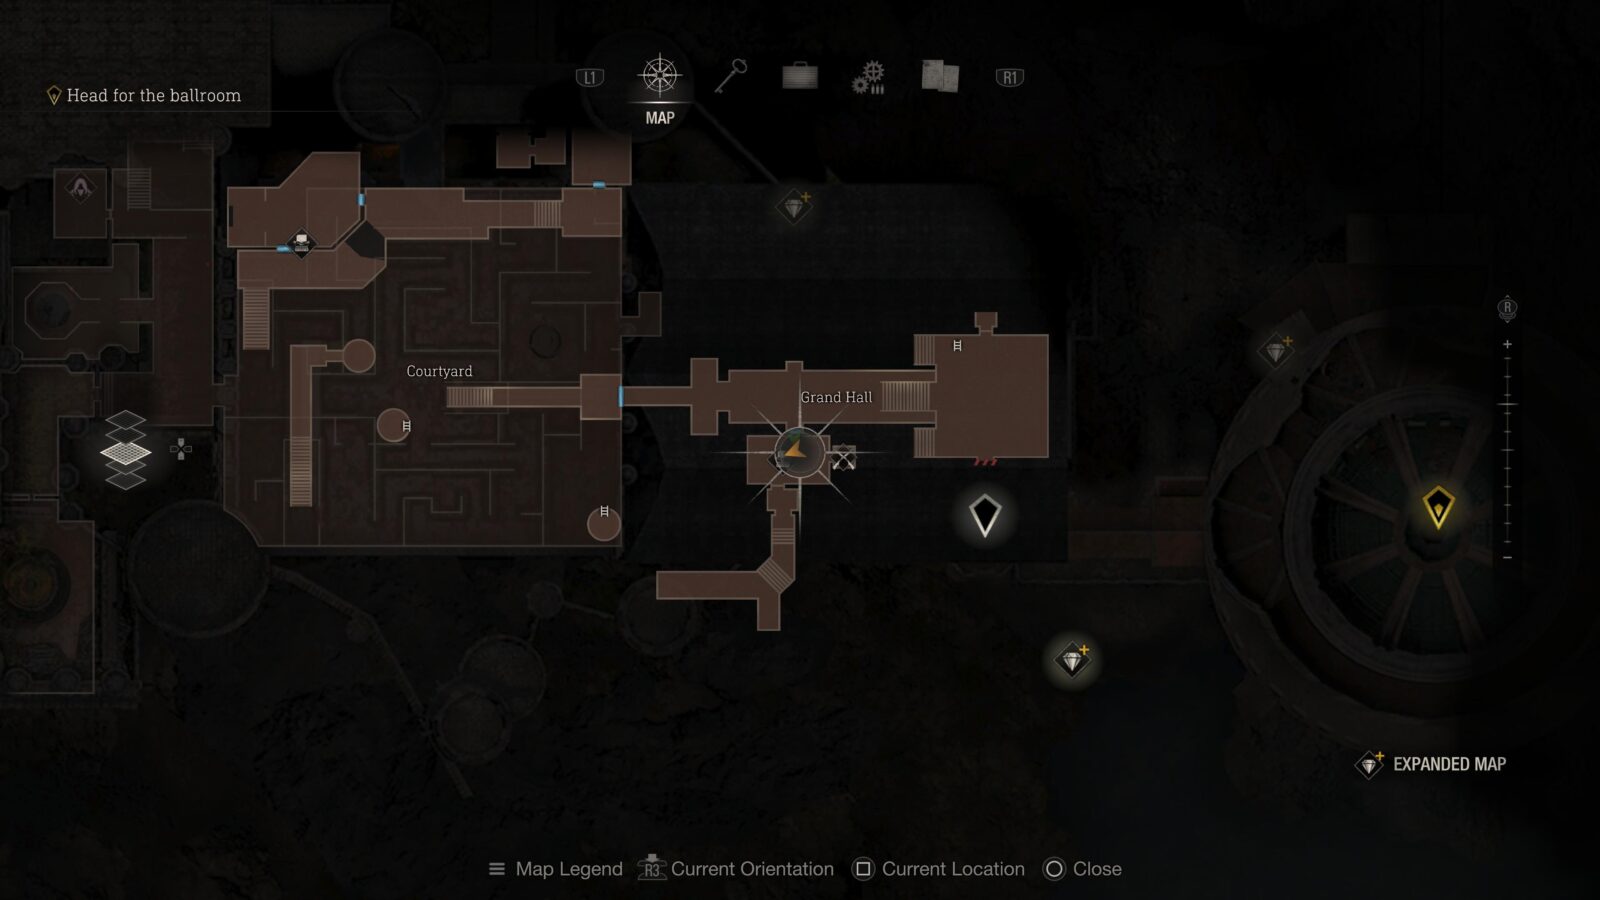
Depraved Idol (Backtracking Required)
Solve the maze by pulling the three levers in the three towers but don’t exit via the gate that opens at the center of the maze. Instead you need to backtrack all the way to the Wine Cellar from Chapter 8. There was a hole above a locked metal gate that you couldn’t open without Ashley but now that you’re reunited with her you can boost her through the gap.
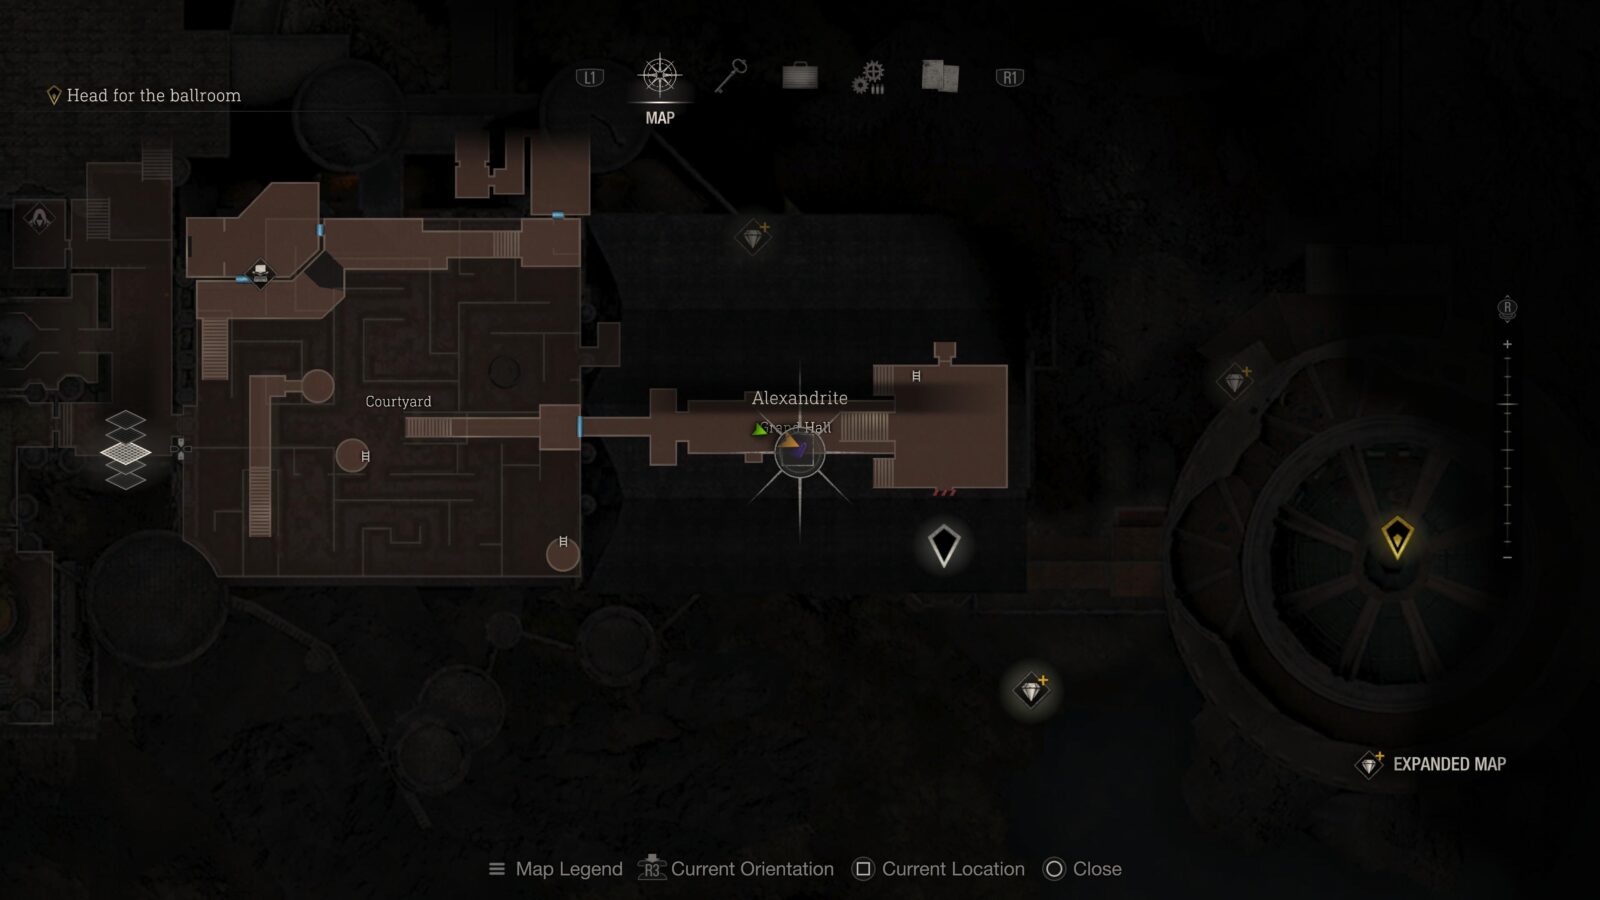
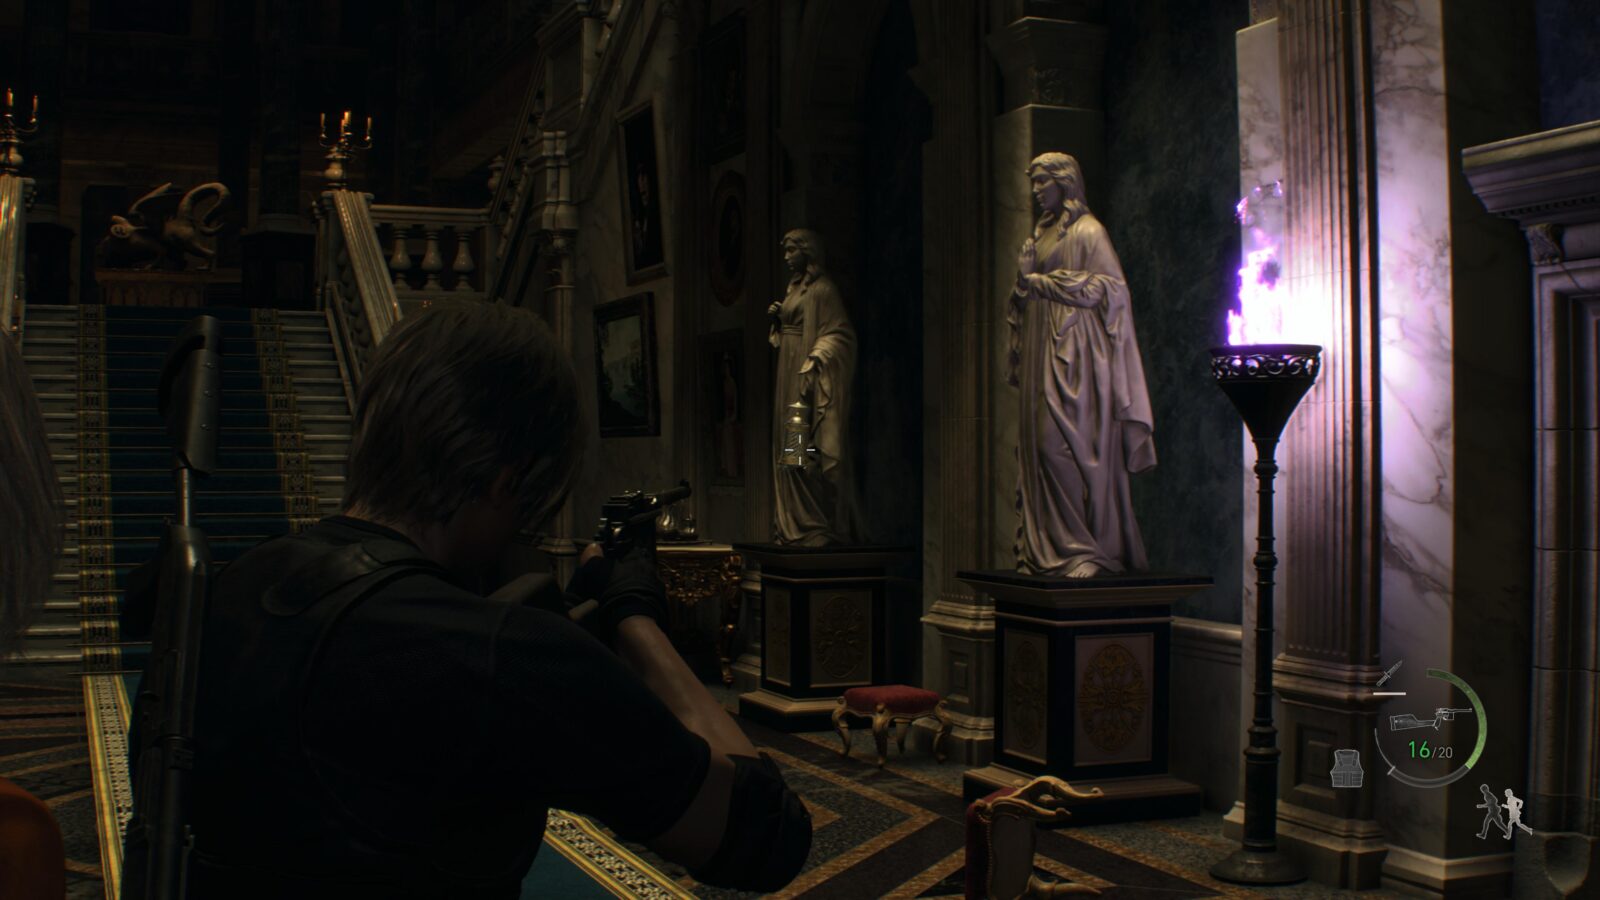
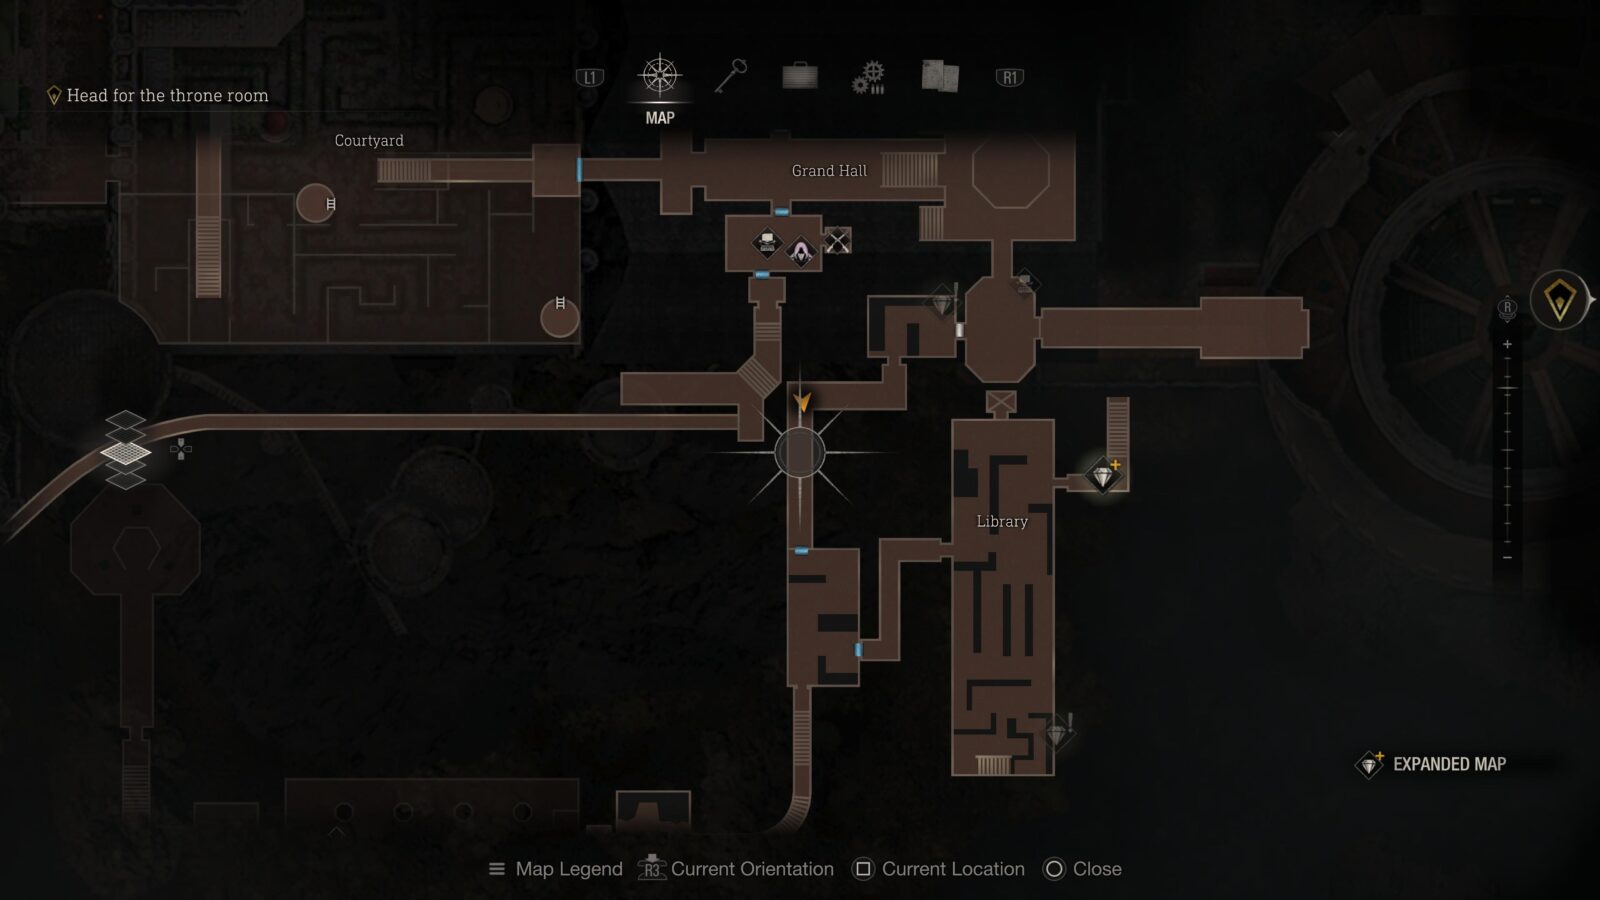
Alexandrite
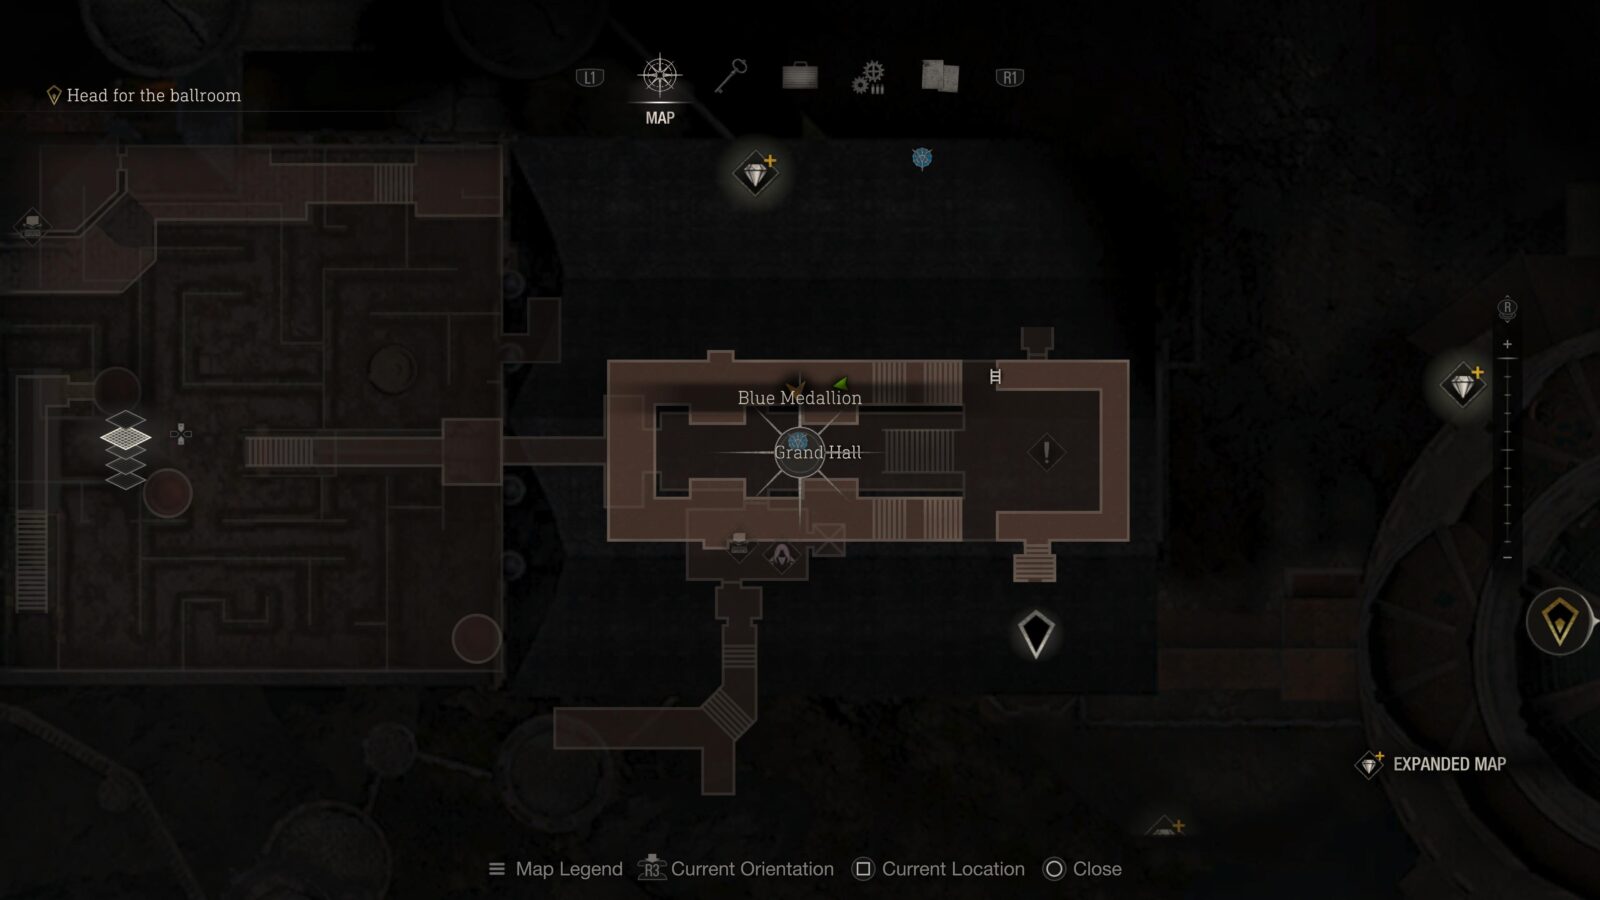
Return to the maze and enter the next area, the Grand Hall. You will see the blue flame that the Merchant always has around him to your right and just to the left of that flame is a statue with a cage hanging from it. Shoot it down and grab the gem inside.
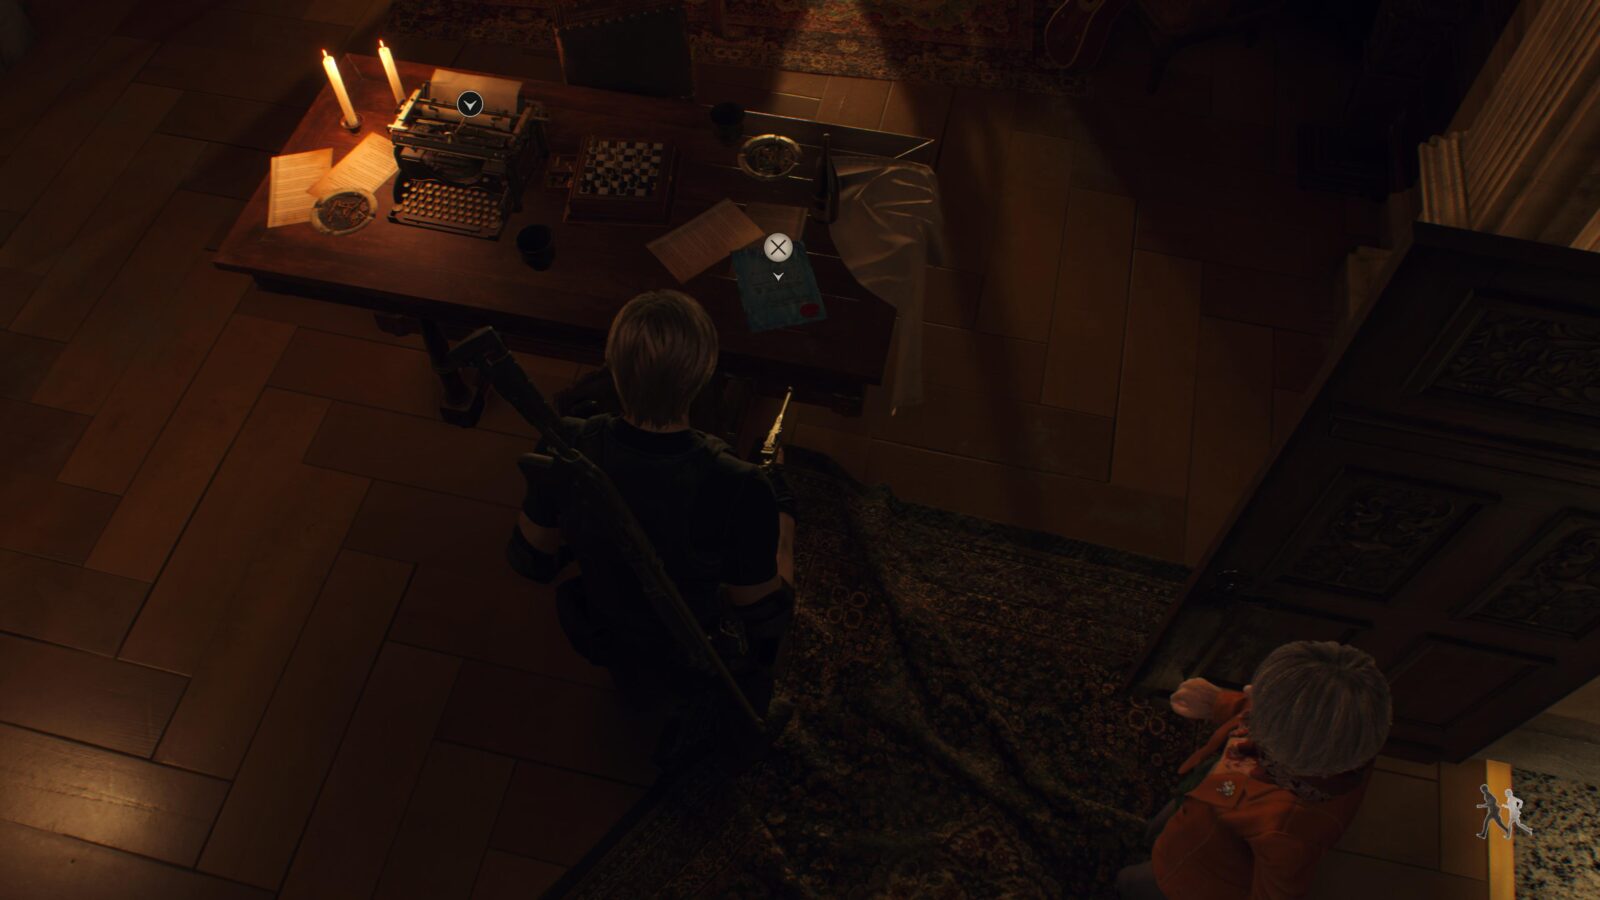
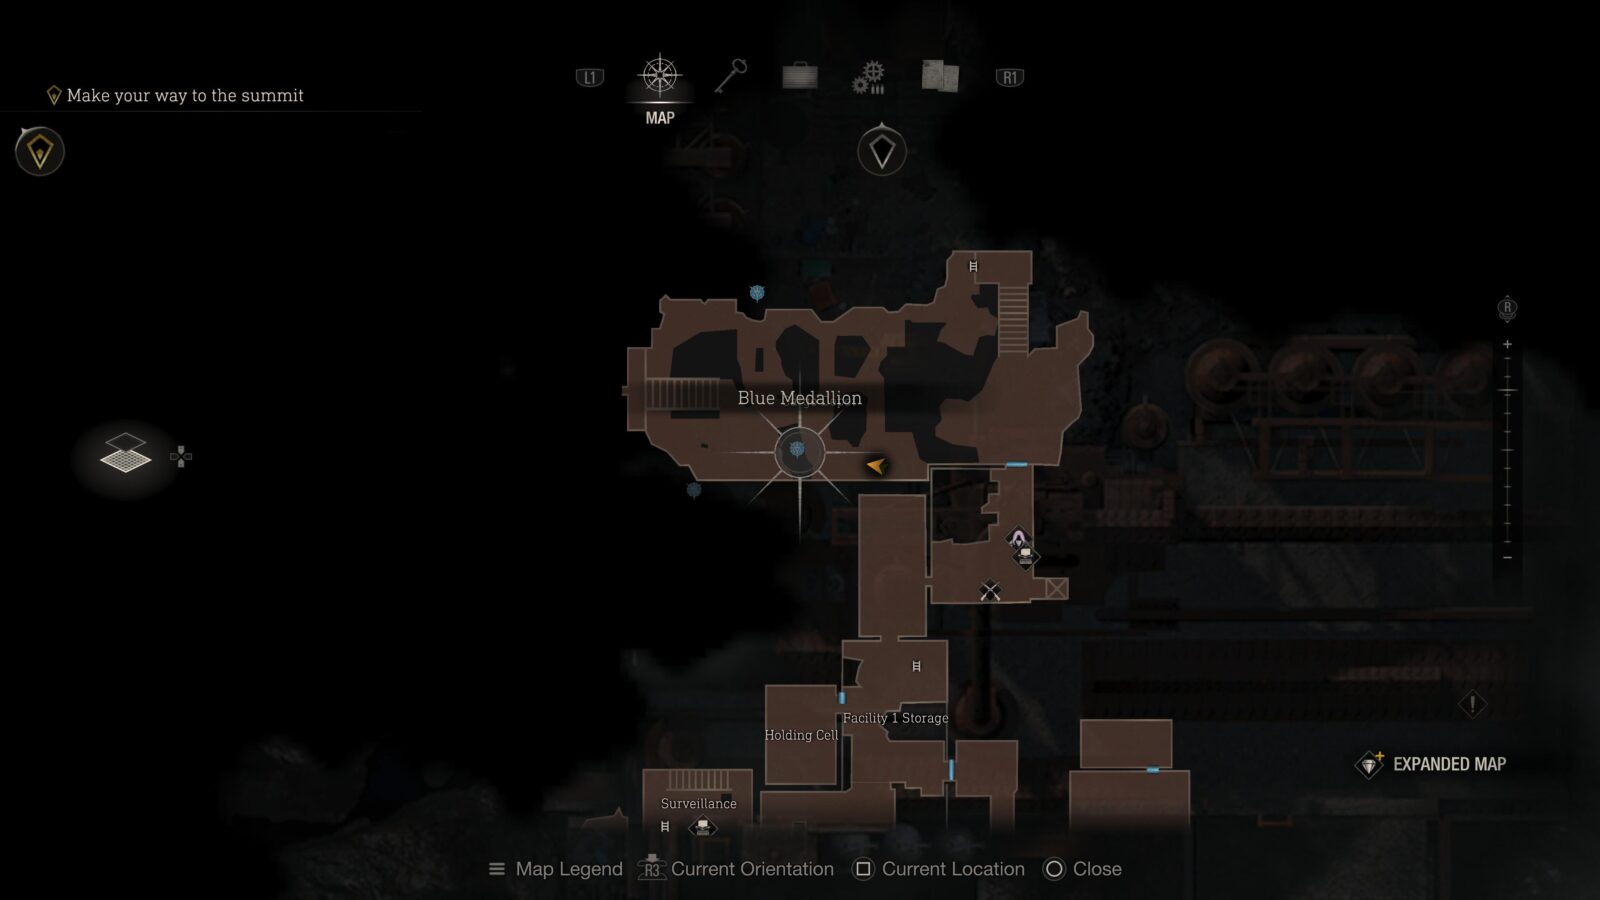
Merchant Request: Destroy the Blue Medallions 4
Head through the door with the Merchant flame outside and you will find a typewriter and the Merchant. On the same desk as the typewriters is another blue medallion request. The medallions are a bit more spread out than some of the other requests so they will be listed as an when you come across them during the progression of this collectible guide.
Shooting Range
Inside the typewriter room is an elevator that leads to another Shooting Range with 3 more challenges, 2A, 2B, and 2C. You don’t have to take on the challenges right now but you will need to get an S Rank on all 12 challenges before you finish the story.
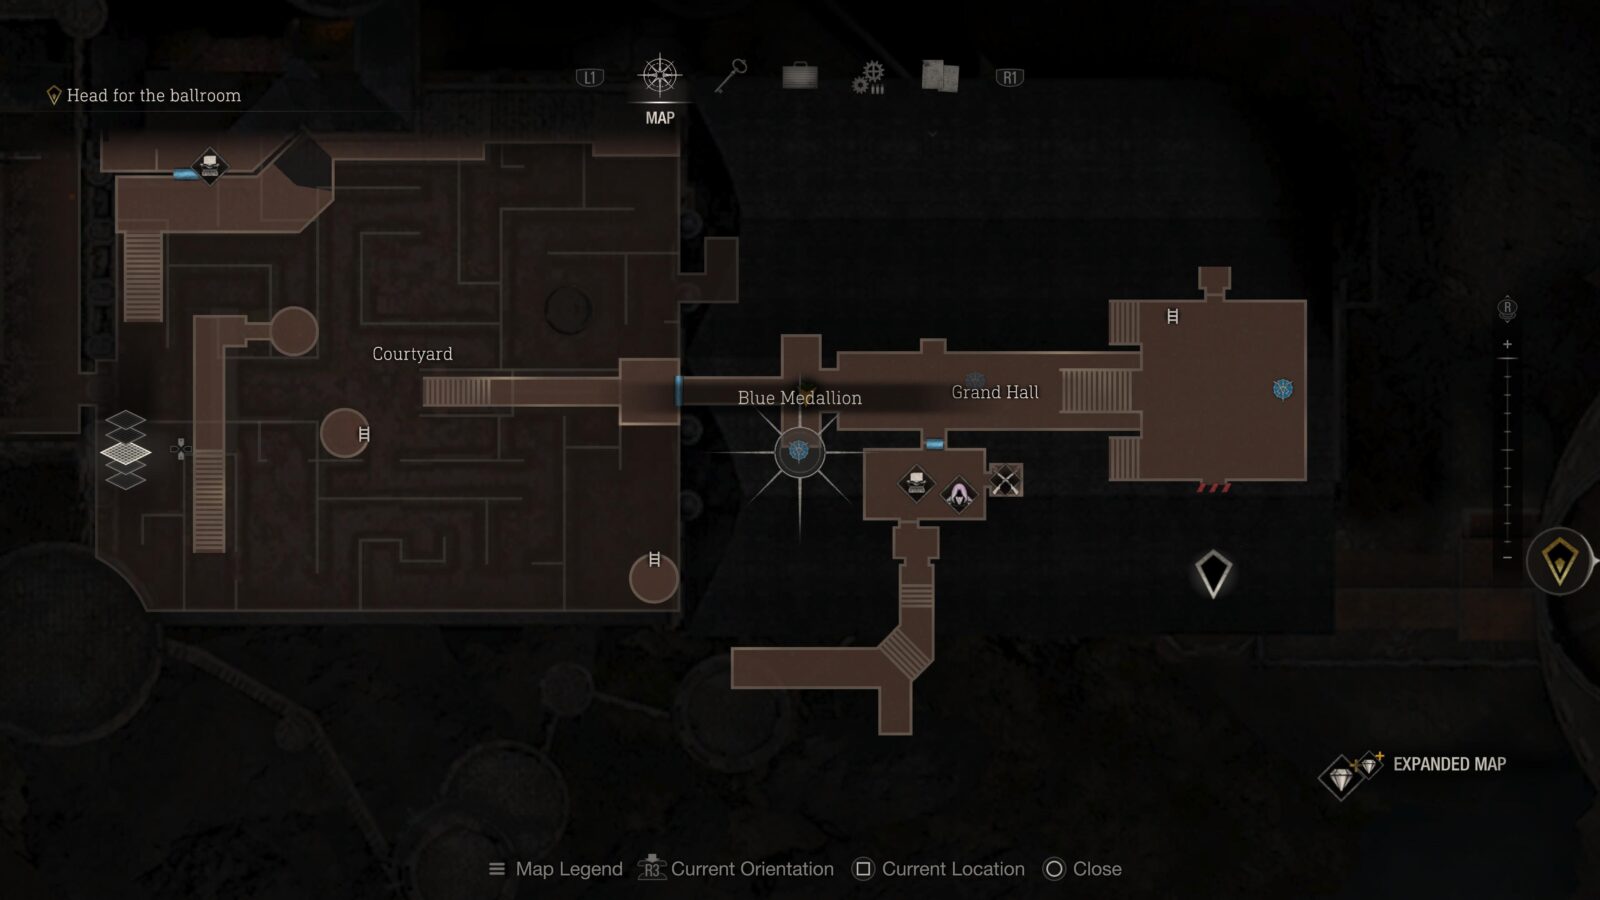
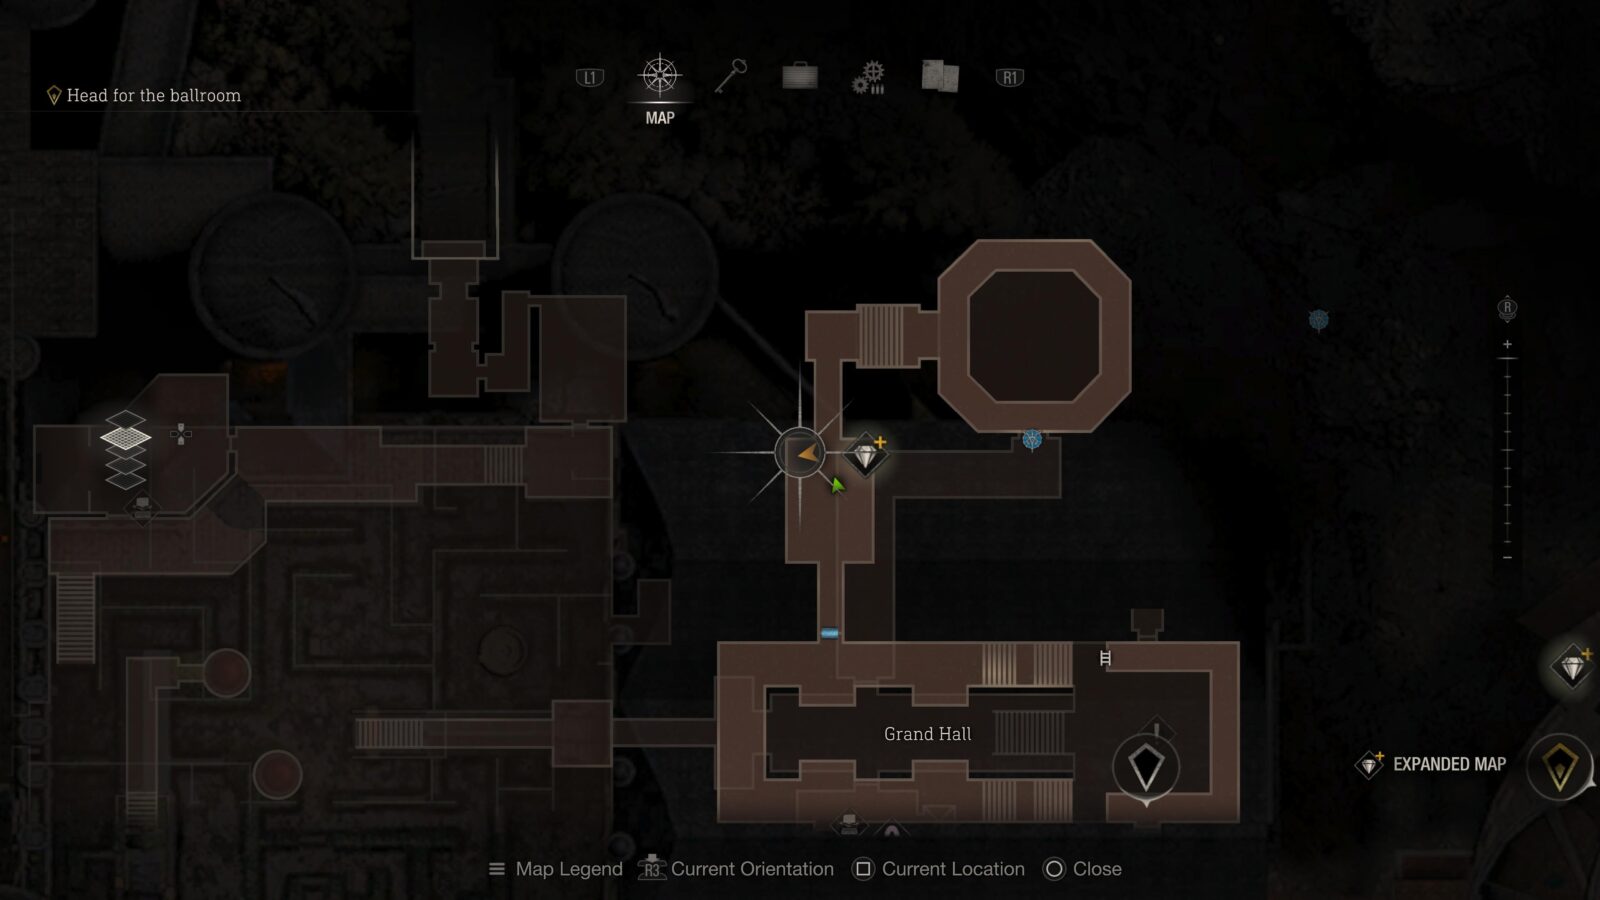
Blue Medallion #1
Leave the typewriter room and head back towards the door to the maze. As you reach the door look to your left and you should see a dark shallow alcove with a medallion hanging from the ceiling.
Blue Medallion #2
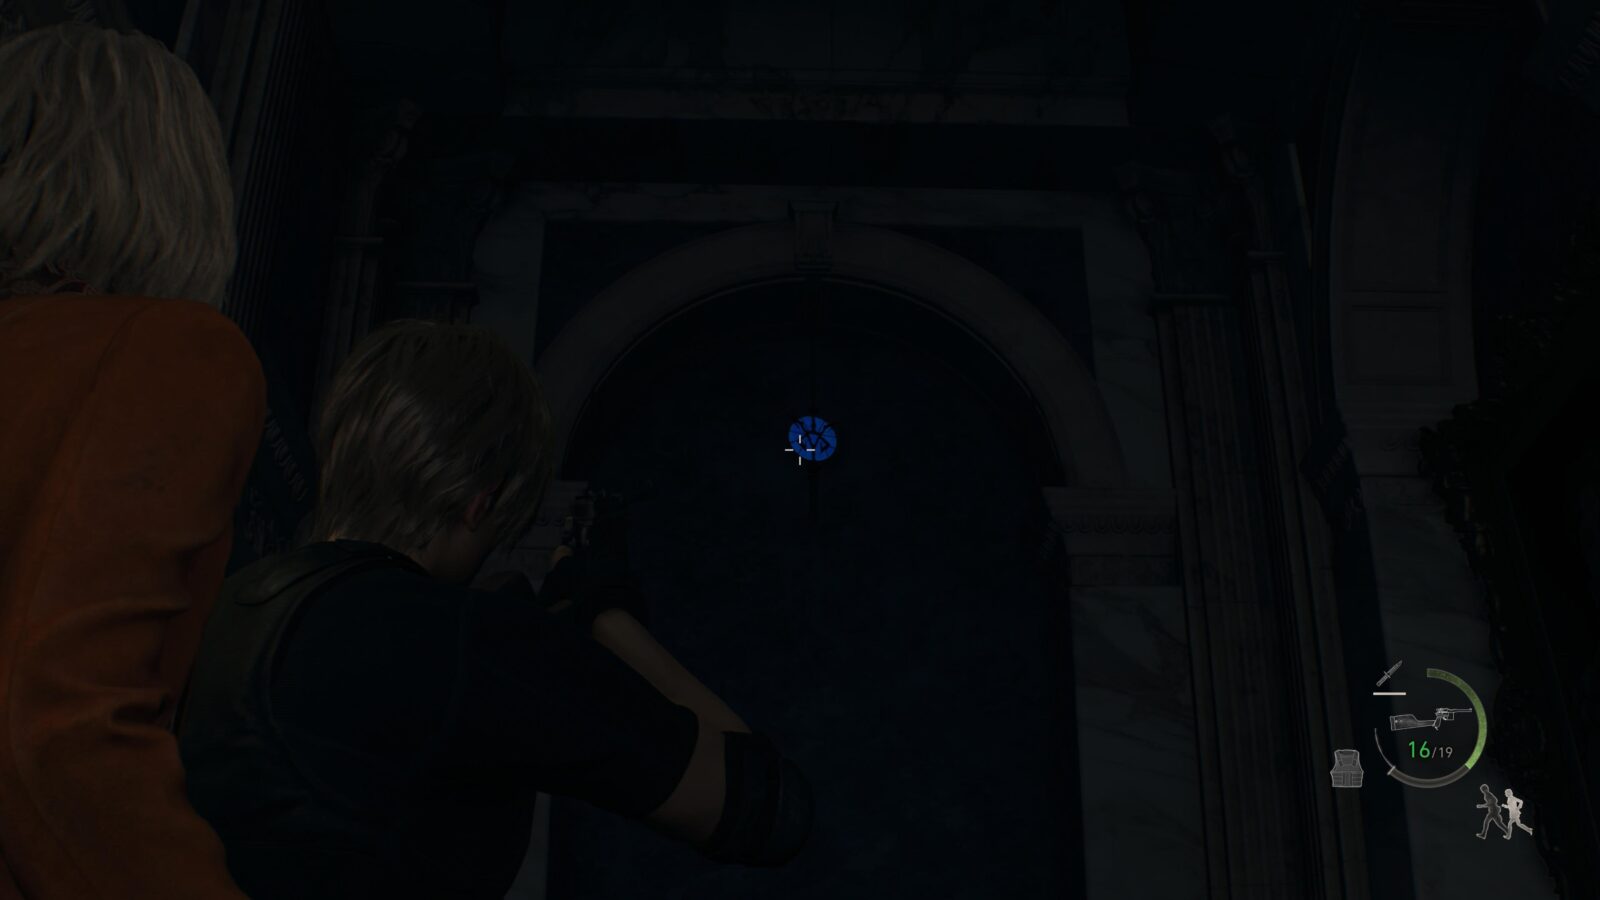
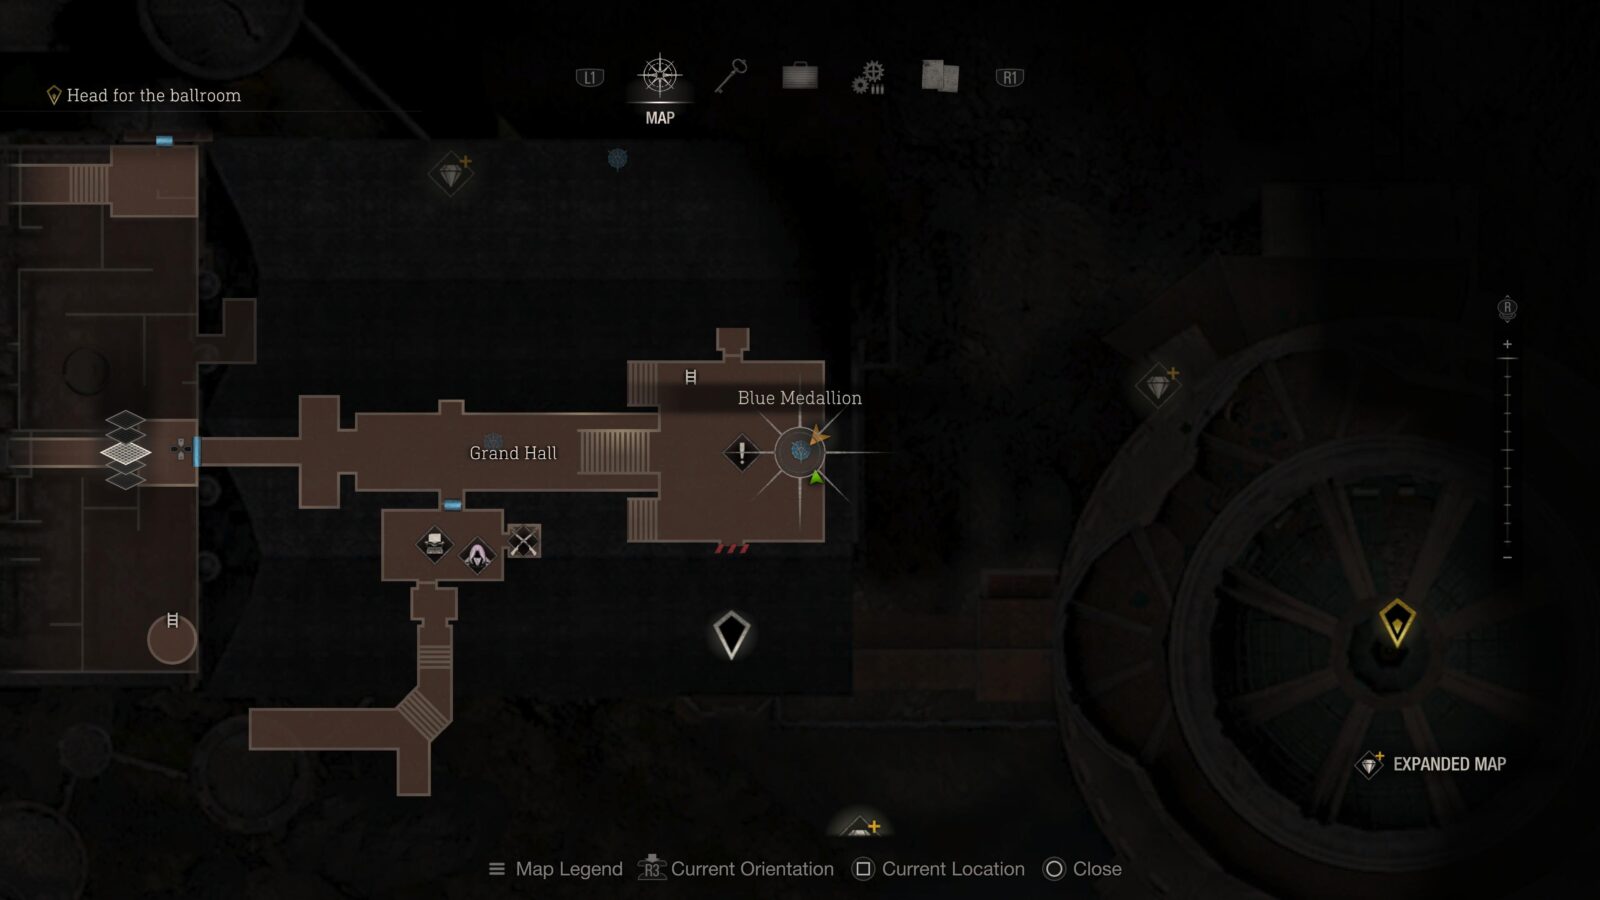
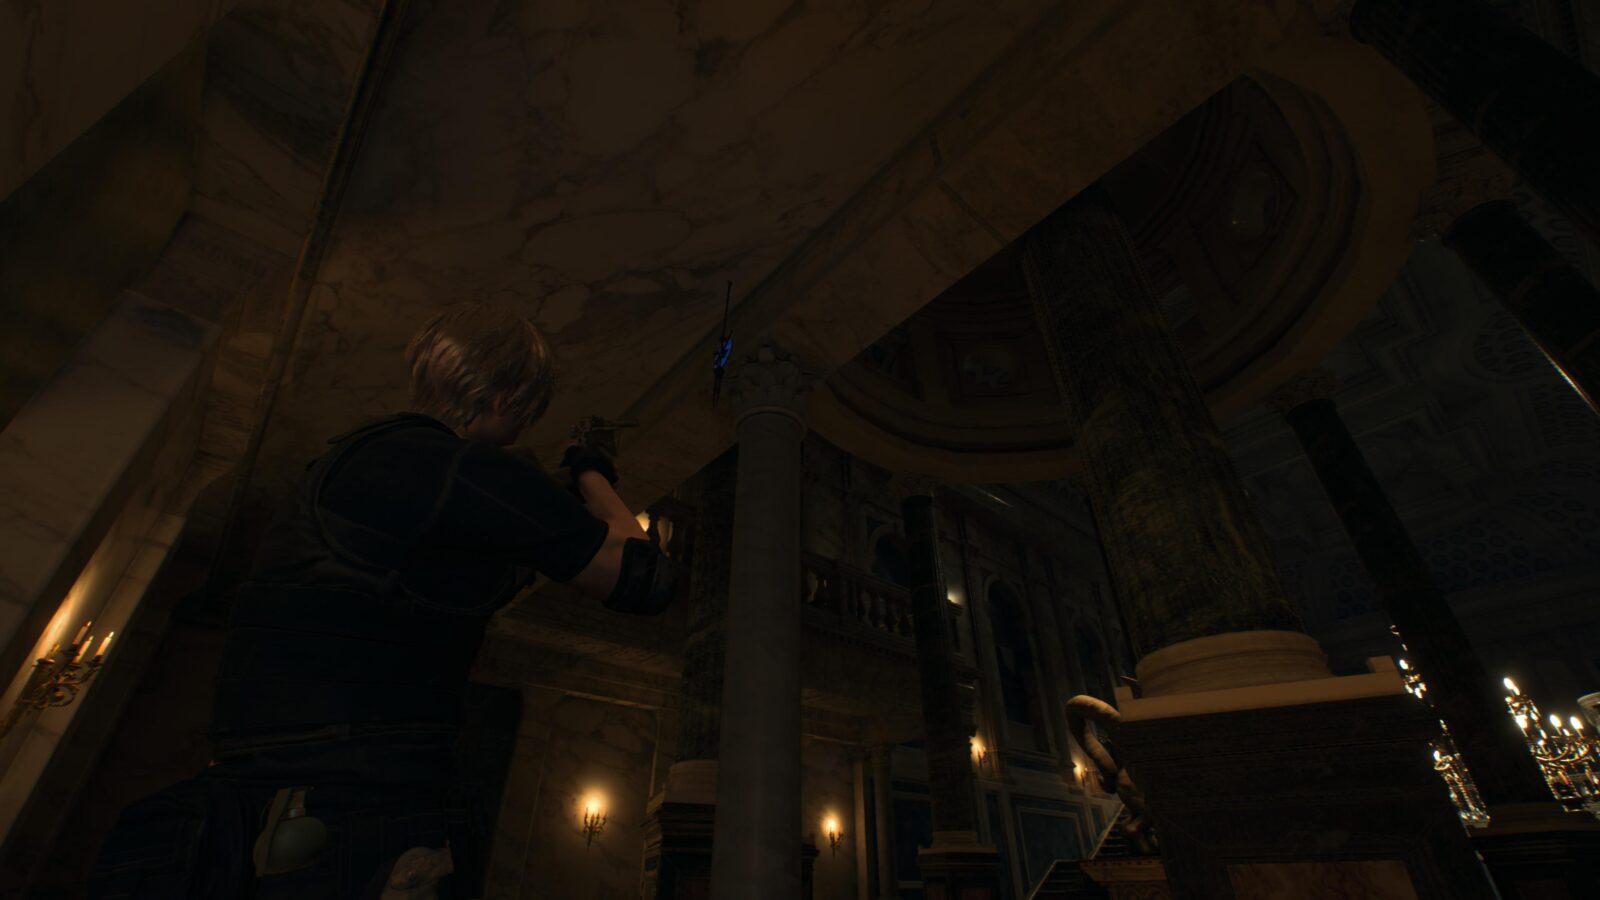
Turn around and walk up the stairs in the Grand Hall where the statue puzzle is. Walk behind the statue and look at the top of the columns to find a medallion.
Merchant Request: More Pest Control
To the left of the statue in the Grand Hall there will be a blue request paper pinned to the wall to the right of a door. You will have to kill more rats for the Merchant. The rats are quite spread out with one of them being in another chapter so I will list them as and when you come across them naturally.
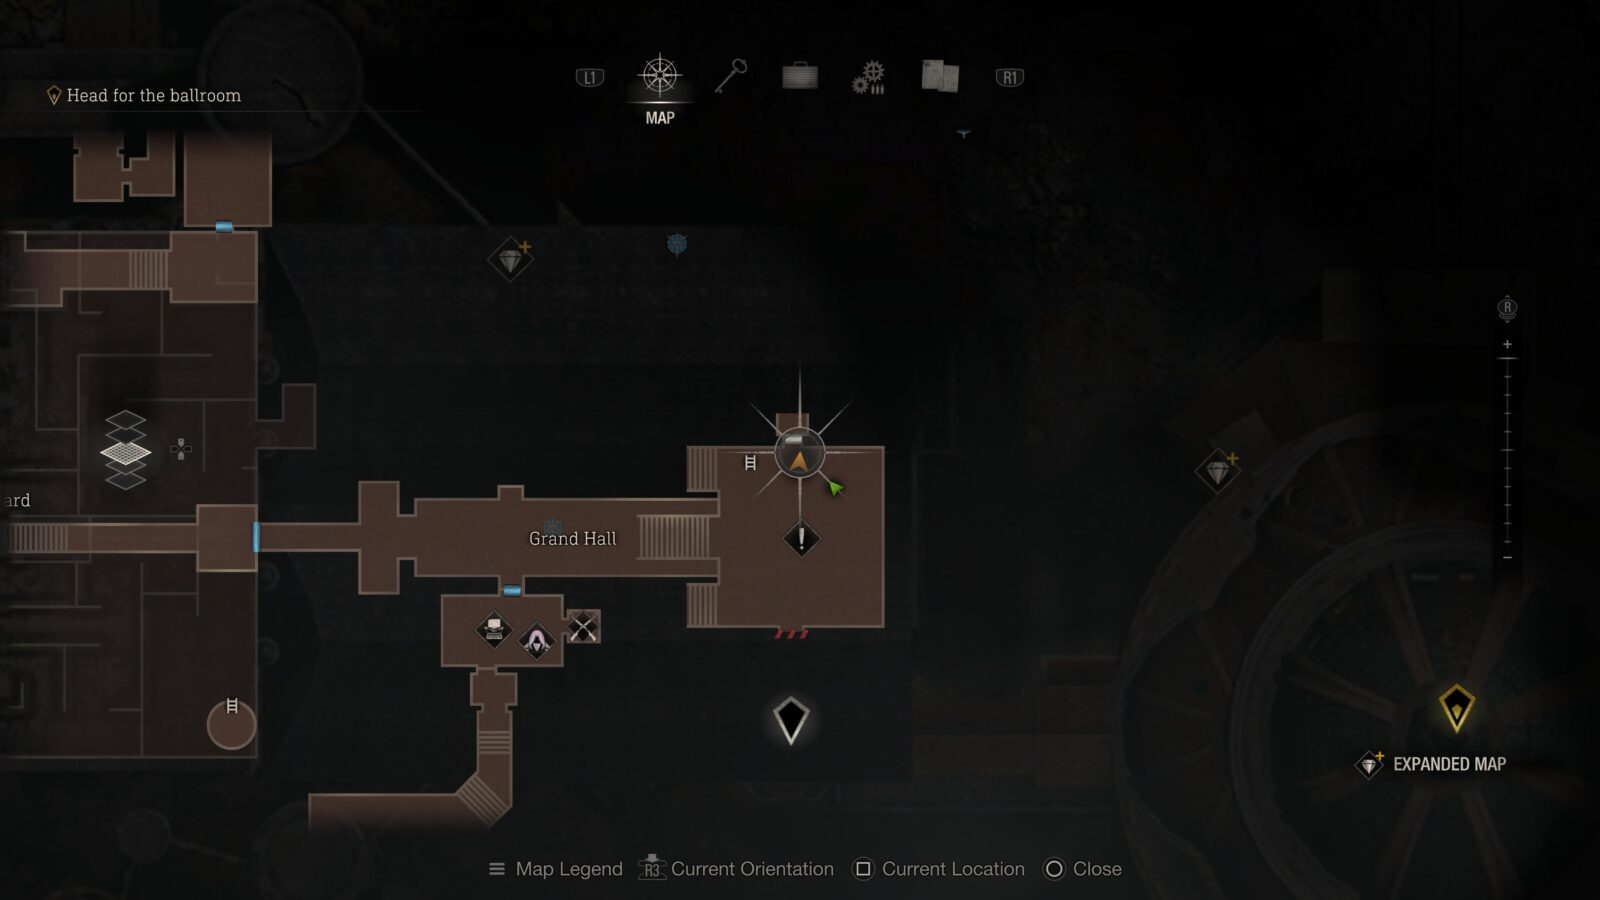

Blue Medallion #3
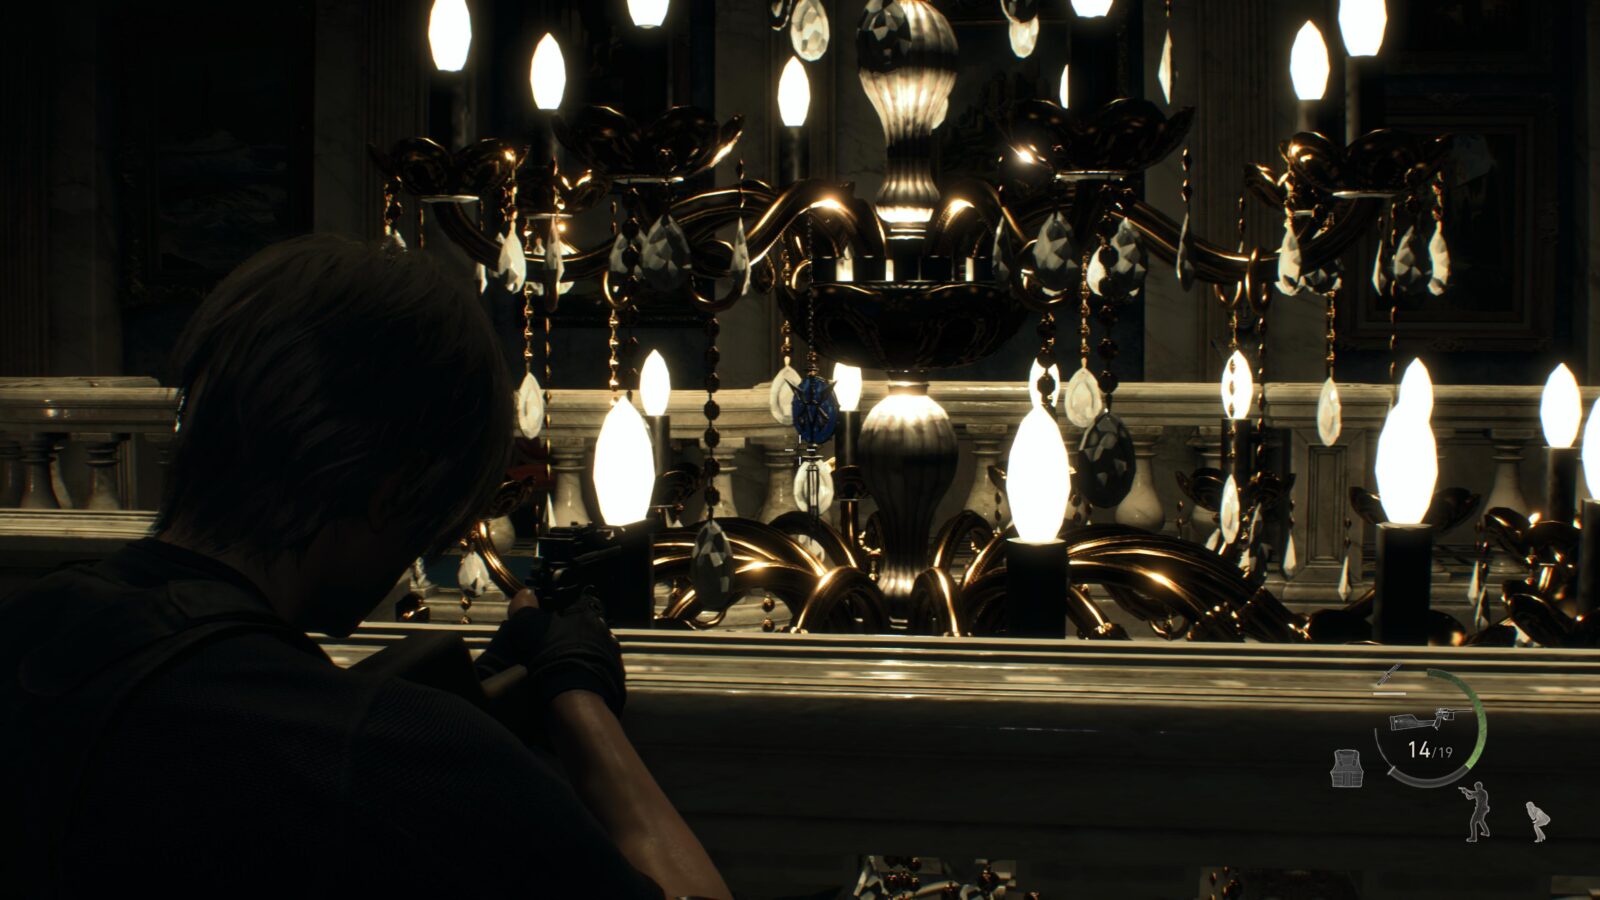
Walk up the stairs to the left of the request note and keep your eye on the large chandelier dangling in the middle of the hall. There is a blue medallion hanging on it at head height.
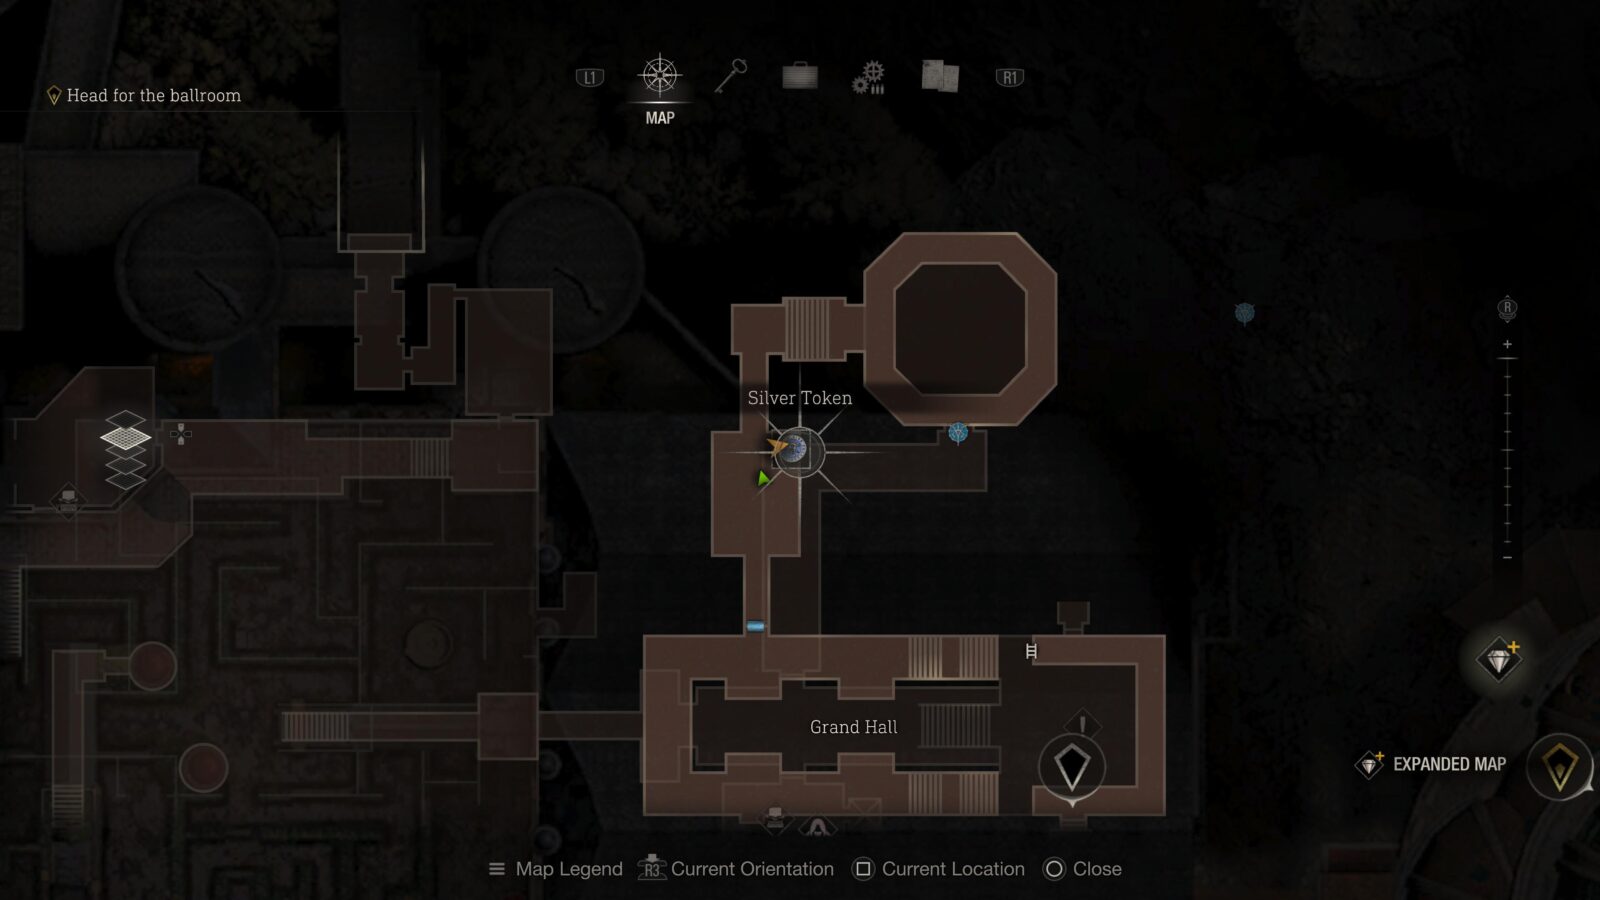
Small Key
Enter the door just beyond the chandelier into a room lined with suits of armor. In the far left corner is a cupboard with a Small Key inside.

Silver Token (Expanded Treasure)
Opposite the Small Key is a metal cage hanging from the ceiling with a Silver Token inside. This is only available to those who have the Expanded Treasure Map DLC.

Blue Medallion #4
Head further down the hall and you will enter the Armory room. On the 2nd floor there will be a medallion on the wall above a chair between some curtains on the far right of the room.
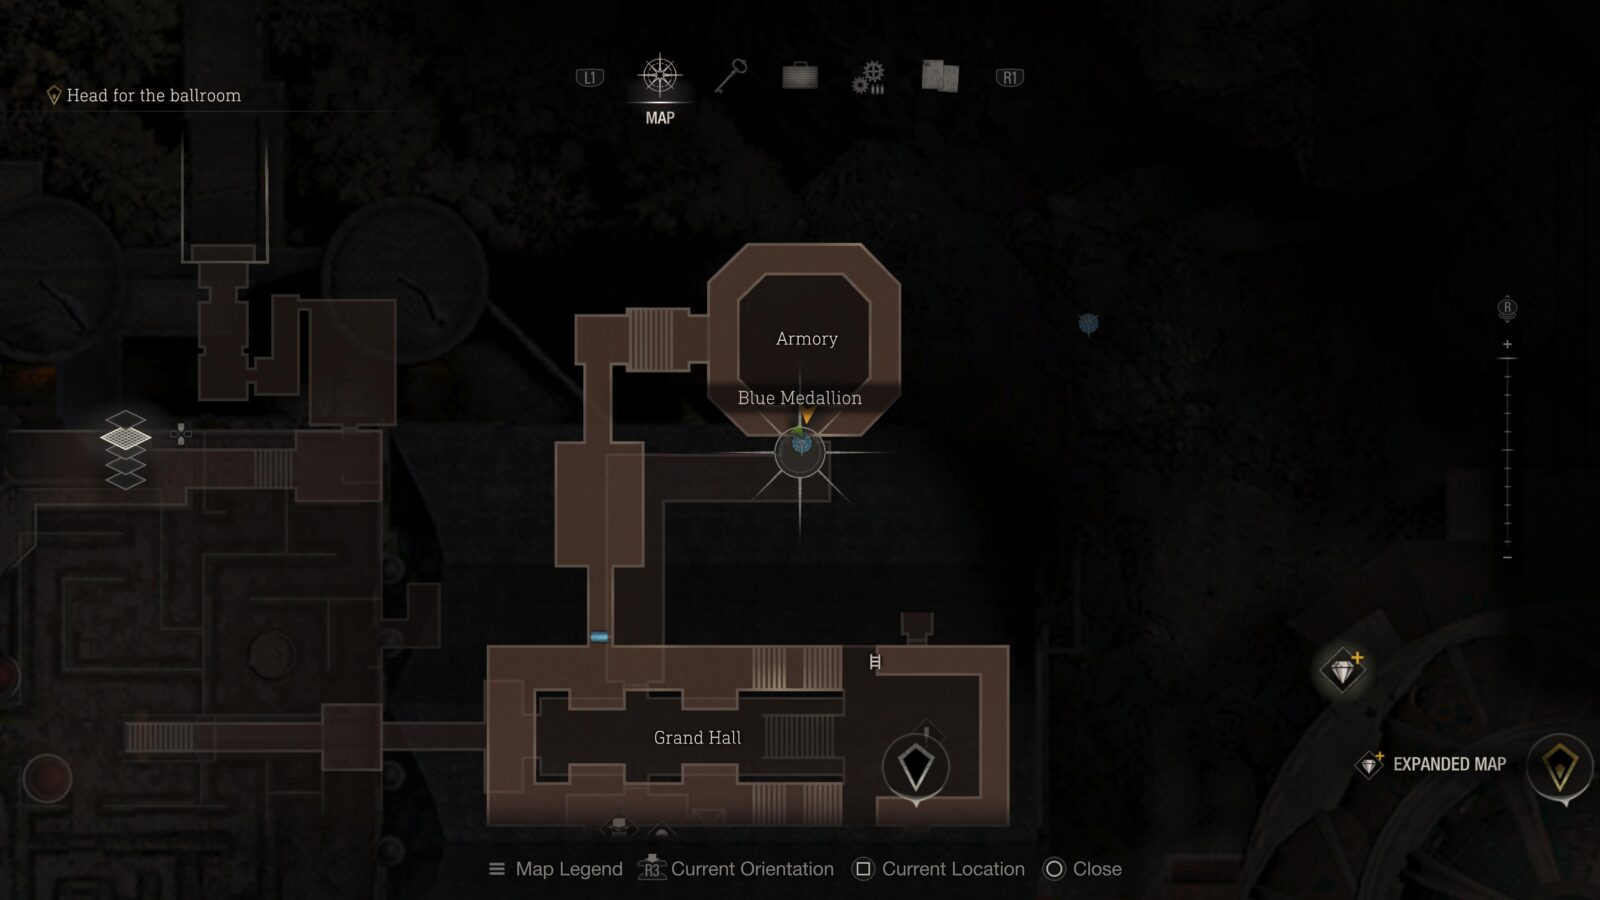

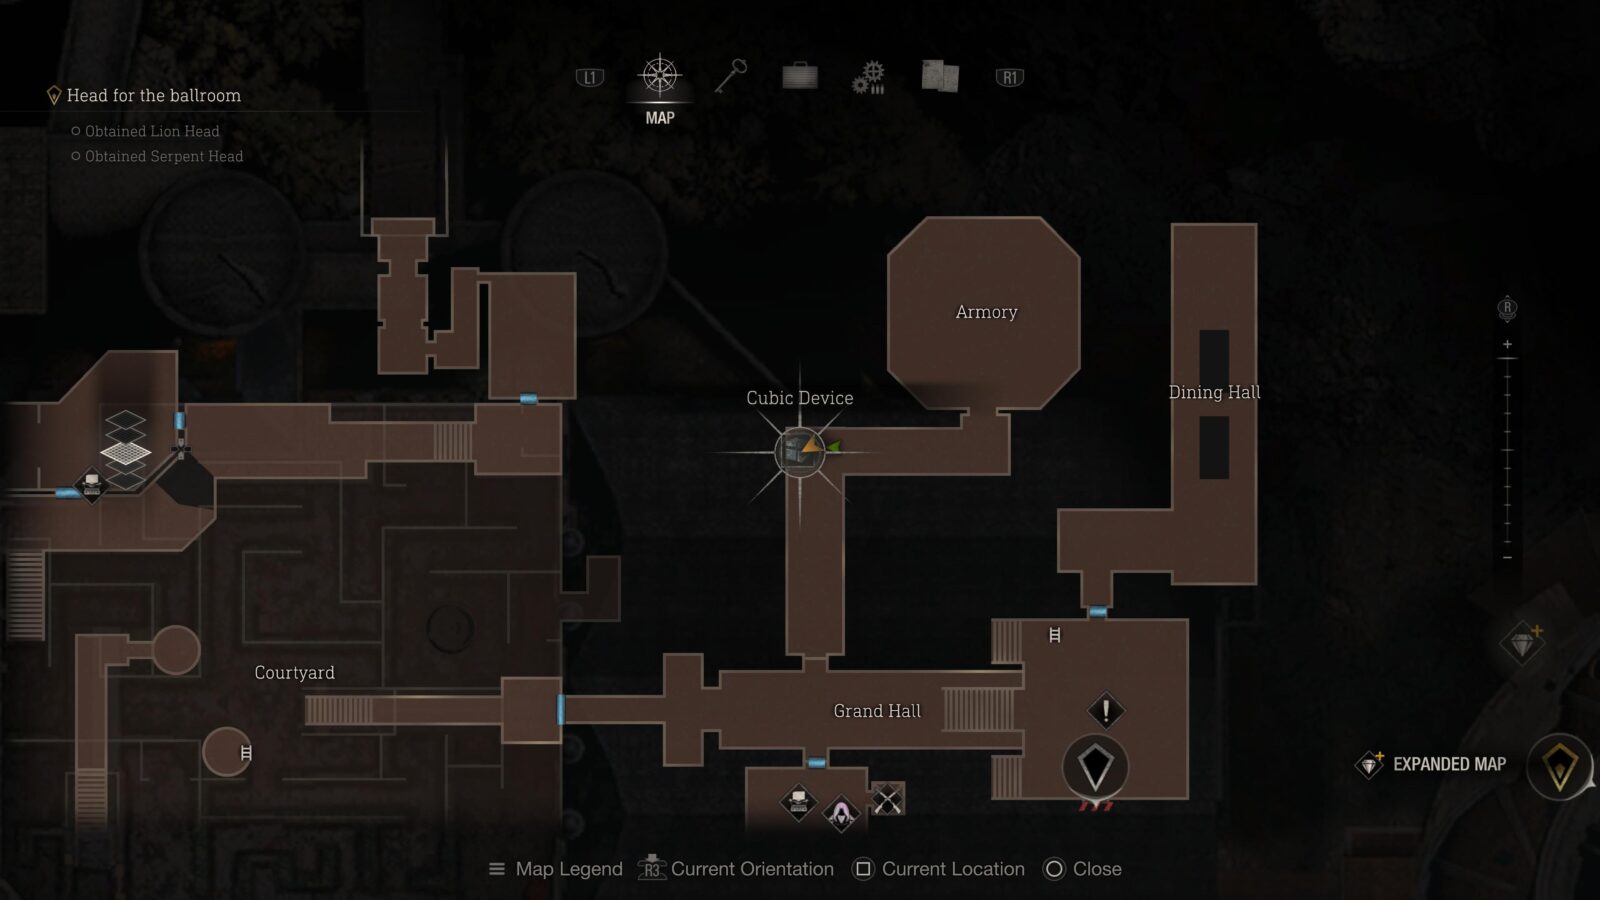
Cubic Device
After you finish the Armory room you will enter a corridor with a chest about halfway in. Inside the chest is a Cubic Device. This isn’t a treasure but will open up shrines that contain treasure within them so you will need to pick it up.

Rat #1
In the corridor after the Armory where you find the Cubic Device is also a rat which you need to kill for the Merchant Request. The rat moves about the corridor so keep an ear out for the little squeeks.
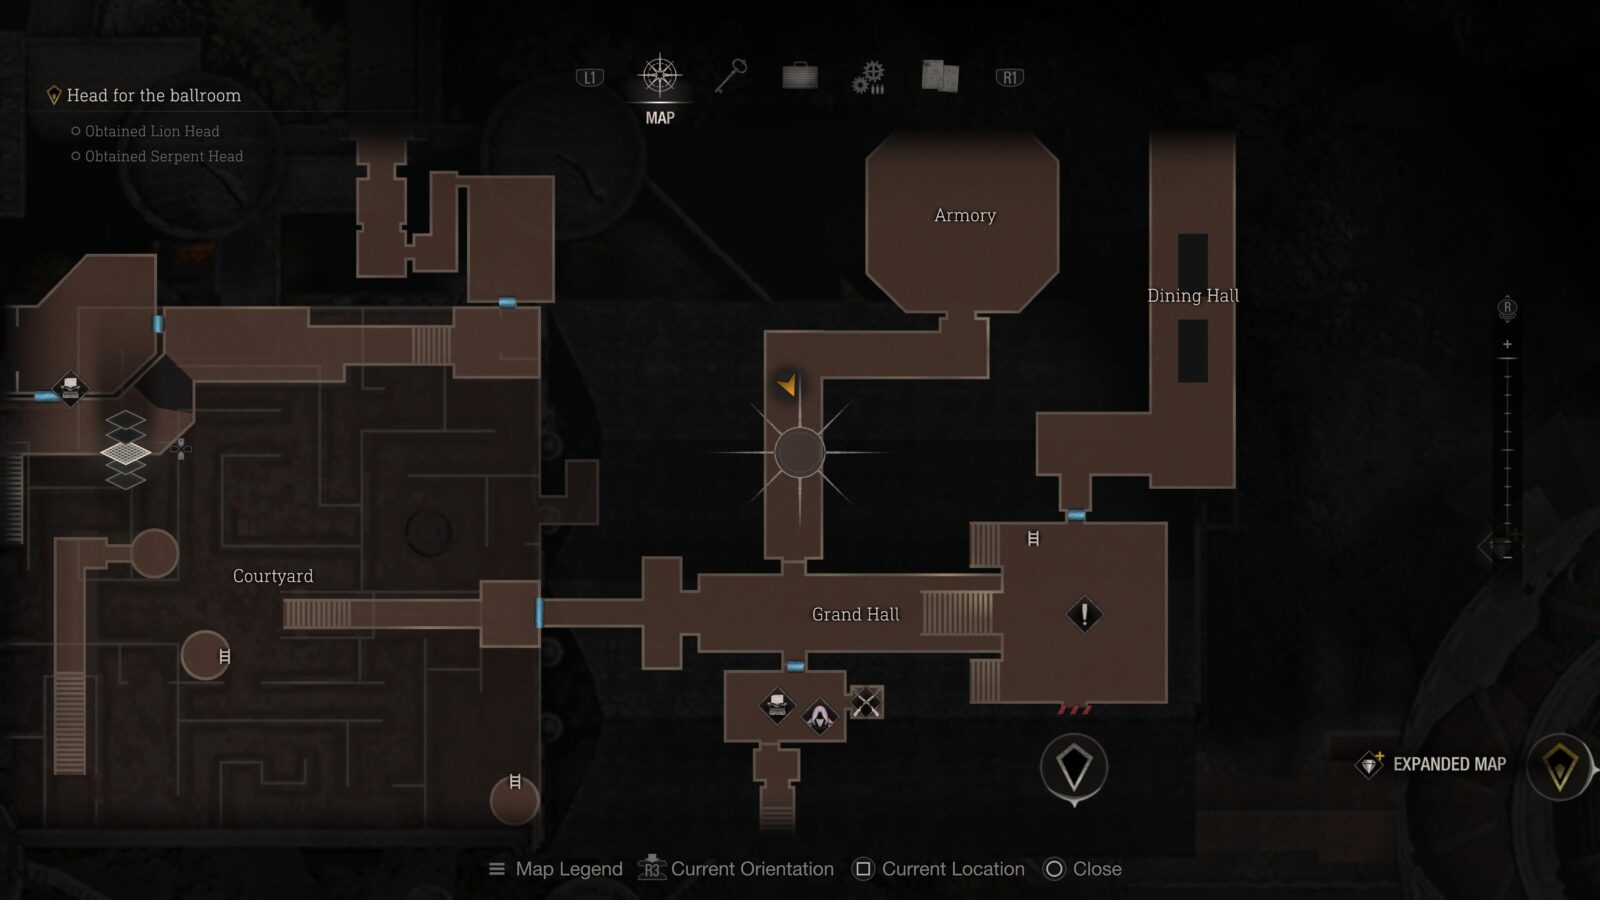
Rat #2
Return to the Grand Hall and head into the door where the Merchant Request was posted. Inside the Dining Hall will be a rat scurrying around. Listen out for its squeeks.
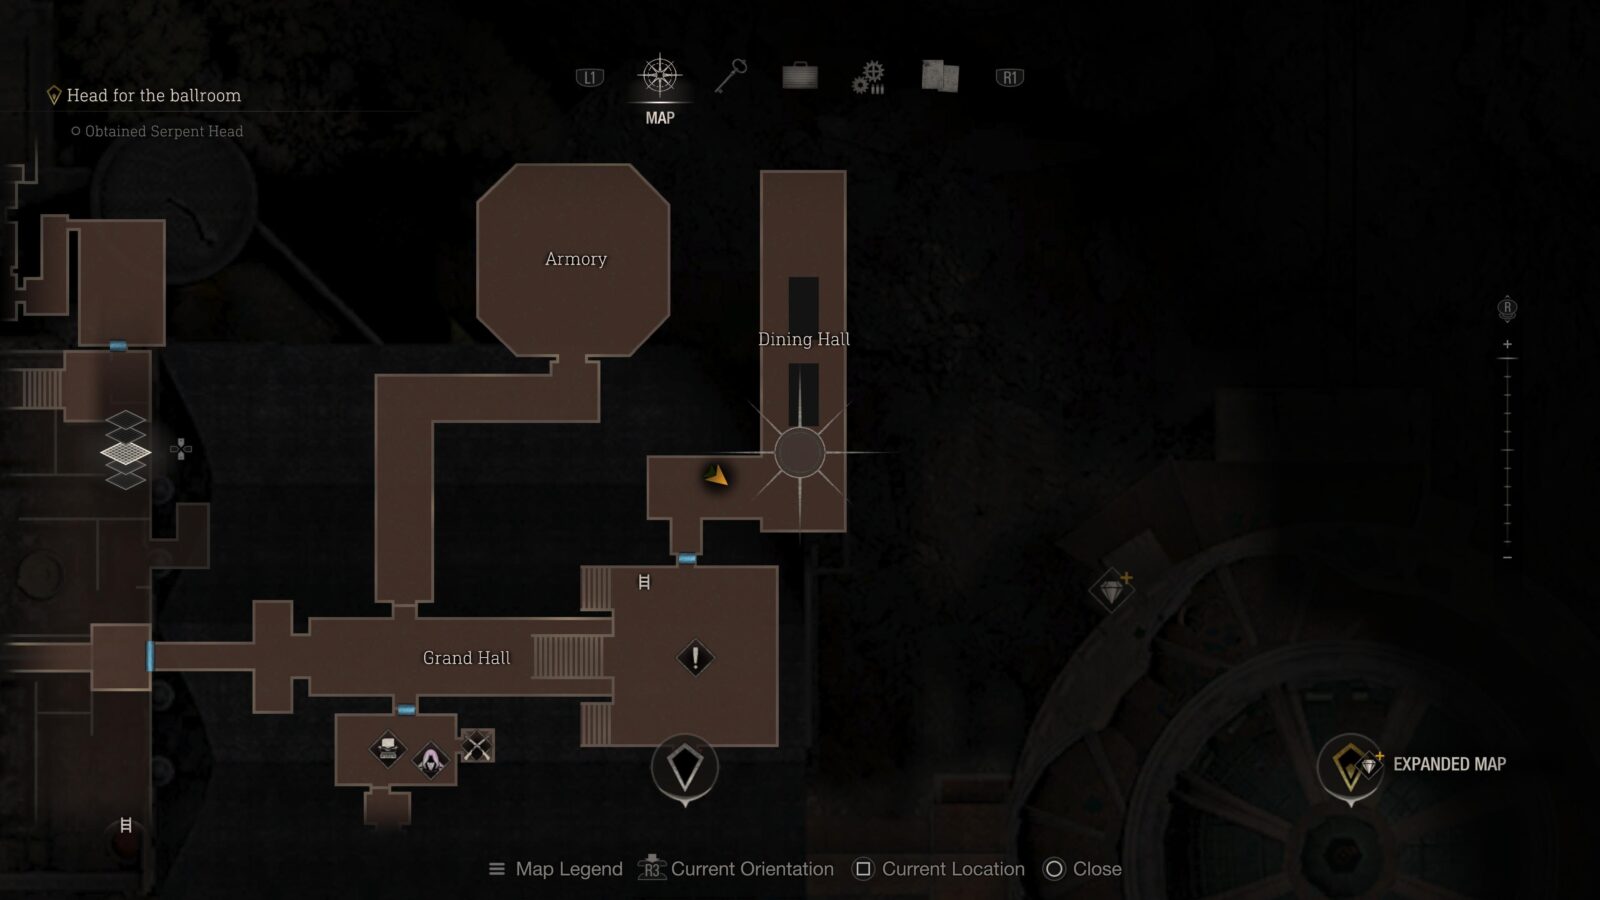
Blue Medallion #5
Inside the dining room between some curtains in the far left corner will be another medallion.


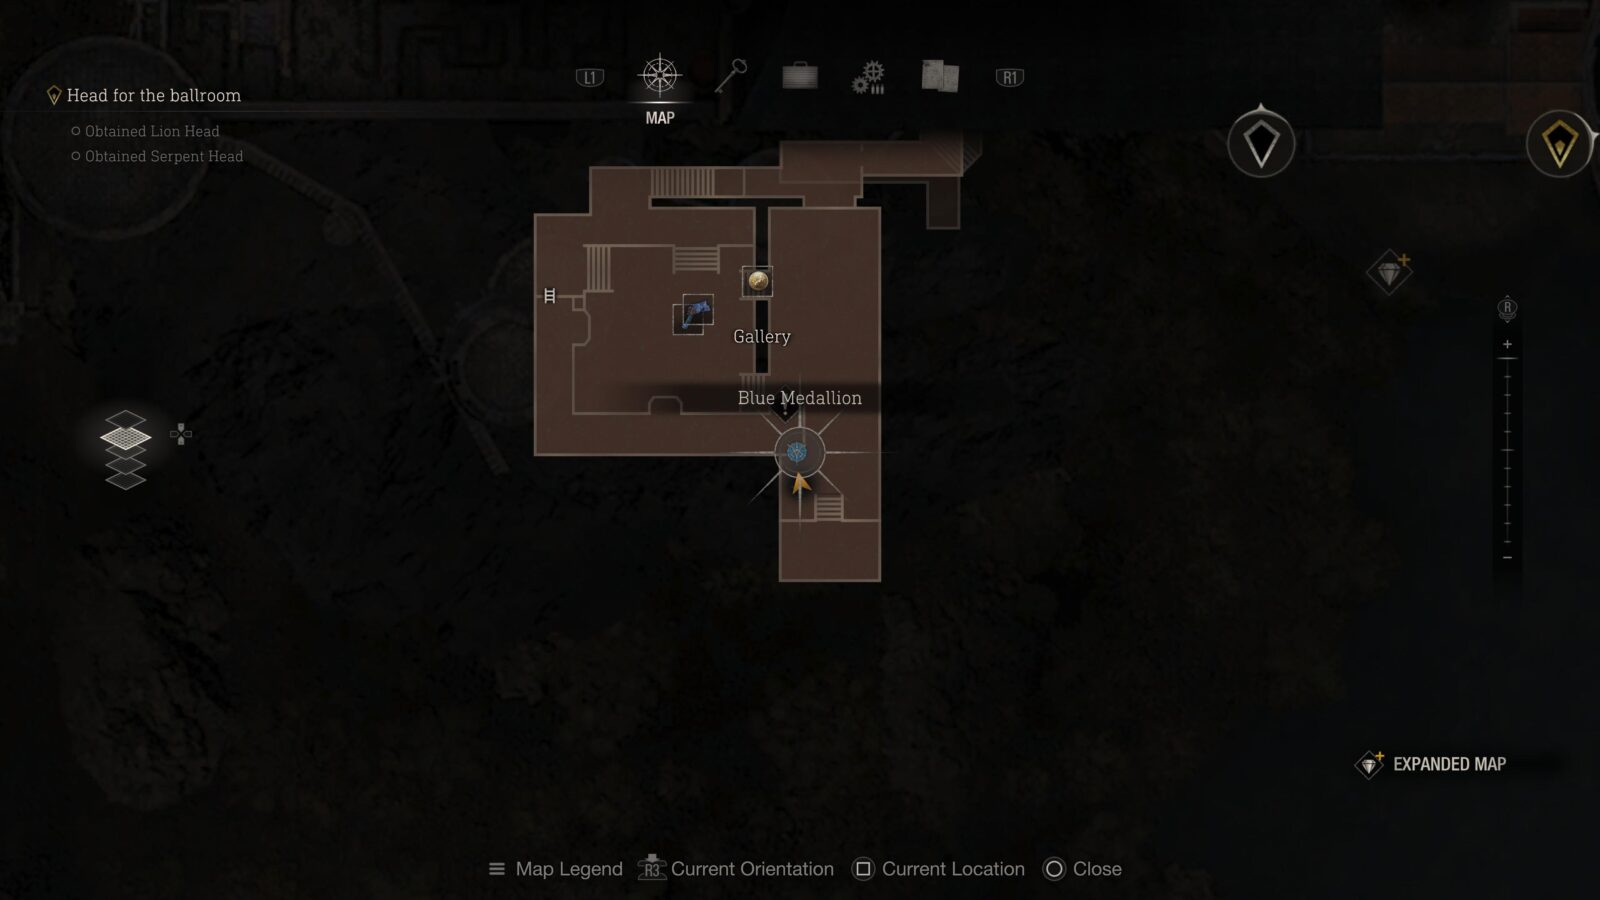
Blue Medallion #6
Leave the Dining Hall and enter the final room on the 2nd floor of the Grand Hall. Inside the Gallery will be another blue medallion which you can find at the southern part of the room after you survive the ambush.

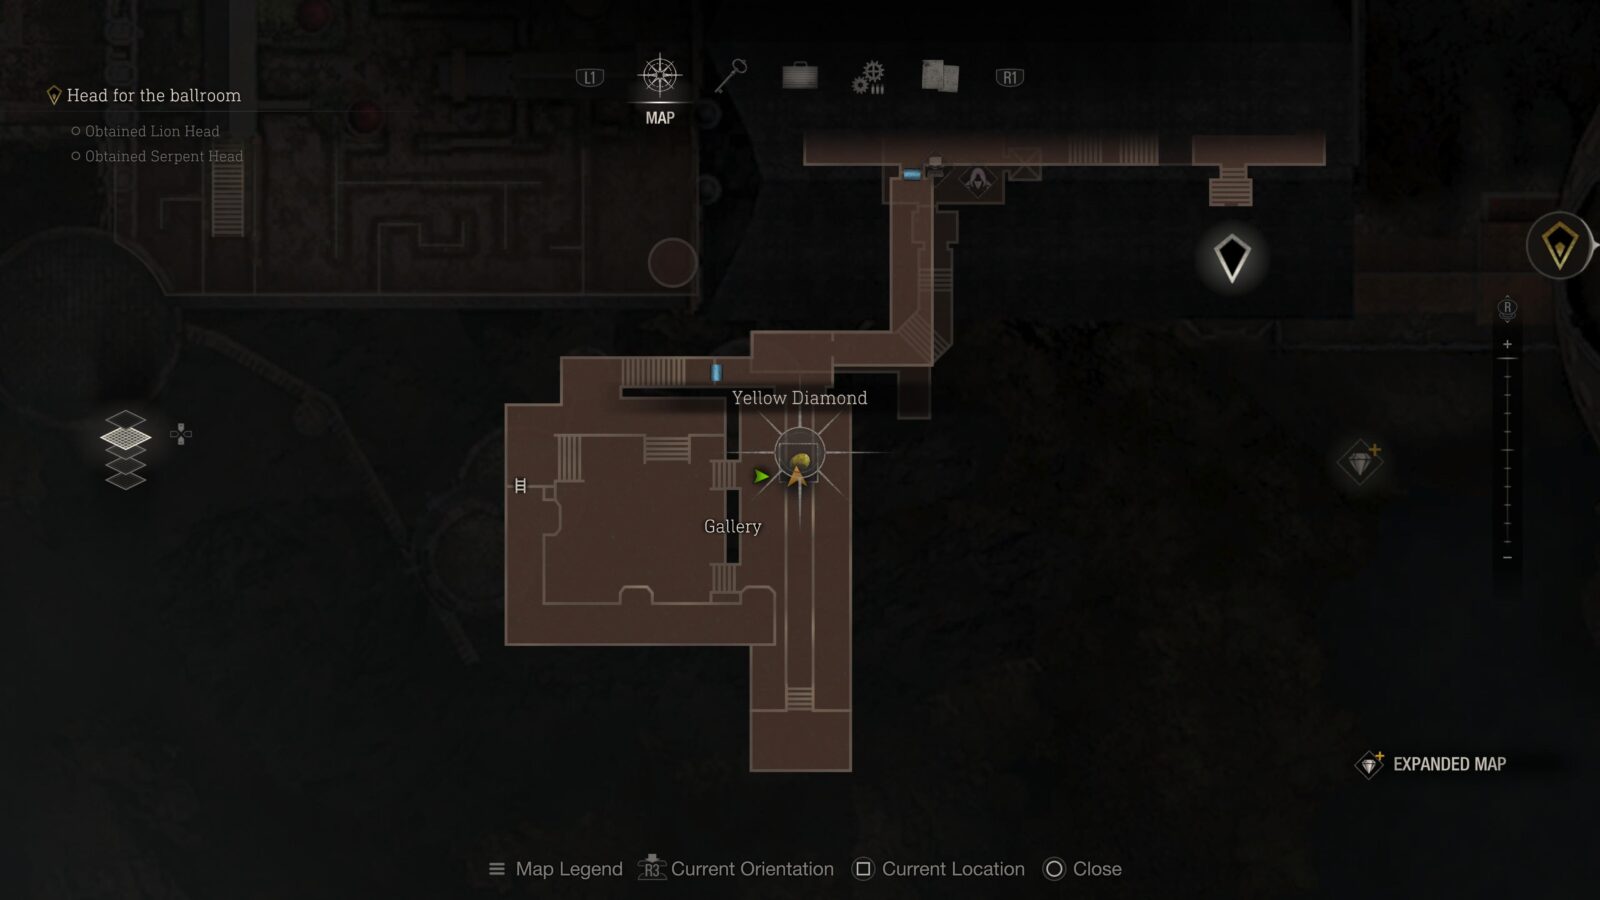
Yellow Diamond
After surviving the ambush in the Gallery you will climb a ladder to raise the pathway once again. Before running to walk on this raised pathway, head into the middle of the room and check for a chest under the pathway itself. Inside the chest is a Yellow Diamond.
Butterfly Lamp
Back in the Grand Hall take a trip to the Typewriter/Merchant room and use the Cubic Device on the shrine there to get a Butterfly Lamp.
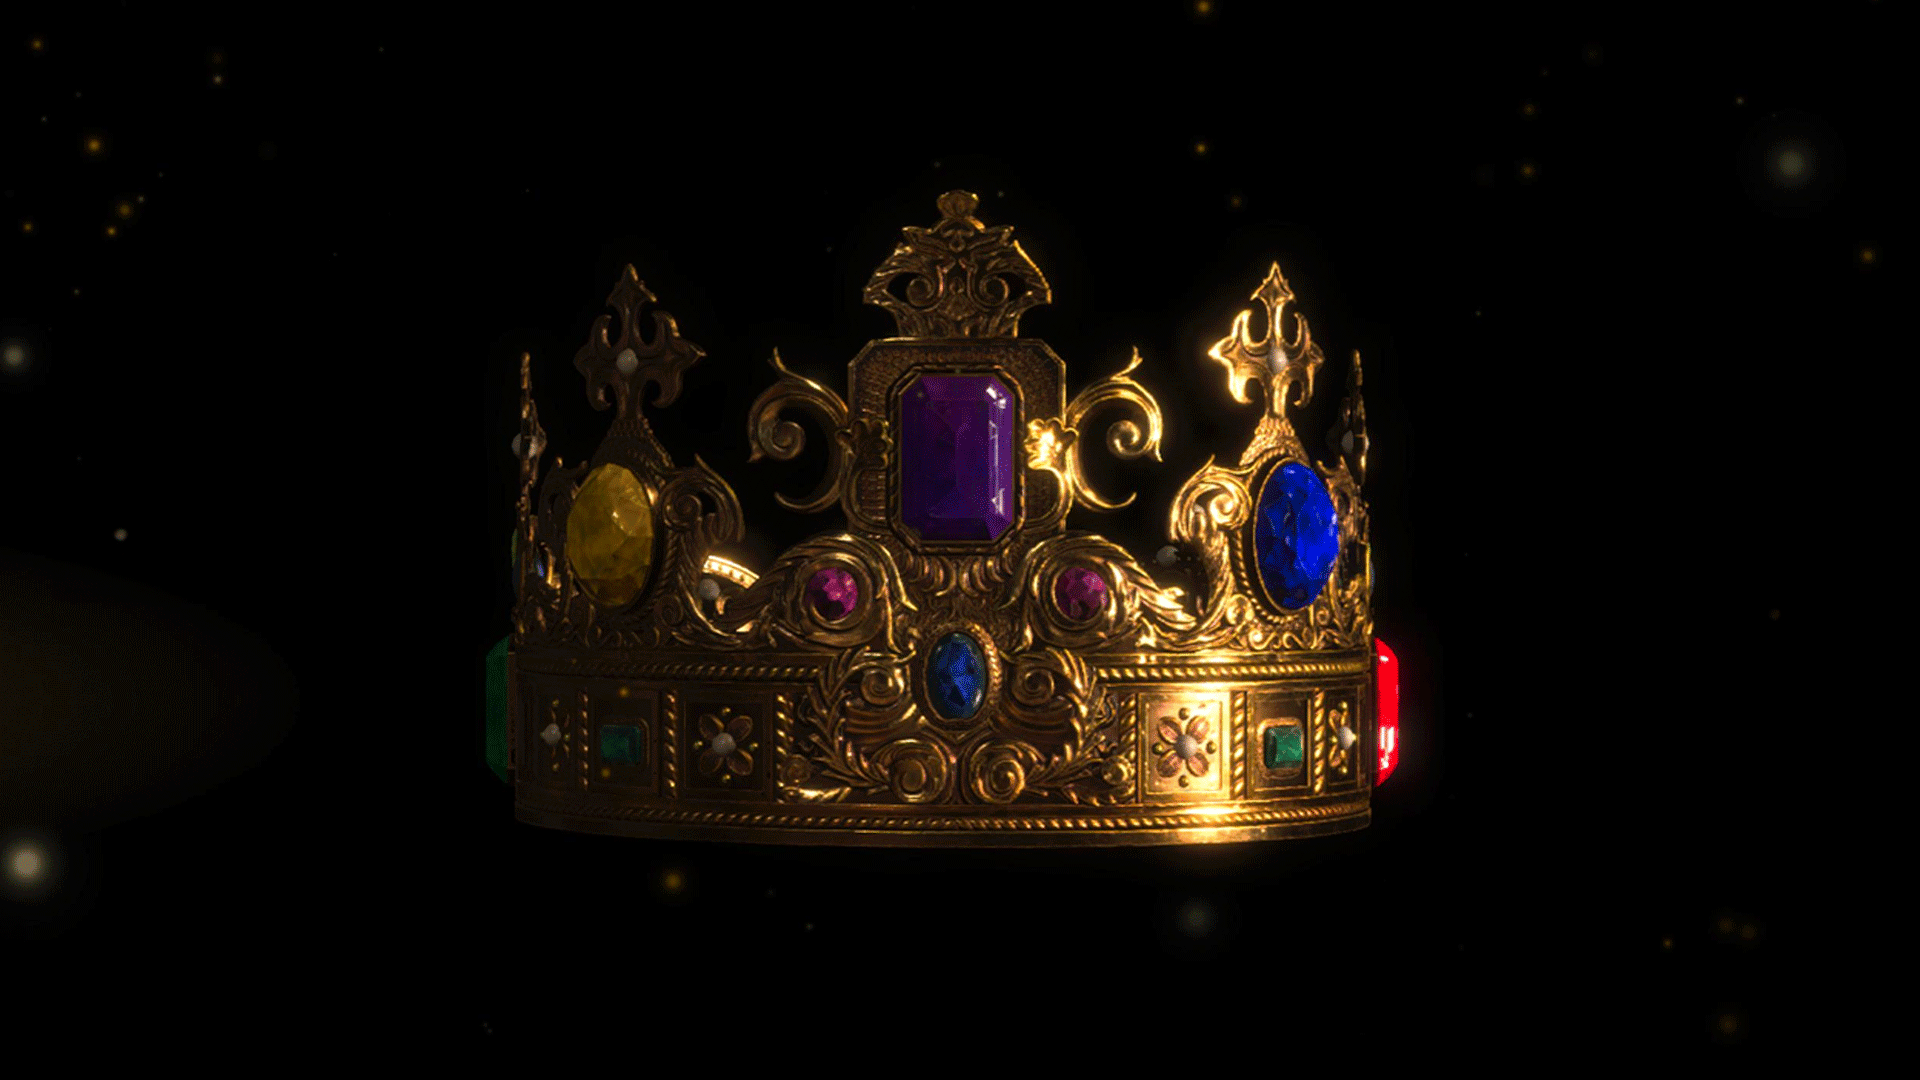
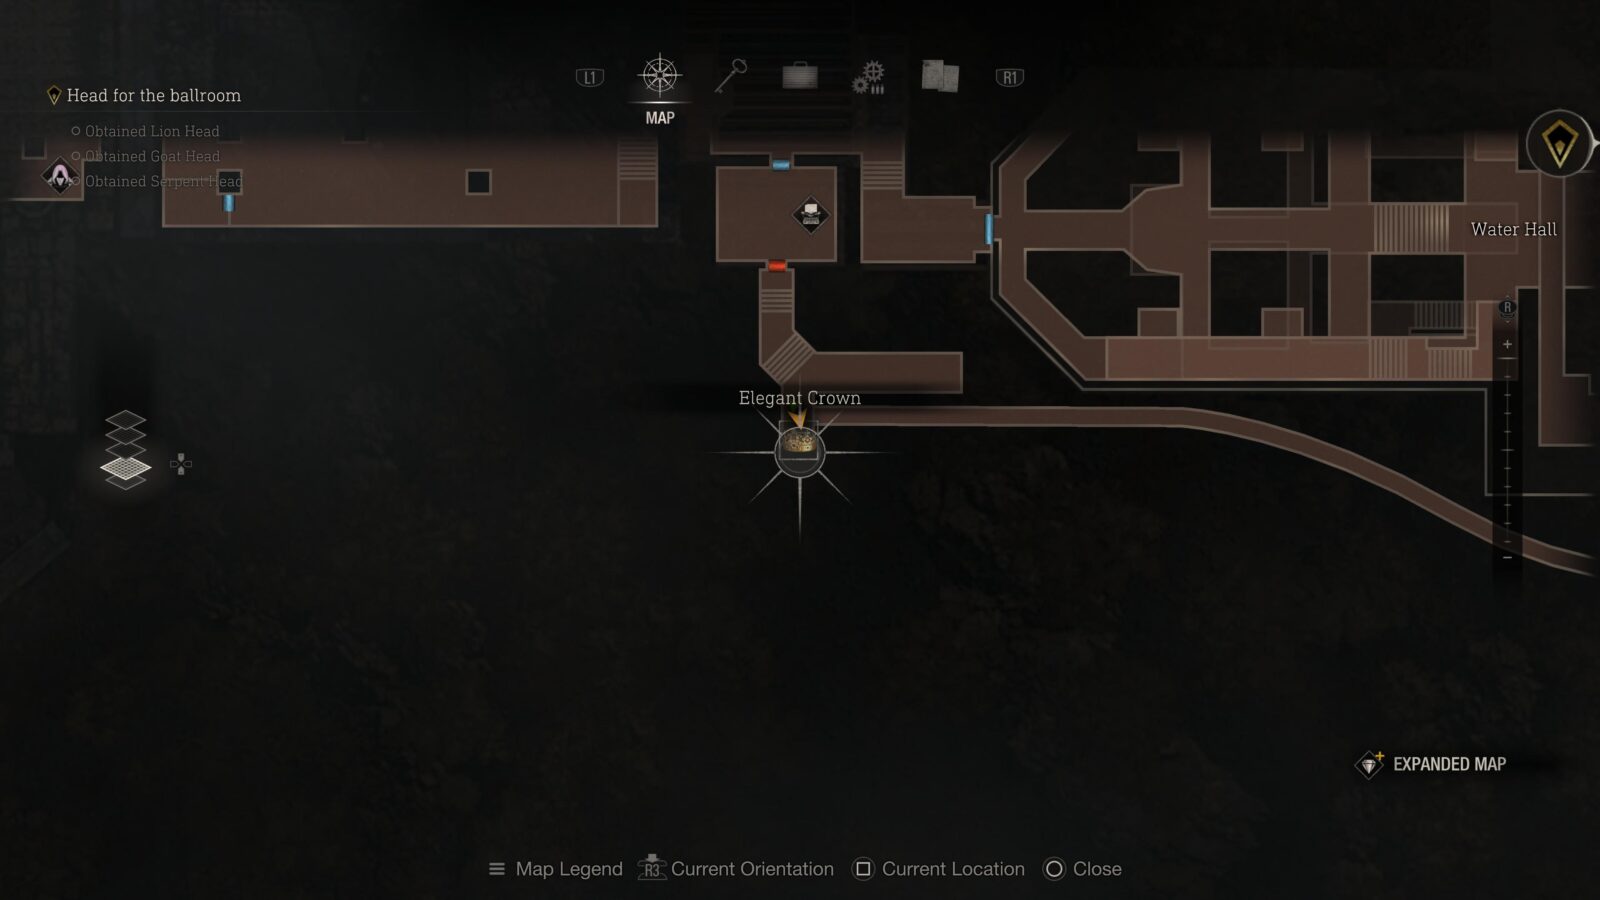
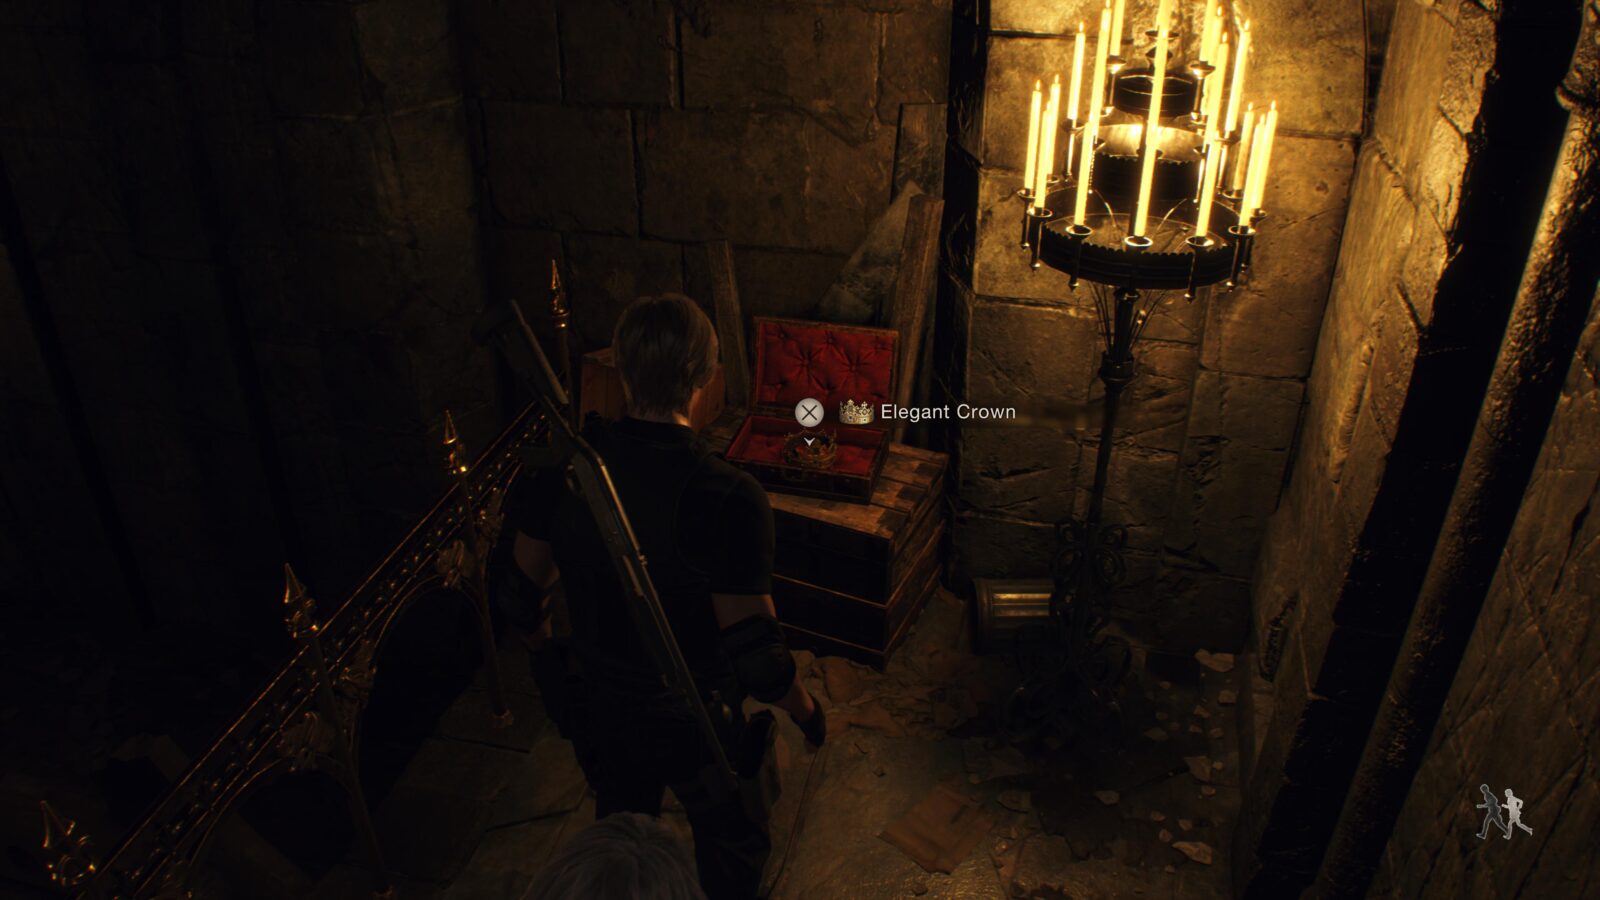
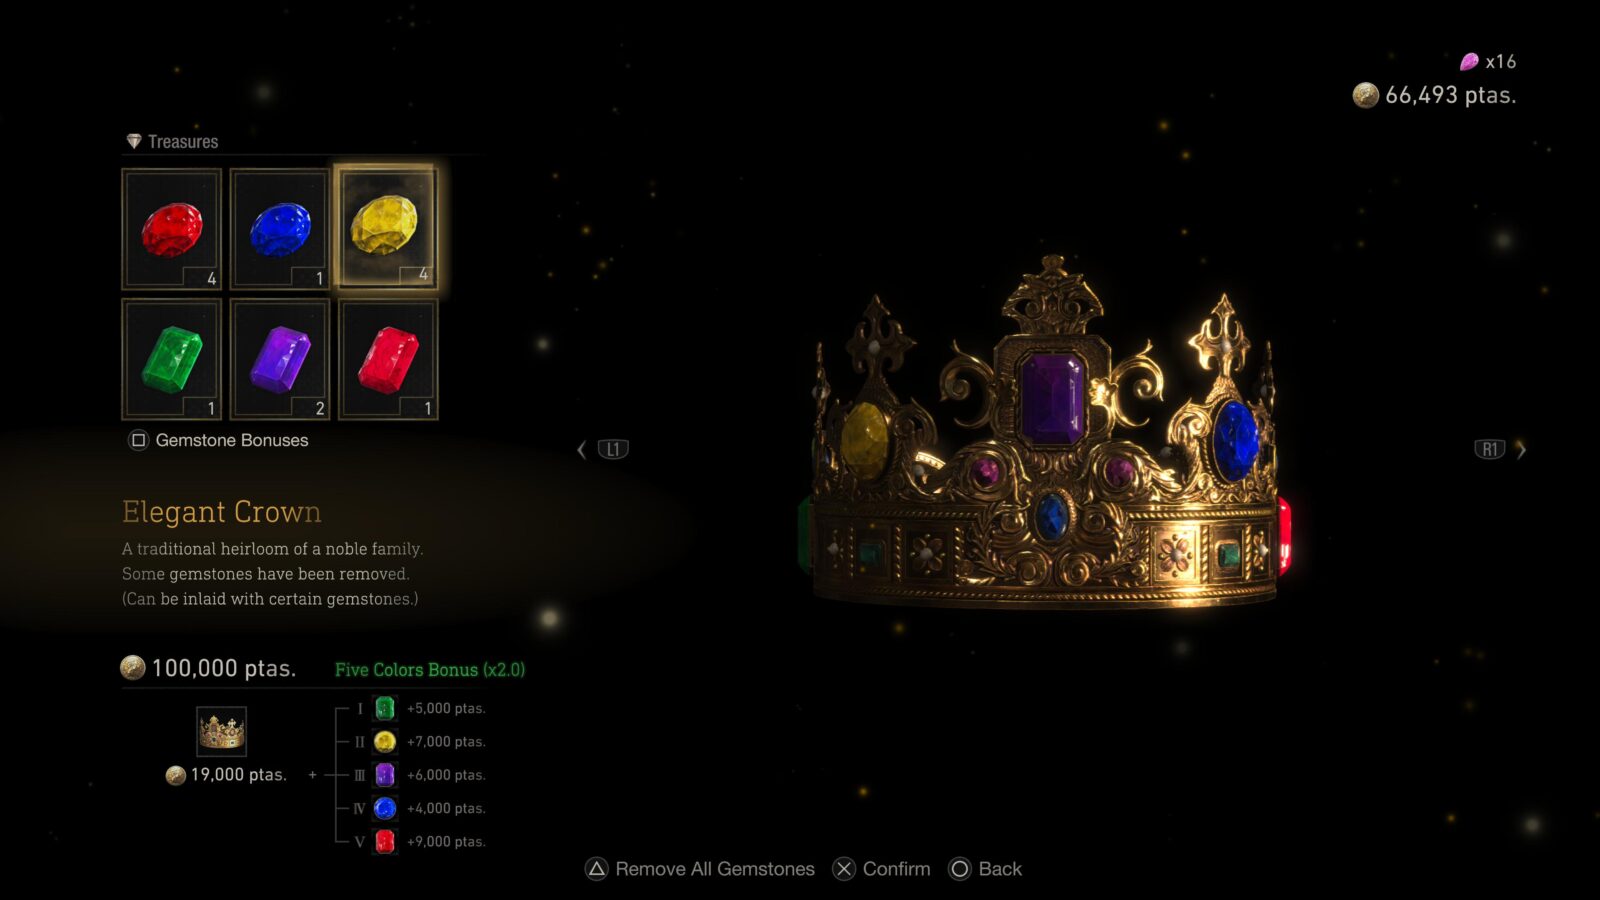
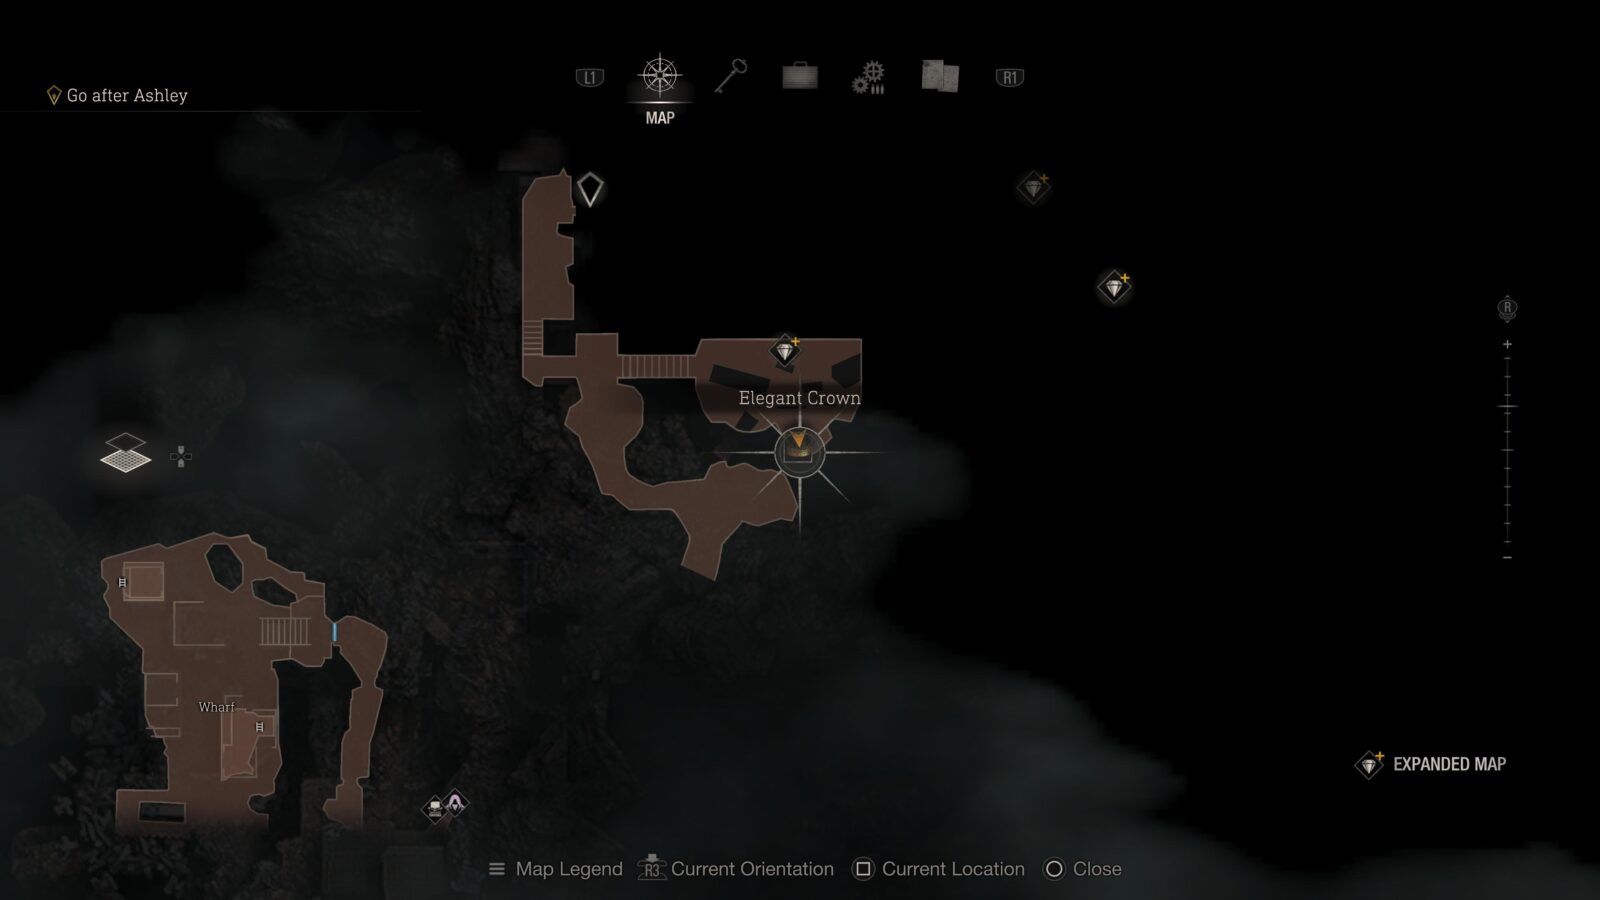
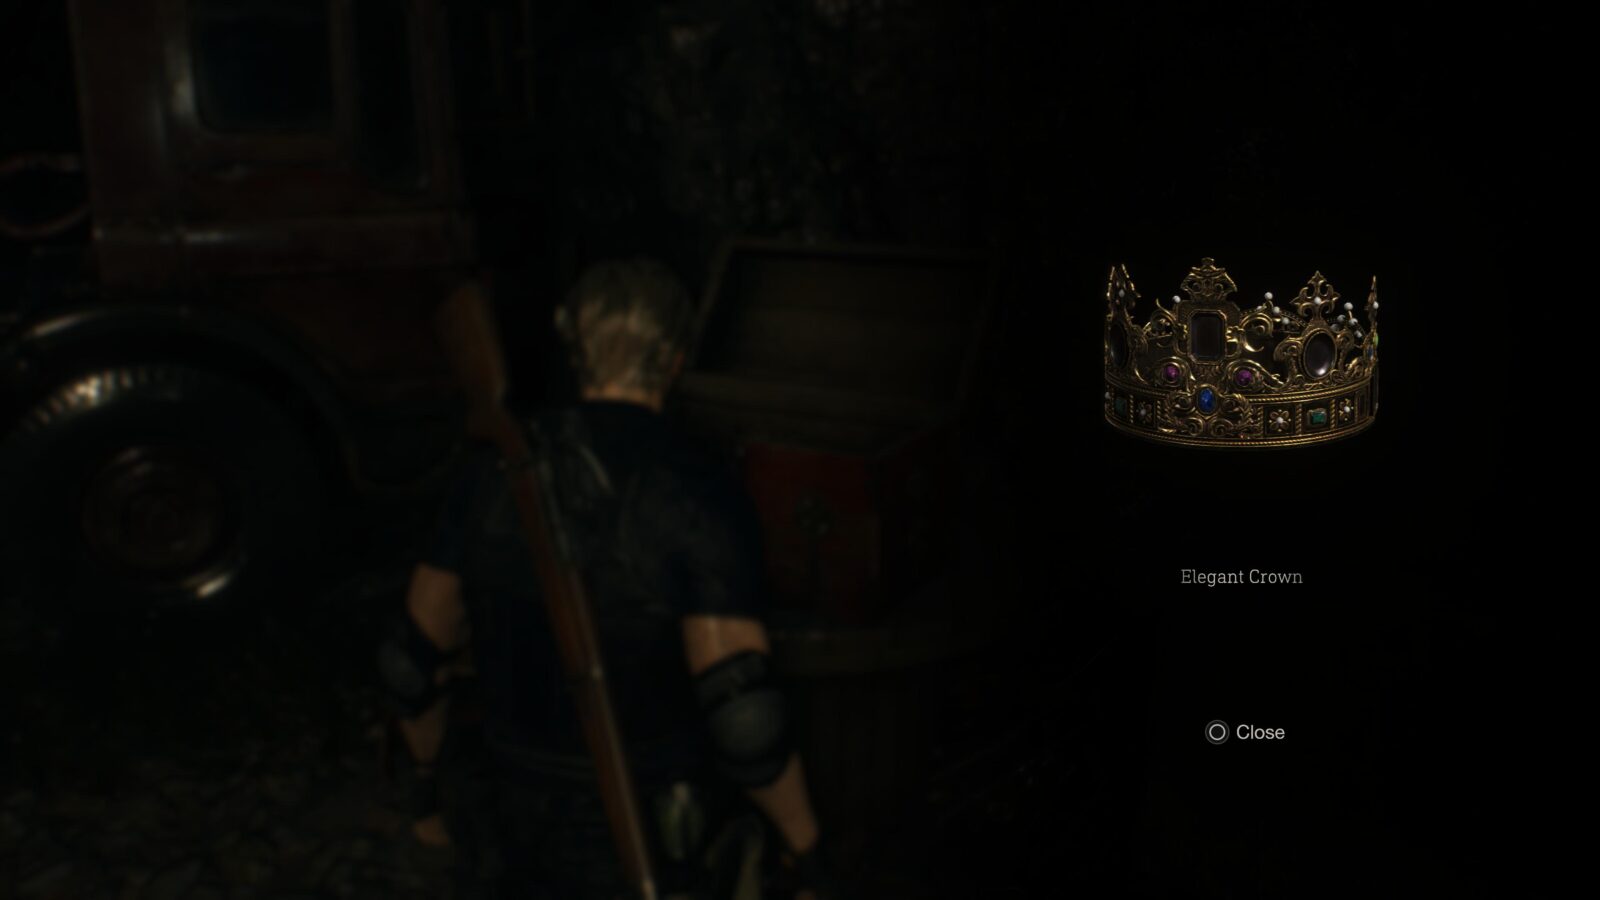
Elegant Crown (Expanded Treasure)
Enter the room to the right of the Merchant and ride the train car. When you get off at the other end there will be a small chest to the left of the stairs with a crown inside. This treasure has 5 slots which means you can slot in 5 different gem colours to maximise its value and sell for 100,000 Ptas which will unlock the Astute Appraiser Trophy. This is only available to those who have the Expanded Treasure Map DLC.
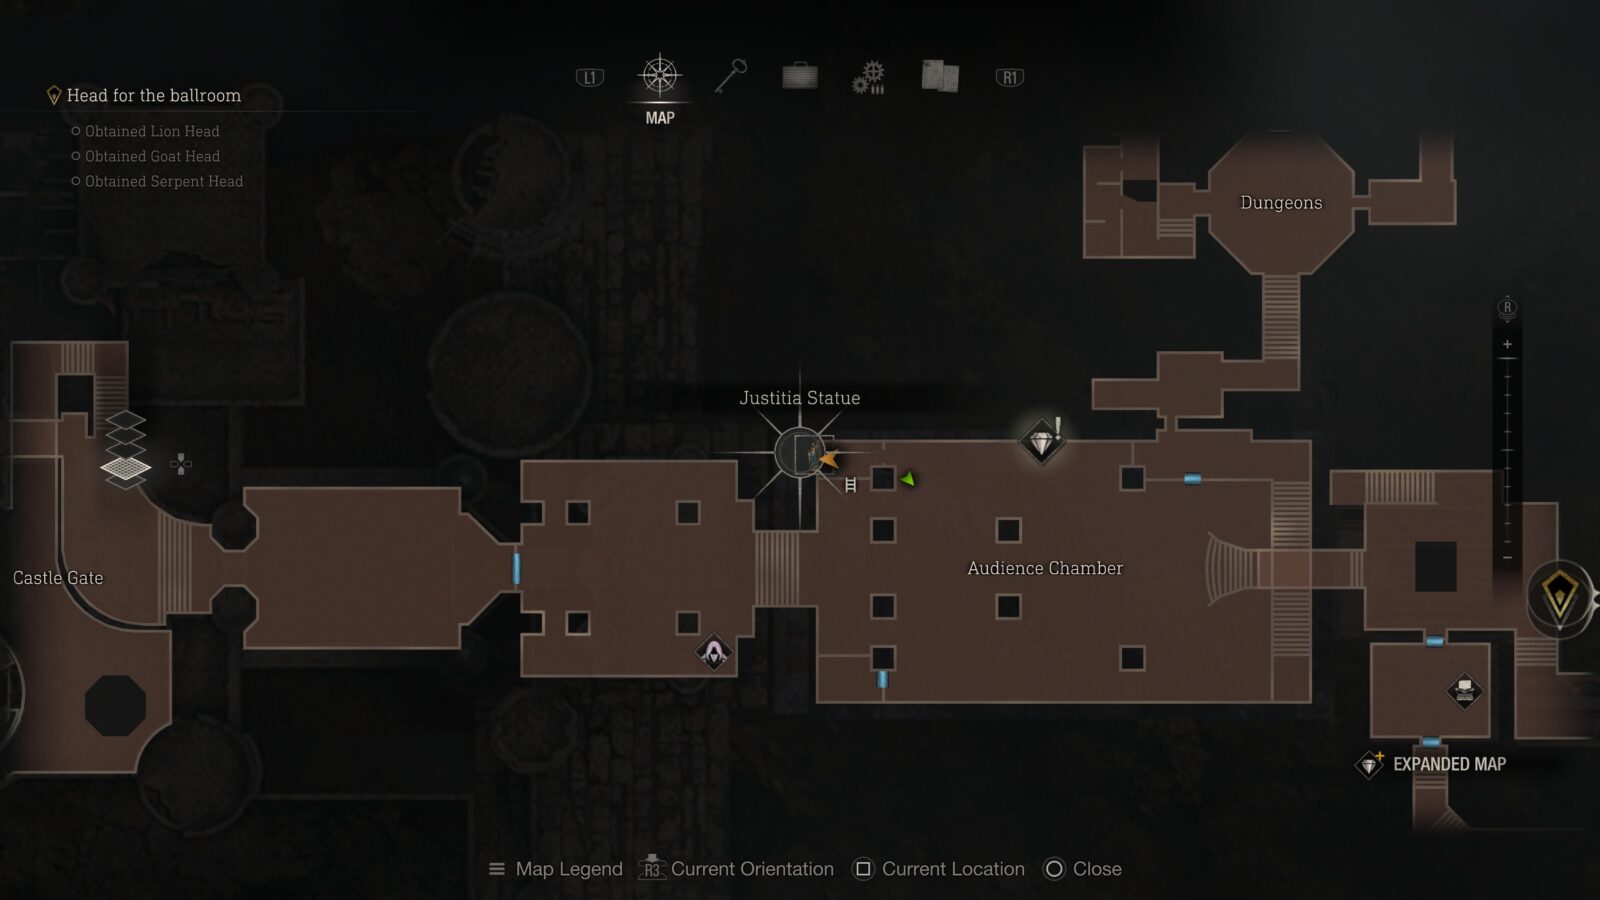
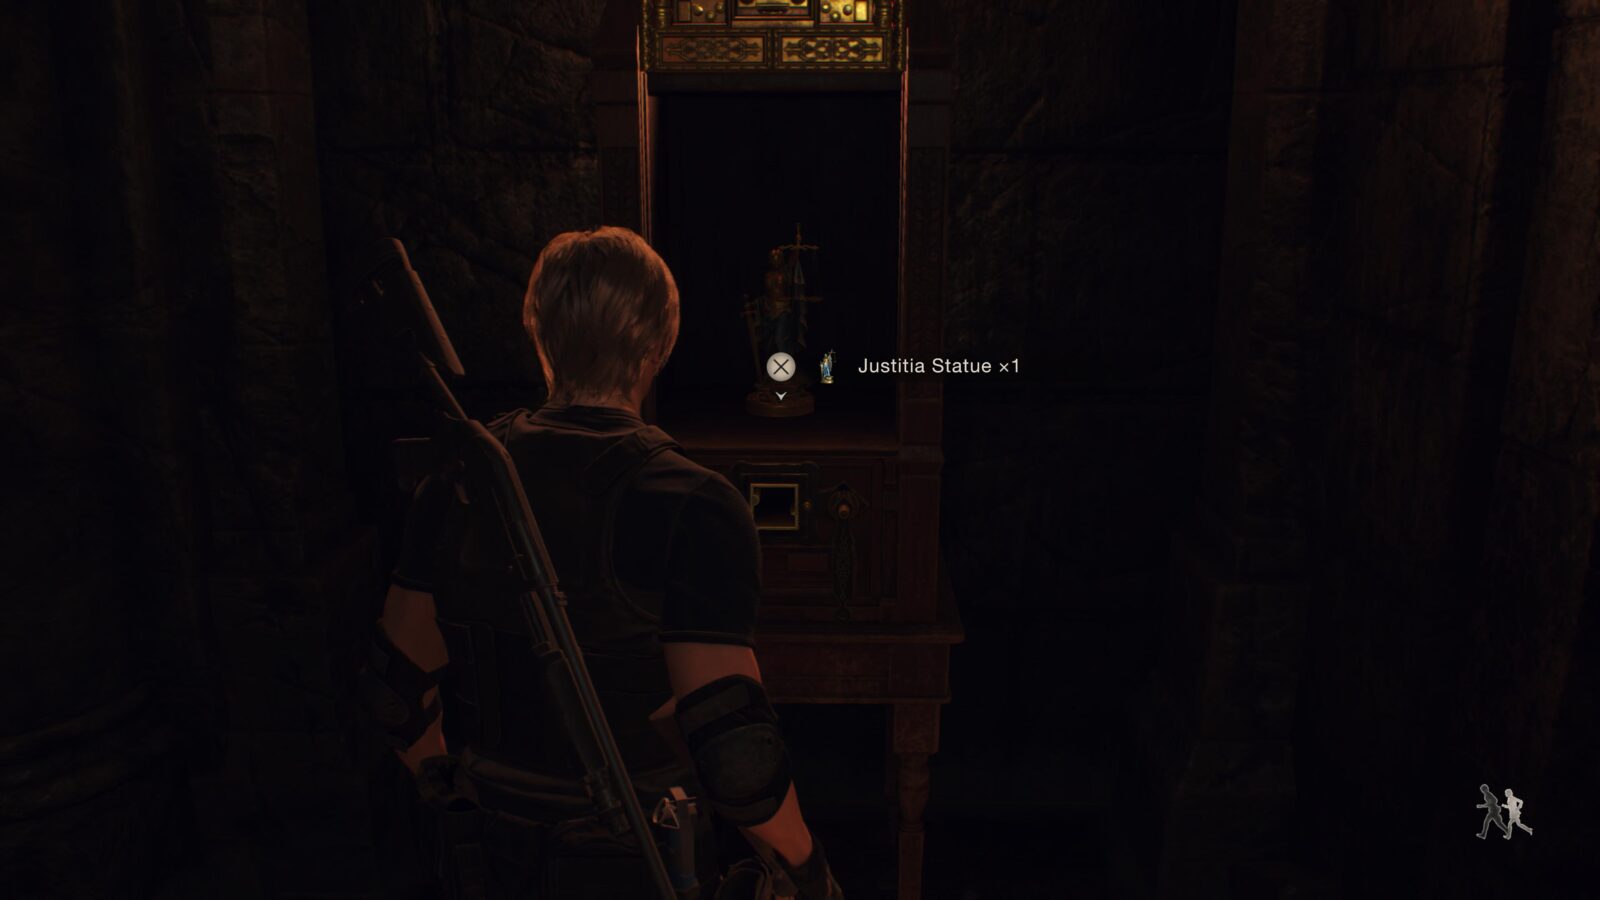
Justitia Statue
Backtrack to the Audience Chamber from the start of the Castle and use the Cubic Device to open the shrine in the Western corner to get a statue.
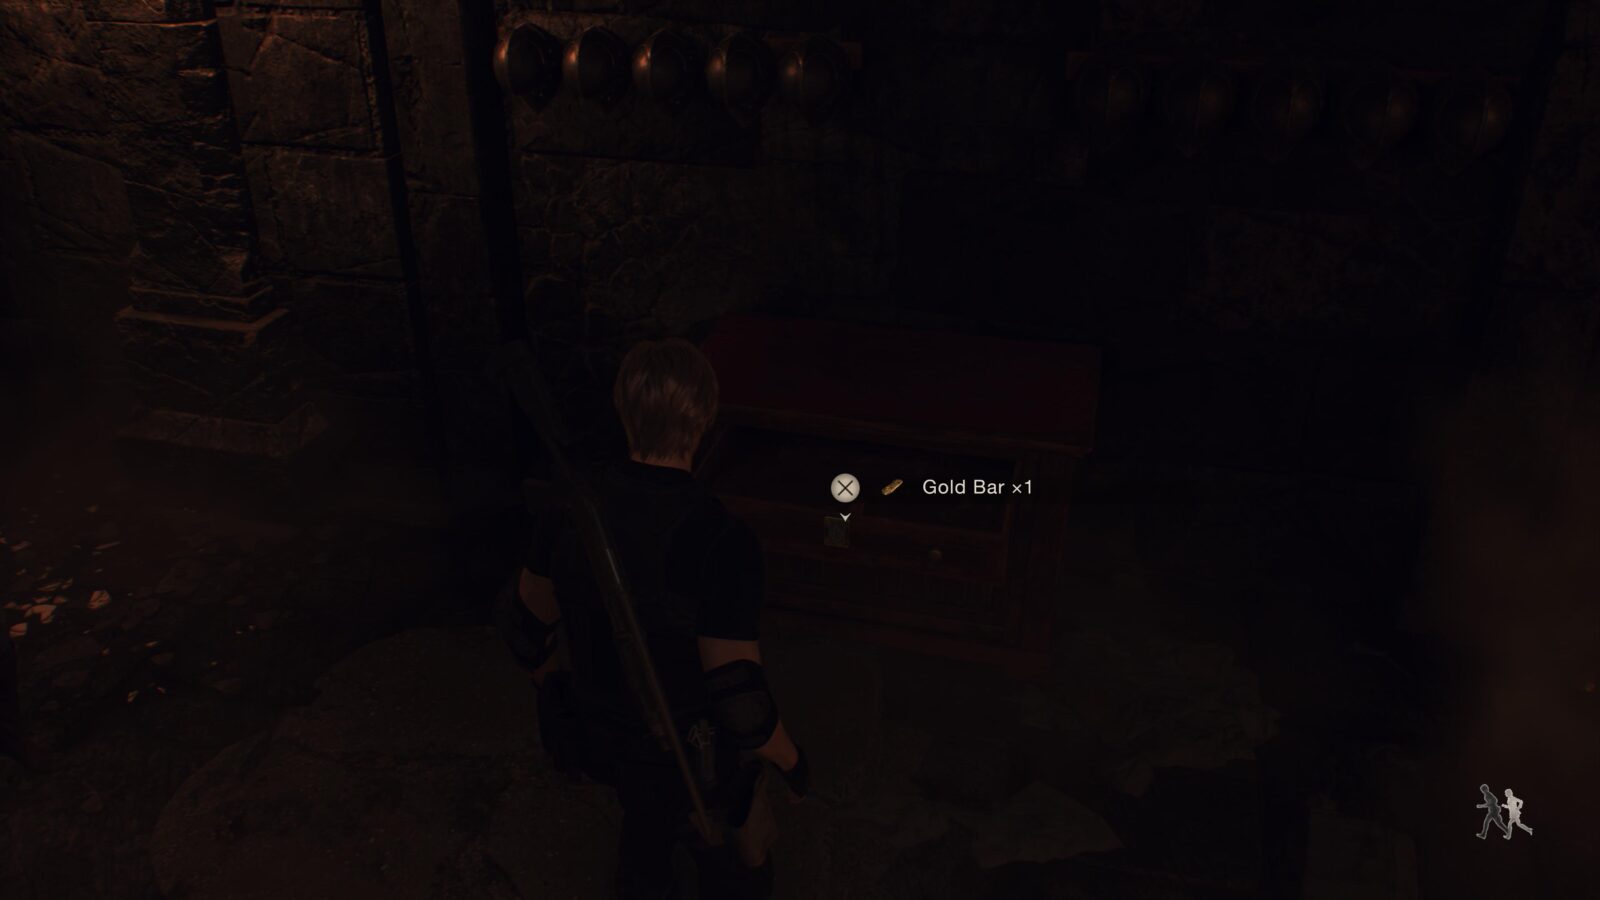
Gold Bar
In the middle of the Audience Chamber on the Northern wall is a locked drawer which you should be able to unlock now you have a small key.

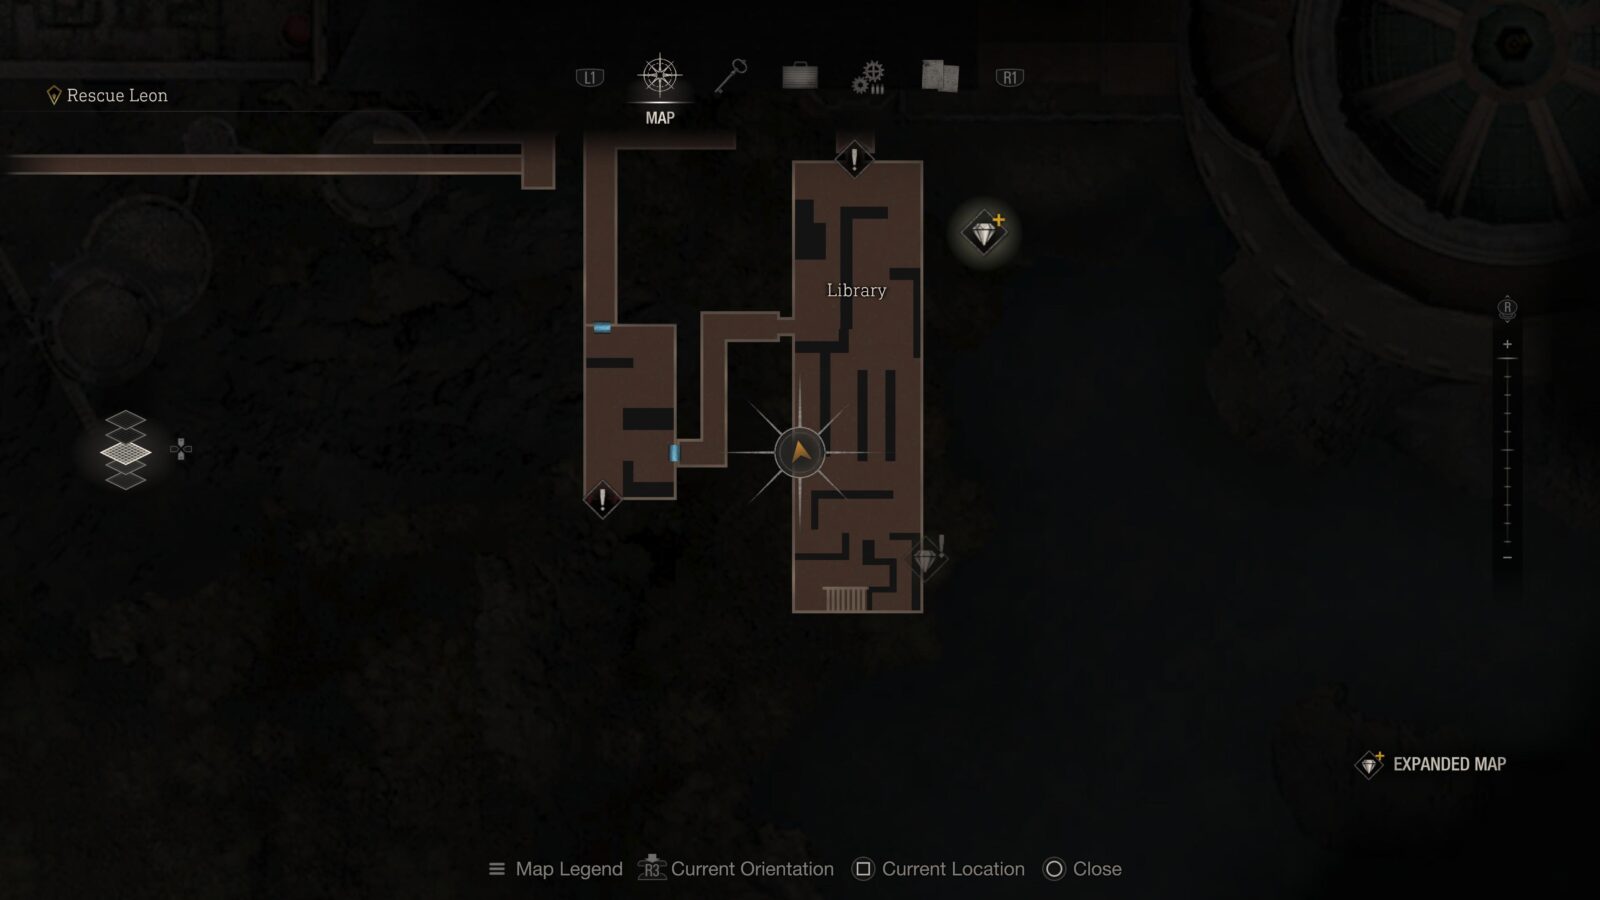
Chapter 9 (Ashley)
In Ashley’s section of Chapter 9 there are only 3 Treasures to collect. Once they have been collected they will count towards the Burglar trophy despite being dropped by Ashley a bit later.
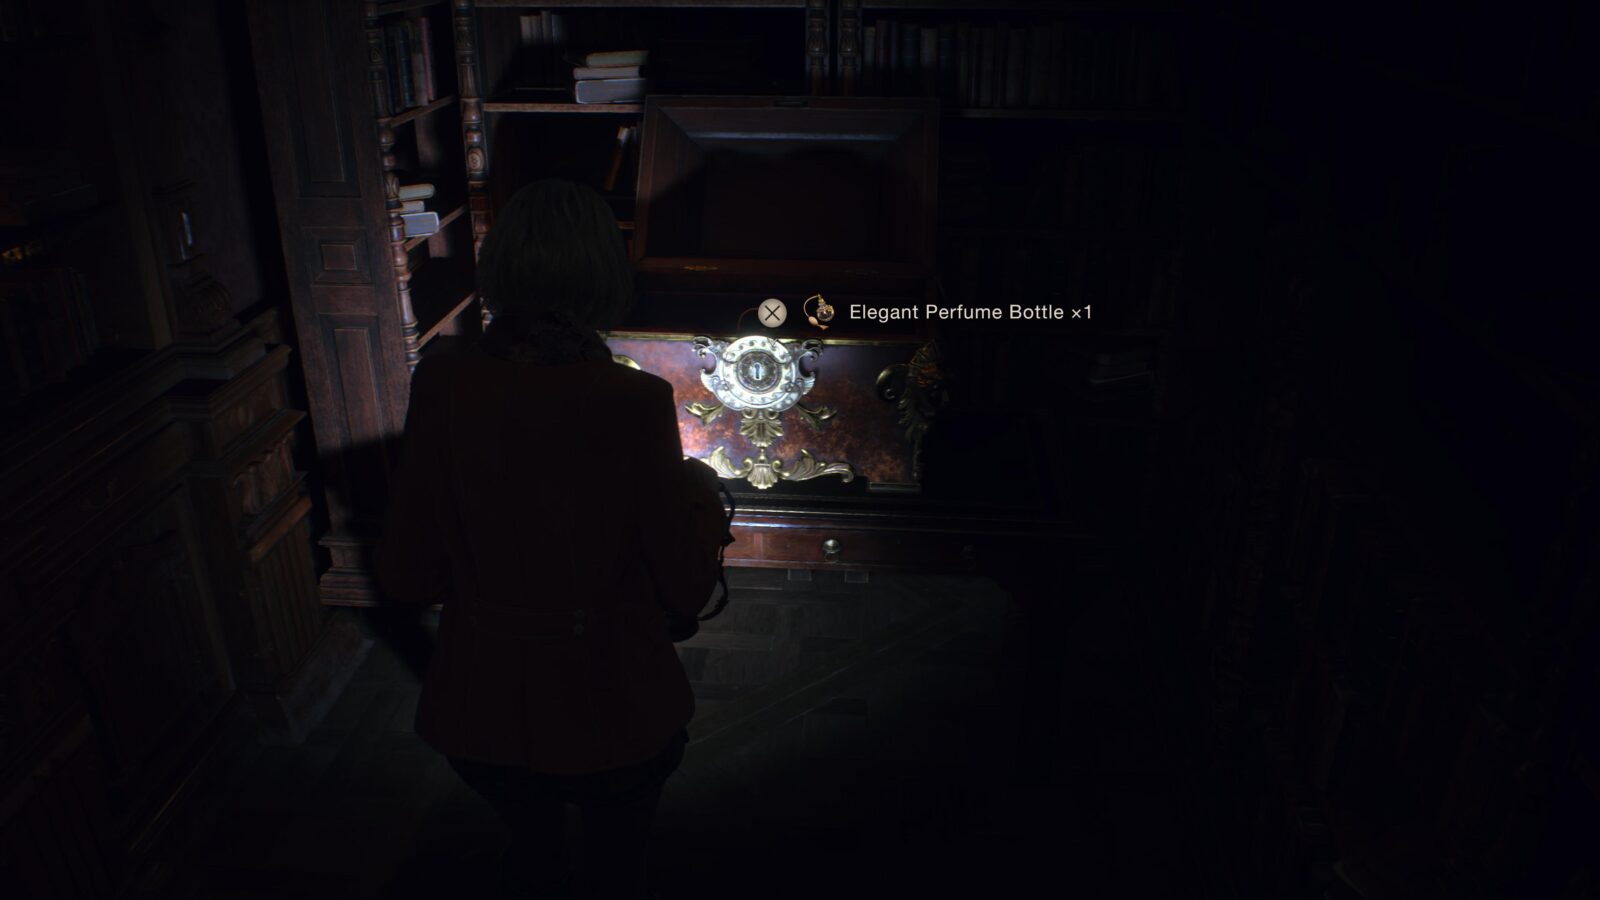
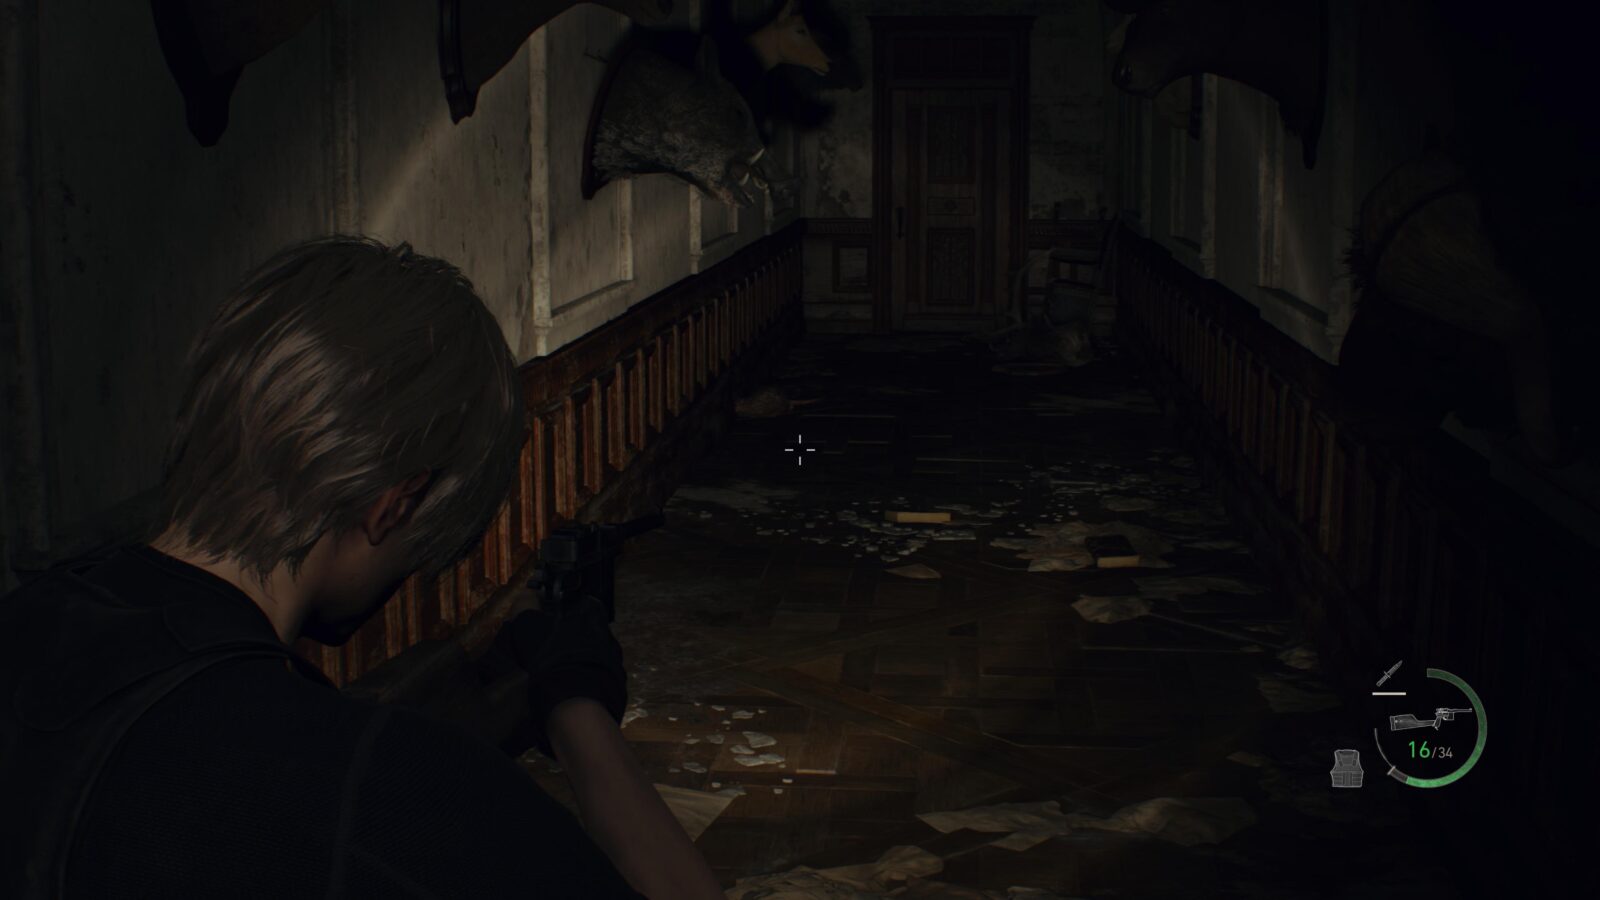
Elegant Perfume Bottle
After grabbing the keys in the Library head back downstairs and you will see a plagas suit of armor walk by. Take a left and follow the path until you see a square hole that you can climb under in front of you. In this area will be a chest you can open with the 2nd key from the left.
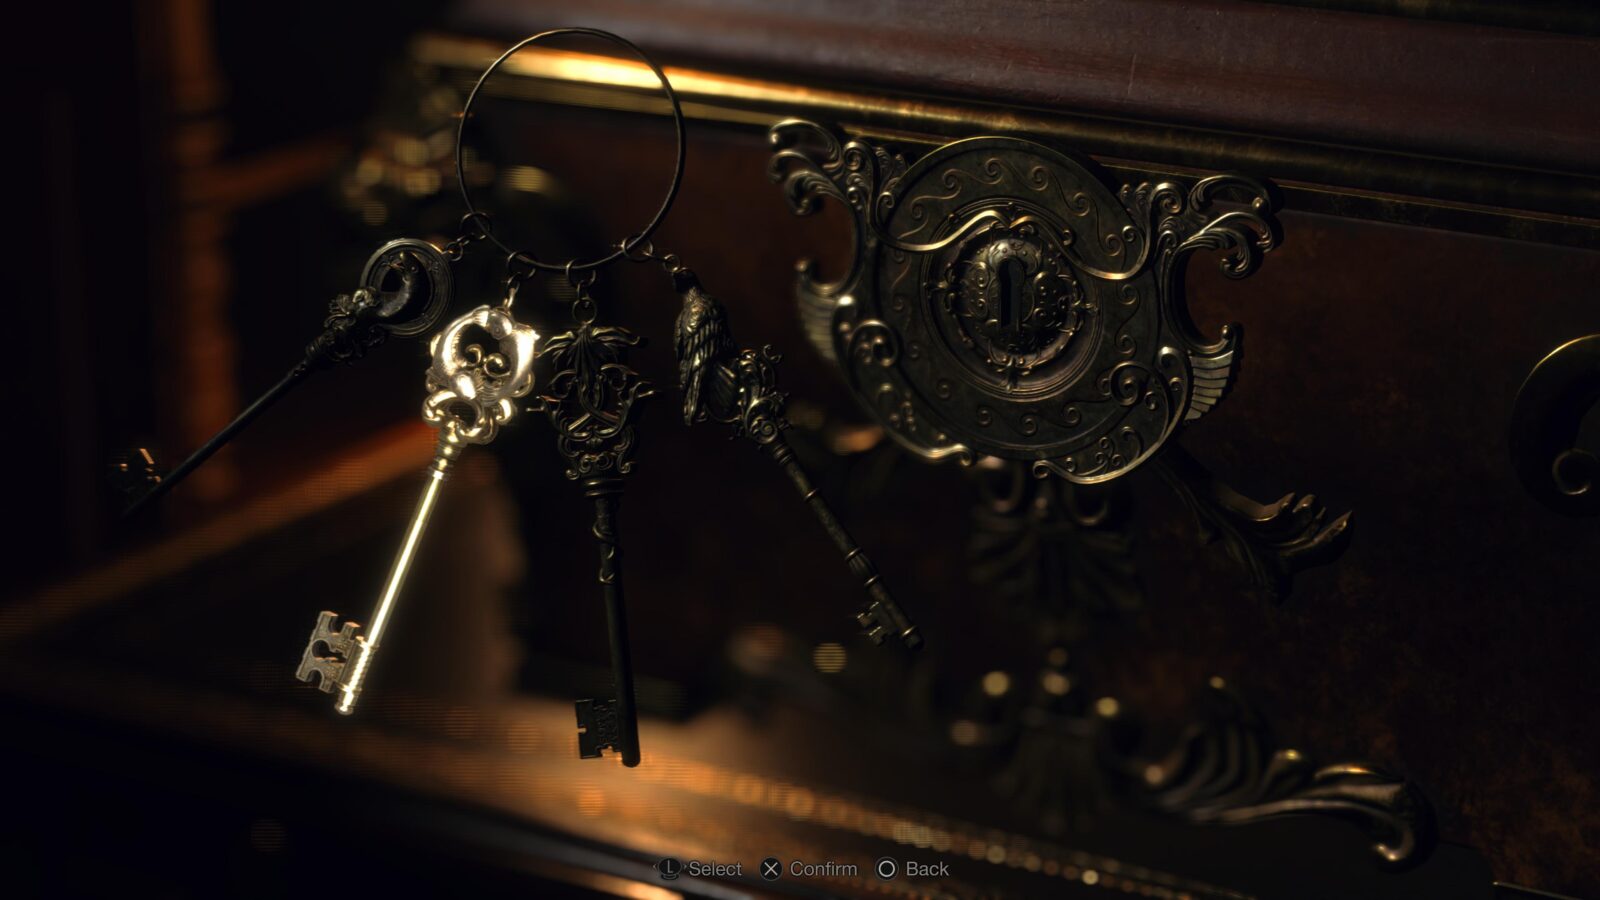
Sapphire
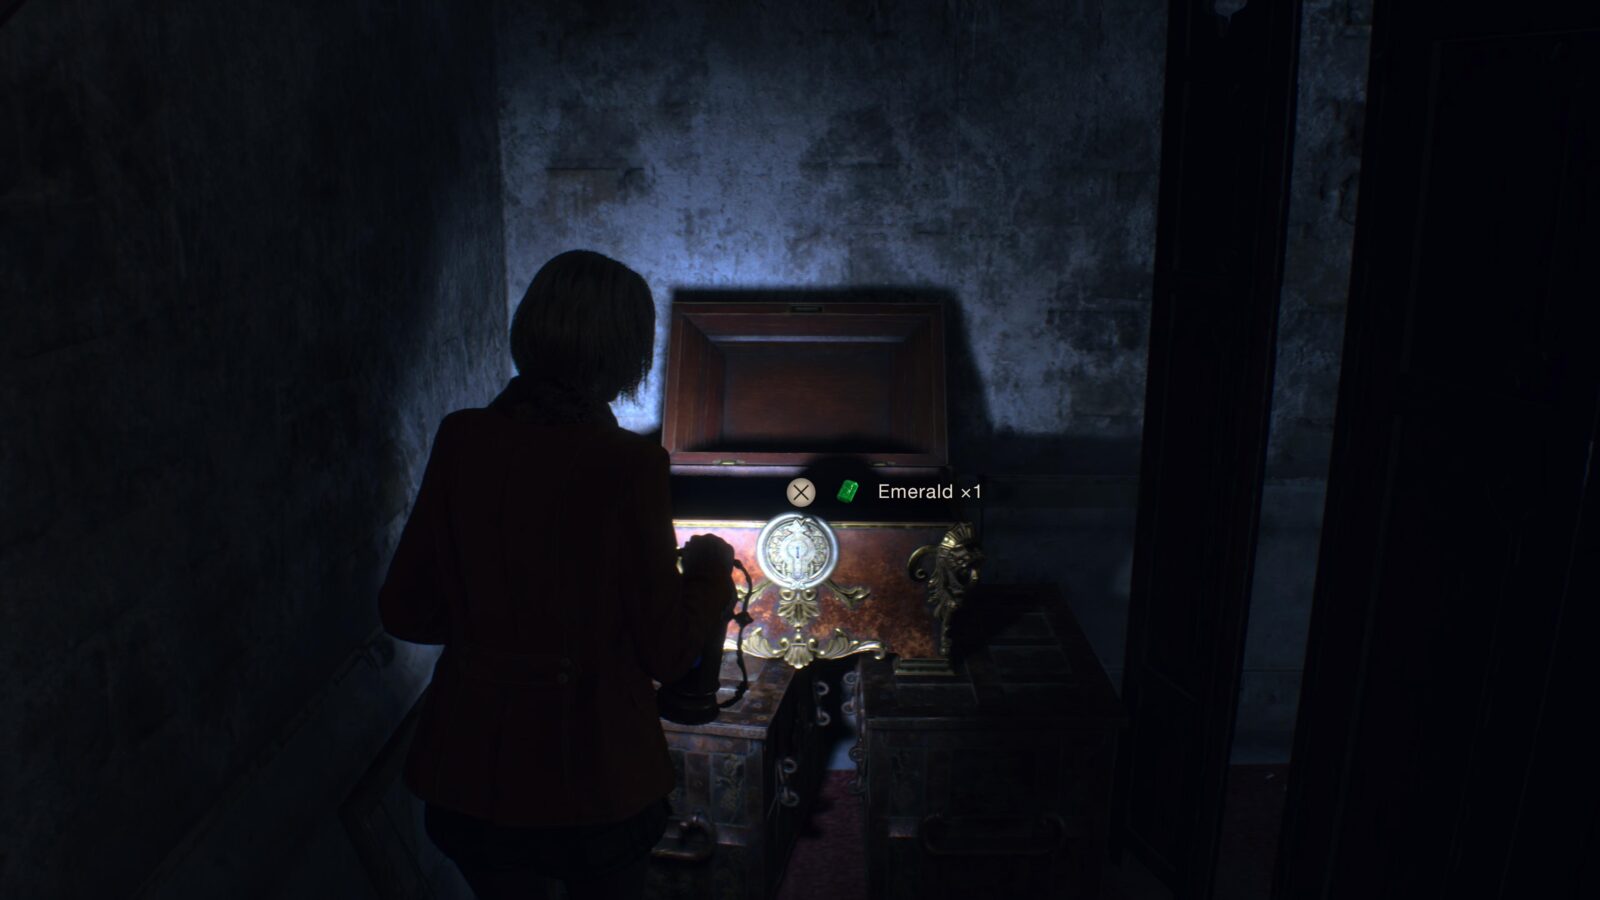
Head up the elevator in the Library and you will enter a room with a Typewriter. On the left of the room behind some shelves is a chest that you can open with the 4th key and inside is a sapphire.
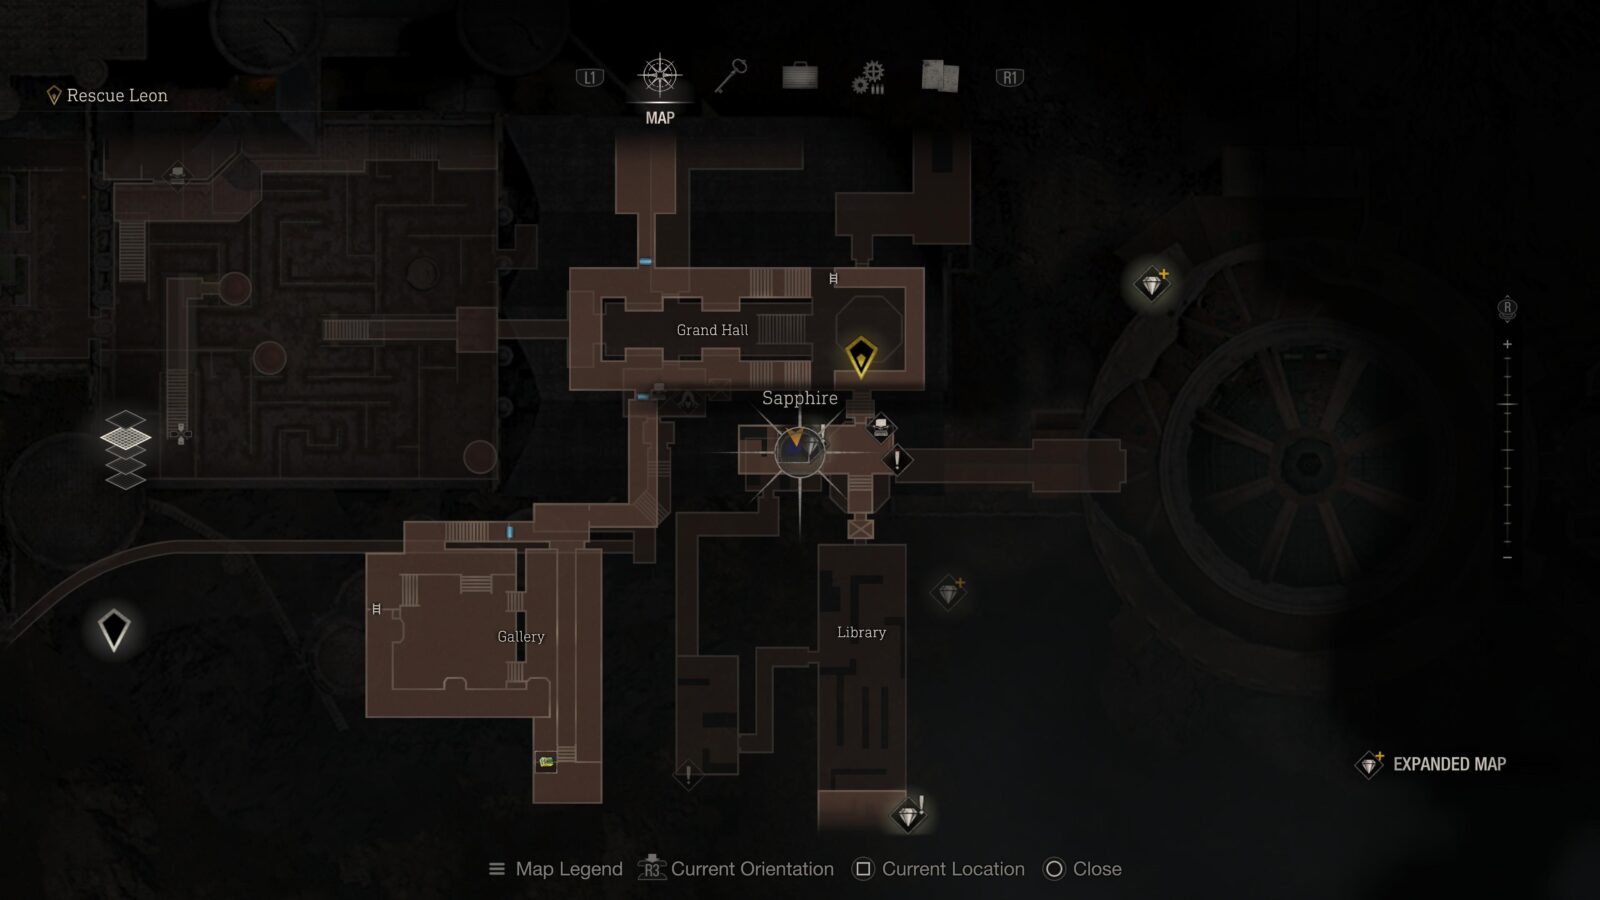
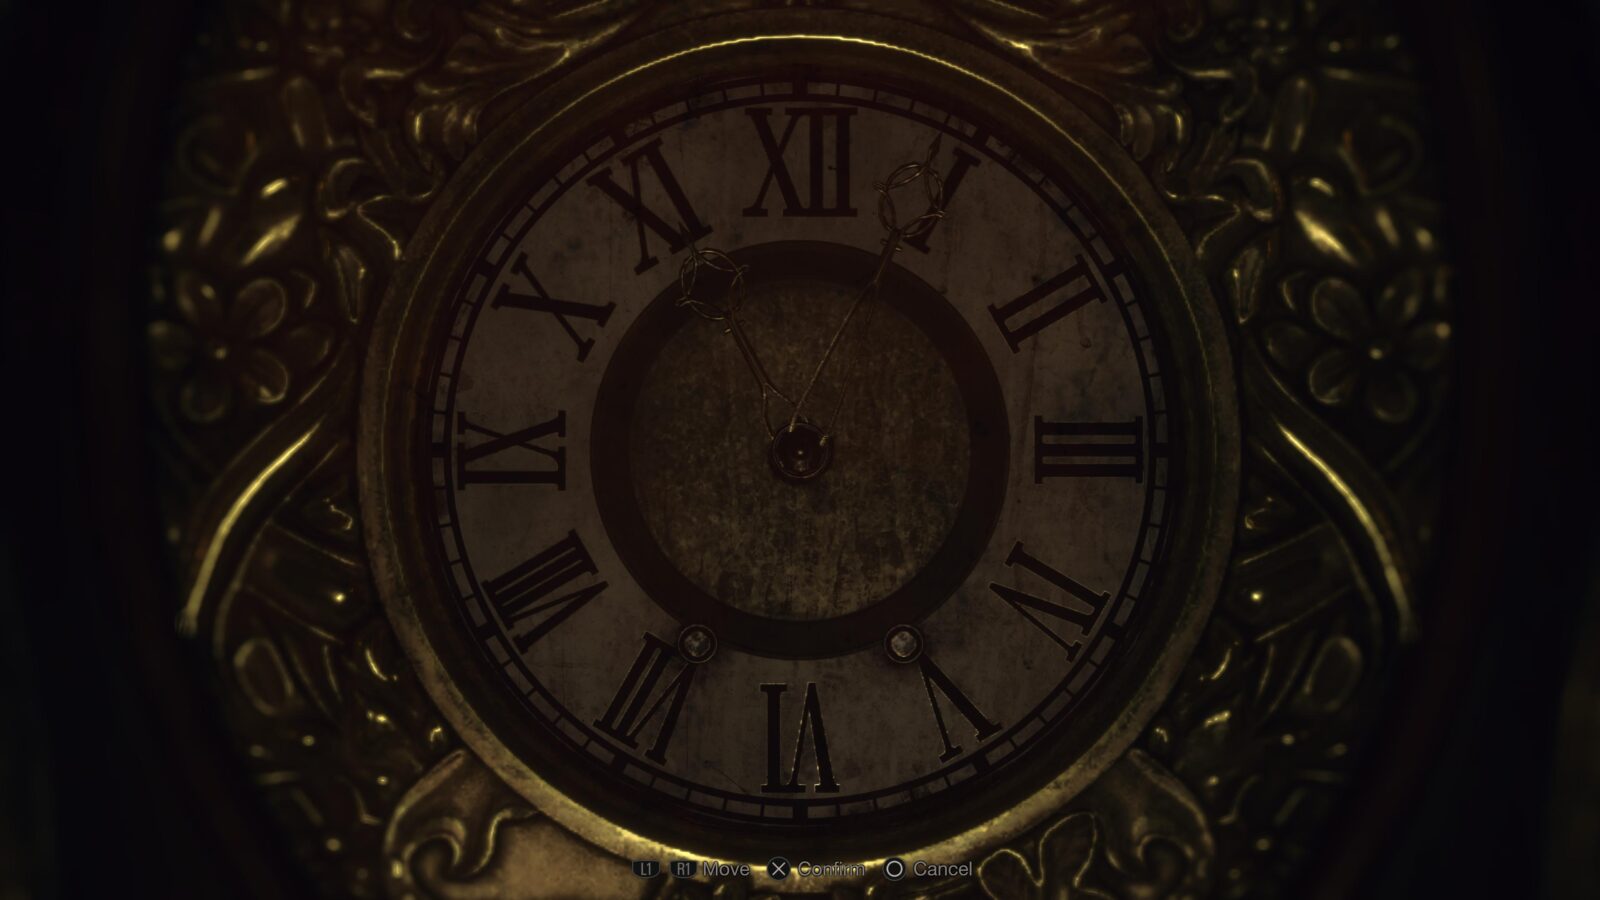
Emerald
Solve the clock puzzle in the Typewriter room by place the minute and hour hands at 11:04 for Assisted and Normal difficulty or 7:00 for Hardcore and Professional difficulty. Now go to the clock you walked past at the start of Ashley’s section and input the same time–again making sure to use the correct time for your chosen difficulty–and a new area will open up. At the bottom of this area you will have to pull 4 strings–2 on either side of the room–which will cause suits of armor to attack you. You must pull all the strings to open a door that you can escape through. Once you’ve open the door head through it and you will see some separators on your right. Behind them is a chest with an emerald.


Chapter 10
At the start of the chapter you can pick up everything that Ashley had on her if you go to the left outer part of the cage (to the right of the statue if you’re facing it head on) Leon was trapped in. These treasures have already been counted towards the Raider trophy but you should pick them up to sell anyway.
There are a total of 1 Clockwork Castellan, 3 Merchant Requests, 1 Small Key (used to unlock locked drawers hiding additional treasure) and 8 Treasures in Chapter 10. This chapter also has 3 Expanded Treasures which can only be obtained with the Expanded Treasure Map DLC.
Merchant Request: Merciless Knight
You should complete this request before you progress any further into the chapter. Head through the door where Ashley’s dropped treasures were and check the table by the door to the Library for a blue note from the Merchant. For this one you need to go into the Mausoleum where Ashley pulled those 4 strings. In there you have to face off against 3 knights, one of them being the giant gold knight you may have spotted when playing as Ashley. This can be a difficult fight even on Assisted but at this point in the game you should have enough resources to fully upgrade the Red9 hand gun or a decent Shotgun to deal high DPS. At the start of the fight throw a flash bang to stun the 3 knights and pump as much lead into the weak spots of the two knights flanking the gold one. This should expose their full weak spots so you can take them down easily. The big gold knight is a little tougher because his weak spot is on the back of his neck. Run circles around him and when he slams his sword down quickly get a shot or two on his weak spot. Rinse and repeat until he goes down.
Rat #3
We can now kill the last rat for the Merchant’s Request we started in the previous chapter. Head back upstairs and into the corridor that leads back into the Grand Hall. The 3rd rat will be scurrying about this corridor so keep an ear out.
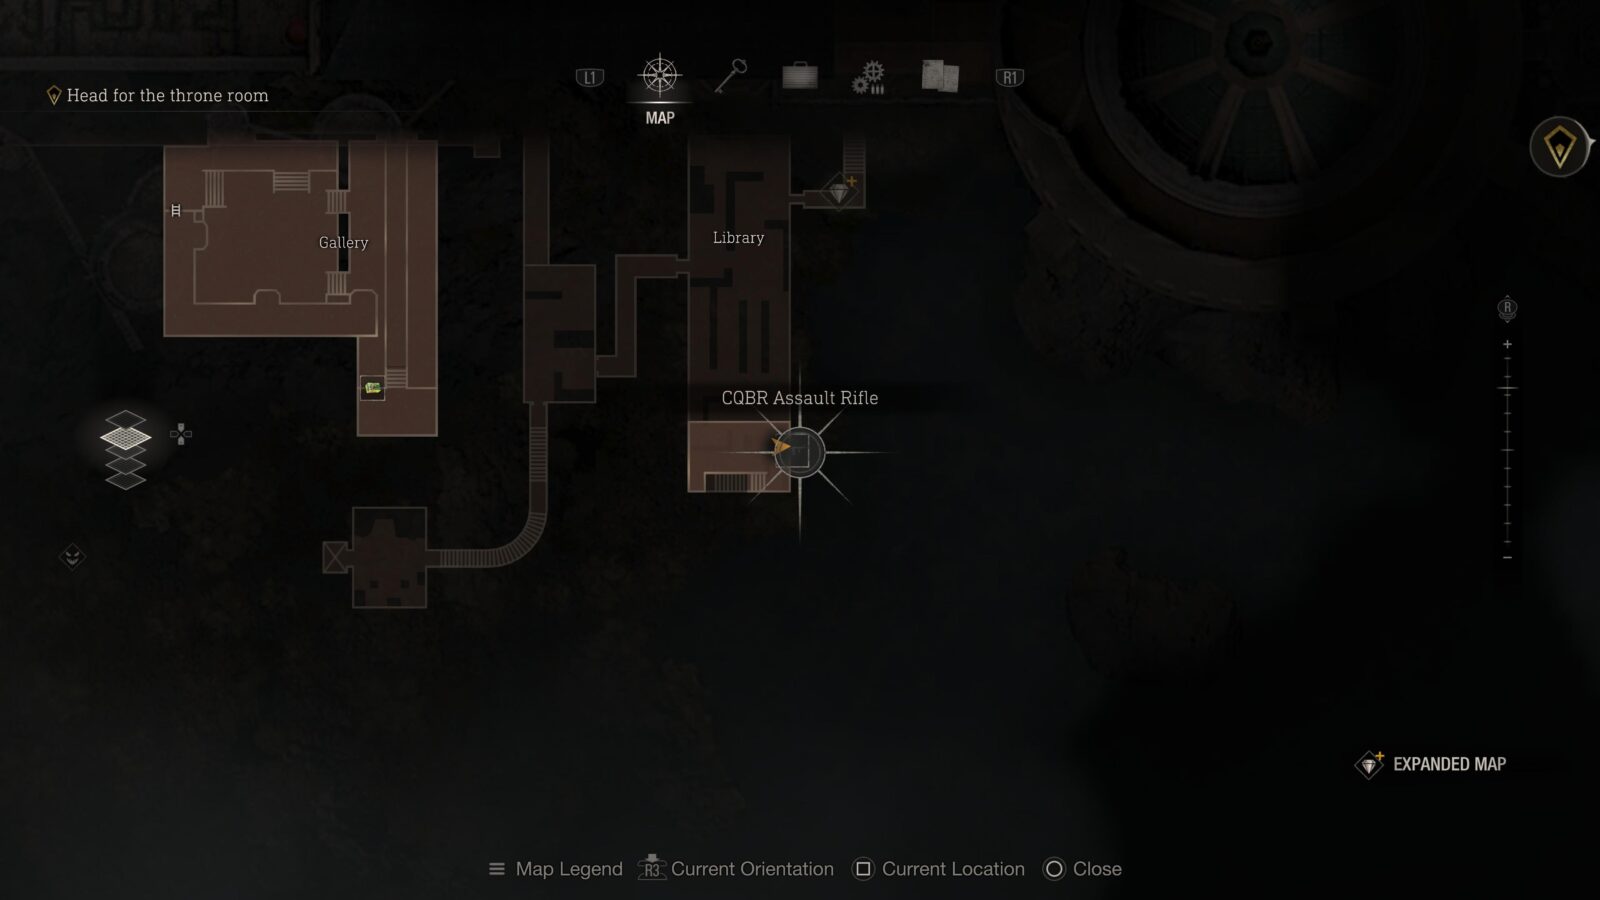
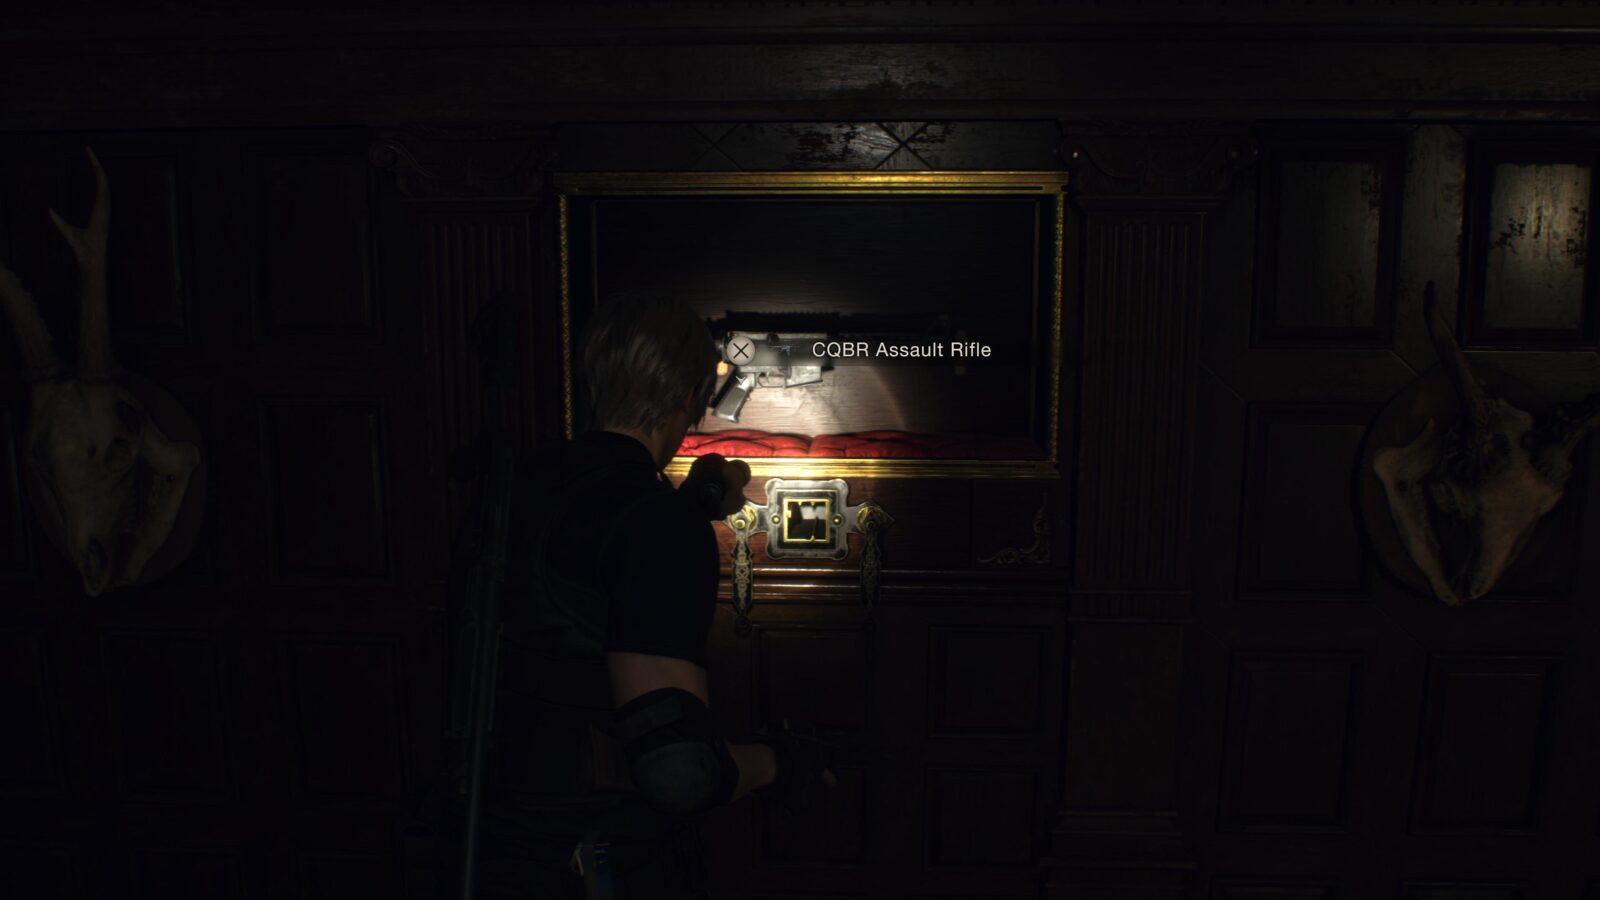
CQBR Assault Rifle
Head into the Library and go up the stairs into the room where Ashley found the keys. On the wall is a painting with a square hole that you can slot the Cubic Device into. Once the painting opens you can grab this gun. This counts towards collecting all weapons and treasures.
Yellow Diamond (Expanded Treasure)
Head to the room where Ashley found the Typewriter and solved the first clock puzzle but on the way check the ceiling in the corridor for a hanging cage with a yellow diamond inside. This is only available to those who have the Expanded Treasure Map DLC.
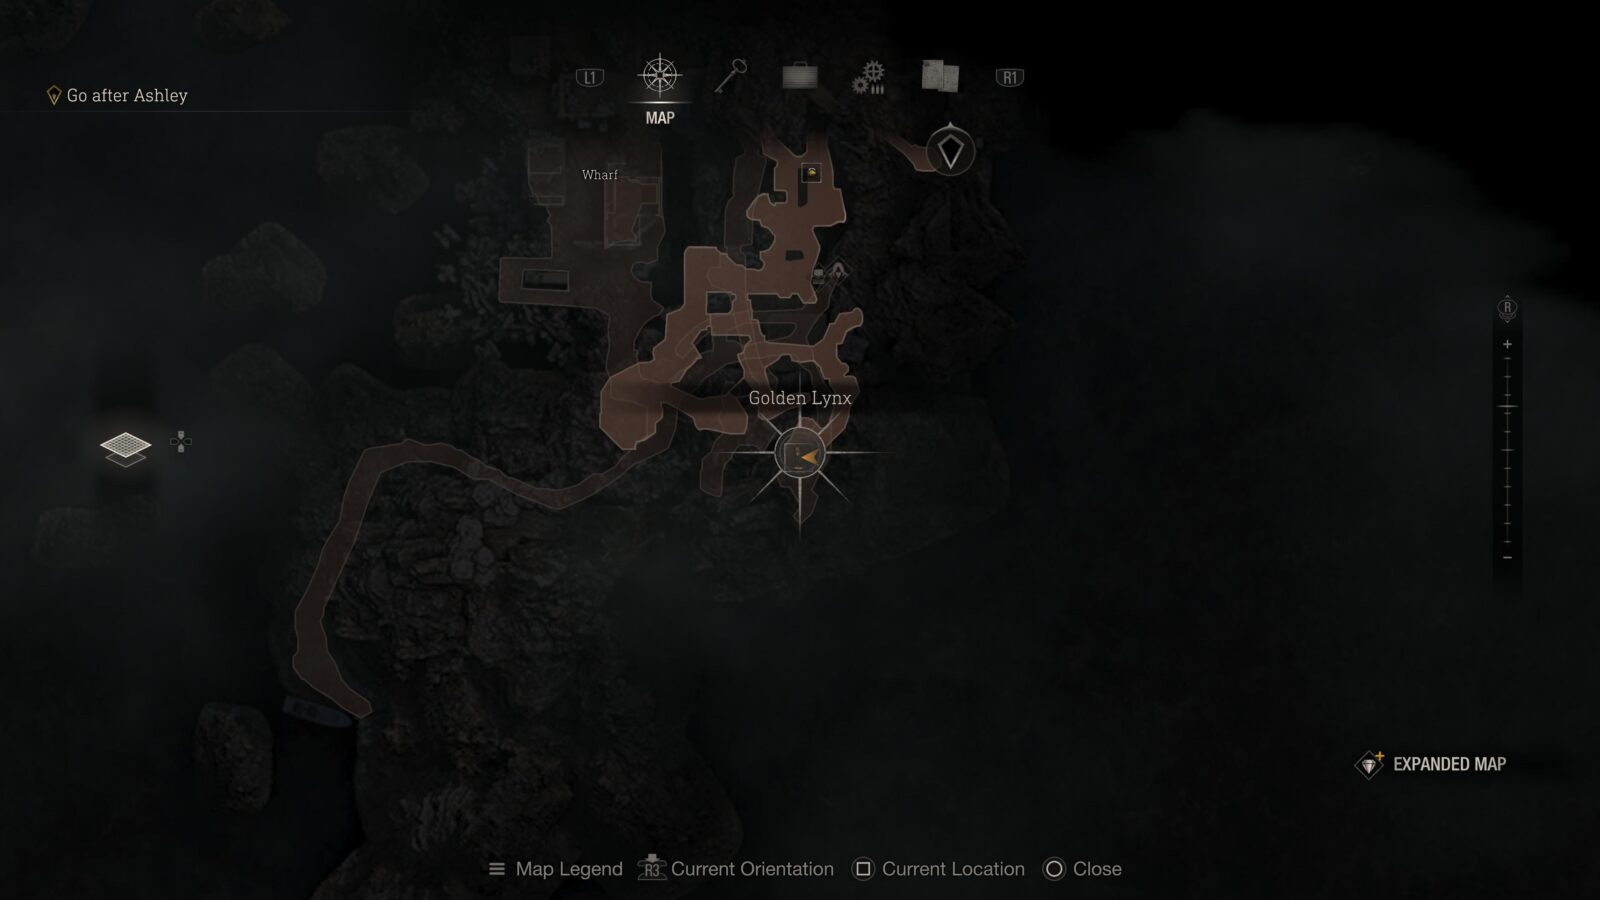
Golden Lynx
Head into the Typewriter room above the Library and use the Cubic Device on the lock box to reveal a treasure.


Silver Token (Expanded Treasure)
When you reach the room atop the curves stairs where the flying insect creatures attack you, you can find a hanging metal cage if you do a 180 and look in the corner opposite a bed. This is only available to those who have the Expanded Treasure Map DLC.


Ruby
When you reach the Ballroom where you are attacked by several Novistadors you can see a large pile of rubble with a chandelier on top, some red cloth, a tunnel running through and leaning against some stairs at the opposite side of the room you entered. In the tunnel is a treasure hanging from the tunnel roof.

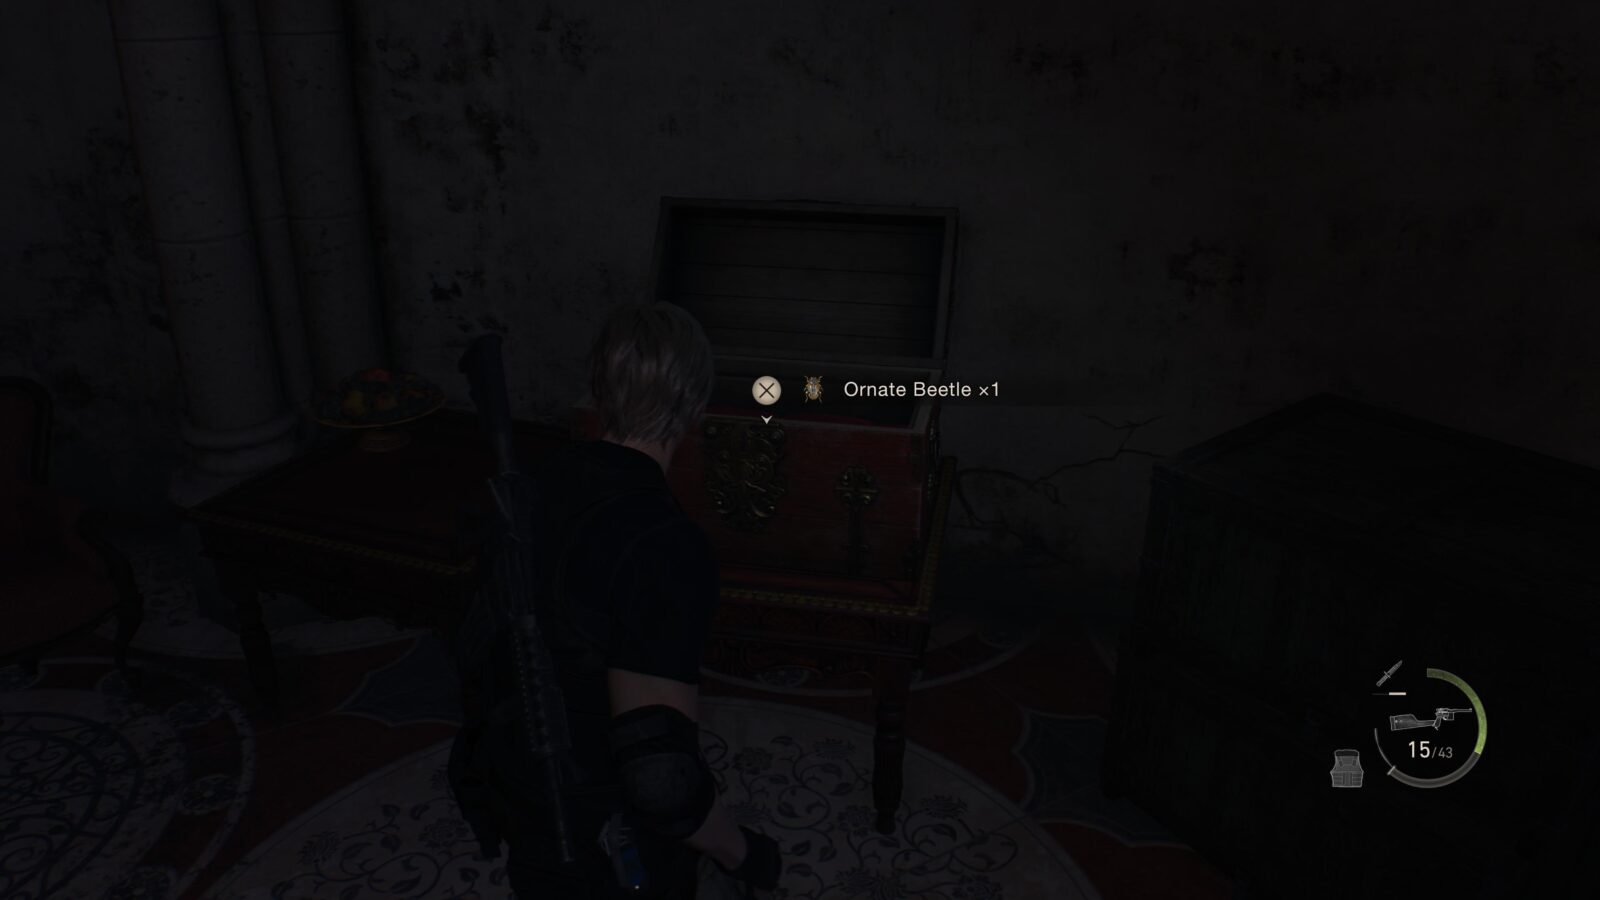
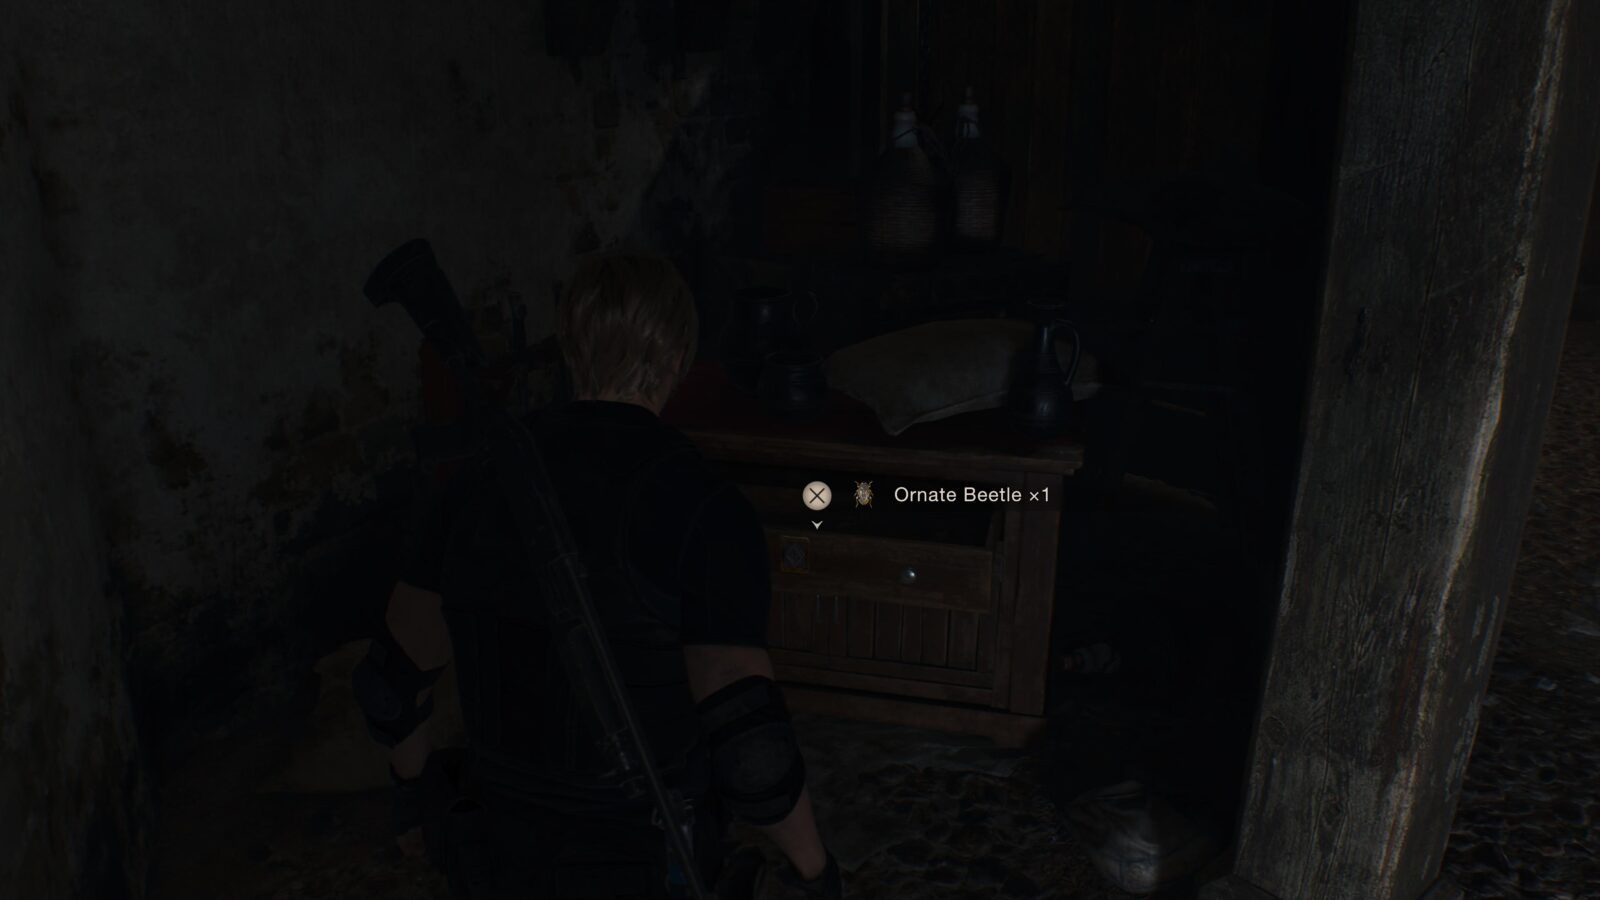
Ornate Beetle
There is a chest with an ornate beetle at the North-Eastern wall of the Ballroom. You can run behind the stairs you used to come down to the ground floor which will lead directly to the chest.

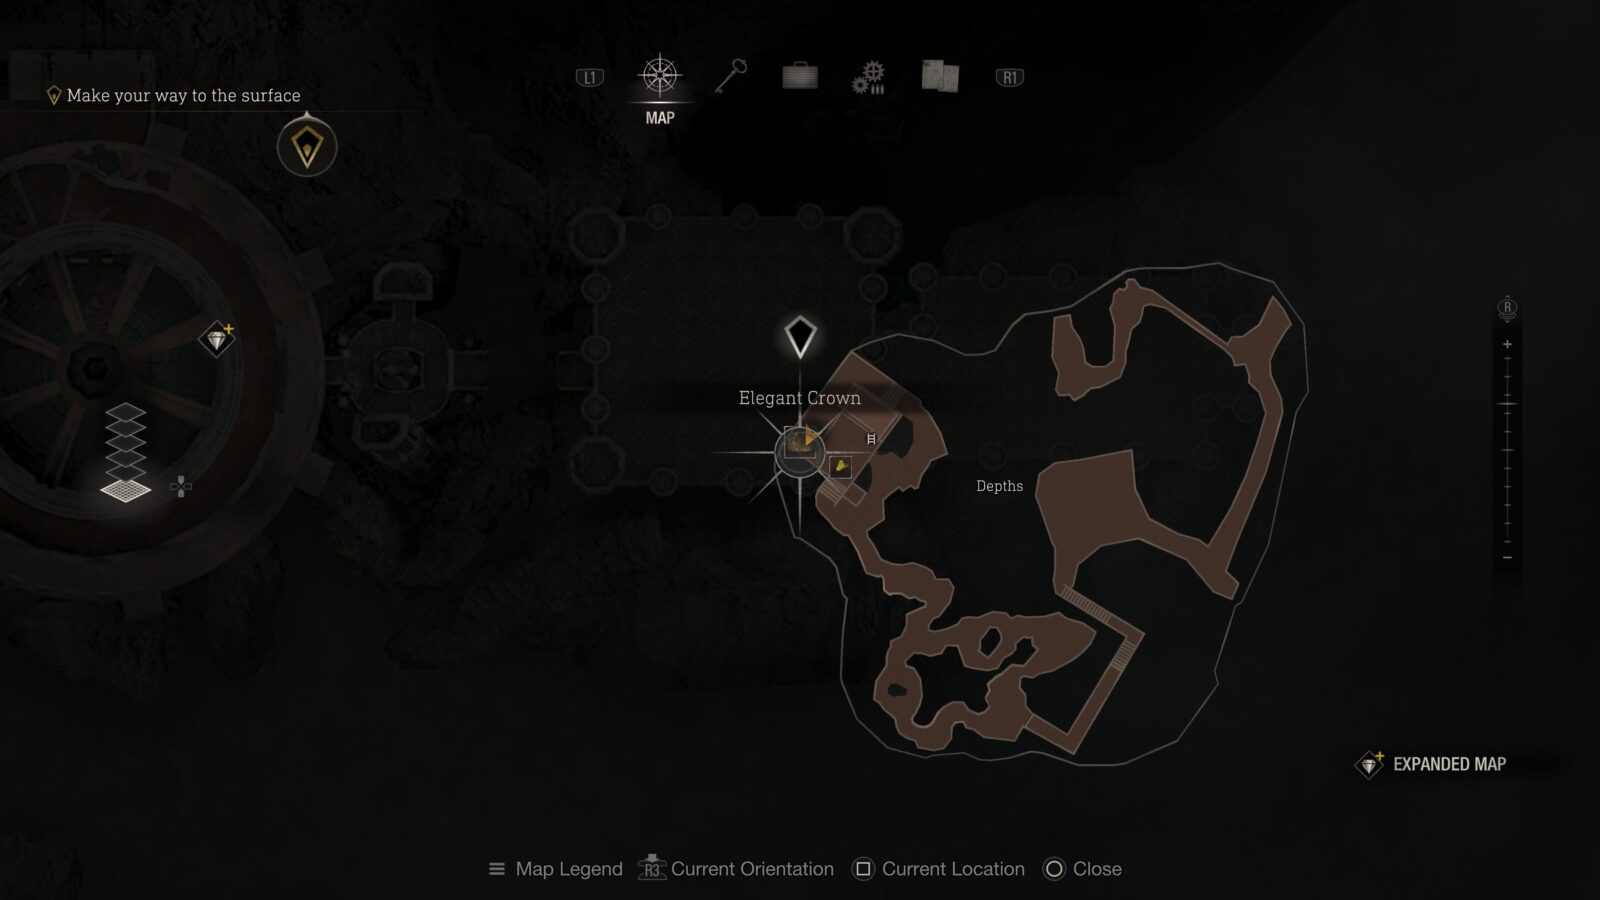
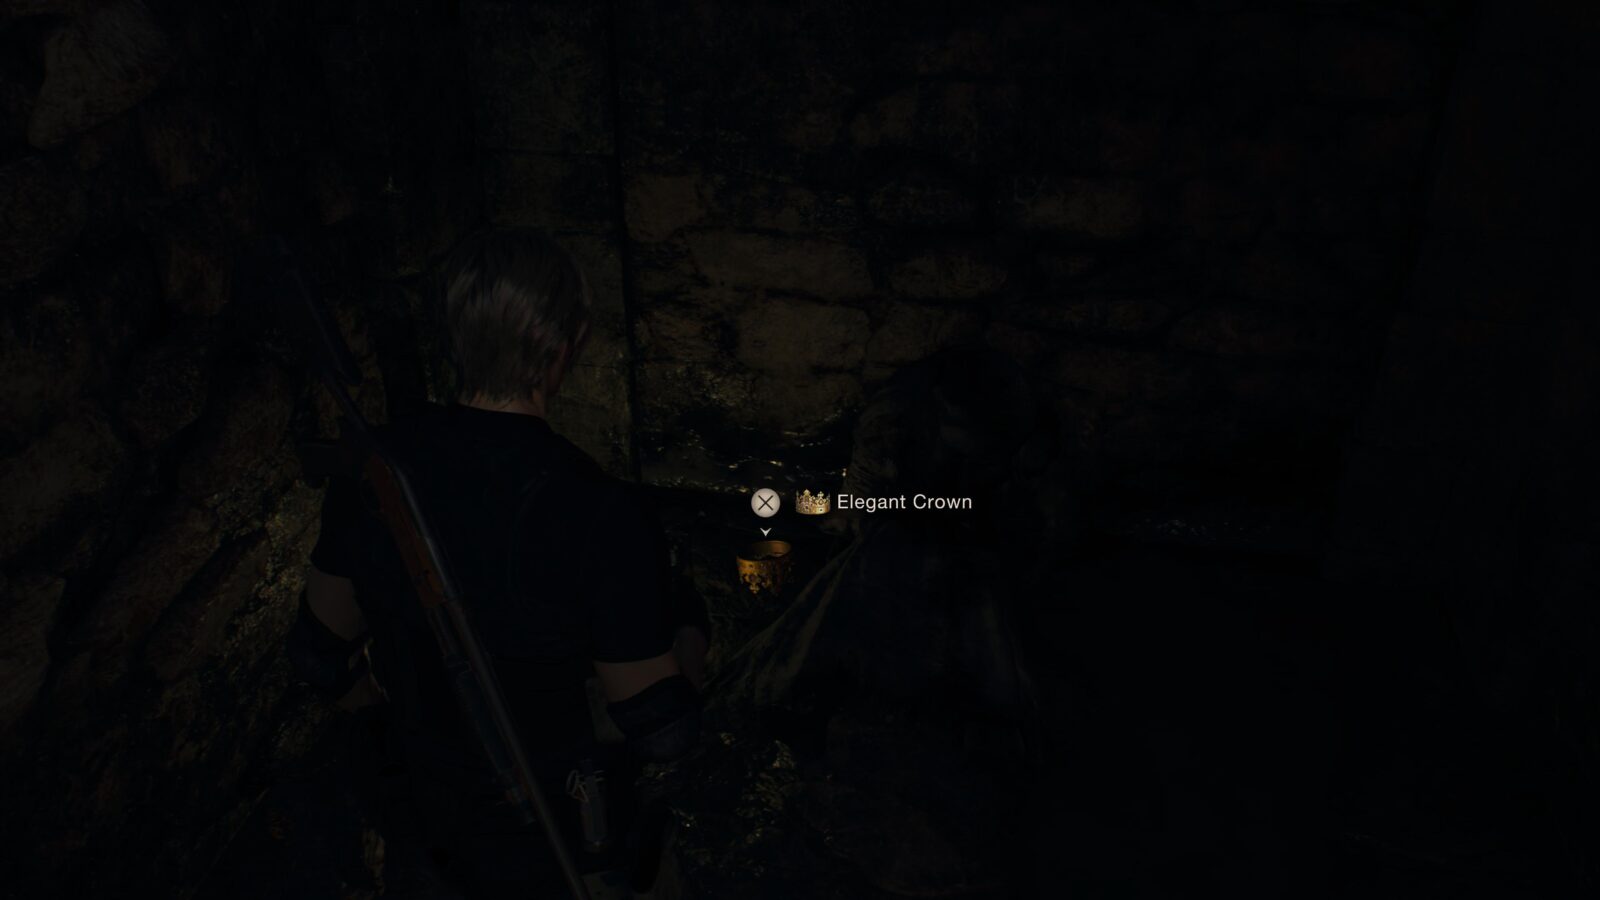
Elegant Crown
In the depths you will wade through black water and fight off Novistadors until you reach the far Western wall where there will be some corpses with a note. Next to one of the corpses is an Elegant Crown that you can sell for 100,000 Ptas if you inlay 5 different coloured gems. If you already squeezed through the wall turn around and squeeze through it again and the crown will be on the floor next to you.
Red Beryl
Squeeze through the wall and climb the ladder to reach the sewer. Walk through the sewer and you will see an alcove on your left with a metal cage hanging by a pipe on the ceiling. Shoot it down to get a gem.
Clockwork Castellan #10
Just before you enter the Typewriter room with the Merchant, look inside the metal grate opposite the room. There will be a castellan upside down at the top of the grate. It’s hard to see because the light your flashlight has to hit it in a certain way.
Spinel (Expanded Treasure)
Enter the Typewriter/Merchant room. Above the door inside the room is a metal cage you can shoot down to get a spinel. This is only available to those who have the Expanded Treasure Map DLC.


Astute Appraiser (Trophy)
Inlay the Elegant Crown with 5 different coloured gems. doing so will increase the sale bonus to x2.0. You can also slot in 5 gems of the same colour for a x1.9 bonus, or 2 gems of the same colour and 3 gems of another colour (i.e. 2 colours overall but split into 2 and 3 gems) for a bonus of x1.8. Now that you’re stood in front of the merchant, if you sell the elegant crown for 100k Ptas you will unlock the Astute Appraiser trophy.
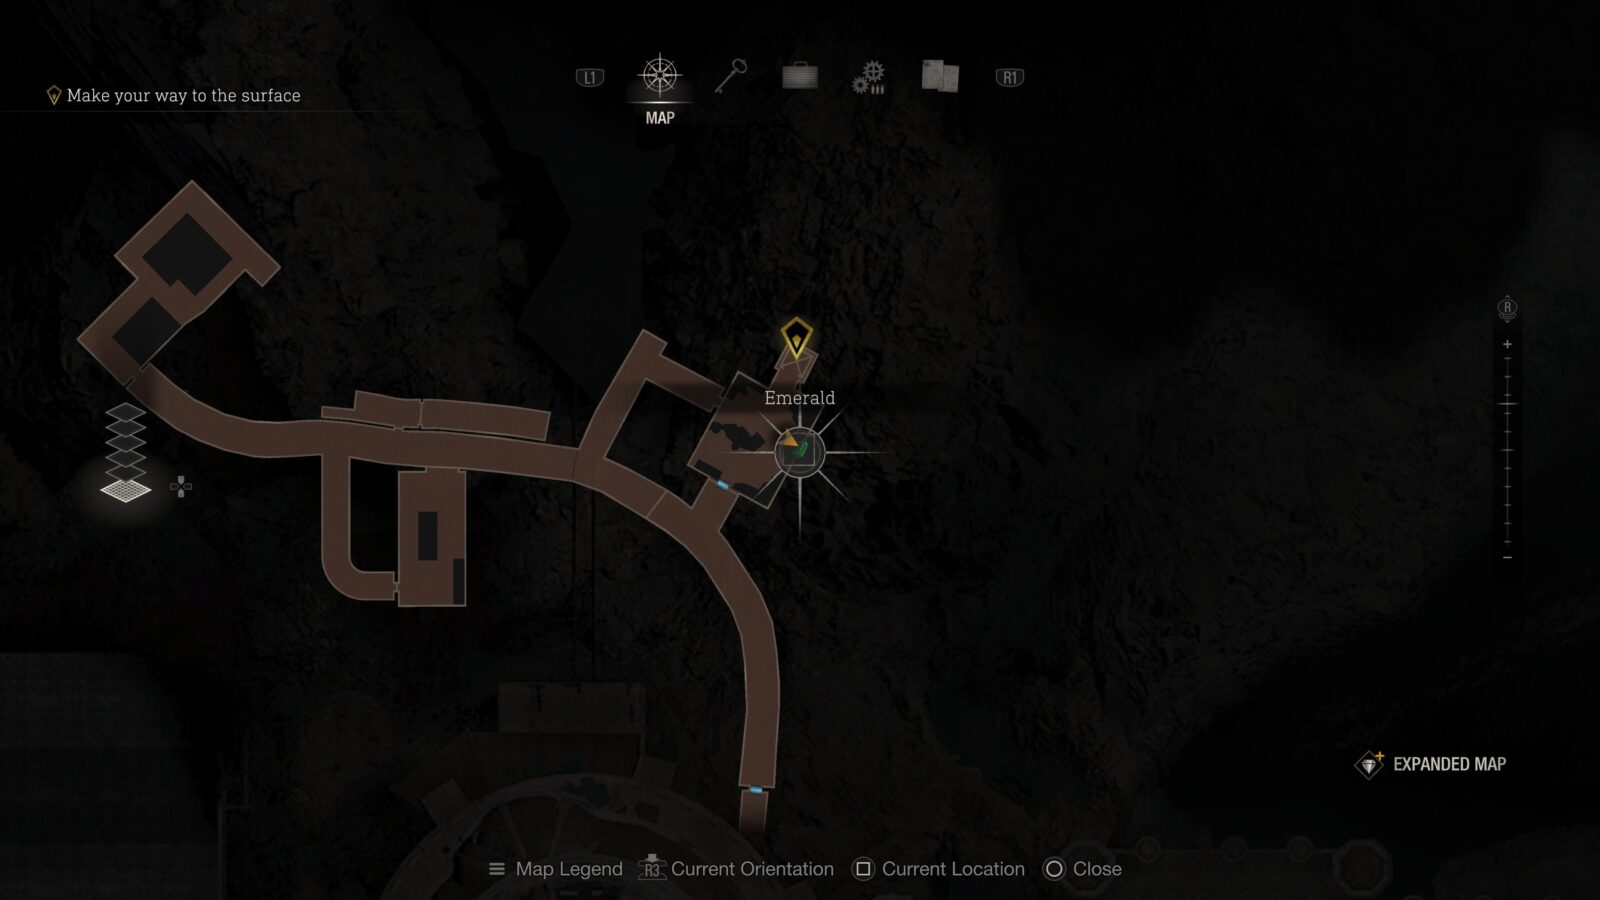
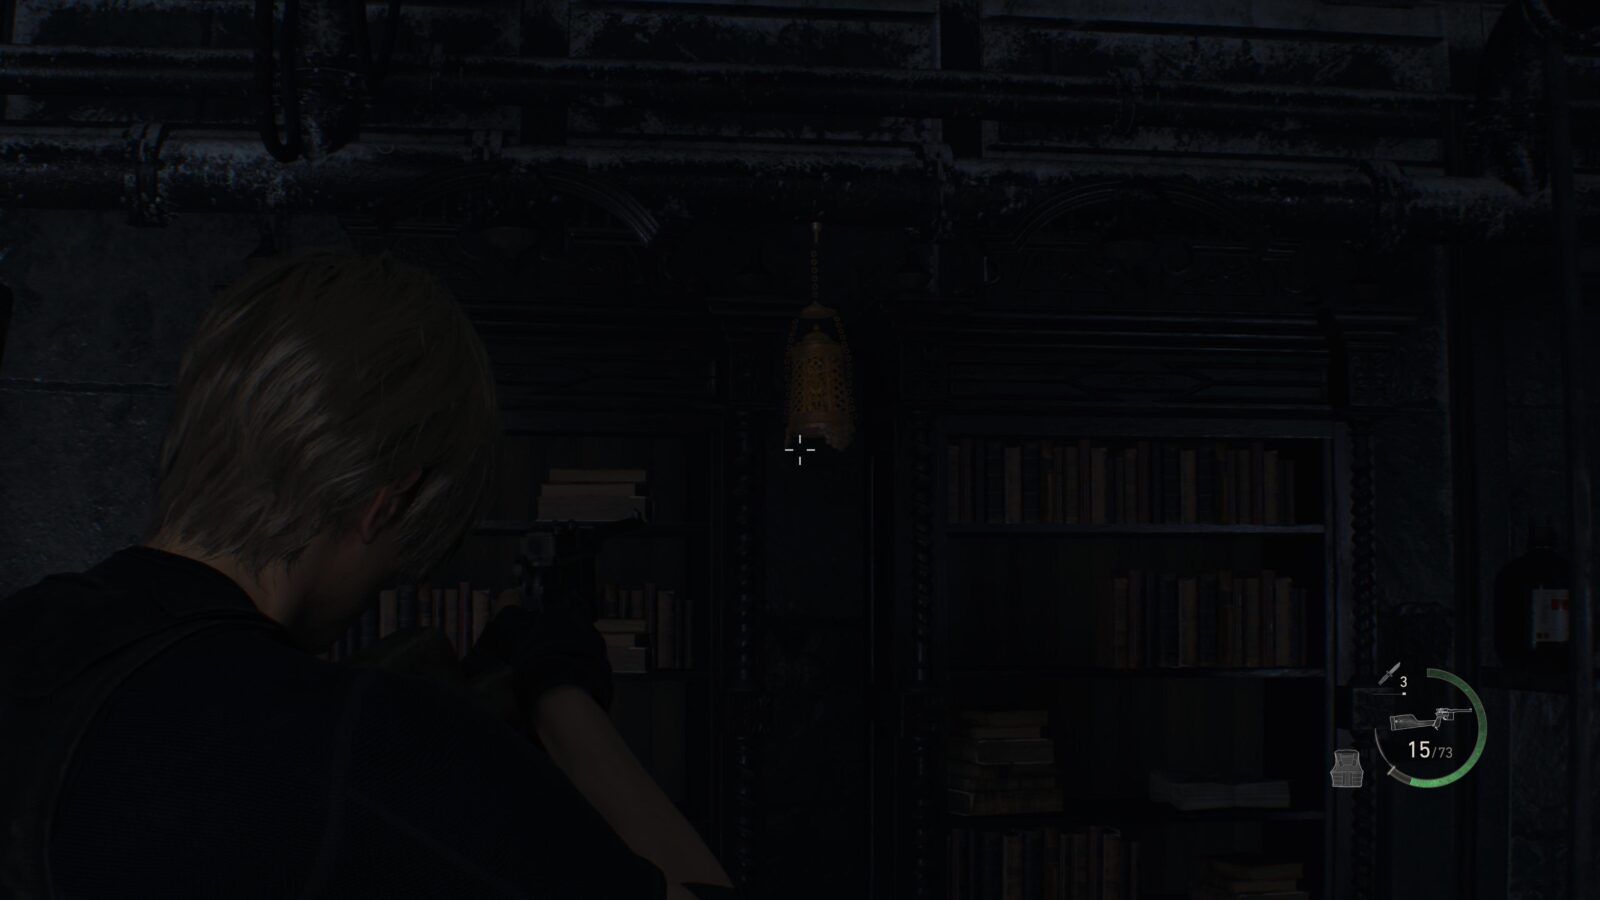
Emerald (Expanded Treasure)
In the next area you will reach a room with a table, some machinery, and a corpse on an upright table. While stood in front fo the corpse look to your right to see a metal cage hanging between two book cases. This is only available to those who have the Expanded Treasure Map DLC.
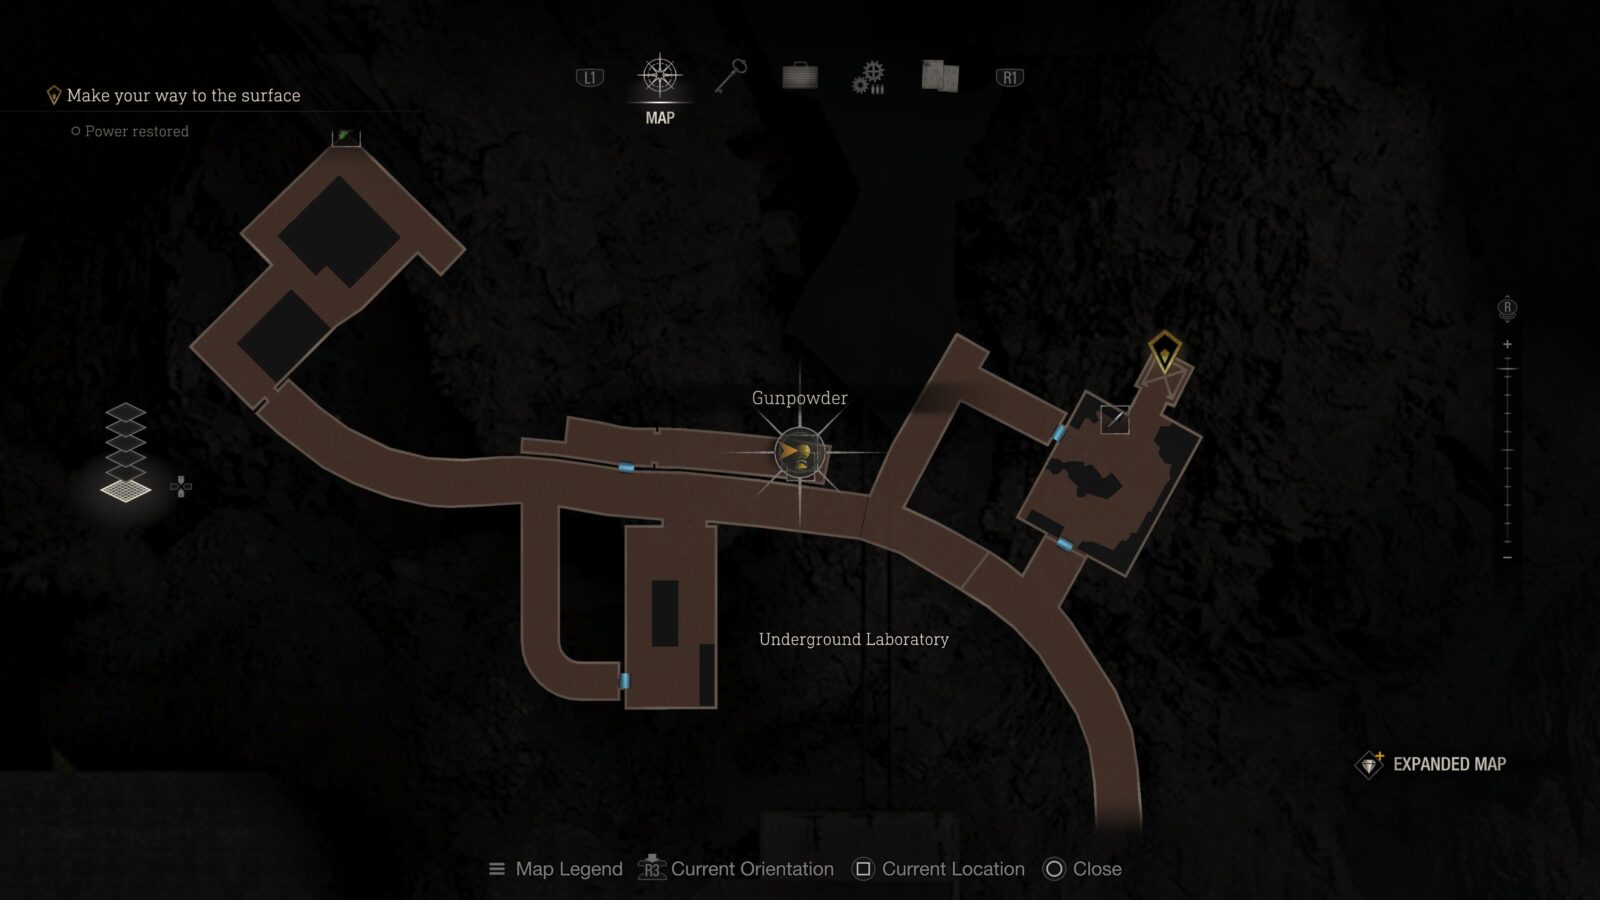
Wave Goodbye, Right Hand (Trophy)
After you turn the power on in the sewer lab area you will be chased by the Verdugo. You must kill it to unlock this trophy which is easier said than done. The Verdugo is fast, hits hard, and can take a lot of damage. The best strategy would be to buy a Rocket Launcher from the Merchant, freeze the Verdugo using one of the switches in the corridors and then shoot the rocket at him when he’s frozen. Then, if he’s still alive, you can use your shotgun or upgraded Red9 to finish him off.
Yellow Diamond
Now that the Verdugo has been taken care of you can return to the side room where you flipped a switch to open a gate. Previously there was a large metal gate separating the room but now the power is back on the gate is lifted and you can get to the chest at the end of the room.

Chapter 11
There are a total of 1 Clockwork Castellan, 1 Merchant Request, 1 Shooting Range, 1 Trophy Opportunity, and 4 Treasures in Chapter 11. This chapter also has 2 Expanded Treasures which can only be obtained with the Expanded Treasure Map DLC.
Shooting Range
At the start of the chapter you can see the Merchant and the familiar elevator that leads to another shooting range with 3 more challenges, 3A, 3B, and 3C.
Spinel (Expanded Treasure)
When you reach the mines with your first enemy encounter you can see a metal cage hanging from a wooden platform on the far Western side of the area. This is only available to those who have the Expanded Treasure Map DLC.
Sapphire
In the mines with the large metal rotating machine (I think it’s some sort of drill?) are some stairs on the North side which lead to some train tracks. At the top of the stairs look up and to your left to find a metal cage hanging from a metal strut. This is also right next to where you lowered the small metal bridge if you’ve already done that.

Golden Hourglass
Cross the small metal bridge that you lowered for yourself and walk to the end of the path where there is an alcove–to the right of where the dynamite is–to find a chest.

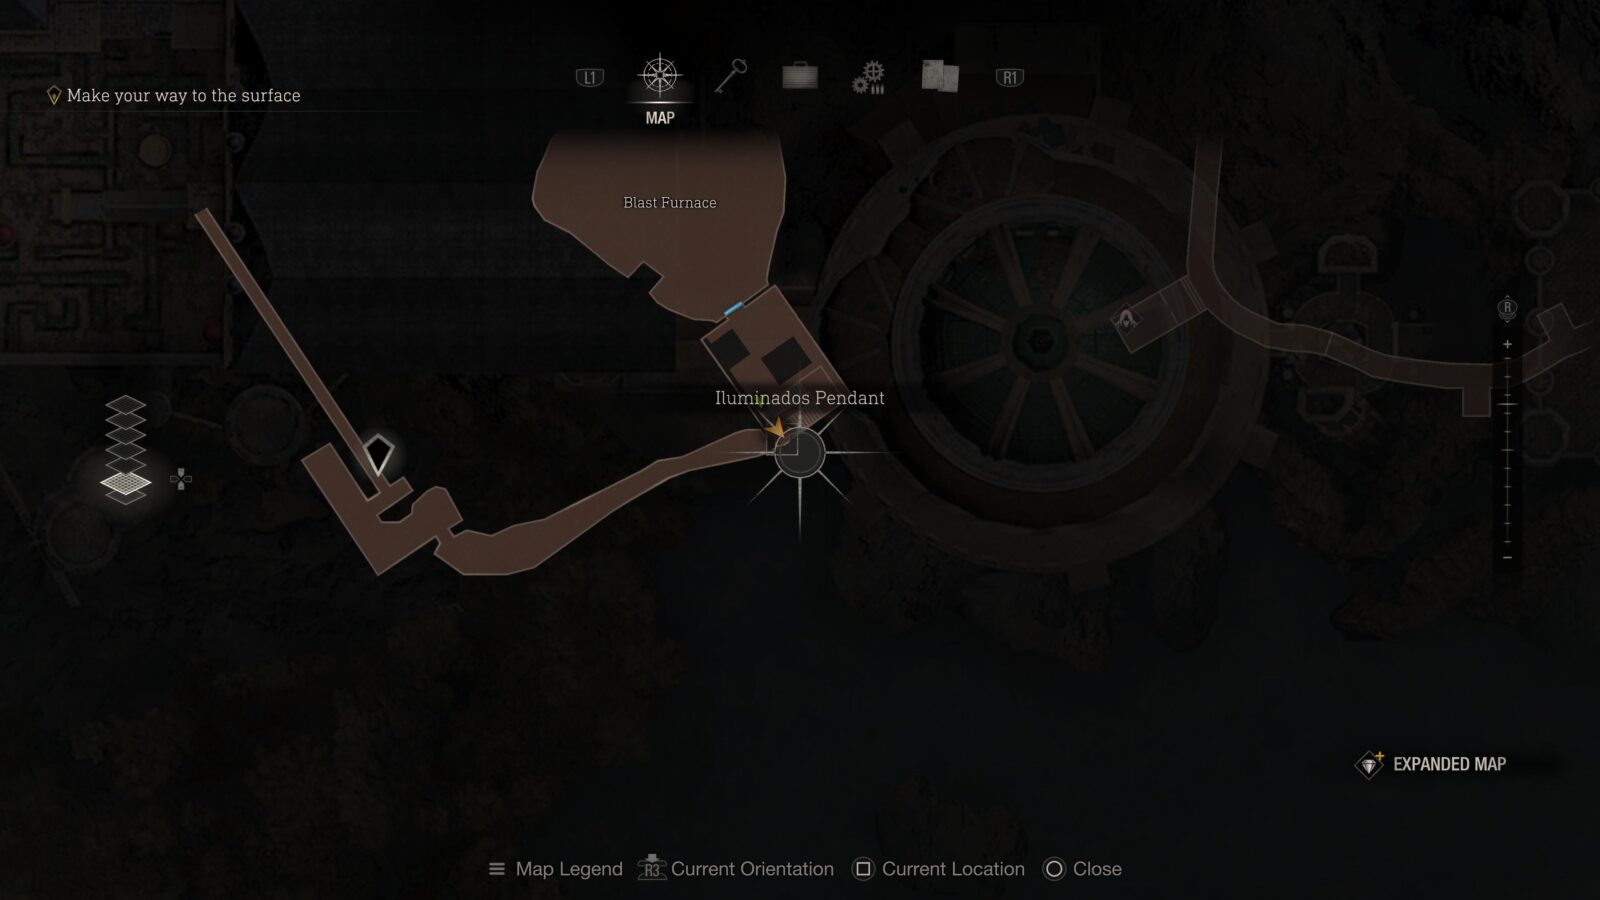
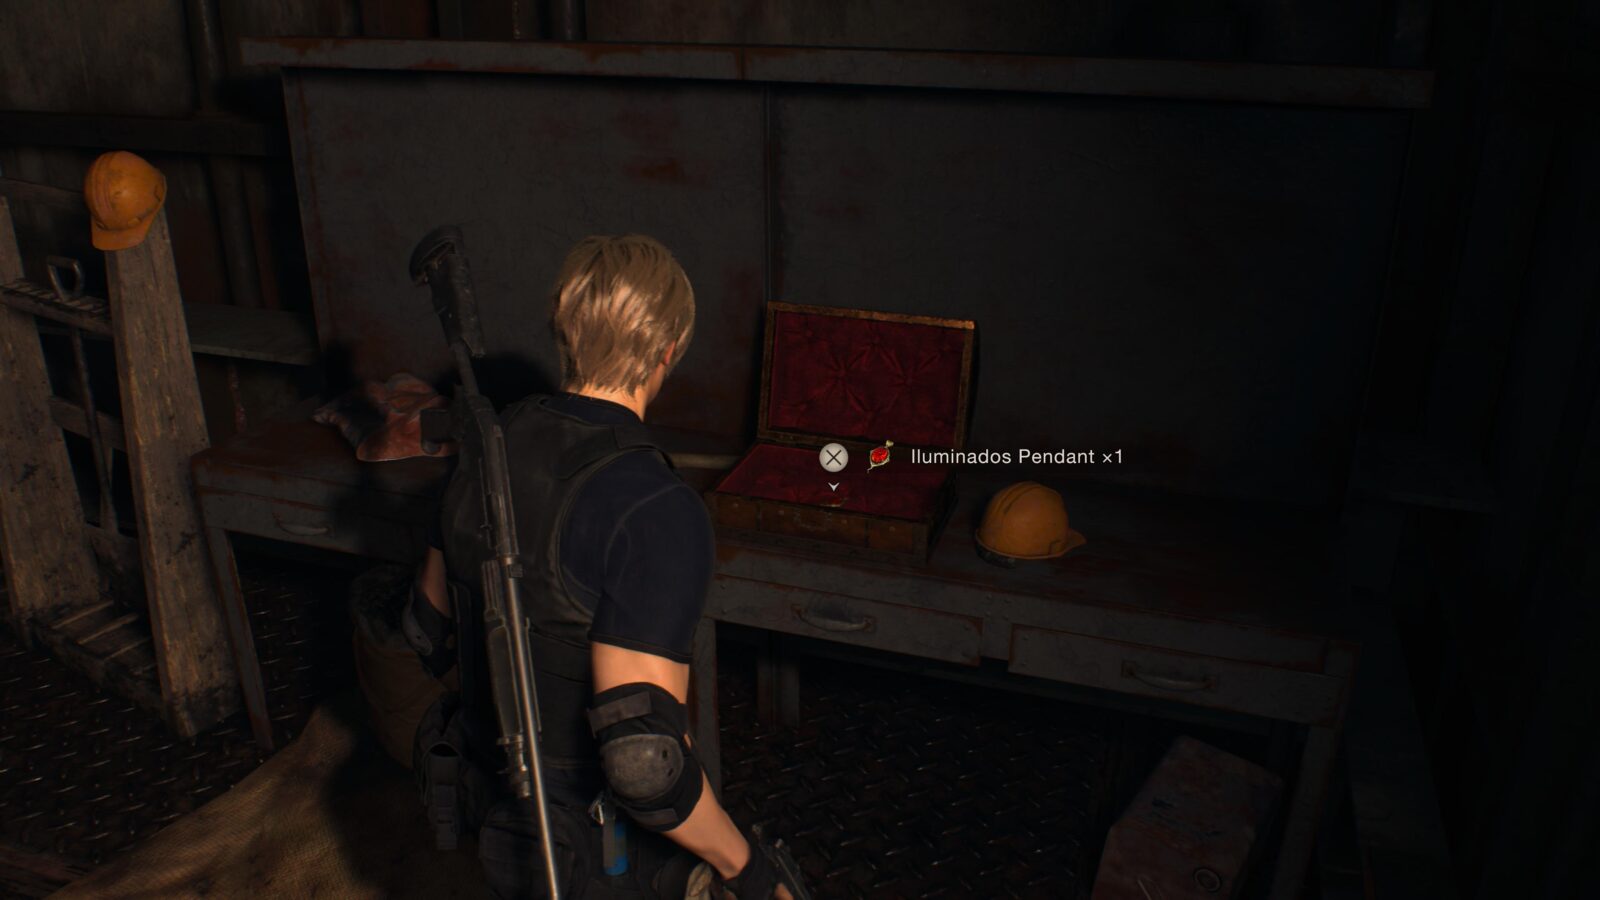
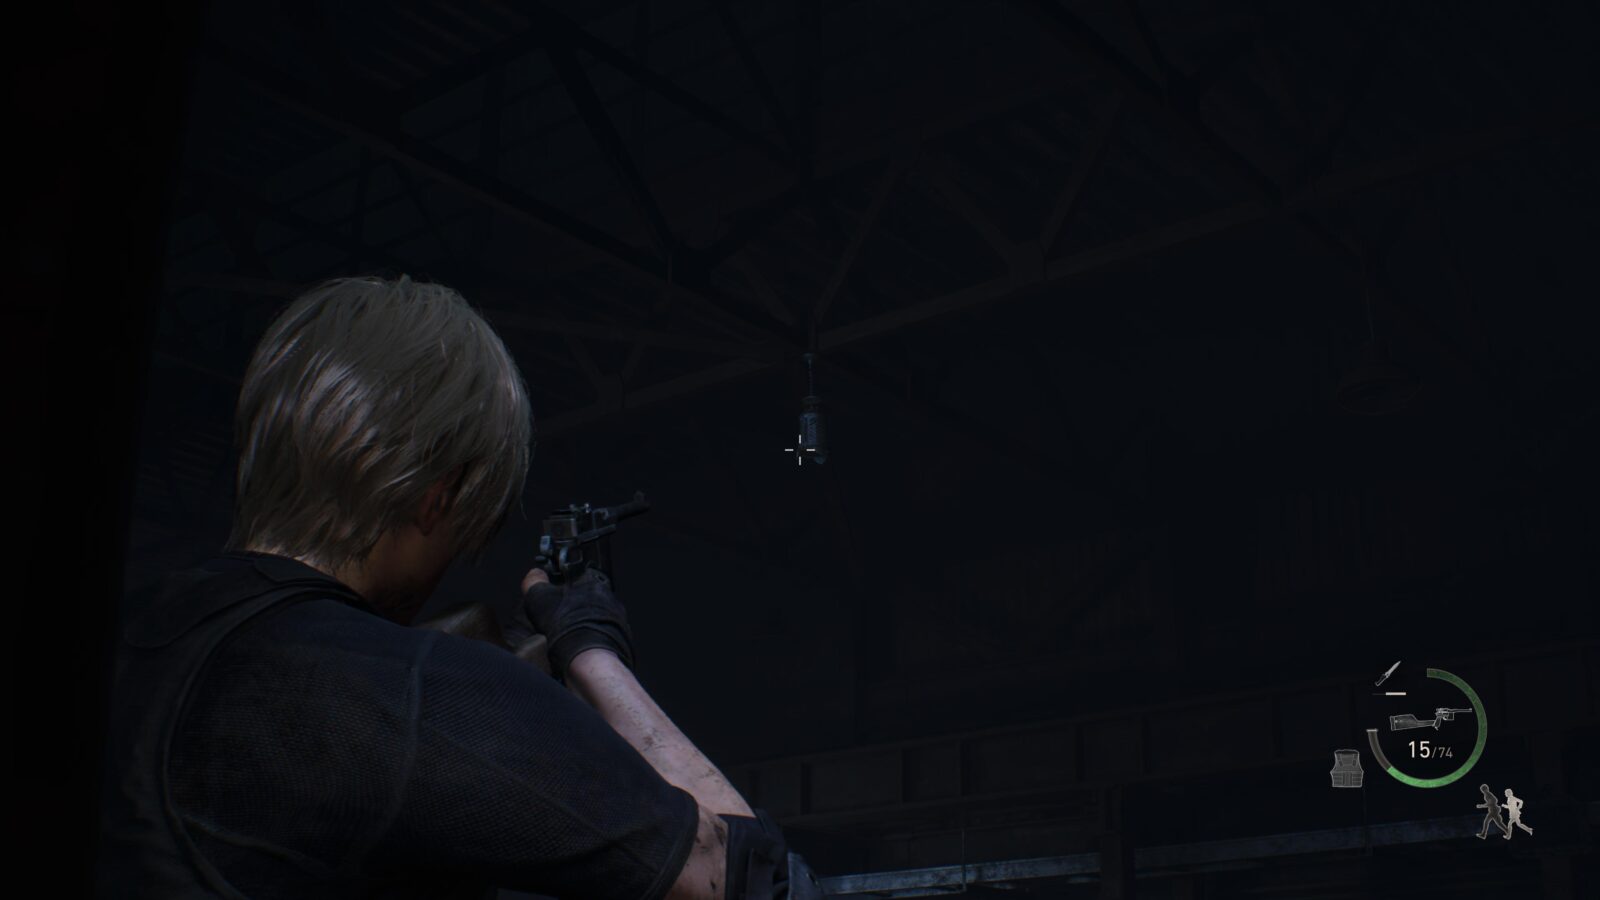
Illuminados Pendant (Expanded Treasure)
In the room directly after the two giants boss fight is a small chest on a desk with a pendant inside. This is only available to those who have the Expanded Treasure Map DLC.
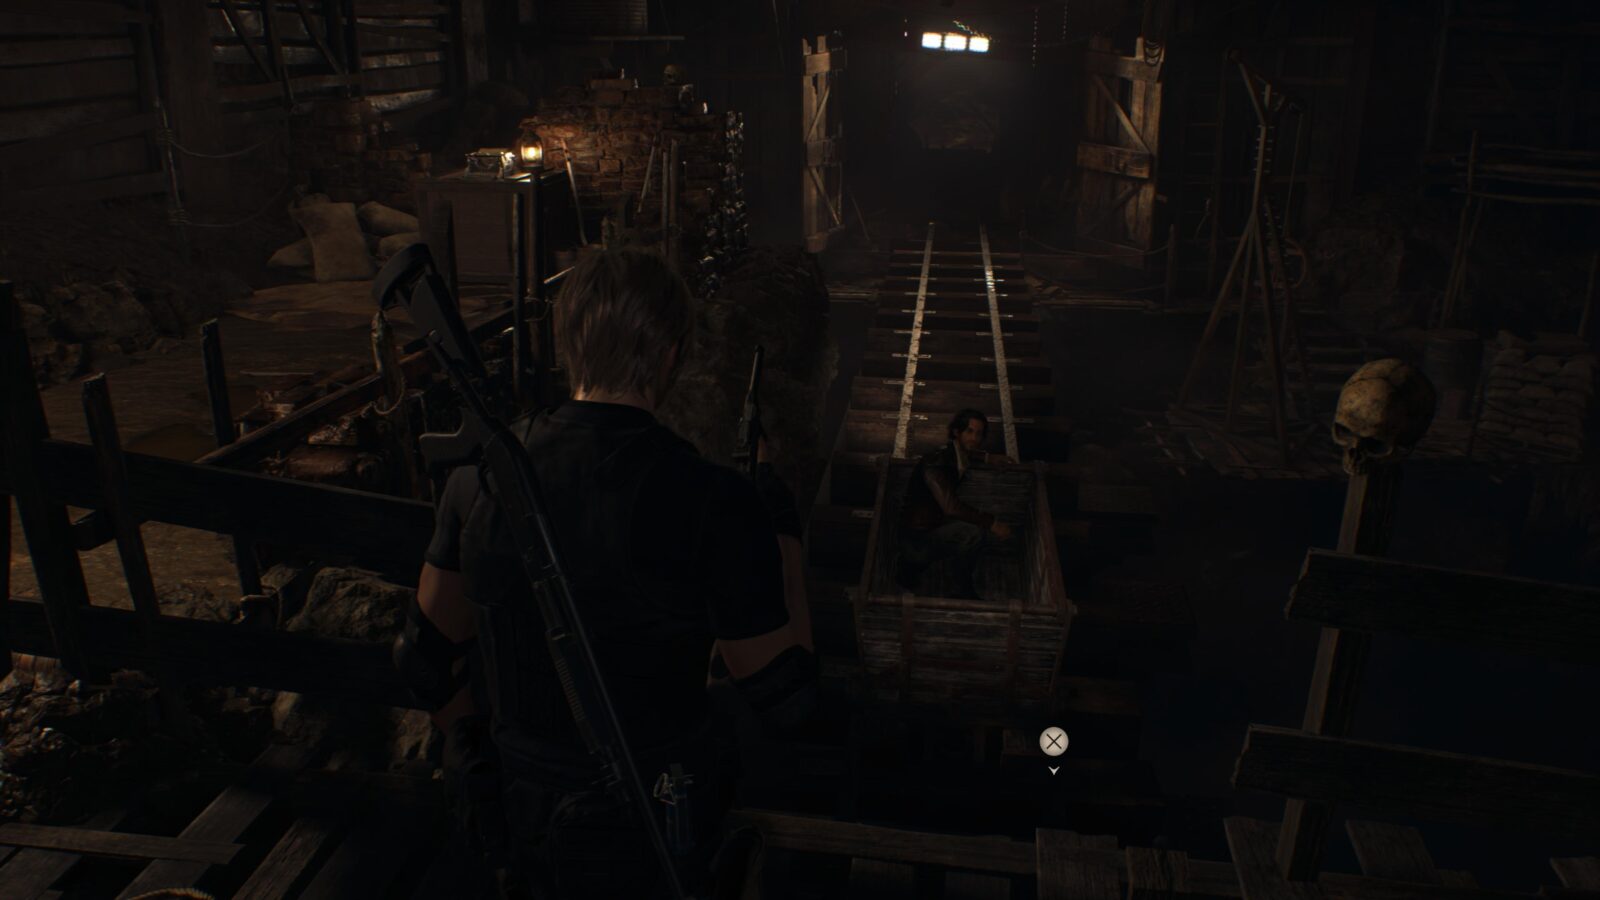
Hope You Like Thrill Rides (Trophy)
After the two giants boss encounter you will ride a mine cart. You mustn’t let the mine cart get damaged at all for this trophy to unlock. The mine cart section is split into 2 parts with a treasure in between them so make sure to grab that before continuing on with the 2nd part. This trophy is easier than it sounds since you can hit options ![]() and Load Game to reload your autosave if your cart gets any damage. This can be done for both parts since they have their own autosaves.
and Load Game to reload your autosave if your cart gets any damage. This can be done for both parts since they have their own autosaves.
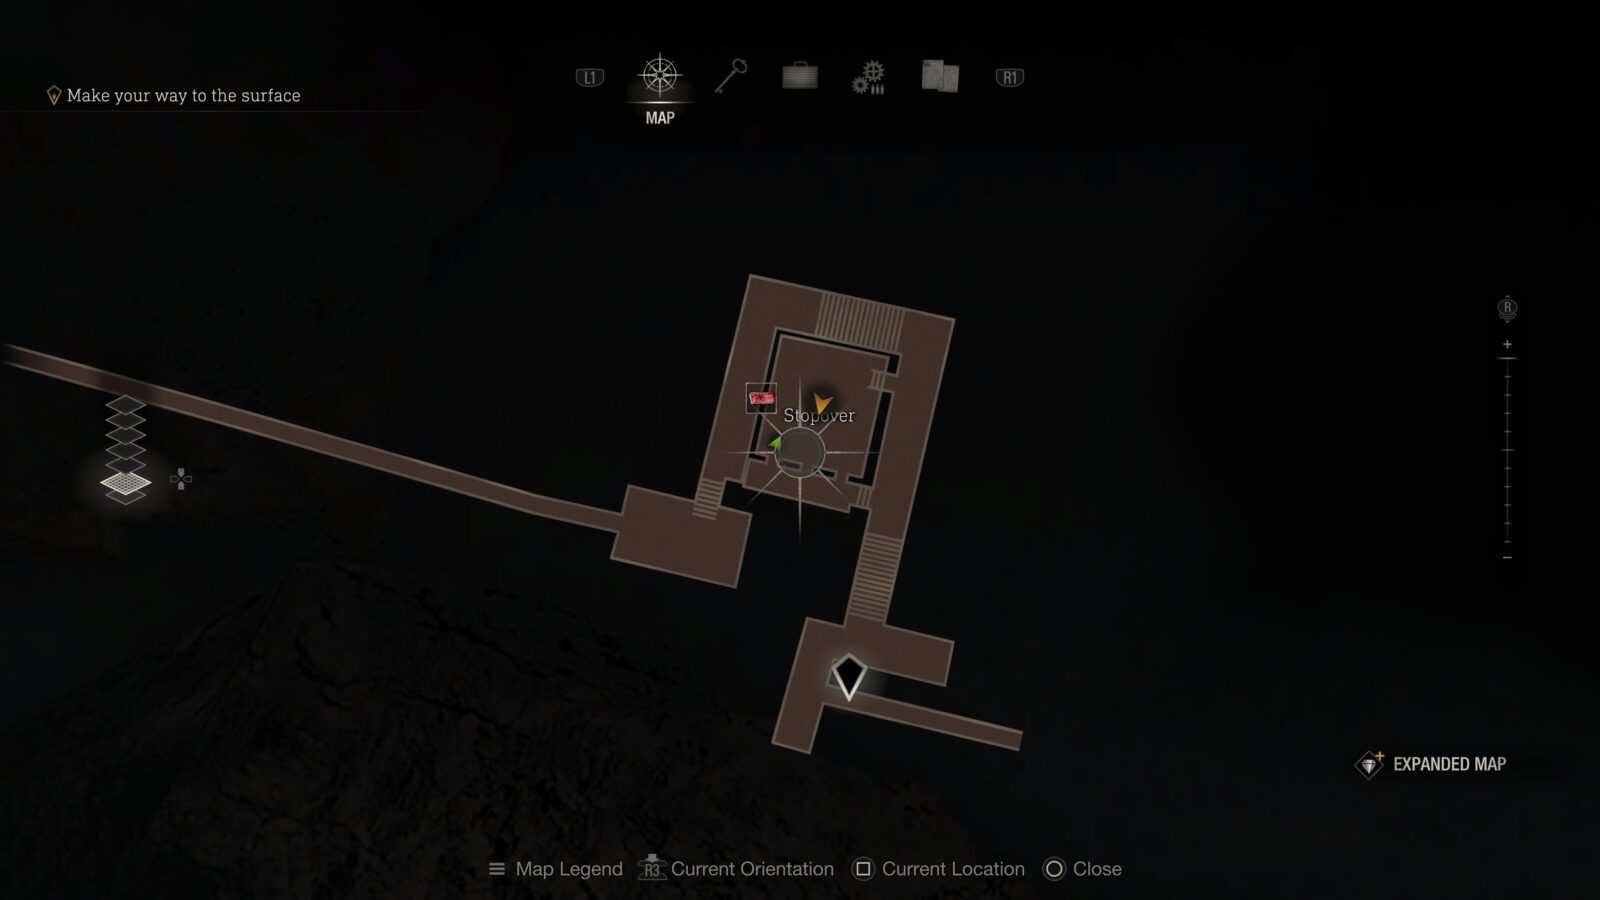
Clockwork Castellan #11
After the 1st mine cart section you will come to a building called “Stopover” with a guy inside throwing sticks of dynamite at you. Get rid of the enemies and go inside the building and look on top of the wall above some doorways to find a castellan.
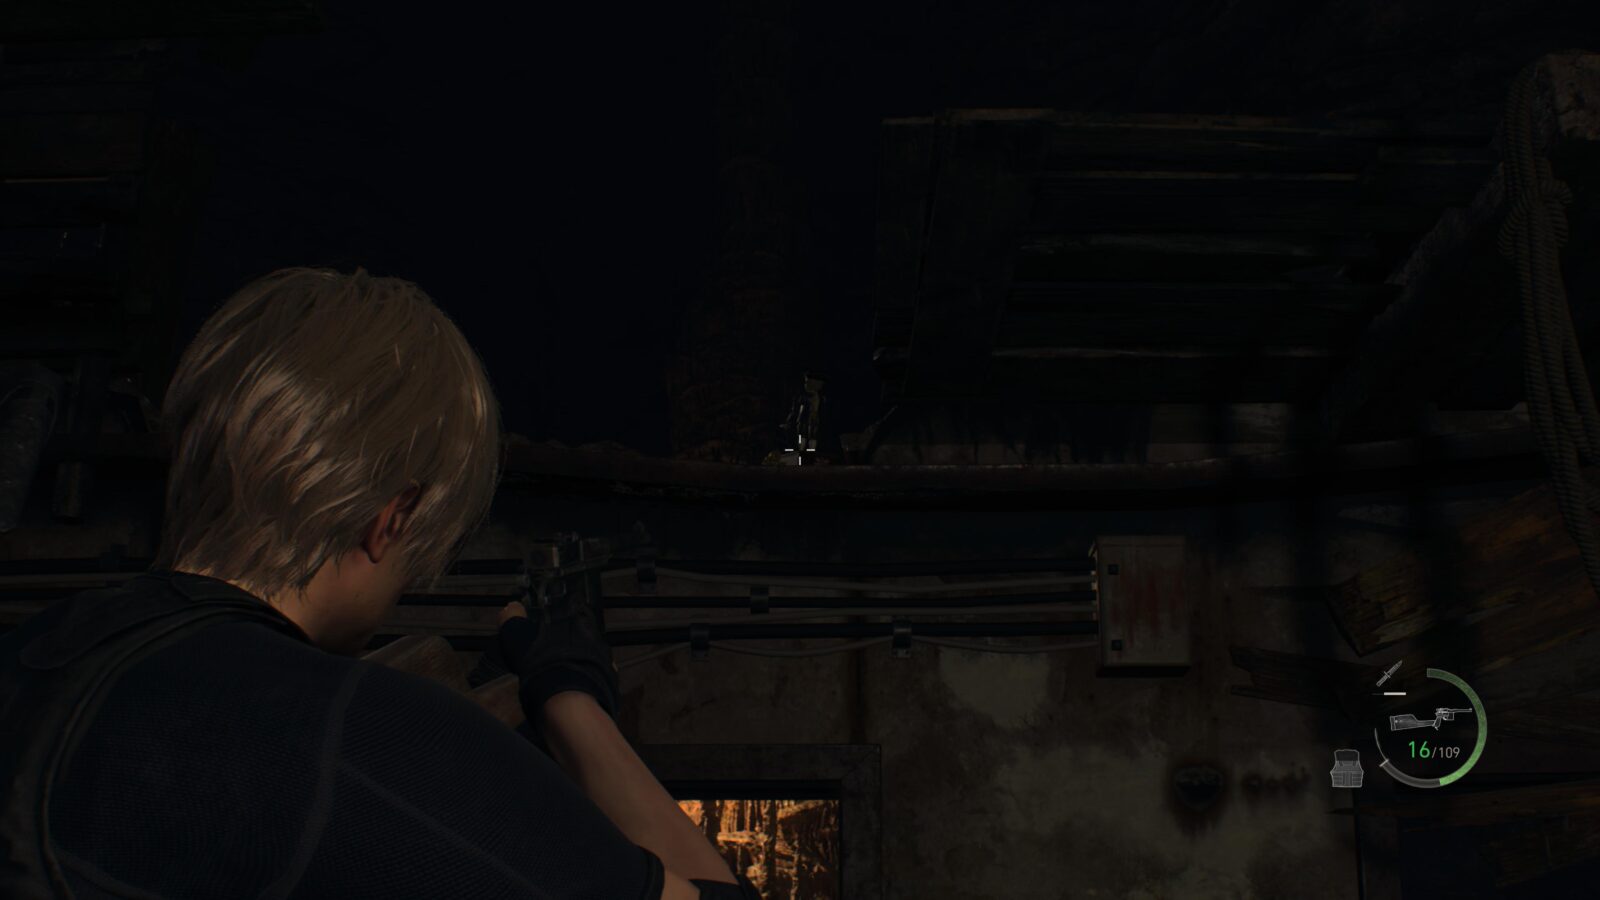
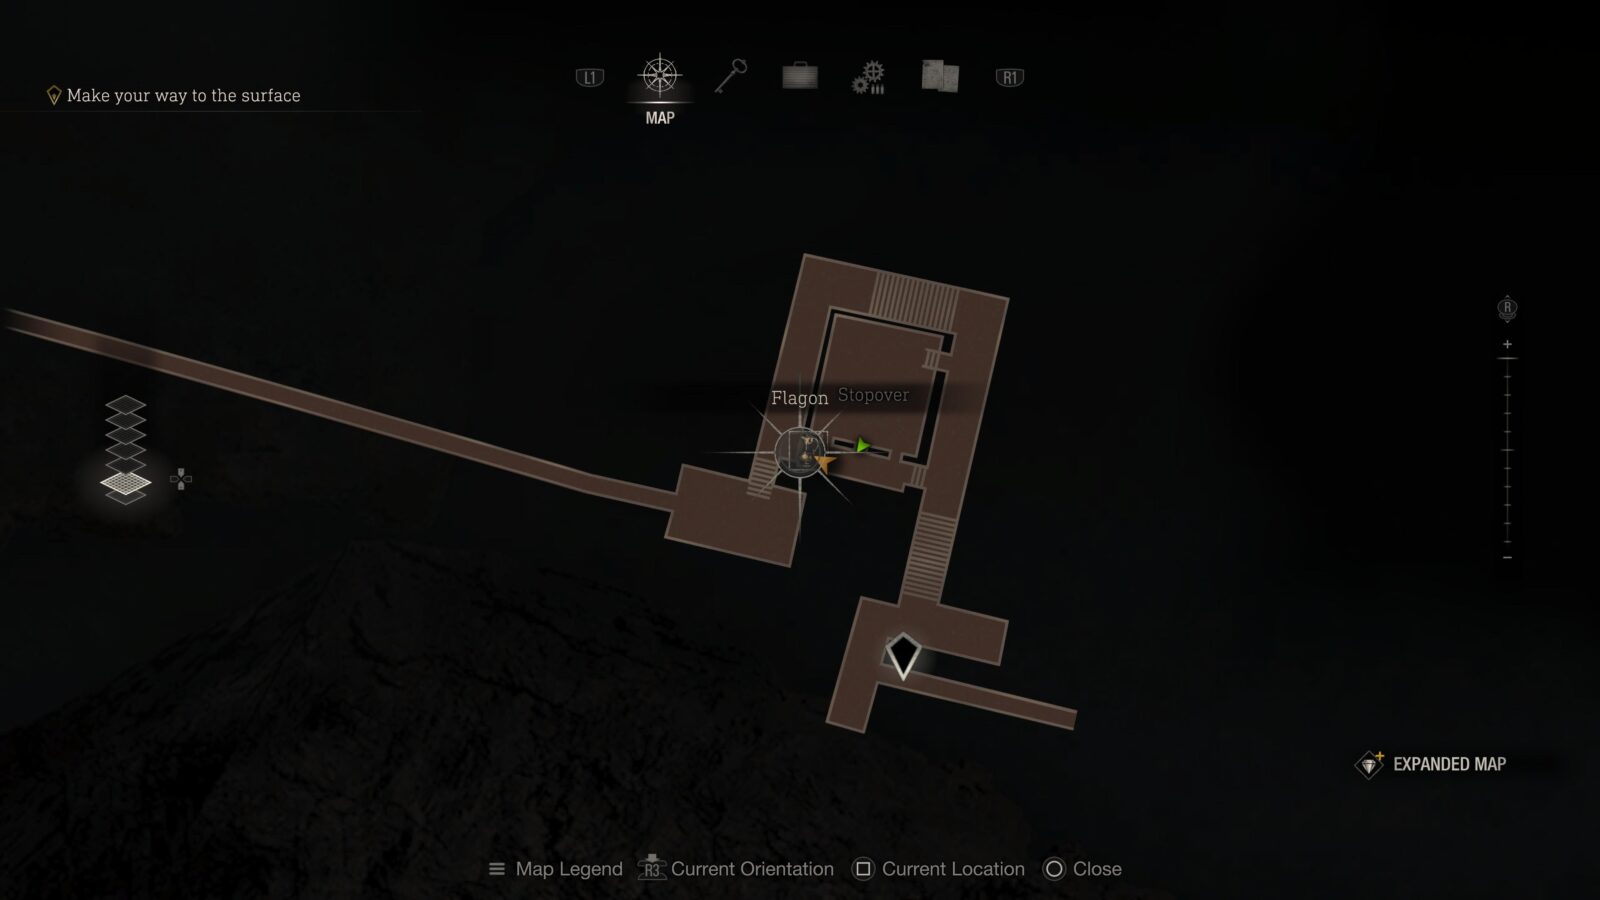
Flagon
Head through the open door below the castellan and turn right to find a chest with a flagon inside.

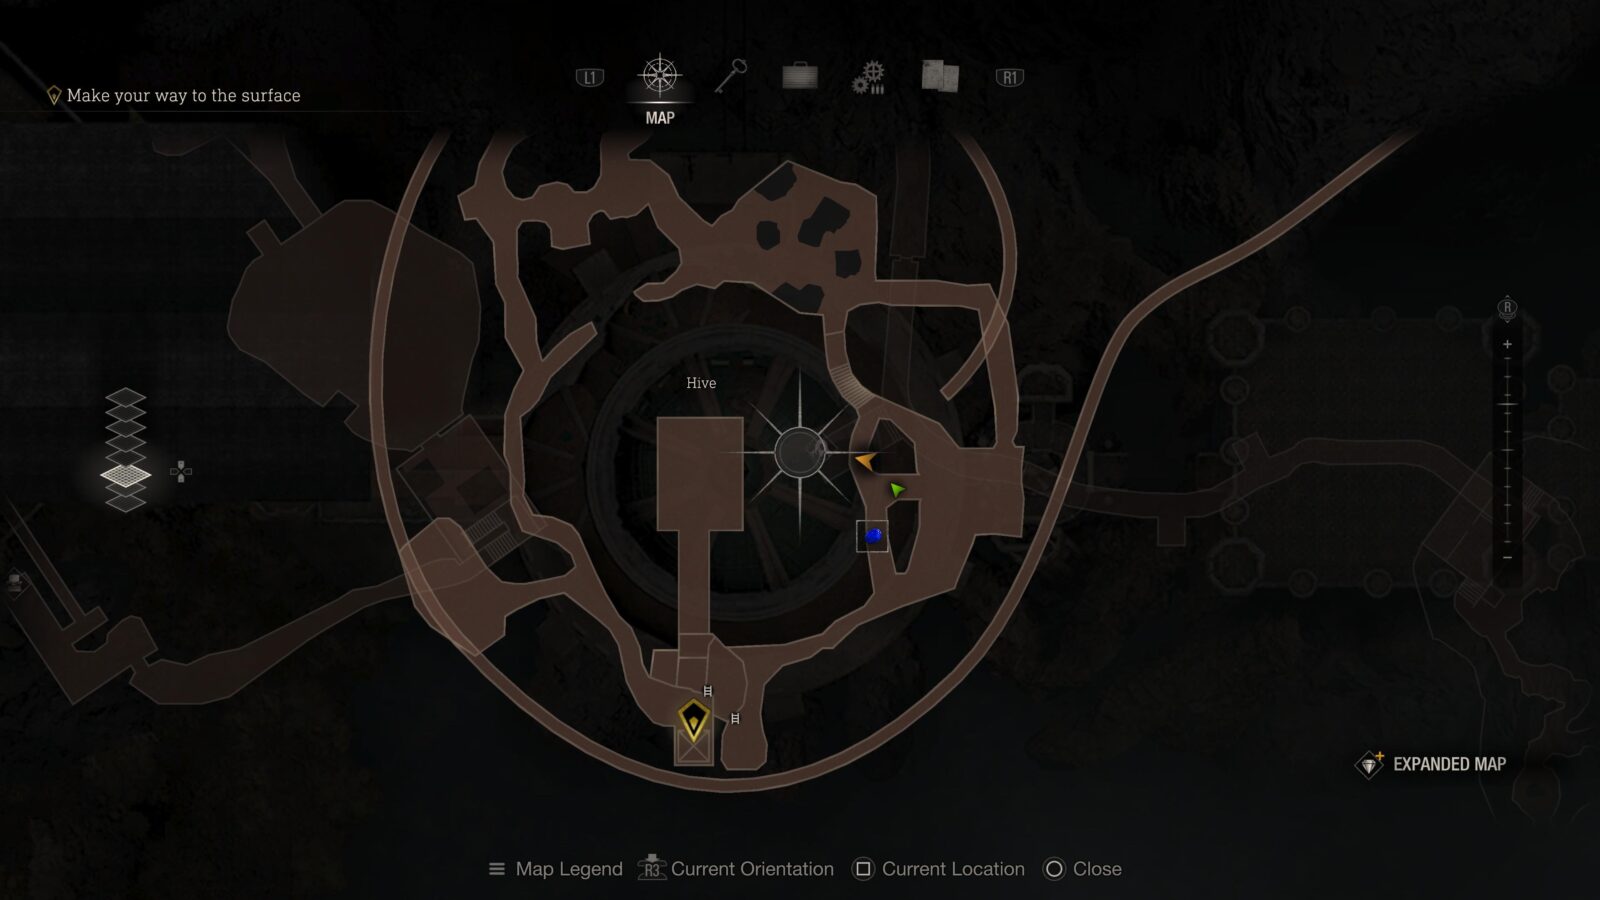
Merchant Request: Insect Hive
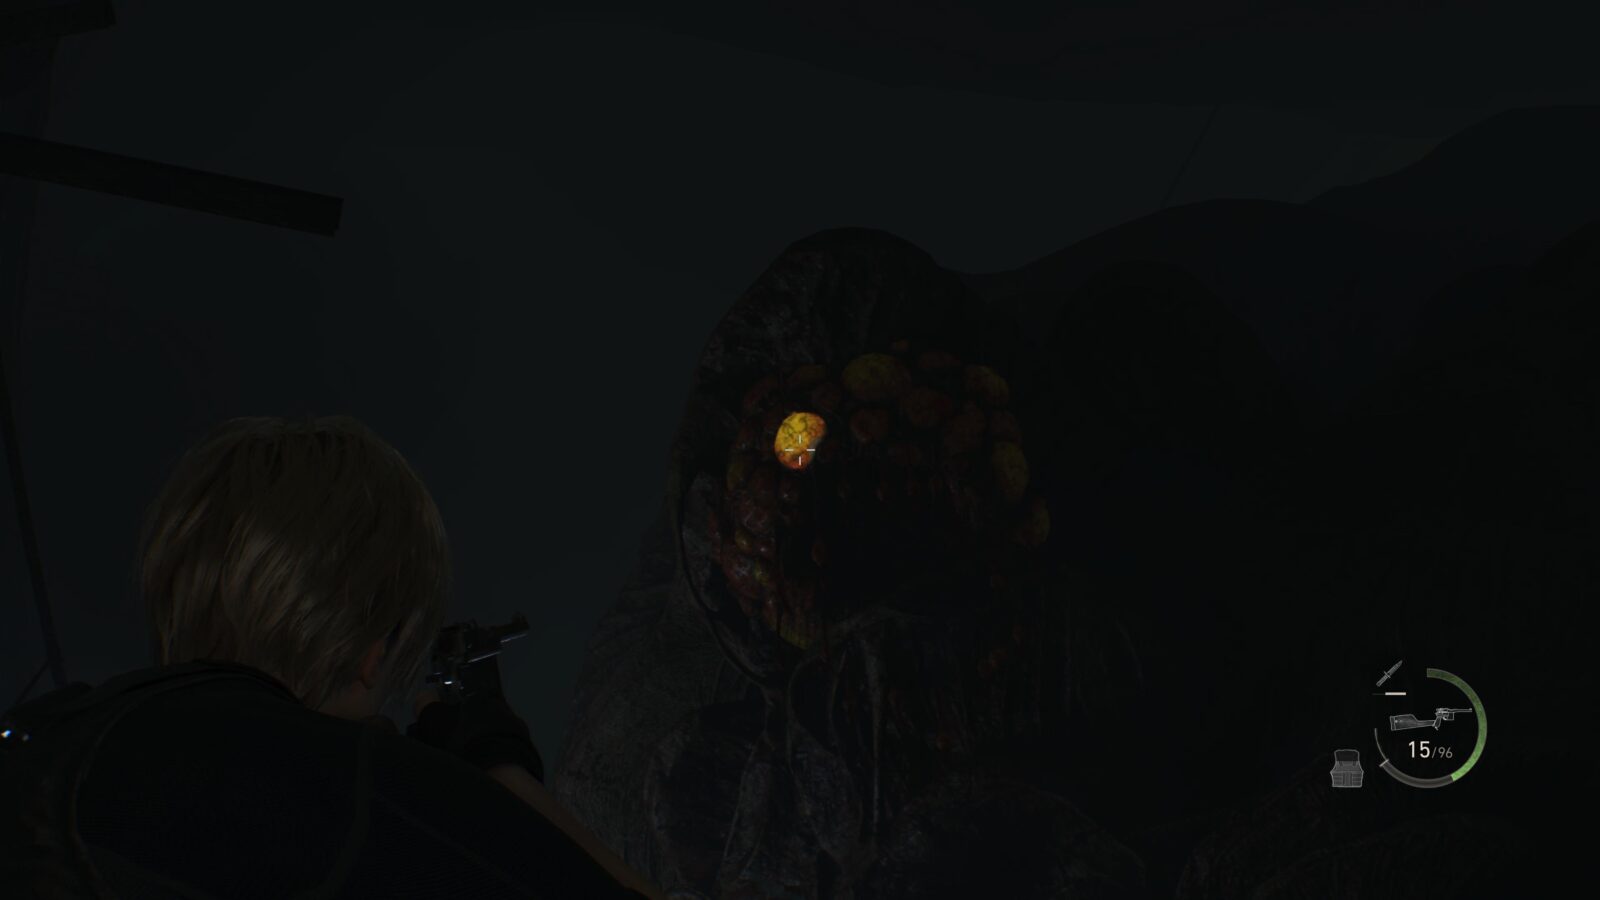
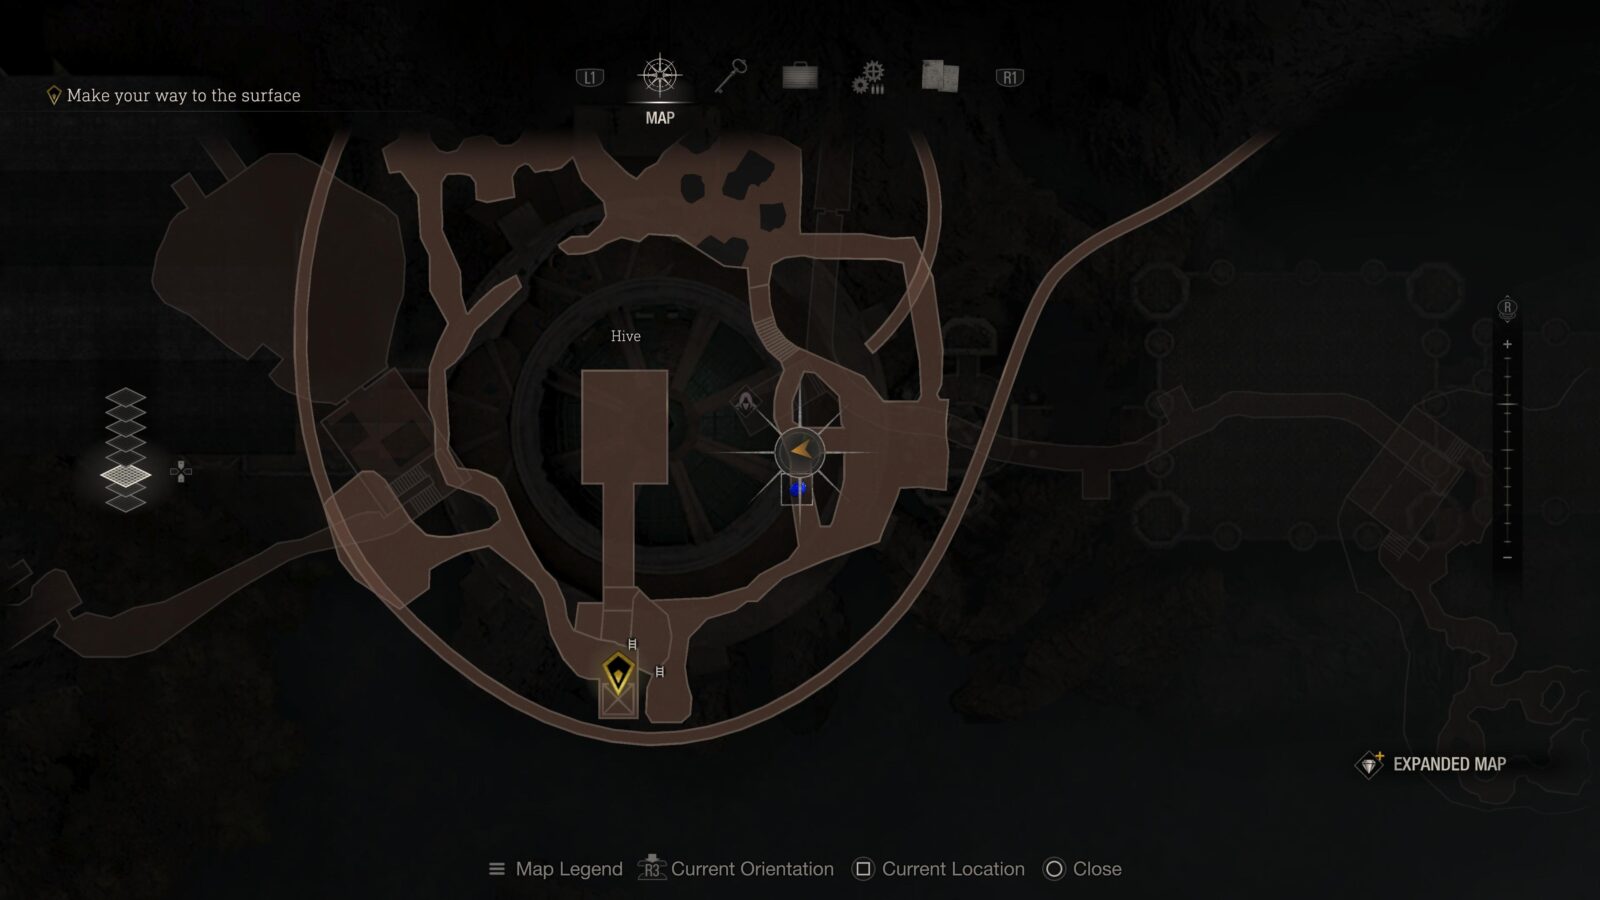
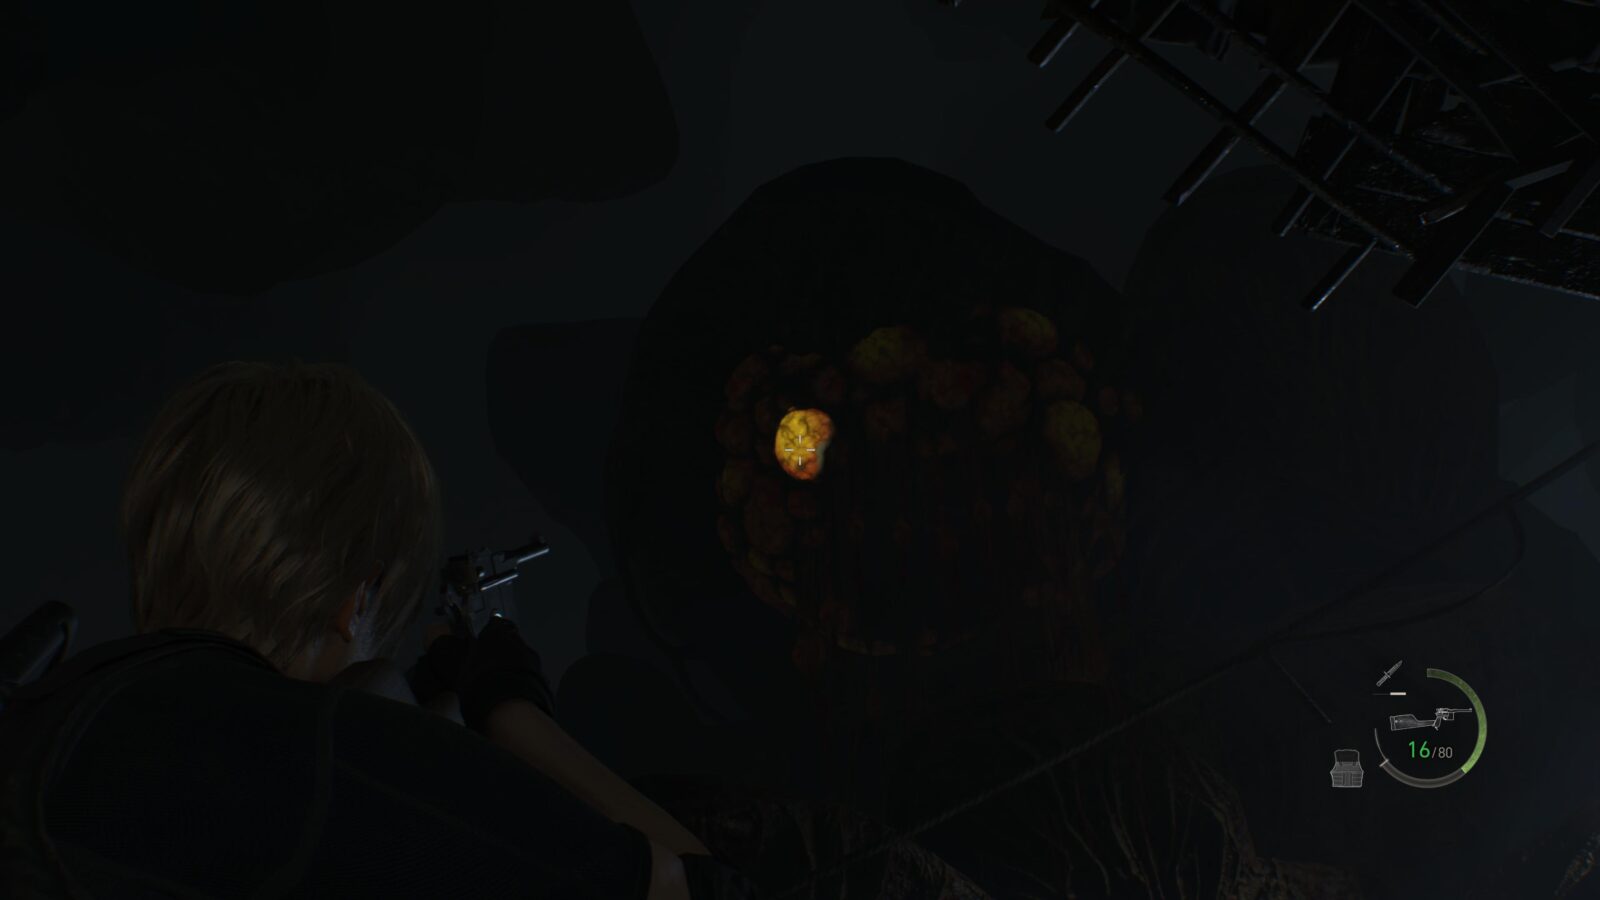
After the mine cart sections you will drop down some levels inside the large cavern. Near an explosive barrel will be a new request. This time you will need to destroy the entrances to 4 insect hives. The hives look like a collection of sacs with one of them being yellow which pulsates. They’re a bit spread out so I’ll list them separately.


Hive #1
Immediately from the request turn left and look up towards the large rock formation in the middle of the cavern. There will be a hive with a single yellow sac that’s pulsing. Shoot it to destroy it.
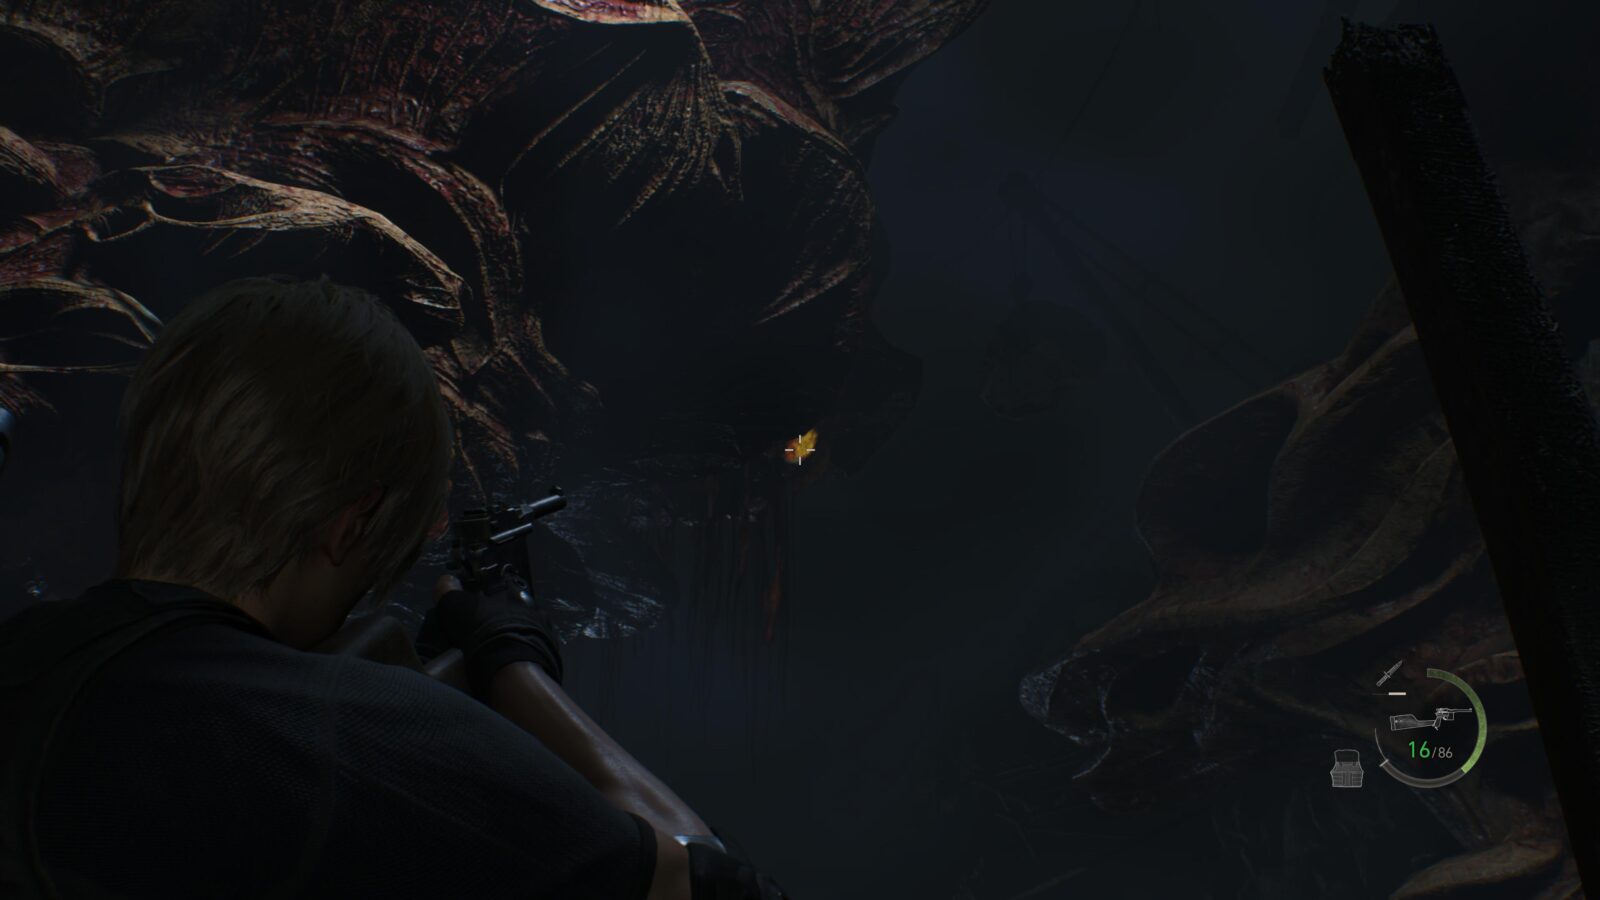
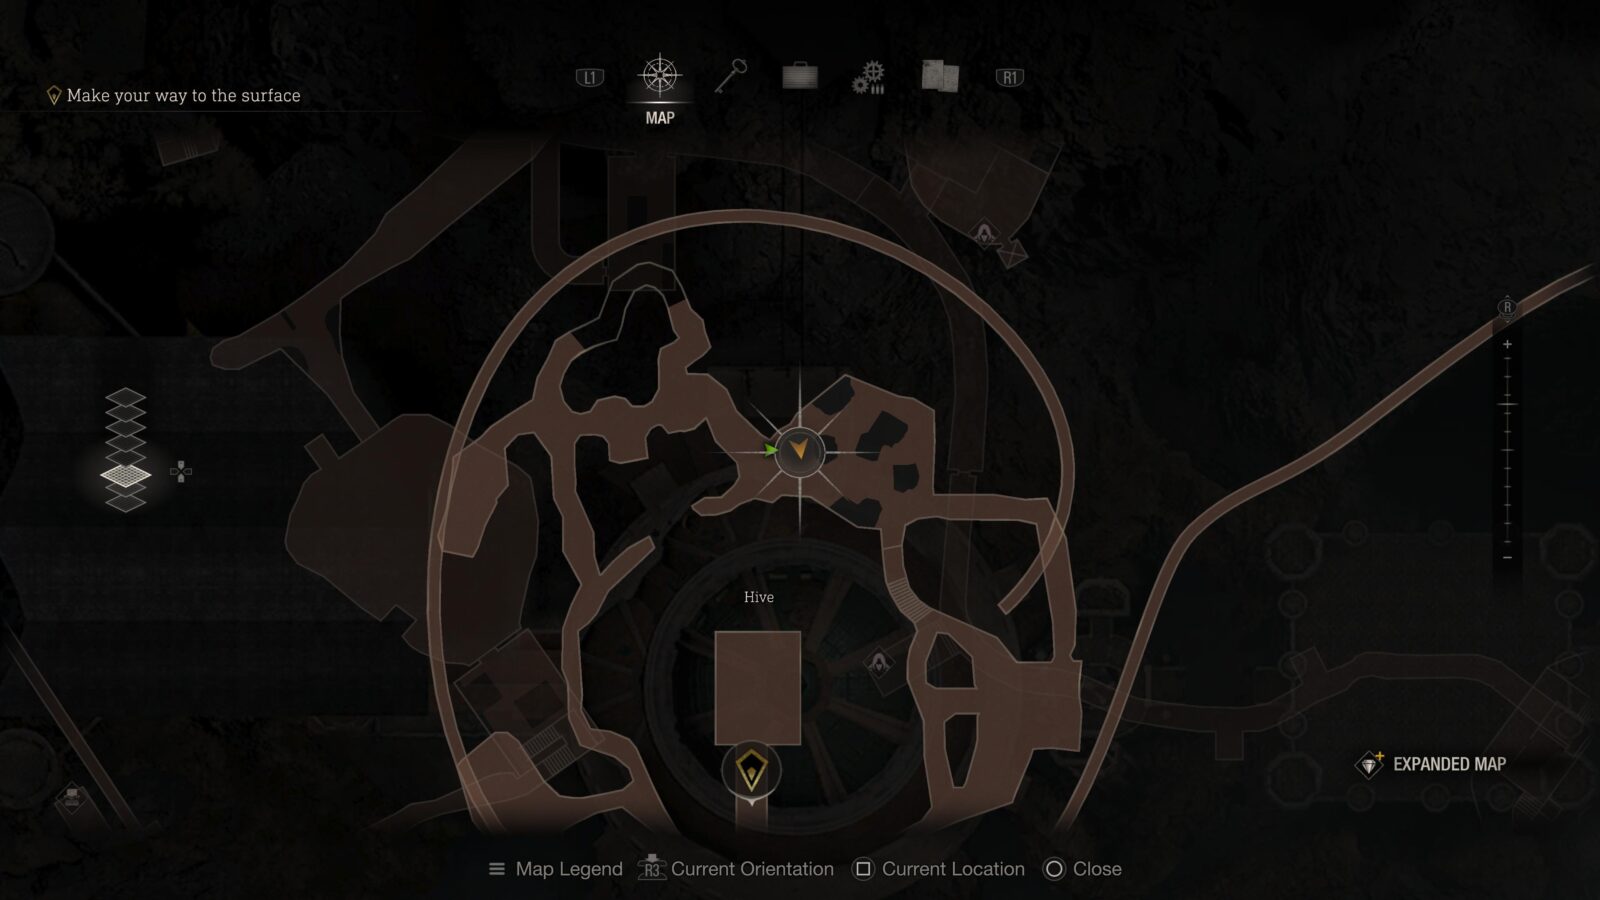
Hive #2
Walk up the path a bit further and you will see another pulsing yellow sac just to the right of where the last one was in the middle.

Hive #3
Head through the tunnel to the right of where you found the request notice and follow the path to a breakable barrel. From the barrel you can see another sac in the middle of the cavern.

Hive #4
Just before you head into the next tunnel you can look up and to your left to find the last sac.
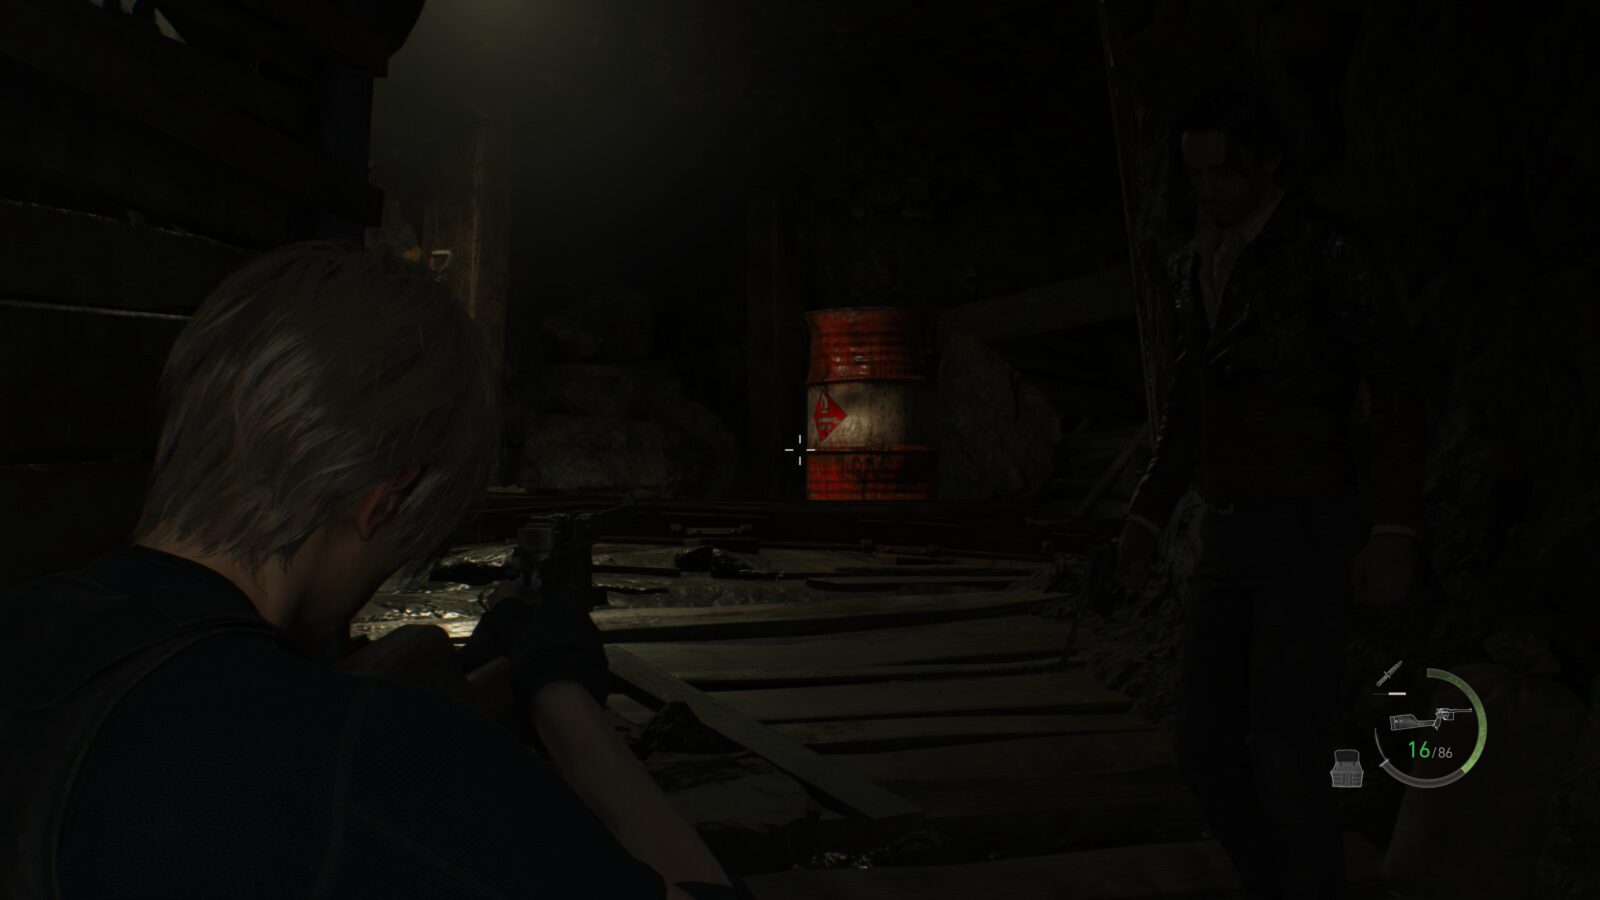
Gold Bar (L)
Proceed through the mine tunnels until you see an explosive barrel next to a cart filled with rocks. Shoot it and it will open a path to a treasure.

Chapter 12
There are a total of 1 Clockwork Castellan, 2 Merchant Requests, 1 Shooting Range, 1 Small Key (used to unlock locked drawers hiding additional treasure), 2 Trophy Opportunities, and 7 Treasures in Chapter 12. This chapter also has 2 Expanded Treasures which can only be obtained with the Expanded Treasure Map DLC.
Small Key
Ride the elevator back up into the castle at the start of the chapter and on a table ahead of you will be a briefcase with a small key inside.
Merchant Request: Jewel Thief
On the wall directly to the left of the elevator is a merchant request. For this one you need to backtrack to the courtyard and retrieve a gem from a crow’s nest. We’ll be doing a bit of backtracking before we board the golden train cart so I’ll list the crow’s nest as a separate item.
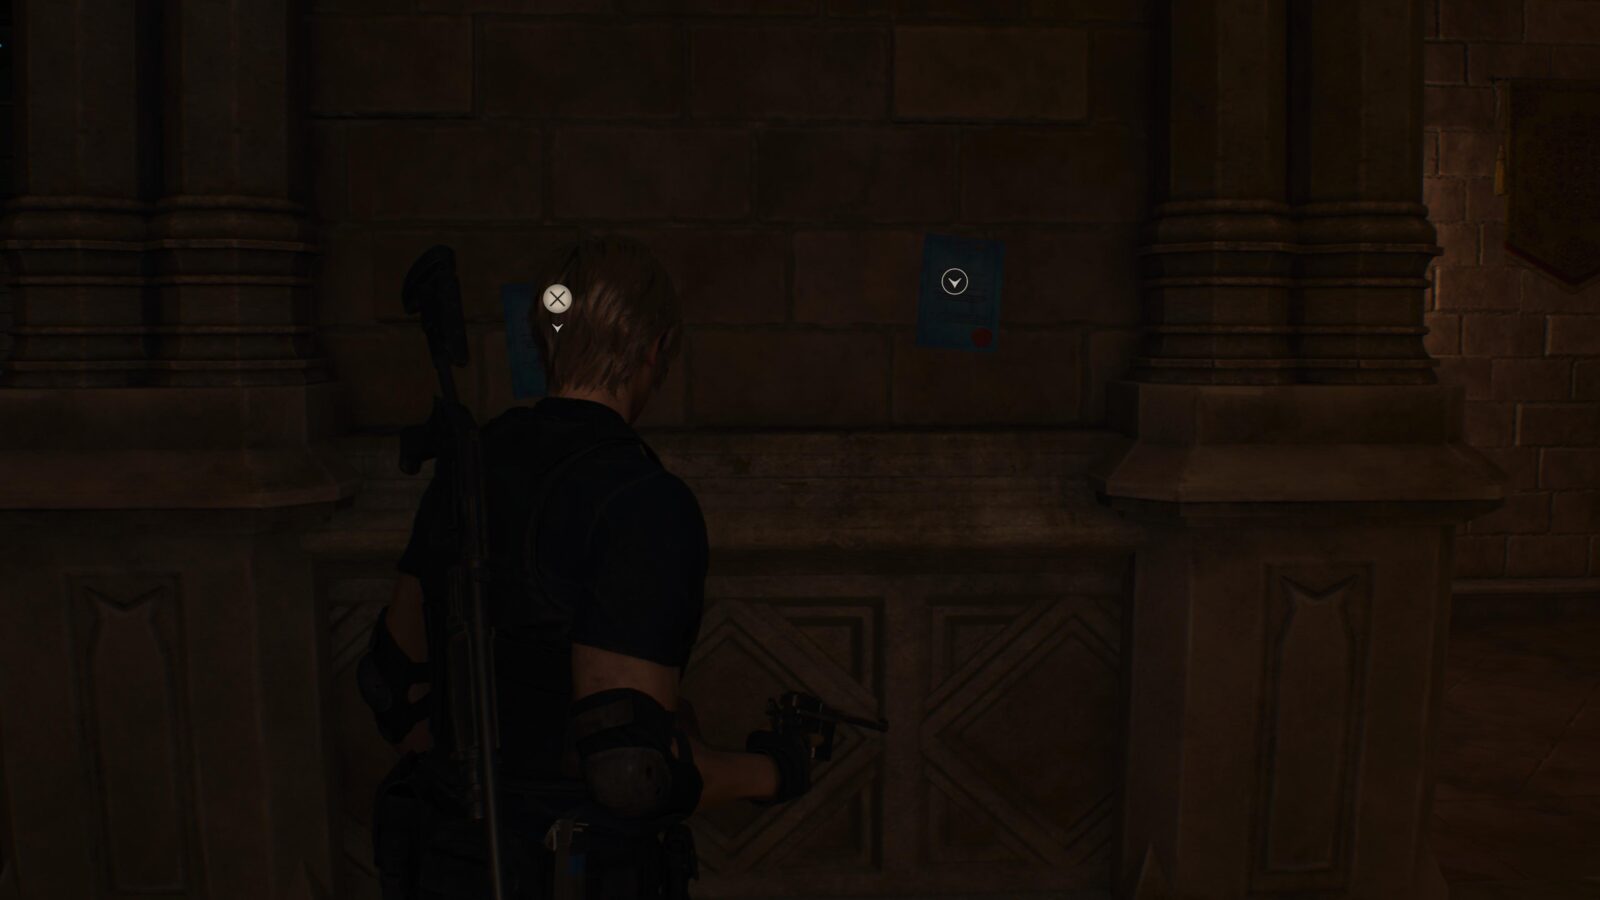
Merchant Request: The Disgrace of the Salazar Family
Also on the same wall as the Jewel Thief request. For this you need to go to the Throne Room and throw an egg at the portrait of Ramón Salazar.
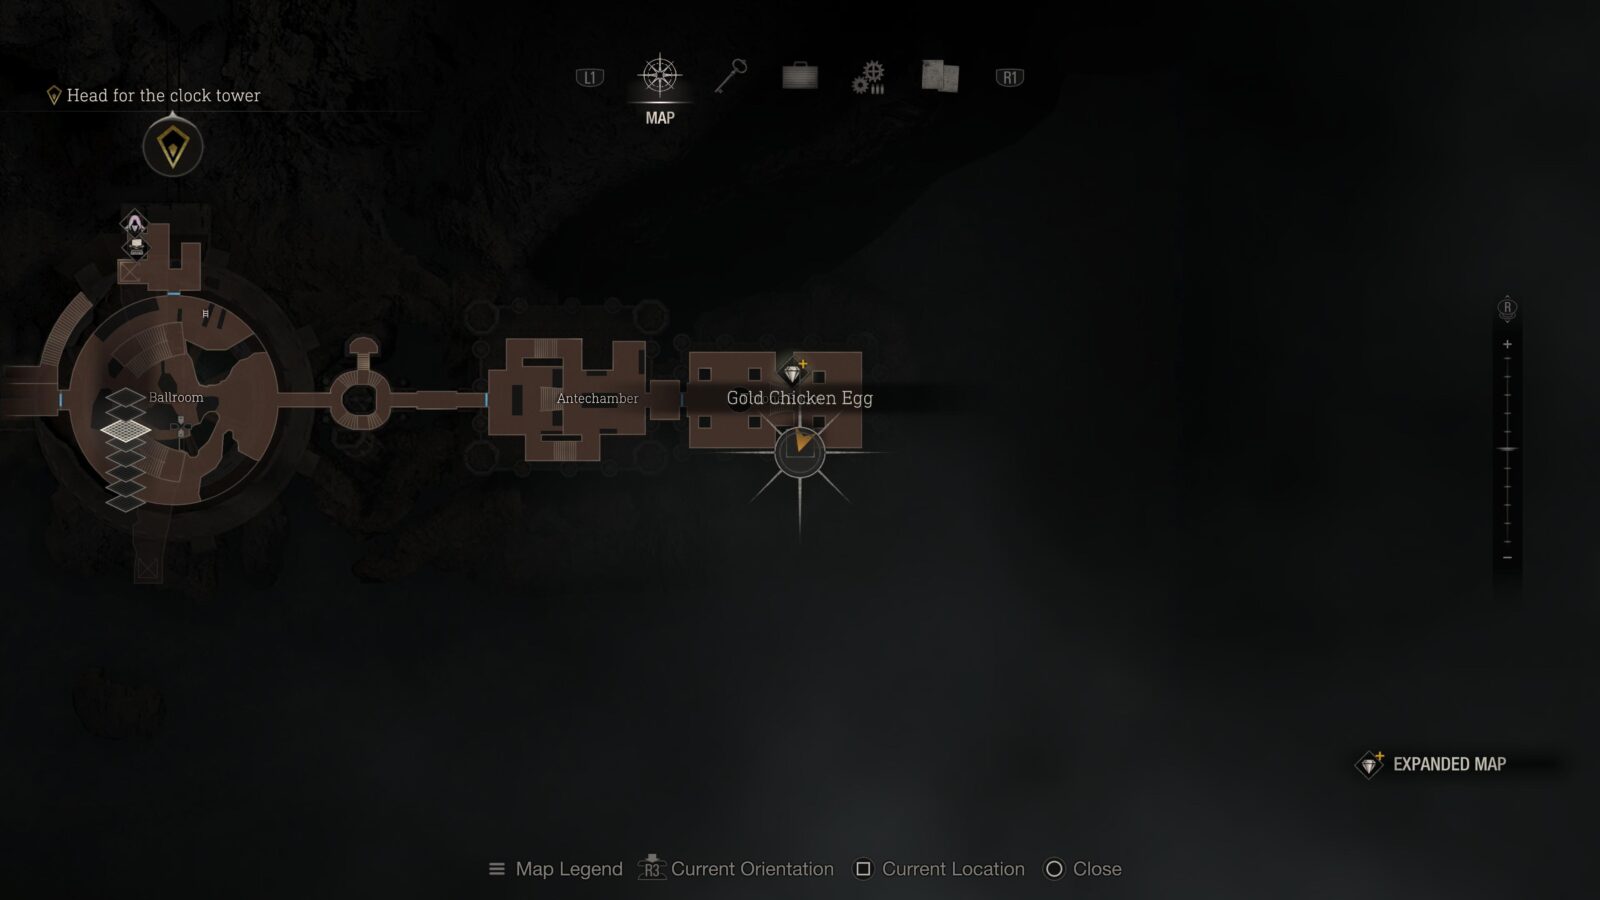
Gold Chicken Egg
Back track to the Throne Room East of the Ballroom and when you get there you will find a lock box you can use the Cubic Device on to reveal a gold egg.

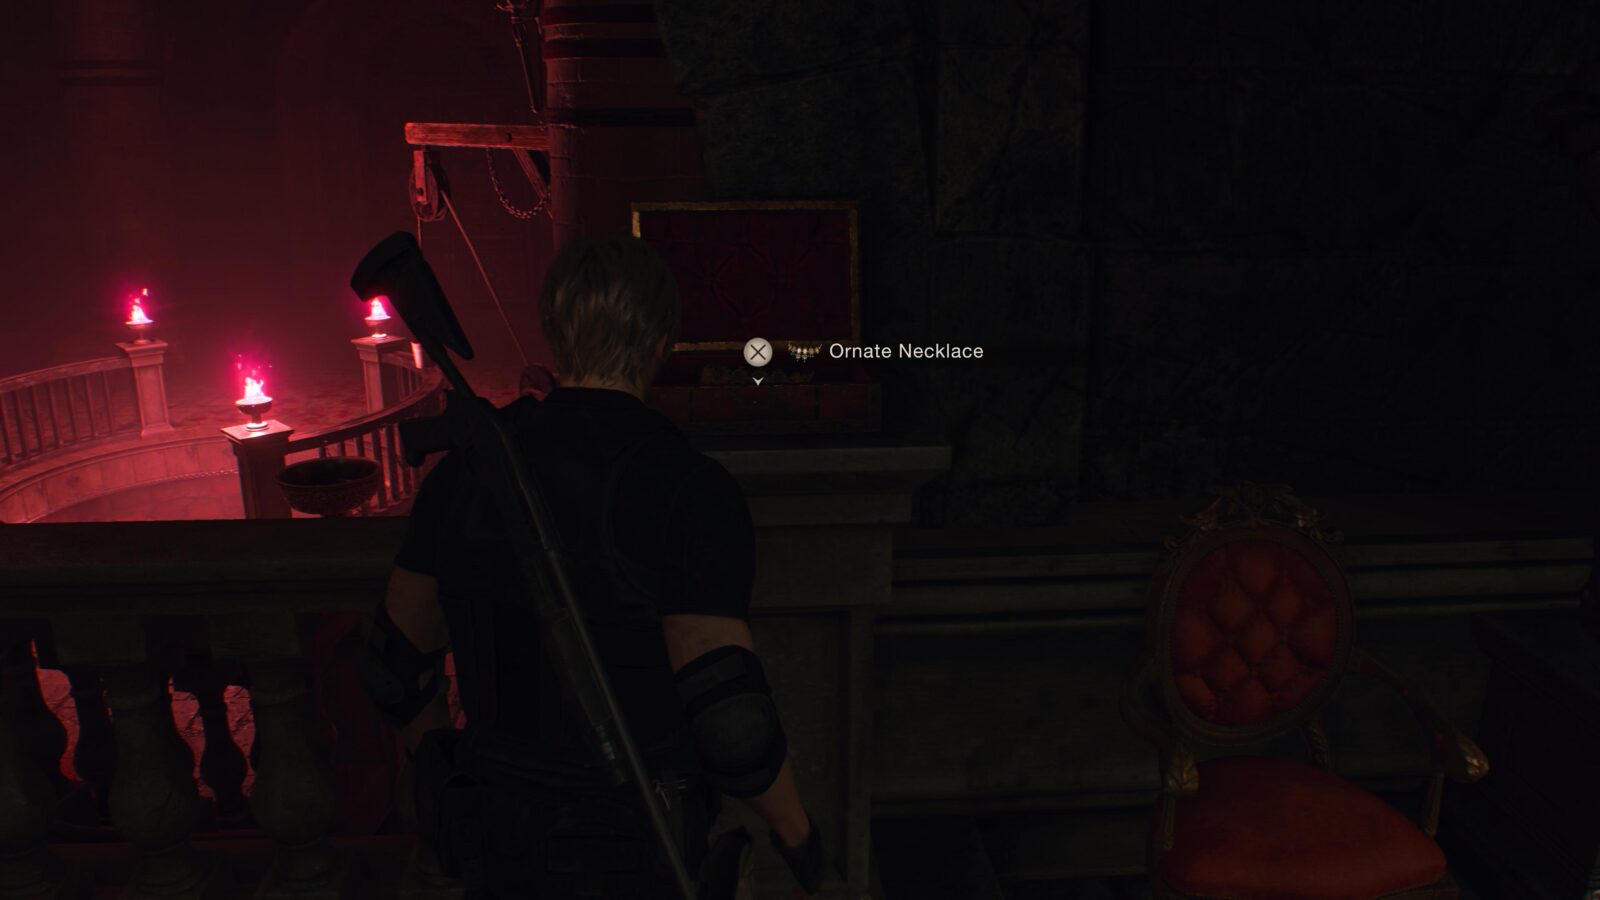
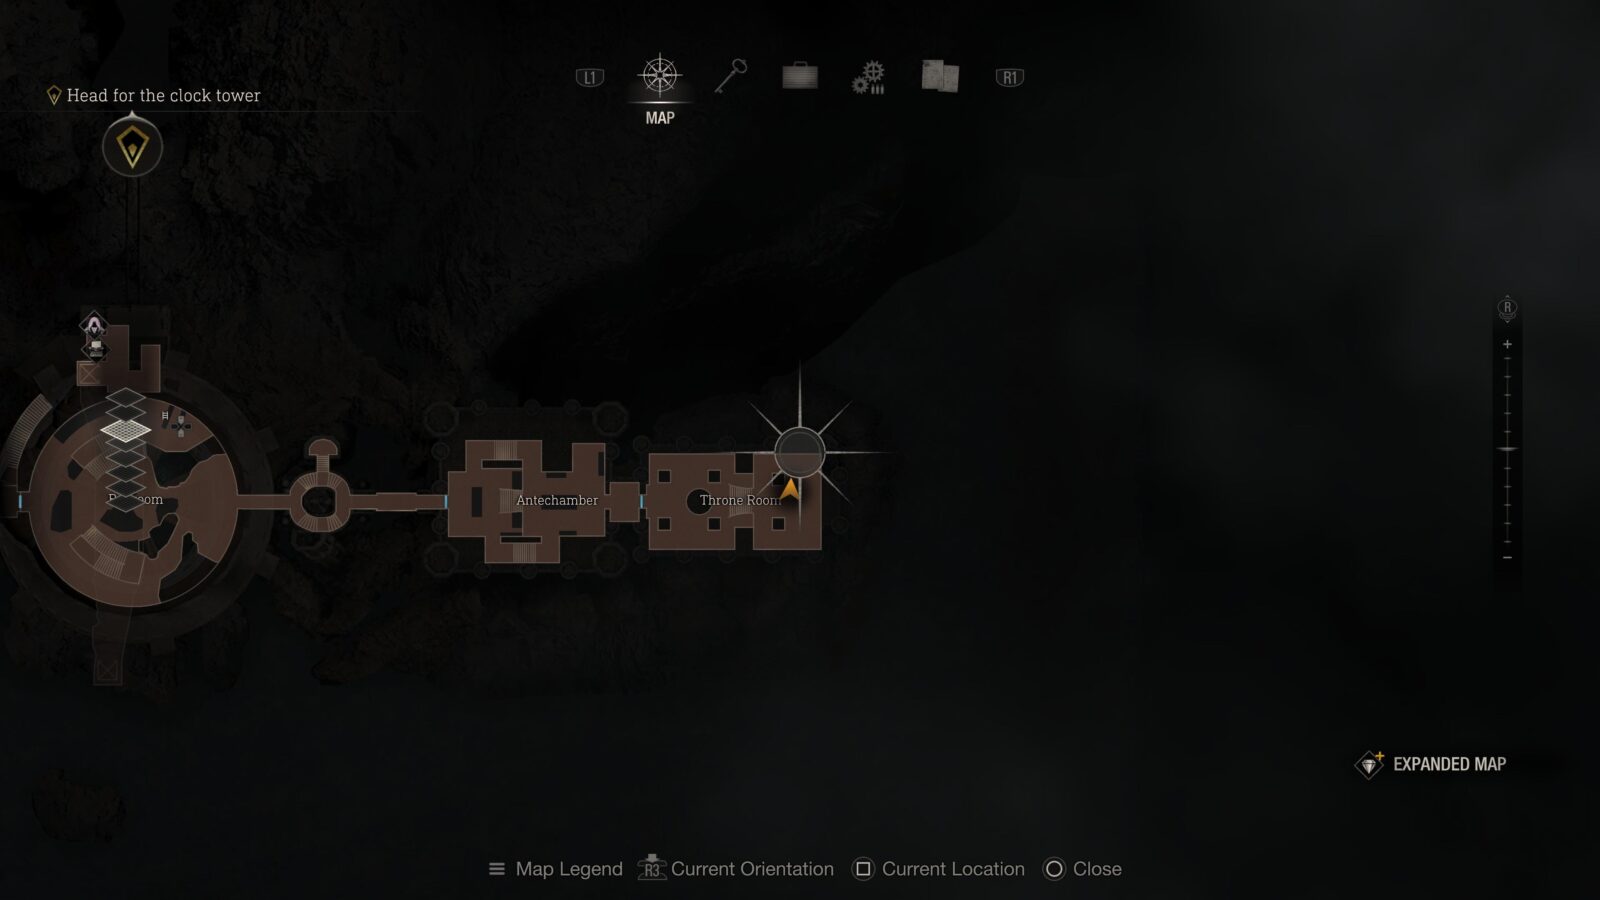
Ornate Necklace (Expanded Treasure)
Also in the Throne Room is a small chest on the stone balustrade with a necklace inside. This is only available to those who have the Expanded Treasure Map DLC.
Ramón Salazar's Painting
In the Throne Room on a wall to the left of the Throne and above two red chairs is Ramón Salazar’s painting. There are two chickens nearby so wait for one of them to lay an egg and then pick it up so you can equip it and throw it at the painting. Be careful because if you select “use” then you’ll eat the egg instead of equipping it.

Scratched Emerald
Backtrack through the Courtyard and head through the Western gate. Turn right and you should be able to see a crow sitting in a nest above the stone archway. Shoot it and grab the gem and sell it to the Merchant to complete the request.

Ornate Beetle
Lastly, back track to the locked drawer in the last castle battlement and open it to find an Ornate Beetle. If you have been following this collectible guide to the letter then you should have a small key from the start of Chapter 12.

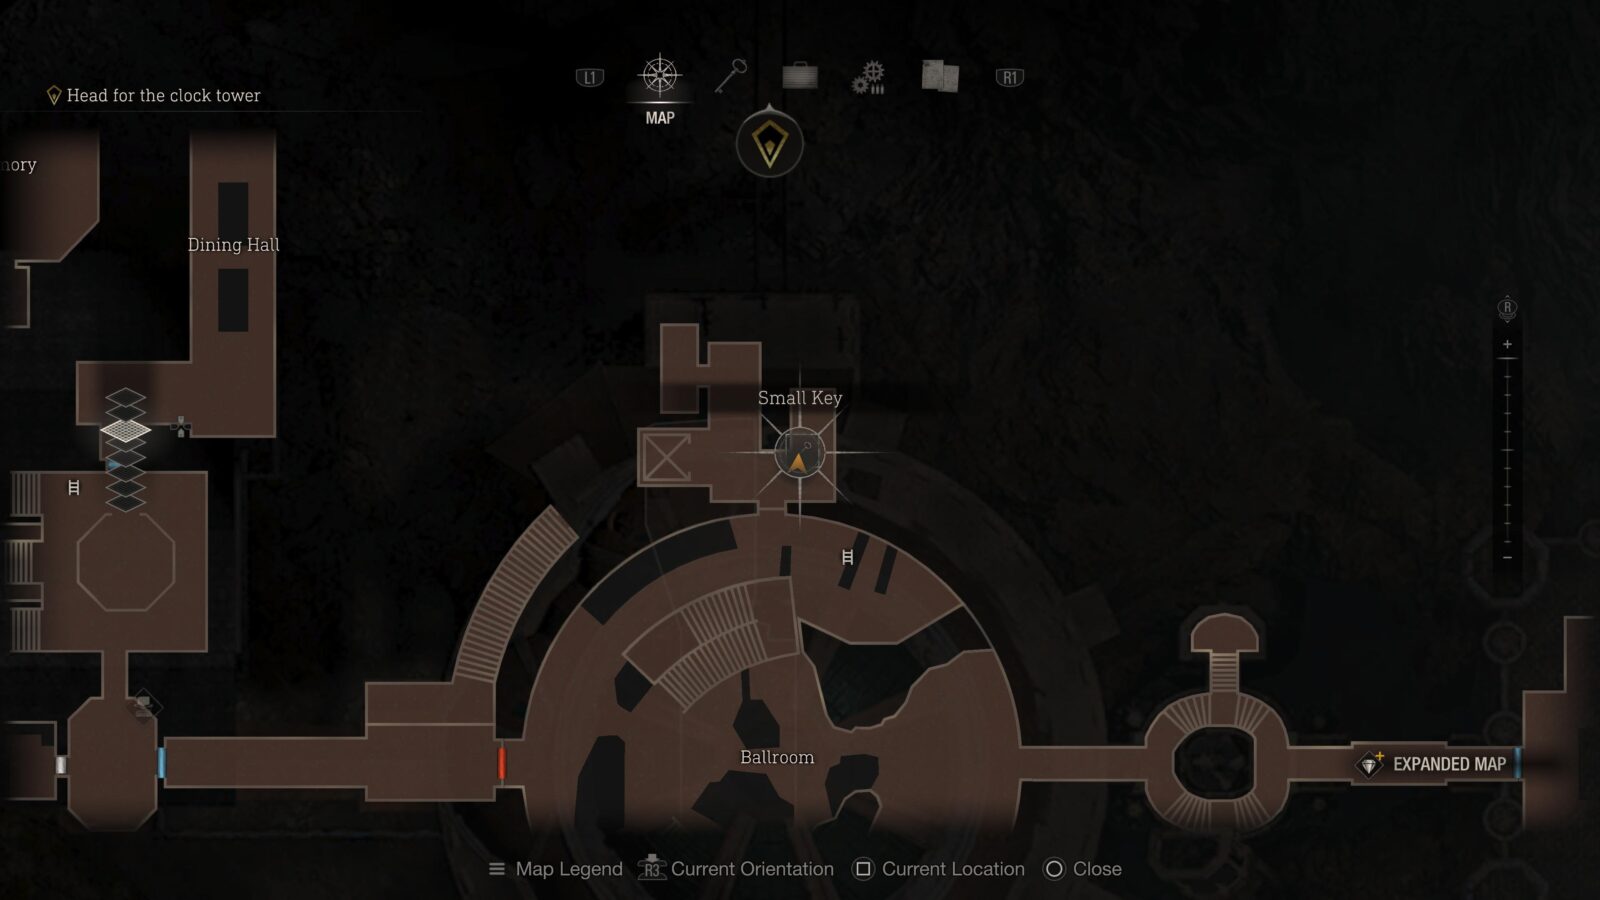
Clockwork Castellan #12
Return to the gold train cart in the room at the North of the Ballroom and ride it to the Clocktower. On the ground floor under the steps at the North West corner is a castellan sitting on a wooden crate.
Gold Bar
Turn to your left after shooting the castellan and head behind some boxes and sand bags to find a chest with a gold bar inside.
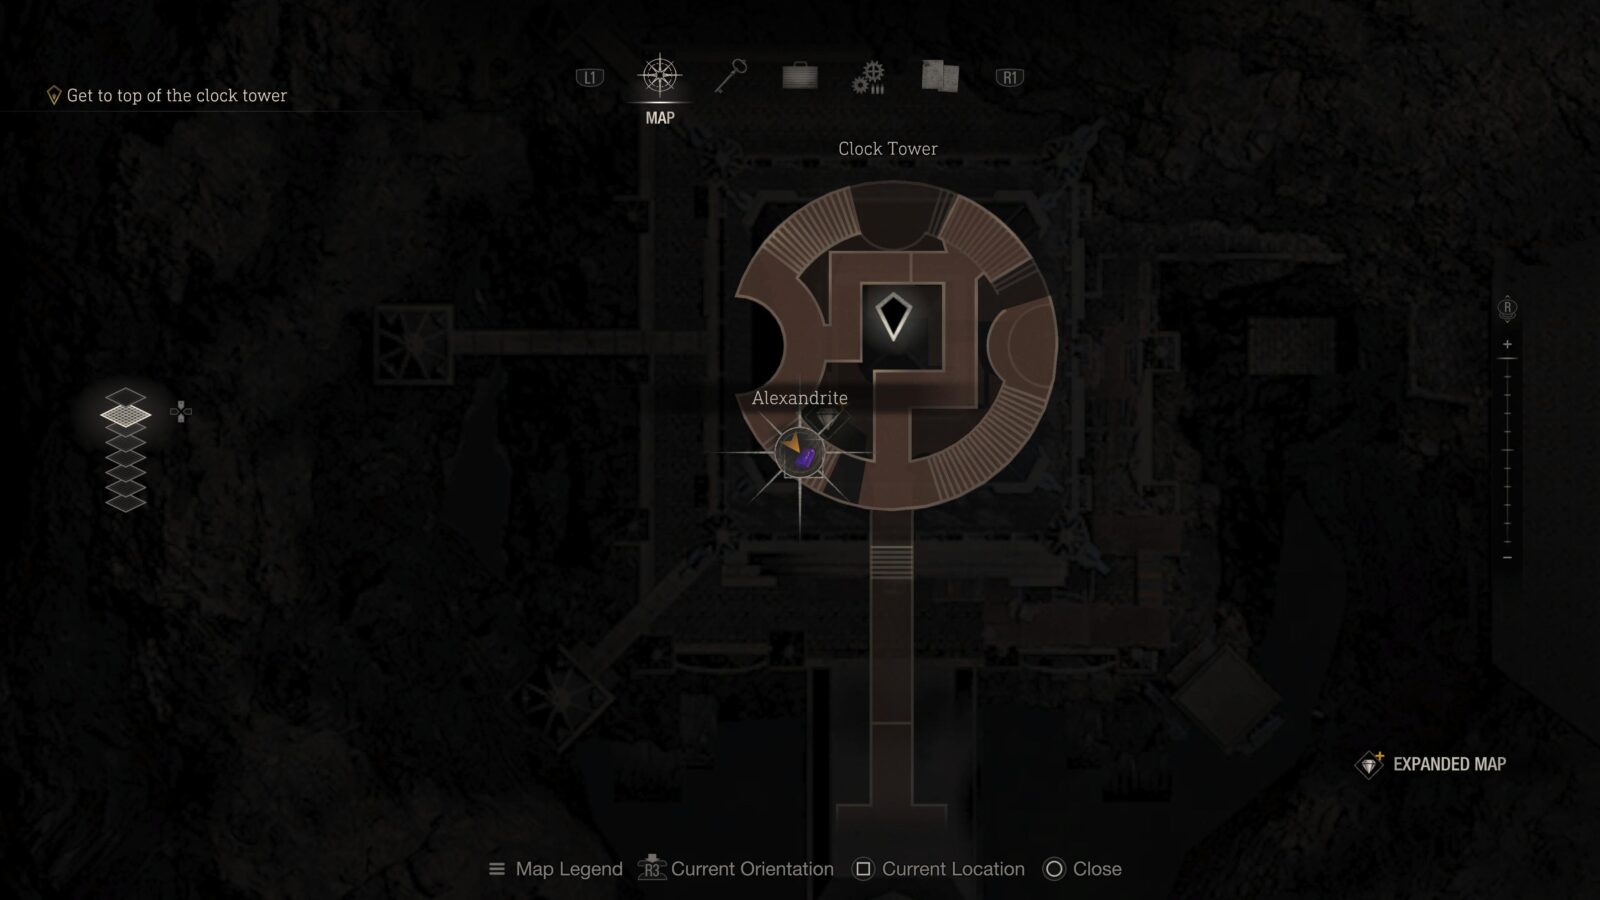
Alexandrite
Go up 1 floor and look for a metal cage hanging above the next set of stairs which are blocked.

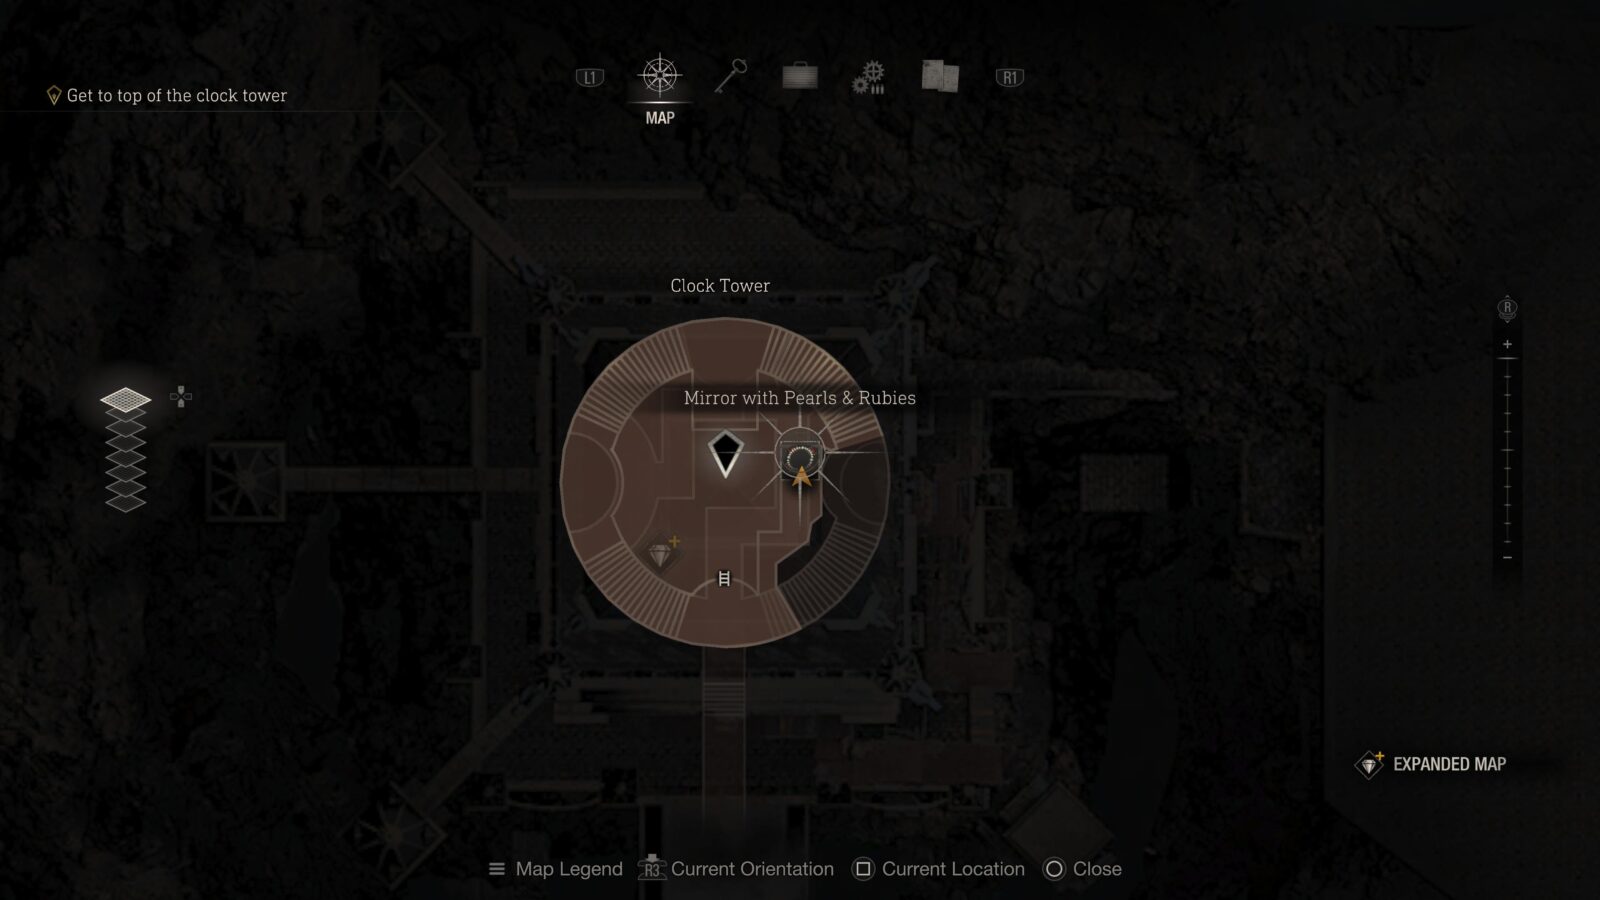
Mirror with Pearls & Rubies
Head to the top of the stairs where the enemy pulling the lever is but don’t drop down the ladder yet. To the right of the lever is a broken balustrade that leads onto a wooden walkway with a chest at the end.

Extravagant Clock
Jump down the ladder and you will see a lever in front of you but don’t pull it yet. Instead look to the left of the lever and you will see a chest.
Capacity Compliance (Trophy)
For this trophy you need to ride the lift to the top without it stopping. There’s a bit of misinformation about this trophy online with most people saying you can’t let an enemy land on the lift at all. This simply isn’t true. Enemies can land on the lift as long as you kill them before Leon can open his mouth to exclaim that the lift has stopped. This window is about 1-2 seconds which means as long as you have an upgraded shotgun on you then anyone who is foolish enough to land on the lift is going to get blasted into minced meat. The easier strategy is just to wait until you can get the infinite rocket launcher and just aim at your feet and press ![]() anyone lands on it.
anyone lands on it.
Silver Token (Expanded Treasure)
After the lift section you will step off and if you look immediately up and to the right you will see a metal cage hanging from the ceiling. This is only available to those who have the Expanded Treasure Map DLC.
Yellow Diamond
After reaching the outside of the Clocktower and jumping down the ladder look up and to the left to see a metal cage hanging from the scaffolding.


You Talk Too Much! (Trophy)
For this trophy you will need to throw a grenade into Salazar’s mouth. I found the best way to do this is to rush straight towards him at the start of the fight and throw the grenade point blank into his mouth.
Yellow Diamond (Expanded Treasure)
After descending the elevator at the end of the chapter you will be walking through a stone wall corridor with a metal cage hanging above one of the doorways halfway through the corridor.


Chapter 13
There are a total of 1 Clockwork Castellan, 1 Weapon, 1 Weapon Part, 1 Trophy Opportunity, and 7 Treasures in Chapter 13. This chapter also has 3 Expanded Treasures which can only be obtained with the Expanded Treasure Map DLC.
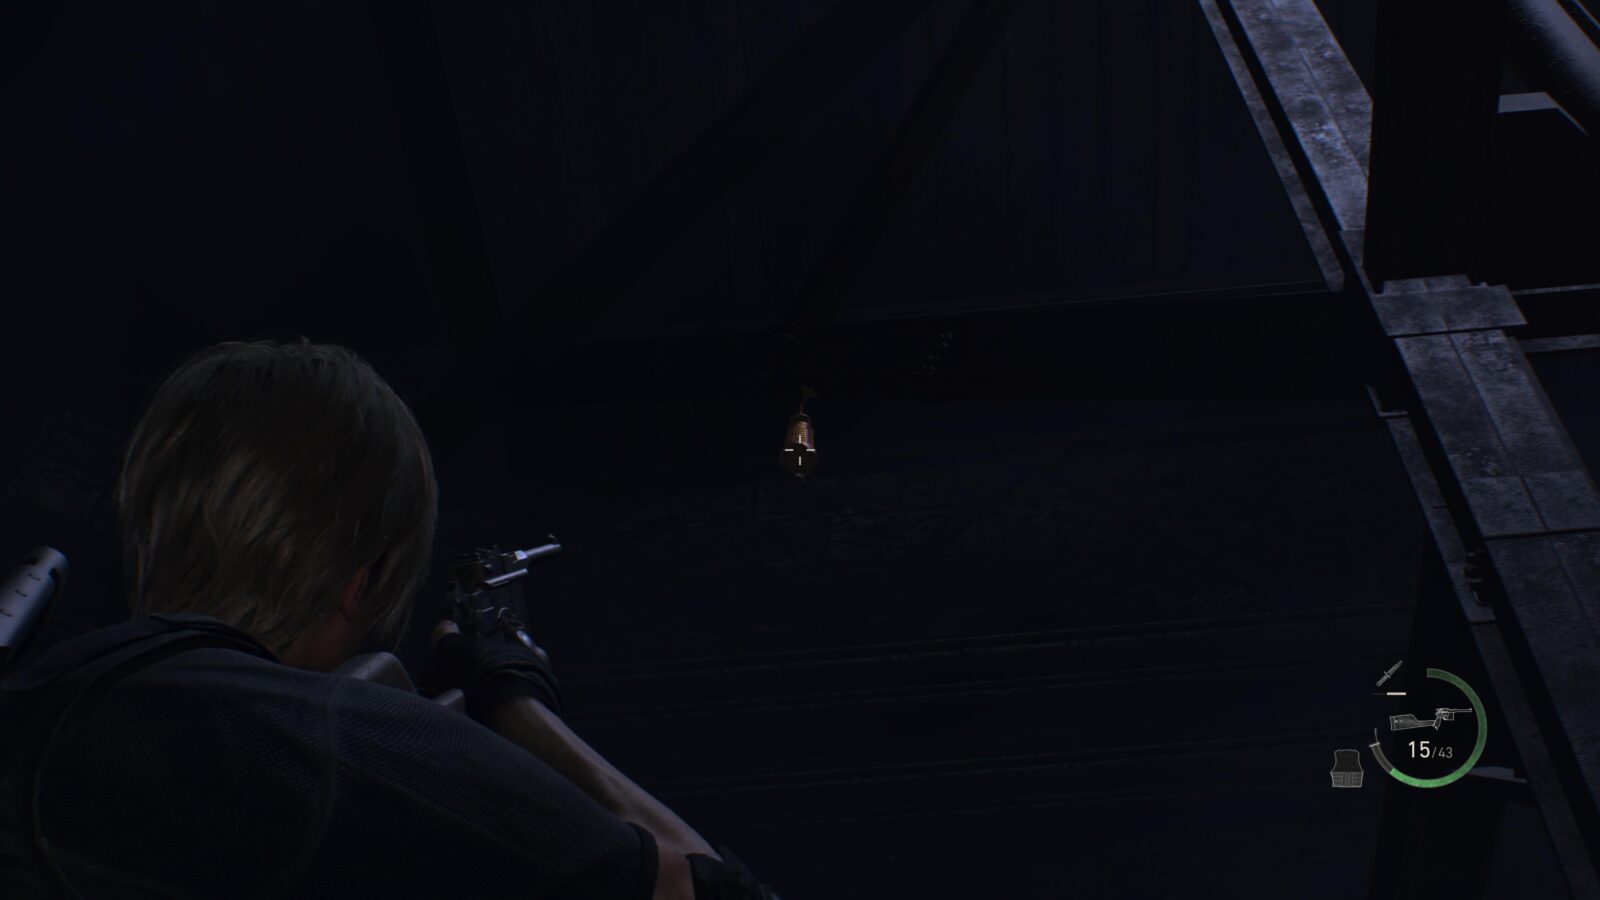
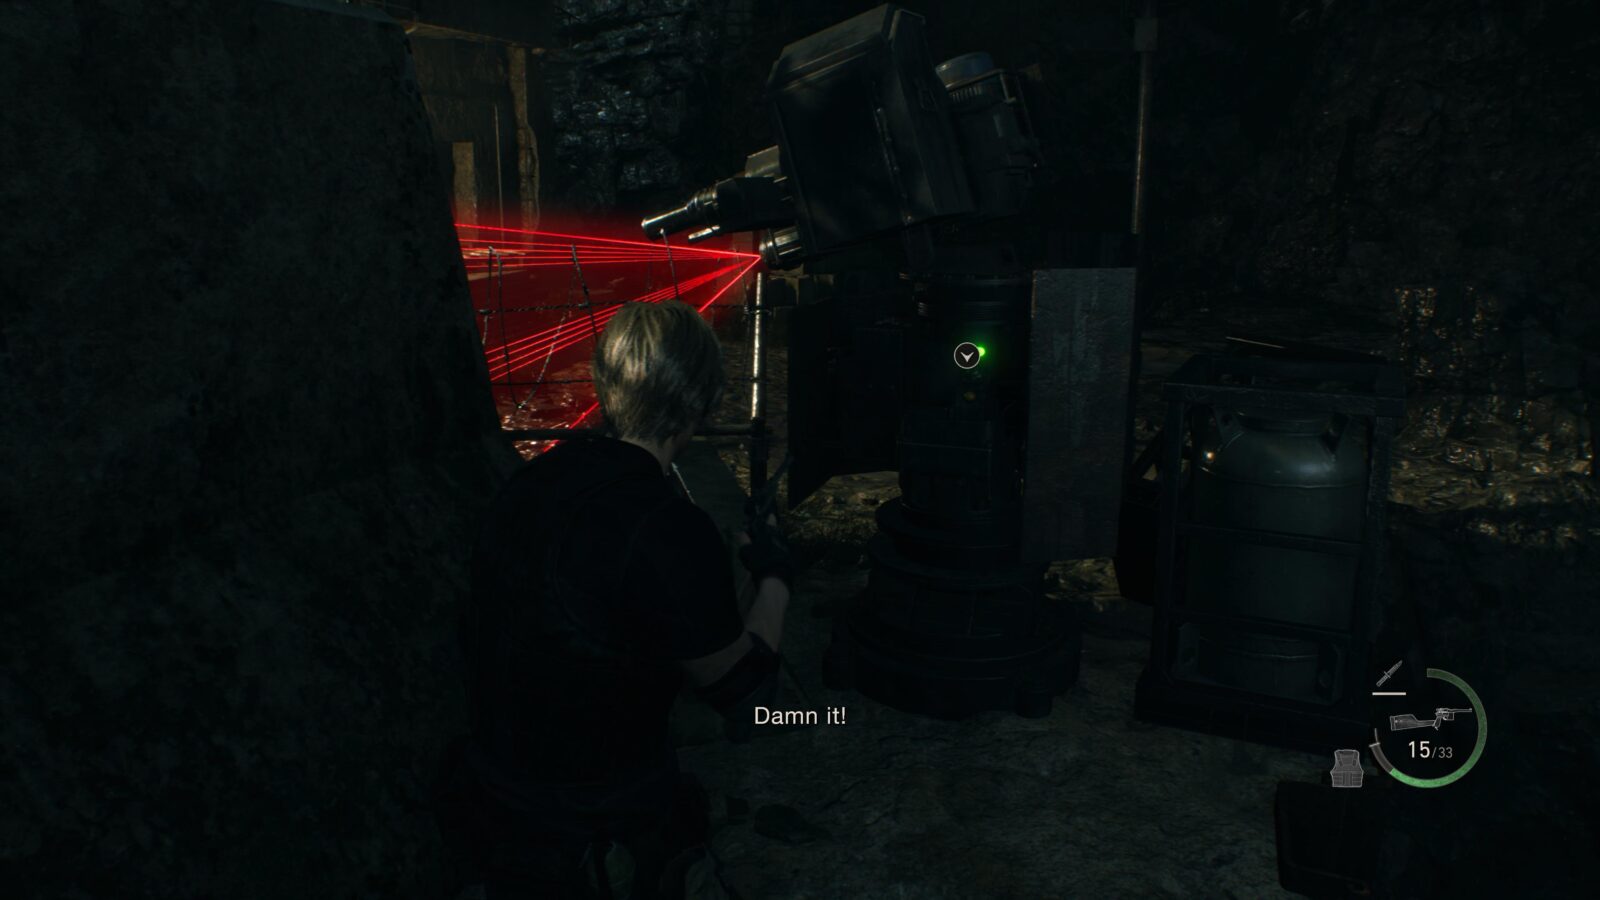
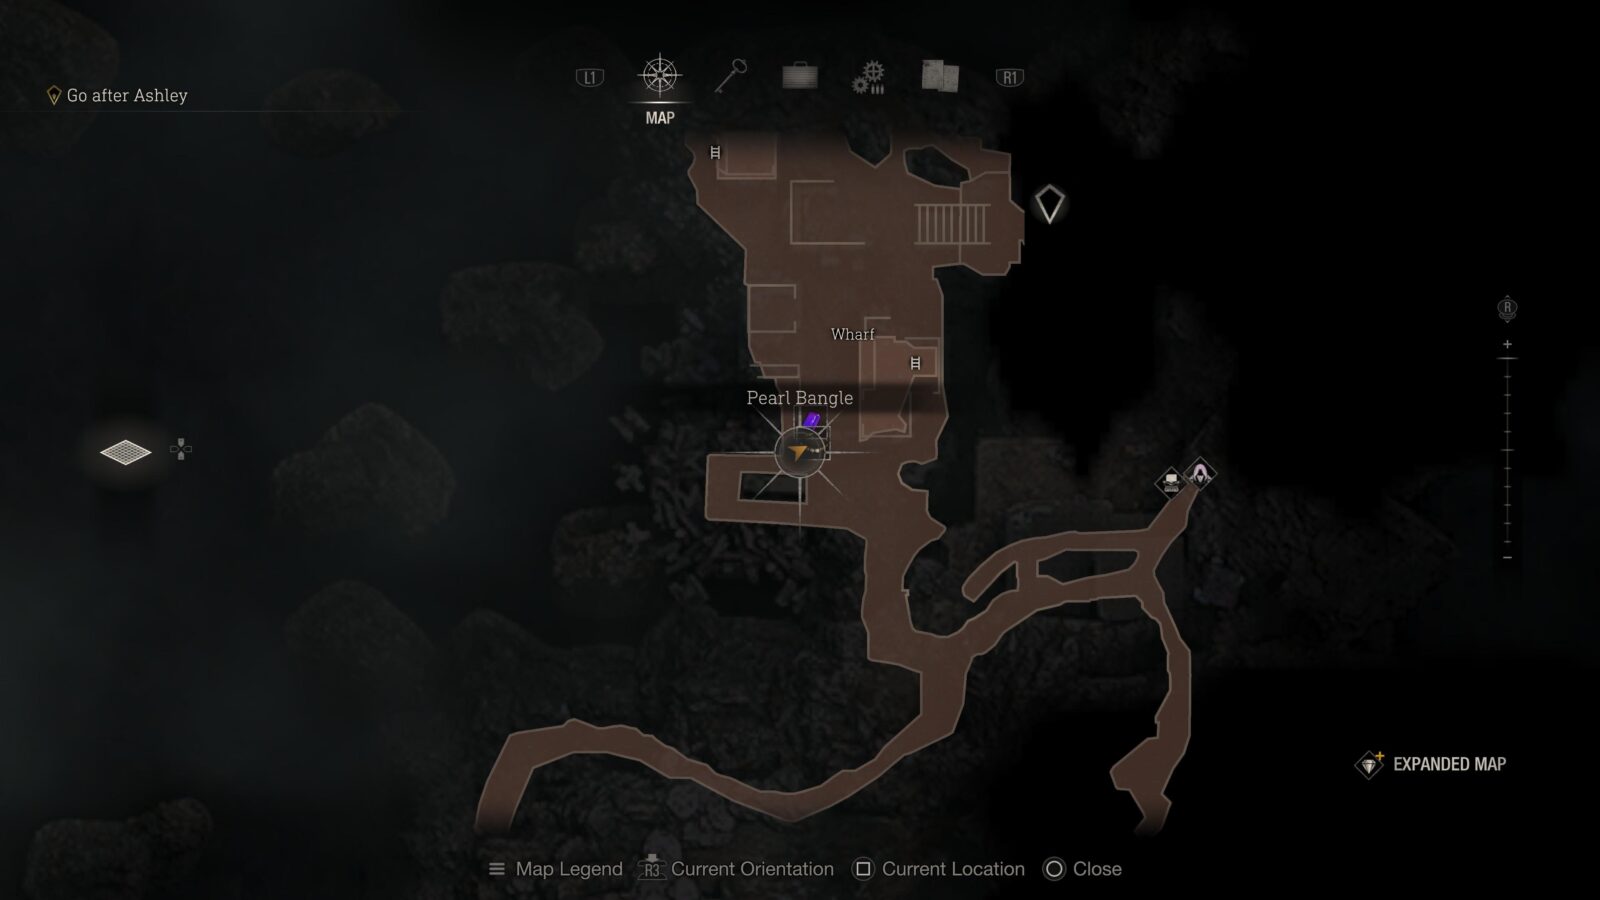
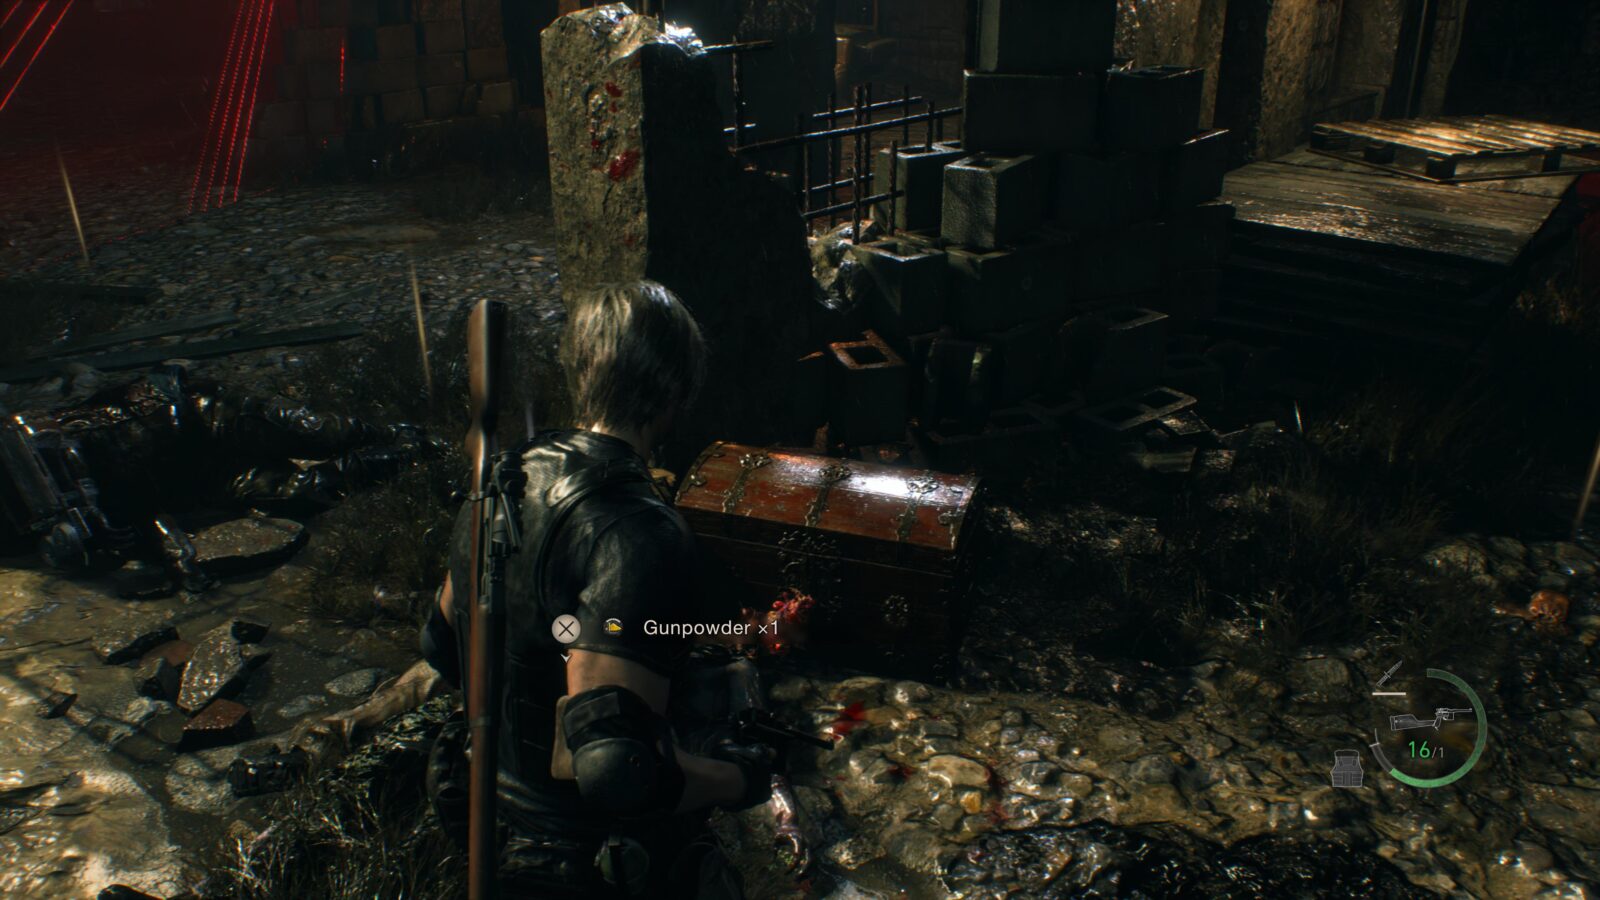
Pearl Bangle
When you reach the Wharf there will be a turret to your left near the water. This is just after the turret blocking the cave entrance. Press the button on the back of the turret to turn it to the right and go to where the lasers were looking to find a chest on the ground.
Golden Lynx
Progress through the island until you reach an enemy with an RPG. Dispatch the enemies in the are and go into the tunnels to the South. In the tunnels is an explosive barrel that you can shoot to open a new area with a chest inside.

Elegant Crown
Go through the gate to the next area and you will come to some stairs going up to your left and some going down to the right. Go down and dispatch the enemies there and you will find a chest on the right of the area. Again, if you haven’t already, inlay this crown with 5 gems of the same colour to be able to sell it for 100k Ptas and get the Astute Appraiser trophy.

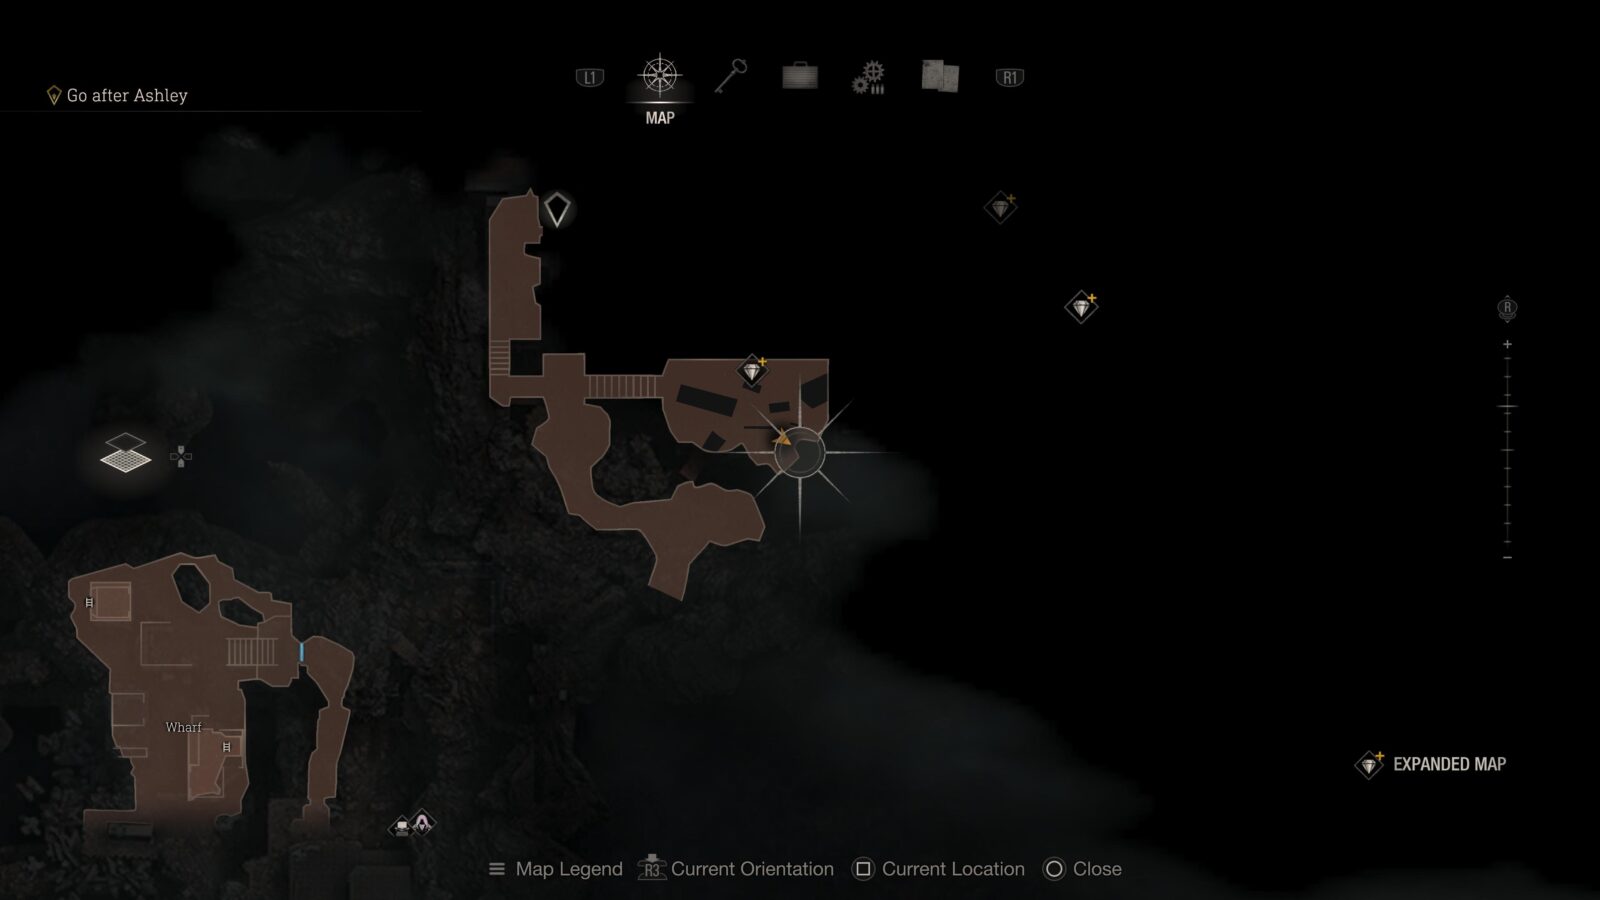
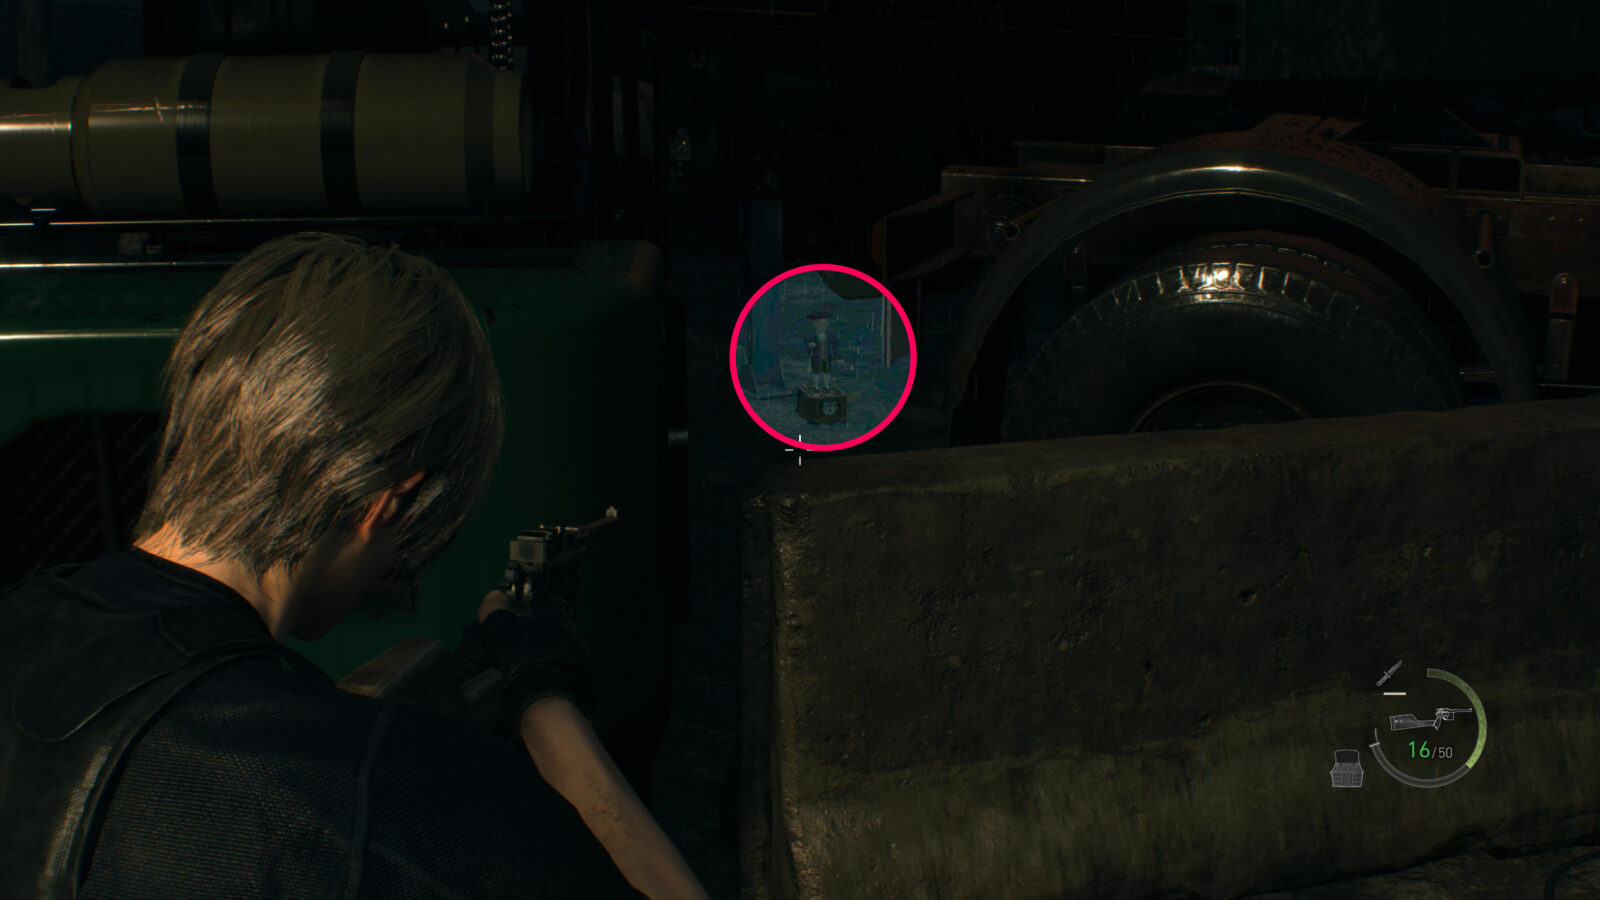
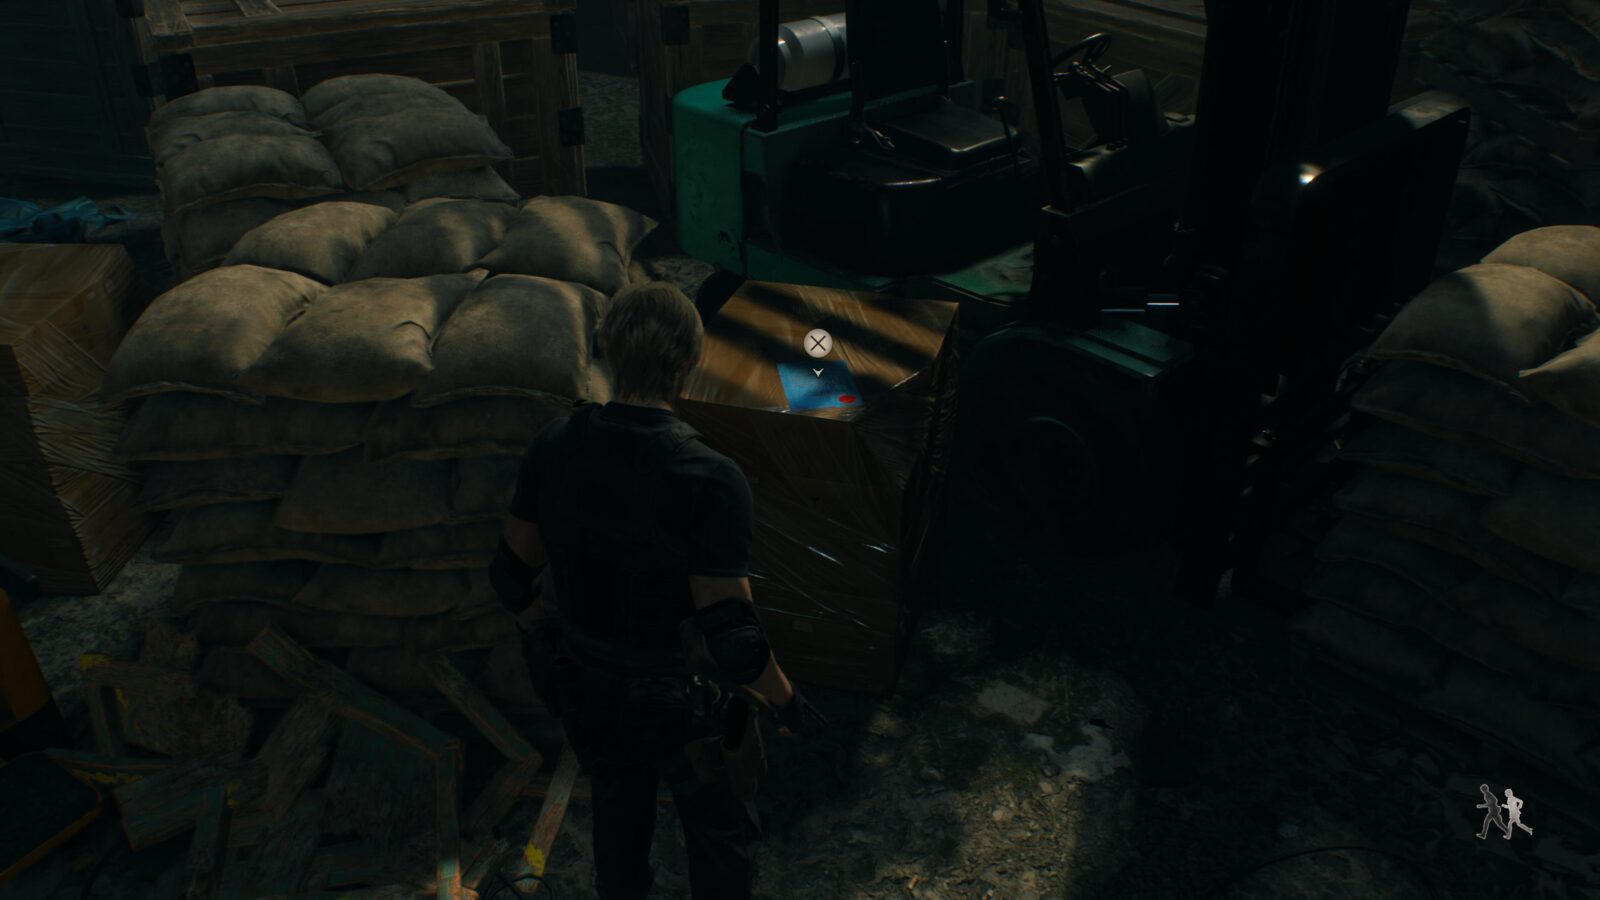
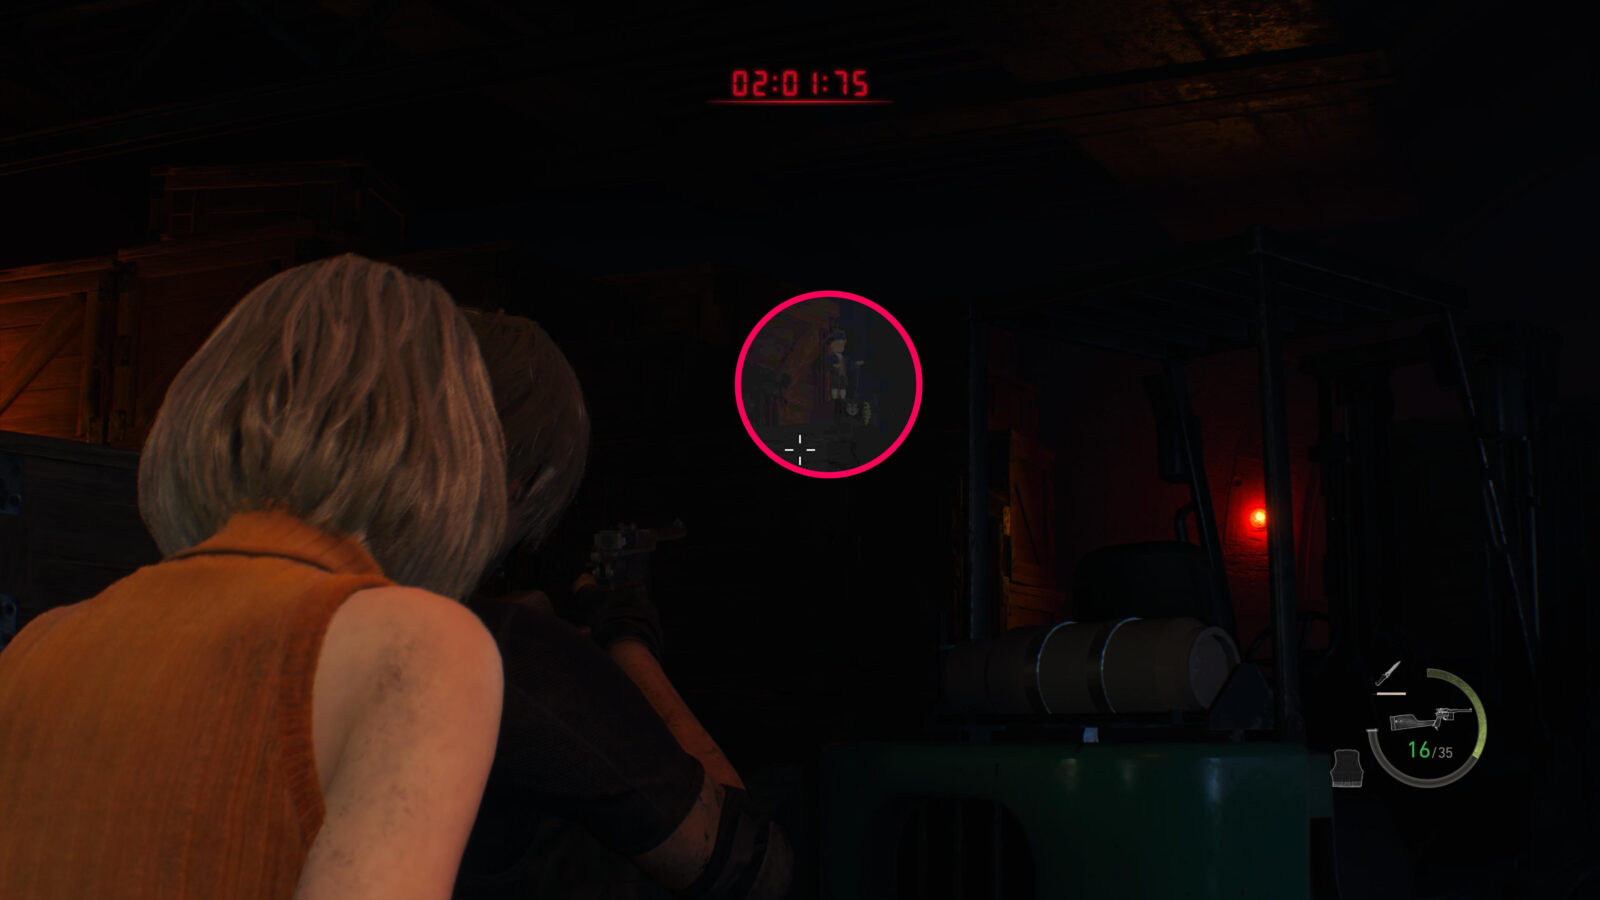
Clockwork Castellan #13
In the same area as the Elegant Crown if you look to the left a bit you will see a green forklift. In between the forklift and the truck is a castellan on the ground behind the concrete barrier.
Emerald (Expanded Treasure)
Turn around from the castellan and look up towards the light above the giant metal doors to find a metal cage you can shoot down. This is only available to those who have the Expanded Treasure Map DLC.

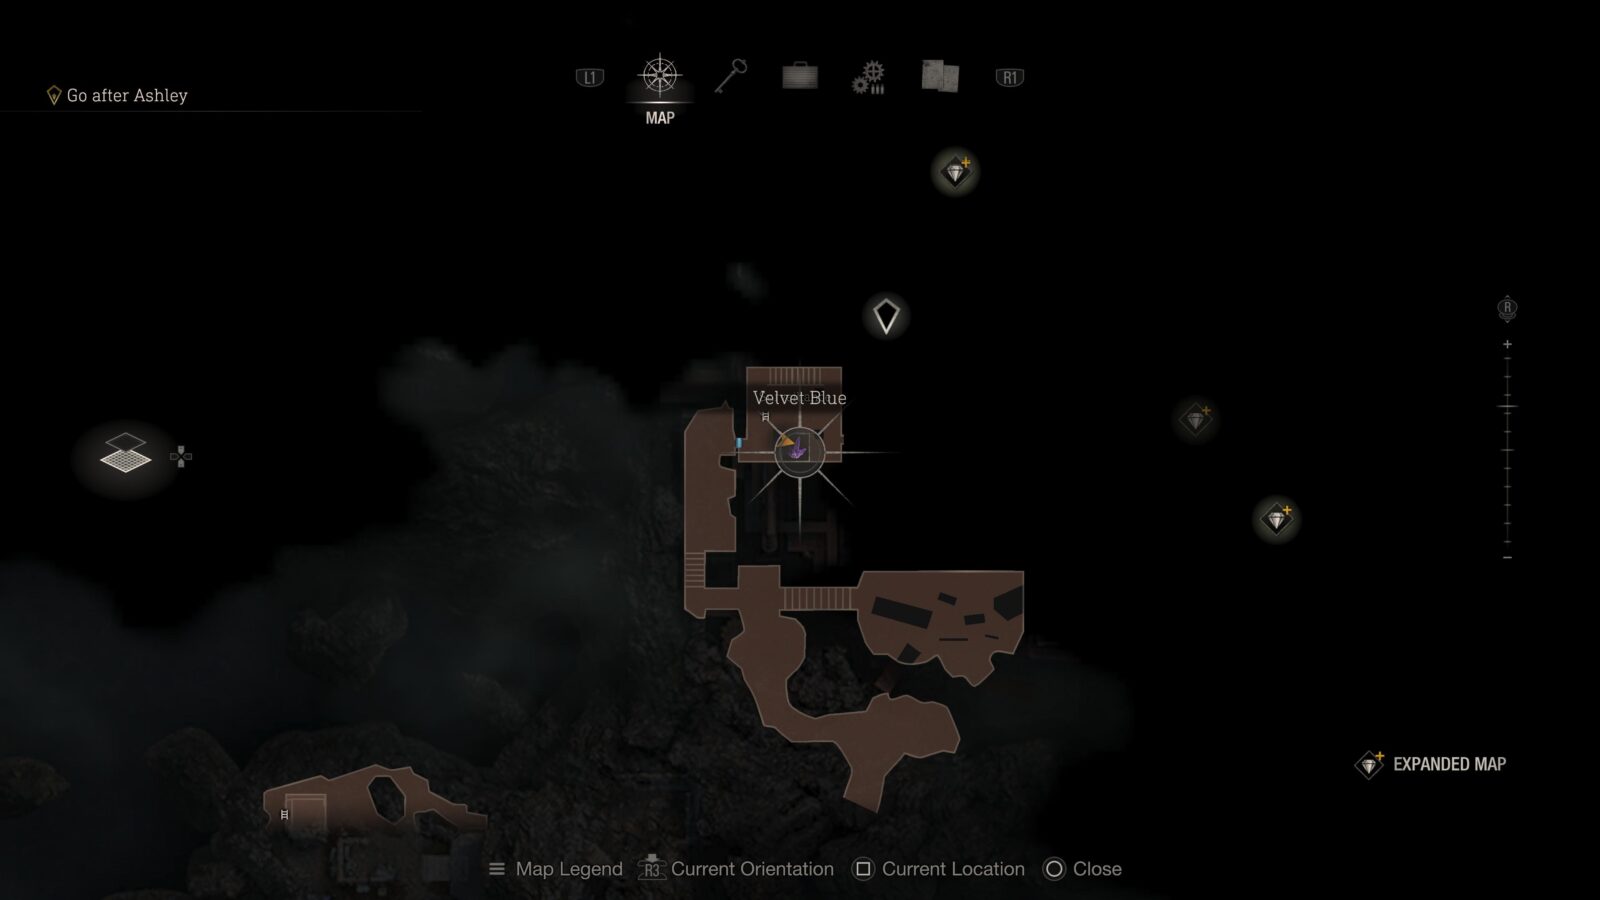
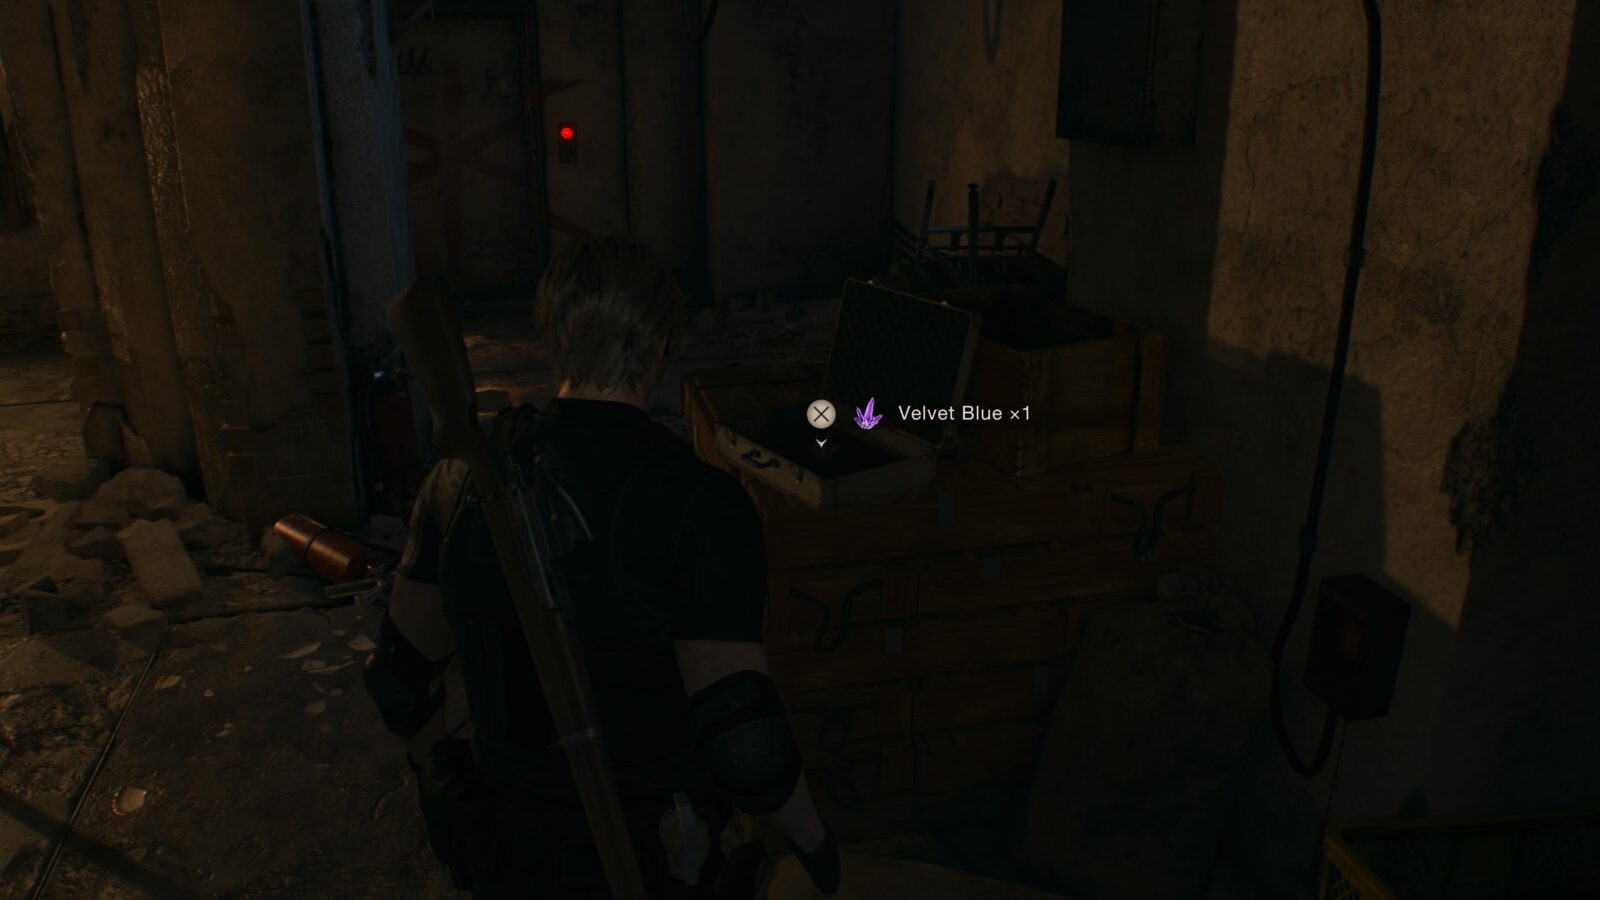
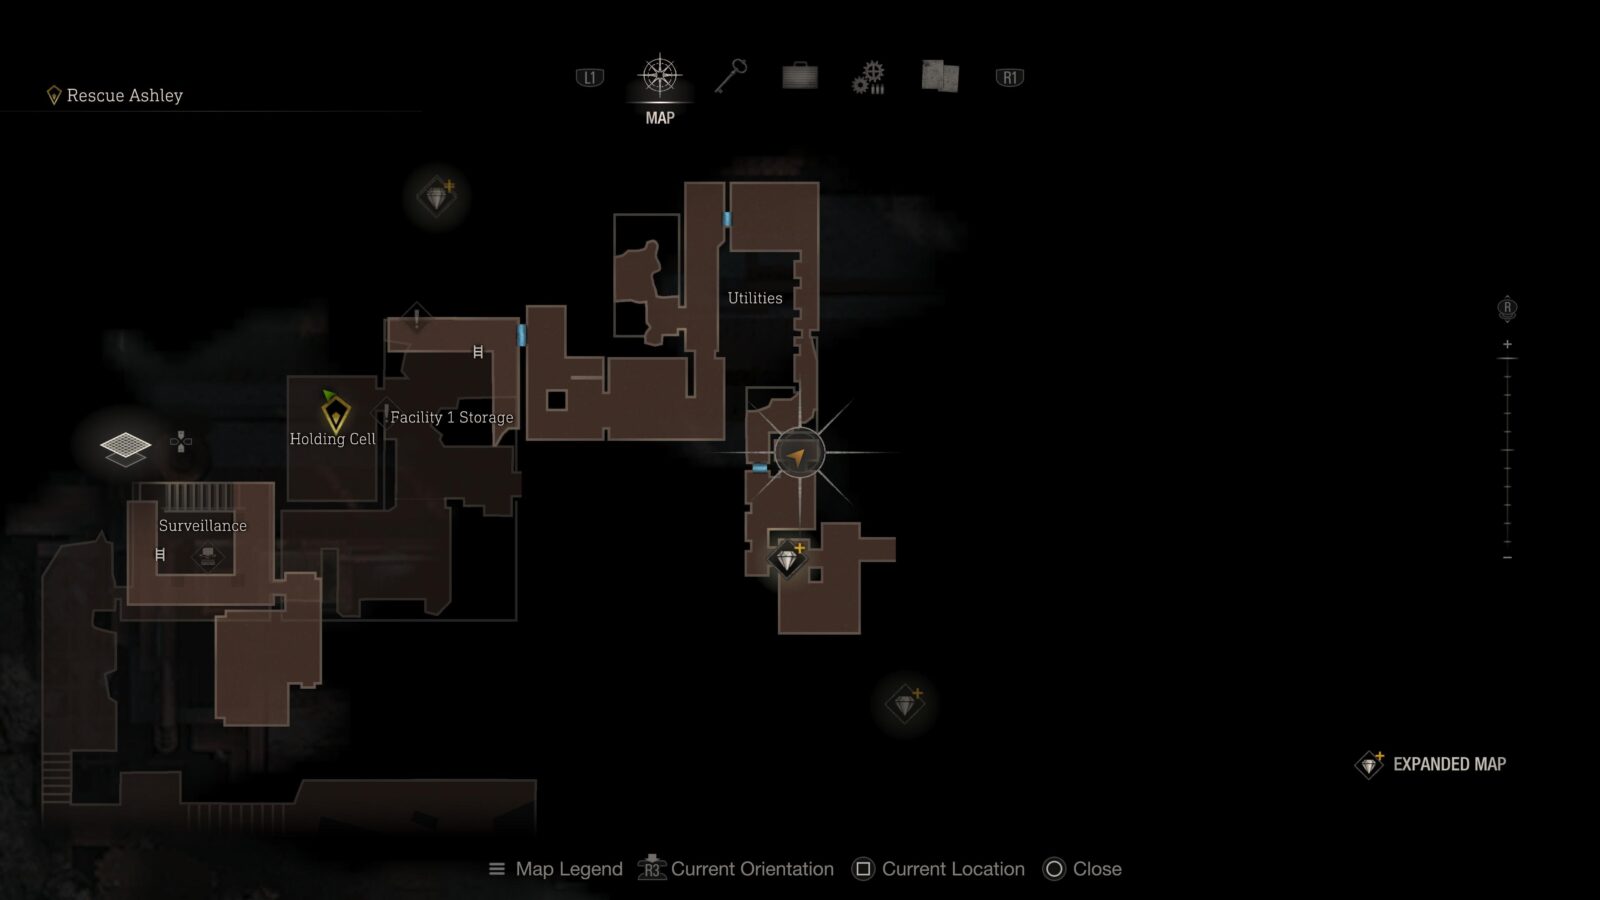
Velvet Blue
Go up the metal stairs and through the door into the building. Immediately ahead of you is a gray briefcase with a treasure inside.
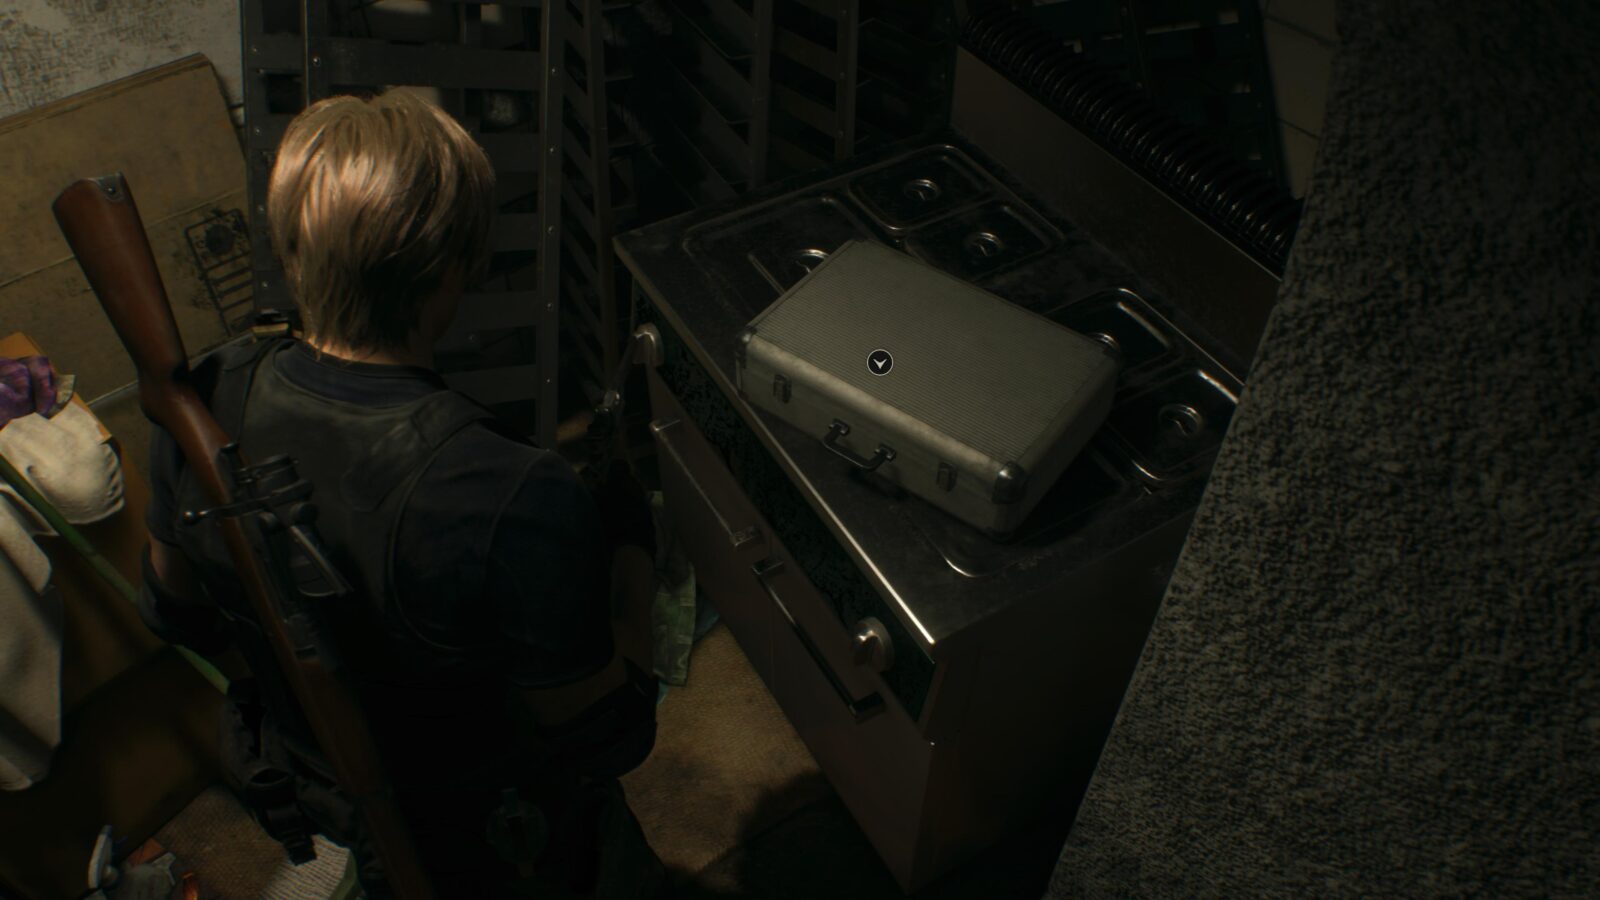
Velvet Blue
Keep progressing and eventually you will reach a kitchen area just before bumping into the Merchant again. In this kitchen area is a bain-marie with a silver case on top with the treasure inside.
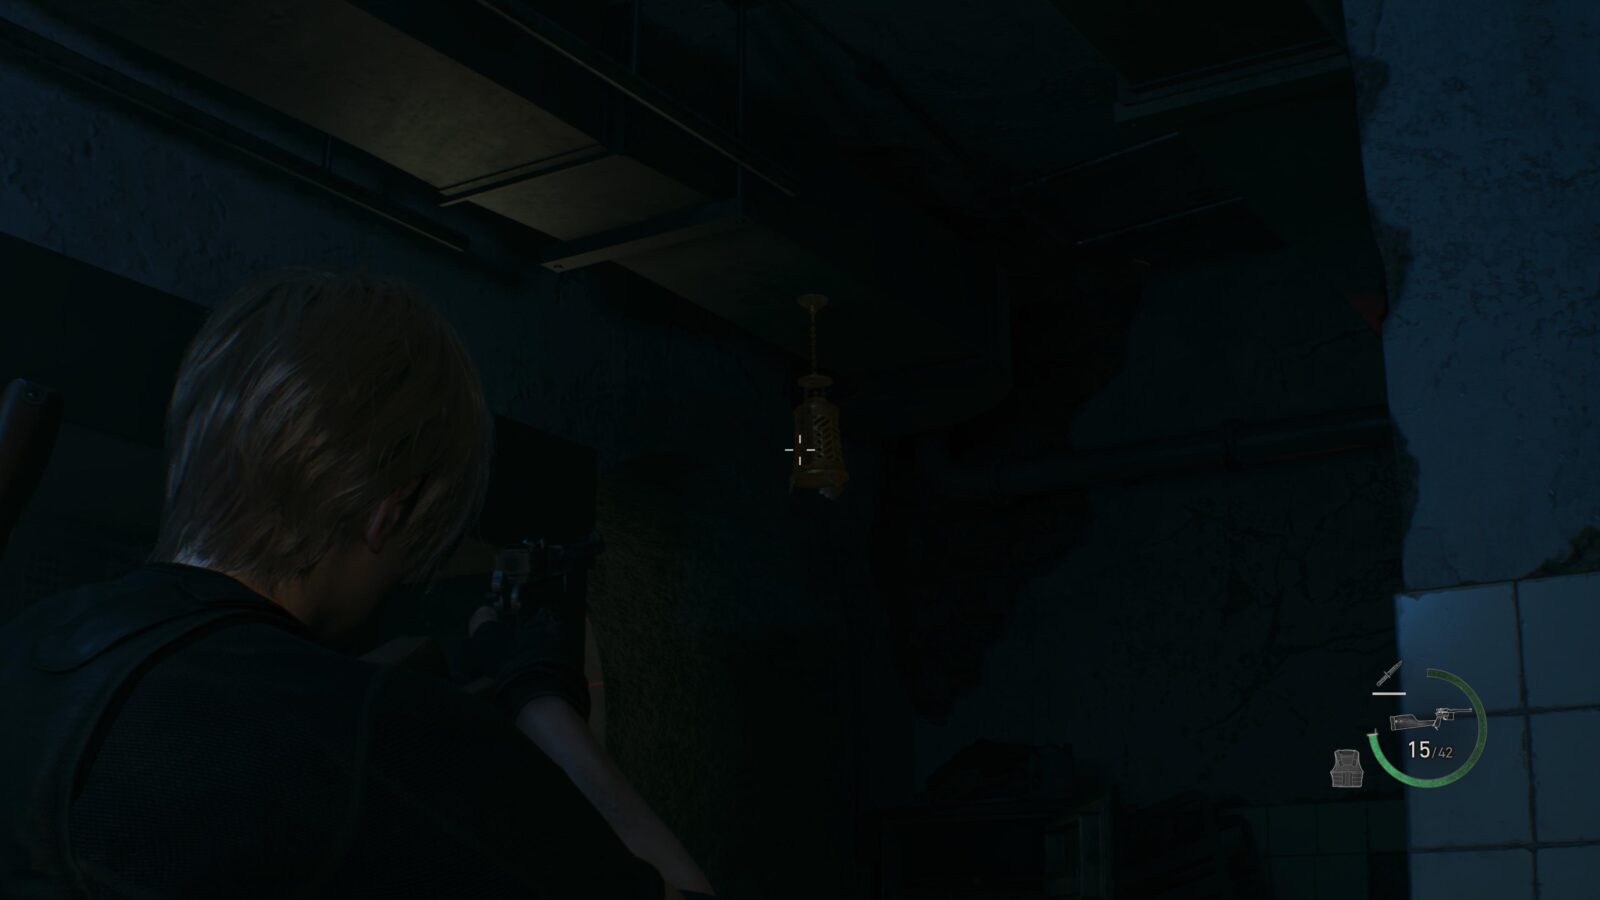
Spinel (Expanded Treasure)
In the same room as the Merchant is a metal cage hanging above the door. Shoot it down to get a spinel. This is only available to those who have the Expanded Treasure Map DLC.
Red Beryl
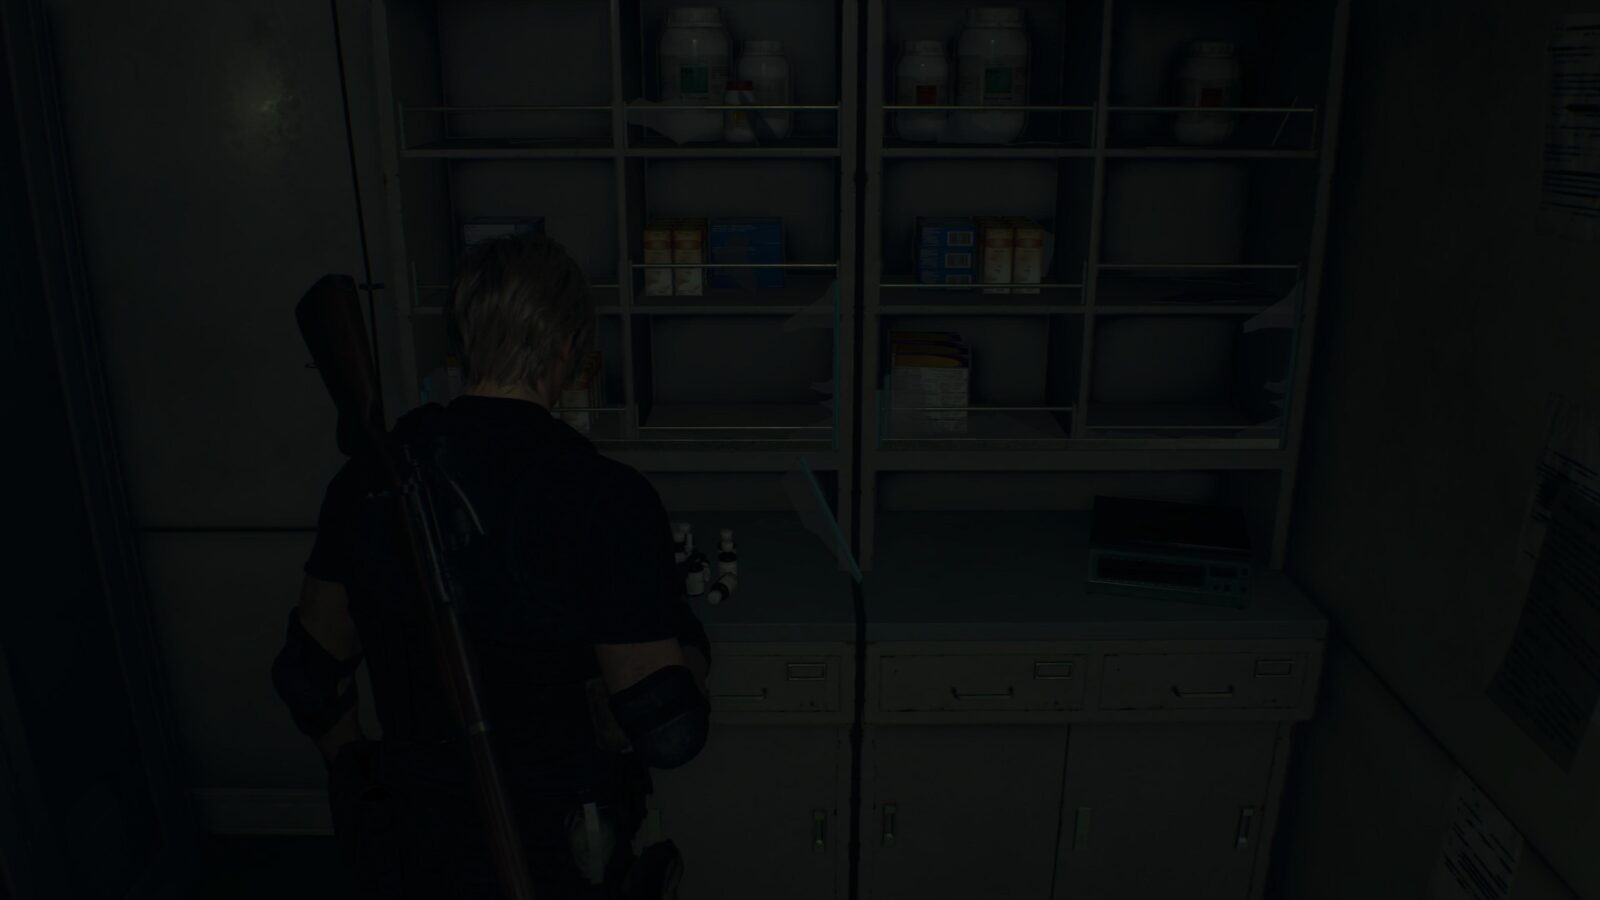
After supplying power to the Dissection area return to the entrance to this while area and there will be a door that will now automatically open when you approach. Inside is a glass cabinet at the back of the room with a red beryl inside. You will need to smash the glass to grab the treasure.
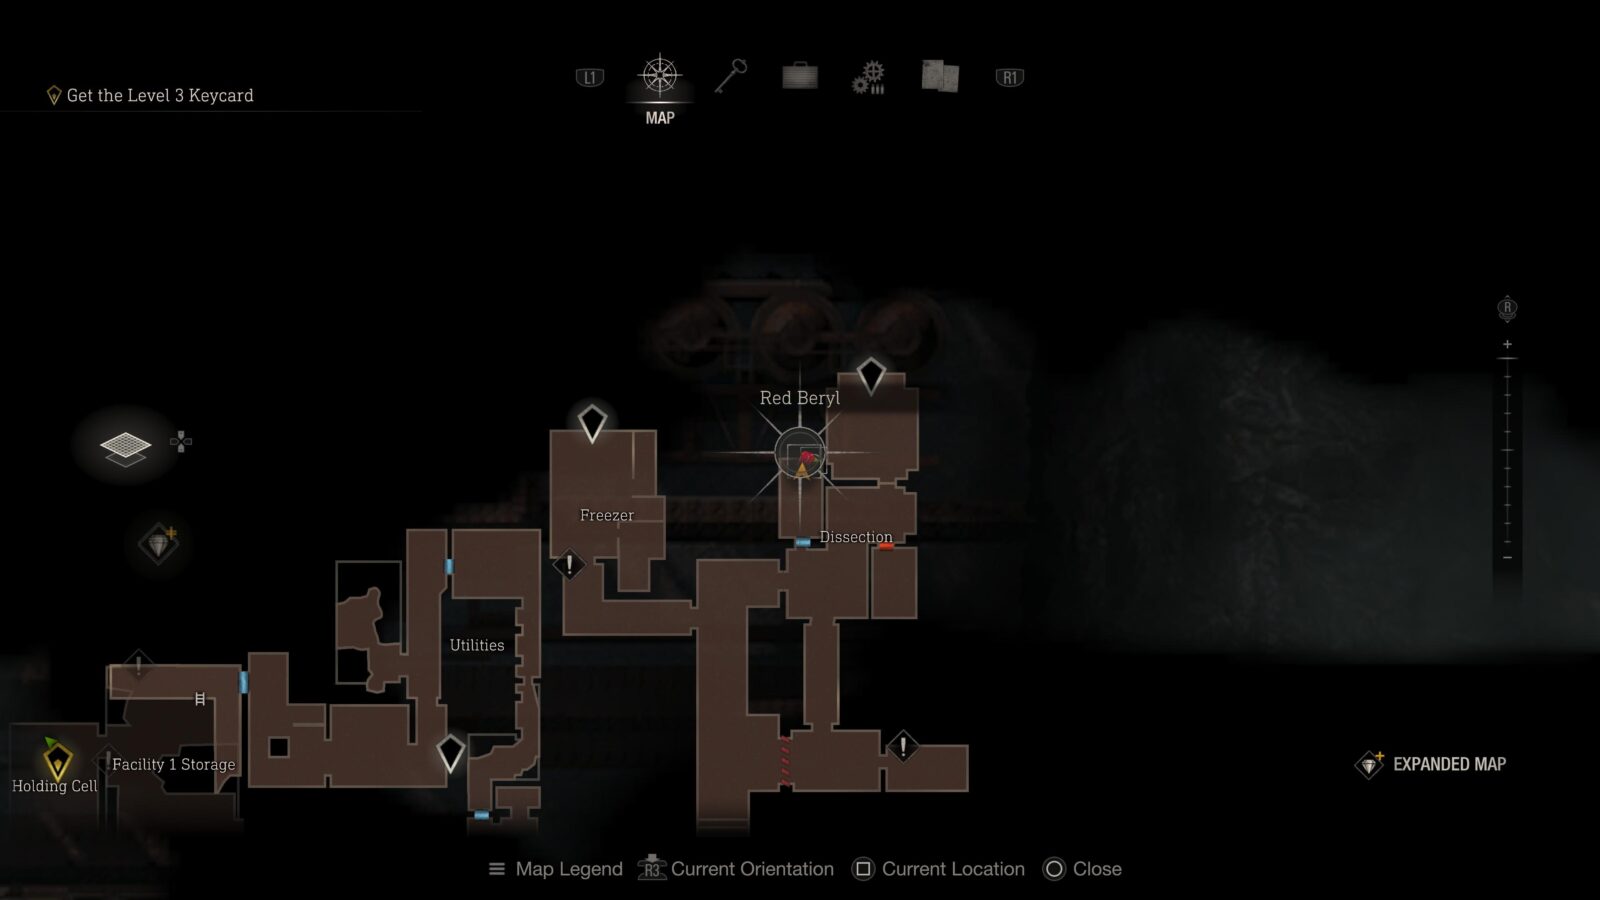
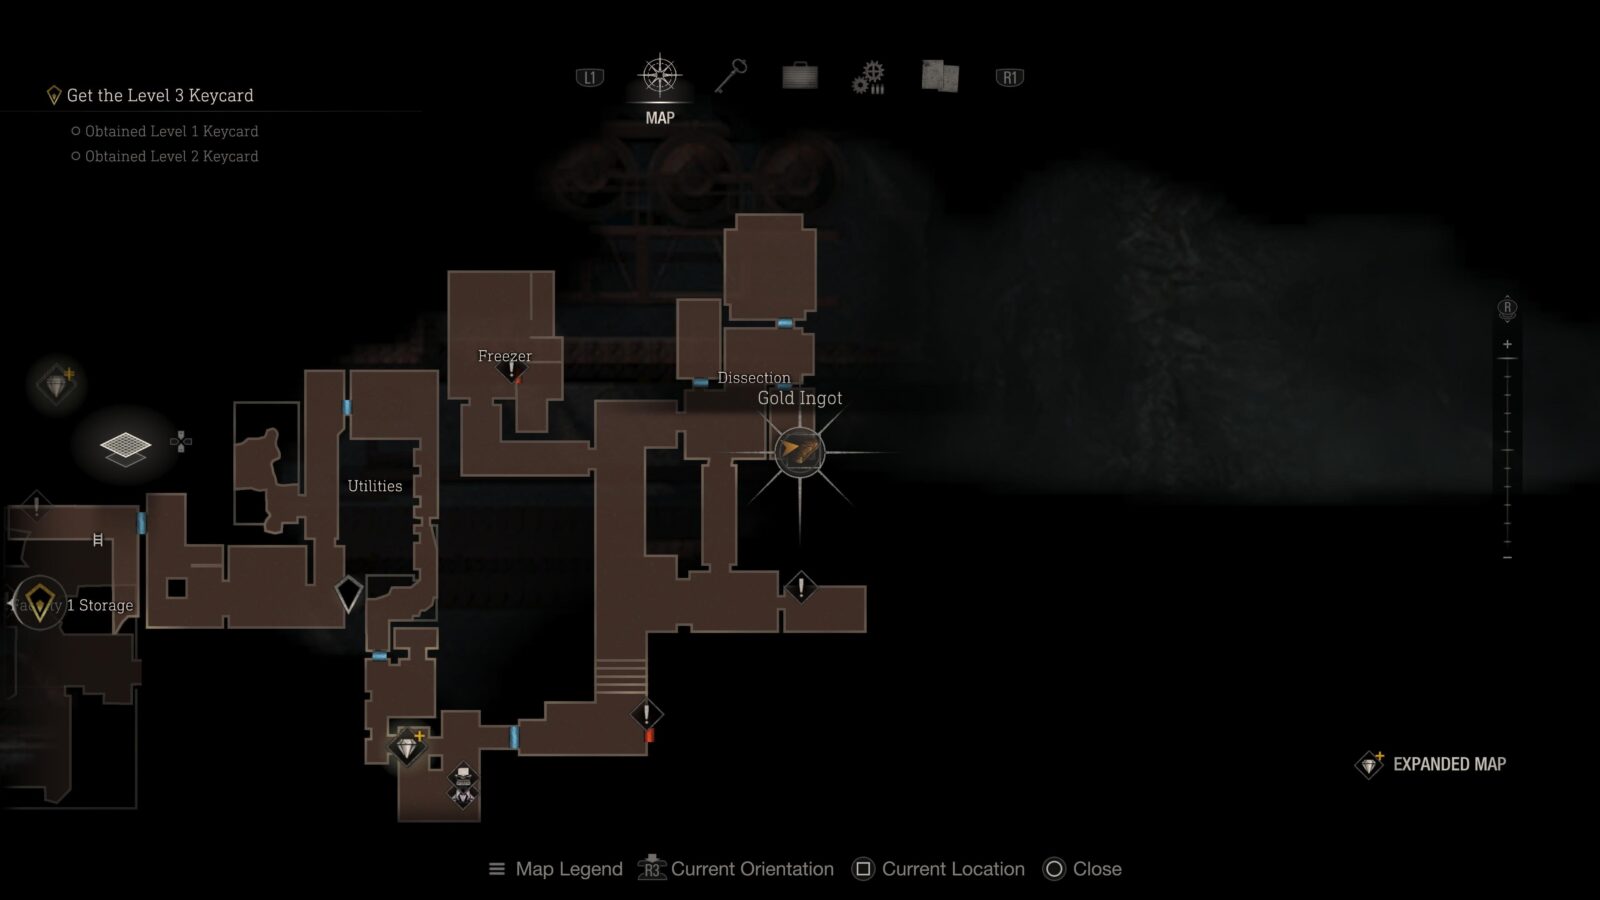
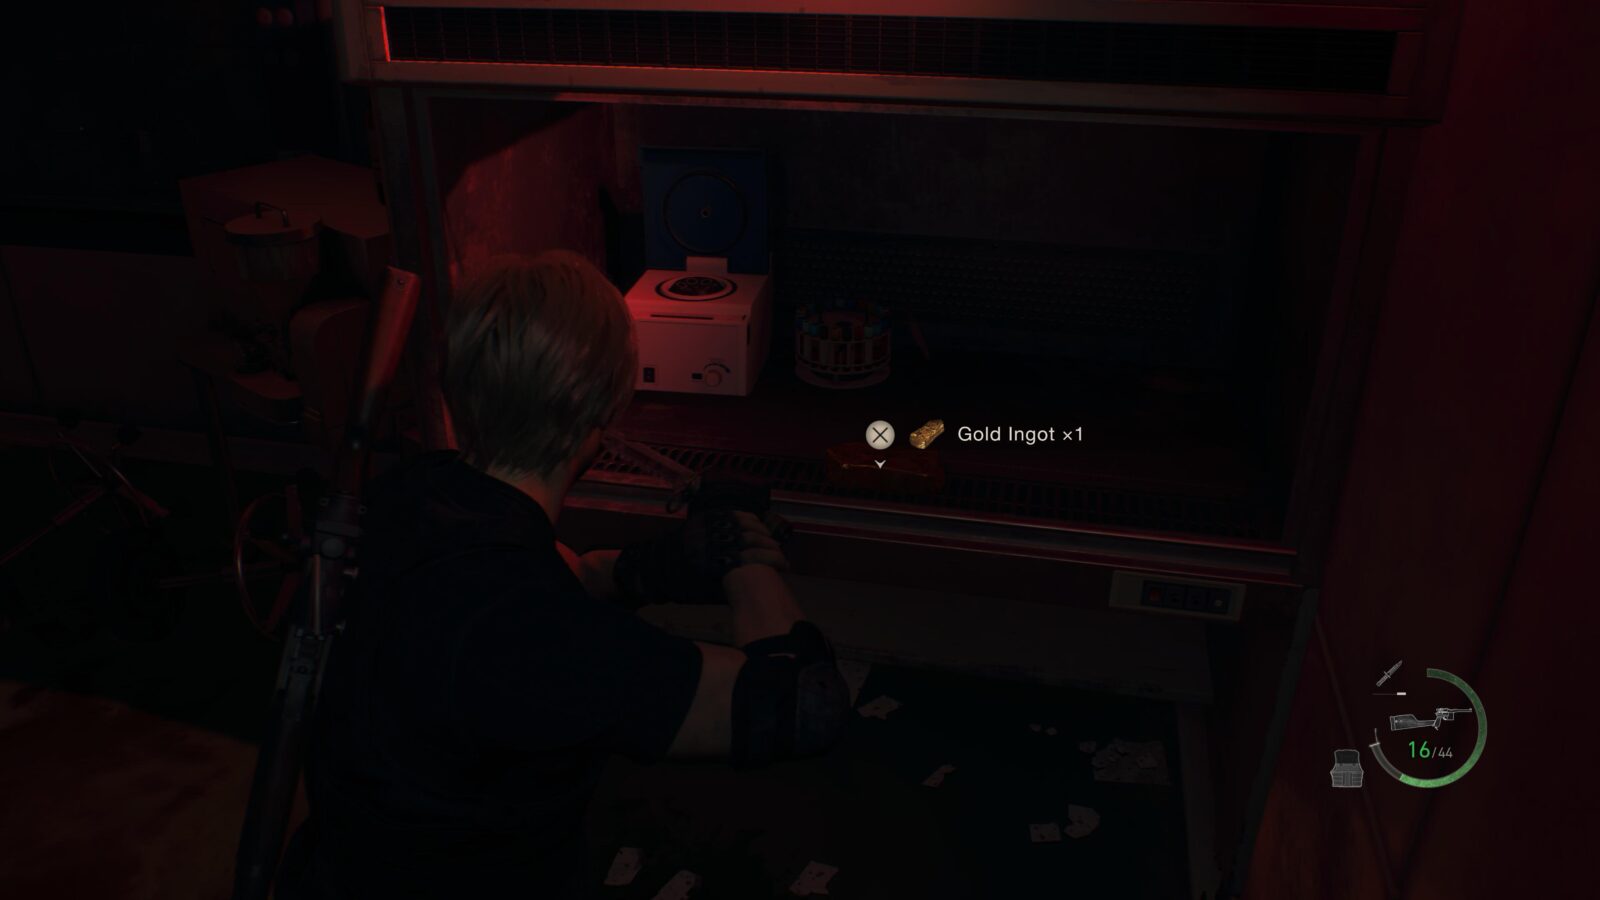
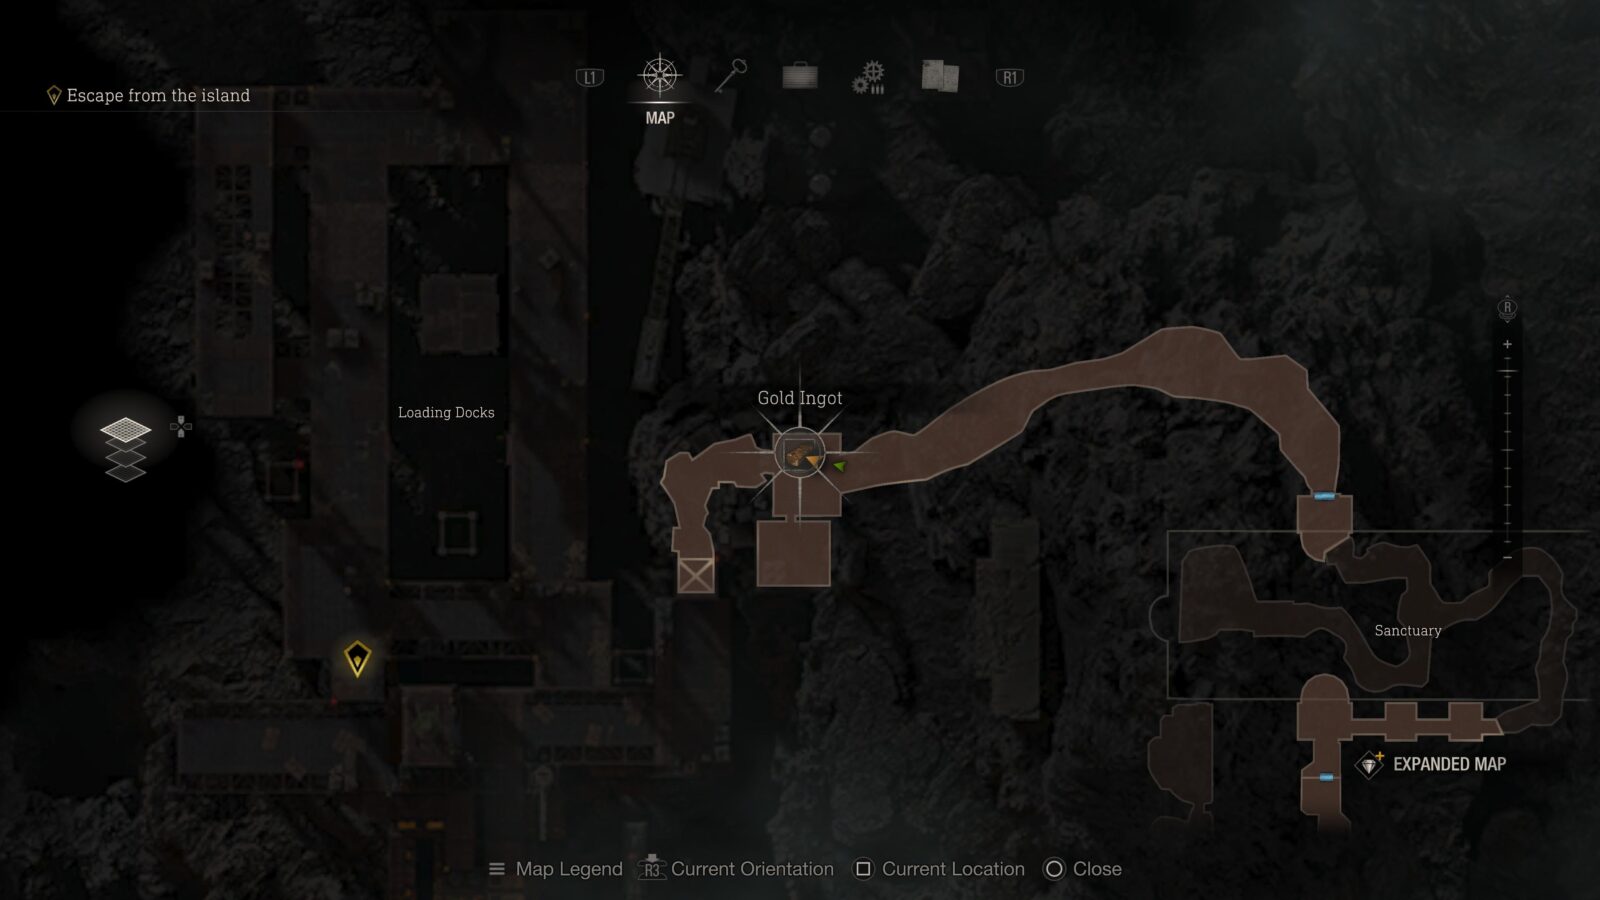
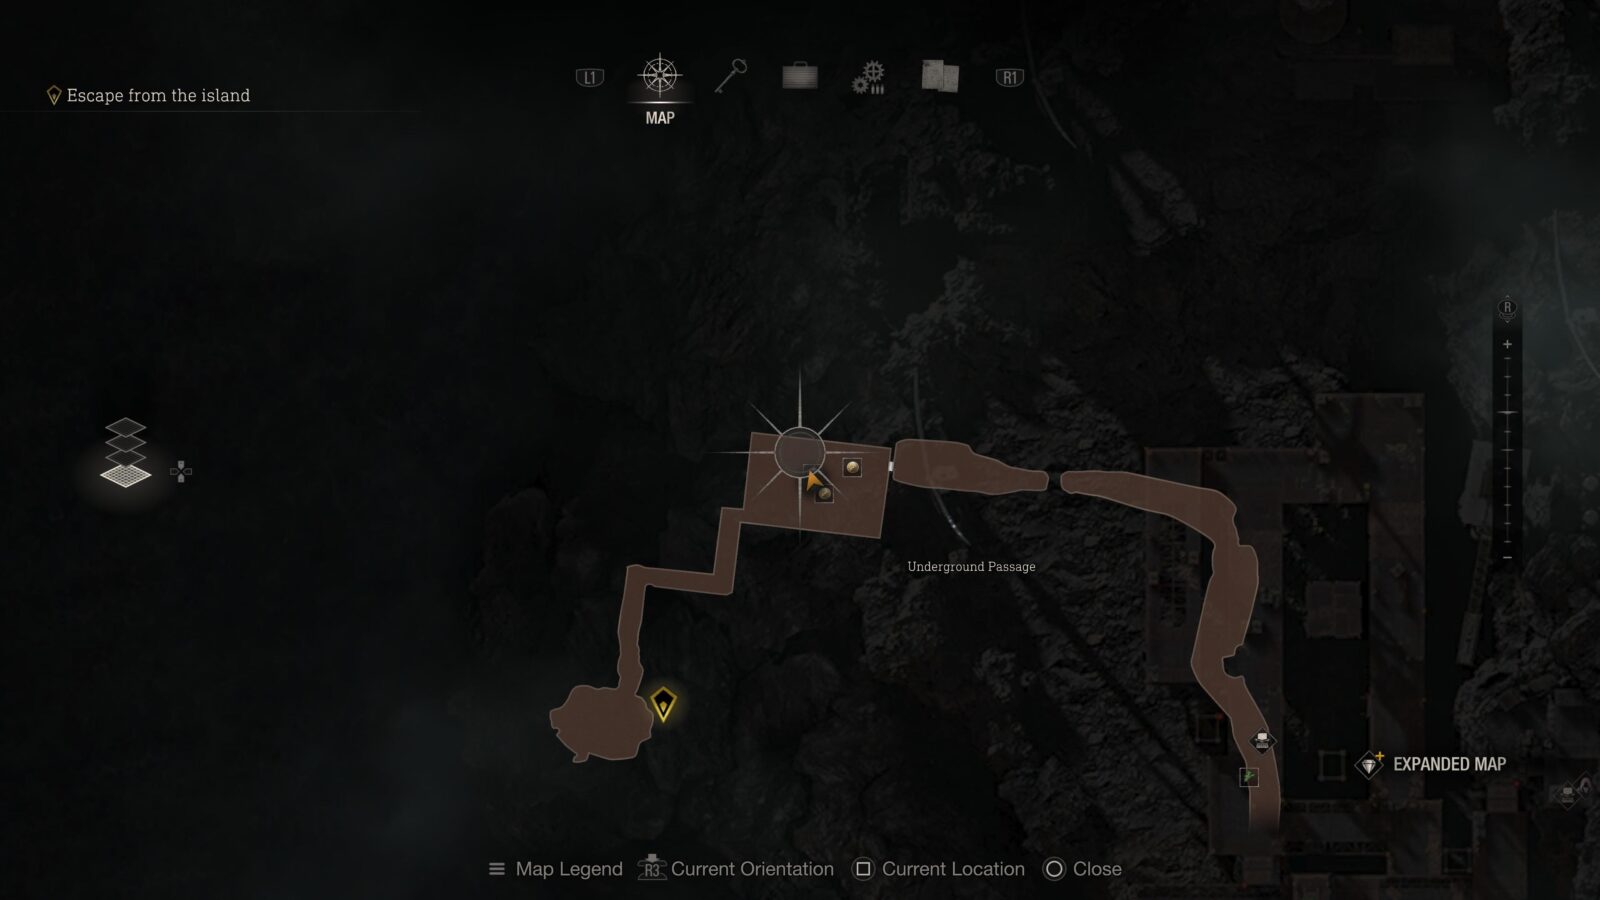
Gold Ingot
Opposite the first puzzle console to get the keycard is a room with some glass incubators. The one of the left has a gold ingot you can grab if you smash the glass.
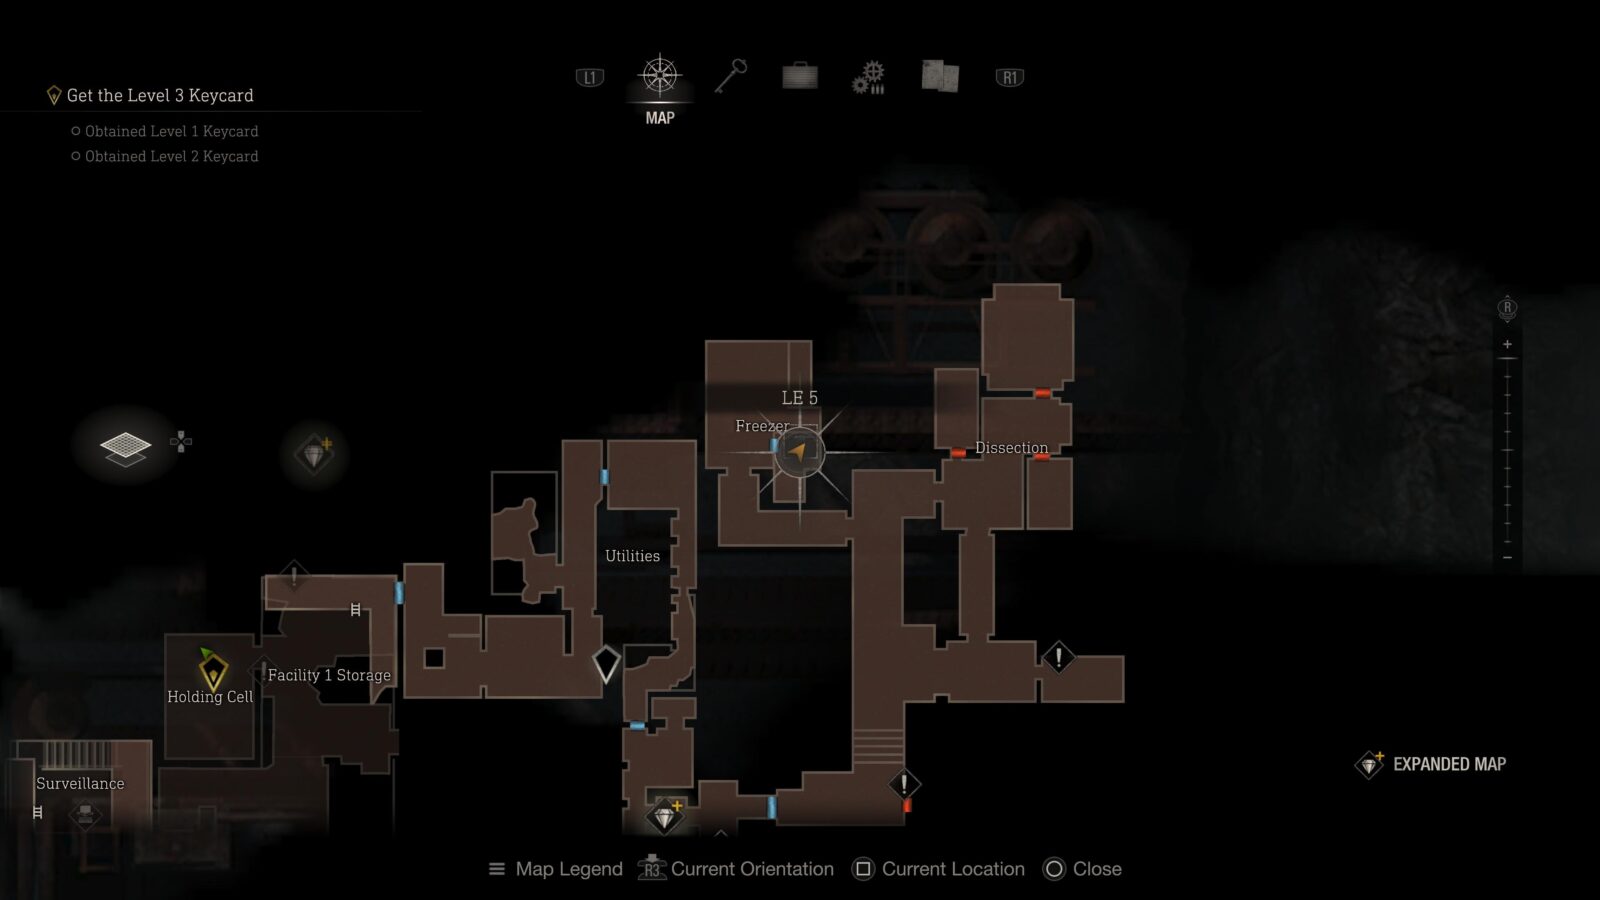
LE 5
Flip the power to the Freezer half of the area and use your Level 1 card on the freezer door. Complete the puzzle on the console inside the freezer and grab the LE 5 from the room when the door opens.

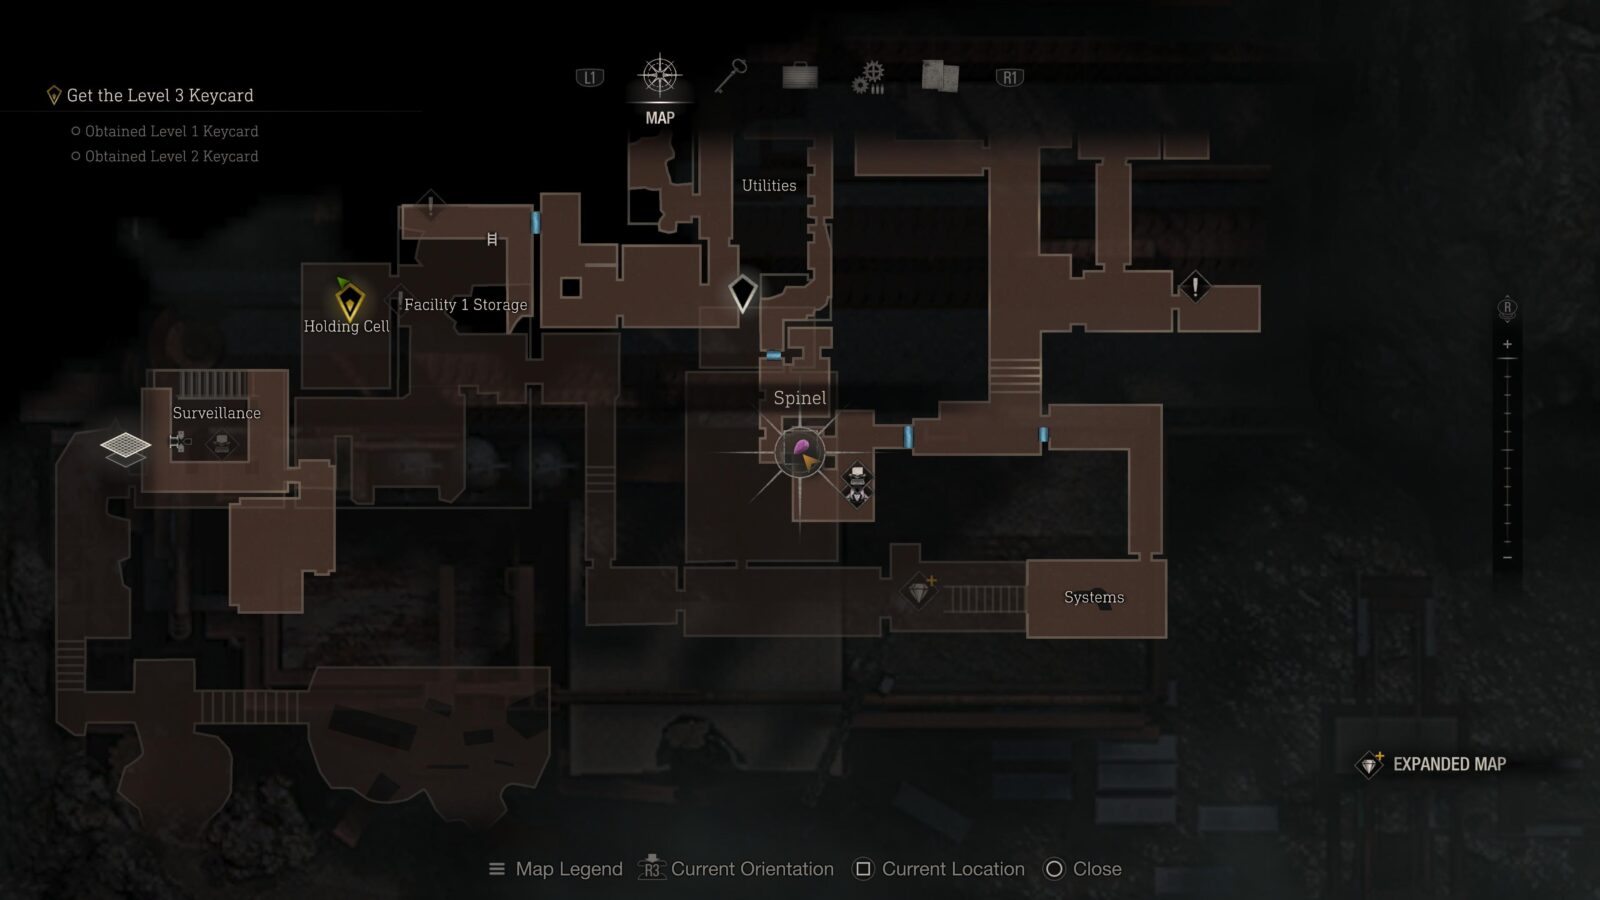
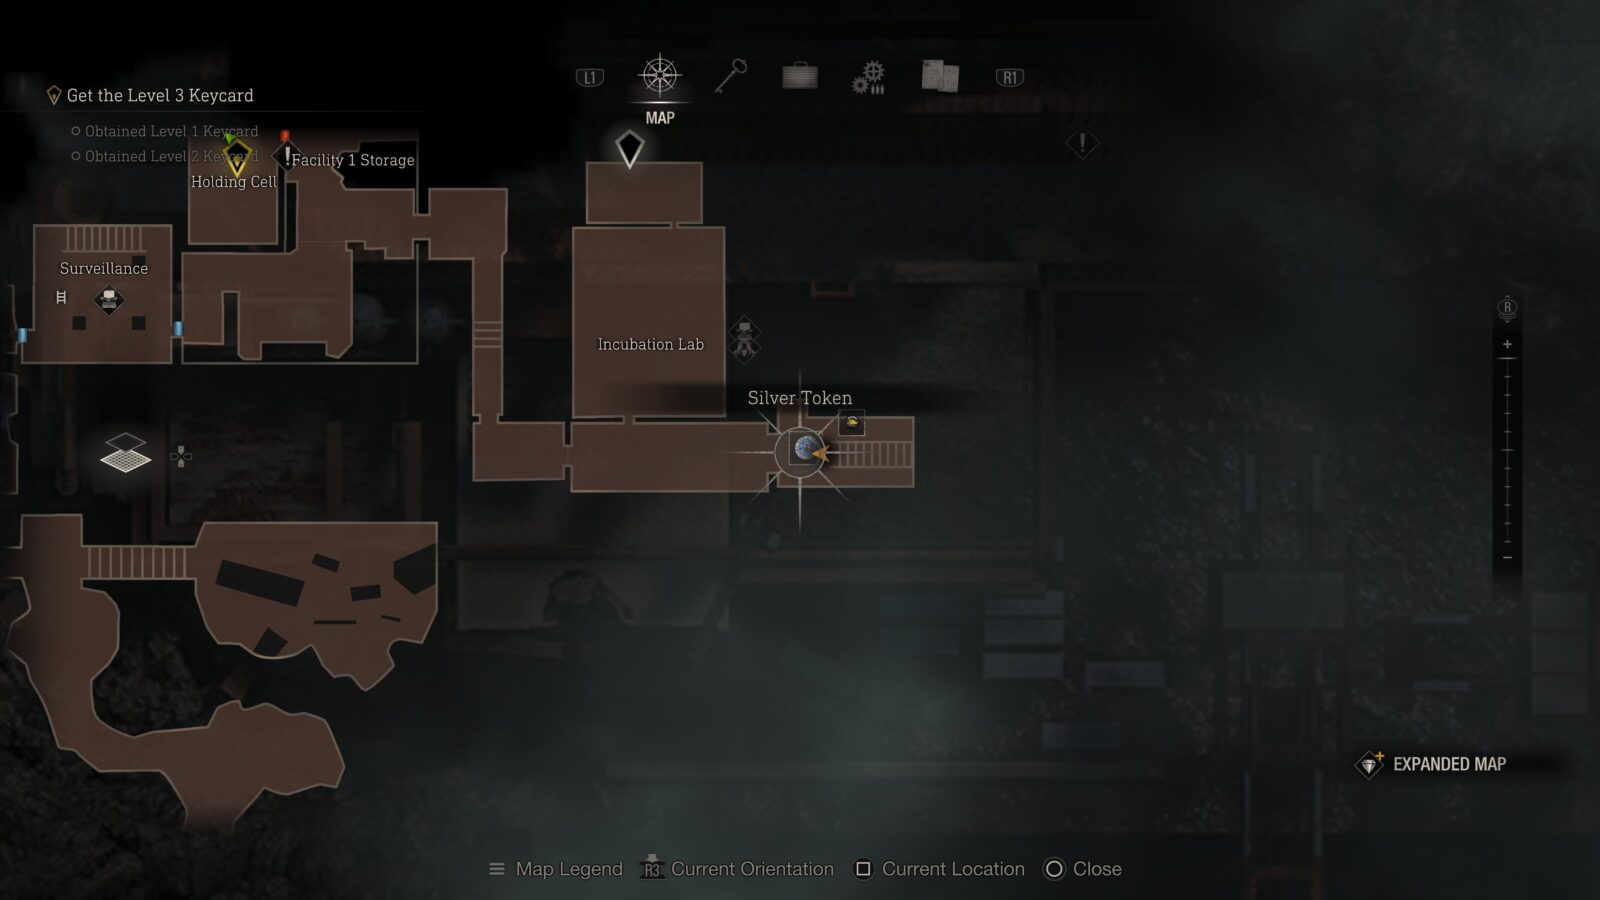
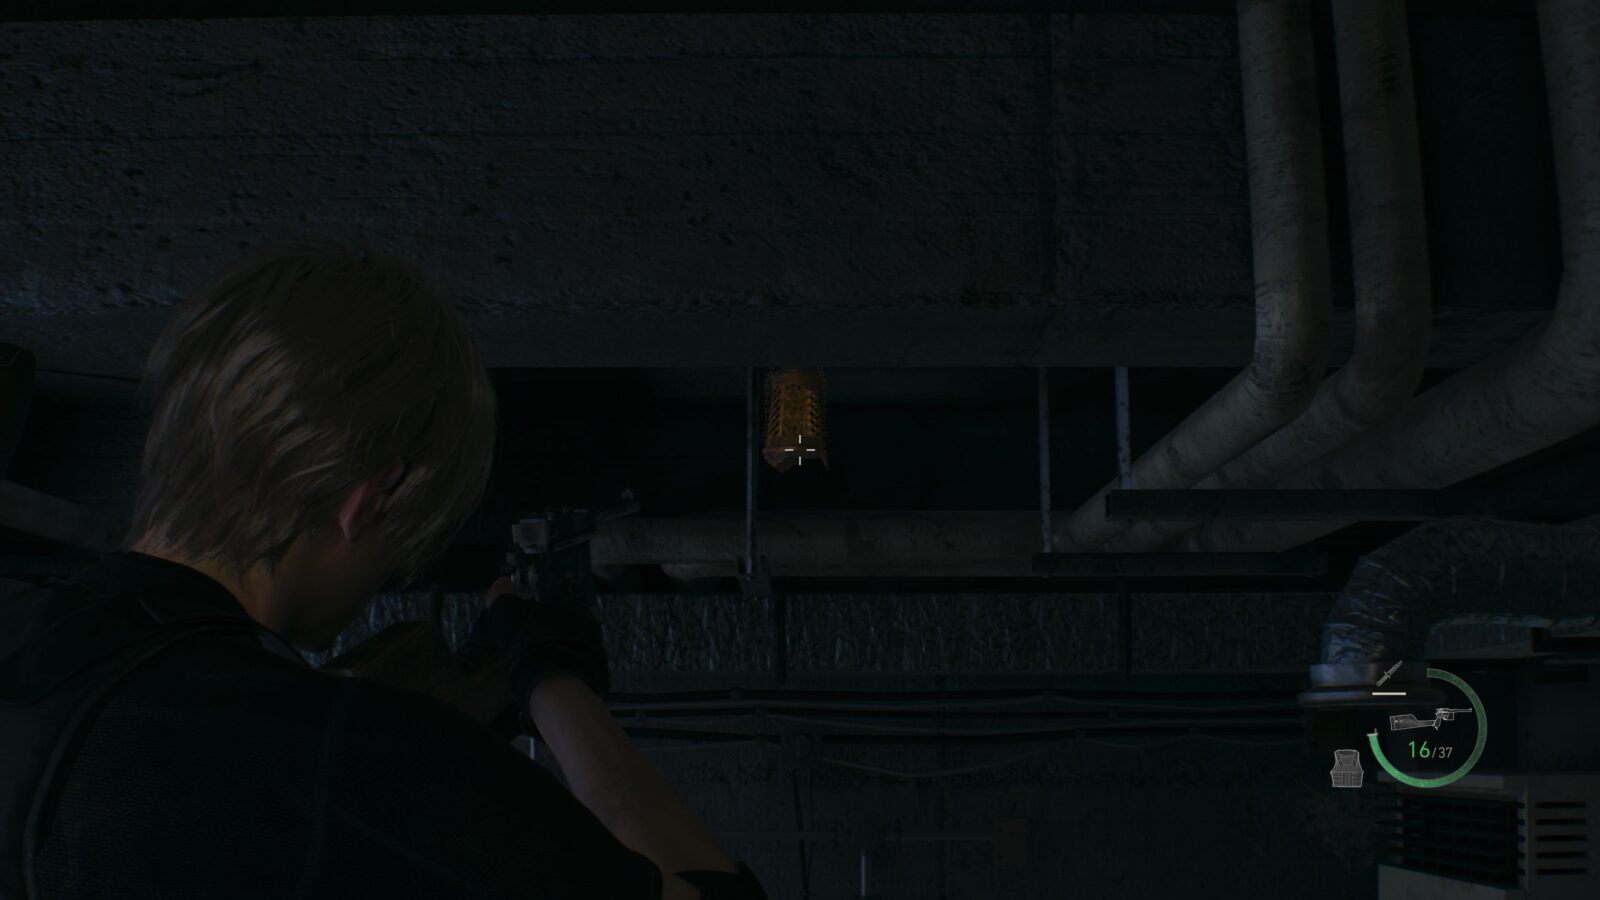
Silver Token (Expanded Treasure)
As you walk down the stairs in the Systems room you will see a metal cage hanging from the ceiling of the lower floor. Inside is a silver token.
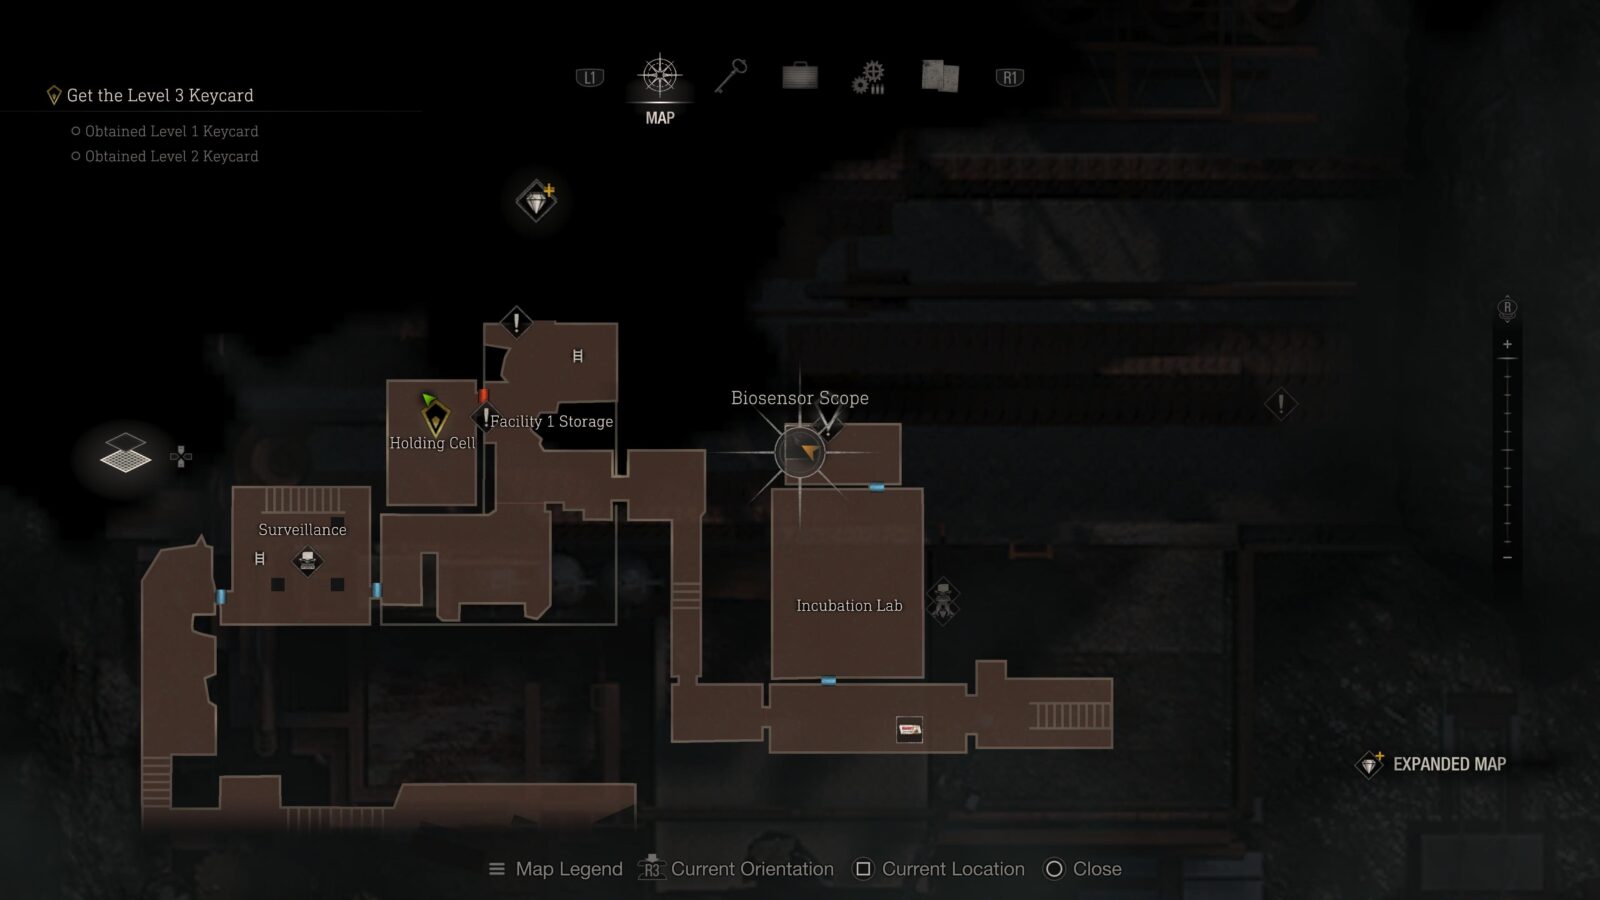
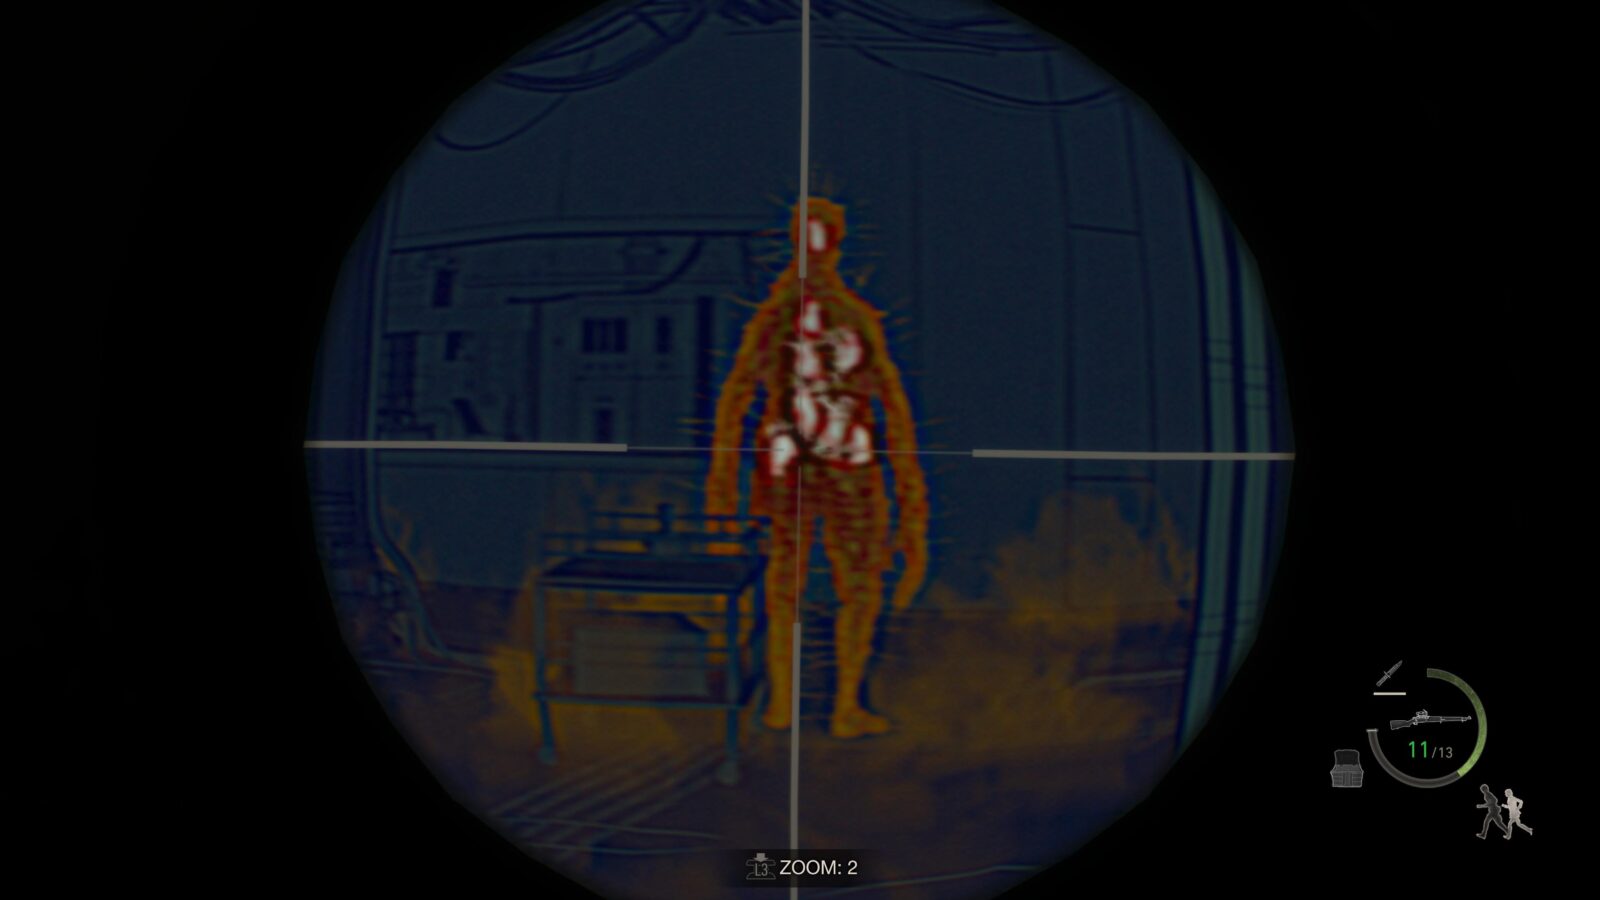
Biosensor Scope
In the Incubation room you will see 4 Regeneradors in tanks with a room at the back where you can pick up a scope. This scope has a trophy attached to it for killing 2 parasites inside a Regenerador in a single shot so don’t proceed with the objectives yet. Instead just pick up the scope and read the next entry on this list.

Two Bugs, One Stone (Trophy)
For this trophy you must have a rifle–such as the SR M1903–in your inventory with the biosensor scope equipped. The scope can only be attached to certain rifles and will let you see the parasites inside the Regeneradors. Once you have the scope equipped on a good rifle then head back into the Incubator room with the 4 Regeneradors and aim at them to find one that has 2 parasites lined up so that one bullet from your rifle kills them both.
Chapter 14
There are a total of 1 Clockwork Castellan, 1 Shooting Range, 3 Merchant Requests, and 8 Treasures in Chapter 14. This chapter also has 3 Expanded Treasures which can only be obtained with the Expanded Treasure Map DLC.
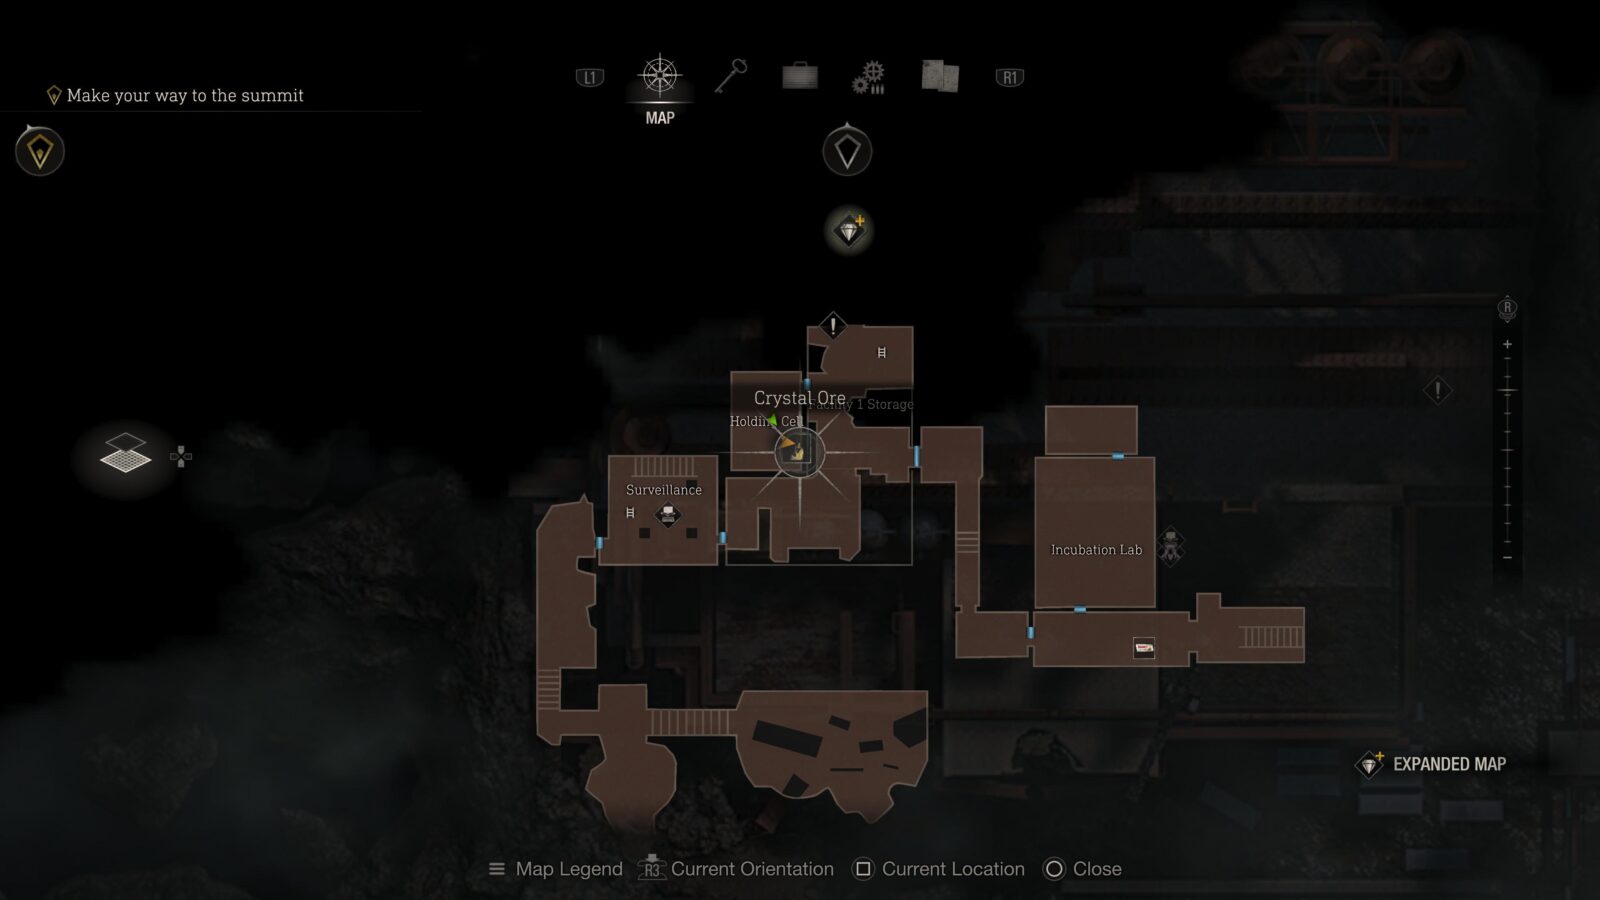
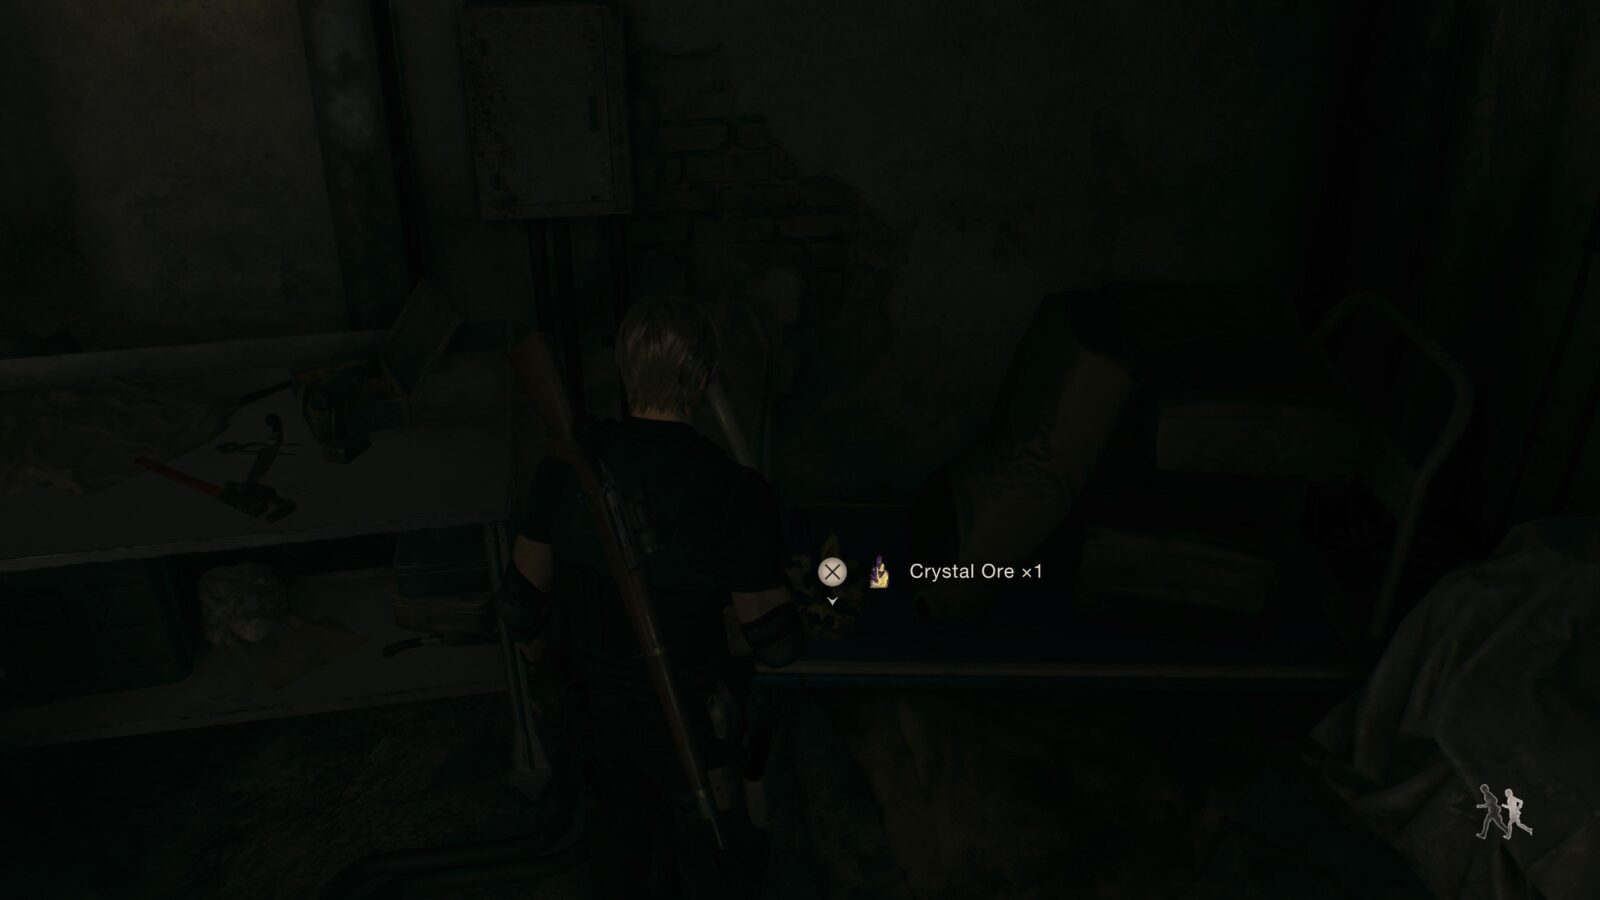
Crystal Ore
At the start of the chapter you can find a treasure in the far right of the Holding Cell where you found Ashley.
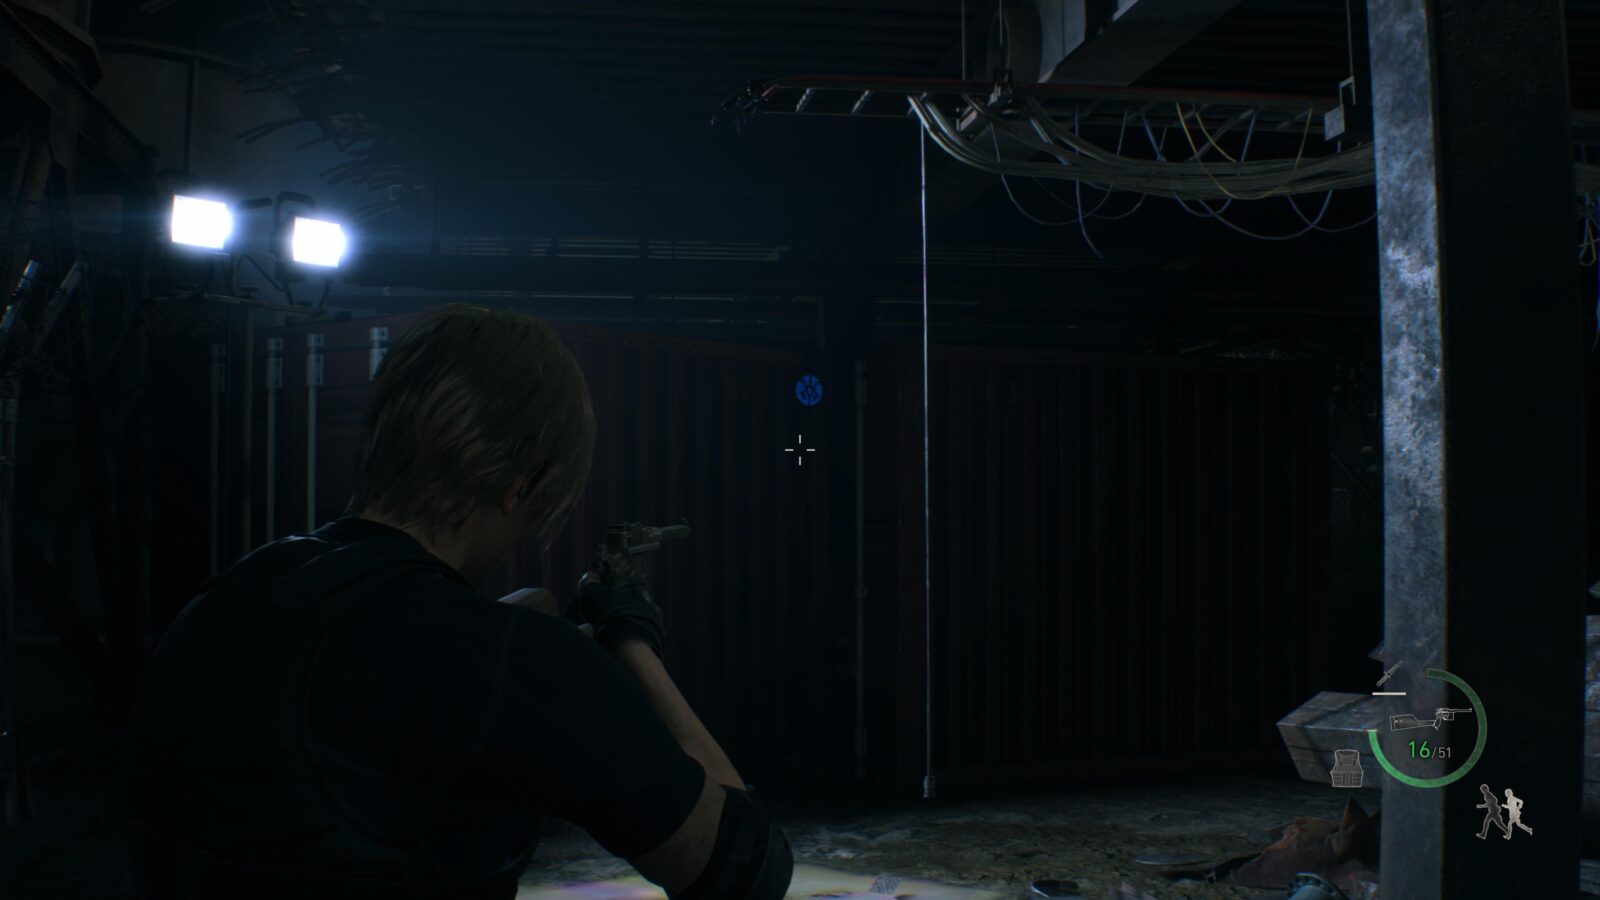
Merchant Request: Destroy the Blue Medallions 5
At the door to the Merchant in the next area is a new request. You gotta destroy more blue medallions. The medallions are scattered throughout the next area so I will list them when you come to them naturally.
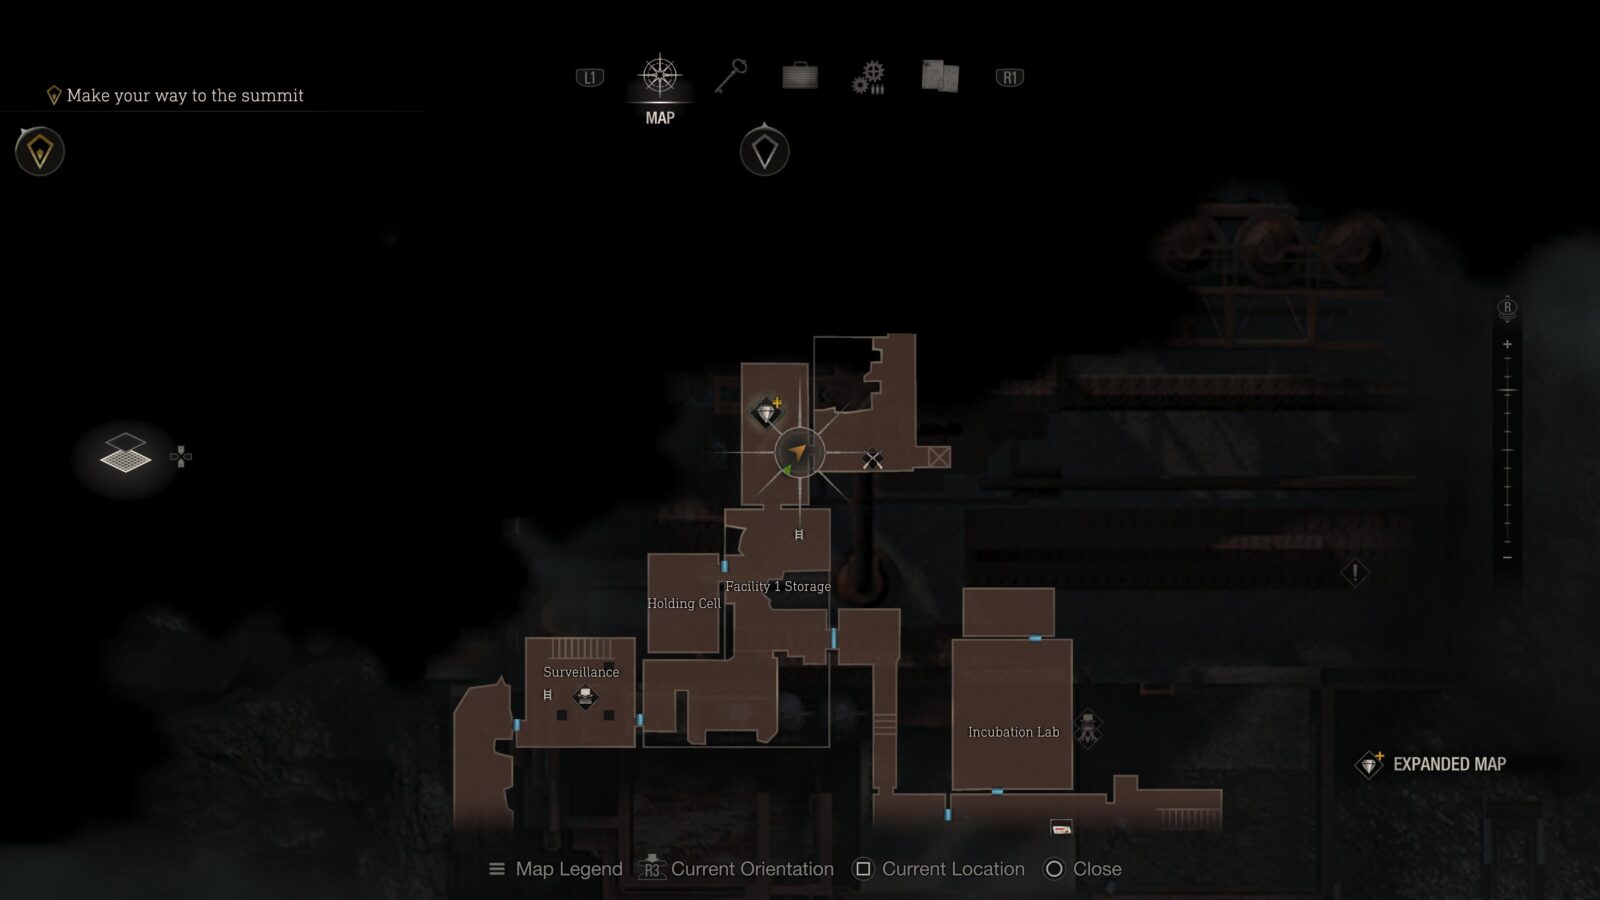

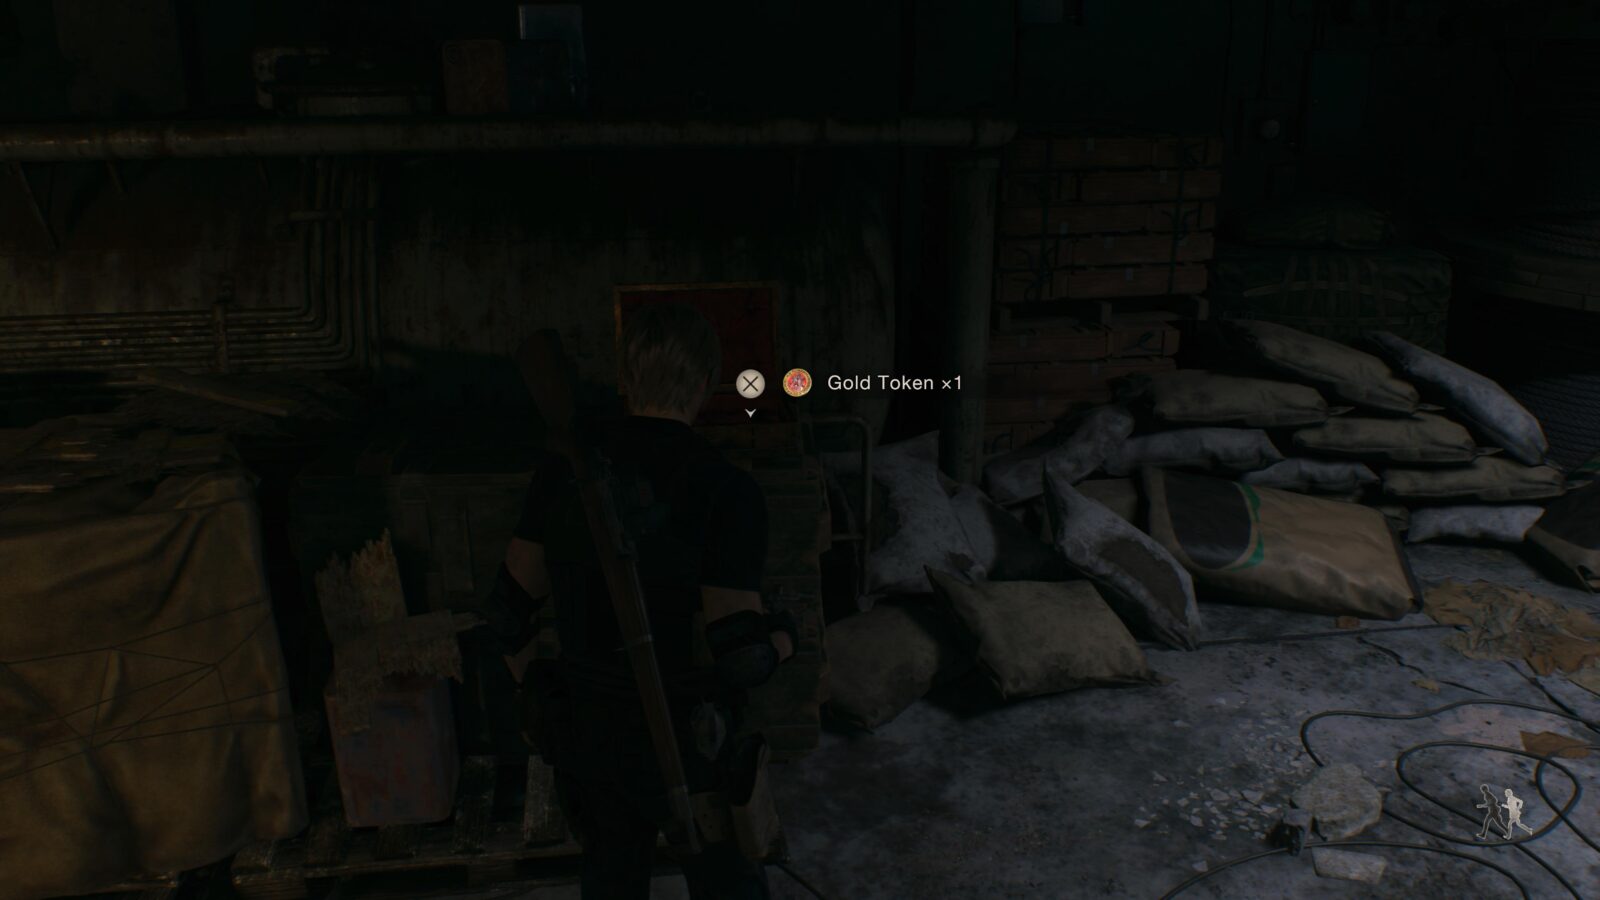
Gold Token (Expanded Treasure)
To the left of the Merchant Request is a small chest on a crate with a gold token inside. This is only available to those who have the Expanded Treasure Map DLC.

Shooting Range
The final Shooting Range can be found next to the Merchant. This Shooting Range will have the challenges 4A, 4B, and 4C unlocked. Now is your time to get S rank on all of the Shooting Range challenges as there will not be another Shooting Range again.
Alexandrite
Leave the Merchant room and walk to the bottom of the stairs before turning around and looking up. There will be a metal rod sticking out with a metal cage hanging from it.
Blue Medallion #1
Still at the bottom of the stairs you can see a medallion a bit lower and to the left of where the Alexandrite was.
Blue Medallion #2
Again without leaving the stairs look down at the ground and to your far left to find a medallion behind the sand bag barrier.

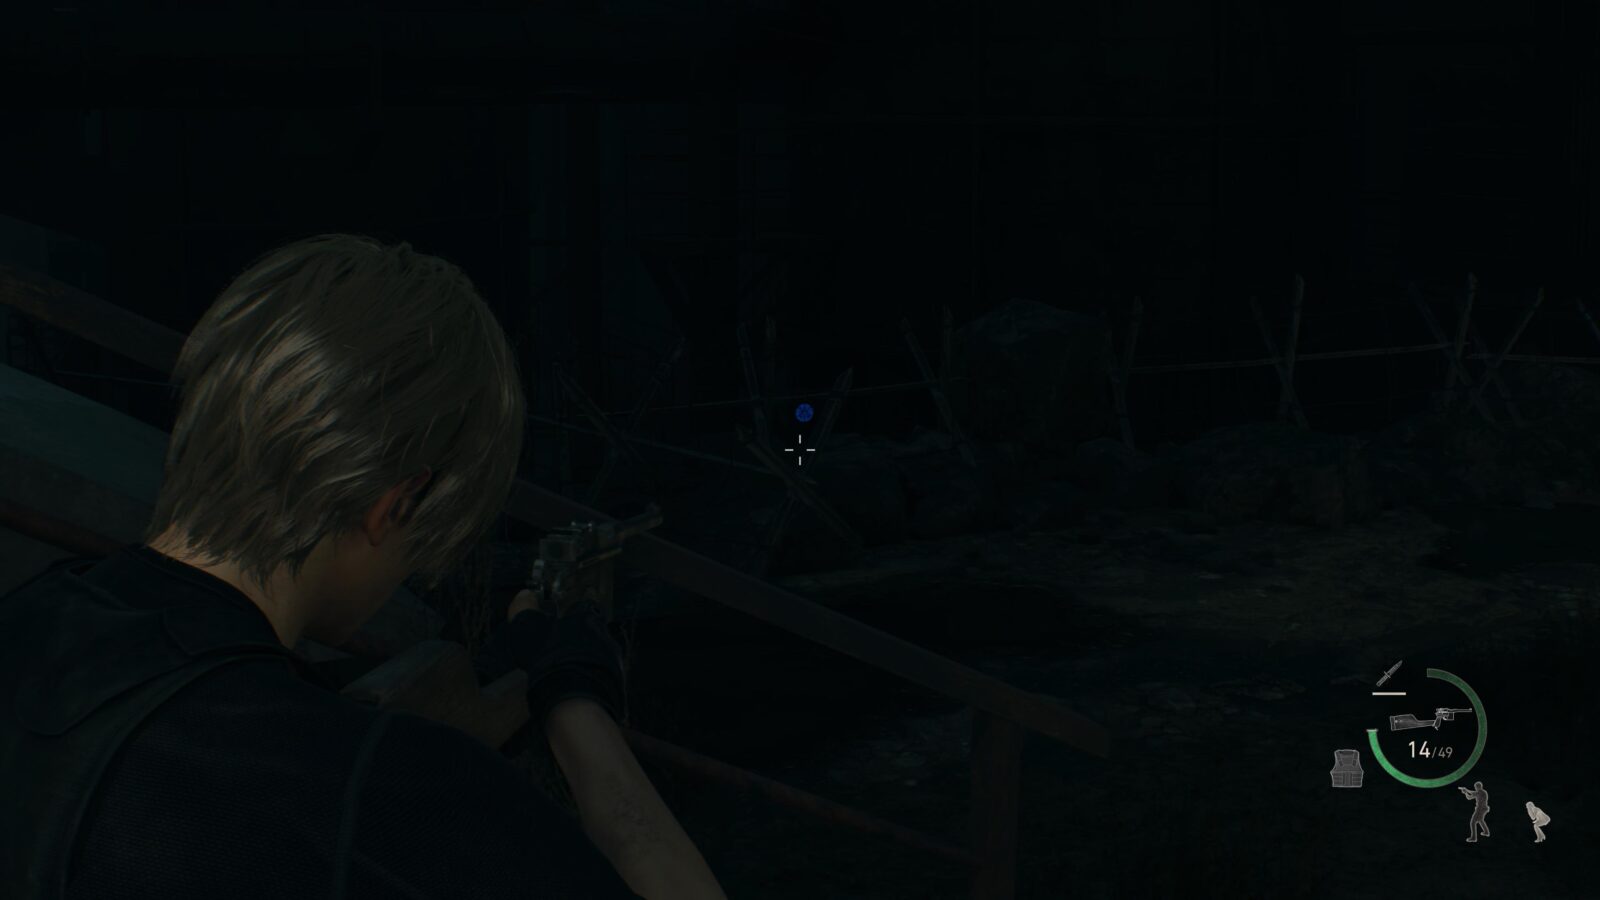
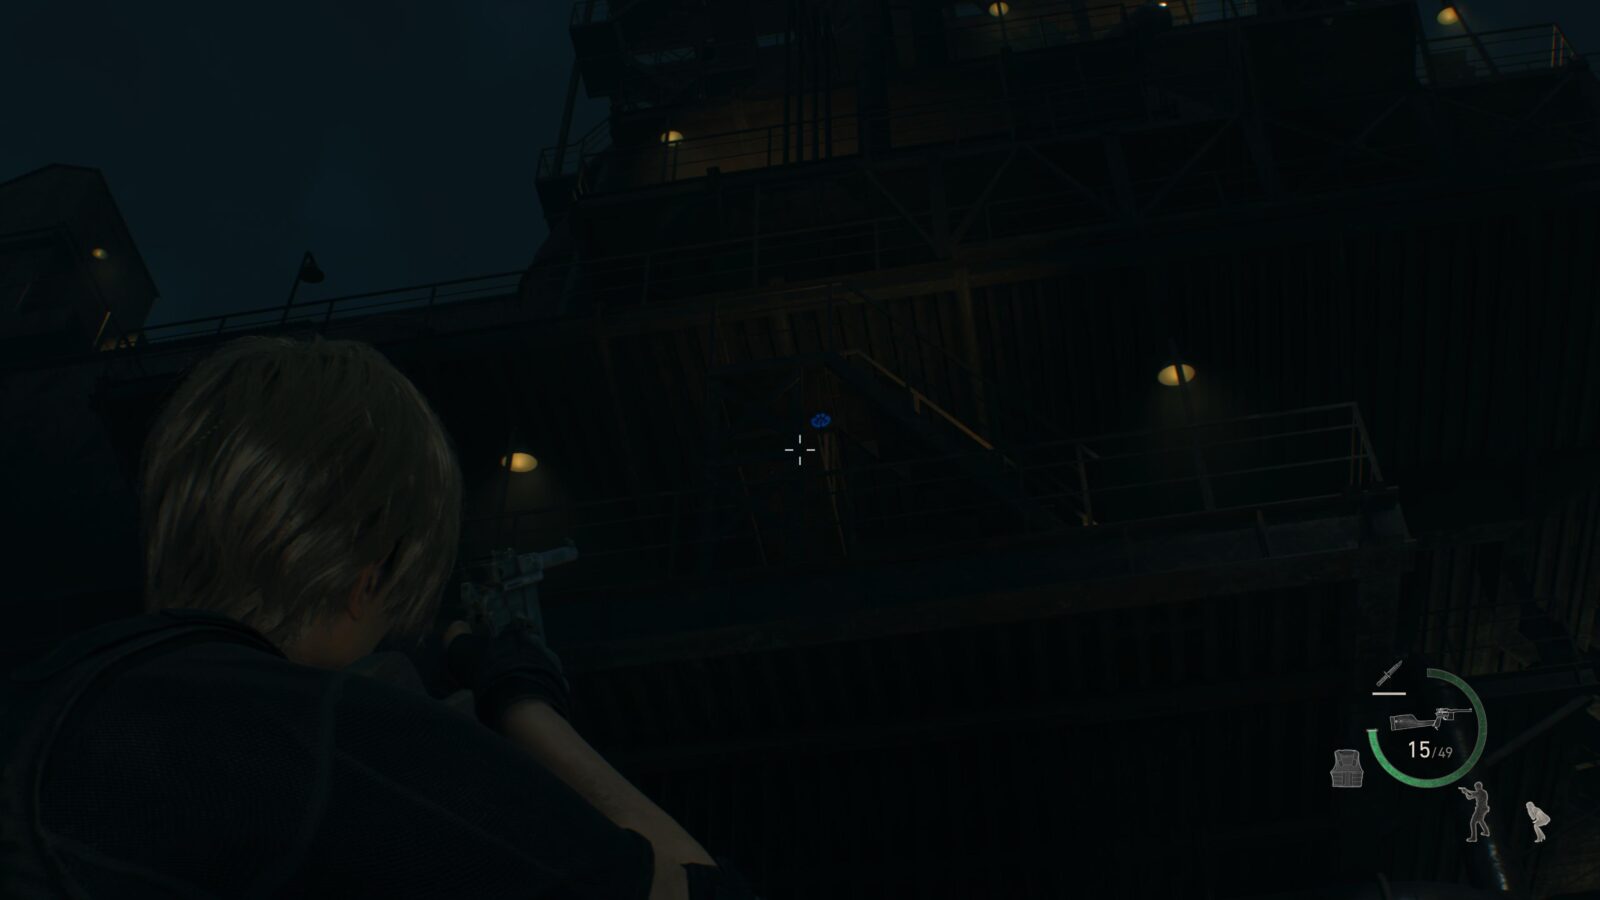
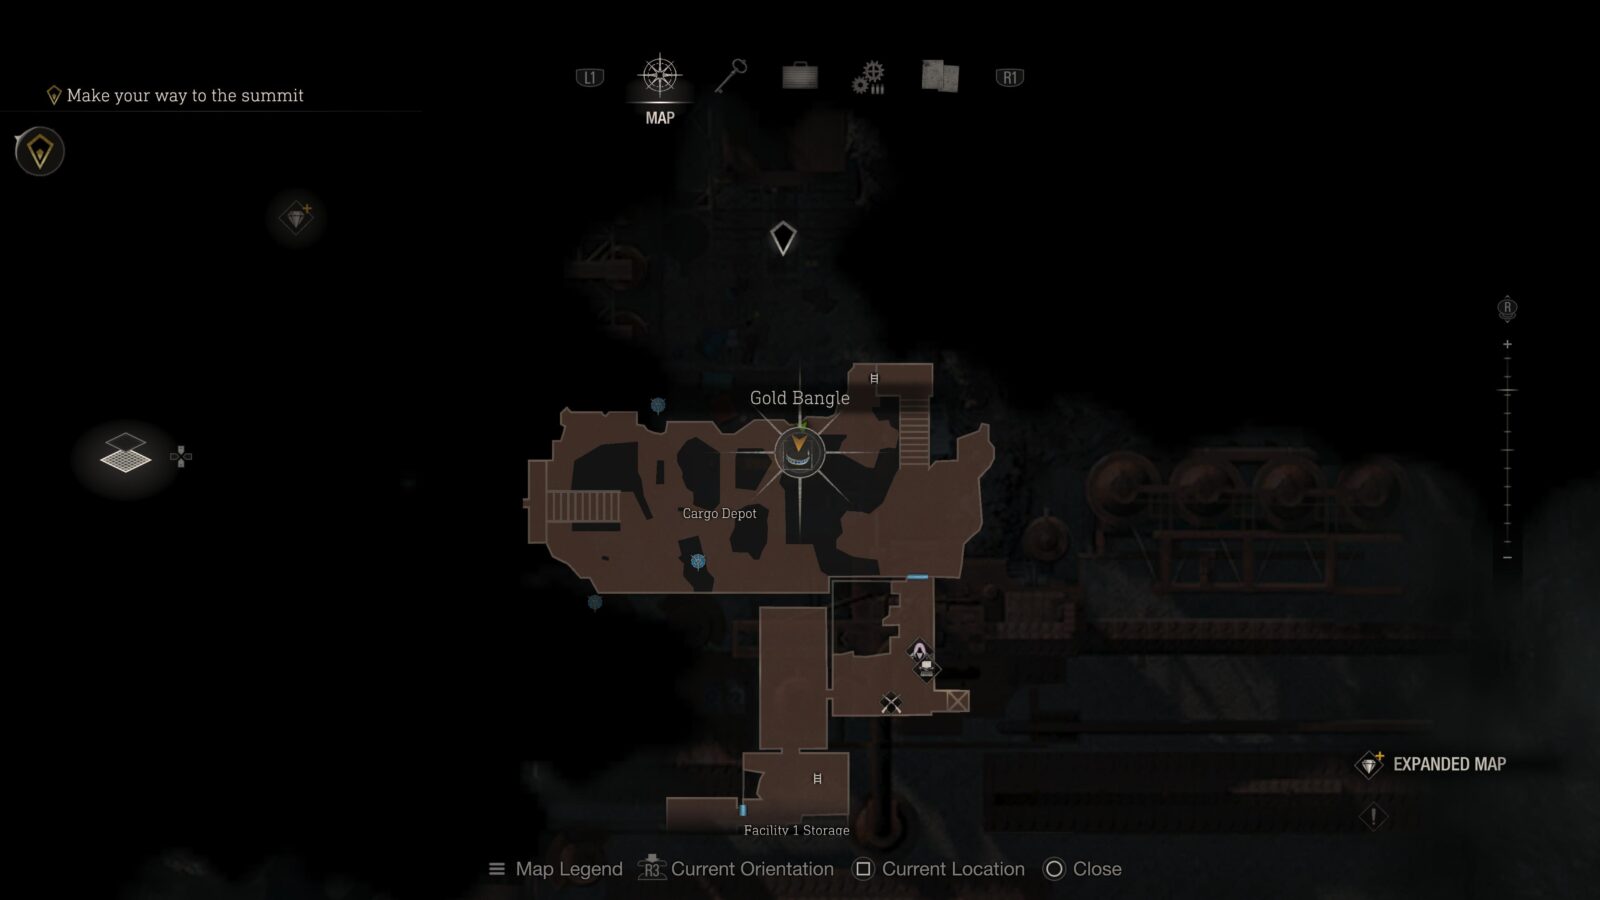
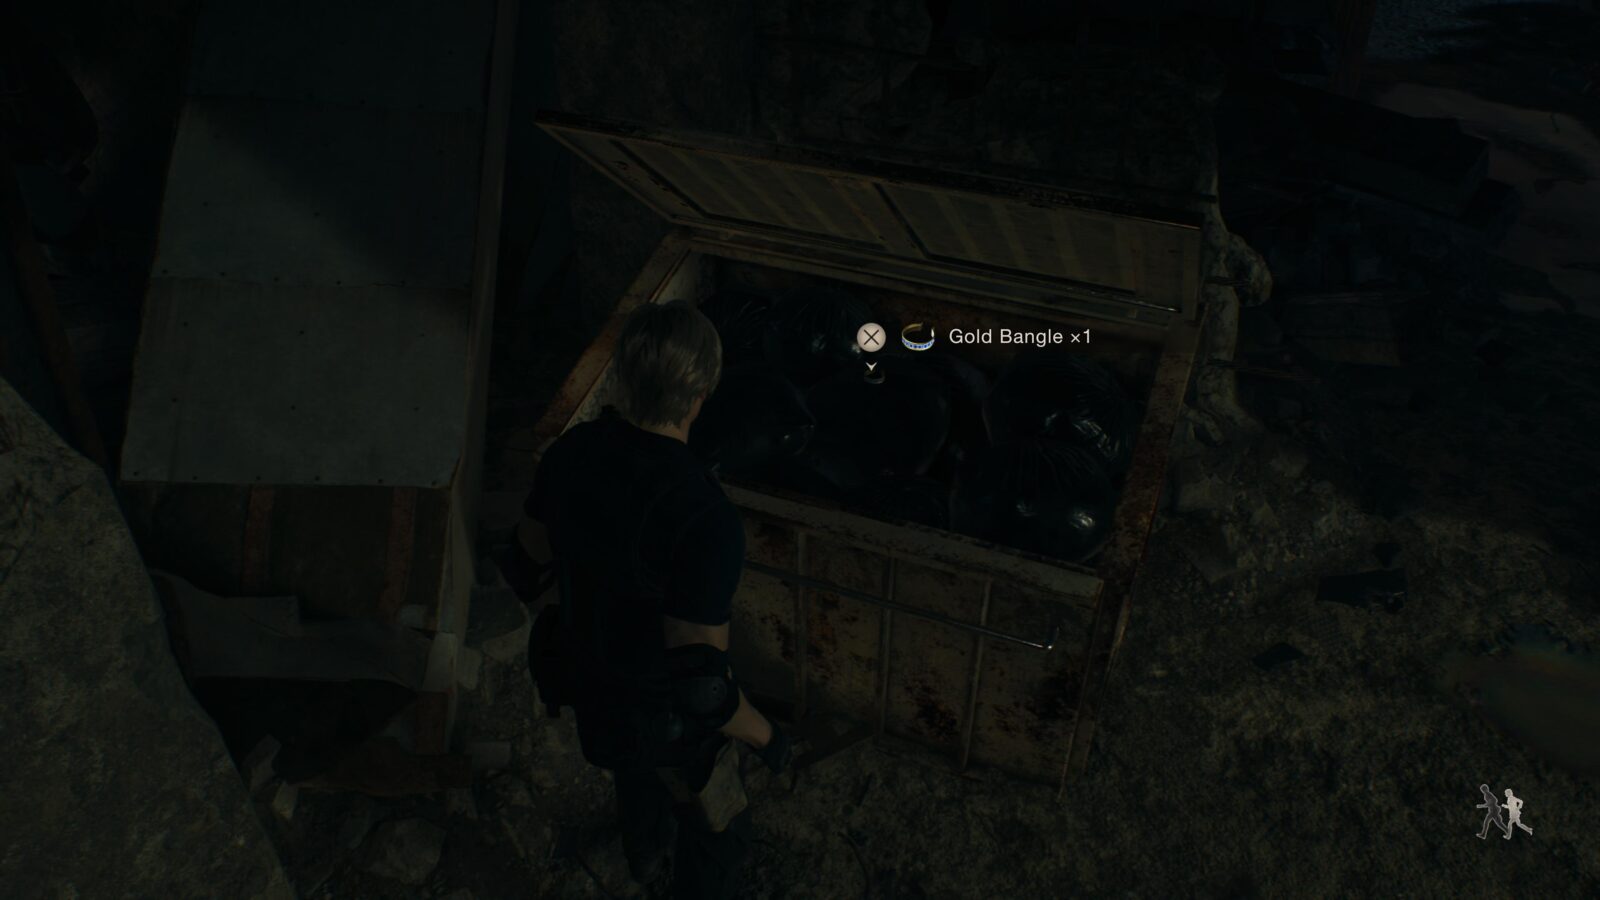
Gold Bangle
Drop down the ladder at the top of the stairs to reach the Cargo Depot area. Walk a few steps into the area and look to your left to find a dumpster that you can open to reveal a bangle.
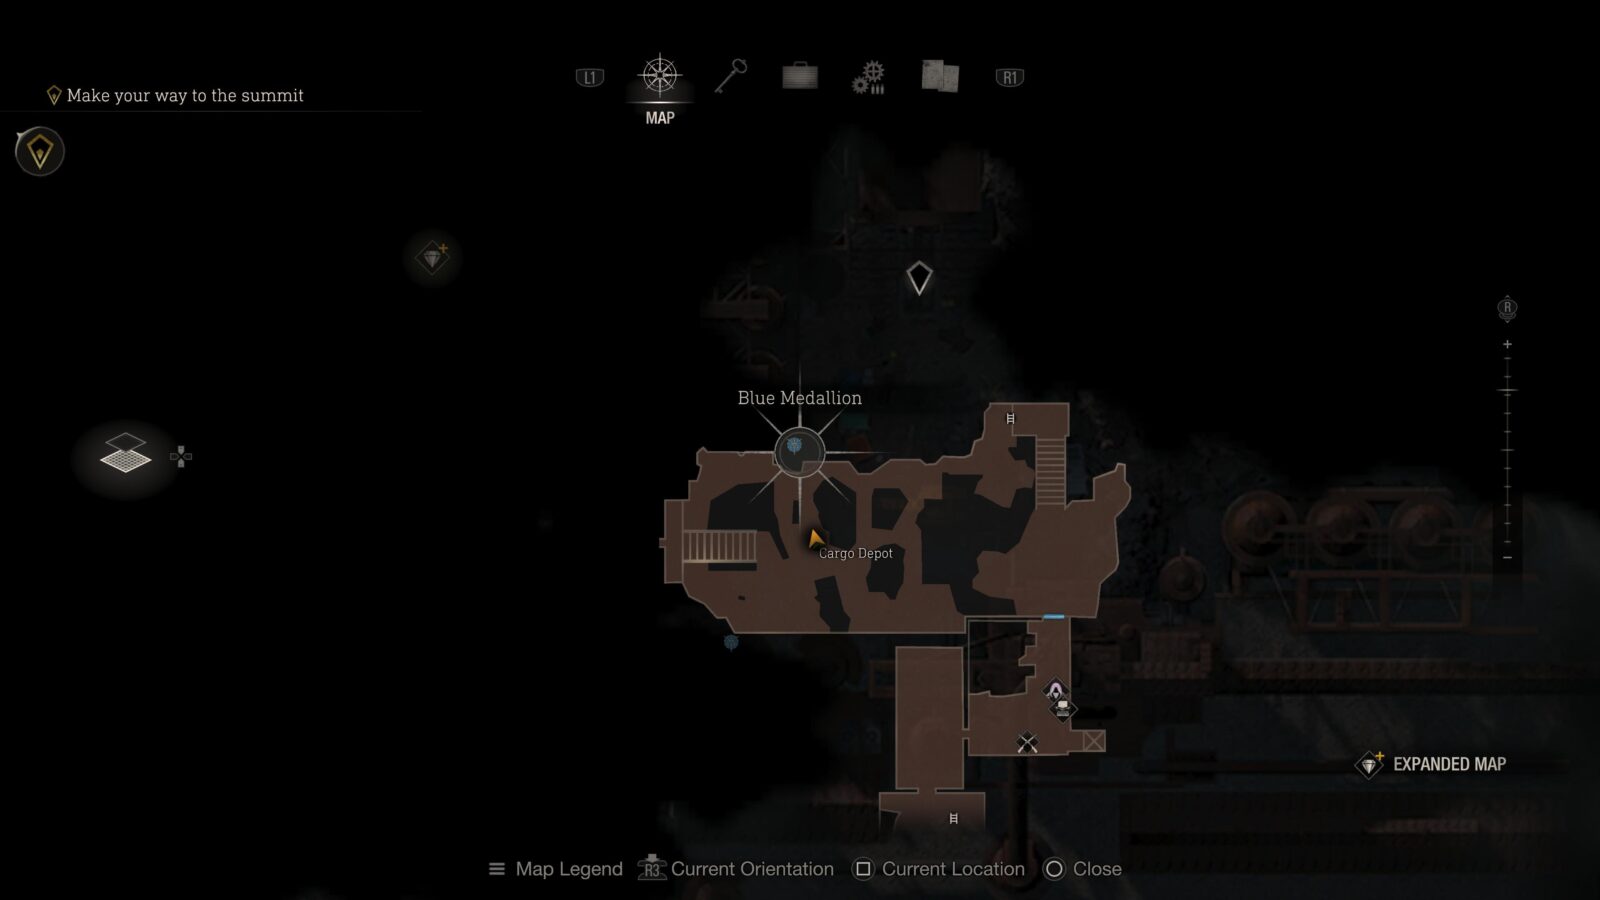
Blue Medallion #3
Take the path next to the dumpster–will be your left–and follow it to the end and turn right to find a medallion on the side of a red shipping container.
Blue Medallion #4
Walk towards the red shipping container and look to your right towards the back wall. There will be some metal cages and a blue medallion hanging above and to the right of them.

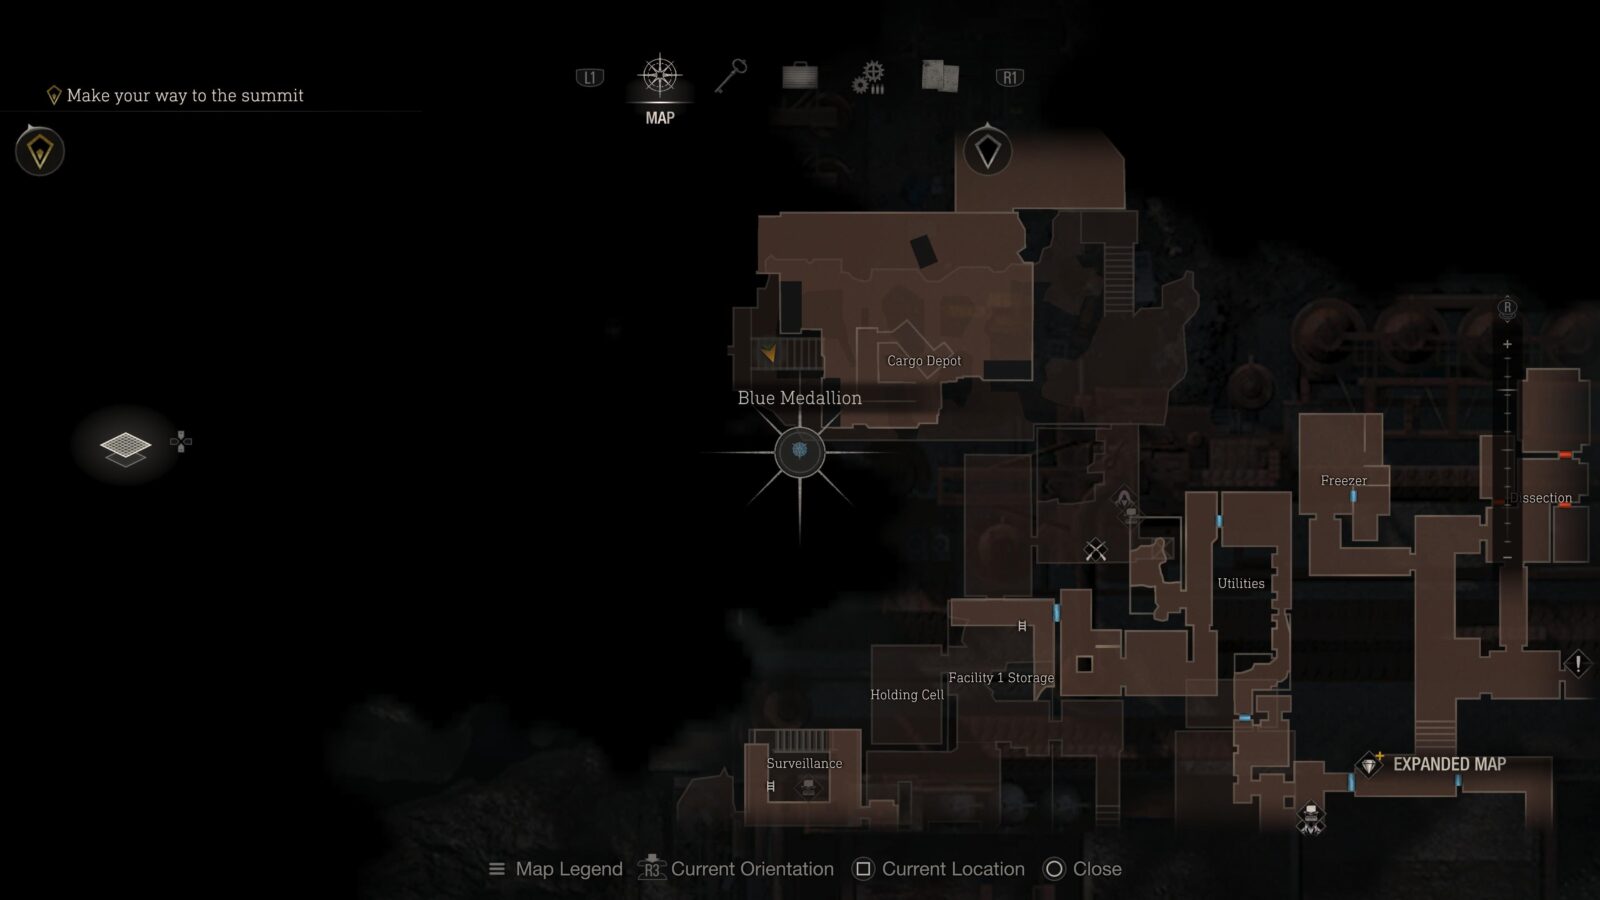
Blue Medallion #5
Walk up the steps at the end of the Cargo Depot area and near the top look to your left to see a water tower. At the top of the tower is the final medallion.
Velvet Blue
Go to the next area and you will be in a sort of furnace room. Go down the path to your left between the glowing furnaces and turn to your left to find a metal gate. Turn around and look at the ceiling above the open window to find a metal cage.

Emerald
Drop into the sewage and duck under the pipe and follow it into the South-West corner of the room to find an Emerald in the garbage pile.
Ornate Necklace
After Ashley raises the bridge in the Waste Disposal room you will enter a command room with several large consoles with a silver briefcase on the middle one with a treasure inside.

Ruby (Expanded Treasure)
Walk through the corridor attached to the command room and you will reach a long metal bridge. Above the bridge on the ceiling is a metal cage you can shoot down. This is only available to those who have the Expanded Treasure Map DLC.
Merchant Request: Even More Pest Control
In the Merchant room on a metal block opposite the merchant is a request to kill more rats. These rats are all in the Waste Disposal room and move about a bit so keep an ear out for their squeaks. They’re all pretty easy to find so there’s no need for a detailed breakdown of their locations and since they move about it wouldn’t be too helpful.
Merchant Request: The Wandering Dead
After Ashley punches a hole in the wall with the wrecking ball you can find a request on a box to the left near a forklift. For this one you will need to backtrack to the Incubation Lab to defeat a powerful enemy. Go there and do this now before you continue the story any further. You get back there by going through the metal gate in the South-East part of this area. There’s a merchant and a typewriter on the way back so buy a Rocket Launcher for 50k Ptas or pull one out of your storage if you have one already. A Rocket Launcher will kill this powerful enemy in 1-hit.
Basically this enemy is a Regenerador but with close to–if not exactly–a dozen plagas parasites inside them which would be somewhat challenging trying to get them all with a rifle and the biosensor scope so instead just shoot a rocket at him.
This could also be a good opportunity to get the Two Bugs, One Stone trophy.

Spinel (Expanded Treasure)
Inside the Amber Storeroom directly ahead of where you enter and up on the ceiling is a metal cage with a spinel in it. This is only available to those who have the Expanded Treasure Map DLC.


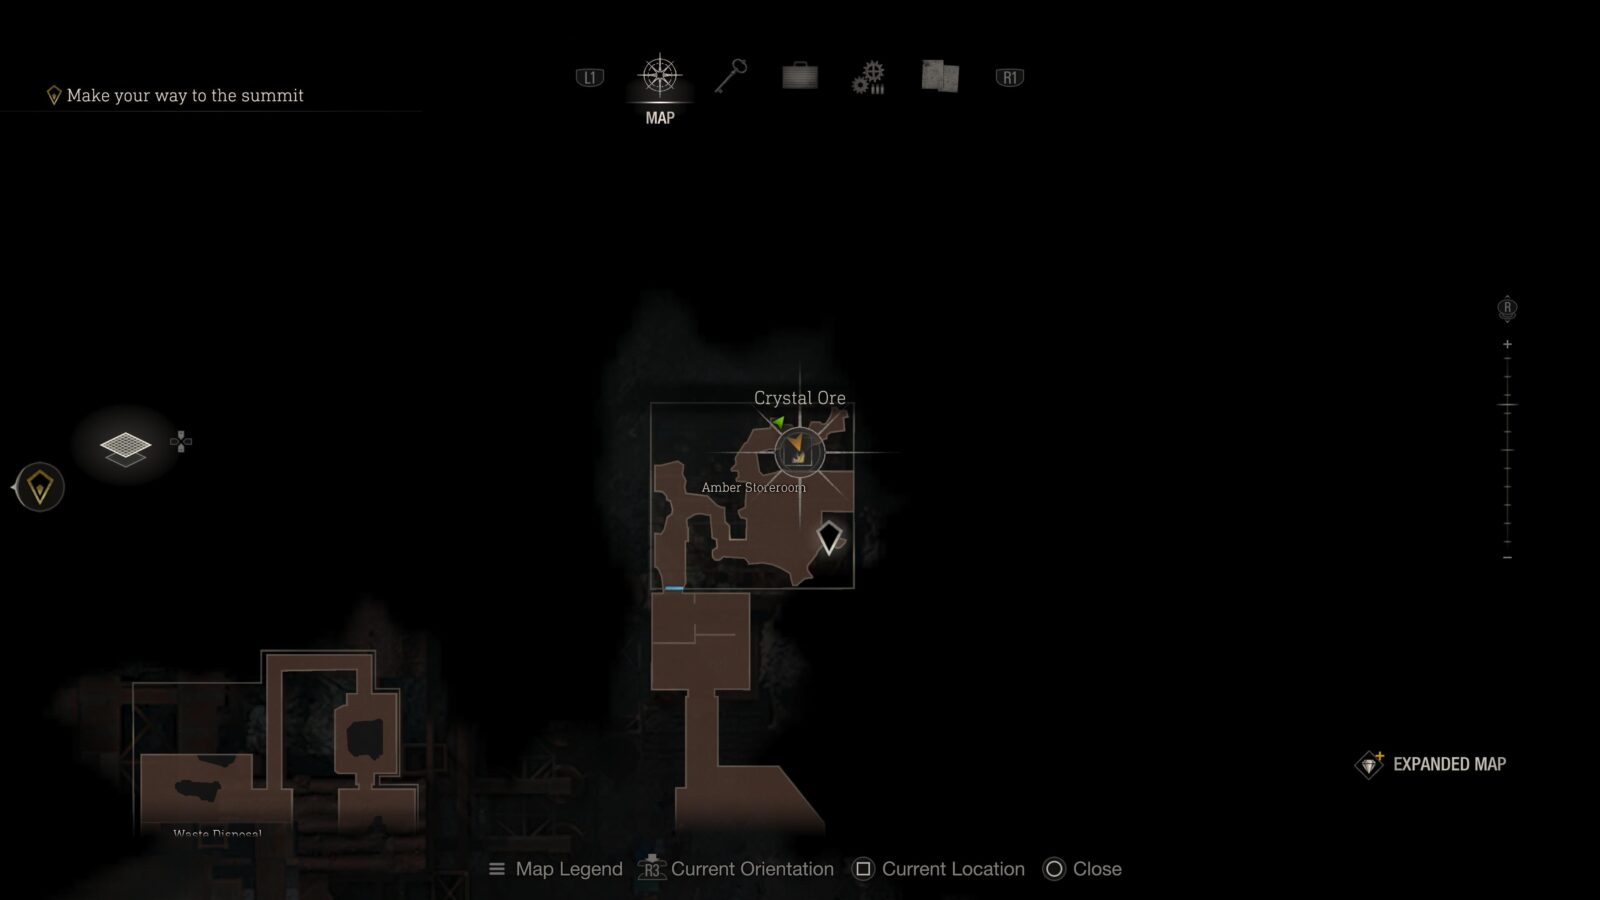
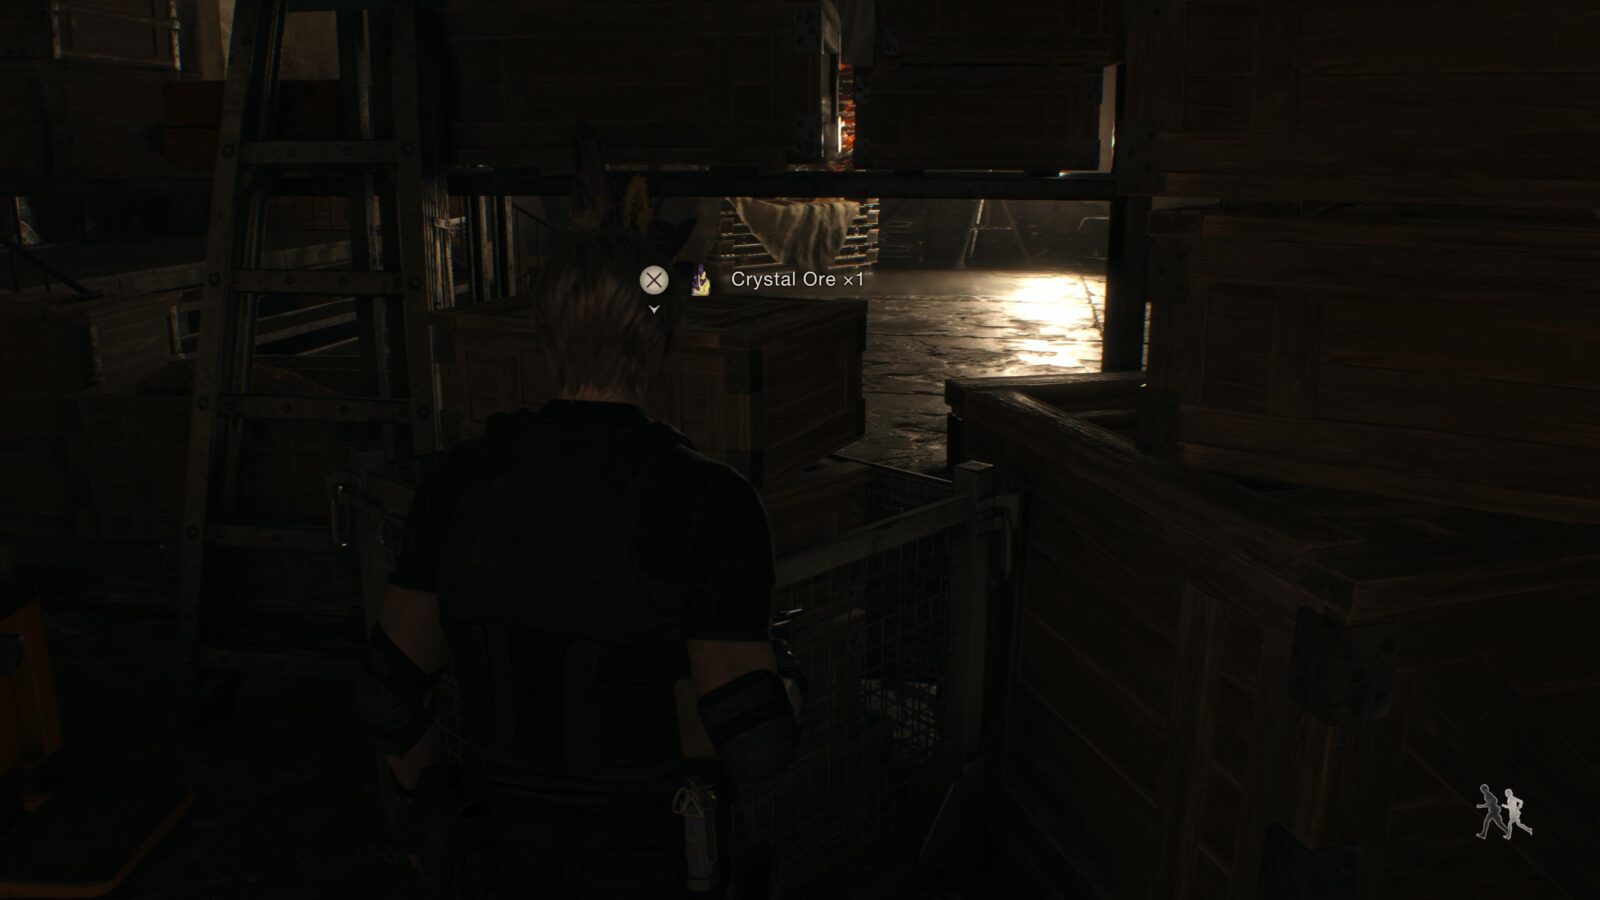
Crystal Ore
In the Amber storage room you will come to a giant amber rock. There is a path to the left that leads behind another amber rock and on your right will be a crystal ore sitting on a wooden crate.
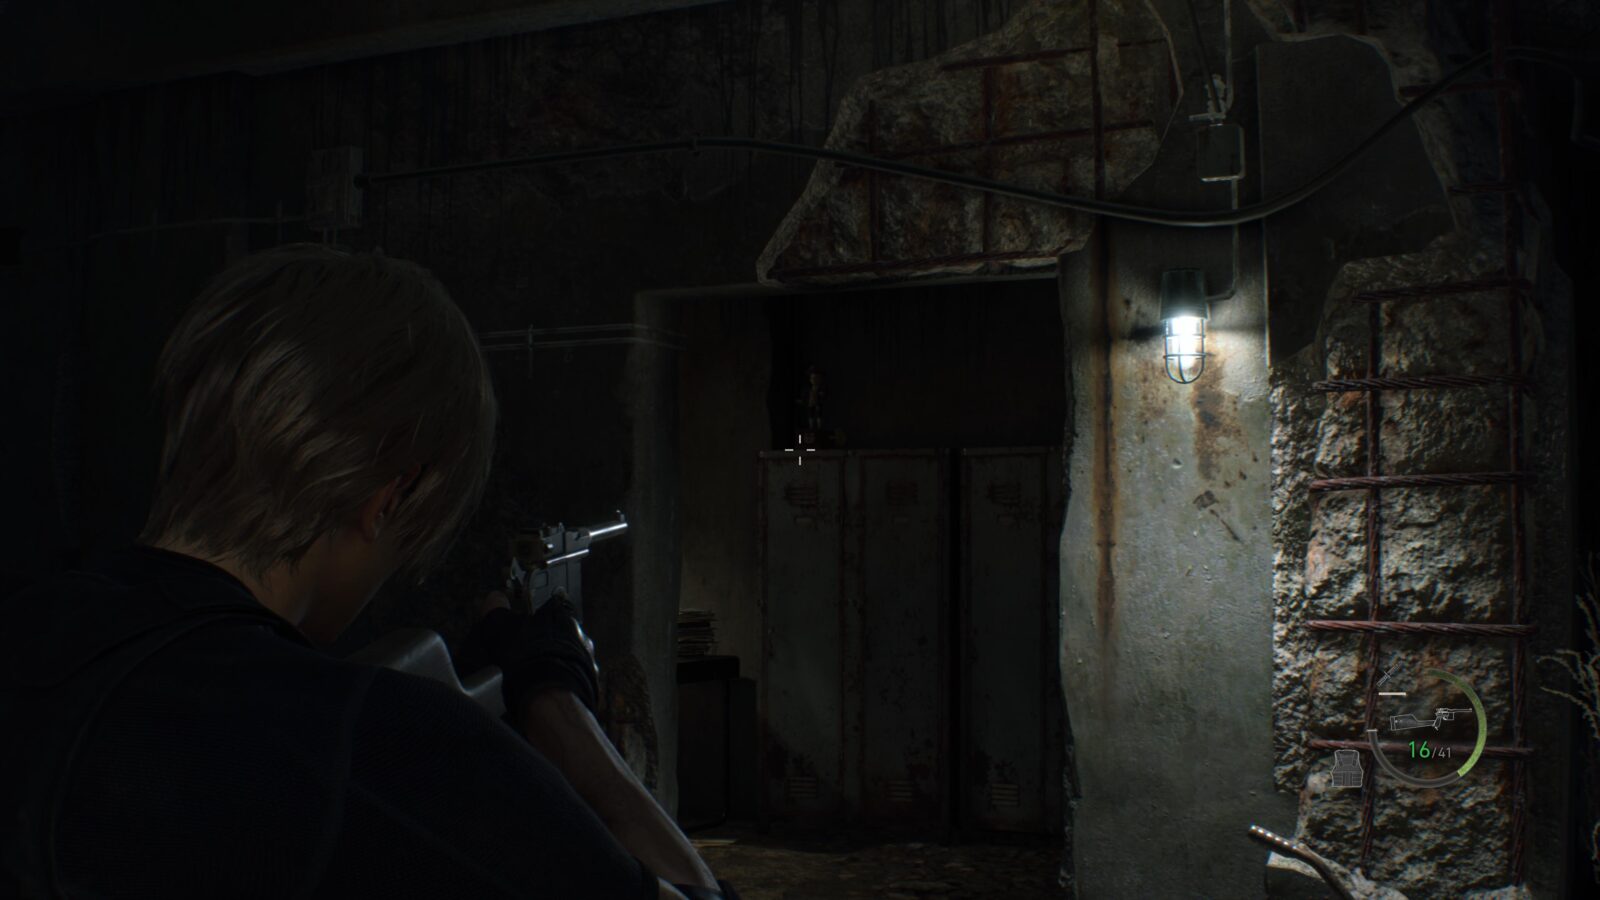
Clockwork Castellan #14
After the cutscene in the Amber storage room you will enter a cave with two tunnels. Follow the one on the right and it will lead to a cliff above the campsite. Behind you when facing the campsite will be a building with some lockers and a castellan sitting on top.
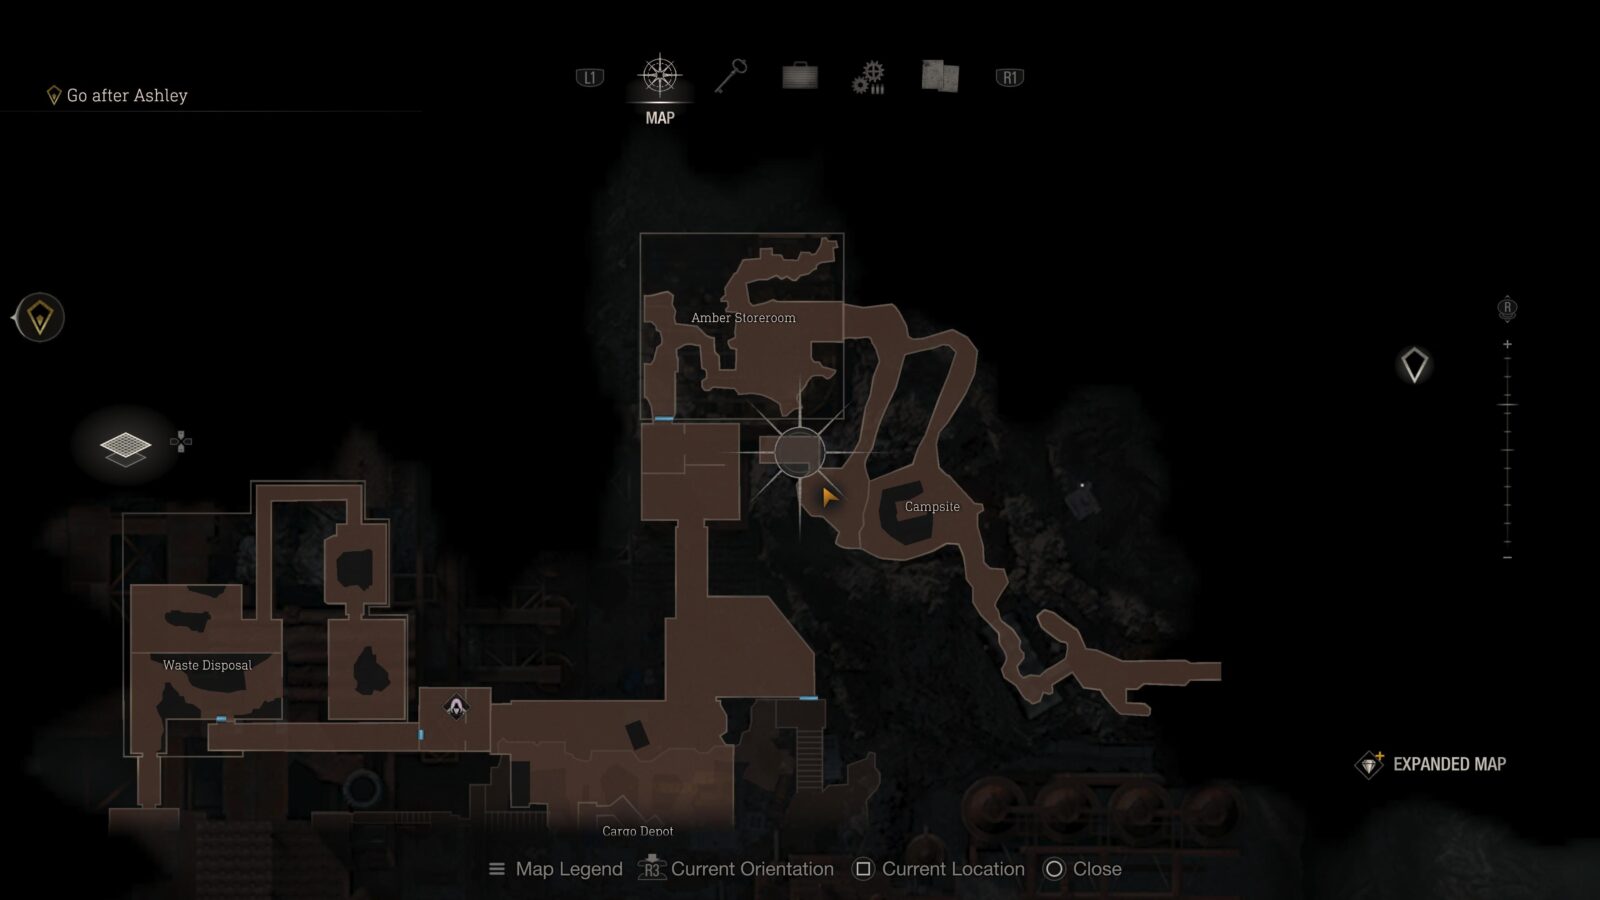
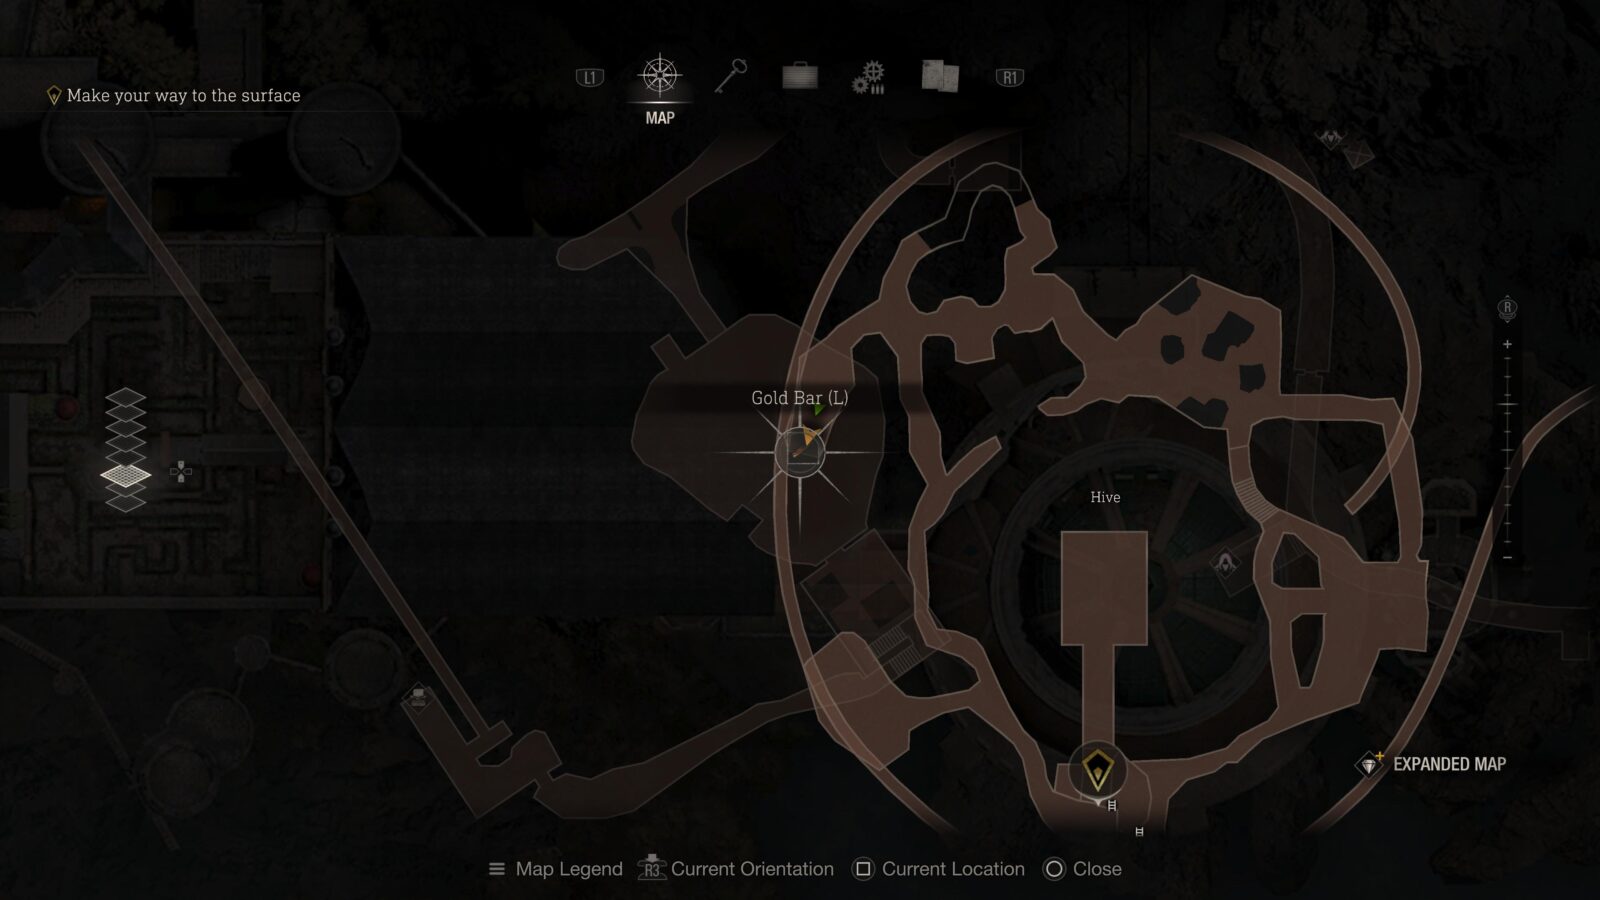
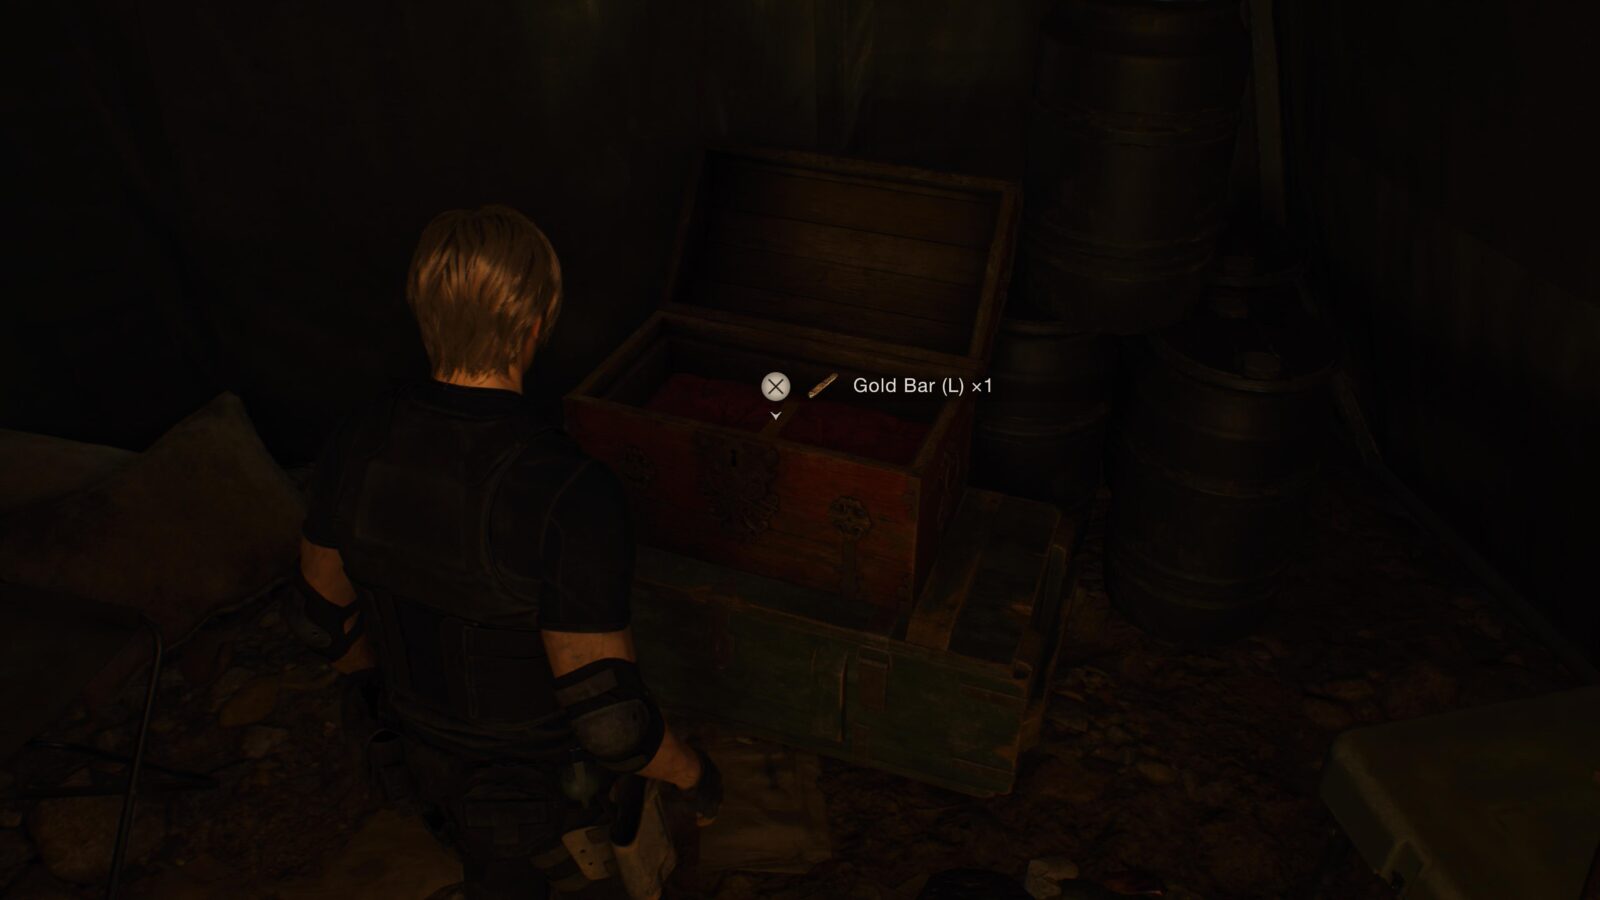
Gold Bar (L)
Drop into the Campsite and go inside the large tent to find a chest with a gold bar inside.

Chapter 15
There are a total of 1 Clockwork Castellan, 1 Shooting Range, 1 Merchant Request, and 4 Treasures in Chapter 15. This chapter also has 2 Expanded Treasures which can only be obtained with the Expanded Treasure Map DLC.
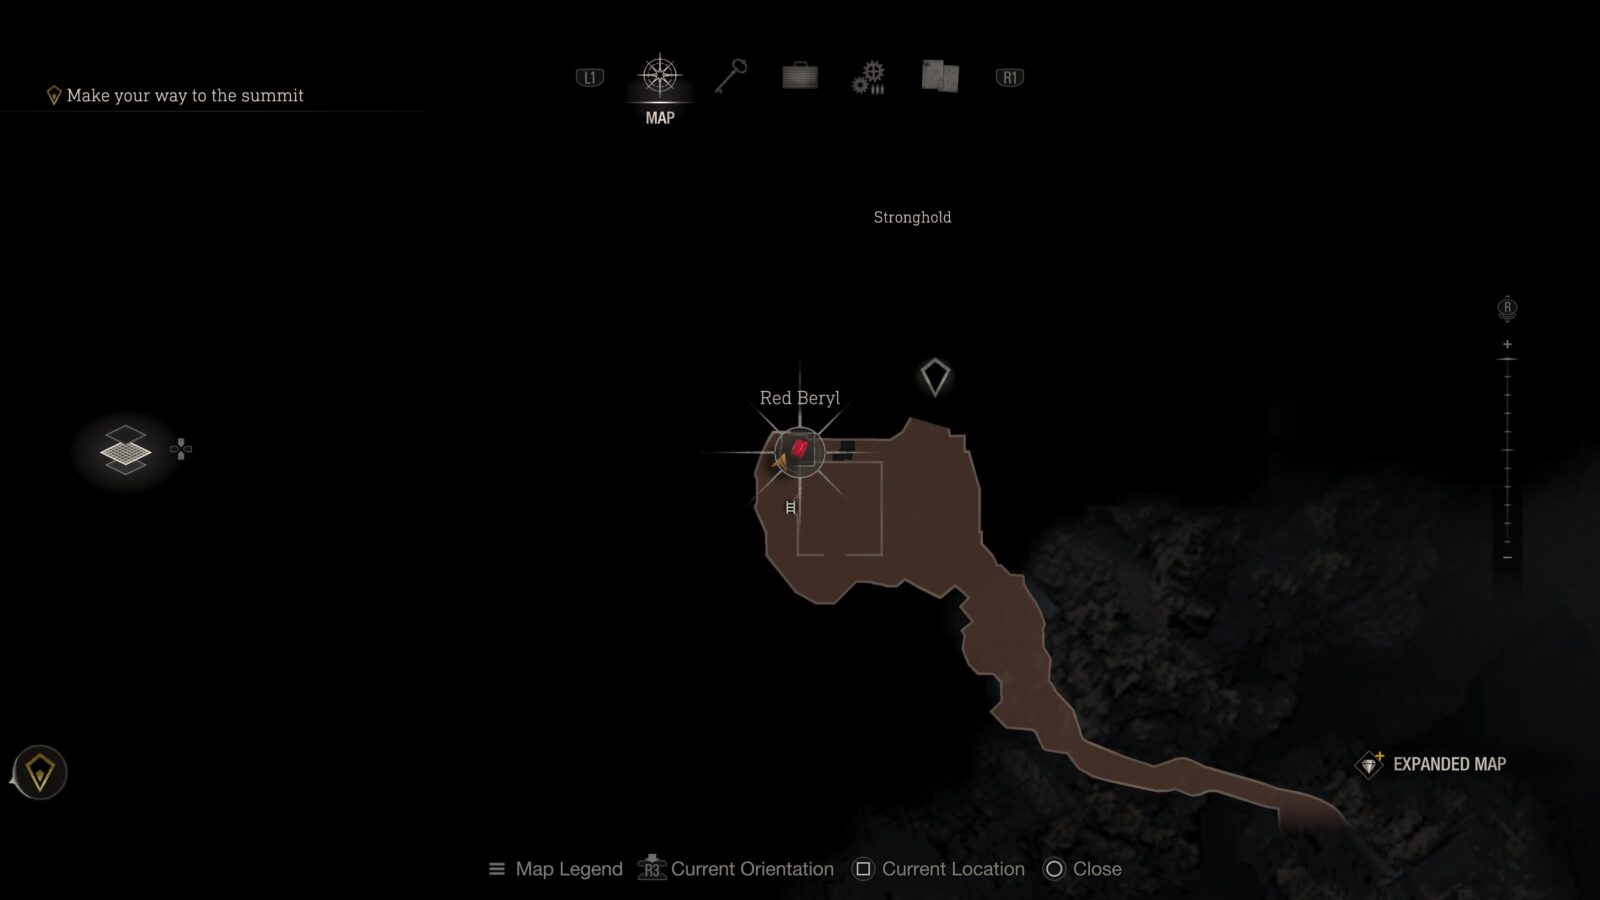
Red Beryl
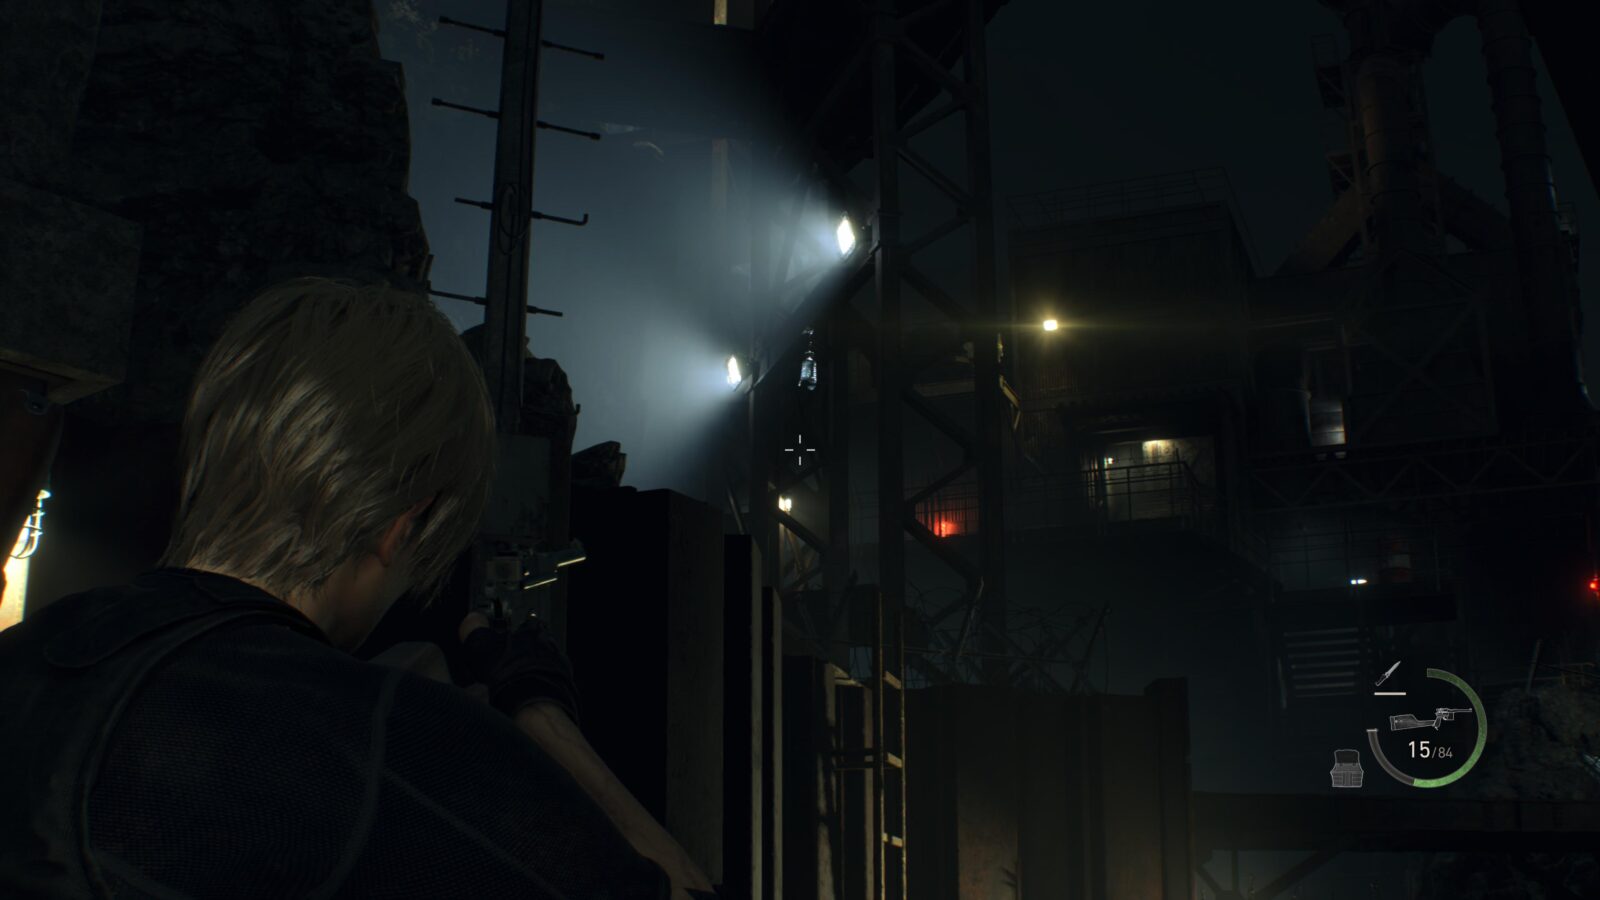
In the area at the start of the chapter where the chopper helps Leon by doing strafing runs there is a house. On the back of the house is a yellow ladder and to the left is a metal cage hanging from the outcropping of the roof.
Velvet Blue
In the next area the chopper will destroy a tower to help you proceed. At the end of this path will be a ladder and above the ladder you will be able to see a metal cage hanging from a metal arch.

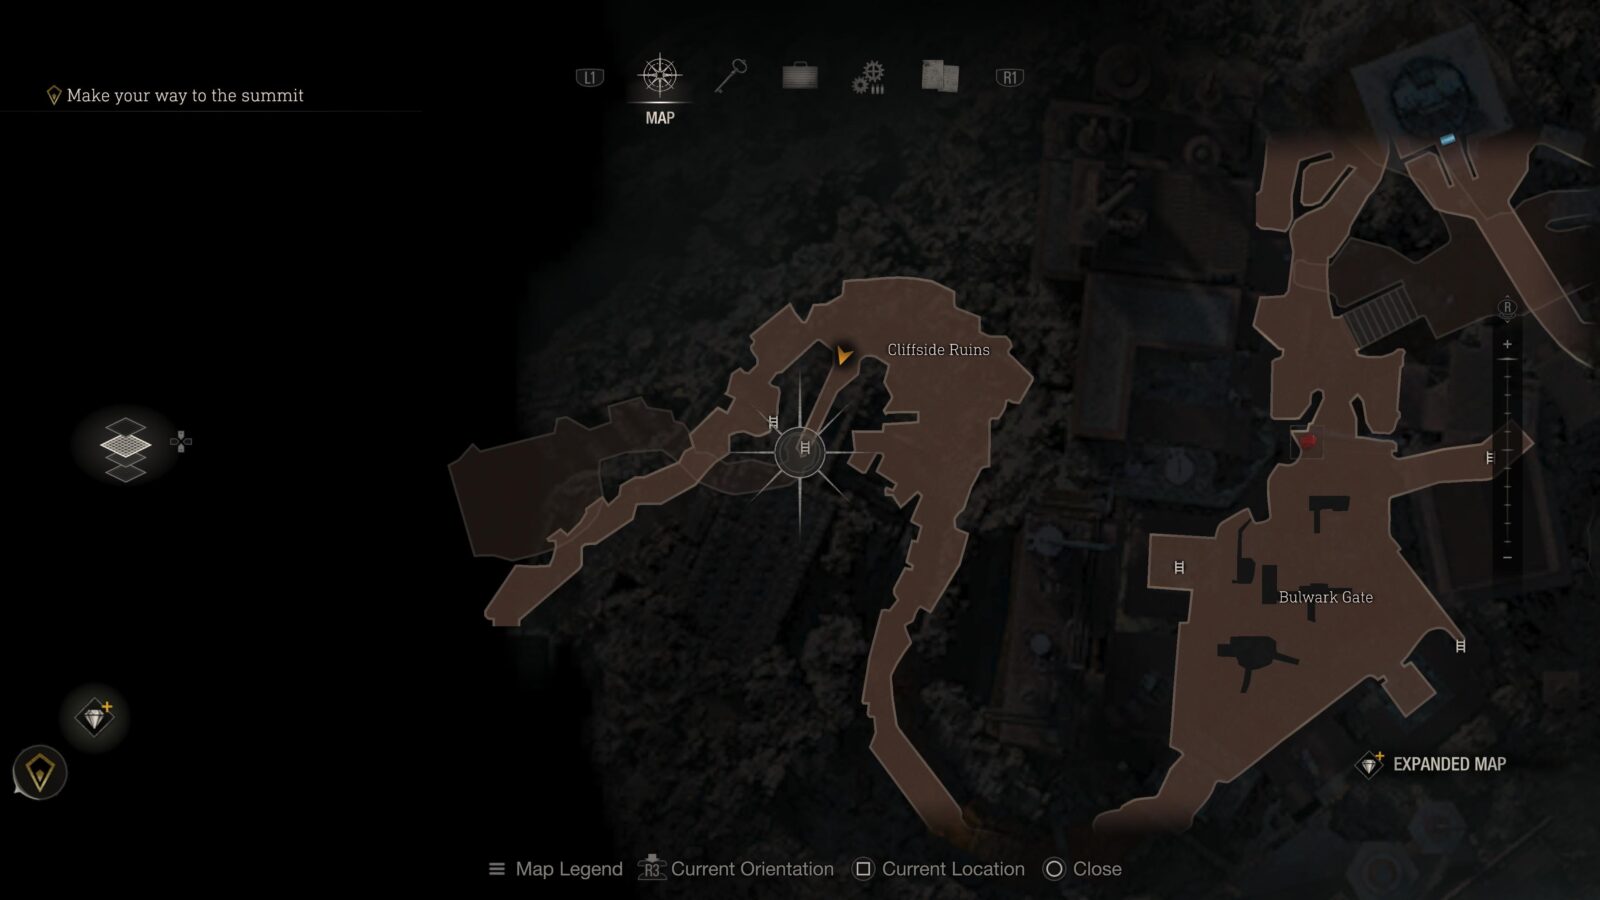
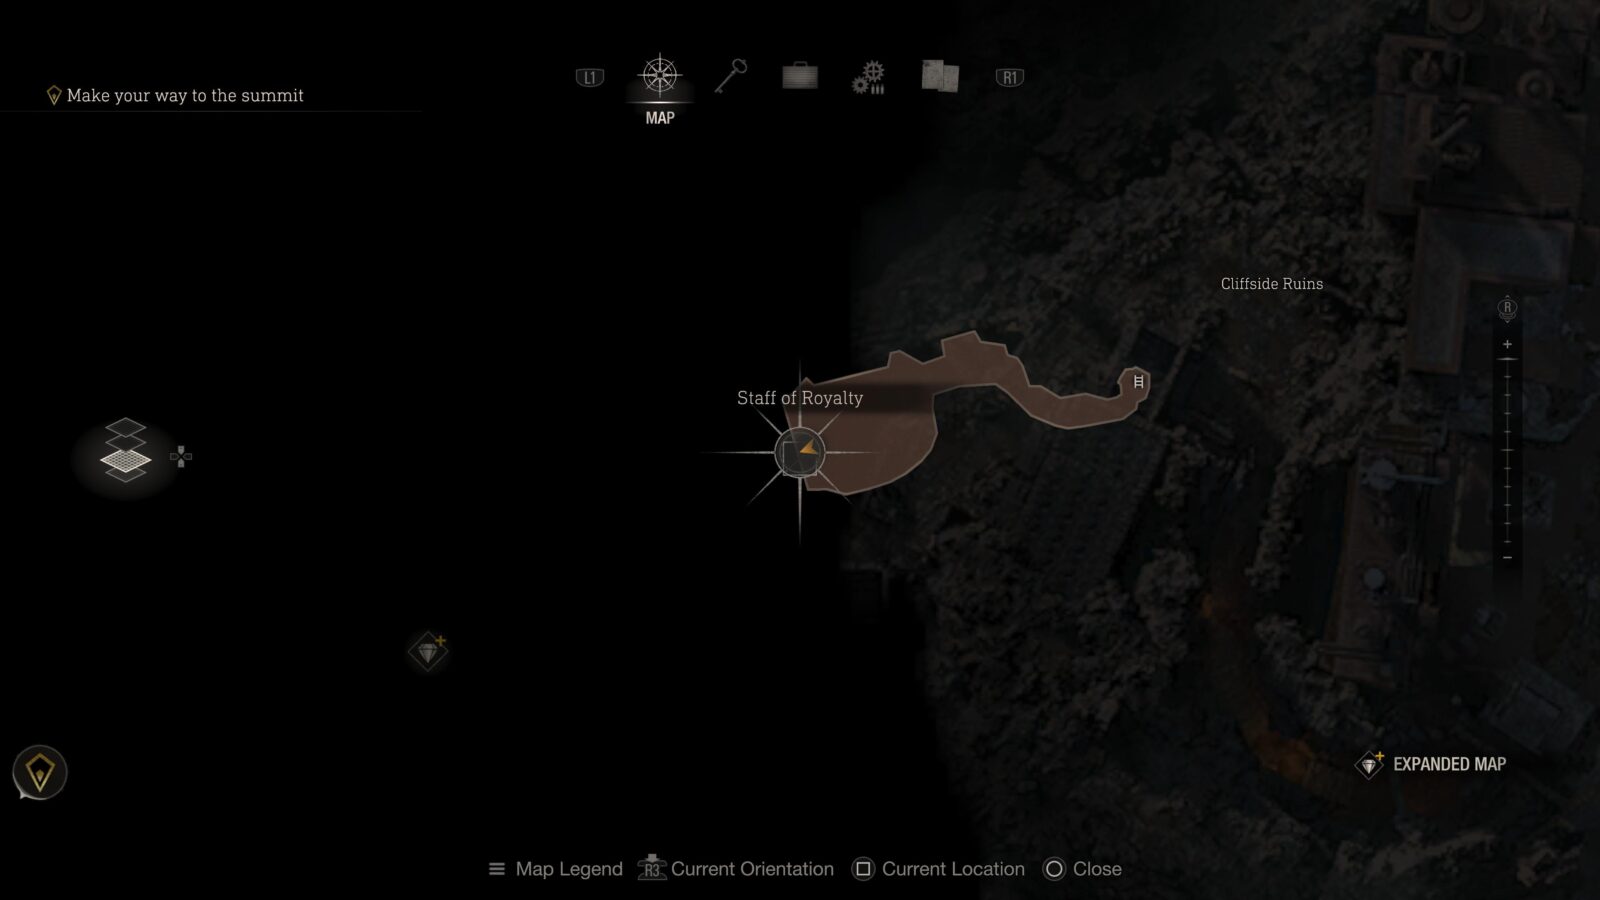
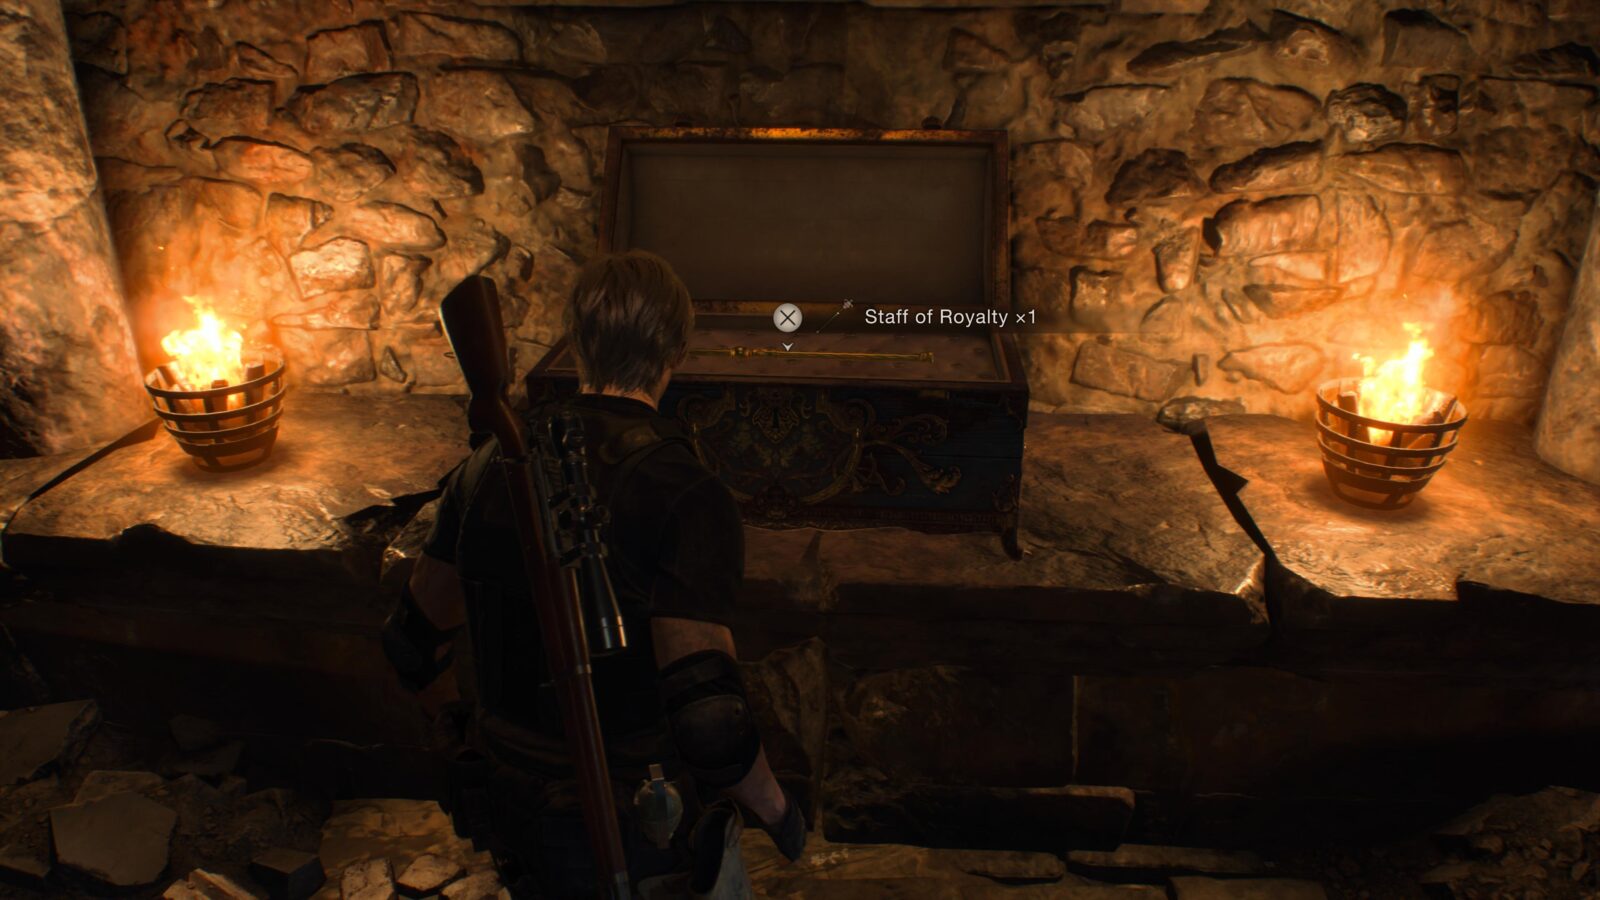
Staff of Royalty
After the cutscene with the chopper pilot, Mike, at Cliffside Ruins you can see a leader in the ruins themselves that leads down. Jump down and follow the path to a chest with a staff inside. If you found the merchant request you went down the wrong path.
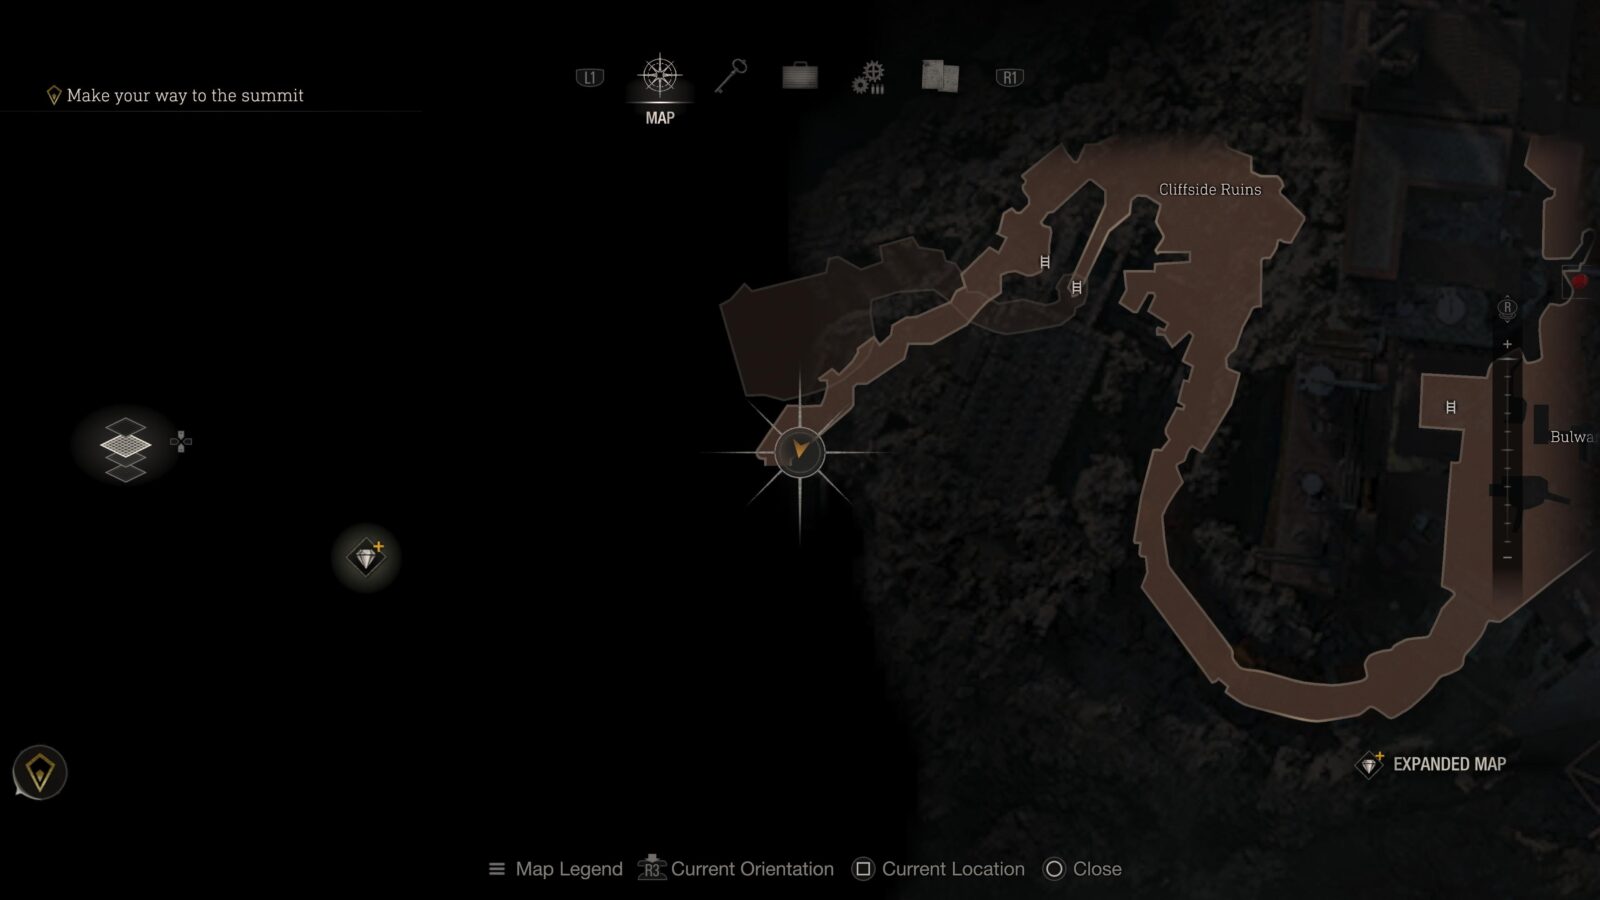
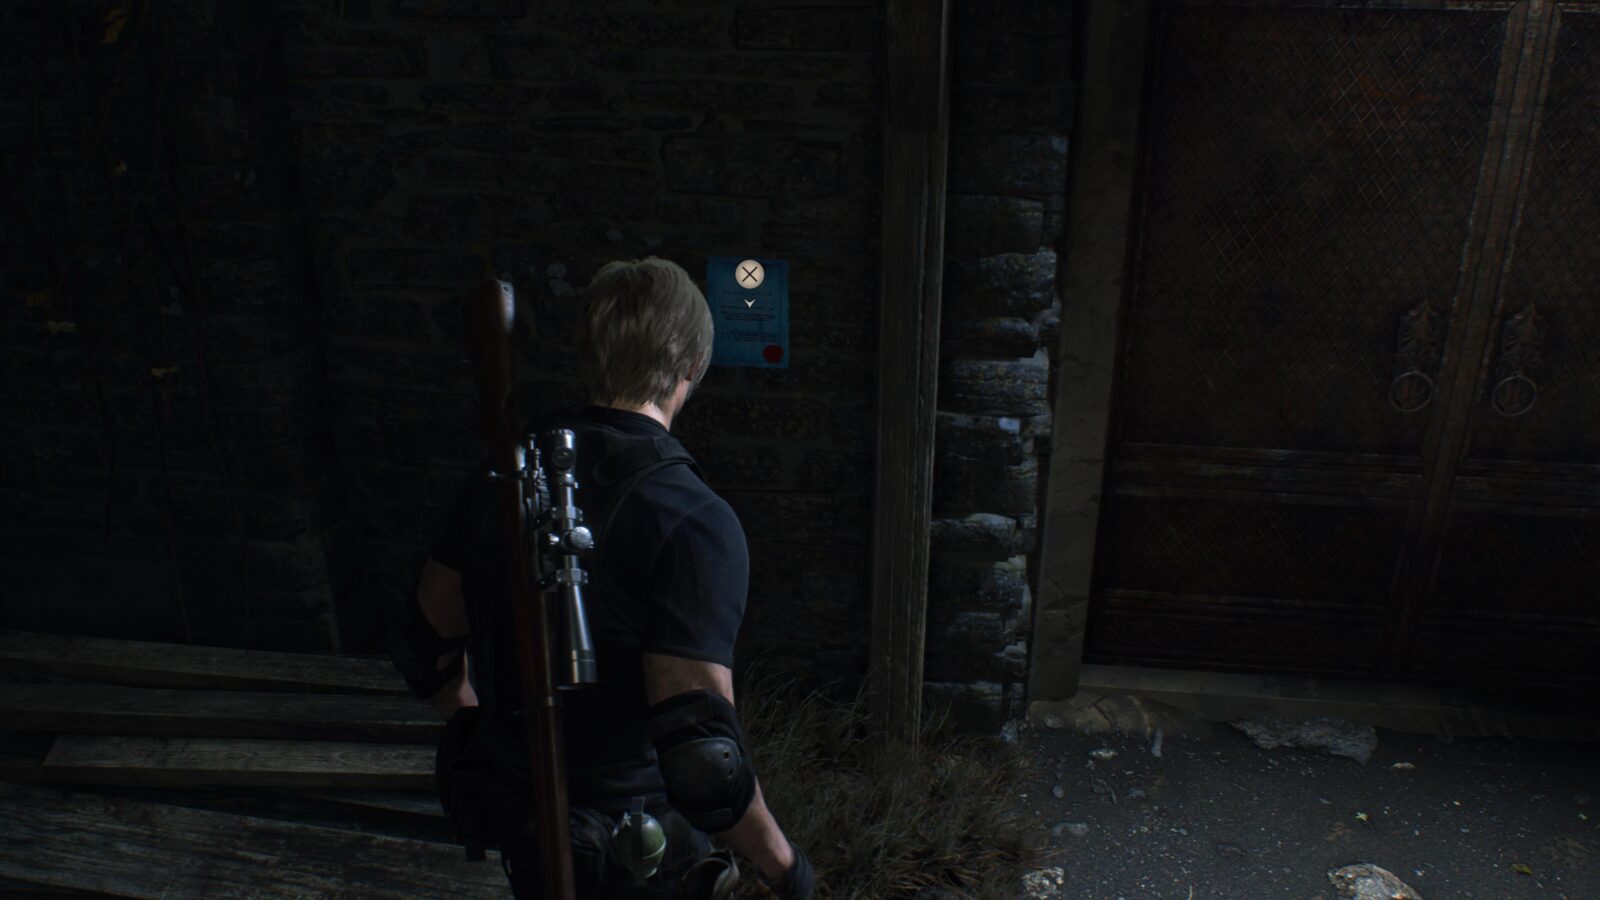
Merchant Request: Destroy the Blue Medallions 6
Go back up the ladders and to the end of the area and you will find a new request pinned to a wall. You have to find and destroy yet more blue medallions.
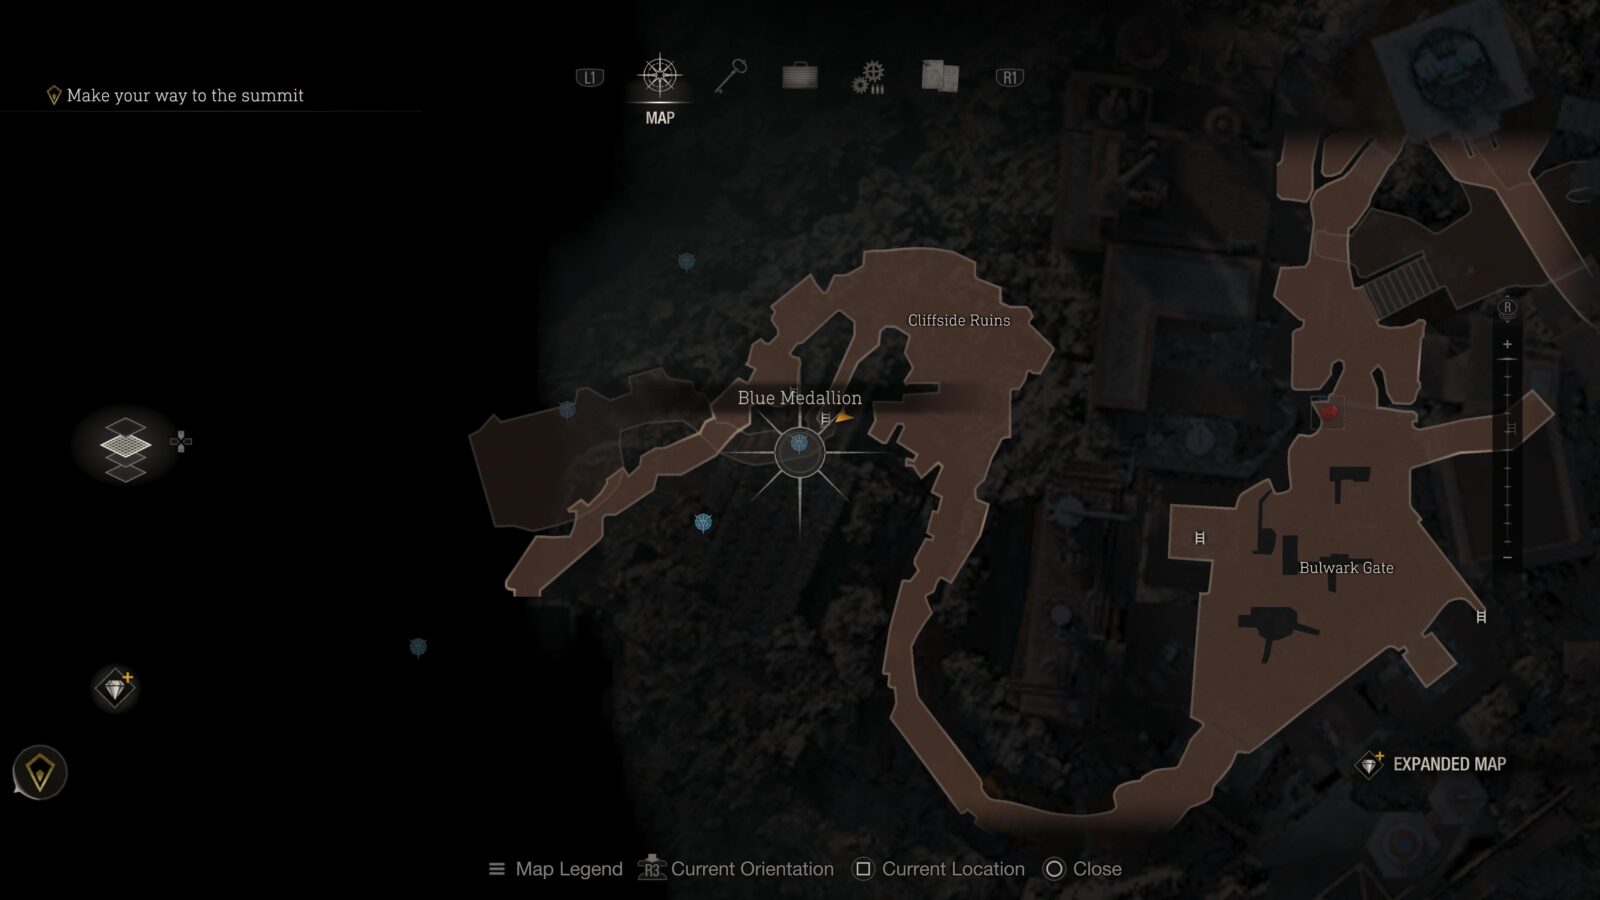
Blue Medallion #1
After picking up the request head back to the ladders that you used to find the Staff of Royalty and jump down them. Head back to the chest and keep out of the windows to your right to find a medallion nestled between some rocks. This one is hard to see and requires a specific angle. Basically you want to get close to the windows and look back towards the path you took to get here to try get an angle on it.

Blue Medallion #2
Climb back up the ladder and look into the archway behind you to find a medallion tucked away to the right.
Blue Medallion #3
Head back towards where you picked up the request but keep an eye out over the cliff’s edge to your right to find a medallion hanging from a broken archway.
Blue Medallion #4
Walk forward some more and look at the scaffolding to your left to find another medallion.

Blue Medallion #5
Above the door where you picked up the request is a tower with a medallion hanging from it. This one is quite a distance and the medallion is hard to see and shoot unless you’ve got a rifle with a scope on you. It’s still possible to soot with a hand gun but you have to be quite accurate.

Clockwork Castellan #15
Head into the next area called Specimen Storage and go into the room to the right of the crank door. Look up and you can see some wooden beams with one of them hiding a castellan.


Splendid Bangle
In the same room as Clockwork Castellan #15 is a chest with a bangle inside.


Silver Token (Expanded Treasure)
In the room before the Merchant and Typewriter is a metal cage hanging from the ceiling. This is only available to those who have the Expanded Treasure Map DLC.

Shooting Range
The final Shooting Range in the game is next to the merchant at the end of the chapter, however, this one doesn’t add any more challenges. If you still haven’t achieved S Rank in all challenges then now is your final chance to do so.
Red Beryl (Expanded Treasure)
Right before the door to the Sanctuary where they’re keeping Ashley look to your left and up at the ceiling to find a metal cage. This is only available to those who have the Expanded Treasure Map DLC.


Chapter 16
There are a total of 1 Clockwork Castellan, 1 Trophy Opportunity, 3 Merchant Requests, and 3 Treasures in Chapter 16. This chapter also has 1 Expanded Treasure which can only be obtained with the Expanded Treasure Map DLC.
Velvet Blue
Leave Luis’ lab and boost Ashley up to the catwalk on your left so she can kick a ladder down. Once up there look at the ceiling in the middle and above the catwalk to find a metal cage.
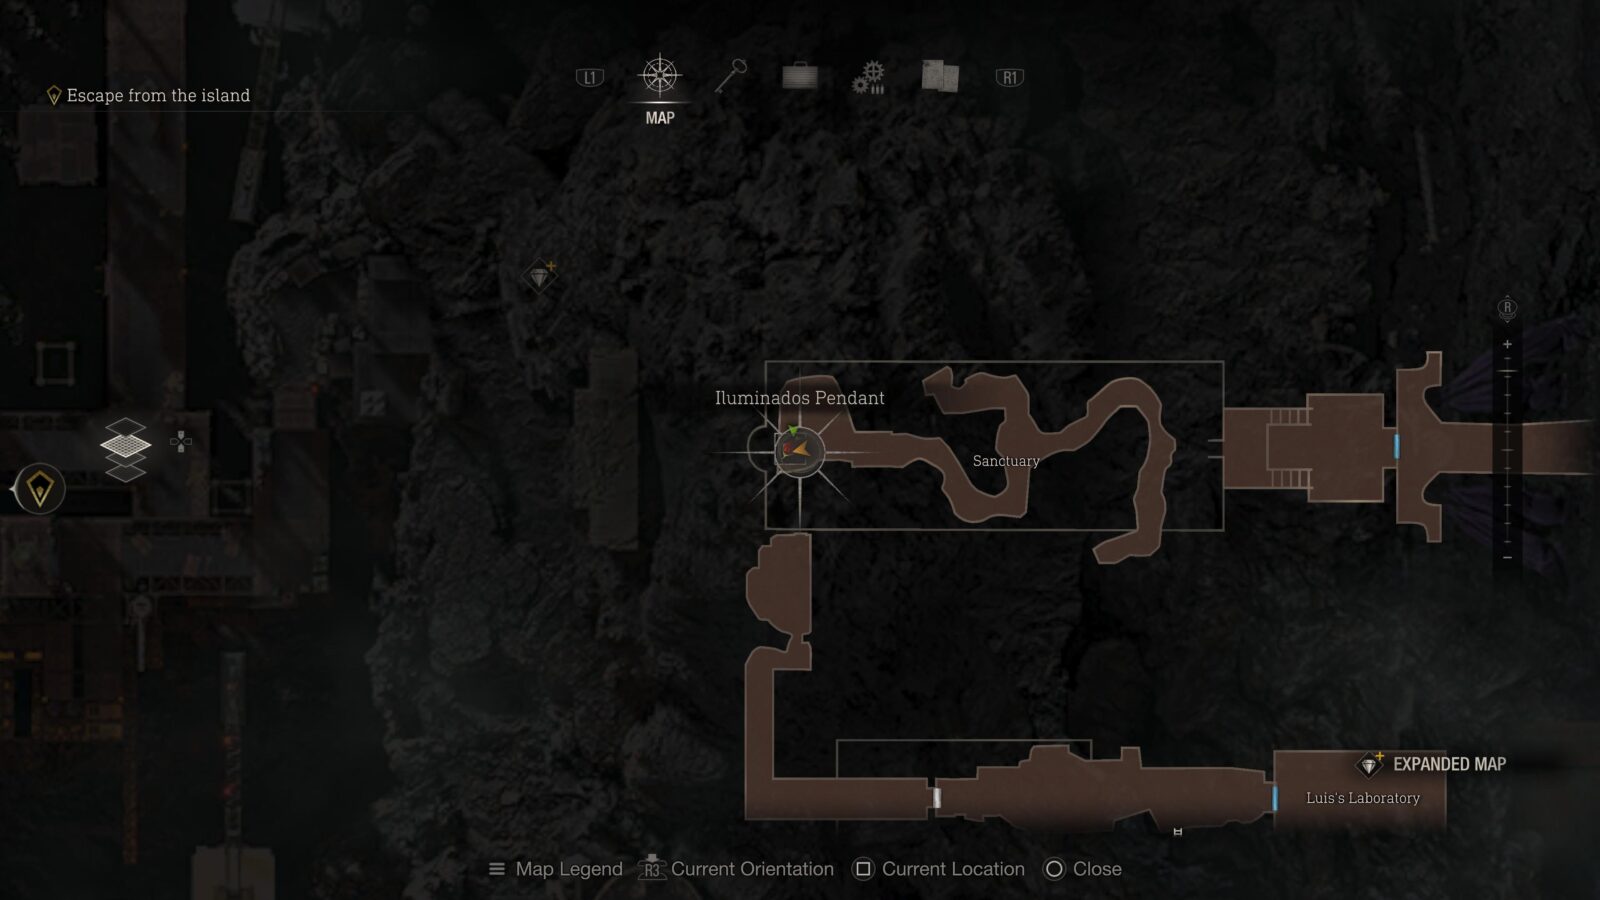
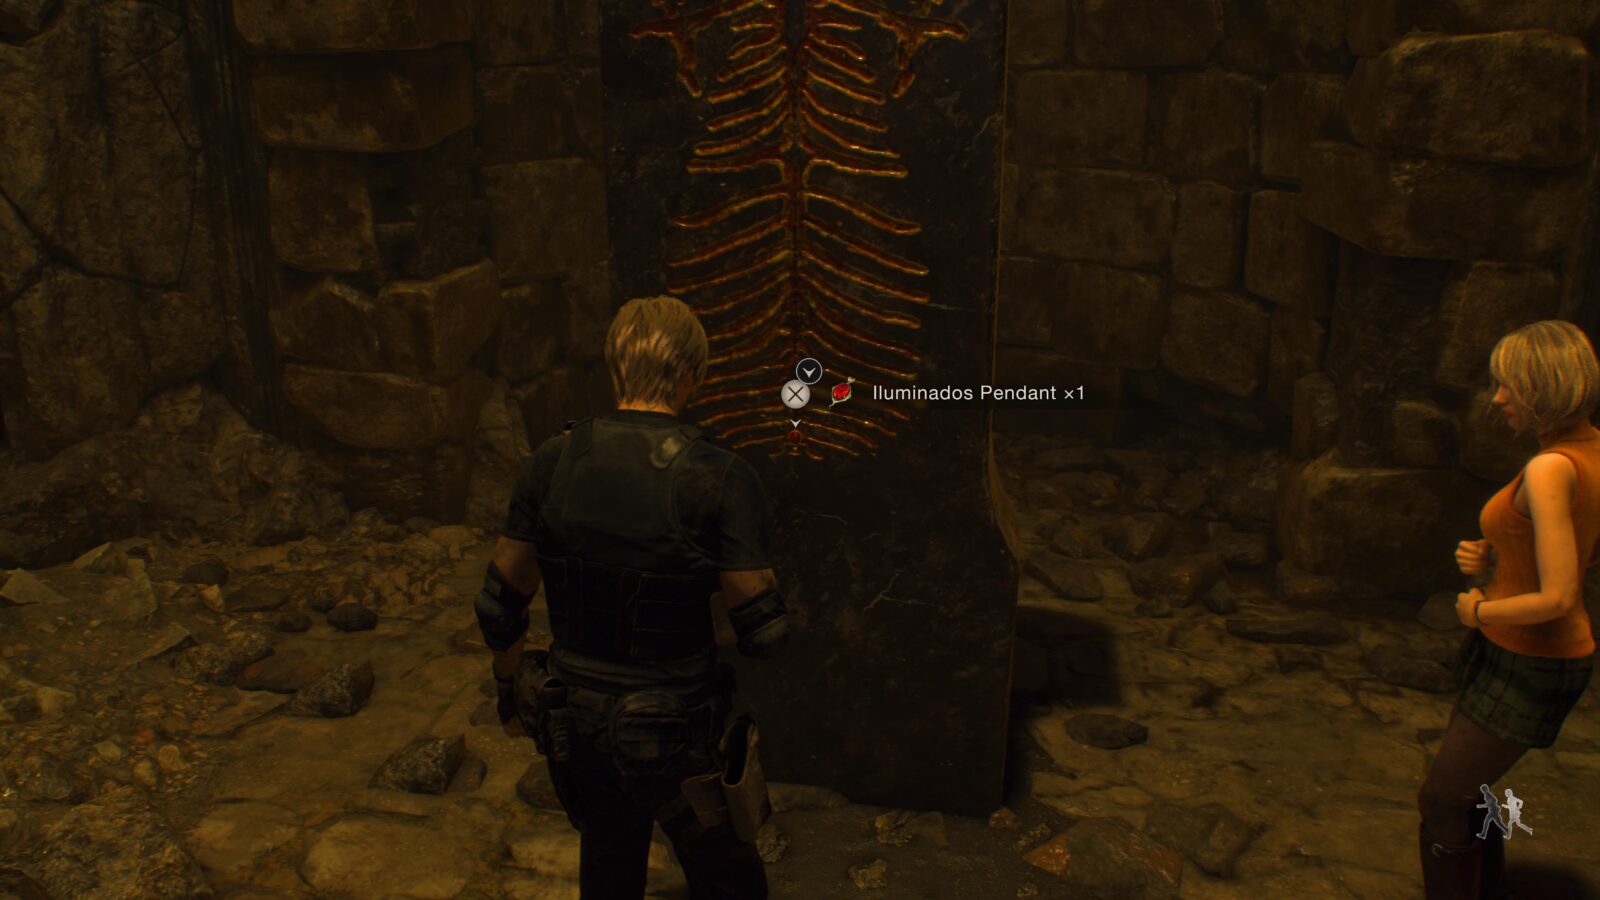
Illuminados Pendant
Enter the Sanctuary and proceed through the rubble until you see a gap you can crouch under on your left. This will lead to where Ashley was laying on the slab and there will be a pendant on the monolith behind it.
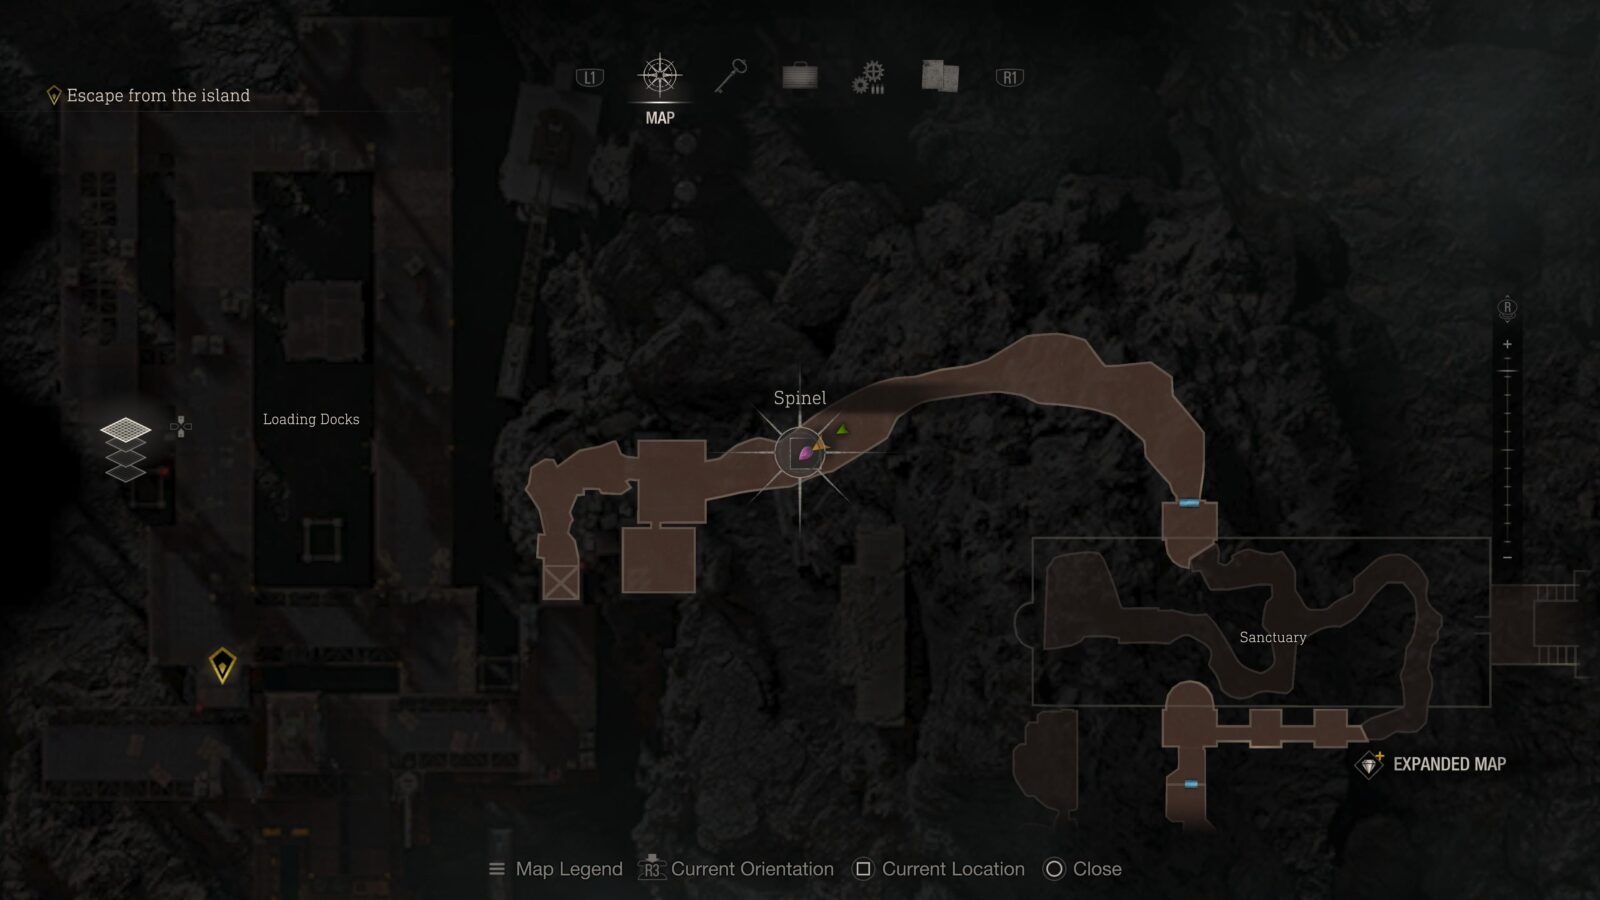
Spinel (Expanded Treasure)
In the tunnel before reaching the Merchant is a metal cage hanging from the ceiling. This is only available to those who have the Expanded Treasure Map DLC.

Gold Ingot
In the Merchant room is the final treasure in a chest. Once you pick this up the Burglar trophy should unlock.

Merchant Weapons & Parts
As this is the final Merchant in the game you should now purchase any weapons and weapon parts you don’t yet have from the merchant and also trade your spinels in for the Matilda, Matilda stock, Scope, and TMP stock etc.
Manual Save
Make a separate manual save here at the final merchant so that you can reload it and fully upgrade the Primal Knife once you have finished the story. Once the knife is fully upgraded you can finish the chapter again and load this save to start a New Game+ save with the indestructible knife already in your inventory.
Clockwork Castellan #16
You will have to be quick with this one as it appears during the timed section post-Saddler boss fight. In the room where all the enemies are writhing on the ground there will be a stack of wooden crates behind a forklift in the North-West part of the room. On the crates is a castellan.
Smooth Escape (Trophy)
During the Jet Ski escape section you are not allowed to take any damage in order to unlock this trophy. Just like the lift trophy you can press options ![]() and reload your autosave if you take any damage.
and reload your autosave if you take any damage.
Thanks for Reading
Plat Get!
Thank You!
Thank You for choosing PlatGet as your source for this Resident Evil 4 Remake Collectibles Guide.
Wondering what to complete next? Browse our complete guide selection or check out our friends at PlatPrices.com to filter the PS Store based on price, trophy difficulty, or completion time.
Got a question, some feedback, or just want to say thanks? Drop a comment in the discussion section below, we'd love to hear from you! No account required!!