
PlayStation 4
Biomutant Trophy Guide


General Info
FAQ
How long does it take to beat Biomutant and unlock all trophies?
Around 25 Hours.
How difficult is it to beat Biomutant and unlock all trophies?
Easy (3/10).
Does Biomutant have online trophies?
No.
Does Biomutant have difficulty-specific trophies?
Yes.
Does Biomutant have missable trophies?
Yes, That's Mine, Snack-Time, Mariner, Gumshow.
Does Biomutant have glitched trophies?
Yes, Toytinkerer.
What is the minimum number of playthroughs required to unlock all trophies in Biomutant?
One.
Does Biomutant have a Platinum Trophy?
Yes.
Other Useful Guides:
Biomutant Side Character Location Guide
Biomutant Old World Gadgets Location Guide
Trophy Guide
Biomutant Trophy Guide and Road Map for PlayStation 4
Biomutant is a unique open-world RPG where you use a complex character creator to create a bestial protagonist. Your choices in the character creator will even influence your character’s base stats! Through this Biomutant Trophy Guide, we aim to show you the smoothest, most pain-free route to the Biomutant Platinum Trophy.
Biomutant Trophy Guide – Before You Begin
Post-Game
Biomutant has no post-game. If you finish the story and then load your save, it will be treated as a New Game Plus save and you’ll be put back at the start of the game. This can be irritating as it means doing various story objectives again to be able to access everything you might need for the Platinum Trophy.
One way around this is to load a previous save to bring yourself back to a point before you finished the game, and can still roam freely. However, I believe the best solution is to simply avoid completing the game until you have collected every possible trophy.
Missable Trophies
There are four World Eater boss fights in Biomutant, and each one has a trophy tied to it. To unlock these trophies you will need to perform certain actions in each fight. They’re not easy to miss, but in the event that you do, you would need to start a new game just to have the opportunity to fight each boss again.
To avoid that (and the obvious pain in the rear it would be), you should save before heading into any boss fight. This way, if you miss one of the trophies, you can just load your save and attempt to get the trophy again.
Bugged Trophies
UPDATE: The game has since been patched, fixing all bugged trophies. I have left the below information intact for referencial purposes, but if you just ensure your game is up-to-date you won’t have any issues.
There are two trophies which have become bugged since the v2.01 patch, which originally worked fine on v1.01.
I imagine it won’t be long until a new patch is released to resolve this issue, but for the time being only those with disc-based copies of the game can avoid the bugs. Those of us on digital copies of the game must wait for a fix to be released.
If you have Biomutant on disc, disconnect from the internet to prevent it from updating and then play it freshly installed on v1.01.
One of the trophies affected is Old World Gadgets which asks you to find 15 relics of the old world. For some reason, since v2.01, the trophy will no longer unlock no matter what you do.
The other affected trophy is Toytinkerer. If you started your save on v1.01 and then updated to v2.01, the character you need to meet for this trophy will no longer spawn. However, if you started your game on v2.01 you have nothing to worry about, and the associated bear character will still spawn as normal.
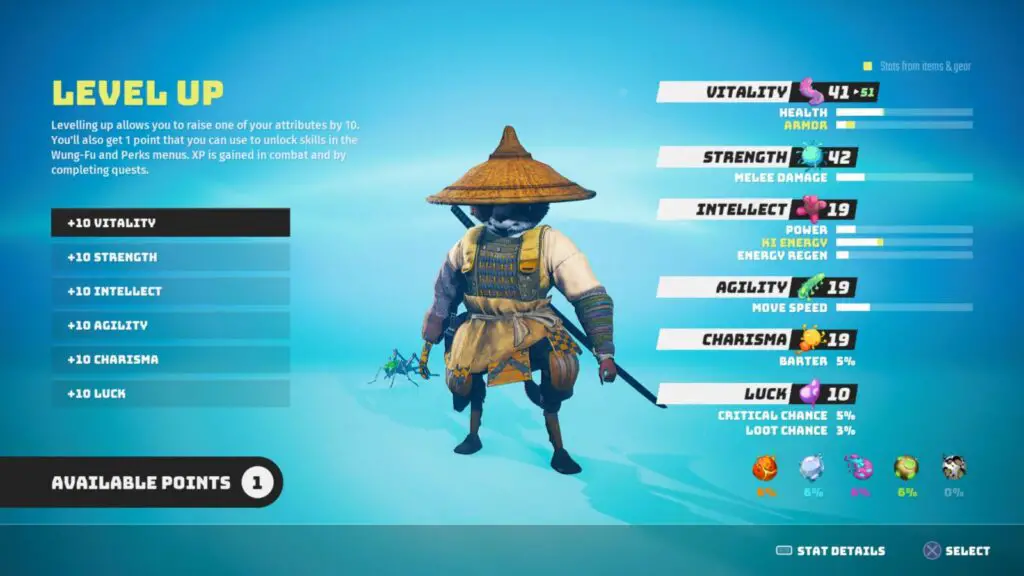
Upgrade Points
There are three types of upgrade points you can earn in Biomutant; Upgrade Points, PSI Points, and Bio-Points. Additionally, there are 4 trophies tied to these points that you do not want to miss.
In order to unlock them all, you should do the following:
- Save 16 Upgrade Points for Pew Pew! and Hack n’ Slash (32 if you don’t use the save trick detailed in Pew Pew!)
- Save 16 PSI Points for Electrified
- Save 14 Bio-Points for both Stick it to Them and Sproing!
If you do not want to let the trophy list dictate how you spend your hard-earned points, then you should save all of these points up, save the game, spend the points on the required skills (use those skills as needed) to unlock the trophies, and then load your save to spend your points however you want.
Tribes and Choices
You will be able to make many choices in Biomutant, including which Tribe you want to ally with. Additionally, each choice can have an effect on whether you’re considered a “Light” character or a “Dark” one.
I just wanted to let you know that none of these choices will affect trophies, you have total and utter freedom in that respect and can enjoy the game’s story and choices as you see fit.
Strongest Weapon
The “Pri Murgel” sword is the rarest weapon with the highest damage output in the whole game. Something which will benefit you immeasurably. Due to the open-world nature of the game, you can grab this quite early in the game.
To start the side quest leading to this weapon, head to these map co-ordinates: X: 144400, Y:-174400 in the southeast corner of the map. You will need the Googlide to cross the water, which you’ll get as part of the story, and at least a Level 2 Engine part.
There, you’ll find a lighthouse called Lumentower. Reach the top of the tower, and a side quest will start, which asks you to interact with the light at the top. Simply follow the waypoints for this side quest to find the Pri Murgel weapon in a cave. Interact with the three sets of runes in the room (from left to right) and then you’ll be able to grab the sword.
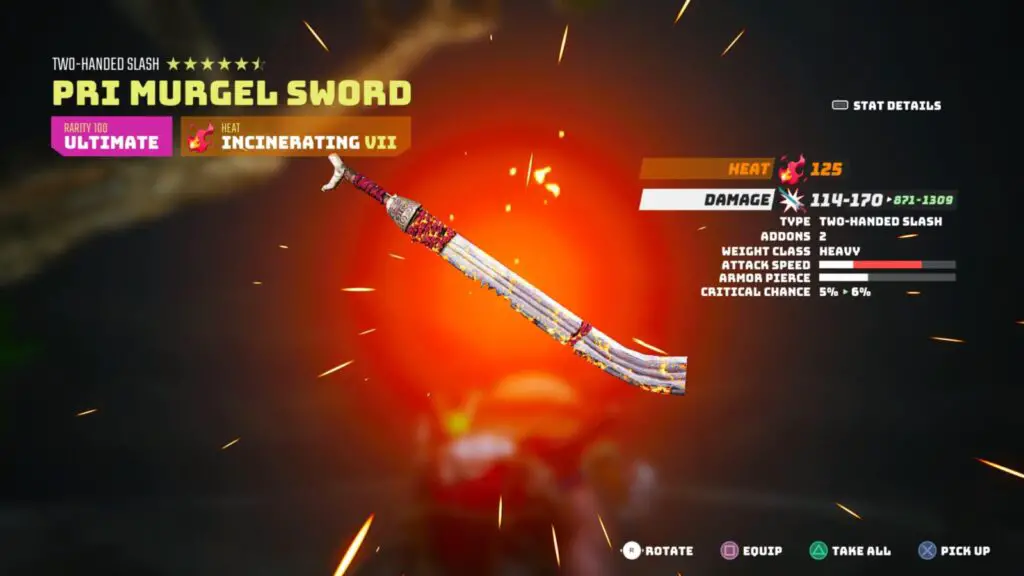
You can make this even more powerful by then tacking on some 1-star Add-Ons. Pri Murgel has two upgrade slots so you can equip up to two add-ons. If you do add two 1-star Melee add-ons to Pri Murgel it will be a 7-star sword and you’ll unlock Starstruck.
Naturally, you should aim to do all this as soon as you can, which should be shortly after visiting Gumquack Hollow for the story.
Phase One – Play the Game!
In this first phase of our Biomutant Trophy Guide, due to the open world nature of the game, you can earn every trophy in any order you like, and enjoy the game along the way!
There are a few things I would recommend keeping at the back of your mind as you play through the game, but other than these you can just play as you like and unlock the trophies in any order you wish:
- Save your Upgrade,, Bio, and PSI Points as instructed here.
- Save the game before each World Eater Boss Fight as instructed here.
- Look out for a bear character holding a lantern. You will need to speak to him 4 times. His appearance is random and entirely luck-based so you should jump at any opportunity to speak to him for the Toytinkerer trophy.
- Use your “Super Wung-Fu” ability as often as you possibly can. You’ll need to use it to defeat 50 enemies for Wung-Fu Master and leaving it too late can easily result in a very long end-game grind.
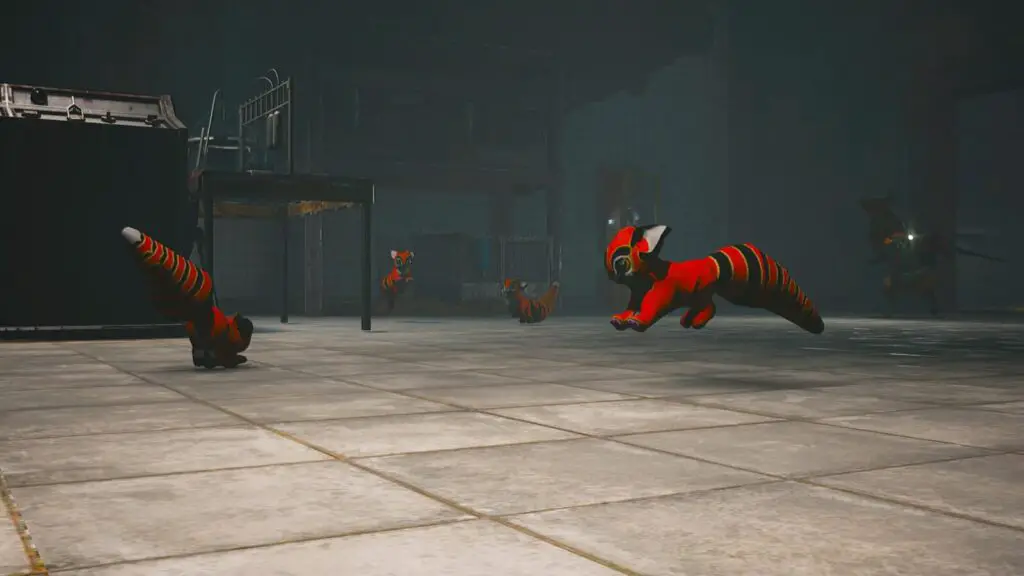
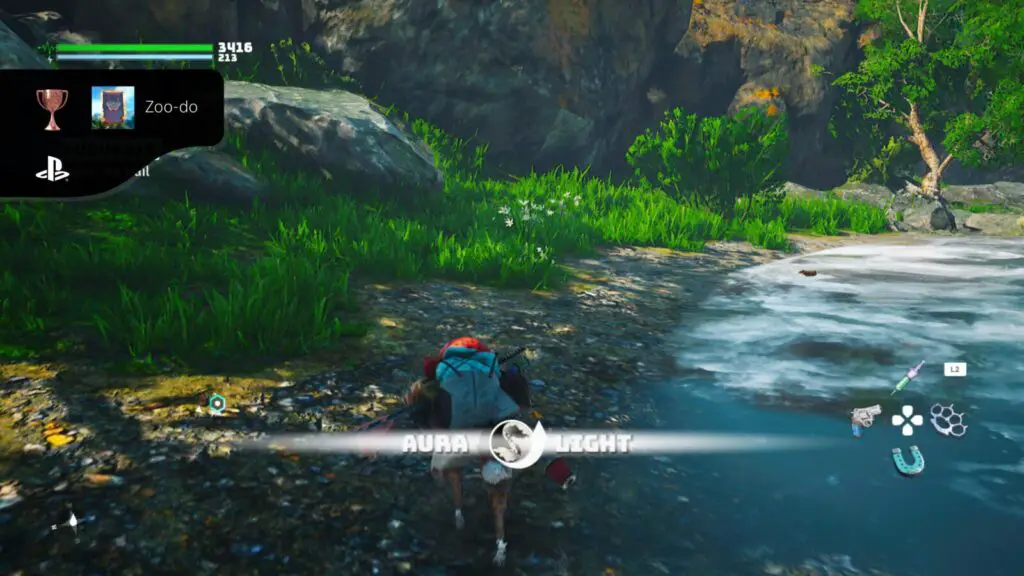
- Keep your eye out for little critters. There are 5 types of creatures you will need to catch multiple times in order to unlock their associated trophies; Sqvips for Zoo-do, Glittermoths for Bugologist (look for these especially, there’s no farming spot for these so finding 20 can take hours), Pippis for Flap-flap, Guppos for Angler, and Gumquacks for Quack.
Main Story Trophies
The trophies in this portion of our Biomutant Trophy Guide are all to do with completing the main story. They are not all unmissable, so be sure to give them a once-over at the very least.


The Adventure Begins
Escape Bunker 101
This trophy is totally unmissable and will unlock when you complete the tutorial at the start of the game.

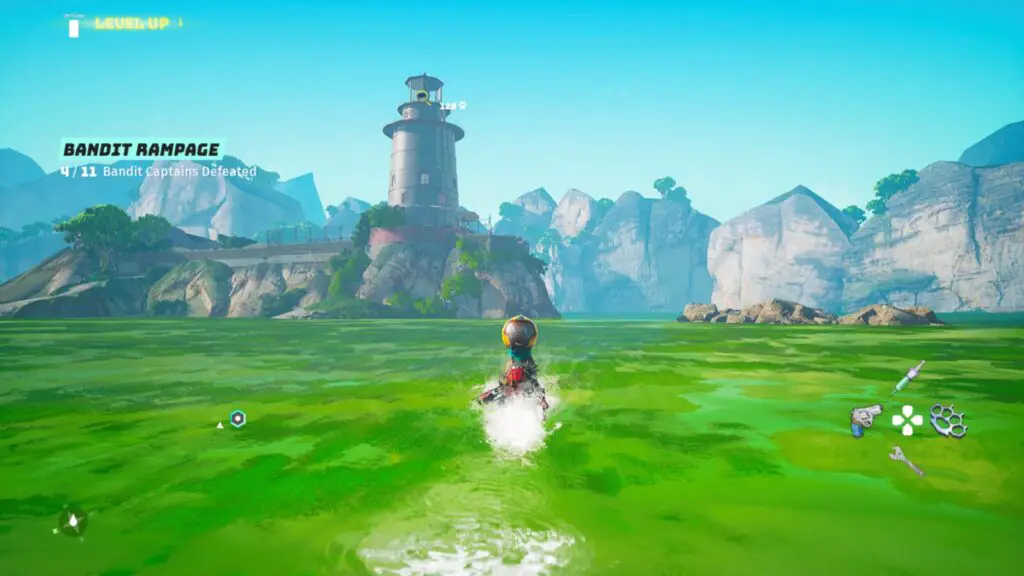
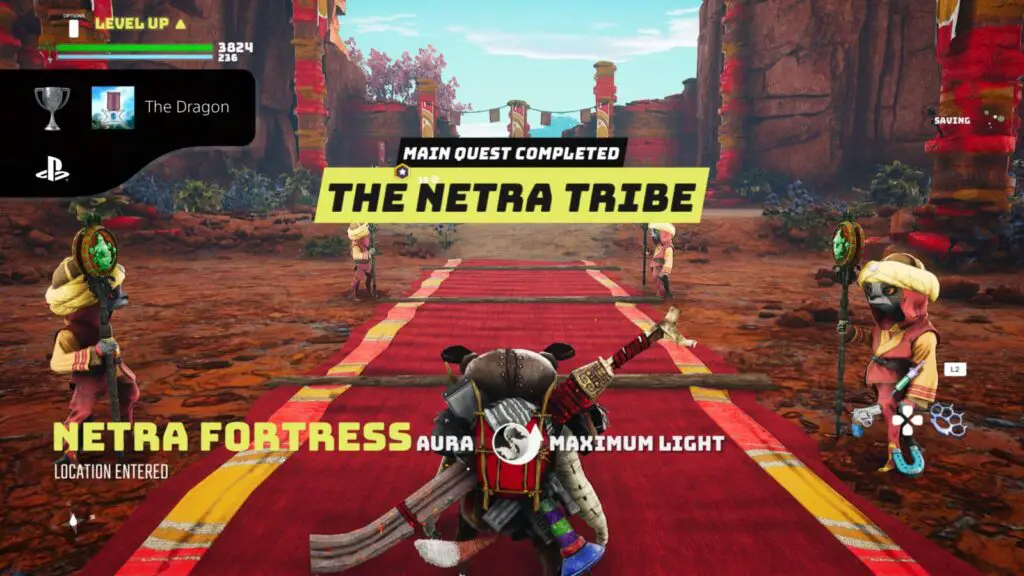
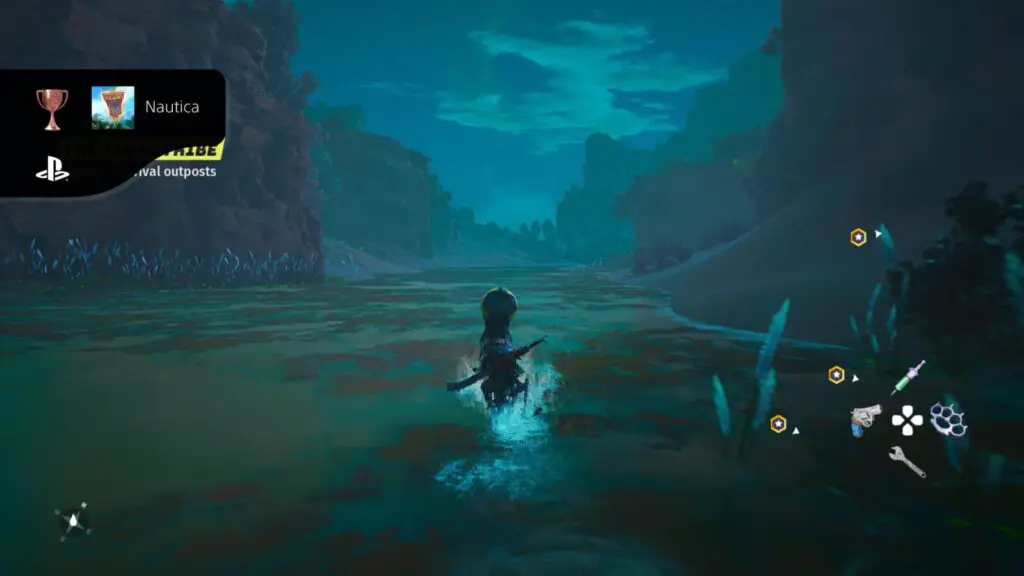
Conquest
Take over 6 Tribe Outposts
There are 18 Tribe Outposts in Biomutant, each of them is attributed to one of the six Tribes, meaning there’s 3 outposts per tribe. Additionally, three of the Outposts will be attributed to your chosen tribe, so there’s actually just 15 that you can take over.
Still, that’s a hell of a lot more than the 6 you need to capture for this trophy. Outposts are very easy to see on the map, and if you just follow the main quest line for each opposing Tribe, you’ll get waypoints to show you exactly where they are. You will need to do this for the trophy “The Dragon” anyway.
The trophy will unlock after you have acquired 6 of your rivals’ outposts, taking your tribe’s total number of outposts up to 9.
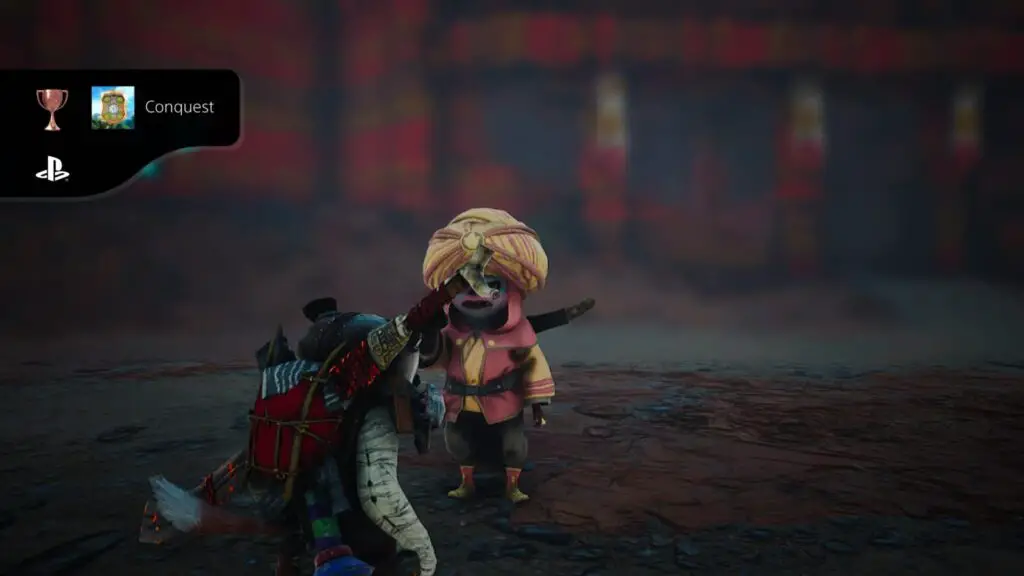


The Dragon
Defeat or Subdue all five Rival Tribe Leaders
Defeating or Subduing a Rival Tribe Leader has three steps to it:
- First, receive orders from your Tribe Leader on which Tribe should be your next target.
- Next, travel around that rival Tribe’s region, capturing their Outposts until you have all 3, this will mean you can now attack their fort.
- Attack their fort and either fight or persuade their leader into submission.
There are a total of 5 rival leaders, but you can do this trophy the easy way or the hard way. This all comes down to a choice you will be given after conquering your second Tribe Fortress. Your Tribe Leader will ask you if you would like to accept the surrender of the other Tribe Leaders, or continue the Conquest.
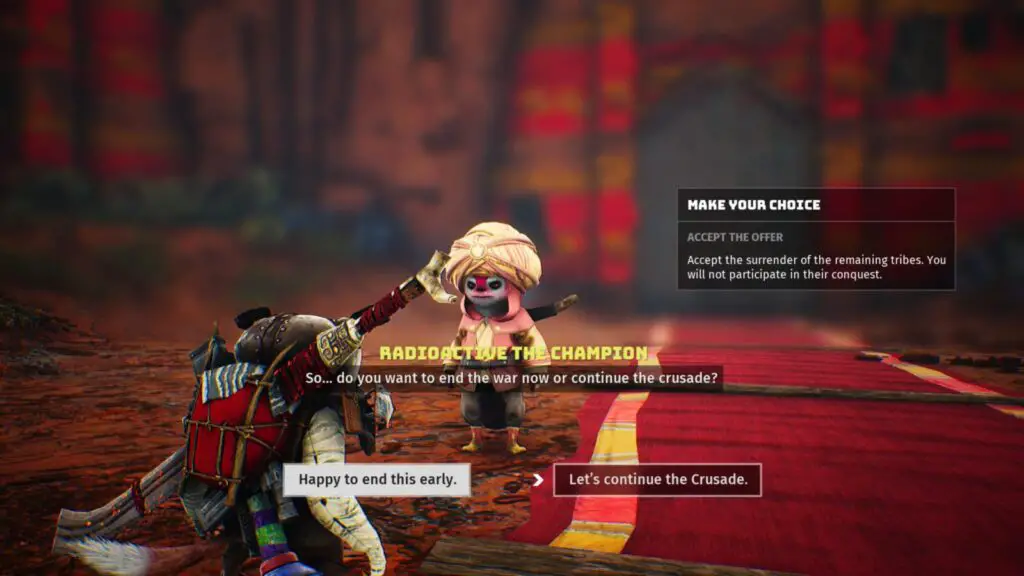
If you choose to accept their surrender, all Tribes and Outposts will fall under your Tribe’s control and the trophy will unlock after a short cutscene.
If you choose to continue the conquest, you will need to continue capturing outposts and forts until you’ve manually taken over all of them. The choice is yours and there’s no risk that ending the conflict early might lock you out of other trophies, you’re totally free to do as you wish here.
Boss Trophies
The following trophies in this portion of our Biomutant Trophy Guide are all earned during the four World Eater boss fights. They’re all completely missable so you should save before heading into any of the boss fights.

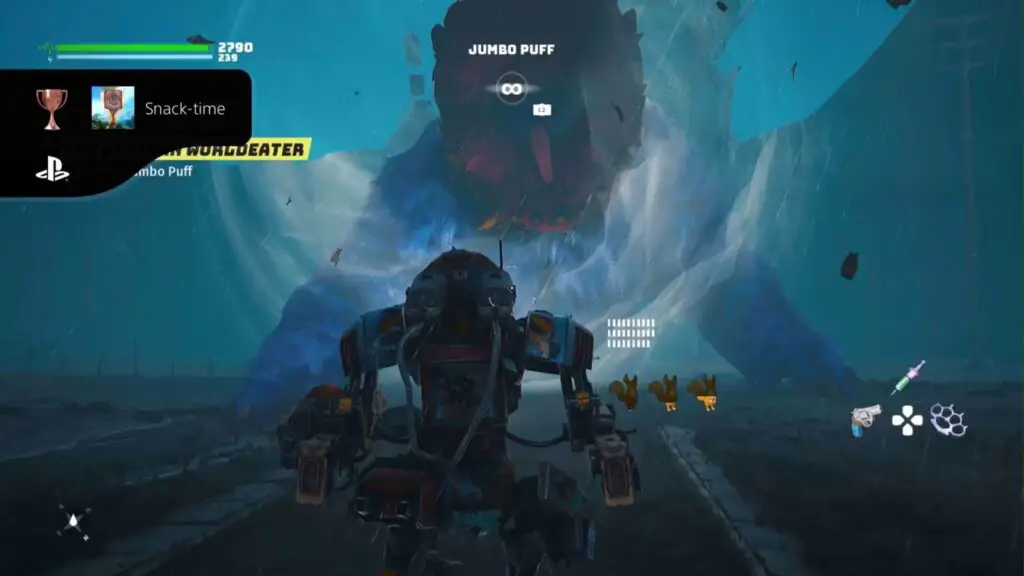
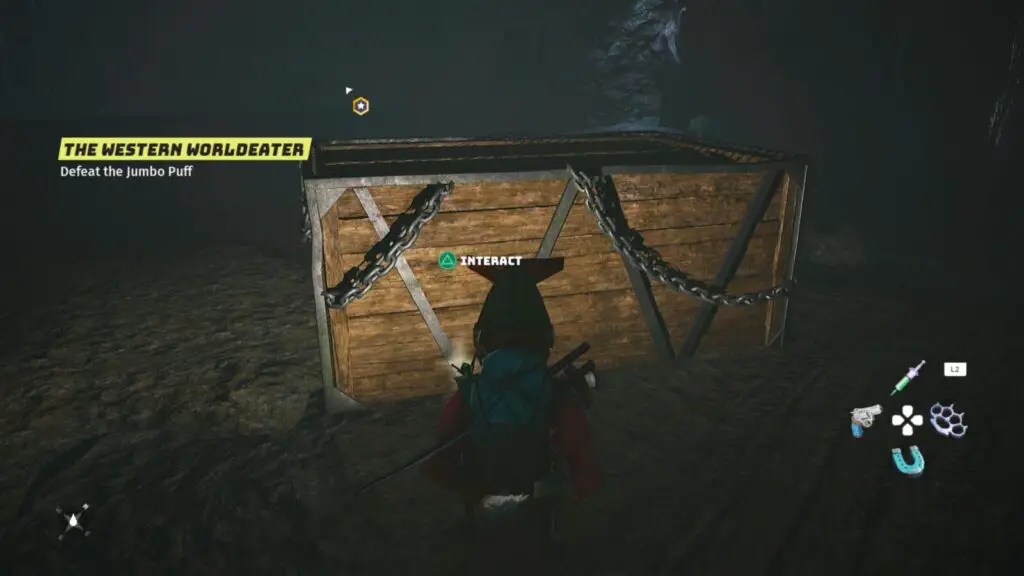
Snack-time
Feed the Jumbo Puff World Eater 6 Sqvips
This trophy is missable. You should save the game before heading into this fight so you can be sure not to lock yourself out of the trophy.
During the Jumbo Puff Boss Fight, the boss will frequently jump up onto the world tree root and throw rocks at you. He can’t be hurt while he’s doing this, but once he is done he will jump back down to your level and begin vaccuuming in air. At this point, you can hit ![]() repeatedly to fire Sqvips into his mouth. You have enough time to fire up to three Sqvips at him while he’s doing this.
repeatedly to fire Sqvips into his mouth. You have enough time to fire up to three Sqvips at him while he’s doing this.
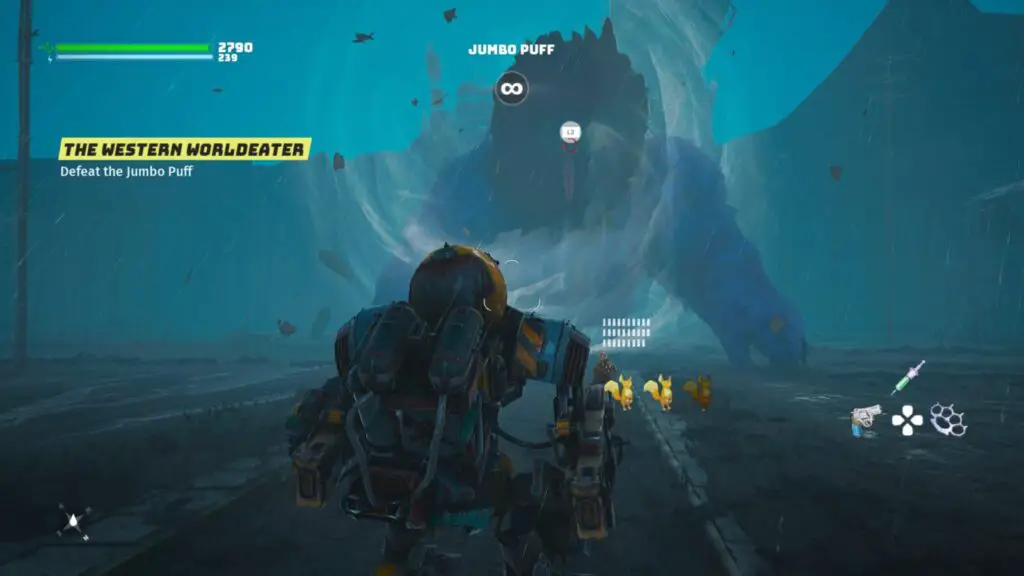
As you need to fire 6 Sqvips into his mouth, you can earn this trophy from the Jumbo Puff doing his vaccuum attack at least twice. You’ll have to be quick though, so really mash that ![]() button when the prompt appears!
button when the prompt appears!
Once you’ve successfully fed him a total of six Sqvips, the trophy will unlock.

That’s Mine
Detonate 3 Bangballs on the Porky Puff
This trophy is missable. You should save the game before heading into this fight so you can be sure not to lock yourself out of the trophy.
The Porky Puff boss is the second Wold Eater Boss Fight in Biomutant. To unlock the trophy, you will need to drag “Bangball” mines over to the boss, and then shoot them to detonate them. This can only be done during the first phase of the fight.
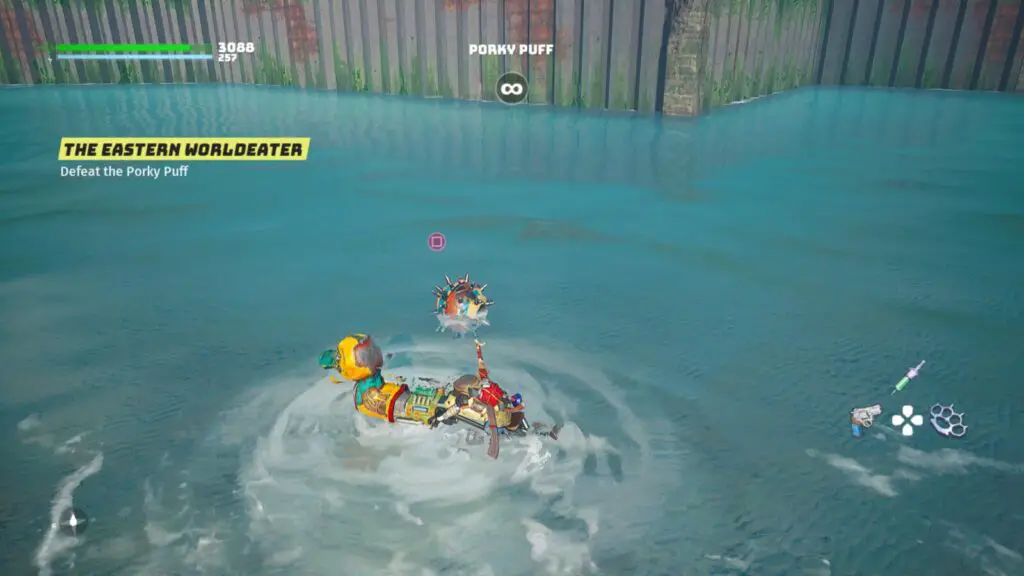
You can tether a Bangball from your Googlide by pressing ![]() when you’re close to one, then drive it over to the Porky Puff and hit
when you’re close to one, then drive it over to the Porky Puff and hit ![]() again to release it next to him.
again to release it next to him.
Once you’ve placed a Bangball next to the boss, simply shoot it with ![]() to cause a large explosion to damage it. Repeat this three times and the trophy will unlock!
to cause a large explosion to damage it. Repeat this three times and the trophy will unlock!


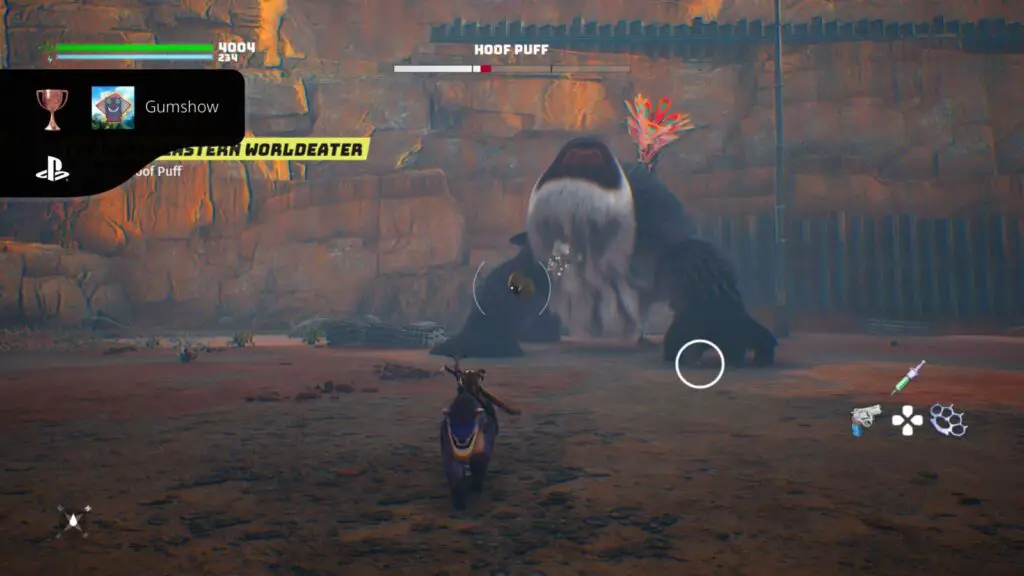
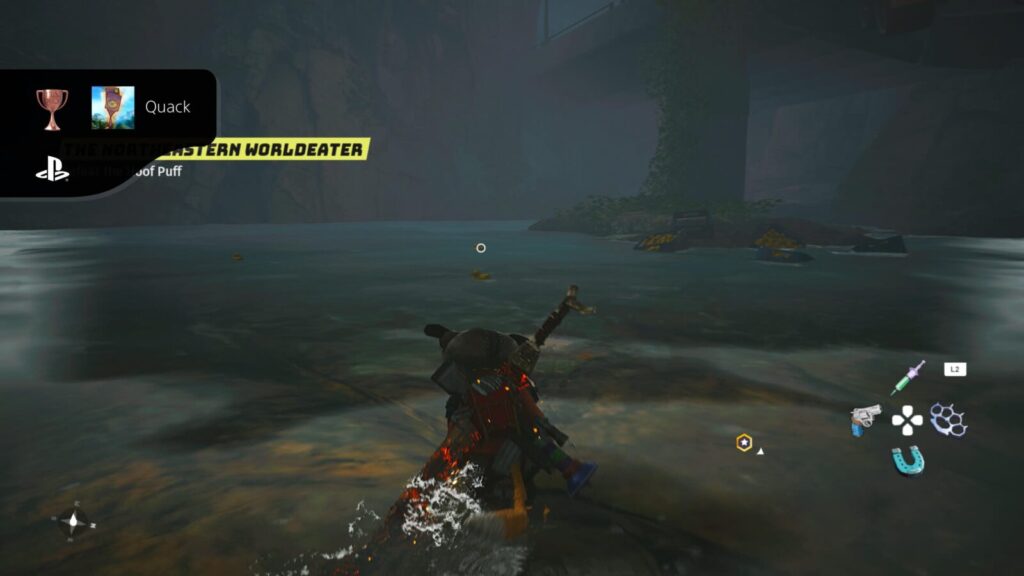
Gumshow
Pull all Teeth from the Hoof Puff
This trophy is missable. You should save the game before heading into this fight so you can be sure not to lock yourself out of the trophy.
During your fight with Hoof Puff, the main way to damage it is to fire ![]() at the weak spots on its legs. When you do this to only its front legs, it will stand there for a moment with its mouth wide open.
at the weak spots on its legs. When you do this to only its front legs, it will stand there for a moment with its mouth wide open.
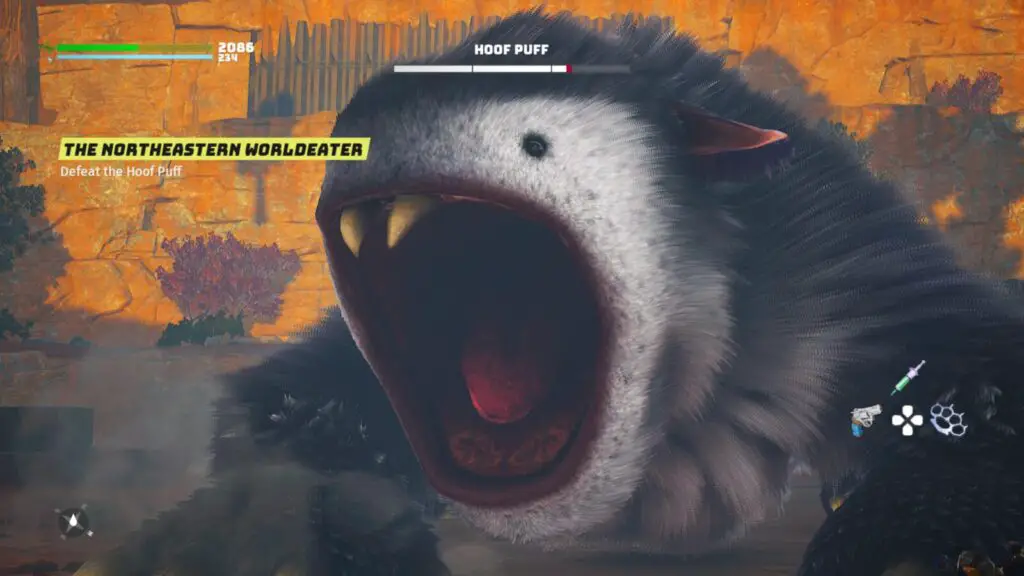
While it is in this state, you can use your grapple to grab one of its teeth and then mash ![]() to pull it out.
to pull it out.
Hoof Puff has four teeth in total so you will need to repeat this four times to remove all of its teeth and unlock this trophy.

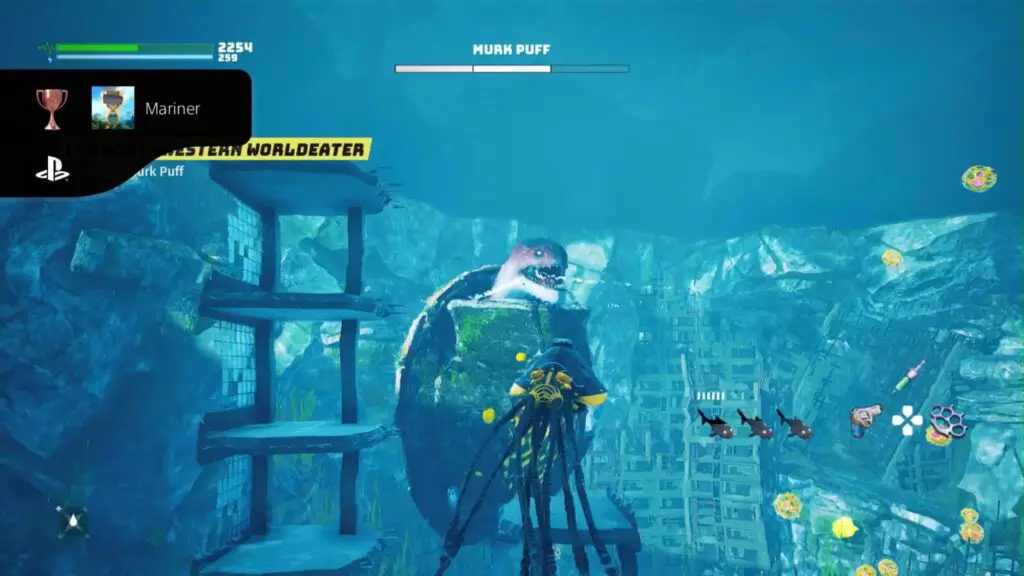
Mariner
Feed the Murk Puff 10 Guppos
This trophy is missable. You should save the game before heading into this fight so you can be sure not to lock yourself out of the trophy.
This is the easiest of the World Eater trophies to miss.
During the second phase of the fight (middle health bar), the boss will retreat into its shell and fire green orbs at you. When it does this, it will poke its head out and an ![]() prompt will appear for you to fire Guppos into its mouth. You can only fire up to three into its mouth within the small window where the prompt is available.
prompt will appear for you to fire Guppos into its mouth. You can only fire up to three into its mouth within the small window where the prompt is available.

If you damage him too much during the second phase of the fight and its health drops down to just one bar, it will stop doing this and you can no longer fire Guppos into its mouth, so be careful not to deal too much damage.
This is cumulative, though. So if you feed him 6 and then need to reset, you will only need to feed him 4 once you load your save, the game will remember how many you did before reloading. Which is very nice!
Once you have successfully fed the boss a total of 10 Guppos, though, the trophy will unlock!


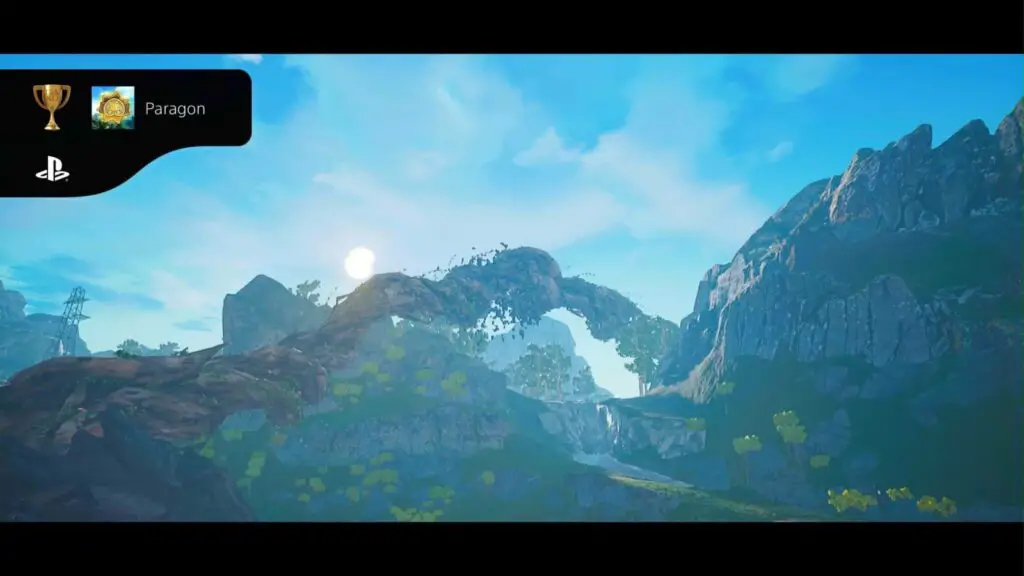
Paragon
defeat all four World Eaters
You simply need to defeat all 4 of the game’s “World Eater” bosses to unlock this trophy. This is the main quest of the game so there are plenty of waypoints to show you where to go.
The story doesn’t end when you earn this trophy, so you’re free to get this and then keep playing, just don’t progress the main questline any further after acquiring this trophy.
Side Quest Trophies
The trophies within this portion of our Biomutant Trophy Guide will all require you to complete Side Quests. You do not need to complete every Side Quest in the game, in fact there’s only a very small handful that you will need to complete.

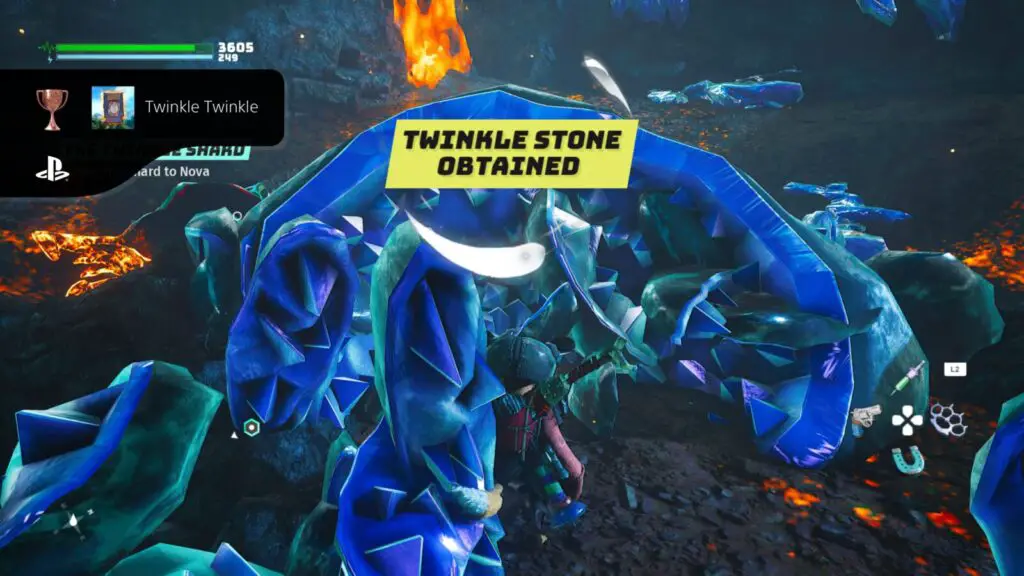
Twinkle Twinkle
Discover a Twinkle Crashsite
To unlock this trophy you will need to start the Side Quest “Twinkle Twinkle,” which you get from Nova. Nova can be found at the top of the tower southwest of Underfoot Outpost at Watchout, Co-ordinates – X: 277500, Y: -85900.

Go through the door there and ride the elevator up to the top of the tower where she waits. Follow the waypoints of the side quest to see a Meteor crash down to earth. Head to the waypoint at the location where the meteor landed and there will be two very powerful enemies waiting for you there.
Defeat them to gain access to the “Twinkle,” so that you can interact with it and complete the rotation puzzle. Upon completion of that puzzle, the trophy will unlock, you don’t even need to finish the quest! You might as well, though, as you get a pretty cool spacesuit for your troubles.

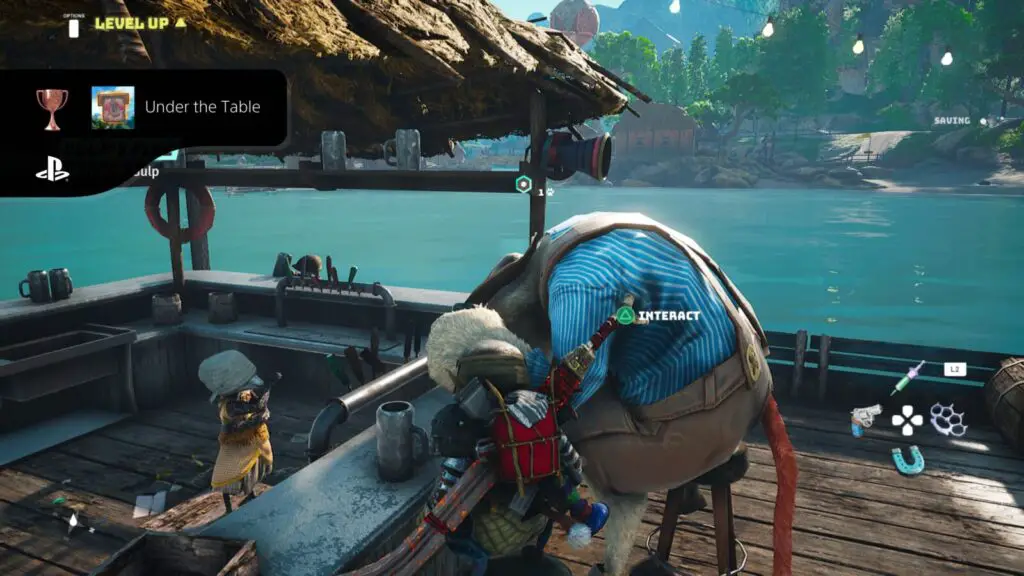
Under the Table
Win a Drinking Competition against Gulp
You are going to meet Gulp as part of the story, he will tell you where you can find Gumquacks for Goop. If you return to Sinkidink after visiting Gumquack Hollow and acquiring the 5 required Gumquacks and speak to him again, he will give you a side quest called “The Radium Syrup Truck.”
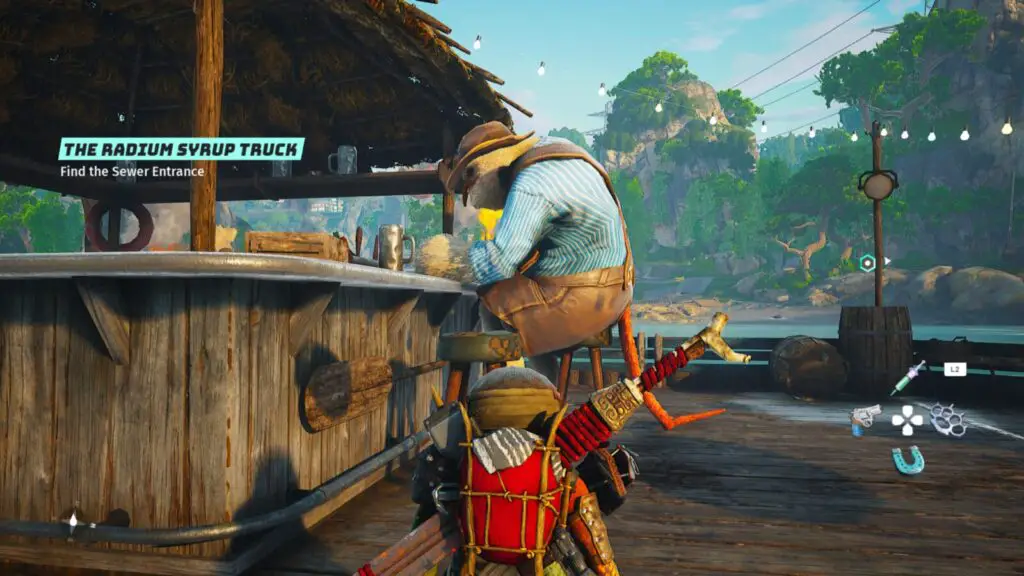
Follow the side quest’s waypoints into a nearby sewer where you’ll acquire just the thing for a little drink-off. Bring it back with you to Gulp and you’ll get a new Side Quest; “The Drink-a-Link.”
Interact with the stool next to Gulp to start this side quest and enter the drink-off. Just mash the on-screen button when the prompts appear until Gulp collapses onto the bar. The quest objective will be to “Check on Gulp,” but the trophy will unlock right away.

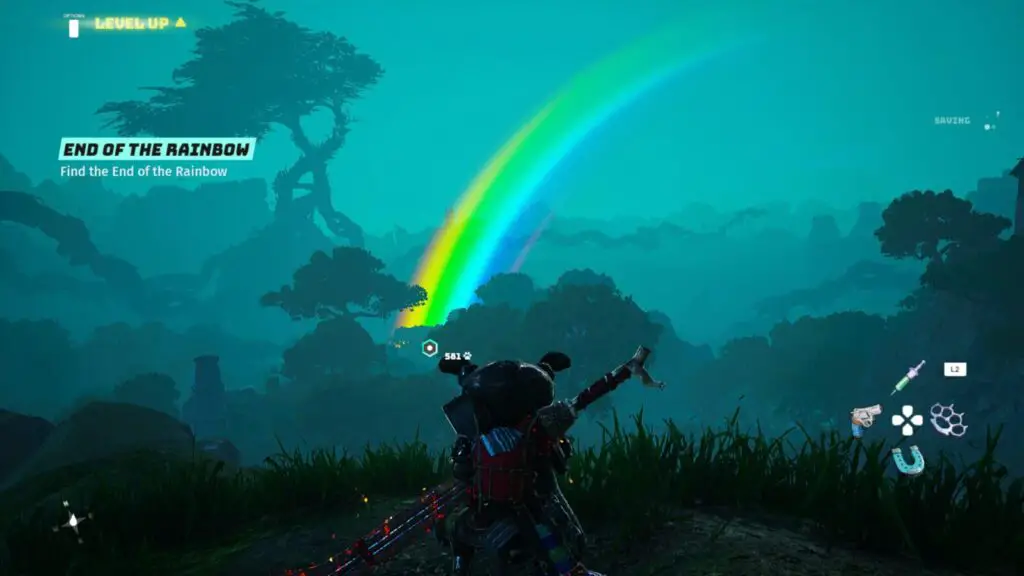
End of the Rainbow
Find out what’s at the end of a Rainbow
West of Urfidurf Outpost, near the water’s edge, there’s a character called Jumble, at Bullibull Glade, Co-ordinates – X: -119000, Y: -67600. It’s not far west from the town of Namby.
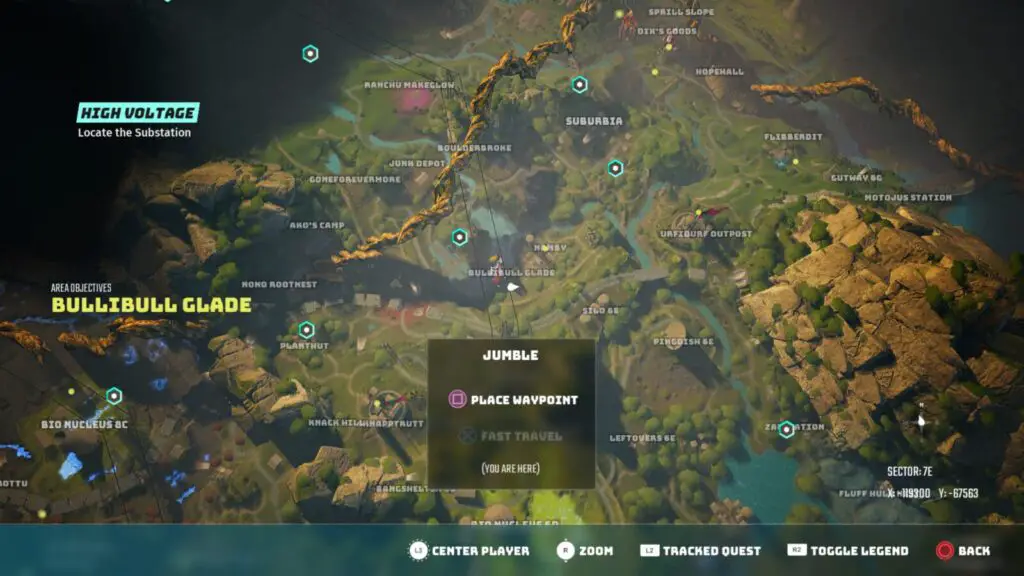
He will give you a side quest to find him some Rainbow concentrate that he can use to make a delicious Juice. Simply follow the side quest markers to the end of the rainbow, open the chest there, and you’ll unlock this trophy!
Combat Trophies
The trophies in this portion of our Biomutant Trophy Guide are all tied to the game’s combat system. They will either require you to make use of one of the game’s combat mechanics, or to defeat enemies of a certain type.

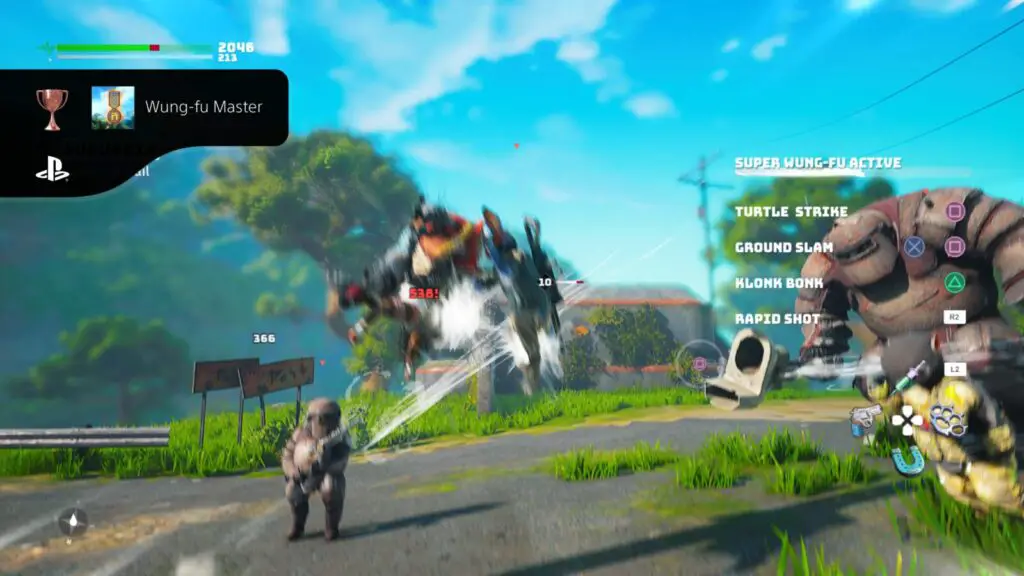
Wung-fu Master
Defeat 50 Enemies using Super Wung-Fu
This is one trophy you will want to be working on as early as you can, because grinding this out at the end of the game is going to take a very long time.
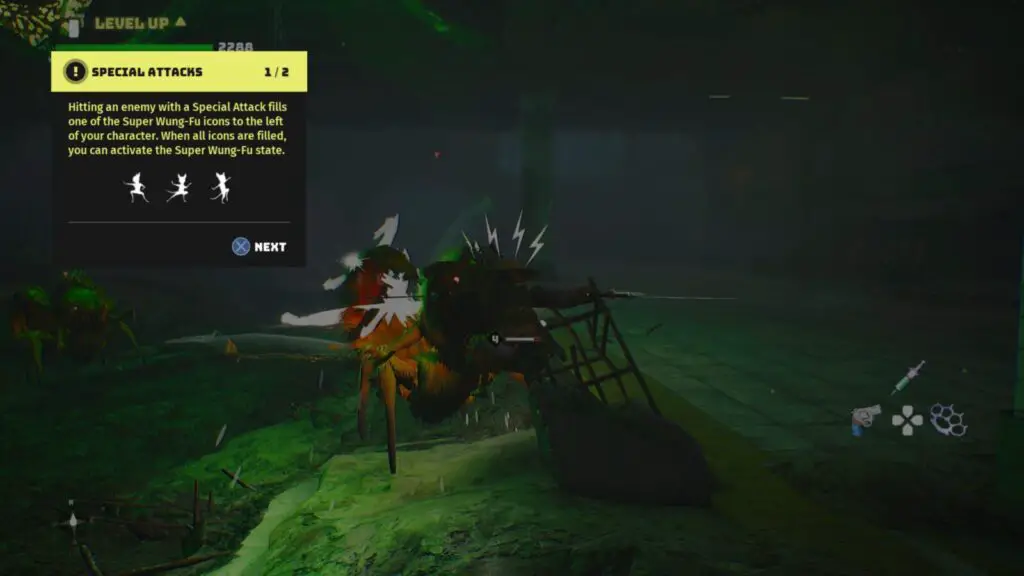
To activate Super Wung-Fu you first need to trigger three special attacks in a row, this will fill up the three silhouettes next to your character, allowing you to press ![]() +
+ ![]() together and trigger Super Wung-Fu mode. In Super Wung-Fu mode you will have a different moveset–which is displayed on-screen–and you’ll be able to defeat enemies much faster.
together and trigger Super Wung-Fu mode. In Super Wung-Fu mode you will have a different moveset–which is displayed on-screen–and you’ll be able to defeat enemies much faster.
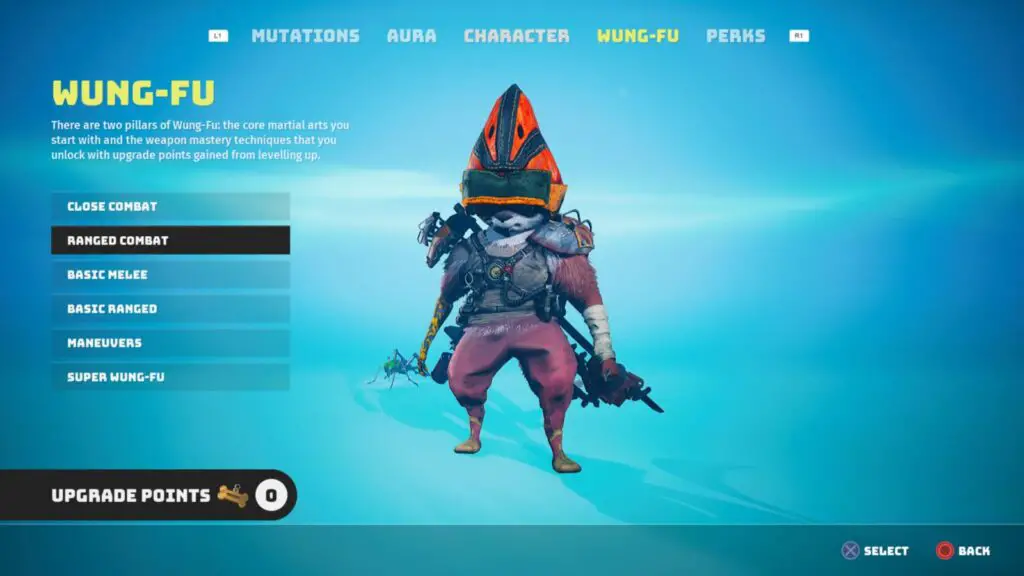
To use a special move you need to input one of the button combos which can be found under the “Wung-Fu” tab of your Character menu. You will need to purchase special moves before they can be used, by spending Upgrade Points on them.
When trying to charge up Super Wung-Fu mode, you cannot use the same move back-to-back, but you can alternate just two special moves. For example, I like to do the following three special move combos to charge up my Super Wung-Fu:
![]() ,
, ![]() ,
, ![]() >
> ![]() ,
, ![]() ,
, ![]() >
> ![]() ,
, ![]() ,
, ![]()
While in Super Wung-Fu mode you will need to defeat a cumulative total of 50 enemies to unlock the trophy. Naturally, you don’t need to do this in a single use of Super Wung-Fu.

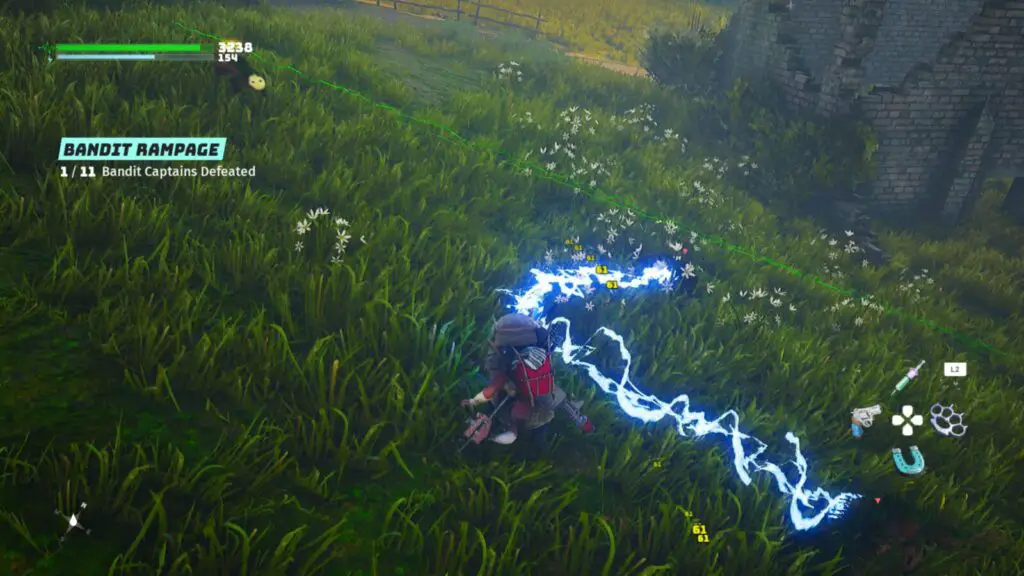
Thugs
Defeat 25 Bandits
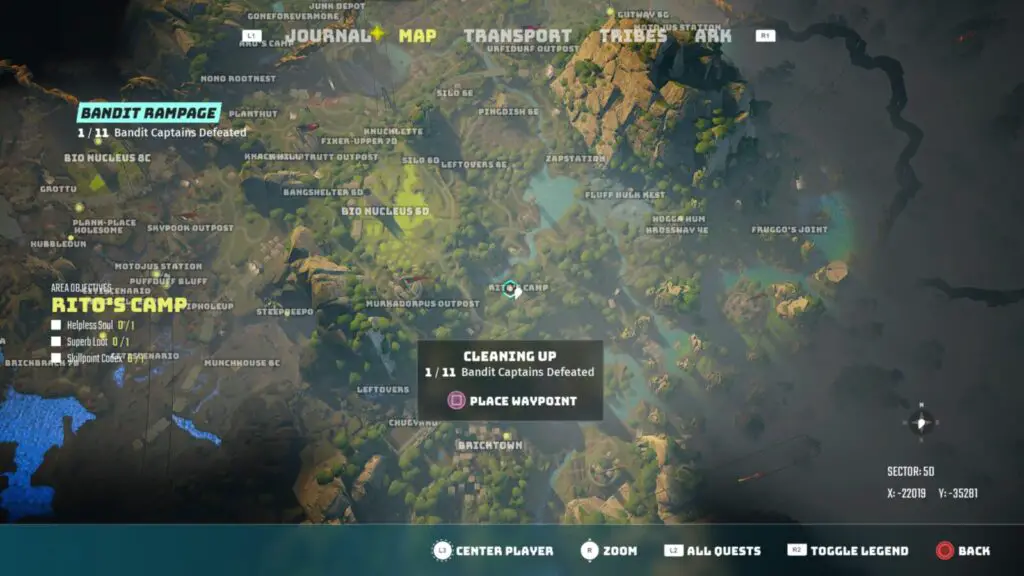
Bandits are a specific type of enemy who are found at Bandit Camps throughout the world. You’ll need to find your first Bandit Camp on your own by simply exploring, but then you’ll receive a Side Quest called “Cleaning Up” which will lead you to each of the 11 Bandit Camps.
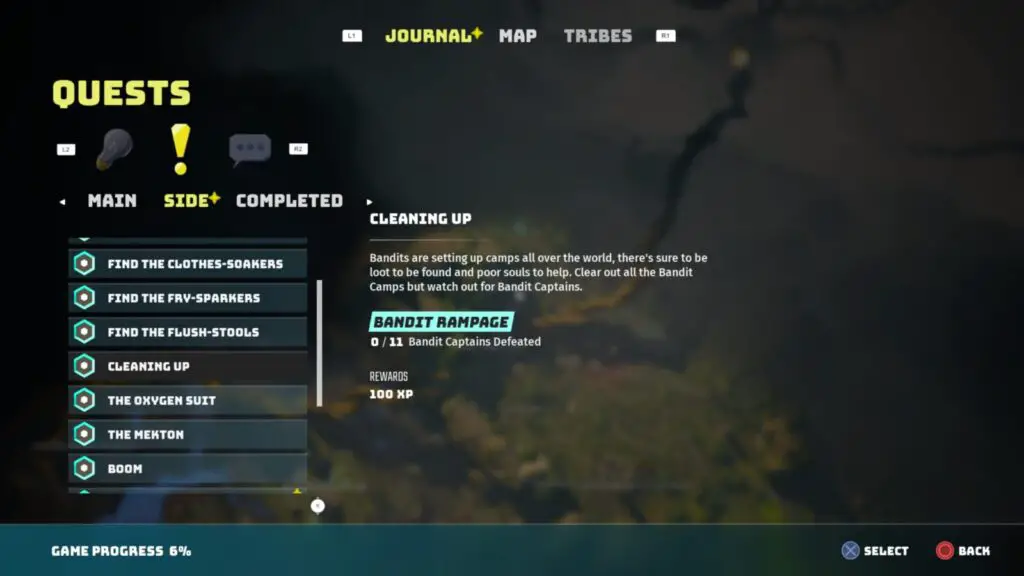
A good camp to start with is “Rito’s Camp” found just east of Murkadorpus Outpost at co-ordinates X: -22000, Y: -35200.
Another decent camp to start with is “Ako’s Camp” found along the south-western root, north-west of Sknapptrutt Outpost at co-ordinates X: -171000, Y: -39000.
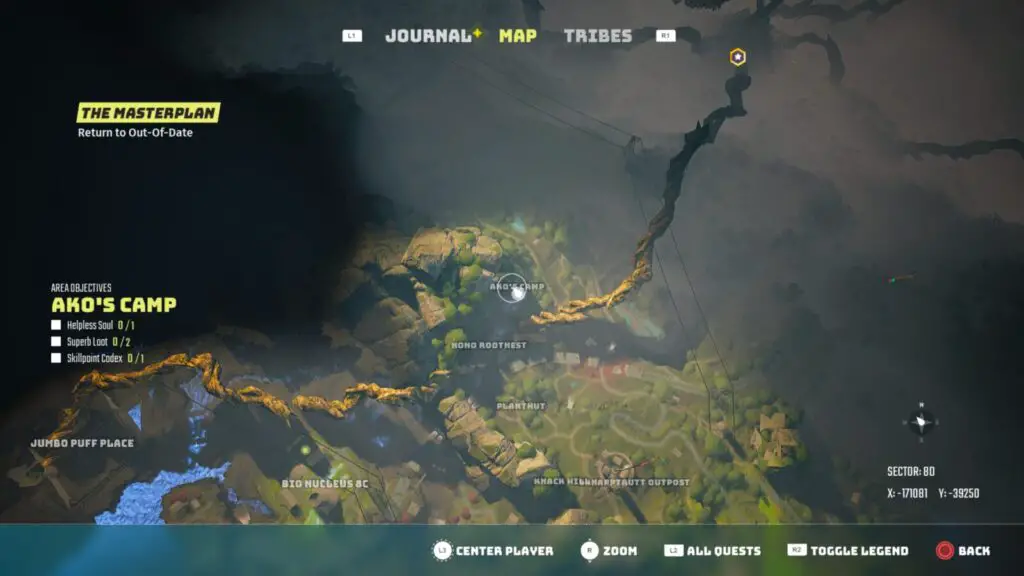
Once you have the side quest, you can make your way from Bandit Camp to Bandit Camp, clearing out the enemies within until you’ve killed 25 of them. You won’t need to clear out all 11 Bandit Camps for this trophy, but feel free to do so if you wish.

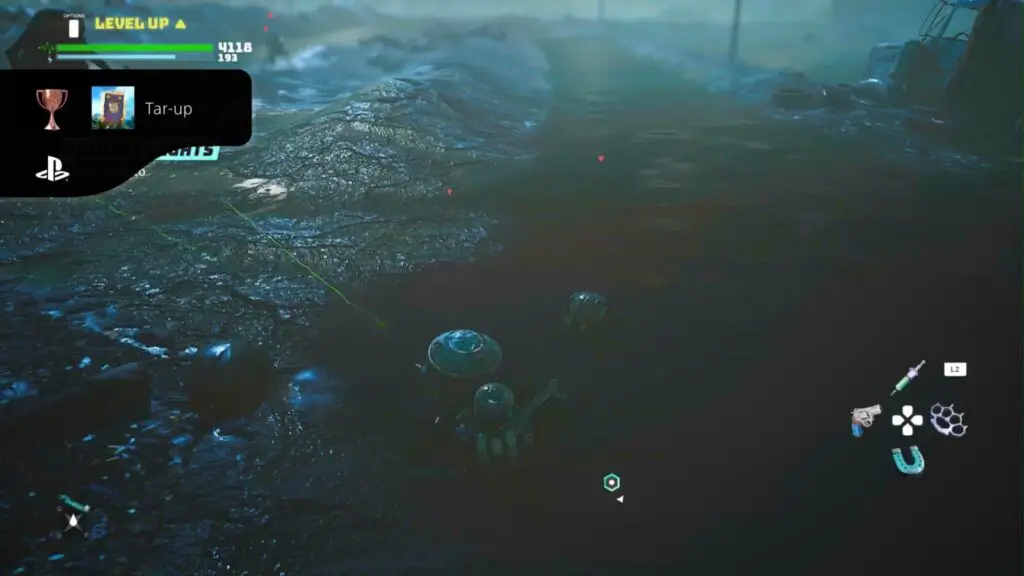
Tar-up
Drown 5 Enemies in Oil during Combat
You can find tar pools in a fair few places around the world. These inky-black pools will slowly pull you in and you cannot jump out of them. Your only hope of survival is to walk to the pool’s edge before you sink under completely.
Interestingly, tar pools have the same effect on enemies, and you will need to push a few enemies into Tar Pools and take full advantage of this feature in order to unlock this trophy.
The best way to get enemies into a tar pool, in my opinion, is to just use the Mucus Bubble ability (required for the Stick it to Them trophy) to pick up a group of enemies, and then pop the mucus bubble when you’re over the pool of tar, effectively dropping them in it.
You will need to do this on a total of 5 enemies but it doesn’t need to be all at once, or even in the same fight, it’s just a cumulative total counted across the entirety of your gameplay.
Northeast of the World Tree, at around the co-ordinates X: -194000, Y: -276000, you can find a trash dump called “Puttiupper Plaza” which is filled with tar pools perfect for dropping enemies into, but you can’t survive there long without an Oxygen Suit.
The side quest to unlock the oxygen suit will be added to your journal the first time you arrive here (or any similar Hypoxia Zone).
When exploring Puttiupper Plaza, look for groups of normal enemies fighting tar monsters. You obviously can’t drown the tar monsters in the tar but the normal enemies are fair game!

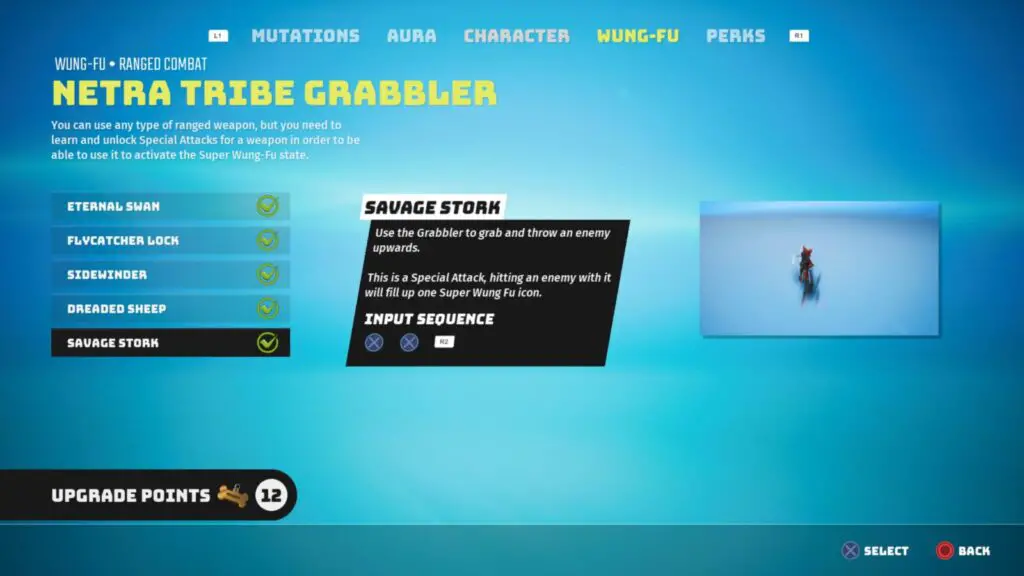
Show-off
Defeat Enemies using 3 Different Tribe Weapons
To unlock this trophy, you will need to attack and kill at least one enemy with three different tribe weapons. Each time you take over a tribe you will unlock a Tribe Weapon, you can get up to 6 of these but if you choose to end the conflict early after taking over your second Fortress then the maximum you can acquire is 3, which is still enough.
You will get one from the tribe you chose as your allied tribe and then one from each of the first two tribes you take over, which will likely be the Jagni/Myriad tribe and the Netra tribe.
You can find the weapons in your gear menu and should equip all three to your ![]() quick-equip menus if they’re not there already. You will then need to defeat just one enemy with each weapon.
quick-equip menus if they’re not there already. You will then need to defeat just one enemy with each weapon.
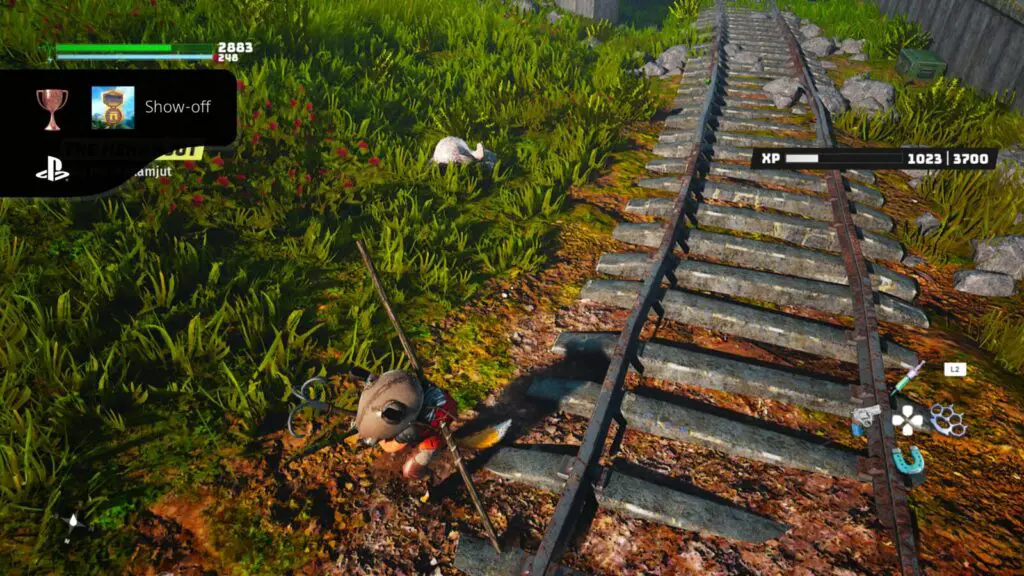
Note that if you acquired the Netra Tribe Grabbler as one of your Tribe Weapons you cannot damage enemies by just using the ![]() attack, you will need to use Combos. I used the “Savage Stork” combo to defeat an enemy with it for this trophy, which was
attack, you will need to use Combos. I used the “Savage Stork” combo to defeat an enemy with it for this trophy, which was ![]() ,
, ![]() ,
, ![]() .
.

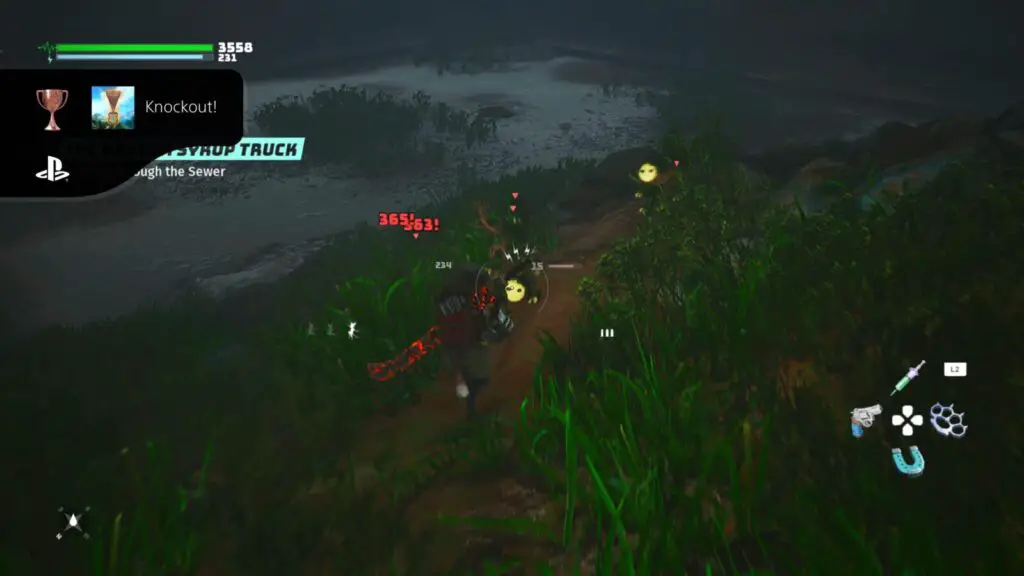
Knockout
Deal more than 1000 Damage in a single hit
The easiest way to do this is to acquire the Pri Murgel weapon, as described here. It has a naturally high damage output, but if it isn’t enough then you can do the following to increase your chances of earning the trophy:
- Upgrade the weapon to a 7-star weapon for the Starstruck trophy
- Increase your Strength stat
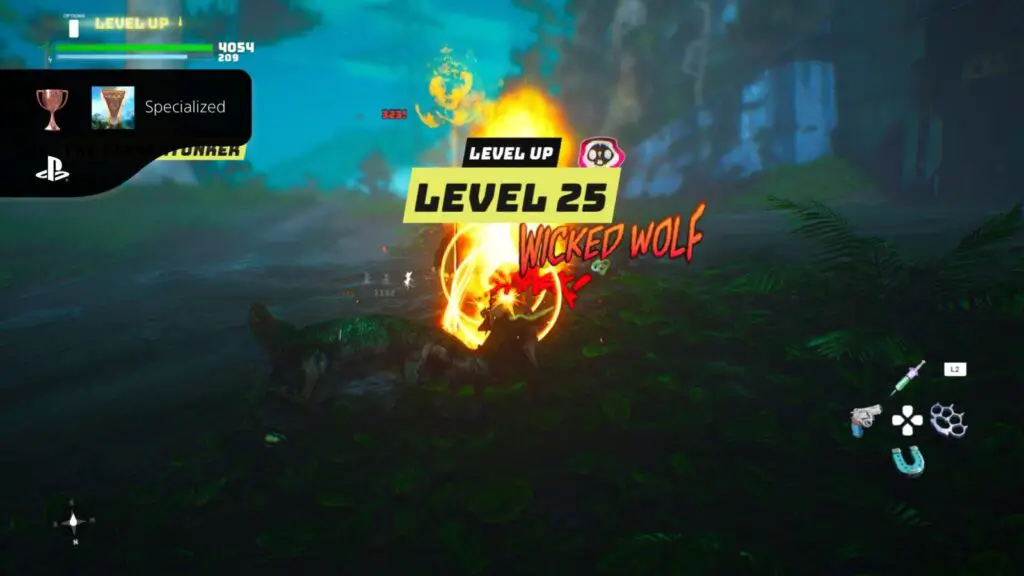
- Use a special ability like “Wicked Wolf” (
 , ,
, ,  )
) - Hope for a critical hit
You can see how much damage you have dealt when you hit an enemy as the numbers jump up from them, which will give you a good idea of how close you’re getting to earning the trophy.
Skill and Upgrade Trophies
The following trophies in this section of our Biomutant Trophy Guide all involve purchasing and using abilities and skills. See our note about Upgrade Points before proceeding.

Specialized
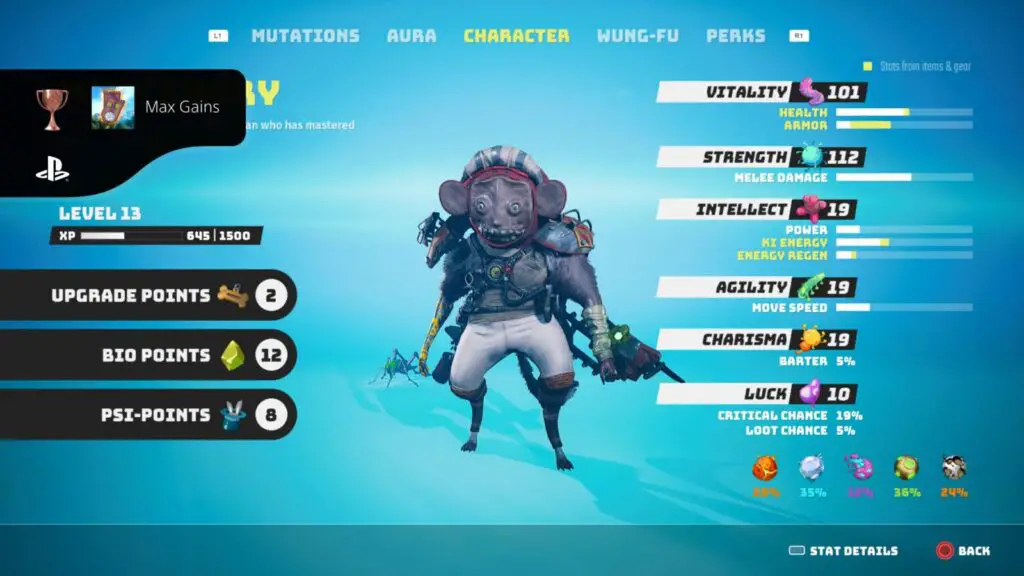
Reach Level 25 with any Character Class
All you need to do for this trophy is earn enough exp to reach level 25. You will earn exp for completing quests, defeating enemies, and plenty more exploration-related events. You should have no trouble reaching Level 25 as you work your way through the rest of the trophies. I was personally level 35 by the time I was done with the game’s Trophy Journey.

Max Gains
Upgrade any 2 attributes to 100
Whenever you level up, you will be given the opportunity to increase one of your attributes by 10. To unlock this trophy, you will need to continuously upgrade the same two attributes until they both have a value of 100 or more.
When I created my character they already had high Strength and Vitality stats, so I chose to upgrade those stats each time I levelled up and had acquired the trophy within the first few hours of gameplay.
Once you have this trophy, you can then upgrade any attributes you like, there are no other trophies like this one.

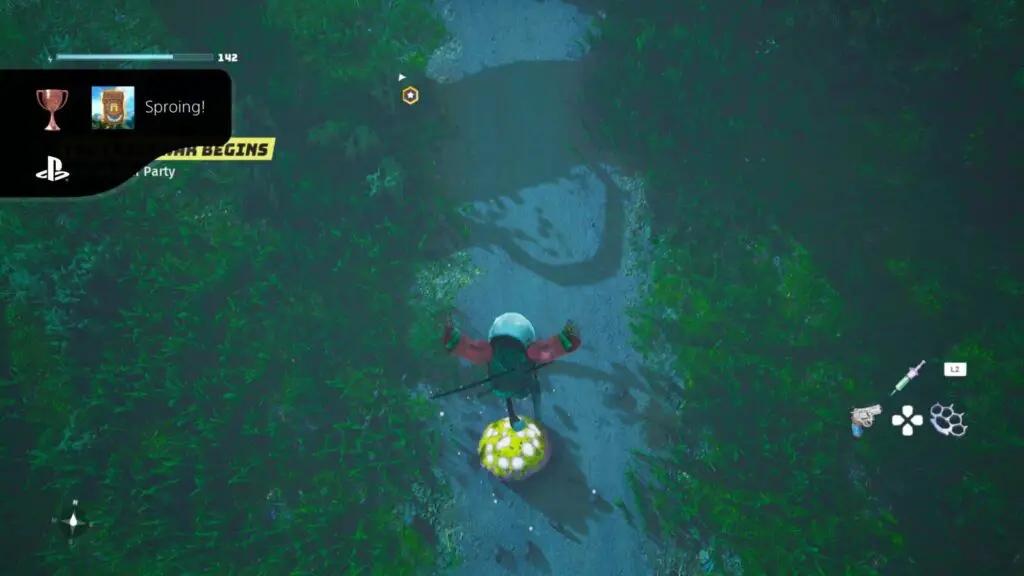
Sproing!
Bounce 50 times on a Fungus
A very easy trophy to earn. Simply spend 4 Bio Points on the “Fungi” ability in the Biogenetics section of the “Mutations” tab in your Character menu.
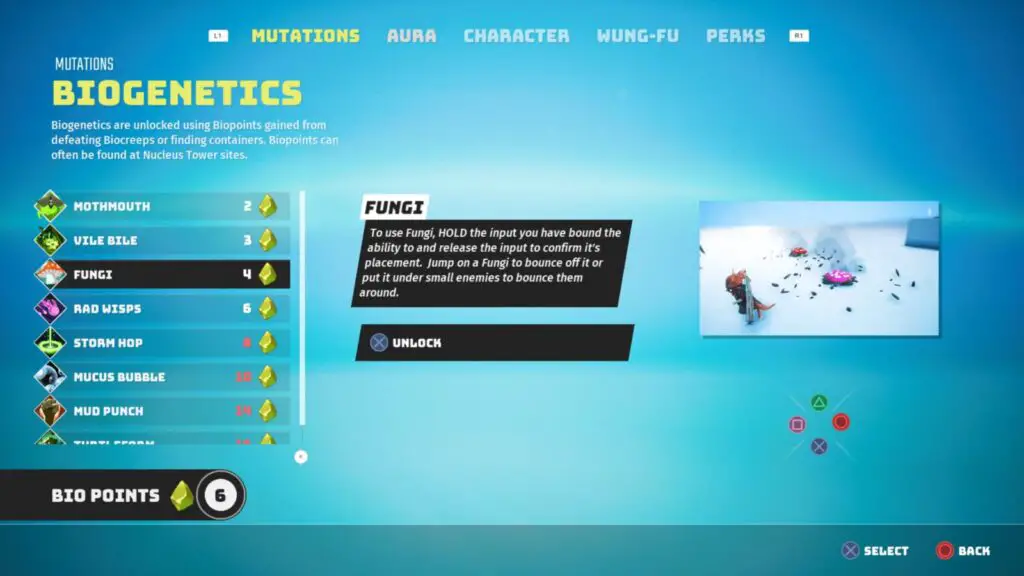
Map it to one of the four face buttons and then hold ![]() before pressing that same face button in-game to spawn a mushroom wherever you’re looking.
before pressing that same face button in-game to spawn a mushroom wherever you’re looking.
Jump onto your newly-grown mushroom and then leave your character to bounce up and down on the shroom until it despawns.
Spawn another one and repeat until the total number of times you’ve jumped on a mushroom reaches 50. At that point, this trophy will unlock!

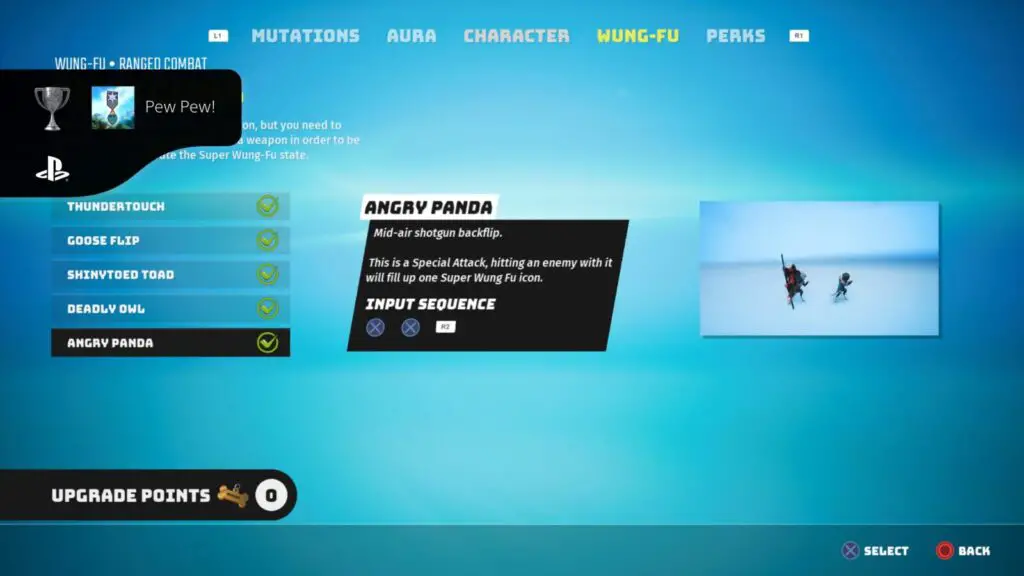
Pew Pew!
Unlock all Gun Proficiency Skills
For this trophy you will need to go to the “Character” section of the ![]() pause menu and then navigate to the “Wung-Fu” tab. Here, you’ll see many options for where you can spend the Upgrade Points that you earn for levelling up.
pause menu and then navigate to the “Wung-Fu” tab. Here, you’ll see many options for where you can spend the Upgrade Points that you earn for levelling up.
You will need to select the “Ranged Combat” option and then purchase the two available skills for each ranged weapon type. In total you will need 16 Upgrade Points to make the required purchases.
This is quite a waste of Upgrade Points, plus you will need 16 more for the Hack n Slash trophy, so the best way to do this would be to save your Upgrade Points so that you have all 16 ready at once. Then, save the game, purchase the necessary skills to acquire the trophy, and load your game to recover your 16 points.
You can then spend those points on the Melee Weapon Skills for Hack n Slash and load your game again to spend your 16 Upgrade Points however you like!

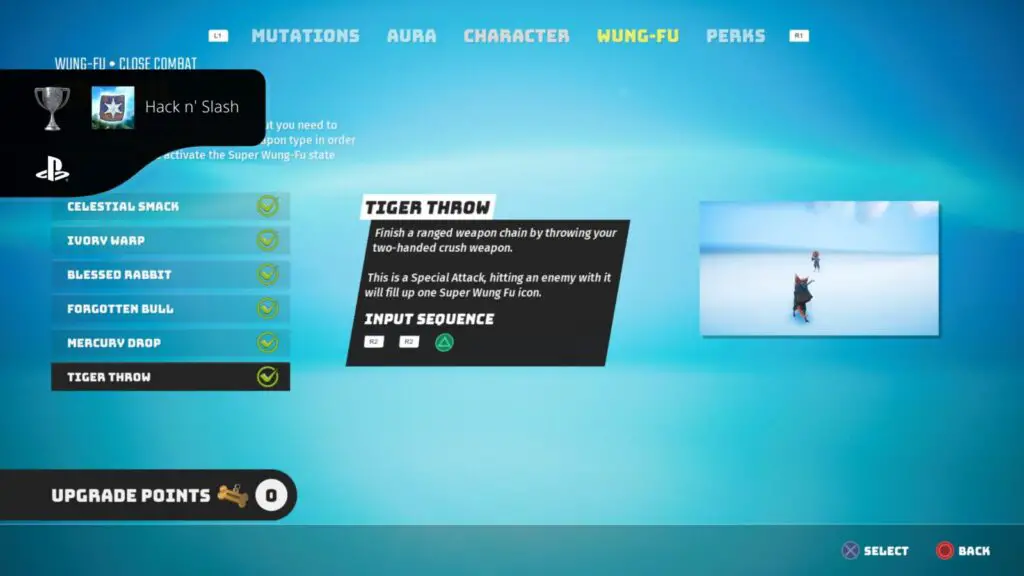
Hack n Slash
Unlock all Melee Weapon Proficiency Skills
This trophy is exactly the same as Pew Pew! except you will need to purchase all of the “Close Combat” Wung-fu skills instead. See Pew Pew! for a method which will allow you to unlock both trophies and keep your Upgrade Points.

Electrified
Defeat 20 Enemies using the Ki-Spark Ability
The Ki-Spark ability is a Psi-Powers Mutation that you can buy from the “Mutations” tab of the Character Menu. It will cost you 16 Psi-Points to purchase and with it, you will be able to electrocute enemies using Force-lightning-style abilities.
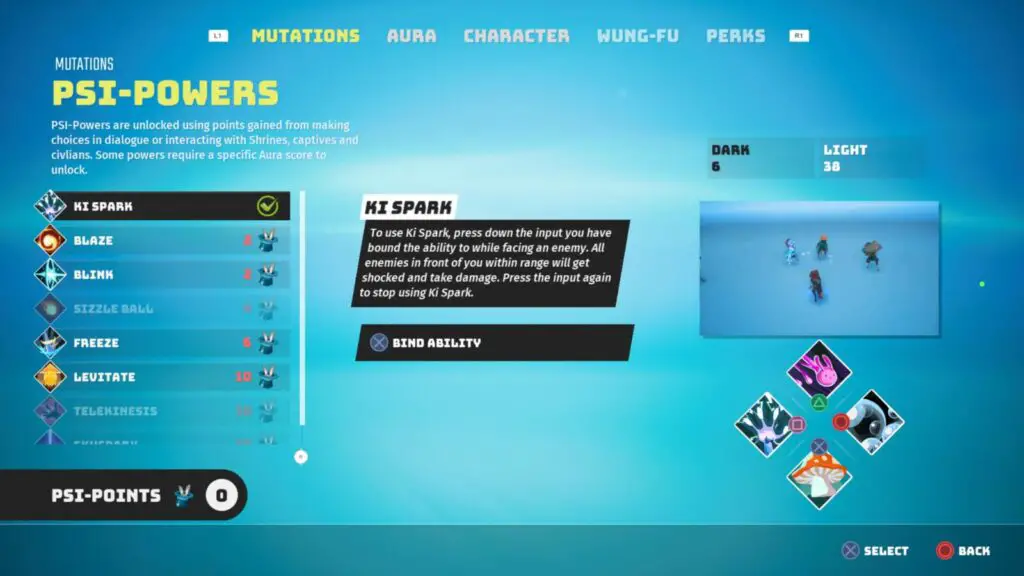
When you activate the ability, you will electrocute all enemies in front of you until you are hit or your Ki (stamina) drops to 0. It doesn’t do a lot of damage, but this trophy requires you to get 20 kills with the ability, so you should weaken enemies first and then hit them with the Ki-Spark ability to finish them off.
When you’ve used the ability to finish off your 20th enemy, this trophy will unlock!

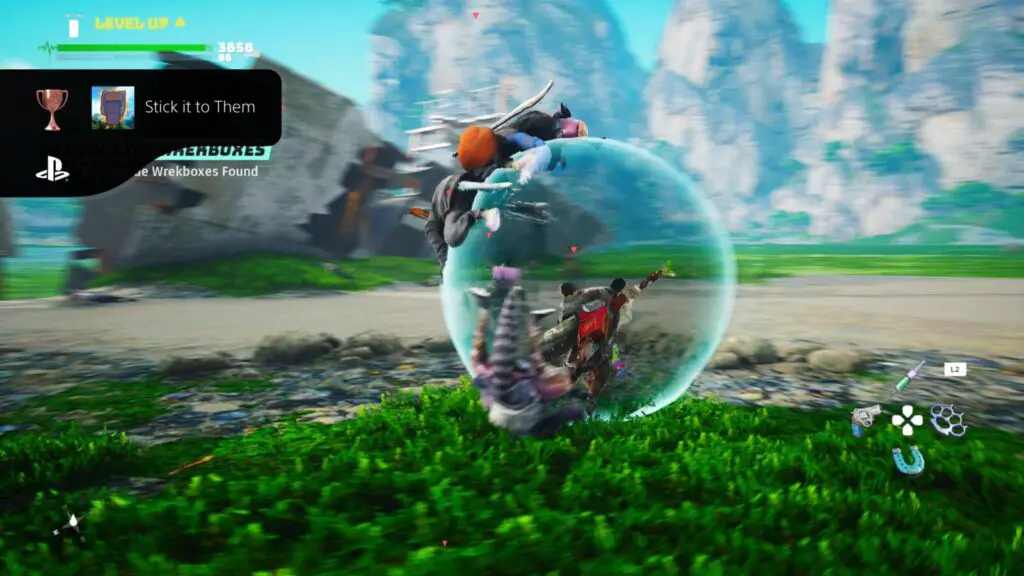
Stick it to Them
Stick 25 Enemies to the Mucus Bubble
The Mucus Bubble is a Biogenetic Mutation that you can buy from the “Mutations” tab of the Character Menu. It will cost you 10 Bio-Points to purchase and will allow you to surround yourself with a mucus bubble which you then use as a hamster ball, rolling across the terrain.
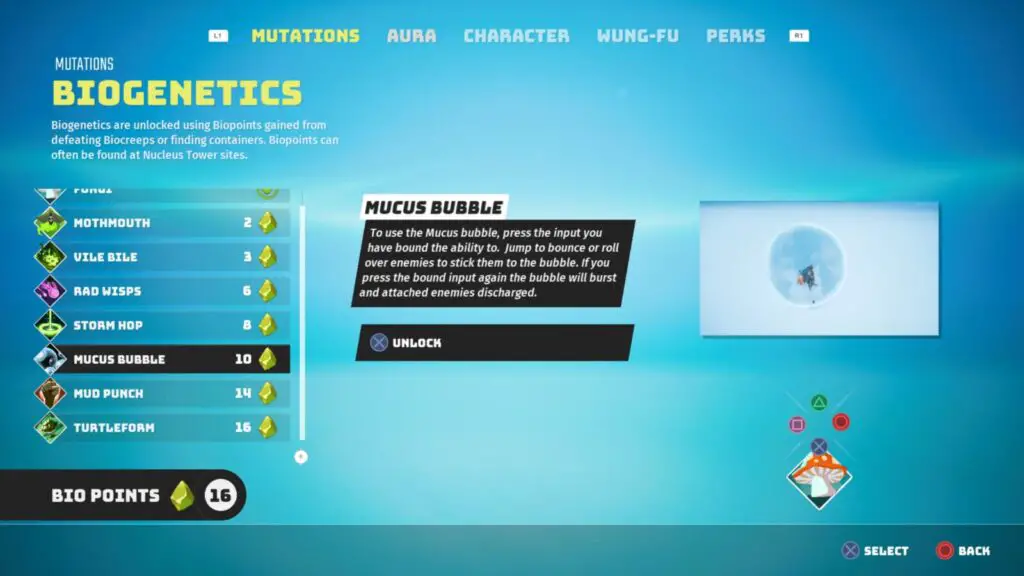
All you need to do for this trophy is to activate your Mucus Bubble (once you’ve purchased the upgrade) and then roll it over enemies to stick them to it. Do this to a cumulative total of 25 enemies throughout the game and the trophy will unlock!
Exploration Trophies
This portion of our Biomutant Trophy Guide contains trophies all related to exploring the world to discover locations or objects, such as the “Old World Gadget” collectibles.

Old World Gadgets
Discover all 15 Old World Gadgets
This trophy is currently unobtainable in digital versions of the game. If you have a physical disc-based version of the game then you can just install the game’s v1.01 base version and then avoid updating the game by disconnecting from the internet until you’ve earned this trophy and Toytinkerer. Once you have both trophies it is safe to update the game. I will update this page once the trophy is obtainable in v2.01 and higher, but there has been no word from the developers on when this might happen.
UPDATE: The game has since been patched and the bugged trophies are no longer an issue. Ensure your game is up-to-date and you can unlock this trophy. If, like me, you completed the requirements of this trophy before the patch was released, just load your save on an up-to-date installation of the game and the trophy will unlock on load.
I suspect that the cause of the issues is the Pling-Plong-Booth collectible. Each time you collect one, the number you have collected goes up by two. I think that the fact you can never find “1/5” is preventing the game from correctly tracking you finding your “first” one.
For when the trophy works again: You will just need to find one of each type of Old World Gadget collectible to unlock this trophy. Each gadget type can be found in about 5 different places and you will get a side quest leading to the other 4 once you collect the first one.
There are 15 you can get out in the wild, but there are some additional ones you will find during sotry missions and side quests that may count towards this trophy.
I have put together a full Old World Gadgets Location Guide which will lead you to your first of each of the 15 types of gadget. Just follow that guide and you should have the trophy by the end!

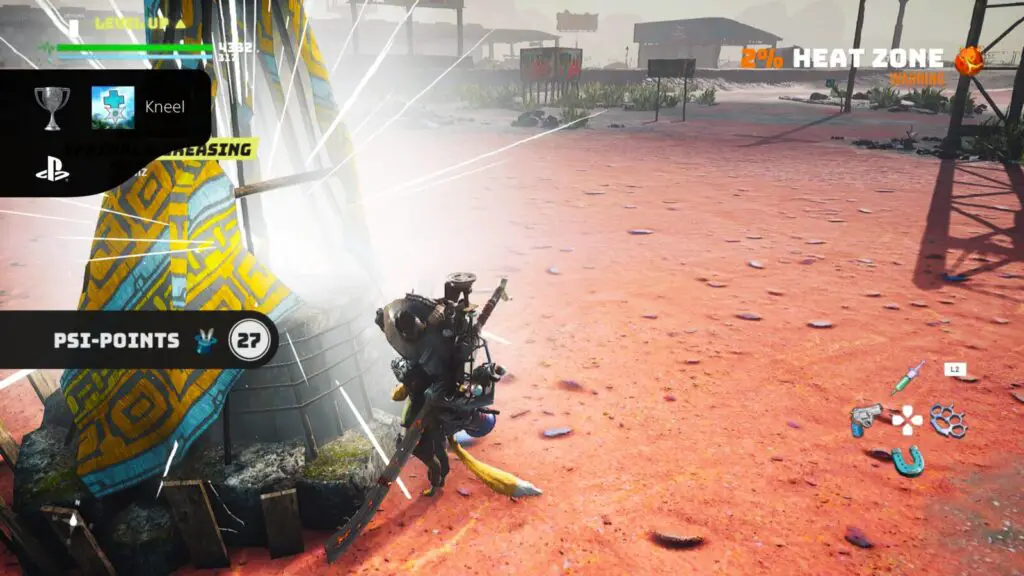
Kneel
Discover all 30 Altars
The trophy description here is wildly misleading. There are in fact far more than just 30 Altars (or Psionic Shrines) in the game, and you should have no trouble finding them all as you explore.
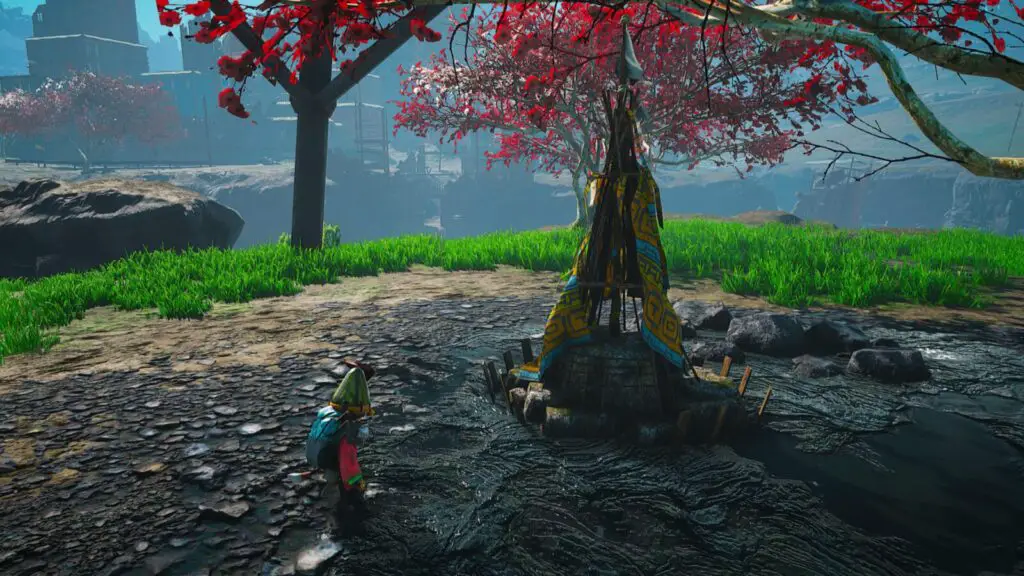
The easiest ones to find are in the 18 enemy Outposts. Outposts care easy to find due to the fact you can distinctly make them out on the world map. Additionally, they all have fast-travel points outside of them to make finding/returning to them easier if you missed the shrine.
Allow me to stress once more how many you can simply stumble across in the wild, though. I had only activated about half of the ones in Outposts by the time I earned the trophy because I found so many while exploring.

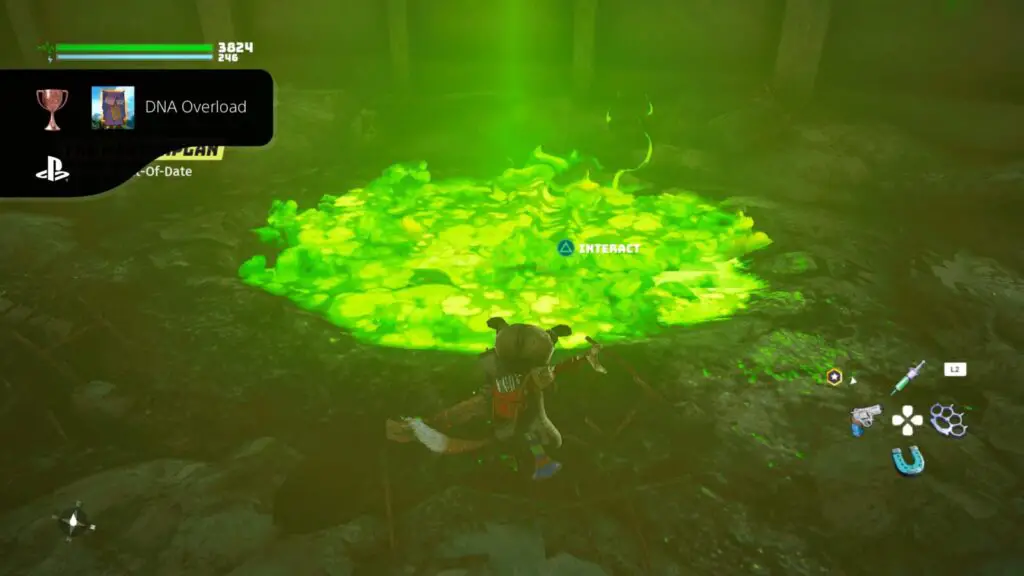
DNA Overload
Re-code your DNA at a Cooling Tower Biopool
Biopools can be found in Bio Nucleus locations, hidden underground. The first Biopool you find is most likely going to be the one at Bio Nucleus 6D, just northwest of the Murkadorpus Outpost, at Co-ordinates X: -77600, Y: -24300.
Using a Biopool will allow you to re-access the character editor and change your appearance without affecting your stats. You will need to do this just one time to unlock the trophy.

Toytinkerer
Unlock all Automaton Upgrades
This Trophy is bugged if your game was started in v1.01. Starting the game on v1.01 on a disc version and then loading that save after a v2.01 patch is installed will mean that the bear character required for this trophy will no longer spawn. You should either start a new game on v2.01 (or greater) or play v1.01 via disc without updating the game.
On your travels you may occasionally bump into a bear-like character holding a lantern. When you approach him, the camera will zoom in on him, making it really difficult to miss your opportunity to interact with him. You’ll even get a Side Quest called “The Mirage” whenever he’s near.
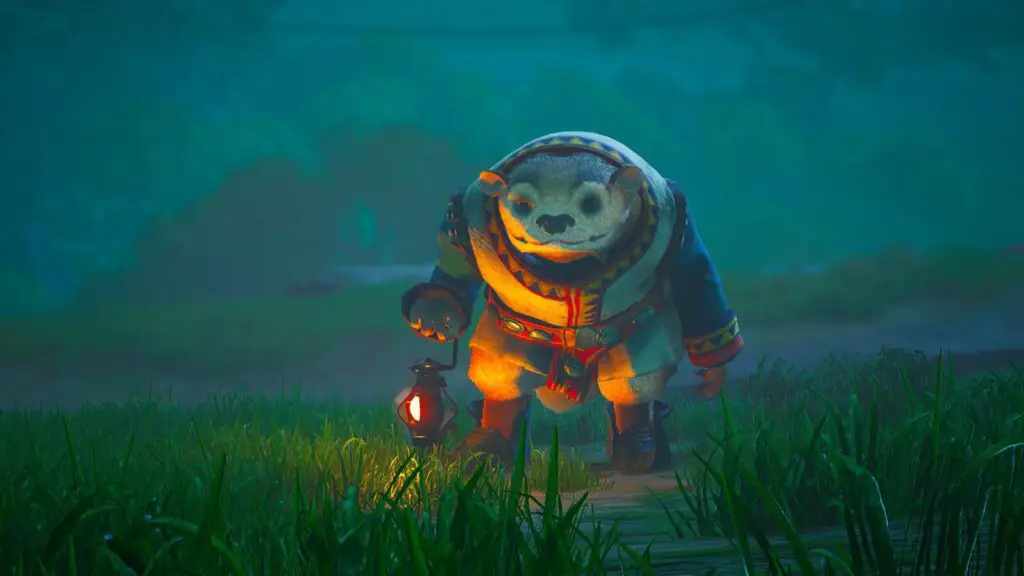
Interact with him ![]() and you’ll have a flashback to fighting one of your Mooma’s disciples in combat. Win the fight (or don’t, it honestly doesn’t matter) and you’ll be taken back to present day and given a choice of Automaton upgrade.
and you’ll have a flashback to fighting one of your Mooma’s disciples in combat. Win the fight (or don’t, it honestly doesn’t matter) and you’ll be taken back to present day and given a choice of Automaton upgrade.
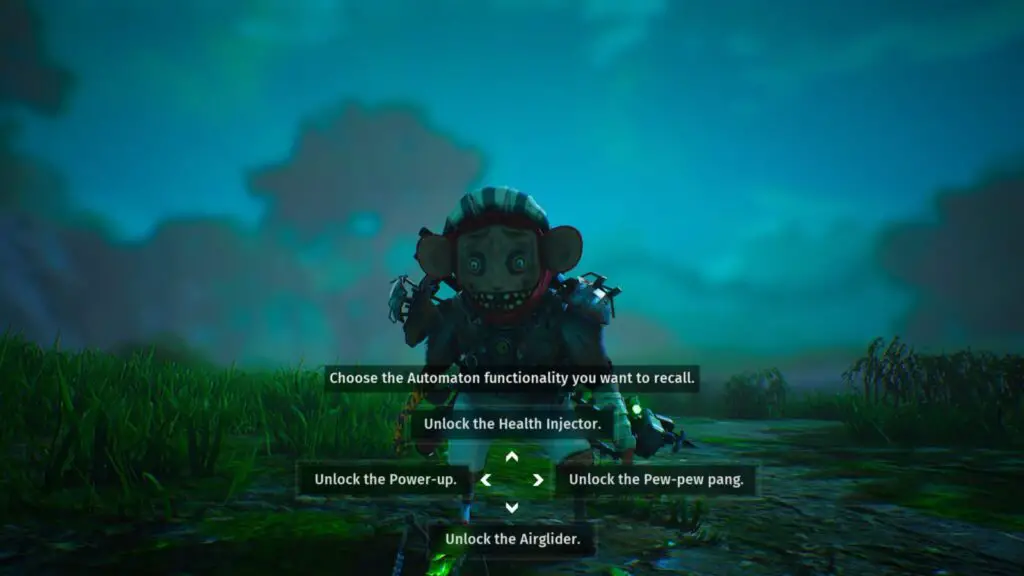
There are four upgrades in total so you will need to find the Mirage bear four times in total. He will show up completely at random in no particular location at all, so just keep an eye out for him while exploring. As I said, he’s pretty hard to miss.
Once you’ve acquired all four Automaton upgrades, this trophy will unlock!


Bagman
Buy an item from Honki
Honki is a vendor found south-east of the World Tree, in a house on “Sprill Slope” at co-ordinates X: -146000 , Y: -175000.
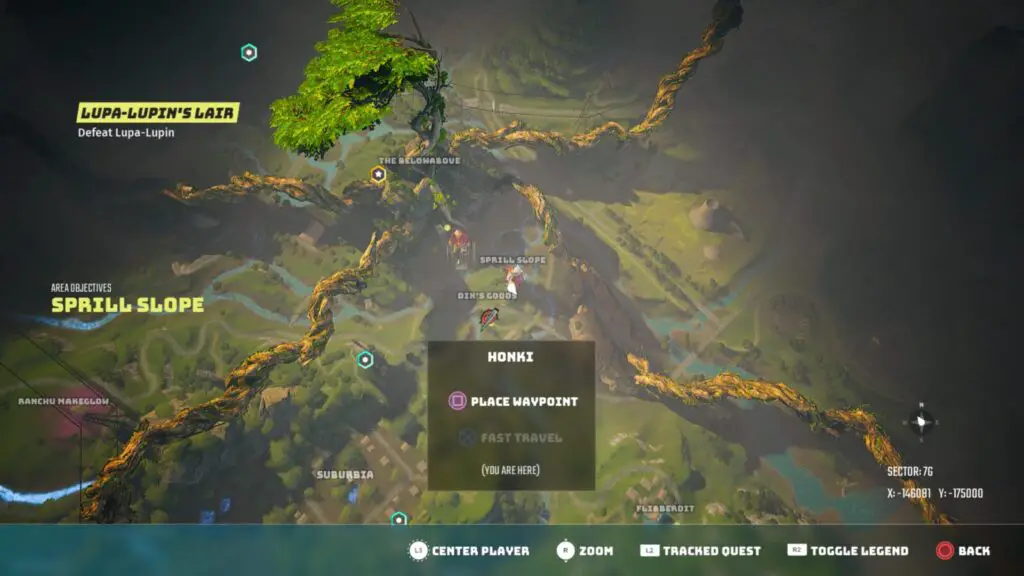
Visit him to get the Side Quest “A Good Nothing-for-Nothing.” Complete it to get the Side Quest “Something Unprofitable.” Once you complete that you will finally be able to trade with him. Ask him to show you what he’s got and purchase any item from him to unlock this trophy!

Adventurer
Discover all 7 Environment Biomes
If you zoom out as far as you can on the map, you will see that the world is split into 8 different areas:
- Whereabouts
- Deadzone
- Surfipelago
- Knupstonies
- Yerpfields
- Mushimosh Mire
- Fnackyleaves
- Kluppy Dunes
Each of these areas correlates more-or-less to the 7 biomes mentioned in the trophy. Saying that, looking at the map, they all look like completely different biomes to me, except maybe Yerpfields and Whereabouts which are very similar.
Either way, by ensuring you’ve visited each of the areas listed above, you will be able to grab this trophy with ease!

Eyes on the Road
Discover and enter 3 Manholes
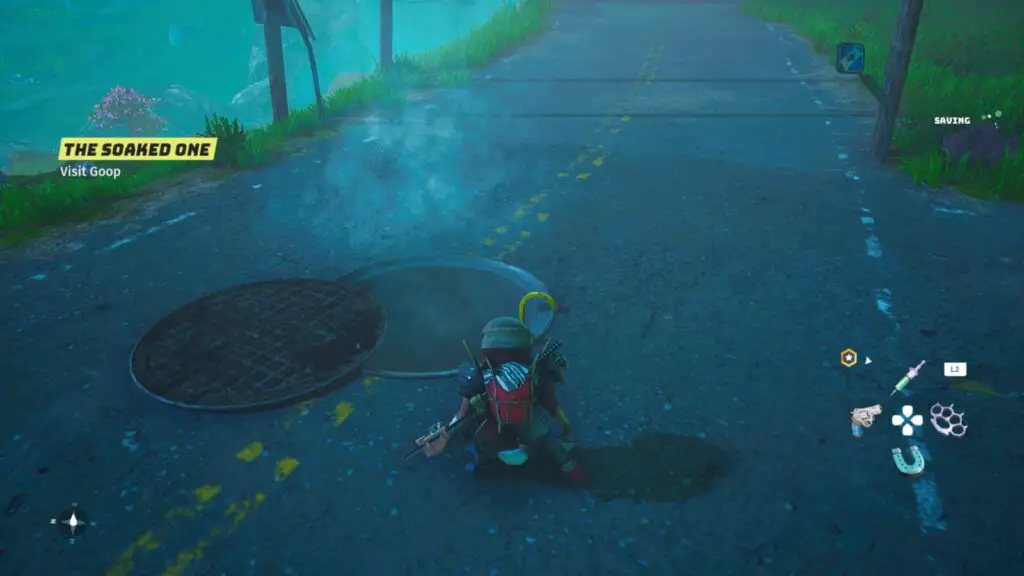
Manholes can occasionally be found on roads and always lead down into a “Gutway” (sewer). They can even be seen on the map, just look for small holes in the ground with a light coming from it.
You need only find 3 of these and they’re not hard to find if you just walk along any roads you see. There’s one that you will enter as part of the side quest “The Radium Syrup Truck” for Gulp, which you should be doing for the trophy Under the Table.

Conscious
Complete all 20 Conscience Dialogues
Conscience dialogues are the short dialogue sequences within which your “Dark” conscience and your “Light” conscience argue over dominance of your “Aura” (whether you’re more dark-aligned or light-aligned). Despite the description stating “all 20” there will be far more than 20 of these dialogue sequences as you make your way through the game.
They will happen when you complete some side and main quests, when you free captives, and more.
Interestingly, the trophy doesnt seem to actually unlock when you’ve seen 20 of them, so the game must count some and not others. That being said, just keep playing the story and side quests until the trophy unlocks, there’s nothing extraneous you’ll need to do to acquire it.

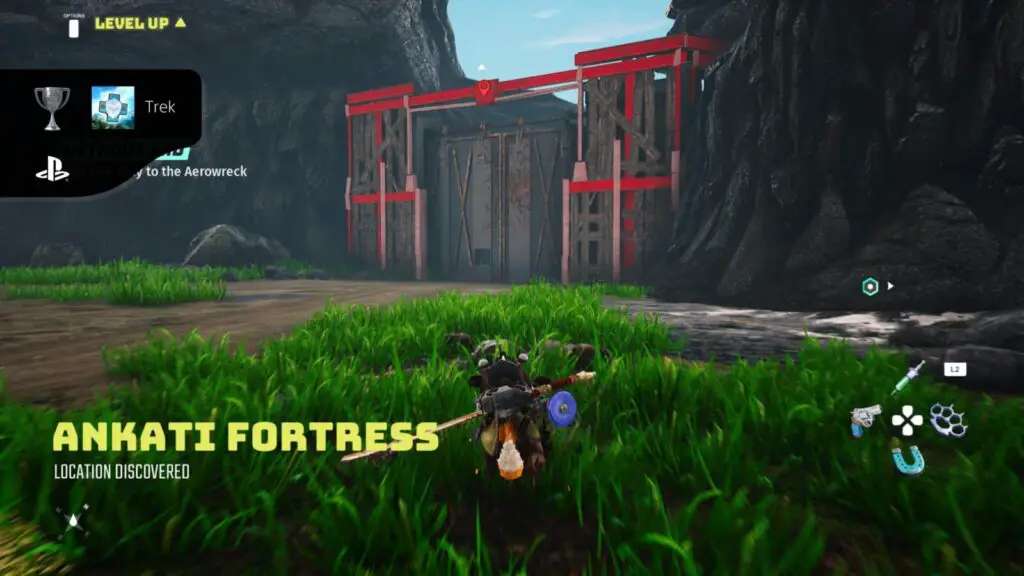
Trek
Discover all 6 Tribe Forts
The 6 Tribe Forts in Biomutant are very easy to find due to the large gold and green discs on the map indicating each Fortress’ location. You can even see them before removing any of the fog on the map.
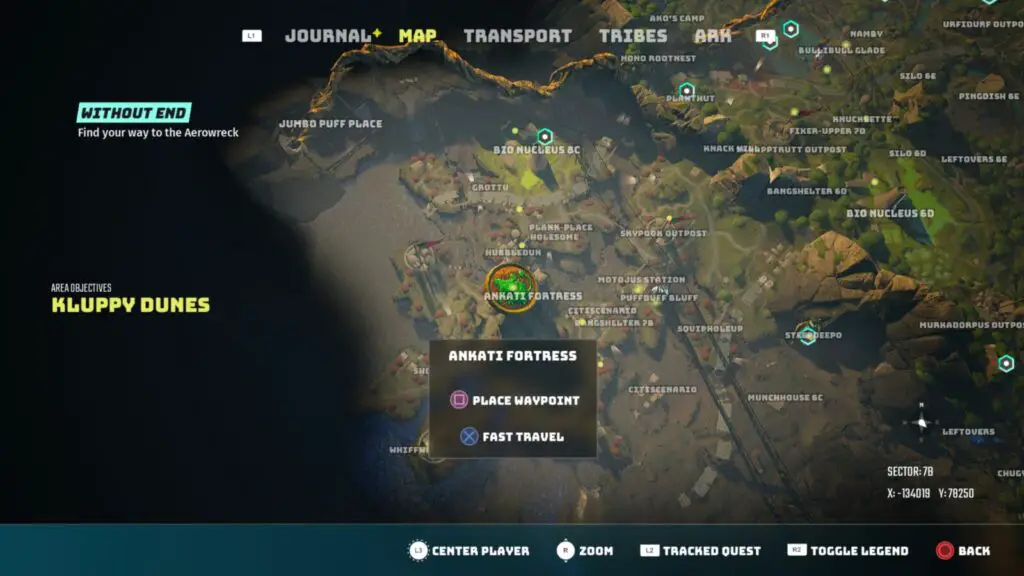
Simply travel to each one to unlock the trophy. You don’t even need to enter the Forts, just get close enough for the game to tell you it has been discovered.
There are 23 important characters in Biomutant, 7 of these are tied to the main story and so don’t appear to count towards the trophy, but the remaining 16 who offer side quests and services all do.
I’ve put together a full Biomutant Side Character Locations Guide which will show you all 23 character locations. I have tried to put them in the most sensible order based on the route you’re most likely to take as the story progresses across the map.
Once you have located them all, the trophy will unlock!
Transport Trophies
The trophies in this portion of our Biomutant Trophy Guide all relate to the various forms of transport in the game; Gnoats, the Googlide, and the Mekton.

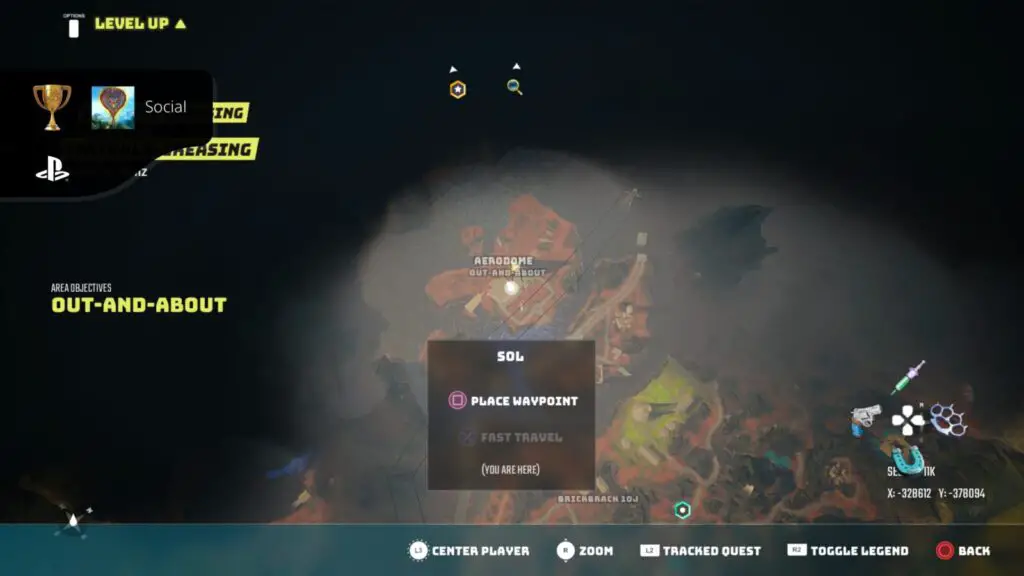
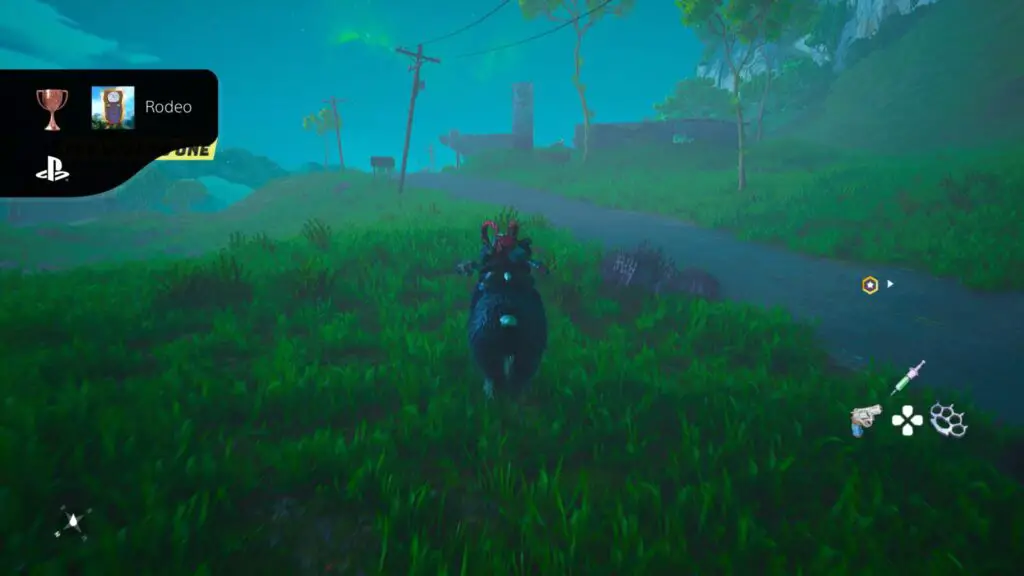
Rodeo
Ride a Gnaut 500 meters
The misleading trophy description here is actually talking about “Gnoats,” mountable creatures you can find in a couple of ways after the game starts. Firstly, once you have allied with a tribe at the start of the game, you’ll get a Side Quest near the Jagni Fortress called “The Open World” with the objective to “Find a Mount.”
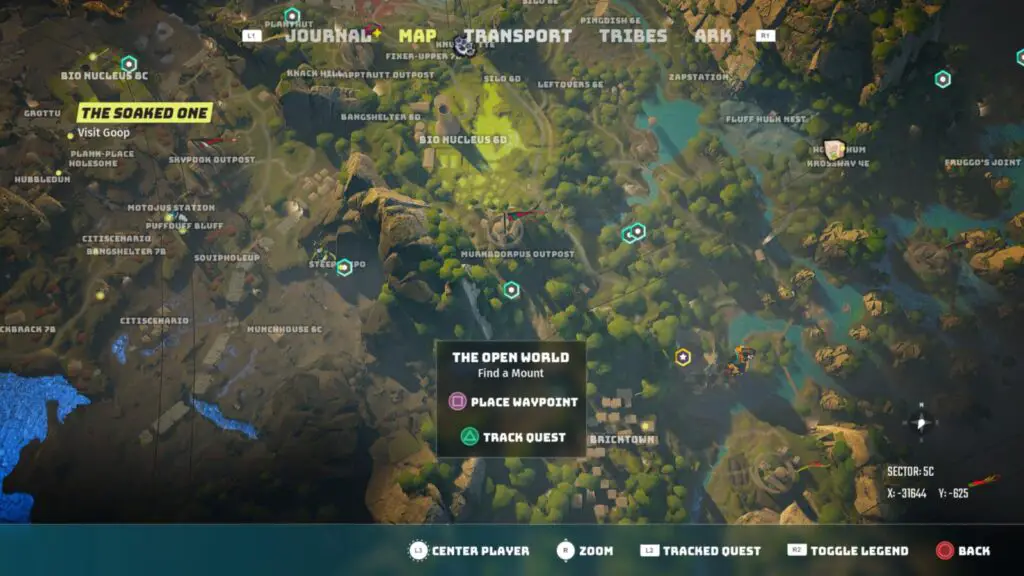
Complete that side quest to acquire a Gnoat. Or you may find Gnoats out in the wild who will be attacked by “The Meat-Eater” Lupa-Lupin when you approach them. Fight off the enemy to save the Gnoat and it will trust you enough to let you tame it.
However you do it, when you finally have a gnoat, simply mount it and ride it a grand total of 500 meters. This isn’t very far, and if you have a waypoint or objective marker to head towards you will be able to see how far you’ve travelled. This also doesn’t have to be all in one trip, it’s a cumulative total, but it wouldn’t really matter if it wasn’t. 500 meters will only take around a minute to travel by Gnoat.

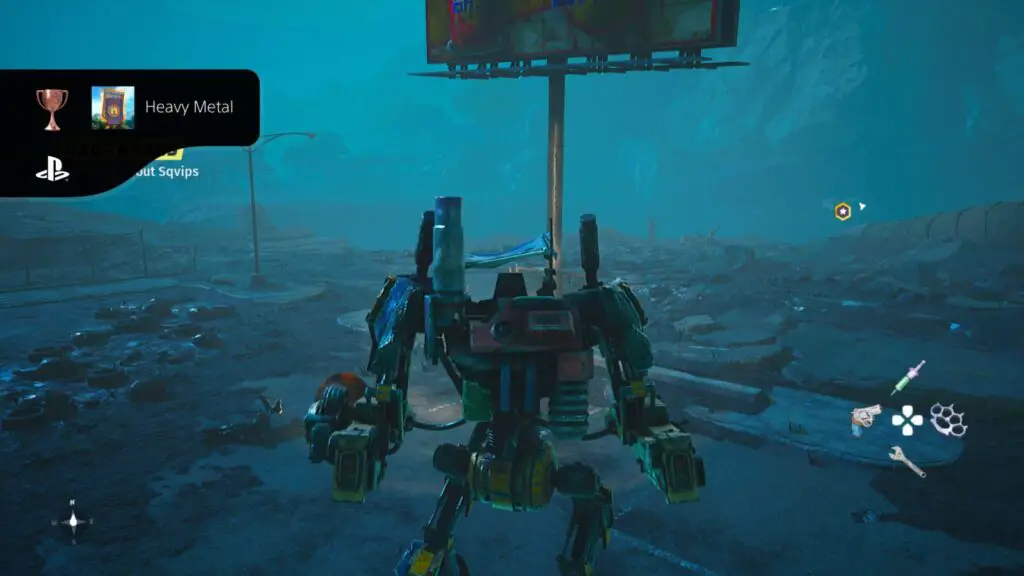
Heavy Metal
Survive 5 minutes in the Mekton while in the Deadzone
You can unlock this trophy as soon as you have the Mekton from Gizmo in the Chugyard. This will happen as part of the story.
Simply enter the Deadzone in the west while wearing the Mekton and then stay inside the Mekton for 5 minutes. You can either put your controller down for 5 minutes and wait it out, or you can explore while you wait. The trophy will unlock once five consecutive minutes have passed.

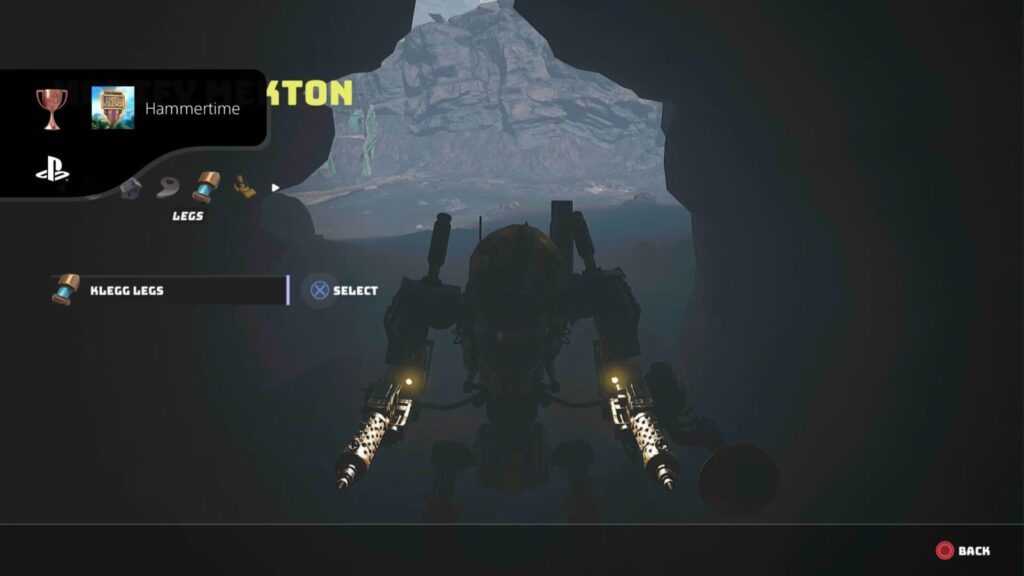
Hammertime
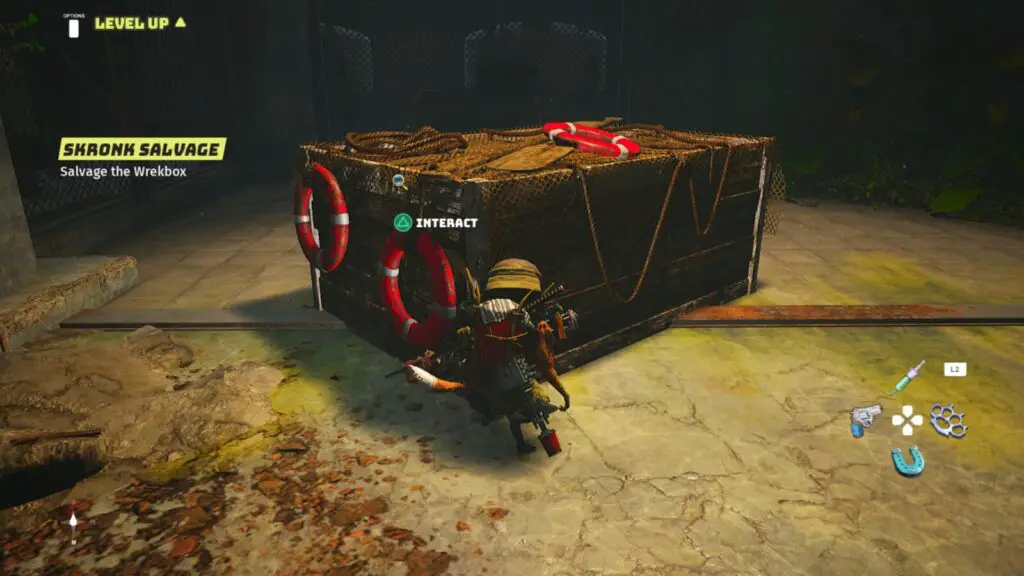
Find and Equip 5 Different Mekton Upgrades
Once you have acquired the Mekton from Gizmo and can begin exploring the Deadzone, you’ll be able to upgrade the Mekton at any time by pressing ![]() . You will first need to find some Mekton parts to upgrade it with, however.
. You will first need to find some Mekton parts to upgrade it with, however.
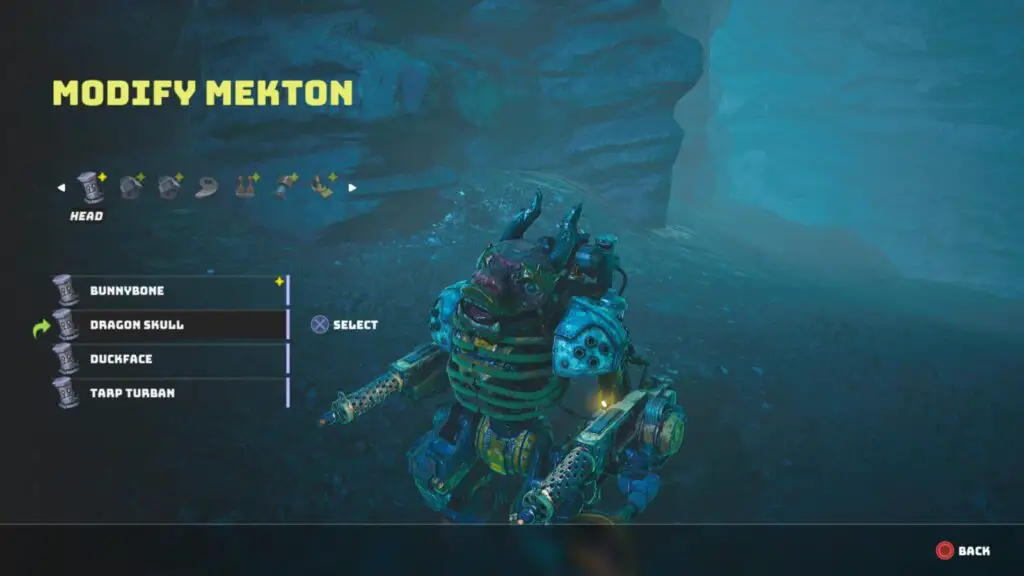
There are many large crates hidden throughout the game which contain Mekton parts. You’ll even need to open one of them as part of the story leading up to acquiring the Mekton. These crates will give you 3 parts each, but you will need five and so just two crates should do the trick.
The crates can be easily found by tracking the “Mekton Wrekboxes” Side Quest which will lead you directly to 14 different boxes.
Once you have five different types of Mekton upgrade, press ![]() (while in the Mekton) to open the Mekton Modification menu and equip each piece of equipment at least once. You do not need all 5 equipped at the same time. The trophy will then unlock right away.
(while in the Mekton) to open the Mekton Modification menu and equip each piece of equipment at least once. You do not need all 5 equipped at the same time. The trophy will then unlock right away.

Nautica
Ride the Googlide across all Water Resistance Levels
There are three Water Resistance Levels you can ride across with the Googlide, and each one requires a higher level of Googlide Engine. In order to unlock this trophy, you will need a Level 3 Engine. I managed to find one from the Googlide parts box in Gumquack Hollow, but just look for Googlide parts until you have one.
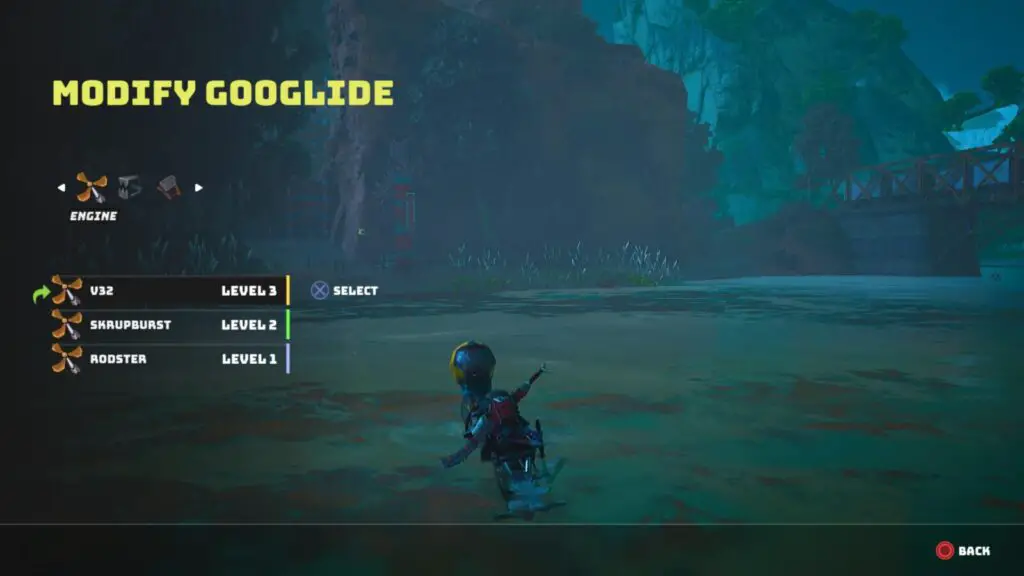
Level 1 Water Resistance is the standard amount of water resistance which you’ll get on all blue water. Level 2 Water Resistance can be found in the green waters off the south coast. The best place to find Level 3 Water Resistance is outside of Rokoblok Outpost, where the water is a brown colour.
Once you’ve ridden your Googlide over all three types of water, this trophy will unlock!

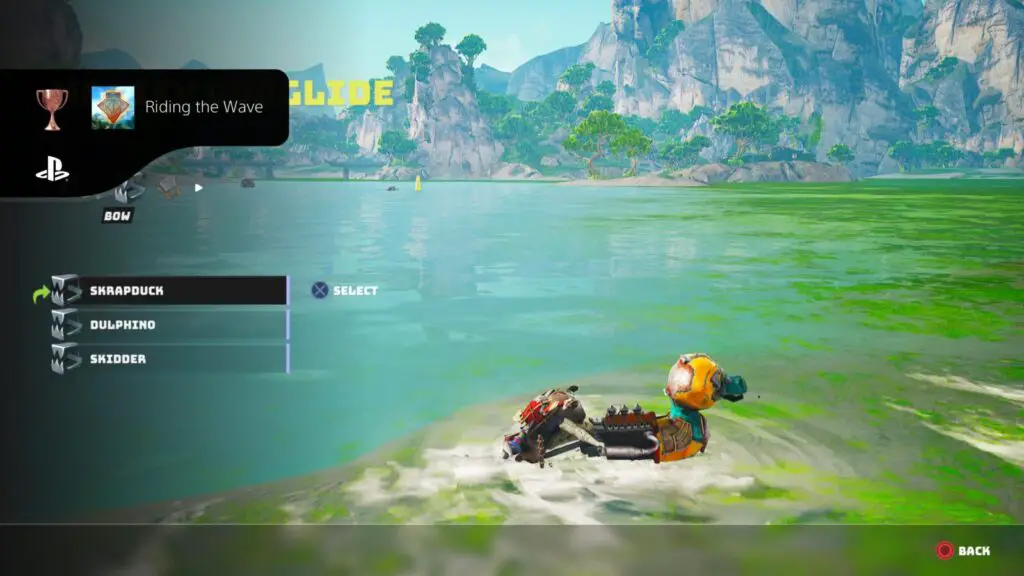
Riding the Wave
Find and Equip 5 Different Googlide Upgrades
You will acquire the Googlide as part of the story while working your way through the bosses and cannot do so until you have found a Googlide Wrekbox with a few Googlide parts inside, as instructed by Goop.
Once you’ve found your first Googlide Wrekbox, you’ll get a side quest called “Googlide Wrekboxes” which will add waypoints for 8 additional Googlide Wrekboxes. You should only need to find 2 or 3 of them to have enough parts for this trophy.
Once you have a good collection of parts to choose from, equip five different parts on your Googlide. To open the Googlide Modification menu, press ![]() to ride the Googlide and then
to ride the Googlide and then ![]() to open the menu. The trophy will unlock when you have equipped at least 5 unique parts at some point. You don’t need to have all 5 parts equipped at the same time.
to open the menu. The trophy will unlock when you have equipped at least 5 unique parts at some point. You don’t need to have all 5 parts equipped at the same time.
Resource Trophies
The two trophies in this portion of our Biomutant Trophy Guide are tied to the game’s currency as well as the various crafting resources. You’re likely to unlock them both naturally, but you should familiarise yourself with their requirements anyway.

In the Green
Possess more than 1000 Greenleaf
Greenleaf is the currency used for selling and buying gear in Biomutant, and 1000 Greenleaf really isn’t that much Greenleaf. There’s three main ways to get Greenleaf for this trophy; looting defeated enemies, selling gear you don’t want anymore to merchants, and collecting Greenleaf from “Green ATMs” which are essentially a loop-shaped branch with a leaf in the center.
Green ATMs will have a small amount of Greenleaf in them which you can collect by jumping through the looped shape of the plant.
Selling items to merchants is probably the quickest way to earn plenty of Greenleaf, though. You can find some merchants near the start of the game at “Humbledun”, west of Skypook Outpost at these co-ordinates X: -146000, Y:61469.
Meet the merchants there and sell them a few items to quickly earn over 1000 Greenleaf.

Elementary
Obtain 10 of each Crafting Resource
In Biomutant, you can find 5 different types of crafting resource; Wood, Metal, Rubber, Plastic, and E-Waste. These resources can only be found in two ways; Either destroy Resource Totems found out in the wild, or Scrap gear that you no longer need.
The latter is naturally the easier way to earn this trophy because you will be getting a lot of gear throughout the game. It shouldn’t take you long to gather 10 of each resource, just keep scrapping items you don’t want or need and the trophy will unlock eventually.
After you’ve earned it, you may wish to instead sell any items you don’t want, this will help with the “In the Green” trophy.

Starstruck
Craft a 7-star Weapon
To unlock this trophy you will need to get a 5-star weapon and then equip it with two one-star Add-ons, provided it can take that many add-ons.
The perfect weapon to do this with is the Pri Murgel sword, the strongest melee weapon in the game, which you can find by following the instructions here. Then, just visit any Outpost Smithy to purchase two one-star add-ons (provided you don’t have any already) and then place them on the sword via the Crafting menu.
Once you press ![]() to commit your add-ons, the sword will be taken from 5.5 stars to 7 stars and the trophy will unlock.
to commit your add-ons, the sword will be taken from 5.5 stars to 7 stars and the trophy will unlock.

Critter Trophies
The trophies in this section of our Biomutant Trophy Guide require you to capture various types of critter found throughout the game. To capture a critter you need to approach it and press ![]() when the prompt appears.
when the prompt appears.

Zoo-do
Capture 20 Sqvips
You’ll be introduced to Sqvips (and the idea of catching them) as part of the story in the Deadzone, after you’ve acquired the Mekton from Gizmo and spoken with Moog, who will send you to a Sqvip cave nearby.
You will be tasked with capturing five of these small squirrel-like critters while you’re in the Sqvipholeup bunker, but there will be more than 5 in there that you’ll be able to find.
Aside from those few (which will give you a good head-start on the trophy) you will need to find the rest as you explore the world. You can find Sqvips everywhere, not just in the deadzone, so you should have no trouble earning this trophy.
Just keep your eye out for them or you’ll end up needing to farm them at the end of your playthrough and that will be no fun. You can usually hear them chittering when one is close so pay attention to what that sounds like.

Quack
Capture 20 Gumducks
Somehow, the developers have entered the wrong name in the trophy description again. The creatures we need to catch are called “Gumquacks,” not “Gumducks.”
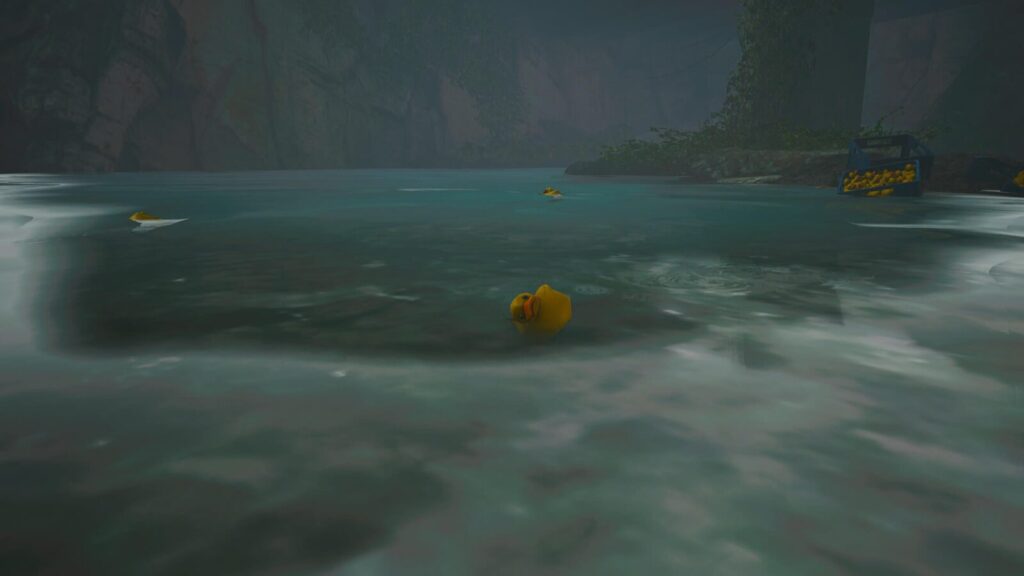
You will be introduced to Gumquacks during the story after meeting Goop in Subnautica Station and acquiring the Googlide. You’ll make your way through a main quest which sends you to Gumquack Hollow to find and capture 5 Gumquacks, which are essentially just Rubber Ducks. 6 of them spawn during the quest.
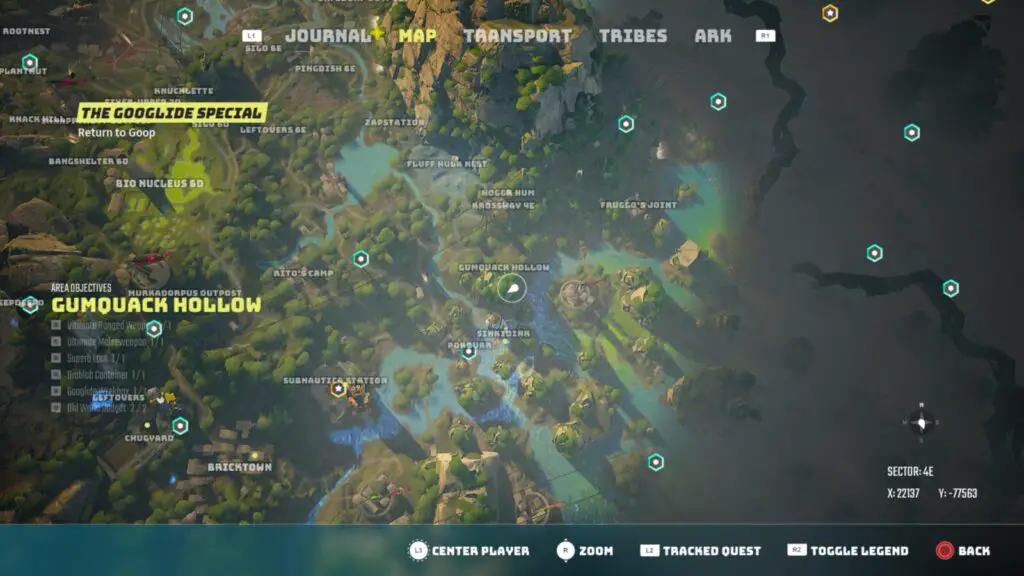
You can actually return to Gumquack Hollow (west of Domp Outpost) to get these same six Gumquacks to respawn over and over again. It takes about 30 minutes of playtime for them to respawn so you can just keep checking back as you play through the game.

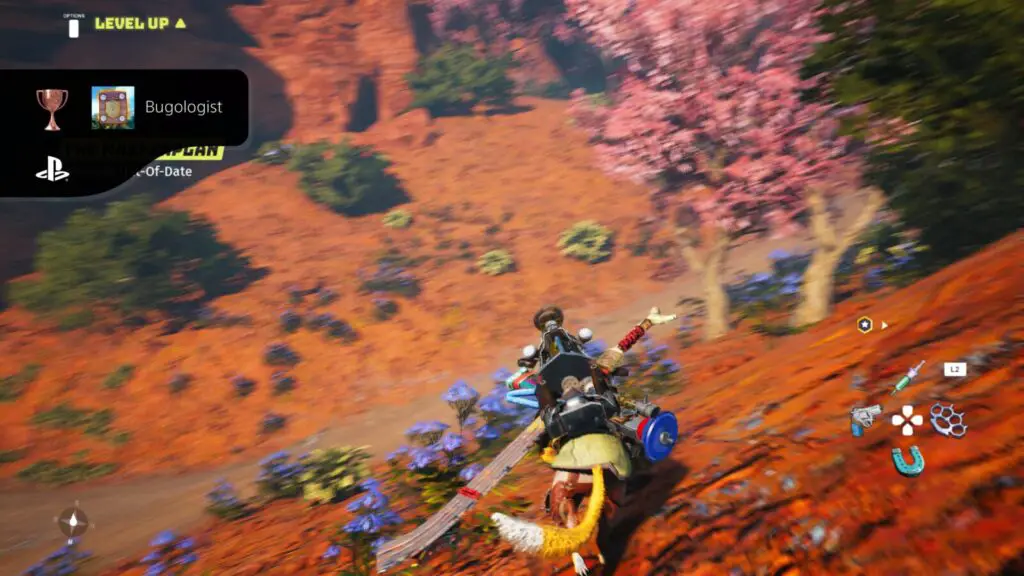
Bugologist
Capture 20 Glittermoths
These rare and hard-to-find glowing butterflies will spawn at random across the world, among groups of smaller butterlfies.
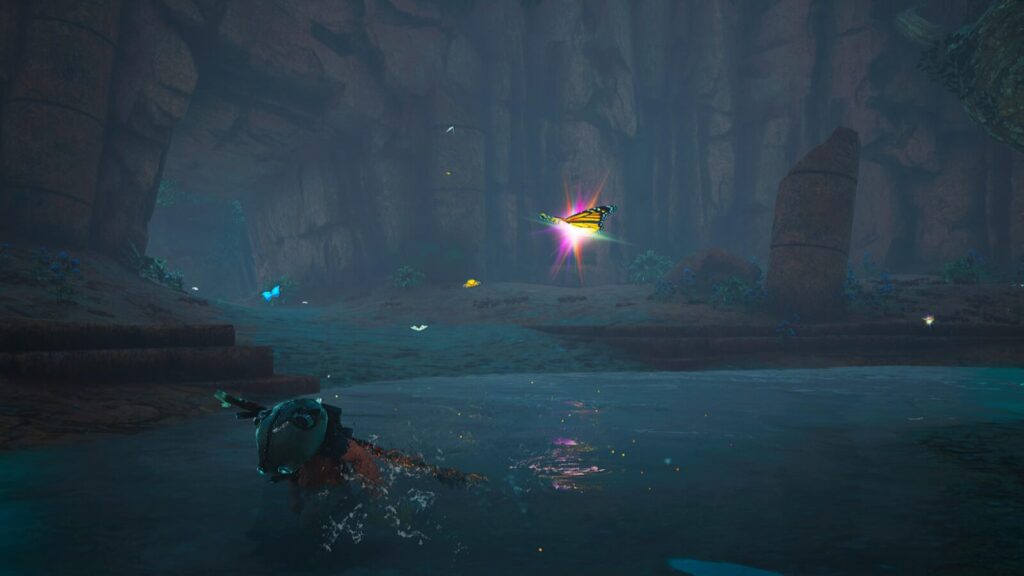
Eventually, as part of the story, you will find yourself inside “Glittermoth Grotto,” where your objective will be to capture 5 Glittermoths and they’re easy to find and catch thanks to this.
Unlike the Gumquacks, they will not respawn at this location. The five you get for this quest is the best head-start you can hope for. For the rest of the game you will need to keep your eyes peeled wide looking for these moths. They spawn very, very rarely, and there’s no ideal spot to farm them. You just have to hope they show up.
Annoying, I know.
Once you have captured a total of 20 Glittermoths overall, this trophy will unlock.

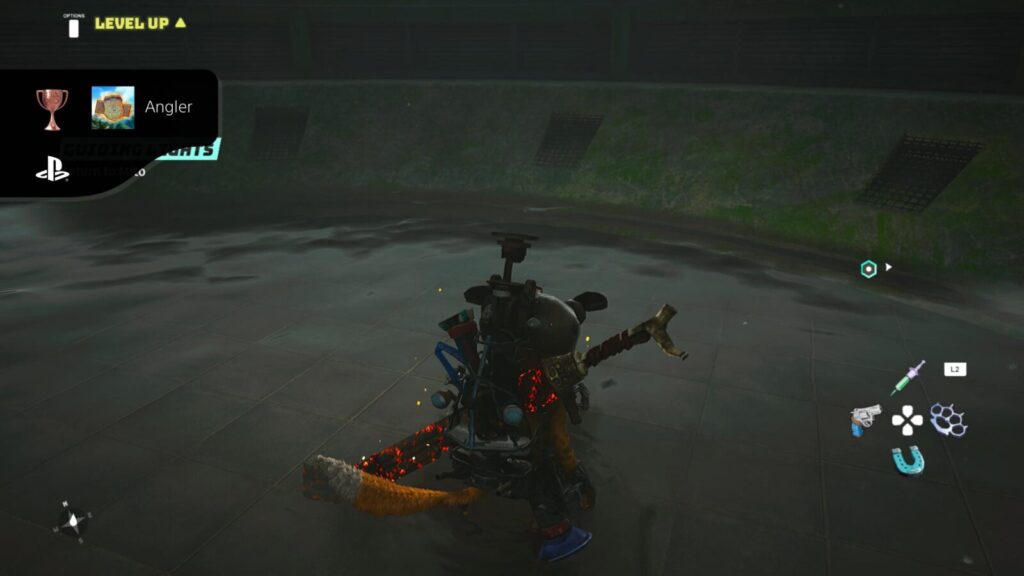
Angler
Capture 20 Guppos
Guppos are black fish which you are likely never to see out in the wild. Luckily, the story will automatically send you to acquire some in the quest leading up to the Western World Eater boss fight.
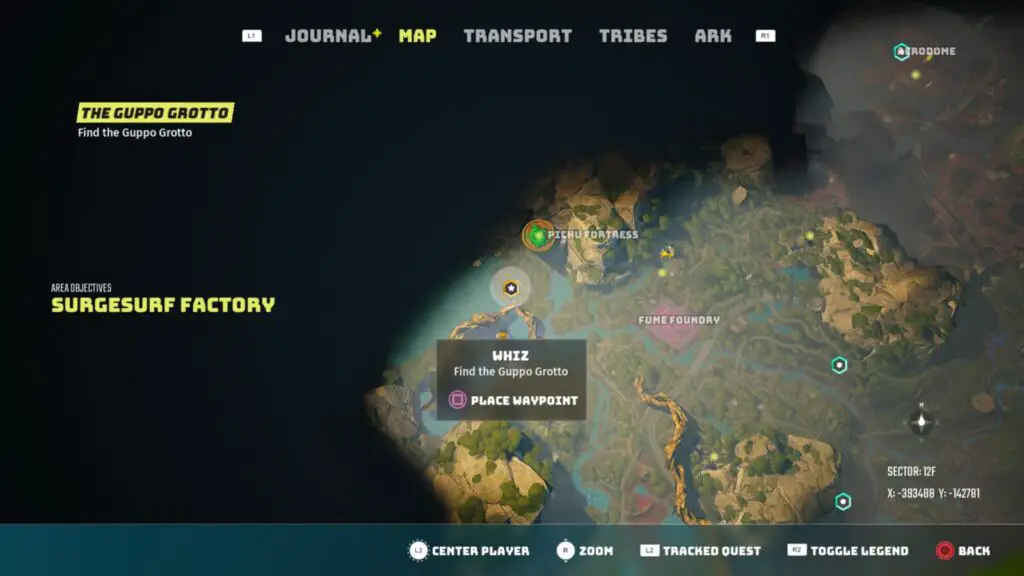
You will be sent to Guppo Grotto, southeast of Pichu Fortress, to collect 5 for Whiz. Just like the Gumquacks, you can fortunately return to this grotto every 30 minutes or so to capture a handful more of them. Repeat this throughout the game to eventually collect 20 in total and unlock this trophy!
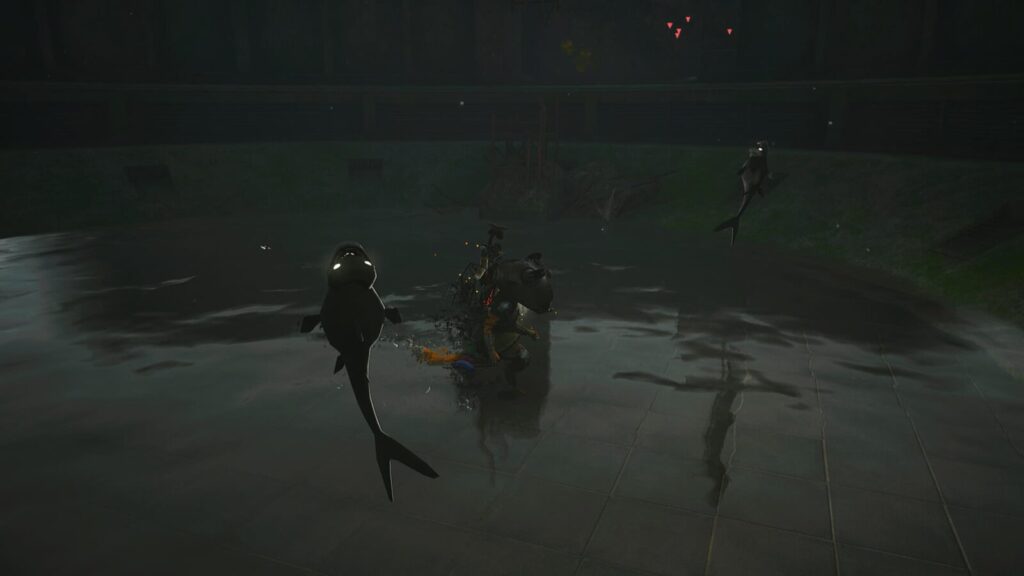
They are pretty annoying to catch because you can only grab them when they jump out of the water. If you just follow them around mashing ![]() , though, you’ll grab them as soon as they decide to jump.
, though, you’ll grab them as soon as they decide to jump.

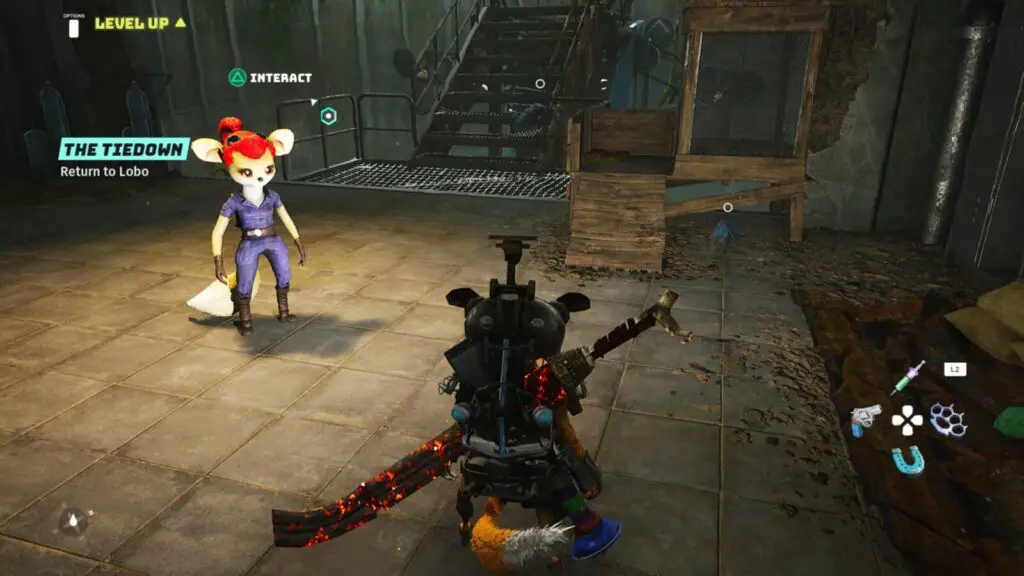
Flap-flap
Capture 20 Pippis
Pippis are small crow-like birds which spawn in flocks around the world. The flocks are easy to locate because they make a lot of cawing and flapping noises when they’re nearby.
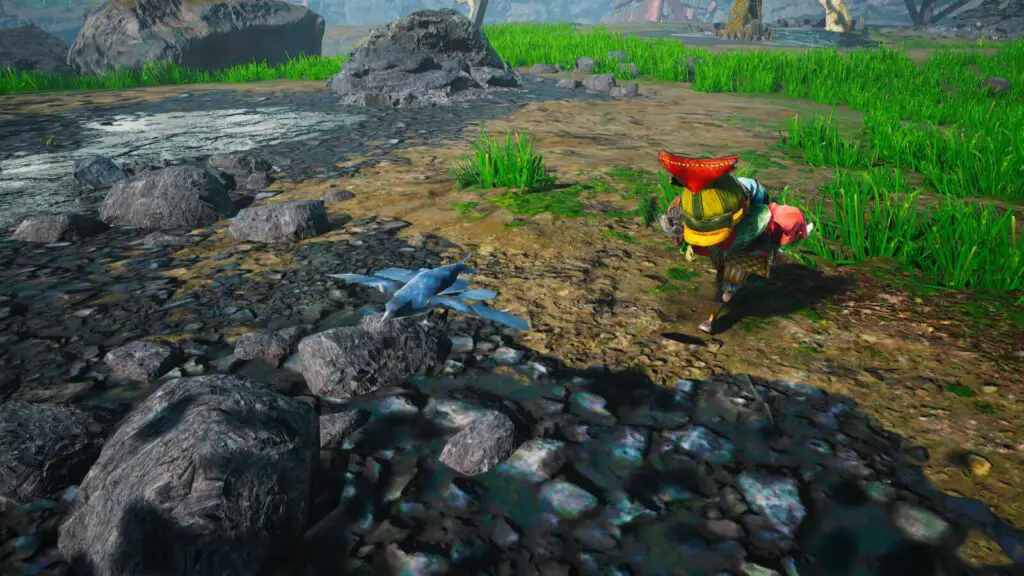
When you approach a flock, the majority of the birds will fly away, but they will always leave behind one bird that cannot fly. Instead, it will just hop arround cawing like crazy. As with all capturable animals, approach it and hit ![]() when the prompt appears to capture it.
when the prompt appears to capture it.
There will be no choice of what to do with the critter like there is with some of the others, and the bird will disappear in a poof of smoke when you capture it, but it counts.
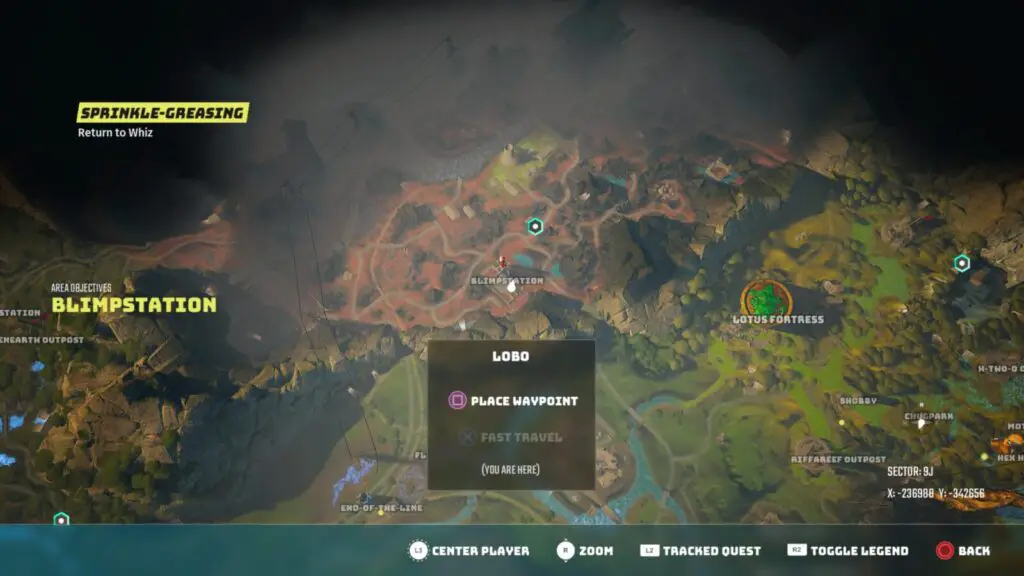
The best place to get these, as there’s no actual story reason to get them, is next to Lobo at the Blimp Station in the Kluppy-Dunes, Co-ordinates – X: -237100, Y: -342700. You will need a Heat Zone Suit to go there, though.
Just entering this area will give you the side quest “The Heat Zone Suit,” the waypoints for which you can then follow to the Heat Zone Pingdish. Activate the pingdish and use it to scan for a signal, that signal will be where the Heat Zone suit is hidden. Head over and acquire it.
Anyway, when you are able to visit Lobo, you’ll find her next to a coop of sorts which will frequently spawn two of these Pippis at once.
PlatGet!


Biomutant Platinum Trophy
Unlock every Trophy in Biomutant
After you have earned every other trophy in this Biomutant Trophy Guide, you will unlock a well-deserved Platinum Trophy.
Thank you for choosing PlatGet as your source for a Trials of Mana Trophy Guide; consider checking our reviews and other guides.
Follow us on Twitter @GetPlat or Instagram @platget for updates on new reviews and guides, as well as small anecdotes about our platinum journeys.


Social
Discover all 16 Side Characters