PlayStation 3, PlayStation 4
Alien: Isolation Trophy Guide


General Info
FAQ
How long does it take to beat Alien: Isolation Trophy Guide and unlock all trophies?
Around 25 Hours.
How difficult is it to beat Alien: Isolation Trophy Guide and unlock all trophies?
Medium (5/10).
Does Alien: Isolation Trophy Guide have online trophies?
No.
Does Alien: Isolation Trophy Guide have difficulty-specific trophies?
Yes.
Does Alien: Isolation Trophy Guide have missable trophies?
Yes, Mercy or Prudence?, One Shot.
Does Alien: Isolation Trophy Guide have glitched trophies?
No.
What is the minimum number of playthroughs required to unlock all trophies in Alien: Isolation Trophy Guide?
One, but Two is recommended..
Does Alien: Isolation Trophy Guide have a Platinum Trophy?
Yes.
Trophy Guide
Alien: Isolation Trophy Guide and Road Map for PlayStation 4
This Alien Isolation Trophy Guide was created to accompany my Platinum Trophy Review, check that out if you have a few minutes and are interested to know my thoughts on the Platinum Journey as a whole.
Alien Isolation Trophy Guide: Before You Begin
Below are some useful tips to help you have the best possible experience platting Alien: Isolation:
- Don’t Run if you can avoid it. Running is extremely loud and on hard difficulty will draw the Xenomorph to your location in seconds. There are some places where it is safe to run, for this use your intuition, but I wouldn’t recommend it ever.
- Loot every container you come across. Lootable containers will have a green light on them, indicating they can be searched with
 .
. - To prevent your inventory getting full, frequently take the opportunity to commit your crafting items to craftable IED blueprints in the
 menu. Even when your inventory is full for each craftable, you’re able to commit crafting items to them. You won’t be able to craft the item if you don’t have space for it, but it will free up inventory space and the item will be ready to craft whenever you next need to.
 - Archive Log, Nostromo Log, and ID Tag collectables will permanently count as collected from the moment you first collect it. If you reload your save, start a new game, or use mission select, that collectable will still count as collected even if you haven’t saved since picking it up. Thanks to this, cleanup is much easier.
For a much easier time platting the game, and a much shorter platinum journey, try to get the One Shot trophy for completing the game without dying, as well as all Collectable Trophies in your first playthrough on Hard Mode. This will remove the need for a second playthrough and cut at least 5-7 hours off your time-to-plat.
Phase One – Hard Difficulty Playthrough without Killing Humans
I know, it’s odd that I would recommend that you complete your first playthrough on Hard, but this way you get the tricky stuff out of the way first freeing you up to get all collectables, misc trophies and your no-death run done on the easiest difficulty.
Hard difficulty really isn’t all that difficult. You just need to play very patiently and carefully to completely avoid detection and you’ll have a pretty easy time.
You may play on Nightmare Difficulty here, but it is not required or even recommended, up to you. If you want to show you’ve got big cojones then go for it, otherwise, there’s really no need to make things more difficult for yourself.
You can, of course, attempt to get all misc trophies, collectables and the no-death trophy in this playthrough too, but again, that’s up to you. Personally, I think it’s worth keeping all other pressures separate from this playthrough so you can just focus on making it to the end.
Unmissable Story Trophies
These trophies in this section of our Alien Isolation Trophy Guide are guaranteed if you manage to reach the end of the story on hard difficulty. Most of them are earned for completing a Mission for the first time.

Awake
Complete the first mission

Welcome to Sevastopol
Complete the second mission

A Perfect Organism
Encounter the Alien in Sevastopol for the first time

A Hunt Begins
Complete the third mission

You Shouldn’t Be There.
Complete the fourth mission

How Do You Feel?
Complete the fifth mission

Caught in the Trap
Complete the sixth mission

An Outpost of Progress
Complete the seventh mission

Not the First
Turn off the beacon

Bait
Complete the tenth mission

Hazard Containment
Complete the eleventh mission

A Synthetic Solution
Complete the twelfth mission

Consultation
Complete the thirteenth mission

Throwing the Switch
Complete the fourteenth mission

The Message
Complete the fifteenth mission

Transmission
Complete the sixteenth mission

Free the Torrens
Complete the seventeenth mission

End of the Hunt
Complete the eighteenth mission

Ripley, Signing Off
Complete the game on any difficulty setting

Survivor
Complete the game on the hardest difficulty setting
A note about the Survivor Trophy: The description says “the hardest difficulty setting”. As mentioned at the top, this isn’t strictly true. The hardest setting is “Nightmare” but you can complete it on “Hard” and still get the trophy.
No-Kill Trophy
Throughout this playthrough, if you are successful in not killing any humans, you will earn the below trophy:

Mercy or Prudence?
Complete the game without killing any humans
You will need to progress from Mission 1 to the end of the game at Mission 19 without once killing a human enemy by your own hands. The following instances will not void the trophy and are acceptable:
- Luring the Xenomorph to kill Humans for you.
- Allowing Androids to kill Humans.
- Allowing NPCs to kill other Humans.
- Flashbanging or otherwise stunning Humans.
It makes sense to try and get this out of the way on your Hard Difficulty playthrough for two reasons; You will be trying to avoid being seen as much as possible anyway and it will allow you to kill as many humans as you like in your second no-death playthrough.
The trophy will pop at the end of Chapter 19 provided you didn’t kill any Humans.
Phase Two – Second Playthrough on Novice Difficulty, No Deaths, All Collectables.
This phase of our Alien Isolation Trophy Guide could just as well become two phases if you still find it difficult to avoid death and get all of the collectables in a single attempt, so feel free to approach this however you are most comfortable. Saying that, Novice difficulty is really quite hilariously easy so I don’t believe you’ll actually have too much to worry about.
Obviously, do your best to find all the collectables, but you can use Mission Select during Phase Three of your trophy journey to find any that you may have missed.
No-Death Trophy
This is the main focus of this second playthrough. You can play aggressively if you like, but you’re welcoming danger that way. I’d recommend you follow the same stealth-centric approach you will have used in your Hard Difficulty playthrough in order to minimise the chances of you getting killed.
By completing your No-Death Run you will naturally pick up a few other no-death trophies along the way, but I’ve put these in Phase Three in-case you end up needing to use Mission Select to get them.

One Shot
Complete the game without dying
It’s quite likely you will end up dying quite a few times thanks to the random nature of the game and the Xenomorph’s positioning, but there are a few ways you can recover your chances, even upon death.
As soon as you die by any means, you will have a couple of seconds to pause the game and select “Load Game” then “Current Save”. This will take you back to your last save location without any deaths on record. However you must be quick about it.
If you wait too long, an autosave icon will appear in the top-right corner, indicating that your death has now been recorded on your “Current Save”. Your only option, then, is to load “Previous Save” from the “Load Game” menu. This will take you to your second-to-last save location with no deaths on record.
If you then die before you can save again, and once again fail to load your save fast enough, both of your saves will have death records on them and you will need to start again.
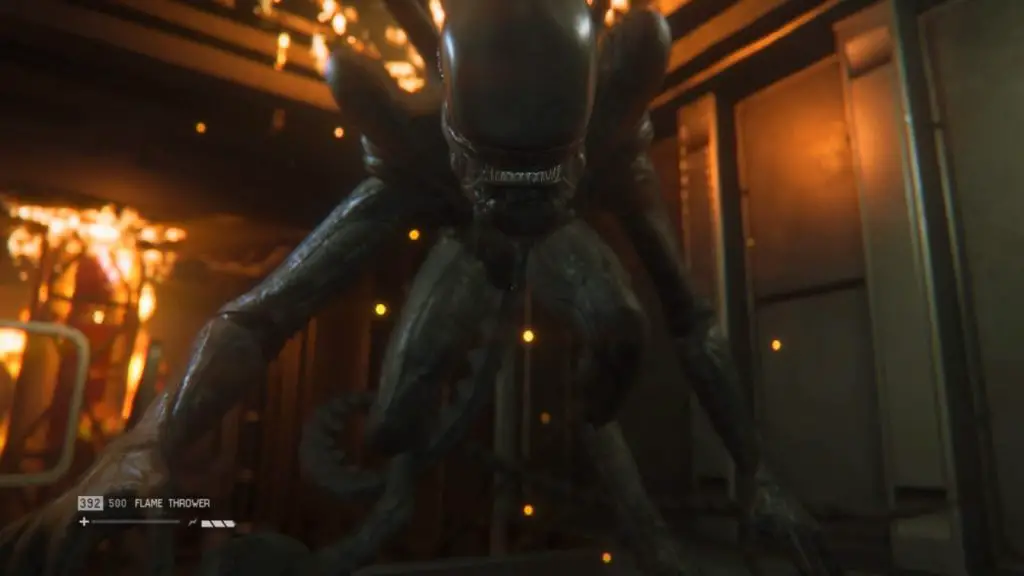
Thankfully, you have plenty of time to do this for almost all enemy types, except from one, which thankfully appears sparingly and always during the same scripted events. The identity of these enemies is a big spoiler, so only look if you care more about this platinum than the game’s story delivery:
Spoilers! Click to Show
Facehuggers! They will appear in the same location every time you play the game, and will announce themselves with a shrill screech.
You will first hear the screech and then about 2 seconds later should be able to see them running at you. If you can’t see them, it may be worth loading your save just in-case you’re about to get your face hugged.
They can also come from unopened eggs. There are only about 4-6 of these throughout the game that you’ll actually need to worry about, but every time you see an unopened egg, burst it with the flamethrower to ensure it’s contents don’t come out and hug your face.

Even when an egg is on fire, the Facehugger can still get you, so keep your distance until you see the egg pop, signifying permanent death of the creature within.
The best way to kill a Facehugger is with a quick burst from the flamethrower, but this can draw enemy attention. As an alternative, try quickly tapping [r2] while looking down, and Ripley will smash the creature with the Maintenance Wrench instead, which is a much quieter way of doing it – though it won’t seem that way.
If a Facehugger gets you, you’ll only get about half a second to pause the game, and missing that window will mean you can’t load your save. and your death will be recorded.
Phase Three – Collectable and Misc Trophy Cleanup
During this phase of our Alien Isolation Trophy Guide you can use Mission Select to get any Collectables you missed.
Collectable Trophies
The below trophies are all tied to Collectables. There are three types of collectable to keep your eye out for; Blueprints, ID tags, and Nostromo/Archive Logs.
You will need to find:
- All 50 ID tags.
- All 10 Nostromo Logs.
- 100/150 Archive Logs.
- At least 7 unique blueprints of the 21 total so that you can craft one of every item type.
A lot of the collectables in the game, especially Nostromo Logs, will be out of your reach from the beginning because you will need to upgrade the cutting torch, acquire a gasmask, and fully upgrade the Security Access Tuner to get full access to the entirety of Sevastopol. The earliest point at which you can access everything — and a good place to collect any remaining collectables, whether during your playthrough or via Mission Select — is during Chapter 16.

The Missing
Collect an ID tag

The Taken
Collect all ID tags
There are 50 ID tags in Alien: Isolation’s main campaign. Once you find your first ID tag, the trophy “The Missing” will pop, but you will need to find all 50 for the trophy “The Taken”.

As collectable progress is stored separately to game progress, finding any ID tag for the first time will mark it as found regardless of whether you save, die, or reload.
You can track how many archive logs you have so far by pressing ![]() and using
and using ![]() /
/![]() to navigate between the different screens. Here, you’ll find a complete numbered list of all the ID tags you’ve found so far, along with details of each tag’s original owner.
to navigate between the different screens. Here, you’ll find a complete numbered list of all the ID tags you’ve found so far, along with details of each tag’s original owner.


Archivist
Collect 10 Nostromo logs in the main campaign
There are just 10 Nostromo logs to find but they are much scarcer than normal Archive Logs, sometimes needing you to go well out of your way to find them or to revisit old locations with better equipment.
For that reason, it’s much easier to handle these as part of mission select cleanup rather than trying to collect them through one of your playthroughs.
As collectable progress is recorded separately to game progress, you need only find each of these once to have them permanently marked as found, regardless of whether you save, die or reload.
The trophy will pop once you find the 10th and final Nostromo Log.


A Record of Disaster
Collect an archive log

Voices of Sevastopol
Collect 100 archive logs
There are 150 Archive Logs. They are mostly found on Terminals you can access throughout the game, some of which are pertinent to story progress and must be accessed regardless of whether you’re going for the trophies. You can also find Audio Terminal Logs in the form of tape recorders.
You will need only find 100 of these, and if you are particularly vigilant you will get this trophy around Mission 12/13.

You can track how many archive logs you have so far by pressing ![]() and using
and using ![]() /
/![]() to navigate between the different screens. Here, you’ll find a complete numbered list of all the archive logs you’ve found so far.
to navigate between the different screens. Here, you’ll find a complete numbered list of all the archive logs you’ve found so far.

As collectable progress is recorded separately to game progress, you need only find each of these once to have them permanently marked as found, regardless of whether you save, die or reload.

Build to Survive
Construct an item

A True Engineer
Construct one of each craftable item
“Build to Survive” will unlock the very first time you craft something. Unless you’re purposefully avoiding doing any crafting, I can’t see why you won’t have this trophy within the first few missions of the game.
“A True Engineer”, however, will ask that you craft every type of item at least one time. To do this, you will need blueprints for each item. You’ll have 3 chances at getting blueprints for each item in a single playthrough as there are v1, v2, and v3 blueprints for them all.
Below are the items you will need to have crafted:
- Medkit
- Noisemaker
- Flashbang
- Smoke Bomb
- EMP Mine
- Pipe Bomb
- Molotov

Unlike other collectables, blueprints do not persist between saves and so you’ll need to do this in a single run. They’re not hard to find though and are often hidden in plain sight along the route you’ll take for the story, just make sure to check any table surface and wall in a new area.
Misc Equipment & Combat Trophies
The following trophies in this Alien Isolation Trophy Guide will require you to use your equipment and weaponry, sometimes in order to dispatch an enemy.

Every Bullet Counts
Use the revolver
For this trophy you just need to use the Revolver one time. The Revolver is a pretty useless weapon and will only come in handy when you’re out of ammo for other weapons.
To earn the trophy, equip the Revolver in the ![]() menu, aim with
menu, aim with ![]() and then fire with
and then fire with ![]() . The first time you do this, the trophy will be yours.
. The first time you do this, the trophy will be yours.


I Admire its Purity
Detect 30 targets with the motion tracker
For this trophy all you need to do is detect 30 unique targets using the motion detector.

The motion detector will be unlocked from Mission 4 onwards and can be brought up with ![]() . It will show any humans, androids, or indeed the Xenomorph using a radar-like system.
. It will show any humans, androids, or indeed the Xenomorph using a radar-like system.
Targets will only appear on the scanner if they are in motion and they will display as a blip depending on their proximity from you. The trophy will pop once you have seen your 30th unique target indicated on the detector.
I used the Motion Detector so much that I had this trophy mid-way through Mission 6 so it’s highly likely that you will earn this trophy naturally provided you’re using the Motion Detector as much as possible… Which is obviously recommended.

Shock to the System
Use the stun baton
Once you have unavoidably acquired the Stun Baton in Mission 6, you will need to use it once to unlock this trophy. You don’t even need to use it on an enemy, though, as simply hitting the wall with it will count.
First, select the stun baton by holding ![]() to open the weapon wheel and then using
to open the weapon wheel and then using ![]() to highlight it before letting go of
to highlight it before letting go of ![]() . Then, with the baton equipped, hold
. Then, with the baton equipped, hold ![]() and press
and press ![]() while close to a wall or enemy.
while close to a wall or enemy.
The trophy will pop as soon as you use it.


Stunned
Knock down a human or stun an android with a non-lethal attack
Stunning an enemy can be done with the following equipment:
- Flashbang – only works on human enemies.
- Maintenance wrench – only works on human enemies. Hit them once to stun them.
- Stun Baton – works on both human and android enemies.
- EMP Mine – only works on un-protected android enemies.
The easiest way to do this is by either using a flashbang on a group of humans or an EMP mine on an Android.


Use With Caution…
Use the shotgun
Once you have acquired the Shotgun in Mission 11, you will need to use it once to unlock this trophy. You don’t even need to use it on an enemy, though, as simply firing it once will count.
First, select the Shotgun by holding ![]() to open the weapon wheel and then using
to open the weapon wheel and then using ![]() to highlight it before letting go of
to highlight it before letting go of ![]() . Then, with the Shotgun equipped, hold
. Then, with the Shotgun equipped, hold ![]() and press
and press ![]() to fire.
to fire.
The trophy will pop as soon as you fire it.


Retreat From Fire
Cause the Alien to retreat using a molotov
To earn this trophy you will first need one of three Molotov Blueprints found throughout Sevastopol.
Once you have the ability to craft Molotovs, create one in the ![]() menu, equip it, and then throw it at a Xenomorph by holding
menu, equip it, and then throw it at a Xenomorph by holding ![]() and then pressing
and then pressing ![]() . The trophy will then pop.
. The trophy will then pop.


Light ’em Up
Use the flamethrower

Back Off
Cause the Alien to retreat by using the flamethrower
The trophy “Light ’em Up” will unlock from you simply firing the Flamethrower once, even if you’re not aiming it at anything in particular.
Once you have acquired the Flamethrower in Mission 10, select it by holding ![]() to open the weapon wheel and then using
to open the weapon wheel and then using ![]() to highlight it before letting go of
to highlight it before letting go of ![]() . Then, with it equipped, hold
. Then, with it equipped, hold ![]() and press
and press ![]() to fire.
to fire.
For the trophy “Back Off” you will want to do this while aiming at the Xenomorph, causing it to retreat. This way, you can earn both trophies at once if it is the first time you’ve used the flamethrower.

You may want to get this trophy as part of mission select cleanup rather than antagonising the creature during one of your playthroughs, but you could always do it after a save and then reload once you have the trophies.

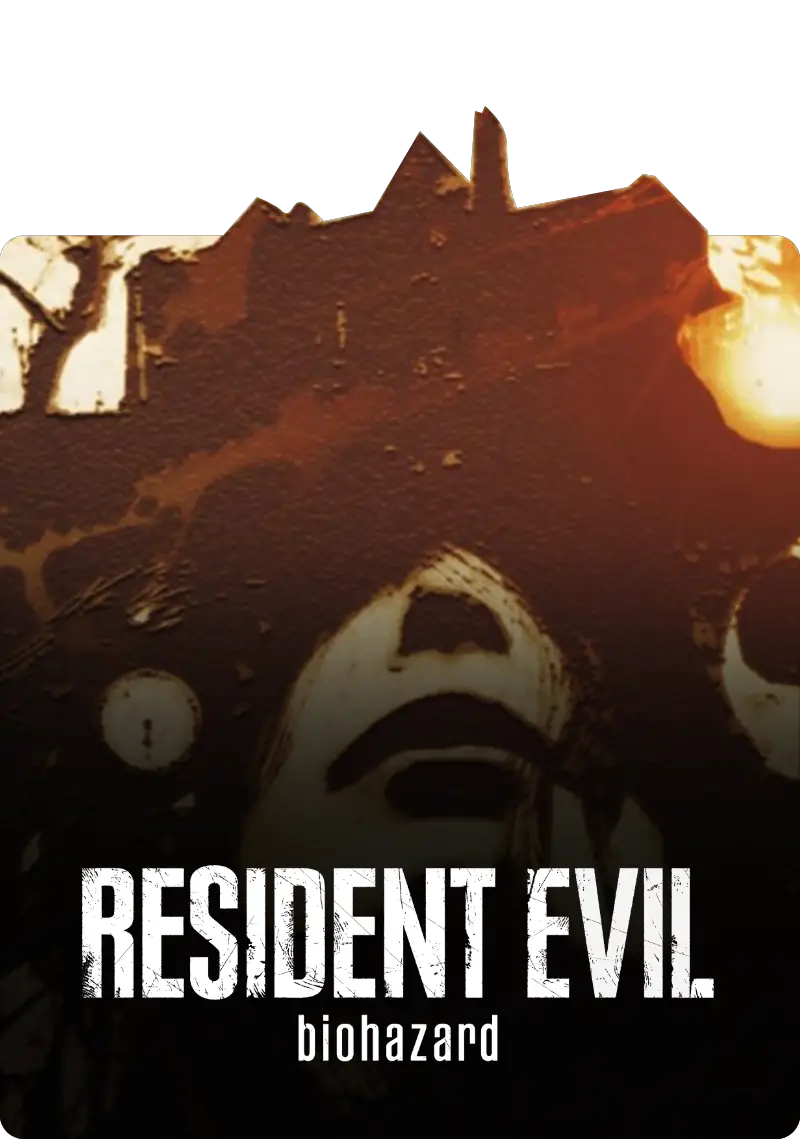
This Should Work
Use the bolt gun
Once you have acquired the Bolt Gun in Mission 14, you will need to use it once to unlock this trophy. You don’t even need to use it on an enemy, though, as simply firing it once will count.
First, select the Bolt Gun by holding ![]() to open the weapon wheel and then using
to open the weapon wheel and then using ![]() to highlight it before letting go of
to highlight it before letting go of ![]() . Then, with the Bolt Gun equipped, hold
. Then, with the Bolt Gun equipped, hold ![]() to aim and then hold
to aim and then hold ![]() to charge up a shot. After a couple of seconds or so, release
to charge up a shot. After a couple of seconds or so, release ![]() to fire the bolt. The trophy will then pop.
to fire the bolt. The trophy will then pop.

Self Defense
Kill 10 humans
This is a trophy you likely won’t earn in your first playthrough as you should be avoiding killing Humans. However, during your second playthrough and the cleanup phase if you have the Mercy or Prudence? trophy, you’re welcome to begin killing any Humans you see.
Hitting an unaware human with the Maintenance Wrench by pressing ![]() is the easiest way to kill them, however they are all pretty susceptible to Shotgun, Revolver, and Flamethrower damage. Not to mention Molotovs and Pipe Bombs which are devastatingly powerful against Human enemies.
is the easiest way to kill them, however they are all pretty susceptible to Shotgun, Revolver, and Flamethrower damage. Not to mention Molotovs and Pipe Bombs which are devastatingly powerful against Human enemies.
Once you have killed your 10th Human enemy, the trophy will pop.


Fault Detected
Kill an Android

My Turn Now
Kill an android using only the maintenance jack
For the above two trophies you will need to kill an Android. You can bundle both of these trophies into one by using the maintenance wrench to kill your first Android, but the easiest way to take one out would be with a Pipe Bomb. Simply throw a Pipe Bomb at an Android from a safe distance and it will die immediately.

Androids with Rubber Suits on will take two Pipe Bombs to defeat.
Killing an Android with a Maintenance Wrench for “My Turn Now” is actually quite difficult, if ever you try to hit one with a wrench while facing them, they will just catch your wrench and push you away. Your best bet is to come up behind an unaware Android somewhere early in the game such as Mission 4 and then press ![]() to bonk them on the bonce with the maintenance wrench.
to bonk them on the bonce with the maintenance wrench.
This won’t kill them, even on Novice difficulty, so you will need to retreat to safety in a vent (they don’t follow you into vents) and then once the Android has given up looking for you, sneak up on him again and give him another whack.
You may need to repeat this a few times until the Android dies and your trophy pops.


Not a Scratch
Escape from android combat without taking damage
For this trophy you just need to be seen by an Android and then escape and hide until it gives up looking for you. Killing the Android is also an option but the trophy attempt will be voided if you take any damage.
There’s a great opportunity for this during Mission 4. There’s an android in a large control room who is moving between 6 monitors on the eastern side of the room. Behind this android is a vent which goes back towards the elevators and has floor-based exits on opposite sides of the control room.
To earn this trophy, you can let him spot you and then retreat into the vents where he won’t be able to follow.
Another strategy for this, which I prefer, is to use an EMP Mine. Craft an EMP mine and then place it on the ground between you and an Android. Get the Android’s attention bey running back and forth a little and then allow him to approach you.
As long as the EMP Mine is between you and the Android, he will be electrocuted before he’s able to reach you, which gives you opportunity to escape and hide somewhere until he gives up looking for you.

Misc Interaction Trophies
The below trophies in our Alien Isolation Trophy Guide will all require you to utilise a feature of the game such as hacking or entering vents a certain number of times.

Seegson Security Bypass
Perform 10 successful hacks
Once you have the Security Access Tuner from Mission 3 of the main campaign, you’ll be able to use it to access locked doors and computers.
You’ll get a minigame on the handheld device in which you need to use ![]() to find the signal and then
to find the signal and then ![]() and
and ![]() to highlight and select the correct symbols to successfully hack the console you’re attempting to bypass.
to highlight and select the correct symbols to successfully hack the console you’re attempting to bypass.

To unlock this trophy you just need to use this tool 10 times, which you should actually be able to do naturally without really even thinking about this trophy.


Seegson Systems Expert
Complete 10 minigames successfully
Minigames are hacking sequences you will not need the Security Access Tuner to complete. Typically a computer which needs accessing via a short minigame will have a number on it’s green display.
There are a few different minigame types which are delivered randomly at specific consoles. In order to unlock this trophy, you simply need to complete 10 of these minigames.
As you will often need to complete them to progress the game it is highly likely you’ll earn this trophy naturally.


Power Games
Access 10 different rewire points
Rewire Points can be found in many different places, they are small grey wall-mounted panels with a green light on the front cover. When you approach a Rewire Point you can press ![]() on it to open the cover and reroute power resources via the control panel.
on it to open the cover and reroute power resources via the control panel.
You will need to use a few of these for story progress but in order to earn the trophy, may need to go out of your way to access a few more.
They are almost always found under or near a security camera, so whenever you see one of those, you should use the rewire panel to route power away from the camera, thus deactivating it. If you do this at every security camera you see, you should unlock the trophy about mid-way through the game.


She’s in the Vents…
Use the vent system 20 times
There’s a pretty strong chance that this trophy will come to you naturally. Often, vents are the best or even the only way to circumnavigate a threat without being seen, so you’ll be using them a lot throughout your two playthroughs.
As you enter a vent for the 20th time, the trophy will pop.

Mission-Specific Trophies
The trophies in this section of our Alien Isolation Trophy Guide will require you to achieve a certain accomplishment within a specific level. These may well come naturally during your two initial playthroughs, due to the fact we will be approaching with no-deaths and no-kills in mind.
If not, though, you can use Mission Select to load the required mission and attempt the requirements.

Just out of Reach
Contact your team and escape Comms without being attacked by an android
You will need to earn this trophy during Mission 4 of the game. You can try to earn this during one of your two playthroughs, but failing that you can just load up the mission on Novice difficulty via Mission Select and then complete the mission in full stealth.
Use vents and distractions to avoid the Androids throughout the stage and the trophy will pop once you reach the elevator at the end of the mission without taking any damage from an Android.

Note that you can get spotted and still earn the trophy, provided you manage to escape unscathed.

Hide. Run. Survive.
Complete the fifth mission without being killed by the Alien
You will need to earn this trophy during the fifth mission by completing it without having a lethal run-in with the Xenomorph. This trophy will have already unlocked if you completed your no-deaths run successfully.
You’ll find yourself in the hospital wing looking for some items required for progression, which is a breeze at first until the alarm begins to sound. This alarm marks the arrival of the Xenomorph and you will then need to be very careful about getting spotted. Use the motion detector to ensure you’re not getting too close to the Xenomorph, and keep your eyes peeled for saliva dripping from vents in the ceiling.
It’s actually okay to get caught and even grabbed by the Xenomorph, this happened to me a few times during my own attempts. The trophy will not become void unless you see a save icon in the top-right corner of the screen. If you pause the game as soon as you are grabbed and Load your current save before the save icon has appeared, you will be able to continue from your last save without needing the restart the stage.
If you do see the save icon, select “Load Previous Save” instead of “Current Save” and you will, again, be able to proceed without worrying about the trophy becoming void.
The trophy will pop once you are in the newly-unlocked elevator at the end of the mission.


Mind Your Step
Navigate Reactor Maintenance without dying
Completing Mission 14 without dying is a difficult feat for sure, you will need to avoid many hostiles in a dark and difficult-to-navigate location.
Note that if any enemy attacks you, you can still stop the trophy being voided by pausing the game and selecting “Load Game” and then loading your current save before you see the auto-save icon in the top right. If you’ve been killed and you saw the auto-save icon, this save is ruined and you will need to select “Load Previous Save”.
If it happens again on this save, your chances are void and you’ll need to try again from Mission Select.
My advice for this trophy contains some pretty heavy spoilers, so only peek under here if you’re sure it’s safe to do so:
Spoilers! Click to Show
This level introduces face-huggers. If they catch you, you won’t be able to pause the game and so can’t load your save before it becomes void. You can use the [ps] button to close the game but unfortunately there’s no guarantee that your save won’t still be voided after doing this.
So, listen out for them, they make a shrill screaming sound when they’re running at you, so if you hear it immediately start looking at the floor. You can hit [r2] when they’re close to squish them before they get to you, or you can use the Flamethrower to burn them to death.
If one comes at you inside a vent, you will need to use the Flamethrower as just tapping [r2] to pull out the maintenance wrench wont work inside vents… As I discovered the hard way.
Face-huggers can also come out of un-hatched eggs. If you see any eggs which are fully closed at the top, then shoot them with a quick burst from the flamethrower to kill the egg and it’s face-hugger so you don’t need to deal with it.
The Xenomorphs in this mission aren’t too much bother, as long as you’re just careful to keep track of their whereabouts and not run straight into them. Their paths are a little more rigid and scripted than the main Xeno from earlier in the game, so they can be a little more predictable, thankfully.
Let the Xenomorph Kill You 100 Times
Given that for most of your playthroughs, you will be trying your best not to get killed by the Alien, there’s a good chance that for this last trophy you will need to grind out 100 deaths at the Alien’s hands…

100 Times Too Many
Get killed by the Alien 100 times
The best way to farm this is to find a save spot near the Alien and save there. Then, with the Xenomorph nearby, start making a lot of noise. Run back and forth, shoot the revolver, throw a flashbang, hit the wrench on the wall. This will draw the Alien to you where they will kill you.
Chapter 14 is particularly good for this, but I did it in Chapter 18 at the end of my Novice Difficulty run, as there’s a guaranteed Xenomorph spawn near a save there.
Alien Isolation Trophy Guide: Plat Get!

Alien: Isolation
Unlocked every Alien: Isolation trophy
Obviously, once you have every single trophy in our Alien Isolation Trophy Guide, this shiny new platinum is all yours! Enjoy it, you’ve earned it!
Thank you for choosing PlatGet as your source for this Alien Isolation Trophy Guide, consider checking out our reviews and other guides!
Follow us on twitter @GetPlat or Instagram @platget for updates on new reviews and guides, as well as small anecdotes about our platinum journeys.