PlayStation 4, PlayStation 5
Minecraft Legends Trophy Guide


General Info
FAQ
How long does it take to beat Minecraft Legends and unlock all trophies?
Around 25 Hours, possibly quicker if you start off on Legendary Difficulty.
How difficult is it to beat Minecraft Legends and unlock all trophies?
Hard (7/10).
Does Minecraft Legends have online trophies?
Yes, Working Together , The Way of the Sword , Nailbiter , Feed the Flames .
Does Minecraft Legends have difficulty-specific trophies?
Yes, Legendary Hero .
Does Minecraft Legends have missable trophies?
No.
Does Minecraft Legends have glitched trophies?
No.
What is the minimum number of playthroughs required to unlock all trophies in Minecraft Legends?
It is recommended to do an easy playthrough and then a Legendary one, but it can be done in just one Legendary playthrough if you're brave.
Does Minecraft Legends have a Platinum Trophy?
Yes.
Trophy Guide
Minecraft Legends Trophy Guide and Road Map for PlayStation
Welcome to our Minecraft Legends Trophy Guide. Minecraft Legends is another example of Microsoft looking down at one of their only successful IPs and saying to themselves “How can we make Minecraft into literally anything but the Minecraft they know and love.” The game is strange, has barely any gameplay resemblance to the actual minecraft, but does surprisingly stand up on it’s own as a relatively nice-looking and fun adventure.
For Trophy Hunters, you’ll find that the majority of the trophy journey is a 3/10 walk in the park with plenty of simple trophies to collect on the way. However, just one trophy—Legendary Hero—asks that you complete the game on Legendary difficulty. This one trophy alone tips the overall journey’s difficulty up significantly.
You have two options, pretty much; You can start the game on Legendary difficulty and slog through a genuinely unpleasant experience before switching the difficulty to easy for trophy cleanup once you have Legendary Hero.
Alternatively, you can first experience the game on a lower difficulty and collect every trophy until the only one left is Legendary Hero. Then, cap off your trophy journey with a gruelling Legendary Difficulty playthrough, in which your earned knowledge of the game should prove exceptionally useful. I recommend the latter, so that’s what this guide will focus on, but just know that the option is there if you want to get things over with a bit quicker.
Phase One | Complete the Story Campaign
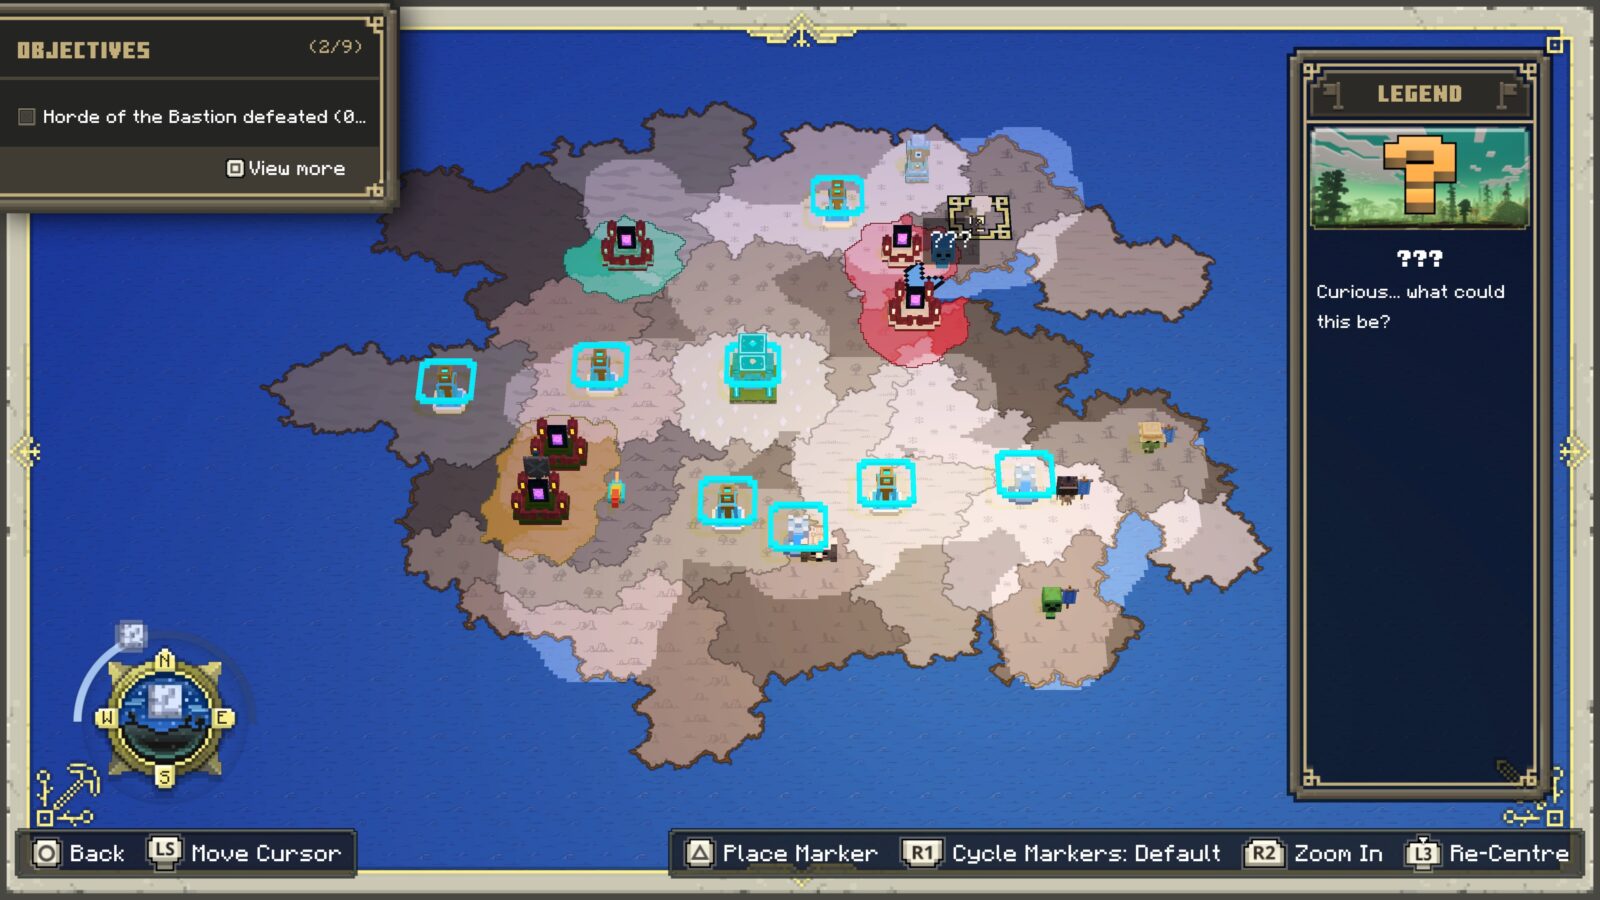
To beat the story campaign in Minecraft Legends, you will need to destroy the bases of all three factions in the game to then spawn a final boss. After you’ve defeated that boss, you can load your save back up and continue playing in that same world to mop things up!
As such, you can spend as much or as little time as you want on side-content and other trophies, with the option to return and mop them up in phase two of this trophy journey.
That said, there are still a few things I’d recommend that you do go out of your way to do as you make your way through the story. These things are entirely optional at this point in your trophy journey, but getting them out of the way sooner rather than later will make not only beating the game easier, but also reduce the amount of future cleanup you leave for yourself:
- Try not to always rush the portal at a base. You do need to try and destroy 250 buildings in a single world for Are These Made of Nether Wart?, so taking the time to dismantle outposts and destroy defences at enemy bases will go a long way toward unlocking it.
- Go and recruit the Skeletons, Creepers, Zombies, and “First” Golems. They’re easily some of the best units in the game, and you’ll have a much easier time with them on your side. See Alliance Trophies.
- Make sure you install at least 5 Banner Improvements at the Well of Fate. See Full Force.
Unmissable Story Trophies

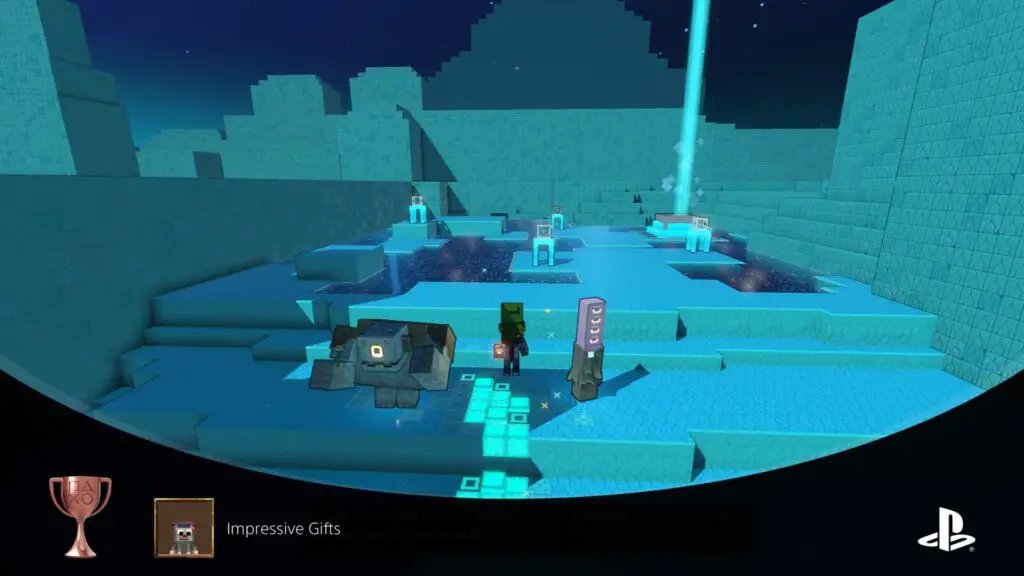
Impressive Gifts
Complete the tutorial.
You will have to complete the tutorial right at the start of the game and don’t really have a say in it. As such, the “Impressive Gifts” trophy will unlock naturally.

With Light Comes Hope
Destroy the Night Beacon Base.
After completing the designated Tutorial section of the game, you’ll be thrust into… Another tutorial. A more lengthy one. When done, you will unavoidably receive the “With Light Comes Hope” trophy.


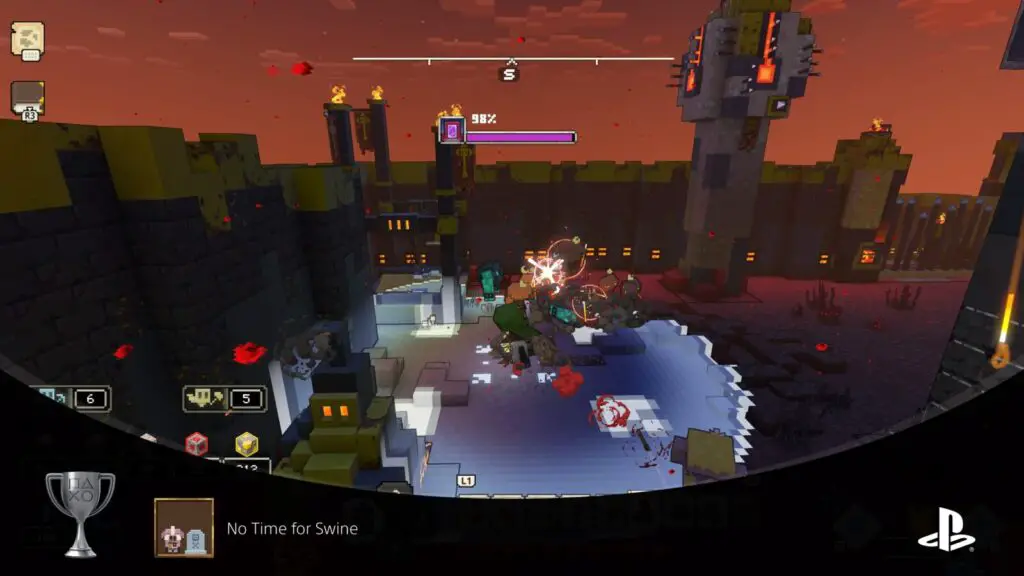
No Time for Swine
Defeat 1,000 piglins in a single world.
Even on Easy Difficulty, you would not be able to progress very far in the story without defeating many, many more than just 1,000 Piglin enemies. As such, the “No Time for Swine” trophy will unlock naturally when you kill your 1,000th Piglin.

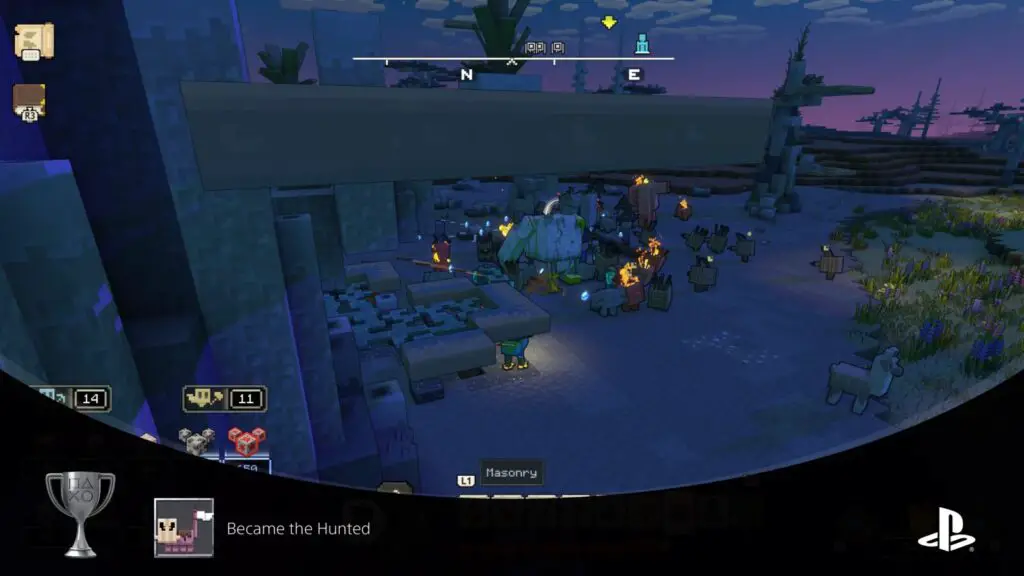
Became the Hunted
Defeat The Beast.
You will unavoidably receive the “Became the Hunted” trophy upon defeating the Horde of the Hunt’s final boss—The Beast—and removing their bases from the map. This is required for story progress so you can’t miss it.

Broken
Defeat The Unbreakable.
You will unavoidably receive the “Broken” trophy upon defeating the Horde of the Bastion’s final boss—The Unbreakable—and removing their bases from the map. This is required for story progress so you can’t miss it.


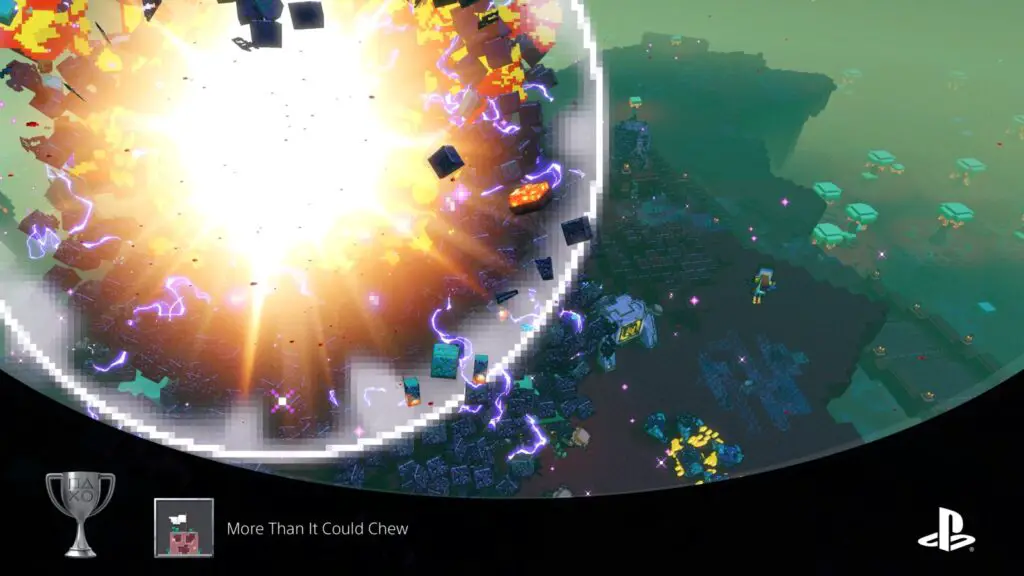
More Than It Could Chew
Defeat The Devourer.
You will unavoidably receive the “More Than It Could Chew” trophy upon defeating the Horde of the Spore’s final boss—The Devourer—and removing their bases from the map. This is required for story progress so you can’t miss it.

Defender of the Overworld
Defeat The Great Hog.
After defeating all three Hordes, penultimate story events will lead you into a final battle with the Great Hog. Upon defeating it, you’ll conclude the story campaign and unlock the “Defender of the Underworld” trophy.
Phase Two | Cleanup on your First Playthrough
Many of the trophies in this second phase of our Minecraft Legends Trophy Journey will likely be things you end up doing naturally of your own accord as you play. That said, some of them do require you to go to some extra lengths, so just make sure you take a moment to mop everything up in your main world before moving on.
If you’ve completed the first playthrough on Legendary Difficulty, then these bits will be your last stop before the Platinum, but you may want to reduce the difficulty in the settings now that you don’t any Difficulty Trophies to earn.
Alliance Trophies

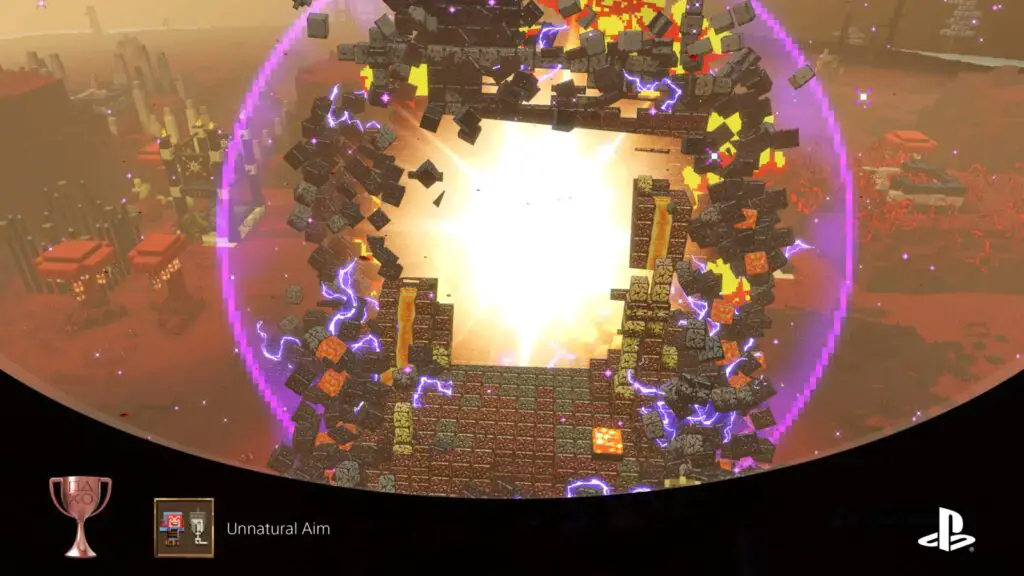
Unnatural Aim
Forge an alliance with the skeletons.
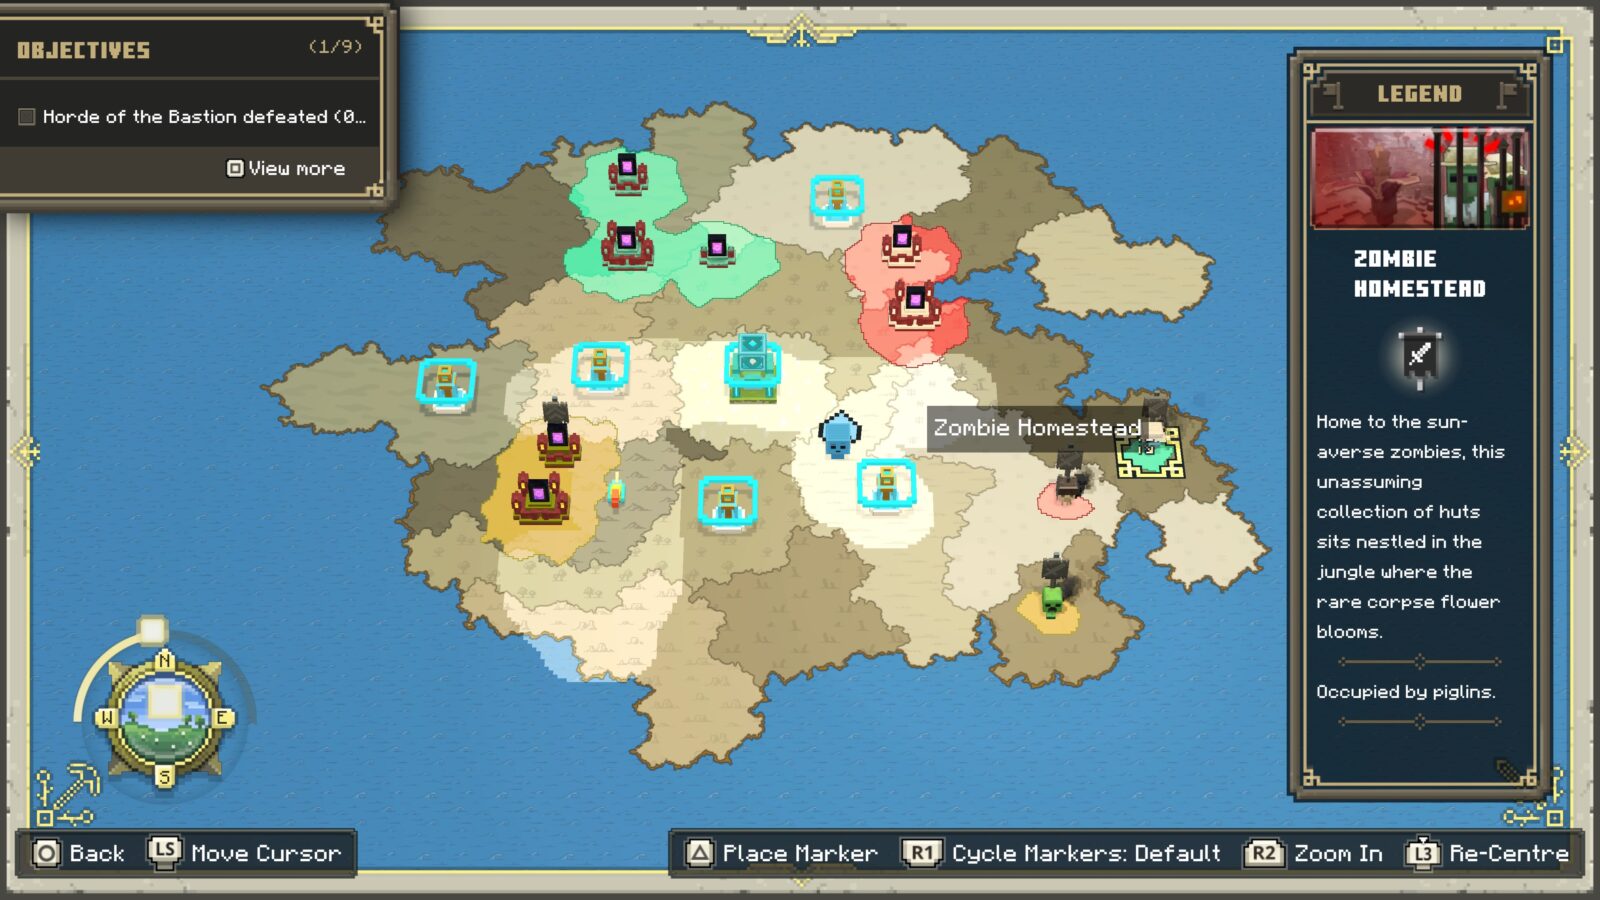
Open your map with ![]() and you should see three classic mob bases in defogged areas; The Skeleton Homestead, the Zombie Homestead, and the Creeper Homestead.If these are in the fog on your map, you may need to explore for them and check “?” icons you uncover.
and you should see three classic mob bases in defogged areas; The Skeleton Homestead, the Zombie Homestead, and the Creeper Homestead.If these are in the fog on your map, you may need to explore for them and check “?” icons you uncover.
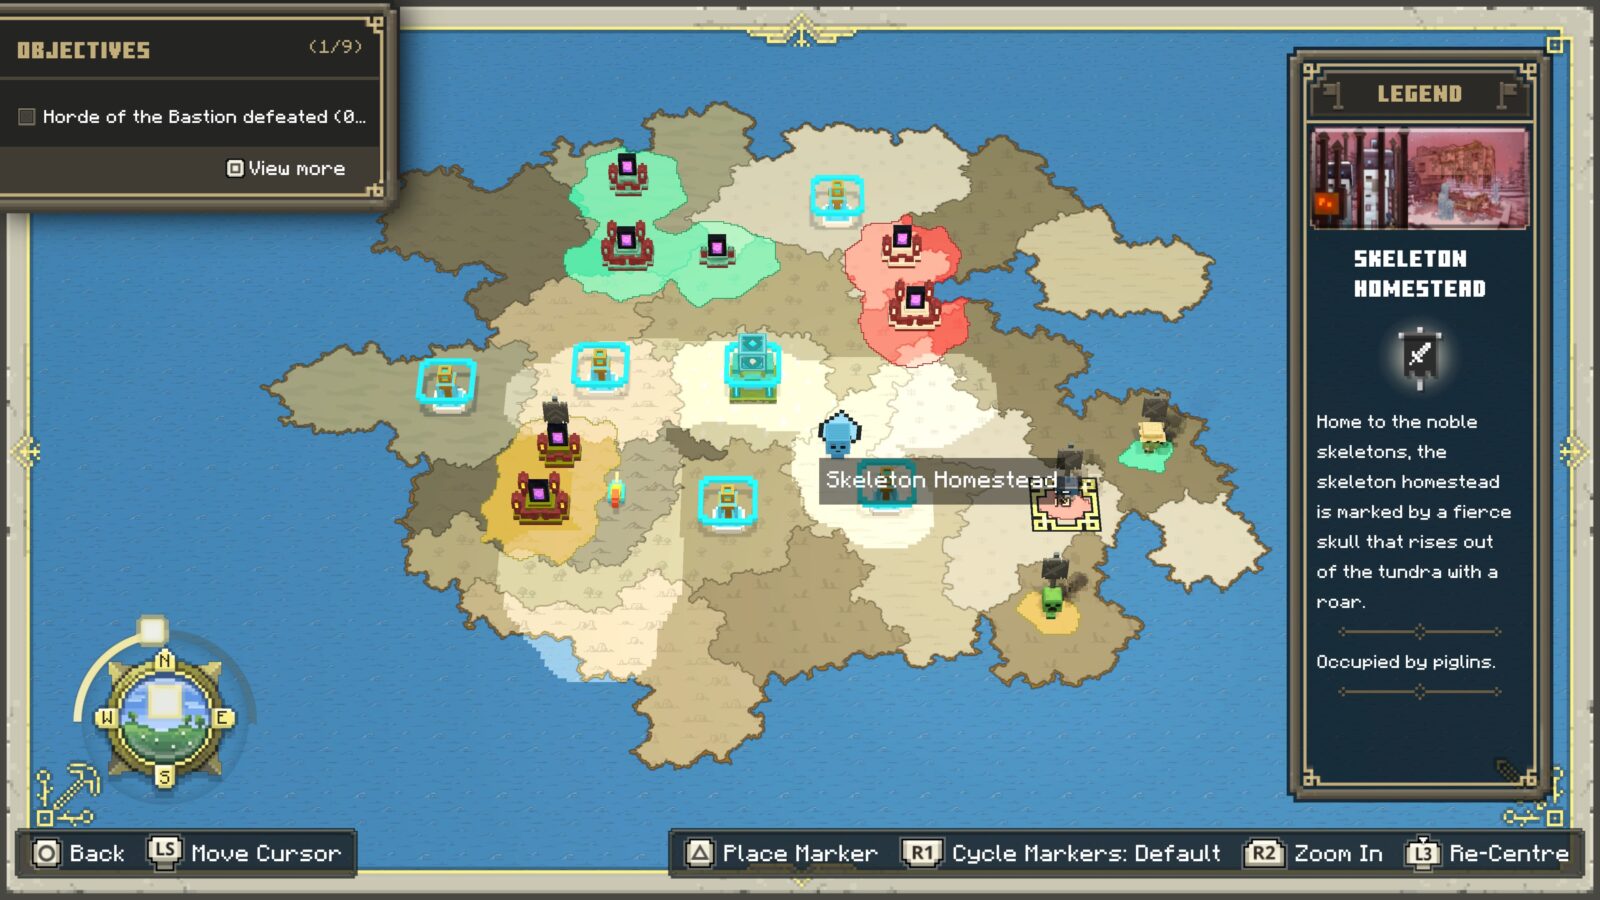
To unlock the “Unnatural Aim” trophy, make your way to the Skeleton Homestead, where you’ll find the Skeletons under attack. Help them fight off the Piglin forces and free them from their cages. Once done, recruit as many as you can and then bring them with you to the nearby Nether Portal.
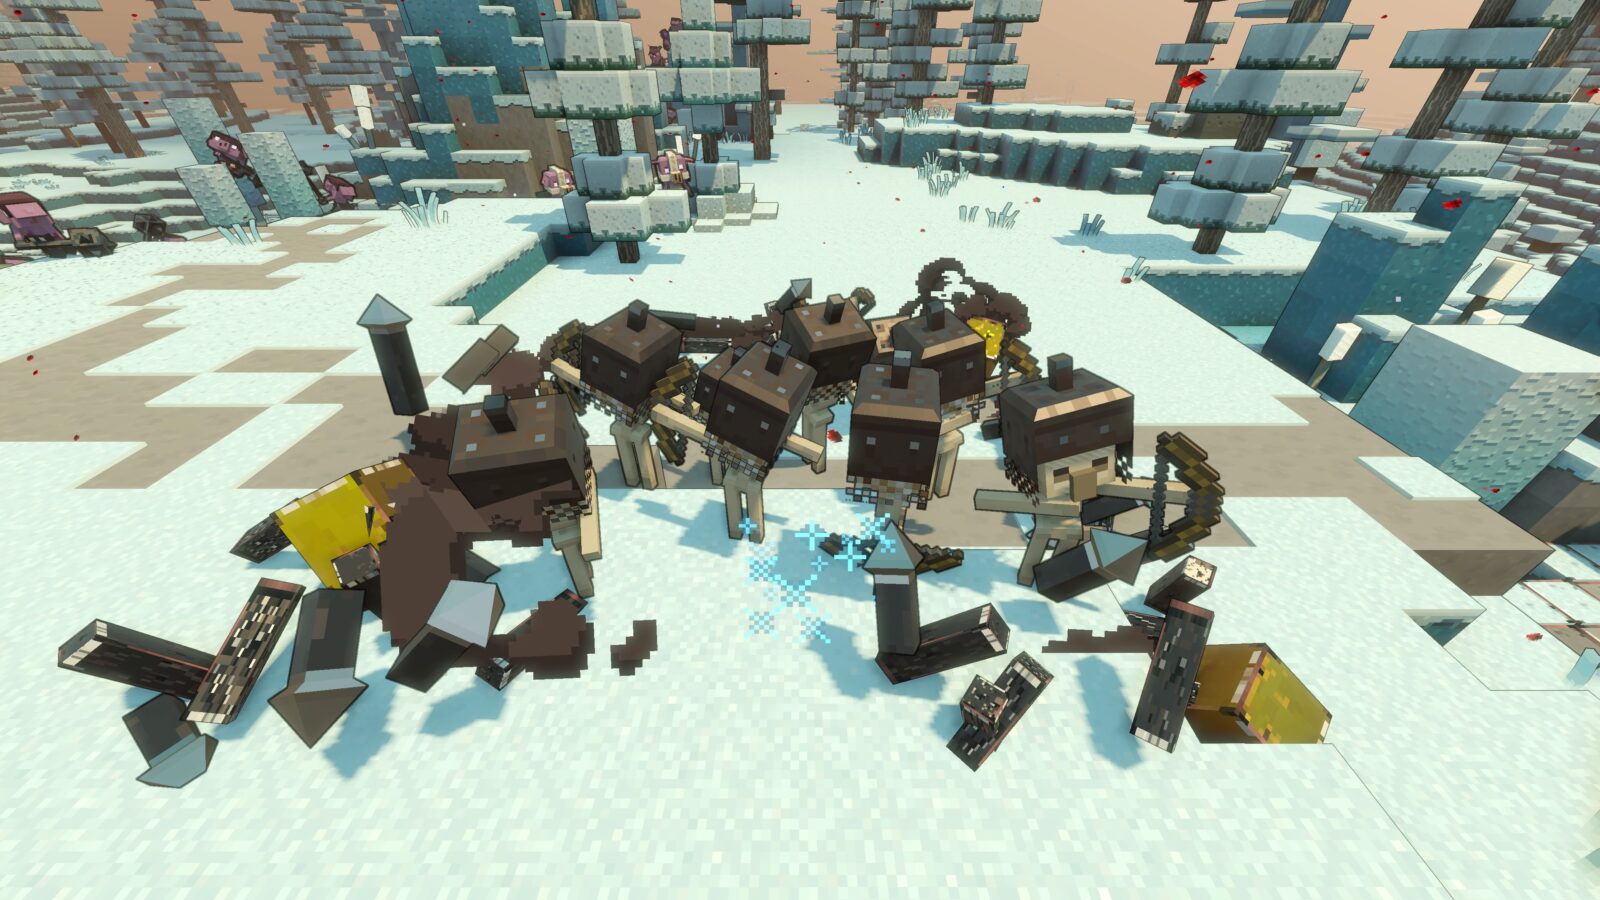
Use them alongside your own summoned forces to take out the portal, officially rescuing the Skeletons. Once the portal has been destroyed, you’ll receive the trophy.

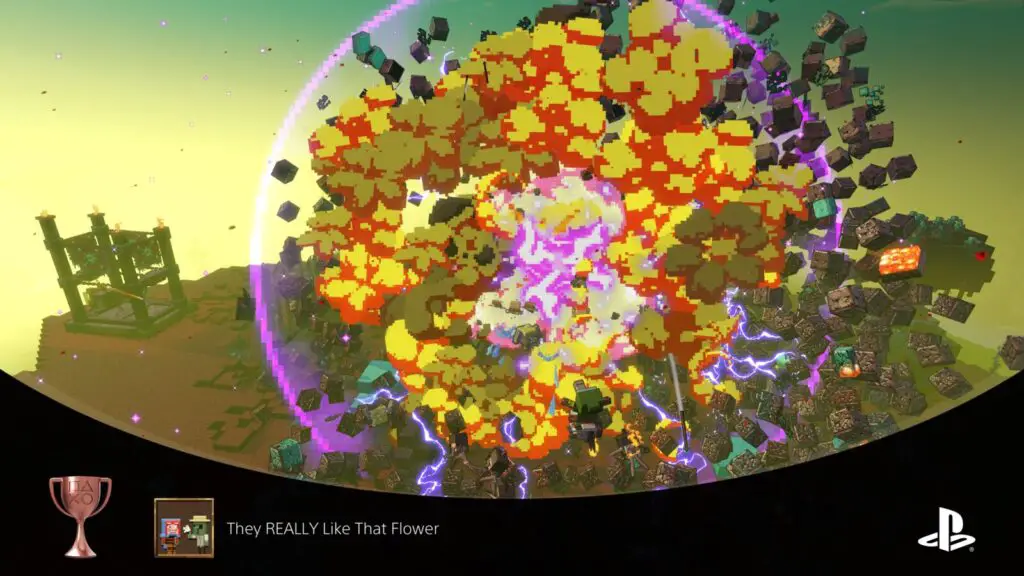
They REALLY Like That Flower
Forge an alliance with the zombies.
Like the Unnatural Aim Trophy, you will need to form an alliance with a classic mob to unlock “They REALLY Like That Flower.” Instead of the Skeleton Homestead, though, look for and head to the Zombie Homestead.
Save the Zombies from the Piglin attack and then use them to take down the nearby portal, after which you’ll receive the trophy.

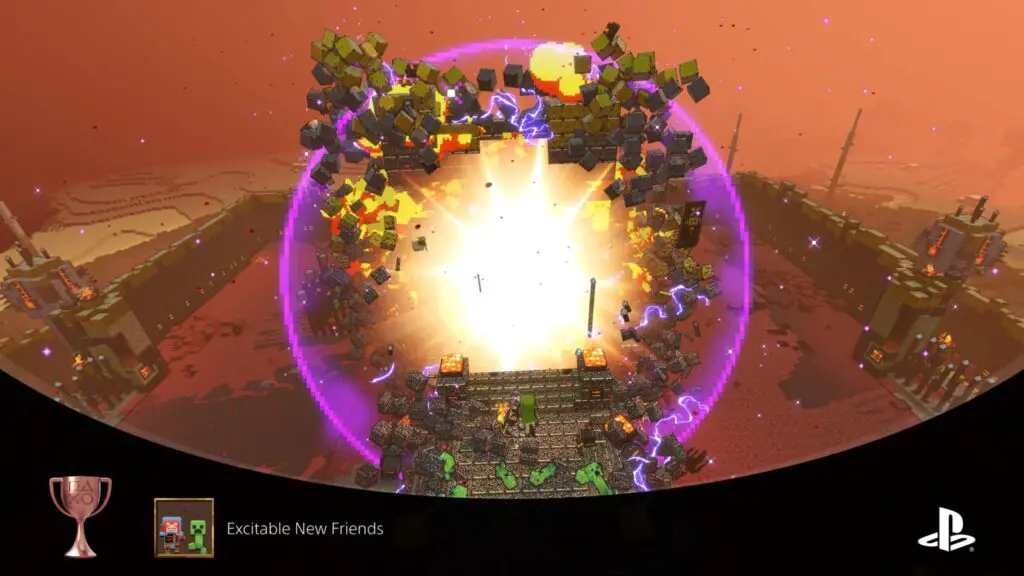
Excitable New Friends
Forge an alliance with the creepers.
Like the Unnatural Aim Trophy, you will need to form an alliance with a classic mob to unlock “Excitable New Friends.” Instead of the Skeleton Homestead, though, look for and head to the Creeper Homestead.
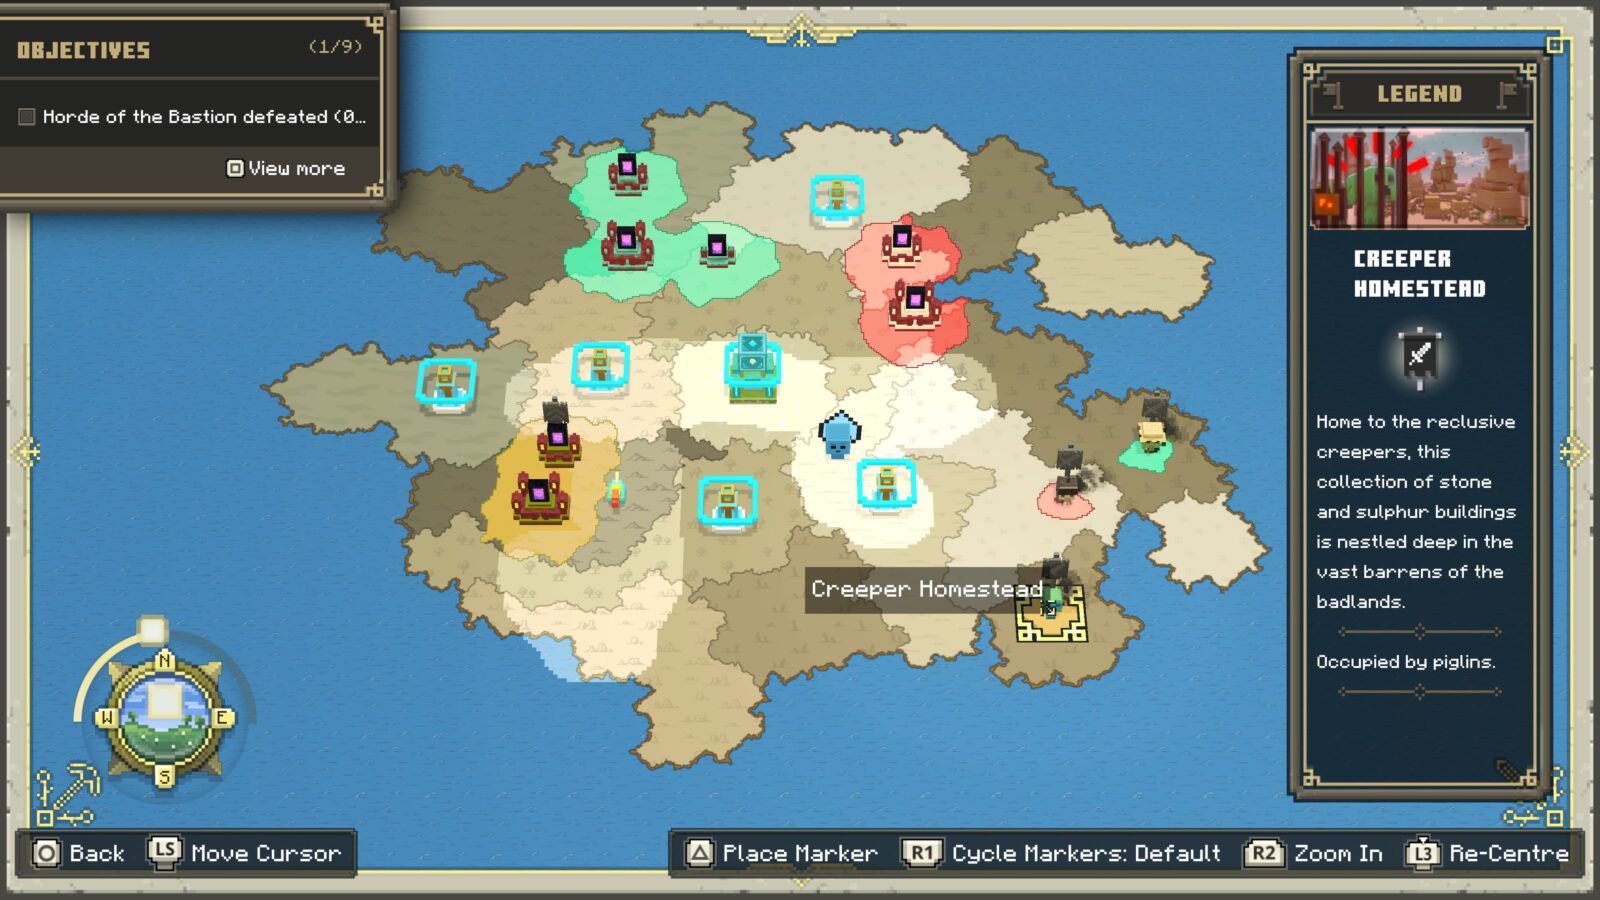
Save the Creepers from the Piglin attack and then use them to take down the nearby portal to receive the trophy.
As this trophy involves commanding groups of Creepers, take a look at the One Boom at a Time trophy, which is easy to earn here.

All-Star Cast
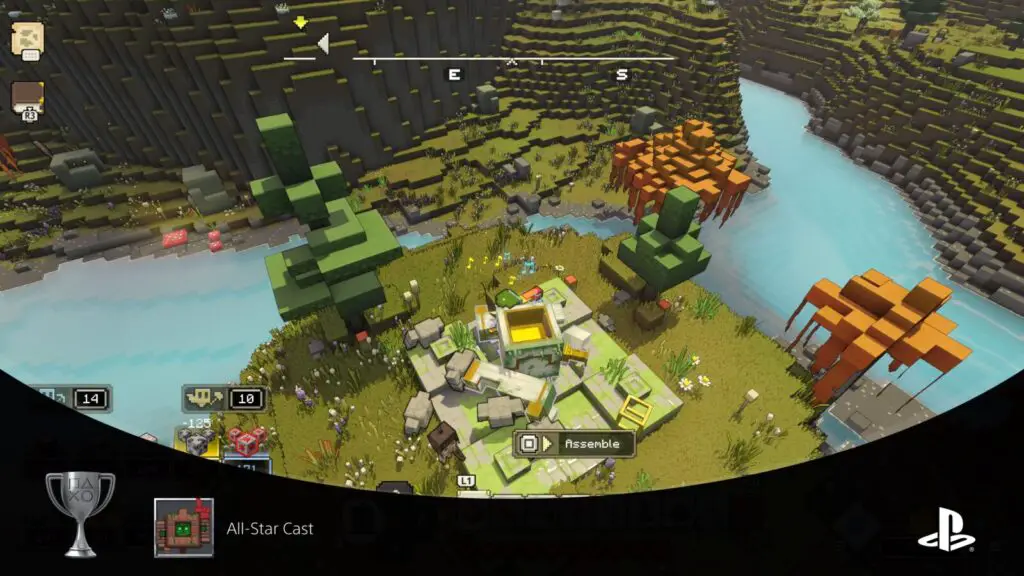
Collect all the Firsts in a single world.
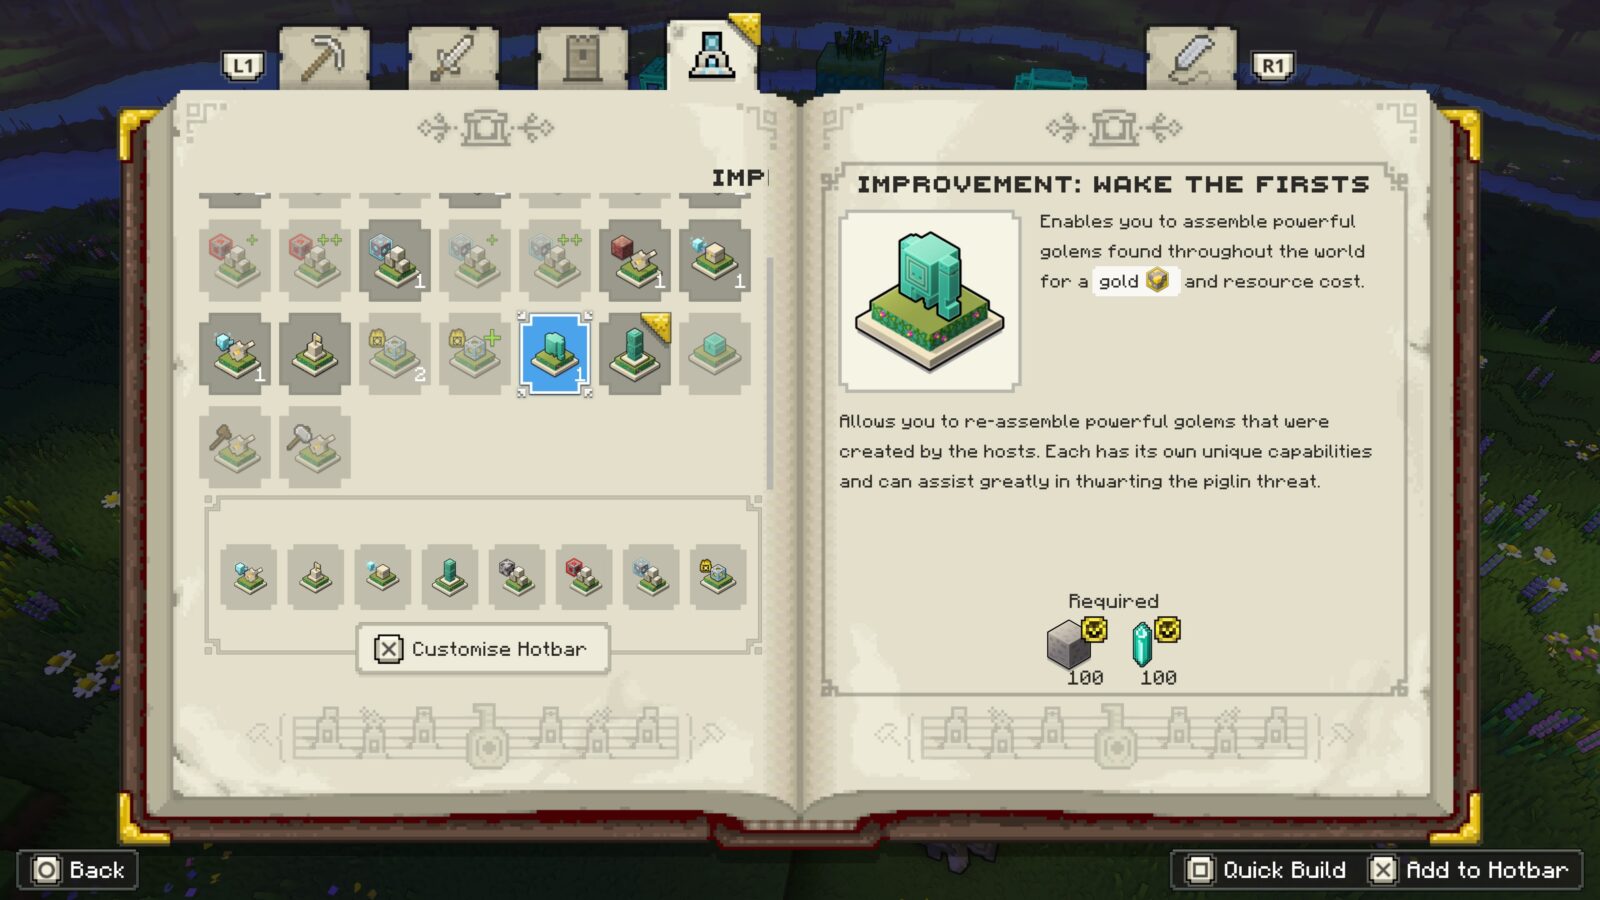
There are four Golems hidden across the map called “Firsts”, such as “First of Oak” and “First of Diorite.”

They can be found at yellow “?” icons on the map, so be sure to check any that come up as you work on defogging the map.
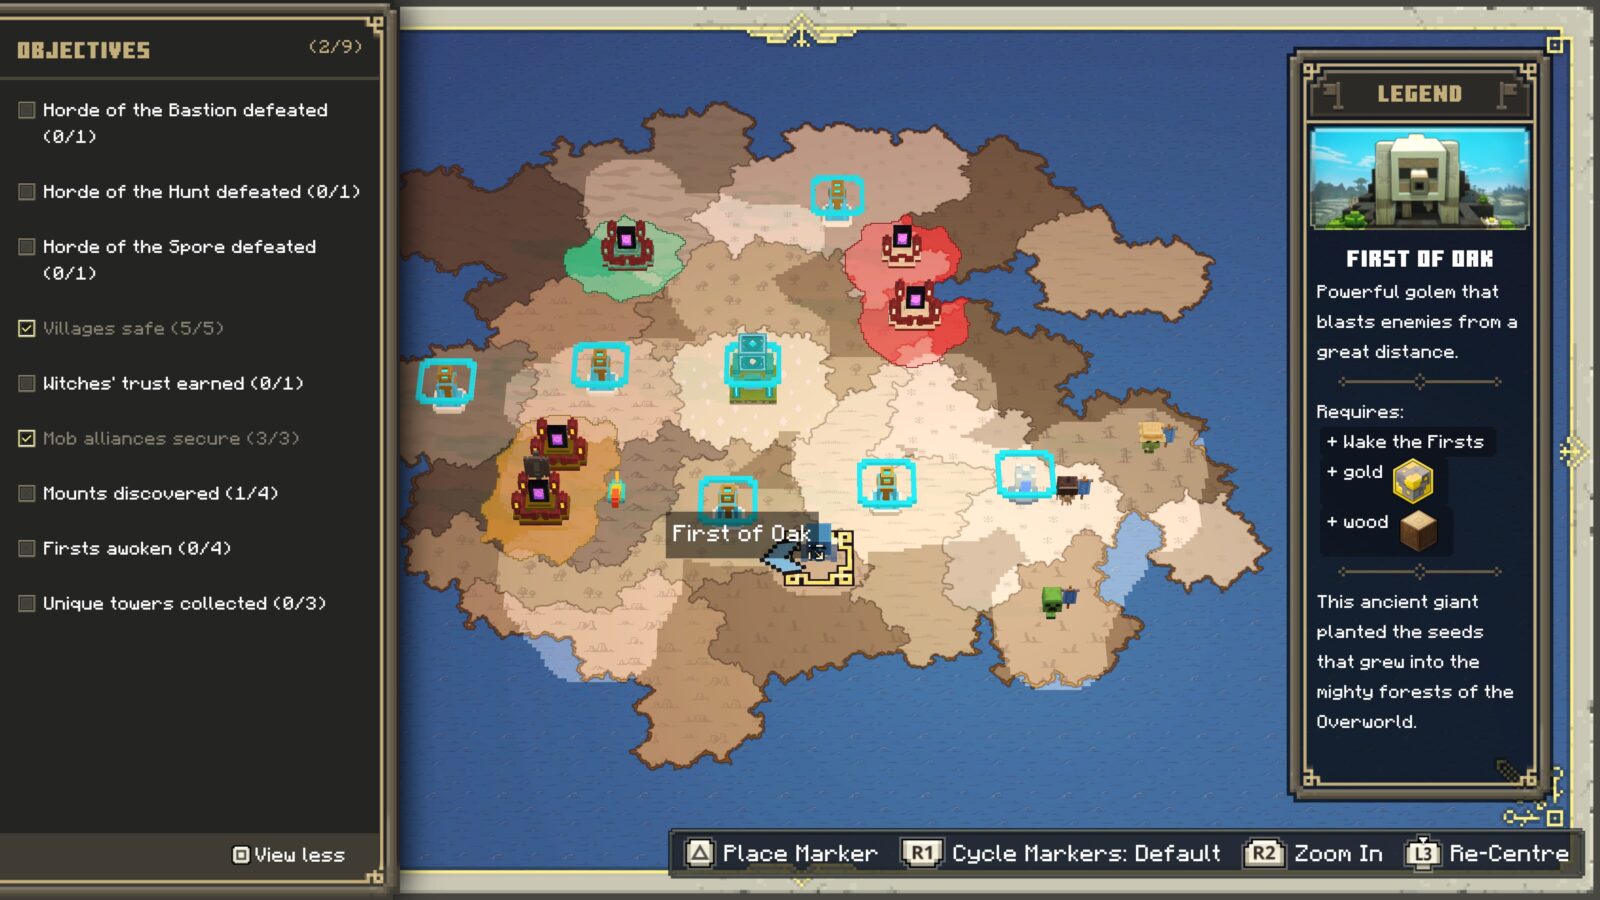
Activating them will require some resources and you also need to place the “Wake the Firsts” upgrade at the Well of Fate. This upgrade becomes available once you’ve found any First for the first time.
Find and awaken all four Firsts and you’ll receive the “All-Star Cast” trophy.
Misc Gameplay Trophies

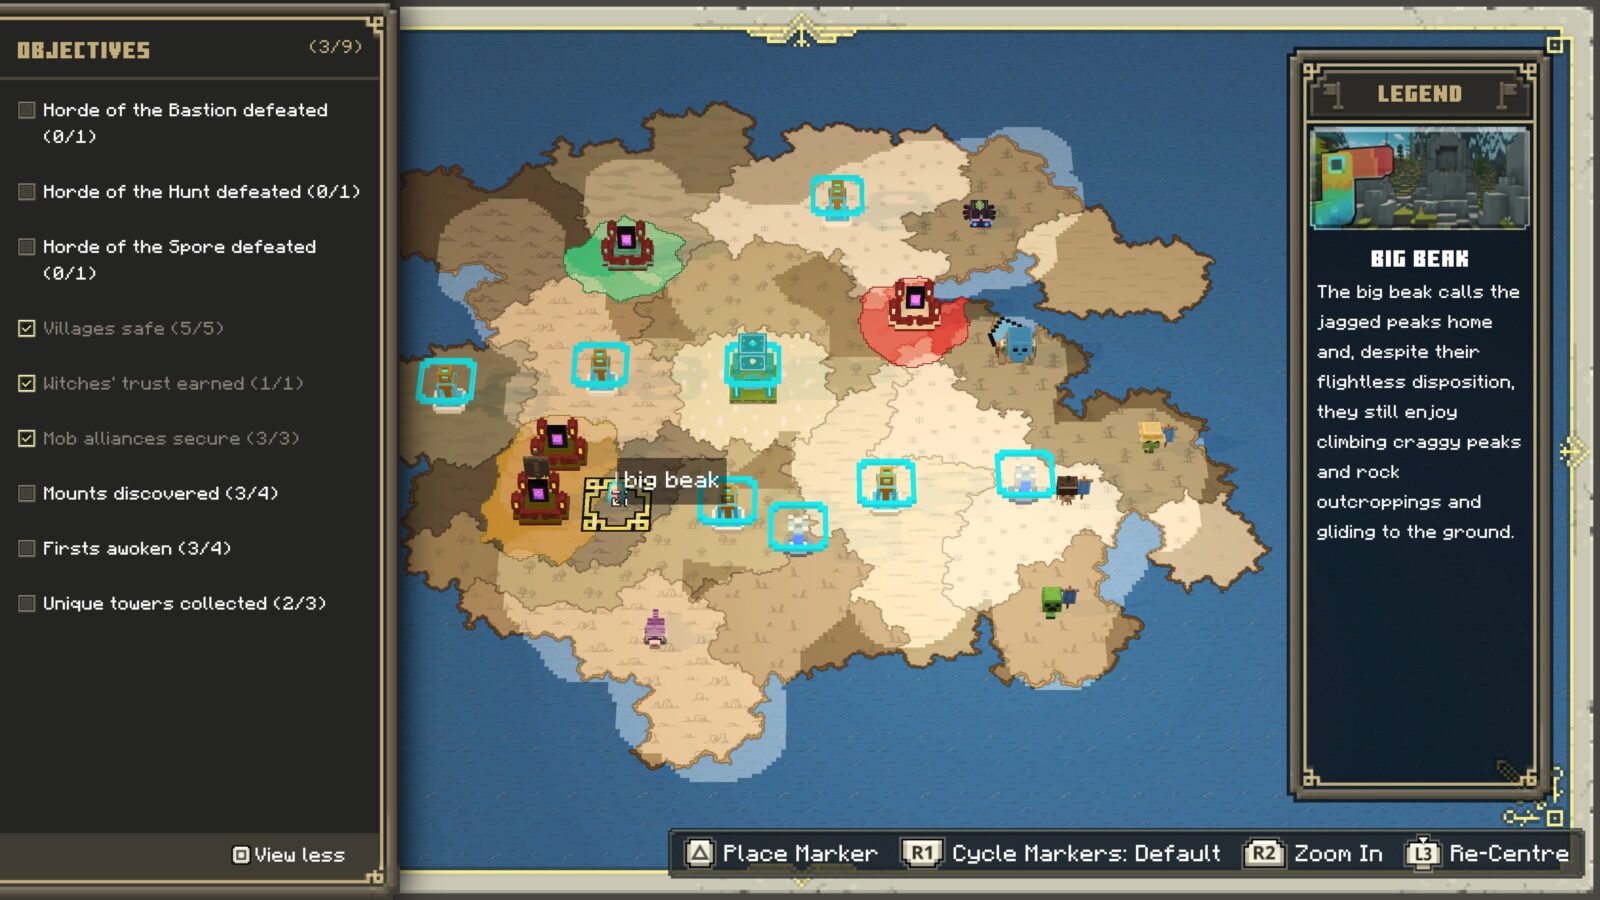
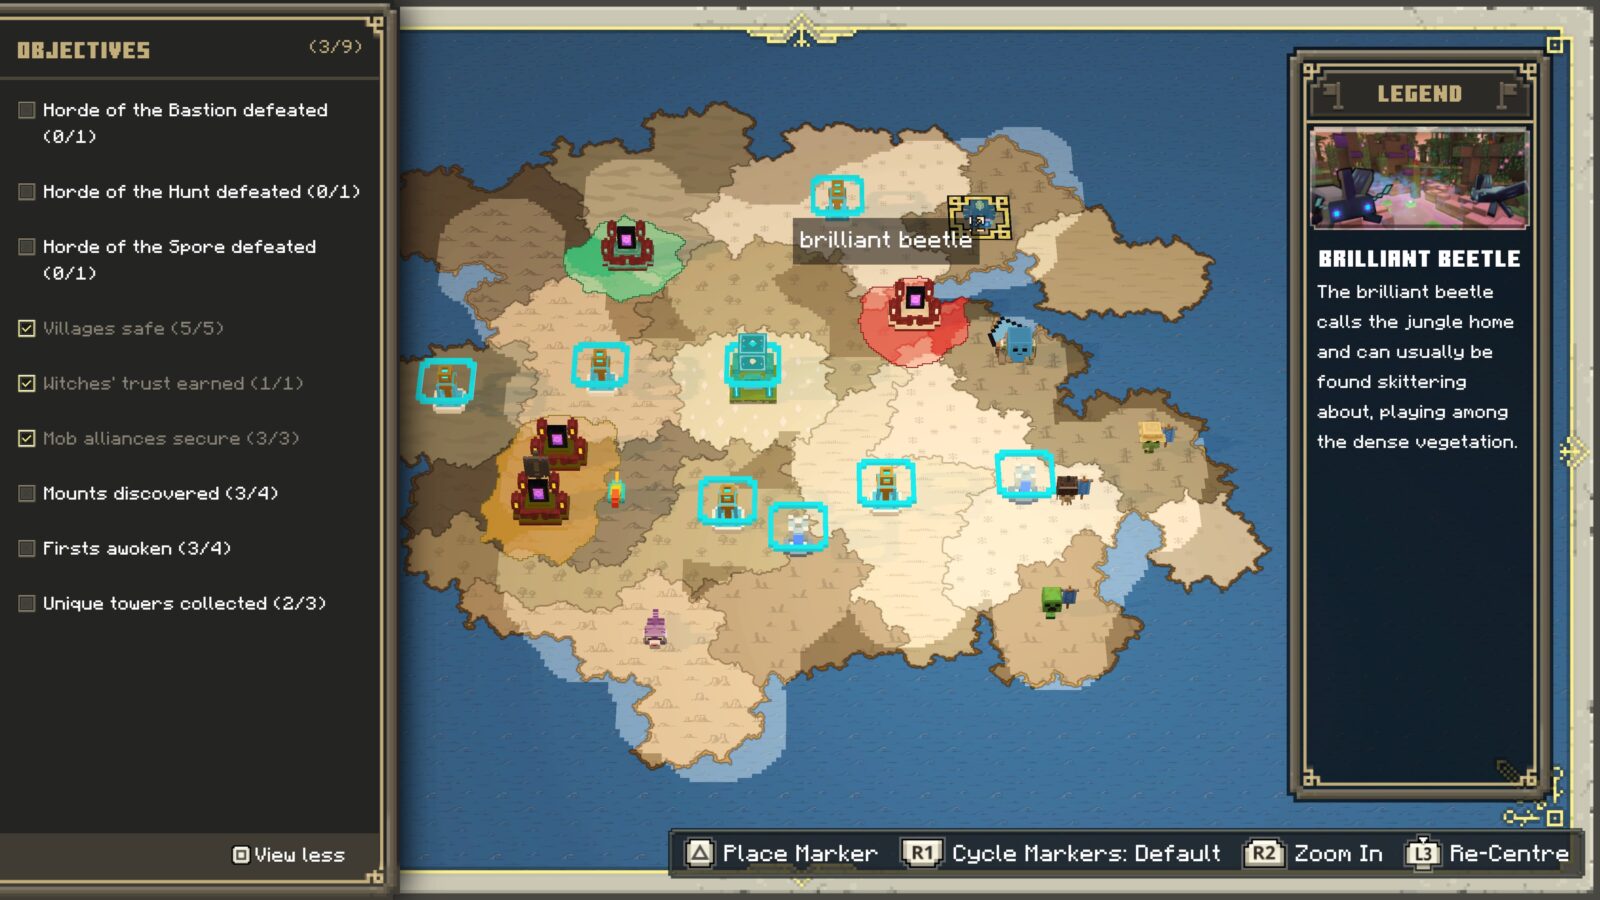
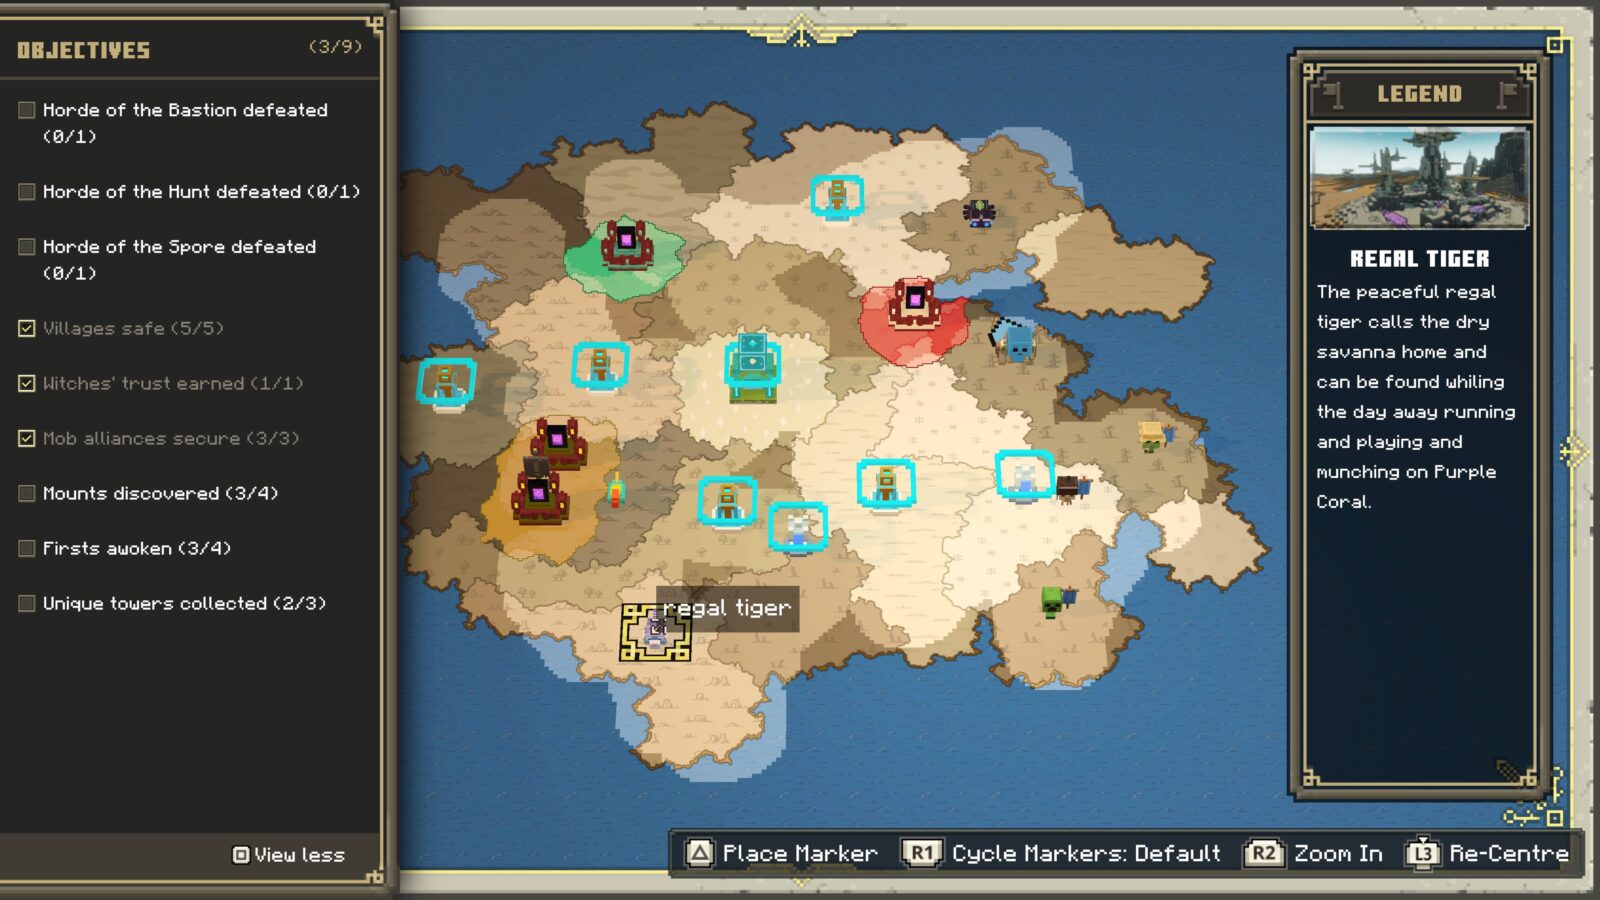
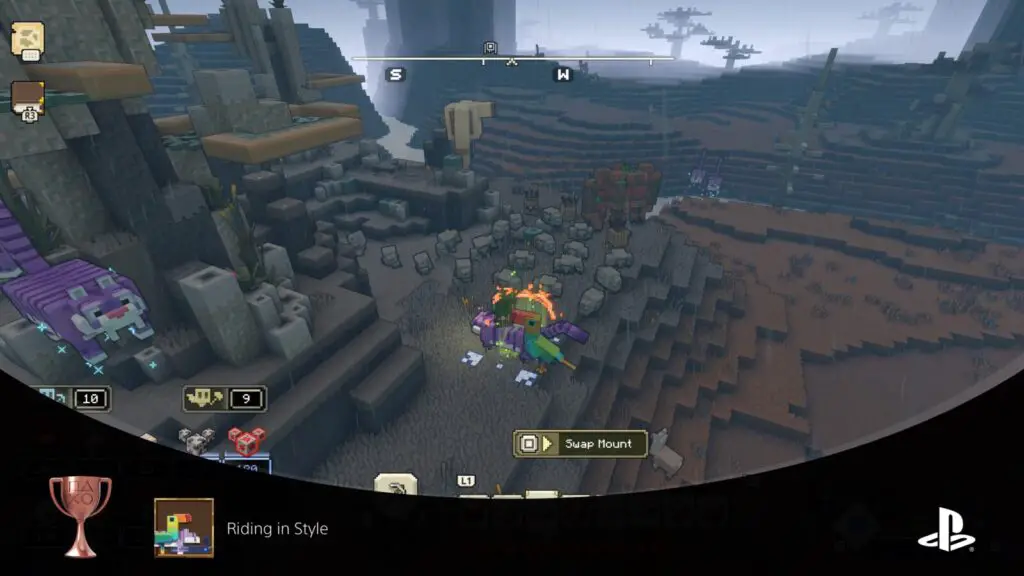
Riding in Style
Ride all of the different mounts in a single world.
There are four mounts in the game, including the horse. To unlock the “Riding in Style” trophy, you need to find and unlock the three alternative mounts:
- Big Beak—This mount is faster than a horse and can glide. Found in Jagged Peaks Biomes.
- Brilliant Beetle—The slowest mount, but it can climb walls and glide. Found in Jungle Biomes.
- Regal Tiger—The fastest mount. Found in Dry Savanna Biomes.
Once you have located one for the first time, get on the mount with ![]() and from that point on, the mount will appear commonly all across the map.
and from that point on, the mount will appear commonly all across the map.
To find the mounts, begin defogging your map. Whenever you see a yellow Question Mark on the map in defogged areas, go to it as it could be a Mount.
Note that the Fearless Frog is not relevant to this trophy as it wasn’t present in the base game. Same goes for any other mounts that have been added through DLC/Future Updates.

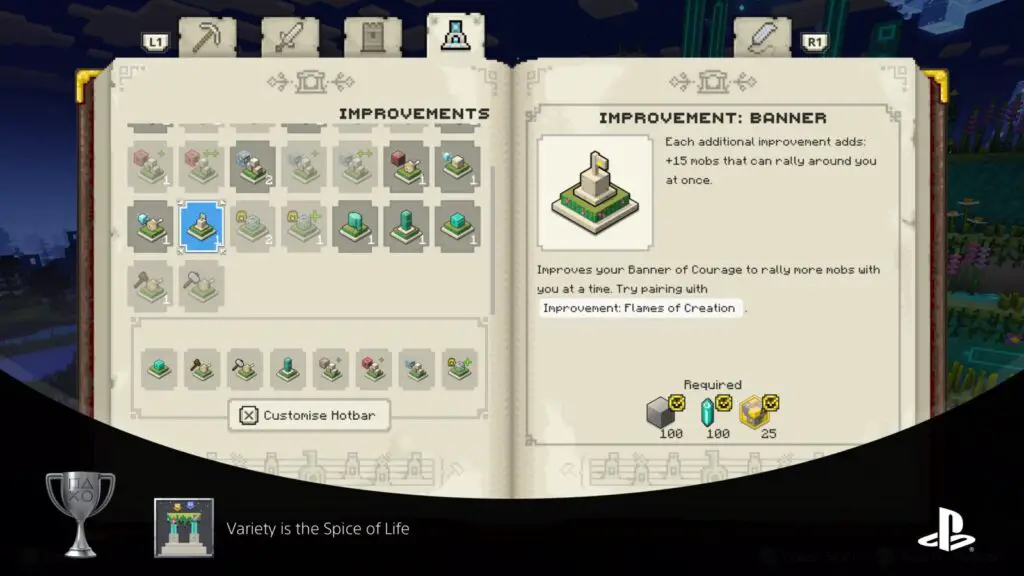
Variety is the Spice of Life
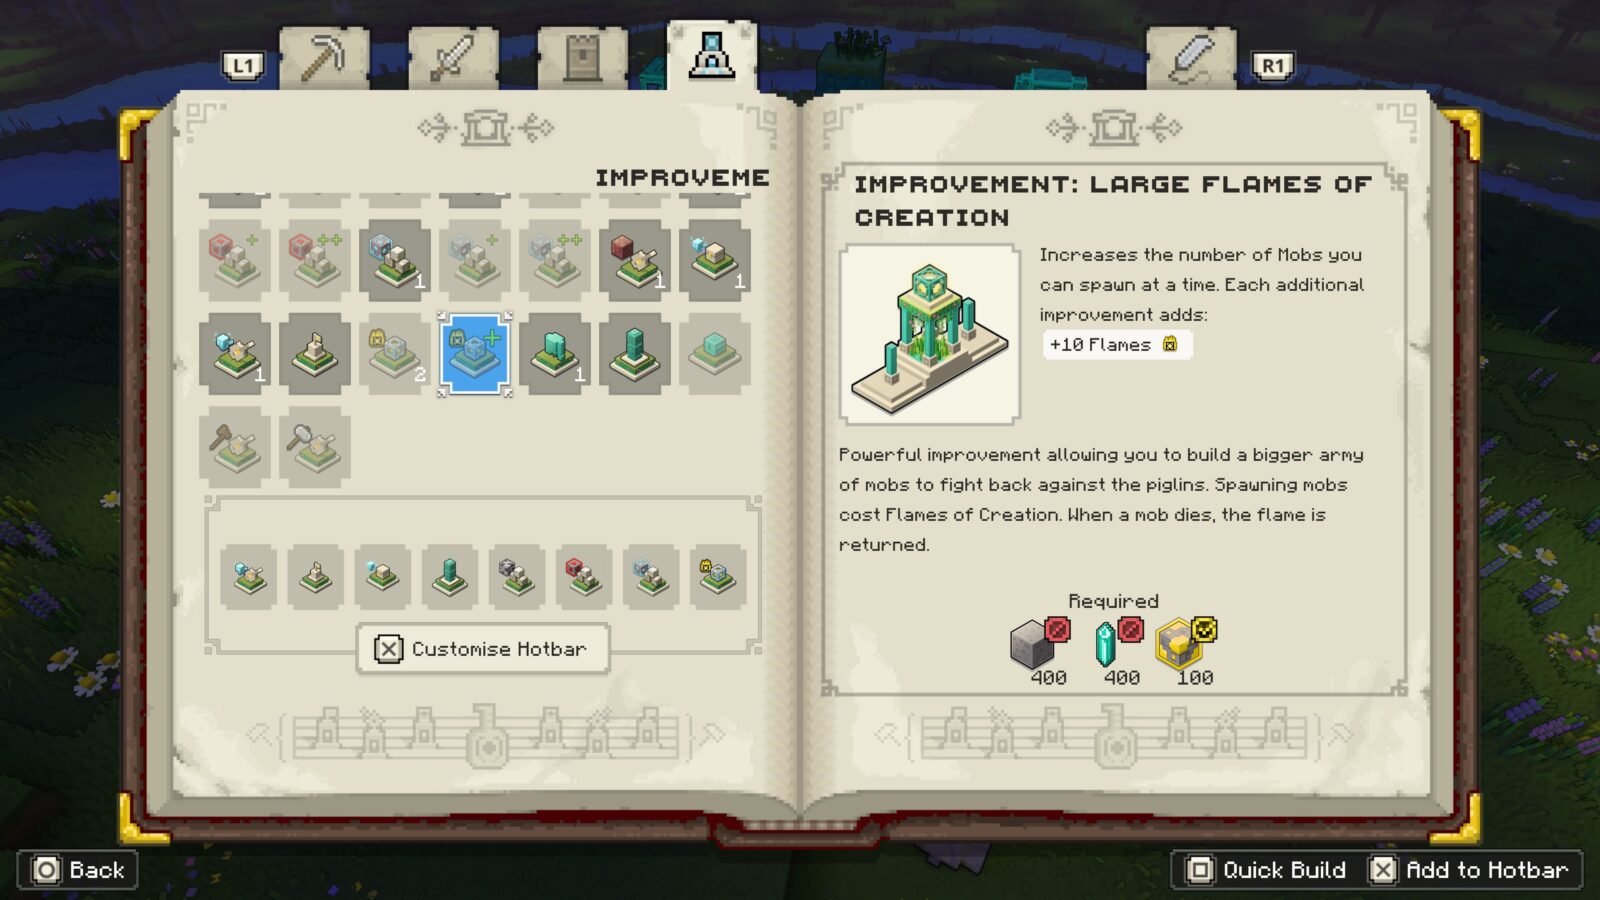
Build all the different improvements at the Well of Fate in a single world.
This trophy is pretty confusing, as it’s not clear what’s meant by “all the different improvements.” Fortunately, I’ve been able to figure this out for you.
The only upgrades you need to install for this trophy are as follows:
- Improvement: Gather Iron (Medium & Large not required)
- Improvement: Gather Coal (Medium & Large not required)
- Improvement: Gather Redstone (Medium & Large not required)
- Improvement: Gather Diamond (Medium & Large not required)
- Improvement: Cure Netherrack
- Improvement: Allay Storage
- Improvement: Abundant Allays
- Improvement: Banner
- Improvement: Flames of Creation (Large not required)
- Improvement: Wake the Firsts—required for All-Star Cast
- Improvement: Collect Power Towers—required for Bring Out the Big Blocks
- Improvement: Shared Village Chests
- Improvement: Expert Carpentry
- Improvement: Expert Mason
You just need one of each, even though you can place multiple, and—as I’ve noted above—you don’t need to place the Medium or Large variants for this trophy.
The trophy will unlock when the final improvement has been built, so give the Allays a moment to finish building whatever you placed.
You can see via the Journal ![]() which improvements you have or haven’t installed yet.
which improvements you have or haven’t installed yet.

I Can See My Village From Here
Spend 20 minutes buffed by bouncecaps in a single world.
All throughout the world in Minecraft Legends, there are red “Bouncecap” Mushrooms, though they mostly appear in the Jungle Biomes. When you step on one, your jump height is boosted for around 30 seconds.
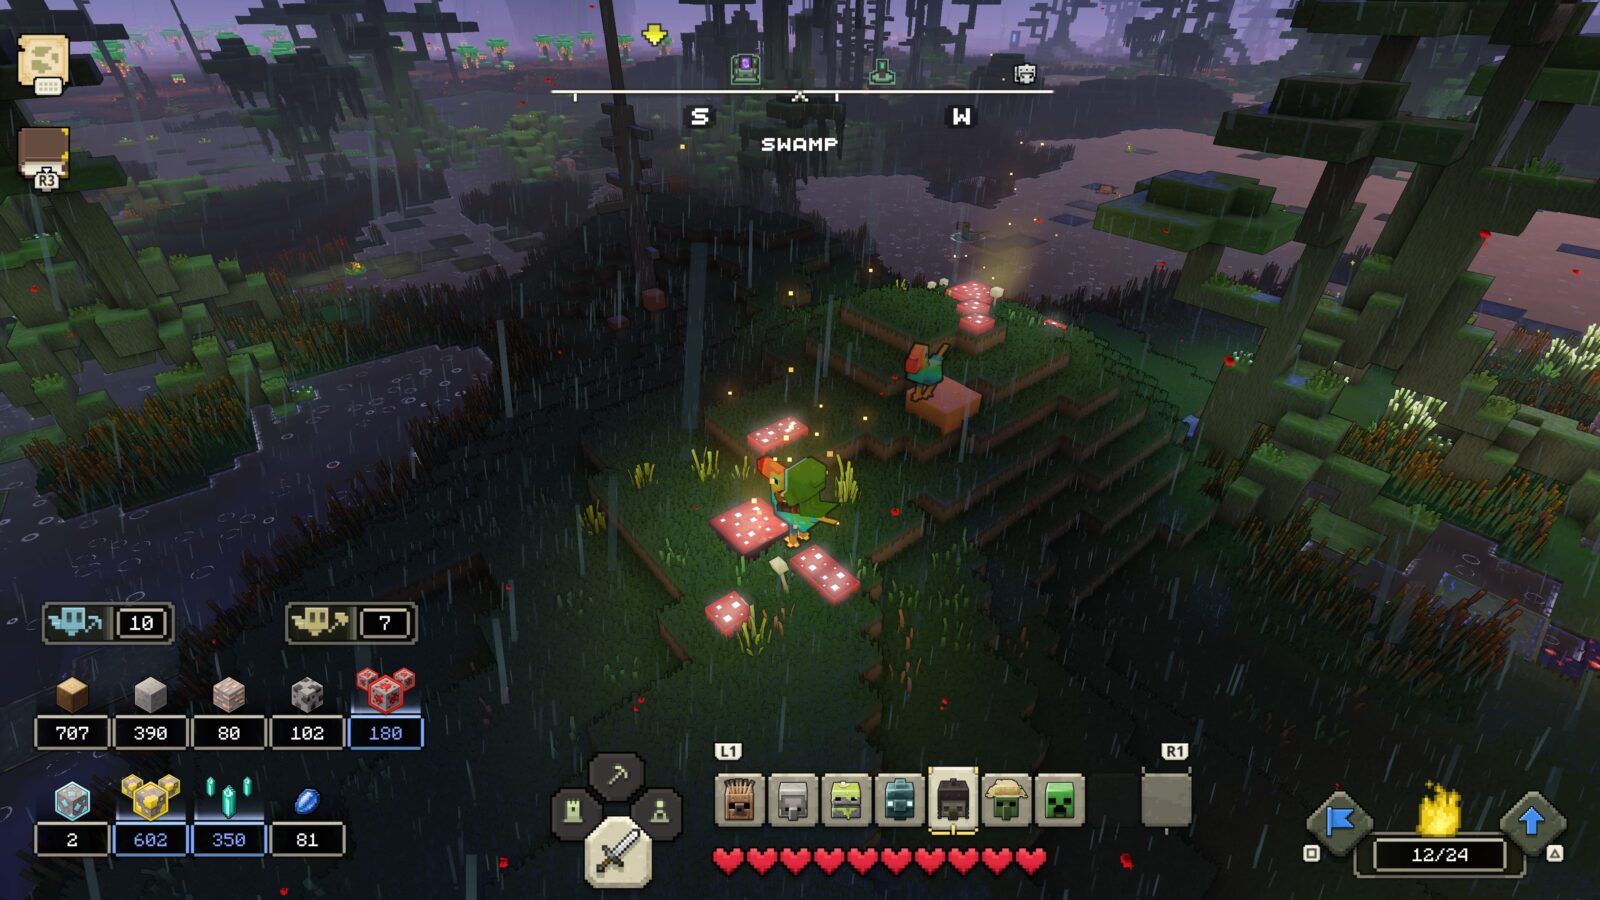
To unlock the “I Can See My Village From Here” trophy, you need to spend a cumulative total of 20 minutes with this buff active.
If you don’t have this trophy by the time you’re done with the game, just go and place your character on top of a Bouncecap Mushroom and then leave the game alone for a while. Each time the buff expires, it will be reapplied, so you can just leave the game running and wait for the trophy to pop.

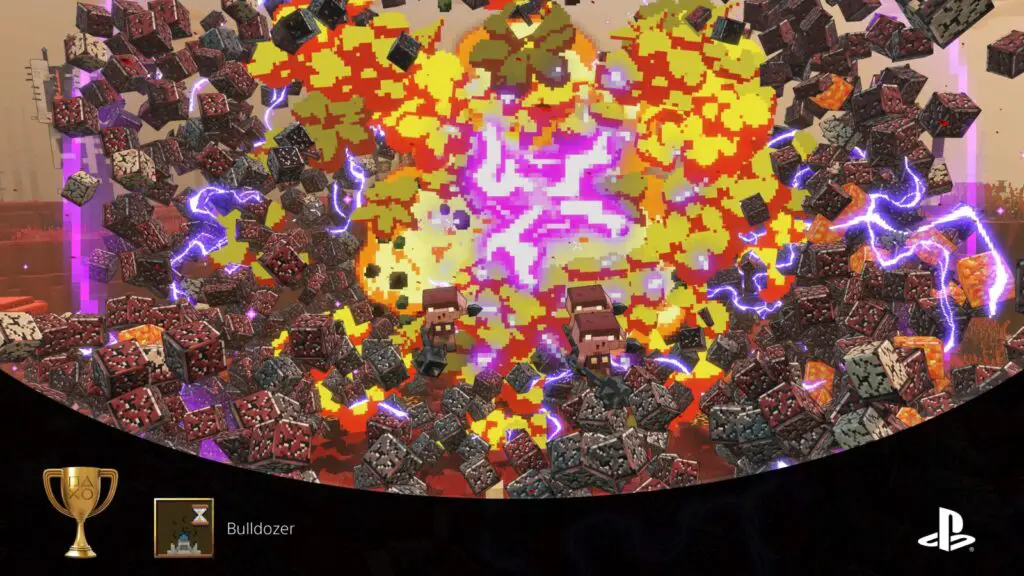
Bulldozer
Destroy a base in under 7 minutes!
To unlock the “Bulldozer” trophy, you’ll need to destroy one of the enemy’s bases in less than 7 minutes. This isn’t as hard as it sounds—especially on Storied Difficulty.
Honestly, just switch the game to Storied for a moment (unless you’re working on your Legendary run!), build up an army of as many little cobblestone golems as you can, and then charge a base (preferably one of the lower-tier bases) with your army and then sic em on the portal.
They should rip through it in a minute or two, even while the enemy is trying to fight them off. That said, bringing some Moss Golems to heal your army isn’t a bad idea either.
If you’re struggling to earn this, defending villages seems to work too. As long as you complete the event start-to-finish in under 7 minutes, the trophy should unlock.
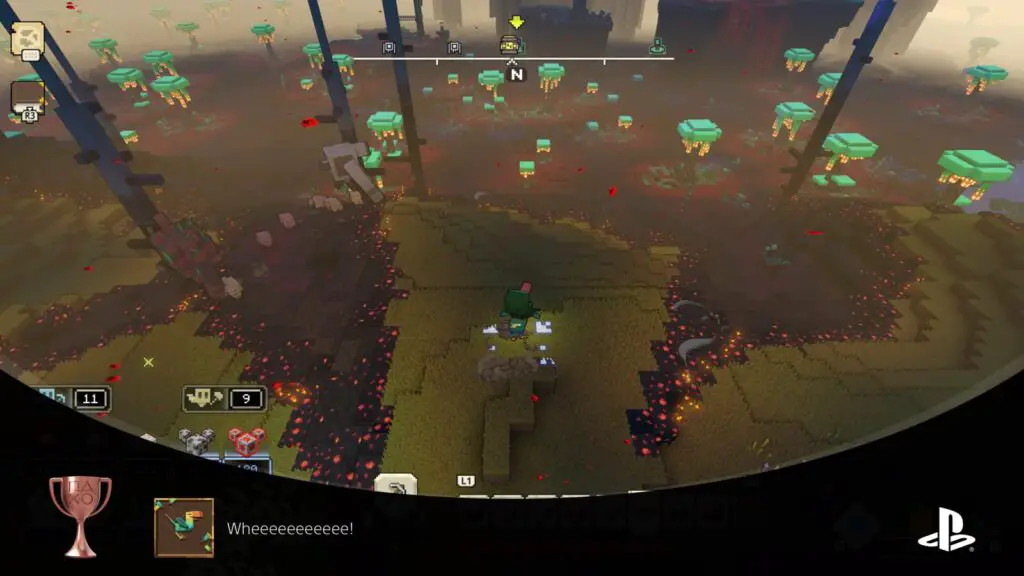
Wheeeeeeeeeee!
Glide for 30 seconds consecutively on the big beak or brilliant beetle.
Of the four mounts you can get (see Riding in Style) two of them—Big Beak and Brilliant Beetle—can glide when you hold ![]() in mid-air.
in mid-air.
While riding either one of these mounts, climb up to the highest peak you can find, then jump off and immediately start holding ![]() to glide.
to glide.
If you manage to stay airborne for 30 seconds or more in a single glide, you’ll receive the “Wheeeeeeeeeee!” trophy.

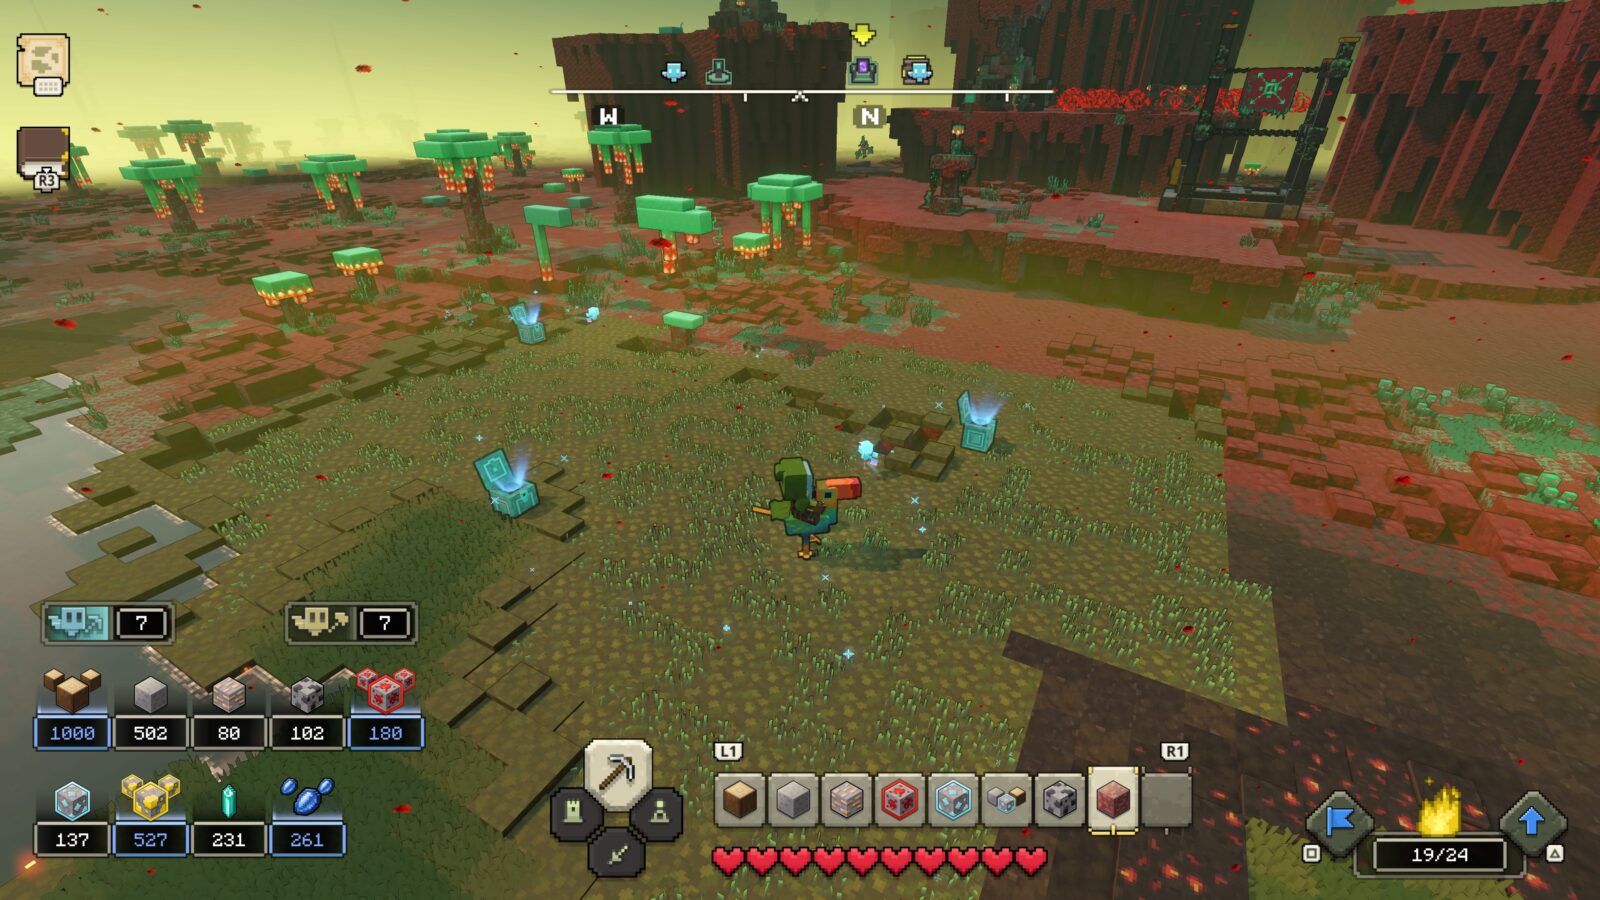
Resource Reinforcements
Open 5 allay chests in a single world.
Throughout the game, you’ll find many random chests laid out in the open world areas. You should come across far more than just five of them while exploring, defogging the map, and travelling to objectives.
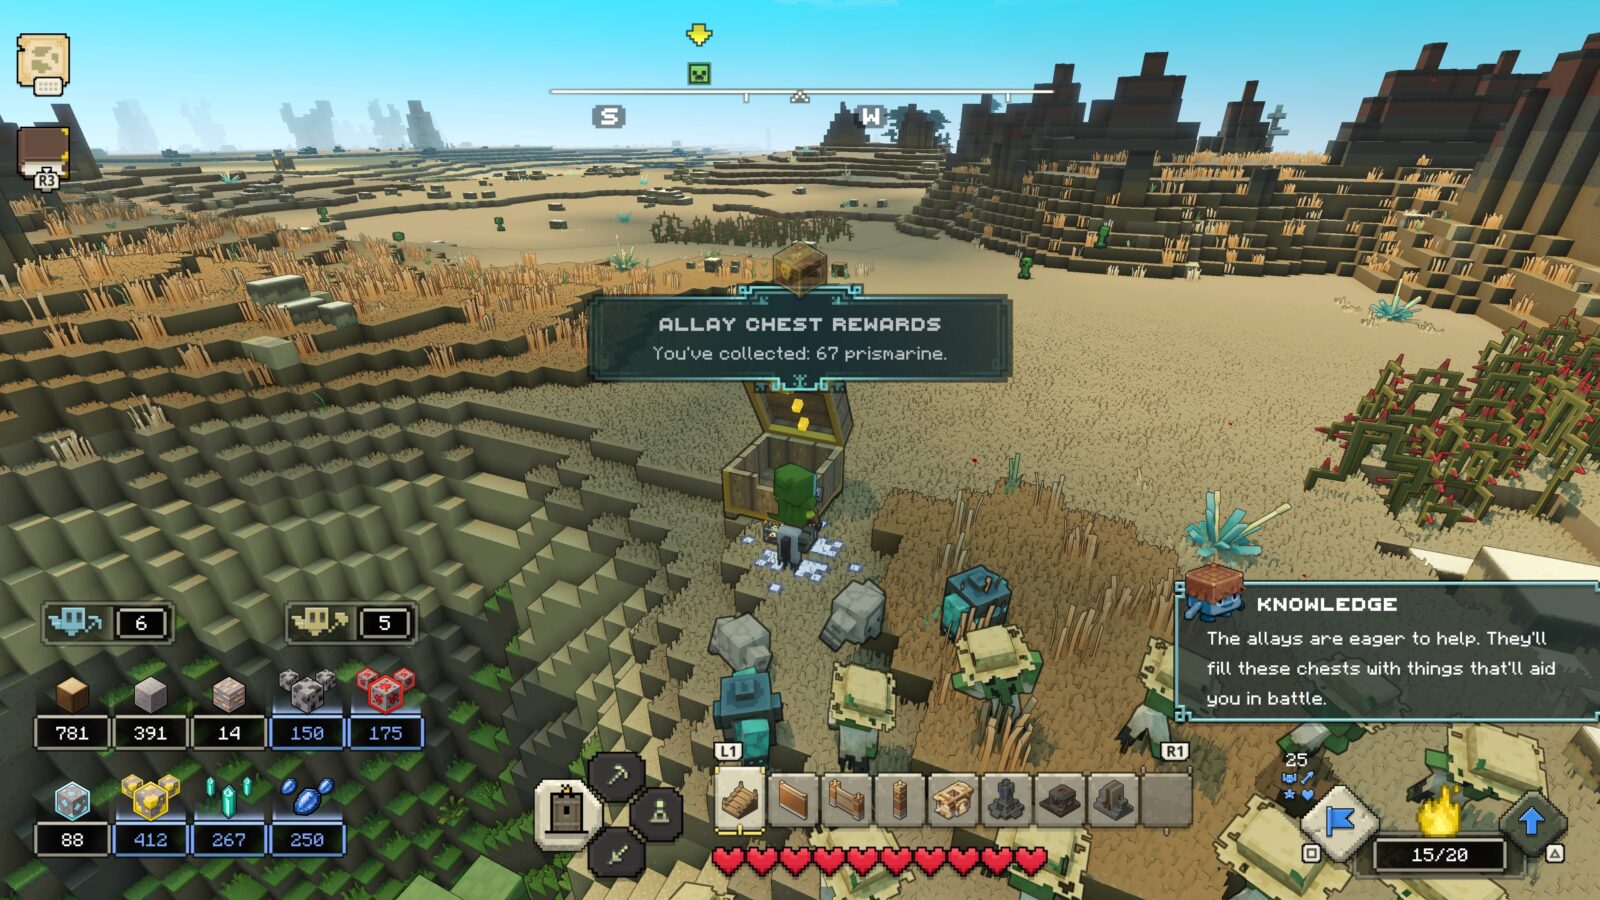
All you need to do to open one is press ![]() when near. The contents are typically a bundle of useful resources.
when near. The contents are typically a bundle of useful resources.
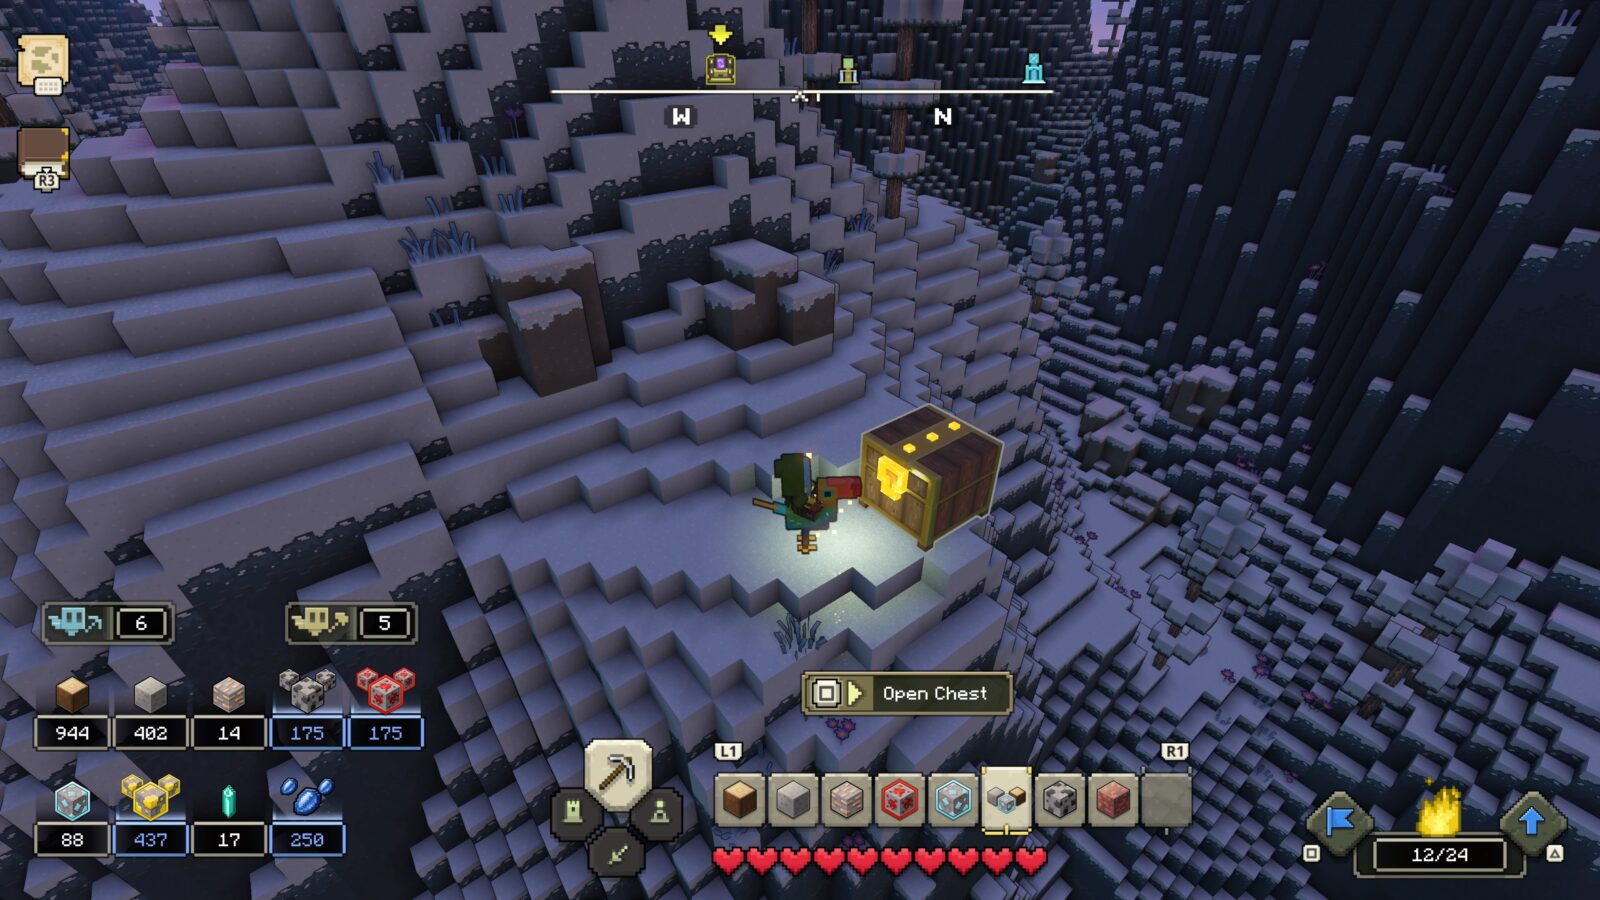
To unlock the “Resource Reinforcements” trophy, open a cumulative total of 5 of these chests.


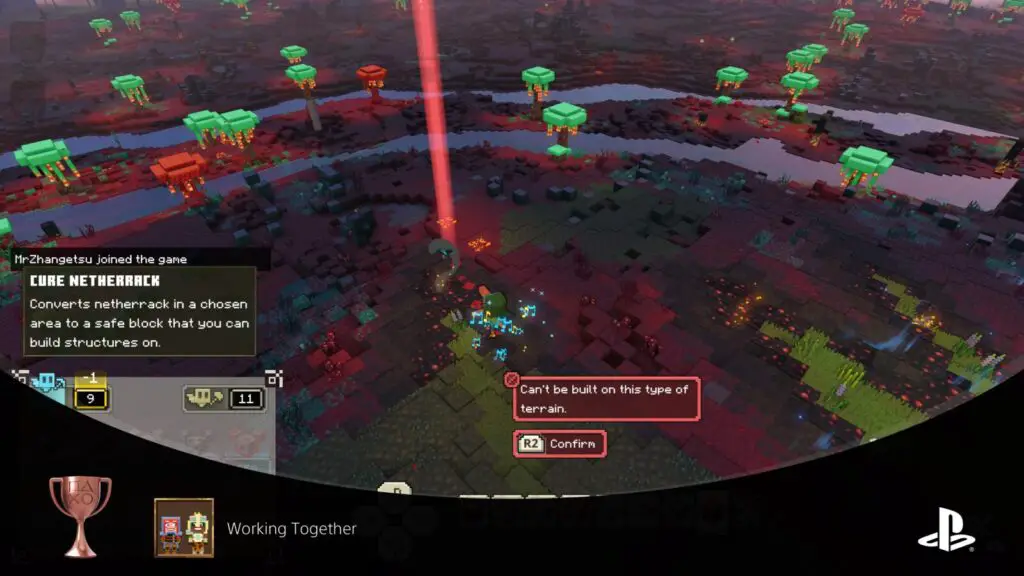
Soothe the Scars
Cure 20,000 netherrack blocks in a single world.
When you install the “Cure Netherrack” upgrade at the Well of Fate, you will get access to a new gathering ability. Press ![]() to switch to your gather options and then switch to “Cure Netherrack” with
to switch to your gather options and then switch to “Cure Netherrack” with ![]() /
/![]() .
.
If Cure Netherrack isn’t on your hotbar, open your journal with ![]() , then navigate to the gathering abilities and equip it from there.
, then navigate to the gathering abilities and equip it from there.
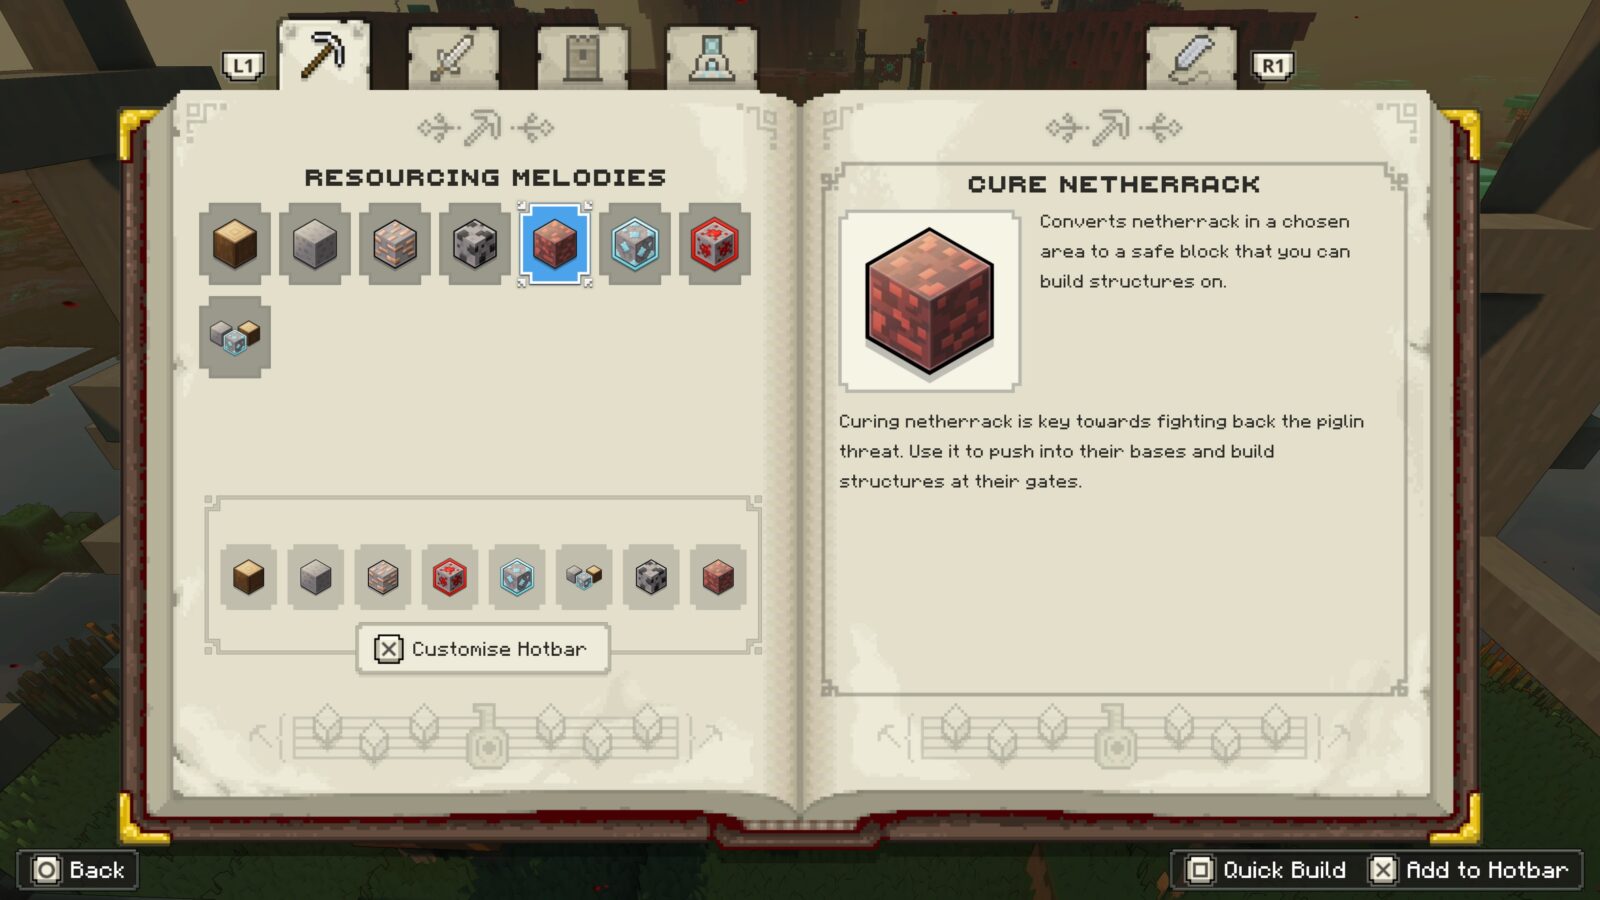
Once equipped, hold ![]() to choose where to place the Gather Allay, and then press
to choose where to place the Gather Allay, and then press ![]() to begin Clearing away the Netherrack. The Allay must be placed on a normal tile and then it will begin clearing any adjacent Netherrack, but it cannot be placed directly onto a Netherrack block.
to begin Clearing away the Netherrack. The Allay must be placed on a normal tile and then it will begin clearing any adjacent Netherrack, but it cannot be placed directly onto a Netherrack block.
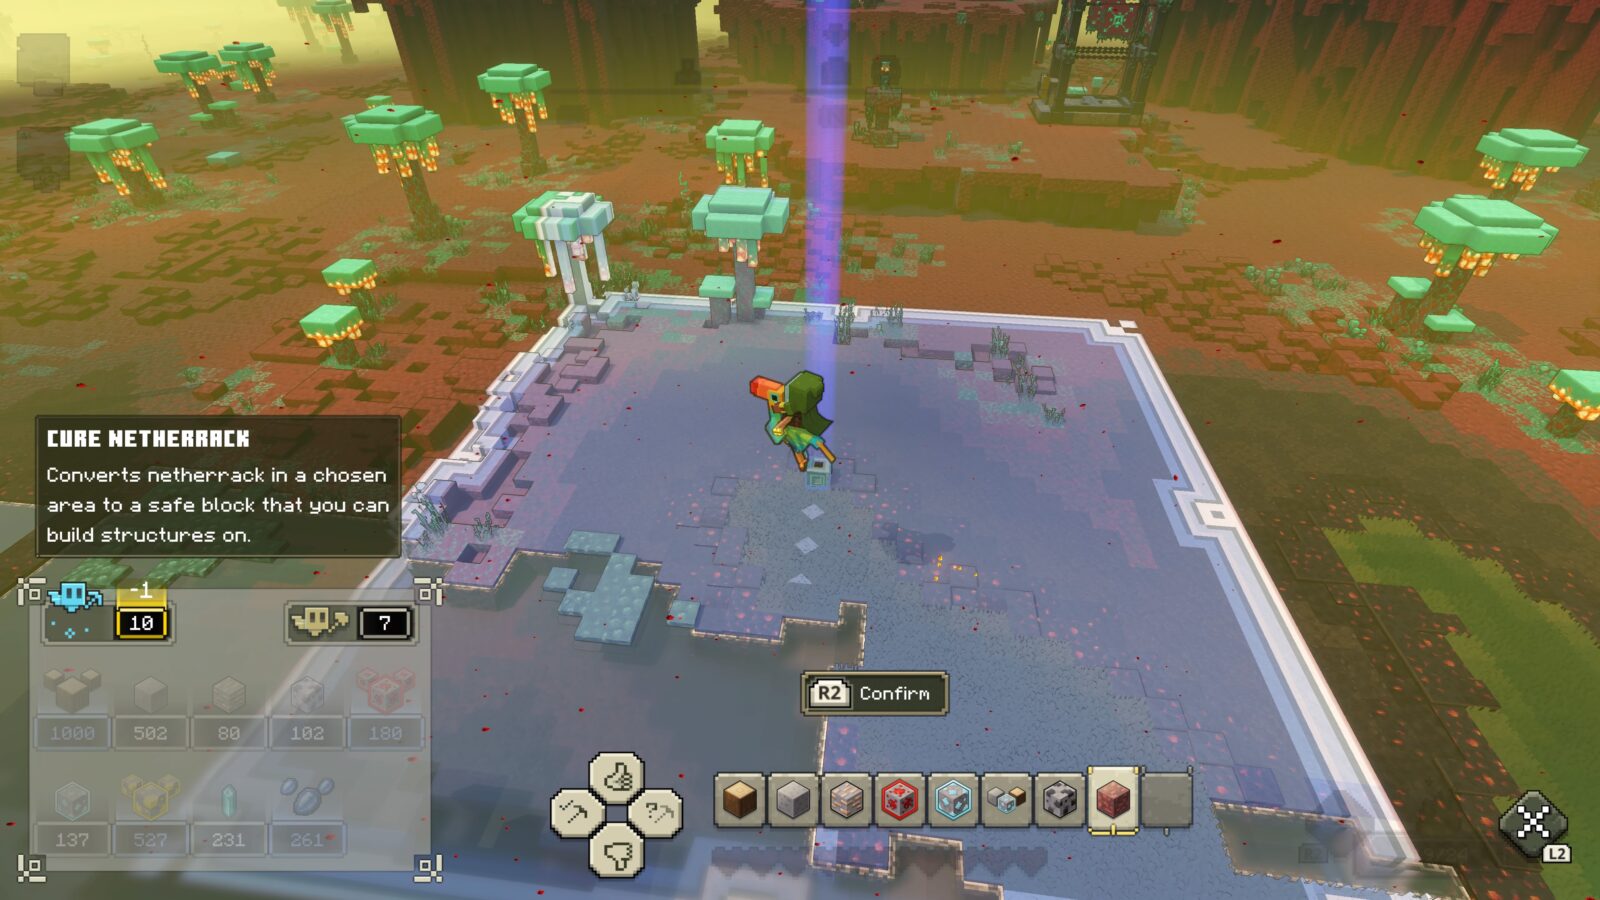
To unlock the “Soothe the Scars” trophy, you need to cure a cumulative total of 20,000 Netherrack blocks using this ability.
You may unlock this trophy naturally, as claiming enemy territory by clearing the Netherrack so you can build closer to their portal is a great strategy for clearing many high-level bases.

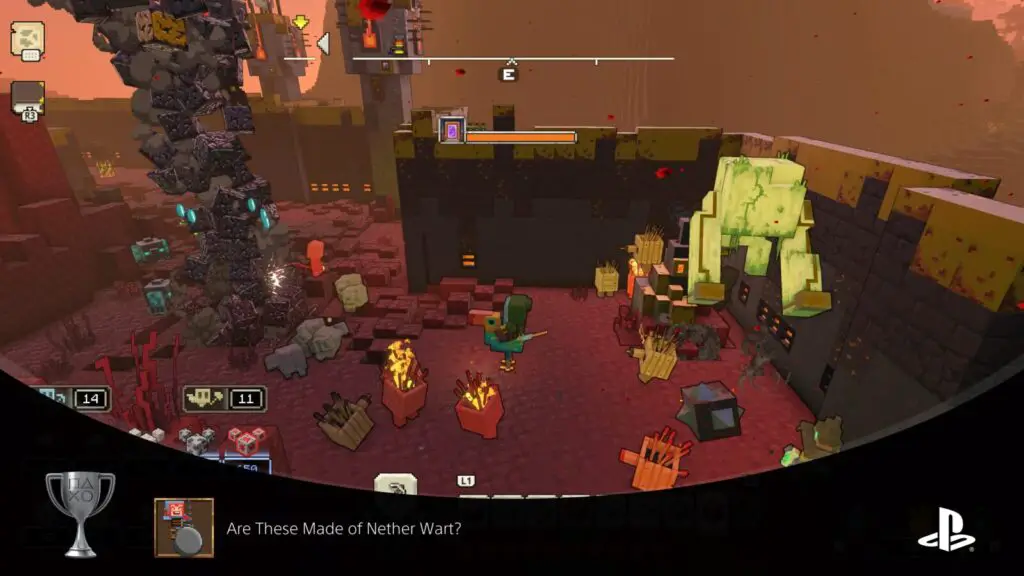
Are These Made of Nether Wart?
Destroy 250 piglin buildings in a single world.
To unlock the “Are These Made of Nether Wart?” trophy, you need to destroy a cumulative total of 250 Piglin buildings and defences. Basically any of the facilities you can have your units destroy when you’re attacking a base or outpost.
This is likely to occur naturally, however, if you rush the portal all the time then there’s a slight chance you could miss this one. I recommend making sure you destroy plenty of buildings each time you attack a piglin base. That, or take out as many outposts as you can find.

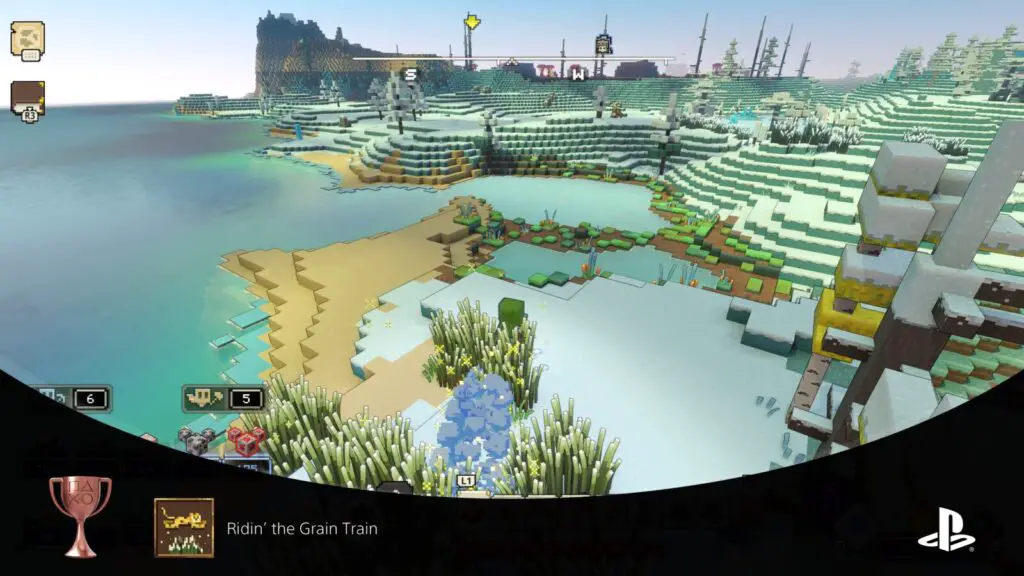
Ridin’ the Grain Train
Spend 2 minutes buffed by speed wheat in a single world.
When you ride through Wheat Patches—on any mount—you will get a small speed boost that lasts for a short duration. To unlock the “Ridin’ the Grain Train” trophy, you need to spend a cumulative total of 2 minutes with this buff active.
Being cumulative, you do not need to try and maintain the speed boost for 2 minutes straight, just run through Wheat Patches whenever you see them and you’ll eventually rack up the minutes needed for the trophy!

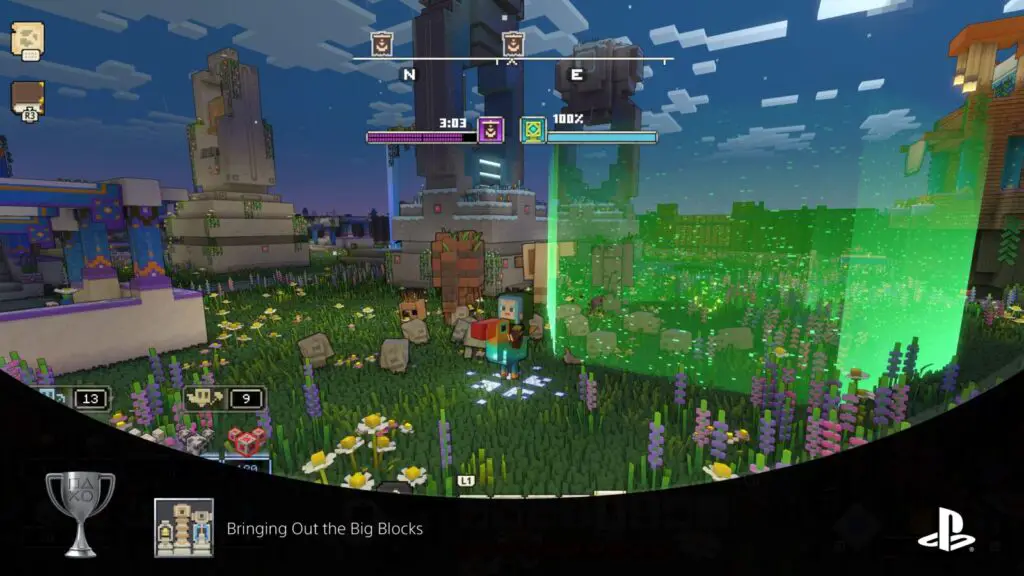
Bringing Out the Big Blocks
Construct 3 host towers within attack range of one another.
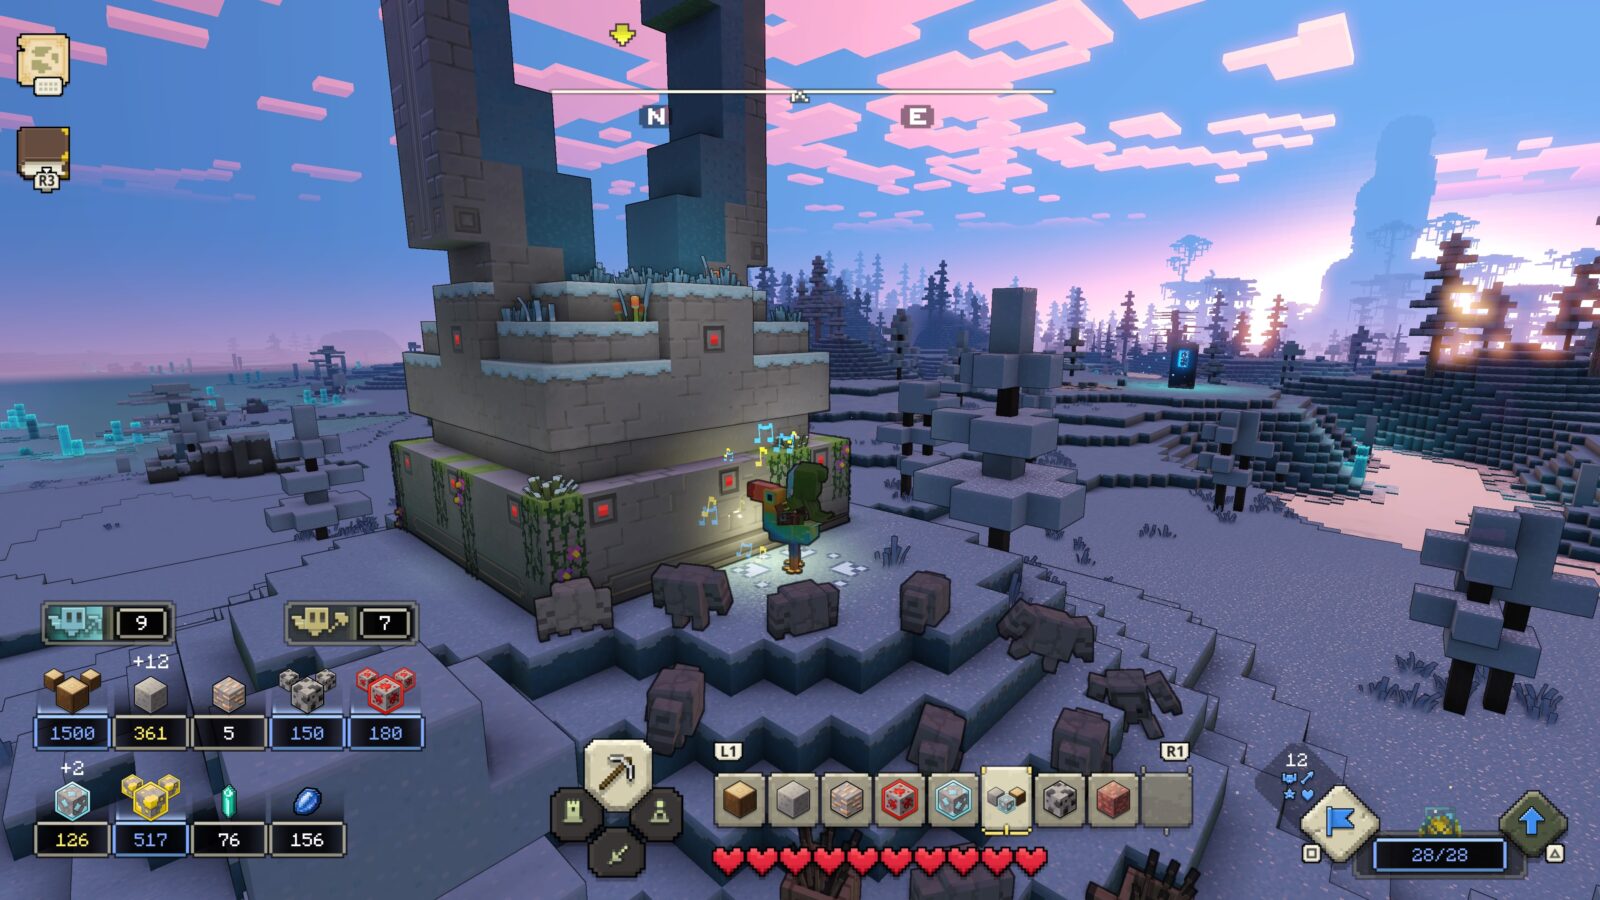
Hidden across the map there are several huge tower structures. They can appear in 3 different flavours; Blast Tower, Frost Tower, and Stun Tower.
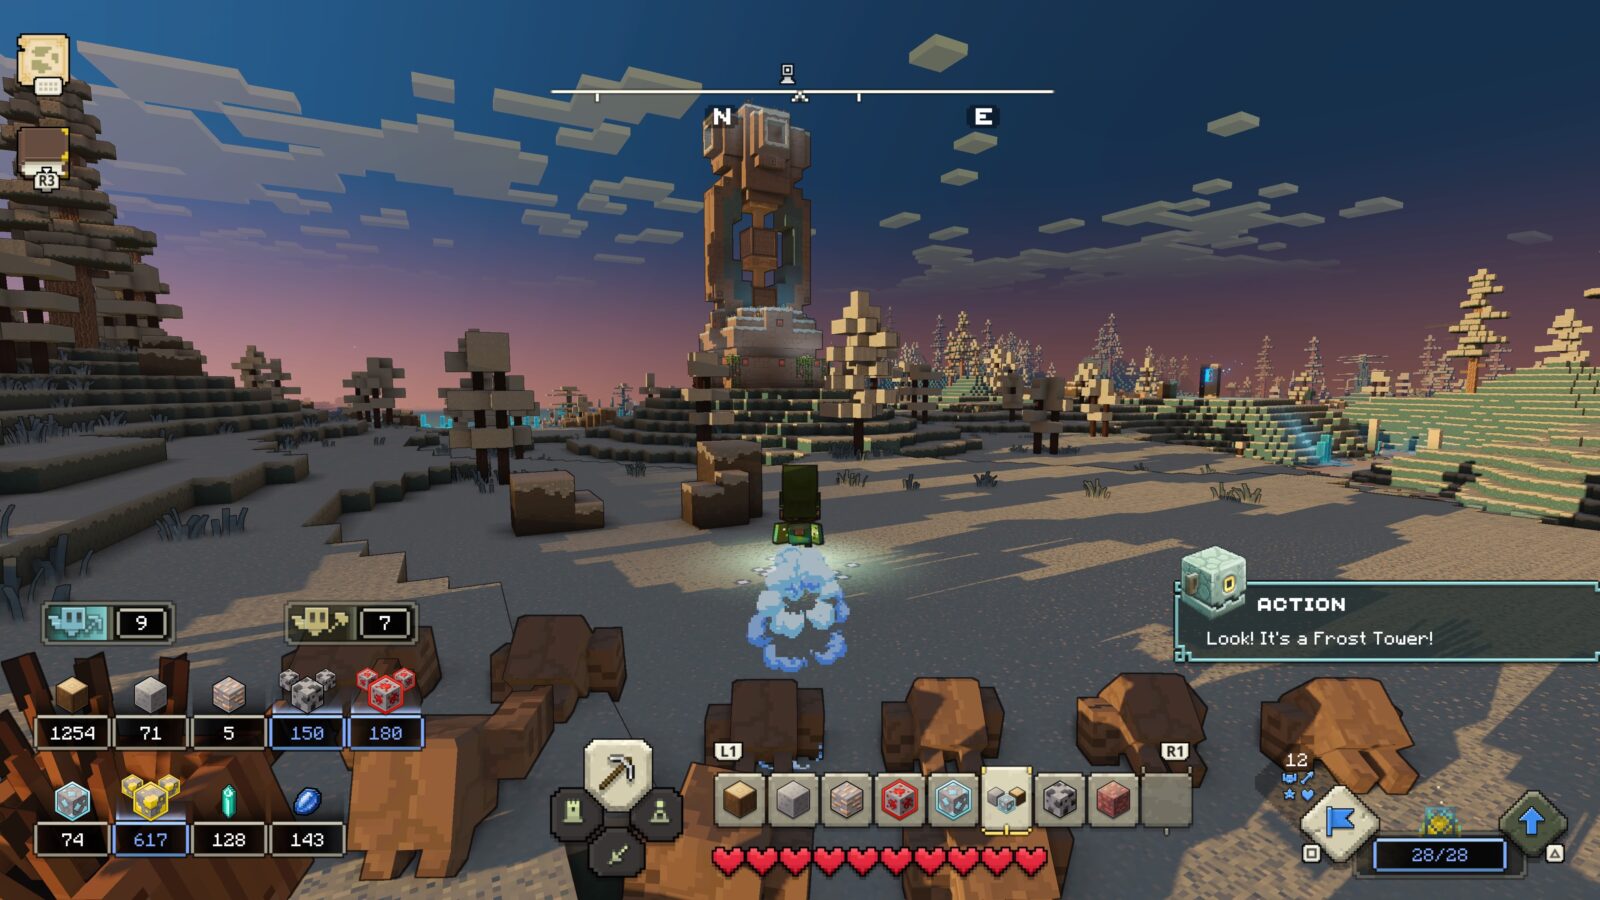
These Power Towers appear at “?” icons on the map/compass, so be sure to check any you see as you defog the map.
To collect these towers, you first need to install the “Collect Power Towers” upgrade at the Well of Fate. This upgrade becomes available once you’ve found a Power Tower for the first time.
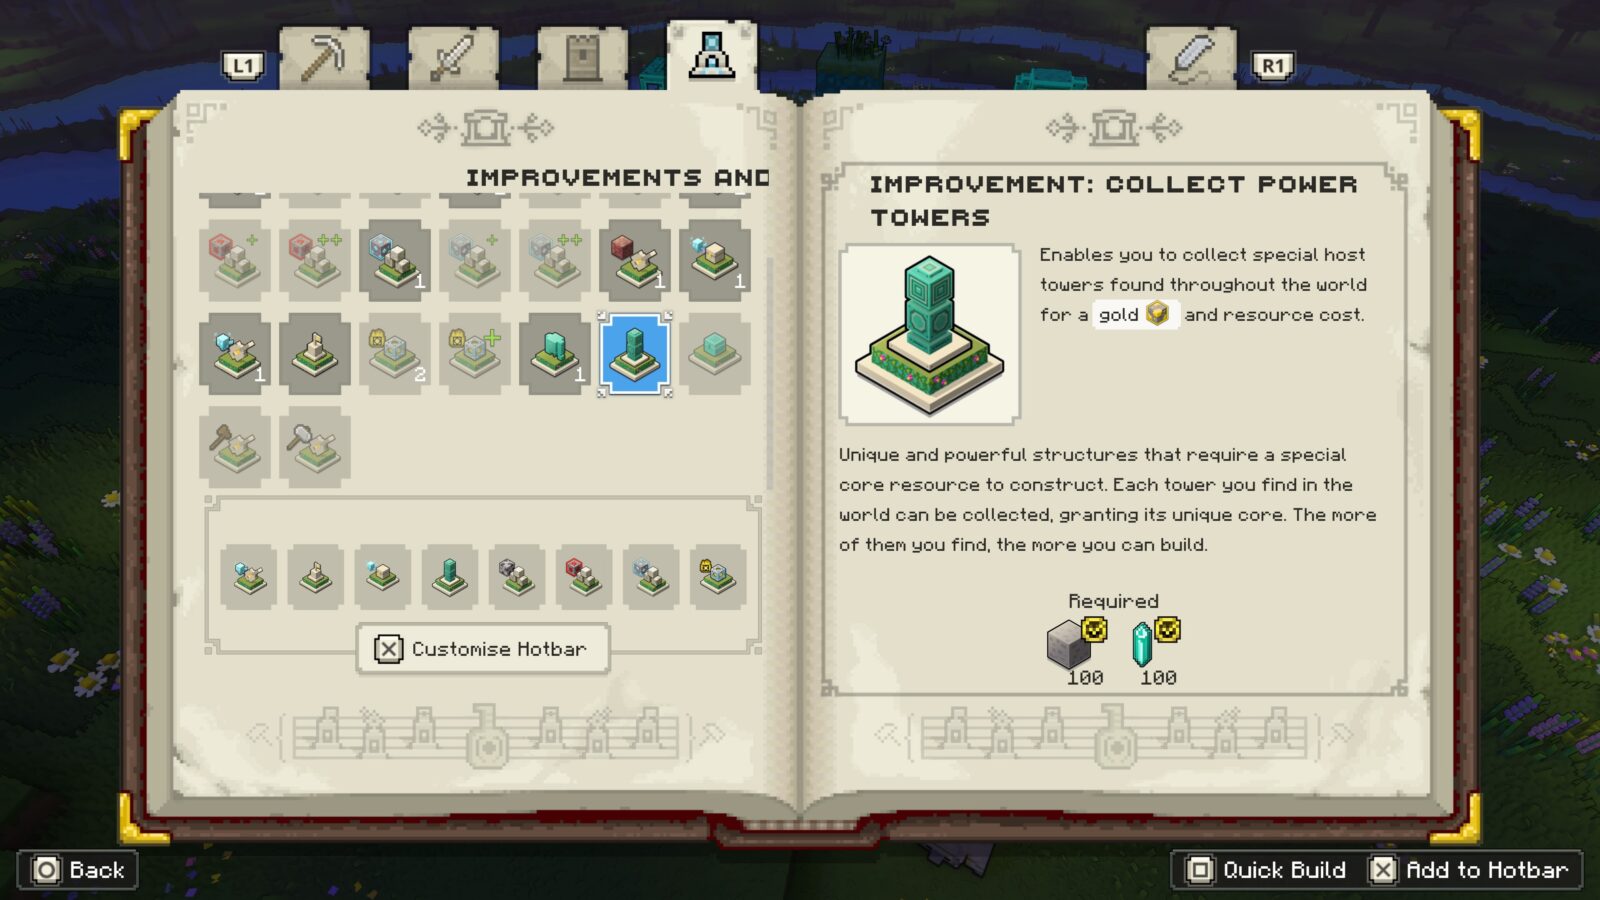
Once you’re able to collect them, find and collect any three towers. They can all be Frost Towers if needed, it just needs to be any three. Basically, you can’t place a Power Tower without first dismantling one somewhere in the world, whether that’s one of the ones available by default or one that you’ve constructed.
When you have dismantled at least three Power Towers of any type, place all three in an area next to each other. They should all be within each other’s blue attack radius, so place them close together.
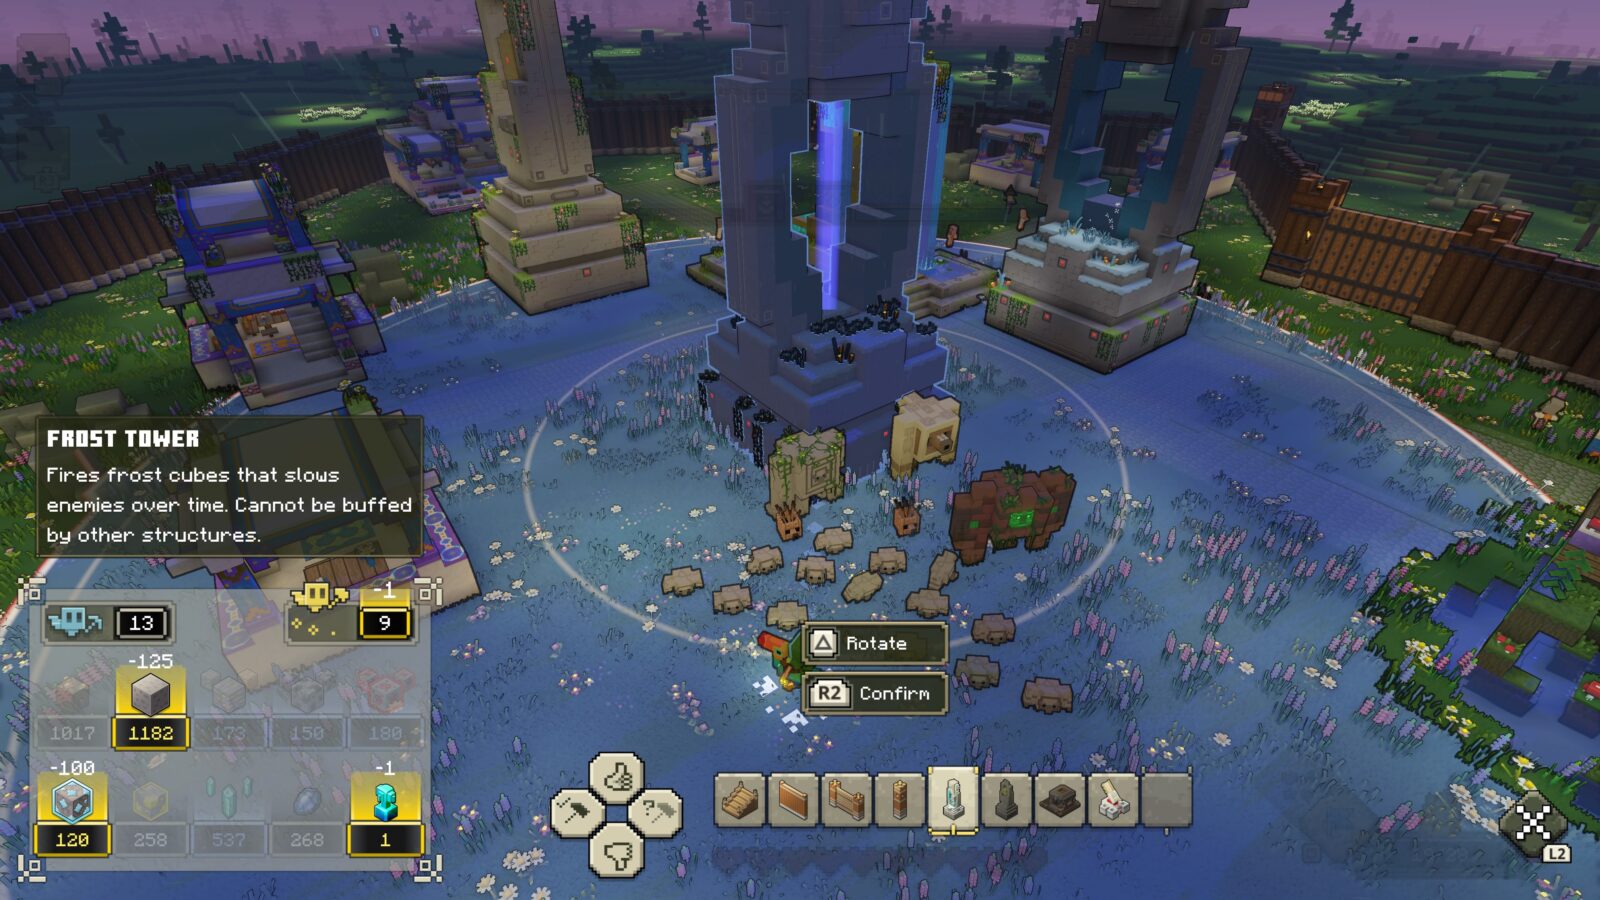
Upon doing the above, the “Bringing Out the Big Blocks” trophy will unlock.

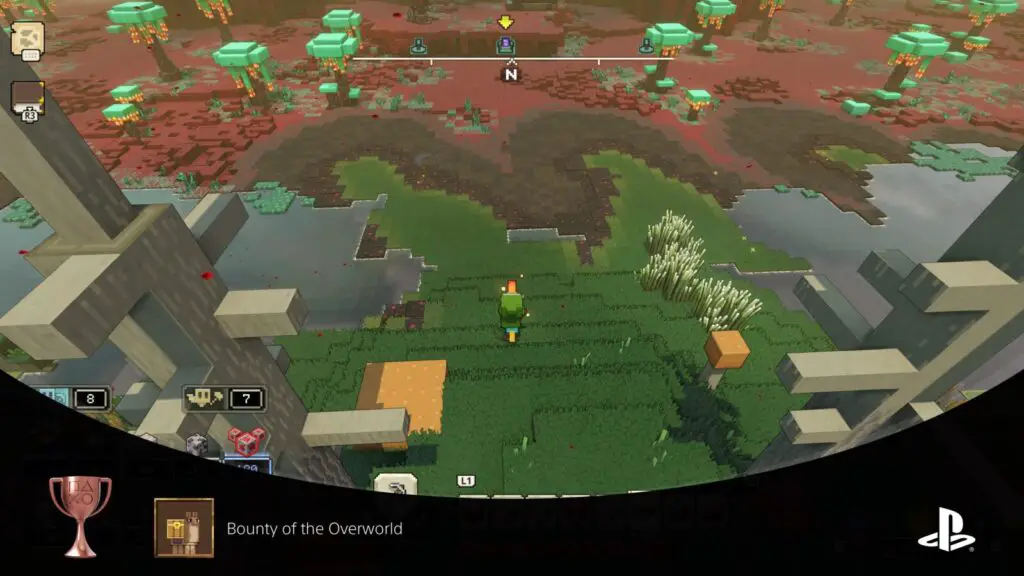
Bounty of the Overworld
Gather 1,000 wood and stone and 125 iron, coal, redstone and diamond in a single world.
You should unlock the “Bounty of the Overworld” trophy naturally, as it doesn’t require too much effort. Essentially, you need to specifically use your Gather Allays to acquire:
- 1,000 Wood
- 1,000 Stone
- 125 Iron
- 125 Coal
- 125 Redstone
- 125 Diamond
Before you can gather these resources, you’ll obviously need the relevant upgrades for your Well of Fate Wellhouse.
The totals are cumulative, so you don’t need to be holding those amounts at one time, just keep gathering resources where you can until the trophy unlocks. As I said, though, it should happen naturally with little effort.

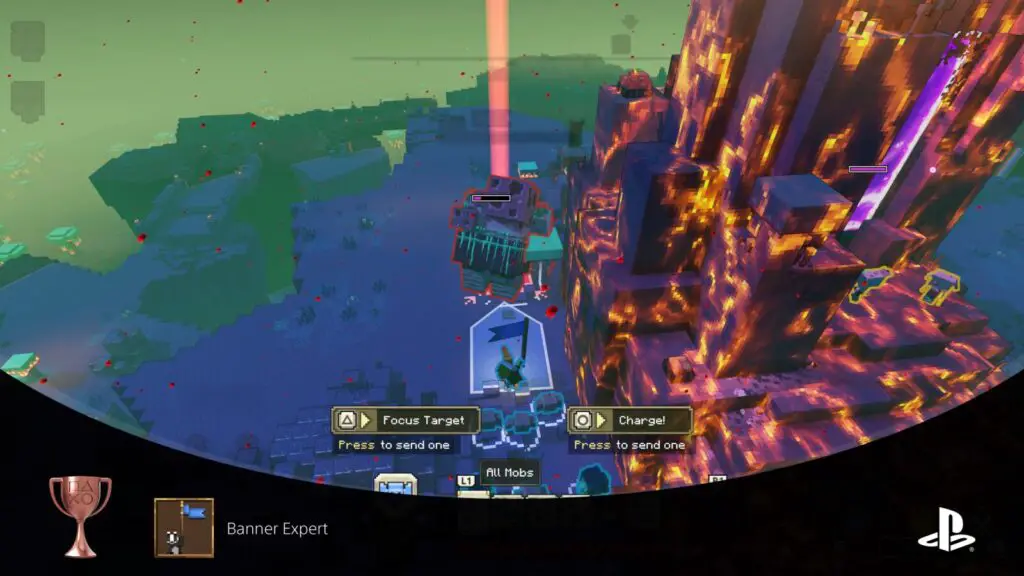
Banner Expert
Give 25 orders from Banner View in a single world.
When you have some units with you, you can hold ![]() to enter “Banner View” and then hold/tap
to enter “Banner View” and then hold/tap ![]() or
or ![]() as needed to issue commands to individuals and groups. You can even give commands to specific subgroups of your main army by using the options in the hotbar with
as needed to issue commands to individuals and groups. You can even give commands to specific subgroups of your main army by using the options in the hotbar with ![]() /
/![]() .
.
To unlock the “Banner Expert” trophy, the only thing you need to do is issue a cumulative total of 25 commands from this Banner View option.
You’ll have to give at least 10 Banner View commands for the One Boom at a Time trophy too.

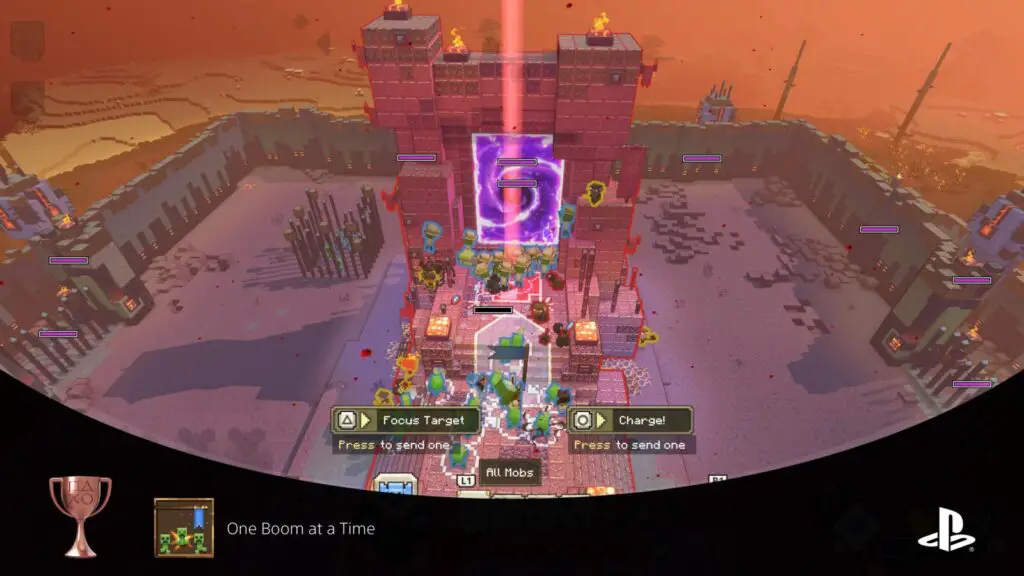
One Boom at a Time
Give 10 individual orders to creepers from Banner View in a single world.
While commanding a group of allies or summons, you can hold ![]() to give more direct commands. You can send out a group at a time using
to give more direct commands. You can send out a group at a time using ![]() or you can send individual enemies out using
or you can send individual enemies out using ![]() .
.
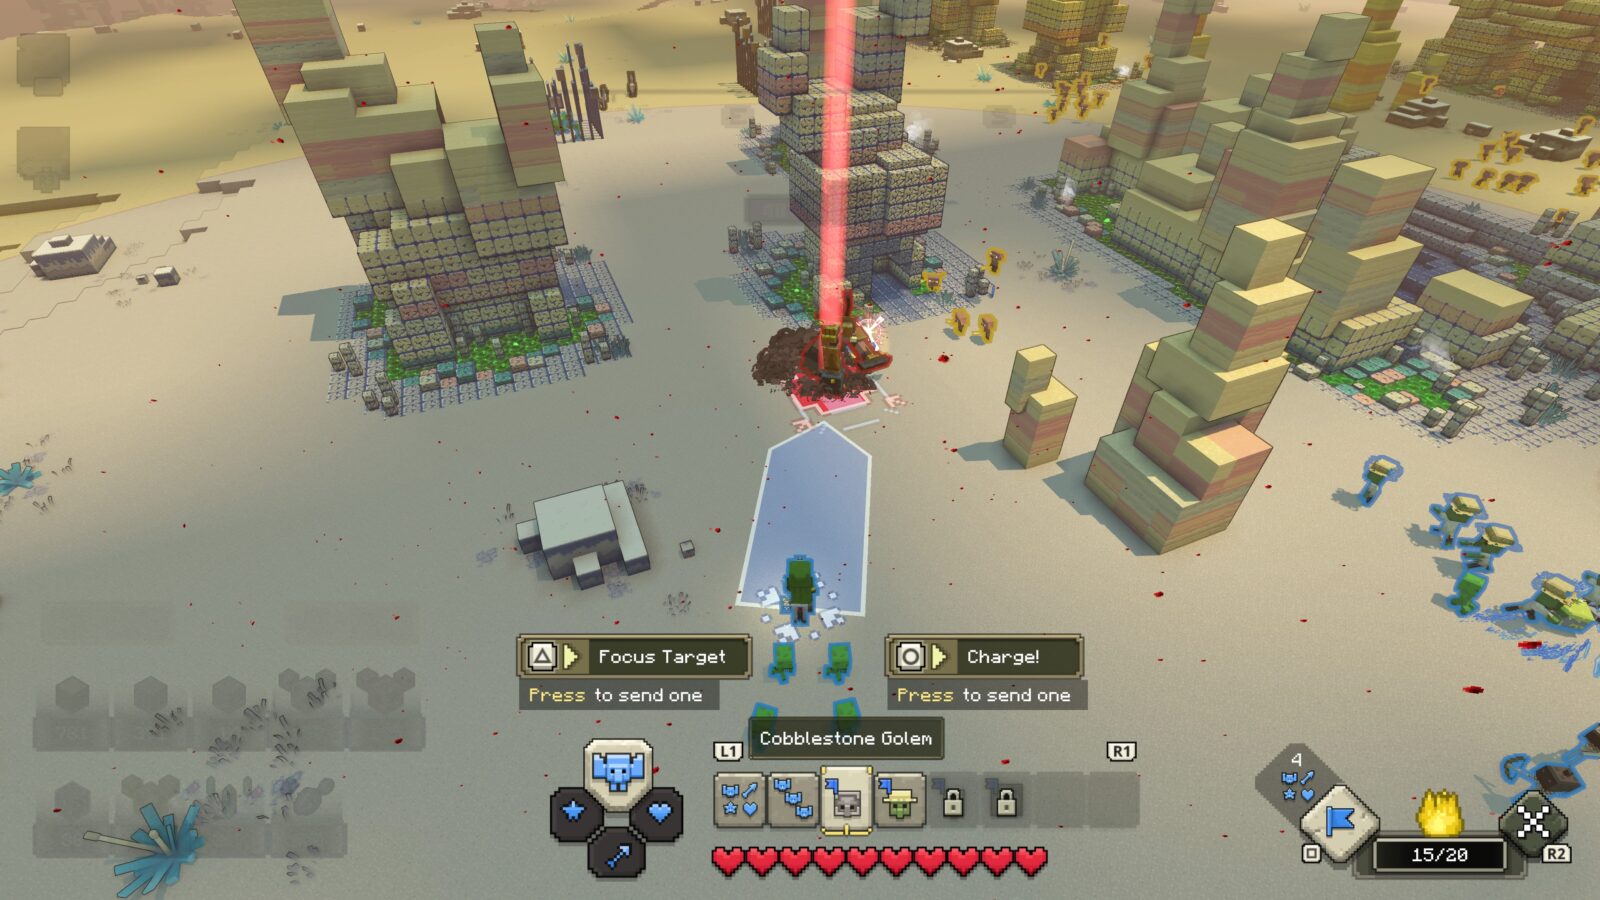
To unlock the “One Boom at a Time” trophy, you need to gather up a group of at least 10 Creepers (it would be easier to attempt this alongside Excitable New Friends) and then hold ![]() to open Banner View and then begin sending them out one by one with
to open Banner View and then begin sending them out one by one with ![]() .
.
After you have used this feature to send out an individual Creeper a cumulative total of 10 times, you will unlock the One Boom at a Time trophy.

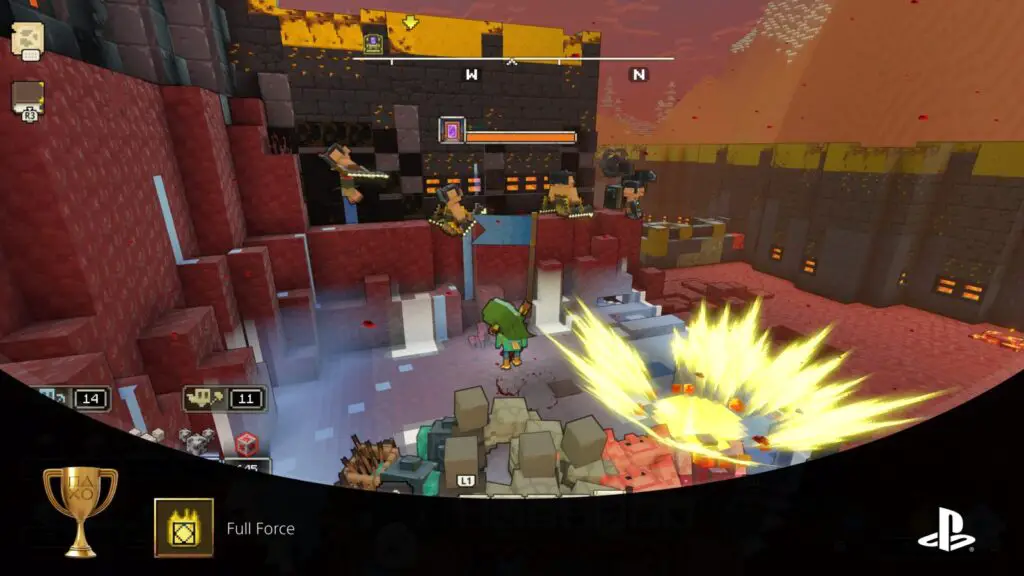
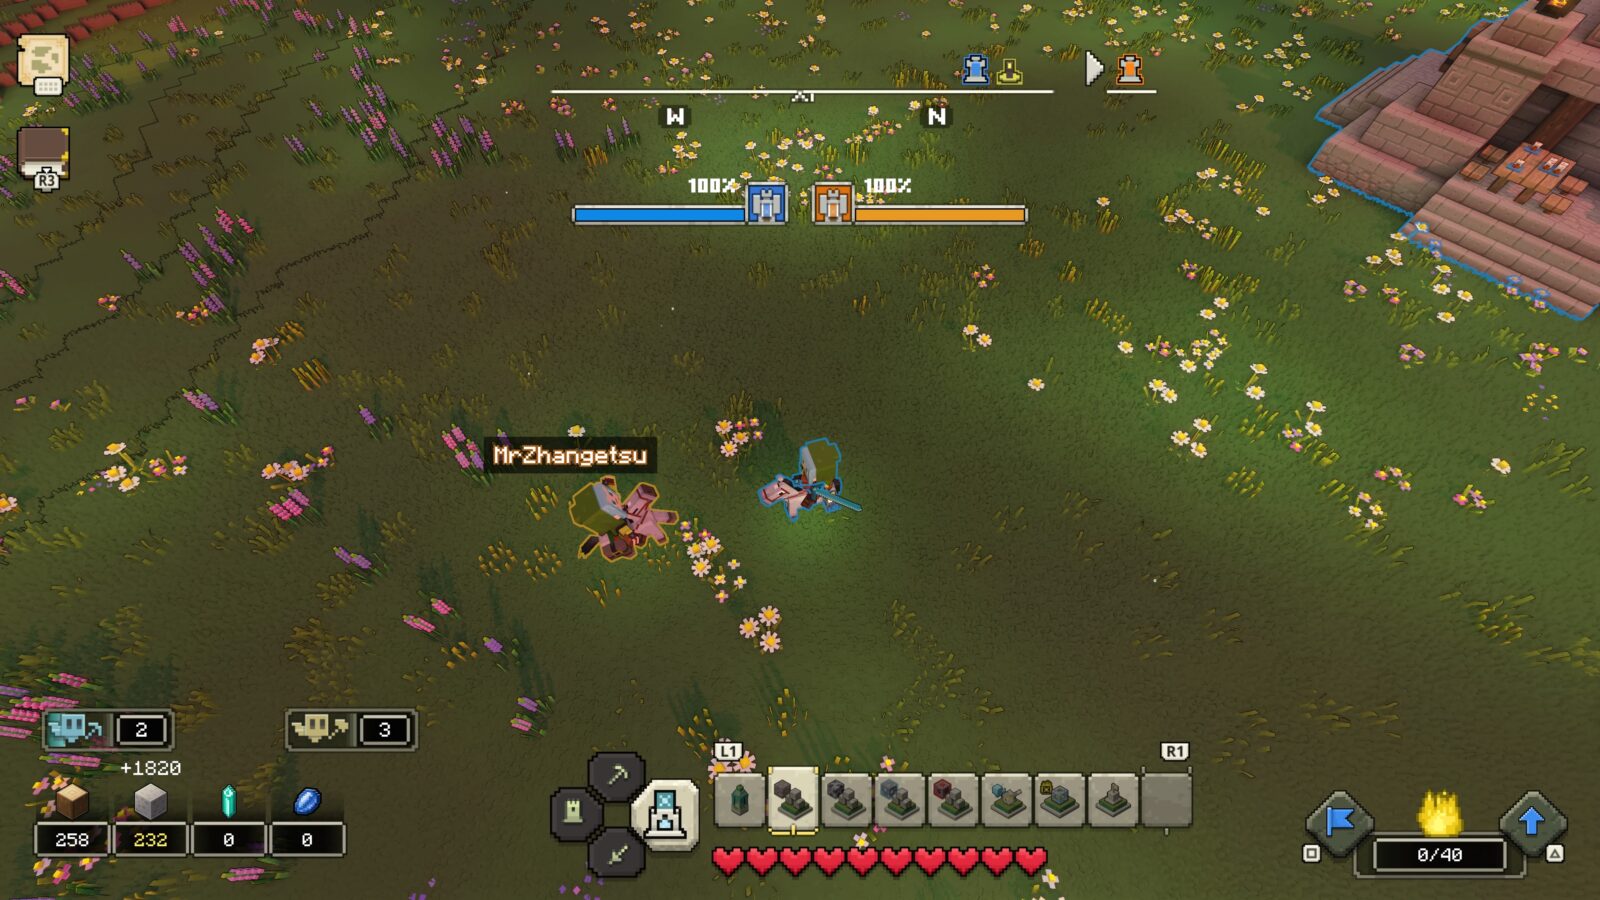
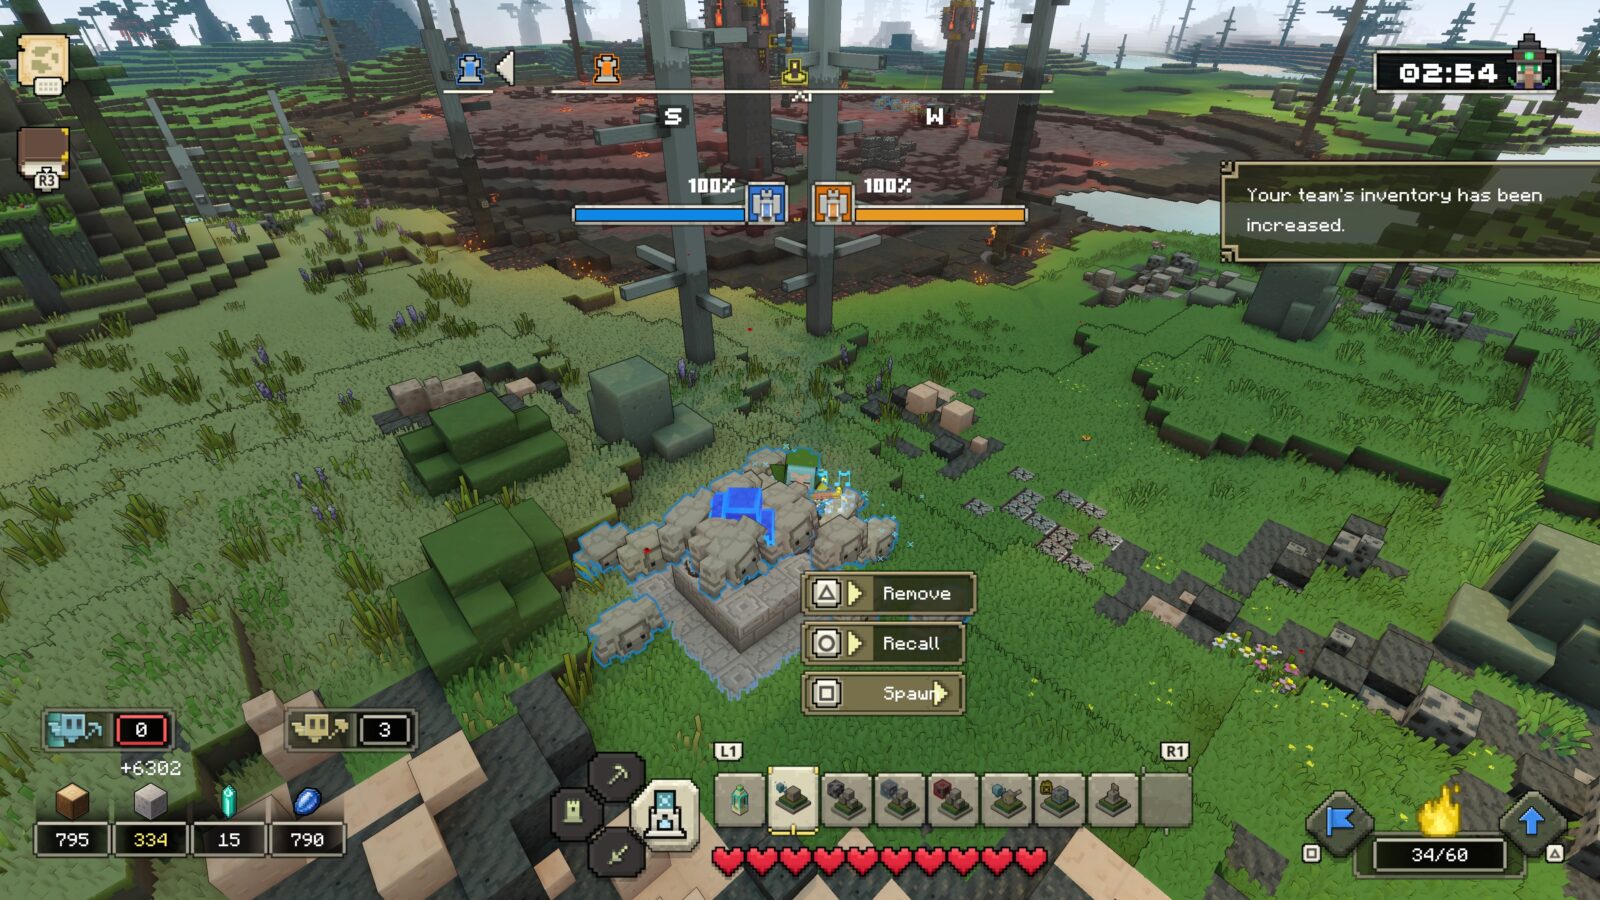
Full Force
Give an army of 80 mobs an order.
The “Full Force” trophy concerns two key resources: Banner Size, and the Flames of Creation.
Banner Size determines how many Mobs you can control at once. No matter what, you will need to upgrade this specific resource until you can control at least 80. I installed 8 “Improvement: Banner” modules at my Well of Fate to be able to do this.

As for Flames of Creation, this determines how many mobs you can actually spawn in. That said, upgrading this is optional for the purposes of this trophy.
You see, you can get around 60-80 mobs to join you by going to each of the Mob Camps—Skeleton Homestead, Zombie Homestead, and Creeper Homestead. Each of these bases will have 20-30 mobs readily available for you to recruit. Additionally, once you’ve made some decent progress in the story, you will also be able to recruit armed villagers and witches from villages!
However you choose to do it, once your banner is large enough and you’ve gathered together at least 80 units, press ![]() to give them all an order and the Full Force trophy will unlock then and there.
to give them all an order and the Full Force trophy will unlock then and there.
Online & Multiplayer Trophies

Working Together
Play a game of co-op.
To unlock the “Working Together” trophy, you simply need to invite another player to your game. Worlds in Minecraft Legends are always online, so you’ll just need to invite someone from the ![]() menu, or have them invite you.
menu, or have them invite you.

The Way of the Sword
Defeat another player with your sword in Versus Mode.
To unlock the “The Way of the Sword” trophy, you need to ensure that, when killing an enemy player in Versus Mode, your sword ![]() attack deals the final blow. If a mob or defence of some kind takes them out, you’ll need to try again.
attack deals the final blow. If a mob or defence of some kind takes them out, you’ll need to try again.
This trophy cannot be earned in a Private Match. You will instead need to achieve this online in Versus Mode against other players in a Public Match.

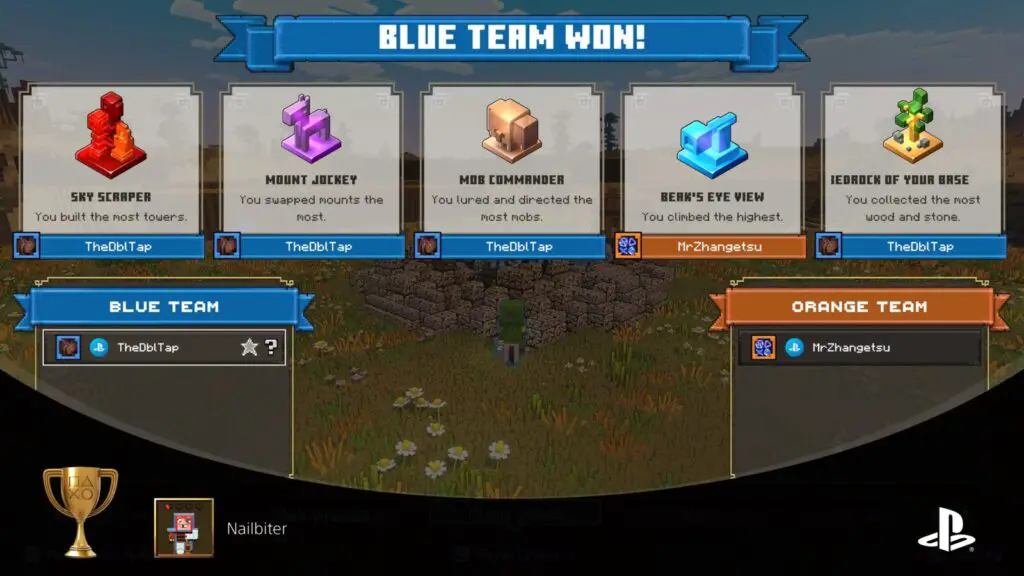
Nailbiter
Defeat an opponent with less than 10% of your HQ's health remaining in Versus Mode.
To unlock “Nailbiter,” start by loading up a game in Versus Mode. In this mode, you gather resources and build defences to keep opposing players from destroying your HQ, while you attempt to destroy theirs first.
For the trophy, you’ll need to allow your HQ’s health to be reduced down to just 10% of its total, ideally less. Your HQ will regenerate health over time, so by allowing it to be reduced to around 5% you can ensure you have time to take out the opponent’s HQ before yours recovers above 10%.
As you may have guessed, you will then need to go to your opponents base and destroy it before yours is destroyed or recovers to over 10%.
It goes without saying that this is a stupidly difficult trophy to pull off without a lot of luck or a good friend. If you have a friend with a copy of the game who’s willing to help you out, start the Versus Mode game with them as your opponent, and then work together to set up the conditions you need.
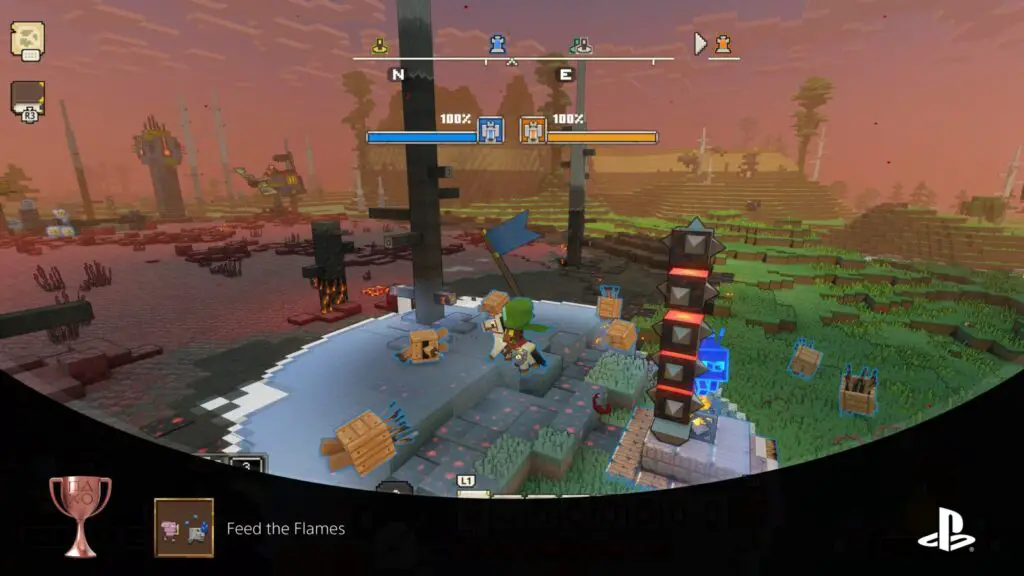
Feed the Flames
Gather 2,400 lapis in 30 minutes or less in Versus Mode.
Lapis are the blue gems you use to spawn units with the Flames of Creation. To unlock the “Feed the Flames” trophy, you need to—while playing in Versus Mode—collect a total of 2,400 Lapis or more within a timeframe of just 30 minutes or less. This isn’t as difficult as it seems, though.
Firstly, you don’t need to hold 2,400 Lapis at one time, you just need to collect that many. Therefore, when the number of Lapis you’re holding reaches the cap of 500, you can spend them on Mob Spawners to free up space for you to collect more.
You can also buy Lapis Flags from the Build Menu, these flags will increase the passive Lapis income, meaning you don’t need to kill Piglins or opposing forces to gather them.
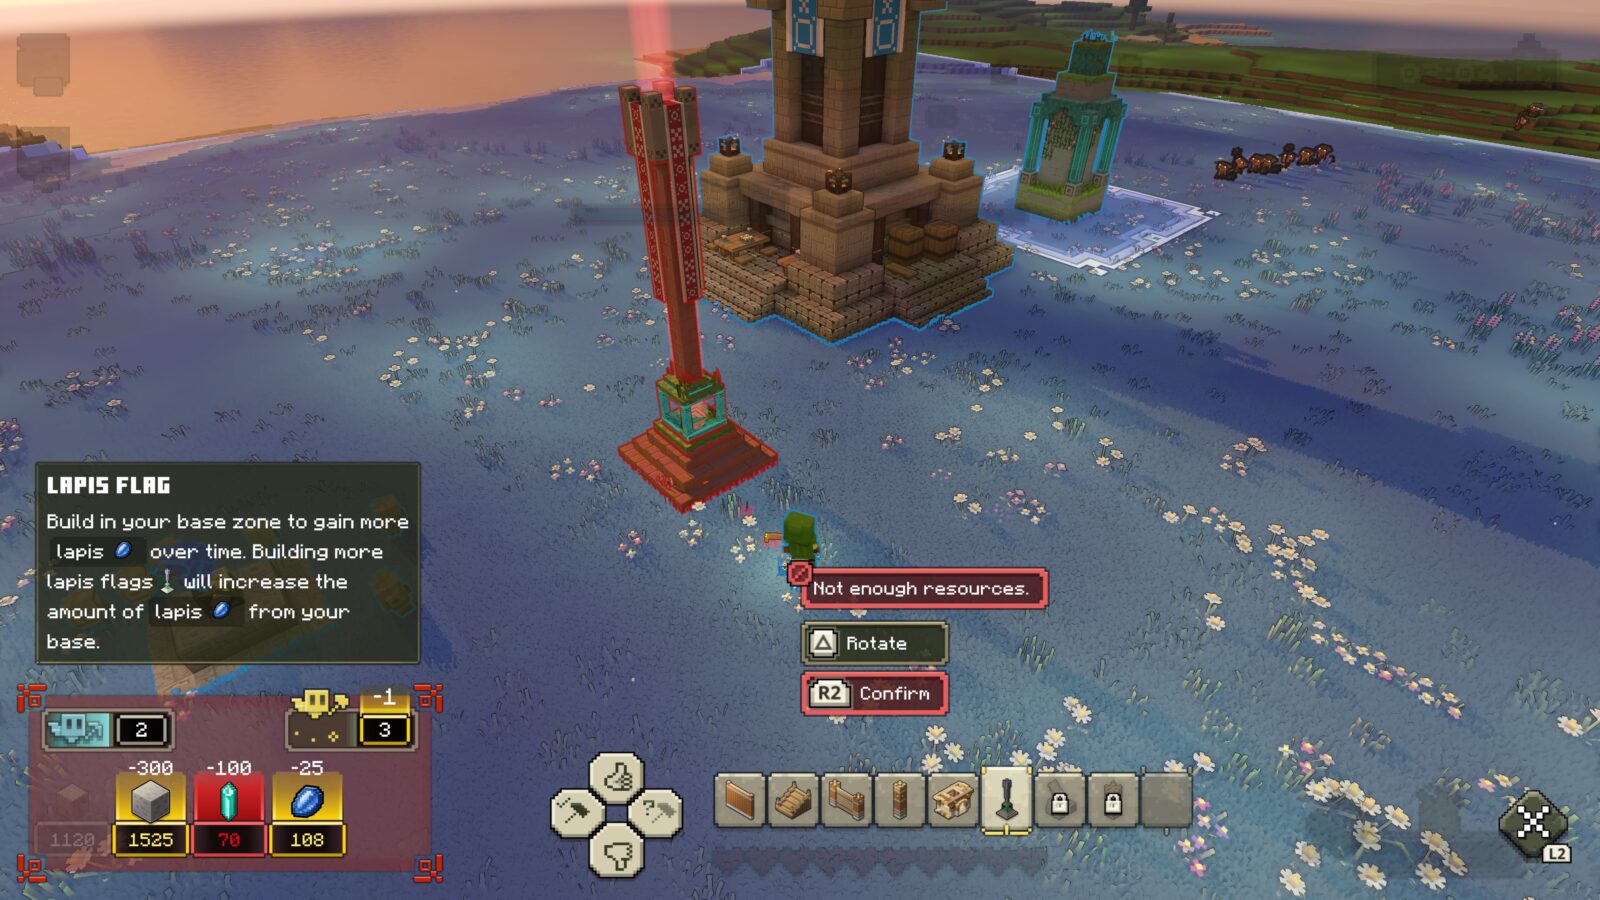
Additionally, you can increase the cap to as much as 900 by building “Allay Storage” improvements at your HQ around an Improvement Hub.
So, that’s pretty much it; Build Lapis Flags, Build Allay Storage Improvements, and Spend Lapis by spawning enemies Keep this up until you’ve collected a total of 2,400 within a 30-minute time period and the trophy is all yours!
You can speed things up a bit by adding Flames of Creation upgrades to your Improvement Hubs too, this way you can spawn more mobs and spend Lapis faster!
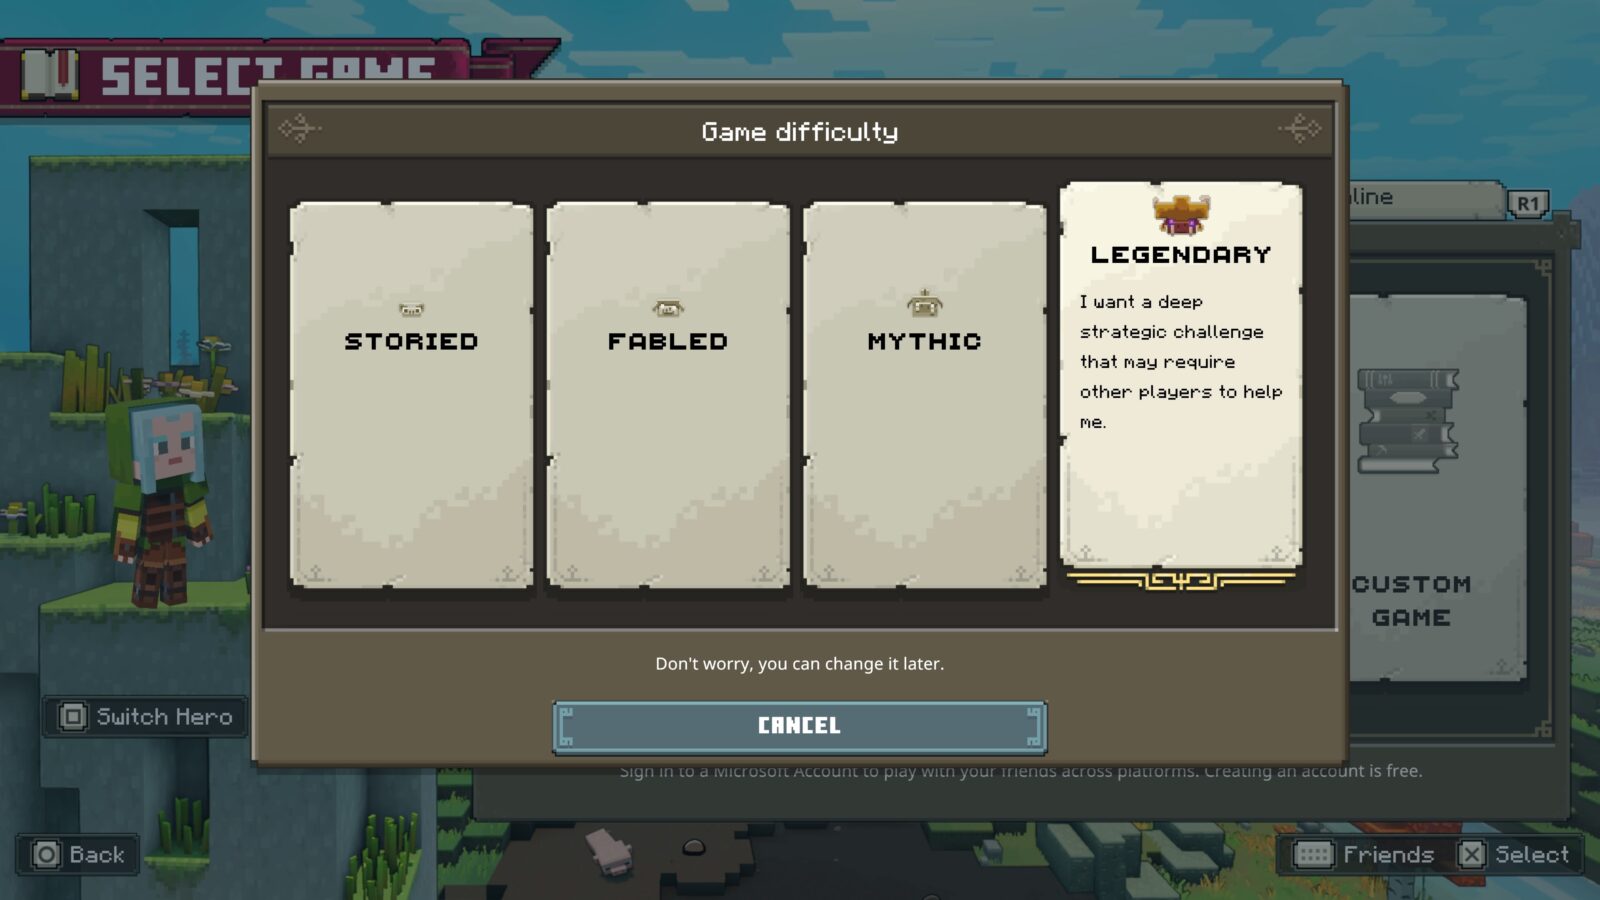
Phase Three | Legendary Difficulty Playthrough
Well, well, well, if you made it this far—and you haven’t done it yet—there should be just one last thing standing between you and the Platinum!
Unfortunately… That one last thing is no walk in the park. It’s going to be a gruelling, painfully difficult 10-15h slog through the game’s hardest mode. Good luck…
You’ll need it.
Complete Minecraft Legends on Legendary Difficulty

Legendary Hero
Defeat the campaign on Legendary.
When you start a new game from the title screen, you need to select the “Legendary” option on the far right. After doing so, be sure not to change the difficulty in the game’s settings. Ever. If you do, you’ll void the trophy and will need to restart from the beginning of the game.
The first bit of advice I’d give you is to not attack any bases at the start. The enemies don’t start attacking villages at night until you attack a base. Once you do attack a base, though, there’ll be multiple invasions on every night, so you should prepare first.
You can use this temporary lull in the action to do the following:
- You won’t be able to get any Prismarine without attacking bases, so you won’t be able to place the First Golem and Power Tower Improvements at the Well of Fate. However, it will still benefit you to find all of these on the map so you can find them quickly and easily as soon as you have the relevant upgrades.
- Make sure you go out and recruit the Skeletons, Zombies, and Creepers. The Creepers are not super useful, but free units are free units.
- Find and swap for whichever Mount you’d prefer to have. I recommend Big Beak personally, its glide is useful and it’s quite fast.
- Gather what resources you can. You should even be able to start placing some basic defenses at all of the villages on the map, ready for nighttime invasions.
When you’re ready, start attacking bases and outposts to begin the action. Every night, you will need to be ready to actively and vehemently guard multiple villages. Many of them will fall, but you can reclaim them by defeating the occupying forces and rebuilding the village using a Carpenter’s Hut.
How things go will depend on your skill and your understanding of the game’s core strategies, and you may even need a few attempts to get things going in your favour. That said, there’s a few more tips I can offer you for your stint in Legendary Difficulty:
- Place Wellhouses near the Skeleton and Zombie homesteads, so you can quickly return to those bases and recruit 20-30 of each troop type per visit. This is a great way to bolster your forces before you storm a base as they’re free to recruit. You could also recruit Creepers if you want, but they basically just attack once and then they’re gone, which is not very helpful, especially not on Legendary Difficulty.
- Prioritise upgrading your Banner and your Flames of Creation. With a big enough army you really can brute-force most bases. If you keep a steady stream of Skeleton Archers coming, you can destroy most formidable defences and troops from a safe distance, then bring a swarm of about 40 Cobblestone Golems into the base to absolutely decimate the portal.
- Though it is possible to rush the portal a lot of the time, it’s not recommended in Legendary Difficulty. It’s better to take your time and clear away some of the defences, especially mob spawners and those annoying fan-turret things they added in the Holiday 2022 update.
- One good thing from the Holiday 2022 update is the witches! These ranged units deal massive damage and are a great addition to your forces. Once you’ve saved a few villages and earned their trust, you’ll be able to recruit them from their bases at each Village. Be sure to recruit these when you can and bring them with you onto Base Raids.
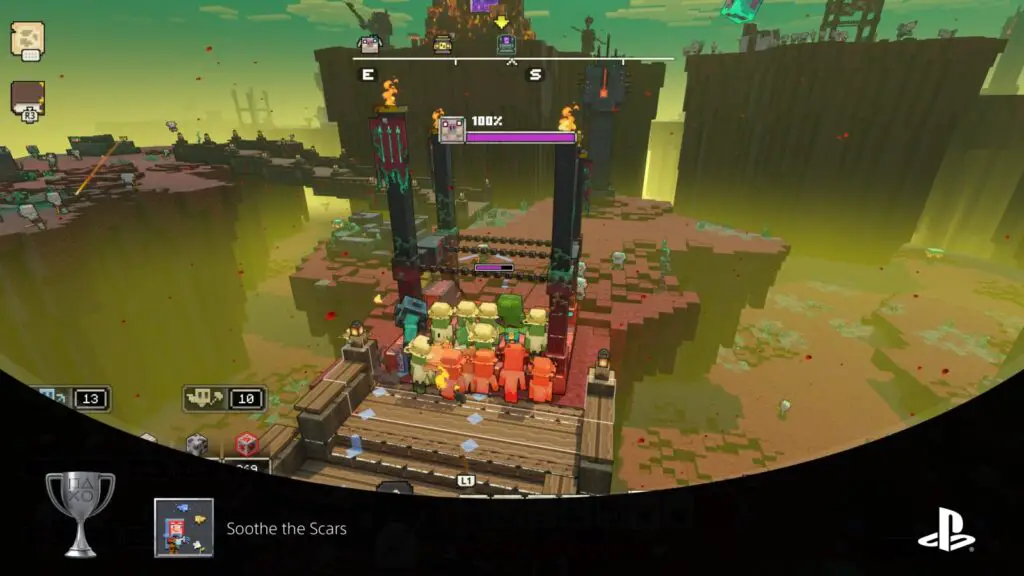
Once you have defeated all three Piglin factions and spawned the Great Hog, defeat it to finish the story campaign and collect your very hard-earned yet well-deserved trophy.
PlatGet!

True Legend
All trophies have been awarded.
After collecting every trophy in this Minecraft Legends Trophy Guide, the "True Legend " Platinum Trophy will unlock. Congratulations!
Thanks for Reading
Plat Get!
Thank You!
Thank You for choosing PlatGet as your source for this Minecraft Legends Trophy Guide.
Wondering what to complete next? Browse our complete guide selection or check out our friends at PlatPrices.com to filter the PS Store based on price, trophy difficulty, or completion time.
Got a question, some feedback, or just want to say thanks? Drop a comment in the discussion section below, we'd love to hear from you! No account required!!