PlayStation 4, PlayStation 5
God of War Ragnarok Trophy Guide


General Info
FAQ
How long does it take to beat God of War Ragnarok and unlock all trophies?
About 40-50 hours on the lowest difficulty..
How difficult is it to beat God of War Ragnarok and unlock all trophies?
Easy (3/10).
Does God of War Ragnarok have online trophies?
No.
Does God of War Ragnarok have difficulty-specific trophies?
Yes.
Does God of War Ragnarok have missable trophies?
No.
Does God of War Ragnarok have glitched trophies?
No.
What is the minimum number of playthroughs required to unlock all trophies in God of War Ragnarok?
One.
Does God of War Ragnarok have a Platinum Trophy?
Yes.
Trophy Guide
God of War Ragnarok Trophy Guide and Road Map for PS4 & PS5
Welcome to our God of War Ragnarok Trophy Guide. God of War Ragnarok is the long-awaited sequel to the critically-acclaimed God of War on PlayStation 4, where the series shifted from Greek to Norse mythology.
This epic sequel is every bit as incredible as its predecessor and is a game you absolutely should not miss out on. The trophy journey itself is about 50% story and 50% exploration, with you having to complete almost all possible side-content.
Phase One – Story and Collectibles
In this initial phase of our God of War Ragnarok Trophy Guide, all you need to do is focus on the story. There are no missable trophies at all and not a single difficulty trophy to cloud your choices. Play exactly how you wish and worry about trophies later.
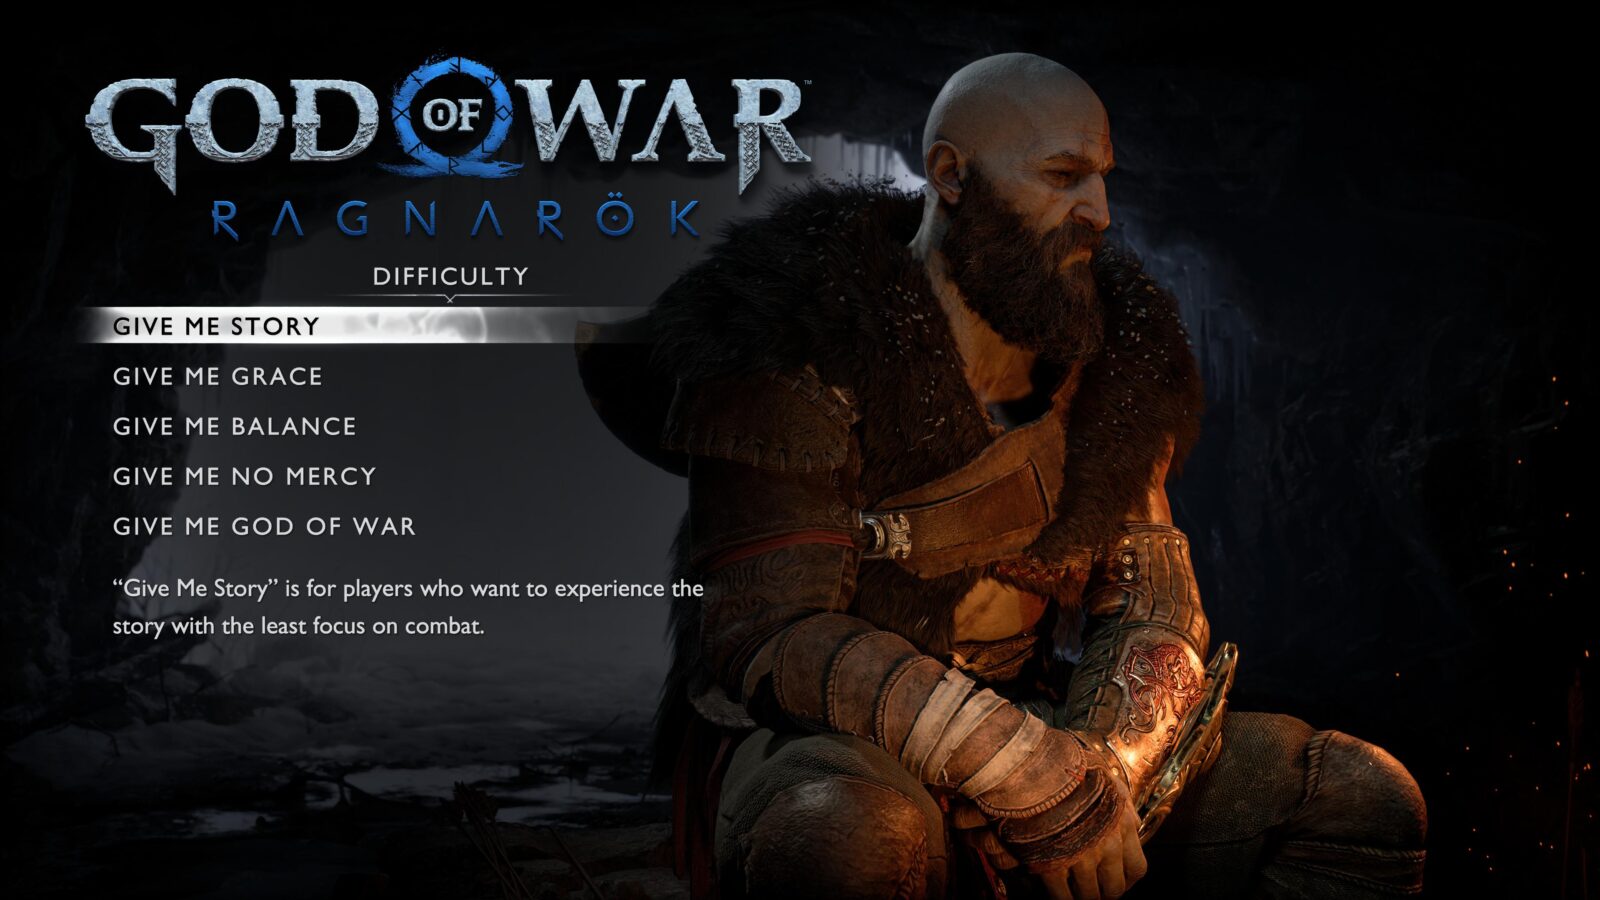
Feel free to even choose “Give Me Story,” the easiest difficulty in the game, as there are no consequences. It really is up to you. There are even some additional Accessibility options that you can exploit to further reduce the difficulty if you need to.
Along the way, feel free to complete as much side-content as you want. If you want to go and explore each time the game opens up, complete Favors, loot Nornir Chests, Shoot Ravens, fight optional Minibosses, and more, don’t hesitate to do so.
Just know that there’s no pressure either way. With everything being unmissable, you can leave as much of it for later as you like.
Unmissable Story Trophies
Below are several story-related trophies. Given the value of God of War Ragnarok’s story, I’ve decided to hide the story trophies inside the spoiler container below. This is because some trophy descriptions contain massive story spoilers.
You can continue, secure in the knowledge that any trophies inside there will definitely unlock, or you can take a peep inside and see what you have coming your way.
Spoilers! Click to Show


A Grizzly Encounter
Battle the Bear

Blood Debt
Battle the God of Thunder

Backyard Brawl
Battle the Mysterious Valkyrie

Root of the Problem
Battle Níðhögg

The Cauldron
Destroy Grýla’s cauldron

Off the Leash
Battle Garm

Comeuppance
Battle Heimdall

Better Together
Battle Hrist and Mist


Ragnarök
Battle the All-Father
Unmissable Non-Story Trophies


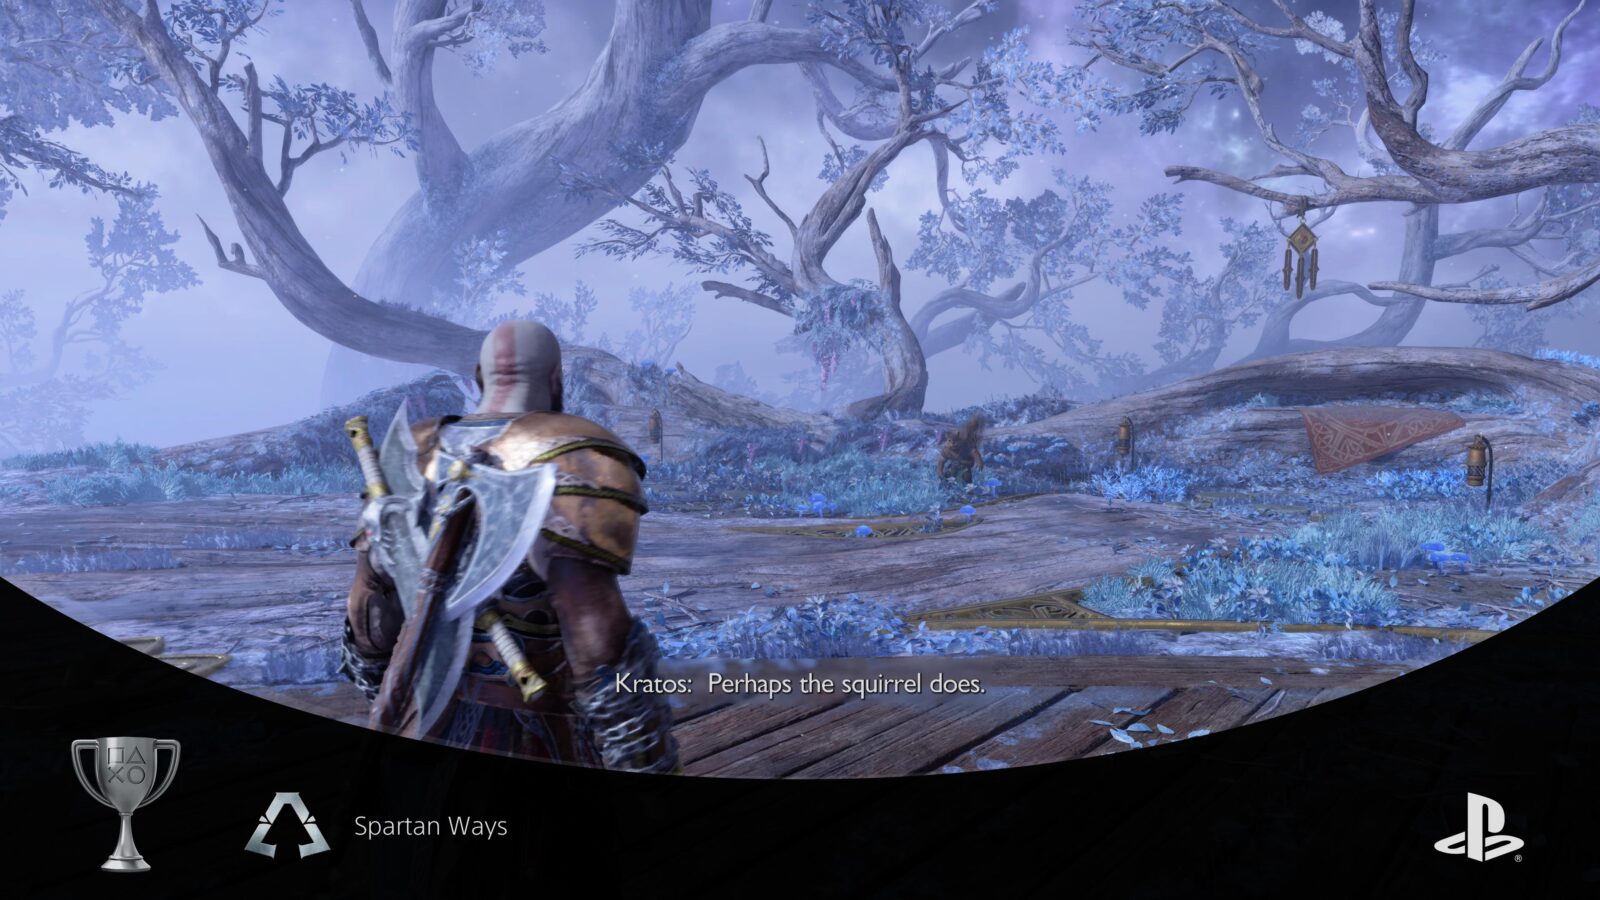
Spartan Ways
Remember the Spartan teachings
There are three types of Spartan Rage (![]() +
+ ![]() )abilities that you will unlock throughout the story. They are all unavoidable and will unlock automatically as you progress. Therefore, the Spartan Ways trophy—for unlocking them all—will also be received unavoidably.
)abilities that you will unlock throughout the story. They are all unavoidable and will unlock automatically as you progress. Therefore, the Spartan Ways trophy—for unlocking them all—will also be received unavoidably.

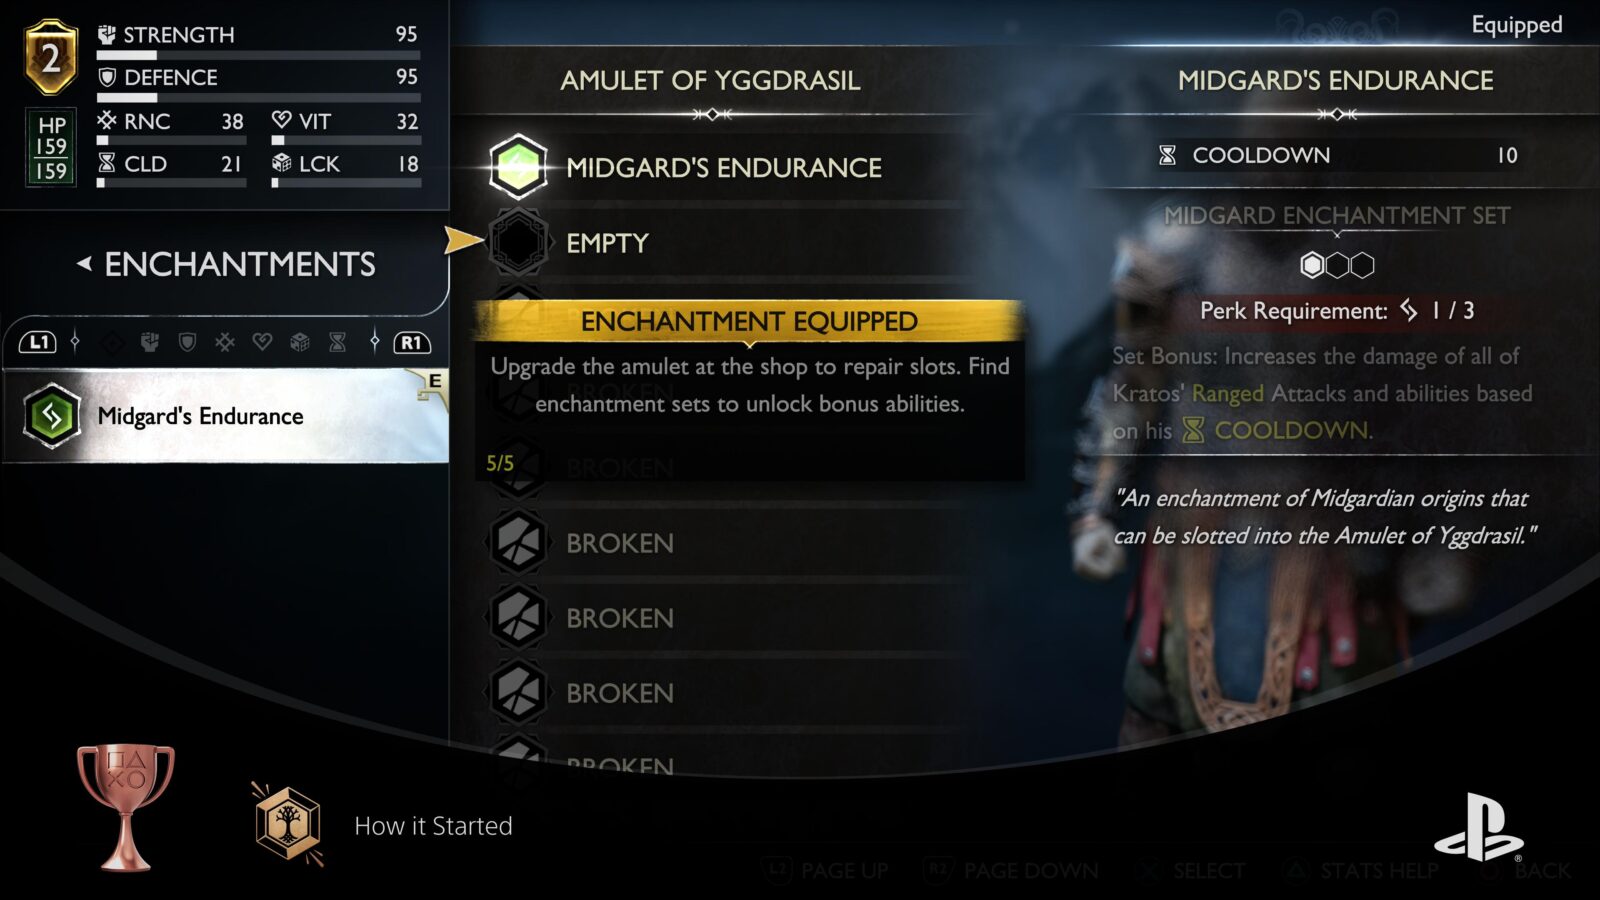
How it Started
Equip an Enchantment
At a certain point in the story, after a particular Boss Fight, you will gain access to the Amulet of Yggdrasil. With it, you can equip enchantments that boost your stats.

As soon as you get the amulet, you will be forced to go through a tutorial on applying enchantments, making the How it Started trophy unmissable.
Phase Two – Favors
One of the easiest transitions from Main Story to exploration is via the Favors; God of War Ragnarok’s Side Quests. By the end of the story, you will have a lot of favors available across almost all the maps in the Nine Realms, unless you’ve already done them all, which is fine too.
By completing favors, you will be taken to more corners of the Nine Realms, unveiling more of the map, receiving valuable rewards, and revealing access to more Mystic Gateways. This will all help to make the collectible cleanup easier. Of course, you’re welcome to continue looking for and grabbing any collectibles you can while completing Favors.
Favor Trophies

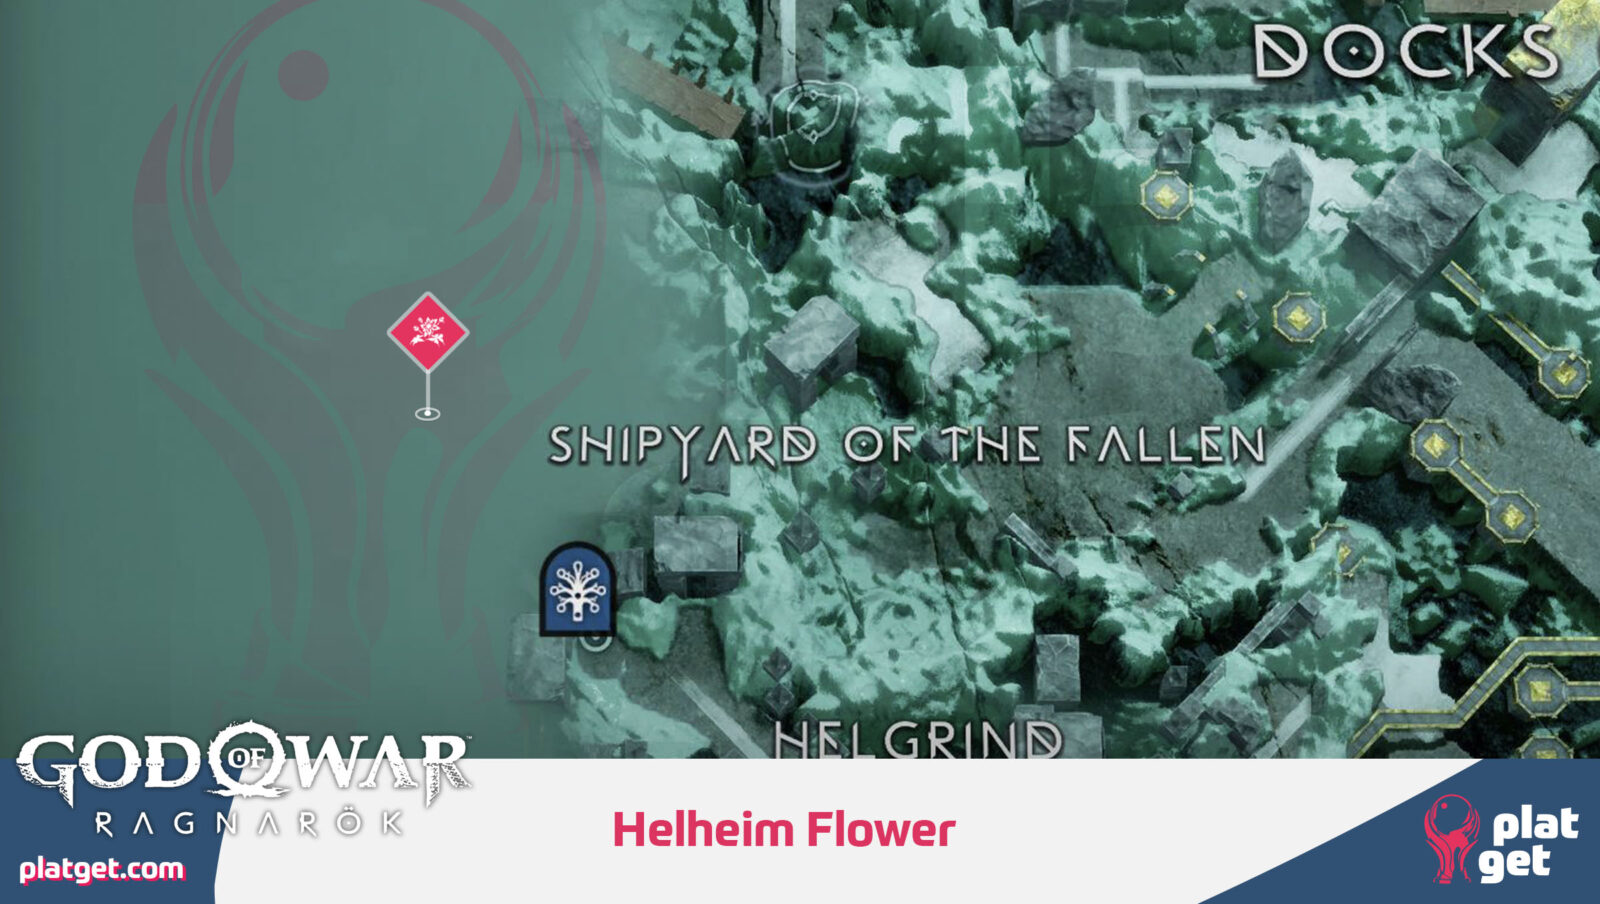
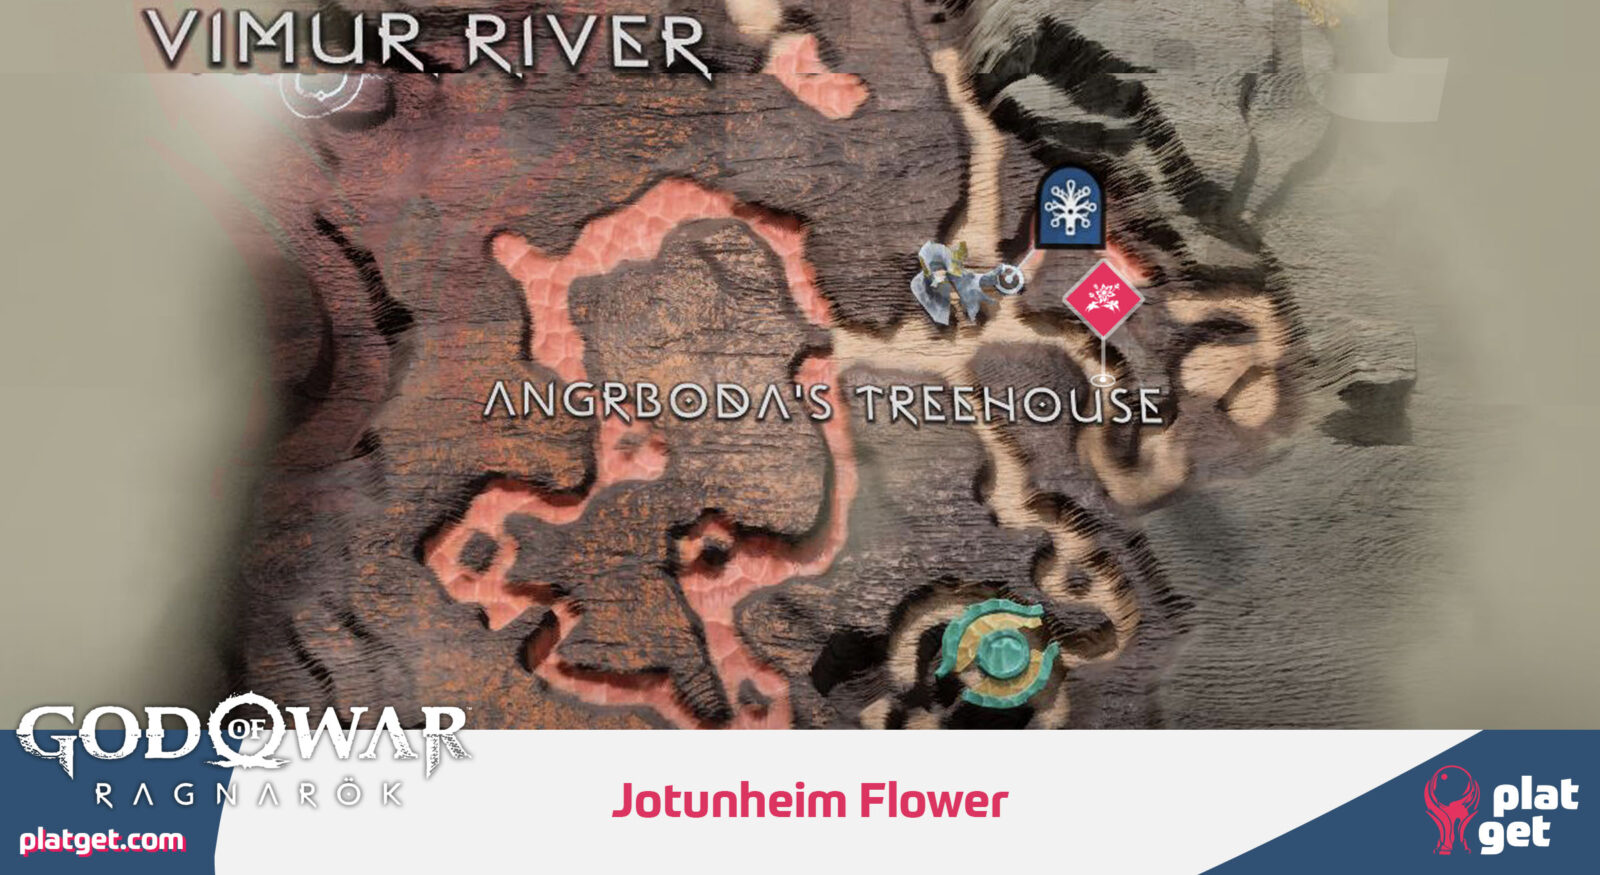
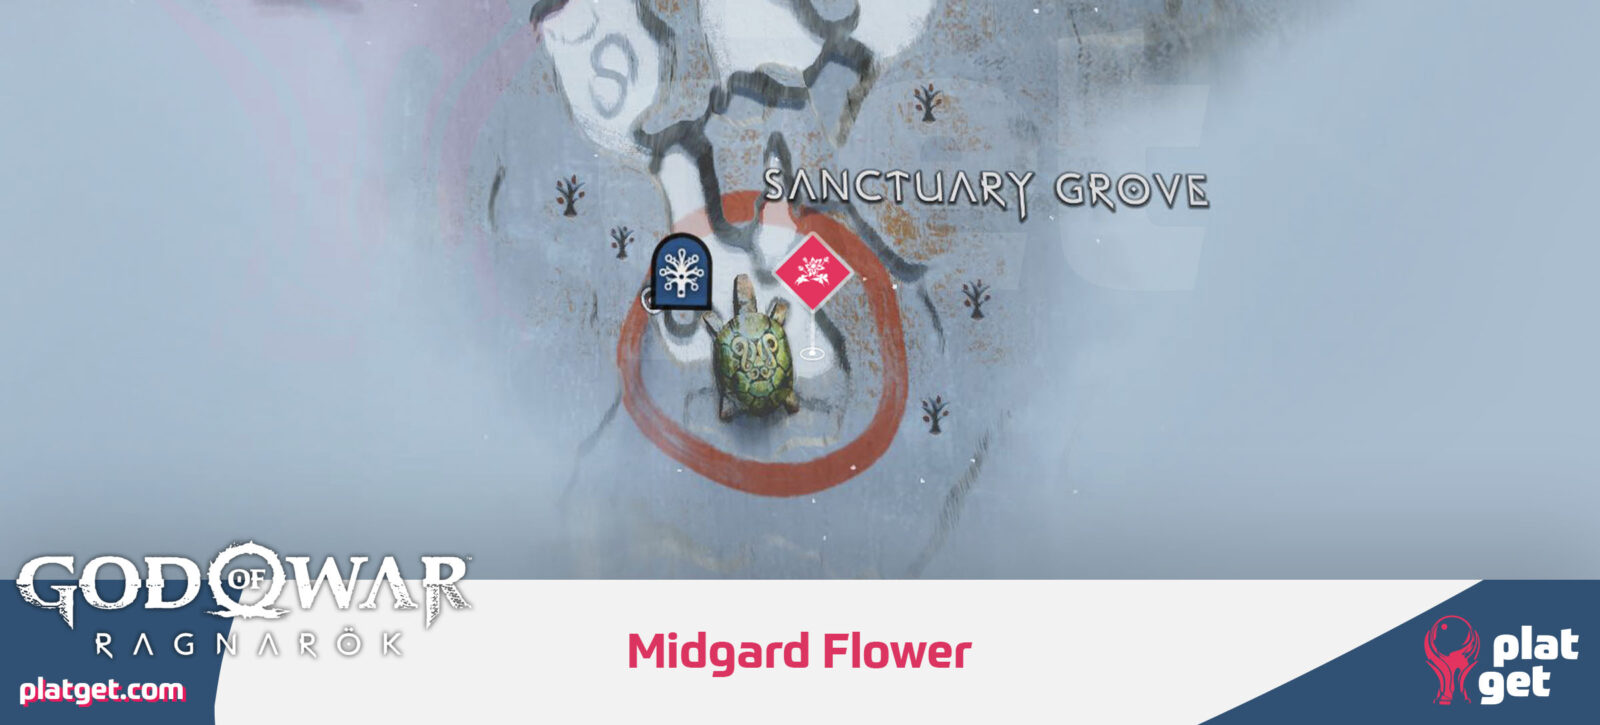
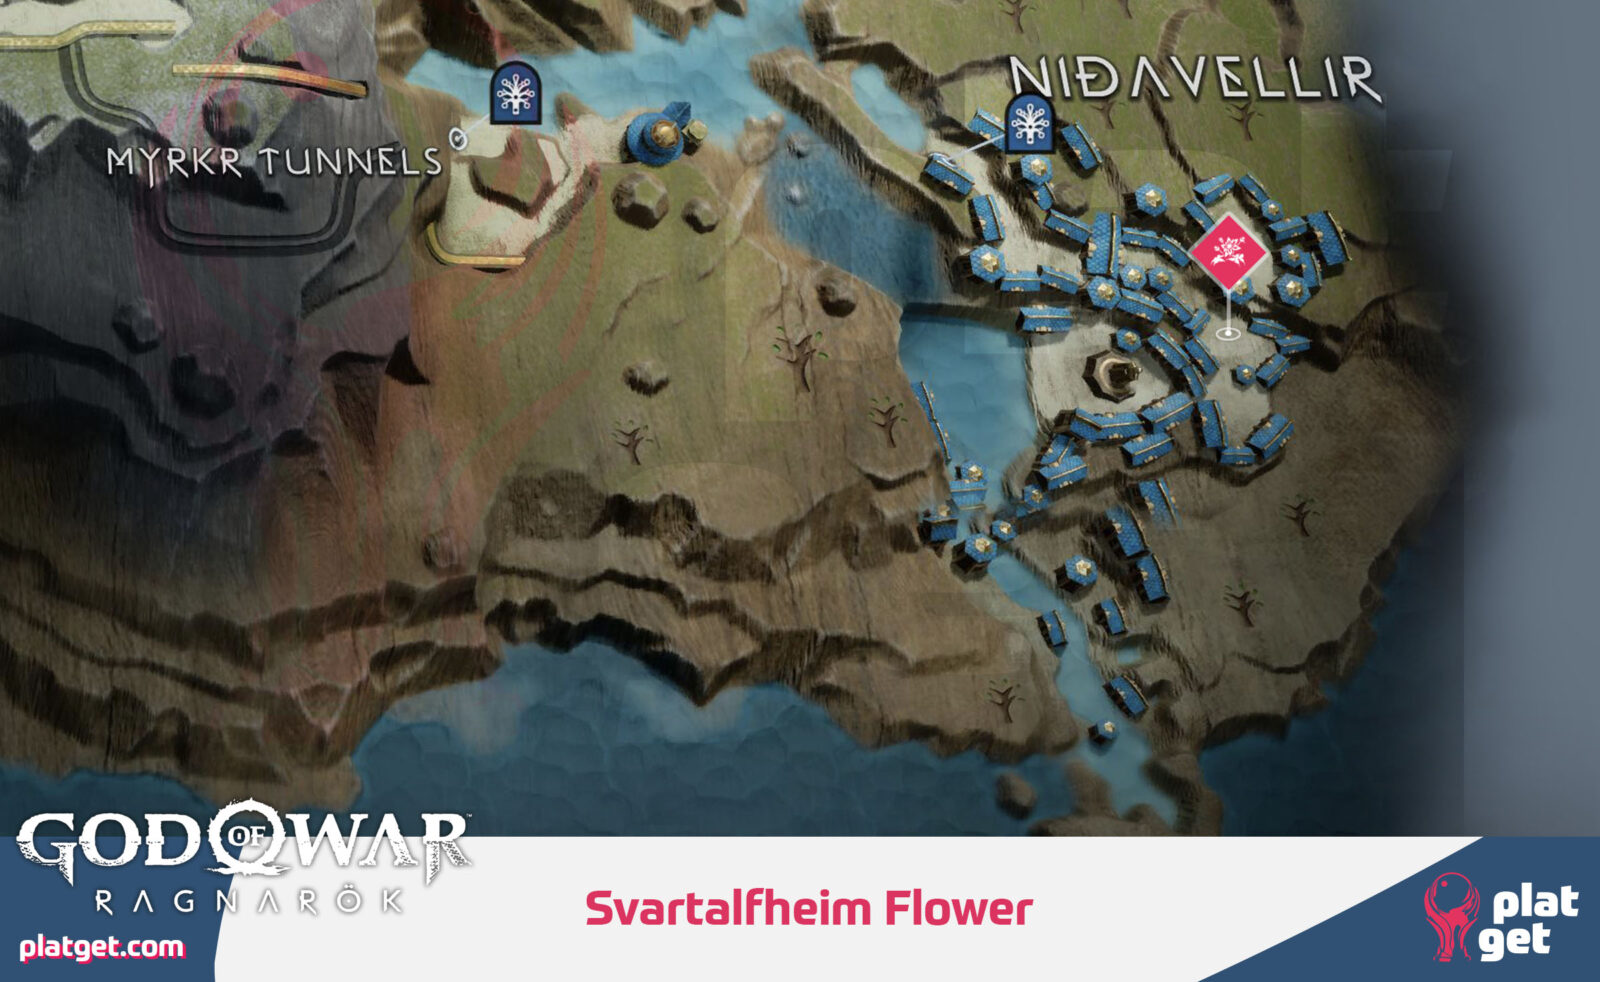
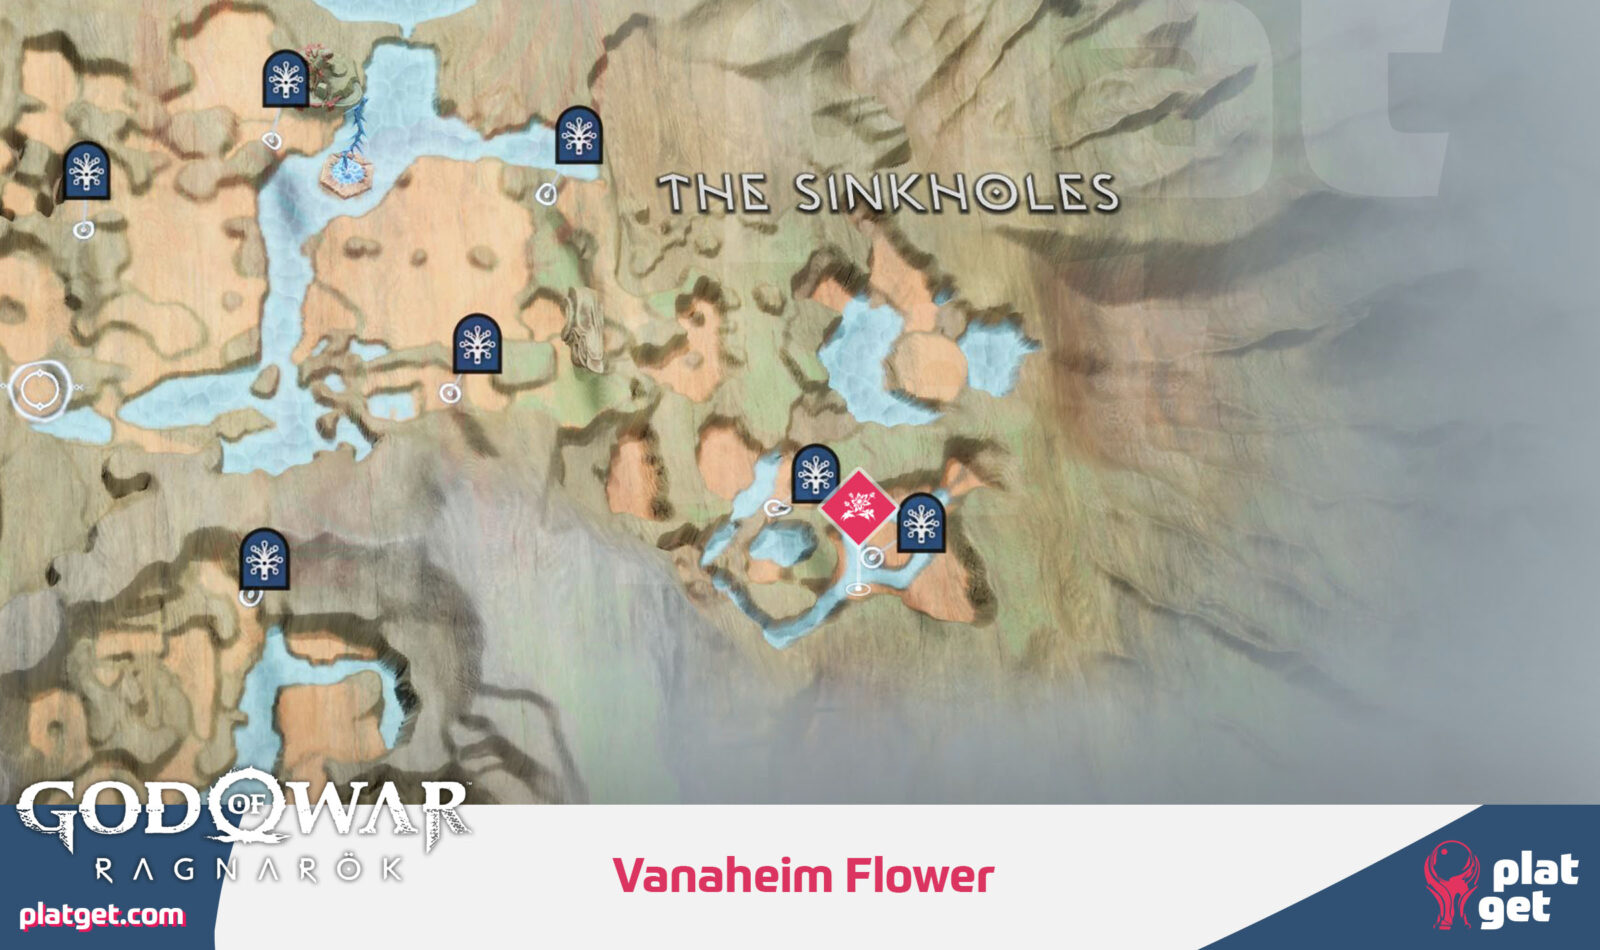
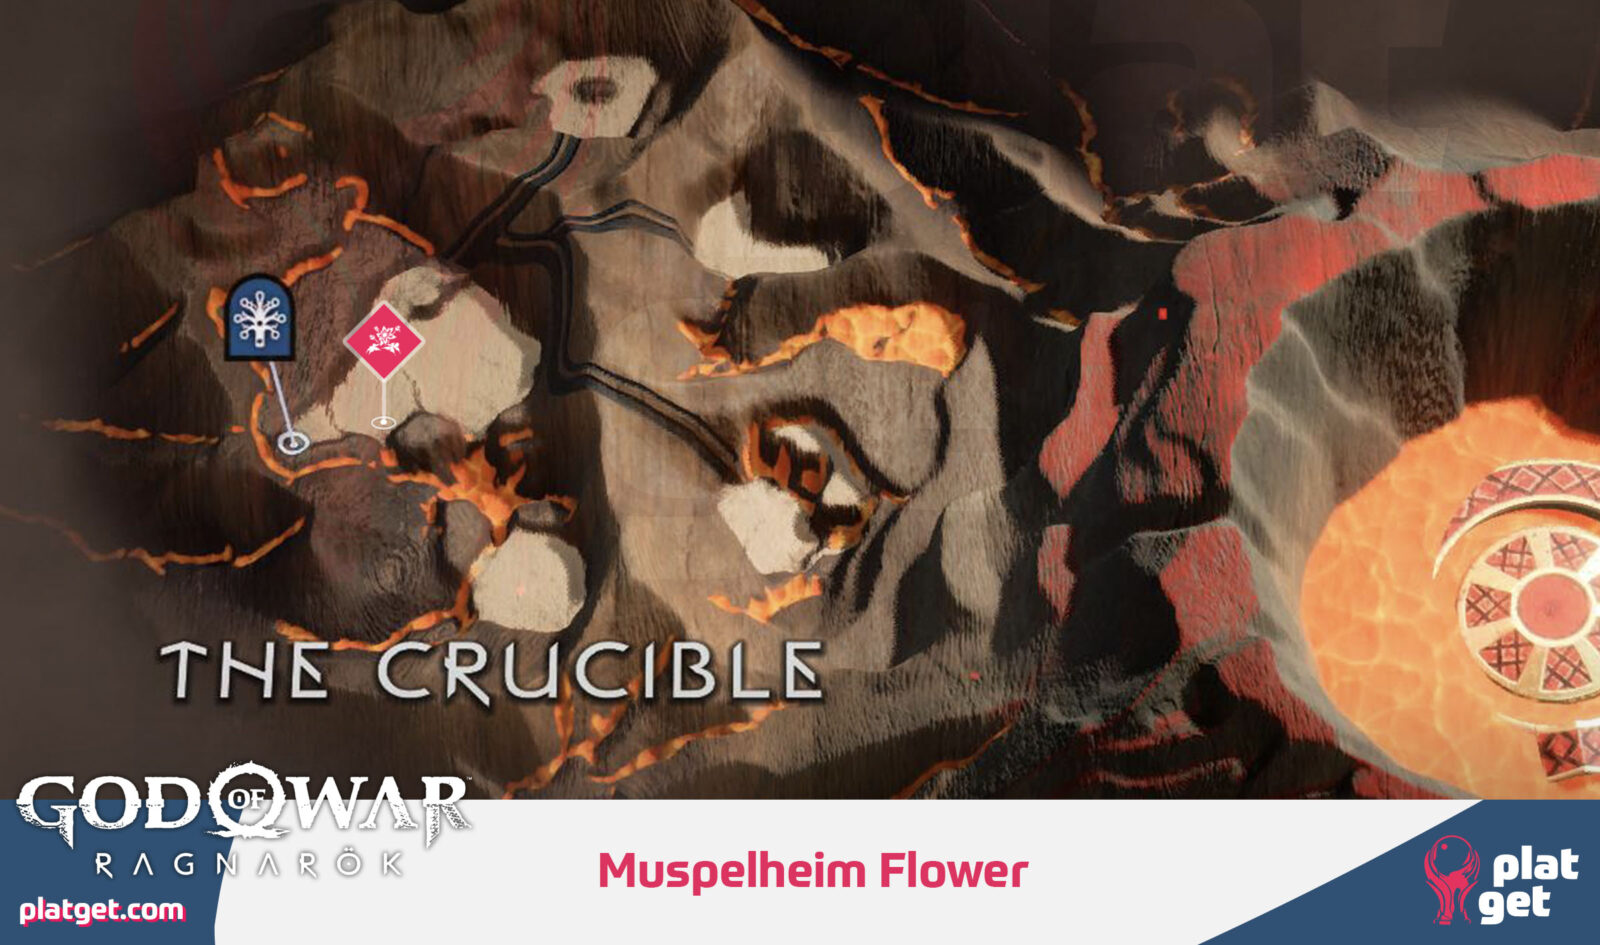
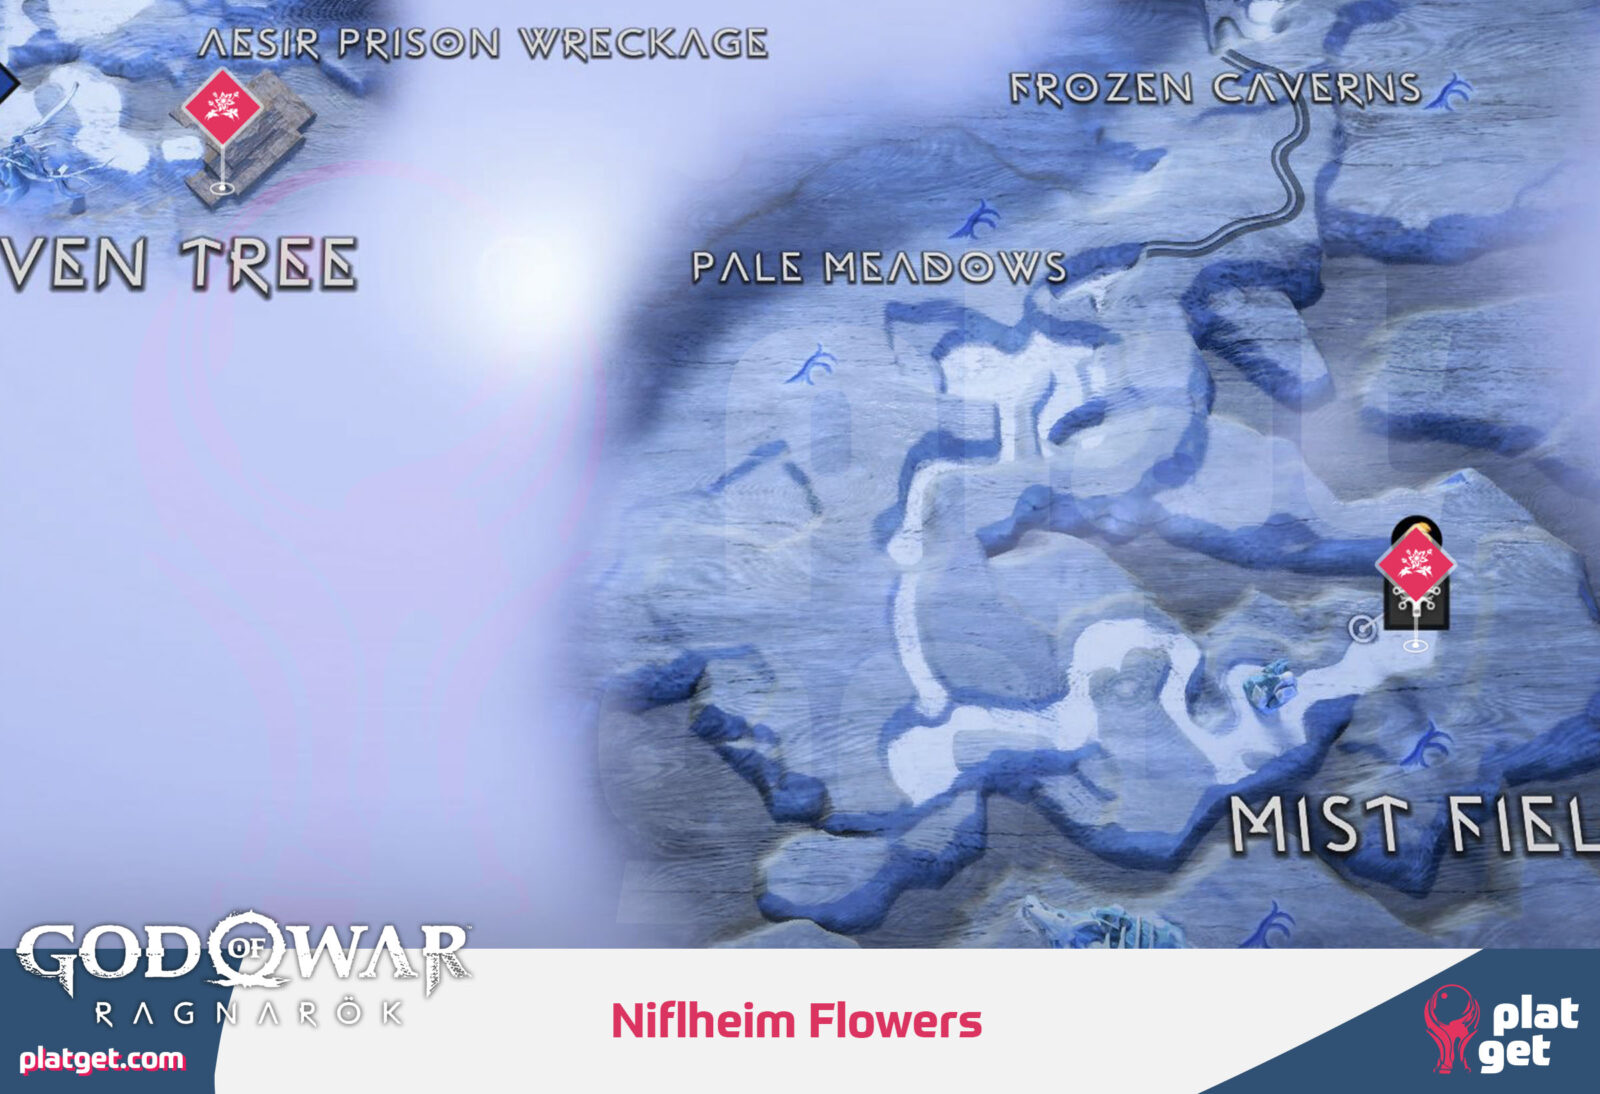
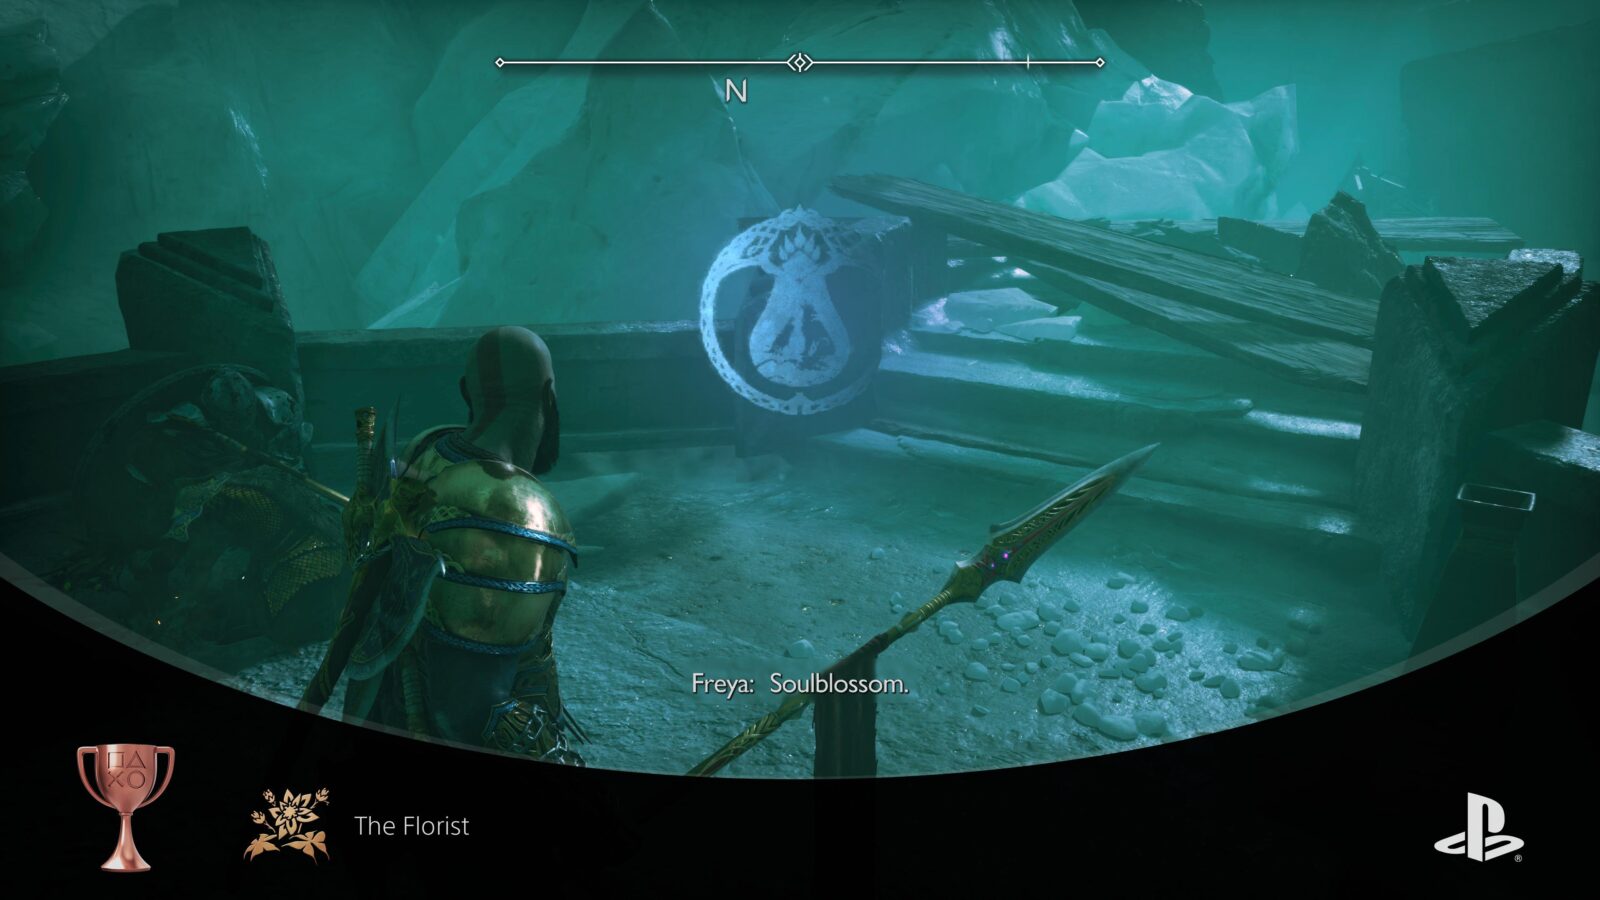
The Florist
Collect one flower from each of the nine realms
The “The Florist” trophy requires you to find and collect Nine different flowers from across 8 of the available realms as part of a Favor Side Quest called “Nine Realms in Bloom.”
The quest will begin automatically as soon as you collect any of the 9 Flowers.
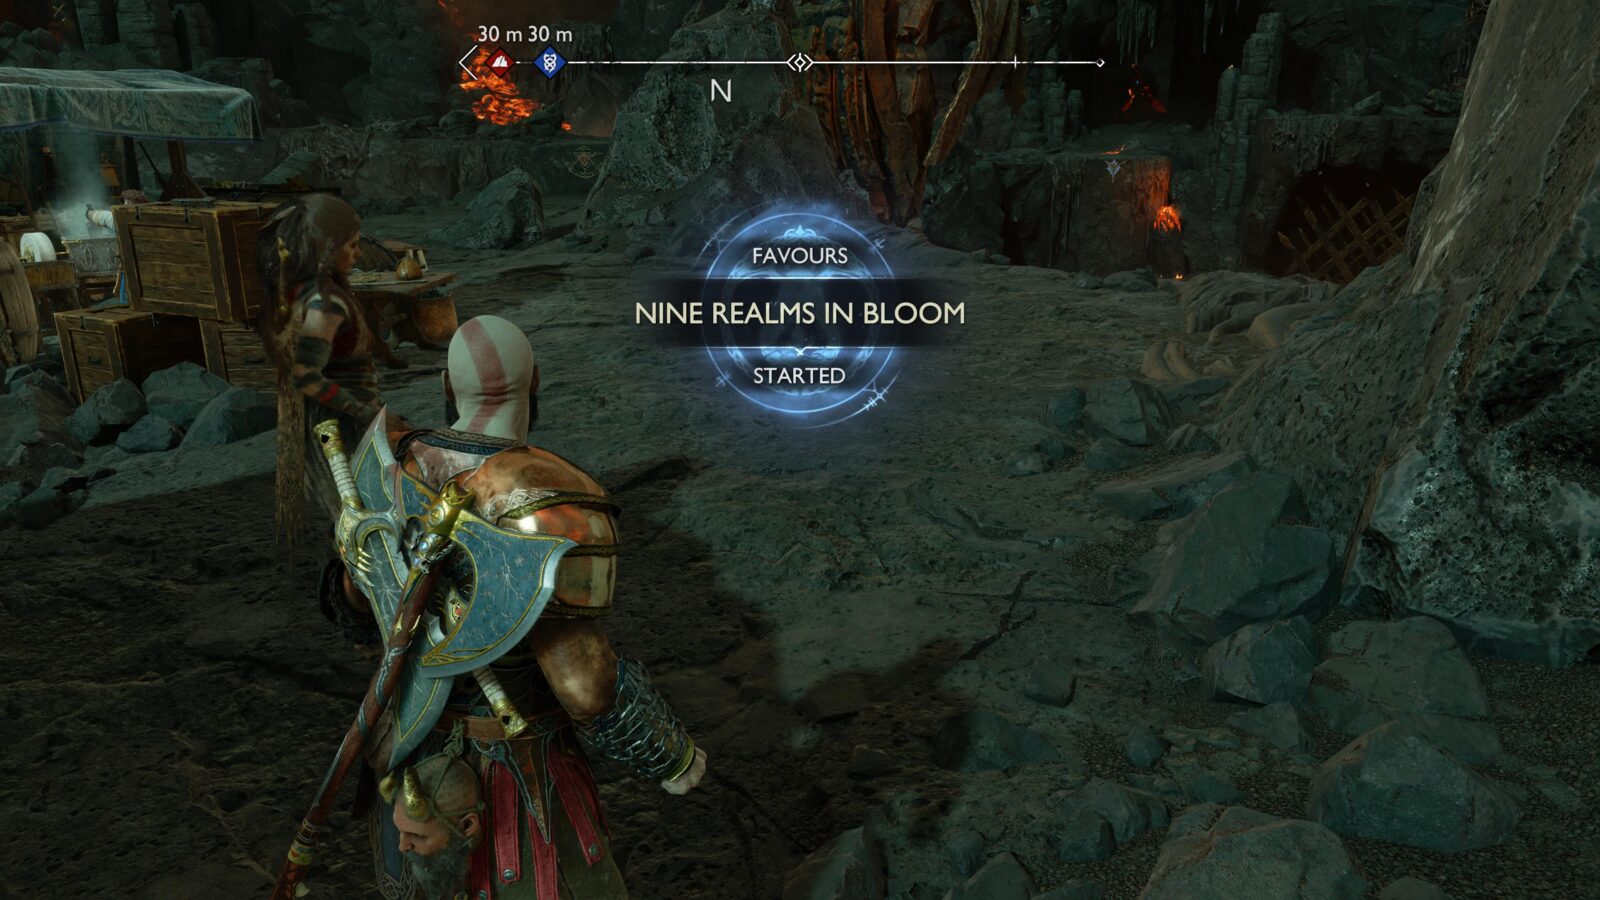
Use the gallery below to see all Nine Flower Locations across eight Realms:


Funeral for a Friend
Attend the funeral
After finishing the story, you will have a Favor called “A Viking Funeral.” Track it from your map or journal and then follow the blue objective markers to complete the Favor.
After some credits play, the Funeral for a Friend trophy will unlock and you can continue playing.

Rebel Leader
Return the Hammer of the Rebellion
After acquiring the Draupnir Spear, you can speak to Durlin to begin the Favor called “Spirit of Rebellion.” If you miss that opportunity, though, you can still speak to him at the marker in Nidavellir after finishing the story.
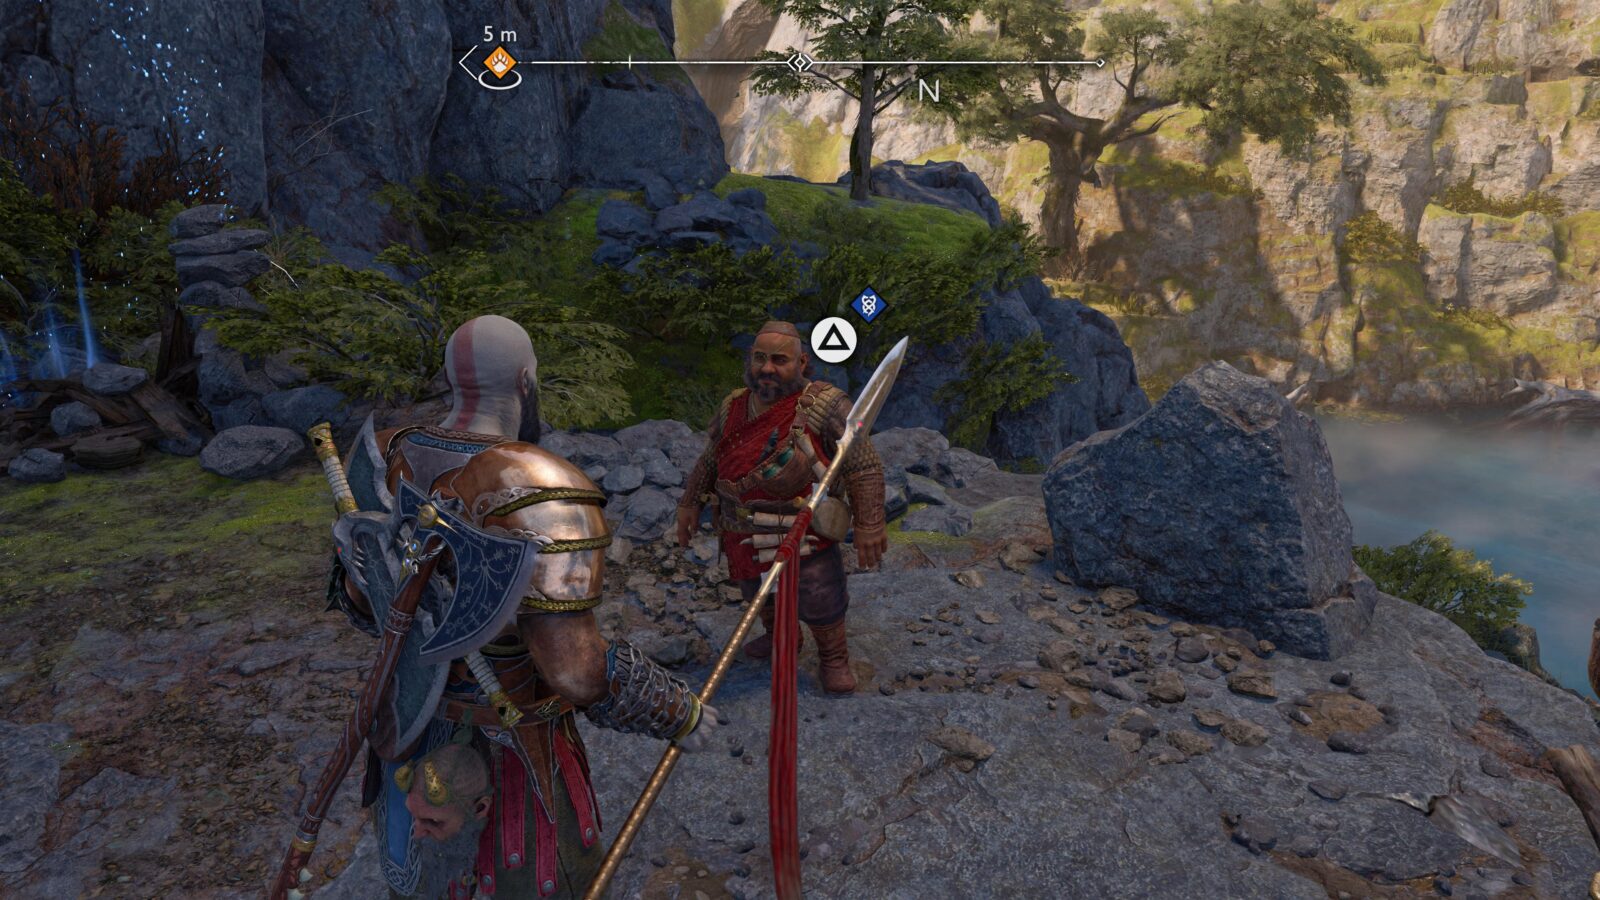
Once you have the quest, go to “Dragon Beach” at the Bay of Bounty in Nidavellir. Climb up the scaffolding and then use the Rune Slate up there to activate some Runic Magic on a large stone hammer at the end of the bridge.
Interact with the hammer and it will lift up, revealing a chest hidden inside. Collect the Hammer of the Rebellion from inside the chest and then bring it to Durlin.
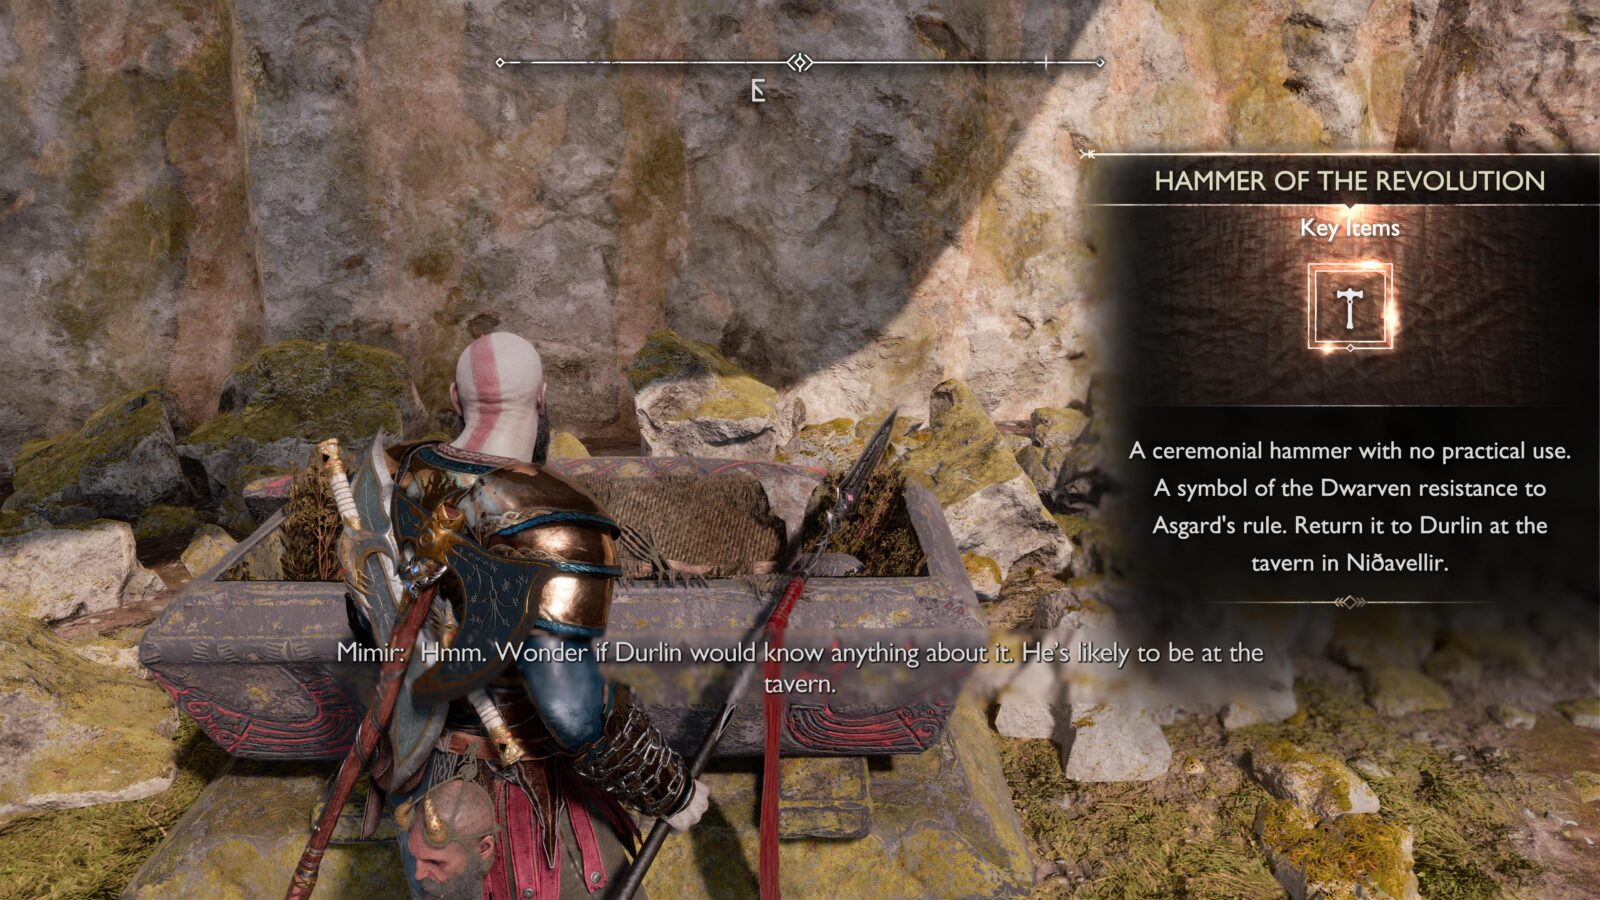
This will complete the “Spirit of Rebellion” favor and unlock the Rebel Leader trophy.


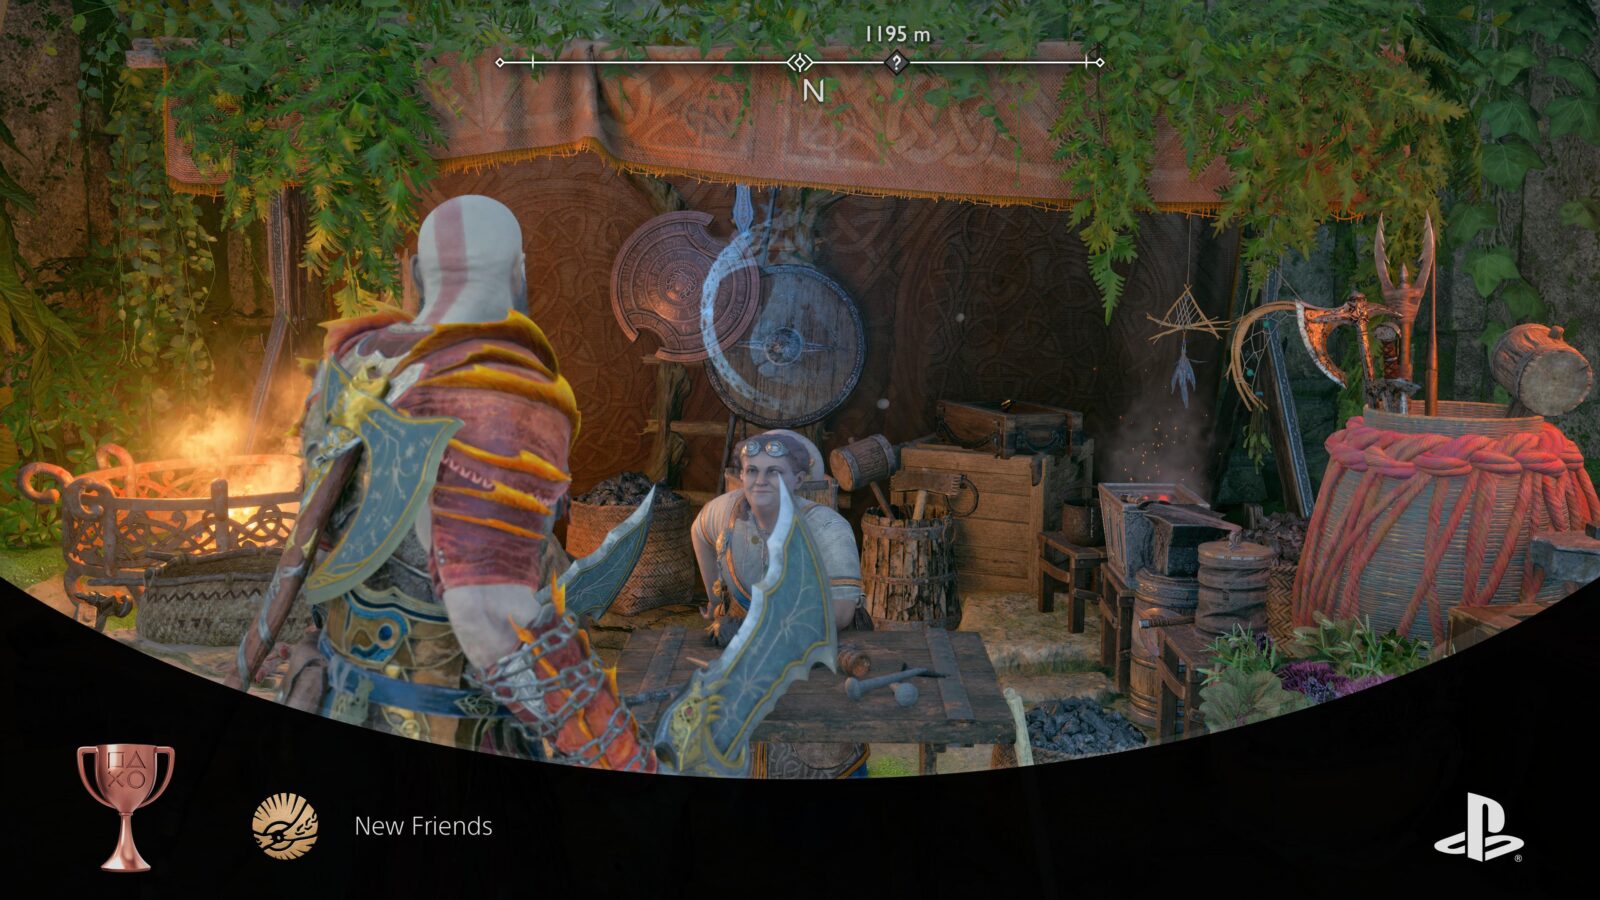
New Friends
Fetch Lunda’s orb
A good while into the story, you will meet a Dwarf woman called Lunda at Freyr’s Camp in Vanaheim. She has a Favor for you called “The Mysterious Orb.” Speak to her to begin the side quest and then follow the blue objective markers on your map to locate the orb and retrieve it.
Bring it back to Lunda to receive your reward as well as the “New Friends” trophy.

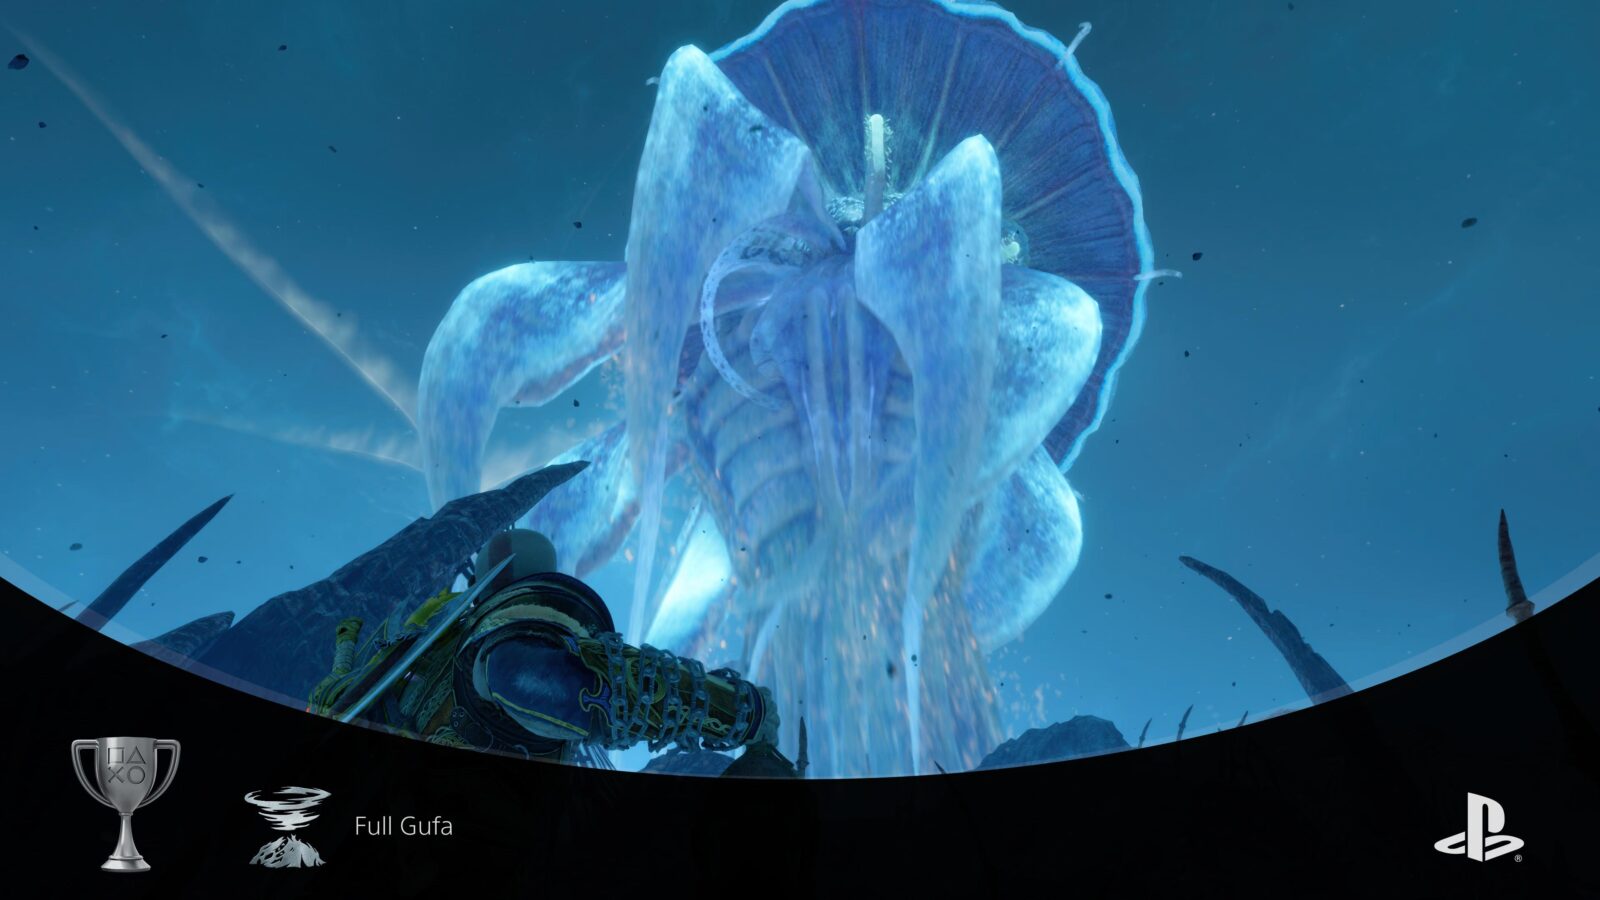
Full Gufa
Free the Hafgufas
Secret of the Sands is a Favor you will receive from Sindri sometime after the fourth Main Mission. Following the objectives of this Side Story will lead to you unlocking and beginning the Song of the Sands Favor.
Follow the blue objective markers to Free the Hafgufas and unlock the “Full Gufa” trophy. You will end up needing to complete every Favor (Side-Quest) in the game on your way to the Platinum anyway, so you may unlock this trophy naturally.

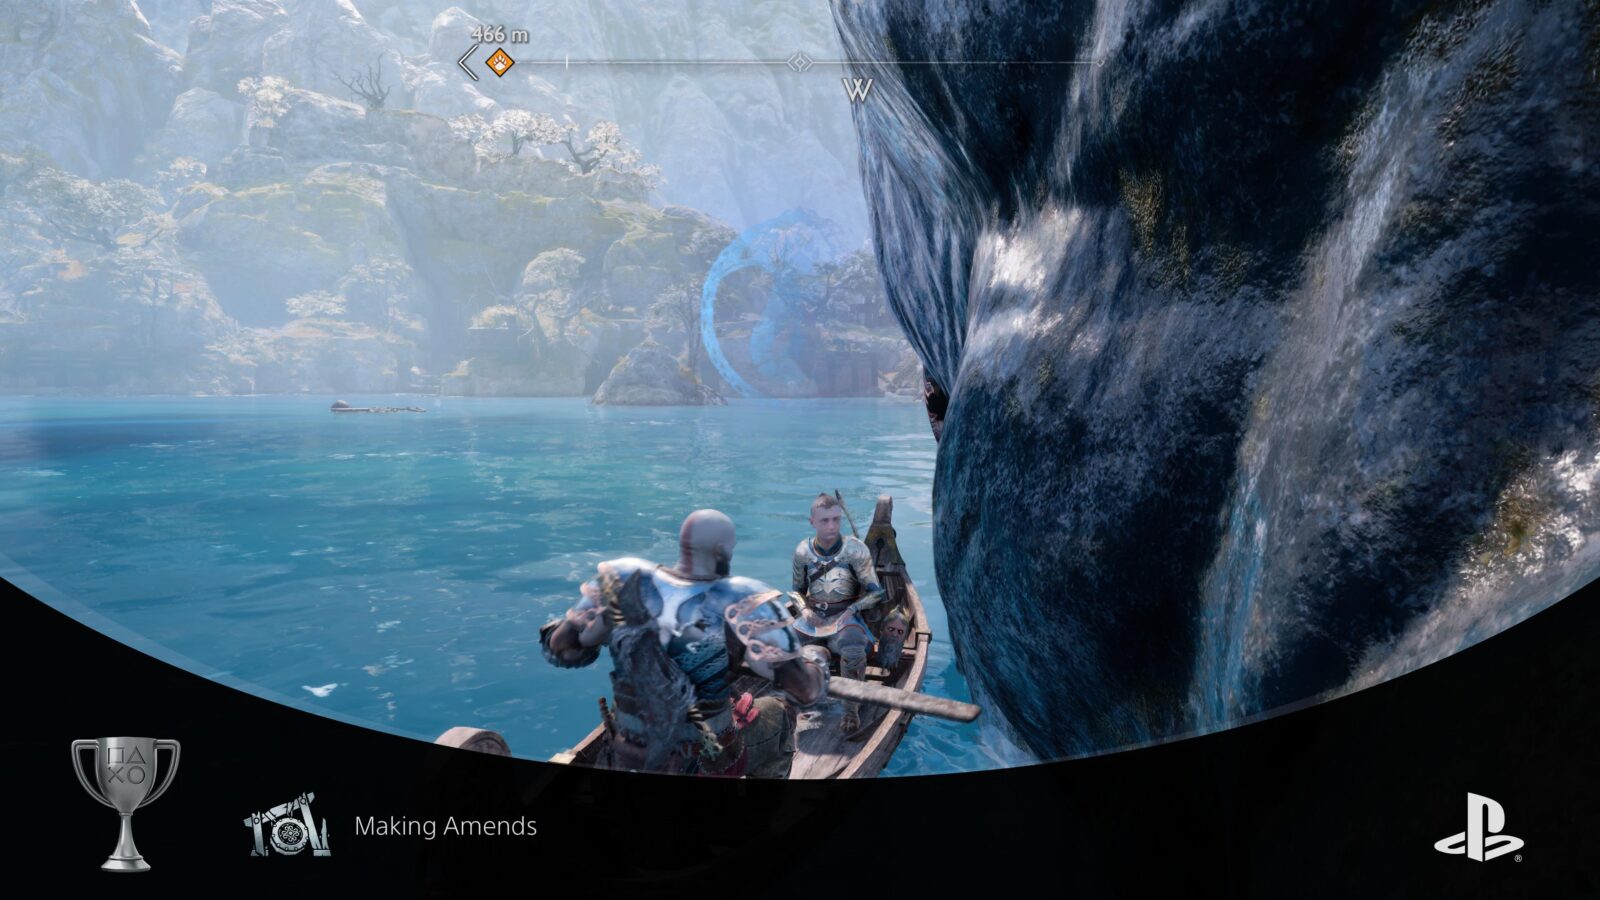
Making Amends
Free the Lyngbakr
The Making Amends trophy can be unlocked by completing a Favor called “The Weight of Chains,” which you can begin by going to the Lyngbakr Island in Svartalfheim’s Bay of Bounty.

Follow the objectives to free the Lyngbakr and unlock the Making Amends trophy. You will end up needing to complete every Favor (Side-Quest) in the game on your way to the Platinum anyway, so you may unlock this trophy naturally.

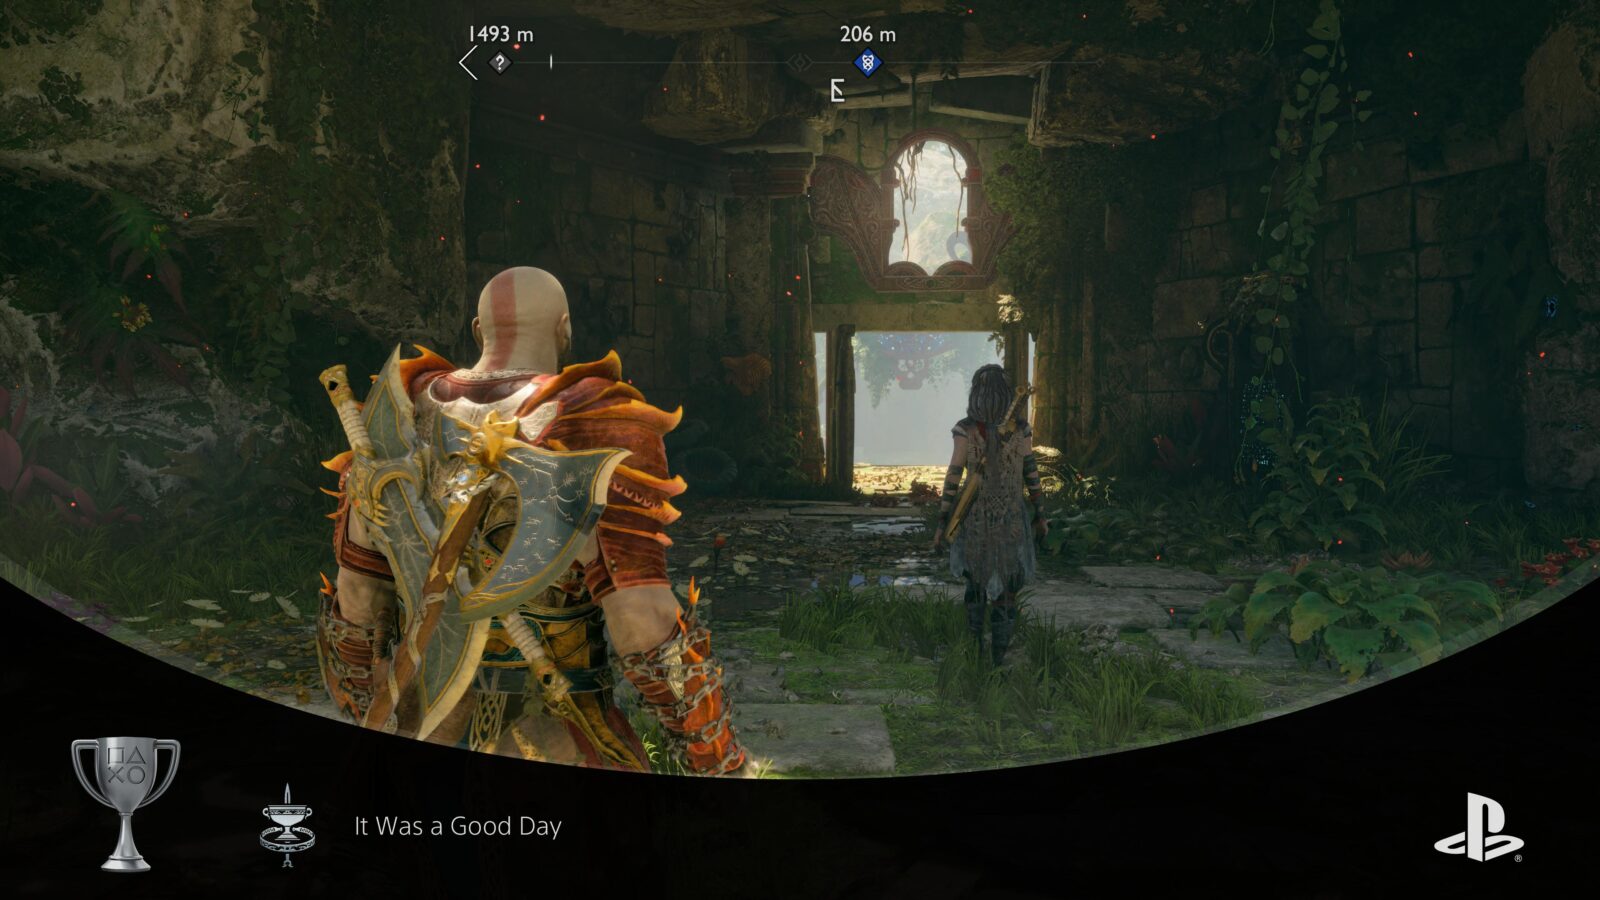
It Was a Good Day
Retrieve Mardöll
About halfway through the story campaign, you can begin a Favor for Freya by sailing the River Delta in Vanaheim at daytime. As you sail past the Mystic Gateway at Freyr’s camp, Freya will talk of some unfinished business, starting the “Freya’s Missing Peace” Favor.
Follow the objectives to retrieve three relics of Freya’s past, one of which is Mardöl. Upon completion of the Favor, you will unlock the “It Was a Good Day” trophy. You will end up needing to complete every Favor (Side-Quest) in the game on your way to the Platinum anyway, so you may unlock this trophy naturally.

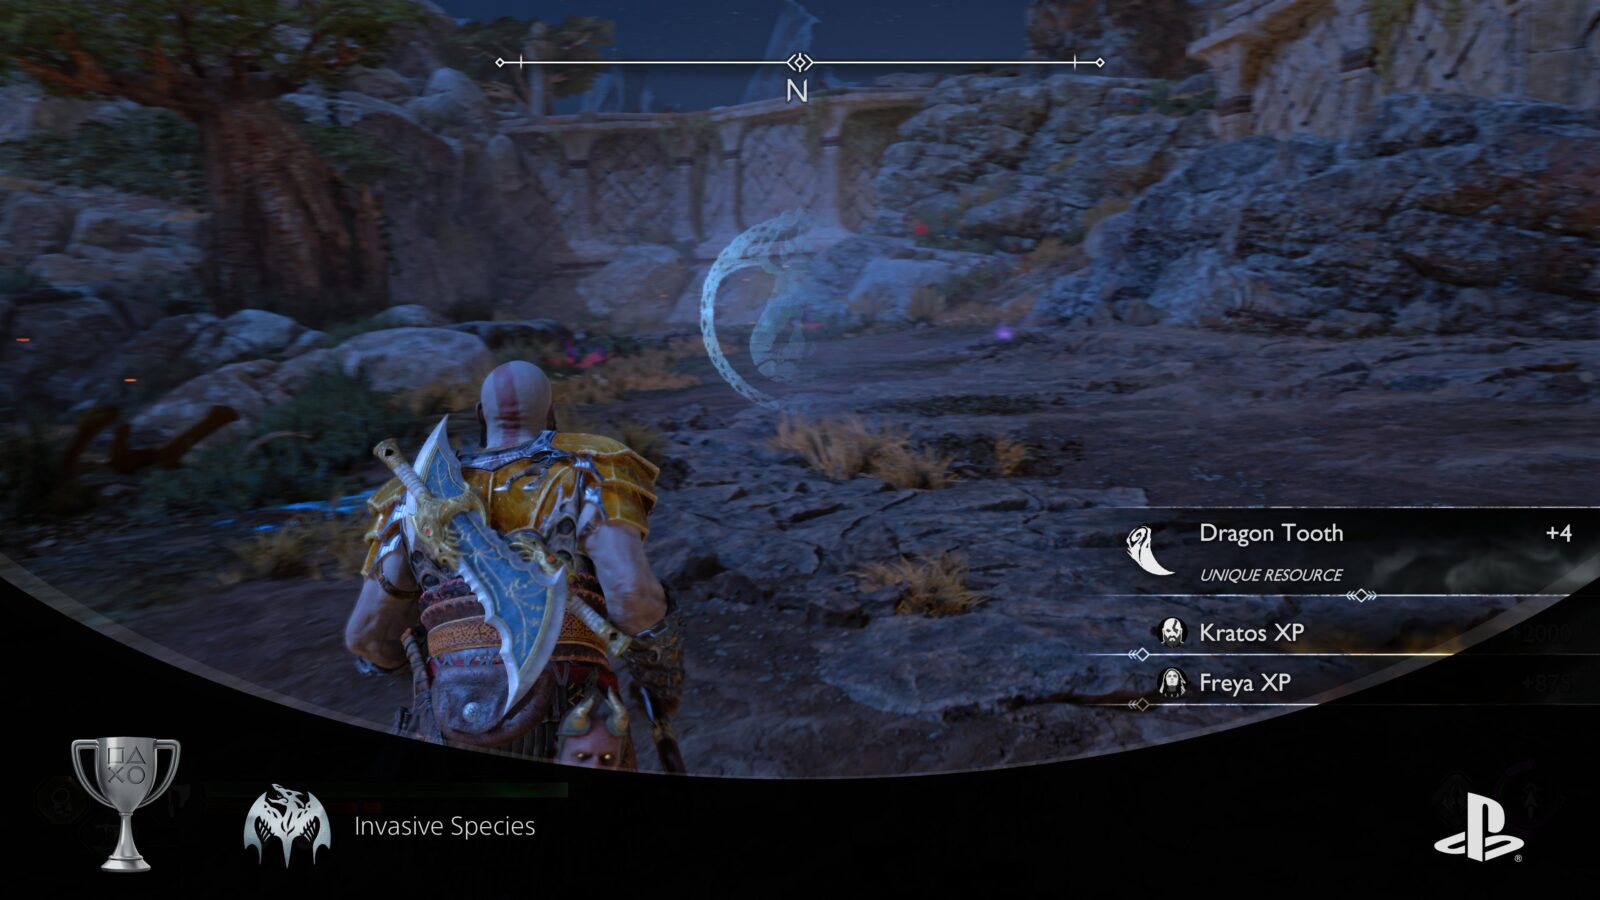
Invasive Species
Complete all of the Crater Hunts
In Vanaheim, if you complete the Favor titled “Scent of Survival,” you will get access to the crater region of Vanaheim.
There, you will be able to complete several more favors, many of which involve hunting Dragons. See the details of the required quests in the table below:
| Favor | Area |
|---|---|
| What Lies Below | The Jungle |
| Trail of the Dead | The Jungle |
| Path of Destruction | The Jungle |
| Quaking Hollow | The Sinkholes |
| The Burning Skies | The Sinkholes |
| In the Dead of Night | The Plains |
| For Vanaheim! | The Plains |
| In Plain Sight | The Plains |
| Nocturnal Predator | The Plains |
Once you have completed all 9 of the Favors listed in the table above, the Invasive Species trophy will unlock.

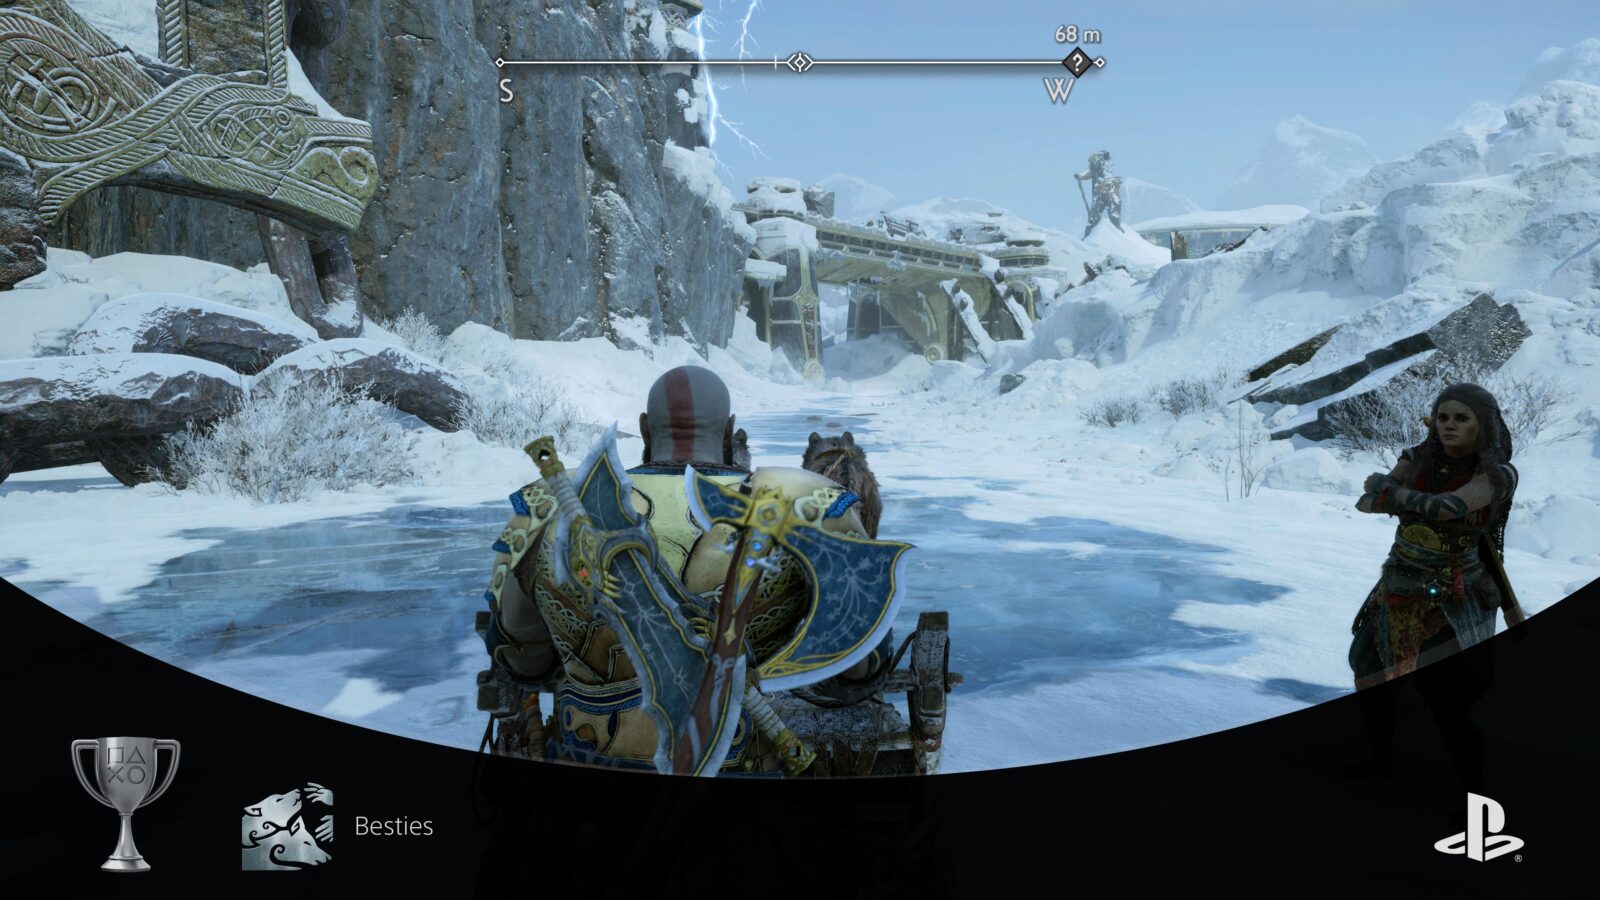
Besties
Pet Speki and Svanna
Around the surface of the Frozen Lake of the Nine in Midgard, you will find various campfires, sending out thick dark pillars of smoke quite visible from afar.
Enter any one of these camps and defeat the Raiders within to begin the Favor titled “Animal Instinct.” Follow the blue Favor waypoints to reach and defeat Raiders at three other camps to complete the side-quest.
When you’re done at the final camp, return to the wolves at your sled. Press ![]() on the sled and Kratos will pet the two wolves, unlocking the “Besties” trophy.
on the sled and Kratos will pet the two wolves, unlocking the “Besties” trophy.

Rightful Place
Return all of the Lindwyrms to Ratatoskr
After you have completed the Main Story Mission titled “The Word of Fate,” you will be able to access a Favor called “The Lost Lindwyrms” by talking to Ratatoskr the Squirrel outside of Sindri’s Home.
Once you’ve started the quest and received the Lindwyrm trap from Ratatoskr, you will find some “Yggdrasil Rift” icons on the map in Svartalfheim and Vanaheim which have Lindwyrms inside them.
You must approach the rifts and interact with them to capture the Lindwyrm in your trap, Ghostbusters style.
The six specific rifts you need to interact with are listed in the table below:
| # | Realm | Area |
|---|---|---|
| 1 | Svartalfheim | The Forge |
| 2 | Svartalfheim | Alberich Hollow |
| 3 | Svartalfheim | Alberich Island |
| 4 | Svartalfheim | The Applecore |
| 5 | Vanaheim | The Plains (The Crater) |
| 6 | Vanaheim | The Plains (The Crater) |
Once you have captured all six Lindwyrms, return to Ratatoskr outside Sindri’s Home and turn in the Favor to unlock the Rightful Place trophy.

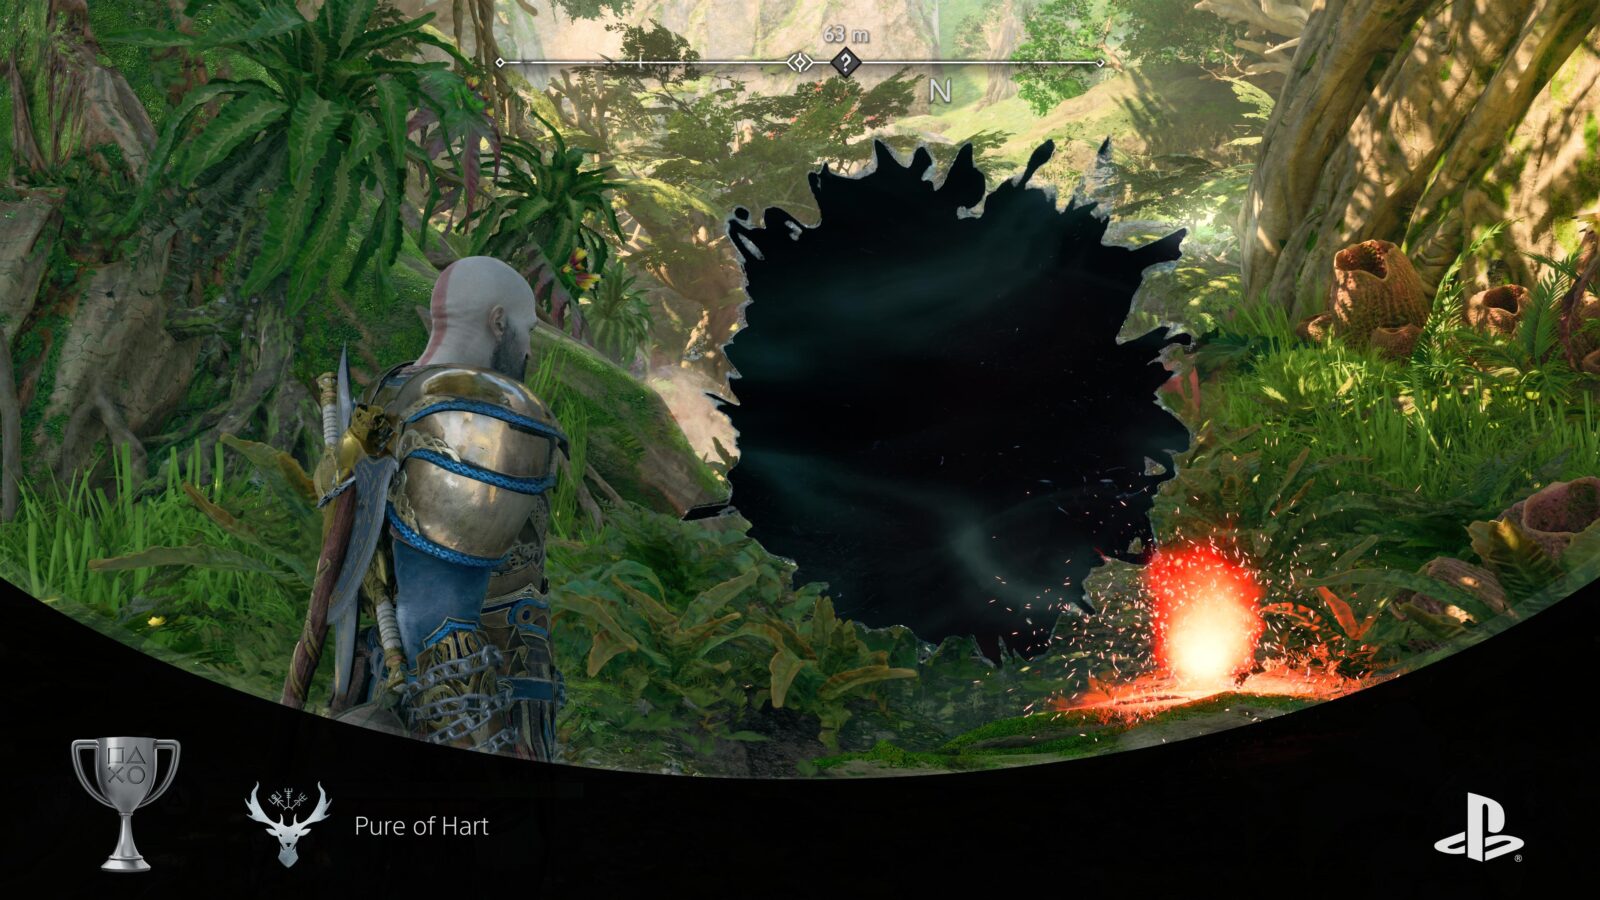
Pure of Hart
Return the Stags of the Four Seasons
In the “Crater” region of Vanaheim, which you can access by completing the favor titled “Scent of Survival,” there are four season-themed Stags.
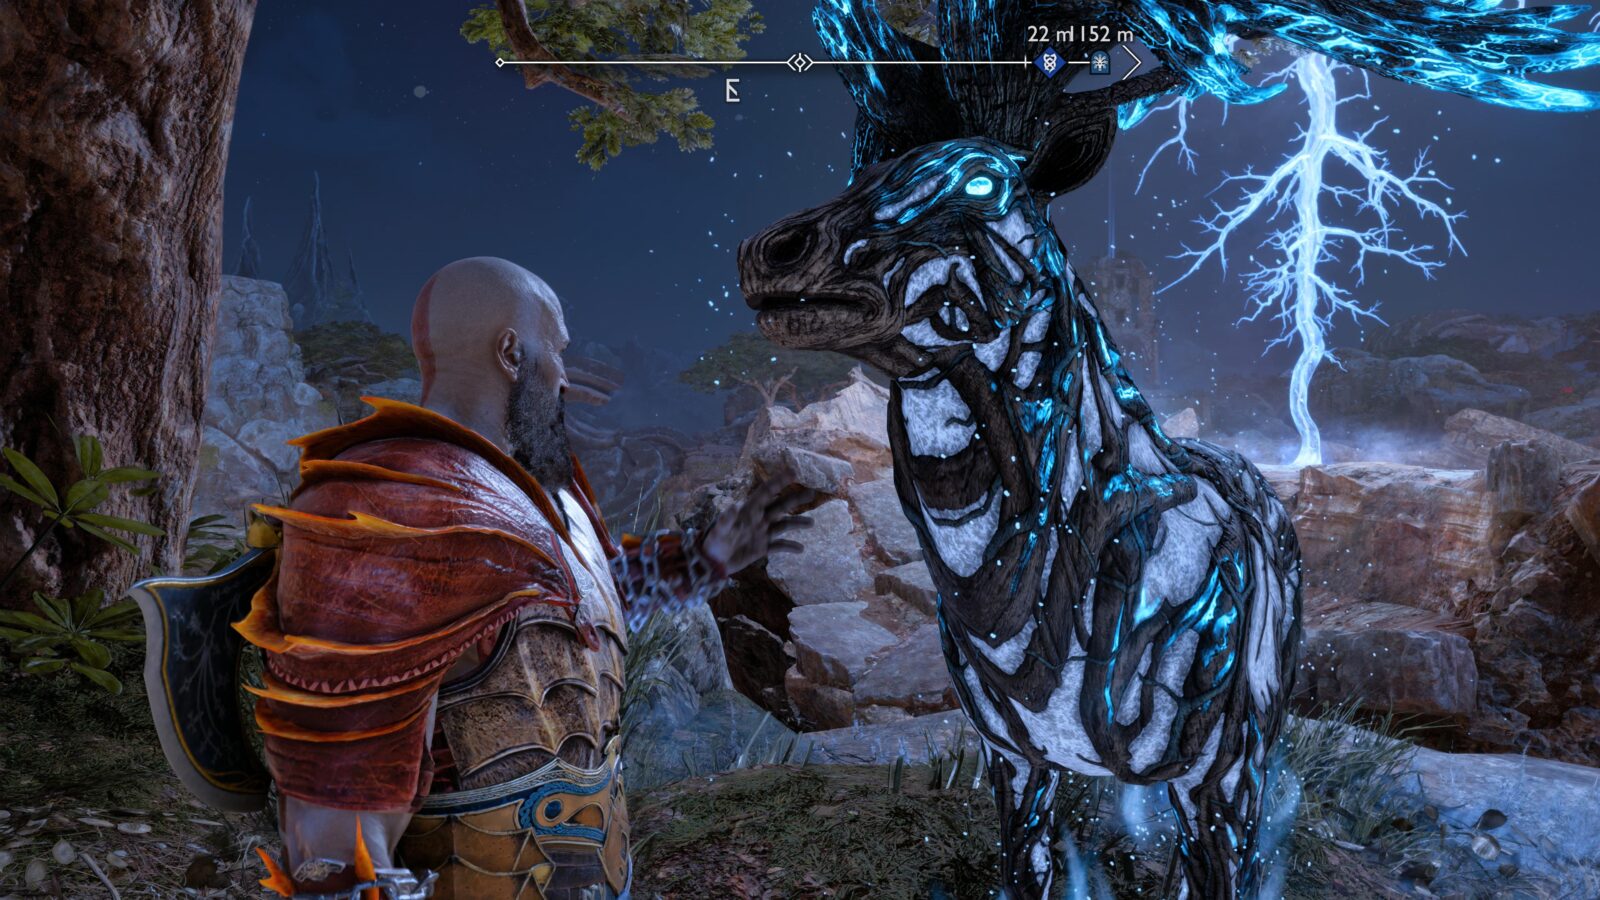
Interacting with any of them will begin the Favor but you will need to return to Sindri’s Home and speak to Ratatoskr to receive the special feed for the Stags.
Once you have it, return to Vanaheim’s Crater Region and interact with all four stags. Use the map below to find each one:
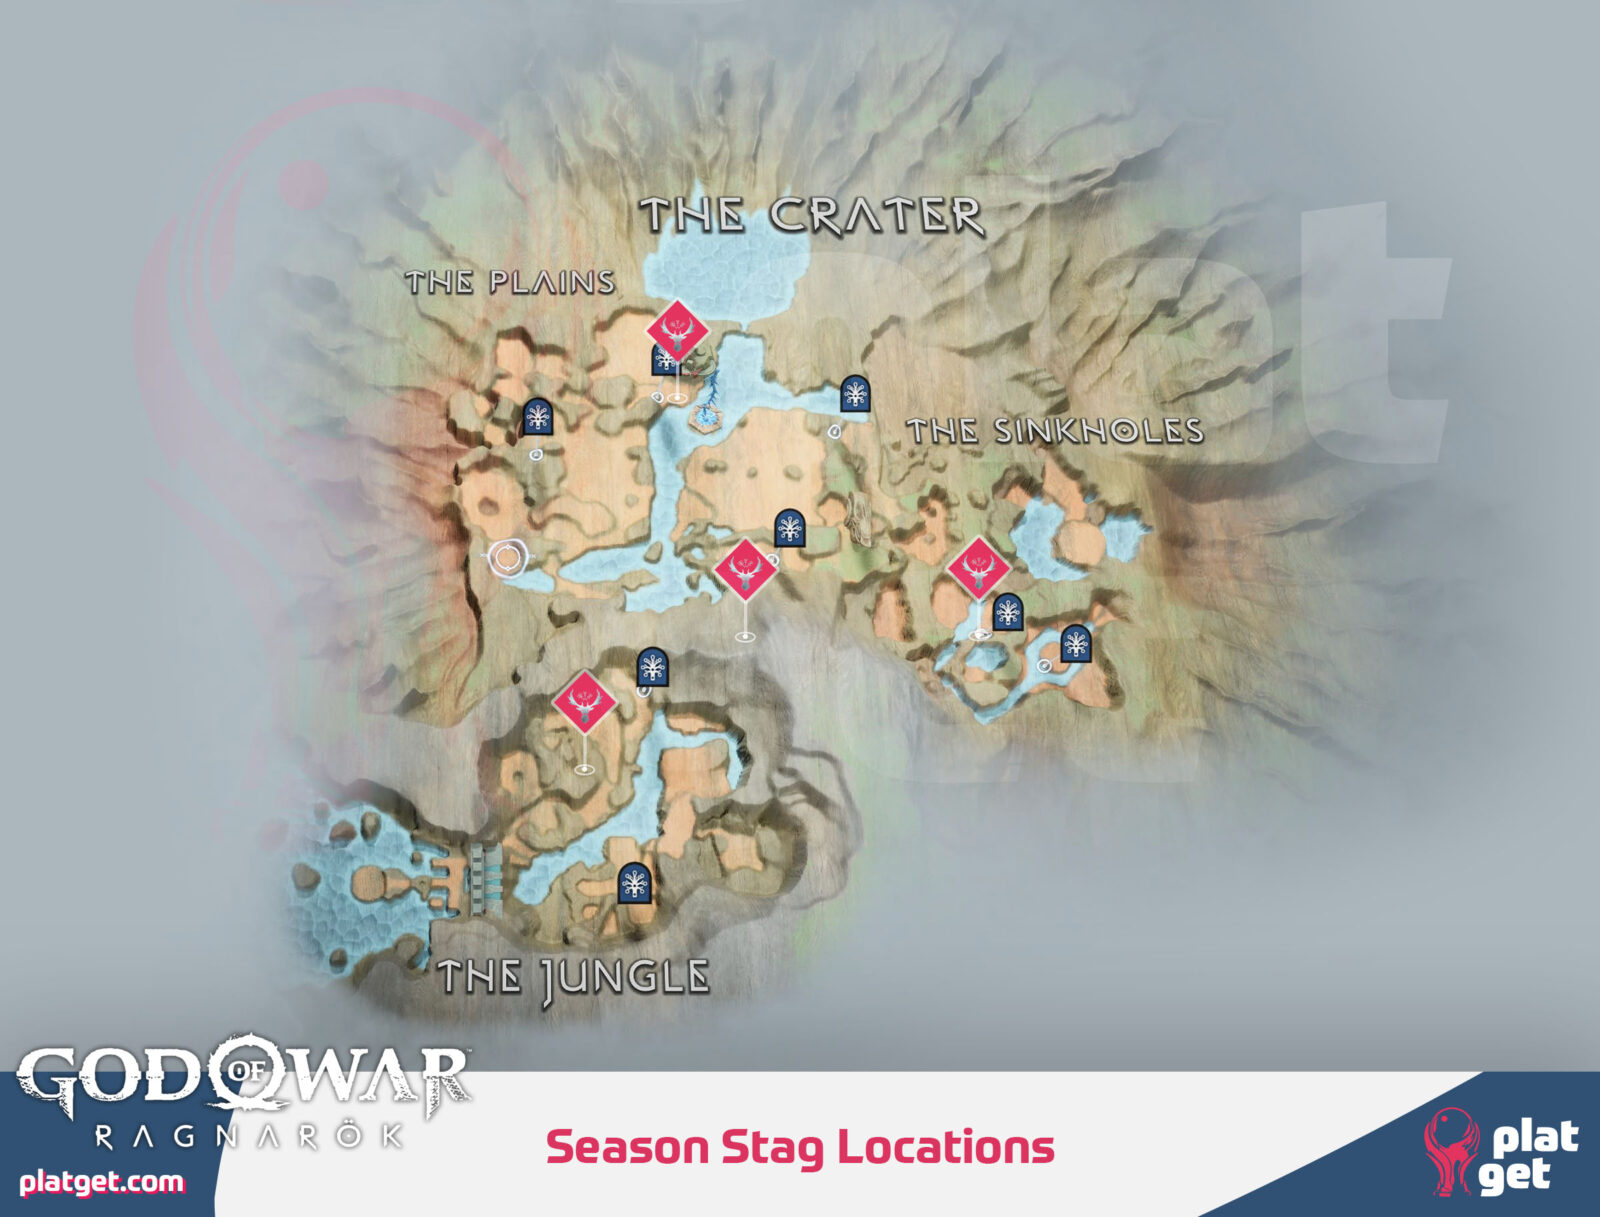
Once you’ve interacted with all four and sent them on their way, the Pure of Hart trophy is all yours.

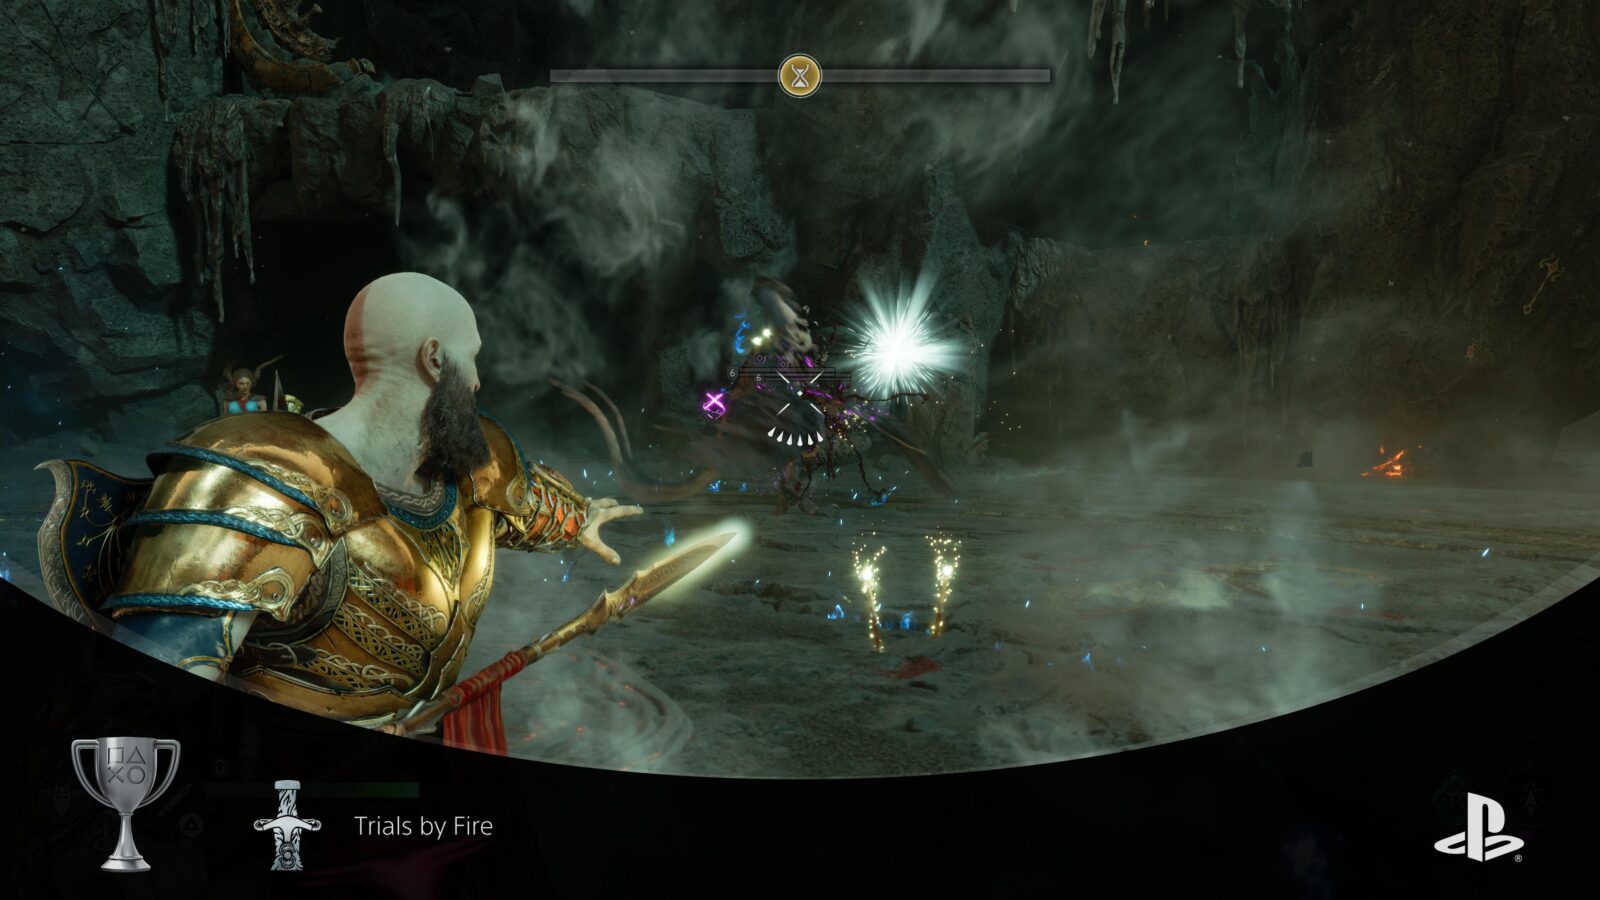
Trials by Fire
Complete the Trials of Muspelheim
In Muspelheim, there are 15 trials you can complete. To access a trial, you must go to one of the three swords marked on the map and interact with it, you can then select which trial you wish to complete.
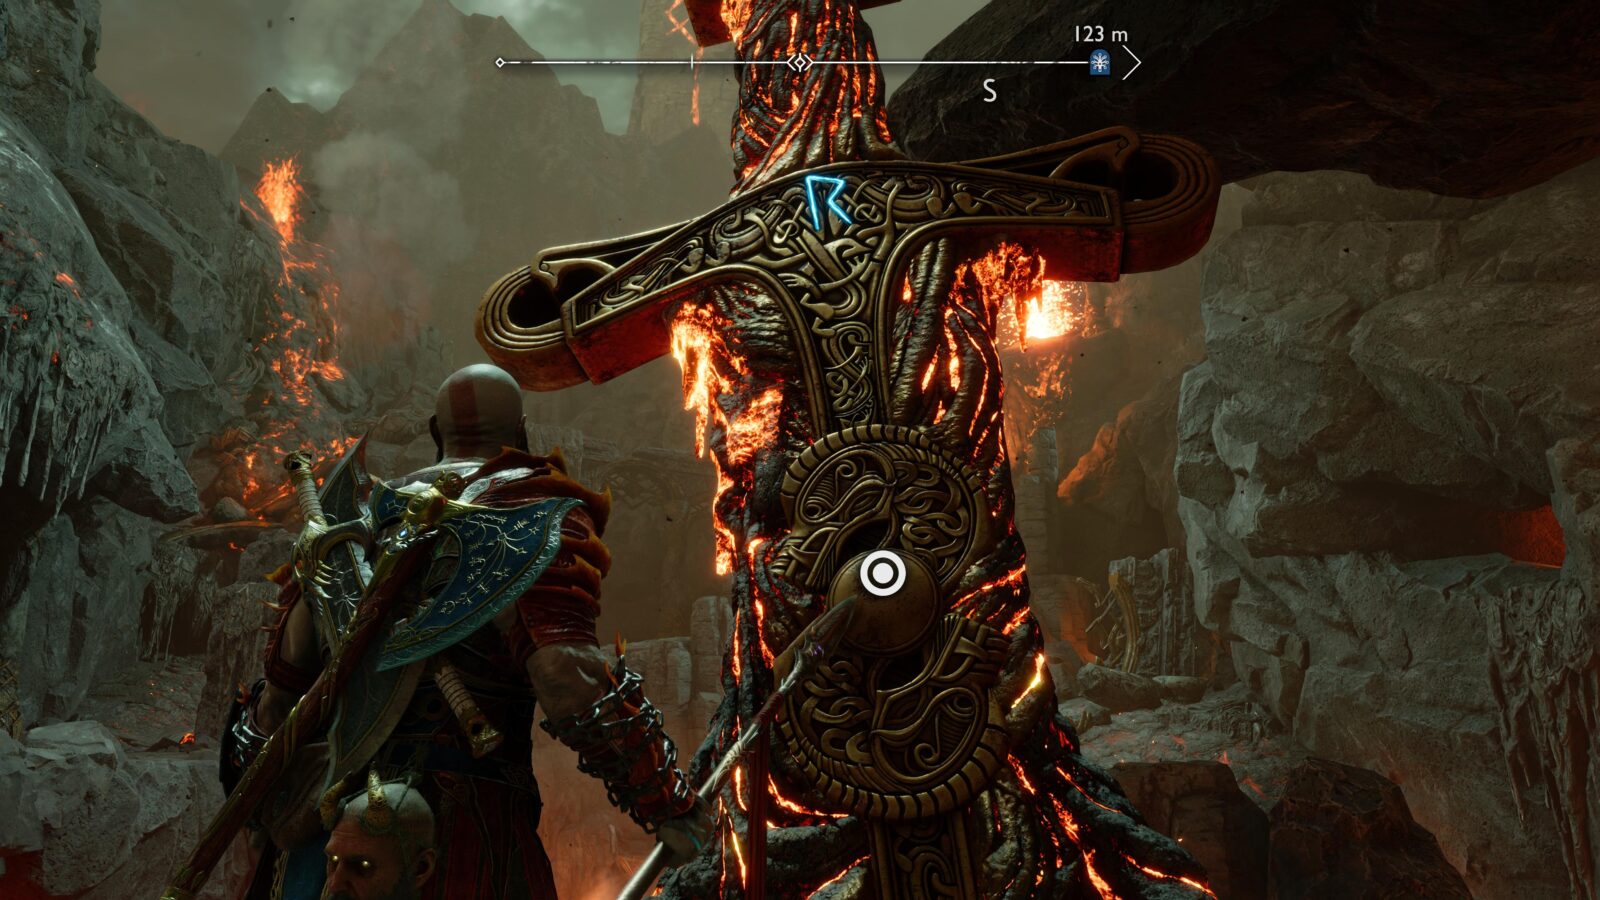
There are 6 trials available at first, two at each shrine. You must then unlock the Nornir Chest at the center of the main arena to unlock another set of trials.
You will then be able to access a third trial at each of the three swords for another 3 total. However, when you complete two trials, you will activate a fourth sword in the center of the arena where the chest used to be.
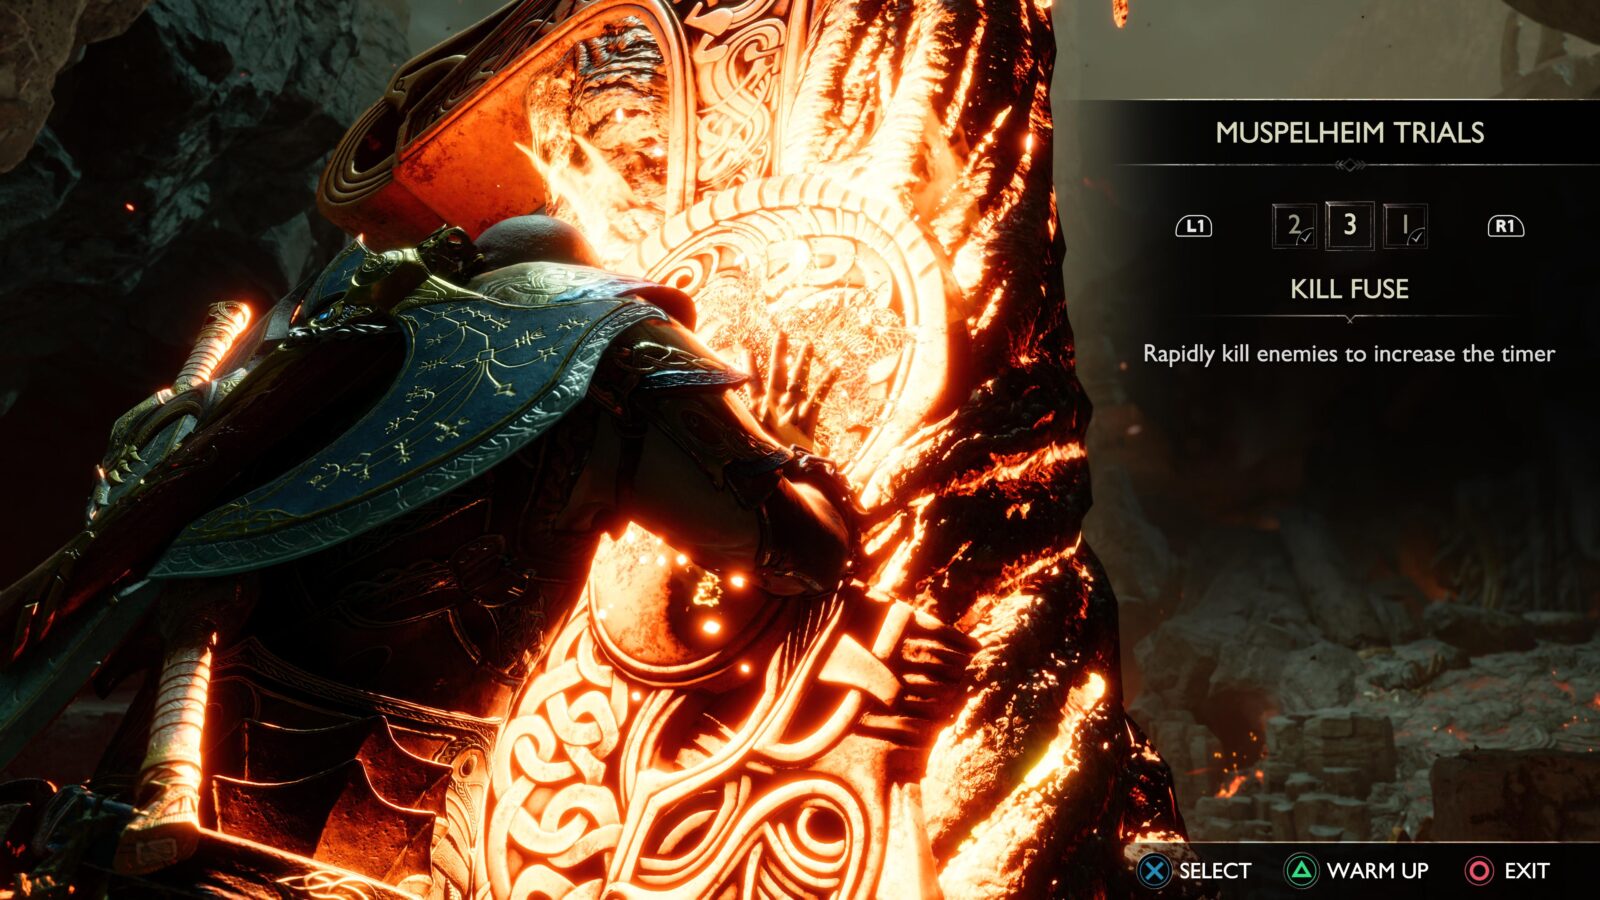
The trial available at the fourth sword will be one of six possible trials, depending on which two trials you completed first. Don’t worry, though, we have the combinations written out below!
| Trial | Sword | Access Conditions |
|---|---|---|
| Weapon Mastery | North | Available from the start. |
| Flawless | North | Available from the start. |
| Ring Out Challenge | East | Available from the start. |
| Feed the Rift | East | Available from the start. |
| Population Control | South | Available from the start. |
| King of the Hill | South | Available from the start. |
| Rampage | North | Open the Nornir Chest. |
| Health Steal | East | Open the Nornir Chest. |
| Kill Fuse | South | Open the Nornir Chest. |
| Endurance Challenge | West | After opening the Nornir Chest, complete a Trial at the North Sword then the East Sword. |
| Boss Rush Challenge | West | After opening the Nornir Chest, complete a Trial at the South Sword then the East Sword. |
| Shield Breaker Challenge | West | After opening the Nornir Chest, complete a Trial at the North Sword then the South Sword. |
| Phantom Challenge | West | After opening the Nornir Chest, complete a Trial at the South Sword then the North Sword. |
| Ring of Fire Challenge | West | After opening the Nornir Chest, complete a Trial at the East Sword then the North Sword. |
| Onslaught Challenge | West | After opening the Nornir Chest, complete a Trial at the East Sword then the South Sword. |
Once you have completed all 15 Trials at least once, you will have gained a lot of great new gear and upgrade resources and will also receive the well-deserved “Trials by Fire” silver trophy!

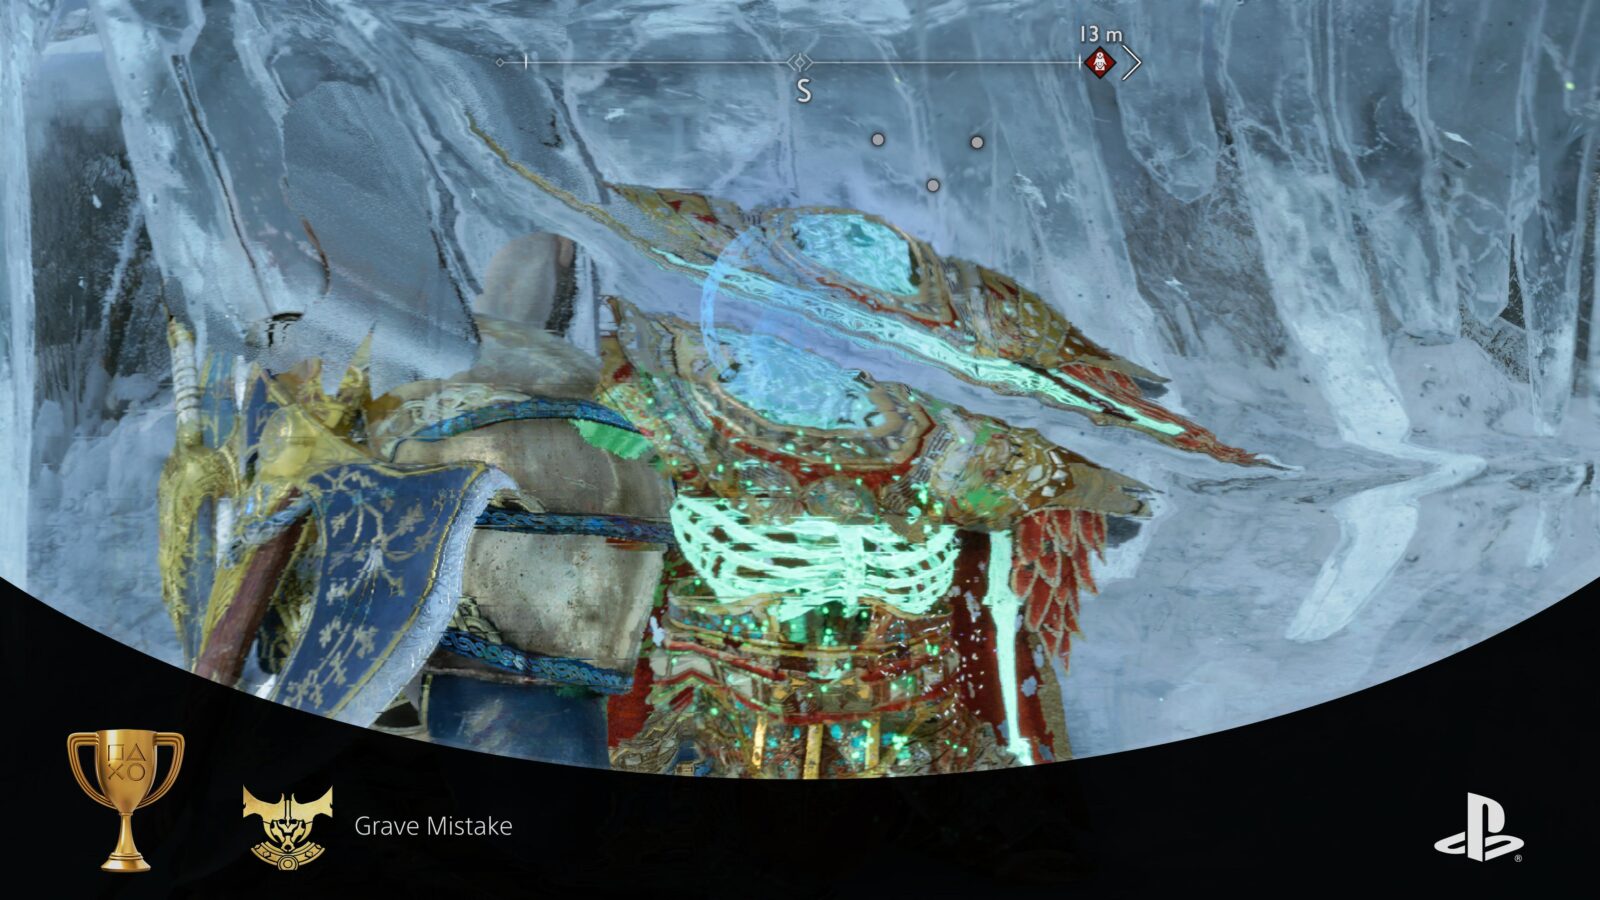
Grave Mistake
Battle King Hrólf
Hrólf is king of the Berzerkers and so to reach him you will need to visit all 10 of the Berzerker Gravestones and defeat the powerful Minibosses that they spawn.
You would be best off preparing for this gruelling task by upgrading your gear and skills as much as you can. It’s also helpful to turn on the “Miniboss Checkpoints” Accessibility Option. This way, if you die, some of your progress on the Miniboss’ HP will be remembered.
It is wise to bring a Ressurection Stone from the Blacksmith to each fight too.
Either way, once you’re done with the first 9 exhausting battles at Berzerker Gravestones, you’ll have to face their King, an even more powerful Berzerker Miniboss. Hrólf. For him, you will definitely need the absolute best gear you can get your hands on.
Berserker Gravestones will first become accessible once you receive the “Inert Hilt of Skofnung” key item. This happens unavoidably throughout the story.
Red Berserker icons are then added to several maps, indicating the locations of Berserker Gravestones:
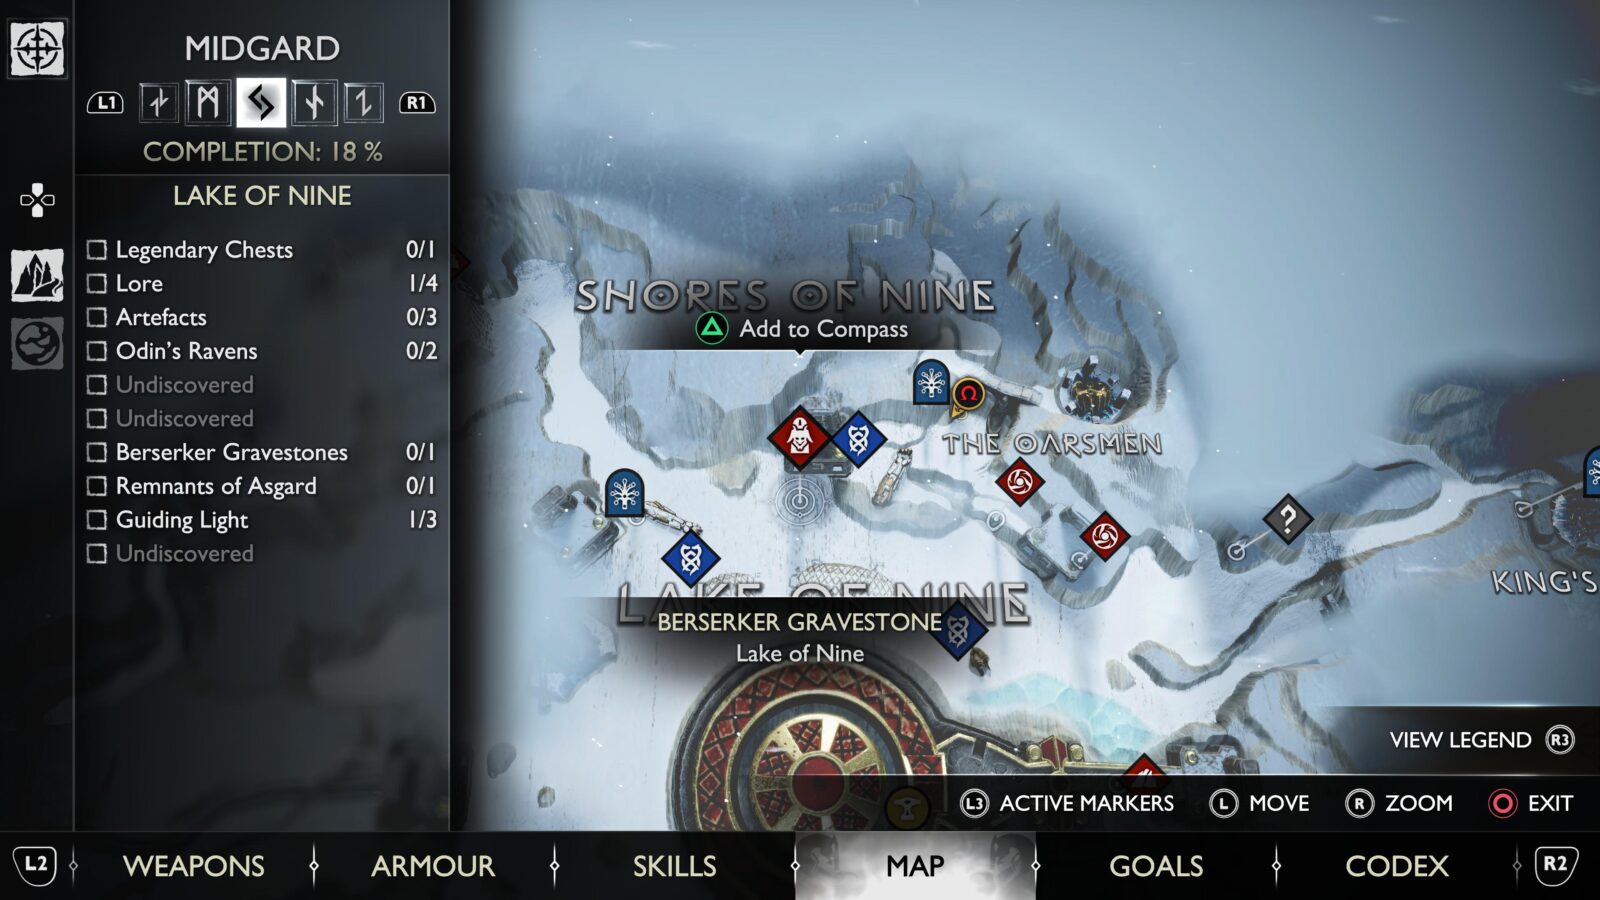
Head to each of the 9 available Gravestones and complete the Miniboss fights at each one to unlock access to the final one on Midgard; King’s Grave.

Head there and interact with the gravestone to summon forth Hrólf, one of the hardest bosses in the game by far. Prepare yourself as much as you can. Fully-upgraded Gear is highly recommended.
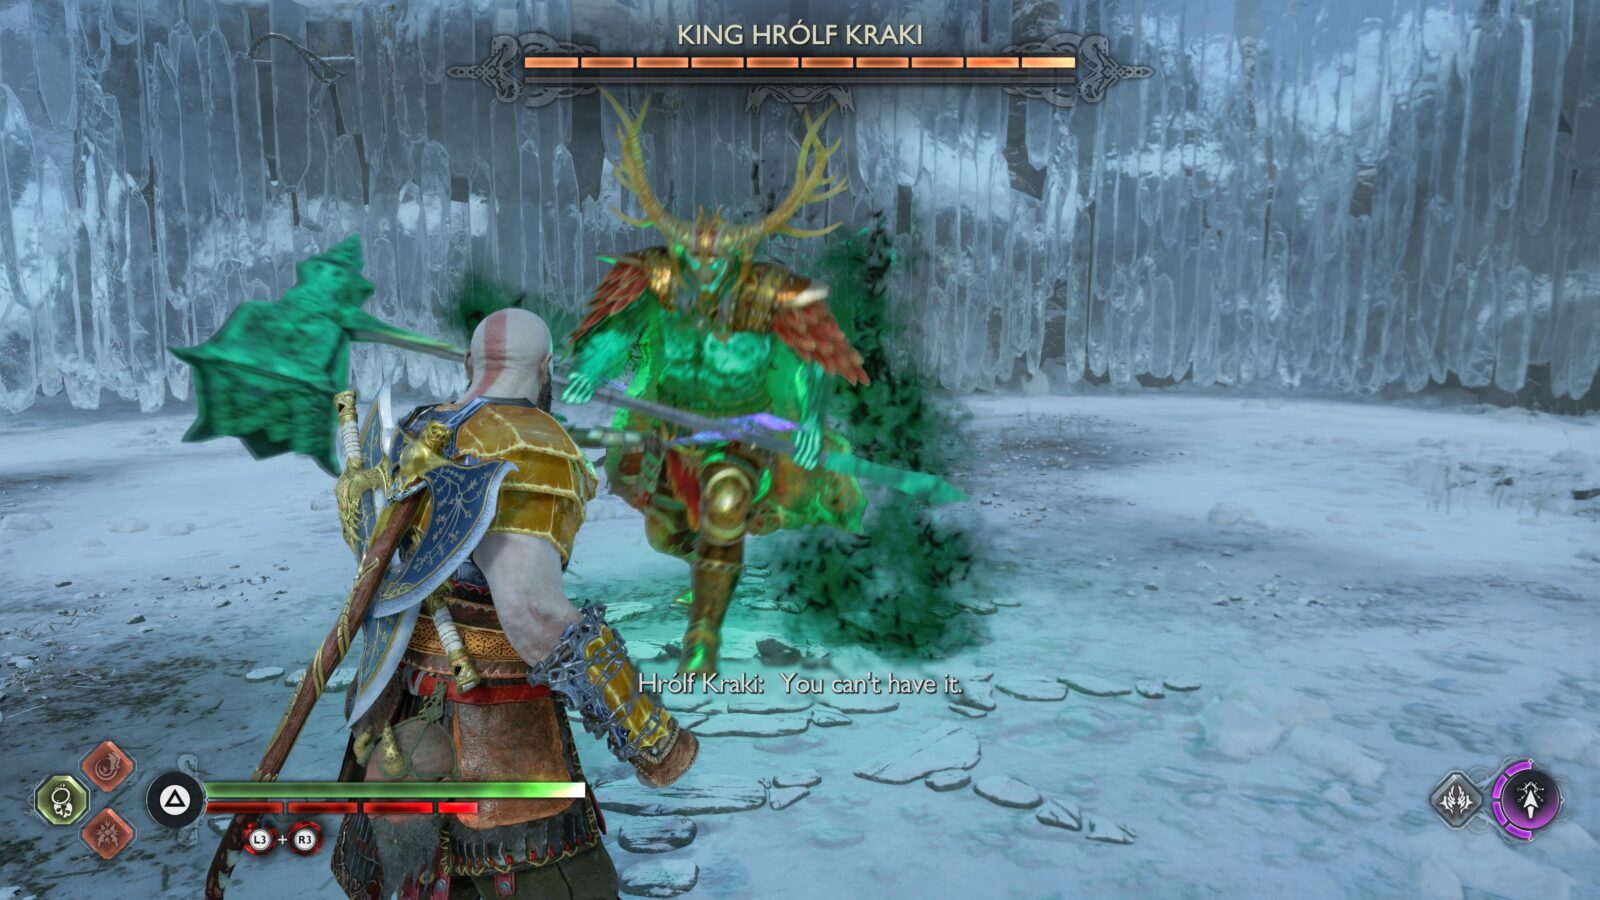
If you manage to successfully bring Hrólf down, the “Grave Mistake” trophy will unlock.

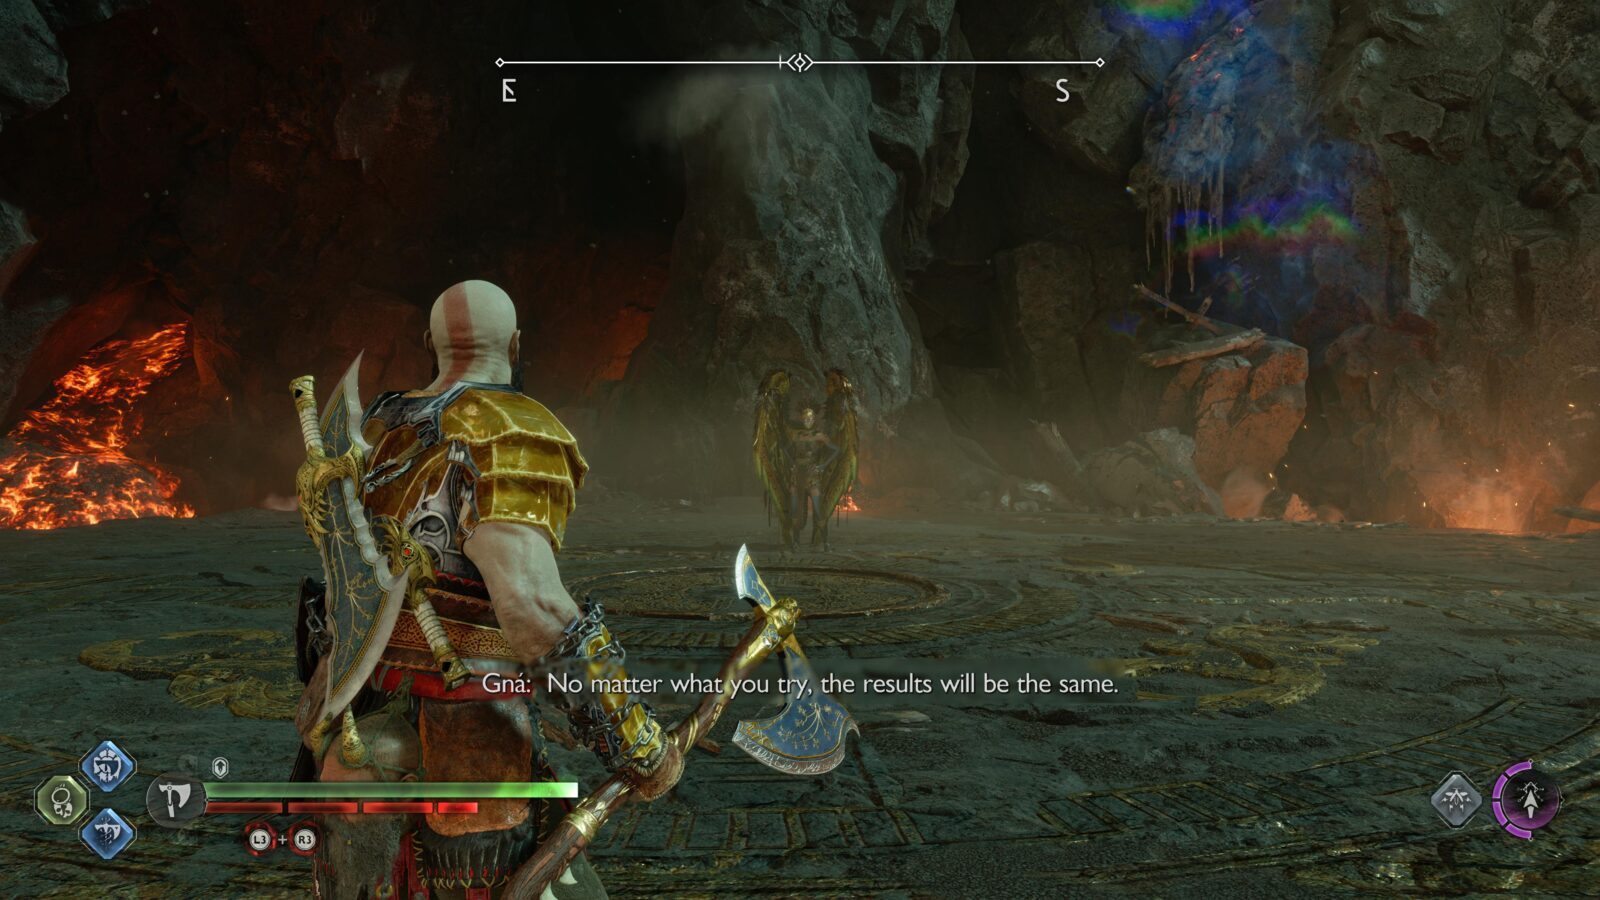
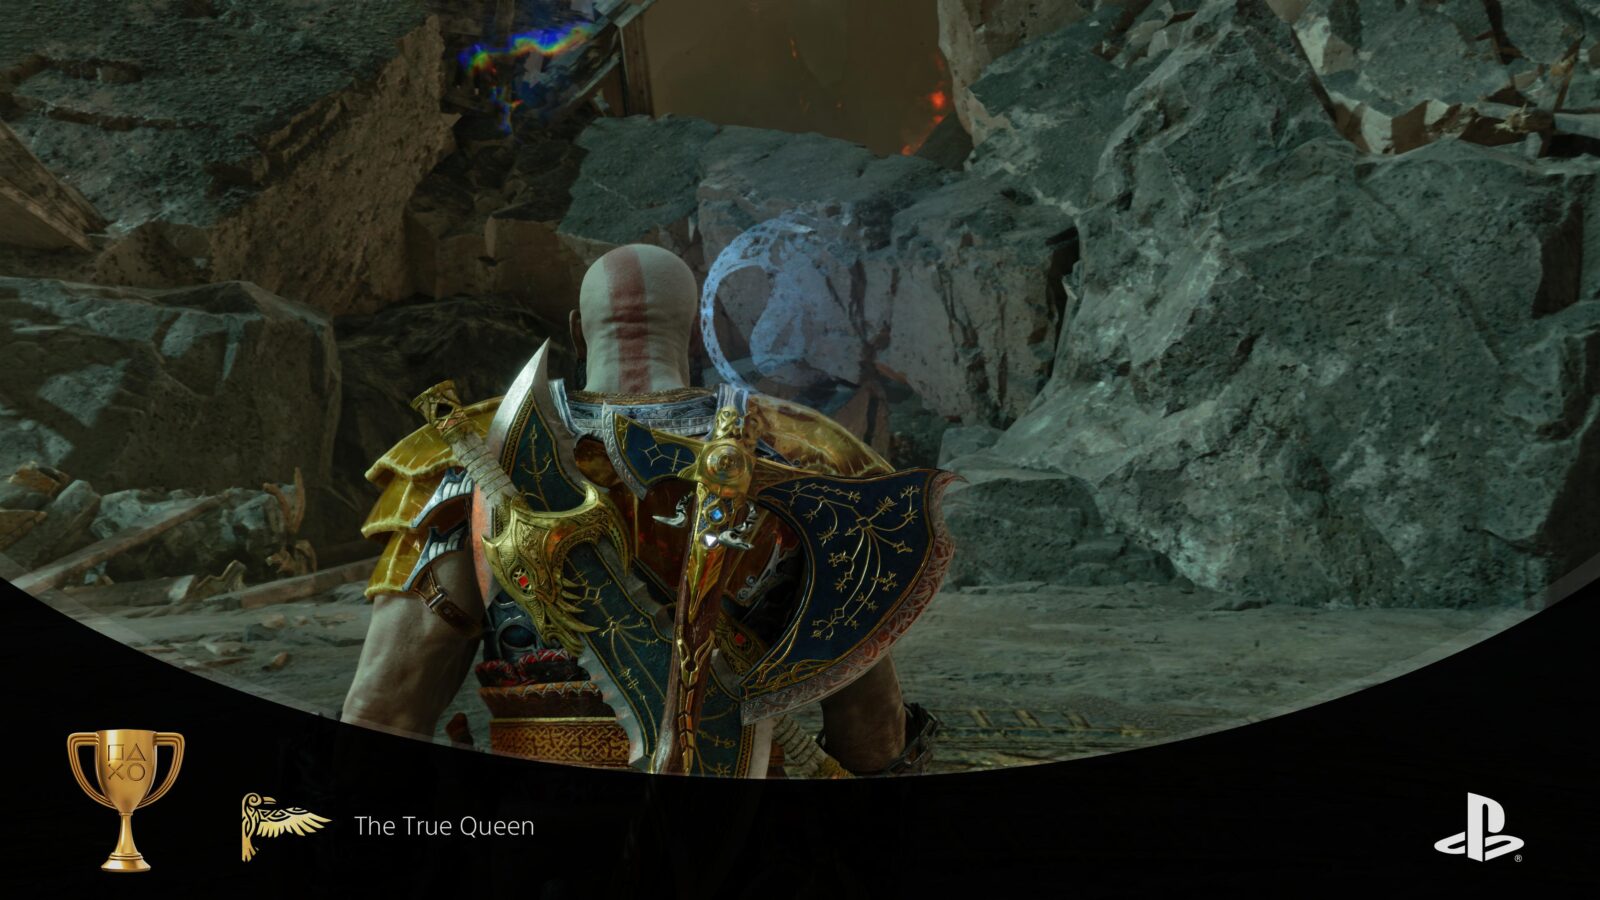
The True Queen
Battle Gná
Gná is an optional post-game boss who is accessible in Muspelheim only once you have completed the main story for the first time.
She is one of the strongest enemies in the game, providing a gruelling challenge even on the easiest difficulty settings. You will need to upgrade your gear and skills as much as you possibly can before facing her.
Once you are ready, head to Muspelheim and go to the Axe icon on the south edge of the Crucible region.

There, you will find Gná, ready to fight if you simply interact with her.
If you continue to struggle with this fight you will either need to leave and come back with better gear, or just continue practicing until you pull it off.
There is a bit of a built-in safety net hidden in the game’s accessibility settings, where you can turn on “Miniboss Checkpoints.” This means that if you reduce a Boss’ health past 50% and then die, their health will only reset up to 50% when you respawn.
You should also purchase a Resurrection Stone at the Blacksmith.
Once you successfully defeat Gná in battle, the “The True Queen” trophy will unlock.
Phase Three – Cleanup and Collectibles
Now that you have all of the story-based objectives boxed off, we shift focus in this final phase of our God of War Ragnarok Trophy Guide to mopping up any leftover collectibles or miscellaneous trophies.
It’s likely that even while doing your best to grab every collectible you could on your way through the story, there may be a fair few slightly more elusive ones you need to scour for. Fortunately, we’ve provided various maps below to help you locate them all and snag your Platinum Trophy.
Collectible Trophies

The Librarian
Collect all of the Books
You will receive the “The Librarian” trophy by collecting all 14 of the “Kvasir’s Poem” Artifacts.
You will need to collect all 38 Artifacts, including these 14 Poems, to unlock the “The Curator” trophy, so will unlock The Librarian while working on that one.

Full Belly
Obtain all of the Apples of Idunn and Horns of Blood Mead
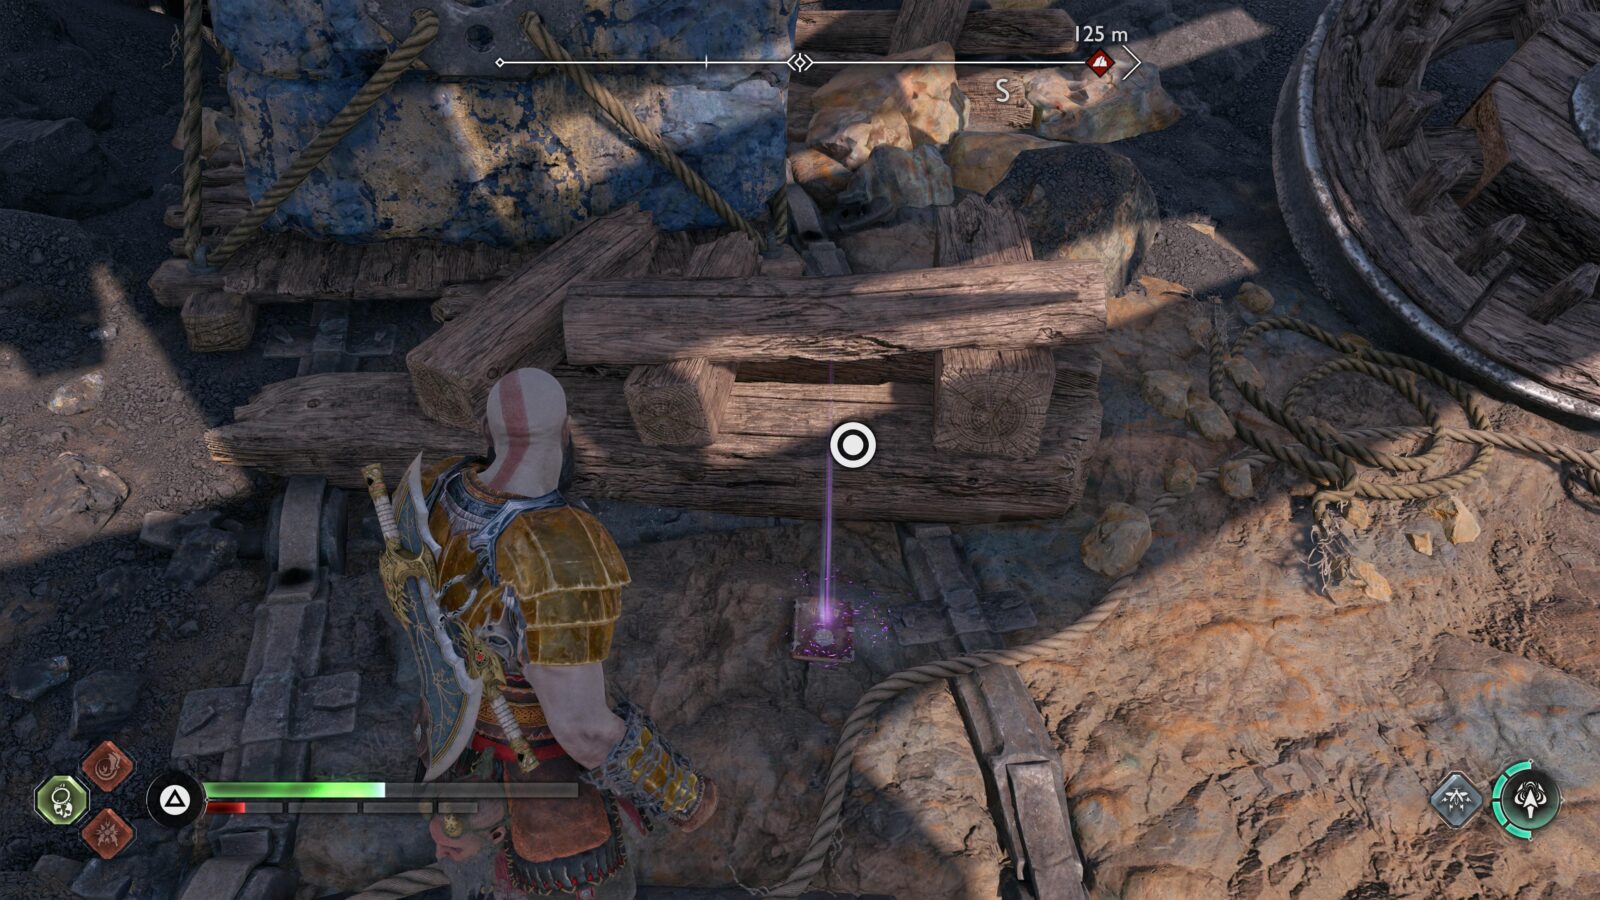
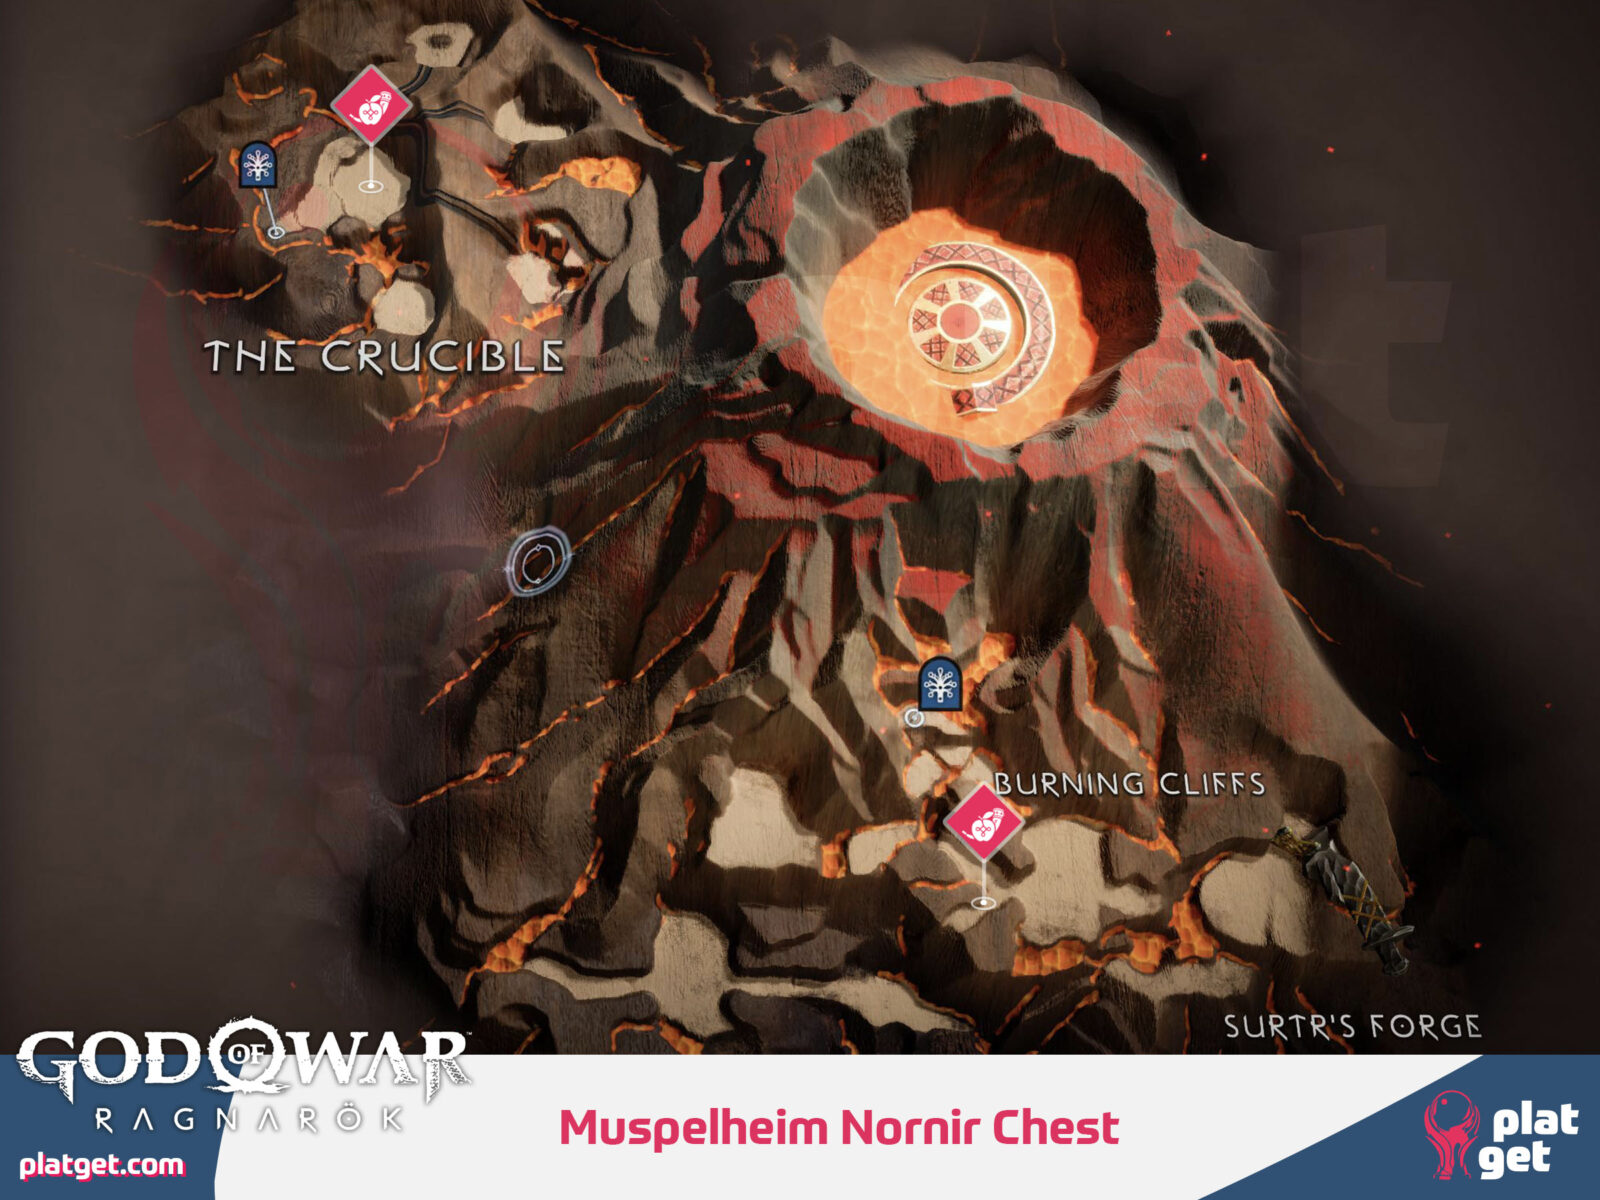
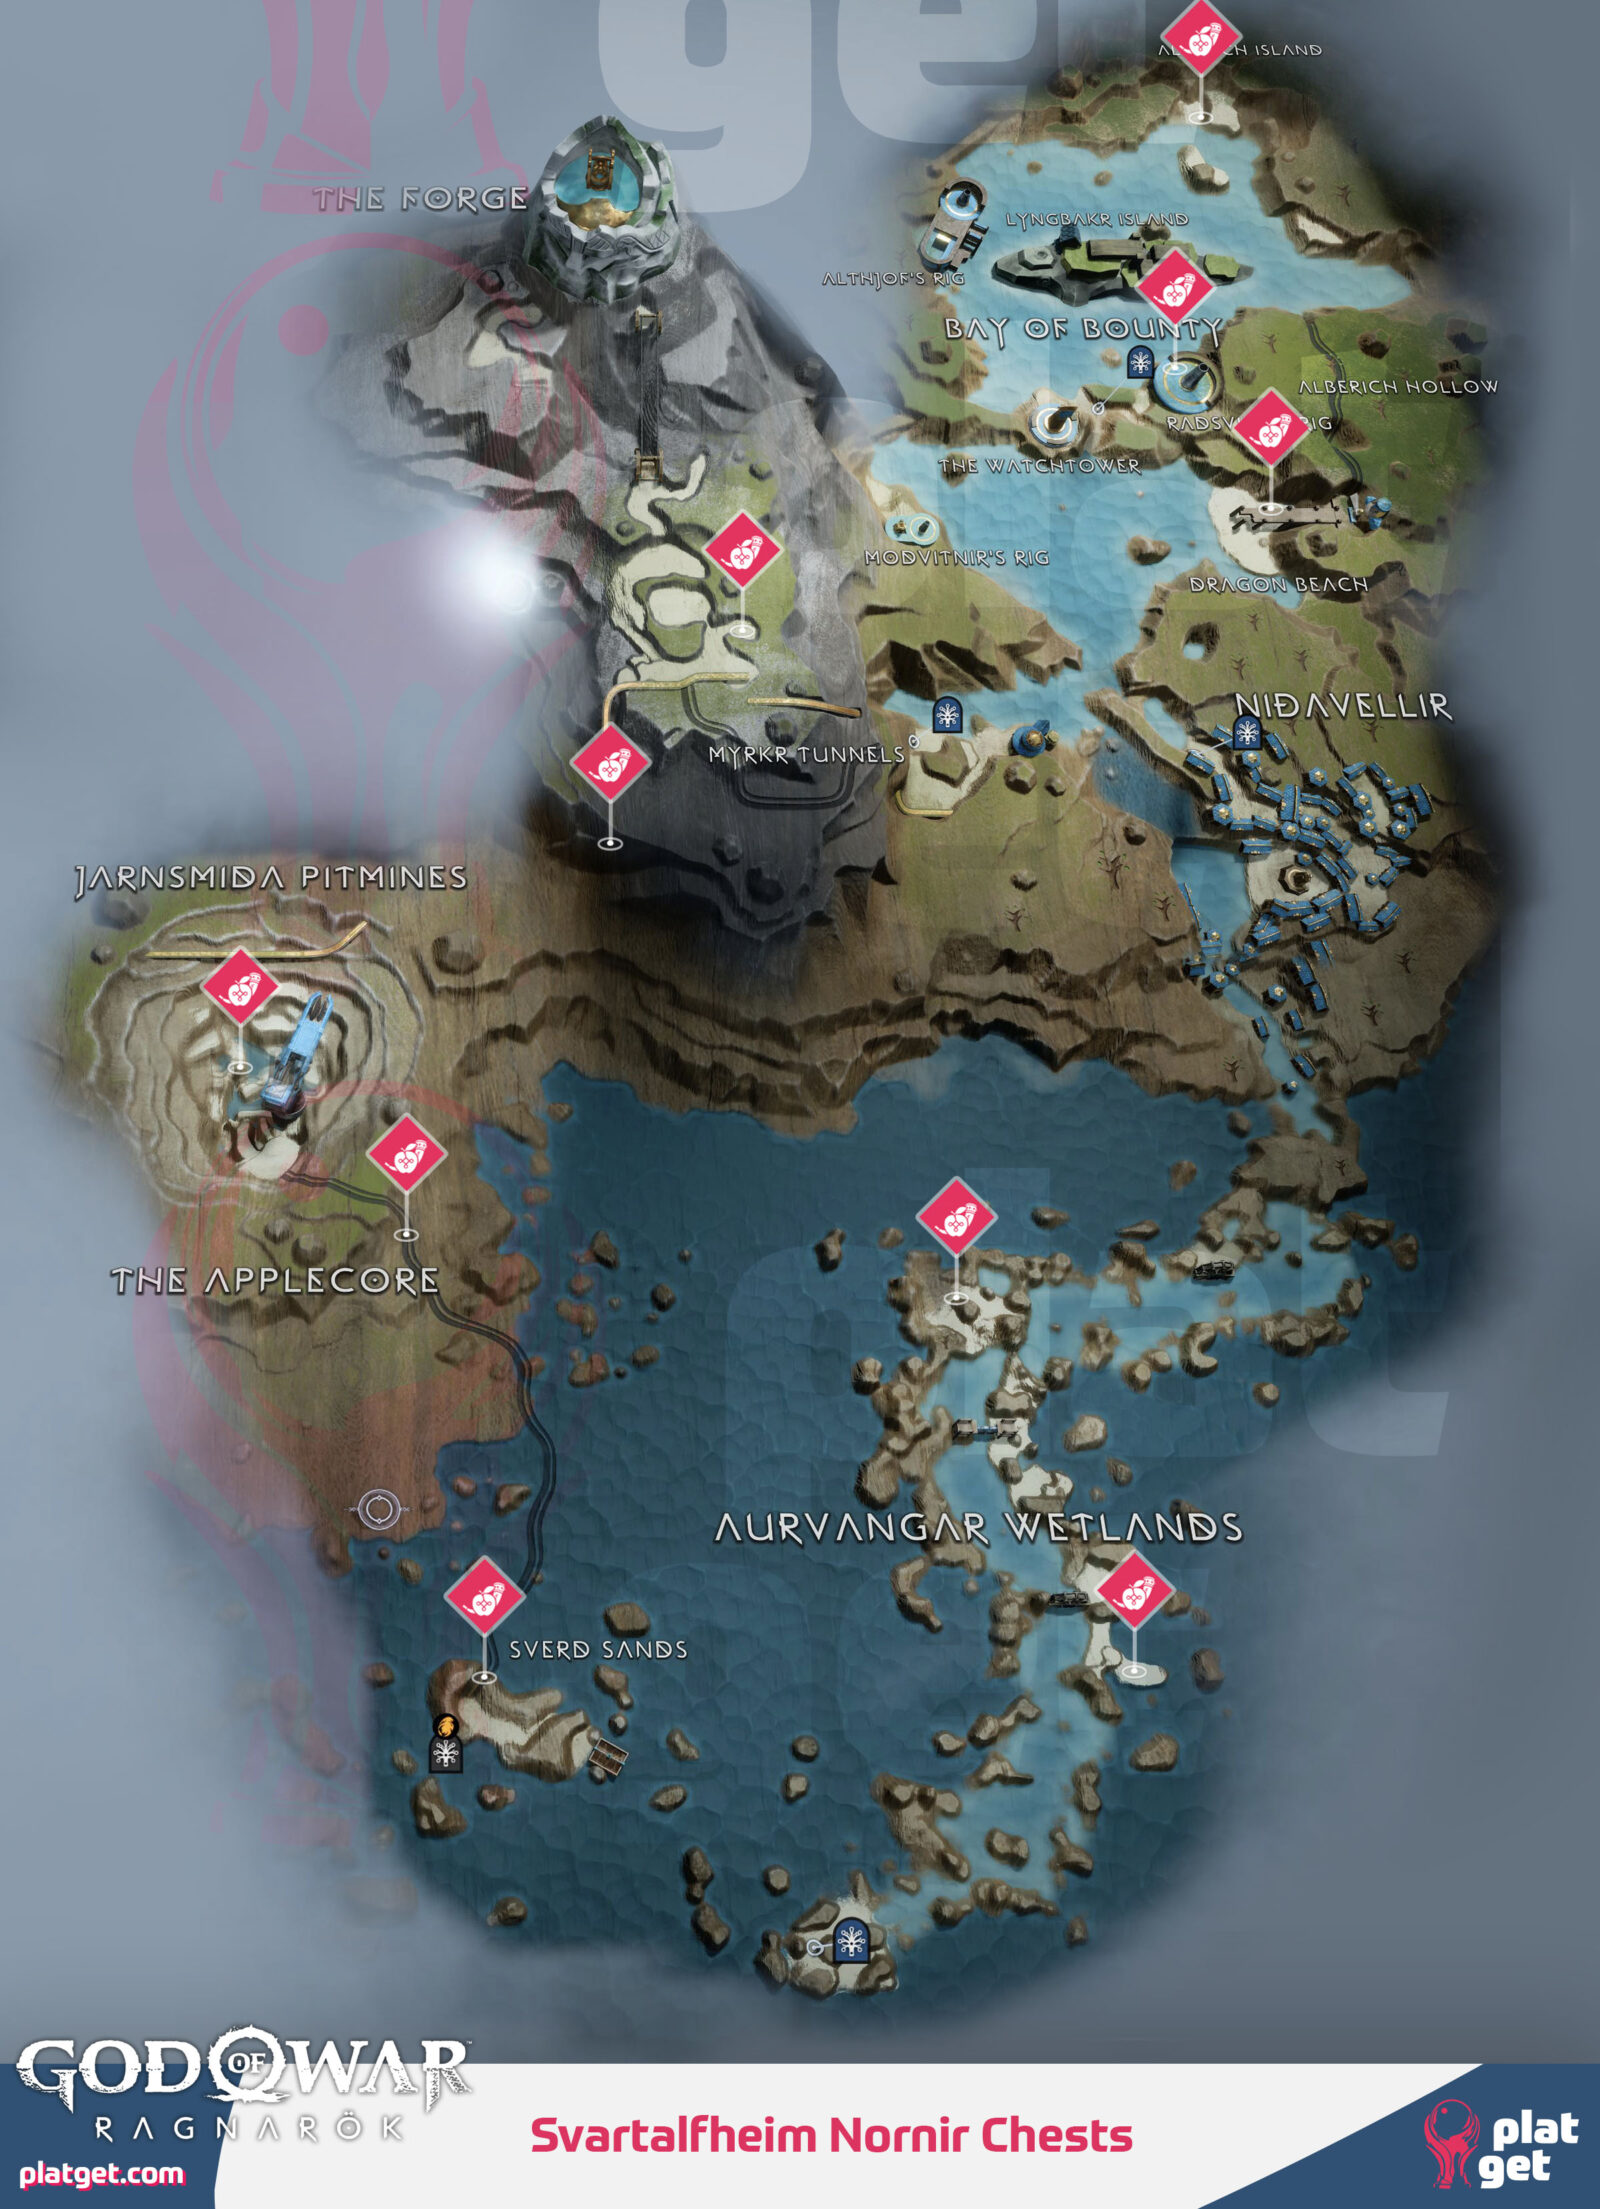
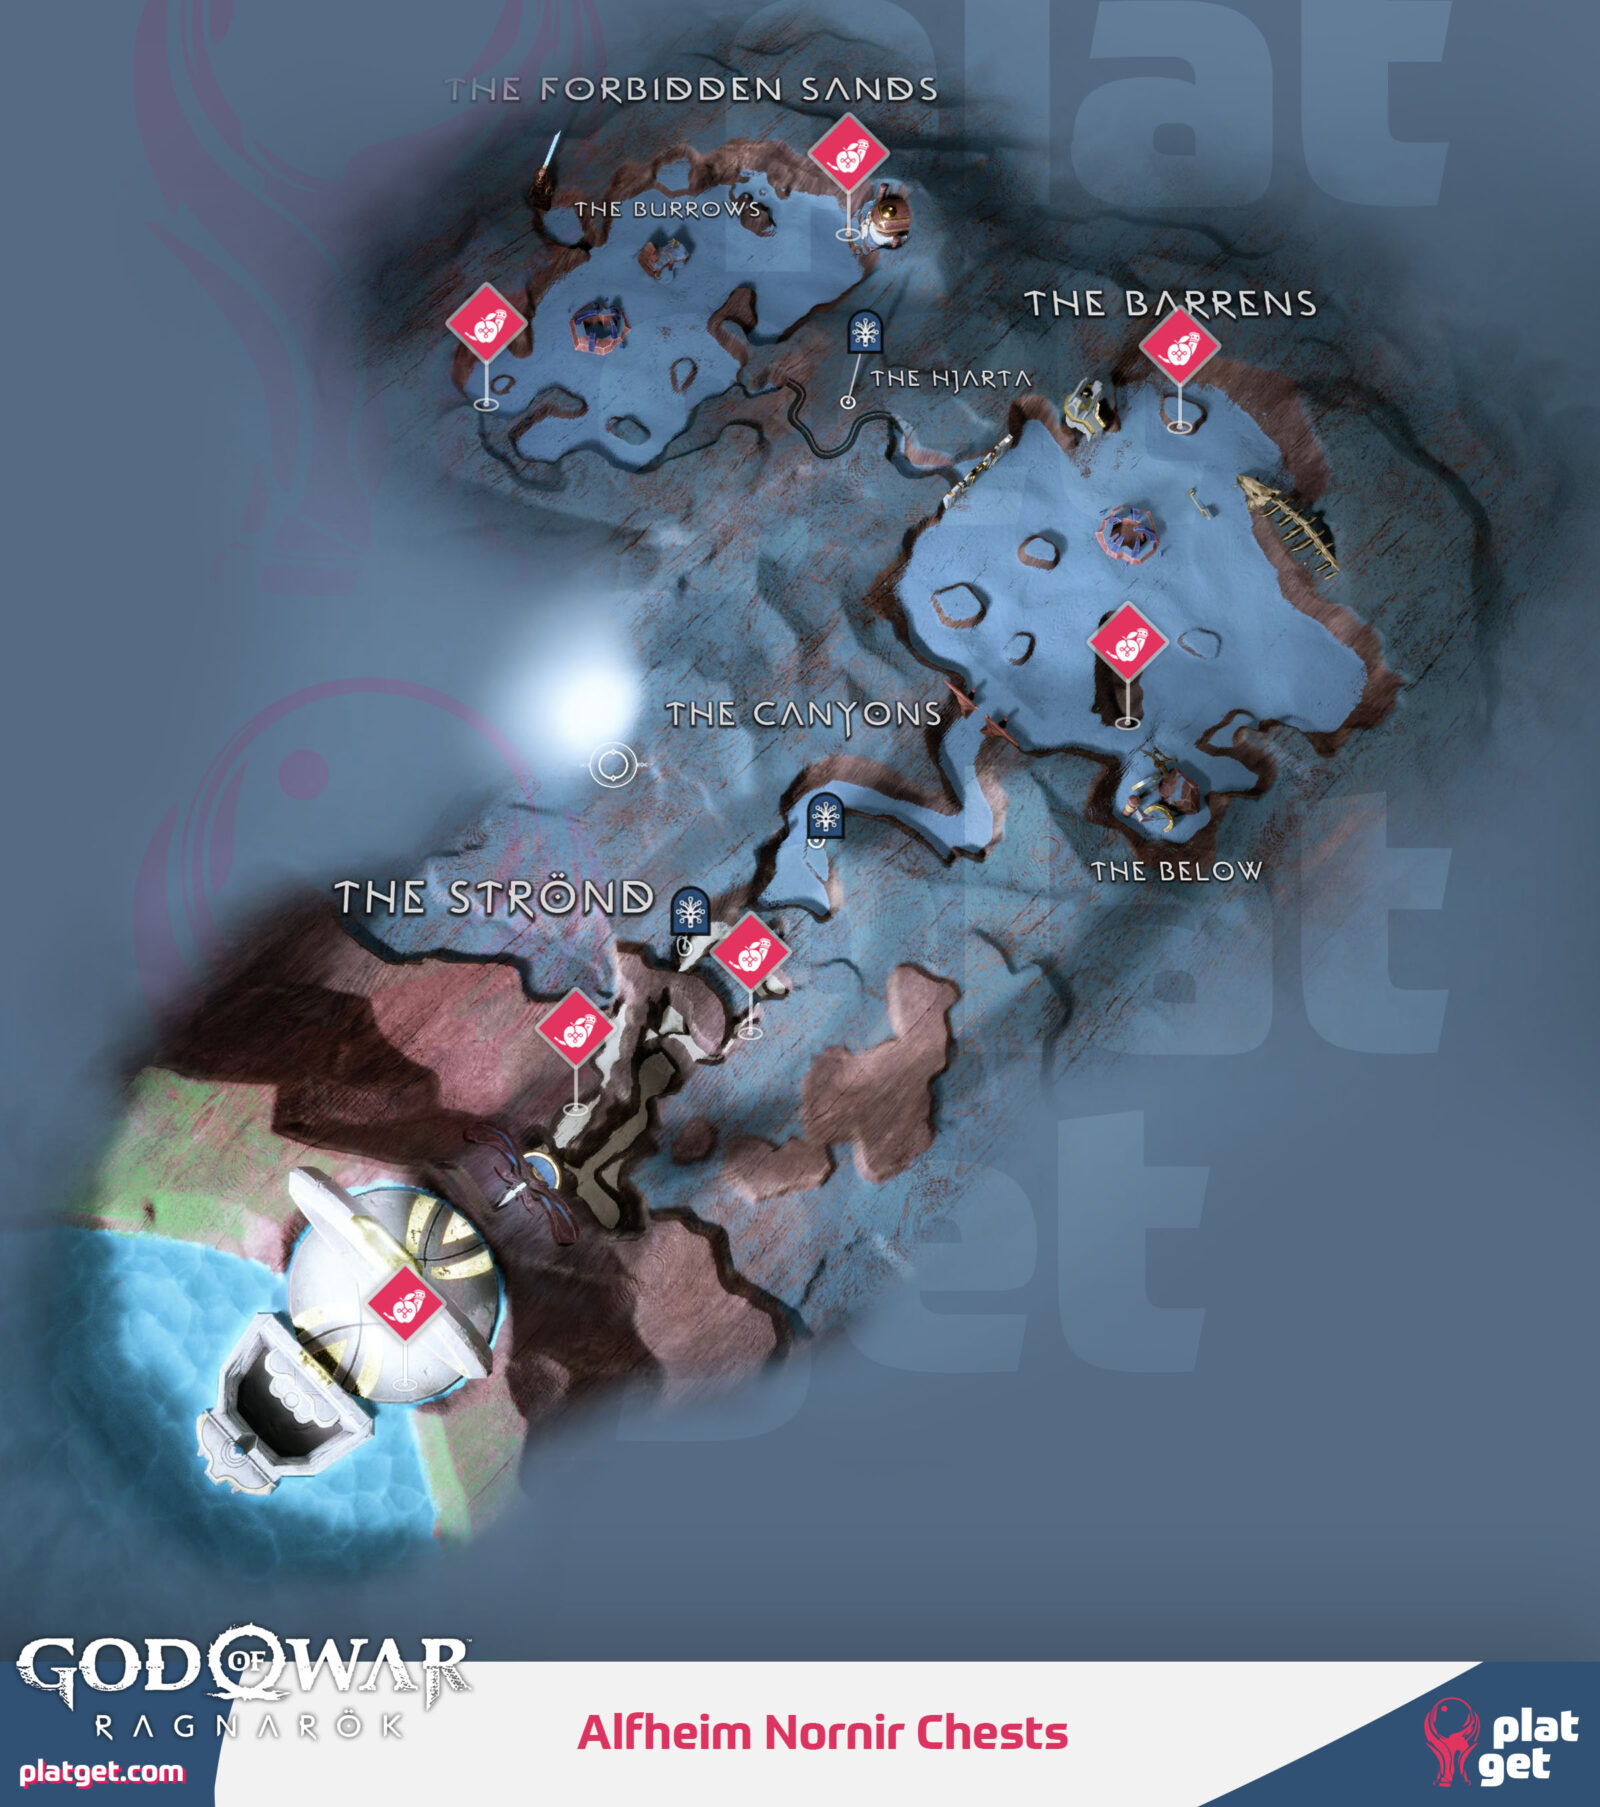
Throughout the game, there are various chests with runes etched into the front of them. These are Nornir Chests and opening them will require you to complete a small puzle.

Inside, you will either receive an Apple of Idunn to increase your Max HP or a Horn of Blood Mead to increase your Max Spartan Rage.

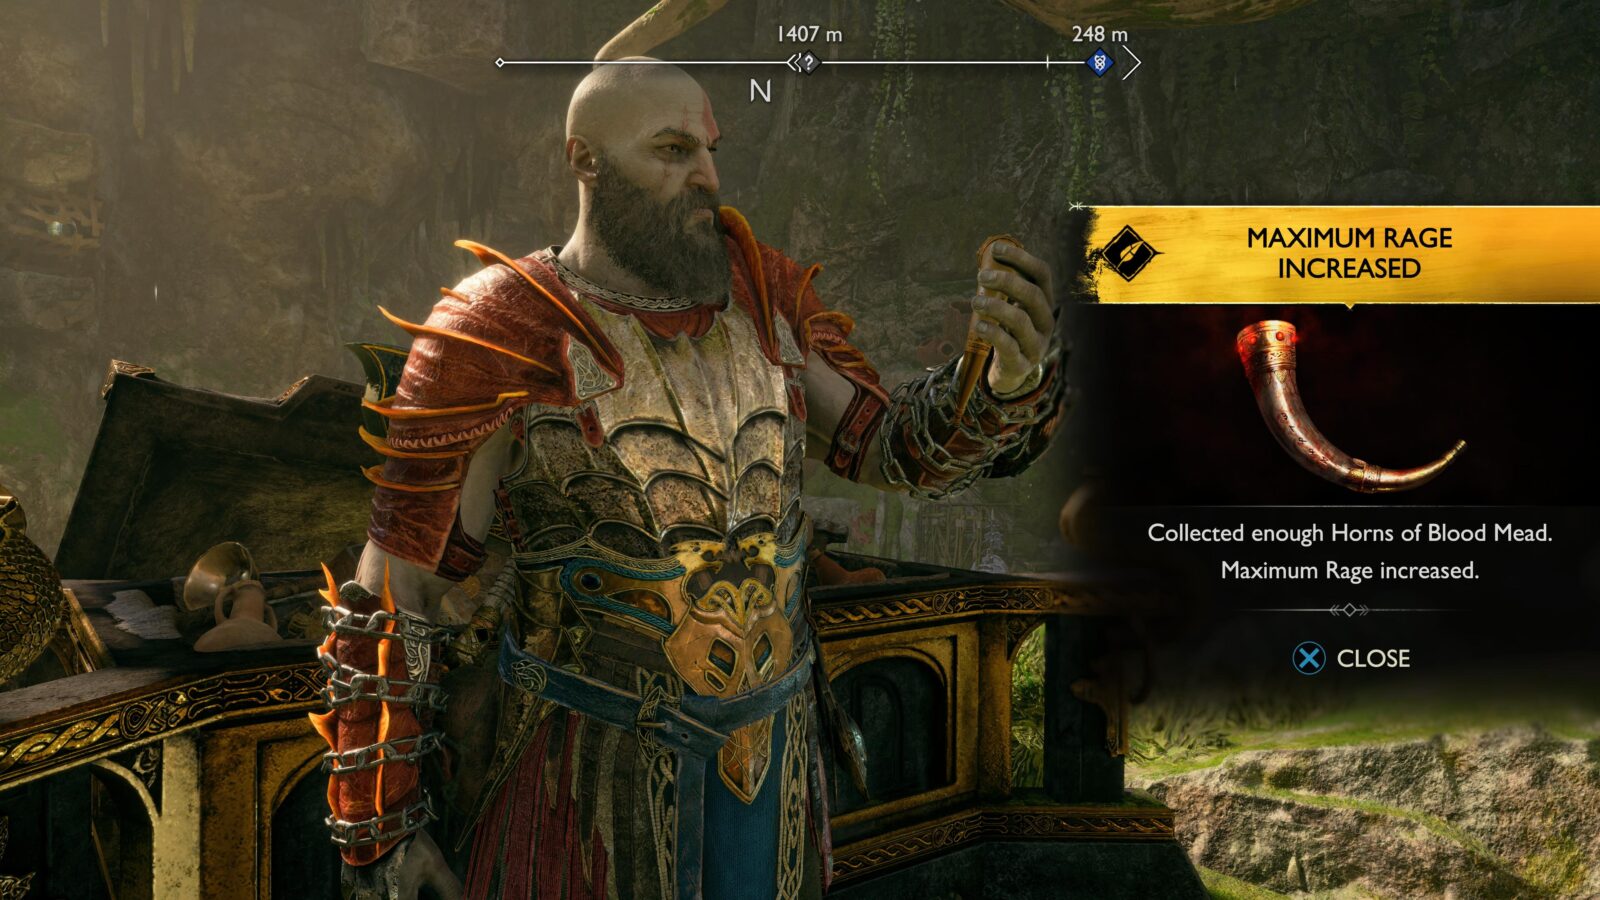
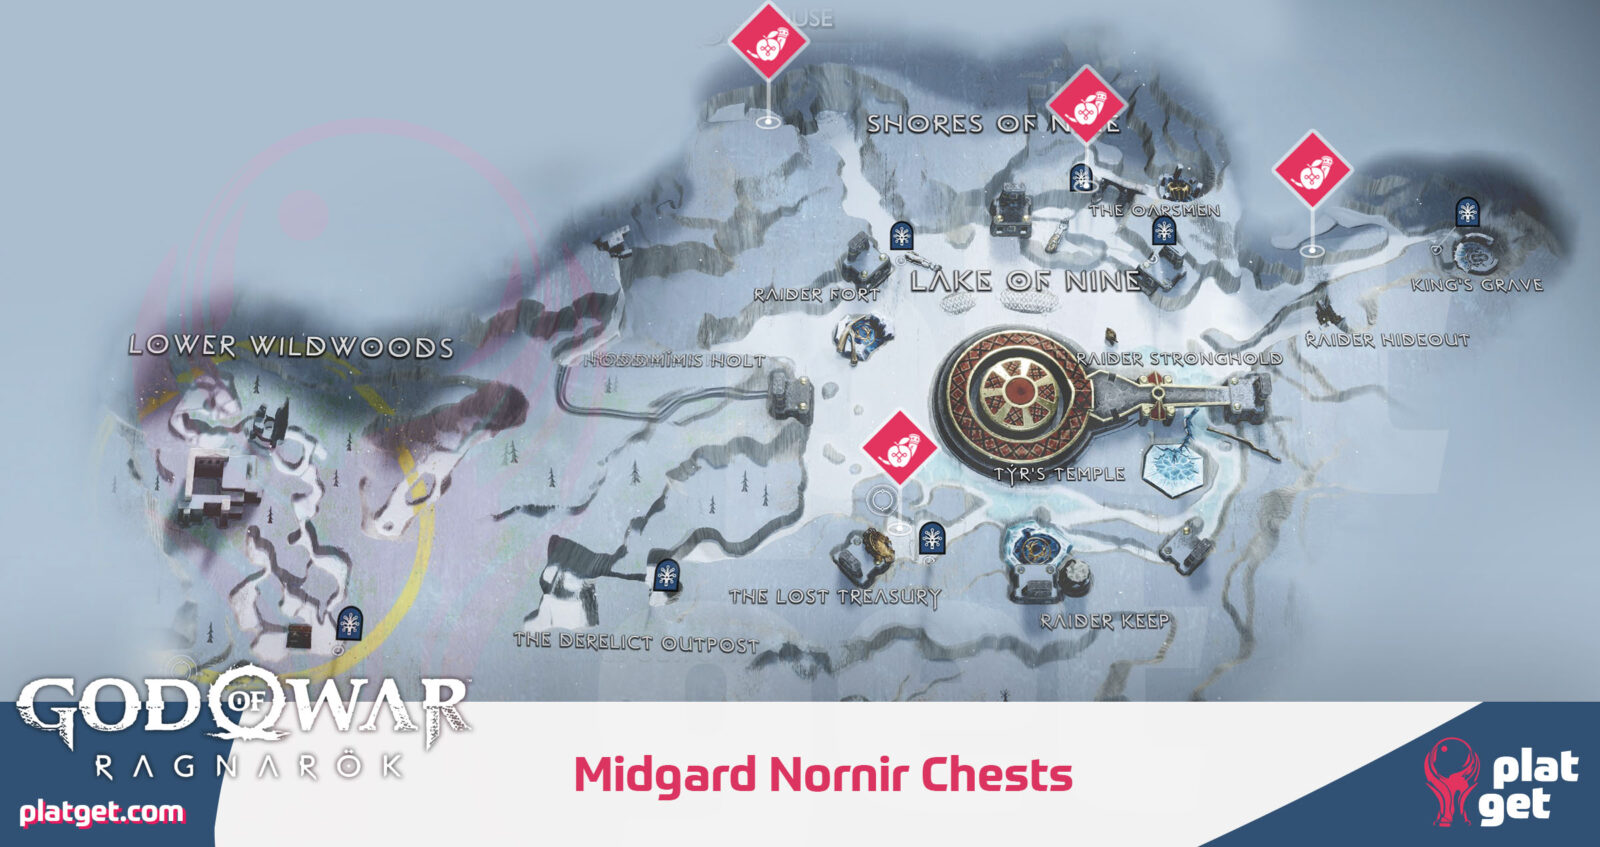
You will essentially need to open all 35 Nornir Chests to ensure you collect every single Apple and Horn. Collecting them all will unlock the Full Belly trophy. Use the maps below to locate and open all 35 Nornir Chests.


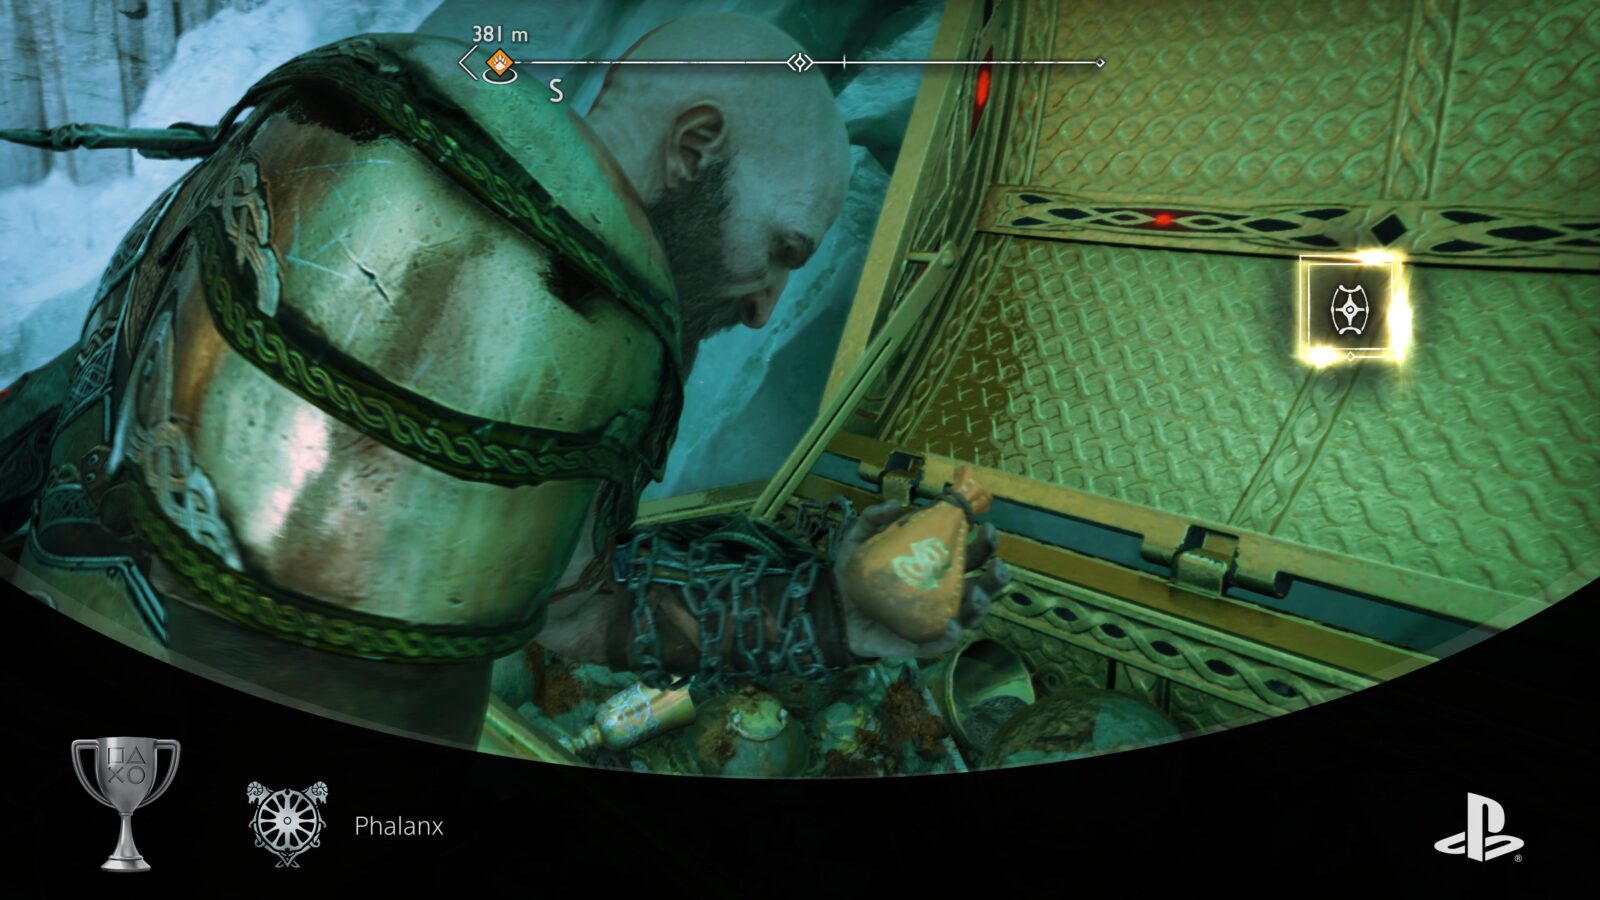
Phalanx
Obtain all Shields
To unlock the “Phalanx” trophy, you must find and collect all five Shields in the game; Three of which can be crafted by the dwarves. Use the table below to figure out how and where to collect each Shield.
| Shield | Acquisition |
|---|---|
| Guardian Shield | Received automatically as part of the story. |
| Onslaught Shield | Immediately after the Garm Boss fight in Helheim (story), there is a Legendary Chest you can open with this shield inside. If you happen to miss it, you can purchase the shield from Blacksmiths at any time after defeating Garm. |
| Dauntless Shield | Craft at the Blacksmith Shop |
| Stone Wall Shield | Craft at the Blacksmith Shop |
| Shatter Star Shield | Craft at the Blacksmith Shop |

Collector
Obtain all Relics and Sword Hilts
Relics, or Sword Hilts, are collectible items hidden across six of the Nine Realms. They are acquired in various ways, but you will essentially need to do all of the below:
- Finish the Story
- Destroy all 48 Ravens
- Collect 4 Lost Pages
- Collect 3 Loose Relics
- Craft 5 Relics
- Complete your Relic Collection
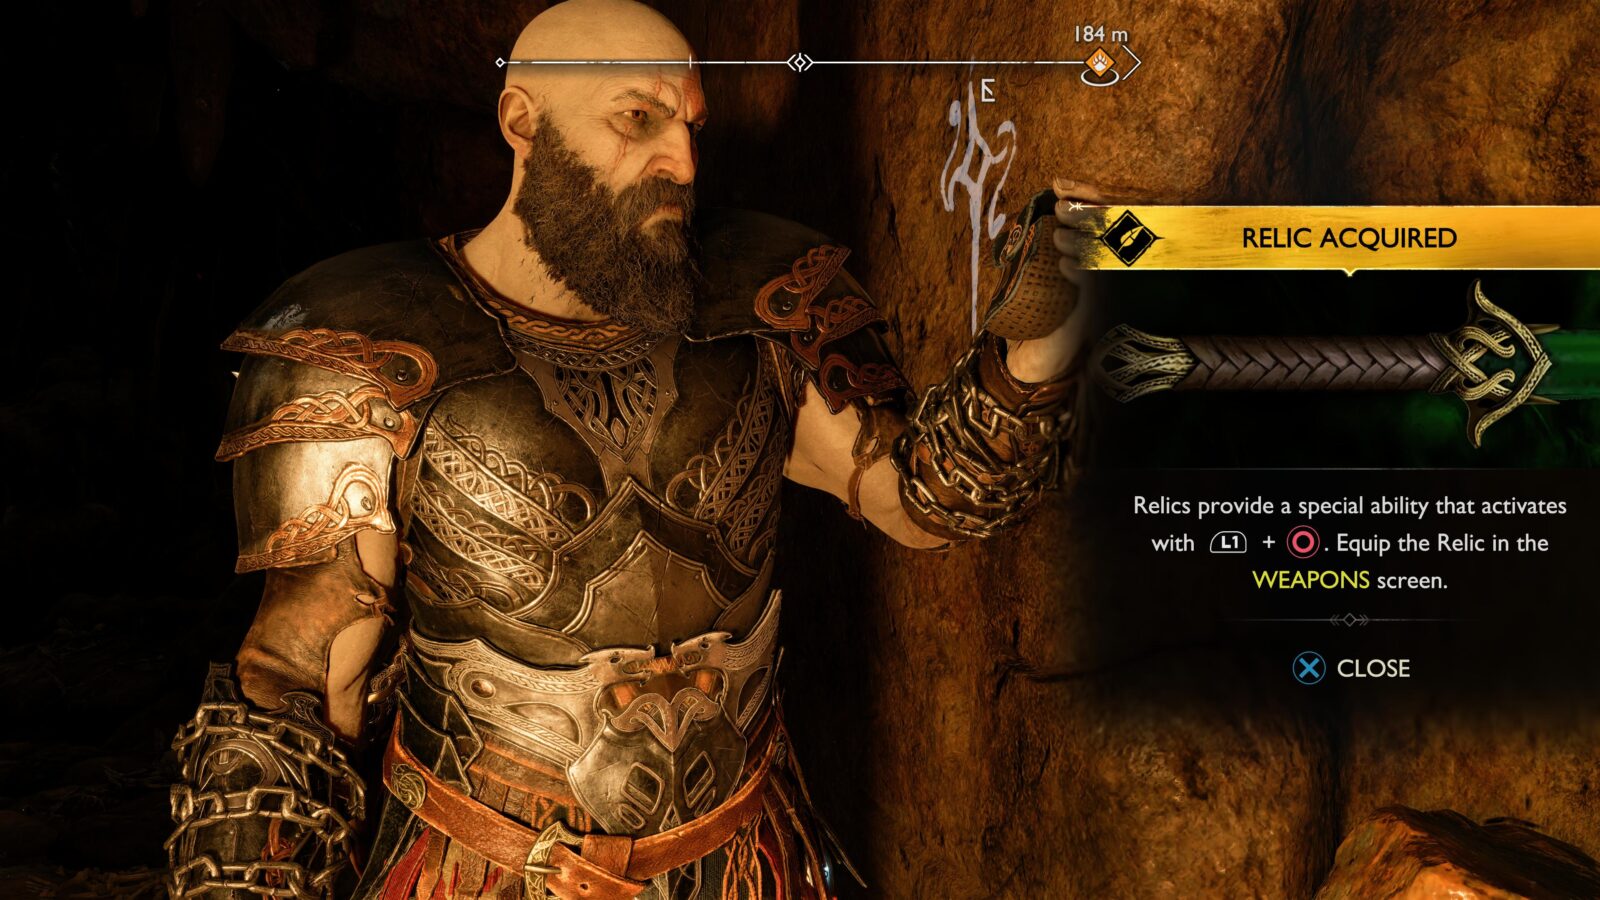
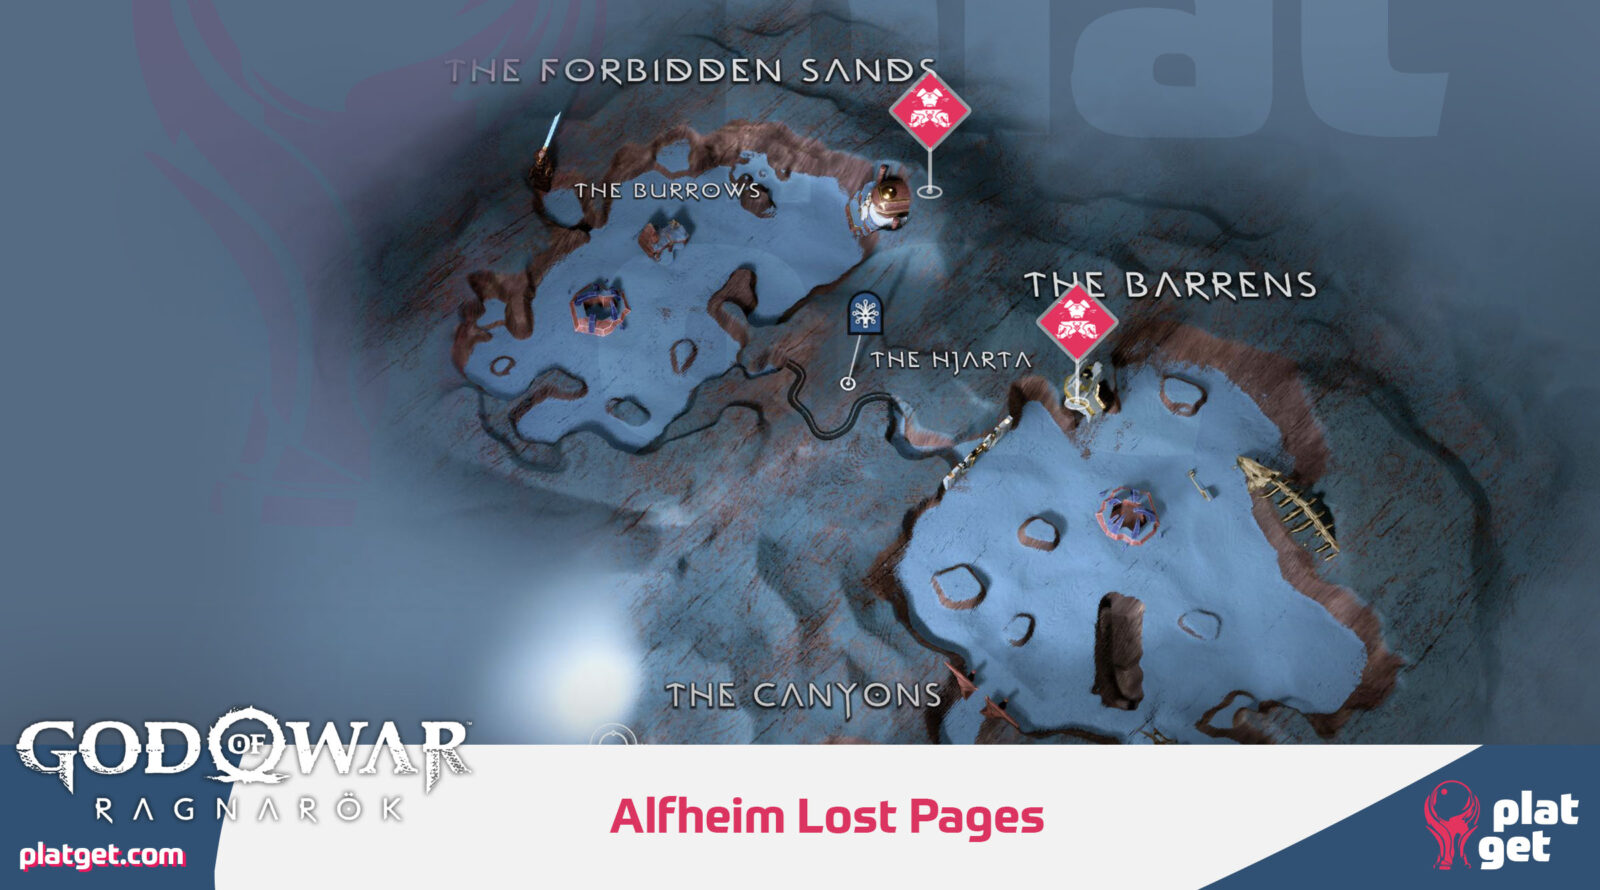
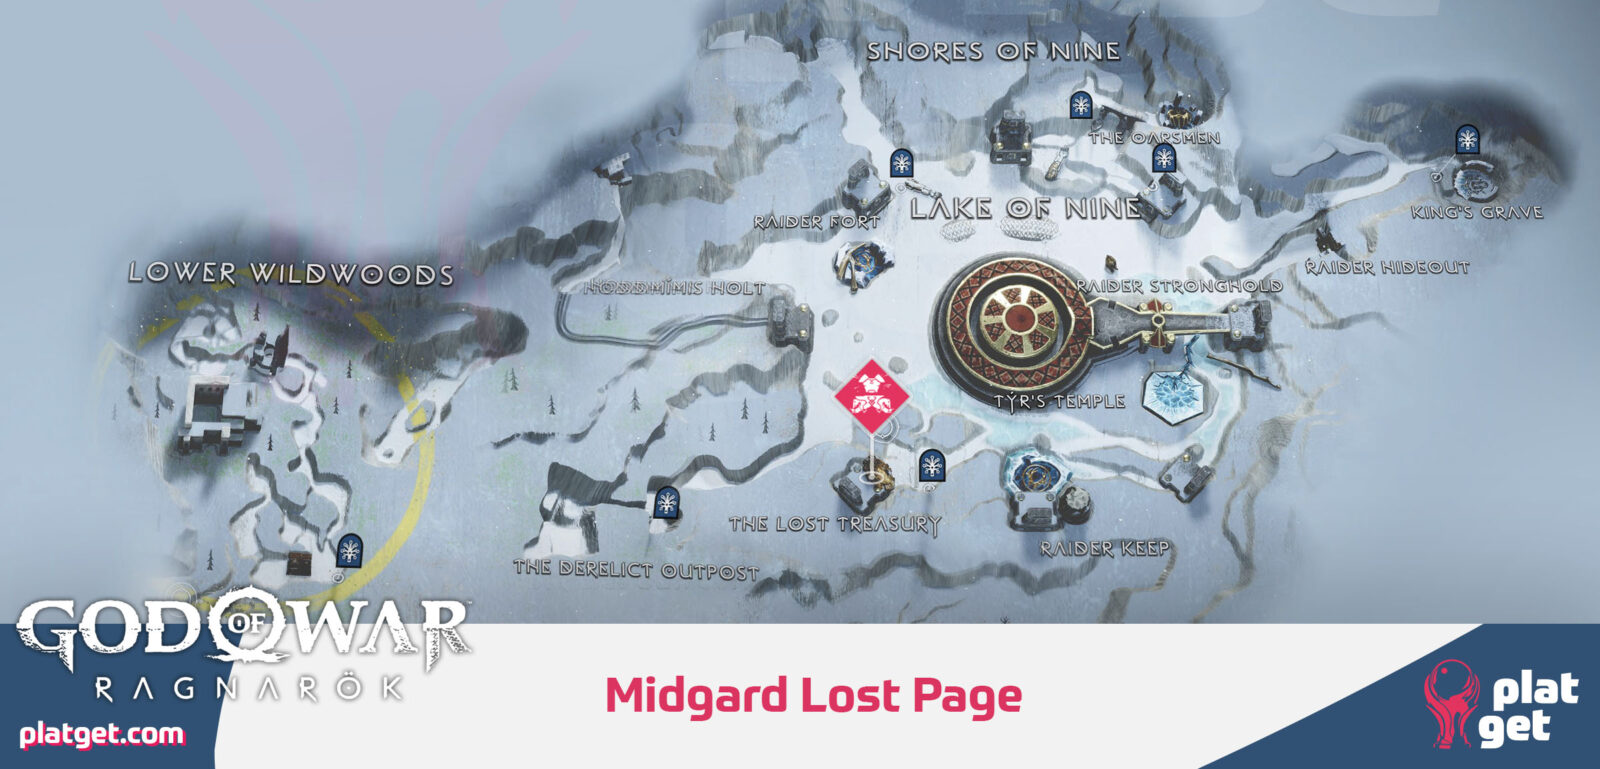
You will need to find and collect/craft all 14 Relics. Before you can craft four of them you will need to collect four Lost Pages too. Use the gallery below to see all four Lost Page locations.
Lost Page Location Maps

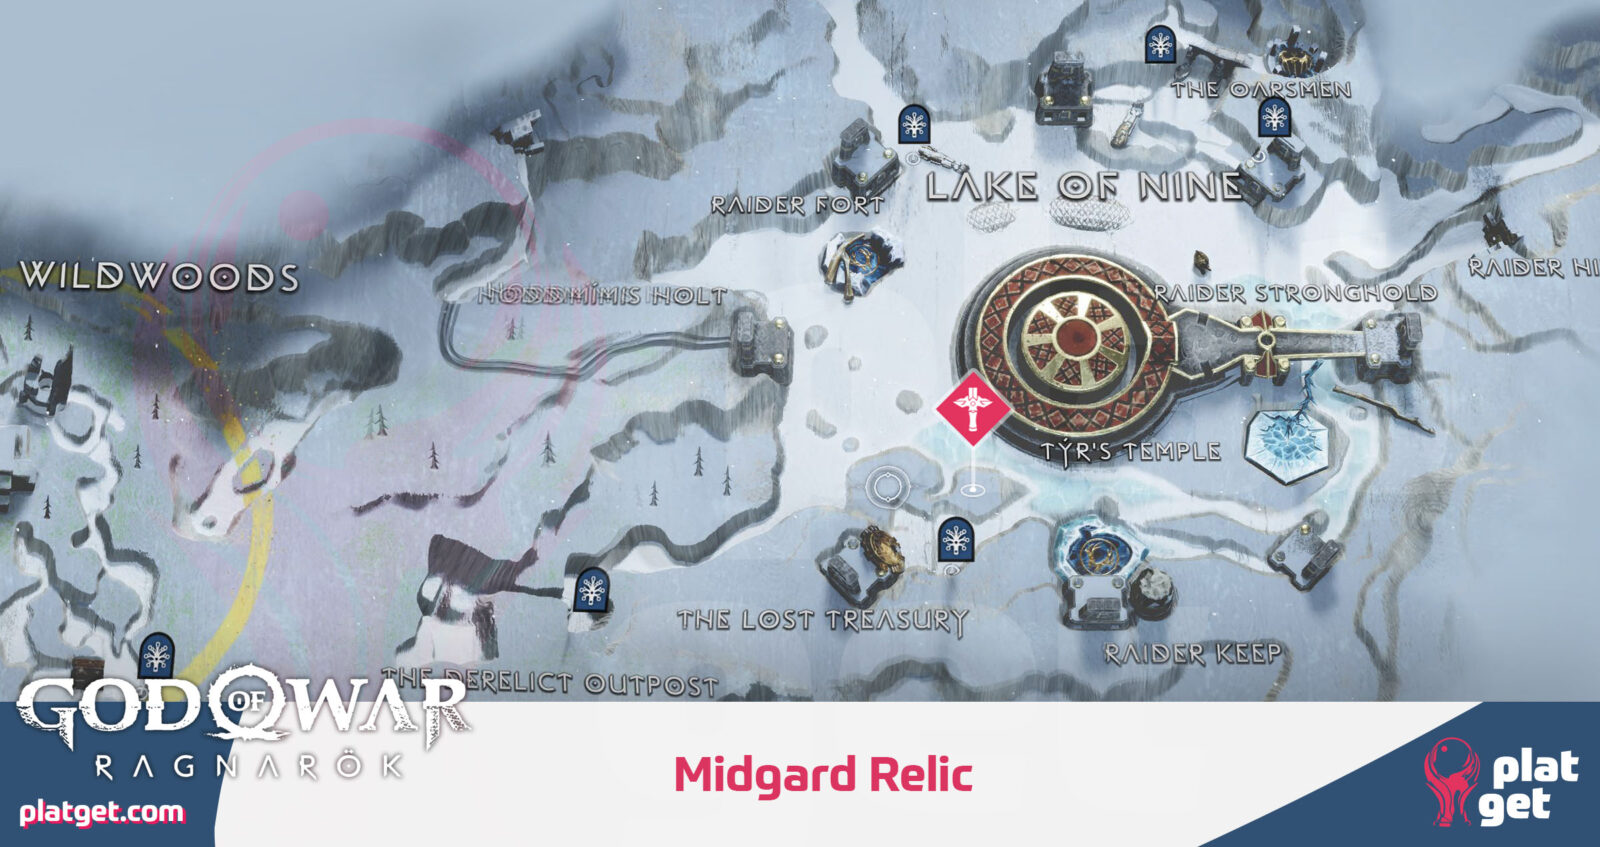
We also have maps for all of the loose Relic Locations; i.e. Relics that you don’t need to craft or receive as a quest reward.
Loose Relic Location Maps

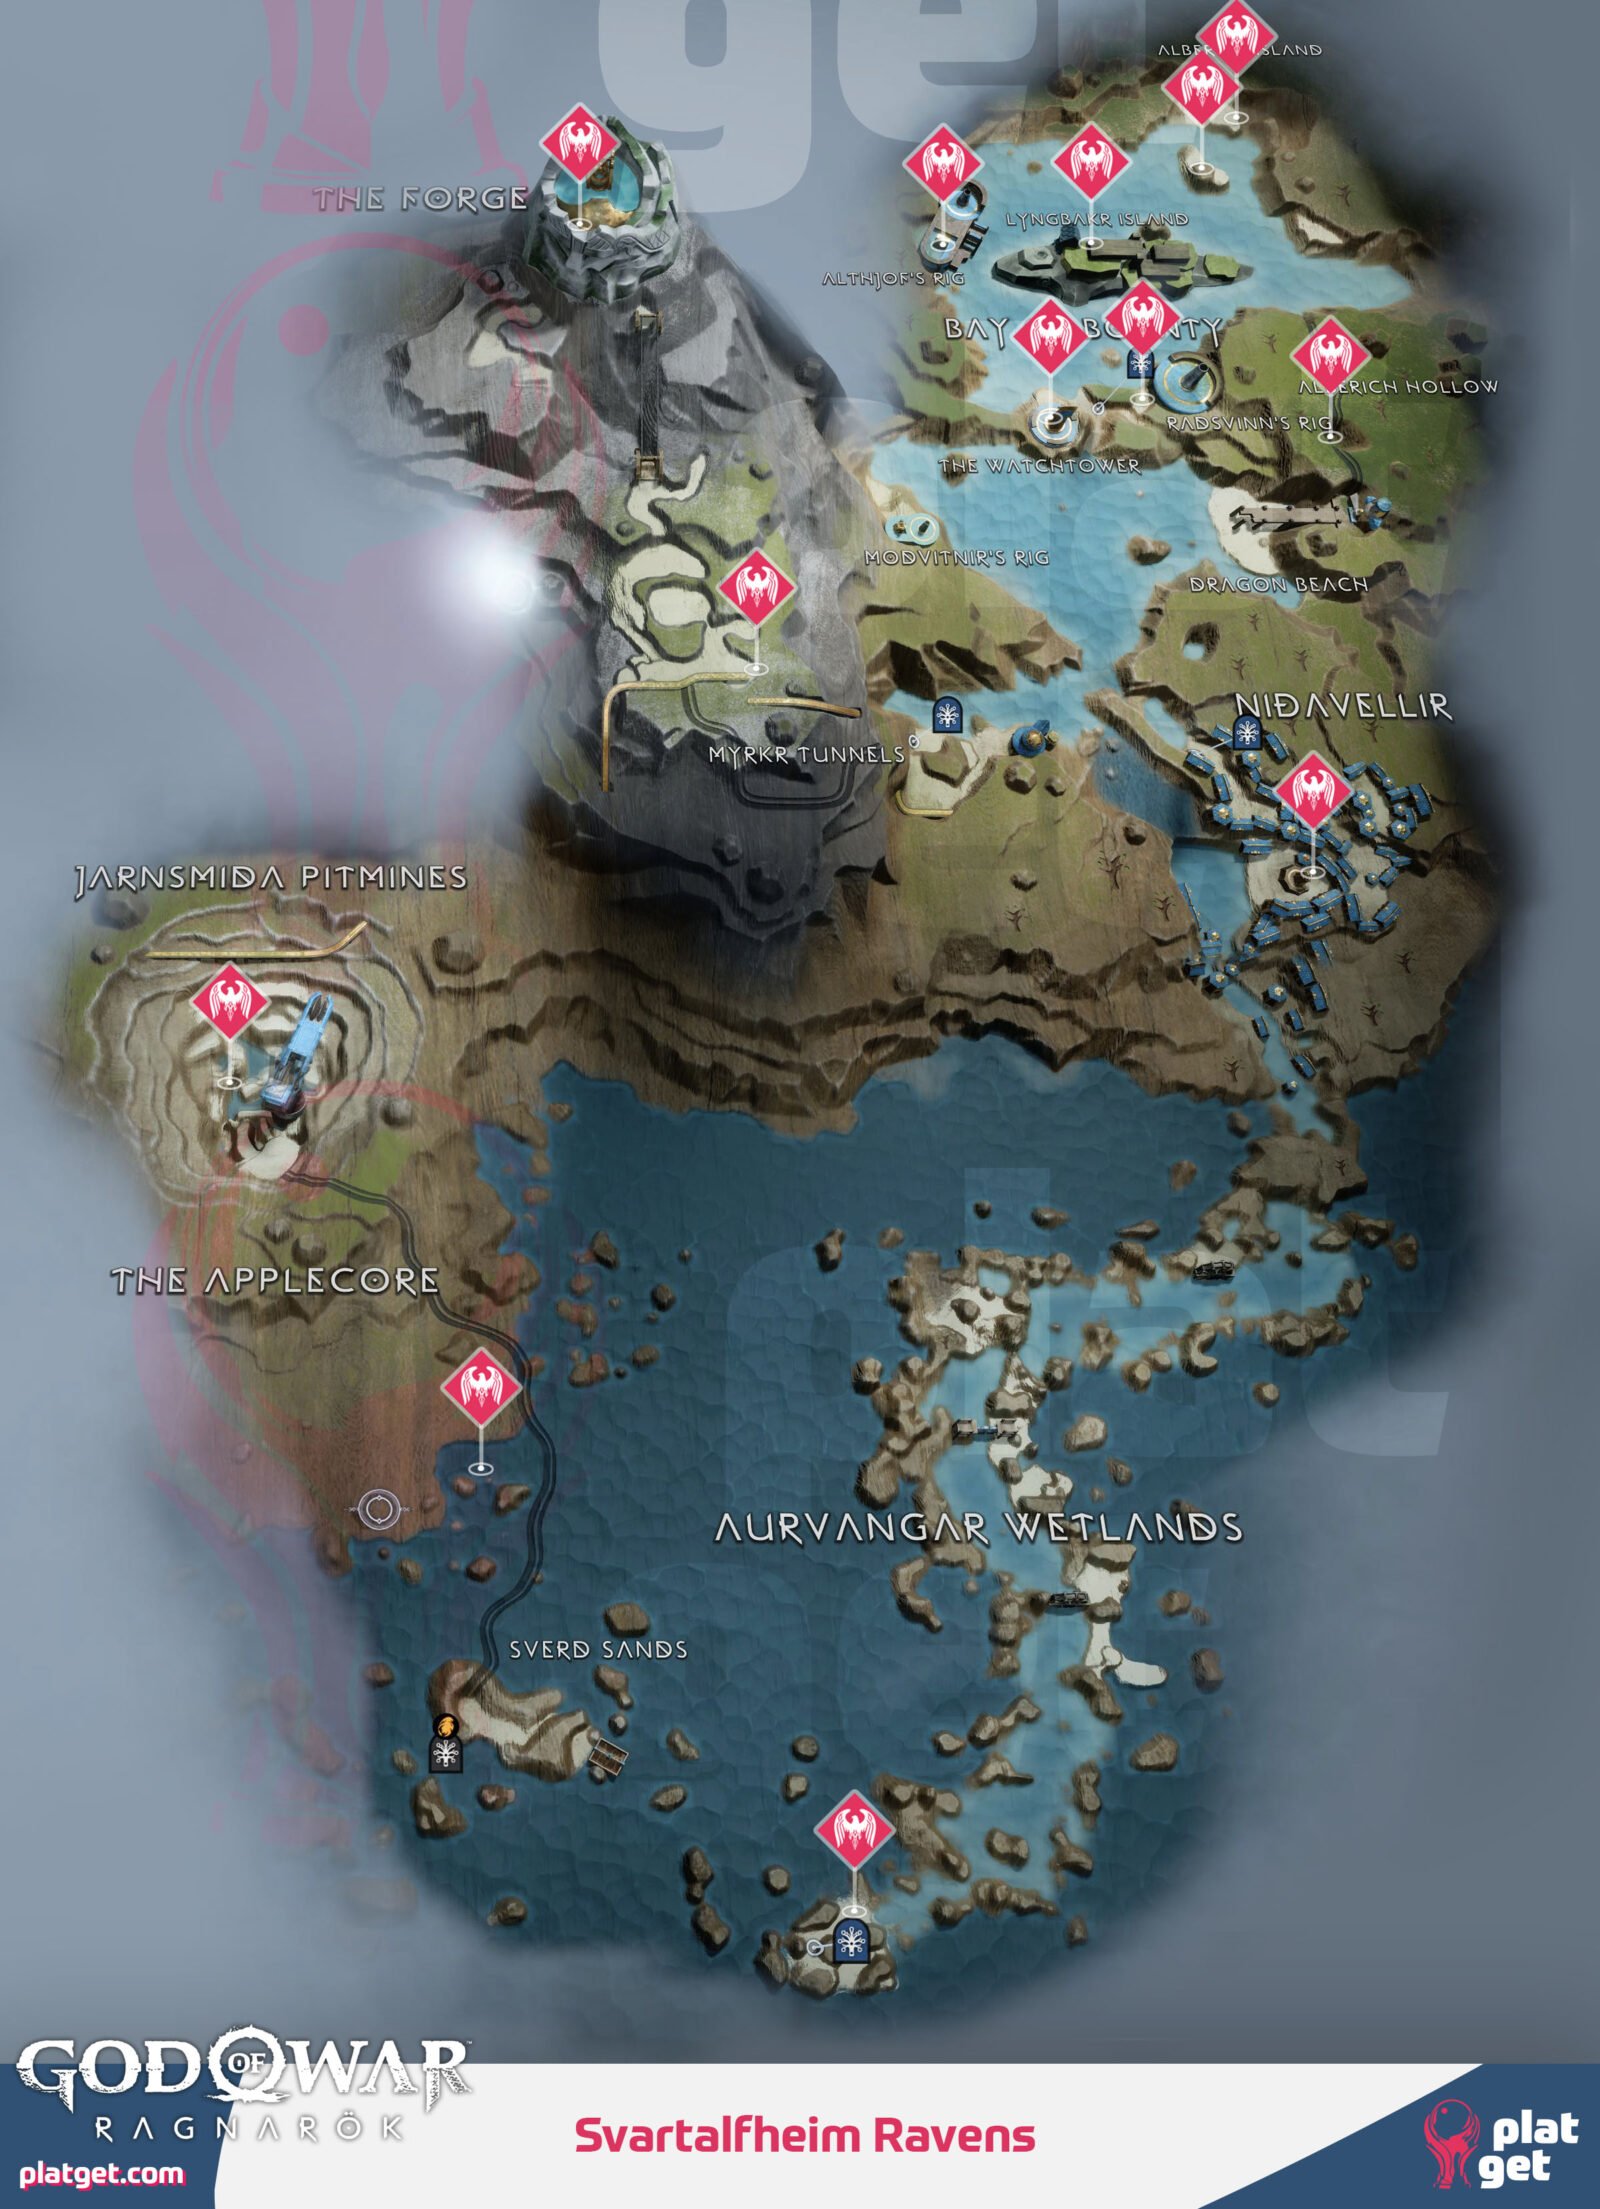
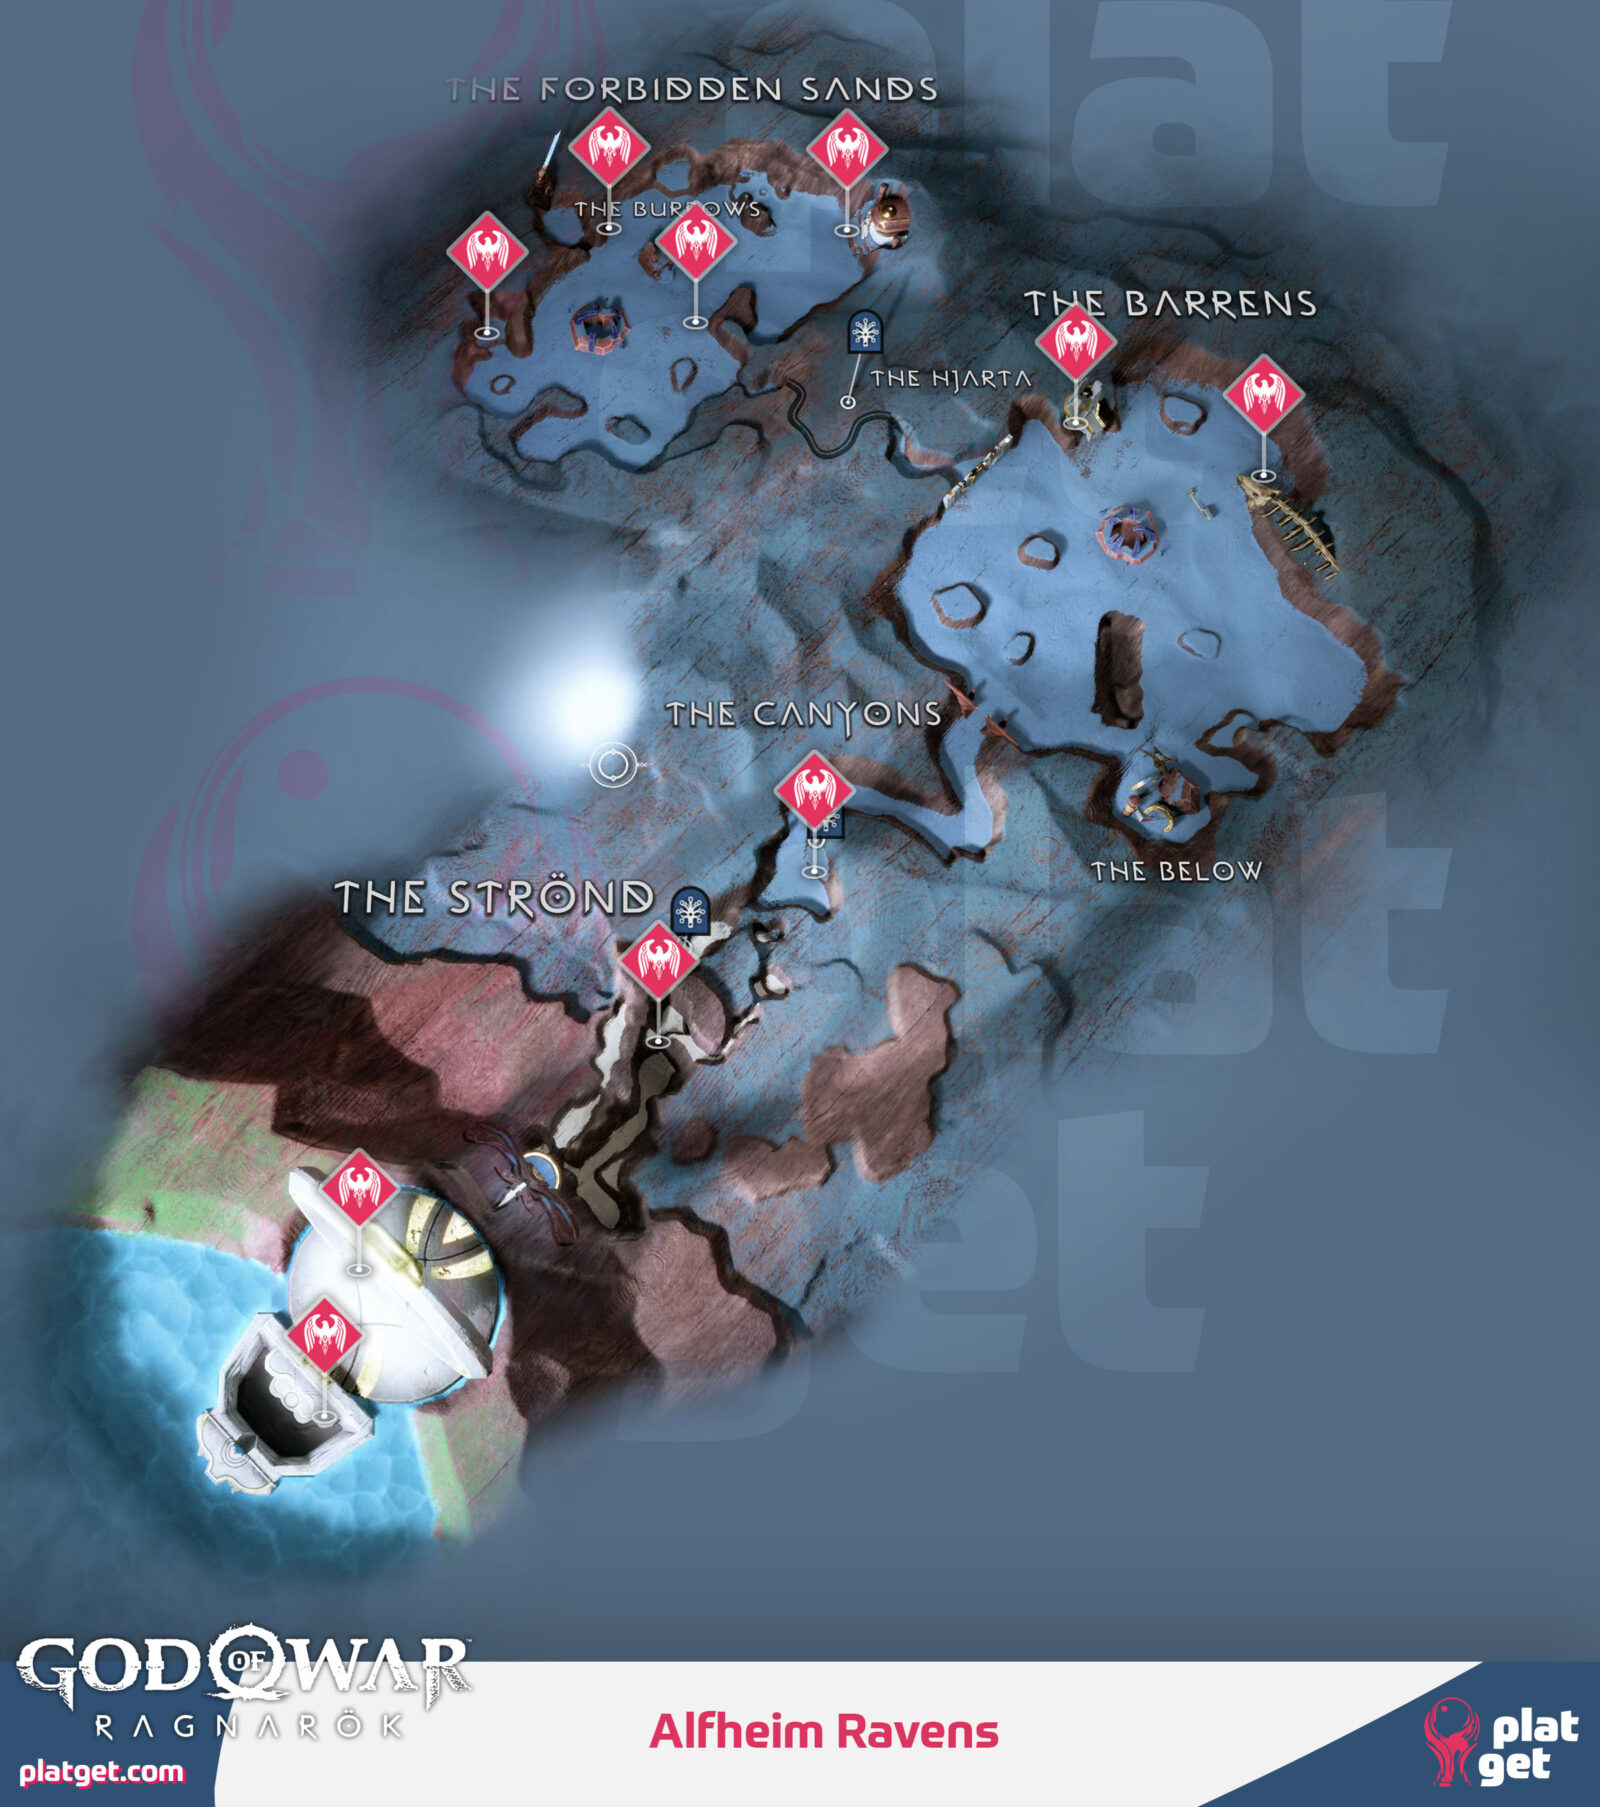
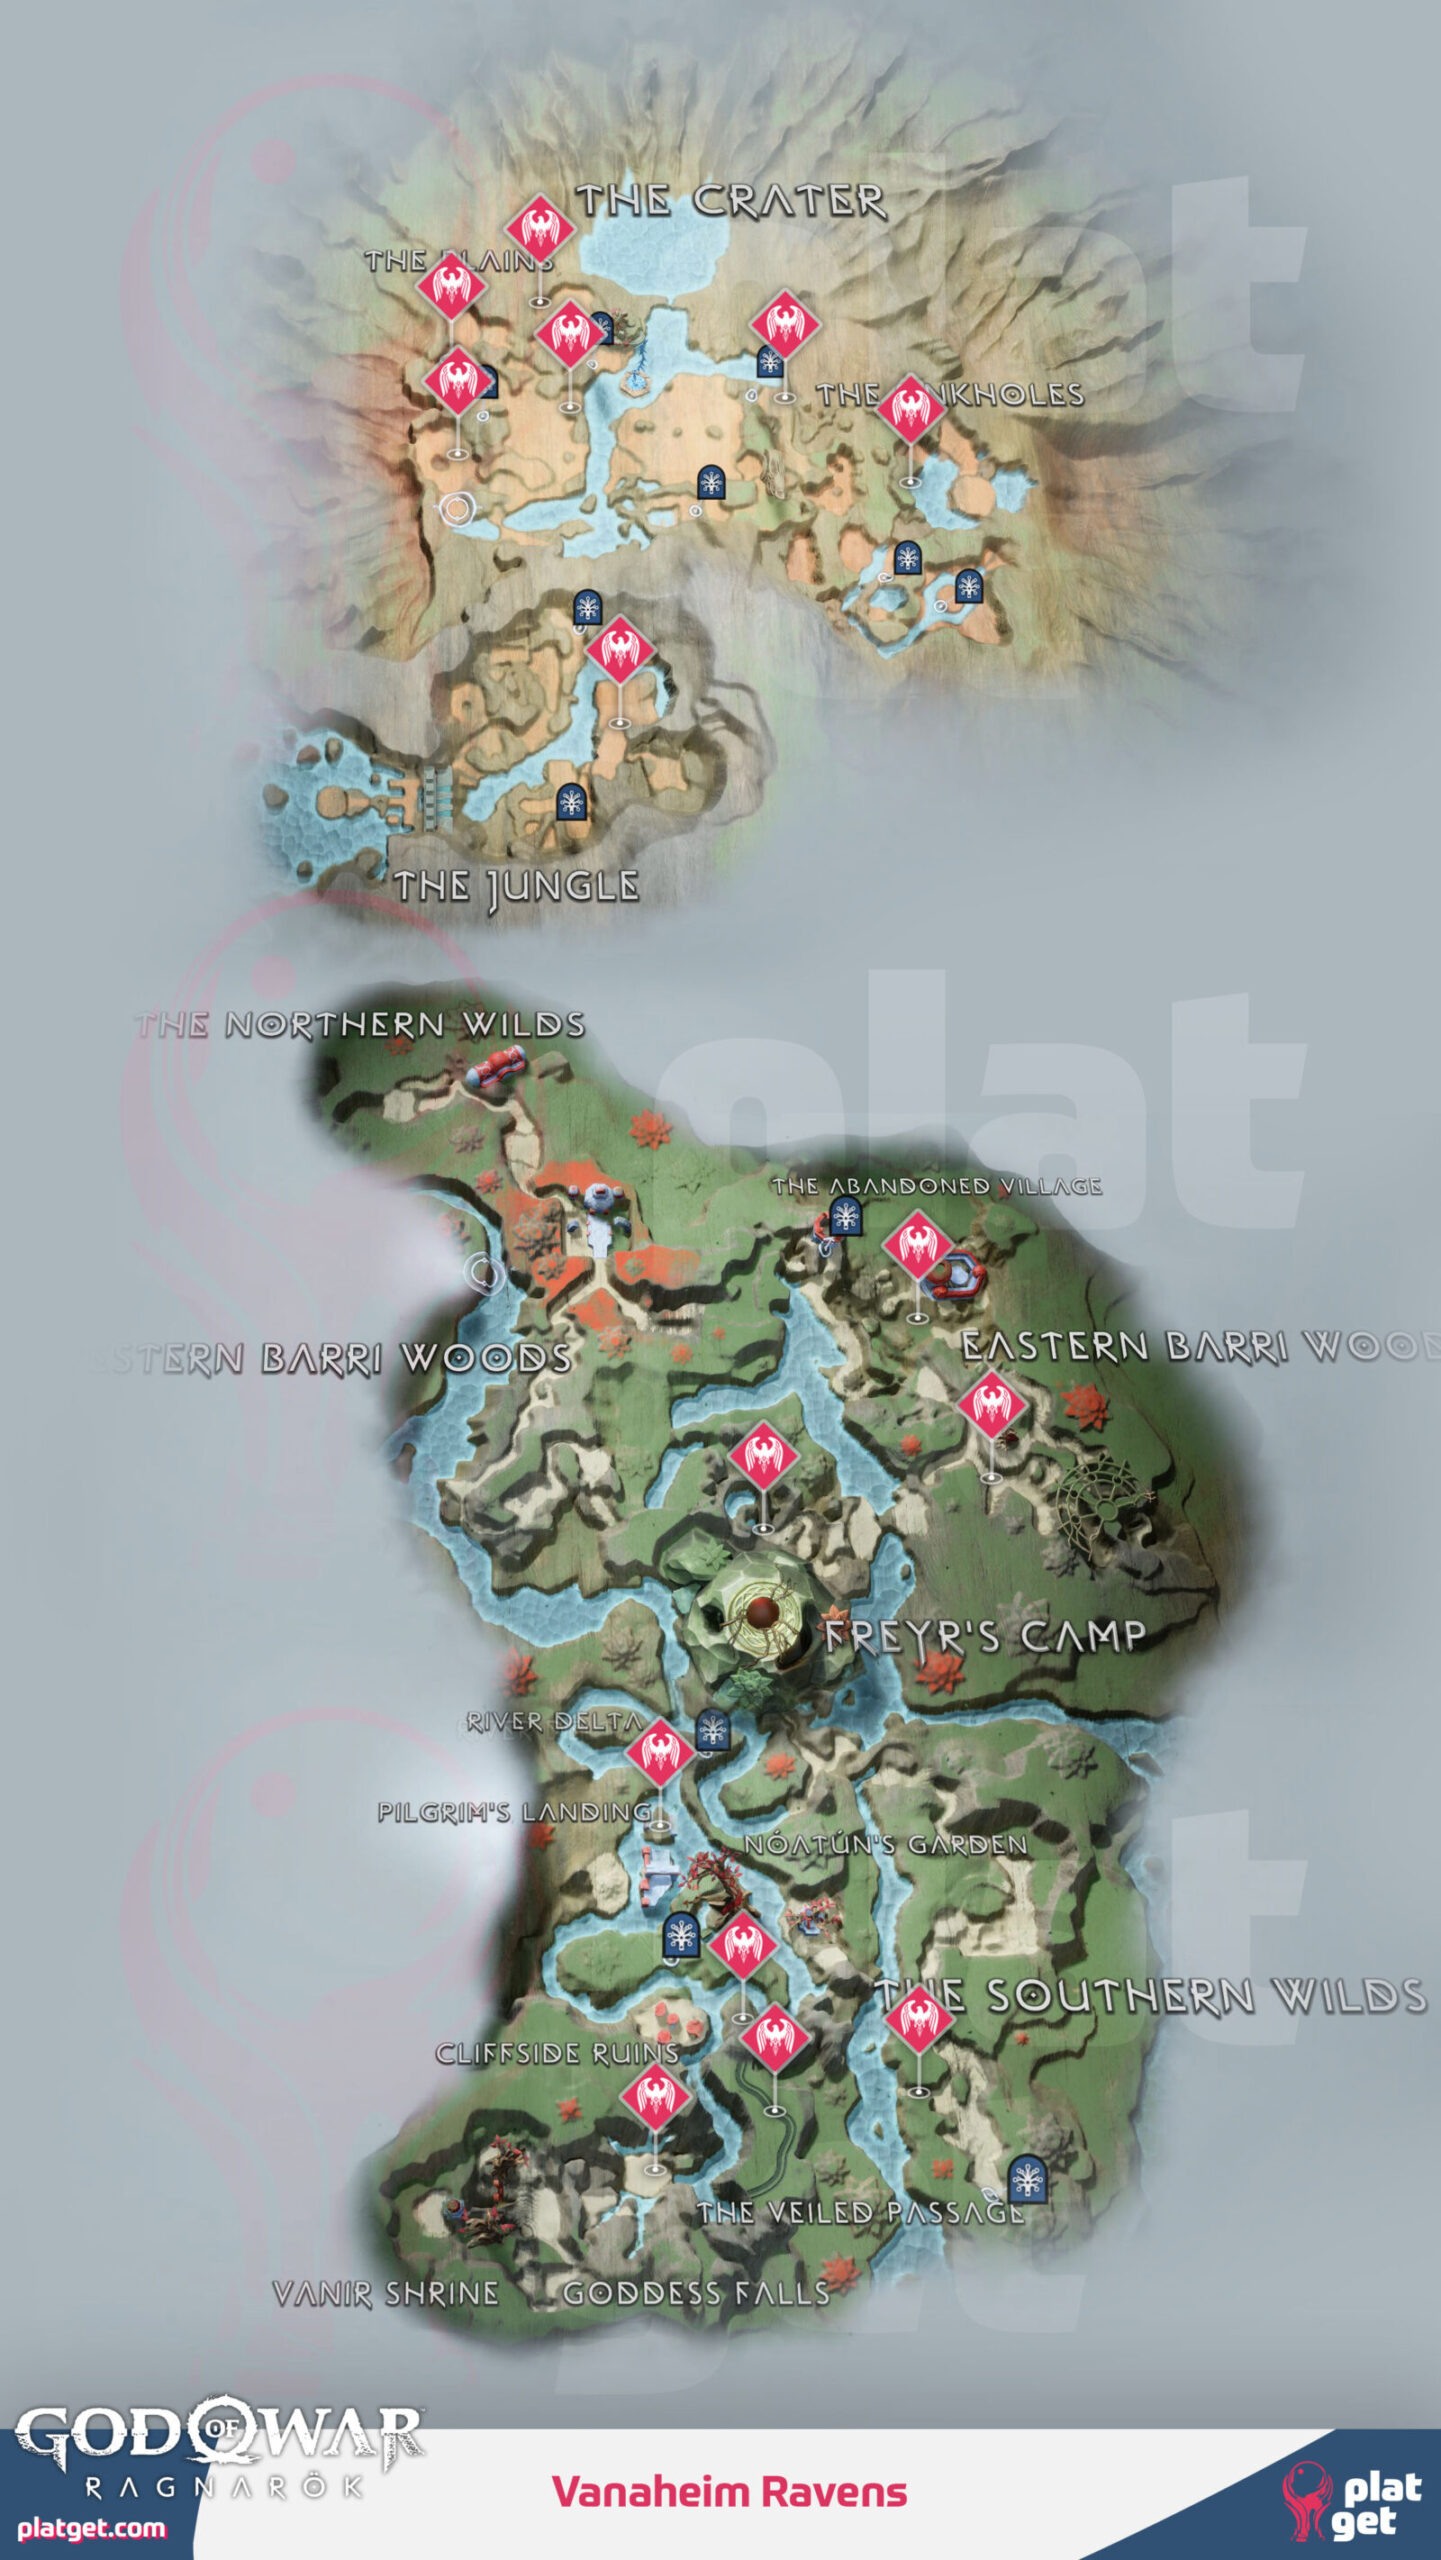
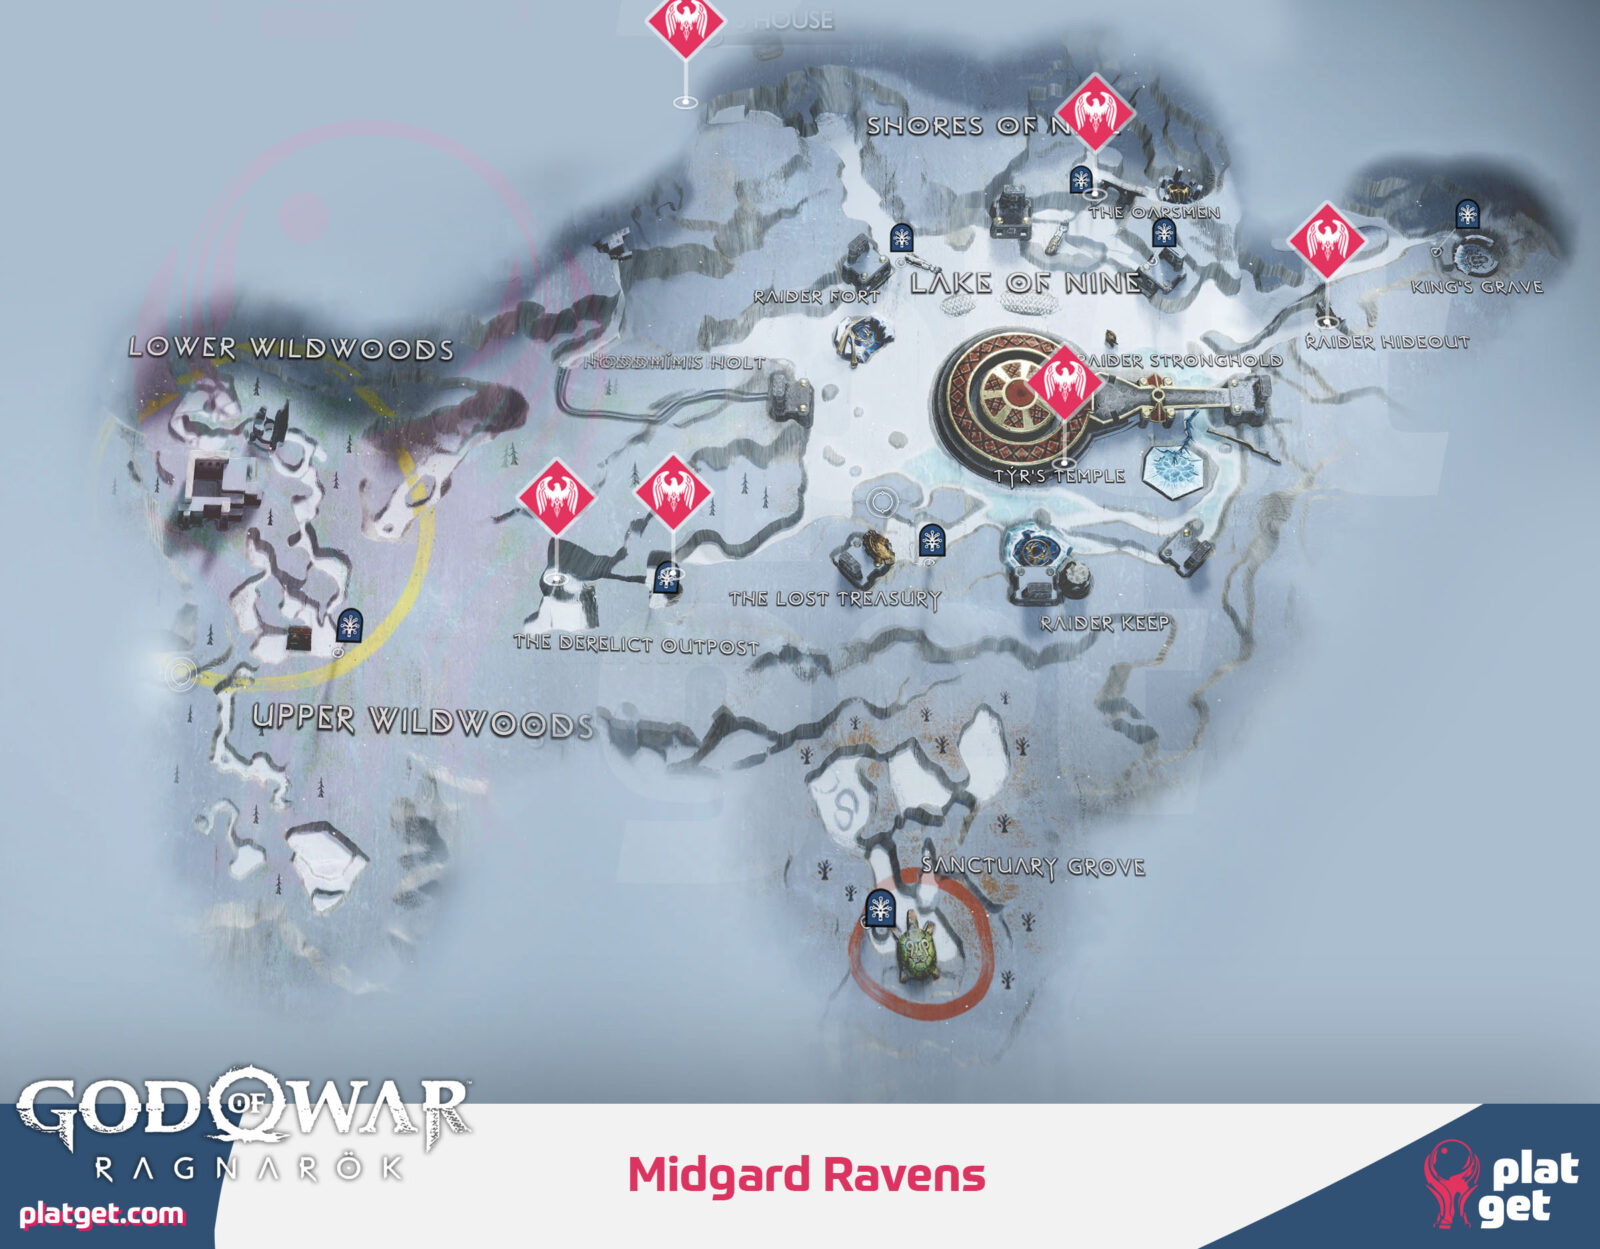
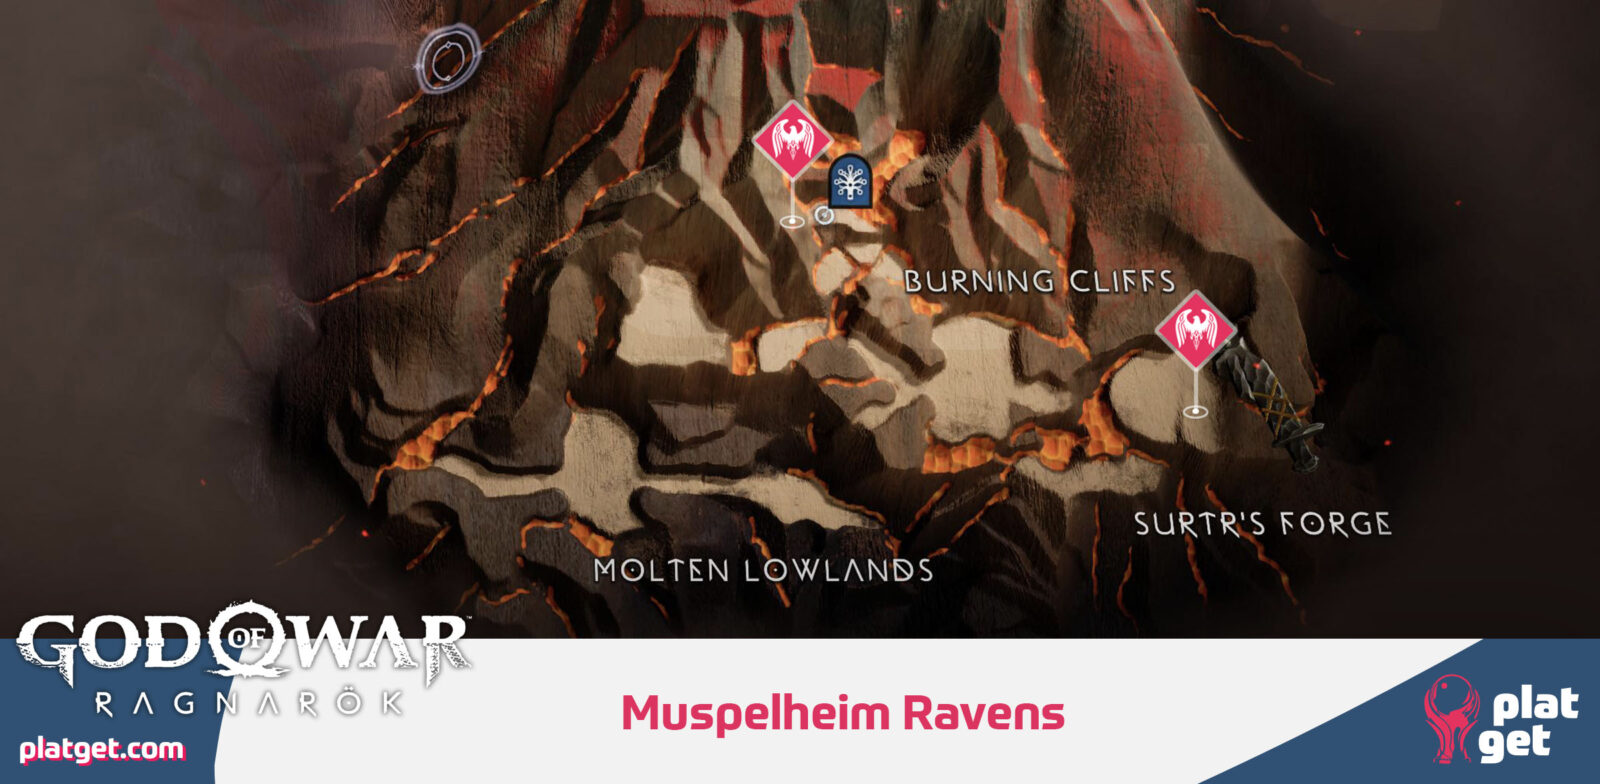
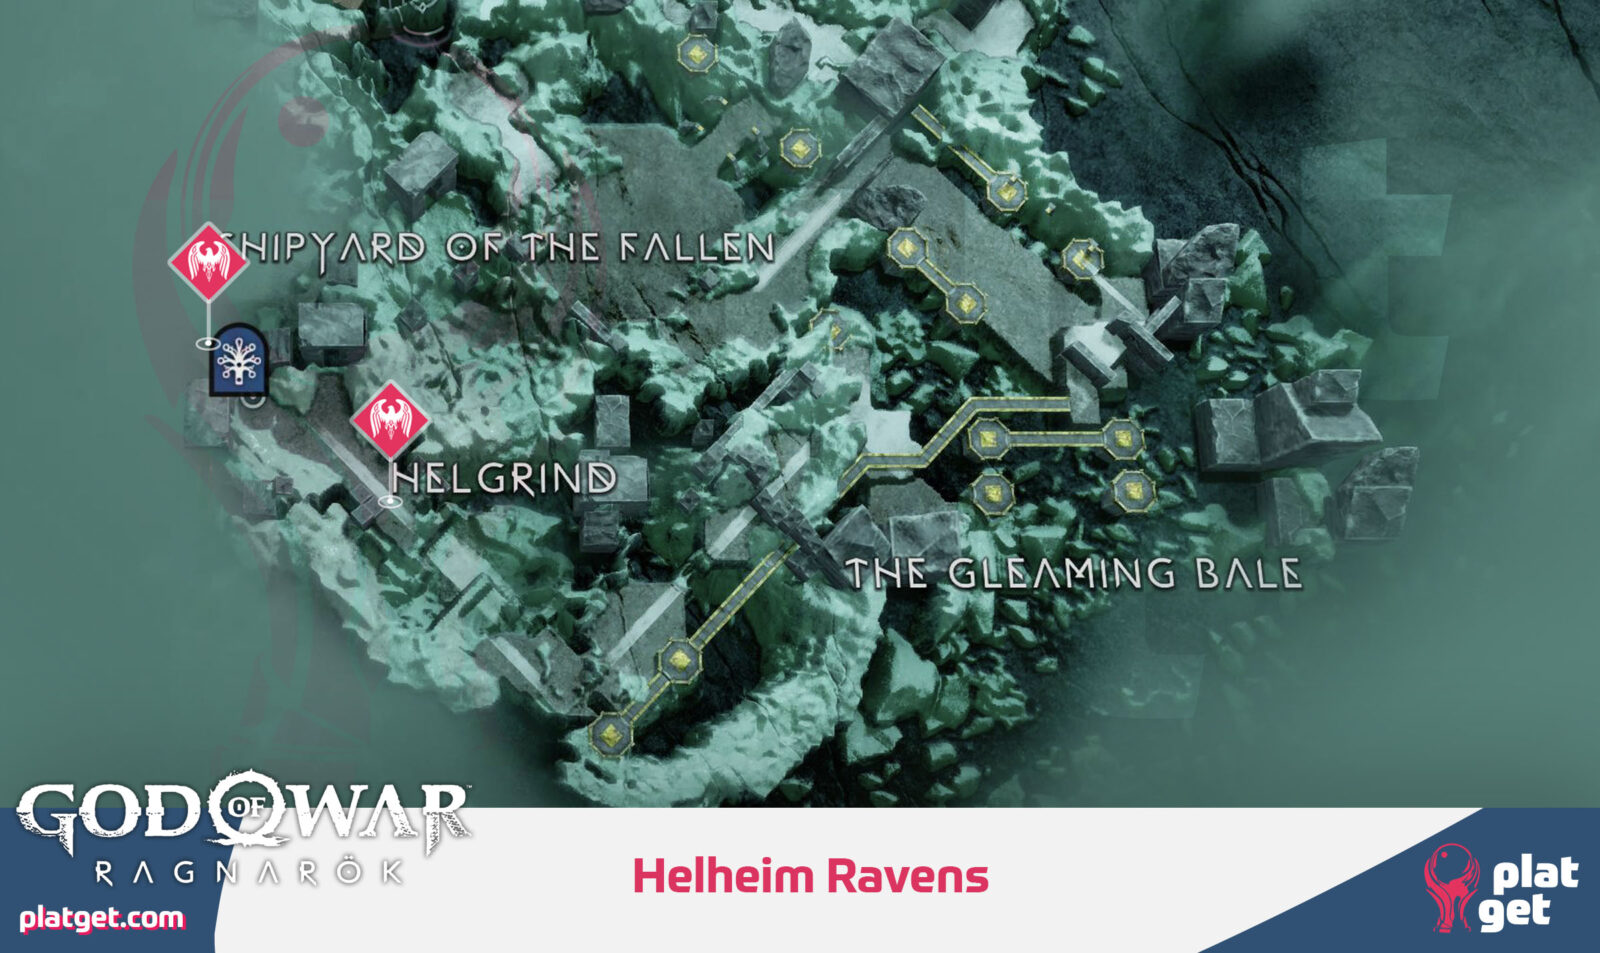
Raven Location Maps
As you will need to open the chests at the Raven Tree for one of the Relics, you’ll need to collect every single Raven too. So here are the 48 Raven locations:
All Relics
You should then be equipped with everything you need to complete your full Relic collection:
| Relic | Acquisition |
|---|---|
| Hilt of Dainsleif | Craft at the Smithy. Requires “Svefnthorn” item dropped by “Ormstunga” boss in Alberich Hollow, Svartalfheim. Also requires Lost Pages. |
| Hilt of Skofnung | Dropped by Berserker Miniboss “Hrolf.” |
| Hilt of Angrvadall | Craft at the Smithy. Requires “Skirnir’s Gambanteinn” item dropped by “Gravel Belly” boss in The Forbidden Sands, Alfheim. Also requires Lost Pages. |
| Hilt of Ridill | Craft at the Smithy. Requires “Crackle of Bilskirnir” item dropped by “Olaf Nautson” boss on the Lake of the Nine, Midgard. Also requires Lost Pages. |
| Glaive of Dodher | Received unavoidably via Story Progress. |
| Huldra Project #9 | Craft at the Smithy. |
| Mystical Heirloom | On the ground in the Lake of the Nine, Midgard. Loose Relic Location Maps. |
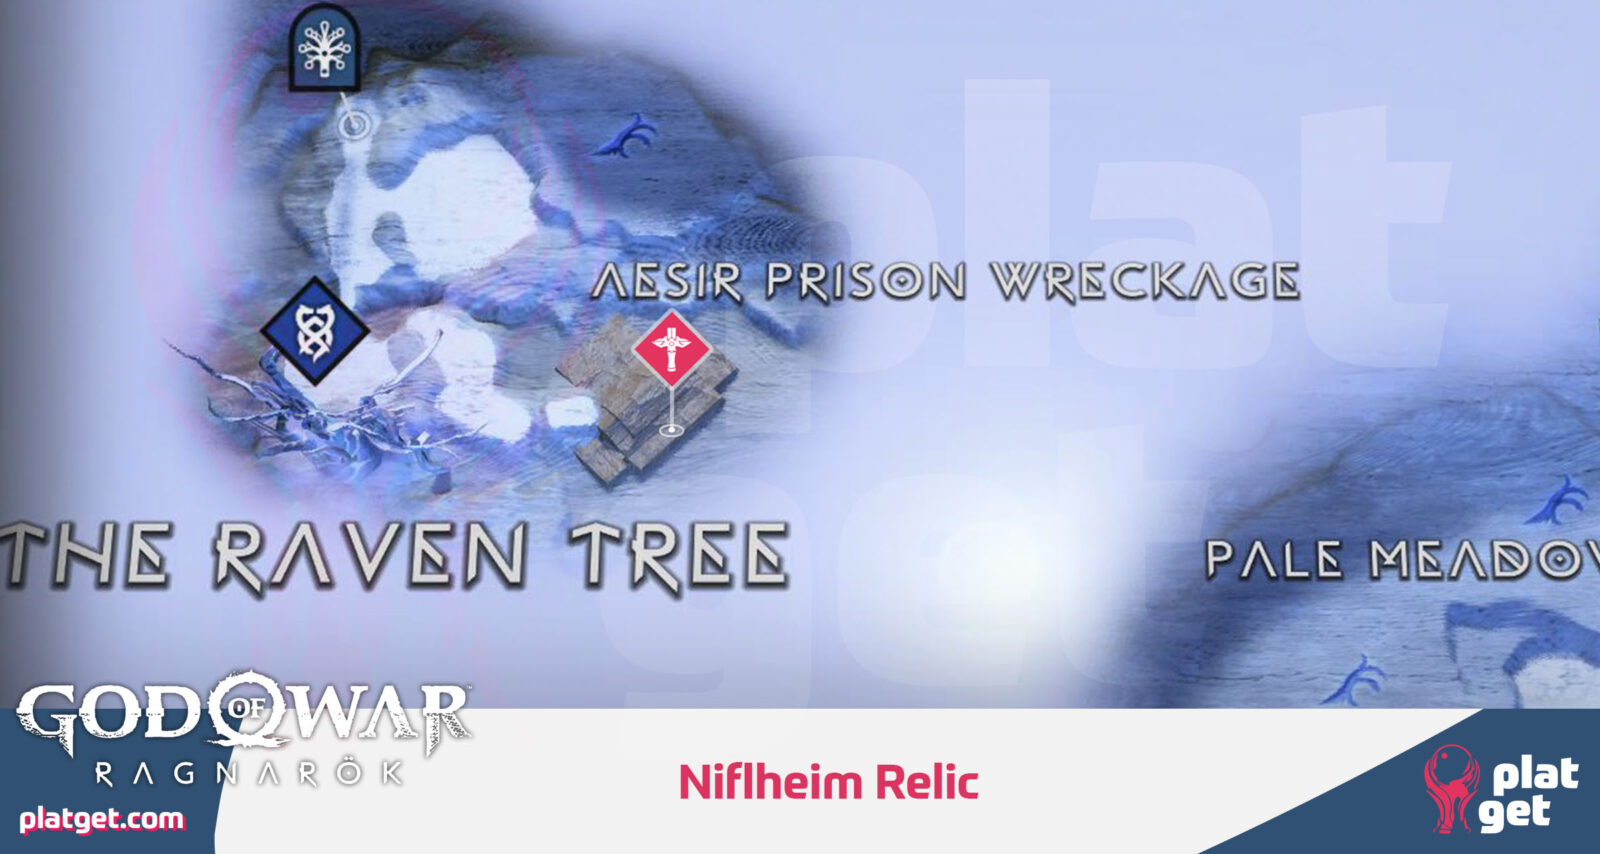
| Hilt of Forsbrandr | Destroy all 48 Ravens in the game then open the Chests at the Raven Tree in Niflheim. |
| Hilt of Tyrfing | Craft at the Smithy. Requires “Nar’s Cup” item dropped by “Blatonn” boss in The Abandoned Village, Svartalfheim. Also requires Lost Pages. |
| Talisman of Meign | Received unavoidably via Story Progress. |
| Hilt of Garm | In a Legendary Chest in the Temple of Light, Alfheim. Loose Relic Location Maps. |
| Hilt of Hrotti | Kill two of the three “Oath Guard” minibosses in The Plains, Vanaheim. |
| Motsognir’s Call | In the Niflheim Prison. Loose Relic Location Maps. |
| Hilt of Hofud | Received unavoidably via Story Progress. |

The Curator
Collect all of the Artifacts
To unlock the “The Curator” trophy, you will need to find and collect all 38 Artifacts as well as completing all of the “Casualty of War” Favors in The Crater Region of Vanaheim to retrieve the 10 related artifacts.
Artifacts have a purple glow and are typically found on the ground in plain sight.
Use the maps below to find and collect all 38 Artifacts (the 10 Vanaheim Casualty of War items are marked too!):
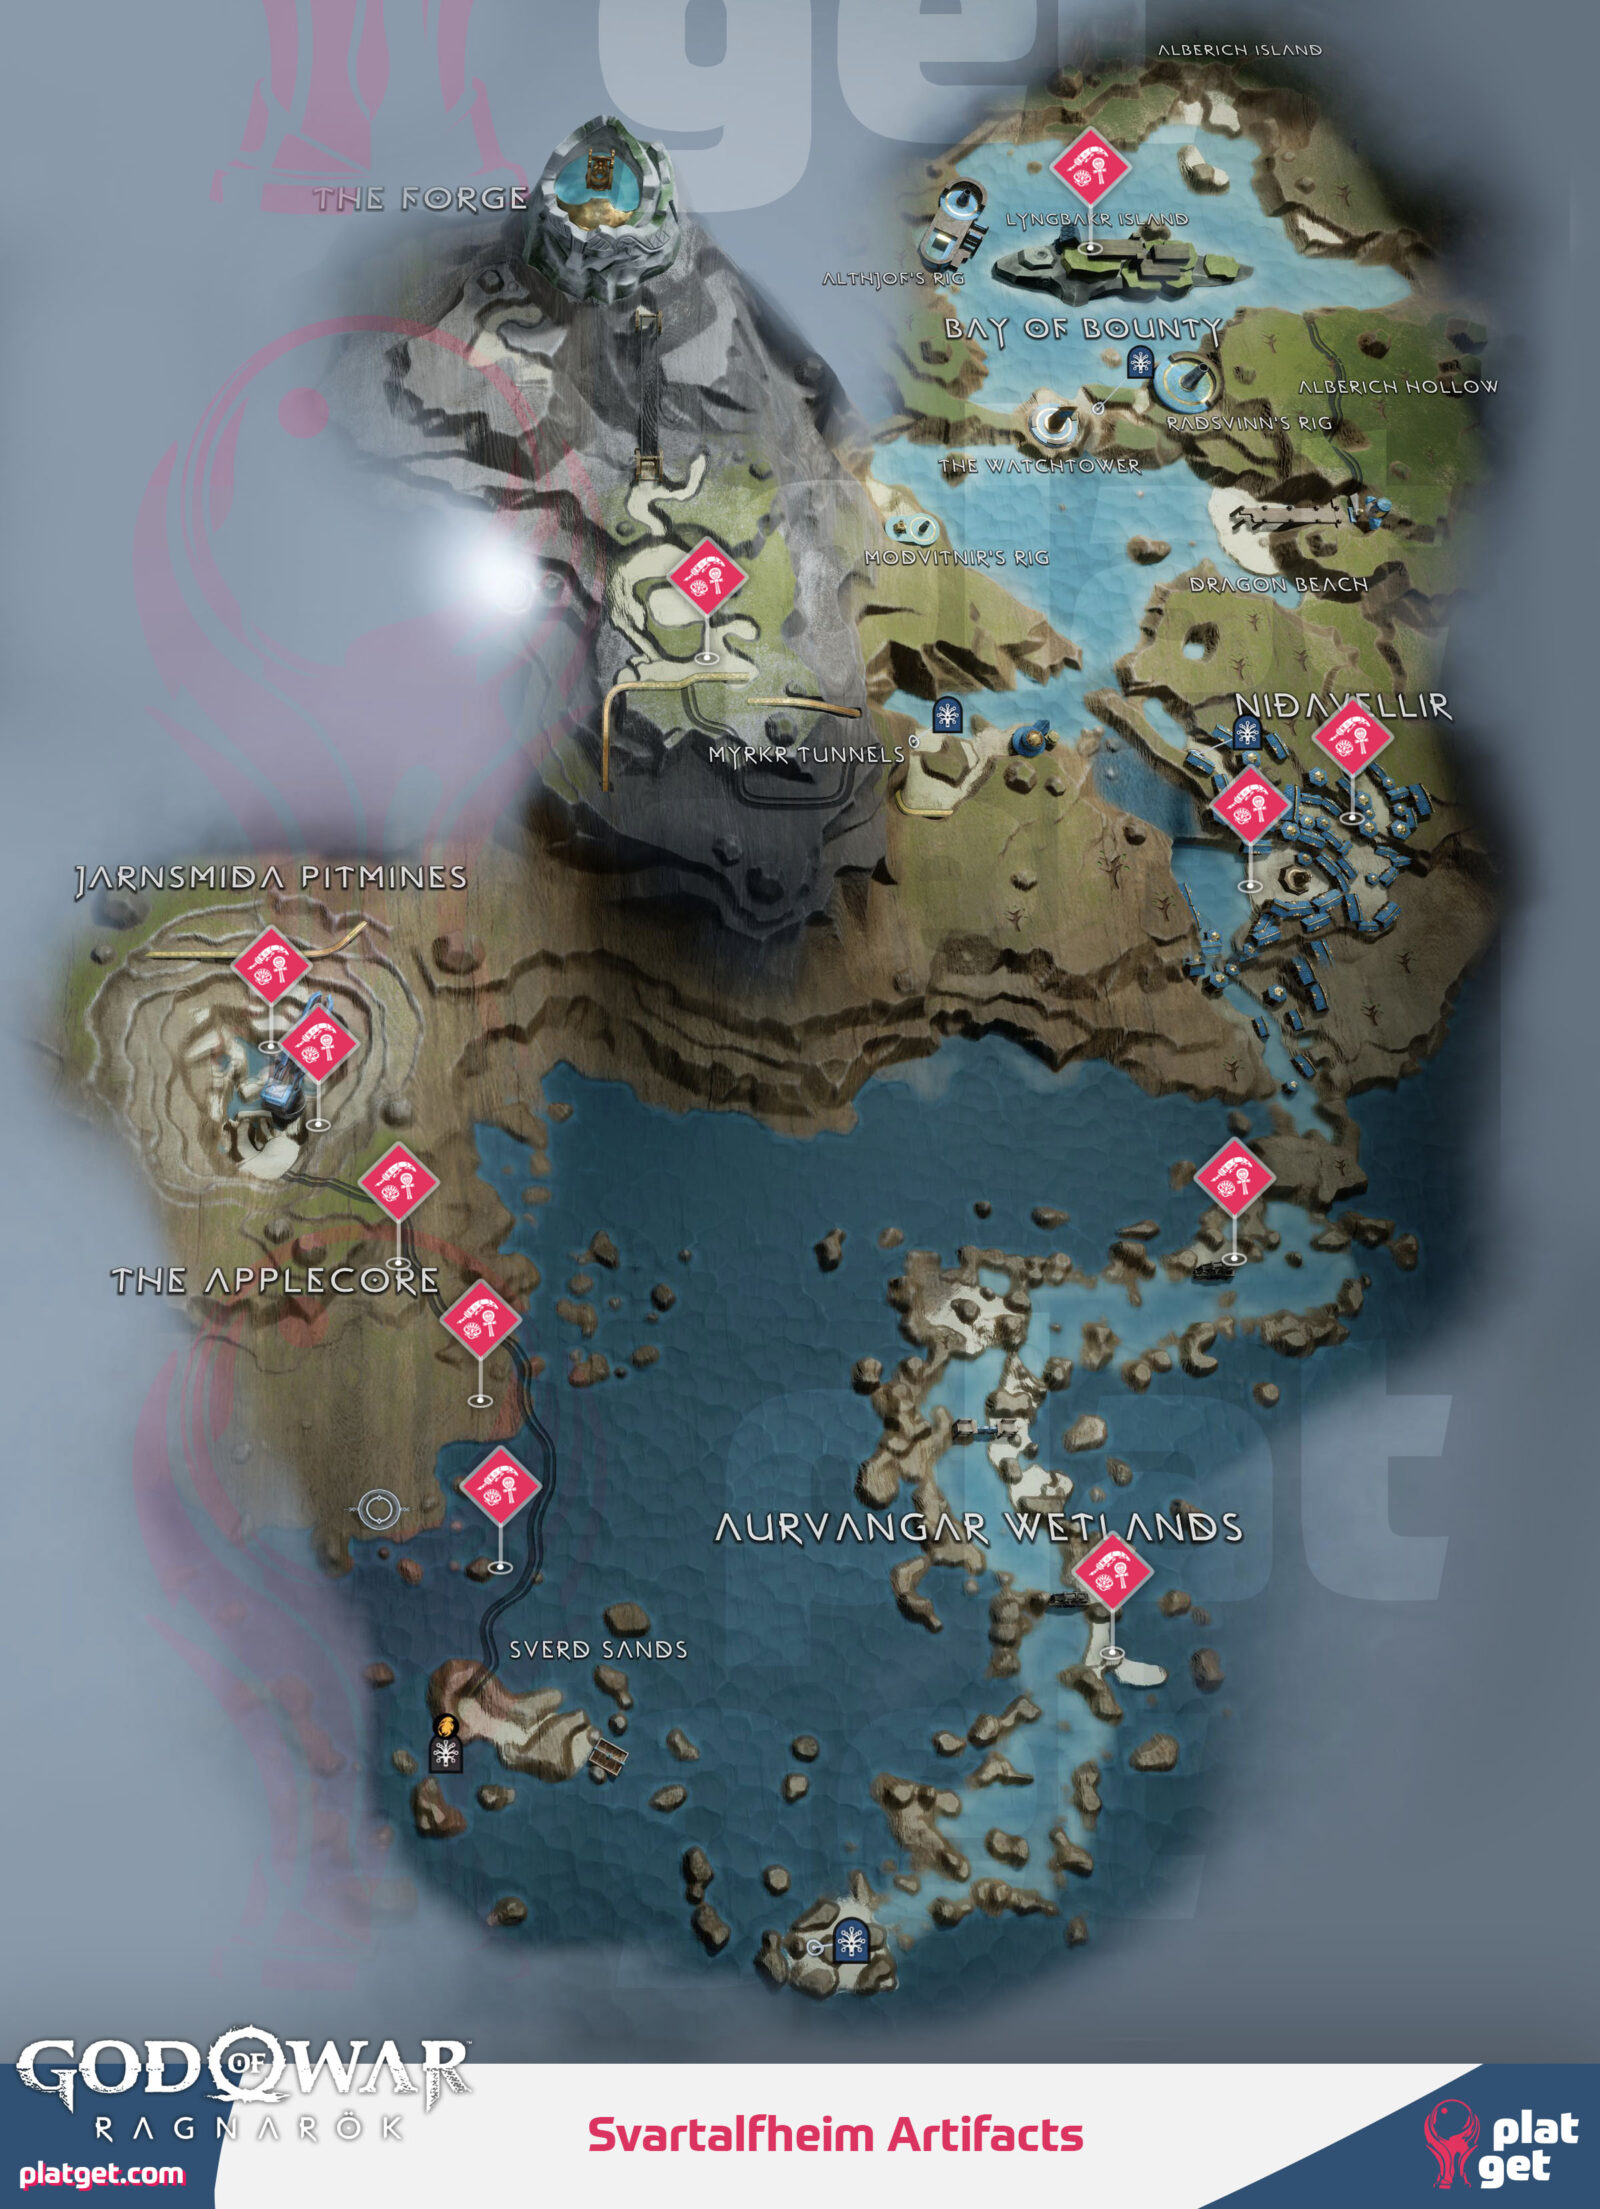
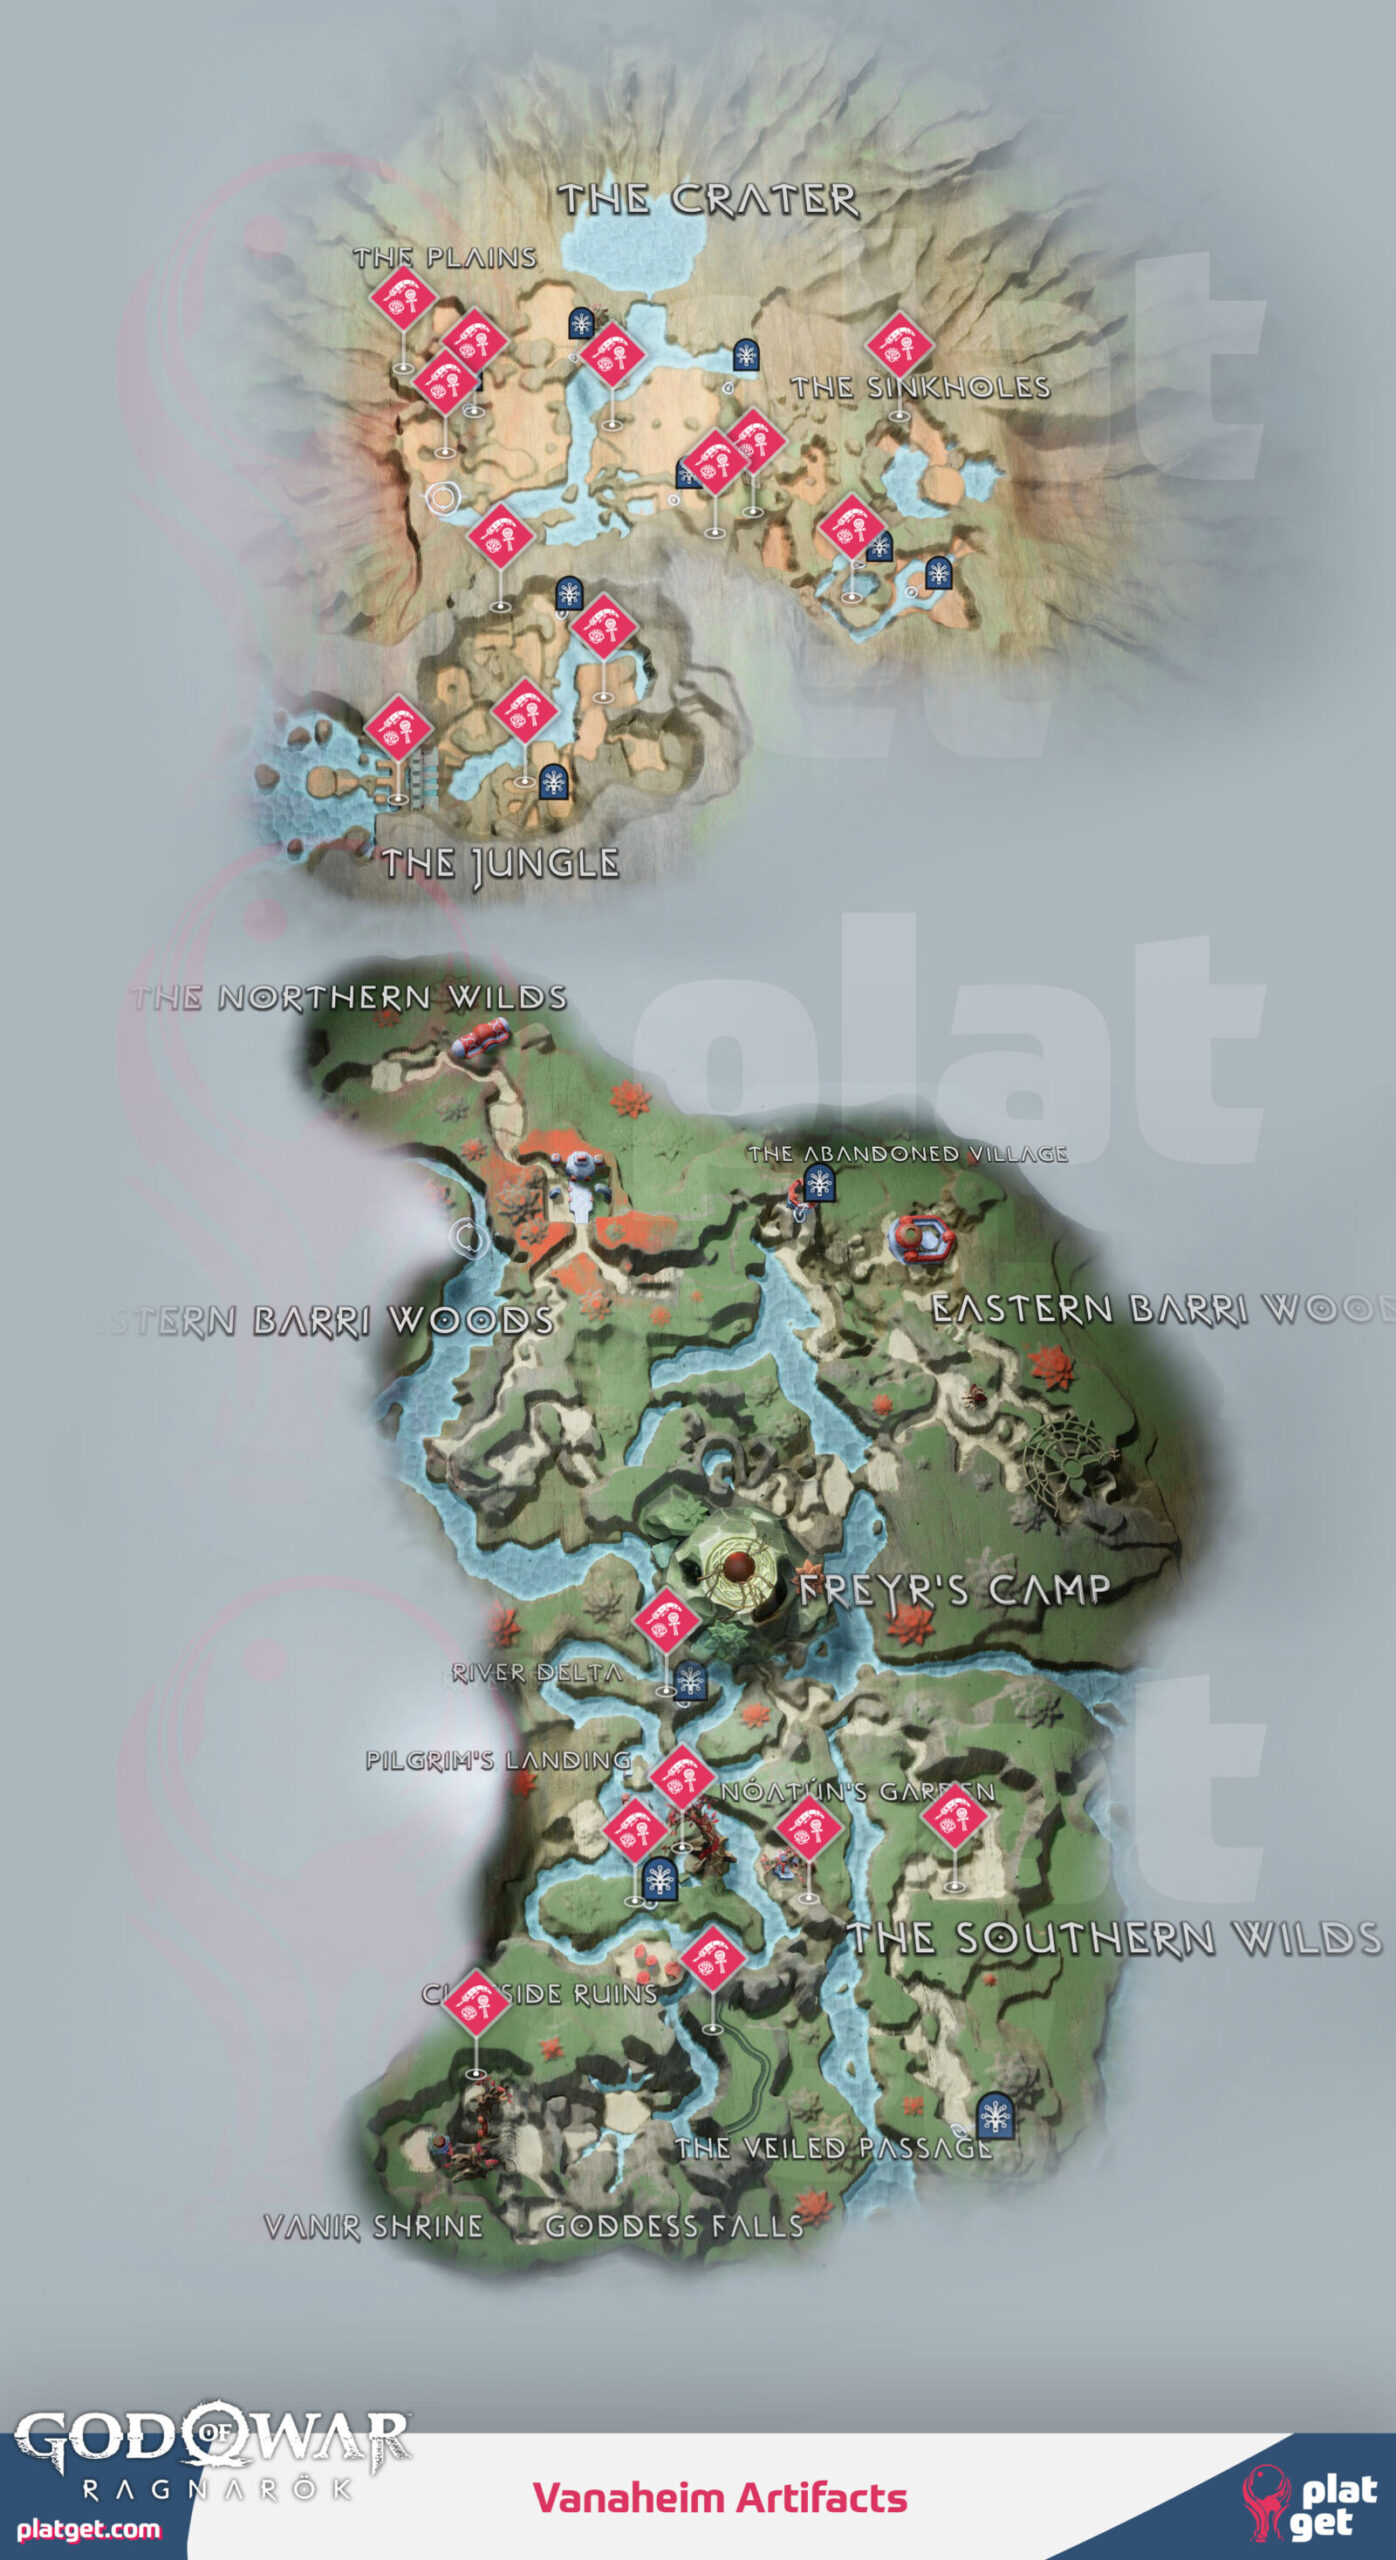
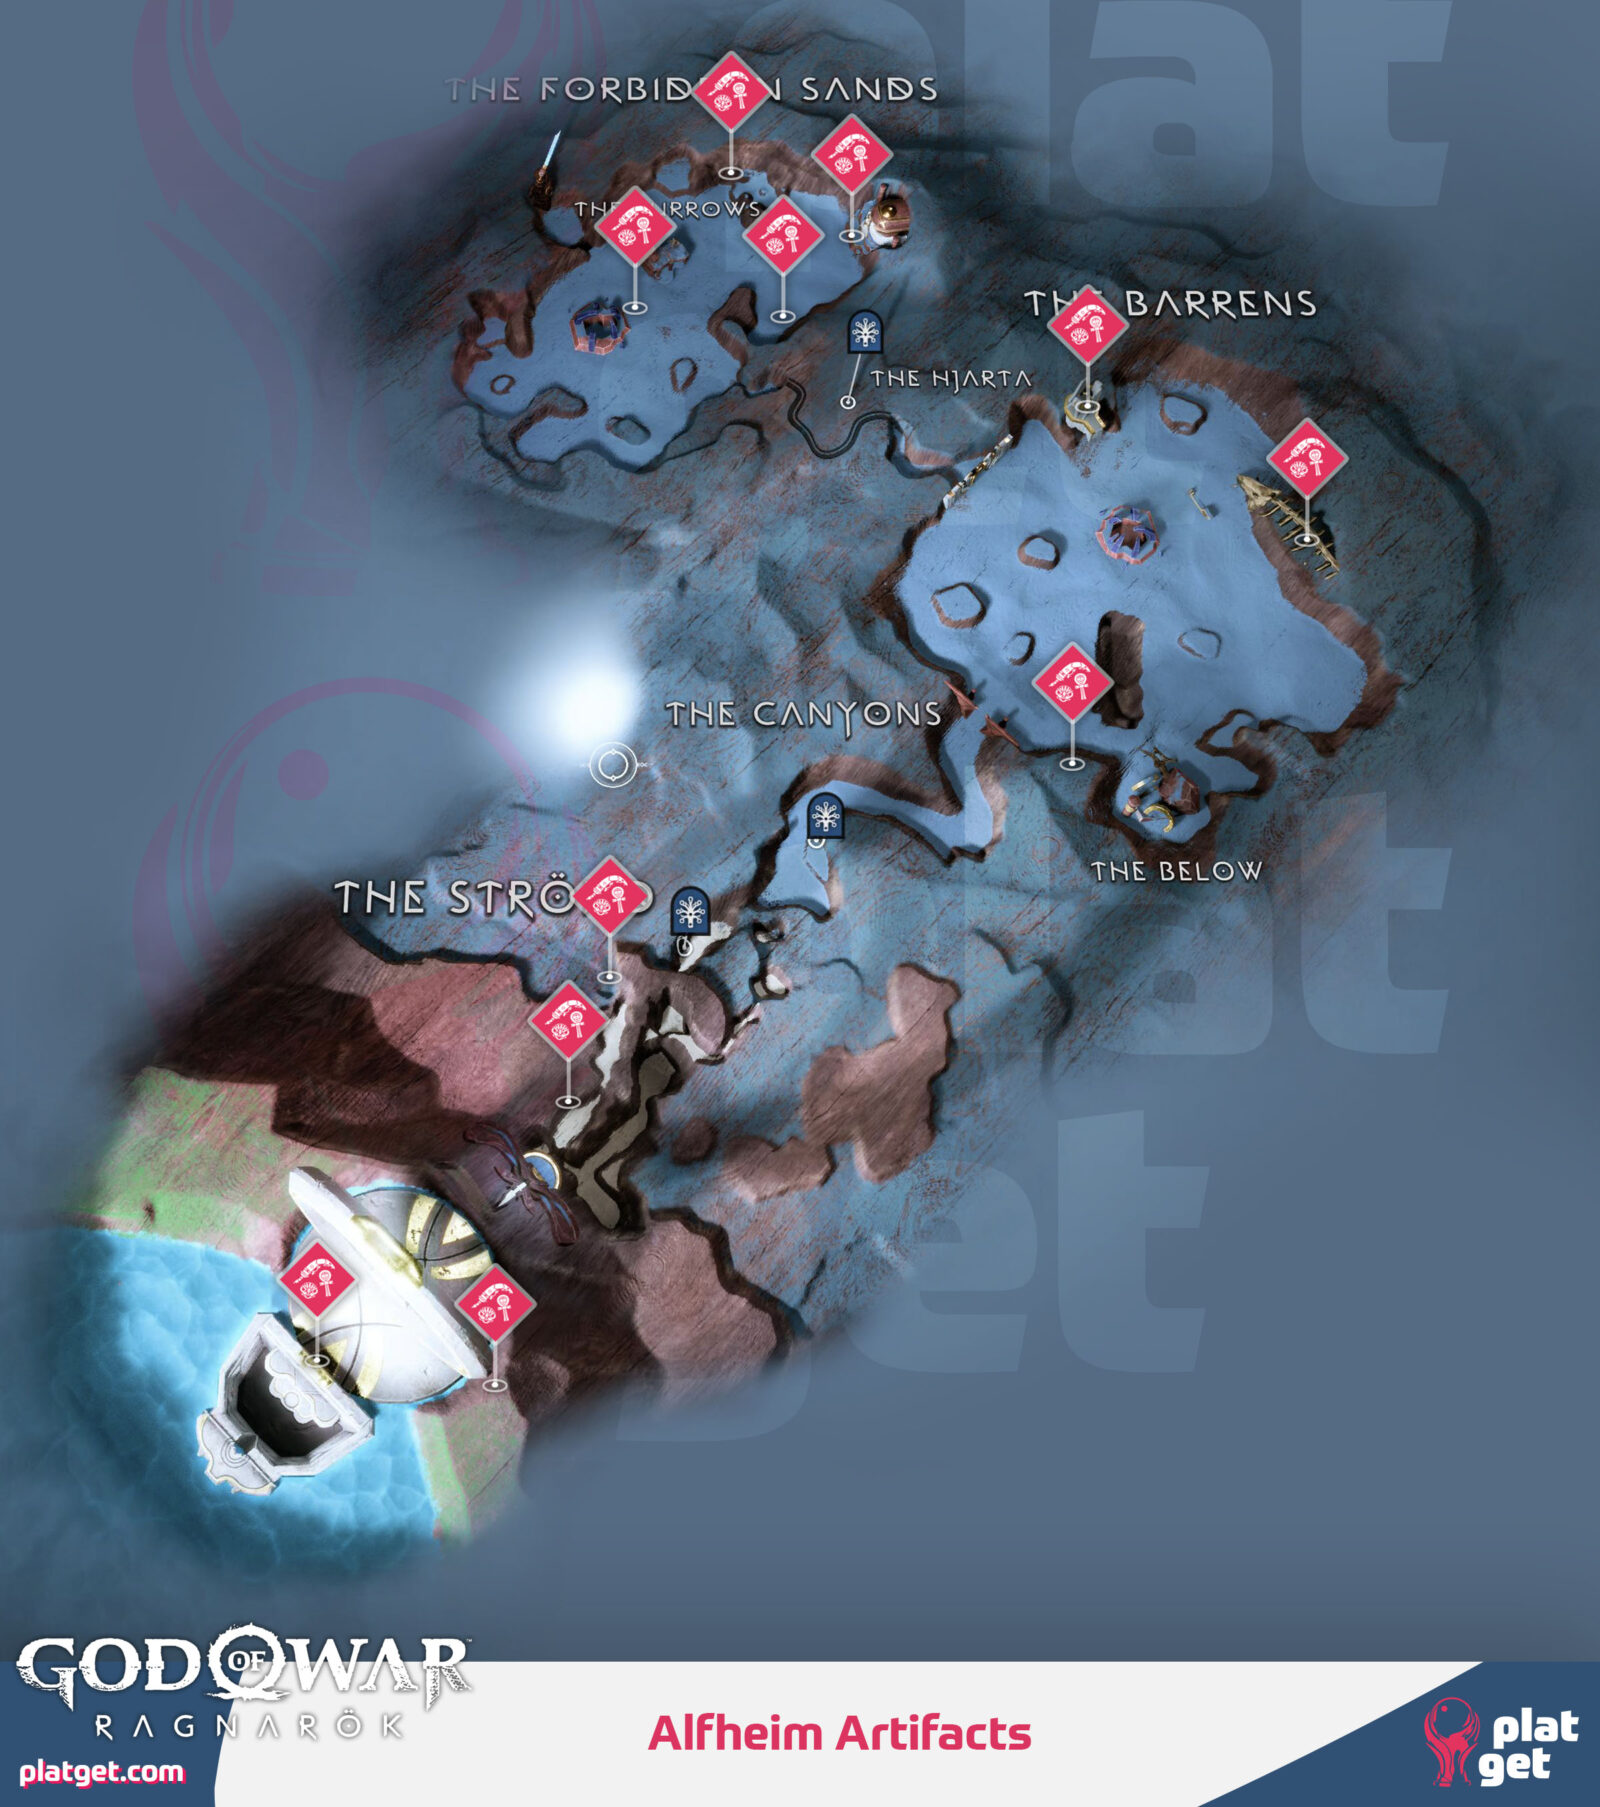
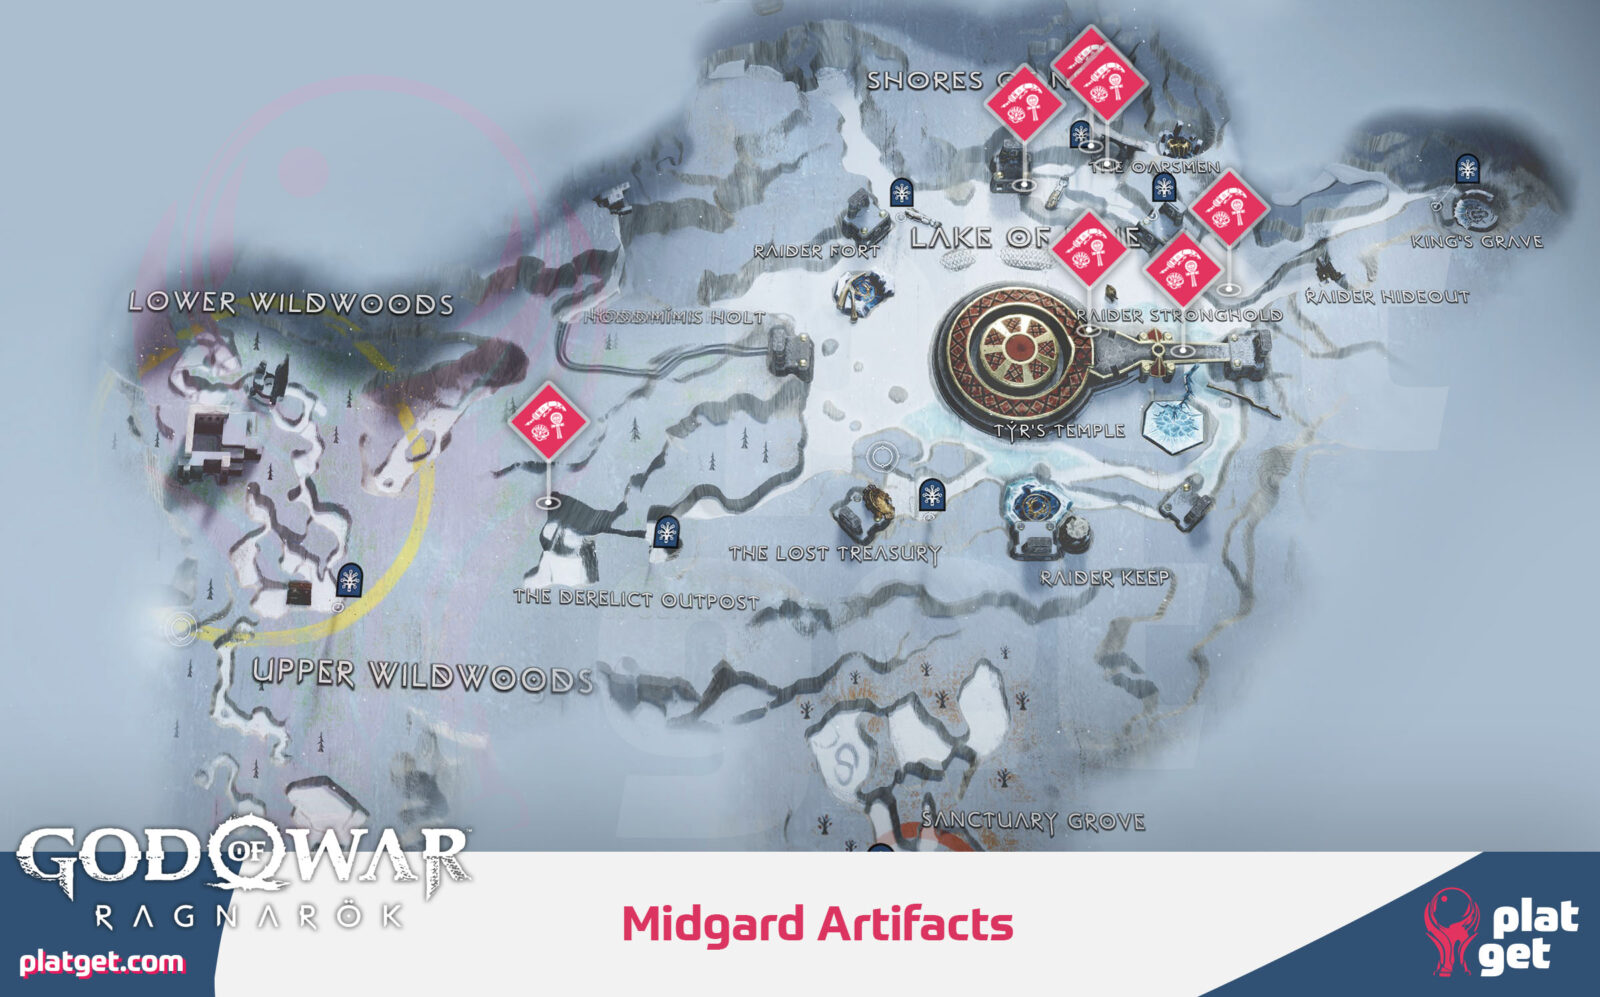
Once you have all 38 Artifacts, including Kvasir’s 14 Poems, and have also collected all 10 Items from the 5 Casualty of War Favors, you will unlock the “The Curator” trophy.
Gear & Upgrade Trophies

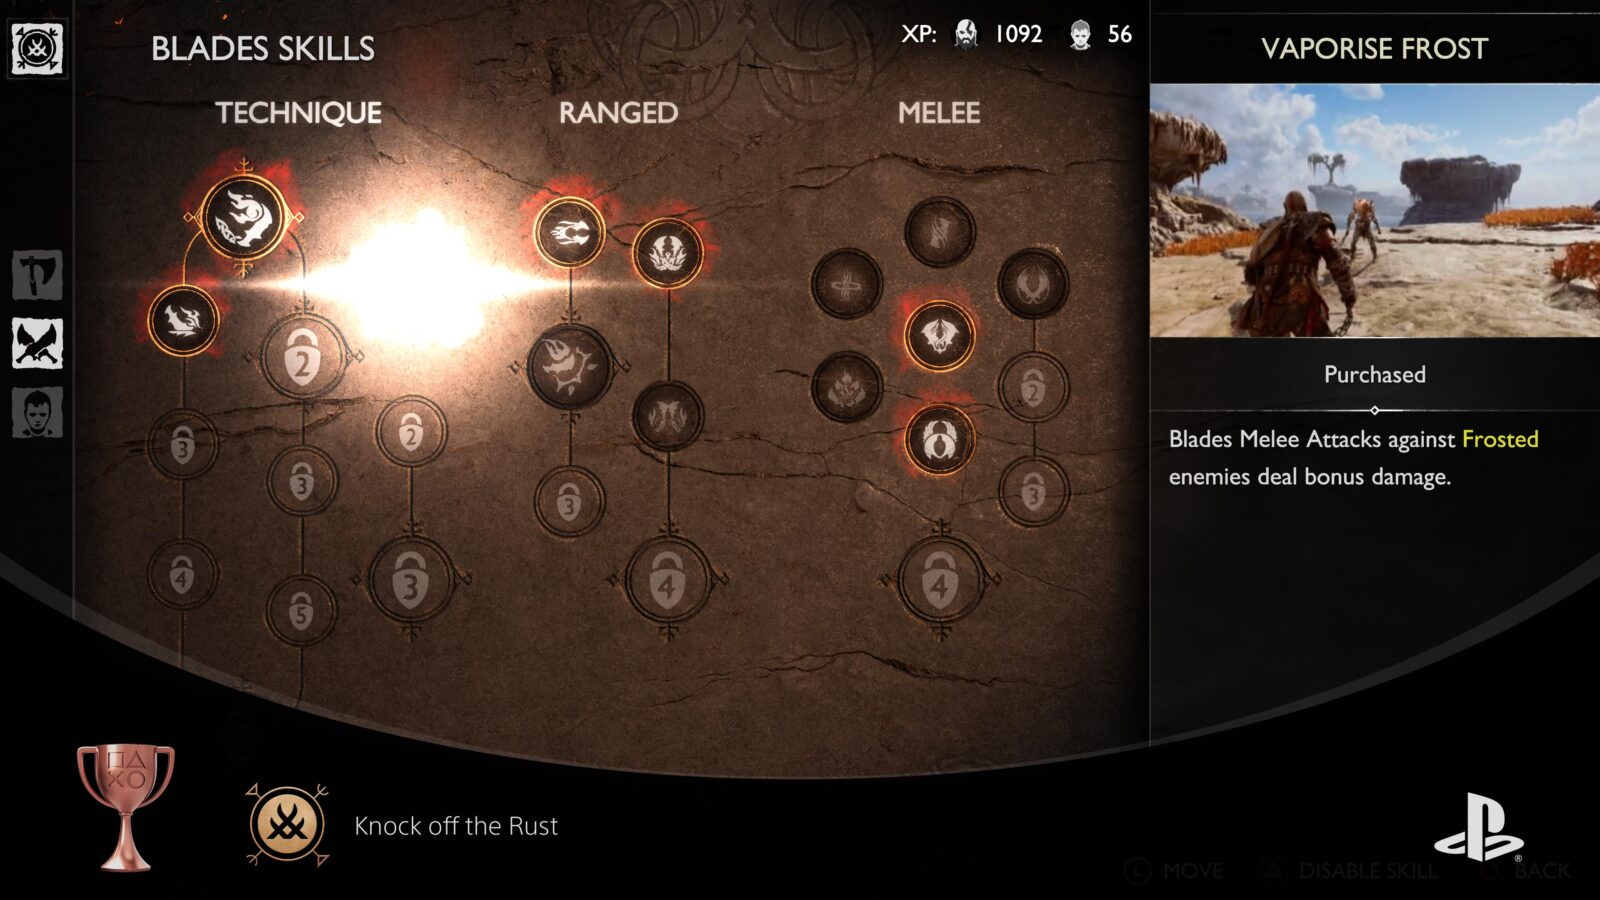
Knock off the Rust
Purchase a Skill
Purchasing any Skill for the first time will unlock the “Knock off the Rust” trophy. You can purchase skills from the “Skills” tab of the ![]() menu. It costs XP to purchase skills, which you will earn from natural gameplay.
menu. It costs XP to purchase skills, which you will earn from natural gameplay.

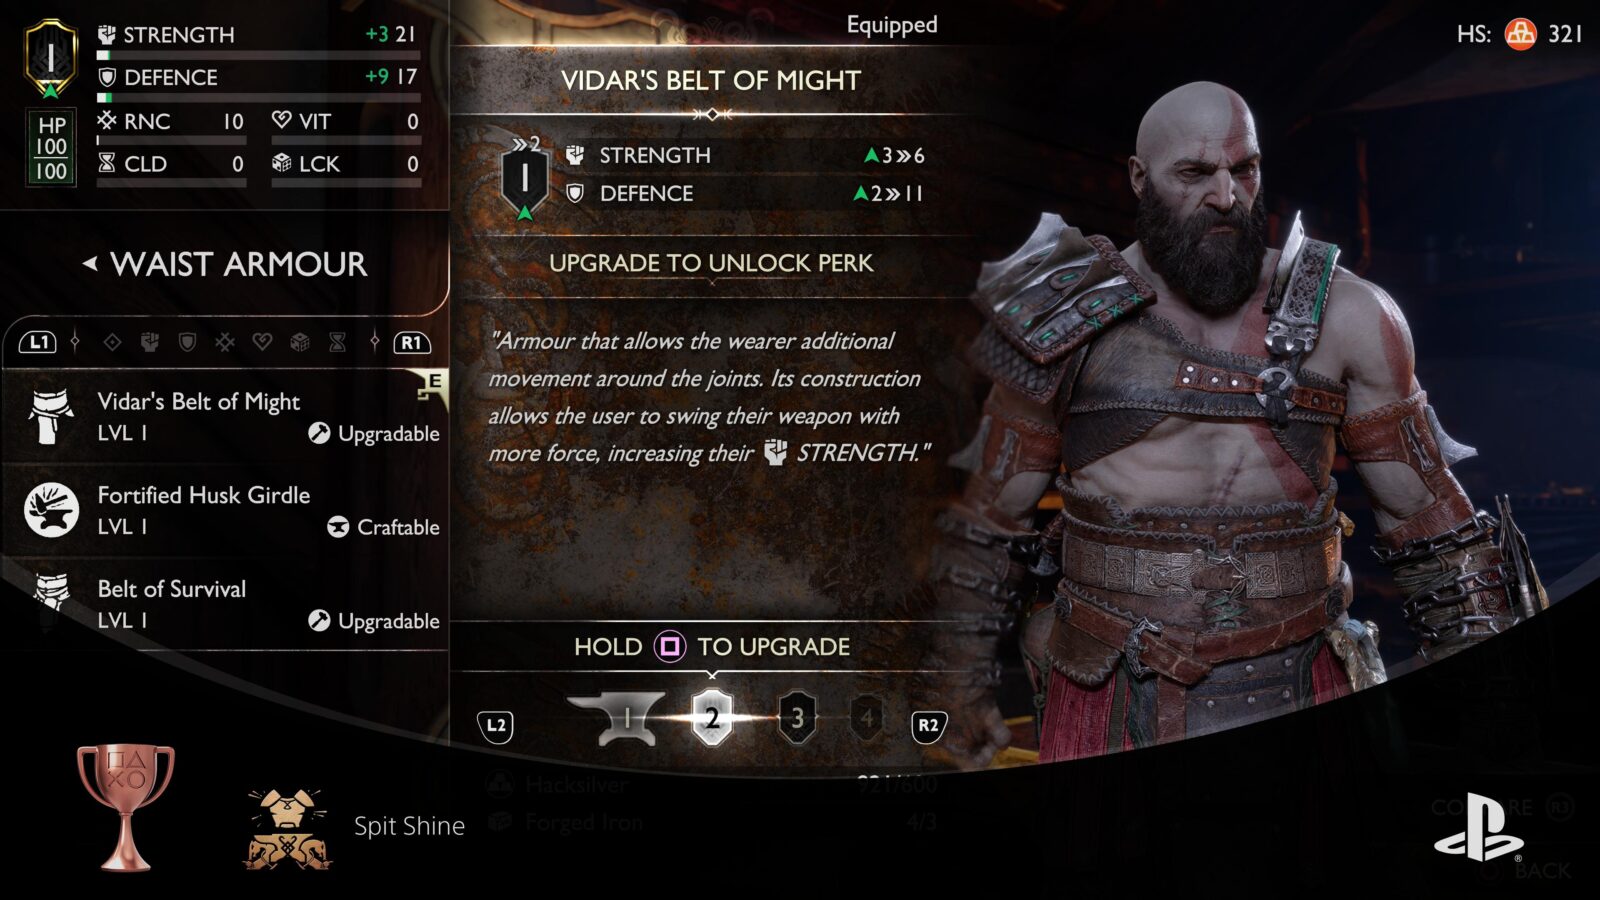
Spit Shine
Upgrade one piece of armor
After Crafting a piece of armor at the forge, you can also improve its stats by upgrading it. If you have the required resources, you can hold ![]() on a piece of gear to upgrade it to the next level.
on a piece of gear to upgrade it to the next level.
Do this for the first time to unlock the Spit Shine trophy.

Dragon Slayer
Craft the Dragon Scaled Armor Set
The “Dragon Slayer” trophy is tied to the “Invasive Species” trophy. Completing any of the 9 Dragon Hunt Favors required for Invasive Species will unlock access to the “Dragon Scaled” Armor Set at the Blacksmith.
To craft any of the gear in this set, though, you will need rare Dragon-related materials. Therefore, it’s best to complete the Invasive Species trophy first, thus ensuring you will have secured plenty of Dragon-related materials to use for crafting.
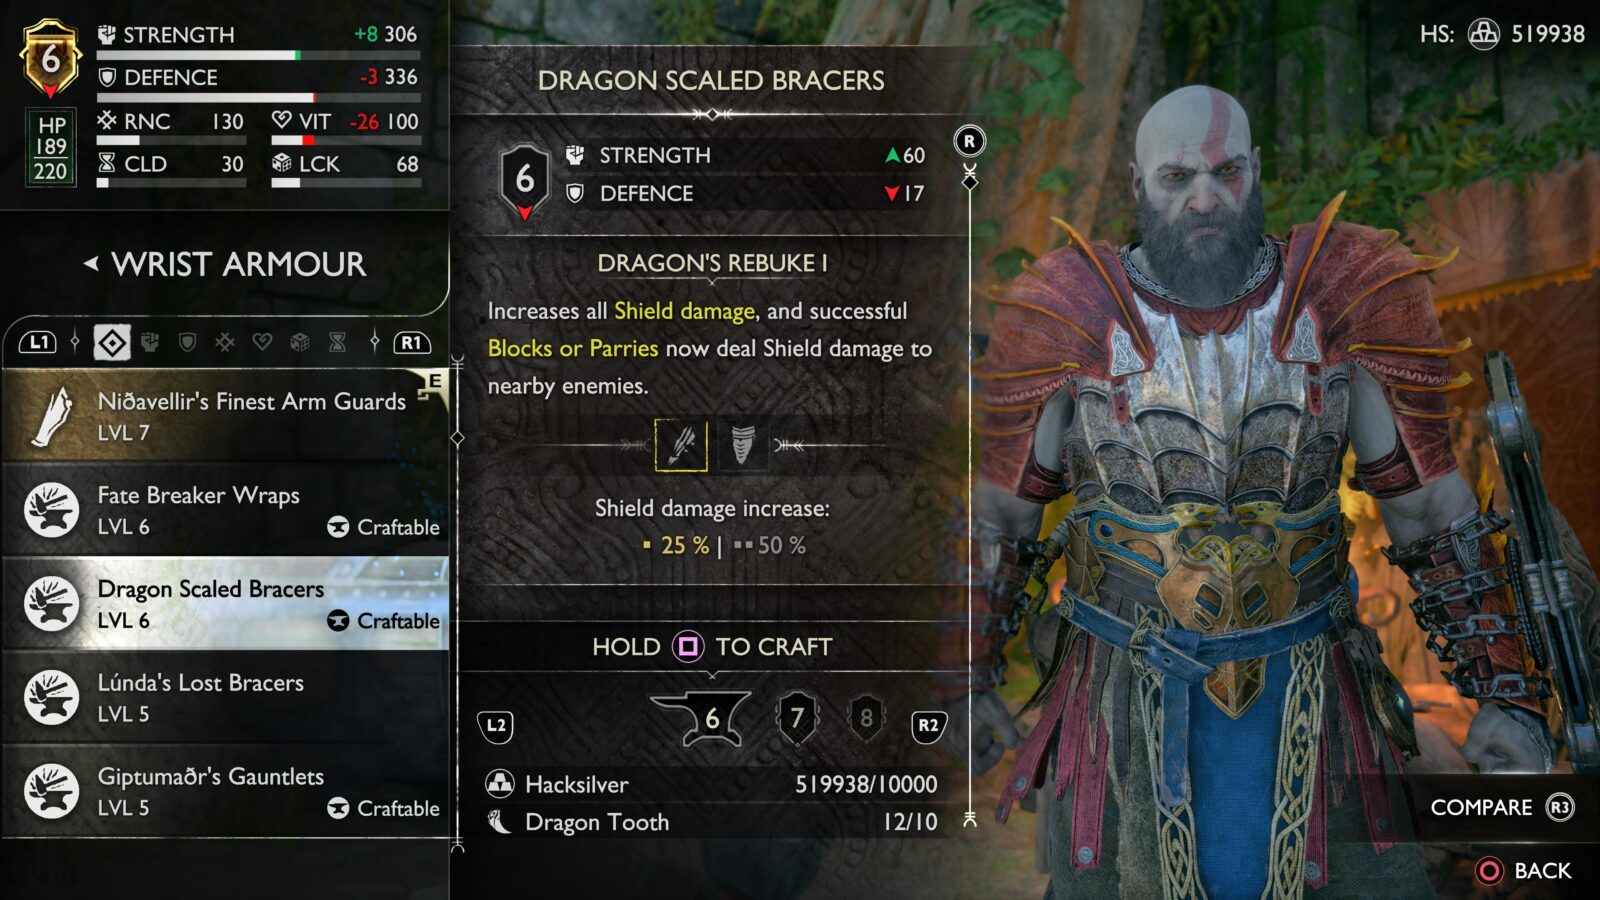
Once you have collected enough Dragon Teeth and Dragon Claws, craft the following armor pieces:
| Armor Piece | Resource Cost |
|---|---|
| Dragon Scaled Breastplate | 1x Dragon Claw + 2x Dragon Tooth |
| Dragon Scaled Bracers | 10x Dragon Tooth |
| Dragon Scaled Girdle | 10x Dragon Tooth |
You do not need to upgrade these items in any way, simply crafting them in their most basic form is enough to unlock the trophy.


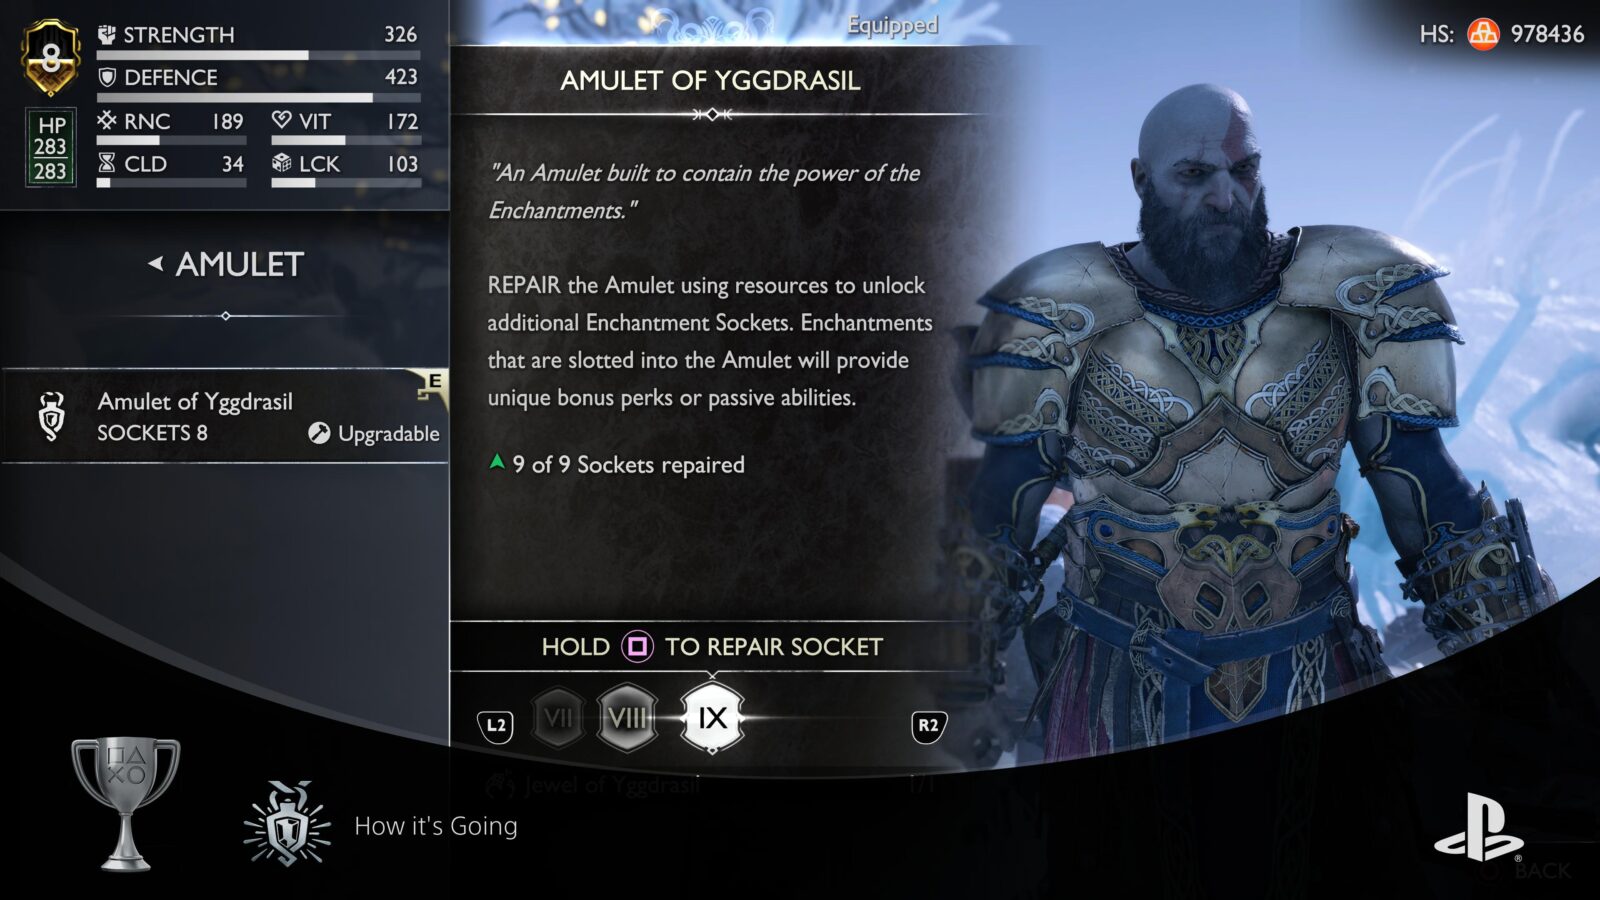
How it’s Going
Fully repair the Amulet of Yggdrasil
After you have unavoidably unlocked the “How it’s Going” trophy from playing through the story, you will have access to the Amulet of Yggdrasil.
At the Blacksmith, you can upgrade your amulet if you have any “Jewel of Yggdrasil” resources.

There are only Seven Jewels of Yggdrasil in the entire game. You will need to find and collect all Seven in order to fully-upgrade the Amulet of Yggdrasil and unlock the “How it’s Going” trophy.
Use the table below to determine how and where to find each Jewel:
| # | Realm | Location |
|---|---|---|
| 1 | Midgard | Story-related, unavoidable. |
| 2 | Svartalfheim | Story-related, unavoidable. |
| 3 | Alfheim | Inside a Legendary Chest in the building on the east side of the Forbidden Sands Region. |
| 4 | Svartalfheim | Inside a Legendary Chest on Alberich Island. |
| 5 | Midgard | Inside a Legendary Chest at The Oarsmen. |
| 6 | Vanaheim | Inside a Legendary Chest in Noatunn’s Garden. |
| 7 | Vanaheim | Inside a Legendary Chest in The Jungle. It’s at the bottom of the trap you need to use to feed one of the dragons for the “Path of Destruction” Dragon Hunt there. |

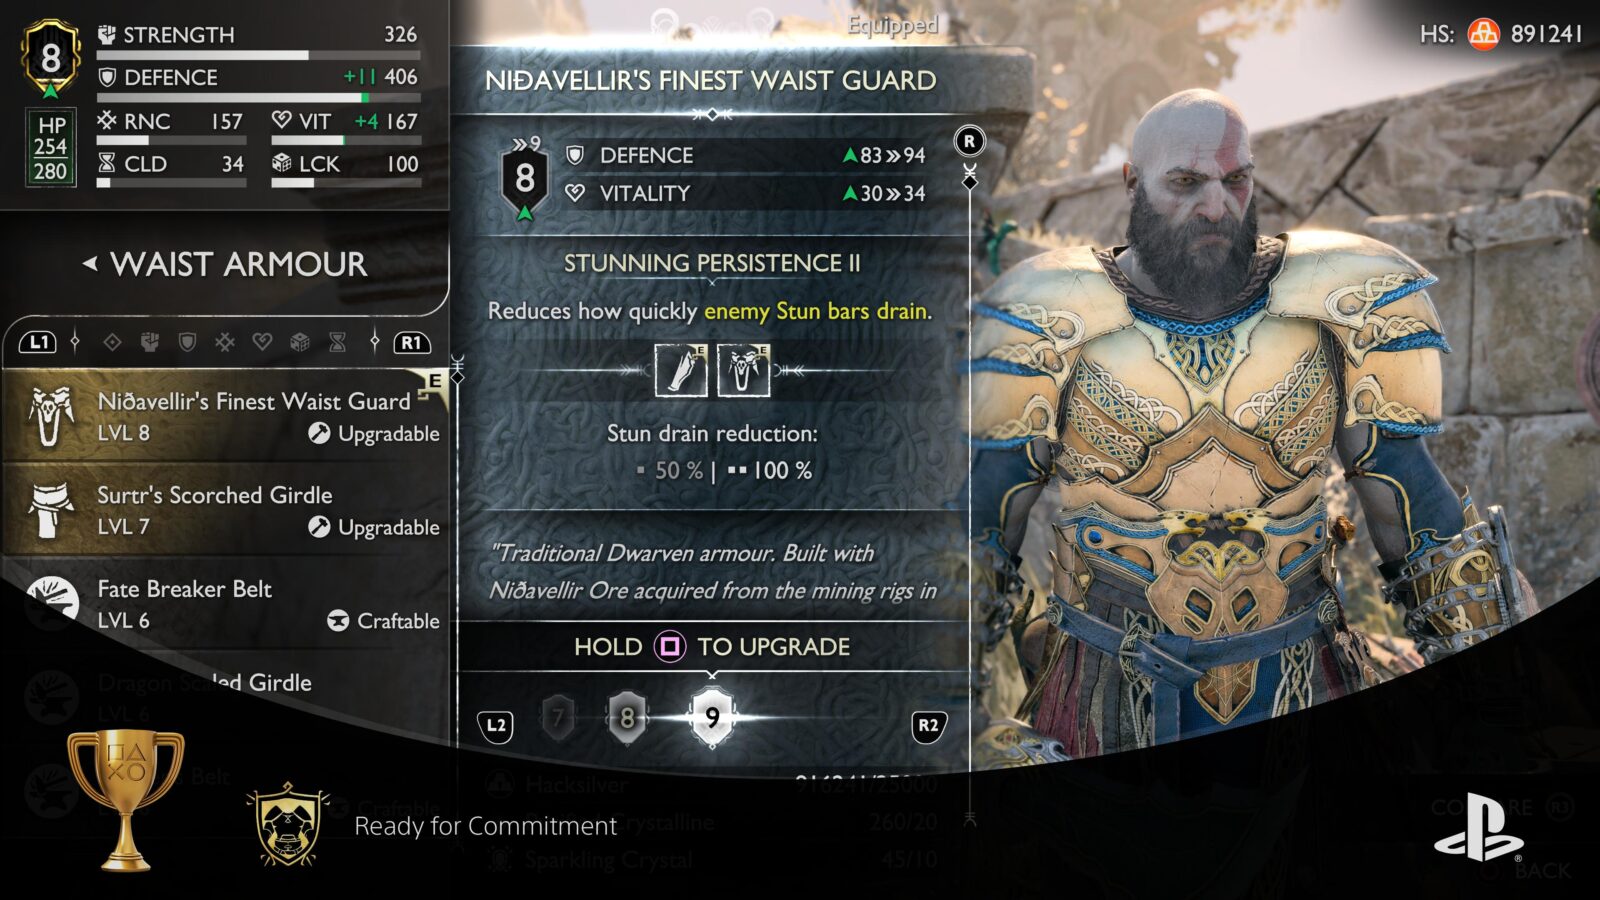
Ready for Commitment
Fully upgrade one armor set
To unlock the “Ready for Commitment” trophy, you will need to first collect a full set of armor. Look for Armor Pieces with the same name (i.e. “Nidavellir’s Finest”) and purchase or collect the full set.
You will unlock a lot of sets throughout your trophy journey and will also have a lot of resources to use for crafting and upgrading.
Pick your favourite set, or just choose based on which ones you have the right resources for, and then work on upgrading all three gear pieces to Level 9.
Once every armor piece in the set is at Level 9, you will unlock the “Ready for Commitment” trophy. You should be able to achieve this quite easily once you’ve done the story and most favors.
Plat Get!


The Bear and the Wolf
Collect all Trophies
Once you have acquired every other trophy in this God of War Ragnarok Trophy Guide, the “The Bear and the Wolf” platinum trophy will unlock.
Thank you for choosing PlatGet as your source for this God of War Ragnarok Trophy Guide. Consider checking out our other guides!
Follow us on Twitter @GetPlat or Instagram @platget for updates on new reviews and guides, as well as small anecdotes about our platinum journeys.