PlayStation 4, PlayStation 5
Bugsnax Bugapedia Guide
Game Guide
Introduction & Helpful Tips
Welcome to the Bugsnax Bugapedia Guide!
Below, you’ll learn where and how to catch all 100 Bugsnax in order to fill your Bugapedia and earn the Quartermaster, Halfway There, and Got to Catch Them All trophies. This guide will also prove useful in completing main and side quests throughout the game as many quest objective will ask you to find and collect certain Bugsnax.
You can use the “Jump To…” links in the sidebar to find a specific Bugsnak, or use Ctrl/Cmd+F to search for one.
It’s helpful to note that if you scan ![]() a Bugsnak with the camera
a Bugsnak with the camera ![]() its patrol path will become highlighted.
its patrol path will become highlighted.
You can also check the weather forecast in the map tab of the journal, which is helpful for finding the few Bugsnax that have weather-dependant spawns.
Every stage has a bed in it somehwere, which you can use with ![]() to sleep until Morning, Noon, Night, and Midnight. Useful for Bugsnax with time-dependant spawns.
to sleep until Morning, Noon, Night, and Midnight. Useful for Bugsnax with time-dependant spawns.
Where to Find and How to Catch All BugSnax
Garden Grove
Bunger
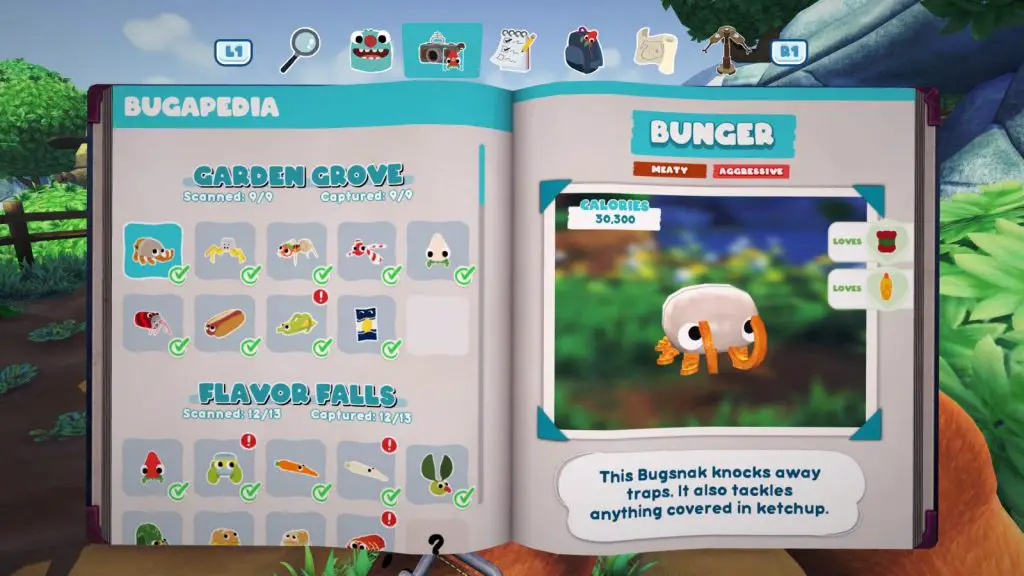
Spawn Conditions: Available at any time in any weather.
There are two Bungers patrolling the lowermost portion of the map. You can lure them towards each other using Ketchup, causing them to headbutt each other and become stunned, allowing you to pick them up with ![]() . You can also use a tripwire to stun them.
. You can also use a tripwire to stun them.
Fryder
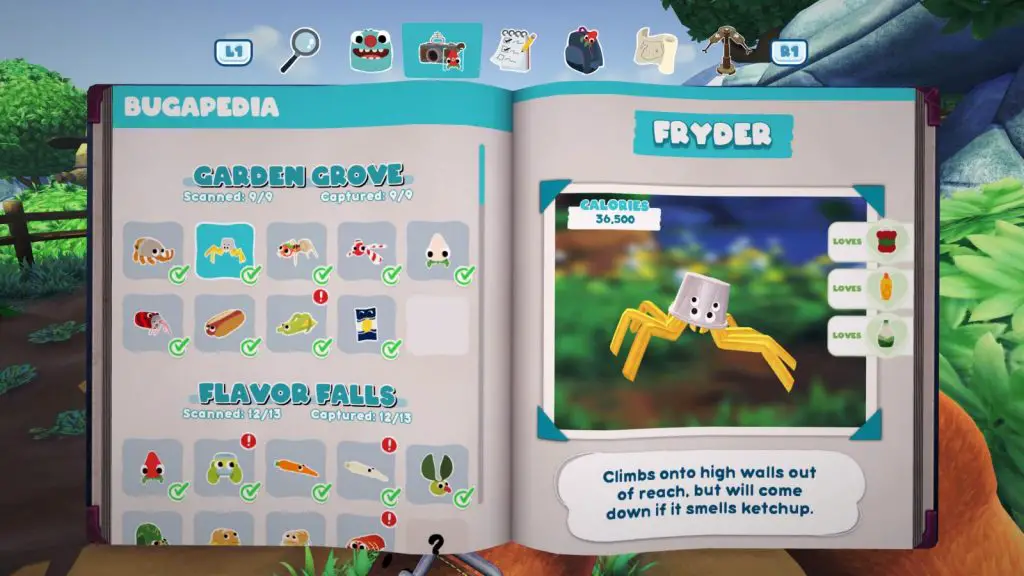
Spawn Conditions: Available at any time in any weather.
There are two Fryders in the cave with the cave paintings in the lower portion of the map. Place a trap and coat it in Ketchup to have the Fryders walk right into it!
Shishkabug

Spawn Conditions: Available at any time in any weather.
Shishkabugs can be found in the lower portion of the map, near the Bungers. If you get too close, they’ll scurry into the bushes and won’t come out again.
To get them to leave the bushes, coat the bush in ketchup so that the Bunger runs over and headbutts it, the Shishkabug will come flying out.
Try to place a trap where you think it might go when spooked, and hit ![]() to snatch it as it passes through the trap’s range.
to snatch it as it passes through the trap’s range.
Sweetiefly
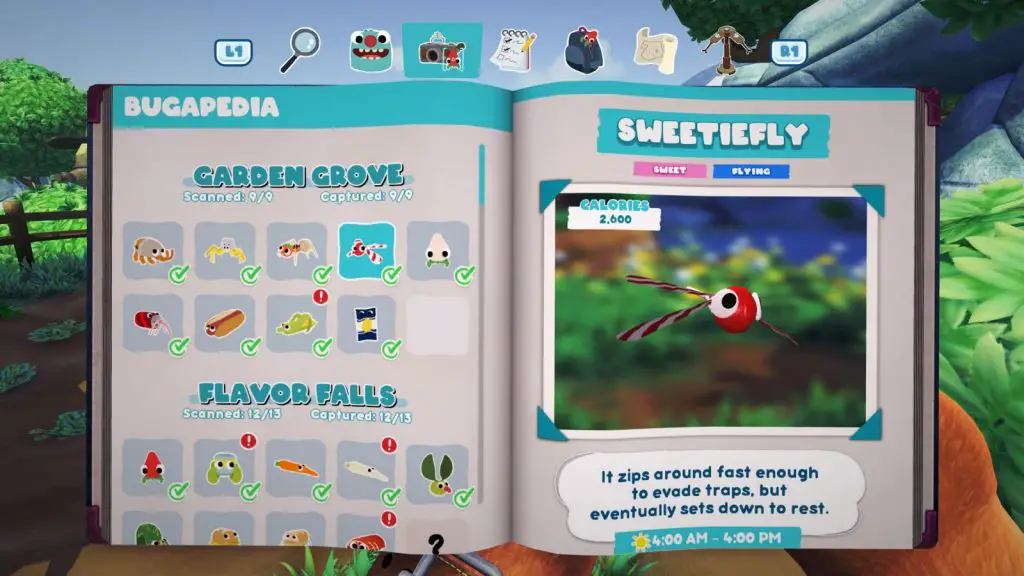
Spawn Conditions: Between 4 AM and 4 PM in sunny weather conditions.
There are many sweetieflies flying around the lowermost portion of the map. They will frequently stop to rest at certain periods in their patrol route, take note of this and place a tripwire near a rest point to stun one so that you can pick it up off the ground with ![]() .
.
White Strabby
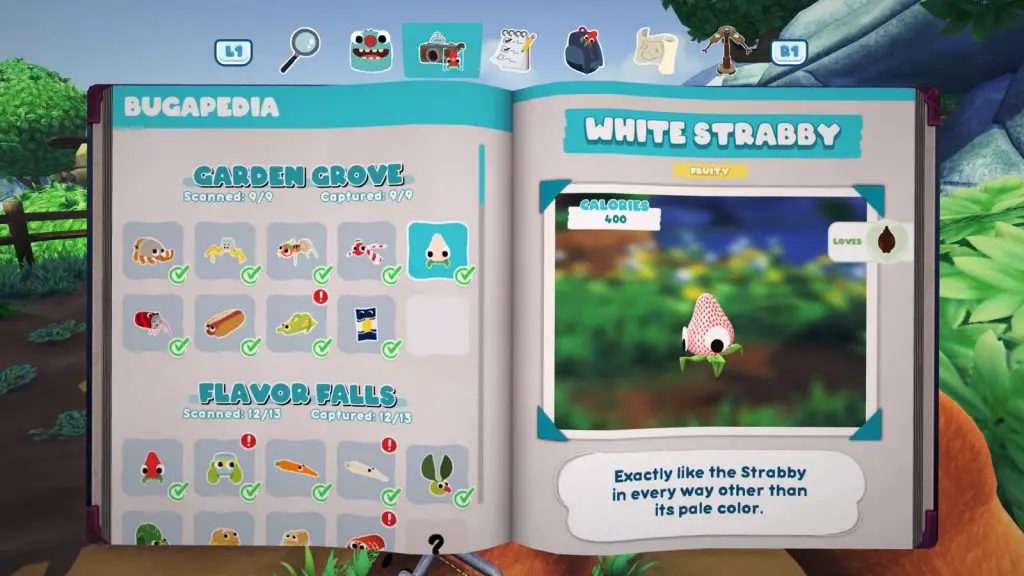
Spawn Conditions: Available at any time in any weather.
The White Strabby can be found in the uppermost portion of the map, near the scarecrow. Just place a trap in its patrol route and grab it when it’s in range. If you get too close, it’ll hide in the bushes, but you can just keep your distance and wait for it to come back out.
Dr. Sodie
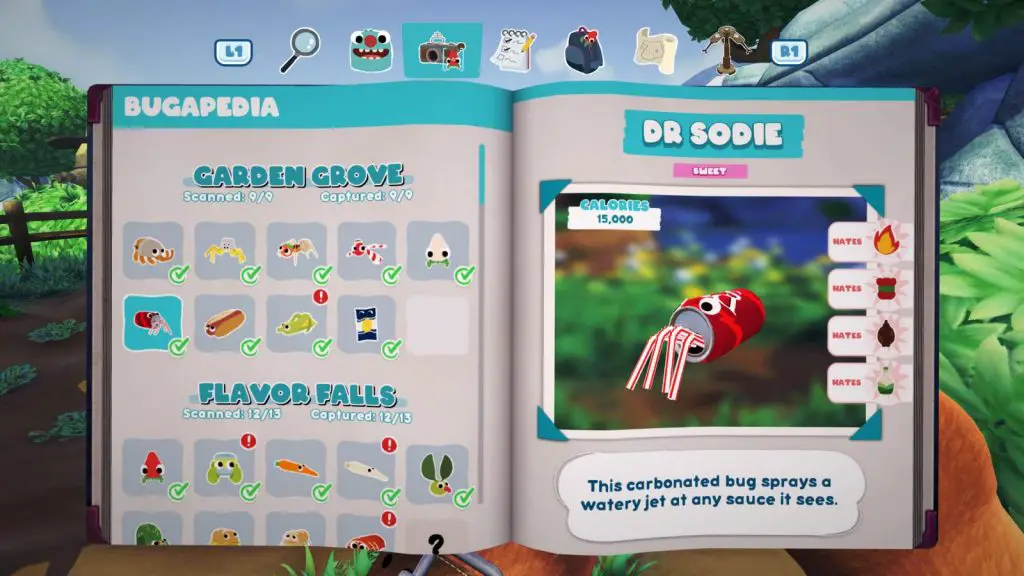
Spawn Conditions: Available at any time in any weather.
Dr. Sodie can be found swimming in the river in the lowermost portion of the map. Simply place a trap and catch it when it swims into range.
Weenyworm
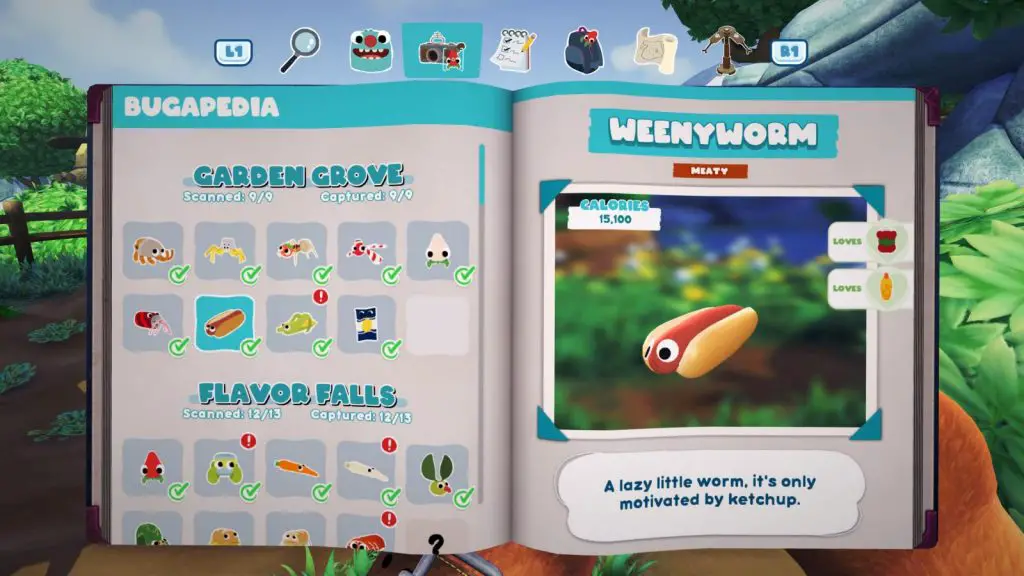
Spawn Conditions: Available at any time in any weather.
The Weenyworm can be found circumnavigating the pen in the uppermost portion of the map. Just put a trap down and wait for it to move into range.
Cobhopper
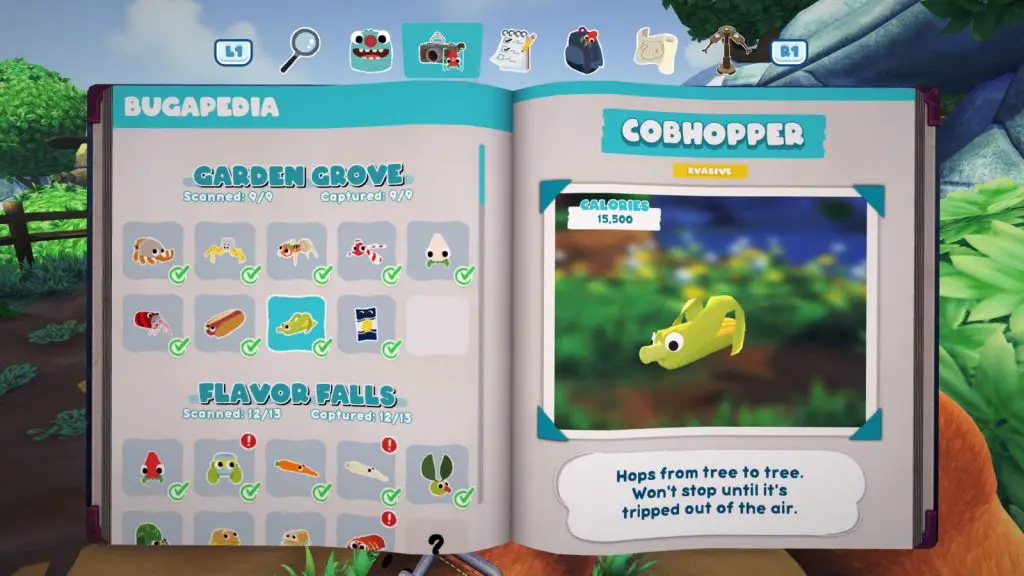
Spawn Conditions: Available at any time in any weather.
The Cobhopper can be found jumping between trees. Simply place a tripwire in its path and wait for it to jump right into it. You can then pick it up with ![]() when it’s stunned.
when it’s stunned.
Crispy Snakpod
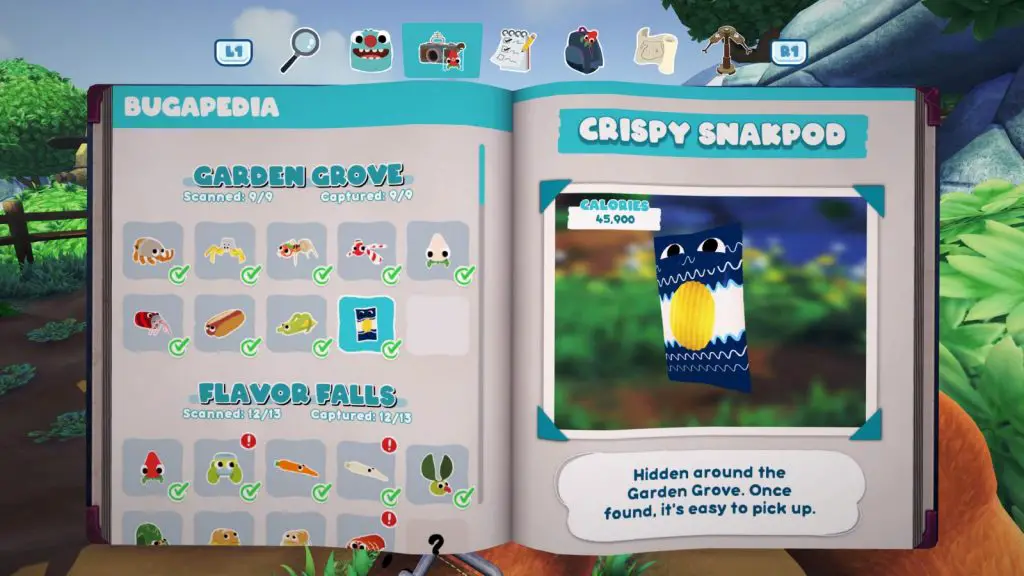
Spawn Conditions: Available at any time in any weather.
There are five Snakpods in this area, but the easiest to catch by far is the one in Beffica’s cave, near the entrance to Snakburg. When you walk into the cave, turn around and look on the wall to the left of the cave entrance.
Flavor Falls
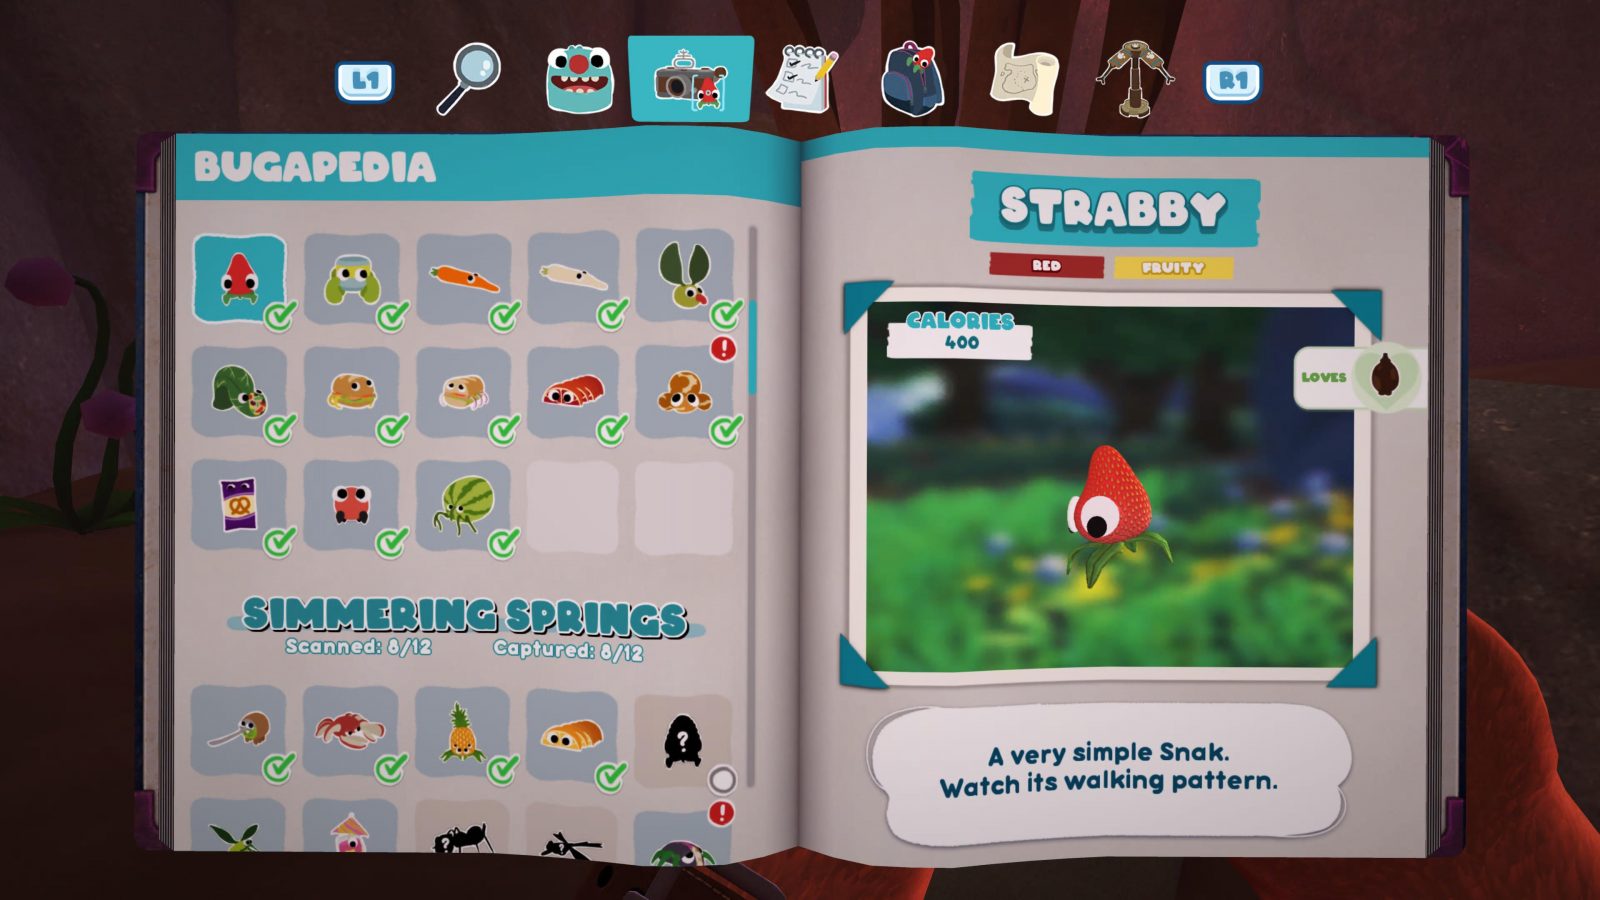
Strabby

Spawn Conditions: Available at any time in any weather.
You’ll catch this as part of the story when you first arrive on the island. You can simply catch a strabby by placing a trap in it’s patrol route and waiting for it to come into range.
Pinkle
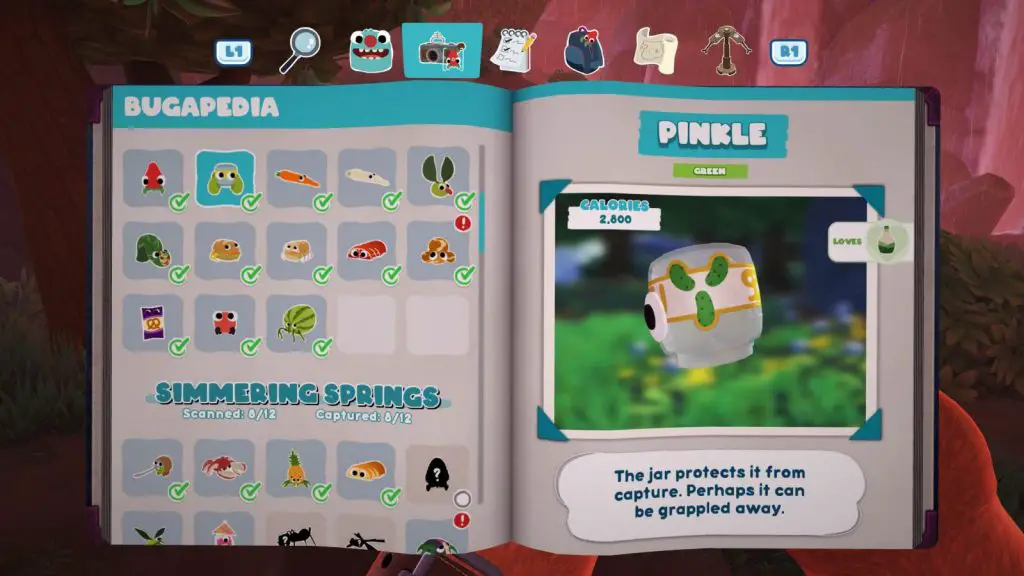
Spawn Conditions: Available at any time in any weather.
A Pinkle can be found in the middle portion of the map, where you first met Filbo. Use the tripwire to stun it and then grab it with ![]() .
.
Rootle
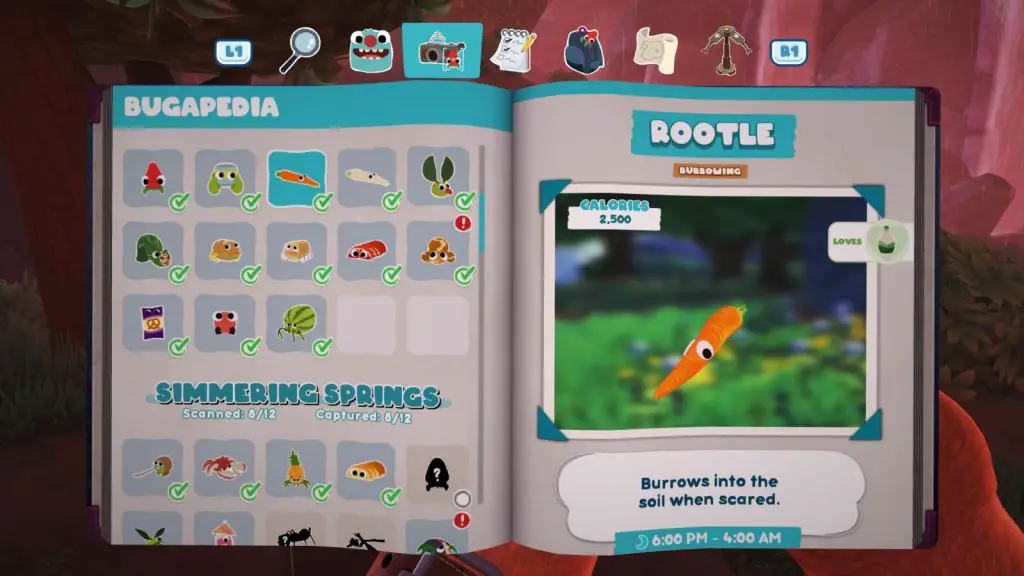
Spawn Conditions: Between 6PM and 4AM in any weather conditions.
The Rootle can be found next to the river near the entrance to Garden Grove. Approach it to make it burrow underground and then place the trap next to it. Walk away so that it surfaces again and then trigger the trap to capture it.
White Rootle
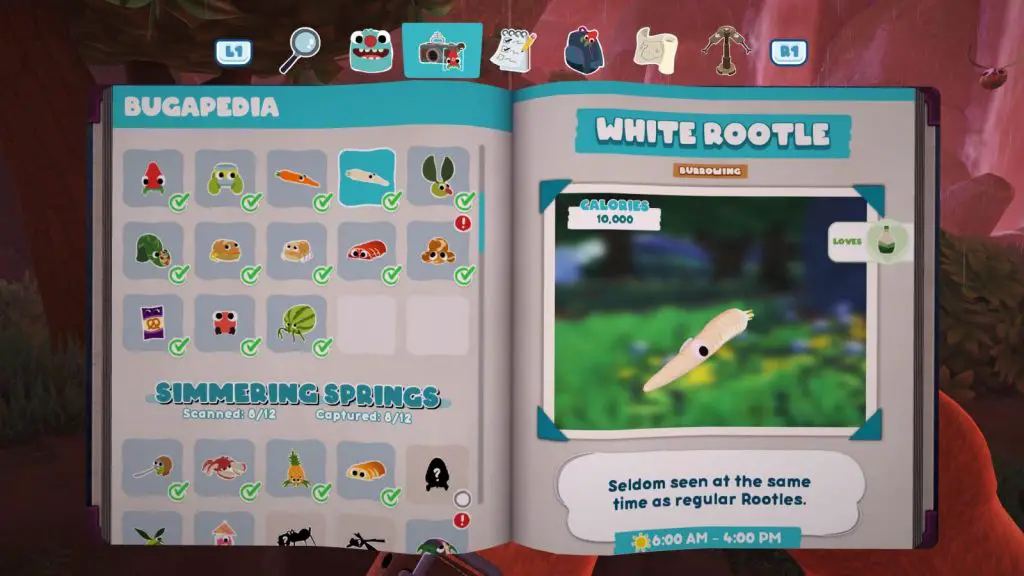
Spawn Conditions: Between 4AM and 6PM in any weather conditions.
The White Rootle can be found next to the river near the entrance to Garden Grove. Approach it to make it burrow underground and then place the trap next to it. Walk away so that it surfaces again and then trigger the trap to capture it.
Green Lollive

Spawn Conditions: Available at any time in any weather.
The Green Lollive can be found flying around the entire map. Simply place a tripwire in it’s path and then grab it with ![]() once stunned.
once stunned.
Inchwrap

Spawn Conditions: Available at any time in any weather.
The best place to grab an Inchwrap is in the lowermost cave which has water on the ground. Keep your distance and shoot Ranch Sauce on the stone ground. The Inchwrap will surface and go over to the ranch dressing, at that point quickly approach the Inchwrap, causing it to try and burrow again in a panic. The hard stone ground will stun it, allowing you to grab it with ![]() .
.
Sandopede and Sub Sandopede
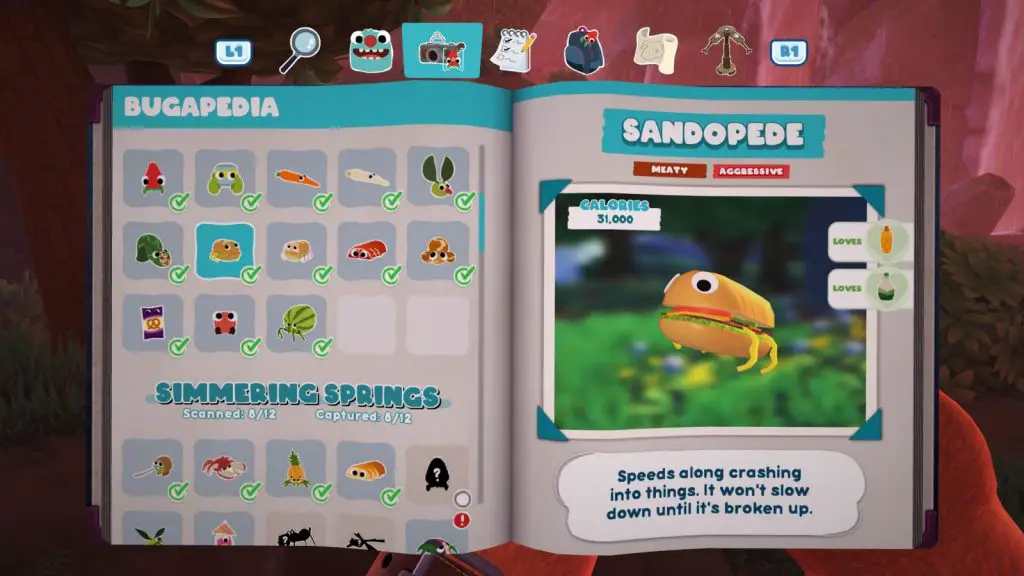
Spawn Conditions: Available at any time in any weather.
The Sandopede is walking around the stage along the same route every time. Both ends of the sandopede are in the bugapedia as “Sandopede” while the sections in the middle (which have flat ends at both sides) are Sub Sandopedes.
Use a trip wire placed in it’s path to cause it to break apart, allowing you to grab each segment with ![]() .
.
Ruby Peelbug
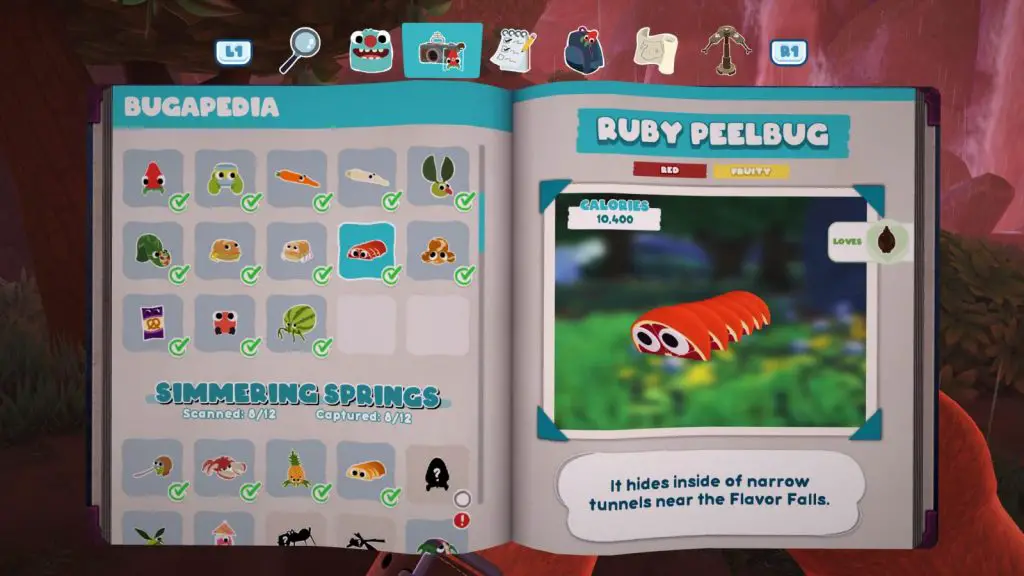
Spawn Conditions: Available at any time in any weather.
The Ruby Peelbug is hidden in the hole in the wall directly ahead of you when you enter the area. Use your Buggy Ball and send it into the hole, then run around to the other side of the ridge to find the other end of this tunnel. The Buggy Ball will force the Peelbug out at the other side, where a simple trap can snatch it up.
Caramel Poptick
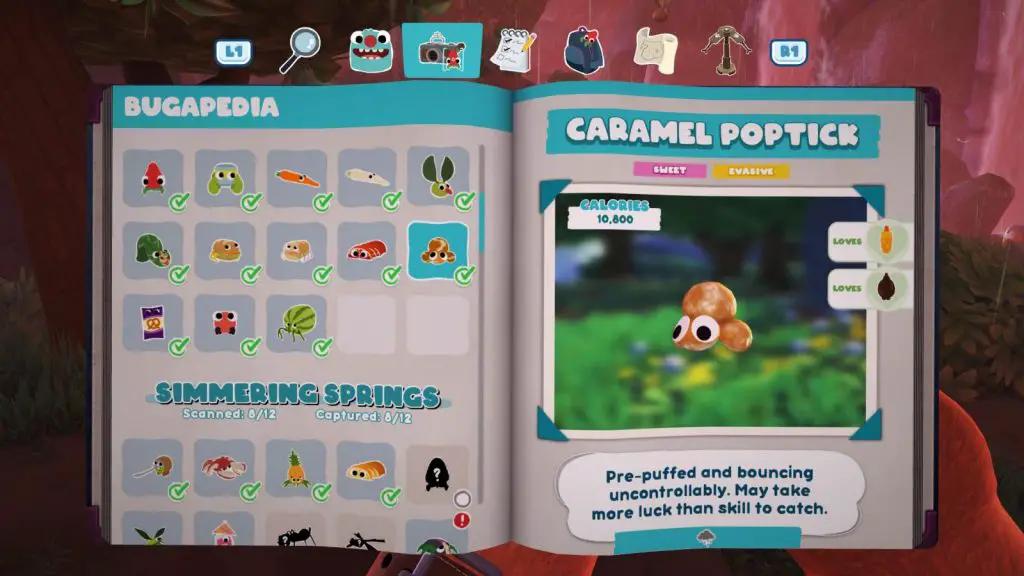
Spawn Conditions: Available at any time but only when raining.
The Caramel Popticks can be found in the lowermost cave which has water on the ground. They’re bouncing around in the room somewhat randomly, so you just need to place a trap and wait for one to bounce into range.
The Inchwrap down here can make things difficult as it will knock your trap away, so it’s worth capturing it first to get rid of it.
Twisty Snakpod
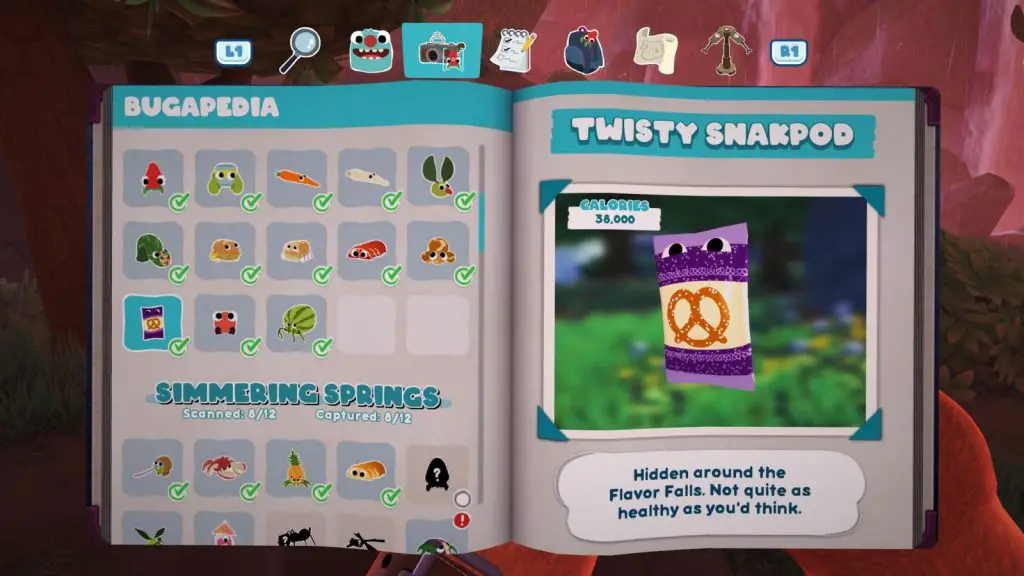
Spawn Conditions: Available at any time in any weather.
When you enter the area, turn immediately left to see this bugsnak hanging out on some rocks in an alcove. Just walk up to it and press ![]() or use the Snakgrabber to collect it.
or use the Snakgrabber to collect it.
Wee Mewon
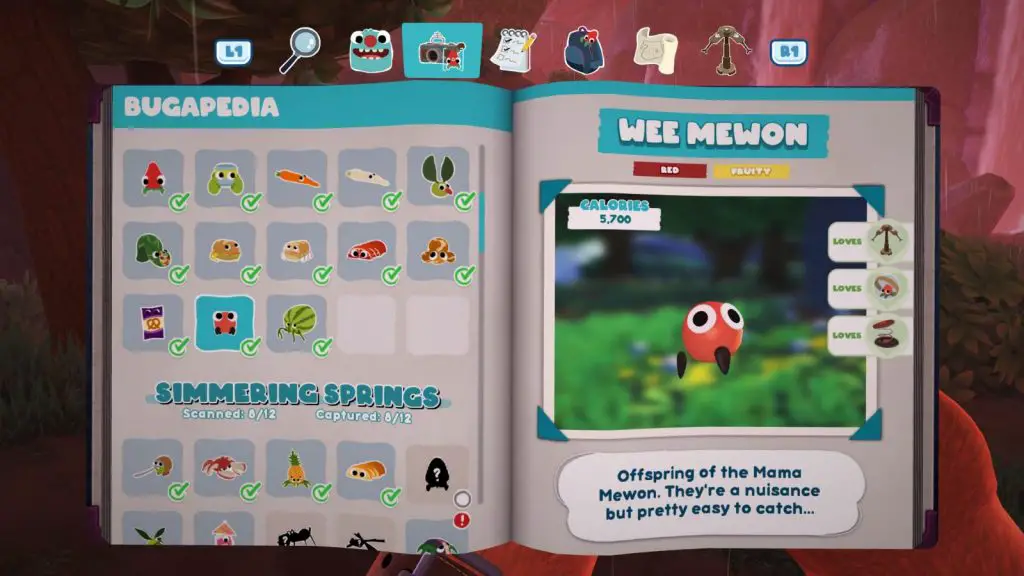
Spawn Conditions: Available at any time in any weather.
Found all around the Mama Mewon boss during the “Throw Down!” mission given to you by Chandlo. Read the Bossy Bugs trophy guide for more info.
Mama Mewon
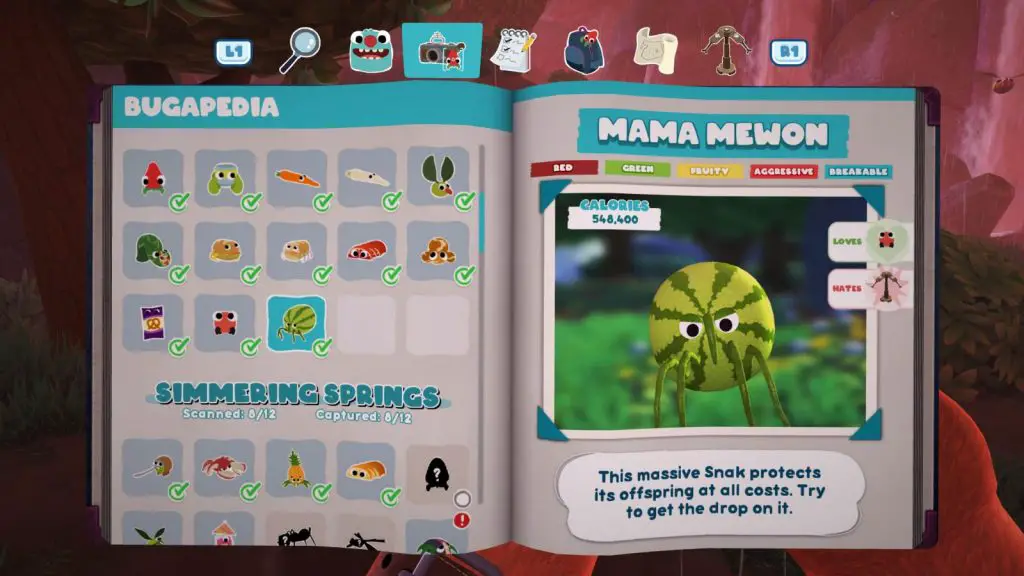
Spawn Conditions: Available at any time in any weather.
Boss fight during the mission “Throw Down!” given to you by Chandlo. Read the Bossy Bugs trophy guide for more info.
Simmering Springs
Kweeble
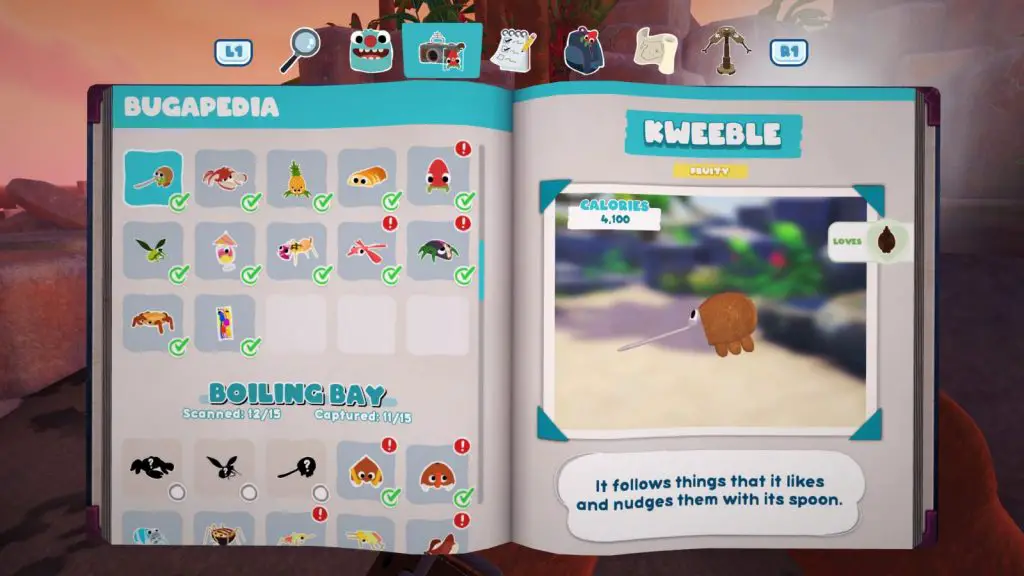
Spawn Conditions: Available at any time in any weather.
Found along the shore on the beach. Simply place a trap in it’s path and grab it when it is in range.
Crapple
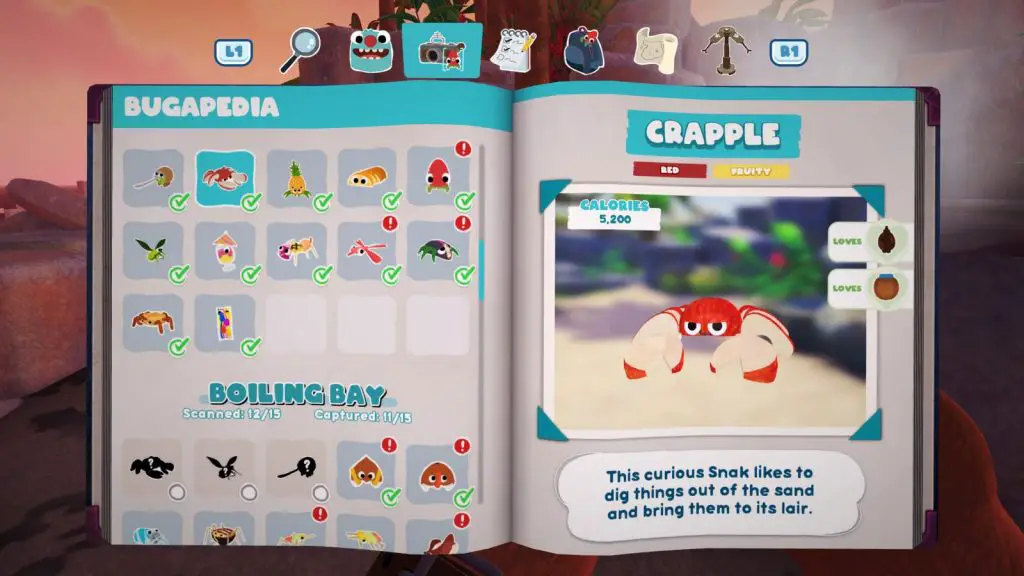
Spawn Conditions: Available at any time in any weather.
Found in the ocean by the shoreline. Just place a trap in it’s path and catch it when in range.
Pineantula
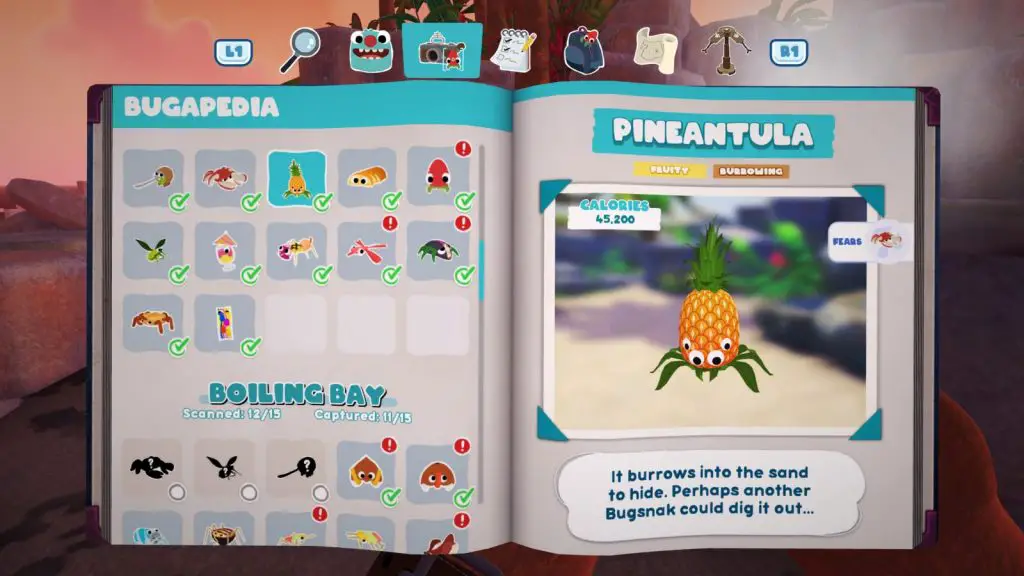
Spawn Conditions: Available at any time in any weather.
Lure a Crapple to it by shooting chocolate at it’s exposed leaves. The crapple will dig it out of the ground and throw it, causing it to become stunned so you can simply pick it up with ![]() .
.
Orange Peelbug
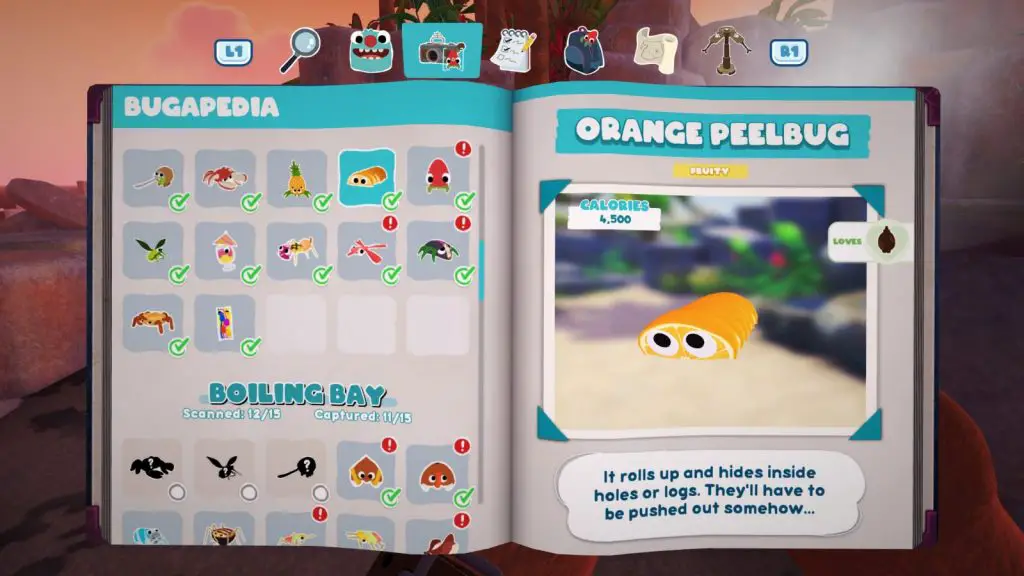
Spawn Conditions: Available at any time in any weather.
Found in hollow logs along the shoreline. Place a trap at one end of the log and then send your Buggy Ball in through the opposite end, driving the Peelbug directly into your trap’s range.
Razzby
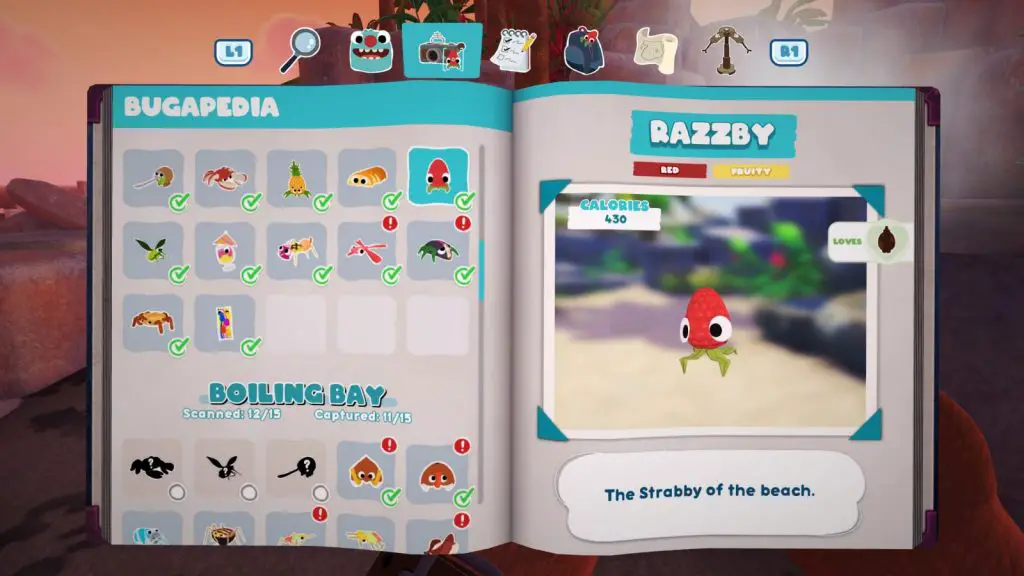
Spawn Conditions: Available at any time in any weather.
Same as a Strabby, place a trap in its path and capture it when in range. If it hides in a bush, give it some space and it will emerge again.
Green Grapeskeeto
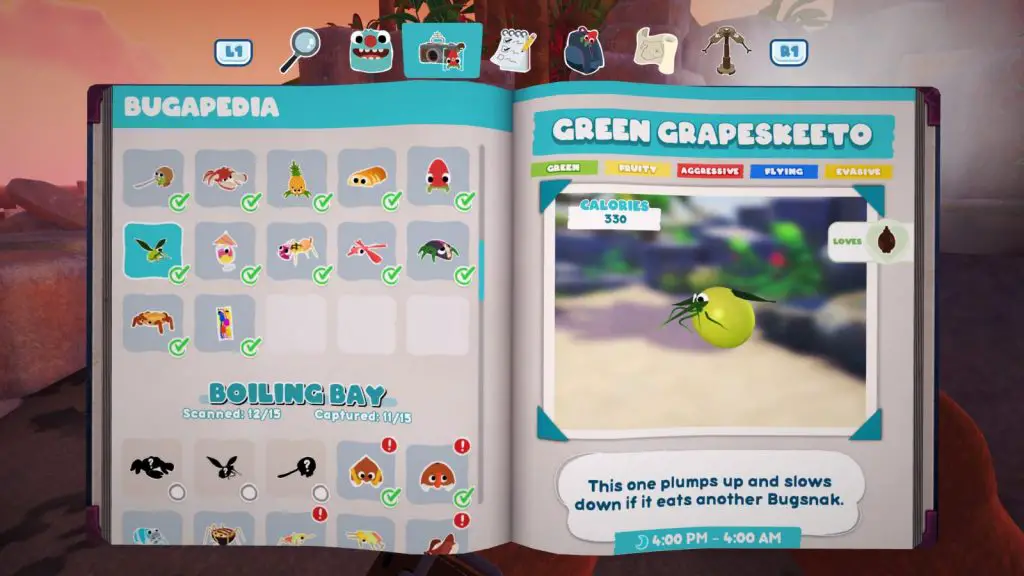
Spawn Conditions: Found between 4PM and 4AM in any weather conditions.
Place a tripwire in its path, stunning it and allowing you to pick it up with ![]() .
.
Snaquiri
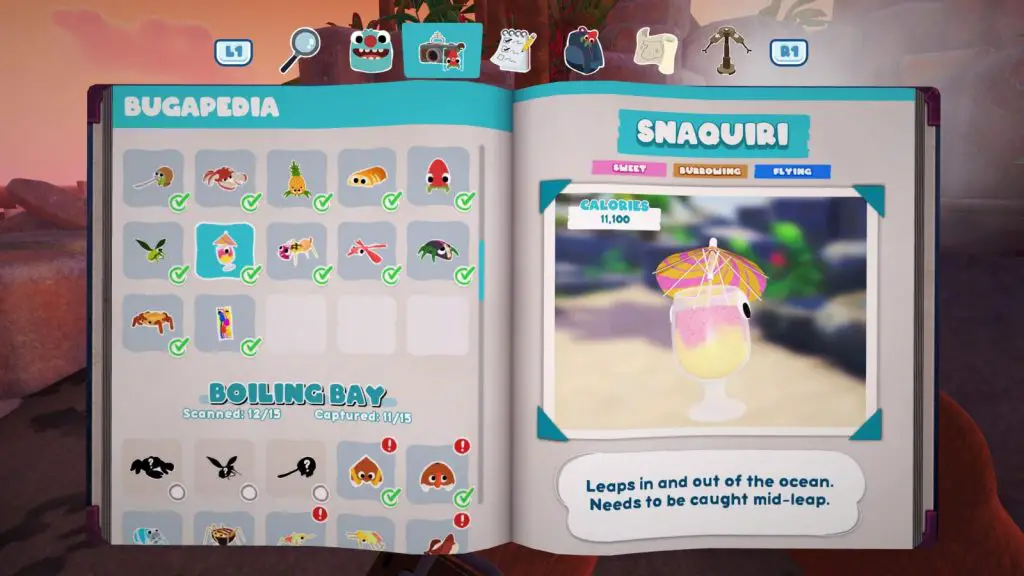
Spawn Conditions: Available at any time in any weather.
The easiest one to catch is found jumping out of a pool near the bed in this level. Simply place a tripwire over the top of the pool so that the Snaquiri hits it when it leaps out of the water. Once stunned, you can grab it with ![]() .
.
Tropicabug
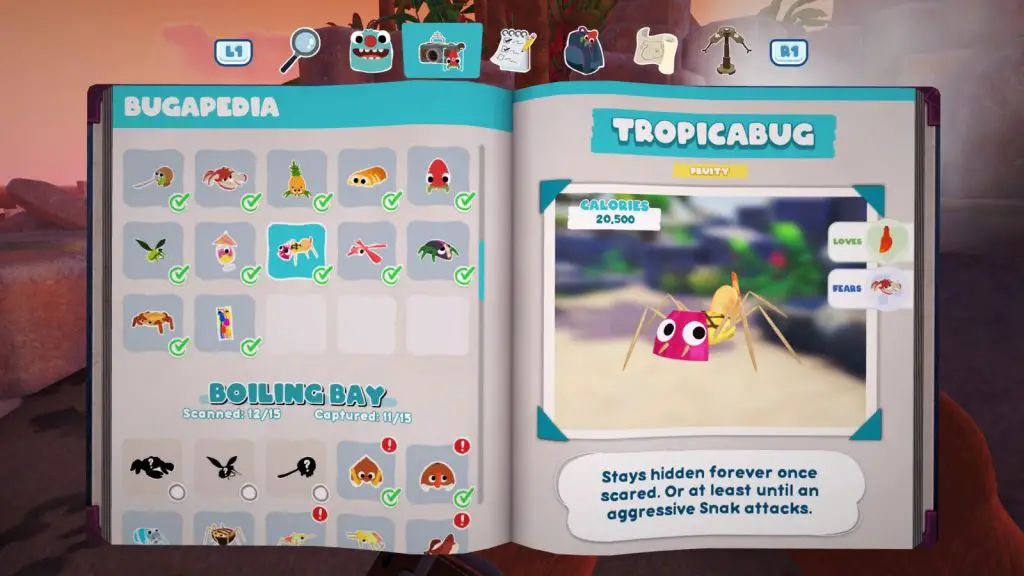
Spawn Conditions: Available at any time in any weather.
If you get too close to this guy, it’ll run and hide in the bushes and won’t come out again. Therefore, it’s imperative that you don’t get too close.
Found near the bushes in the left-most route to the beach when you enter from Snaxburg. Carefully place a trap near it, coat the trap in hot sauce, and then fire a couple of splotches of hot sauce on the ground to act as a breadcrumb trail leading the bug to the trap. With everything set up, move away from the trap so you don’t accidentally spook the critter and wait for it to walk right into range.
Lovely Sweetiefly
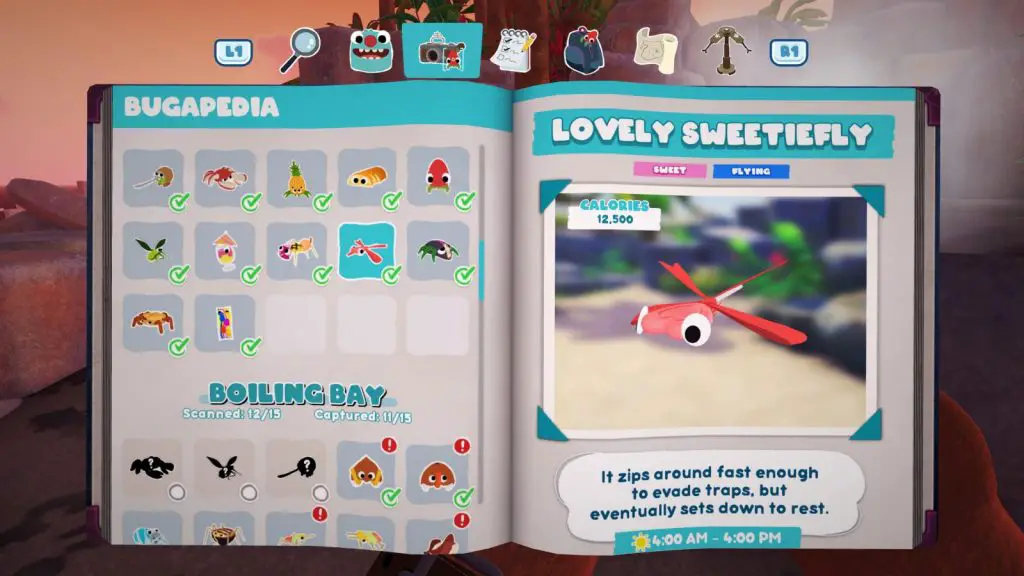
Spawn Conditions: Available from 4AM to 4PM as long as it isn’t raining.
The easiest one to catch is right near the entrance from Snaxburg. it will frequently rest on the rocks nearby, so you can just place a tripwire near there and wait for it to become stunned so you can grab it with ![]() .
.
Baja Tacroach
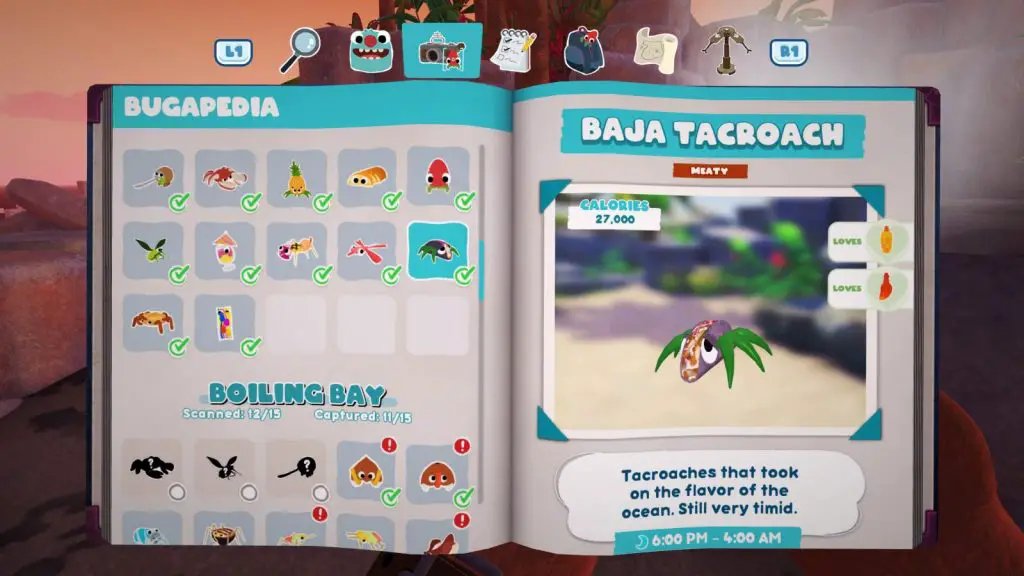
Spawn Conditions: Available from 6PM to 4AM in any weather conditions..
Near the coast, there are some stairs leading up to a naturally-formed pool and a hanging triangle (instrument). Here, the Baja Tacroach will spawn.
Place a trap nearby and coat it in cheese sauce to have the Tacroach walk right into the trap’s range.
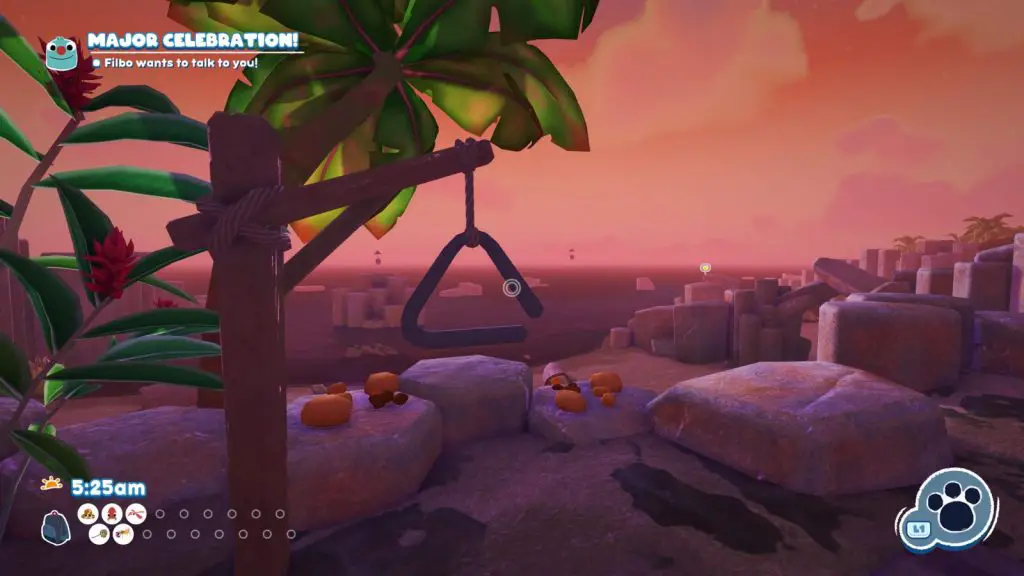
Waffstackarak
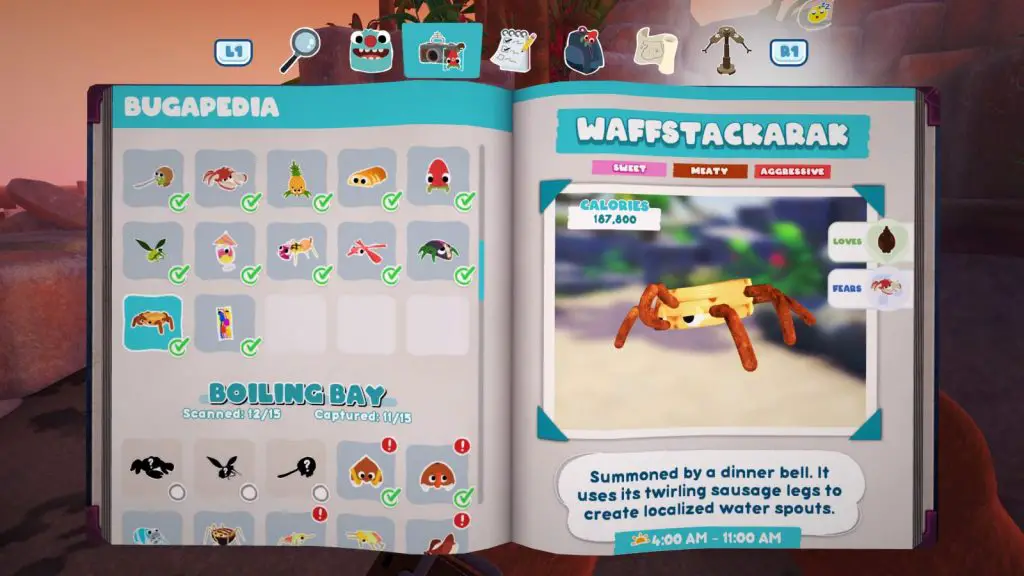
Spawn Conditions: Spawns when you play the triangle between 4AM and 11AM in any weather conditions.
Near the coast, there are some stairs leading up to a naturally-formed pool and a hanging triangle (instrument). Press ![]() on the triangle to play it, summoning the Waffstackaraks from the water.
on the triangle to play it, summoning the Waffstackaraks from the water.
Place a tripwire in it’s path and then grab it with ![]() once it is stunned.
once it is stunned.
Grumpy Snackpod
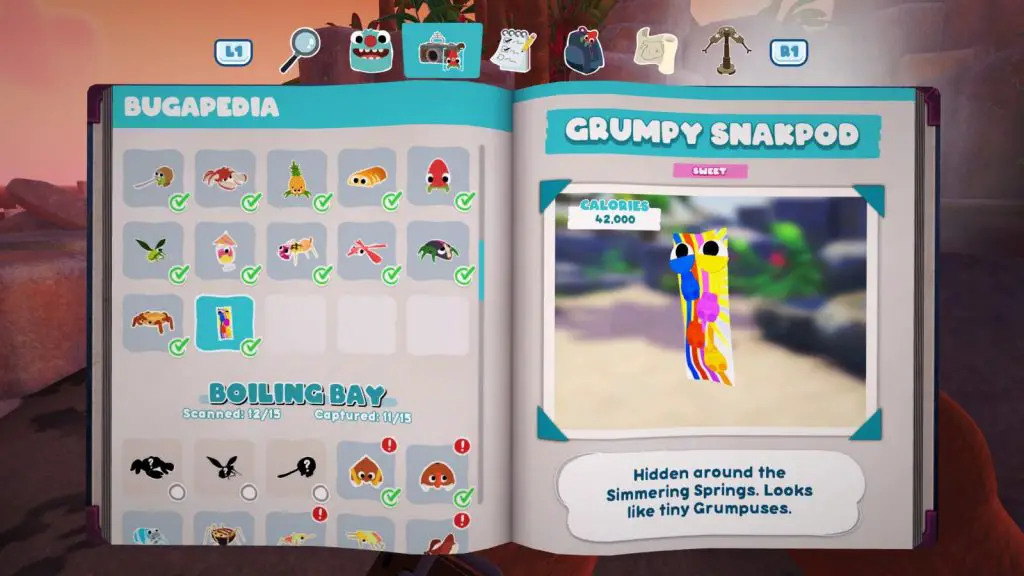
Spawn Conditions: Available at any time in any weather.
When entering the area from Snaxburg, turn to the right and look in the rock pool you’ll see there. There’s a Grumpy Snackpod relaxing under the water. Just walk right up to it and grab it with ![]() .
.
Boiling Bay
Green Crapple
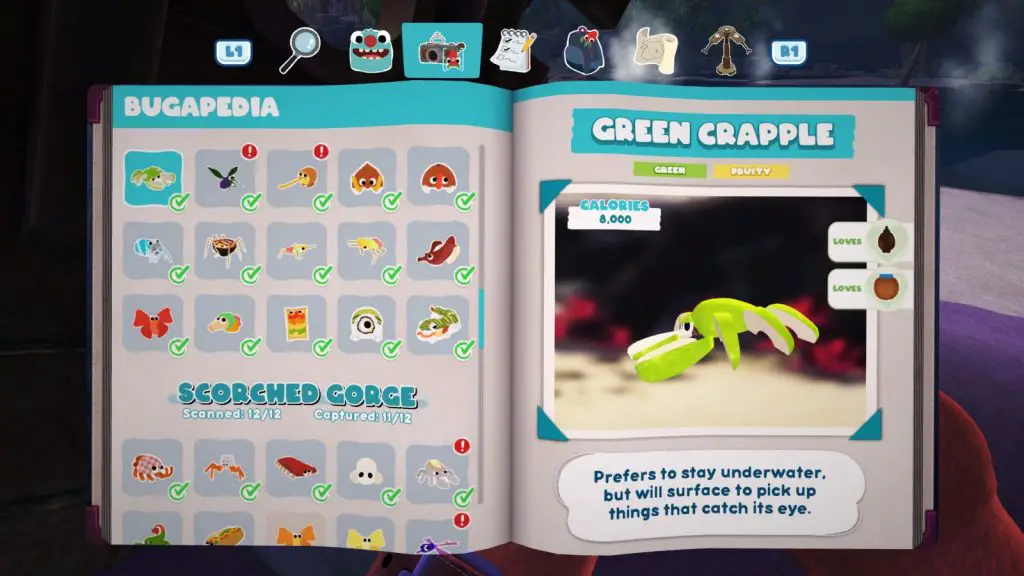
Spawn Conditions: Available at any time in any weather.
Found underwater. Just place a trap in it’s path and grab it when it’s in range.
Grapeskeeto

Spawn Conditions: Available between 4PM and 4AM in any weather.
Found by the cave entrance. Set up a tripwire in it’s flight path to stun it and then pick it up off the ground with ![]() .
.
Golden Kweeble

Spawn Conditions: Available at any time in any weather.
Found along the shore on the beach. Simply place a trap in it’s path and grab it when it is in range.
Greater Cocomite and Lesser Cocomite
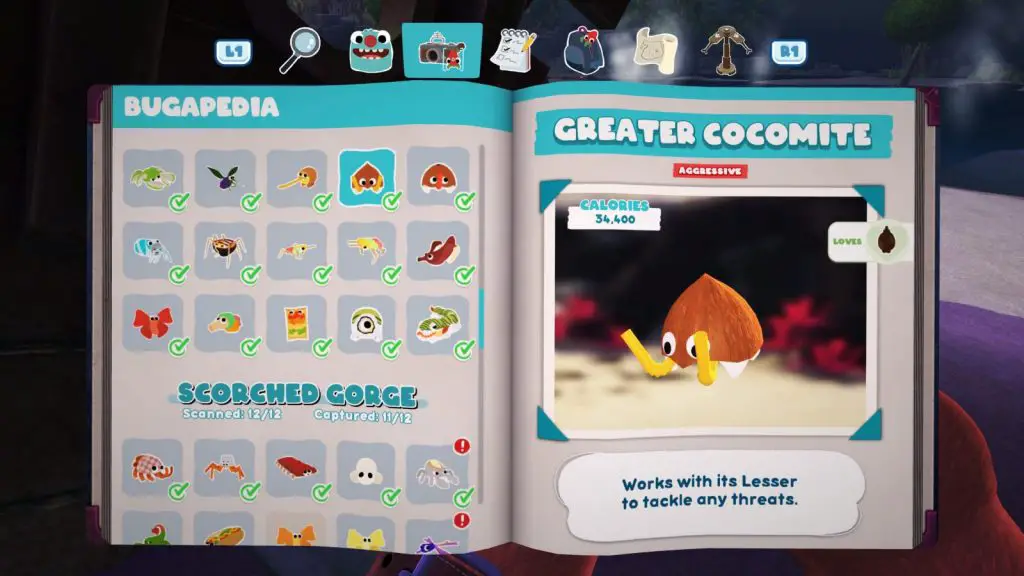
Spawn Conditions: Available at any time in any weather.
You can find Coconuts in palm trees such as the one outside the cave entrance. Hit the base of the palm tree with the Snakgrappler or have the nearby Paletoss charge the tree and a coconut will drop out of it.
Grab the coconut with ![]() and drop it into one of the nearby lava streams and after a short while it will pop, splitting in two. One half is the Greater Cocomite (two straws), the other is the Lesser Cocomite (one straw).
and drop it into one of the nearby lava streams and after a short while it will pop, splitting in two. One half is the Greater Cocomite (two straws), the other is the Lesser Cocomite (one straw).
Put a tripwire in their path to stun them and then grab them with ![]() .
.
La Sodieux
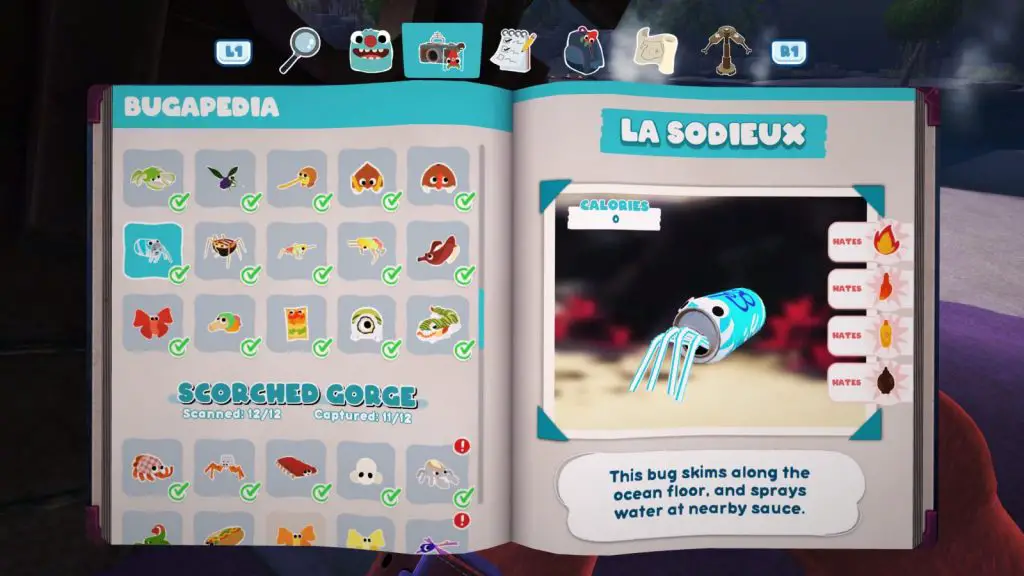
Spawn Conditions: Available at any time in any weather.
Found along the shore in the water. Simply place a trap in it’s path and grab it when it is in range.
Noodler
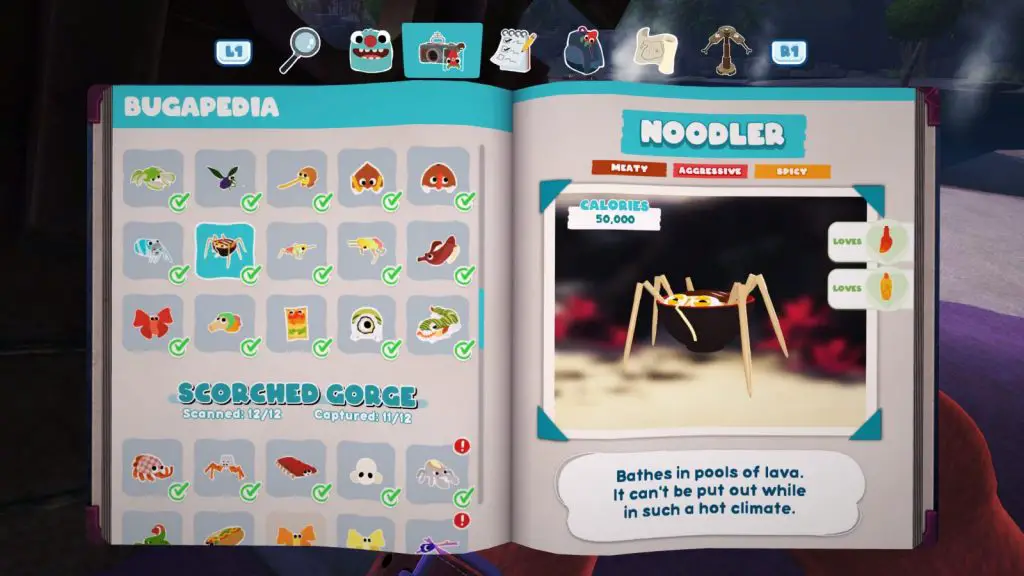
Spawn Conditions: Available at any time in any weather.
Found in the cave, swimming in the lava. Place your Buggy Ball by the edge of the lava and hit it with hot sauce to get the Noodler’s attention. Use the Buggy Ball to bait the noodler outside to the Paletoss Grande on the beach. Once the Paletoss is close enough to the Noodler, it will charge and headbutt it, cooling it down.
When cooled, the Noodler can simply be picked up.
Paletoss
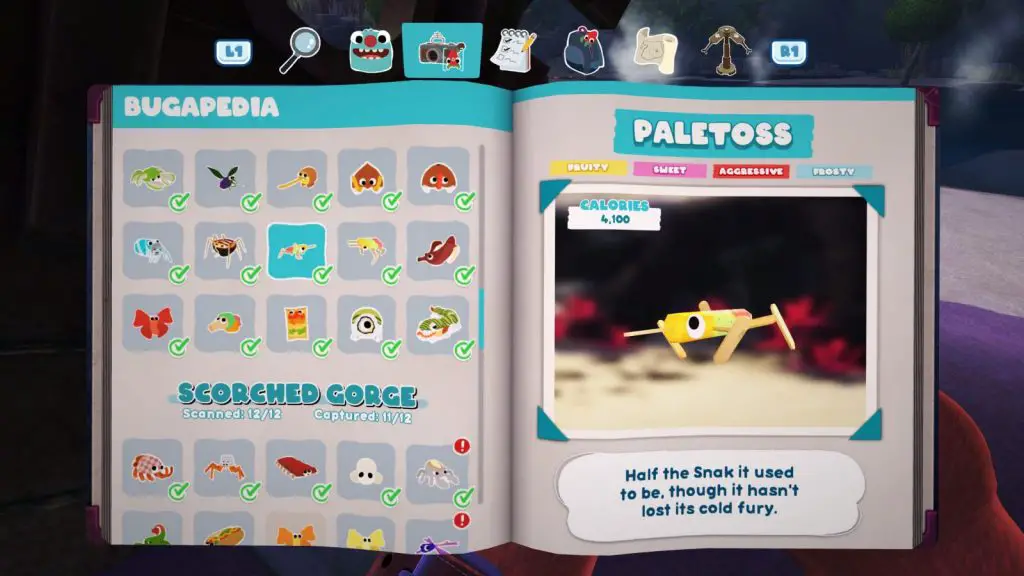
Spawn Conditions: Available at any time in any weather.
Near the entrance to the cave you’ll find a Paletoss Grande, which will aggressively charge you, freezing you if it comes into contact. In order to split it into two Paletoss, you’ll need to bring it into contact with fire or lava.
There are plenty of lava rivers nearby, so just bait the Paletoss over to one by having it charge you, and then once it has been thawed, a bomb-shaped timer will appear above it’s head. Let the timer run down and it will split in two, with both individual halves of the Paletoss Grande being an individual Paletoss.
For a short while after splitting, Paletoss can just be grabbed, but if they are not stunned, you can stun them with a tripwire, allowing them to be grabbed.
Paletoss Grande

Spawn Conditions: Available at any time in any weather.
Near the entrance to the cave you’ll find a Paletoss Grande, which will aggressively charge you, freezing you if it comes into contact. In order to split it into two Paletoss, you’ll need to bring it into contact with fire or lava.
There are plenty of lava rivers nearby, so just bait the Paletoss over to one by having it charge you, and then once it has been thawed, a bomb-shaped timer will appear above it’s head. If the timer reaches zero, the Paletoss Grande will split into two smaller Paletoss, which you don’t want if you intend on catching the Grande.
You will need to trip it with a tripwire before the timer reaches zero, which will stun it, allowing you to grab it with ![]() .
.
Red Banopper
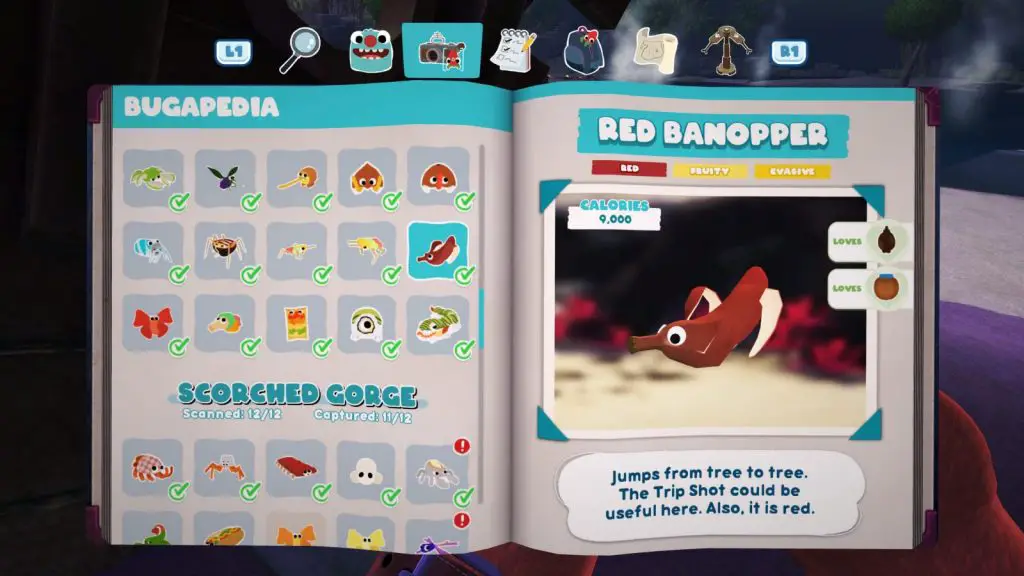
Spawn Conditions: Available at any time in any weather.
The Red Banopper can be found hopping between trees in the middle of the water. In order to catch it, you’ll need to set up a tripwire in it’s path, so that it gets stunned as it jumps between two trees. Once stunned, you can pick it up with ![]() .
.
Flamin’ Cheepoof
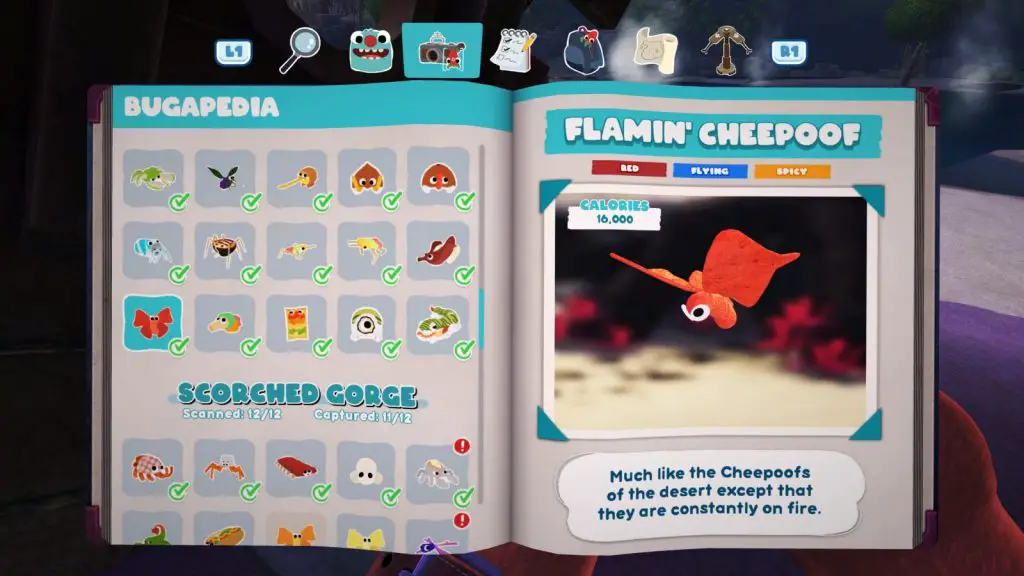
Spawn Conditions: Available at any time in any weather.
Two Flamin’ Cheepoofs can be found in the lava cave, and they are the most difficult Bugsnak to capture. First, you’ll need to get the Paletoss Grande to follow you into the cave. You’ll need to make sure it doesn’t thaw, too, as we’ll use it’s frostiness to cool off the Cheepoof once we stun it.
If the Paletoss Grande does thaw, let it split into two Paletoss, as they can be used too, and will re-freeze if they stay away from the lava for long enough.
With the Paletoss in the room, prepare your Trip Shot. Scan the Flamin’ Cheepoofs and you’ll see that one of them has a lower flight path than the other. Typically their flight paths mean they will stay over the lava 95% of the time, which we don’t want as the Paletoss then won’t be able to reach them. However, the one with the lower path goes over the rocks at the edge of the lava in the corner of the room, near the entrance.
Place the Trip Shot underneath this portion of the flight path which is not over the lava, and fire it directly upwards at the ceiling, creating a vertical tripwire. When the Cheepoof hits it, it will fall onto the ground next to the lava, where the Paletoss can get to it and cool it down, giving you ample opportunity to grab it and add it to your collection.
Sherbie
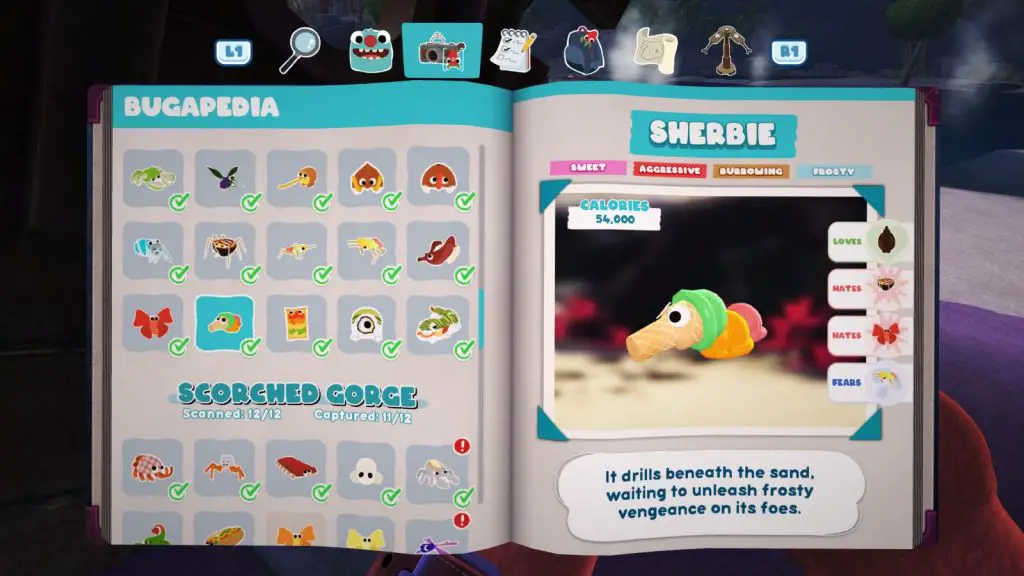
Spawn Conditions: Available at any time in any weather.
Sherbie can be found on the part of the coast which juts out into the ocean, past the Paletoss and opposite the cave entrance. To bring it out from underground, just shoot some chocolate sauce on the ground.
It’s frozen and you will need to defrost it before you can grab it, so create a trail of chocolate splotches or use the buggy ball coated in chocolate to bait it over to the nearby lava stream, where you can defrost and it and then grab it with ![]() once it stops burning.
once it stops burning.
Fruity Snakpod
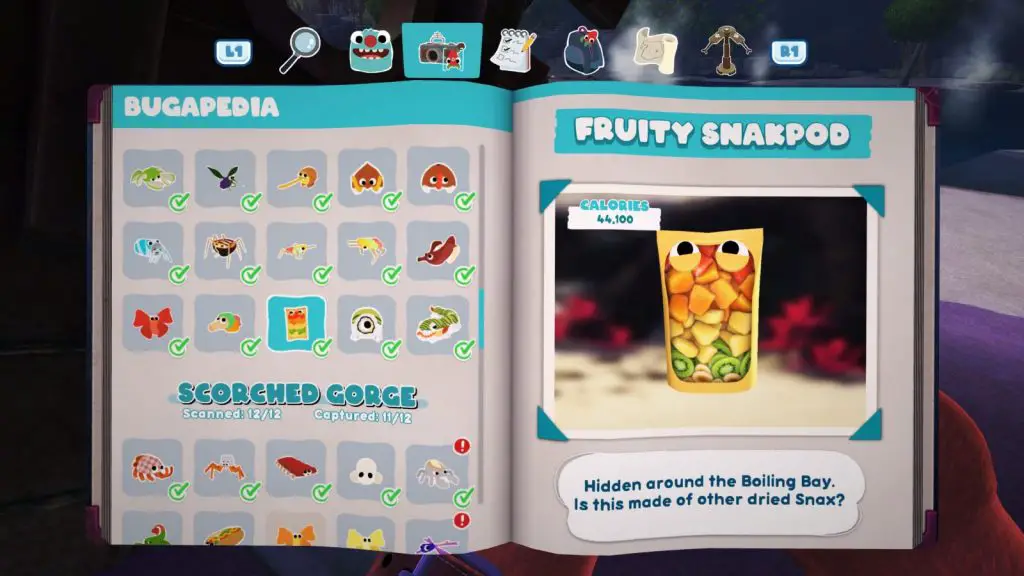
Spawn Conditions: Available at any time in any weather.
Head out to the shipwreck with the treasure chest on a small island out to sea. There, on one of the upper-most wooden beams of the shipwreck, you’ll see one of these bugsnax. Use the Snakgrappler to grab it.
Minimaki
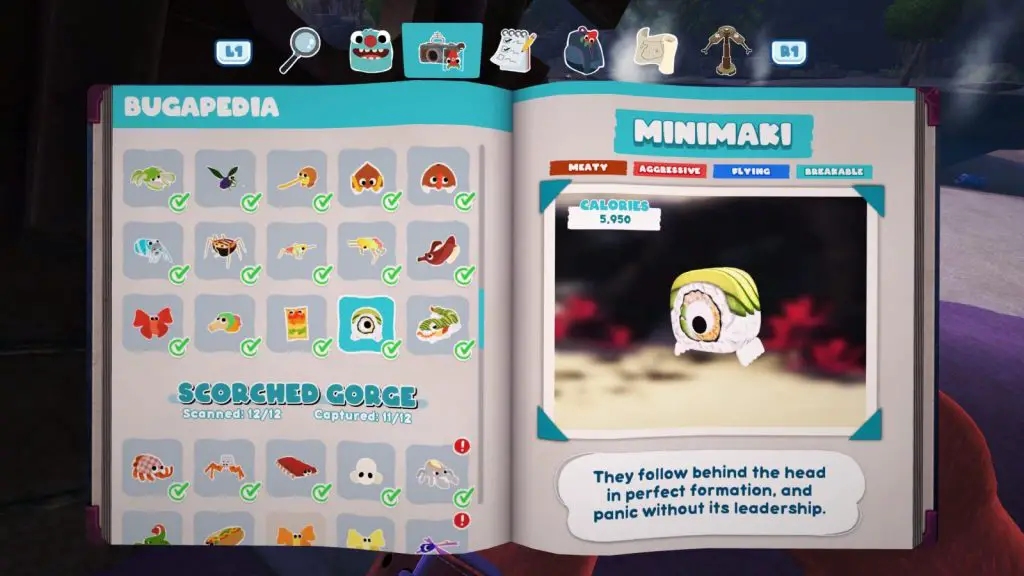
Spawn Conditions: Available at any time in any weather.
Part of the boss you’ll fight during the “Dance with the Dragon!” mission given to you by Wiggle. Read the Bossy Bugs trophy guide for more info.
Megamaki
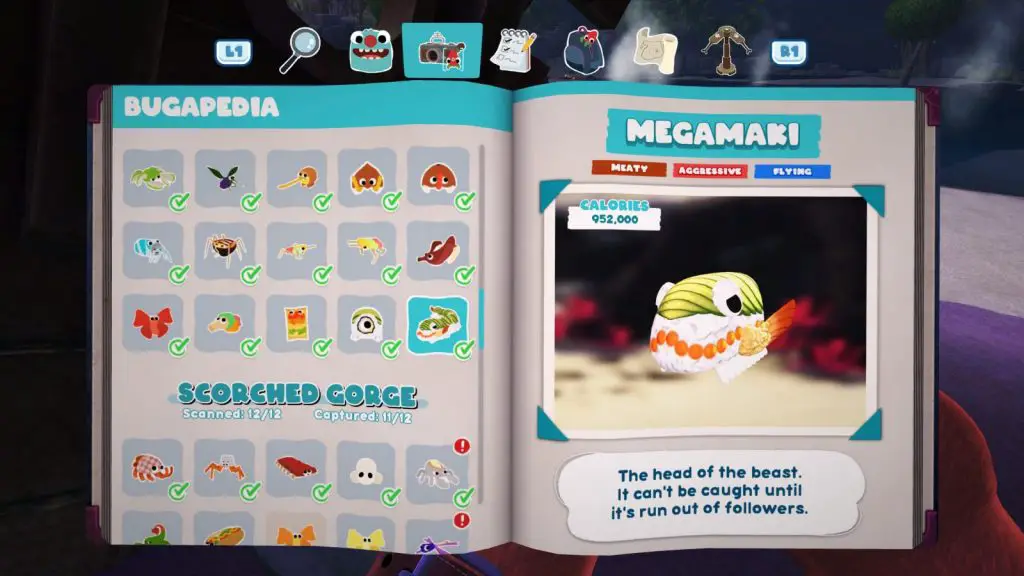
Spawn Conditions: Available at any time in any weather.
The boss you’ll fight during the “Dance with the Dragon!” mission given to you by Wiggle. Read the Bossy Bugs trophy guide for more info.
Scorched Gorge
BBQ Bunger
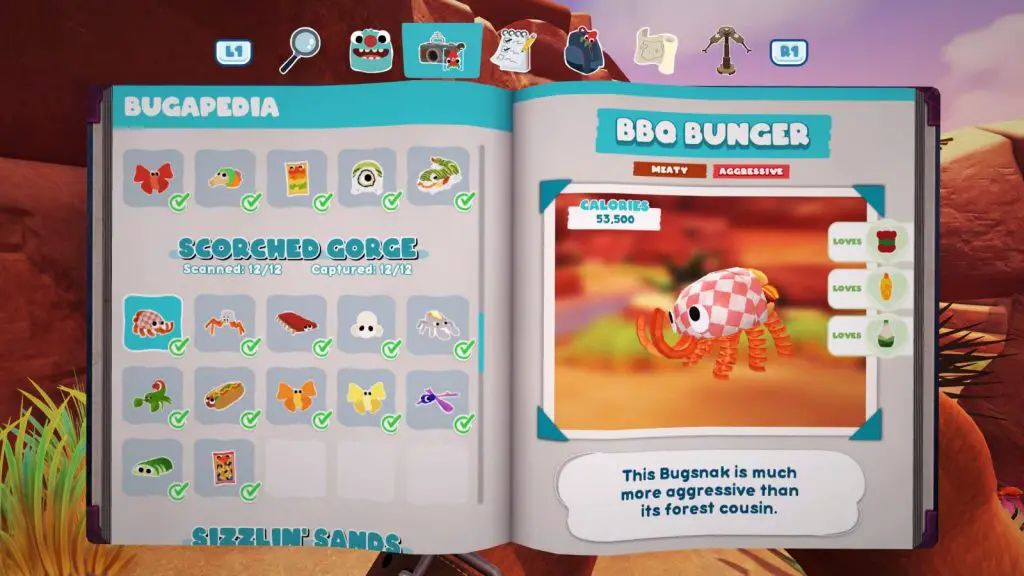
Spawn Conditions: Available at any time in any weather.
Place a tripwire in its path to stun it. Once stunned, you can press ![]() to pick it up.
to pick it up.
Sweet Fryder
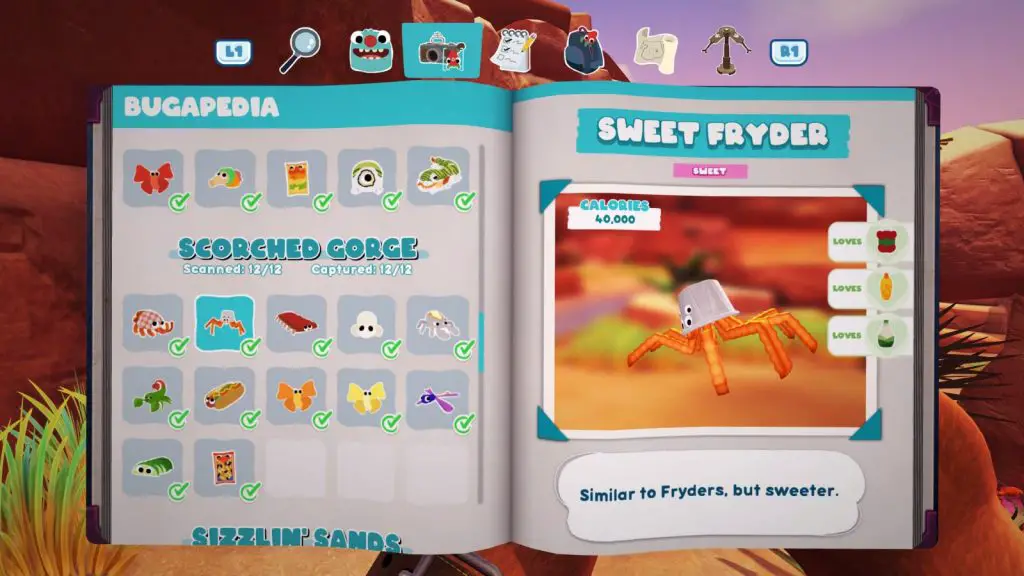
Spawn Conditions: Available at any time in any weather.
The Sweet Fryder can be found on a rocky plateau at the edge of the level which always has a strong wind blowing across it. To capture it, place the Lunchpad on the opposite cliff edge with the Trap placed on it. Aim and fire the trap at the fryder and be ready to press ![]() to capture it as soon as it is in range.
to capture it as soon as it is in range.
Ribblepede
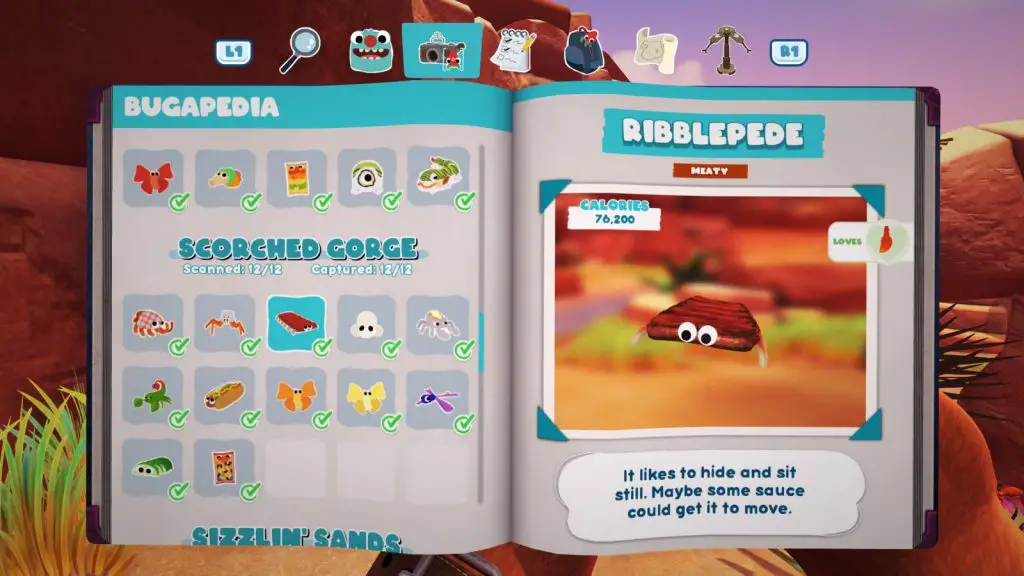
Spawn Conditions: Available at any time in any weather.
Found on the walls of the abandoned houses in the ruins along the edge of the area. Place a trap on the ground and coat it in hot sauce, the ribblipede will then walk right into your trap.
Poptick
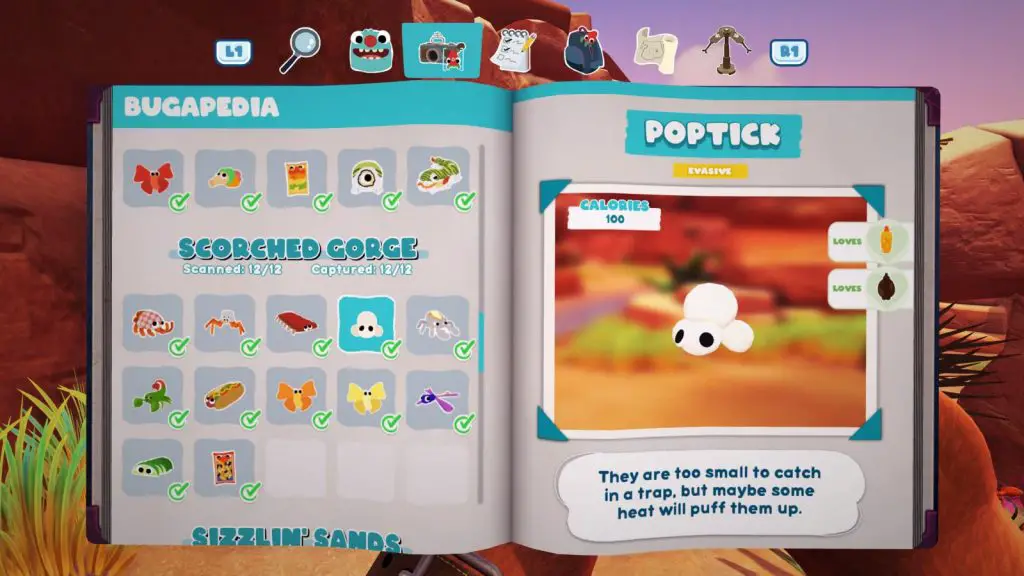
Spawn Conditions: Available at any time in any weather.
You will find them in their tiny un-popped form around the edges of the main plateau, in the lower portion of the canyon. They’ll need to first be popped before they can be captured. To do this, hit them with hot sauce while they’re near a Scorpenyo. Scorpenyos hate hot sauce so it will shoot a fireball at the Poptick, setting it on fire.
Wait a short while and the Poptick will pop, turning into it’s popped form, which can now be caught with a simple trap placed in its patrol route.
Spuddy
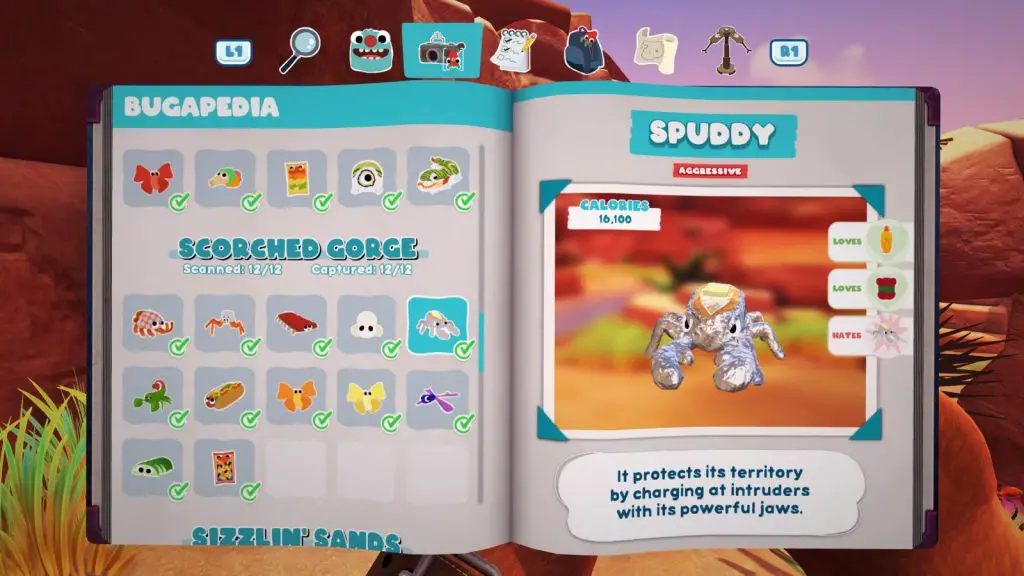
Spawn Conditions: Available at any time in any weather.
Spuddies are hyper-aggressive and will attack anything that gets near to them… including other Spuddies. If you can bait two near each other, they’ll stun one another allowing you to pick them up with ![]() . This even happens naturally quite a lot.
. This even happens naturally quite a lot.
Alternatively, you can stun them with a tripwire.
Scorpenyo
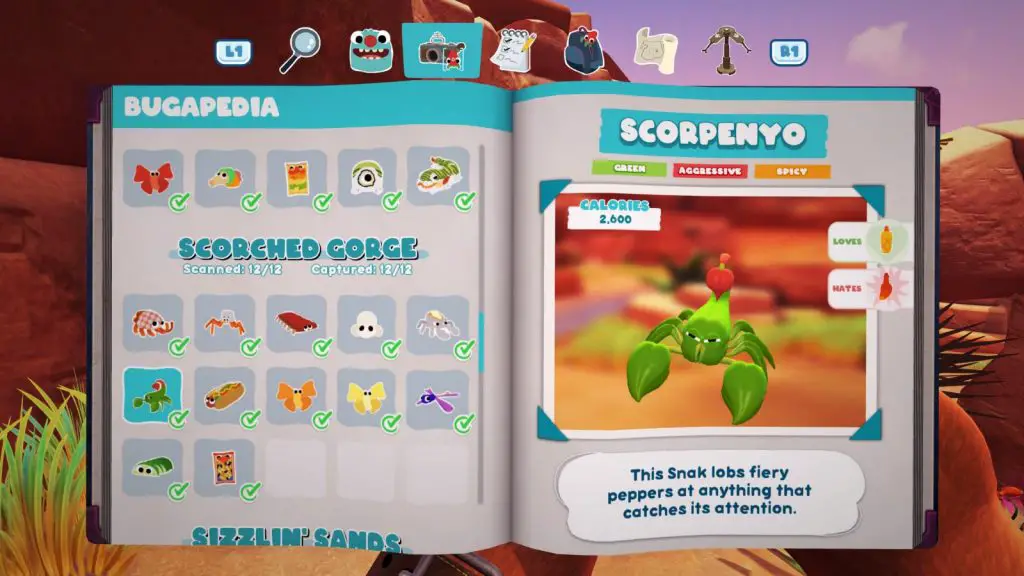
Spawn Conditions: Available at any time in any weather.
To capture a Scorpenyo, you’ll first need to cool it off. The easiest one to catch is under the bridge at the back of the level which leads to the Sizzlin’ Sands area. Simply put a tripwire in its path and it will drop down into the water below it, where you can simply pick it up.
Shy Weenyworm
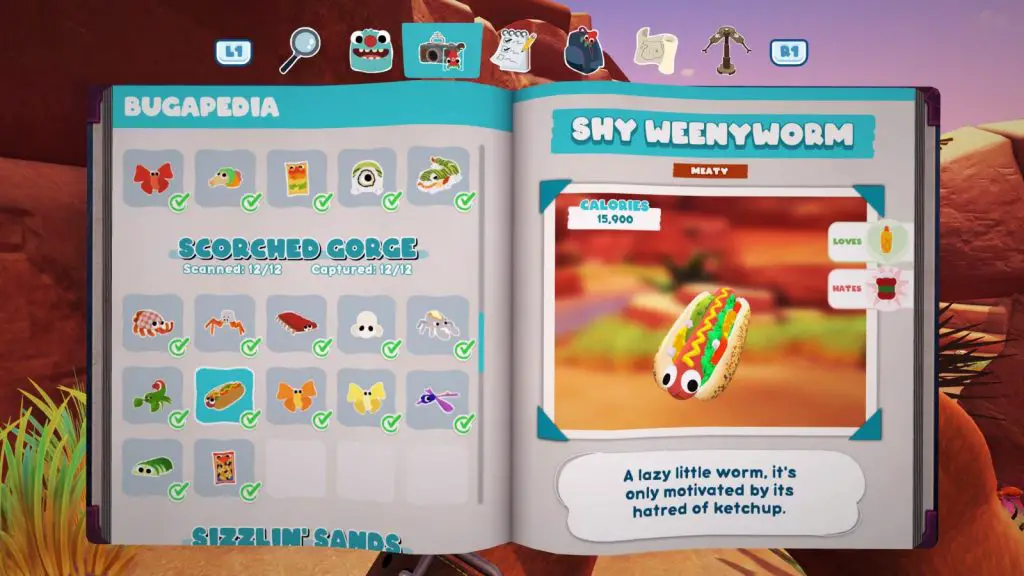
Spawn Conditions: Available at any time in any weather.
The Shy Weenyworm is found in a secret room that you’ll need to find as part of the main quest to get a character to return to Snaxburg. Along the edge of the map, near the windy plateau where the Sweet Fryder is found, there’s a cracked wall which you can break by having the nearby Spuddy charge at it.
Breaking this wall will grant you access to the secret room where the Shy Weenyworm is found. Place a trap on the ground in its path to easily grab it.
Cheepoof
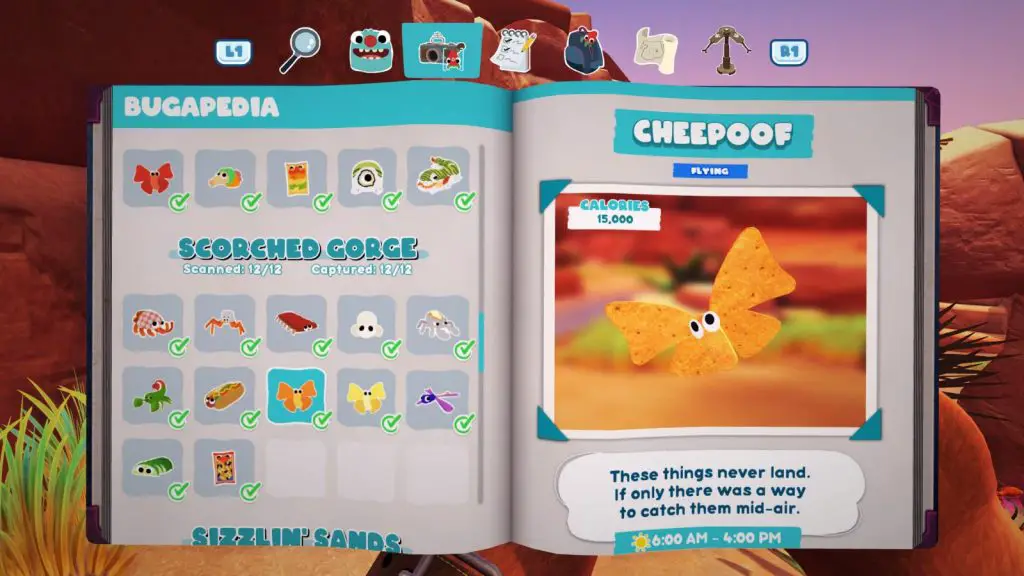
Spawn Conditions: Available from 6AM to 4PM in any weather.
Cheepoofs are found in several places throughout the area, but you’ll first see it flying around a cactus on the plateau ahead of you when you enter the area from Snaxburg.
To capture a Cheepoof, place a Trap on your Lunchpad and fire it at the Bugsnak. Once it is in range, hit ![]() to grab it right out of the air.
to grab it right out of the air.
White Cheepoof

Spawn Conditions: Available from 4PM to 6AM in any weather.
White Cheepoofs appear everywhere the Cheepoof appears, just at night instead of the day.
To capture a White Cheepoof, place a Trap on your Lunchpad and fire it at the Bugsnak. Once it is in range, hit ![]() to grab it right out of the air.
to grab it right out of the air.
Crystal Sweetiefly
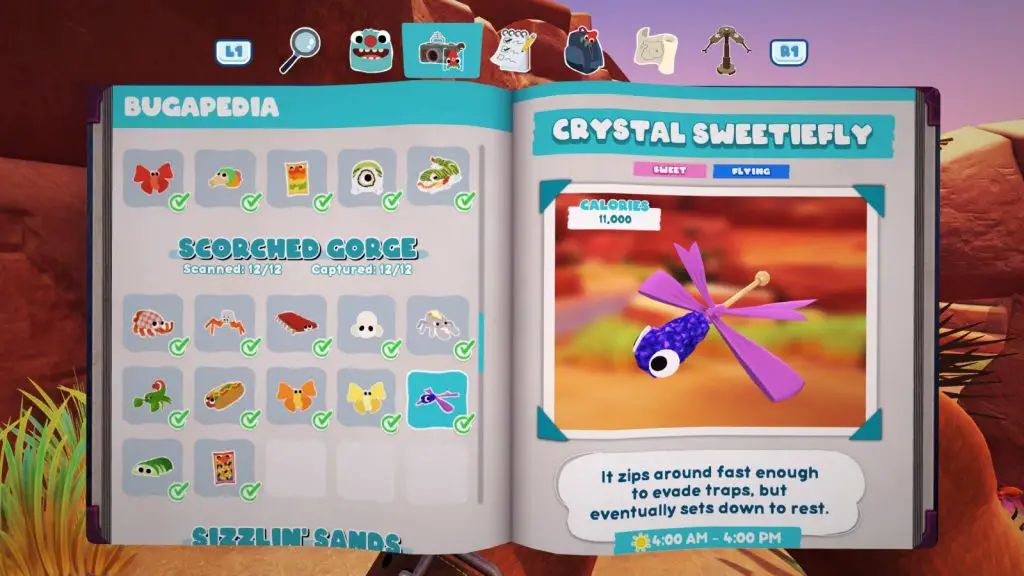
Spawn Conditions: Available from 4AM to 4PM in any weather.
A Crystal Sweetiefly can be found flying around near the ruins, stopping to take a rest on one of the upper walls of the ruined area. Simply place a tripwire in it’s path, or at it’s resting spot, to stun it so you can grab it with ![]() .
.
Green Peelbug
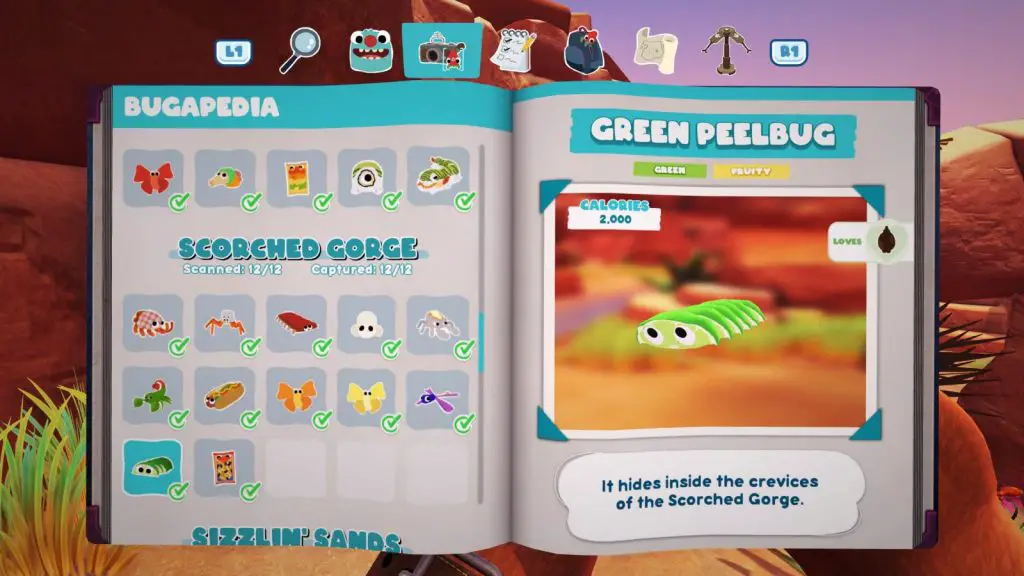
Spawn Conditions: Available at any time in any weather.
Like all Peelbugs, the Green PEelbug is found in small holes which you will need to send your Buggy Ball into.
Place a trap at the opposite entrance to the Peelbugs tunnel so that when your Buggy Ball drives it out it will come out right into your trap’s range.
Puffy Snakpod

Spawn Conditions: Available any time in any weather.
There are many places to find a Puffy Snakpod in this area, the one I grabbed was in the ruin area, up on one of the higher walls. Simply use the Snakgrappler to snatch it off the wall and add it to your collection.
Sizzlin’ Sands
Tacroach
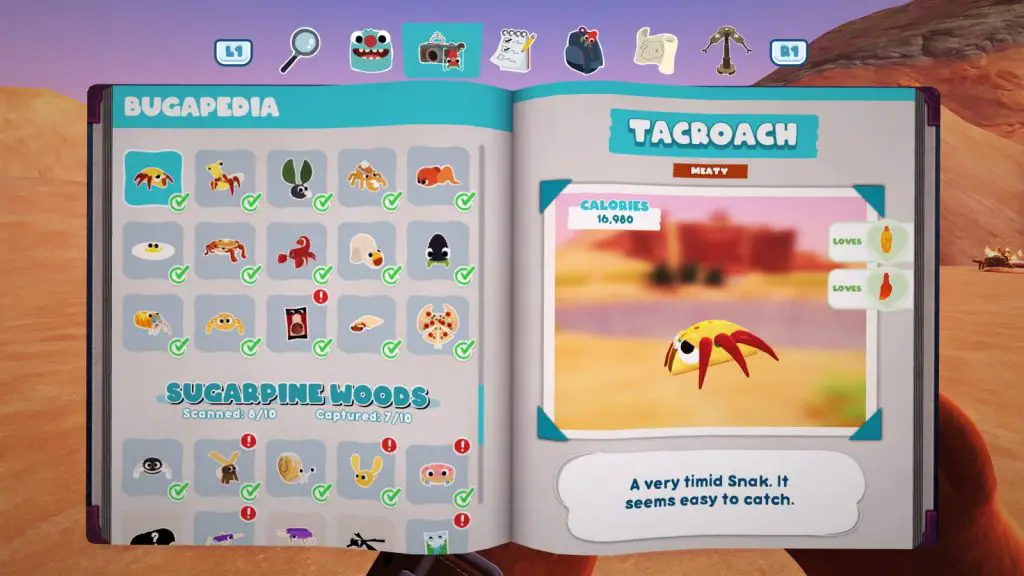
Spawn Conditions: Available at any time in any weather.
Tacroaches don’t actually spawn on their own. You will need to break apart a Preying Picantis in order to catch one. To break apart a Picantis, bait it over to the oasis and into the water, or close enough that the Sodie in the oasis sprays it with water. Now, once it is cooled off, wait for the bomb-shaped timer to reach zero, at which point it will break up into it’s various components.
Once you’ve got a Tacroach to capture, coat a trap in hot/cheese sauce and grab it once it comes into range.
Preying Picantis
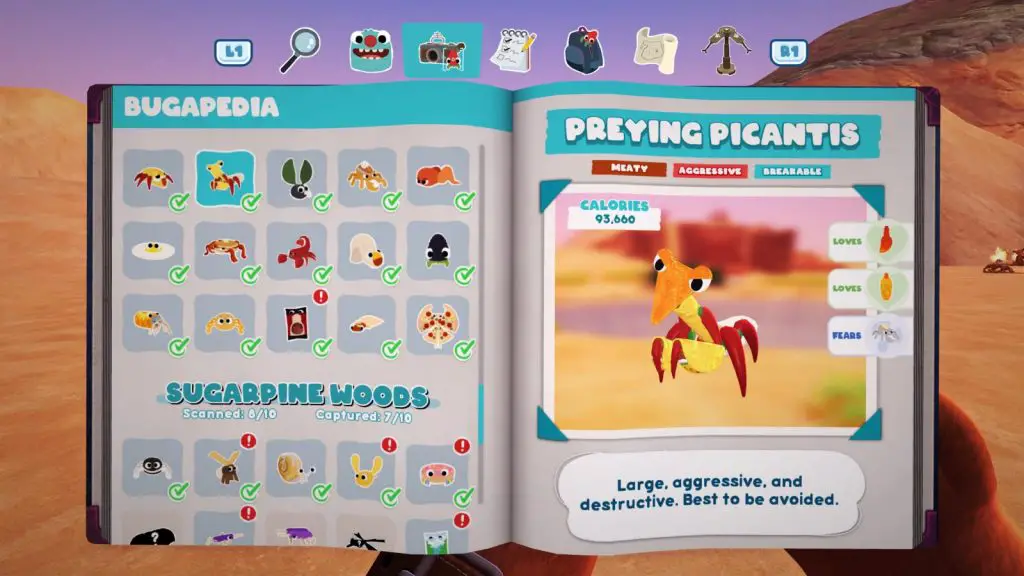
Spawn Conditions: Available at any time in any weather.
There are two Preying Picantises in this area, both fairly close to each other, but the easiest one to bait is the one on lower ground.
Bait it over to the oasis and either bring it into the water or close enough that the Sodie sprays it with water. Once it is cooled down, a bomb-shaped timer will appear and you’ll need to capture the Picantis before the timer reaches zero or it will break up into its component parts.
To do so, stun it with a tripwire and then grab it with ![]() .
.
Black Lollive
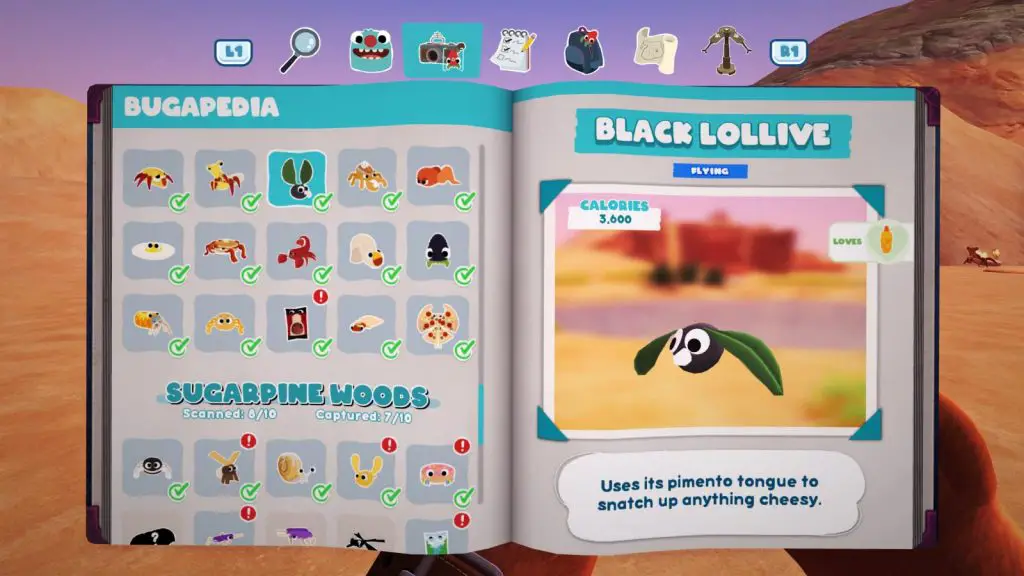
Spawn Conditions: Available at any time in any weather.
Found flying in a circle around the Oasis. At a certain point in the Black Lollive’s flight path, at the edge of the oasis, it flies low enough that you can just capture it with the trap.
Loaded Spuddy
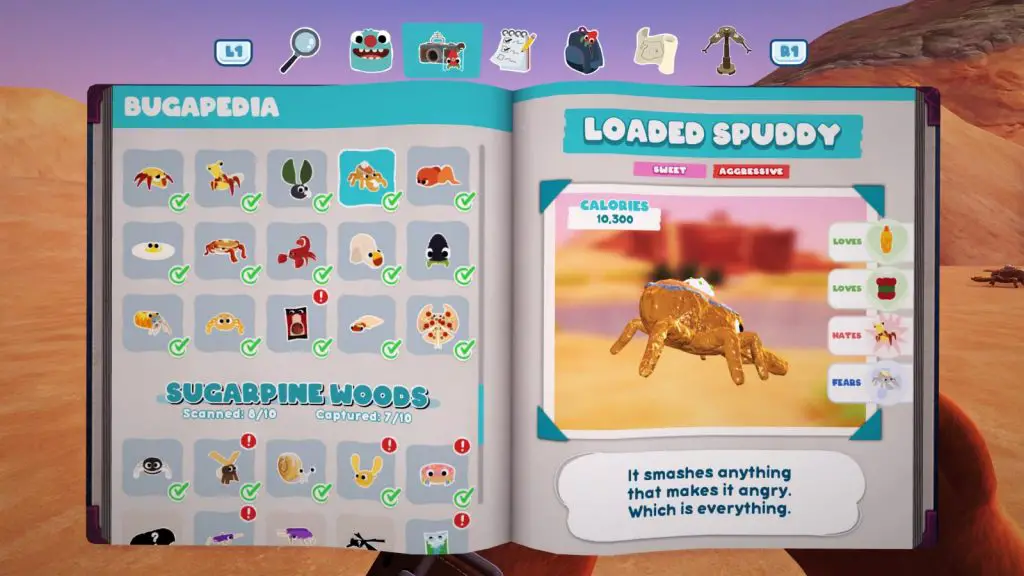
Spawn Conditions: Available at any time in any weather.
Found in several spots throughout the area. Simply stun it with the tripwire, or bait another Spuddy into headbutting it.
Buffalocust
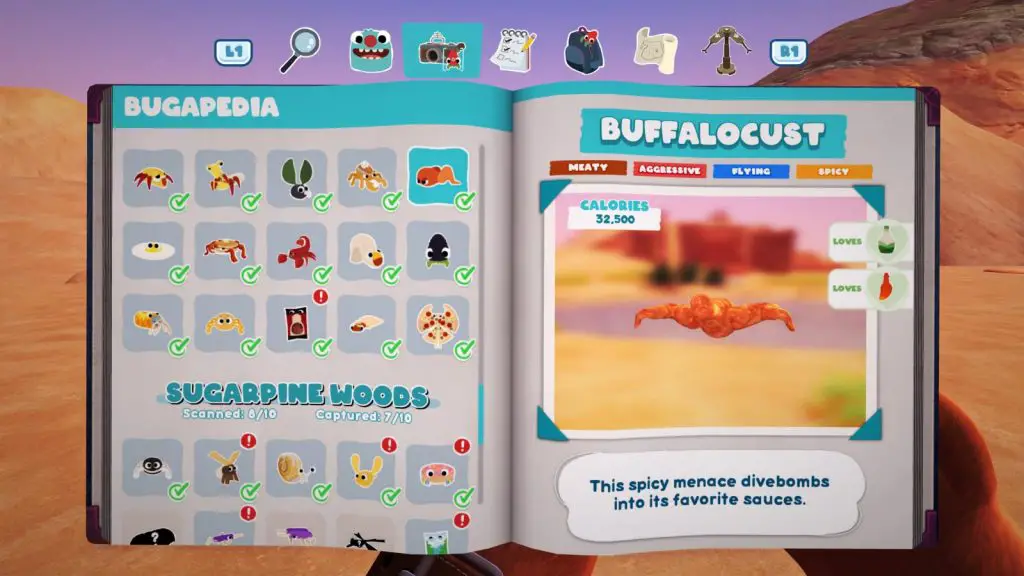
Spawn Conditions: Available at any time in any weather.
Found flying in a couple of spots in the area. Place a tripwire on the ground below and coat it in hot sauce or ranch dressing. The Buffalocust will fly right into the tripwire, allowing you to pick it up with ![]() .
.
Eggler
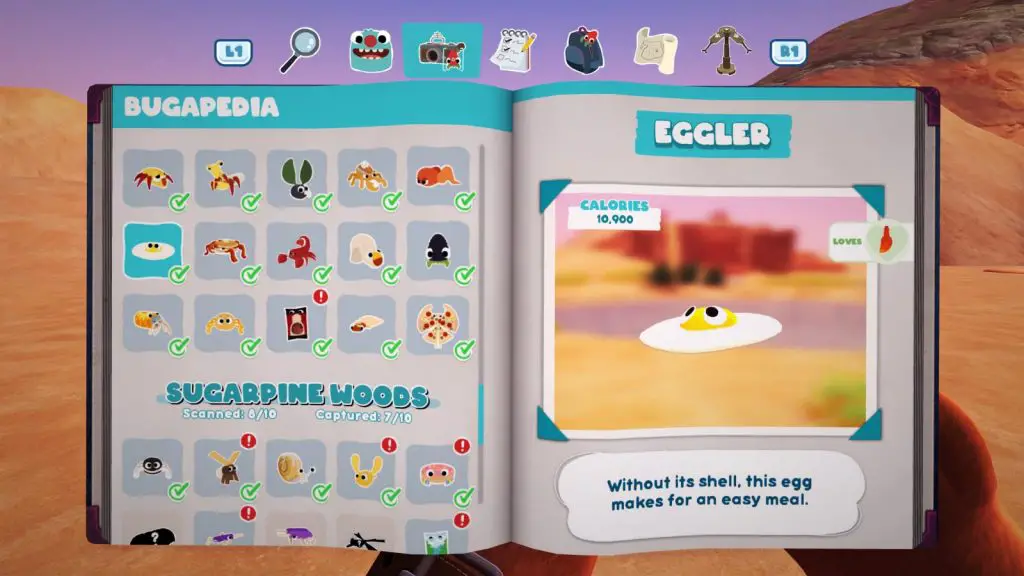
Spawn Conditions: Available at any time in any weather.
Next to the Preying Picantis on the raised platform that has stairs, you’ll find a whole egg. Throw this egg at a flaming Bugsnak (such as the Picantis) or place it in the path of a charging Spuddy, and it will crack open.
Once the Eggler is out of its shell you can catch it with a standard trap.
Flapjackarak
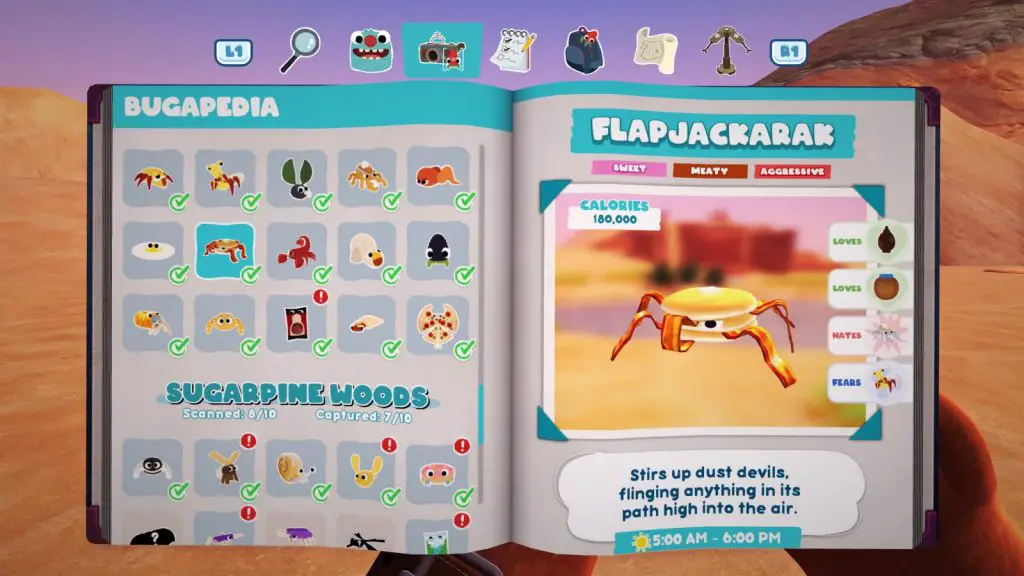
Spawn Conditions: Available between 5AM and 6PM in any weather.
Found in several places around the desert. Simply stun it by putting a tripwire in its path and then grab it with ![]() .
.
Scorpepper
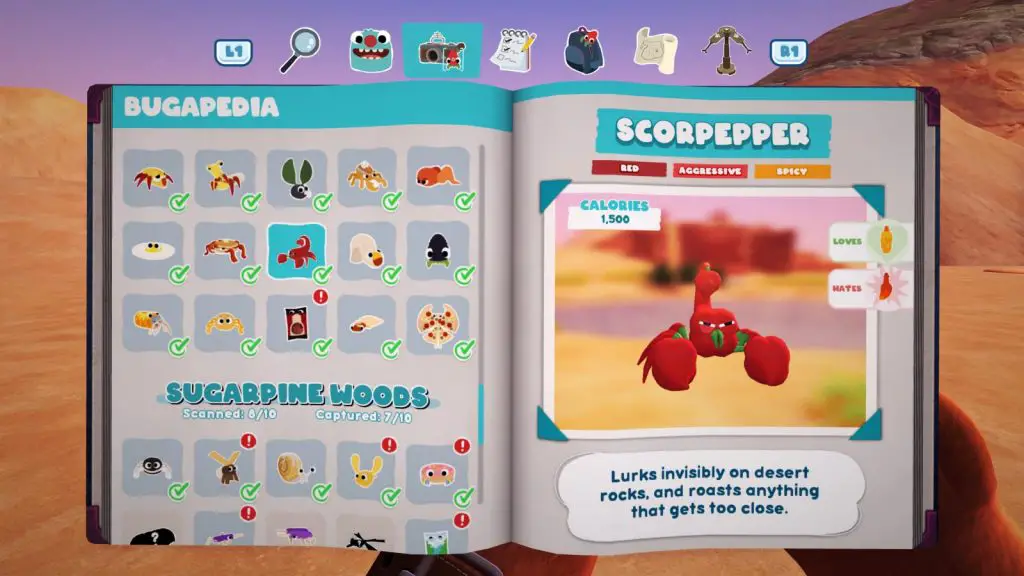
Spawn Conditions: Available at any time in any weather.
The Scorpepper is found on the side of the large stone structure where you first acquire Cheese Sauce. To capture it, lure it over to the oasis using a trail of Cheese Sauce, or a Buggy Ball coated in Cheese Sauce. Once it has been cooled off you can grab it with ![]() .
.
Incherrito
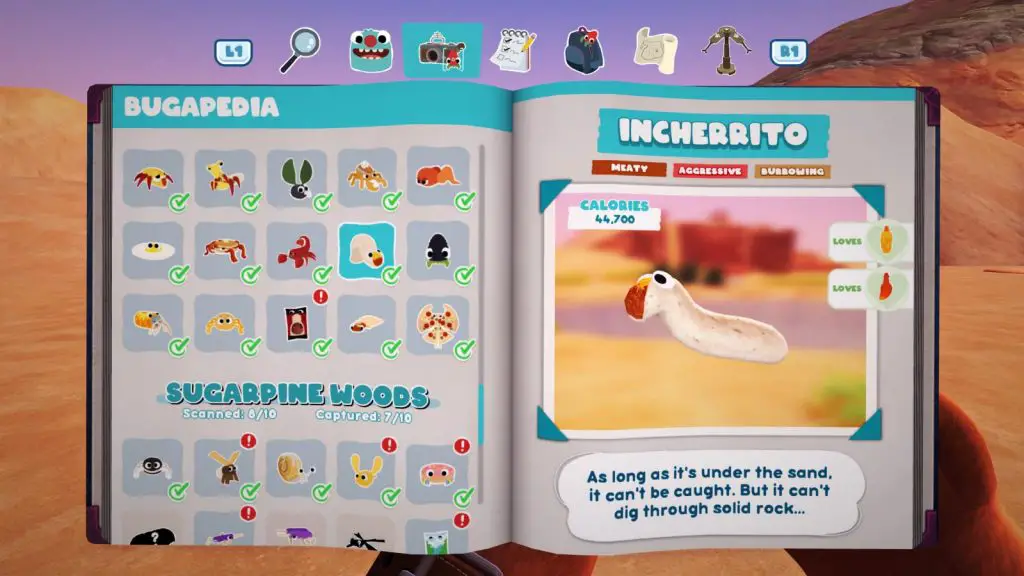
Spawn Conditions: Available at any time in any weather.
You can find an Incherrito in the underground caverns which you can open by squirting Ranch dressing on the cracked rocks in the floor near the Pyramid, causing a nearby Buffalocust to fly straight into it, opening up the entrance.
Alternatively, you can break up a Preying Picantis as the Incherrito is one of it’s component parts.
Squirt Cheese or Hot Sauce on a rocky surface to have the Incherrito surface and go up to the resulting splotch. Keep your distance, though, or it will burrow underground again. Once the Incherrito is on a stone surface, run up to it and it will try to burrow into the rock, hitting its head and becoming stunned, at which point you can grab it with ![]() .
.
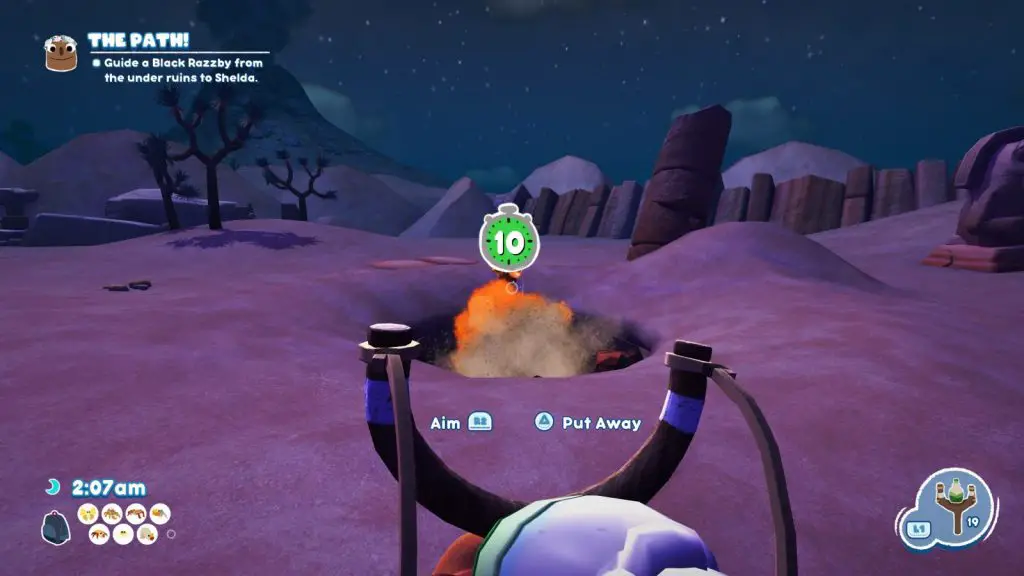
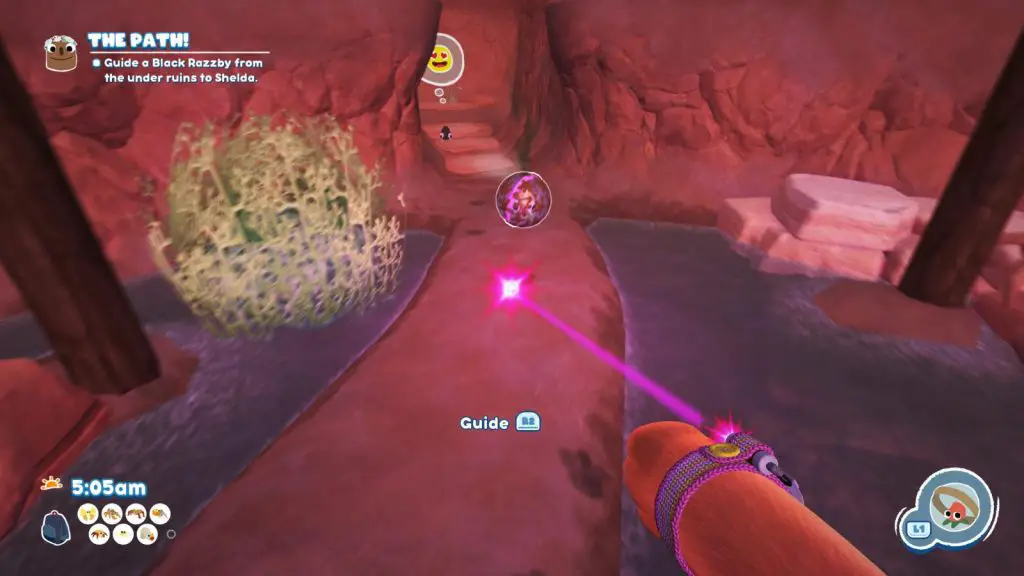
Black Razzby
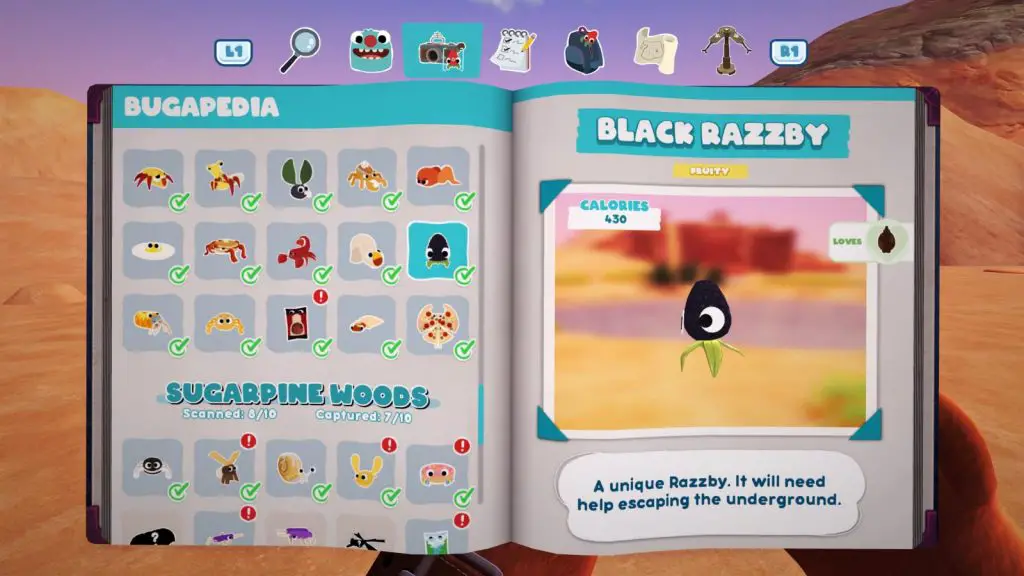
Spawn Conditions: Available at any time in any weather.
You can find a Black Razzby near the Incherritos in the underground caverns which you can open by squirting Ranch dressing on the cracked rocks in the floor near the Pyramid, causing a nearby Buffalocust to fly straight into it, opening up the entrance.
The Razzby can be baited with a chocolate-coated Buggy Ball, which you’ll need to do for a quest to bring it to the surface. Otherwise, when aiming to catch it, place a trap coated in chocolate sauce and it will run straight into the trap’s range.
Sodie D
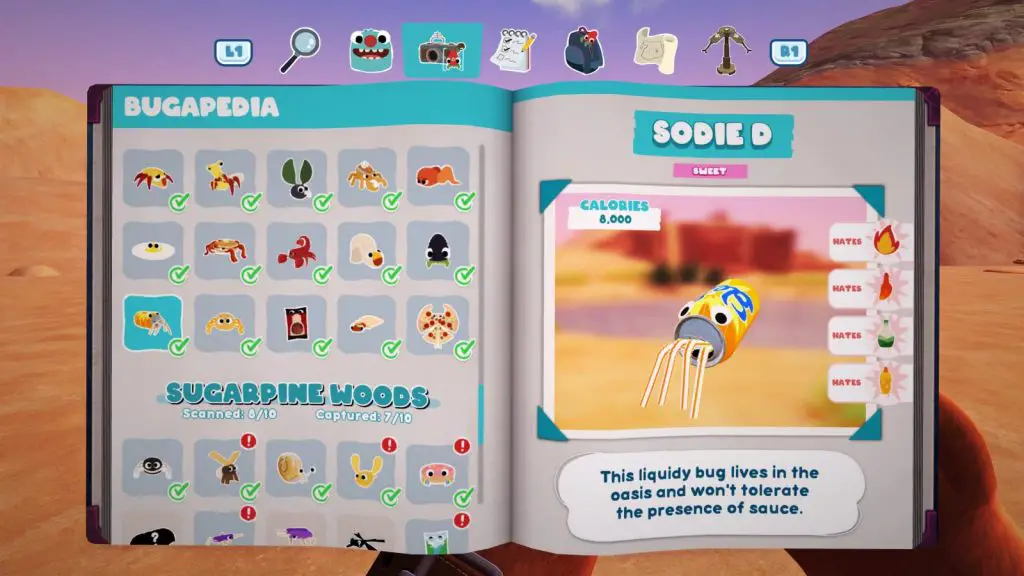
Spawn Conditions: Available at any time in any weather.
Found in the water at the Oasis. Just place a trap in its path and capture it when it is in range.
Cheezer
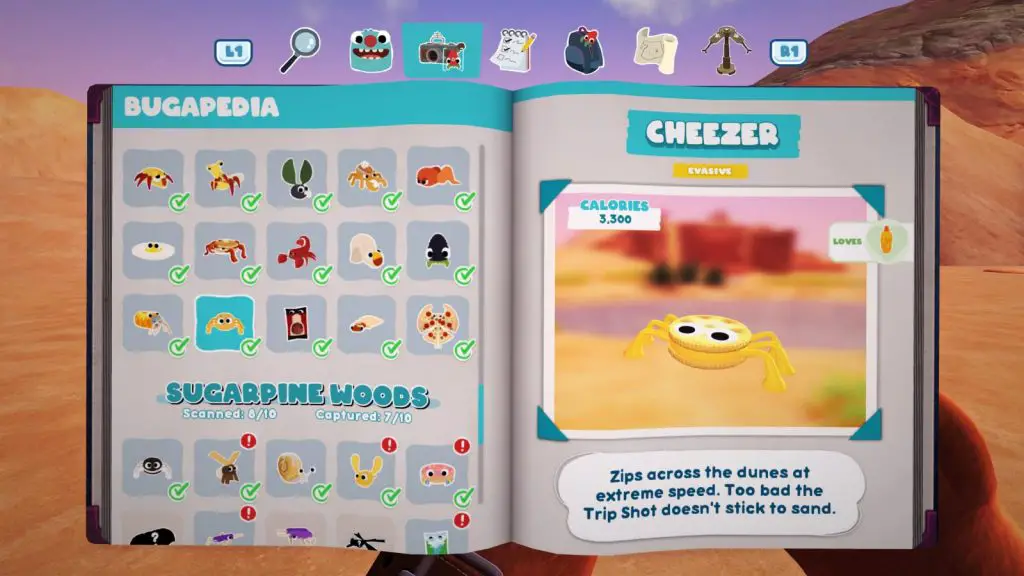
Spawn Conditions: Available at any time in any weather.
You can find a Cheezer near the area’s entrance, running around the map. Place a Tripwire in its path to stun it, and then walk over and pick it up with ![]() .
.
Meaty Snackpod
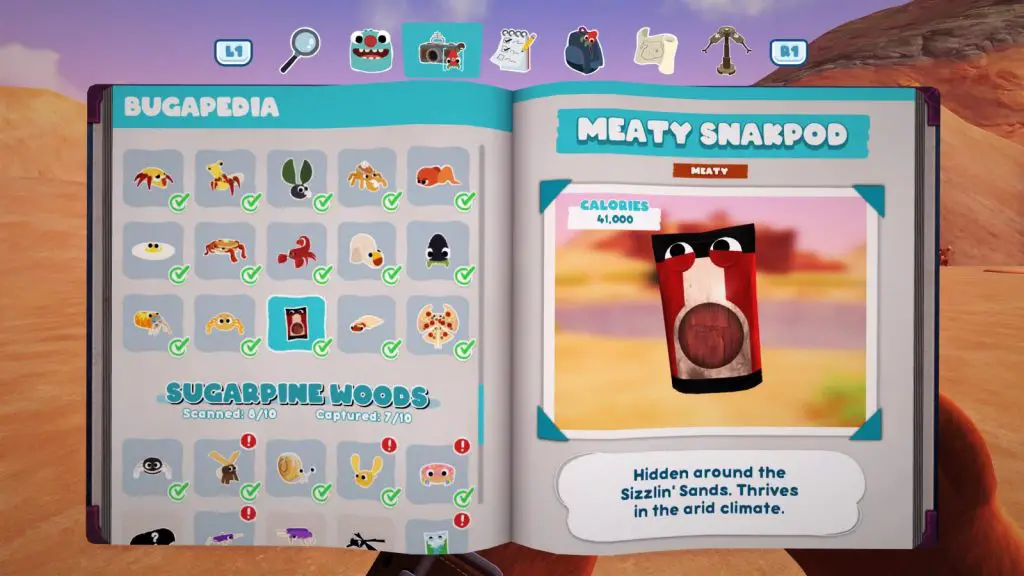
Spawn Conditions: Available at any time in any weather.
You can find Meaty Snackpods in several places on the map. I found mine on a pillar near the Pyramid. To grab it just use the Snakgrappler to pull it down and add it to your collection.
Bombino

Spawn Conditions: Available at any time in any weather.
Present at the boss fight during the “A Slice of Heaven!” mission given to you by Cromdo. Read the Bossy Bugs trophy guide for more info.
Mothza Supreme

Spawn Conditions: Available at any time in any weather.
The boss you’ll fight during the “A Slice of Heaven!” mission given to you by Cromdo. Read the Bossy Bugs trophy guide for more info.
Sugarpine Woods
Kwookie
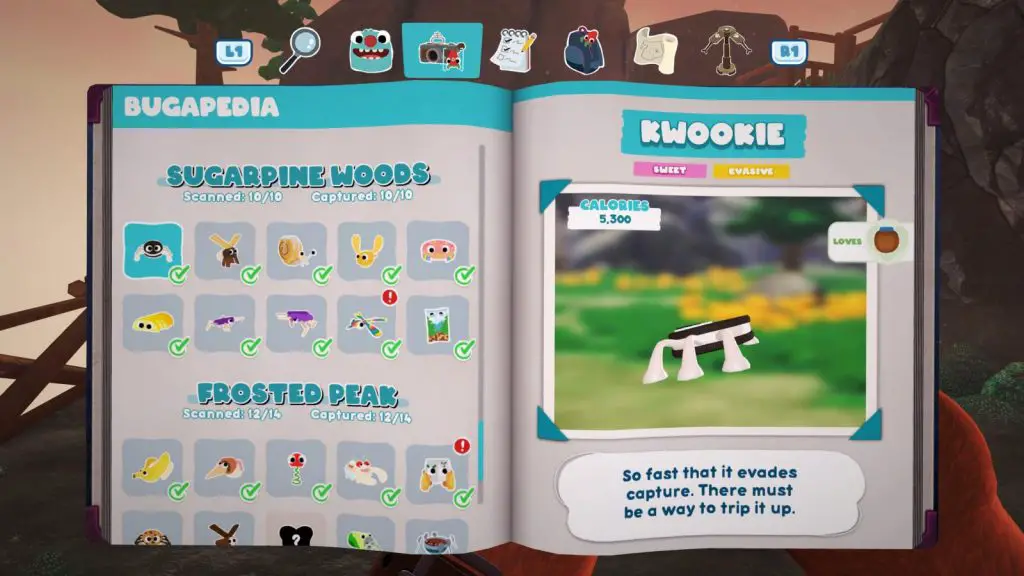
Spawn Conditions: Available at any time in any weather.
A Kwookie can be found running along a set route near the entrance. Place a tripwire to stun it and then pick it up from the ground.
Charmallow
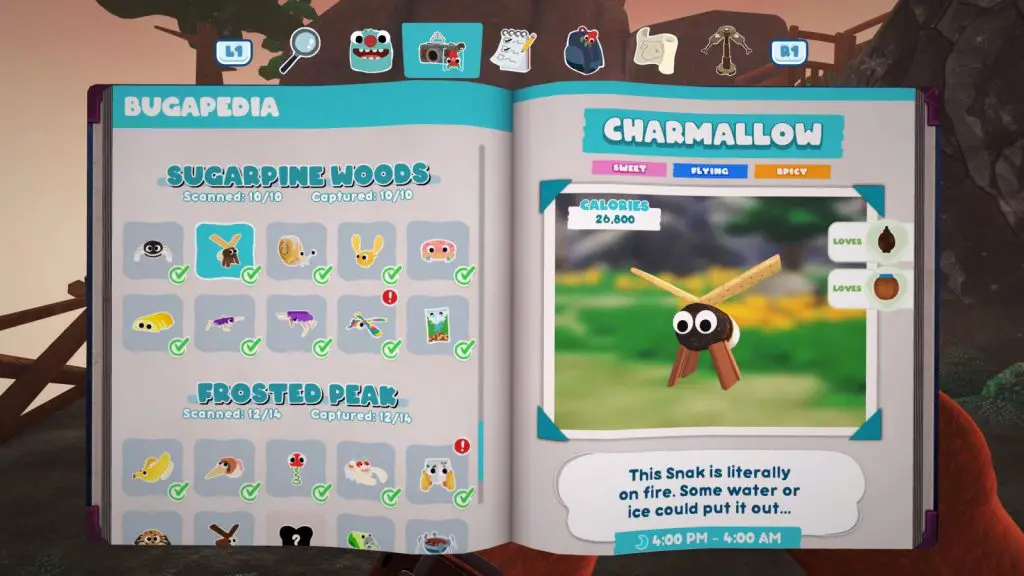
Spawn Conditions: Available between 4PM and 4AM in any weather.
The easiest Charmallow to capture is near the Big Bopsicle on the left side of the map when you enter from Snaxburg. Coat the Big Bopsicle in Peanut Butter and the Charmallow will fly at it, being extinguished by the Bopsicle’s cold temperature.
You can then pick up the Charmallow with ![]() .
.
Cinnasnail
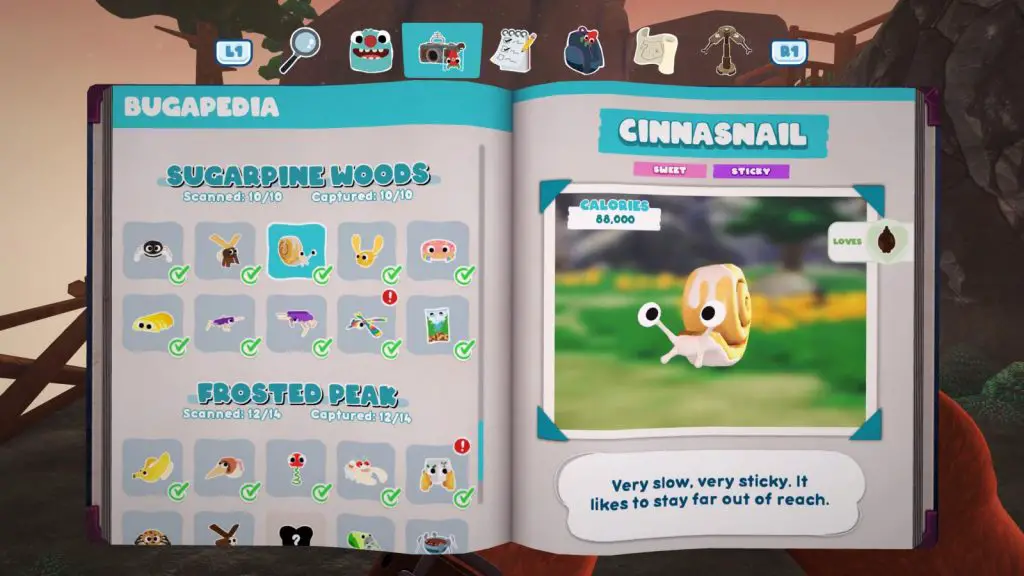
Spawn Conditions: Available at any time in any weather.
There are three Cinnasnails in the area and you’ll be asked to capture one with the Snakgrappler as part of Chandlo’s main questline. To capture one (such as the one near the basketball court) trip it with a tripwire and then use the Snakgrappler to collect it.
Hunnabee
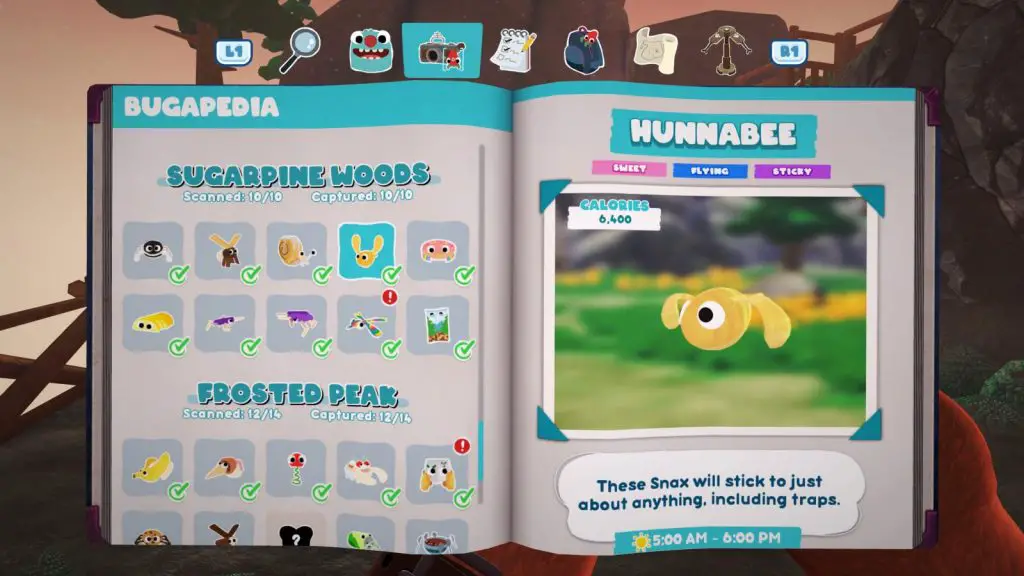
Spawn Conditions: Available from 5AM to 6PM in any weather.
You’ll find a group of Hunnabees to your left when you enter the area from Snaxburg. Place a Lunchpad below them and then put a trap on it. Simply fire the trap up at them and trigger it once a Hunnabee is in range to capture it.
Sprinklepede
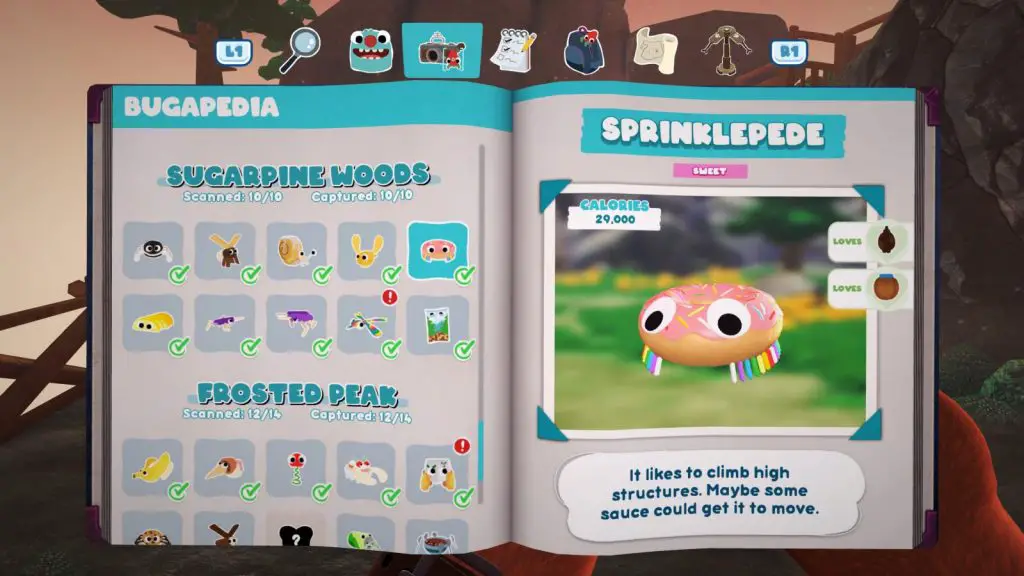
Spawn Conditions: Available at any time in any weather.
There’s only one Sprinklepede, found on the side of the watchtower near the entrance to Frosted Peak. Place a Lunchpad on the ground nearby with a trap on it and then launch the trap at the Sprinklepede. It will get knocked off the watchtower and begin falling. As it falls, it will come within range of the trap, and you can catch it before it hits the ground.
If you’re unsuccessful, the Sprinklepede will zoom off and complete a lap of the map before returning to the watchtower and jumping back up onto the watchtower. You can either place a Tripwire to stun it on its way back, or you can try to get it with the Lunchpad and Trap again.
Yellow Peelbug
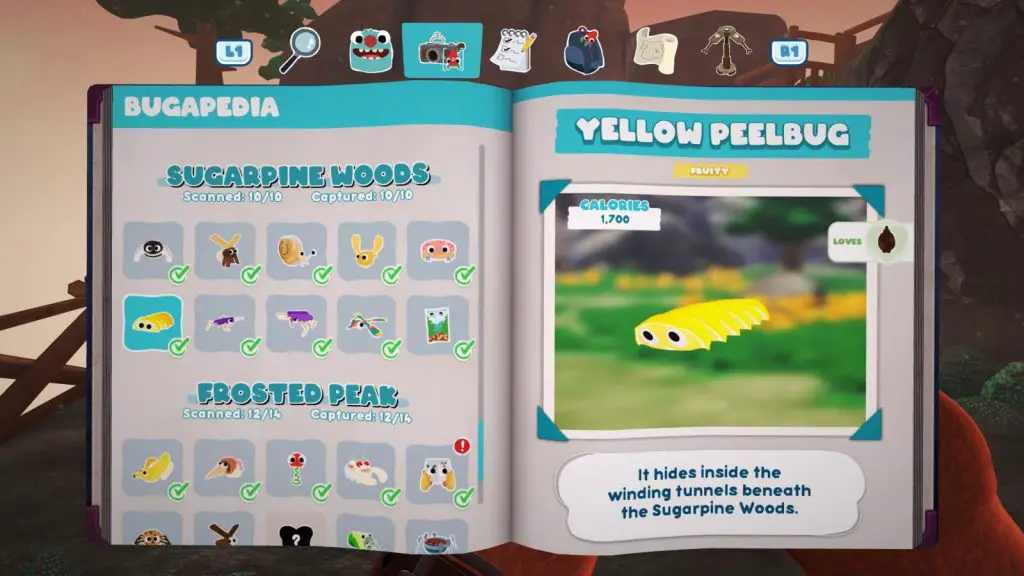
Spawn Conditions: Available at any time in any weather.
As with all other Peelbugs, it can be found inside holes like the one near the log cabin. Set a trap up at the opposite end and then send your Buggy Ball into the tunnel, forcing the Peelbug out and into your trap’s range. Trigger the trap to catch it.
Bopsicle

Spawn Conditions: Available at any time in any weather.
To get a Bopsicle, you’ll need to thaw a Big Bopsicle, and let its timer reach zero so that it splits into two Bopsicles. you can find a Big Bopsicle by heading left when you arrive in the area from Snaxburg and heading into the shady passage on that side.
You’ll need a Charmallow in order to thaw a Bopsicle, so be sure to sleep until night time. Hit the Bopsicle with some Peanut Butter to attract the nearby Charmallow, who will thaw the Bopsicle.
Once the Big Bopsicle splits, you’ll have a few seconds to collect the Bopsicles with ![]() , otherwise you can use a tripwire to stun them.
, otherwise you can use a tripwire to stun them.
Big Bopsicle
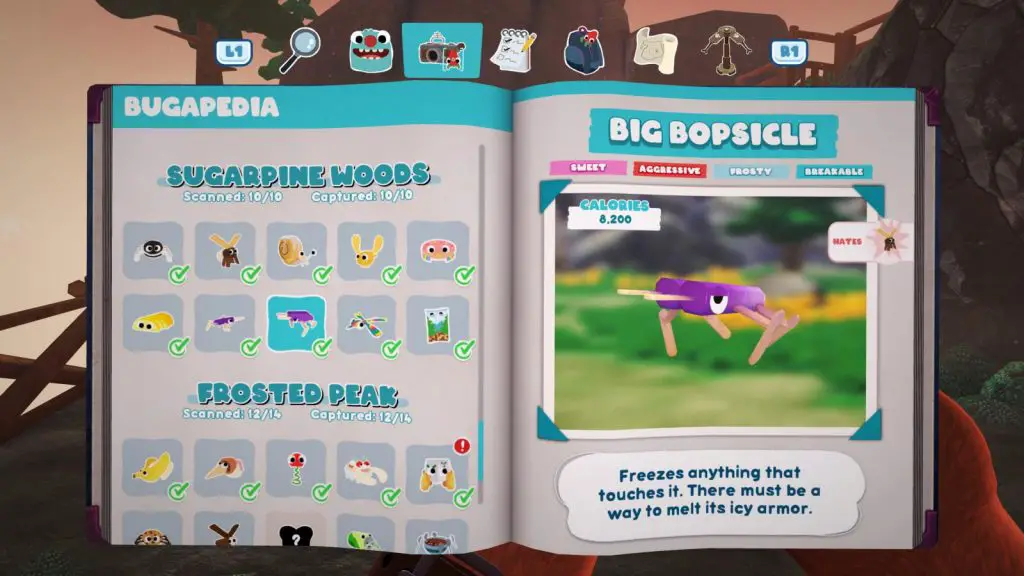
Spawn Conditions: Available at any time in any weather.
Before you can capture a Big Bopsicle you’ll need to thaw it out. You’ll need a Charmallow in order to thaw a Big Bopsicle, so be sure to sleep until night time. Hit the Big Bopsicle with some Peanut Butter to attract the nearby Charmallow, who will thaw the Big Bopsicle.
You will then need to hit and stun it with a Tripwire before the timer above its head can reach zero in order to collect it with ![]() . If the timer reaches zero it will split into two Bopsicles.
. If the timer reaches zero it will split into two Bopsicles.
Rainbow Sweetiefly
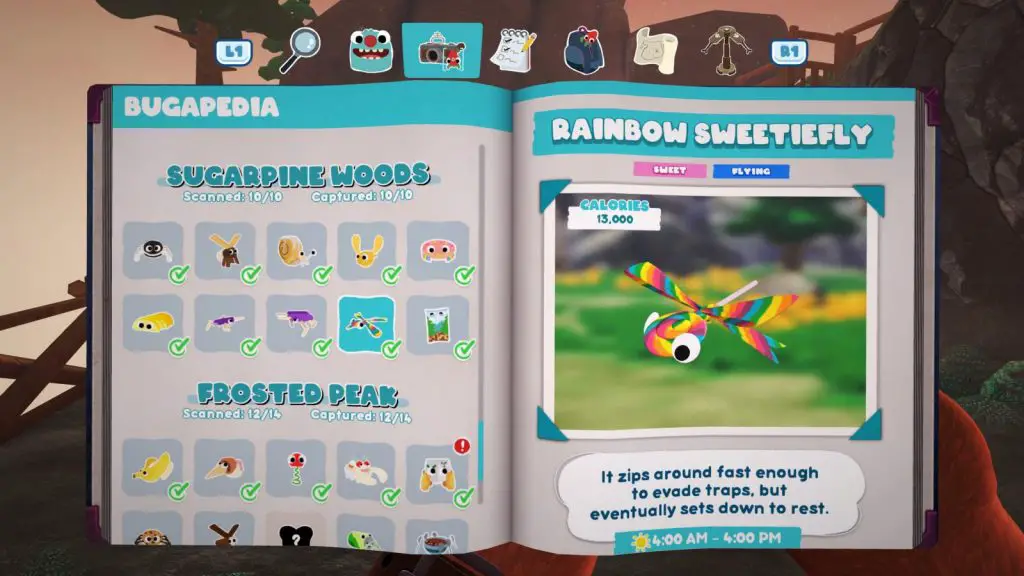
Spawn Conditions: Available at any time in any weather.
You can find a Rainbow Sweetiefly flying around near the Basketball Court. You’ll need to stun it with a tripwire and then grab it with the Snakgrappler to add it to your collection.
Nutty Snakpod
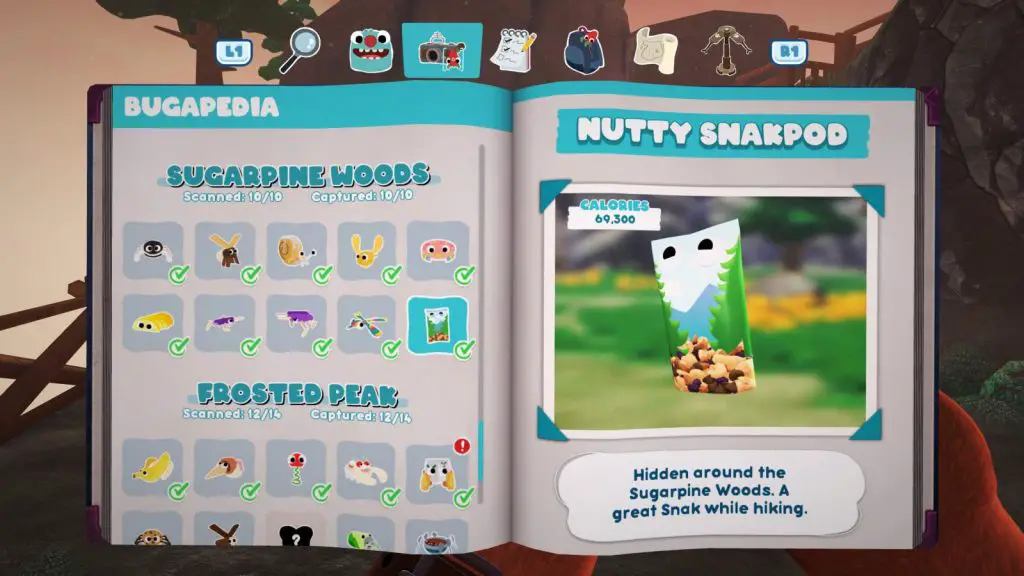
Spawn Conditions: Available at any time in any weather.
On the lower level, below where the Log Cabin is, there’s a cracked wall with a drawing of the Snakgrappler reticule on it. Pull the wall down with the Snakgrappler to reveal a small alcove containing a Nutty Snakpod. Approach it and grab it with ![]() or shoot it with the Snakgrappler to collect it.
or shoot it with the Snakgrappler to collect it.
Frosted Peak
Banopper
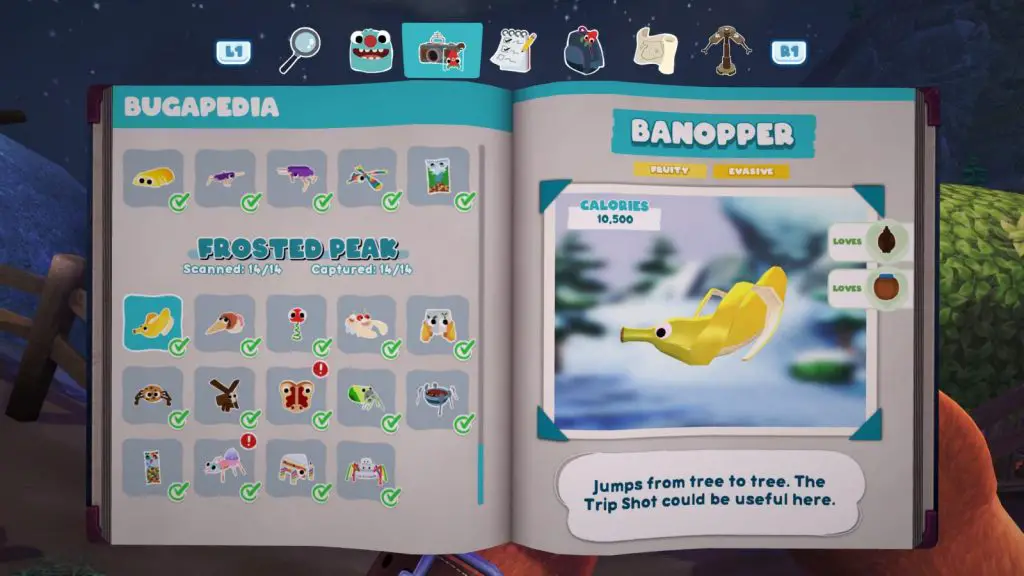
Spawn Conditions: Available at any time in any weather.
To spawn a Banopper, you’ll first need to split a Scoopy Banoopy up into its component parts. To do so, you can either place your Trip Shot in a fire source such as a campfire or a torch and then shoot it at the Scoopy Banoopy, or you can bait the Stewdler from inside the cave over to it.
The Scoopy Banoopy, once thawed, will have a bomb-shaped timer above its head, once this reaches zero the Bugsnak will break down into its component parts, one of which is the Banopper, which will retreat into the trees and begin hopping between them.
To capture it, place a tripwire in its path and then grab it after it has been stunned.
Scoopy
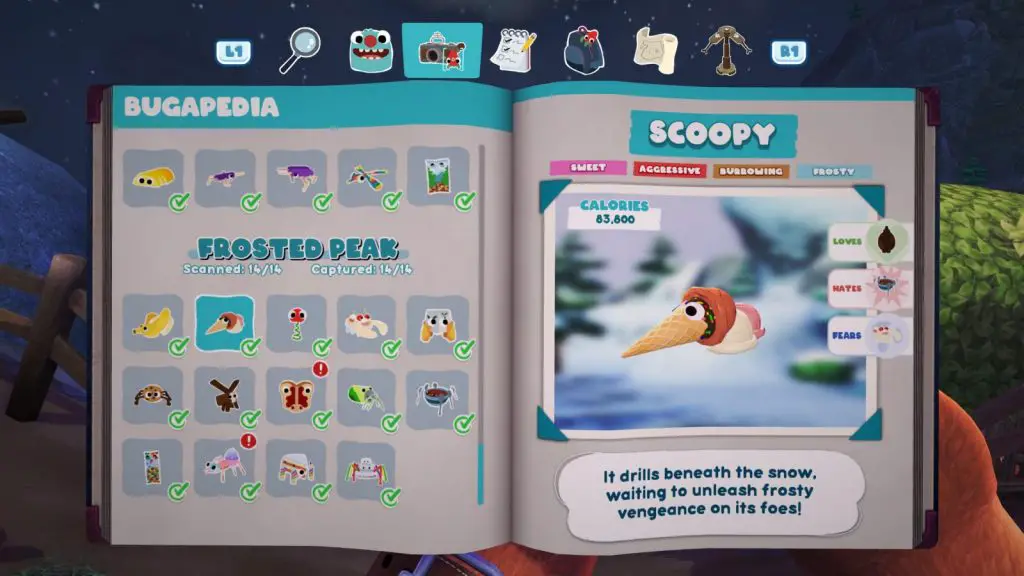
Spawn Conditions: Available at any time in any weather.
To spawn a Scoopy, you’ll first need to split a Scoopy Banoopy up into its component parts. To do so, you can either place your Trip Shot in a fire source such as a campfire or a torch and then shoot it at the Scoopy Banoopy, or you can bait the Stewdler from inside the cave over to it.
The Scoopy Banoopy, once thawed, will have a bomb-shaped timer above its head, once this reaches zero the Bugsnak will break down into its component parts, one of which is the Scoopy, which will retreat into the ground, only surfacing to shoot you with a freezing snowball every now and then.
To capture it, you’ll need to thaw it with either of the methods you used to thaw the Scoopy Banoopy and then pick it up while it is stunned from the thawing.
Cheery
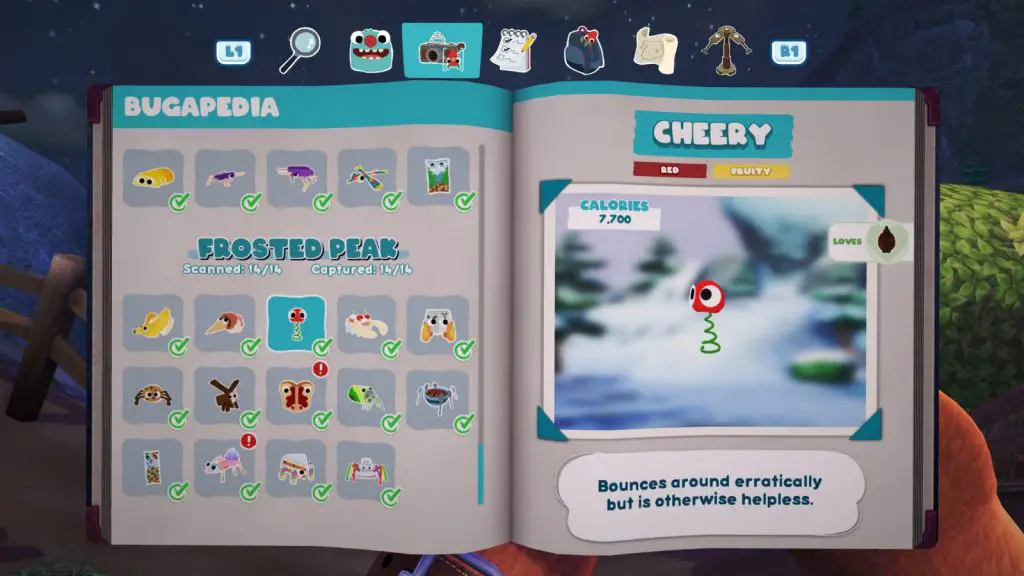
Spawn Conditions: Available at any time in any weather.
To spawn a Cheery, you’ll first need to split a Scoopy Banoopy up into its component parts. To do so, you can either place your Trip Shot in a fire source such as a campfire or a torch and then shoot it at the Scoopy Banoopy, or you can bait the Stewdler from inside the cave over to it.
The Scoopy Banoopy, once thawed, will have a bomb-shaped timer above its head, once this reaches zero the Bugsnak will break down into its component parts, one of which is the Cheery, which will retreat up to the bushes near the cave entrance. From there, it can be captured just like a Strabby or Razzby by using a standard trap and not getting too close.
Scoopy Banoopy
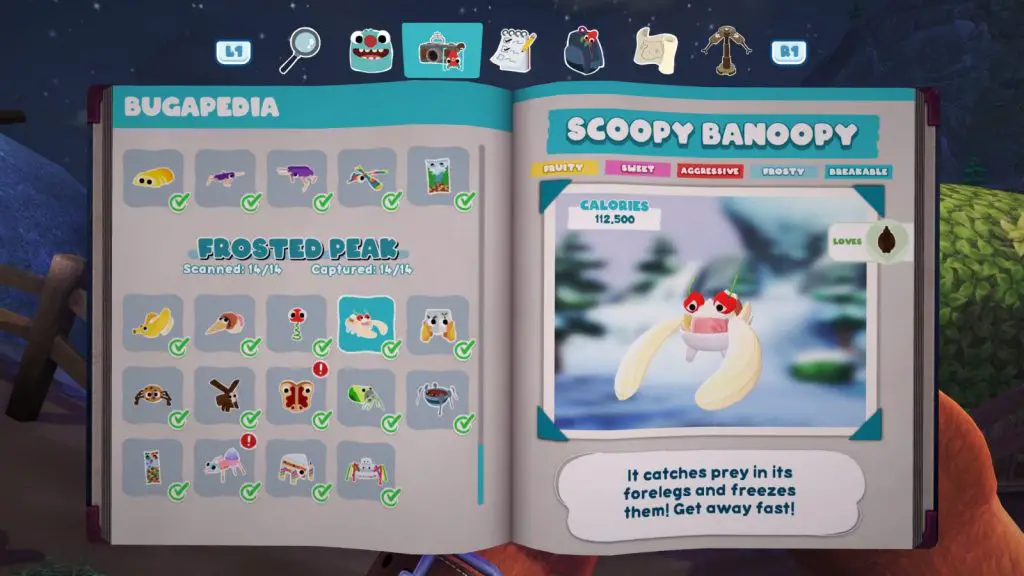
Spawn Conditions: Available at any time in any weather.
To capture a Scoopy Banoopy, you will first need to thaw it. To do so, you can either place your Trip Shot in a fire source such as a campfire or a torch and then shoot it at the Scoopy Banoopy, or you can bait the Stewdler from inside the cave over to it.
The Scoopy Banoopy, once thawed, will have a bomb-shaped timer above its head, once this reaches zero the Bugsnak will break down into its component parts, which we don’t want if our intent is to capture it.
To capture it, you’ll need to hit it with a tripwire, stunning it so that it can be grabbed with ![]() .
.
Aggroll

Spawn Conditions: Available at any time in any weather.
The Aggroll is in an ice block on the right-hand side of the cave where the Stewdler is. To thaw the block and release the Aggroll, place your Trip Shot in one of the torches near the entrance and fire it at the ice block.
Once it is free, you’ll need to pull the box off its head with the Snakgrappler and then use the tripwire to stun it so it can be grabbed with ![]() .
.
Chippie
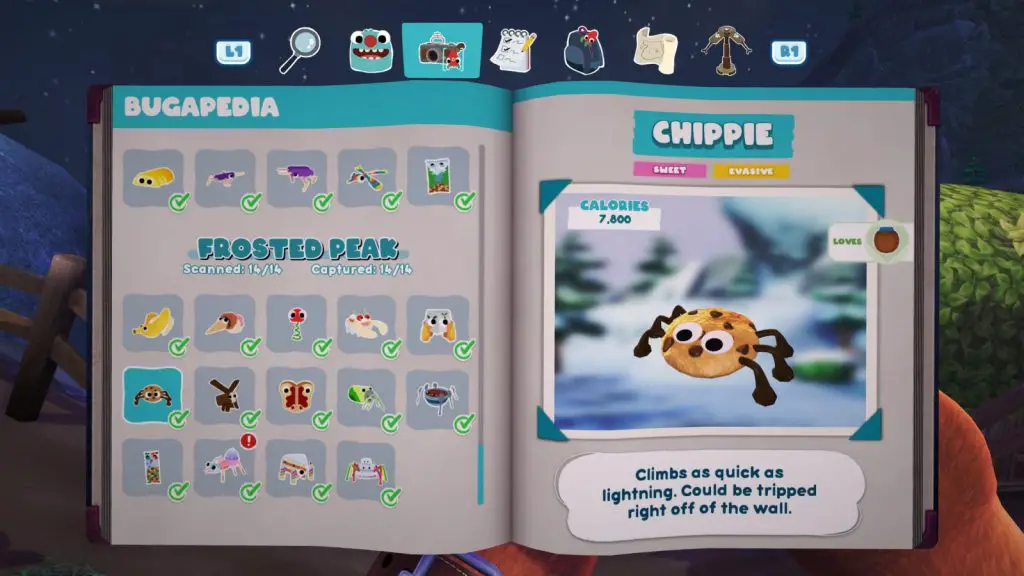
Spawn Conditions: Available at any time in any weather.
You can find a Chippie running around the mountain. The best place to capture it is in the cave you’ll find halfway up the mountain climb. Simply place a Tripwire in its path and grab it with ![]() when it is stunned.
when it is stunned.
Chillynilly
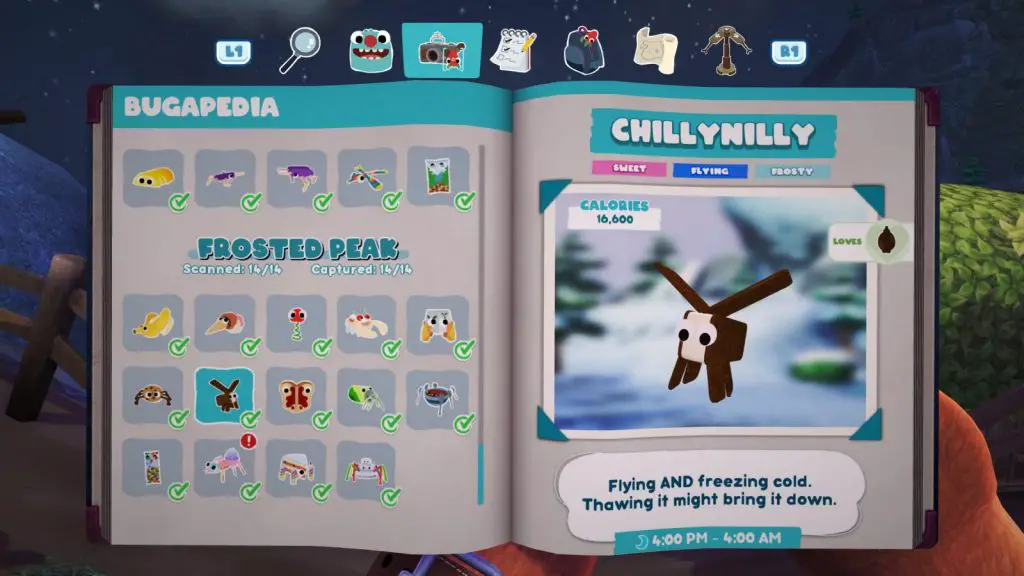
Spawn Conditions: Available from 4PM to 4AM in any weather.
You’ll find a Chillynilly in the cave halfway up the mountain climb, near another Stewdler. Hit the Stewdler with some Chocolate Sauce to draw the Chillynilly down to it. The heat from the Stewdler will thaw and stun the Chillynilly so that it can be grabbed.
Butterjam
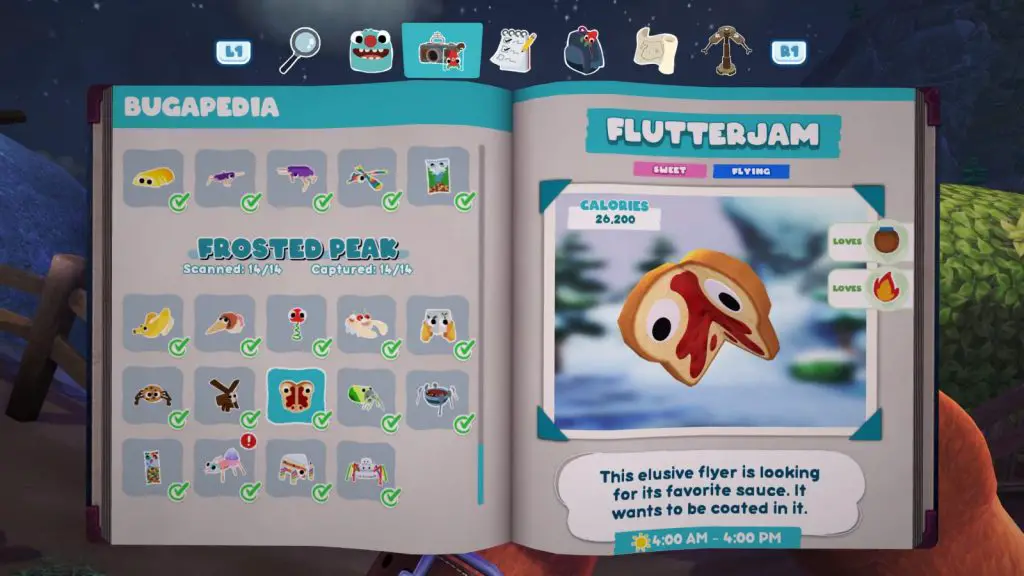
Spawn Conditions: Available from 4AM to 4PM in any weather.
You can find Butterjams flying around the mountain. To capture one, all you need to do is hit it with Peanut Butter, creating a PB&J sandwich, which you can then pick up off the ground with ![]() .
.
Mt Sodie
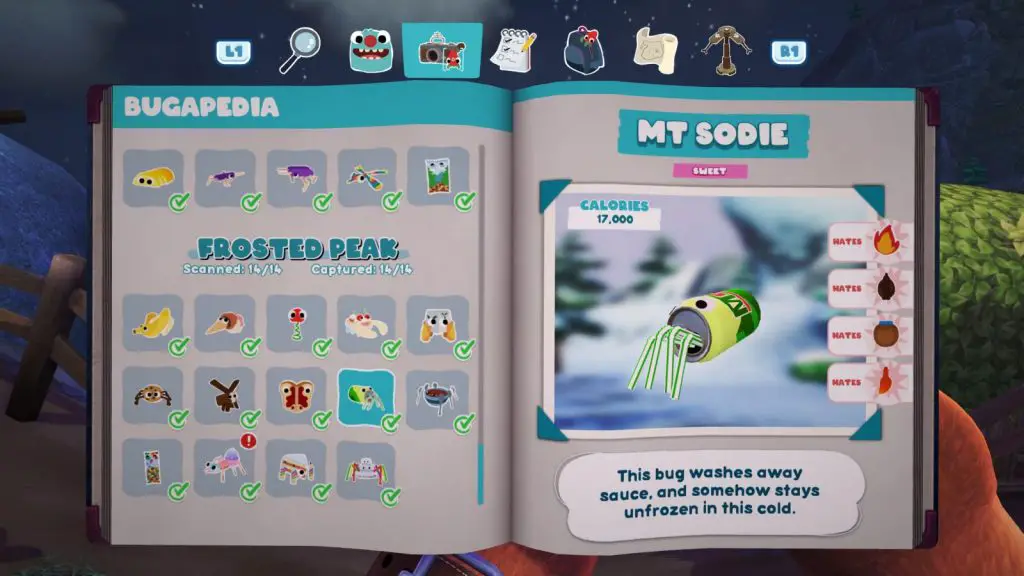
Spawn Conditions: Available at any time in any weather.
The Mt. Sodie can be found in the frozen pond at the lowermost level of the area. Unlike most Sodies, you can’t just place a trap in its path because the water will freeze the trap. Instead, place the trap at the water’s edge, stand inside it, and hit the Sodie with the Snakgrappler.
It will begin swimming towards you, spraying you with water. Once it gets close enough to be within the trap’s range, trigger the trap and collect the Sodie.
Chillynilly
Spawn Conditions: Available at any time in any weather.
You’ll find a Stewdler in the cave halfway up the mountain climb, but you’ll need to attempt to capture it at night, so that there is a Chillynilly in the cave too. Hit the Stewdler with some Chocolate Sauce to draw the Chillynilly down to it. The cold from the Chillynilly will extinguish and stun the Stewdler so that it can be grabbed.
Melty Snakpod
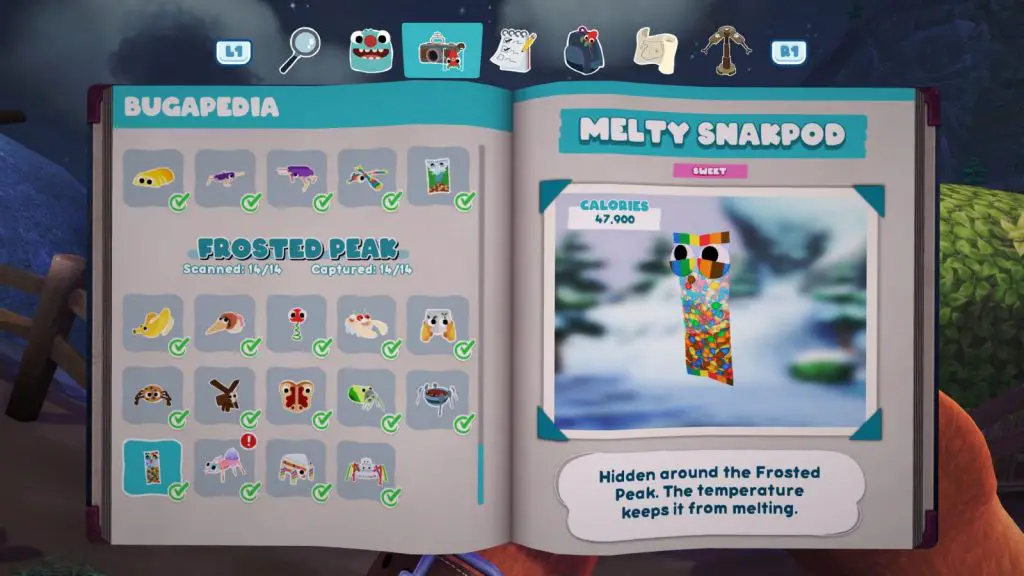
Spawn Conditions: Available at any time in any weather.
Head to the top of the mountain and look on the side of the tent. There you’ll find a Melty Snakpod. Grab it with ![]() or shoot it with the Snakgrappler to add it to your collection.
or shoot it with the Snakgrappler to add it to your collection.
Instabug
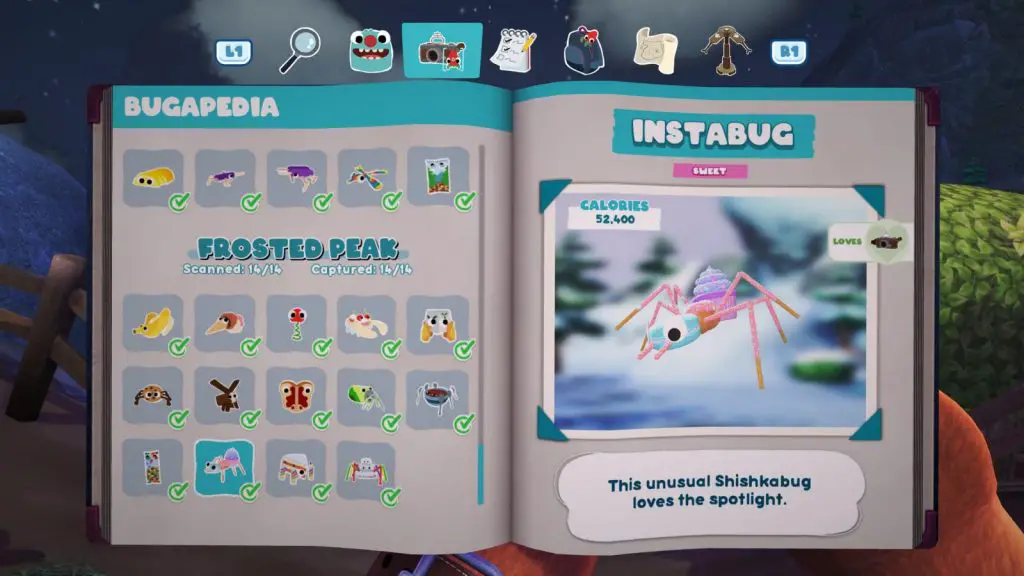
Spawn Conditions: Available at any time in any weather.
This peculiar bug actually prefers your attention. Head up to the cave with the Noodler in it, and look for a shaking bush near the entrance. Place a trap next to it, and then use ![]() to bring out your camera. A quirky little Shishkabug will come out and lap up all the attention, but as soon as your camera goes away it will scuttle back into the bush.
to bring out your camera. A quirky little Shishkabug will come out and lap up all the attention, but as soon as your camera goes away it will scuttle back into the bush.
Therefore, you’ll need to be ready to very quickly activate the trap as soon as you close the camera in order to capture the critter.
Baby Cakelegs
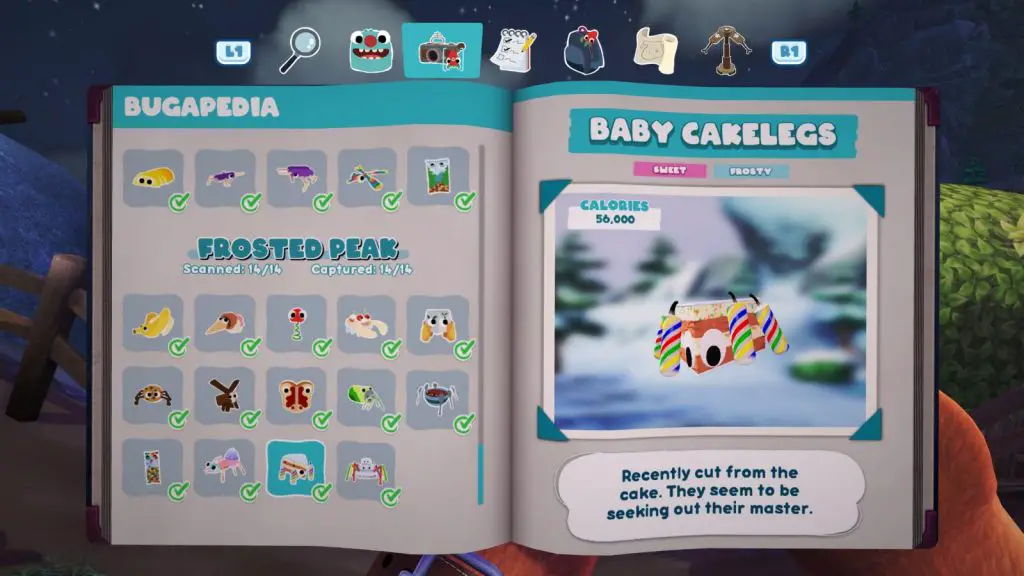
Spawn Conditions: Available at any time in any weather.
Part of the boss you’ll fight during the “Cake Boss!” mission given to you by Snorpy. Read the Bossy Bugs trophy guide for more info.
Daddy Cakelegs
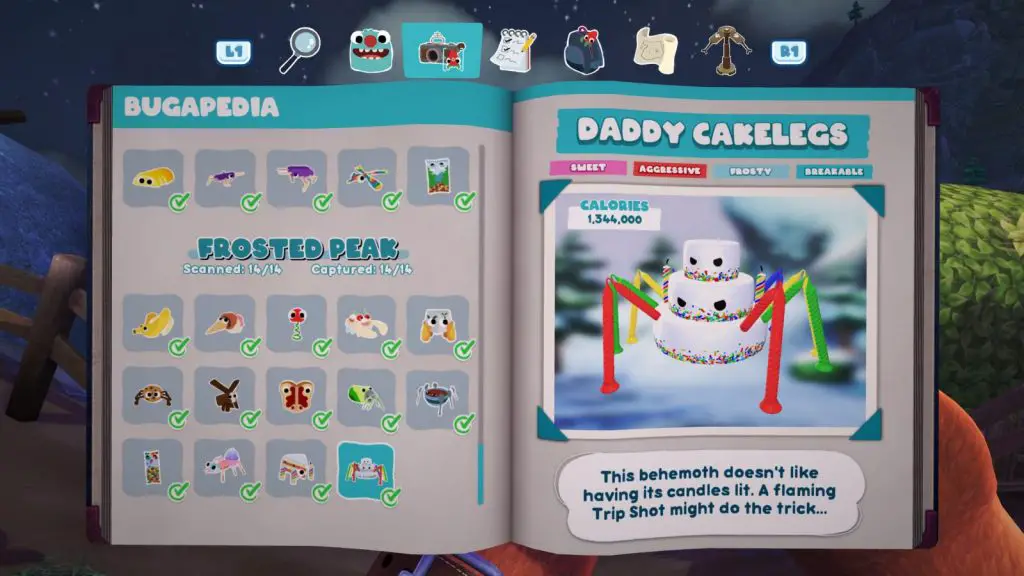
Spawn Conditions: Available at any time in any weather.
The boss you’ll fight during the “Cake Boss!” mission given to you by Snorpy. Read the Bossy Bugs trophy guide for more info.