PlayStation 4
Borderlands 3 Trophy Guide


General Info
FAQ
How long does it take to beat Borderlands 3 and unlock all trophies?
Around 50 Hours.
How difficult is it to beat Borderlands 3 and unlock all trophies?
Easy (3/10).
Does Borderlands 3 have online trophies?
Yes.
Does Borderlands 3 have difficulty-specific trophies?
No.
Does Borderlands 3 have missable trophies?
No.
Does Borderlands 3 have glitched trophies?
No.
What is the minimum number of playthroughs required to unlock all trophies in Borderlands 3?
One.
Does Borderlands 3 have a Platinum Trophy?
Yes.
Other Useful Guides:
Borderlands 3 Map Guide
Trophy Guide
Borderlands 3 PlayStation 4 Trophy Guide and Road Map
This Borderlands 3 Trophy Guide was created to accompany my Platinum Review, check that out if you have a few minutes!
Borderlands 3 is the 4th mainline title in the Borderlands series but you don’t need to have played the others to be able to enjoy this one. The protagonists and antagonists are unique to this story and the returning characters will re-introduce themselves well enough.
There are no missable trophies but there are 3 potentially-online trophies – only one will definitely require you to have internet access.
- I Hope You Didn’t Teabag – You can do this in split-screen if you have a second controller.
- Stay Away From the Light – You also can do this in split-screen if you have a second controller.
- Gun Pals! – You’ll need at least one friend on PSN, they don’t need to own the game but you’ll need internet access to unlock the trophy.
I strongly recommend playing with a friend if you can, this trophy journey will be long and tedious and playing with a friend will make it all the more bearable.
However, there are reports of co-operative play causing trophies to glitch and refuse to pop. This was never something we experienced and as far as I know these issues have since been patched, but just be very wary of that potentiality and take my advice on co-op with a pinch of salt.
Phase One – Complete Borderlands 3 Main Mission Trophies
As nothing is missable, you can technically play however you want. While making this Borderlands 3 Trophy Guide we approached the game by completing every side-quest we had available until main missions were our only remaining option, but you can simply prioritise main missions for now if you wish. Just know that doing so will mean you have less EXP which can come back to bite you.
Note that you can also play the entire game on Easy with zero repercussions and because there are no character-specific trophies, you only need a single playthrough as whichever character you want!
Unmissable Story Trophies
A good chunk of the trophies in this Borderlands 3 Trophy Guide will grace the corner of your screen just by you playing through the main missions. As long as you finish the 23 main campaign chapters, you’ll have the following trophies:

Welcome to the Crimson Raiders
Complete mission “Children of the Vault”

So Long, Pandora!
Complete mission “Taking Flight”.

NOG It Off
Complete mission “Hostile Takeover”.

I Mustache You A Question
Complete mission “Atlas, At Last”.

Gone From My Sight
Complete mission “Beneath the Meridian”.

That Was Cold
Complete mission “Lair of the Harpy”.

Heir To An Empty Castle
Complete mission “Cold as the Grave”.

Cross the Streamers
Complete mission “Blood Drive”.

Apocalypso!
Complete mission “The Great Vault”.

I Am A Goddess, A Glorious Female Warrior
Complete mission “In the Shadow of Starlight”.

Bye, Felicia!
Complete mission “Divine Retribution”.

Damn, Gina
Obtain all Vault Rewards.
Along the way, you will undoubtedly unlock a whole lot of other trophies in this Borderlands 3 Trophy Guide without even trying. You can speed up your trophy journey by completing as much side-content as possible while you play through.
Phase Two – Side Mission Cleanup
Within this phase of the Borderlands 3 Trophy Guide, you’ll be making your way back to all of the zones throughout the game and cleaning up. There will most likely be a good number of side-quests left for you to tackle and while you’re revisiting each zone you’ll be able to ensure everything is uncovered and the discovery trophies are all earned.
As part of this phase of the Borderlands 3 Trophy Guide, you’ll also want to find several things on each map, this includes the Eridian Slabs, Hammerlock’s Hunting Targets and Zer0’s Targets of Opportunity, this is the best time to do these as you will be revisiting almost every zone anyway so you might as well get these upon your return.
Side Mission Trophies
There are just 75 side-quests which actually count towards the platinum, some of which are repeatable but need doing only once.
These quests are, in alphabetical order (as that’s how the game lists them, making this list easier to cross-reference);
- Baby Dancer – Found in: Sanctuary – Level: 35
- Bad Reception – Found in: Pandora, The Droughts – Level: 5
- Bad Vibrations – Found in: Nekrotafeyo, Desolation’s Edge – Level: 36
- Boom Boom Boomtown – Found in: Pandora, Devil’s Razor – Level: 33
- Buff Film Buff – Found in: Pandora, Devil’s Razor – Level: 34
- Cannonization – Found in: Nekrotafeyo, Desolation’s Edge – Level: 36
- Capture the Frag – Found in: Eden-6, Floodmoor Basin – Level: 27
- Childhood’s End – Found in: Pandora, Konrad’s Hold – Level: 35
- Cistern of Slaughter – Found in: Promethea, Cistern of Slaughter (from Meridian Metroplex) – Level: Scales with you
- Discover the Trial of Cunning – Found in: Pandora, The Splinterlands – Level: 26
- Discover the Trial of Discipline – Found in: Promethea, Meridian Outskirts – Level: 33
- Discover the Trial of Fervor – Found in: Eden-6, Jakob’s Estate – Level: 33
- Discover the Trial of Instinct – Found in: Eden-6, Floodmoor Basin – Level: 33
- Discover the Trial of Supremacy – Found in: Nekrotafeyo, Desolation’s Edge – Level: 36
- Discover the Trial of Survival – Found in: Pandora, Devil’s Razor – Level: 33
- Don’t Truck with Eden-6 – Found in: Eden-6, Floodmoor Basin – Level: 22
- Dump on Dumptruck – Found in: Pandora, The Droughts – Level: 4
- Dynasty Dash: Eden-6 – Found in: Eden-6, Floodmoor Basin – Level: 27
- Dynasty Dash: Pandora – Found in: Pandora, Devil’s Razor – Level: 33
- Dynasty Diner – Found in: Promethea, Meridian Metroplex – Level: 12
- ECHOnet Neutrality – Found in: Sanctuary – Level: 33
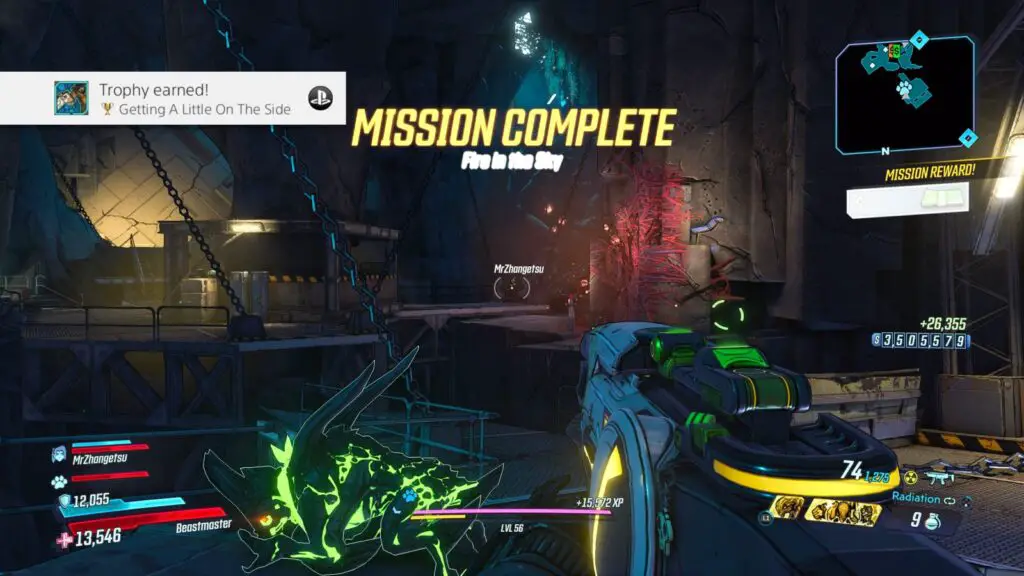
- Fire in the Sky – Found in: Nekrotafeyo, Desolation’s Edge – Level: 36
- Get Quick, Slick – Found in: Eden-6, Floodmoor Basin – Level: 22
- Golden Calves – Found in: Pandora, Ascension Bluff – Level: 8
- Head Case – Found in: Pandora, Ascension Bluff – Level: 6
- Healers and Dealers – Found in: Promethea, Meridian Outskirts – Level: 10
- Holy Spirits – Found in: Athenas – Level: 13
- Homeopathological – Found in: Nekrotafeyo, Desolation’s Edge – Level: 36
- Invasion of Privacy – Found in: Sanctuary – Level: 17
- Irregular Customers – Found in: Eden-6, Floodmoor Basin – Level: 27
- It’s Alive – Found in: Nekrotafeyo, Desolation’s Edge – Level: 36
- Just A Prick – Found in: Sanctuary – Level: 12
- Just Desserts – Found in: Pandora, The Splinterlands – Level: 26
- Kill Killavolt – Found in: Sanctuary – Level: 13
- Let’s Get it Vaughn – Found in: Pandora, Carnivora – Level: 26
- Life of the Party – Found in: Pandora, Devil’s Razor – Level: 33
- Malevolent Practice – Found in: Eden-6, Floodmoor Basin – Level: 24
- Maliwannabees – Found in: Promethea, Meridian Outskirts – Level: 10
- On the Blood Path – Found in: Eden-6, The Anvil – Level: 23
- Opposition Research – Found in: Skywell-27 Skywell-27 16
- Pandora’s Next Top Mouthpiece – Found in: Sanctuary – Level: 31
- Porta Prison – Found in: Promethea, Lectra City – Level: 13
- Powerful Connection – Found in: Pandora, The Droughts – Level: 2
- Proof of Wife – Found in: Promethea, Lectra City – Level: 13
- Raiders of the Lost Rock – Found in: Sanctuary – Level: 26
- Ratch’d Up – Found in: Promethea, Atlas HQ – Level: 17
- Rise and Grind – Found in: Promethea, Meridian Metroplex – Level: 12
- Rumble In The Jungle – Found in: Eden-6, Voracious Canopy – Level: 29
- Sacked – Found in: Eden-6, Jakob’s Estate – Level: 25
- Sell Out – Found in: Eden-6, Ambermire – Level: 26
- Sheega’s All That – Found in: Pandora, Devil’s Razor – Level: 34
- Skag Dog Days – Found in: Pandora, The Droughts – Level: 7
- Slaugherstar 3000 – Found in: Slaughterstar 3000 – Level: Scales with you
- Swamp Bro – Found in: Eden-6, Floodmoor Basin – Level: 27
- Technical NOGout – Found in: Promethea, Meridian Outskirts – Level: 14
- The Demon in the Dark – Found in: Pandora, Konrad’s Hold – Level:35
- The Feeble and the Furious – Found in: Pandora, Devil’s Razor – Level: 34
- The Homestead – Found in: Pandora, The Splinterlands – Level: 26
- The Homestead (Part 2) – Found in: Pandora, The Splinterlands – Level: 26
- The Homestead (Part 3) – Found in: Pandora, The Splinterlands – Level: 26
- The Kevin Konundrum – Found in: Sanctuary – Level: 22
- The Slaughter Shaft – Found in: Pandora, The Slaughter Shaft (from Konrad’s Hold) – Level: Scales with you
- Transaction-Packed – Found in: Nekrotafeyo, Desolation’s Edge – Level: 36
- Trial of Cunning Proving Grounds – Found in: Ghostlight Beacon – Level: Scales with you
- Trial of Discipline Proving Grounds – Found in: Precipice Anchor – Level: Scales with you
- Trial of Fervor Proving Grounds – Found in: The Skydrowned Pulpit – Level: Scales with you
- Trial of Instinct Proving Grounds – Found in: Wayward Tether – Level: Scales with you
- Trial of Supremacy Proving Grounds – Found in: The Hall Obsidian – Level: Scales with you
- Trial of Survival Proving Grounds – Found in: Gradient of Dawn – Level: Scales with you
- Under Taker – Found in: Pandora, The Droughts – Level: 7
- Welcome to Slaughterstar 3000 – Found in: Nekrotafeyo, Desolation’s Edge – Level: Scales with you
- Wildlife Conservation – Found in: Pandora, Konrad’s Hold – Level: 35
- Witch’s Brew – Found in: Eden-6, Jakob’s Estate – Level: 25
Completing all of the above side-quests will guarantee you the following two trophies:

À La Carte
Complete 20 Side Missions.

Getting A Little On The Side
Complete all Side Missions.
However, alongside those you should also receive trophies for completing the Proving Ground Missions as well as the Slaughterhouse Missions since they also count as side-quests.
The Proving Grounds
The proving grounds each begin with a “Discover” side-quest. Not to be mistaken for “Discovery” side-quests, which lead to some very difficult and completely optional content not needed for the Platinum.
The ones you’ll need as well as their locations are:
- Discover the Trial of Cunning – Found in: Pandora, The Splinterlands – Level: 26
- Discover the Trial of Discipline – Found in: Promethea, Meridian Outskirts – Level: 33
- Discover the Trial of Fervor – Found in: Eden-6, Jakob’s Estate – Level: 33
- Discover the Trial of Instinct – Found in: Eden-6, Floodmoor Basin – Level: 33
- Discover the Trial of Supremacy – Found in: Nekrotafeyo, Desolation’s Edge – Level: 36
- Discover the Trial of Survival – Found in: Pandora, Devil’s Razor – Level: 33
Each one will simply ask you to go back to sanctuary, punch in the new co-ordinates on the bridge, and then head down to the drop pod where you’ll find an NPC. Said NPC will offer you the actual trial quest there, meaning that each proving ground quest-line checks two whole quests off your list of 75, for a total of 12.
Each actual Proving Ground quest is as follows:
- Trial of Cunning Proving Grounds – Found in: Ghostlight Beacon – Level: Scales with you
- Trial of Discipline Proving Grounds – Found in: Precipice Anchor – Level: Scales with you
- Trial of Fervor Proving Grounds – Found in: The Skydrowned Pulpit – Level: Scales with you
- Trial of Instinct Proving Grounds – Found in: Wayward Tether – Level: Scales with you
- Trial of Supremacy Proving Grounds – Found in: The Hall Obsidian – Level: Scales with you
- Trial of Survival Proving Grounds – Found in: Gradient of Dawn – Level: Scales with you
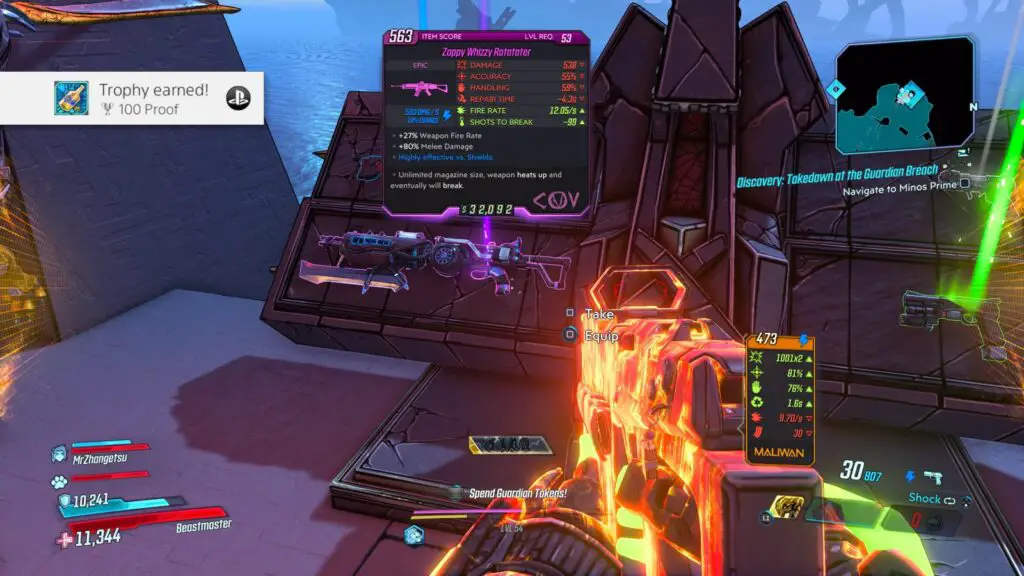
None of these quests are all that difficult, especially when compared to the Slaughterhouse missions, and completing them all will earn you this trophy:

100 Proof
Clear all the Eridian Proving Grounds.
The Slaughterhouse
The Slaughterhouse side-quests are some of the toughest content you’ll need to endure as part of this Borderlands 3 Trophy Guide. There are four Slaughterhouse side-quests to complete, though only three of them are actually Slaughterhouse missions:
- Cistern of Slaughter – Found in: Promethea, Cistern of Slaughter (from Meridian Metroplex) – Level: Scales with you
- The Slaughter Shaft – Found in: Pandora, The Slaughter Shaft (from Konrad’s Hold) – Level: Scales with you
- Welcome to Slaughterstar 3000 – Found in: Nekrotafeyo, Desolation’s Edge – Level: Scales with you
- Slaugherstar 3000 – Found in: Slaughterstar 3000 – Level: Scales with you
Both the Cistern of Slaughter and the Slaughter Shaft can be completed as early as you discover them, however, the Slaughterstar must be travelled to via Sanctuary’s space-faring abilities and to be able to access it, you must first find the “Welcome to Slaughterstar 3000” quest in the game’s final location; Nekrotafeyo.
They’re pretty straight-forward, just complete 5 rounds of waves. Each round will consist of 3-5 waves of enemies and you shouldn’t have too much difficulty for the most part. However, the 4th and 5th rounds of Slaughterstar 3000 will be incredibly difficult unless you have very good weapons and have purchased plenty of SDUs from Marcus to increase your ammunition capacity.
If you continue to struggle with Slaughterstar for many hours, there’s actually a cheese/exploit for Slaughterstar 3000 which will slow down your progress a lot but allow you to protect yourself from damage while slowly taking out enemies. If you have a Beastmaster, using your pet to help you take out the enemies from behind cover will put you at a great advantage and speed things up a lot.
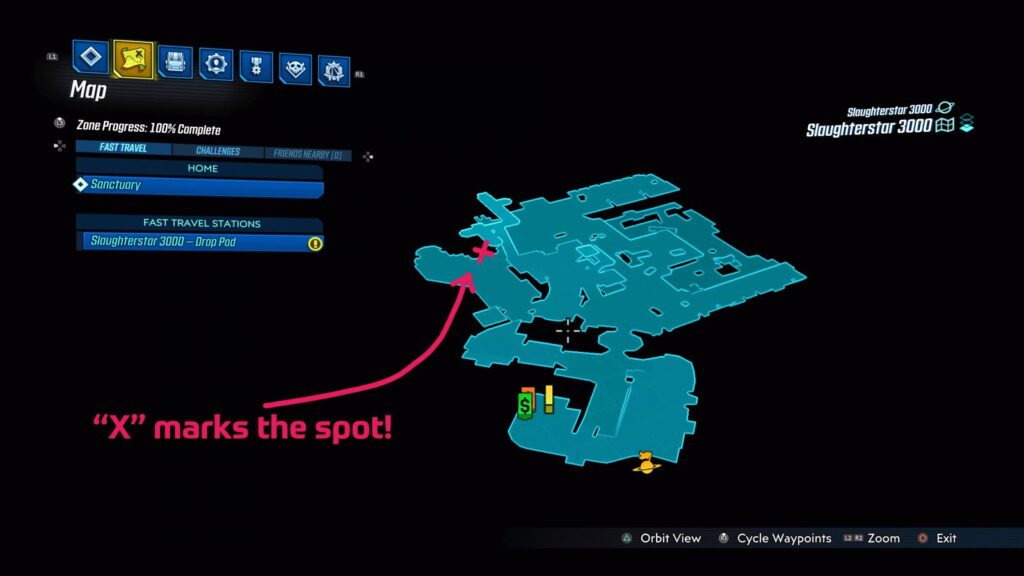
In the back corner of the map, beneath one of the catwalks where enemies spawn, you can hide behind two large pipes there, where enemies can’t hit you (some Frontrunner enemies will be able to get in) and you can slowly pick off any enemies from behind cover. You will need to leave this safe spot a few times to bait a few enemies or reach the more stubborn ones, but you can always jump back into the “cheese spot” whenever your health starts to get low.
You can find the cheese spot marked on the map below:
Complete all 3 Slaughterhouse missions to earn yourself this trophy:

Slaughterhouse 3
Complete all the Circles of Slaughter.
Hammerlock and Zer0 Trophies
Hammerlock and Zer0 both have additional “Crew Challenges” to assign to you in each zone, some of which I have no doubt you will find and complete naturally throughout your playthrough.
The challenge locations are indicated on the map via green rhombus-shaped icons, Hammerlock Legendary Hunts have a skull icon in the centre and Zer0’s Targets of Opportunity have a crossed-swords icon.
Both of these types of challenges are essentially just miniboss encounters which aren’t all that difficult but do scale to your level.
To ensure you’re finding all of these as you play, make sure to check the locations listed under the trophies below and uncover any greyed-out locations in each zone until you find them. It’s typically very easy to determine where one will be, as you’ll see a branched-off, arena-like space which you haven’t explored.

Got Big Game
Defeat all of Hammerlock’s Legendary Hunts.
There are 10 hunts to find in total spread across the many zones in Borderlands 3. To find them, visit each of the locations listed below and explore any uncovered grey areas on your map:
- Lavender Crawly Found in: Pandora, The Droughts
- Skrakk Found in: Pandora, Ascension Bluff
- Antalope Found in: Pandora, Devil’s Razor
- Phoenix Found in: Pandora, The Splinterlands
- Manvark Found in: Pandora, Konrad’s Hold
- Chupacabratch Found in: Athenas
- Chonk Stomp Found in: Eden-6, Floodmoor Basin
- Jabbermogwai Found in: Eden-6, Voracious Canopy
- Blinding Banshee Found in: Nekrotafeyo, Desolation’s Edge
- Brood Mother Found in: Nekrotafeyo, The Pyre of Stars
Complete all 10 and you will earn the trophy.
You can use our Map Guide to find the locations of every Legendary Hunt in Borderlands 3.

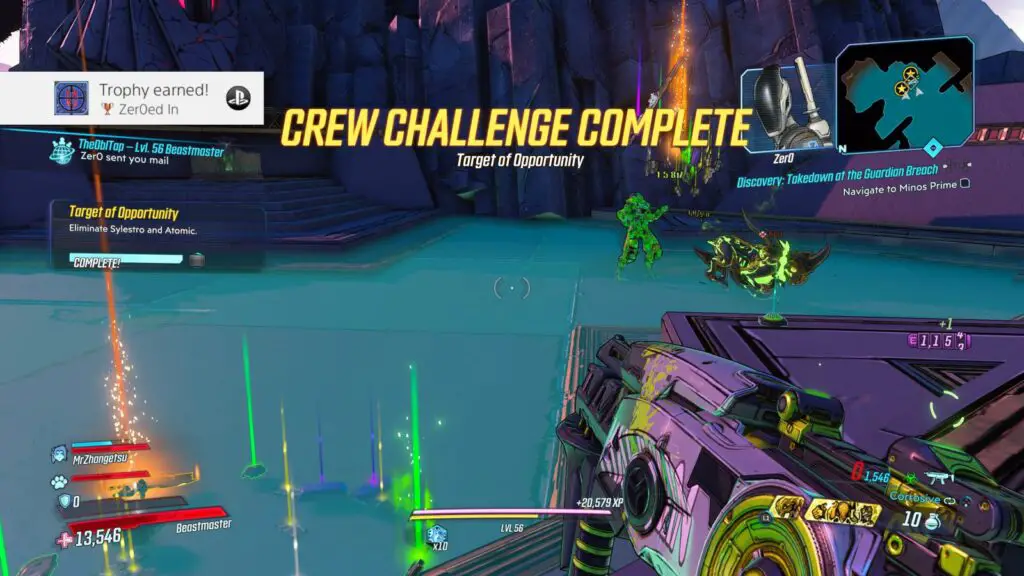
Zer0ed In
Defeat all of Zer0’s Targets of Opportunity.
As with Hammerlock’s Hunts there are 10 Targets of Opportunity to find for Zer0. You can find Zer0 in Sanctuary and refer to his hit list there, which will usually mark ones you’ve defeated with a big red “DEAD” stamp. However, this list is unreliable and prone to glitching.
To find the 10 targets, head to each of the locations listed below and explore any uncovered grey areas on your map:
- Hot Karl Found in: Pandora, Devil’s Razor
- DJ DeadSk4G Found in: Pandora, The Splinterlands
- Crushjaw Found in: Pandora, Cathedral of the Twin Gods
- Baron Noggin Found in: Promethea, Meridian Metroplex
- Handsome Jackie Found in: Promethea, Skywell-27
- Judge Hightower Found in: Promethea, Lectra City
- Sky Bullies Found in: Eden-6, The Anvil
- Heckle and Hyde Found in: Eden-6, Jakobs Estate
- Psychobillies Found in: Eden-6, Ambermire
- Sylestro and Atomic Found in: Nekrotafeyo, Tazendeer Ruins
Finding and defeating all 10 will earn you this trophy.
You can use our Map Guide to find the locations of every Target of Opportunity in Borderlands 3.
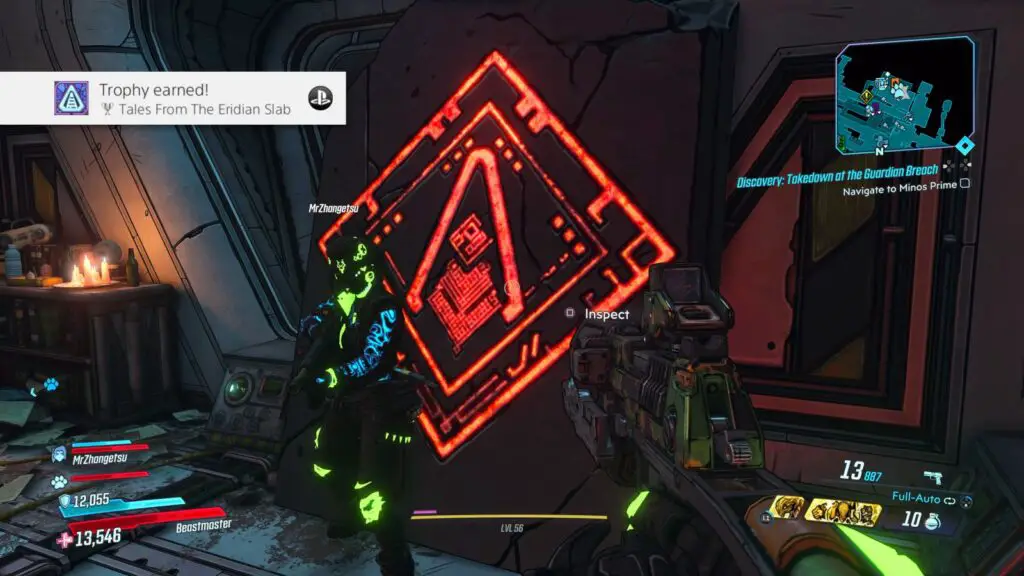
Decipher all Eridian Slabs
The other type of zone collectable you will want to find during this phase of the Borderlands 3 Trophy Guide are Eridium Slabs. There’s usually 1-2 of these per zone and they’re marked on your map once you discover them, with the icon changing when you’ve translated them.
These are the worst kind of collectable because you can’t actually collect them at first. Not until you’re very close to the end of the game, at which point – once you have the device which can translate them – you will have to back-track to every bloody map in the game to find them all!

Tales From The Eridian Slab
Decipher all of the Eridian Slabs.
Finding and translating all 30 Eridian Writing Slabs will earn you this trophy.
You can use our Map Guide to find the locations of every Eridian Slab in Borderlands 3.
Glitch Warning: This trophy is very buggy and probably won’t pop right away! If the trophy doesn’t pop when you translate your last slab, travel back to Sanctuary and translate the one found in the infirmary. If that still doesn’t work, close the game and then return to the slab in the infirmary after loading the game again. This time, hit ![]() on the slab repeatedly, over and over, until the prompt changes from “Translate” to “Inspect”. The trophy will then pop a short while later.
on the slab repeatedly, over and over, until the prompt changes from “Translate” to “Inspect”. The trophy will then pop a short while later.
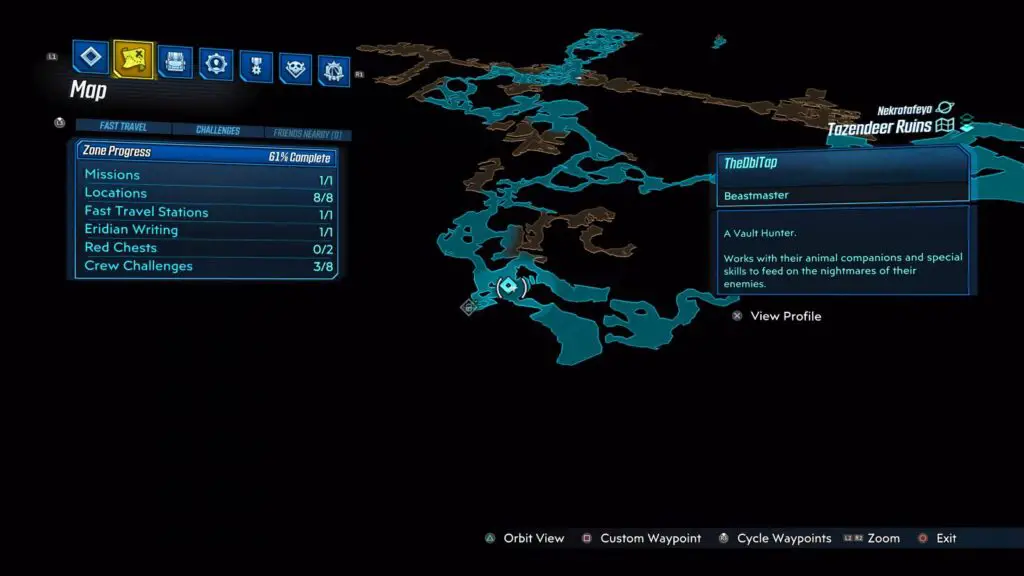
Unveiling all Maps for Discovery Trophies
The next few trophies in the Borderlands 3 Trophy Guide will mostly occur naturally whilst you explore the various zones in search of the above additional content, but just for posterity, here they are.
To unlock each one, you will need to visit every zone on every planet and then press ![]() in the map to bring up your zone progress menu. Here, you will see how many locations you have uncovered. You will need to find them all on every planet to earn all of the trophies below.
in the map to bring up your zone progress menu. Here, you will see how many locations you have uncovered. You will need to find them all on every planet to earn all of the trophies below.

A Hundred Names For Sand
Discover all named locations on Pandora.

Swamped
Discover all named locations on Eden-6.

City Slicker
Discover all named locations on Promethea.

Exoarchaeolo—You Get the Gist
Discover all named locations on Nekrotafeyo.

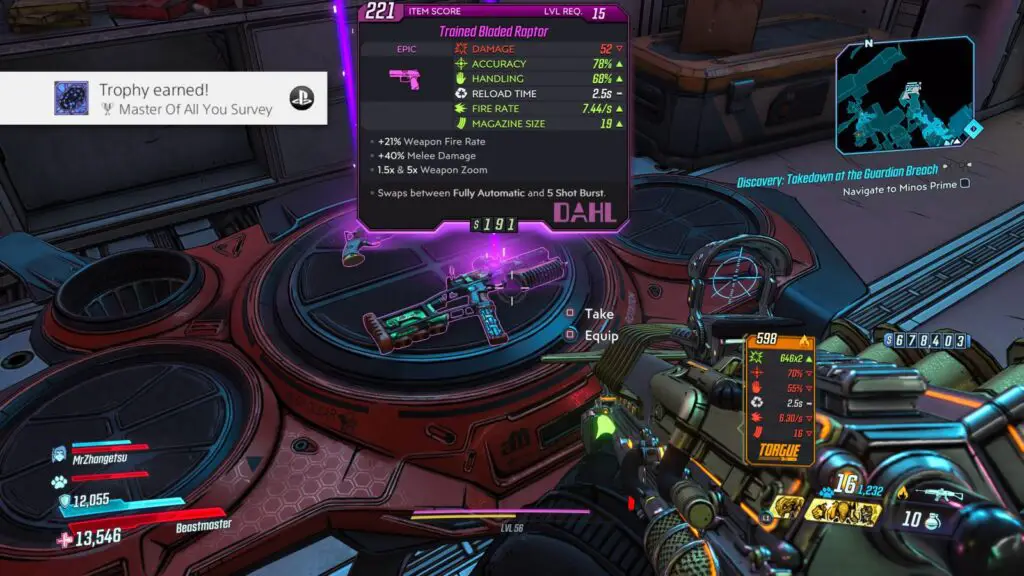
Master of All You Survey
Discover all named locations.
That last one is actually very glitchy, but in a good way. Somehow, I managed to earn this trophy for discovering all locations, long before actually discovering them all and thus I didn’t have some of the other discovery trophies. Regardless of whether this glitch occurs, you’ll still need to find them all anyway.
Phase Four – Miscellaneous Clean-Up, Co-op and Level 50
In this final phase of the Borderlands 3 Trophy Guide you will be going through the remaining miscellaneous trophies, which – if you don’t already have them – will include the few co-op trophies I mentioned at the start. We’re also going to get the few levels you probably still have remaining after completing all the main and side missions.
Co-Op Trophies
In order to play in co-op, you can either use a 2nd controller to play in split-screen or add a friend to your party online.

I Hope You Didn’t Tea-bag
Win a duel.
With your second controller or online friend at the ready, melee them with ![]() to drop a duel proposal hologram on the ground between you. Now, have player 2 look down at the hologram and hold
to drop a duel proposal hologram on the ground between you. Now, have player 2 look down at the hologram and hold ![]() to accept the duel.
to accept the duel.
There will be about 20 seconds of grace period for you to prepare and then you will be able to attack each other. To earn the trophy you will need to be the winner by downing player 2.
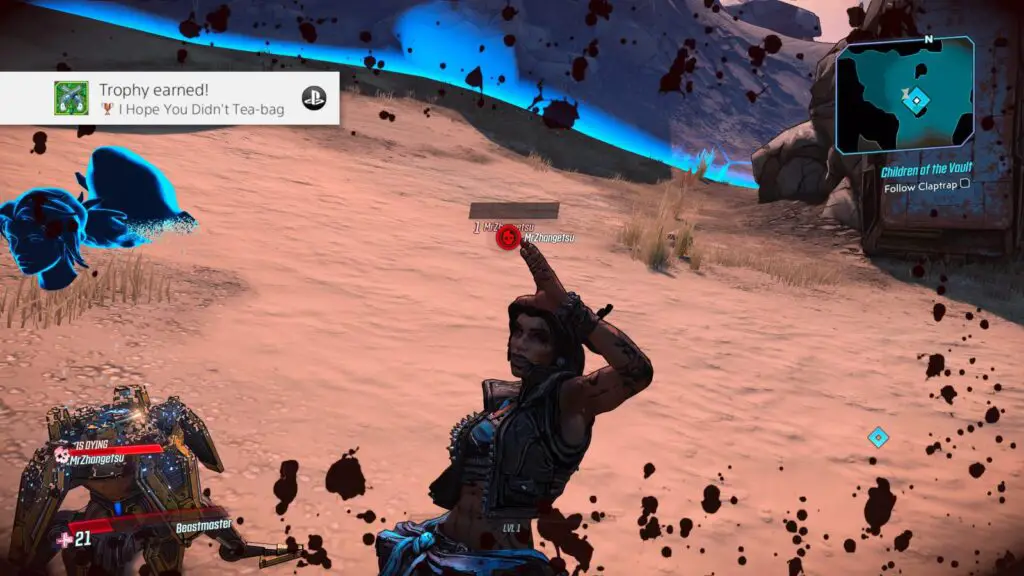
If they need the trophy too, just initiate another duel and let them kill you — It’s only fair!

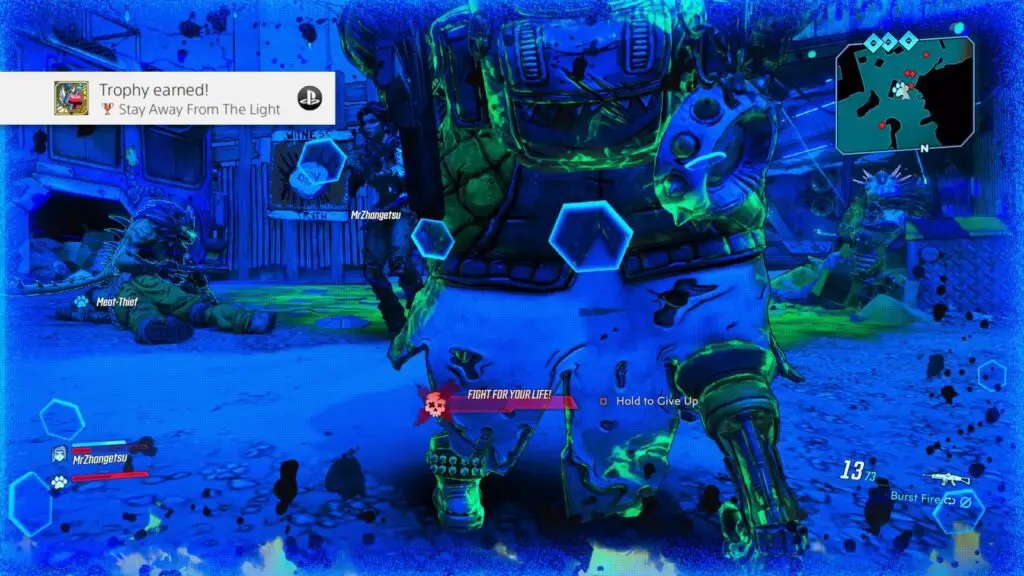
Stay Away From the Light
Revive another player
When you get “killed” in Borderlands you will fall to the ground and be given the opportunity to instantly revive by getting a kill while downed. Doing so will activate “Second Wind” and you’ll be back in action.
Alternatively, you can be revived by a teammate if one is available. To earn this trophy you will need to have a second player via split-screen or online multiplayer and have them get downed. The easiest way is to just ensure they have no Shield equipped and then have them stand in a group of enemies without fighting back.
You can then run over to them and hold ![]() while looking at them to bring them back to life and earn yourself this trophy.
while looking at them to bring them back to life and earn yourself this trophy.
If they need the trophy too, remove your shields and get yourself killed too, letting them revive you instead.

Gun Pals
Send an item to a friend.
For this one you don’t actually need a second player in the game with you, you just need to have any PSN friend. That friend doesn’t even have to have Borderlands 3!
To begin with, open the pause menu with the Options button and then select the “Social” option. Within here, press ![]() 3 times to switch to the Mail tab. Here you can press
3 times to switch to the Mail tab. Here you can press ![]() to “Send Mail”. Select an item from your backpack and then select a friend from your friends list who you would like to send it to.
to “Send Mail”. Select an item from your backpack and then select a friend from your friends list who you would like to send it to.
You’ll then be asked to confirm your choice, do so and your item will be gone forever (unless they send it back) but this trophy will be yours.
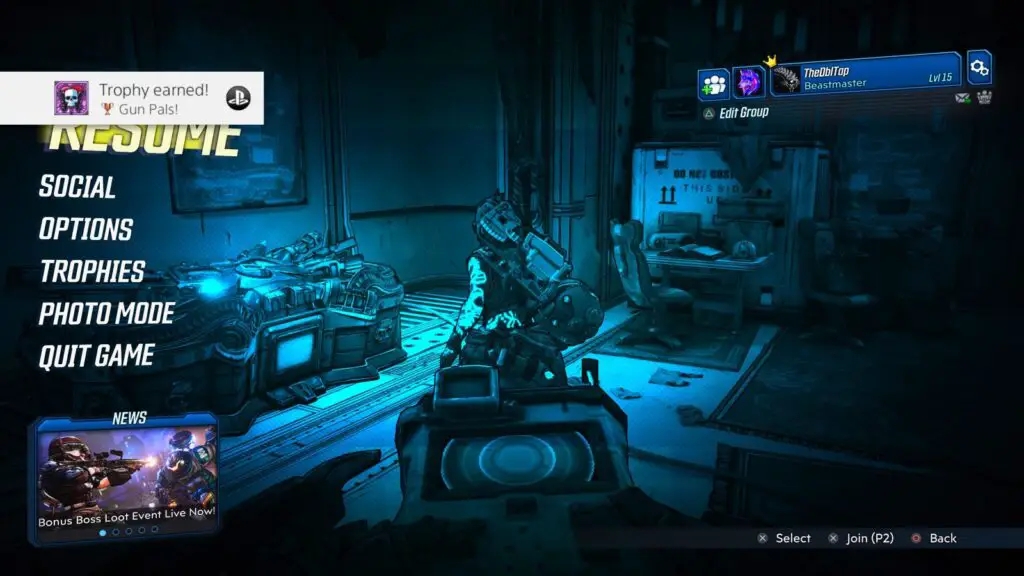
It does seem to take an absurdly long time for this trophy to pop, though, so don’t panic if it seems like it’s not happening.
Misc Sanctuary Trophies
These trophies involve interacting with someone or something on your ship, “Sanctuary”, which you will unlock after completing the main quest “Taking Flight”.

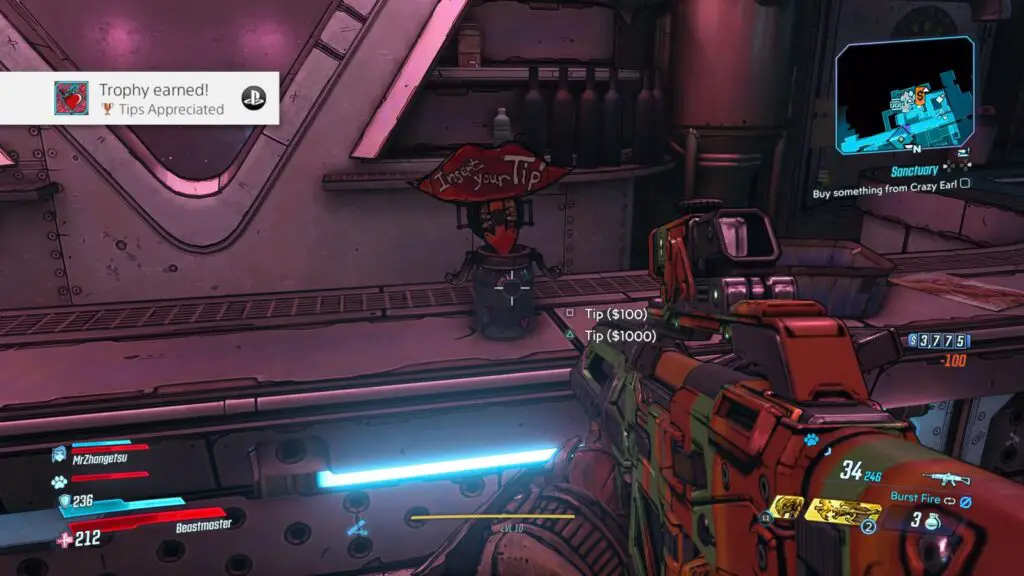
Tips Appreciated
Tip Moxxi
Whilst aboard the ship, Sanctuary, look for Moxxi’s bar which can be found at the Slot Machine icon on the map. Here, if you head up to the bar you’ll see a tip jar which comically states “Insert Your Tip” on it. Here you can choose to press ![]() to insert $100 or
to insert $100 or ![]() to insert $1000. I suggest you just go for the $100.
to insert $1000. I suggest you just go for the $100.
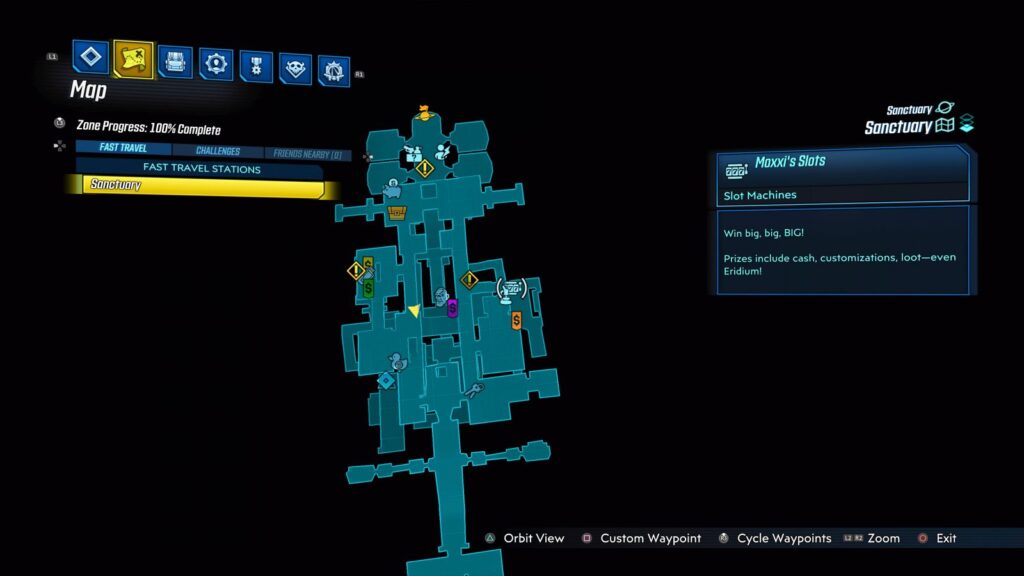

Dropping Loads
Win a live grenade at a Slot Machine
In the same location as the above trophy’s tip jar, — Moxxi’s Bar — you can find a series of slot machines at the opposite side of the room. These slot machines cost more and more depending on your level and progress through the game, so it is better to do this early on while they’re cheap because you’re at the will of RNG for this one and could end up wasting a lot of money.
Approach a slot machine and press ![]() to set it’s reels spinning. In order to earn the trophy you will need to repeatedly activate the Slot Machines until a grenade drops out of it, which can unfortunately take a long time as it’s pretty random.
to set it’s reels spinning. In order to earn the trophy you will need to repeatedly activate the Slot Machines until a grenade drops out of it, which can unfortunately take a long time as it’s pretty random.
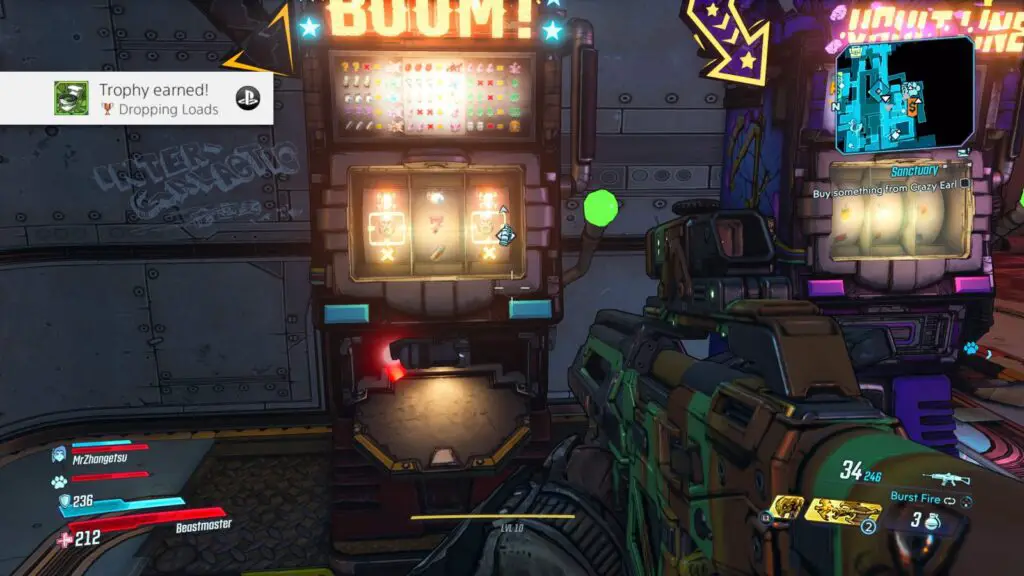
For me, it took around 10-15 attempts but my co-op friend made almost 30 attempts and spent a lot of money before a grenade appeared.

Good Against Remotes Is One Thing
Get a perfect score at the Firing Range on any difficulty.
This trophy is pretty difficult unless you’re with a friend.
On the ship, head downstairs from Marcus’ shop and you’ll find a shooting range with a Handsome Jack cutout in the middle. Approach the console on the left to activate the shooting range. You can either press ![]() to begin the normal difficulty mode or press
to begin the normal difficulty mode or press ![]() for a more difficult one. You do not need to do the harder one.
for a more difficult one. You do not need to do the harder one.
There are 15 targets to shoot in the normal difficulty version and you will need to hit them all to earn the trophy. When you have successfully hit all 15 targets, confetti will be dropped from the ceiling to indicate you were successful.
Bringing a friend means you can both take half of the range each, one of you shoots all targets on the left, the other gets the ones on the right, and you share the targets down the middle. That’s only around 7-10 targets to worry about hitting.
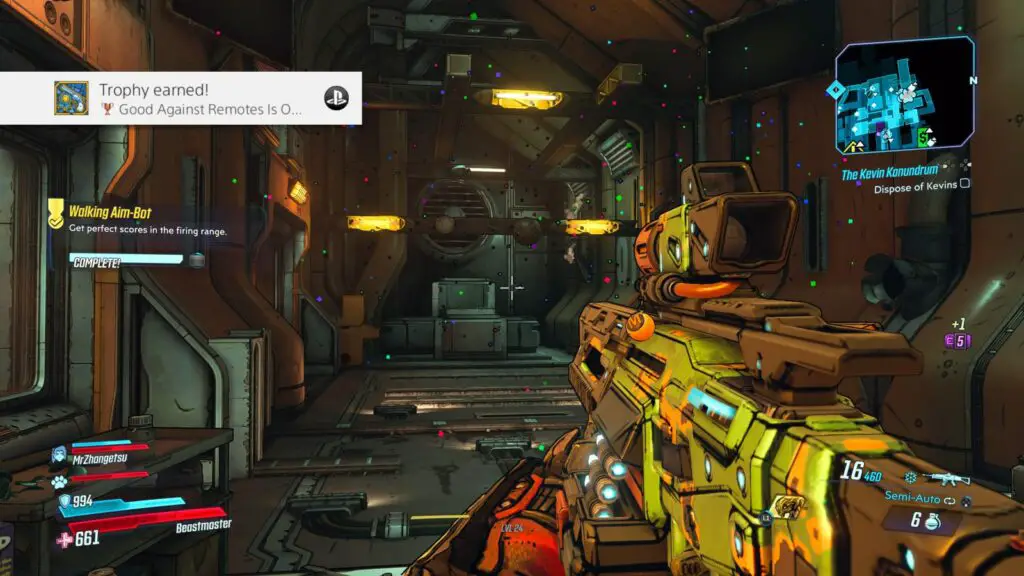
However, only the person who started the challenge will earn the trophy. If your friend needs it too, you’ll need to be a good sport and help them earn theirs once they initiate it.

My Name Is Earl
Buy 20 cosmetic items from Crazy Earl.
In the depths of sanctuary is a very secretive man named Earl hidden behind a big purple door. Earl will let you buy cosmetic items using a rare currency called Eridium which is found by smashing purple crystals (once you have the ability) hidden throughout the game. Some bosses will also drop them.
Earl also has vending machines from which you can buy weapons using Eridium, these do not count for the trophy, don’t waste your Eridium here. Instead, ensure you’re buying cosmetic items from his purple doorway.
The cosmetic items can be quite expensive, but if you want to ensure you’re getting the most for your money and getting this trophy by spending as little as possible, you can just buy Room Decorations from him. A good number of these cost only 20/25 Eridium crystals each and they count towards the trophy completion so it is well worth buying as many as you can before you spend all your Eridium on cool colour schemes.
Misc Combat Trophies
The following trophies in this Borderlands 3 Trophy Guide will all need to be earned from within combat situations.

Barreled Right Over Them
Kill an enemy with an exploding barrel.
In Borderlands 3 there are several types of barrel, each with one of the various elemental damage types. As in most FPS games, shooting one of these barrels will cause it to explode, dealing damage of its elemental type.
In order to earn the trophy, you will need to blow up one of these barrels while an enemy is near it and kill them with it.
These barrels are plentiful and you’ll be hitting them even without meaning to, so the chances of you getting through the entire game without earning this trophy accidentally are pretty low.

Feelin’ A Little Stabby
Kill an enemy, knifing them with a gun blade.
For this trophy you will need to get a weapon with a bayonet attached to it. These are not rare by any means and there are plenty of guns with knives attached to them.
When you have one, if you press ![]() to melee with it equipped, instead of your standard melee attack your character will stab at the enemy. Kill them with this attack (best to do early on) to unlock this trophy.
to melee with it equipped, instead of your standard melee attack your character will stab at the enemy. Kill them with this attack (best to do early on) to unlock this trophy.

Stick It To ‘Em
Kill two or more enemies with a single sticky grenade.
For this trophy you will need a sticky grenade. Check the stats of each grenade you pick up and if you see that one has the “Sticky” attribute, equip it and start lobbing it at enemies whenever you see them stood together in groups of 2 or more.
You will need to kill two enemies at once with a sticky grenade, but there are a couple of things to keep in mind:
- The grenade doesn’t need to actually stick onto them… for some reason. Both MrZhangetsu got the trophy when the grenade wasn’t on an enemy at all.
- Torgue weapons which fire sticky grenades won’t help you with this trophy, it needs to actually be a grenade thrown with
 .
.

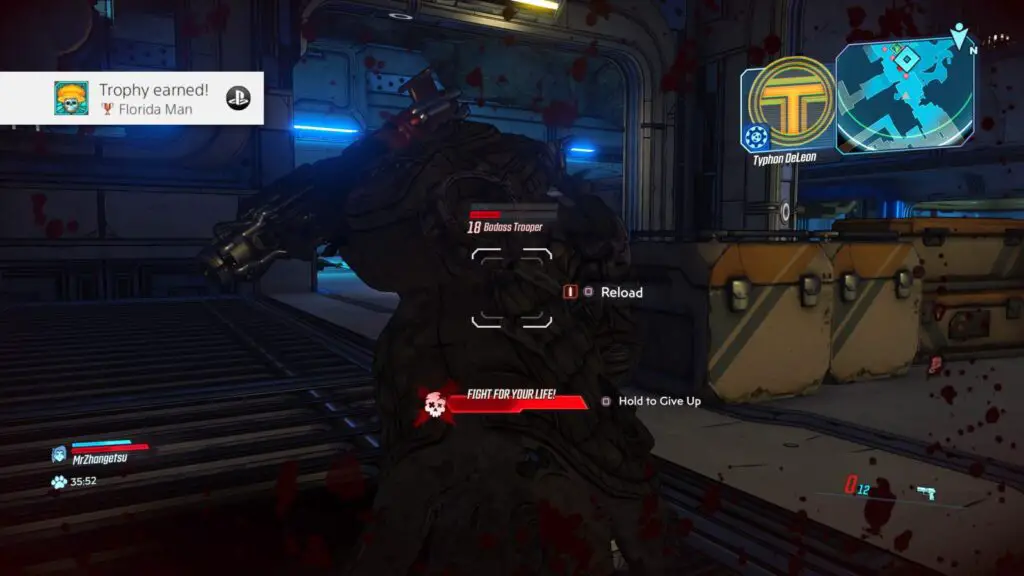
Florida Man
Down yourself by grenade or explosion.
This trophy is pretty easy, all you have to do is kill yourself.
No no no nooo, wait. I meant in the game you crazy sonova… Just… In the game.
The best way to do this is to first unequip any shields you have equipped and then press yourself into a corner or against a wall before lobbing grenades at your feet until your health is depleted. A rocket launcher should be effective too, and I can personally vouch for the effectiveness of weapons which explode when you reload them by throwing them away.

Rewards Card
Earn a Loyalty Package from each weapon manufacturer.
This trophy requires the most grinding over any other trophy. In total, you’re going to need to kill 900 enemies with weapons from 9 different manufacturers, and you’ll need to keep track of your progress manually somehow via a notepad, spreadsheet, or some such method.
Every time you kill 100 total enemies with weapons from a specific manufacturer, the manufacturer will email you to extend their thanks by giving you a weapon that you probably won’t use.

To earn this trophy you will need to get 100 kills with weapons from each of the 9 following manufacturers:
- Maliwan
- Jakobs
- Dahl
- COV
- Hyperion
- Tediore
- Atlas
- Torgue
- Vladof
This is a total count across all weapons so you don’t need to stick to the same weapon for each manufacturer, just get 100 kills with any of their weapons over any amount of time.
It might be a good idea to leave their emails in your inbox without claiming the weapon inside, so that you can always refer to your inbox as a way of tracking your progress.
You can access your email inbox by pressing options, going to the “Social” option and then pressing ![]() three times to reach your email inbox.
three times to reach your email inbox.
If you still need this trophy at the end of the game, I suggest going to pandora where the enemies are weaker and farming kills with the manufacturers you need emails from.
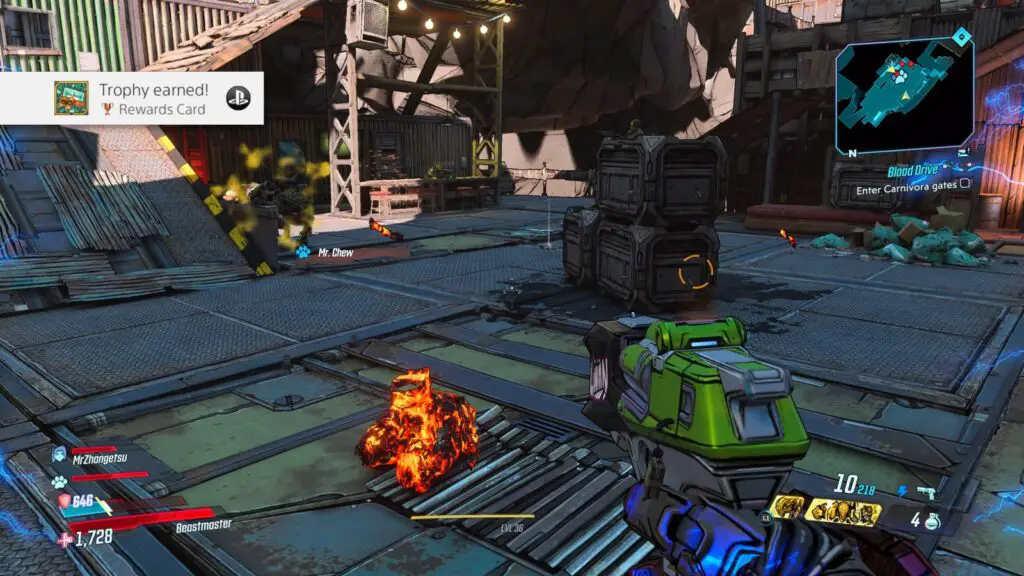
Once you have received an email from all 9, the trophy will be yours! You don’t actually need to open the emails, as you can see from the above screenshot, simply receiving the emails is enough.
Misc Item Trophies
The following trophies require you to find specific items peppered throughout the game…

Bolt-Ons
Unlock 10 Character Heads or Skins.
There are quite a few cosmetic items you can acquire, from room decorations to weapon skins to itty bitty little phone charms to hang off your guns. This trophy, however, is specific to character cosmetics, which means heads and skins.
You could actually just earn this trophy by buying 10 heads or skins (or a combination of both) from Earl in the bowels of Sanctuary, but you will get plenty of these items dropping naturally through gameplay. All you need to do to register them towards the trophy progress is press ![]() on them from within your inventory.
on them from within your inventory.
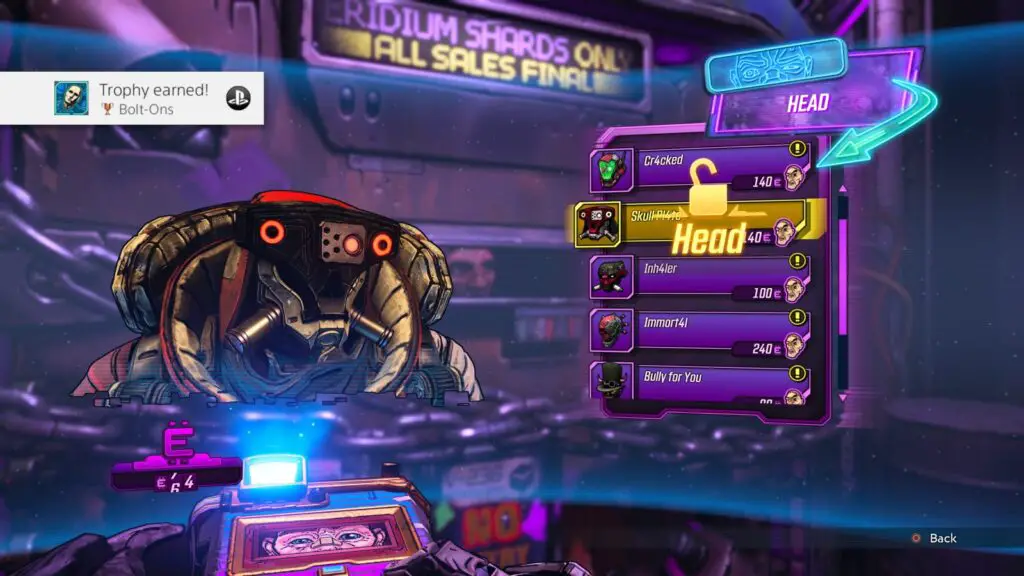
Even if you’re playing as Amara and you get a skin for a Fl4k, you can press ![]() to add that Fl4k skin to your account, which counts towards the trophy.
to add that Fl4k skin to your account, which counts towards the trophy.
Glitch Warning: There are reports of a glitch with this trophy not popping, which we didn’t actually have any trouble with so it may have been patched out. The suggested solution for said glitch is to hoard 10 cosmetic items in your character’s bank on Sanctuary and then unlock them all one after the other .

Mechani-Cool
Unlock 10 Vehicle Parts via hijacking.
This trophy’s description is a little misleading as it would have you believe you need to steal the vehicle by pulling the driver out and jumping into it, but that’s not actually the case.
In Borderlands 3, you can take almost any vehicle to a Catch-a-Ride station and park it there to unlock any new parts it might have. There are 10 crew challenges for “Hijack Vehicles” which are green diamond icons with little speedometer icons in them, but you don’t need to do those. We did about 2 of them and still managed to earn the trophy.
What we did instead, was to get into any new vehicle we saw whilst playing and then take that back. Cyclone parked up at the side of a swamp? Jump in and take it to Catch-a-Ride. Enemy giving you trouble? Take their vehicle and park it at the Catch-a-Ride. It is much easier to do it this way than to bother trying to track down all the relevant Crew Challenges.
Finding 10 different parts to add to your vehicle customisation menu will net you this trophy.
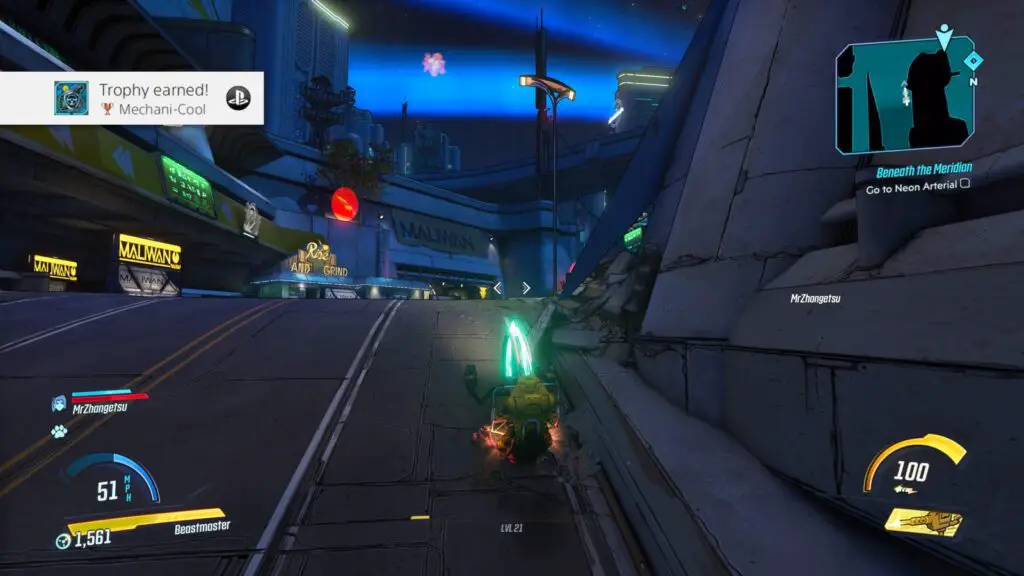
As you can see in the screenshot above, I’m not at a Catch-a-Ride when the trophy popped. This is because MrZhangetsu was actually the one to deliver the new vehicle to the Catch-a-Ride. When you play online, all new vehicle parts are unlocked for both players.

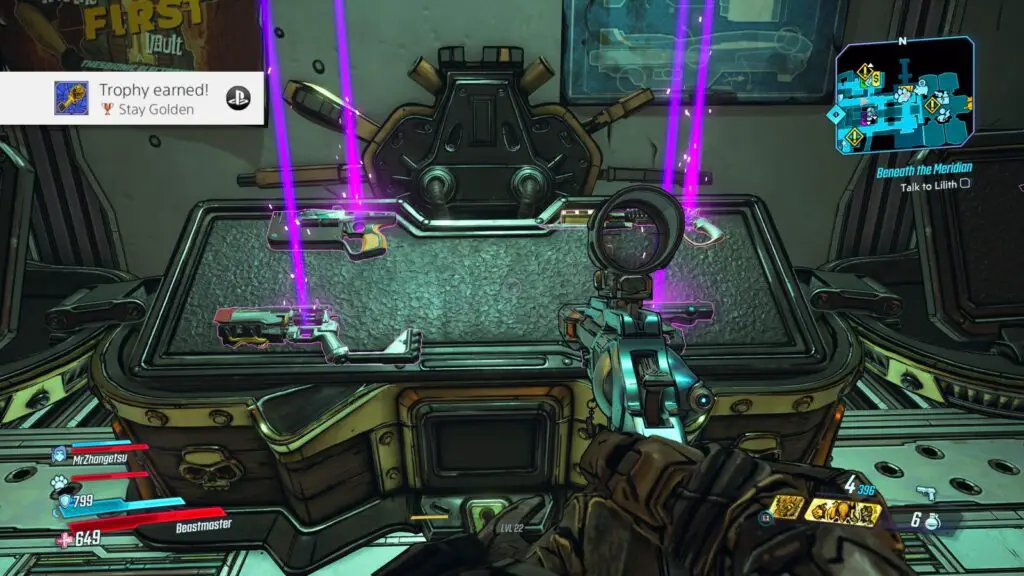
Stay Golden
Use a Golden Key.
For this trophy, all you have to do is use one Golden Key at the Golden chest on Sanctuary.
To earn this trophy you’ll need to go to the “Social” in the pause menu and then press ![]() until you’re on the “SHiFT” tab. You will need to make a SHiFT account here (or do so on a computer/phone and then just login on this tab) but once that’s done, you’ll instead see a a field where you can enter a code.
until you’re on the “SHiFT” tab. You will need to make a SHiFT account here (or do so on a computer/phone and then just login on this tab) but once that’s done, you’ll instead see a a field where you can enter a code.
Enter this code for three Golden Keys: ZFKJ3-TT3BB-JTBJT-T3JJT-JWX9H
If you want more, you can check this page for a frequently updated list by USGamer, however, we found the rewards the Golden Chests gave out to be useless 99% of the time.
Once you have a key, find the golden chest on Sanctuary – in the corridor between Marcus’ shop and the Lost Loot dispenser – and use the key there.

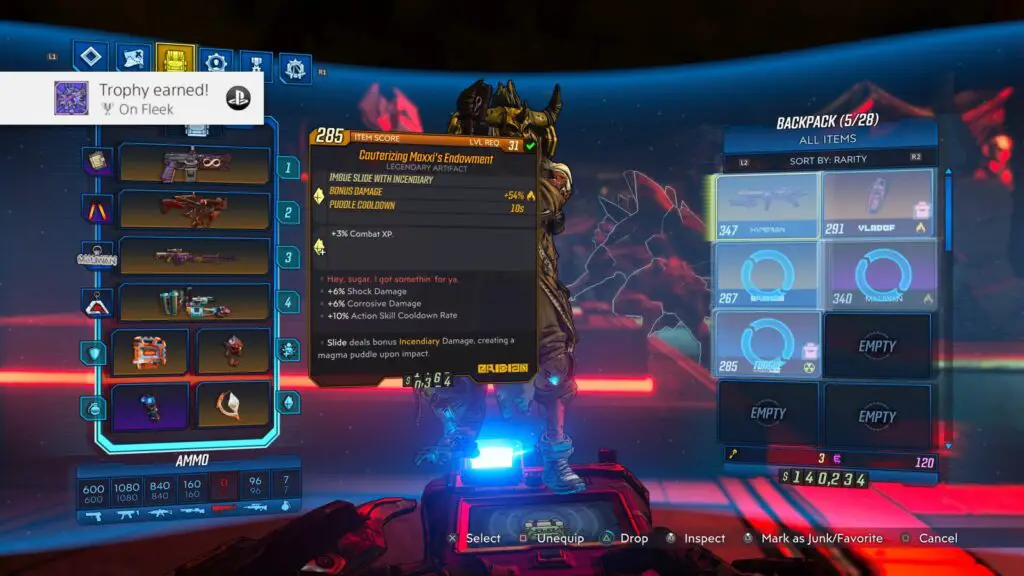
On Fleek
Equip purple-rarity gear or better in every slot.
This trophy is very likely to come naturally to you, but cannot actually be earned until you have completed the Story mission “Cold as the Grave”. From that point on you’ll be able to equip “Artefacts” and will thus be able to equip something in every slot.
For the trophy, you’ll want to put a Legendary (gold) or Epic (purple) gear item in each equipment slot. The trophy will then pop.
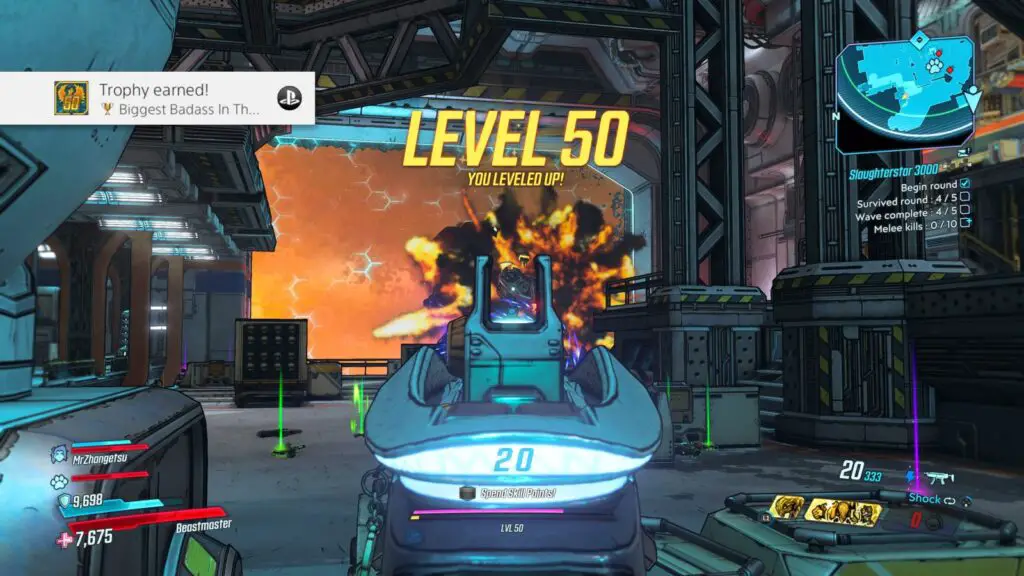
Reach Vault Hunter Level 50
The next 4 trophies in this Borderlands 3 Trophy Guide are extremely simple, and just require you to play the game. You get exp for everything from discovering a new location to completing a quest and almost everything in-between. Not level 50 yet? Then just keep playing!
We reached Level 50 during our post-game trophy cleanup and were level 56 by the time we were done with the game.

You Got Skills
Reach level 2

Star Bound
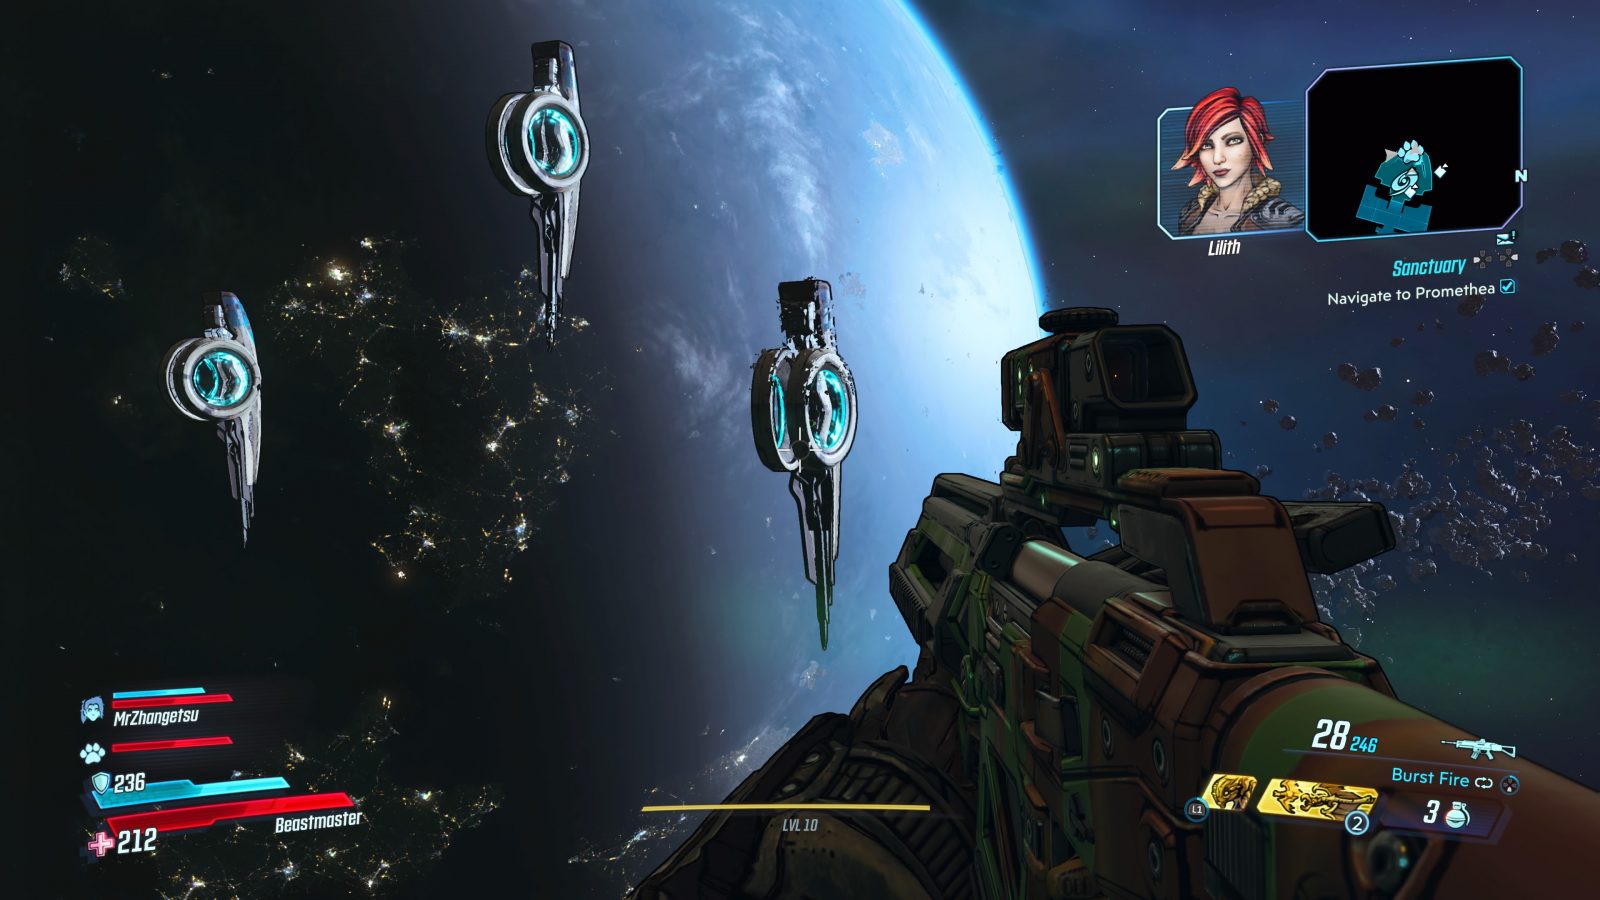
Reach level 10

Vaulting Your Way To The Top
Reach level 25
You should reach level 25 a few hours before you finish the main campaign, but from here on out the exp thresholds are getting pretty big!

Biggest Badass In The Borderlands
Reach level 50
We reached Level 50 long after completing the story, during one of the Slaughterhouse quests as part of our side-quest cleanup. You shouldn’t need to do anything other than completing the game’s main and side-content for this trophy, but if you do, you can try the “True Vault Hunter” mode available after main campaign completion, as the EXP rewards are increased in this mode.
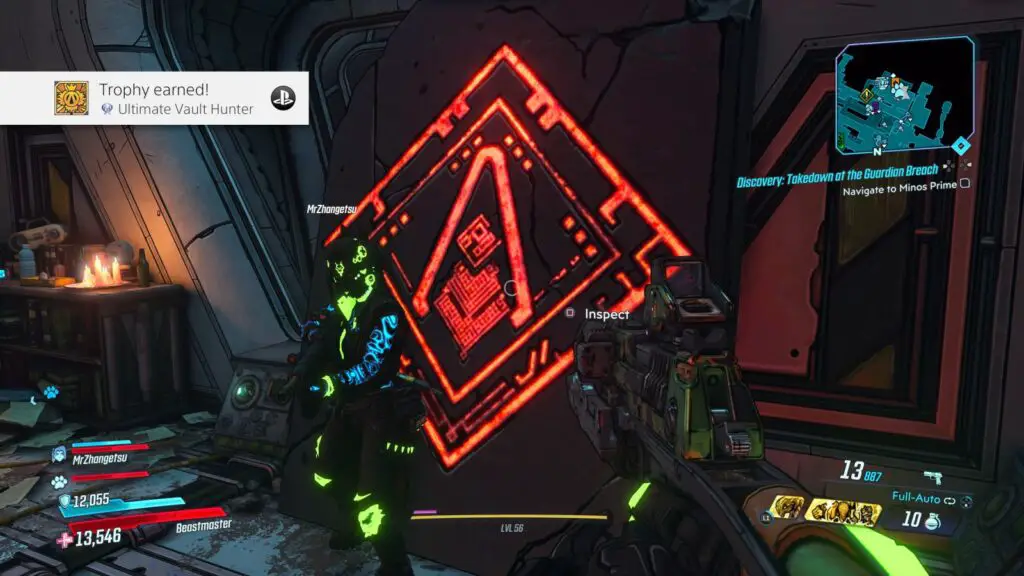
Plat Get!
Naturally, once all of the trophies in this Borderlands 3 Trophy Guide are yours, you’ll be able to lay claim to the Platinum Trophy, greater than any reward those vaults were ever going to give you.

Ultimate Vault Hunter
Unlock all Borderlands® 3 Trophies.
Thank you for choosing PlatGet as your source for this Borderlands 3 Trophy Guide, consider checking out our reviews and other guides!
Follow us on twitter @GetPlat or Instagram @platget for updates on new reviews and guides, as well as small anecdotes about our platinum journeys.