PlayStation 4
Monster Hunter Stories 2 Trophy Guide


General Info
FAQ
How long does it take to beat Monster Hunter Stories 2 and unlock all trophies?
Around 60-80 Hours.
How difficult is it to beat Monster Hunter Stories 2 and unlock all trophies?
Easy (3/10).
Does Monster Hunter Stories 2 have online trophies?
No.
Does Monster Hunter Stories 2 have difficulty-specific trophies?
No.
Does Monster Hunter Stories 2 have missable trophies?
No.
Does Monster Hunter Stories 2 have glitched trophies?
No.
What is the minimum number of playthroughs required to unlock all trophies in Monster Hunter Stories 2?
One.
Does Monster Hunter Stories 2 have a Platinum Trophy?
Yes.
Trophy Guide
Monster Hunter Stories 2 Trophy Guide and Road Map for PlayStation
Welcome to our Monster Hunter Stories 2 Trophy Guide. This sequel to Monster Hunter Stories is a massive improvement in many ways, not just graphically. There are many quality of life improvements including; access to all of your items during battle, the ability to place genes in any slot during the Rite of Channeling, and a much more balanced EXP system which makes party changes more viable. That said, the game is also more challenging in many ways, with tougher battles, limited stable slots, and much more complex combat mechanics.
In terms of the trophy journey, you’ll be looking at a similar list of trophies to the game’s predecessor, just without the pains of having to find 100 lost pigs or stumble across an insanely rare accessory. That said, there are some new arguably more arduous challenges, including; collecting all of Navirou’s Outfits, acquiring every Gene, and using every Kinship Skill!
Phase One | Complete the Story
In this first phase of our Monster Hunter Stories 2 Trophy Guide, I recommend mostly just progressing the story. Along the way, to strengthen your team, earn exp, and find resources, you’ll end up doing a lot of exploring, complete subquests, engage in many battles, and hatch plenty of eggs. All of these things will ultimately contribute to your progression in other trophies which we’ll come to once you’ve completed the story.
Some things I’d recommend looking out for while playing, however, are:
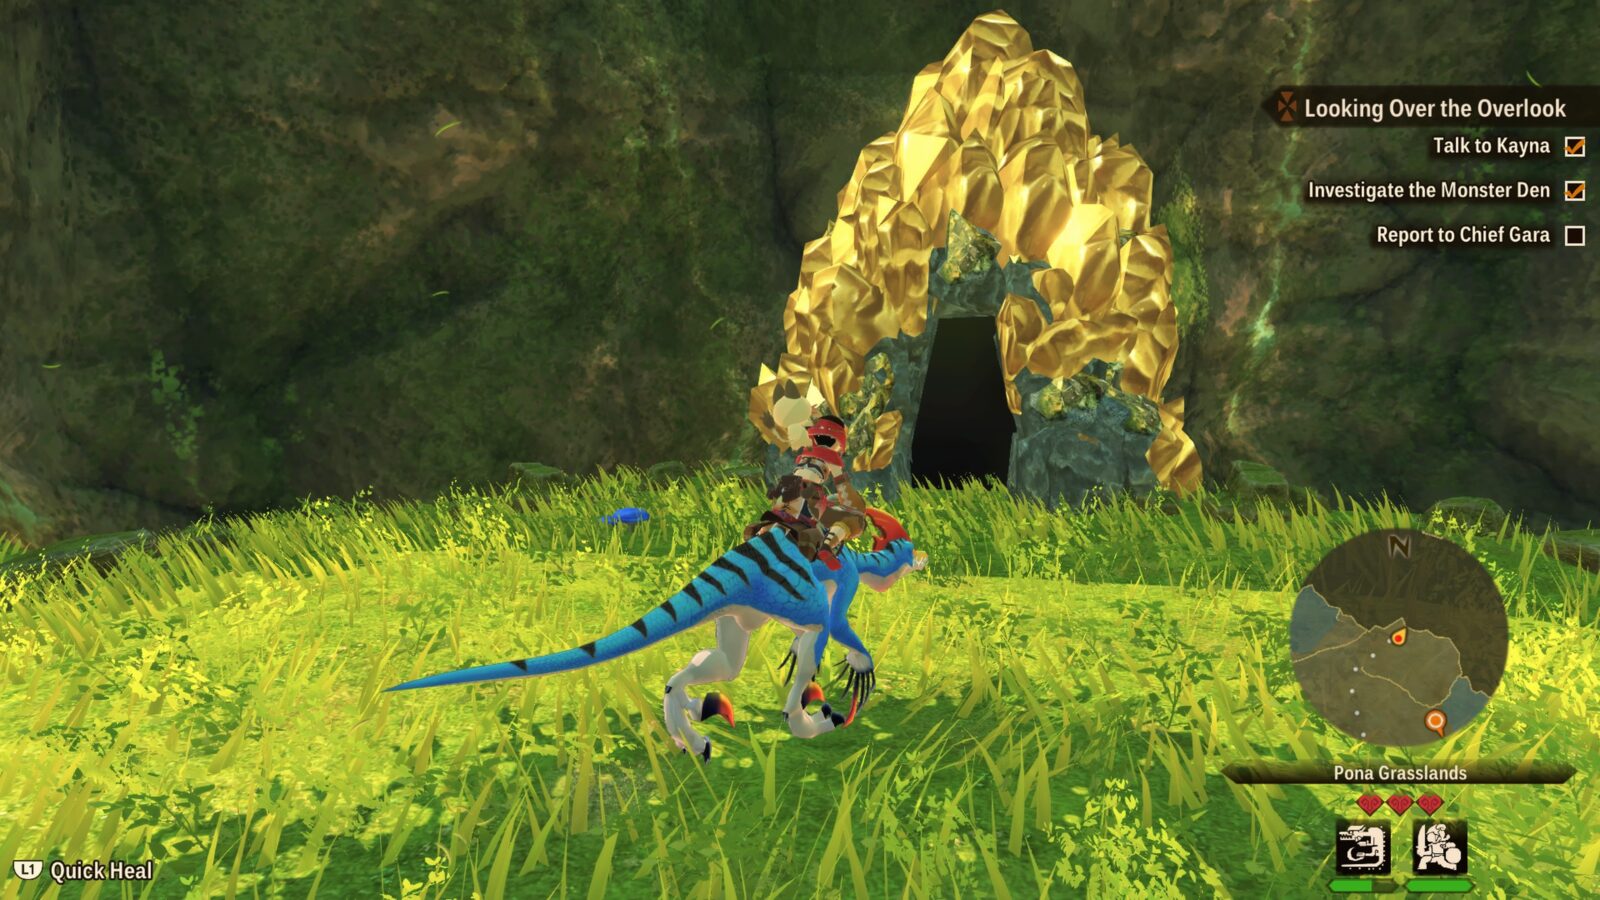
- Rare Monster Dens. If you happen to see any of the Monster Den caves that are a bright shining gold colour, be sure to head inside and grab an egg, as it will contain a rare or powerful Monstie to add to your team and they’re more likely to have rare Genes, which will be very important towards the end of your trophy journey. Eggs are more important here than in MH Stories 1, too, as you’ll actually need to fill your Monstipedia this time!
- Recipes & Skill Scrolls. Often you’ll come across Subquests, usually those given to you by NPCs with blue “!” speech bubbles over their heads, that offer Recipe Books or Skill Scrolls as a reward. You’ll eventually need to collect every Recipe and every Skill Scroll so try and complete these ones where you can.
- Fight any New Monsters you see. You’ll need to fill the Monsterpedia in MH Stories 2, just like in the game’s predecessor, so fighting a new Monster whenever you see one will save you some hunting later. It’s good for EXP too, of course!
- Look out for new Catavan Stands. You’ll need to unlock every Catavan Stand in MH Stories 2, so be sure to interact with them as and when you find them. They have a paw icon on the minimap that makes them easier to spot!
Unmissable Story Trophies

Friend of Kayna
Reached Kinship Stone Level 2.
The “Friend of Kayna” trophy unlocks naturally when you set sail for Rutoh Village as part of the story campaign.

Friend of Alwin
Reached Kinship Stone Level 3.
You will unavoidably receive the “Friend of Alwin” trophy as part of the story after the Rathian fight.

Friend of Avinia
Reached Kinship Stone Level 4.
You will unavoidably receive the “Friend of Avinia” trophy as part of the story after the Seltas fight.

Friend of Reverto
Reached Kinship Stone Level 5.
You will unavoidably receive the “Friend of Reverto” trophy as part of the story after reuniting with Ratha.

Friend of Kyle
Reached Kinship Stone Level 6.
You will unavoidably receive the “Friend of Kyle” trophy as part of the story after the Mizutsune fight.

Friend of Cheval
Reached Kinship Stone Level 7.
You will unavoidably receive the “Friend of Cheval” trophy as part of the story after the Nergigante fight.

Friend of Ratha
Reached Kinship Stone Level 8.
You will unavoidably receive the “Friend of Ratha” trophy as part of the story after the Credits sequence.

Wanderer's Shield
Viewed all Story Cutscenes. But don't be fooled! Your adventures are not over yet...
Shortly after the Friend of Ratha Trophy unlocks, you will also unavoidably receive the Wanderer’s Shield trophy. I can confirm that it’s safe to skip cutscenes (I skipped a few myself) and it won’t void the trophy!
As the Trophy Description suggests, however, there’s a bit more story left. See the Shining Kinship Stone trophy for next steps.

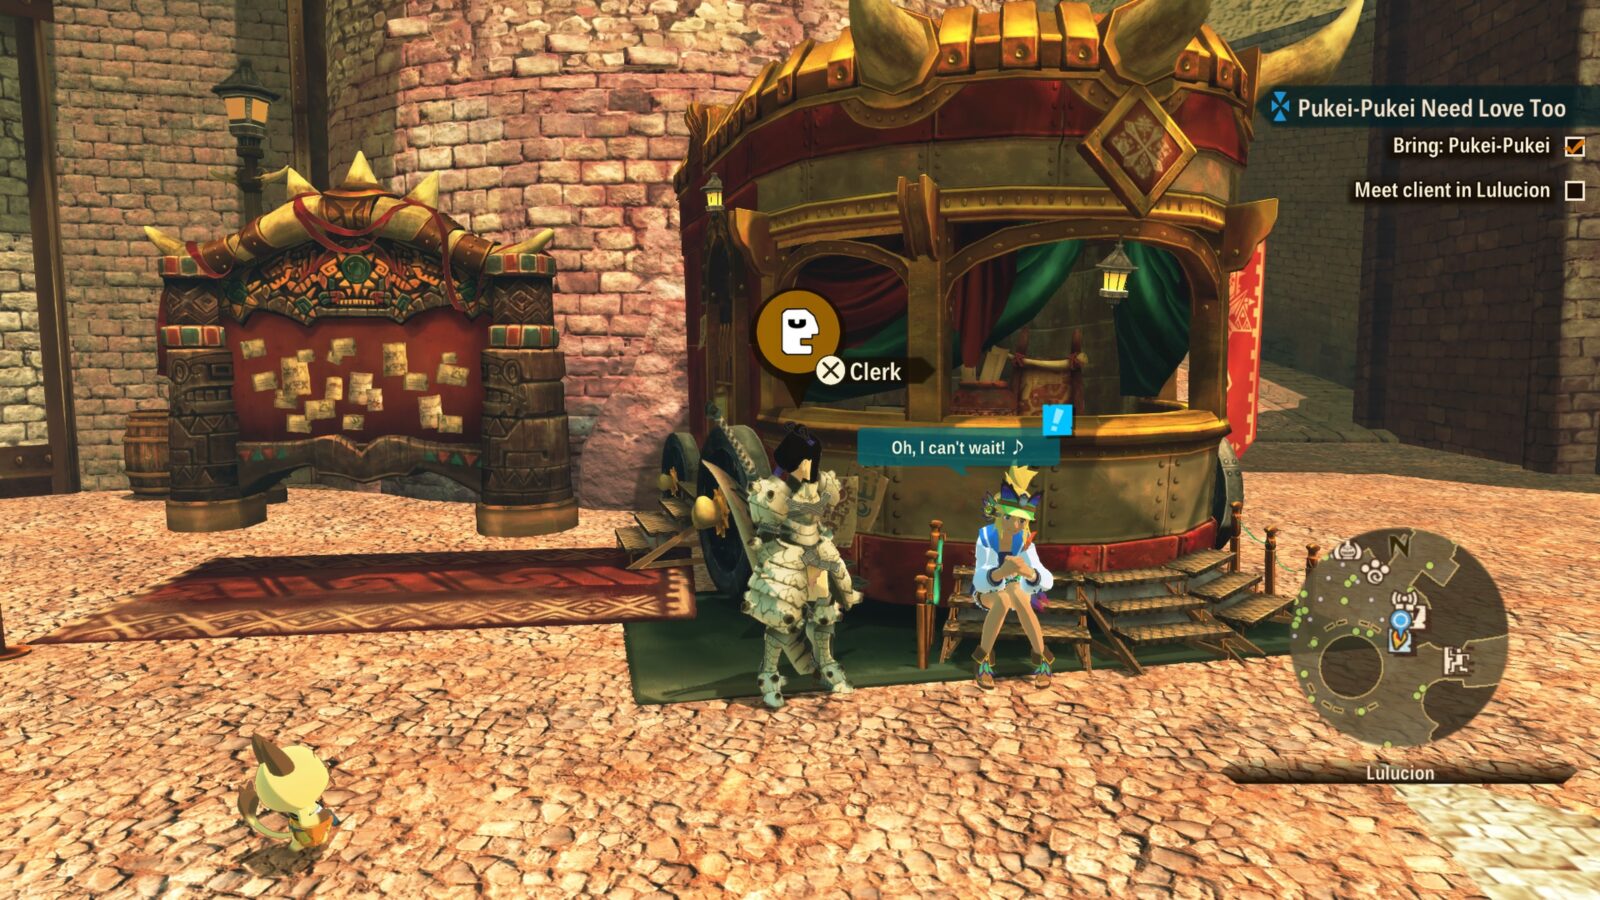
Shining Kinship Stone
Visited Lulucion at Kinship Stone Level 9.
After completing the story, head to Lulucion. There’s an NPC there sitting on the steps in front of a kiosk. She will give you a Subquest to complete for which you need to show her a Pukei-Pukei. Hatch one and add it to your party, then speak to her again to complete the “Pukei-Pukei Need Love Too” Subquest.
Speak to her again after that and she’ll have a new Subquest for you, concerning the Pink Rathian. Complete the “A Monster Among Flowers” Subquest by defeating the Pink Rathian in Pomodore Garden.
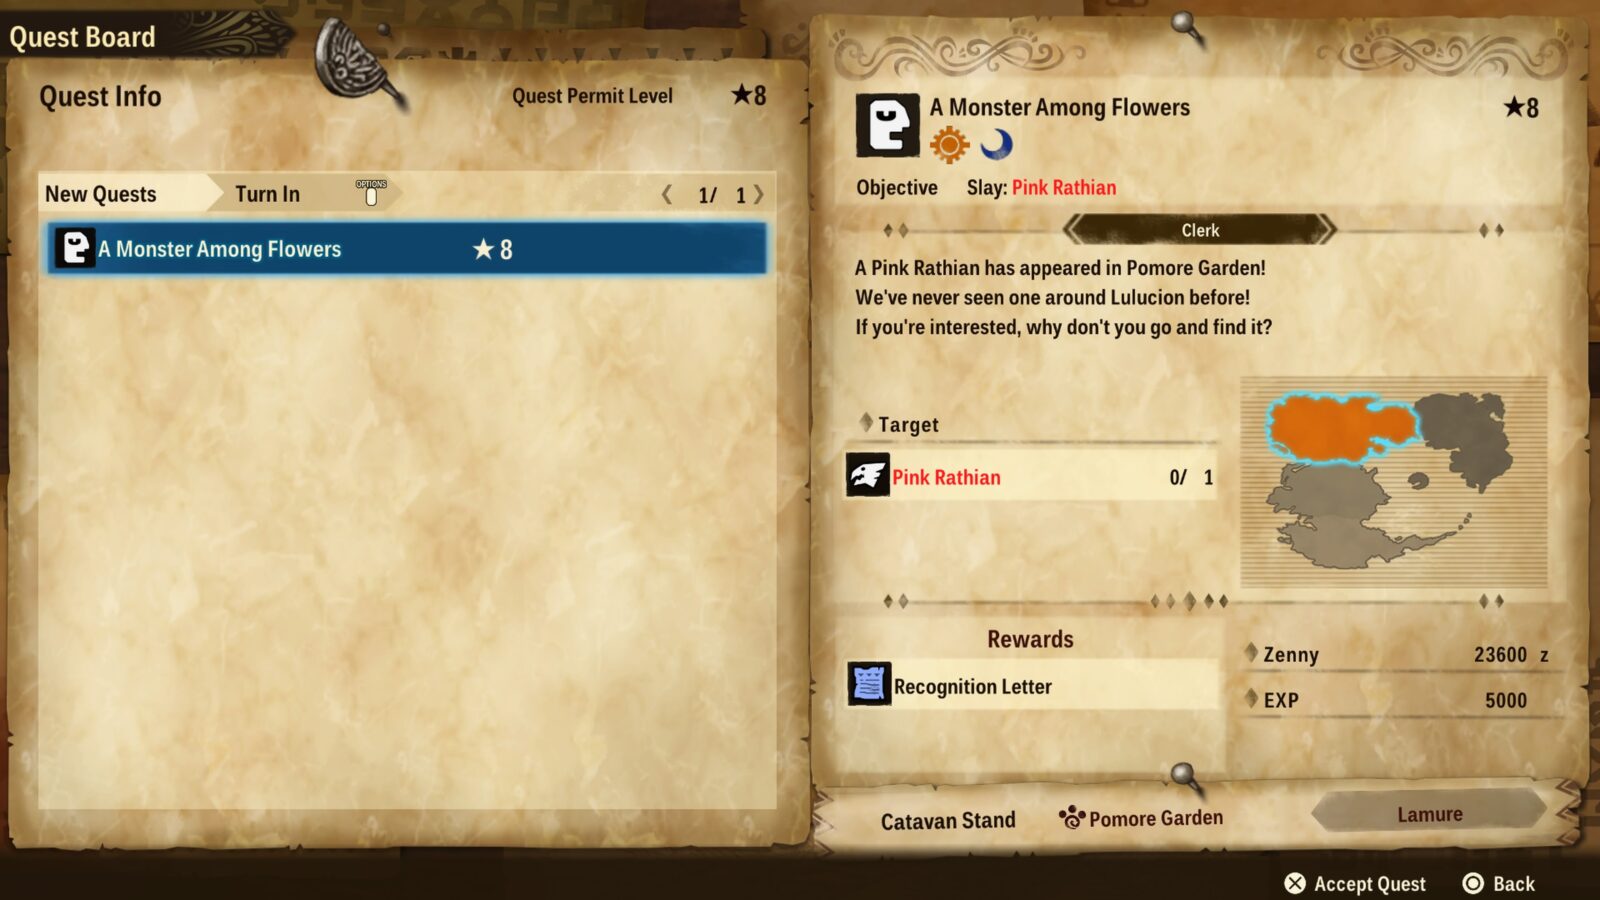
You probably won’t be able to do this right away because even the basic enemies in High Rank dens are incredibly powerful. You should upgrade your team a bit with some higher-rarity Monsties and complete some Subquests to level them up to around Level 50. At that point, you’ll have a much easier time.
It should be noted that the Pink Rathian you slay doesn’t have to specifically be the one in Pomodore Gardens and if you beat one elsewhere, such as the Elder’s Lair, you’ll be able to complete the quest.
Once you have defeated a Pink Rathian and handed in the quest, the NPC will have another one for you; this time “Azure Sea, Sky, Rathalos,” for which you need to defeat an Azure Rathalos.
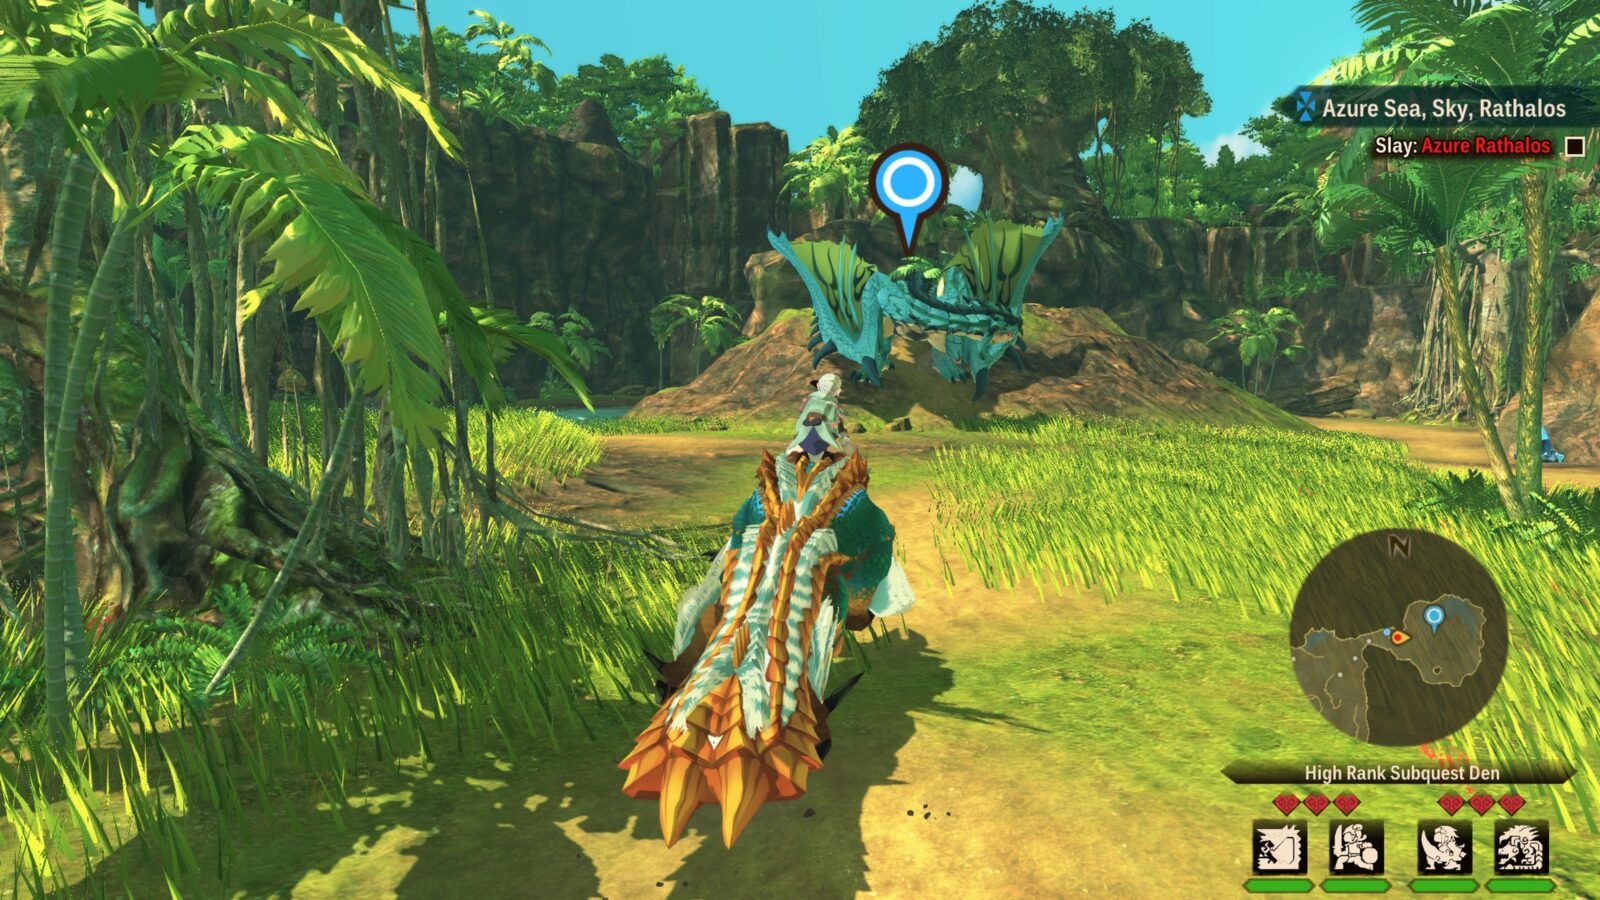
She directs you to one in North Kamuna Cape on Hakolo Island but, again, you can simply defeat any High Rank Azure Rathalos. Much like the Pink Rathian, there’s one in Zone 1 of the Elder’s Lair.
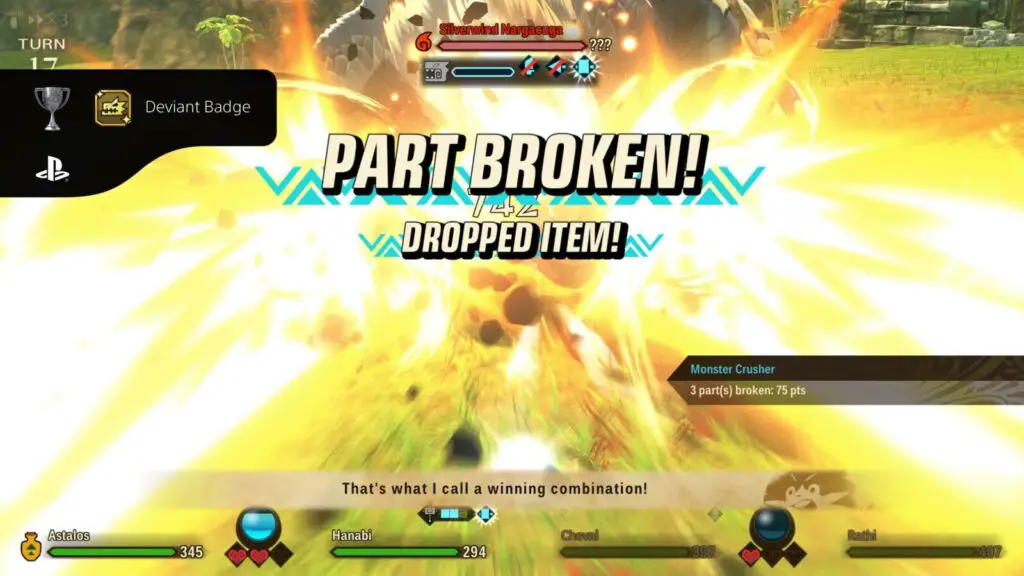
Her next quest is in regards to a Deviant Monster! This is where things get more interesting. You need to complete the “Deviant Monsters: Hakolo” subquest that she gives you. You’ll need to follow tracks by following the scoutflies and collecting resources in the area, as you have done many times before throughout the story.
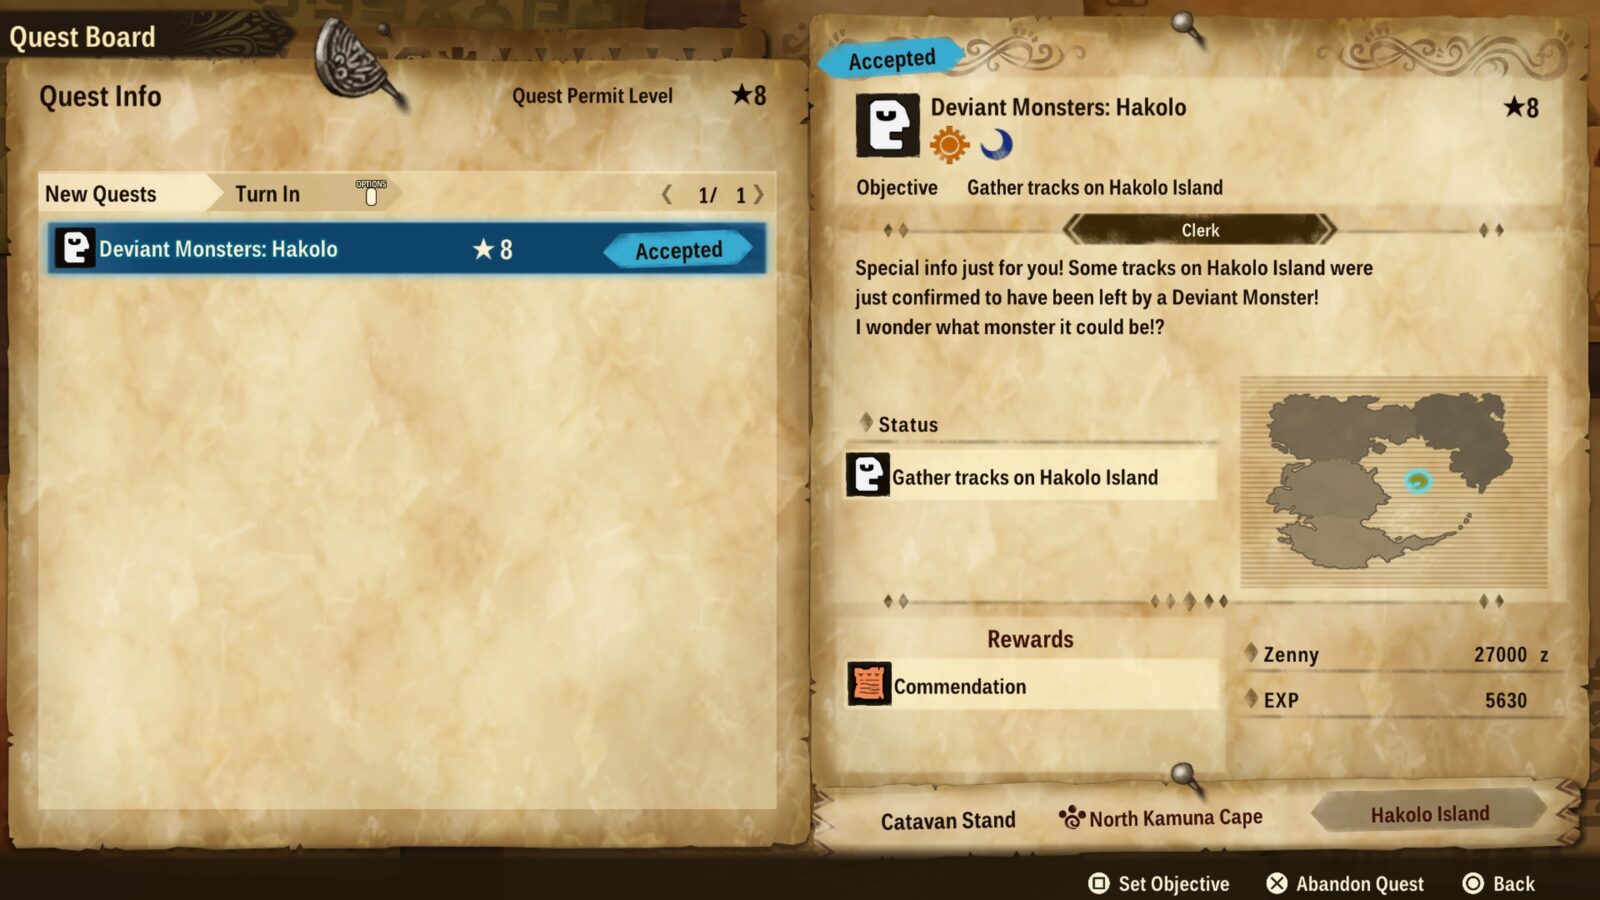
These will lead you to a Den containing a rare and powerful Monster for you to fight.

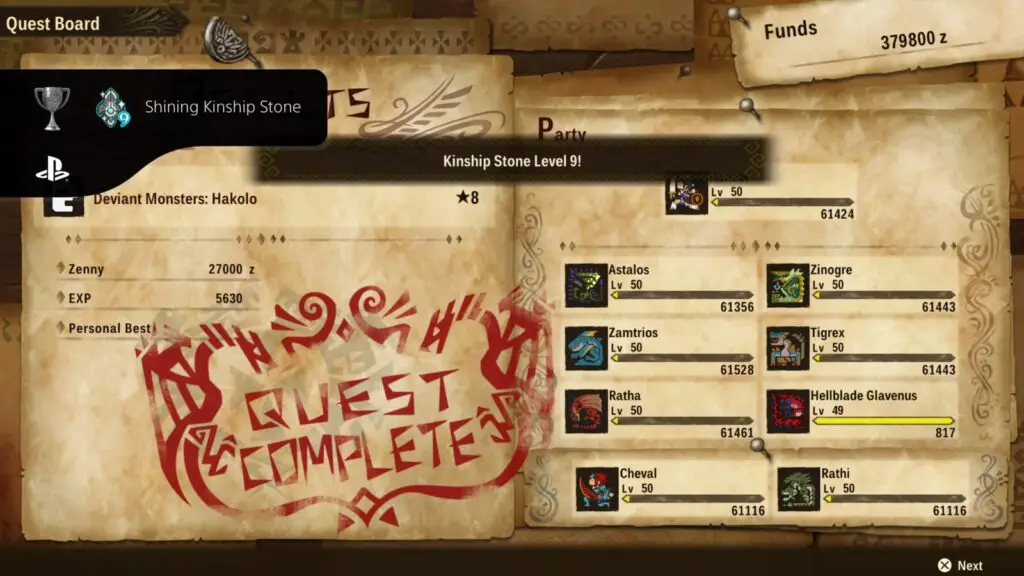
After you defeat the powerful Deviant Nargacuga at the nest in the Subquest den, you will unlock the Deviant Badge trophy for defeating your first Deviant Monster. With the objectives complete, return to Lulucion and hand in the subquest to the client to receive the “Shining Kinship Stone” trophy and your Level 9 Kinship Stone.

Deviant Badge
Slayed a Deviant Monster. Show it off with pride.
You will unlock the “Deviant Badge” trophy upon defeating your first Deviant Monster. You have to do this to unlock the Shining Kinship Stone trophy anyway, so you should unlock it in pursuit of that trophy.
Phase Two | Cleanup
With the main story objectives complete and your Kinship Stone as levelled-up as it can get, it’s time for you to really get stuck in to some of the additional content and challenges laid out for you. There will be collectibles, subquests, a post-game dungeon, and more subquests. Here’s a quick summary:
- Subquests; there’s a lot of subquests in MH Stories 2 and the Good Soul Medal asks you to complete at least 100 of them!
- You’ll also need to collect every recipe again for Sage’s Tome, which will mean completing a lot of NPC Subquests in the game’s many settlements to claim Recipe Books and Felyne Coins that you can use to buy more Recipe Books from Melynx inc.
- You also need to collect every Skill Scroll for Expert’s Tome. These also come from subquests given to you by NPCs in each settlement.
- While visiting the Questboard you should also earn the Scroll of Cooperation trophy and the Versus Battle Trophies. Don’t worry, though, they can all be earned offline!
- Take on and complete the challenging Elder’s Lair post-game dungeon for Secret Scroll of Bonds.
- Combat Trophies; You’re going to need to defeat at least 200 Monsters (if you somehow haven’t already) for Champion Rider Plaque.
- You’ll need to try and earn at least 50 S-Rank battle rankings for Supreme Crest. Although, this is also likely to happen naturally.
- Another likely unmissable goal is to break at least 30 Monster Parts for Peerless Partbreaker Symbol, but I’ll be shocked if you didn’t do that ages ago.
- You’ll need to upgrade a High-Rank Weapon and a High-Rank Armor Set to MAX Level to unlock Battle Gear Royalty and Battle Armor Royalty respectively.
- Try to fill all 9 Gene Slots on one Monstie for Initiate’s Certificate and upgrade an XL Gene to Max Level for the Mastery Gem trophy.
- Purchase an Expedition Ticket+ from Melynx inc and then start an expedition to unlock Expedition Orders.
- Collect all of Navirou’s Outfits and then equip one to unlock Trendsetter.
- Acquire some Layered Armor and then equip it to unlock Fashionista.
- Find and visit every Catavan Stand in the game for Catavan Conqueror. These are useful to have anyway!
Subquest Trophies

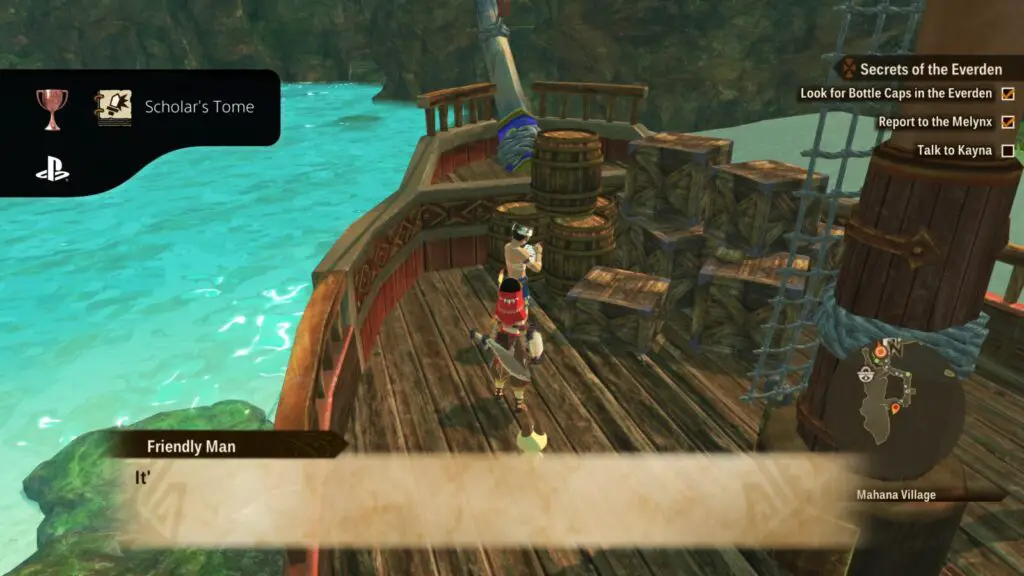
Scholar's Tome
Obtained a Skill Scroll other than the default Skill Scrolls. A sign of your noteworthy weapon proficiency.
To unlock the “Scholar’s Tome” trophy, you simply need to acquire a Skill Tome for the first time. This is very likely to happen naturally as Skill Tomes are often given to you as Subquest rewards. There are quite a lot of them in the game, too!
One example is an NPC on the boat in Mahana Village who gives you a Sword & Shield Skill tome for simply crafting and equipping the “Bone Kris” sword and shield, then speaking to him.
You will eventually need to collect every Skill Scroll to unlock the Expert’s Tome Trophy.

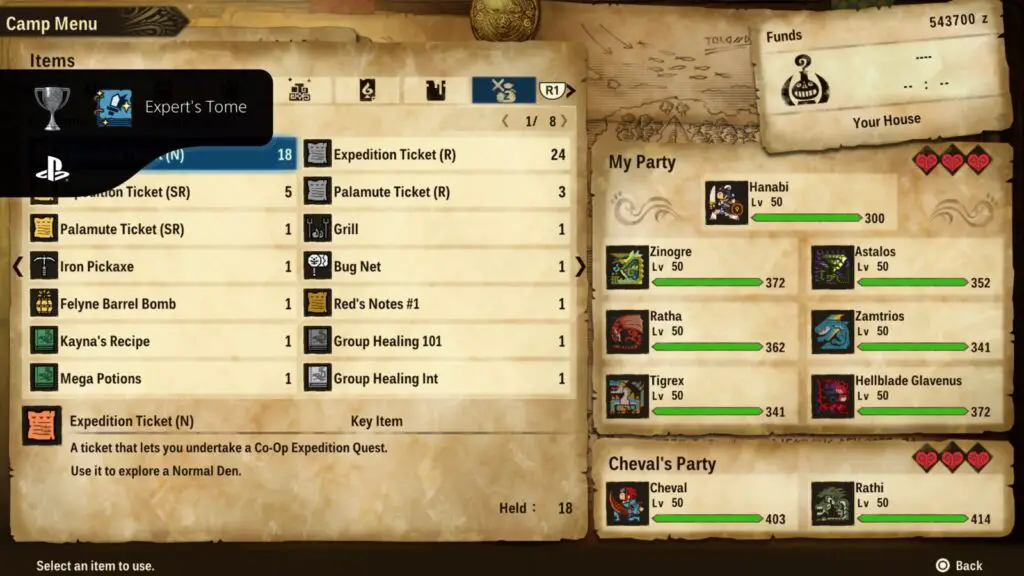
Expert's Tome
Collected all Skill Scrolls and viewed the Key Items tab. There's no weapon you cannot put to good use.
To unlock the “Expert’s Tome” trophy, you need to find all 23 Skill Scrolls available in Monster Hunter Stories 2. Skill Scrolls are always unlocked via NPC Subquests given to you by NPCs in settlements. To ensure you don’t miss any, open the Map in each Settlement and look for “!” icons. Speak to the NPCs at these icons to accept their quests and, if they offer a Skill Scroll as a reward, complete the Subquest to claim it.
Once you have all 23 Skill Scrolls, go to the “Items” option in the ![]() menu and then tab across to the “Key Items” tab at the end. If you have all 23 Skill Scrolls, the trophy will then unlock.
menu and then tab across to the “Key Items” tab at the end. If you have all 23 Skill Scrolls, the trophy will then unlock.

Philosopher's Tome
Collected half or more of all Books of Combos. Testifies to your remarkable craftsmanship.
To unlock the “Philosopher’s Tome” trophy, you will need to acquire 50% of the possible combination recipes in Monster Hunter: Stories.

These are given as rewards for completing Subquests, usually those given to you by NPCs in the game’s various Settlements.

You will eventually need to find all the Combination recipes in the game to unlock the Sage’s Tome Trophy.


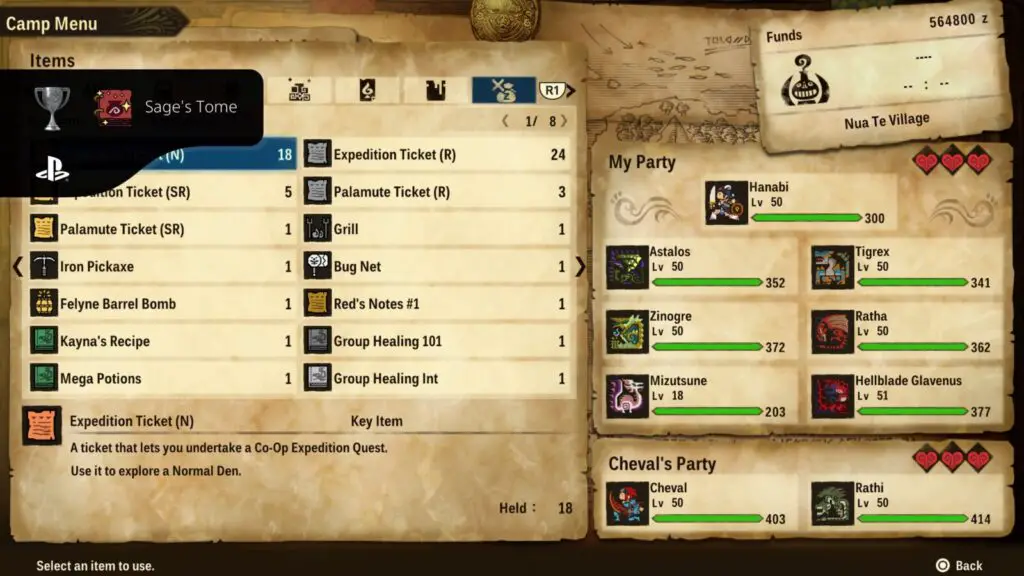
Sage's Tome
Collected all recipes and viewed the Key Items tab. Proof of your mastery over all items.
To unlock the “Sage’s Tome” trophy, you need to find and acquire all 37 Combination Recipes in Monster Hunter Storioes 2. These come from a combination of places; some are from the Melynx Inc store, some come from Questboard Subquests, and the majority come from NPC Subquests.
I’ve put together a table below, showing how and where to acquire each recipe. Note that some quests won’t be intrinsically available and you’ll need to complete preceding subquests to reveal them. Especially NPC Subquests, as many NPCs offer a series of quests rather than just one single subquest.
| Recipe | Acquisition |
|---|---|
| Kayna’s Recipe | Unlocks naturally as part of the story |
| Group Healing 101 | Shake That Soot Subquest (Quest Board) |
| Group Healing Int | Pukei-Pukei Need Love Too Subquest (Lulucion NPC) |
| Mega Potions | Unlocks naturally as part of the story |
| Hunter’s Life: Spring | Melynx Inc. (12 Bottle Caps) |
| Hunter’s Life: Summer | Rider 101: Combining Subquest (Quest Board) |
| Hunter’s Life: Fall | Offal’s Not Awful Subquest (Nua Te NPC) |
| Hunter’s Life: Winter | Secret Dealings Subquest (Lulucion NPC) |
| Positivity Pills | Item Quiz 1 Subquest (Rutoh Village NPC) |
| Essence Vitale | A Test of Purr-severance! Subquest (Lulucion NPC) |
| Healer’s Comp V.1 | Wash Hands, Bring Antidote Subquest (Quest Board) |
| Healer’s Comp V.2 | En-egg-matic Eggs Subquest (Mahana Village NPC) |
| Healer’s Comp V.3 | Monsterpedia Target: 30% Subquest (Lulucion NPC) |
| Healer’s Comp V.4 | Hung Out to Dry Subquest (Nua Te NPC) |
| Need a Boost? | Energy Drink Subquest (Quest Board) |
| Perfect Vision | Shadows of Red 3 Subquest (Rutoh Village NPC) |
| Trendsetter: Scents | Item Quiz 2 Subquest (Rutoh Village NPC) |
| Deep Clean | Shakalaka Scamps Subquest (Nua Te NPC) |
| Warm and Healthy | More Layers Subquest (Rutoh Village NPC) |
| Cool and Healthy | Staying Cool Subquest (Felyne Shelter NPC) |
| Tracking Basics | Rider 101: Hatching Eggs Subquest (Quest Board) |
| Boom Boom Book | The Grass is Greener Subqest (Lulucion NPC) |
| Big Boom Boom Book | Melynx Inc. (16 Bottle Caps) |
| Flash Bomb How-To | Tundra Terror Subquest (Kuan Village NPC) |
| Boom Boom Bang Book | A Taste of Home Subquest (Lulucion NPC) |
| Knifepedia: Poison | Melynx Inc. (8 Bottle Caps) |
| Knifepedia: Paralysis | Melynx Inc. (8 Bottle Caps) |
| Knifepedia: Sleep | Melynx Inc. (8 Bottle Caps) |
| Pitfall Surprise | Melynx Inc. (8 Bottle Caps) |
| Shocking Surprise | Melynx Inc. (8 Bottle Caps) |
| Tranquil Surprise | Melynx Inc. (8 Bottle Caps) |
| Taste of Home | Delicious Donuts Subquest (Quest Board) |
| Alwin’s Speciality | Three-Hole Donuts Subquest (Quest Board) |
| Family Favorite | Hot Fresh Donuts Subquest (Quest Board) |
| Sweet Secret | Drawn In by Donuts Subquest (Quest Board) |
| Culinary Traditions | The Secret to Beauty Subquest (Nua Te NPC) |
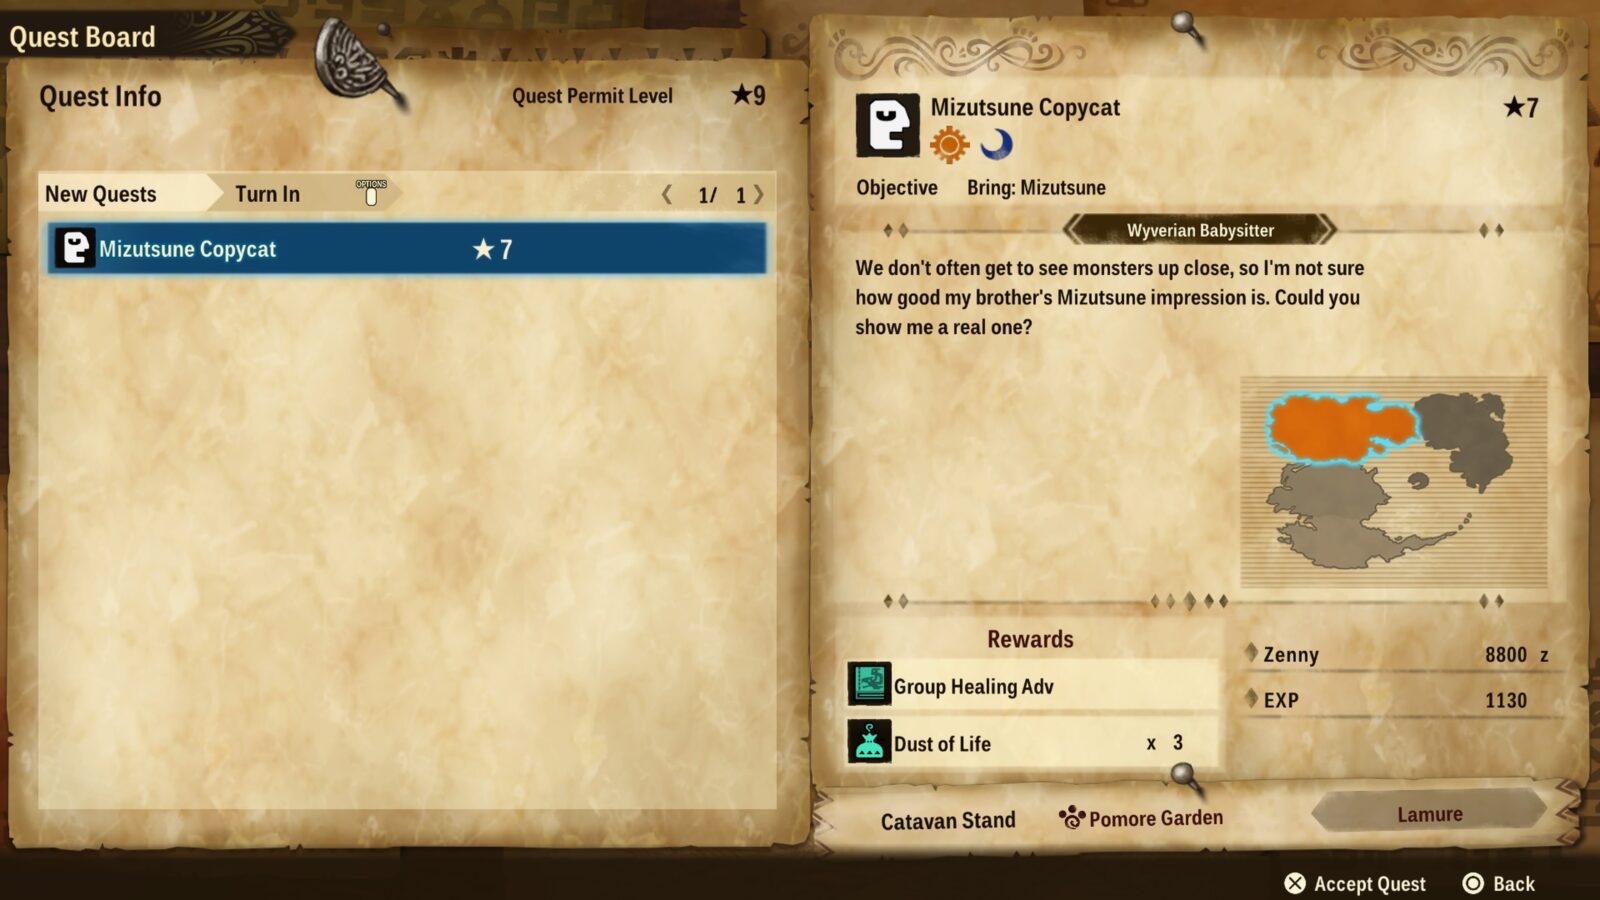
| Group Healing Adv | Mizutsune Copycat Subquest (Nua Te NPC) |
Once you have acquired them all, open your Items menu via ![]() and then tab to the “Key Items” tab to have the trophy unlock.
and then tab to the “Key Items” tab to have the trophy unlock.

Helping Hand Medal
Completed 50 or more Subquests. Making a big difference, little by little.
You will unlock the “Helping Hand Medal” trophy for completing a cumulative total of 50 Subquests. This counts the quests you pick up from the quest board, but also any that you happen to complete and hand in at NPCs in the various settlements. You’ll need to go on to complete another 50 Subquests for the Good Soul Medal trophy.
Subquests are a great way to gain resources, money, and exp so it’s likely that you’ll be completing these a lot to keep up with the level demands of the story and thus may earn this trophy naturally.


Good Soul Medal
Completed 100 or more Subquests. Making a big difference, little by little.
The “Good Soul Medal” trophy will unlock when you complete your 100th Subquest. As these are such a great way to earn resources and exp, you’ll probably be completing a lot of them on your way through the story. If not, however, you can just begin mopping them up once you’re done with the story.
You won’t need to complete every Subquest in the game, as there are far more than just 100. In pursuit of the Platinum, though, there’s a good chance you’ll end up completing more than 100 of them.


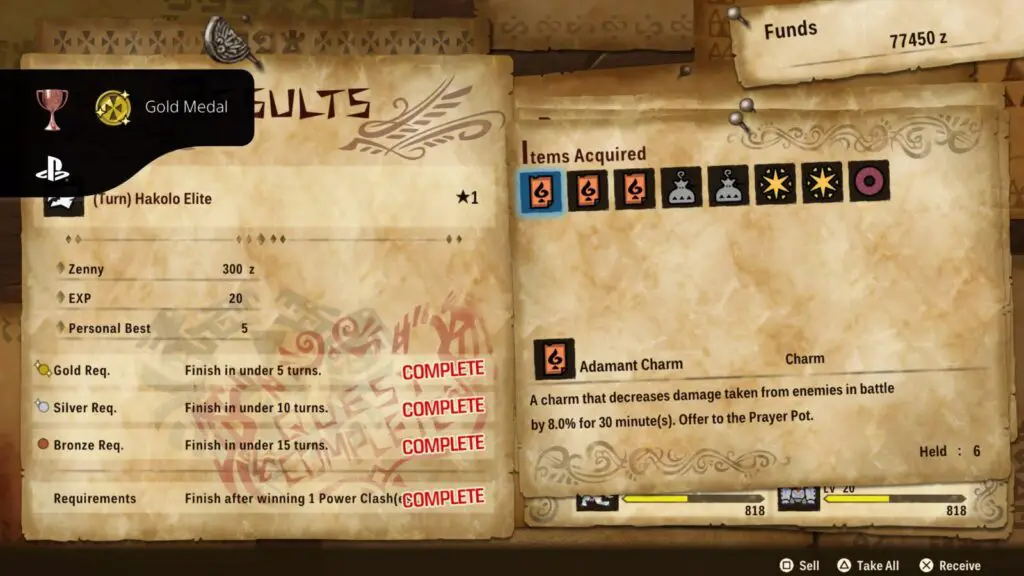
Gold Medal
Completed the gold Trial Quest requirements. As befits such an achievement, this medal is solid gold.
At questboards in Monster Hunter Stories 2, there’s a “Trial Quests” option.

This option gives you access to a series of arena-based trials in which you must defeat the listed Monsters. Each trial has a set of win conditions that give you either a Bronze, Silver, or Gold bonus.
These win conditions differ, but in Trials marked “Turn,” they depend on how many turns you complete the trial in. To unlock the “Gold Medal” trophy, you will need to complete any Trial Quest and achieve the Gold Requirements of that trial.

The easiest one to earn the trophy from is, of course, the “Hakolo Elite” trial. This trial asks that you kill a Bulldrome, a Kulu-Ya-Ku, and a Yian Kut-Ku in 5 turns or less to acquire the Gold Bonus. Once you’re deep into the story (or have completed it) this battle is a breeze and your high-level gear and high-rank monsters will blow right through the low-rank enemies in this trial.

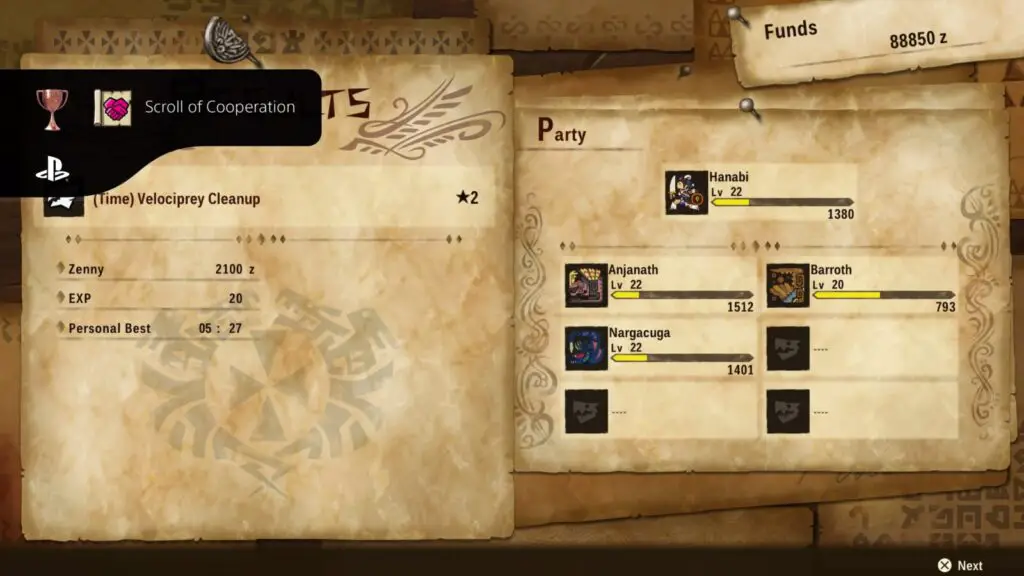
Scroll of Cooperation
Completed a Co-Op Quest. Working together with friends makes everything so much easier!
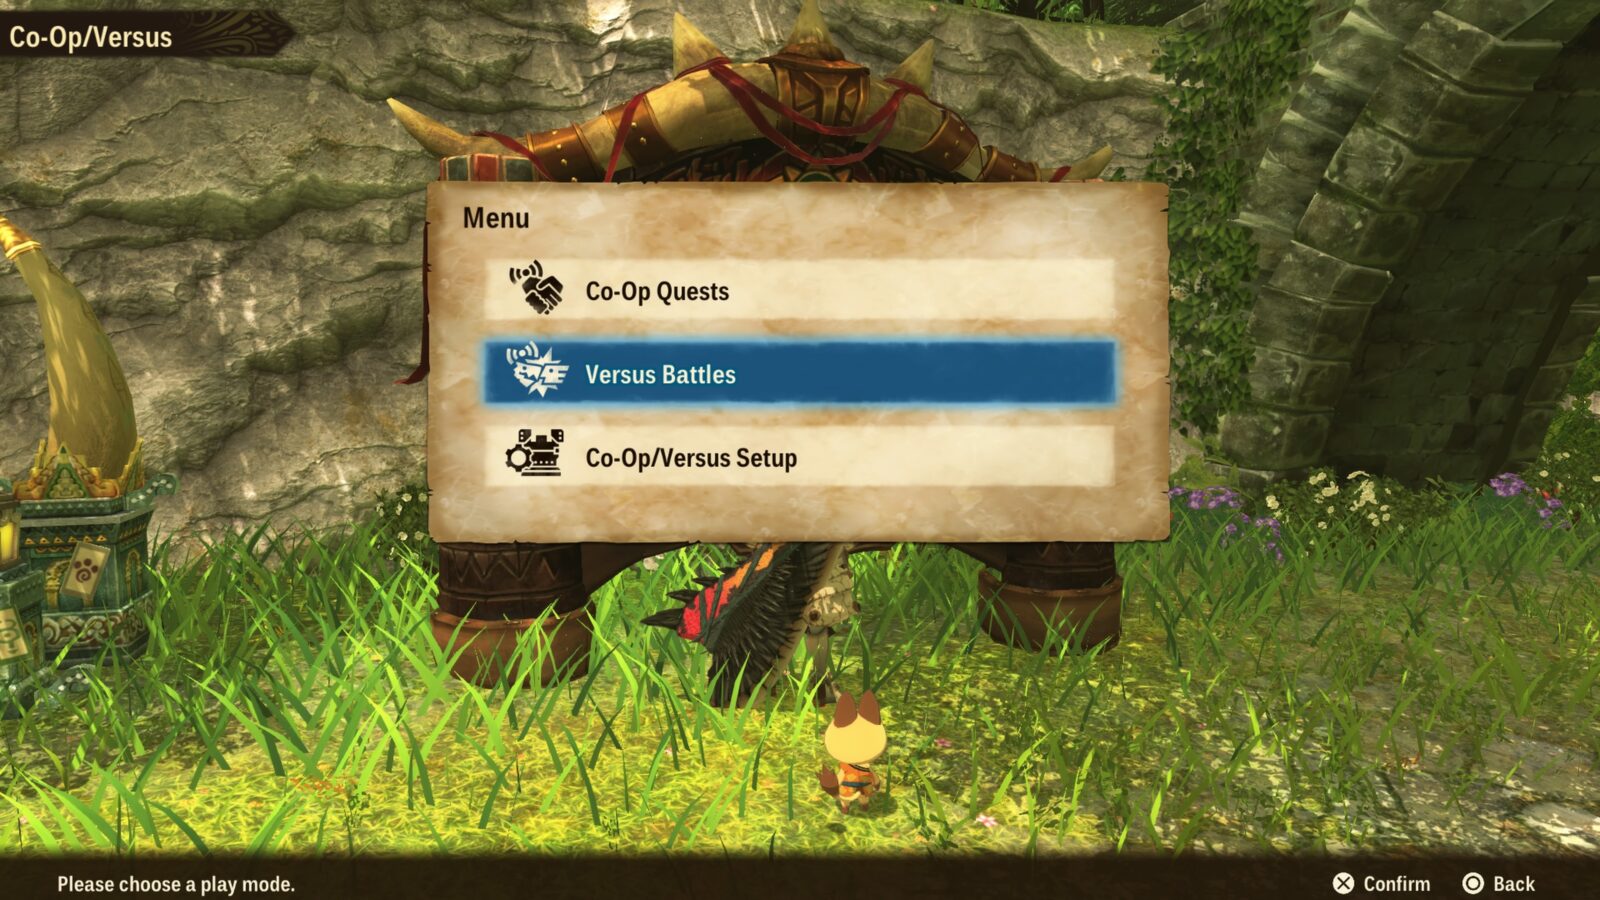
Eventually as you progress the story, you’ll unlock the “Co-op/Versus” option at the Questboard, from where you can engage in network battles and complete co-op quests with friends. Fret not, however, as there is also the “Offline Play” option, which allows you to do all of those things with random NPCs instead of real-world players.

To unlock the “Scroll of Cooperation” trophy, you just need to complete any Co-Op Quest via the Questboard. To do so offline, go to any Questboard, select Co-Op/Versus, then select Offline Play. From there, choose Co-Op Quests and then complete any of the quests you see.

The Scroll of Co-Operation trophy will then unlock on the results screen at the end of the quest.
Complete the Elder's Lair

Secret Scroll of Bonds
Visited Mahana Village after completing the Elder's Lair. You emerged victorious from a true test of strength.
Elder’s Lair is a post-game dungeon similar to the Tower of Illusion in Monster Hunter: Stories 1. To access it, return to the “Fbn. Grounds – Altar” Catavan Stand and speak to Chief Gara there.

There are 10 Zones to make your way through, each zone has a Catavan Stand from which you can save the game and easily return to the deepest Zone you’ve reached. You will also find a Felyne NPC in each Zone who will give you an objective to complete before you can head deeper.
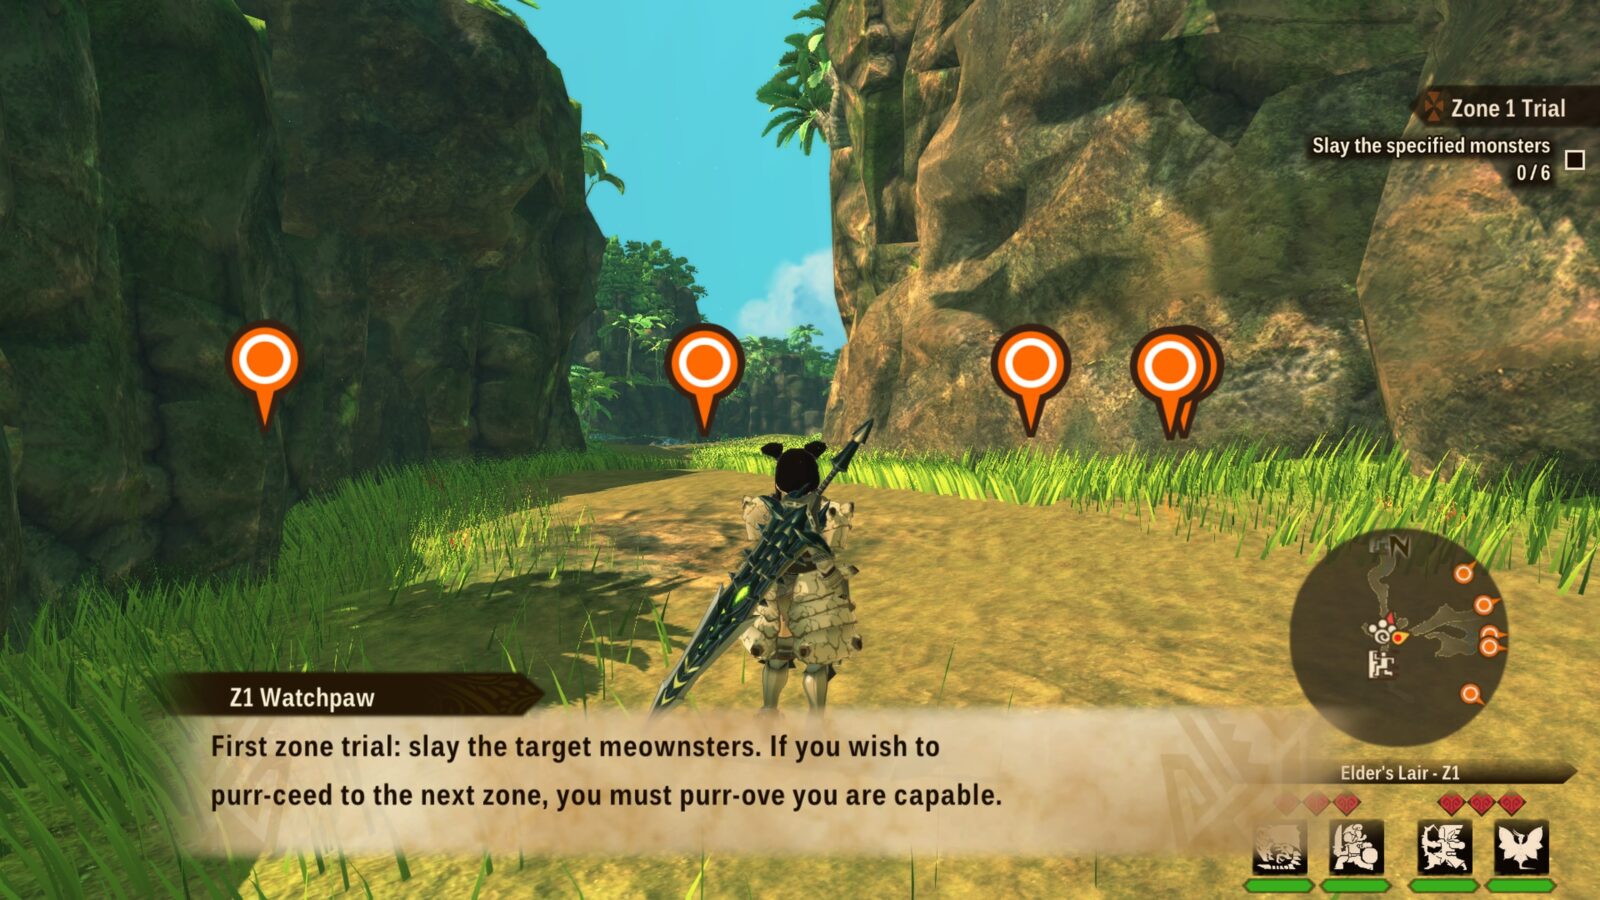
Some zones, like the first one, ask that you defeat specific monsters, while others ask that you break specific Monster Parts in battle. Others will act as Boss Zones where you need to fight and defeat a single powerful High-Rank Monster like Velkhana or Fatalis.

These bosses are some of the hardest possible challenges in the entire game, capable of wiping out your rider in a single hit if you’re not careful. To ensure you have the best chances in a Boss Battle, take the time to open all of the chests in their zone. These chests contain notes from Red which give you invaluable information on how to defeat each boss.
To unlock the “Secret Scroll of Bonds” trophy, you need to complete the objectives in all 10 zones of the Elder’s Lair. You’ll want your Monsters to be around Level 45-50 when you begin the dungeon to be able to keep up with the High-Rank Monsters you’ll be faced with.
Versus Battle Trophies

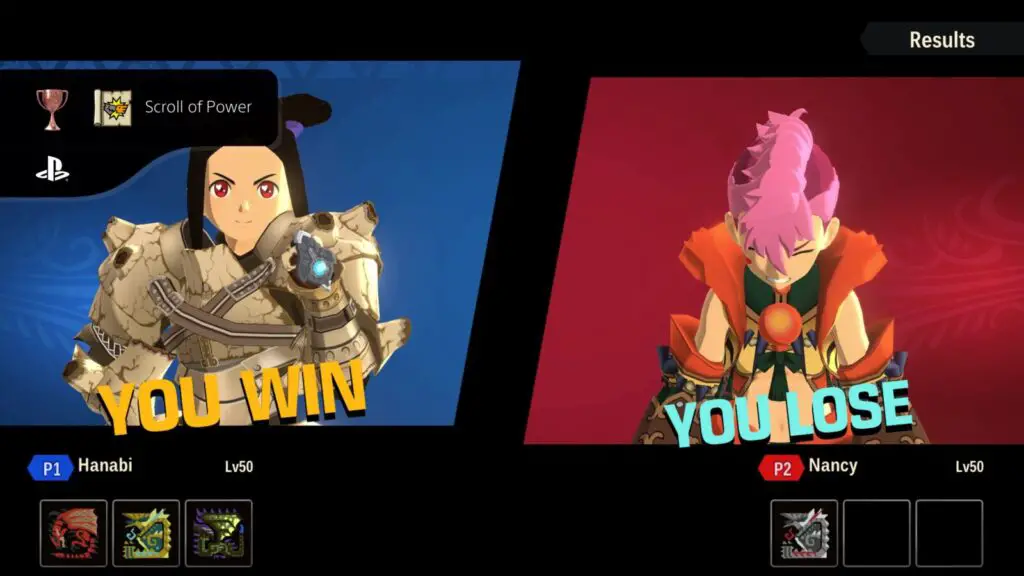
Scroll of Power
Won a Single Battle. The first of many battles to come.
As you progress the story, you’ll eventually unlock the “Co-op/Versus” option at the Questboard. From there you can engage in network battles and complete co-op quests with friends. But don’t worry, there is also the “Offline” option, which allows you to do all of those things with random NPCs instead of real-world players!
To unlock the “Scroll of Power” trophy, you just need to complete any Single Versus Battle via the Questboard. To do so offline, go to any Questboard, select Co-Op/Versus, then select Offline Play. From there, choose Versus Battles and then create a Single Battle.
The Scroll of Power trophy will then unlock on the results screen at the end of the battle. You do need to win, and sometimes depending on the opponent’s Monsties, that’s not such an easy thing to do. You can just keep starting Single Versus battles until you succeed, though.
Versus Battles work like any other Rider-v-Rider battle in that you both have 3 hearts and the first person to lose all three hearts will lose the battle. You lose a heart when either your rider or your Monstie go down.

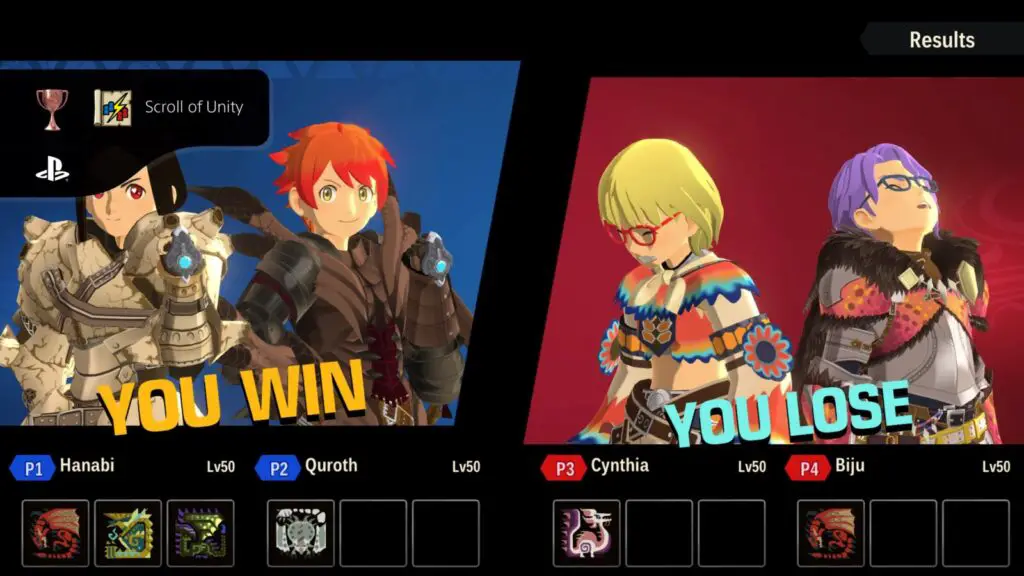
Scroll of Unity
Won a Pair Battle. Teamwork is the key to success.
As you progress the story, you’ll eventually unlock the “Co-op/Versus” option at the Questboard. From there, you can engage in network battles and complete co-op quests with friends. But don’t worry, there is also the “Offline” option, which allows you to do all of those things with random NPCs instead of real-world players!
To unlock the “Scroll of Unity” trophy, you just need to complete any Pair Versus Battle via the Questboard. To do so offline, go to any Questboard, select Co-Op/Versus, then select Offline Play. From there, choose Versus and then create a Pair Battle.

The Scroll of Unity trophy will then unlock on the results screen at the end of the battle. You do need to win, and sometimes depending on the opponent’s Monsties, that’s not such an easy thing to do. You can just keep starting Pair Versus battles until you succeed, though.
Versus Battles work like any other Rider-v-Rider battle in that you both have 3 hearts and the first person to lose all three hearts will lose the battle. You lose a heart when either your rider or your Monstie go down. However, in Pair Battles you and your partner both have 3 hearts but the battle will end when either one of you (or your opponents) loses 3 hearts.
Misc Combat Trophies

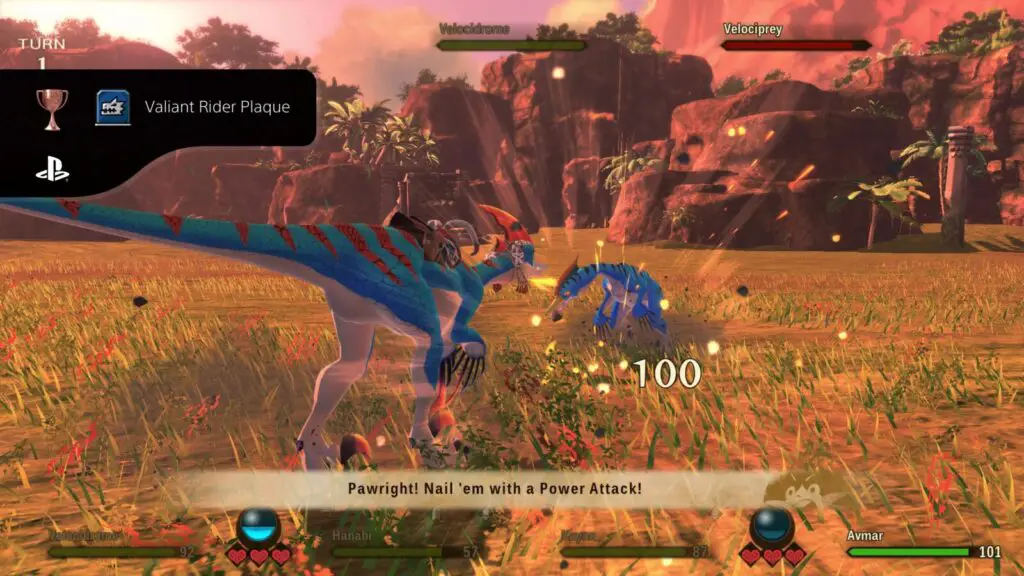
Valiant Rider Plaque
Defeated 50 or more monsters. A commemoration of your incredible courage.
The “Valiant Rider Plaque” unlocks after you defeat your 50th Monster. This should happen naturally, and quite early in the story, too.

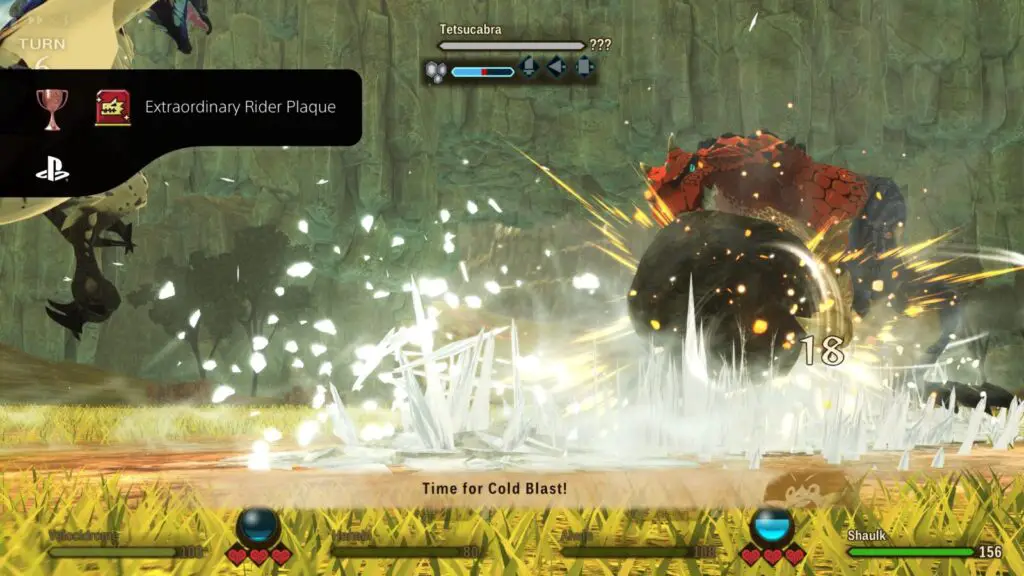
Extraordinary Rider Plaque
Defeated 100 or more monsters. A commemoration of your incredible courage.
The “Extraordinary Rider Plaque” unlocks after you defeat your 100th Monster. This should happen naturally, and not too long into the story.

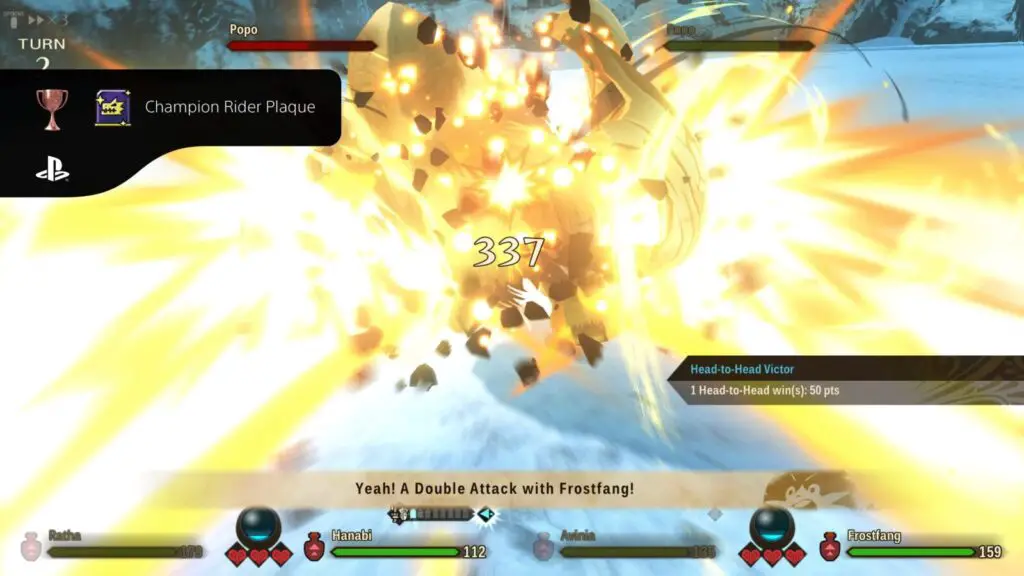
Champion Rider Plaque
Defeated 200 or more monsters. A commemoration of your incredible courage.
The “Champion Rider Plaque” unlocks after you defeat your 200th Monster. This should happen naturally throughout the course of the story campaign.

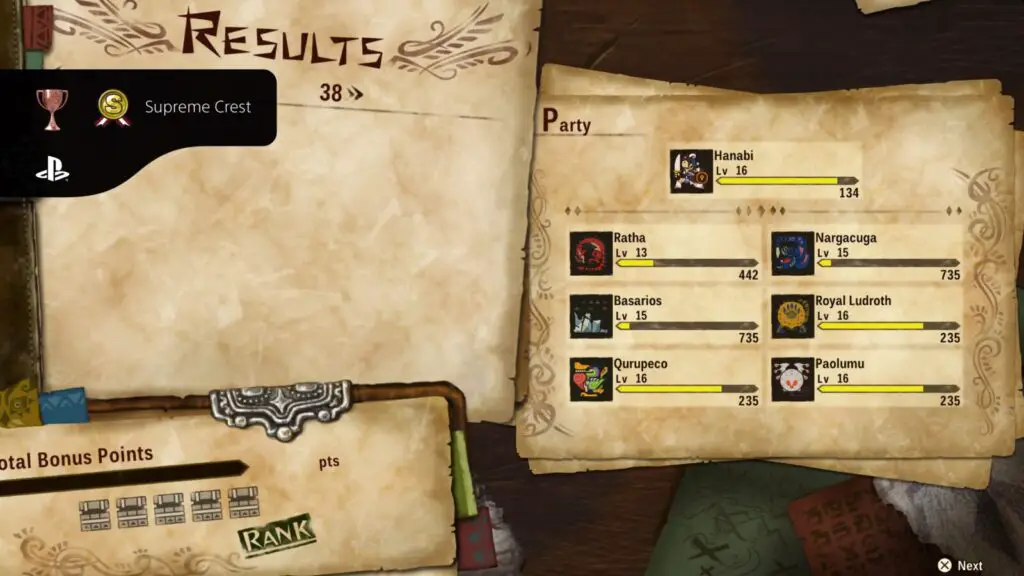
Supreme Crest
Obtained S Rank in 50 or more battles. A crest to commemorate your style.
At the end of any battle in Monster Hunter Stories 2, you’ll receive a ranking based on your performance. This could be D, C, B, A, or S. S being the highest rating you can achieve.

Your ranking is not based on how quickly you complete the battle or how little damage you take, instead it’s based on how much of a spectacle the fight was. If you win lots of Head-to-heads, ride on your monster, or activate skills and kinship abilities (and more), you will gain “Bonus” score. These bonuses are listed on the left-hand side in a post-battle summary screen to help you better understand what you get points for.
Arguably, with MH: Stories 2 having a much more complex battle system and more ways to earn bonus points, achieving an S Rating in MH: Stories 2 is much easier than it was in MH: Stories.
Honestly, in my experience, as long as you understand and make use of the various combat mechanics present in MH: Stories 2, you’ll unlock the “Supreme Crest” trophy naturally throughout the course of the Story Campaign. This happens when you’ve achieved your 50th S Rank in a battle.

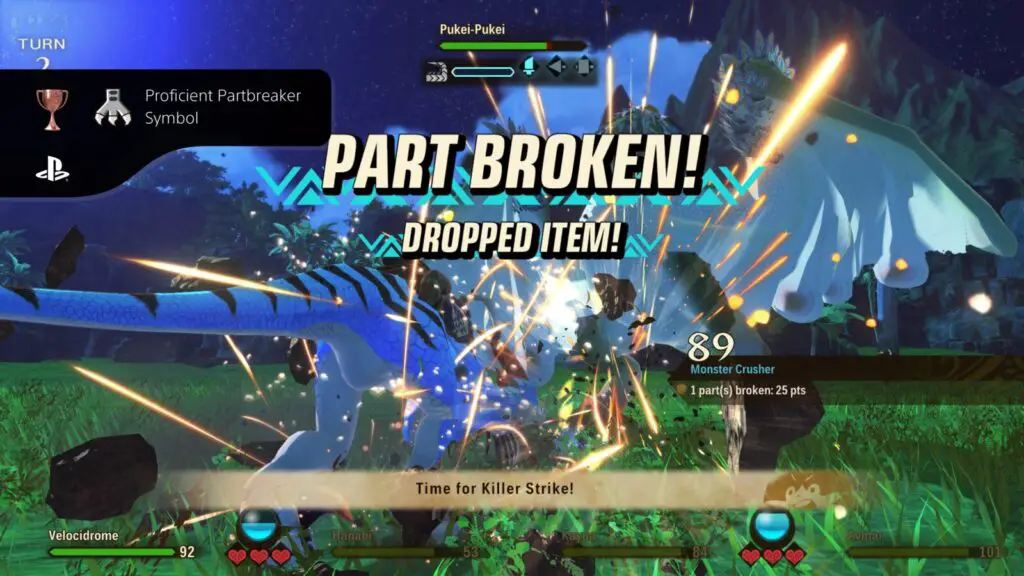
Proficient Partbreaker Symbol
Broke monster parts 10 or more times. Proof of your understanding of monster anatomy.
When fighting Monsters, you will sometimes be able to choose which parts to attack, such as Pukei-Pukei’s tail, Anjanath’s Nose, or Kulu-Ya-Ku’s rock. You can cycle these parts with ![]() /
/![]() .
.
To unlock the “Proficient Partbreaker Symbol” trophy, you just need to break Monster Parts by depleting a part’s separate health gauge a cumulative total of 10 times. Breaking a Monster Part will typically weaken the Monster or prevent it from using an ability.

Peerless Partbreaker Symbol
Symbol Broke monster parts 30 or more times. Proof of your understanding of monster anatomy.
Break 30 Monster Parts in total to unlock the “Peerless Partbreaker Symbol” trophy. See Proficient Partbreaker Symbol for more info.

Other Misc Trophies

Battle Gear Royalty
Upgraded a high rank weapon to max level. A symbol of true weapon mastery and power.
Once you reach the end-game in Monster Hunter Stories 2 and begin fighting High Rank Monsters, you will be able to craft and upgrade High-Rank gear at the Smithy.

High-rank gear has a red icon and requires High-Rank Monster Parts and Resources to craft and upgrade, thus requiring you to farm a lot of High-Rank Monsters and explore plenty of High-Rank Monster Dens not just for their parts but also for resources like Armor Gems, Weapon Gems, and rare bones, minerals, and more.
Craft any weapon that you like using the resources available to you, and then farm the appropriate parts and resources to upgrade the weapon 3 times, taking it to MAX level. Upon doing so, the “Battle Gear Royalty” trophy will unlock!

Battle Armor Royalty
Upgraded high rank armor to max level. A sign that you have mastered the art of defense.
Once you reach the end-game in Monster Hunter Stories 2 and begin fighting High Rank Monsters, you will be able to craft and upgrade High-Rank gear at the Smithy.

High-rank gear has a red icon and requires High-Rank Monster Parts and Resources to craft and upgrade, thus requiring you to farm a lot of High-Rank Monsters and explore plenty of High-Rank Monster Dens not just for their parts but also for resources like Armor Gems, Weapon Gems, and rare bones, minerals, and more.
Craft any piece of armor that you like using the resources available to you, and then farm the appropriate parts and resources to upgrade the armor 3 times, taking it to MAX level. Upon doing so, the “Battle Armor Royalty” trophy will unlock!

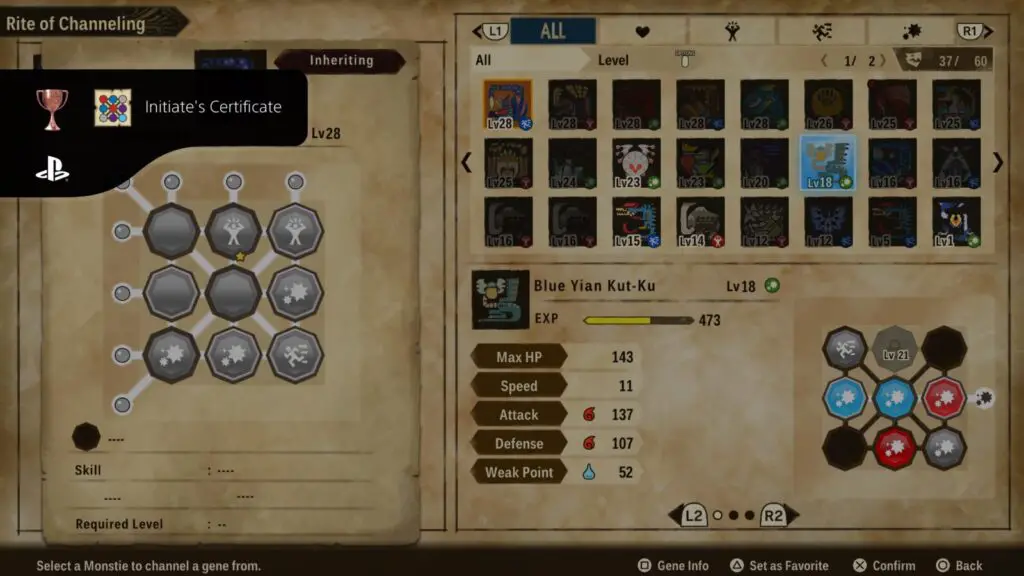
Initiate's Certificate
Channeled genes into all nine slots. Always strive for perfection.
To unlock the “Initiate’s Certificate” trophy, you need to have a Monstie that has Genes in all 9 slots on their Gene Card.
All Monsties have Genes and Gene slots that only unlock by leveling them up, so you’ll first need to pay attention to those and ensure your Monstie is raised to the appropriate level.

Most Monsties also have some locked slots that must be unlocked using Ritual Items (via the Rite of Channeling menu at the Stables). These come in the form of rare Stims, typically specific to the type of Monstie whose slots you wish to unlock.
Once you’ve unlocked all 9 slots in a Monstie, you’ll then need to use the Rite of Channeling to transfer genes from your other Monsties to fill those slots. This part is a bit easier than in the game’s predecessor because you can place a gene in any open slot, and it doesn’t need to be from a matching position in the Gene Card.
The trophy will then unlock when all 9 slots are unlocked and filled on any Monstie.

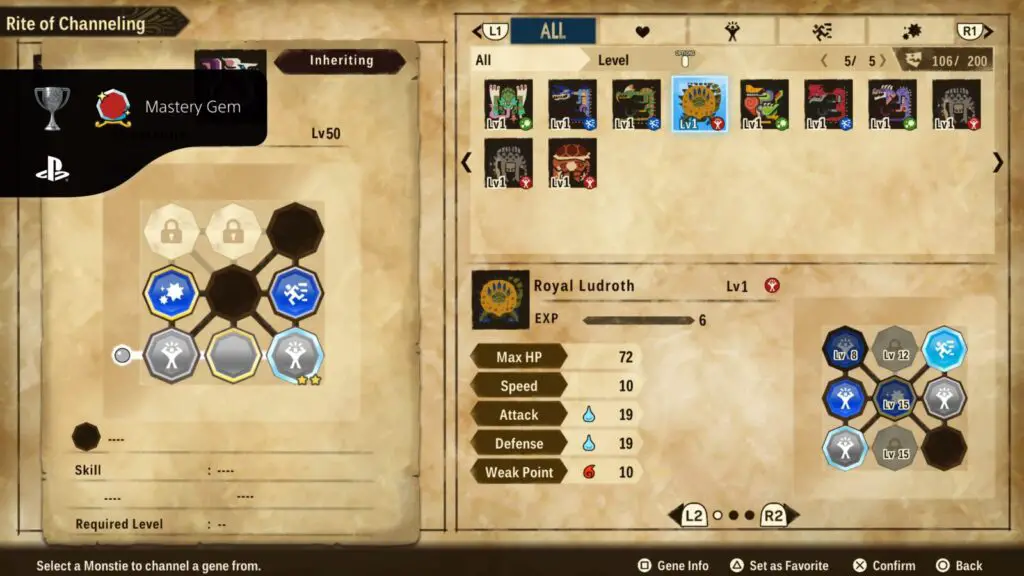
Mastery Gem
Upgraded an XL gene to max level. Proof that you're a pro at Monstie husbandry.
In Monster Hunter Stories 2, there are Genes of different sizes with more powerful effects. L (Large) genes have a gold border, whereas XL (Extra-Large) genes have a thick platinum-colored border. When using the Rite of Channeling, you can not only add new genes and replace existing genes, but if you take a gene from another Monster that your Monster already has, you can place it in the same spot to upgrade that gene!

Upgraded genes will have a small star icon on them, and they can be upgraded again to add more star icons.
To unlock the “Mastery Gem” trophy, you need to upgrade any XL gene twice, so that it has two stars on it. This is actually not a max level gene, but the trophy unlocks at this point regardless.


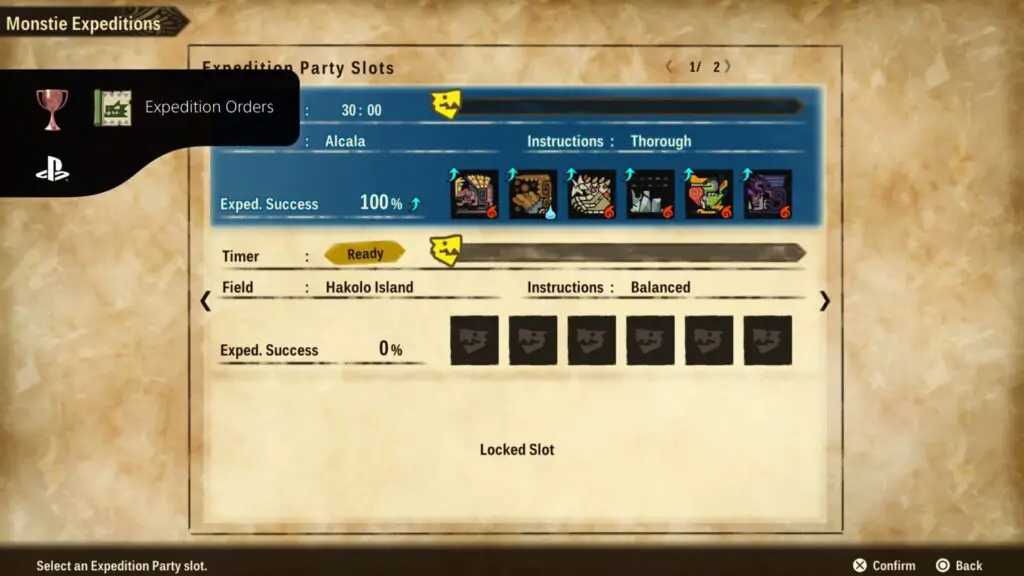
Expedition Orders
Unlocked a Monstie Expedition Party slot and dispatched an Expedition Party. Thrilling expeditions await you!
Before you can earn the “Expedition Orders” trophy, you must go and purchase at least one Expedition+ Ticket from a Melynx Inc. Felyne using Bottle Caps. Bottle Caps can be farmed from red chests in Everdens, which are special types of Monster Den which are always present and are marked on the map. An Expedition+ Ticket increases the number of Monstie Expeditions you can have running at one time.

The first Expedition+ Ticket you can buy becomes available in Lulucion and costs 22 Bottle Caps. Once you’ve visited a Melynx Inc. Felyne and purchased one such ticket, head to the Stables and run any Expedition in any of your Expedition Slots. The trophy will then unlock immediately.

Trendsetter
Changed Navirou's Outfit after obtaining all Outfits. Note: Excluding outfits marked with a +.
To unlock the Trendsetter trophy, you need to collect all of Navirou’s outfits and then change his outfit once via the Chest in your Home. The vast majority of Navirou’s outfits are acquired via the Melynx Inc vendor in any city. The Melynx Inc Vendor’s stock grows over time as you progress the story, but all of the outfits below will be available after you’ve completed the story. Each outfit costs 8 Bottle Caps, here’s a full list:
- Red Hero Outfit
- Blue Hero Outfit
- Green Hero Outfit
- White Flu Mask
- Black Flu Mask
- Pink Flu Mask
- R Cheerleader Outfit
- G Cheerleader Outfit
- B Cheerleader Outfit
- Wanderer’s Outfit
- Eyepatch Outfit
- Bandaged Outfit
- Naviljhho Outfit
- King’s Outfit
- Azure King’s Outfit
- Silver King’s Outfit
- Ruin King’s Outfit
- Numbers Outfit
- Heart-Shaped Glasses
- Purrty-Eye Frames
- Mahana Headband
- Rutoh Scarf
- Kuan Cap
- Lulucion Hat
- A Nua Look
- Felyne Straw Hat
- Pawesome Outfit
The only remaining outfit that you cannot buy is part of a secret quest. To begin this hidden subquest, go to Lulucion and speak to Kyle to add him to your party. Once done, go to Rutoh Village.
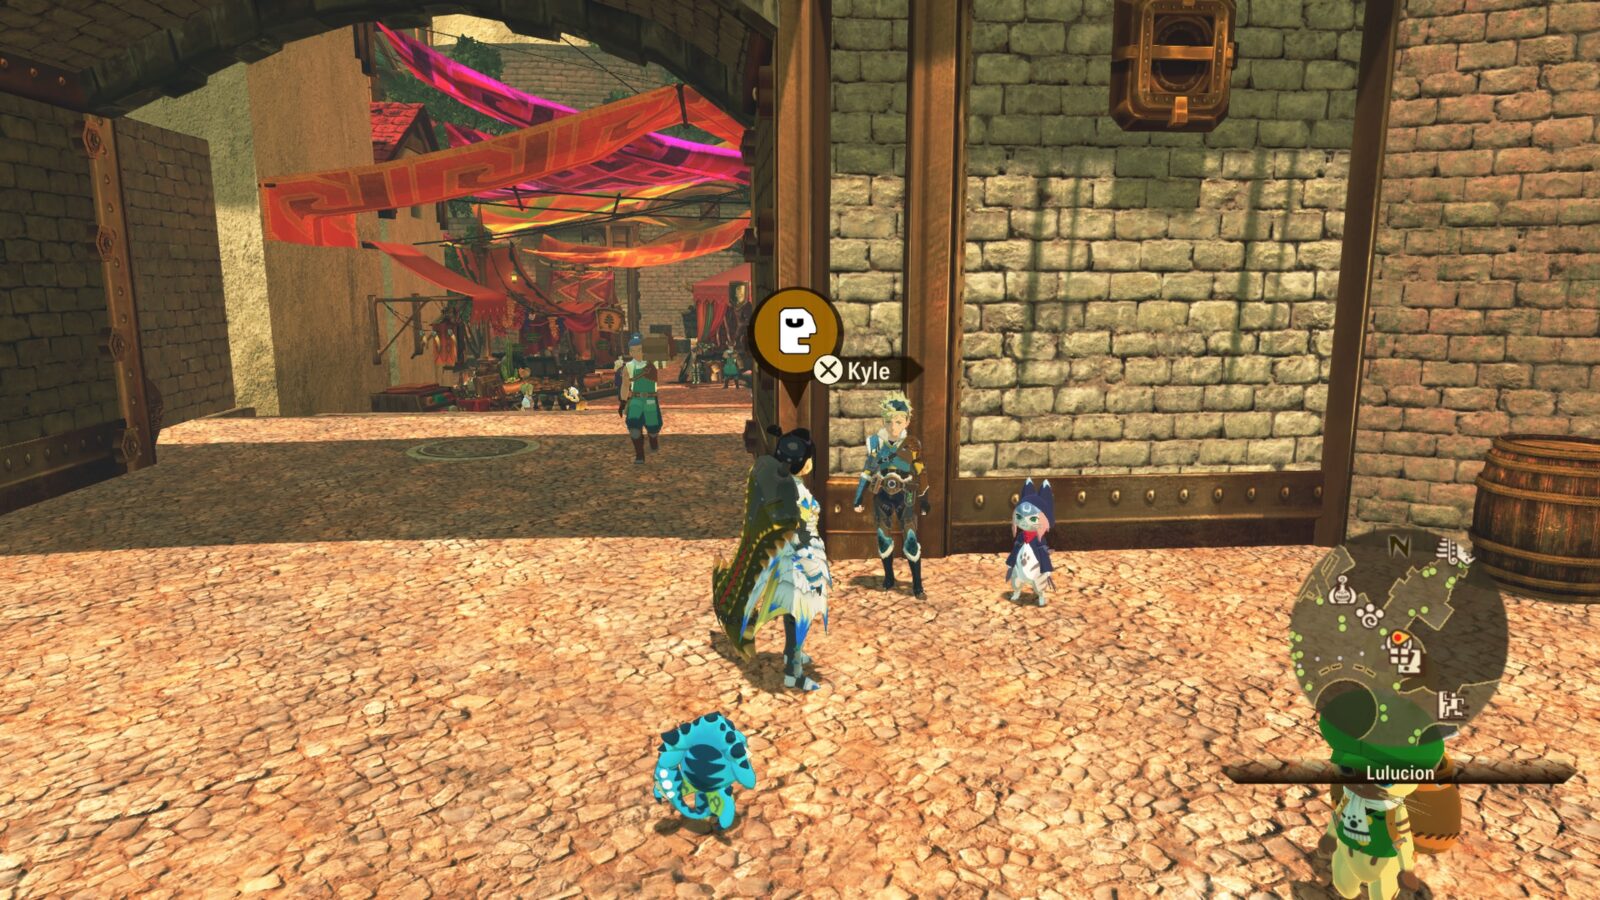
In Rutoh Village, speak to Tsukino next to Kyle at the Catavan Stand, and she will hide herself in the village. Look for her in the following places:

Left of the village elder, in a barrel with binoculars.

Behind a tree left of where you spoke to her, dressed as a Catavaner.

Dressed as a cute felyne girl near the Stables.

Behind the tree next to the Melynx Inc vendor.

Once you’ve found her in all of the above places, travel to Kuan Village and speak to her again near the entrance to make her go and hide once more. Now, in Kuan Village, look for her in these locations:

Dressed in a big fluffy coat near the Christmas Tree at the center of the village.

Dressed as a snowman among the rubble at the end of the bridge on the north side of the village.

To the right of the Kuan Village Chief, disguised as a cobblestone wall.

After finding her in that final location, you’ll be returned to Tsukino, where she’ll give you the final Navirou Outfit.
Go to your home and equip any Navirou Outfit via the Chest to unlock the Trendsetter trophy!


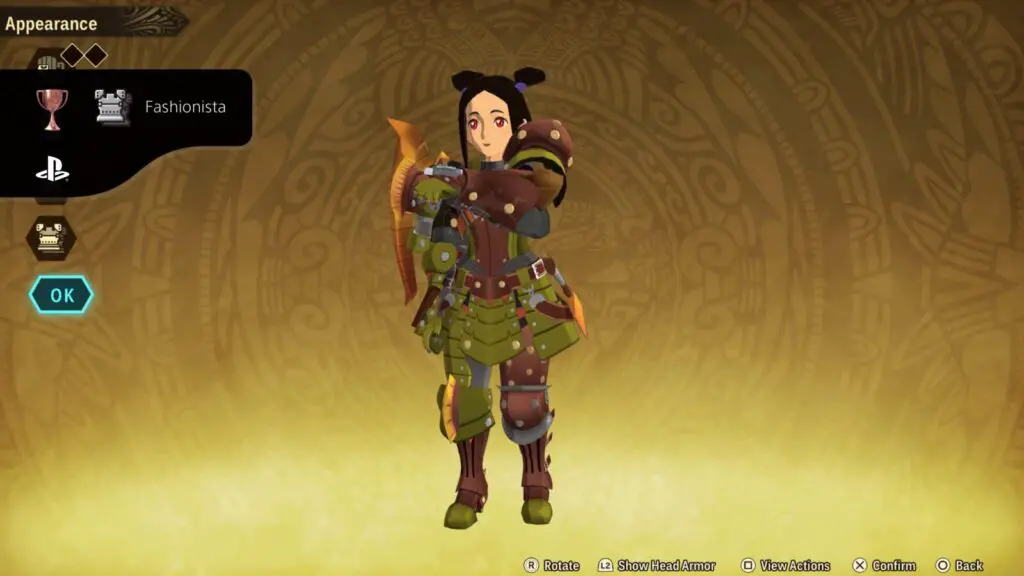
Fashionista
Obtained and changed into Layered Armor. Now you can hunt monsters in style! Note: Excluding Layered Armor marked with a +.
To unlock the “Fashionista” trophy, you first need to acquire some Layered Armor. You should note that special layered armor, usually marked with a “+” symbol, does not count towards this trophy.
A good way to acquire Layered Armor is by purchasing it from the Layered Armor Smithy at the south end of Lulucion.
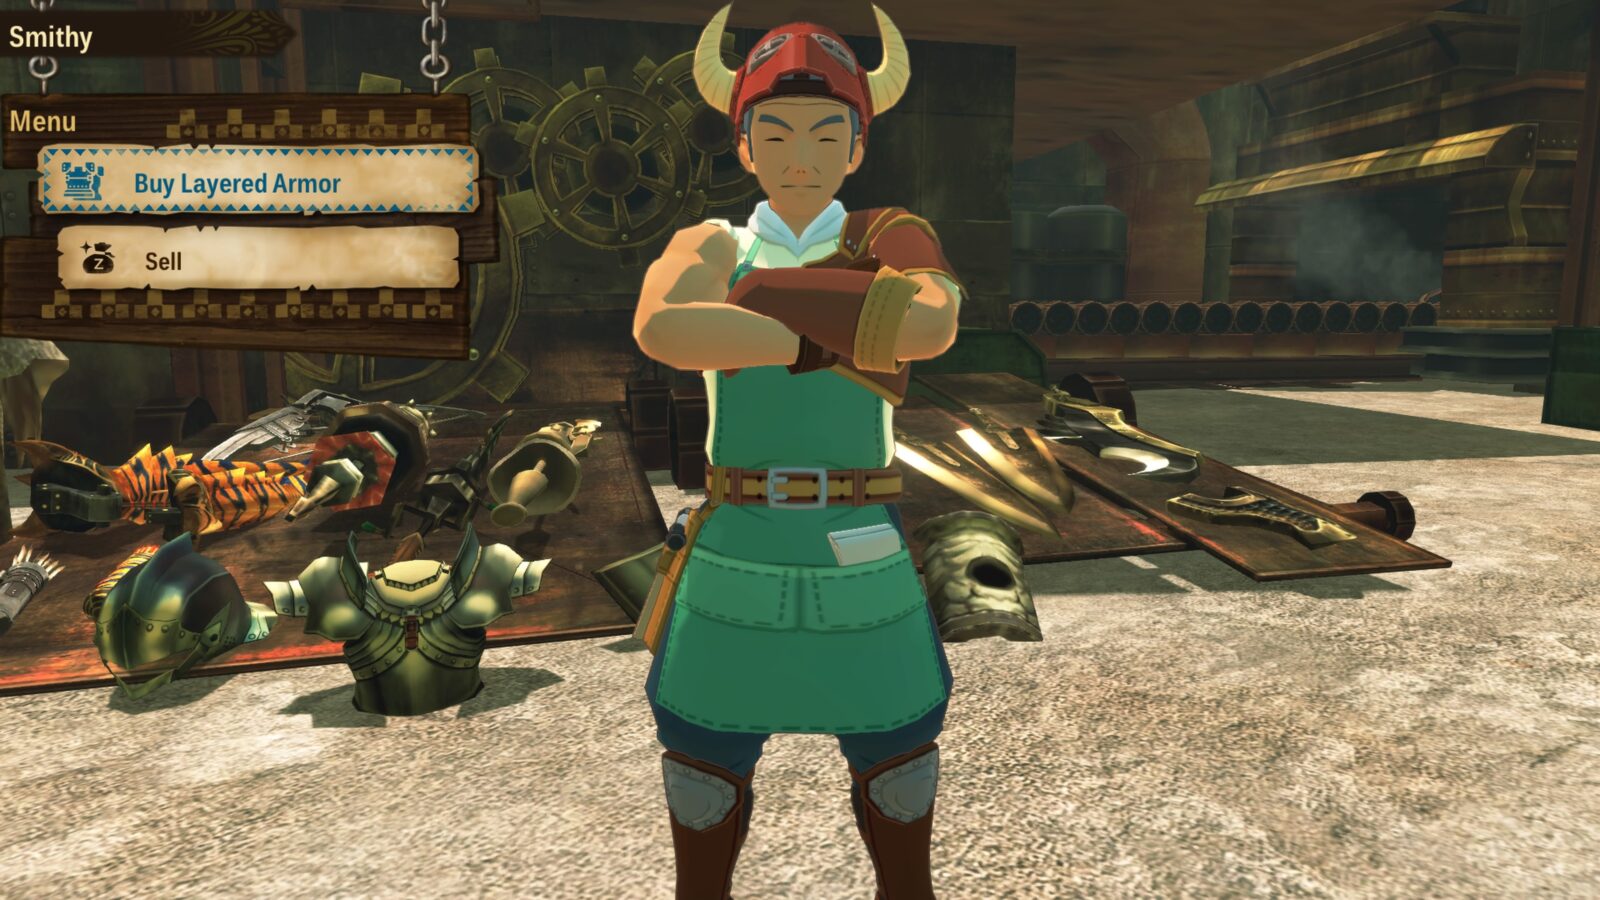
Once you have some, go back to your home, access the Chest, select “Appearance” then go down to the Layered Armor options. Select one to equip, back out with ![]() and then press
and then press ![]() on the “OK” button to apply the change.
on the “OK” button to apply the change.

The Fashionista trophy will then unlock immediately.

Catavan Conqueror
Visited all Catavan Stands. Many thanks for your pawtronage.
To unlock the Catavan Conqueror trophy, you will need to find and activate every Catavan in the game, thus giving you full reign to freely roam the map via Fast Travel. Unfortunately, many of the Catavans you need to find at the end of the game are in each zone of the Elder’s Lair, so you will need to unlock the Secret Scroll of Bonds trophy before you can unlock this one.
See below a table with a full list of Catavan Stands and where to find them:
| Location | Region |
|---|---|
| Mahana Village | Hakolo Island |
| North Kamuna Cape | Hakolo Island |
| East Kamuna Heights | Hakolo Island |
| Sailors Beach | Alcala |
| Rutoh Village | Alcala |
| Alcala Valley | Alcala |
| Alcala Highlands | Alcala |
| Etulle Lofty Tree | Alcala |
| Harzgai Rocky Hills | Alcala |
| Harzgai Hill – Inner | Alcala |
| Wendwood | Alcala |
| Loloska Wintery Way | Loloska |
| Kuan Village | Loloska |
| Base of Mt. Lavina | Loloska |
| Woodland | Loloska |
| Loloska Forest | Loloska |
| Loloska Rocky Canyon | Loloska |
| Lavina Glacial Peaks | Loloska |
| Lavina Hot Springs | Loloska |
| Lulucion | Lamure |
| Sadona Barrens | Lamure |
| Monster Research Lab | Lamure |
| Jalma Highlands | Lamure |
| Lamure Tower Front | Lamure |
| Lamure Tower – 3F | Lamure |
| Lamure Tower – 5F | Lamure |
| Pit of Rememberance | Lamure |
| Pomore Garden | Lamure |
| Terga Volcano Base | Terga |
| Nua Te Village | Terga |
| Forbidden Grounds | Hakolo Island |
| Forbidden Grounds Altar | Hakolo Island |
| Elders Lair – Zone 1 | Elders Lair |
| Elders Lair – Zone 2 | Elders Lair |
| Elders Lair – Zone 3 | Elders Lair |
| Elders Lair – Zone 4 | Elders Lair |
| Elders Lair – Zone 5 | Elders Lair |
| Elders Lair – Zone 6 | Elders Lair |
| Elders Lair – Zone 7 | Elders Lair |
| Elders Lair – Zone 8 | Elders Lair |
| Elders Lair – Zone 9 | Elders Lair |
| Elders Lair – Zone 10 | Elders Lair |
Phase Three | Monster, Egg & Gene Grind
This final phase of the Monster Hunter Stories 2 trophy journey will make or break your chances at owning the Platinum. Ahead of you are many more hours of fighting Monsters, raiding Nests, and hatching Eggs in a 1v1 battle against RNG itself.
To collect these remaining trophies you will need to:
- Encounter every Monster for the Monsterpedia: Master trophy.
- Hatch every Monstie at least once for the Monstipedia: Complete Edition trophy.
- Use every possible Kinship Skill at least once for the Monster Rider trophy.
- Use every possible Double Kinship Skill at least once for the Bonds of Friendship trophy.
- Hatch Monsties with unique genes until you’ve collected every possible Gene for the Genetics Compendium trophy.
These are no small feat, and while I’ve provided what information I can below, you may still find yourself putting many frustrated hours into completing these extensive collections. Best of look, Pawtner.
Encounter Every Monster Once

Monsterpedia: Novice
Encountered one third or more of monsters. There is still much to be discovered. Note: Excluding monsters marked with a +.
To unlock the “Monsterpedia: Novice” trophy, you need to have encountered 33% of the Monsters in the Monsterpedia. Hatching a Monster you have not yet encountered in the wild will not add it to your Monsterpedia; the Monsterpedia and Monstipedia are completely separate. You will eventually need to encounter all Monsters to unlock the Monsterpedia: Master Trophy.

Monsterpedia: Expert
Encountered two thirds or more of monsters. Just gathering the information is tough enough! Note: Excluding monsters marked with a +.
To unlock the “Monsterpedia: Expert” trophy, you need to have encountered 66% of the Monsters in the Monsterpedia.
You will eventually need to encounter all Monsters to unlock the Monsterpedia: Master Trophy.


Monsterpedia: Master
Encountered all monsters. Your Monsterpedia is now filled with info about all sorts of monsters. Note: Excluding monsters marked with a +.
To unlock the “Monsterpedia: Master” trophy, you’re going to need to find and encounter every single Monster in the Monsterpedia at least once. This includes the Monsters in the Low Rank tab of the Monsterpedia and the Monsters in the High Rank tab, excluding those marked with a “+” icon. The excluded Monsters are numbers 126 through 135 in the High Rank tab of the Monsterpedia.
This table shows you where to find the initial 111 Monsters in the Low Rank tab of the Monsterpedia. Note that the Low Rank tab also includes some named Monsters numbered 201 through 217. These are all special boss Monsters that you can only face by completing Quest Board Subquests with “(Hard)” in the title.
| No. | Name | Region | Location |
|---|---|---|---|
| 1 | Aptonoth | Hakolo Island | North Kamuna Cape |
| 2 | Larinoth | Hakolo Island | North Kamuna Cape |
| 3 | Kelbi | Hakolo Island | North Kamuna Cape |
| 4 | Velociprey | Hakolo Island | North Kamuna Cape |
| 5 | Velocidrome | Hakolo Island | North Kamuna Cape |
| 6 | Kulu Ya-Ku | Hakolo Island | North Kamuna Cape |
| 7 | Bnahabra (Blue) | Hakolo Island | North Kamuna Cape |
| 8 | Konchu (Yellow) | Hakolo Island | North Kamuna Cape |
| 9 | Yian Kut-Ku | Hakolo Island | North Kamuna Cape |
| 10 | Bullfango | Hakolo Island | North Kamuna Cape |
| 11 | Bulldrome | Hakolo Island | North Kamuna Cape |
| 12 | Pukei Pukei | Hakolo Island | North Kamuna Cape |
| 13 | Apceros | Alcala | Alcala Highlands |
| 14 | Slagtoth (Green) | Alcala | Alcala Highlands |
| 15 | Gargwa | Alcala | Alcala Highlands |
| 16 | Jaggi | Alcala | Alcala Highlands |
| 17 | Jaggia | Alcala | Alcala Highlands |
| 18 | Great Jaggi | Alcala | Alcala Highlands |
| 19 | Ludroth | Alcala | Alcala Valley |
| 20 | Royal Ludroth | Alcala | Alcala Valley |
| 21 | Tetsucabra | Alcala | Harzgai Rocky Hill |
| 22 | Arzuros | Alcala | Alcala Highlands |
| 23 | Qurupeco | Alcala | Etulle Lofty Trees |
| 24 | Blue Yian Kut-Ku | Alcala | Alcala Valley |
| 25 | Tigrex | Alcala | Harzgai Hill-Inner |
| 26 | Monoblos | Alcala | Harzgai Hill-Inner |
| 27 | Paolumu | Alcala | Wendwood |
| 28 | Basarios | Alcala | Harzgai Rocky Hill |
| 29 | Yian Garuga | Alcala | Alcala Valley |
| 30 | Duramboros | Alcala | Wendwood |
| 31 | Nargacuga | Alcala | Alcala Highlands |
| 32 | Rathian | Alcala | Alcala Highlands |
| 33 | Popo | Loloska | Base of Mt. Lavina |
| 34 | Konchu (Blue) | Loloska | Base of Mt. Lavina |
| 35 | Bnahabra (Green) | Loloska | Base of Mt. Lavina |
| 36 | Conga | Loloska | Loloska Forest |
| 37 | Congalala | Loloska | Loloska Forest |
| 38 | Baggi | Loloska | Base of Mt. Lavina |
| 39 | Great Baggi | Loloska | Base of Mt. Lavina |
| 40 | Kecha Wacha | Loloska | Loloska Forest |
| 41 | Gypceros | Loloska | Loloska Forest |
| 42 | Zamite | Loloska | Base of Mt. Lavina |
| 43 | Zamtrios | Loloska | Base of Mt. Lavina |
| 44 | Nerscylla | Loloska | Loloska Forest |
| 45 | Barroth | Loloska | Loloska Rocky Canyon |
| 46 | Tobi-Kadachi | Loloska | Loloska Rocky Canyon |
| 47 | Khezu | Loloska | Lavina Glacial peaks |
| 48 | Red Khezu | Loloska | Lavina Glacial Peaks |
| 49 | Seltas | Loloska | Loloska Forest |
| 50 | Seltas Queen | Loloska | Loloska Forest |
| 51 | Lagombi | Loloska | Base of Mt. Lavina |
| 52 | Jade Barroth | Loloska | Lavina Glacial Peaks |
| 53 | Anjanath | Loloska | Loloska Forest |
| 54 | Gammoth | Loloska | Woodland |
| 55 | Zinogre | Loloska | Lavina Glacial peaks |
| 56 | Barioth | Loloska | Loloska Rocky Canyon |
| 57 | Legiana | Loloska | Lavina Glacial Peaks |
| 58 | Slagtoth (Brown) | Lamure | Sadona Barrens |
| 59 | Bnahabra (Brown) | Lamure | Sadona Barrens |
| 60 | Konchu (Red) | Terga | Terga Volcano Base |
| 61 | Cephalos | Lamure | Sadona Barrens |
| 62 | Hermitaur | Lamure | Sadona Barrens |
| 63 | Uroktor | Terga | Terga Volcano Base |
| 64 | Ioprey | Terga | Terga Volcano Base |
| 65 | Iodrome | Terga | Terga Volcano Base |
| 66 | Genprey | Lamure | Lamure Tower 3F |
| 67 | Gendrome | Lamure | Lamure Tower 3F |
| 68 | Plesioth | Lamure | Sadona Barrens |
| 69 | Cephadrome | Lamure | Sadona Barrens |
| 70 | Ash Kecha Wacha | Lamure | Lamure Tower Front |
| 71 | Purple Gypceros | Lamure | Lamure Tower Front |
| 72 | Green Nargacuga | Lamure | Pomore Garden |
| 73 | Diablos | Lamure | Lamure Tower Front |
| 74 | Black Diablos | Lamure | Lamure Tower 5F |
| 75 | White Monoblos | Lamure | Jalma Highlands |
| 76 | Crimson Qurupeco | Lamure | Pomore Garden |
| 77 | Misutzune | Lamure | Pomore Garden |
| 78 | Lagiacrus | Lamure | Pomore Garden |
| 79 | Uragaan | Terga | Terga Volcano base |
| 80 | Daimyo Hermitaur | Lamure | Sadona Barrens |
| 81 | Plum Daimyo Hermitaur | Lamure | Monster Research Lab |
| 82 | Brute Tigrex | Lamure | Sadona Barrens |
| 83 | Purple Ludroth | Lamure | Sadona Barrens |
| 84 | Ruby Basarios | Lamure | Pomore Garden |
| 85 | Gravios | Terga | Terga Volcano Base |
| 86 | Altaroth | Terga | Terga Volcano Base |
| 87 | Great Thunderbug | Terga | Terga Volcano Base |
| 88 | Konchu (Green) | Terga | Terga Volcano Base |
| 89 | Shakalaka | Terga | Terga Volcano Base |
| 90 | Desert Seltas Queen | Terga | Terga Volcano Base |
| 91 | Green Plesioth | Terga | Terga Volcano Base |
| 92 | Shrouded Nerscylla | Terga | Terga Volcano Base |
| 93 | Emerald Congalala | Terga | Terga Volcano Base |
| 94 | Agnaktor | Terga | Terga Volcano Base |
| 95 | Black Gravios | Terga | Terga Volcano Base |
| 96 | Ivory Lagiacrus | Terga | Terga Volcano base |
| 97 | Brachydios | Terga | Terga Volcano Base |
| 98 | Nergigante | Terga | Terga Volcano Base |
| 99 | Astalos | Terga | Terga Volcano Base |
| 100 | Glavenus | Alcala | Alcala Valley |
| 101 | Glacial Agnaktor | Loloska | Alcala Highlands |
| 102 | Bazelgeuse | Hakolo Island | Forbidden Grounds |
| 103 | Remobra | Hakolo Island | Forbidden Grounds |
| 104 | Great Dracophage Bug | Hakolo Island | Forbidden Grounds |
| 105 | Bnahabra (Red) | Hakolo Island | Forbidden Grounds |
| 106 | Vespoid | Hakolo Island | Forbidden Grounds |
| 107 | Sand Barioth | Hakolo Island | Forbidden Grounds |
| 108 | Deviljho | Hakolo island | Forbidden Grounds |
| 109 | Stygian Zinogre | Elder’s Lair | Zone 5 |
| 110 | Seregios | Elder’s Lair | Zone 9 |
| 111 | Barrel Felyne | Anywhere | Random rare spawn |
The table below consists of additional High Rank Monsters only logged in the “High Rank” tab of the Monsterpedia. Most of them can be found in the Elder’s Lair. Once you have your Level 9 Kinship Stone,t hough, you may run into them elsewhere throughout the game too. You can also find many of them in Super Rare Monster Dens.
| No. | Name | Region | Location |
|---|---|---|---|
| 112 | Rathalos | Hakolo Island | North Kamuna Cape |
| 113 | Azure Rathalos | Hakolo Island | North Kamuna Cape |
| 114 | Pink Rathian | Lamure | Pomore Garden |
| 115 | Fulgur Anjanath | Elder’s Lair | Zone 5 |
| 116 | Silverwind Nargacuga | Elder’s Lair | Zone 8 |
| 117 | Thunderlord Zinogre | Elder’s Lair | Zone 8 |
| 118 | Bloodbath Diablos | Elder’s Lair | Zone 8 |
| 119 | Grimclaw Tigrex | Elder’s Lair | Zone 8 |
| 120 | Dreadqueen Rathian | Elder’s Lair | Zone 8 |
| 121 | Kirin | Elder’s Lair | Zone 9 |
| 122 | Teostra | Elder’s Lair | Zone 9 |
| 123 | Ranjang | Elder’s Lair | Zone 9 |
| 124 | Kushala Daora | Elder’s Lair | Zone 9 |
| 125 | Velkhana | Loloska | Base of Mt. Lavinia (After beating boss version in Elder’s Lair) |
Lastly, there is a “Bosses” tab in the Monsterpedia. These will all be encountered both as part of the story and the Elder’s Lair.
Gotta Hatch 'Em All

Monstipedia: New Edition
Completed one third or more of the Monstipedia. A simple task for a Rider. Note: Excluding Monsties marked with a +.
The “Monstipedia: New Edition” trophy will unlock when you have hatched eggs for 33% of the Monsties in the Monstipedia. You will need to hatch 81/96 Monsties for the Monstipedia: Complete Edition Trophy.

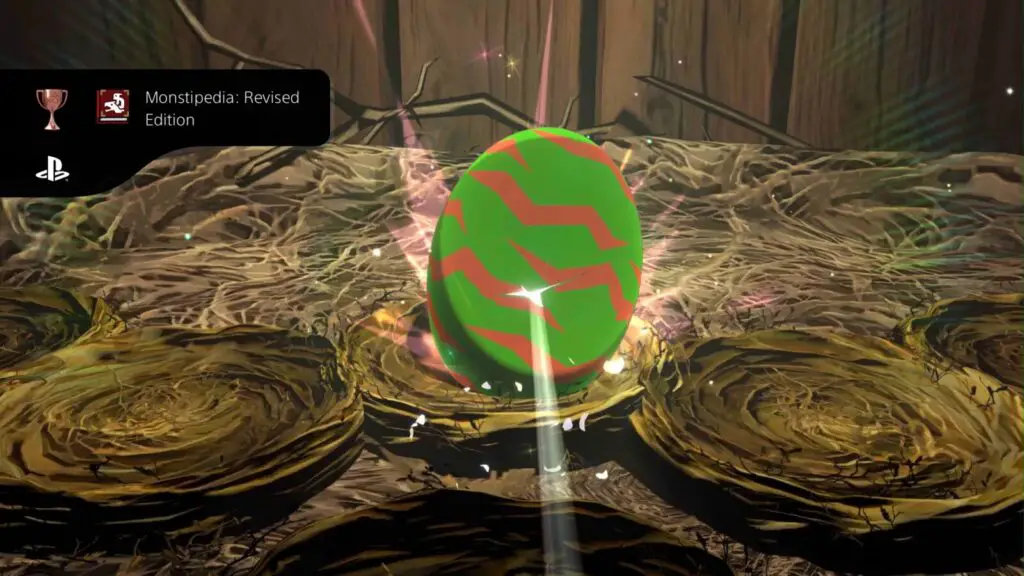
Monstipedia: Revised Edition
Completed two thirds or more of the Monstipedia. You're a Rider en route to the top. Note: Excluding Monsties marked with a +.
The “Monstipedia: Revised Edition” trophy will unlock when you have hatched eggs for 66% of the Monsties in the Monstipedia. You will need to hatch 81/96 Monsties for the Monstipedia: Complete Edition Trophy.

Monstipedia: Complete Edition
Completed the Monstipedia. Very few actually manage to achieve this. Note: Excluding Monsties marked with a +.
To unlock the “Monstipedia: Complete Edition” trophy, you will need to acquire and hatch eggs for 81 of the 96 Monsties in the Monstipedia. To help you do this, I’ve provided the table below, which shows you where you can find the dens for each hatchable Monster.
Additionally, if you run into any of these hatchable Monsters in battle, you can usually get them to “retreat” by hitting them with a Paintball before you defeat them. If successful, a den for that Monster will spawn nearby and you can go in for a guaranteed egg!
| No. | Name | Region | Location |
|---|---|---|---|
| 001 | Aptonoth | Hakolo Island | North kamuna Cape |
| 005 | Velocidrome | Hakolo Island | North kamuna Cape |
| 006 | Kulu Ya-Ku | Hakolo Island | North kamuna Cape |
| 009 | Yian Kut-Ku | Hakolo Island | North kamuna Cape |
| 011 | Bulldrome | Hakolo Island | North kamuna Cape |
| 012 | Pukei Pukei | Hakolo Island | North kamuna Cape |
| 013 | Apceros | Alcala | Alcala Highlands |
| 018 | Great Jaggi | Alcala | Alcala Highlands |
| 020 | Royal Ludroth | Alcala | Alcala Valley |
| 022 | Arzuros | Alcala | Alcala Highlands |
| 023 | Qurupeco | Alcala | Etulle Lofty Trees |
| 024 | Blue Yian Kut-Ku | Alcala | Alcala Valley |
| 025 | Tigrex | Alcala, Harzgai | Harzgai Hill-Inner |
| 026 | Monoblos | Alcala | Harzgai Hill-Inner |
| 027 | Paolumu | Alcala | Wendwood |
| 028 | Basarios | Alcala | Harzgai Rockey Hill |
| 029 | Yian Garuga | Alcala | Alcala Valley |
| 031 | Nargacuga | Alcala | Alcala Highlands |
| 032 | Rathian | Alcala | Alcala Highlands |
| 033 | Popo | Loloska | Base of Mt. Lavina |
| 037 | Congalala | Loloska | Loloska Forest |
| 039 | Great Baggi | Loloska | Base of Mt. Lavina |
| 040 | Kecha Wacha | Loloska | Loloska Forest |
| 041 | Gypceros | Loloska | Loloska Forest |
| 043 | Zamtrios | Loloska | Base of Mt. Lavina |
| 044 | Nerscylla | Loloska | Loloska Forest |
| 045 | Barroth | Loloska | Loloska Rocky Canyon |
| 046 | Tobi-Kadachi | Loloska | Loloska Rocky Canyon |
| 047 | Khezu | Loloska | Lavina Glacial peaks |
| 048 | Red Khezu | Loloska | Lavina Glacial Peaks |
| 051 | Lagombi | Loloska | Base of Mt. Lavina |
| 052 | Jade Barroth | Loloska | Lavina Glacial Peaks |
| 053 | Anjanath | Loloska | Loloska Forest |
| 054 | Gammoth | Loloska | Woodland |
| 055 | Zinogre | Loloska | Lavina Glacial peaks |
| 056 | Barioth | Loloska | Loloska Rocky Canyon |
| 057 | Legiana | Loloska | Lavina Glacial Peaks |
| 065 | Iodrome | Terga | Terga Volcano Base |
| 067 | Gendrome | Lamure | Lamure Tower 3F |
| 069 | Cephadrome | Lamure | Sadona Barrens |
| 070 | Ash Kecha Wacha | Lamure | Lamure Tower Front |
| 071 | Purple Gypceros | Lamure | Lamure Tower Front |
| 072 | Green Nargacuga | Lamure | Pomore Garden |
| 073 | Diablos | Lamure | Lamure Tower Front |
| 074 | Black Diablos | Lamure | Lamure Tower 5F |
| 075 | White Monoblos | Lamure | Jalma Highlands |
| 076 | Crimson Qurupeco | Lamure | Pomore Garden |
| 077 | Misutzune | Lamure | Pomore Garden |
| 078 | Lagiacrus | Lamure | Pomore Garden |
| 079 | Uragaan | Terga | Terga Volcano base |
| 082 | Brute Tigrex | Lamure | Sadona Barrens |
| 083 | Purple Ludroth | Lamure | Sadona Barrens |
| 084 | Ruby Basarios | Lamure | Pomore Garden |
| 085 | Gravios | Terga | Terga Volcano Base |
| 092 | Shrouded Nerscylla | Terga | Terga Volcano Base |
| 093 | Emerald Congalala | Terga | Terga Volcano Base |
| 095 | Black Gravios | Terga | Terga Volcano Base |
| 096 | Ivory Lagiacrus | Terga | Terga Volcano base |
| 097 | Brachydios | Terga | Terga Volcano Base |
| 098 | Nergigante | Terga | Terga Volcano Base |
| 099 | Astalos | Terga | Terga Volcano Base |
| 100 | Glavenus | Alcala | Alcala Valley |
| 102 | Bazelgeuse | Hokolo island | Forbidden Grounds |
| 107 | Sand Barioth | Hakolo Island | Forbidden Grounds |
| 108 | Deviljho | Hakolo island | Forbidden Grounds |
| 109 | Stygian Zinogre | Elder’s Lair | Zone 5 |
| 110 | Seregios | Elder’s Lair | Zone 9 |
| 112 | Rathalos | Hakolo Island | North Kamuna Cape, High Rank Dens |
| 113 | Azure Rathalos | Hakolo Island | North Kamuna Cape, High Rank Dens |
| 114 | Pink Rathian | Lamure | Pomore Garden, High Rank Dens |
| 115 | Fulgur Anjanath | Loloska | Base of Mt. Lavina, High Rank Dens |
| 116 | Silverwind Nargacuga | Hakolo Island | East Kamuna Heights, Super Rare Dens |
| 117 | Thunderlord Zinogre | Loloska | Loloska Rocky Canton, Super Rare Dens |
| 118 | Bloodbath Diablos | Lamure | Jalma Highlands, Super Rare Dens |
| 119 | Grimclaw Tigrex | Alcala | Alcala Valley, Super Rare Dens |
| 120 | Dreadqueen Rathian | Terga | Terga Volcano Base, Super Rare Dens |
| 121 | Kirin | Lamure | Pomore Garden, Super Rare Dens |
| 122 | Teostra | Terga | Terga Volcano Base, Super Rare Dens |
| 123 | Rajang | Alcala | Super Rare Dens in Alcala & Loloska |
| 124 | Kushala Daora | Alcala | Etulle Lofty Trees, Super Rare Dens |
| 125 | Velkhana | Loloska | Base of Mt. Lavina, Super Rare Dens |
Kinship Skill Trophies

New Rider
Viewed one third or more of Kinship Skills. There are many more Monsties out there to befriend. Note: Excluding Monsties marked with a +.
Every hatchable Monstie in the game has a unique Kinship Skill. To unlock the “New Rider” trophy, you need to first hatch every possible Monstie, then add each Monstie to your team, fill its Kinship gauge in battle, and then activate its Kinship Skill by riding it. You’ll need to do this for 33% of the Monsties in the Monstipedia, but Monster Rider requires you to have done this with 100% of them.

Veteran Rider
Viewed two thirds or more of Kinship Skills. One step closer to finishing it all. Note: Excluding Monsties marked with a +.
To unlock the “Veteran Rider” trophy, you need to first hatch every possible Monstie, then add each Monstie to your team, fill its Kinship gauge in battle, and then activate its Kinship Skill by riding it. You’ll need to do this for 66% of the Monsties in the Monstipedia, but Monster Rider requires you to have done this with 100% of them.

Monster Rider
Viewed all Kinship Skills. You are truly a Rider among Riders! Note: Excluding Monsties marked with a +.
To unlock the “Monster Rider” trophy, you will need to have used a Kinship Skill with every Monstie that you had to hatch for the Monstipedia: Complete Edition trophy. If you have released any Monsties to make room in your stables or used some up for Channeling, you will need to hatch them again. That said, you’ll be hatching all Monsties multiple times for the Genetics Compendium trophy.
You can increase the space in your Stables by purchasing stable expansions from the Melynx Inc Felyne using Bottle Caps.
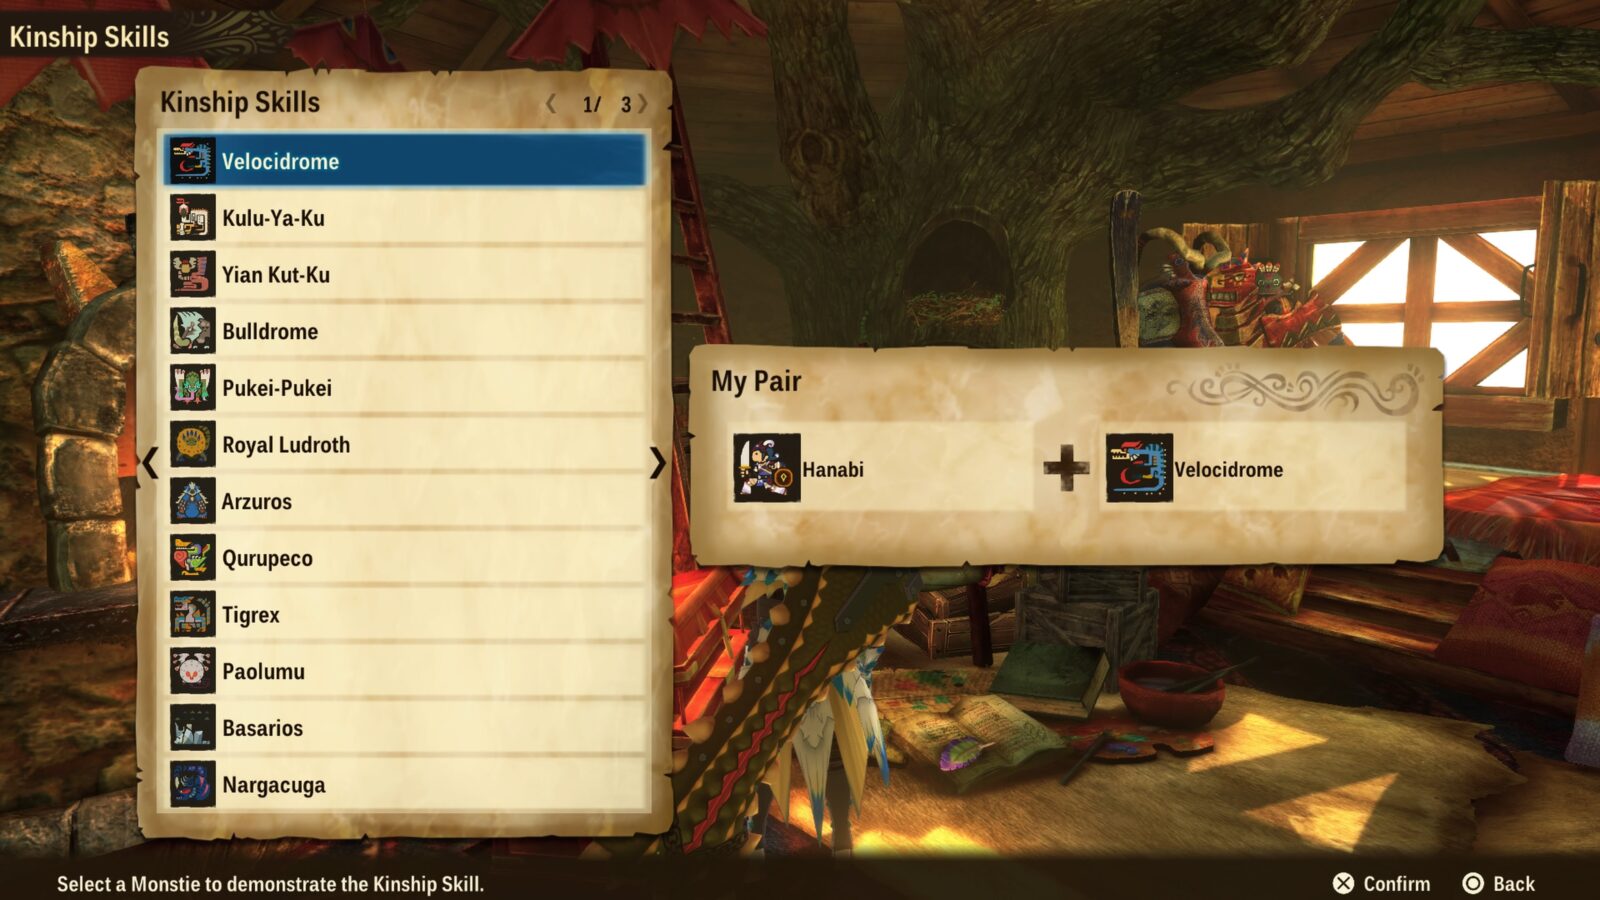
To use a Kinship Skill, you need to first enter battle with your chosen Monstie, then win Head-to-Heads or activate Double Attacks to increase their Kinship Gauge. Once the Gauge is full, select “Ride” in the battle menu to mount the Monstie. From there, you can then select the “Kinship Skill” option, which is in place of the “Ride” option.
To see which Kinship Skills you have already used before, go to your Home in any settlement and interact with the Chest. From there, select “Gallery” and then “Kinship Skills” and you’ll see a list of the Monsties you’ve done a Kinship Skill with before.

Bonds of Friendship
Viewed all Double Kinship Skills. Bonds of friendship are forever.
So, upon reading the description for this trophy, you may be thinking “Oh god, do I have to use every Kinship Skill again with every companion?”
Fortunately, the answer is no. To unlock the “Bonds of Friendship” trophy, you do need to use a Double Kinship Skill with every companion, however, only Double Kinship Skills activated with Ratha as your Monstie seem to count.
To see which ones you’ve completed before, go to the Home in any settlement and then interact with the Chest. There, select “Gallery” and then “Double Kinship Skills.”

You will need to perform a Double Kinship Skill with the following Battle Buddies:
- Kayna – Mahana Village
- Alwin – Rutoh Village
- Avinia – Kuan Village
- Reverto – Lulucion
- Cheval – Nua Te Village
- Kyle – Lulucion
After completing the game, you can speak to any of these companions in the locations listed above to enlist them and add them to your party.
To perform a Double Kinship Skill, enter battle with your desired Battle Buddy, then complete Head-to-Heads and Double Attacks until your Kinship Gauge is full. Then, wait for your Battle Buddy’s Kinship Gauge to fill up. When you see your Battle Buddy mount their Monstie, mount yours too and then select “Kinship Skill.” If the Battle Buddy is also mounted when you select this, they will join you, initiating a Double Kinship Skill.
In the case of Reverto and Kyle, who do not use or mount Monsties, you will instead need to wait until their Kinship Gauge reaches Level 3. Once that happens, their next move will be a Kinship Skill, so you need to ensure your gauge is filled in preparation. When you see their gauge filled, mount your Monstie and select “Kinship Skill” to have them add their power to the attack.
Once you have performed Double Kinship Skills with Ratha as your active Monstie with all 6 possible companions, the Bonds of Friendship trophy will unlock!
Collect All Genes

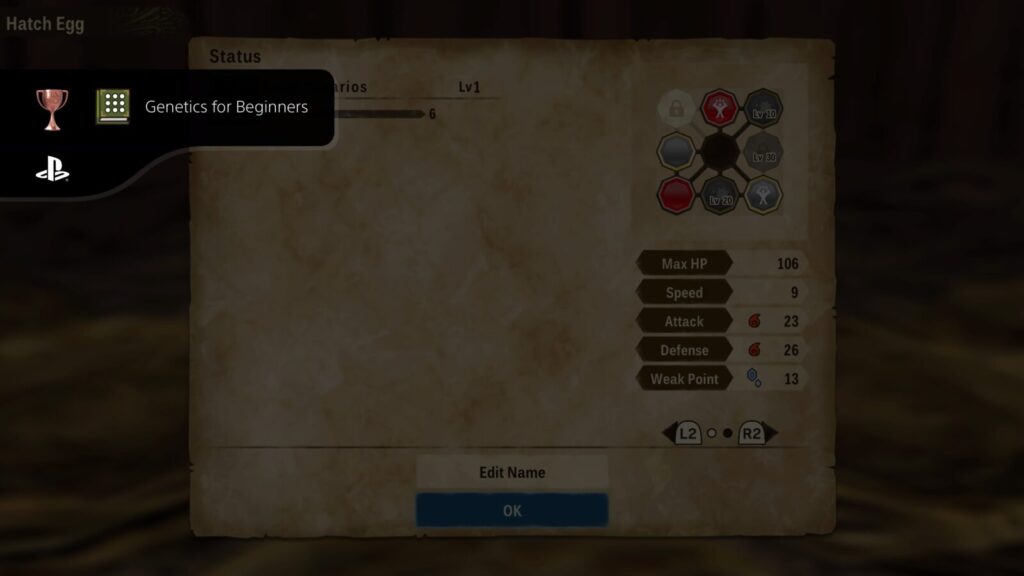
Genetics for Beginners
Completed one third or more of the Book of Genes. Every journey starts with a single step. Note: Excluding genes marked with a +.
The “Genetics for Beginners” trophy unlocks when you have hatched Monsties with enough unique genes to fill out 139 of the 419 slots in the Book of Genes. You will eventually need to fill out all 419 slots to unlock the Genetics Compendium Trophy.

Advanced Genetics
Completed two thirds or more of the Book of Genes. Master genetics to defeat any foe. Note: Excluding genes marked with a +.
The “Advanced Genetics” trophy unlocks when you have hatched Monsties with enough unique genes to fill out 278 of the 419 slots in the Book of Genes. You will eventually need to fill out all 419 slots to unlock the Genetics Compendium Trophy.

Genetics Compendium
Completed the Book of Genes. Proof of your astounding scholarship. Note: Excluding genes marked with a +.
To unlock the “Genetics Compendium” trophy, you need to continuously collect and hatch eggs to try and eventually unlock every possible Gene in the game. You can check how many genes you’ve unlocked so far by going into the “Field Guides” option in the ![]() menu and then selecting “Book of Genes.” Here, you’ll see a full list of every Gene that you have and have not unlocked.
menu and then selecting “Book of Genes.” Here, you’ll see a full list of every Gene that you have and have not unlocked.
There are a whopping 419 genes, including the S, M, L, and XL versions of every possible gene. L and XL genes are very rare but you can get them most easily by farming High-Rank, Rare, and Super Rare Monster Dens in each region of the game.
Additionally, when you are collecting eggs from a nest, look out for eggs that shine brightly as you pick them up, these eggs are most likely to have a rarer or higher-level gene. Note that genes which are locked on a Monstie will not be added to your Book of Genes until you unlock them by levelling that Monstie up to the appropriate level. A quick and easy way to continuously levewl up your Monsties throughout the farming process is to frequently send out Expeditions, making sure to swap out the Expedition Monsties when all of their genes have been unlocked.
There is no table or resource that I could produce for you which would be as convenient or extensive as the resource available here. On that Kiranico webpage, you will find a full list of all genes in the game, as well as the Monsters which are most likely to have them.
PlatGet!

Wings of Hope
Obtained all trophies.
After collecting every trophy in this Monster Hunter Stories 2 Trophy Guide, the "Wings of Hope " Platinum Trophy will unlock. Congratulations!
Thanks for Reading
Plat Get!
Thank You!
Thank You for choosing PlatGet as your source for this Monster Hunter Stories 2 Trophy Guide.
Wondering what to complete next? Browse our complete guide selection or check out our friends at PlatPrices.com to filter the PS Store based on price, trophy difficulty, or completion time.
Got a question, some feedback, or just want to say thanks? Drop a comment in the discussion section below, we'd love to hear from you! No account required!!